1
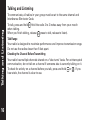
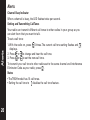
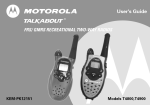
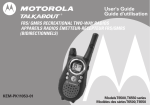
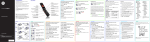
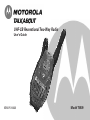
UHF-CB Recreational Two-Way Radio
User’s Guide
KEM-PK10668
Model T5509
1
Safety and General Information
Safety and General Information
2
Important Information on Safe and Efficient Operation
Read This Information Before Using Your Radio.
The information provided in this document supersedes the general safety
information in user guides published prior to December 1, 2002.
Transmit and Receive Procedure
Your two-way radio contains a transmitter and a receiver. To control your
exposure and ensure compliance with the general population/uncontrolled
environment exposure limits, always adhere to the following procedure:
• Transmit no more than 50% of the time.
• To transmit (talk), press the Push to Talk (PTT) button.
• To receive calls, release the PTT button.
Transmitting 50% of the time, or less, is important because the radio generates
measurable RF energy exposure only when transmitting (in terms of measuring
standards compliance).
Exposure To Radio Frequency Energy
Your Motorola two-way radio complies with the following RF energy exposure
standards and guidelines:
• United States Federal Communications Commission, Code of Federal
Regulations; 47CFR part 2 sub-part J
Safety and General Information
4
Two-way Radio Operation
When using your radio as a traditional two-way radio, hold the radio in
a vertical position with the microphone 1 to 2 inches (2.5 to 5 cm) away
from the lips.
Body-Worn Operation
To maintain compliance with FCC/Health Canada RF exposure guidelines, if you
wear a radio on your body when transmitting, always place the radio in a Motorolasupplied or approved clip, holder, holster, case, or body harness for this product.
Use of non-Motorola-approved accessories may exceed FCC/Health Canada RF
exposure guidelines.
If you do not use one of the Motorola-supplied or approved body-worn accessories,
and are not using the radio held in the normal use position, ensure the radio and its
antenna are at least 1 inch (2.5 cm) from your body when transmitting.
Data Operation
If applicable, when using any data feature of the radio with or without an accessory
cable, position the radio and its antenna at least 1 inch (2.5 cm) from the body.
Approved Accessories
For a list of approved Motorola accessories, please contact retailer where you purchased this unit from.
Electromagnetic Interference/Compatibility
Note: Nearly every electronic device is susceptible to electromagnetic interference
(EMI) if inadequately shielded, designed, or otherwise configured for electromagnetic compatibility.
Safety and General Information
6
Medical Devices - Hearing Aids
Some digital wireless radios may interfere with some hearing aids. In the event
of such interference, you may want to consult your hearing aid manufacturer to
discuss alternatives.
Other Medical Devices
If you use any other personal medical device, consult the manufacturer of your
device to determine if it is adequately shielded from RF energy. Your physician
may be able to assist you in obtaining this information.
Safety and General Use While Driving
Check the laws and regulations on the use of radios in the area where you drive.
Always obey them. When using your radio while driving, please:
• Give full attention to driving and to the road.
• Use hands-free operation, if available.
• Pull off the road and park before making or answering a call if driving
conditions so require.
Operational Warnings
For Vehicles with an Air Bag
Do not place a portable radio in the area over an air bag or in the air bag deployment area. Air bags inflate with great force. If a portable radio is placed in the air
bag deployment area and the air bag inflates, the radio may be propelled with
great force and cause serious injury to occupants of the vehicle.
Safety and General Information
8
Batteries
All batteries can cause property damage and/or bodily injury such as burns if a
conductive material such as jewelry, keys, or beaded chains touch exposed terminals. The conductive material may complete an electrical circuit (short circuit) and
become quite hot. Exercise care in handling any charged battery, particularly
when placing it inside a pocket, purse, or other container with metal objects.
Battery Charger Safety Instructions
Save these Instructions
1. Do not expose the charger to rain or snow.
2. Do not operate or disassemble the charger if it has received a sharp blow, or
has been dropped or damaged in any way.
3. Never alter the AC cord or plug provided with the unit. If the plug will not fit
the outlet, have the proper outlet installed by a qualified electrician. An improper condition can result in a risk of electric shock.
4. To reduce the risk of damage to the cord or plug, pull the plug rather than the
cord when disconnecting the charger from the AC receptacle.
5. To reduce the risk of electric shock, unplug the charger from the outlet before
attempting any maintenance or cleaning.
6. Use of an attachment not recommended or sold by Motorola may result in a
risk of fire, electric shock, or personal injury.
Control Buttons - Model T5509
Control Buttons - Model T5509
Use
to:
• Turn radio on/off
• Adjust volume
LED Indicator Light
Use
to:
• Talk
Use
to:
• Select menu options
• Exit the menu (when
pressed while in a
menu)
• Lock and unlock the
keypad (when held
down and not in a
menu)
• Save a setting
Accessory Jack
Use
Use
to:
• Transmit call tone
• Scan
Removeable front cover
Use
Speaker
to:
and
Microphone
10
to:
• Scroll through menus
Battery Meter
The battery icon shows the battery charge level, from full
to empty
. When
the battery is empty, the radio chirps periodically after releasing
. The radio powers
off when the voltage drops below a predetermined level to protect the rechargeable
battery.
Getting Started
Note: Remove the batteries before storing your radio for extended periods of time.
Batteries corrode over time and may cause permanent damage to your radio.
12
Using the Desk Stand Charger (Optional Accessory)
The desk stand charger provides drop-in charging convenience for NiMh batteries
and can be placed on any flat surface, such as a desk or workbench. Charge the NiMh
battery overnight (at least 16 hours) before using it for the first time. After the initial
charge, an empty battery is fully charged within 14 hours.
1. Turn the radio off and remove the battery cover.
2. Remove the battery pack from the clear plastic bag. Do not disassemble or unwrap
the battery pack.
3. Insert the NiMh battery pack so the metal contacts on the side of the battery are
facing outward from the radio to connect with the contacts on the battery door.
4. Reposition the battery cover and press down to secure.
5. Plug the AC power supply into the plug on the desk stand.
6. Plug the AC power supply into a standard wall outlet.
7. Remove the battery pocket inserts from the charger pockets.
8. With a radio facing forward, slide it into one of the charging pockets.
Talking and Listening
Talking and Listening
To communicate, all radios in your group must be set to the same channel and
Interference Eliminator Code.
16
To talk, press and hold . Hold the radio 2 to 3 inches away from your mouth
when talking.
When you finish talking, release
(press to talk, release to listen).
Talk Range
Your radio is designed to maximize performance and improve transmission range.
Do not use the radios closer than 5 feet apart.
Checking the Channel Before Transmitting
Your radio has multiple channels shared on a "take turns" basis. For uninterrupted
communication, do not talk on a channel if someone else is currently talking on it.
To check for activity on a channel before you talk, press and hold
or
. If you
hear static, the channel is clear to use.
Special Features
18
Duplex Mode
The units support the use of repeater in Duplex mode or without the use of repeater
in Simplex mode. This Duplex mode is only supported for Channel 1 to Channel 8.
When in these channels, press
or
button will trigger between Duplex and
Simplex mode.
For example, in channel 1,
duplex mode will display:
Simplex mode will display:
Push to Talk Timeout Timer
To prevent accidental transmissions and save battery life, the radio emits a continufor 60 continuous seconds.
ous warning tone and stops transmitting if you press
Locking the Keypad
To avoid accidentally changing your radio settings, press and hold
for 3 seconds
or until
displays. You can turn the radio on and off, adjust the volume, receive,
transmit, send a call tone, and monitor channels. All other functions are locked.
To unlock the radio, press and hold
for 3 seconds or until
is no longer
displayed.
Alerts
Channel Busy Indicator
When a channel is busy, the LED flashes twice per second.
Setting and Transmitting Call Tones
Your radio can transmit different call tones to other radios in your group so you
can alert them that you want to talk.
Alerts
To set a call tone:
1. With the radio on, press
3 times. The current call tone setting flashes and
displays.
2. Press
or
to change and hear the call tone.
3. Press
or
to set the new call tone.
To transmit your call tone to other radios set to the same channel and Interference
Eliminator Code as your radio, press
.
Notes
• The T5509 model has 10 call tones.
• Setting the call tone to
disables the call tone feature.
20
To transmit to a radio that has QT noise filtering turned on:
1. Select the same channel and Interference Eliminator Code as the other radio.
2. Press
to send a call tone. This allows your voice to pass through the QT
noise filter on the receiving radio.
3. Press
and speak normally.
Alerts
Note: If you skip step 2, the beginning of your message may not be heard on the
receiving radio.
For a 30-second period, starting after the last transmission, all transmissions received on the selected channel and code will pass through the QT
noise filter.
22
Note: Channel 5 and 35 do not have the QT feature.
5. To transmit, speak into accessory microphone. There is a short delay between
the time you start talking and when the radio transmits.
6. To receive, stop talking.
To turn VOX off, press
or remove the audio accessory.
Accessories
Handsfree Use Without Accessories (iVox)
You can use the iVox feature to transmit handsfree without the need for any voice
activation (VOX) accessories. Once iVOX is turned on, the radio detects your voice
and transmits when you speak.
1. Turn the radio off.
2. Turn the radio on while pressing
3. To temporarily disable iVox, press
4. To turn off iVox, turn the radio off.
.
displays.
flashes intermittently.
Setting the Sensitivity Level
Adjusting the radio’s sensitivity level helps minimize the possibility of unintended
noises triggering a transmission and helps the radio pick up soft voices.
1. Press
2. Press
until
displays.
or
to select the sensitivity level:
= High Sensitivity
for quiet environments
24
.
= Medium Sensitivity
for most environments
= Low Sensitivity
for noisy environments
Note: When you connect a VOX accessory, the radio is automatically set to the
last chosen sensitivity level.
Copyright Information
Copyright Information
26
Manufactured, distributed or sold by Giant International Ltd., official licensee for
this product. Motorola, the Motorola logo trademarks and the Motorola trade
dress are owned by Motorola, Inc. and are used under license from Motorola, Inc.
Please contact Giant International Ltd. at 800-638-5119 for questions/comments,
warranty, support, or service related to this product. MOTOROLA and the Stylized
M Logo are registered in the U.S. Patent & Trademark Office. All other product or
service names are the property of their respective owners. © Motorola, Inc. 2005.
What Is Not Covered By The Warranty
1. Defects or damage resulting from use of the Product in other than its normal
and customary manner or by not following the instructions in this user manual.
2. Defects or damage from misuse, accident or neglect.
Warranty
3. Defects of damage from improper testing, operation, maintenance, adjustment,
or any alteration or modification of any kind.
4. Breakage or damage to aerials unless caused directly by defects in material or
workmanship.
5. Products disassembled or repaired in such a manner as to adversely affect
performance or prevent adequate inspection and testing to verify any warranty
claim.
6. Defects or damage due to range.
7. Defects or damage due to moisture, liquid or spills.
8. All plastic surfaces and all other externally exposed parts that are scratched or
damaged due to normal use.
9. Products rented on a temporary basis.
10. Periodic maintenance and repair or replacement of parts due to normal usage,
wear and tear.
28