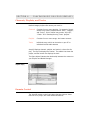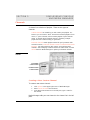
1
IMPORTANT SAFETY NOTICES
The following is a list of important safety instructions for operating
the simplefi:
Read Instructions
Read all the safety and operating instructions
before you operate the product.
Retain Instructions
Retain the safety and operating instructions for
future reference.
Heed Warnings
Adhere to all the warnings on the product and
in the operating instructions.
Follow Instructions Follow all operating and use instructions.
Cleaning
Unplug this product from the AC power before
cleaning. Do not use liquid cleaners or aerosol
cleaners. Use a dry cloth for cleaning.
Attachments
Do not use attachments not recommended by
the product manufacturer as they may cause
hazards.
Water and Moisture Do not use this product near water — for
example, near a bath tub, wash bowl, kitchen
sink, or laundry tub, in a wet basement, or near
a swimming pool.
Power Sources
Operate this product only from the type of
power source indicated on the marking label of
the power supply (or power plug). If you are
not sure of the type of power supply, consult
your product dealer or local power company.
For products intended to operate from other
sources, refer to the specific operating instructions.
Power-Cord
Protection
Route the power supply cords so that they are
not likely to be walked on or pinched by items
placed upon or against them. Pay particular
attention to cords at plugs, convenience receptacles, and the point where they exit from the
product.
IMPORTANT SAFETY NOTICES
I
IMPORTANT SAFETY NOTICES
Remote Control
and Batteries
Keep the remote control and enclosed batteries away from children. Batteries may cause
chemical burns or fire if mishandled. Do not
disassemble, recharge, or heat batteries.
Dispose of or recycle spent batteries appropriately, and replace with correct type and size.
Replacement Parts There are no replacement parts. If necessary,
the unit is replaced with a new unit.
Heat
Situate the product away from heat sources
such as radiators, heat registers, stoves, and
other products that produce heat.
Rain or Moisture
To prevent fire or shock hazard, do not expose
this unit to rain or moisture.
Damage Requiring
Service
Unplug this product from the wall outlet and
refer servicing to qualified service personnel
under the following conditions:
• The power supply cord or plug is damaged.
• Liquid has been spilled, or objects have fallen
into the product.
• The product has been exposed to rain or water.
• The product does not operate normally by
following the operating instructions.
• The product has been dropped or the cabinet
has been damaged.
• The product exhibits a distinct change in
operation.
Overloading
Do not overload wall outlets and extension
cords as this can result in a fire or electric
shock.
IMPORTANT SAFETY NOTICES
II
IMPORTANT SAFETY NOTICES
Restricted Right Notification For U.S. Government Users
The software (including firmware) addressed in this guide is provided
to the U.S. Government under agreement which grants the government the minimum "restricted rights" in the software, as defined in
the Federal Acquisition Regulation (FAR) or the Defense Federal
Acquisition Regulation Supplement (DFARS), whichever is applicable.
If the software is procured for use by the Defense Department, the
following legend applies:
Restricted Rights Legend
Use, duplication, or disclosure by the Government is subject to
restrictions as set forth in subparagraph (c)(1)(ii) of the Rights in
Technical Data and Computer Software clauses at DFARS 252.2277013. If the software is procured for use by any U.S. Government
entity other than the Department of Defense, the following notice
applies:
Notice:
Notwithstanding any other lease or license agreement that may pertain to, or accompany the delivery of this computer software, the
rights of the Government regarding its use, reproduction, and disclosure are set forth in FAR 52.227-19(C). Unpublished - rights reserved
under the copyright laws of the United States.
IMPORTANT SAFETY NOTICES
III
PROPRIETARY MATERIAL
Information and software in this document are proprietary to
Motorola, Inc. and SimpleDevices, Inc. (or its Suppliers) and without
the express prior permission of an officer of Motorola or
SimpleDevices, may not be copied, reproduced, disclosed to others,
published, or used, in whole or in part, for any purpose other than
that for which it is being made available. Use of software described
in this document is subject to the terms and conditions of the
Software License Agreement. This document is for information purposes only and is subject to change without notice.
Radio Frequency Interference Regulations
This equipment has been tested and has been found to comply with
the limits for a Class B digital device, pursuant to Part 15 of the FCC
Rules. These limits are designed to provide reasonable protection
against interference in a residential installation. This equipment
generates, uses, and can radiate radio frequency energy and, if not
installed and used in accordance with the instructions, may cause
unwanted interference to radio communications. However, there is
no guarantee that interference will not occur in a particular installation. If this equipment does cause unwanted interference to radio or
television reception, which can be determined by turning the equipment off and on, the user is encouraged to try to correct the interference by one or more of the following measures:
•
•
•
•
Reorient or relocate the receiving antenna.
Increase the separation between the equipment and receiver.
Connect the equipment into an outlet on a circuit different from
that to which the receiver is connected.
Consult the dealer or an experienced radio/TV technician to
help.
Changes or modifications not expressly approved by Motorola
and SimpleDevices could void the user's authority to operate the
equipment.
PROPRIETARY MATERIAL
IV
PROPRIETARY MATERIAL
Notification of Canadian Requirements
This digital apparatus does not exceed the Class B limits for radio
noise emissions from digital apparatus as set out in the Radio
Interference Regulations of the Canadian Department of
Communications.
Le présent appareil numérique n’émet pas de bruits radioélectriques
dépassant les limites applicable aux appareils numériques de classe
B prescrites dans le règlement sur le brouillage radioélectrique édicté par let Ministère des Communications du Canada.
Exposure to Radio Frequency Radiation
The radiated output power of the this internal wireless radio is far
below the FCC radio frequency exposure limits. Nevertheless, the
wireless radio shall be used in such a manner that the radio is 2.5 cm
or further from the human body.
The internal wireless radio operates within guidelines found in radio
frequency safety standards and recommendations, which reflect the
consensus of the scientific community. SimpleDevices therefore
believes the internal wireless radio is safe for use by consumers. The
level of energy emitted is far less than the electromagnetic energy
emitted by wireless devices such as mobile phones. However, the
use of wireless radios may be restricted in some situations or environments, such as aboard airplanes. If you are unsure of restrictions,
you are encouraged to ask for authorization before turning on the
wireless radio.
PROPRIETARY MATERIAL
V
PROPRIETARY MATERIAL
© 2001 SimpleDevices, Inc. All rights reserved. Used by permission.
Copyright © 2001 by Motorola, Inc.
simplefi User Guide for Windows®
All rights reserved.
No part of this publication may be reproduced in any form or by any means or used to make any
derivative work (such as translation, transformation or adaptation) without written permission from
Motorola, Inc. or SimpleDevices, Inc.
Any audio content that you may want to play on your simplefi may be protected under copyright
law. The unauthorized duplication or sharing of such could be a violation of the rights of the copyright owner. Please be sure to obtain any permission required from the copyright owner.
SimpleDevices, Inc. reserves the right to revise this publication and to make changes in content
from time to time without obligation on the part of SimpleDevices, Inc. to provide notification of
such revision or change.
SimpleDevices, Inc. assumes no responsibility or liability for any errors or inaccuracies that may
appear in this documentation. SimpleDevices, Inc. provides this guide without warranty of any
kind, either implied or expressed, including, but not limited to, the implied warranties of merchantability and fitness for a particular purpose. SimpleDevices, Inc. may make improvements or
changes in the product(s) described in this manual at any time.
Motorola, Inc. reserves the right to revise this publication and to make changes in content from
time to time without obligation on the part of Motorola Inc. to provide notification of such revision
or change.
Motorola, Inc. assumes no responsibility or liability for any errors or inaccuracies that may appear
in this documentation. Motorola, Inc. provides this guide without warranty of any kind, either
implied or expressed, including, but not limited to, the implied warranties of merchantability and
fitness for a particular purpose. Motorola Inc. may make improvements or changes in the
product(s) described in this manual at any time.
Acrobat® Reader Software is provided subject to the Adobe Systems, Inc. Software End User
License Agreement included on the CD-ROM. Acrobat is a registered trademark of Adobe
Systems, Inc. in the United States and/or other countries. Acrobat Reader 4.0 © 1987-1999
Adobe Systems Incorporated. All rights reserved.
simplefi, SimpleWare, SimpleServe, Media Manager, SimpleServe Console, and Online Guide are
either registered trademarks or trademarks of SimpleDevices Incorporated in the United States
and/or other countries.
MOTOROLA and the stylized M logo are registered trademarks of Motorola, Inc.
® U.S. Patent and Trademark Office
All other product or service marks are the property of their respective owners.
PROPRIETARY MATERIAL
VI
SOFTWARE LICENSE AND LIMITED WARRANTY
MOTOROLA SOFTWARE
Home Networking Products
MOTOROLA, INC.
Broadband Communications Sector
Home Networking Division
101 Tournament Drive
Horsham, PA 19044
IMPORTANT: PLEASE READ THIS SOFTWARE LICENSE AND LIMITED WARRANTY (“AGREEMENT”) CAREFULLY
BEFORE YOU USE THE MOTOROLA HOME NETWORKING PRODUCT (“PRODUCT”) AND/OR INSTALL, DOWNLOAD OR USE ANY APPLICATION AND/OR USB DRIVER SOFTWARE (“APPLICATION SOFTWARE”) PROVIDED
WITH THE PRODUCT. BY USING THE PRODUCT AND/OR INSTALLING, DOWNLOADING OR USING ANY OF
THE APPLICATION SOFTWARE, YOU INDICATE YOUR ACCEPTANCE OF EACH OF THE TERMS OF THIS AGREEMENT. UPON ACCEPTANCE, THIS AGREEMENT WILL BE A LEGALLY BINDING AGREEMENT BETWEEN YOU
AND MOTOROLA FOR THE USE OF THE APPLICATION SOFTWARE AND ANY FIRMWARE PROVIDED WITH THE
PRODUCT (COLLECTIVELY, “SOFTWARE”). THE TERMS OF THIS AGREEMENT APPLY TO YOU AND TO ANY
SUBSEQUENT USER OF THE SOFTWARE.
IF YOU DO NOT AGREE TO ALL OF THE TERMS OF THIS AGREEMENT (I) DO NOT INSTALL OR USE THE SOFTWARE AND (II) RETURN THE PRODUCT, SOFTWARE, INCLUDING ALL ASSOCIATED MEDIA, COMPONENTS,
DOCUMENTATION AND ANY OTHER MATERIALS PROVIDED WITH THE PRODUCT, TO YOUR POINT OF PURCHASE FOR A FULL REFUND.
The Software includes associated media, any printed materials, and any “on-line” or electronic documentation.
Software provided by third parties may be subject to separate end-user license agreements from the manufacturers
of such Software.
The Software is never sold. Motorola licenses the Software to the original customer and to any subsequent licensee
for personal use only on the terms of this License. Motorola and its 3rd party licensors retain the ownership of the
Software.
SOFTWARE LICENSE (“License”)
You may:
USE the Software only in connection with the operation of the Product.
TRANSFER the Software (including all component parts and printed materials) permanently to another person, but
only if the person agrees to accept all of the terms of this License. If you transfer the Software, you must at the
same time transfer the Product and all copies of the Software (if applicable) to the same person or destroy any
copies not transferred.
TERMINATE this License by destroying the original and all copies of the Software (if applicable) in whatever form.
You may not:
(1) Loan, distribute, rent, lease, give, sublicense or otherwise transfer the Software, in whole or in part, to any other
person, except as permitted under the TRANSFER paragraph above. (2) Copy or translate the User Guide included
with the Software, other than for personal use. (3) Copy, alter, translate, decompile, disassemble or reverse engineer the Software, including but not limited to, modifying the Software to make it operate on non-compatible
hardware. (4) Remove, alter or cause not to be displayed, any copyright notices or startup message contained in
the Software programs or documentation. (5) Export the Software or the Product (or any of the Product’s components) in violation of any United States export laws.
The Software and Product are not designed or intended for use in on-line control of aircraft, air traffic, aircraft navigation or aircraft communications; or in design, construction, operation or maintenance of any nuclear facility.
MOTOROLA AND ITS 3RD PARTY LICENSORS DISCLAIM ANY EXPRESS OR IMPLIED WARRANTY OF FITNESS
FOR SUCH USES. YOU REPRESENT AND WARRANT THAT YOU SHALL NOT USE THE SOFTWARE AND PRODUCT FOR SUCH PURPOSES.
Title to the Software, including the ownership of all copyrights, mask work rights, patents, trademarks and all other
intellectual property rights subsisting in the foregoing, and all adaptations to and modifications of the foregoing
shall at all times remain with Motorola and its 3rd party licensors. Motorola retains all rights not expressly licensed
under this License. The Software, including any images, graphics, photographs, animation, video, audio, music and
text incorporated therein is owned by Motorola or its 3rd party licensors and is protected by United States copyright laws and international treaty provisions. Except as otherwise expressly provided in this License, the copying,
reproduction, distribution or preparation of derivative works of the Software, any portion of the Product or the documentation is strictly prohibited by such laws and treaty provisions. Nothing in this License constitutes a waiver of
Motorola’s rights under United States copyright law.
SOFTWARE LICENSE AND LIMITED WARRANTY
VII
SOFTWARE LICENSE AND LIMITED WARRANTY
This License and your rights regarding any matter it addresses are governed by the laws of the Commonwealth of
Pennsylvania, without reference to conflict of laws principles. THIS LICENSE SHALL TERMINATE AUTOMATICALLY
if you fail to comply with the terms of this License.
Motorola is not responsible for any third party software provided as a bundled application, or otherwise, with the
Product and/or Software.
U.S. GOVERNMENT RESTRICTED RIGHTS
The Software, Product and documentation are provided with RESTRICTED RIGHTS. The use, duplication or disclosure by the Government is subject to restrictions as set forth in subdivision ©(1)(ii) of The Rights in Technical Data
and Computer Software clause at 52.227-7013. The contractor/manufacturer is Motorola, Inc., Broadband
Communications Sector, 101 Tournament Drive, Horsham, PA 19044.
LIMITED WARRANTY
Motorola warrants to the original end user customer that the Product (including firmware but excluding any
Application Software) will be free from defects in materials and workmanship under normal use. With respect to
Application Software, Motorola warrants to the original end user customer that (i) the media on which the
Application Software is provided (“Media”) will be free from defects in material and workmanship under normal
use, and (ii) the Application Software will perform substantially as described in its documentation; however,
Motorola does not warrant that such Application Software will perform error free or without bugs. These warranties
shall not apply: (i) to any Product, Software or Media subjected to accident, misuse, neglect, alteration, Acts of
God, improper handling, improper transport, improper storage, improper use or application, improper installation,
improper testing or unauthorized repair; or (ii) to cosmetic problems or defects which result from normal wear and
tear under ordinary use, and do not affect the performance or use of the Product, Software and/or Media. These
warranties apply only to a Product, Software and/or Media that are manufactured by Motorola and identified by
the Motorola or General Instrument trademark, trade name or product identification logo(s) affixed to the Product.
MOTOROLA IS NOT RESPONSIBLE FOR, AND PROVIDES “AS IS” ANY SOFTWARE SUPPLIED BY 3RD PARTIES.
EXCEPT AS EXPRESSLY STATED IN THIS PARAGRAPH, THERE ARE NO WARRANTIES OF ANY KIND RELATING
TO THE PRODUCT, SOFTWARE AND MEDIA, EXPRESS, IMPLIED OR STATUTORY, INCLUDING BUT NOT LIMITED
TO IMPLIED WARRANTIES OF MERCHATABILITY, FITNESS FOR A PARTICULAR PURPOSE, OR THE WARRANTY
AGAINST INFRINGMENT PROVIDED IN THE UNIFORM COMMERCIAL CODE. Some states do not allow for the
exclusion of implied warranties, so the above exclusion may not apply to you.
What additional provisions should I be aware of? Because it is impossible for Motorola to know the purposes for
which you acquired this Product and Software or the uses to which you will put this Product and Software, you
assume full responsibility for the selection of the Product and Software for its installation and use. While every reasonable effort has been made to insure that you will receive a Product and Software that you can use and enjoy,
Motorola does not warrant that the functions of the Product and Software will meet your requirements or that the
operation of the Product and Software will be uninterrupted or error-free. Motorola is not responsible for problems
caused by the interaction of the Product and Software with any other hardware or software.
How long does this Limited Warranty last? The Limited Warranty for the Product (including firmware) continues for
a period of one (1) year from the date of original purchase from an authorized Motorola re-seller. Application
Software and Media are warranted for a period of ninety (90) days from the date of original purchase from an
authorized Motorola re-seller. All warranty claims must be made within the applicable Warranty Period.
What you must do to obtain warranty service. To take advantage of this Limited Warranty you must return the
Product, Software and Media for repair or replacement to your original point of purchase along with an original
point of purchase receipt. For assistance with this process, you may call the Motorola toll-free phone number
(below). Motorola’s sole and exclusive obligation shall be to repair or replace any Product, Software and/or Media
that does not meet Motorola’s Limited Warranty. THIS WARRANTY IS VOID IF THE PRODUCT IS DAMAGED.
THESE ARE YOUR SOLE AND EXCLUSIVE REMEDIES for any and all claims that you may have arising out of or in
connection with this Product, Software and Media, whether made or suffered by you or another person and
whether based in contract or tort.
IN NO EVENT SHALL MOTOROLA BE LIABLE TO YOU OR ANY OTHER PARTY FOR ANY DIRECT, INDIRECT,
GENERAL, SPECIAL, INCIDENTAL, CONSEQUENTIAL, EXEMPLARY OR OTHER DAMAGES ARISING OUT OF THE
USE OR INABILITY TO USE THE PRODUCT, SOFTEWARE AND/OR MEDIA (INCLUDING, WITHOUT LIMITATION,
DAMAGES FOR LOSS OF BUSINESS PROFITS, BUSINESS INTERRUPTION, LOSS OF INFORMATION OR ANY
OTHER PECUNIARY LOSS), OR FROM ANY BREACH OF WARRANTY, EVEN IF MOTOROLA HAS BEEN ADVISED
OF THE POSSIBILITY OF SUCH DAMAGES. (Some states do not allow the exclusion or limitation of incidental or
consequential damages, so the above exclusion or limitation may not apply to you.) IN NO CASE SHALL
MOTOROLA’S LIABILITY EXCEED THE AMOUNT YOU PAID FOR THE PRODUCT.
This warranty is governed by the laws of the Commonwealth of Pennsylvania, excluding its conflict of laws principles.
Motorola’s toll-free number is 1-800-200-6084
SOFTWARE LICENSE AND LIMITED WARRANTY
VIII
IX
CONTENTS
Section 1
Introduction
Using This Manual
3
Related Documentation
4
Document Conventions
4
If You Need Help
4
Section 2
Overview
System Requirements
5
simplefi Digital Audio Receiver components
5
Software
6
SimpleWare Software
6
Wireless USB Network Adapter Software
6
Section 3
Installation
Setting Up simplefi
7
Installing SimpleWare Software
8
Installing the Wireless Network Adapter
12
Device Discovery
18
Activating Your Online Guide
21
Section 4
Playing Music On Your simplefi
Before You Start
25
Channels, Playlists and Tracks
26
The Remote Control
26
Browsing Channels, Playlists, and Tracks
28
Browsing Content While a Track is Playing
29
Repeating a Channel, Playlist, or Track
29
Adjusting Headphone Volume
30
CONTENTS
X
CONTENTS
Section 5
SimpleServe Console And Media Manager
SimpleServe Console
32
SimpleServe Console Options
33
Media Manager
34
Adding Music to Your PC
36
Ripping CDs
36
Downloading From the Internet
37
Organizing Music with Media Manager
37
Channels
38
Creating a New Custom Channel
38
Deleting an Existing Custom Channel
39
Renaming an Existing Custom Channel
39
Playlists
40
Creating a New Playlist
40
Importing a Playlist
40
Deleting an Existing Playlist
41
Renaming an Existing Playlist
41
Tracks
42
Adding Tracks to Music Library
42
Adding Tracks to a Playlist (Drag and Drop)
43
Adding Tracks to a Playlist (Add Track Dialog)
44
Removing a Track
44
Editing Track Information
44
Searching for Music in Music Library
45
Playing Music on Your PC
45
CONTENTS
XI
CONTENTS
Section 6
Online Guide
Activating Online Guide
49
Channels
49
TagIt!
51
BounceIt!
52
Account Information
53
SimpleWare Updates
53
Appendix A, Specifications
55
Appendix B, Frequently Asked Questions
57
Appendix C, Troubleshooting
63
Appendix D, Configuring IP Address Information
73
Appendix E, Setting HomeRF Security Code
81
Appendix F, Manual Installation of Wireless Adapter Software
87
CONTENTS
XII
XIII
SECTION 1
INTRODUCTION
Stream Music To Your Stereo
The Motorola simplefi™ Digital Audio Receiver enables you to
wirelessly stream CD-quality digital audio from your PC or the Internet
to high-fidelity stereo equipment in your home. You no longer have to
listen to your MP3s and Internet radio streams on your computer
speakers or headphones while your expensive home stereo equipment
sits unused!
Easy To Install
The Motorola simplefi is simple to install, and our easy-to-use and
intuitive software will have you playing digital music on your stereo in
minutes. Included in the simplefi system is a wireless adapter that
enables you to set up a home wireless network, a key feature of this
product, because it means you don’t have to move your PC next to
your stereo—you can stream digital music to stereo equipment
anywhere in the house.
We recommend that you follow our step-by-step installation guide in
this manual to ensure that you install the wireless adapter software and
SimpleWare software correctly. Using this manual, installation is a quick
and easy four-step process. When the software is installed, and you’ve
plugged simplefi into your stereo, you’re ready to build your online
music collection.
Simple To Manage
Here’s how it works. At your PC, add your favorite digital audio
content to your Media Manager, which enables you to create channels
to organize your music and Internet audio streams, and also allows you
to build playlists to group the music you like (rock, classical guitar,
opera, etc.), organize by artist (all the songs you own by Madonna, for
example), or create music mixes for any occasion (dinner music, party
mixes, Saturday morning tunes, etc.).
Now that you’ve added music and Internet audio streams to Media
Manager, you can access and listen to them on your home stereo. Use
the removable simplefi remote control to select and play your playlists
and favorite Internet channels right at your stereo.
SECTION 1, INTRODUCTION
1
SECTION 1
INTRODUCTION
Bookmark Your Favorite Songs
With our exclusive TagIt!™ feature, you can bookmark any song at
simplefi and then get information about the song at your personalized Tags page on your PC—you can learn more about the artist,
purchase the CD, find concert tour dates, or share it with a friend!
simplefi is simply the most powerful and convenient way to play
CD-quality MP3s and Internet audio on your home stereo equipment, when and where you want.
System Benefits
•
•
•
•
•
•
•
•
•
•
Wireless access allows you to listen to digital music on your
stereo—without moving the PC to the living room or next to
your stereo.
Listen to MP3s stored on your computer’s hard drive on your
home stereo equipment.
Access live Internet audio streams from all over the world and
listen to them on your home stereo equipment.
Upload your entire CD collection, build playlists, and customize
your music in new and exciting ways.
Access and interact with PC content right at your home stereo
using the simplefi remote control.
Tag content at simplefi to learn more about it on your PC,
including artist, album, purchase information, upcoming
concerts, and more.
Share music with friends using the BounceIt!™ function on your
personalized Tags page.
Use the Online Guide to discover new music. You have access
to thousands of Internet radio stations and online MP3s available
to you from our Internet partners.
When you’ve uploaded your CDs to your PC, and you’ve
discovered and collected new Internet digital music and other
audio programming, you’ll have access to all of your music in
stereo at the touch of a button!
Your simplefi software is upgradeable. When new features and
utilities are released, you can access software updates directly
from Online Guide.
SECTION 1, INTRODUCTION
2
SECTION 1
INTRODUCTION
Figure 1-1
simplefi Digital Audio
Receiver
Using This Manual
The following sections provide information and instructions to install,
configure, and operate the simplefi Digital Audio Receiver.
Section 1
Section 2
Section 3
Section 4
Section 5
Section 6
Appendix A
Appendix B
Appendix C
Appendix D
Introduction provides a product description, related
documentation, technical help, and repair
information.
Overview describes the functions of the simplefi.
Installation provides instructions on how to set up
simplefi, install the wireless network adapter, install
SimpleWare software, and activate Online Guide.
Playing Music On Your simplefi describes using
your remote control, and browsing and selecting
content at simplefi.
SimpleServeTM Console And Media Manager
describes the control panel for launching the device
software, and where to collect, manage, and store
your digital audio for playback.
Online Guide provides you with online services and
access to Internet radio stations and other audio
content.
Specifications provides the technical specifications
for simplefi.
Frequently Asked Questions provides answers to
commonly asked questions.
Troubleshooting provides tips for dealing with
common problems.
Configuring IP Address Information helps you
configure more complex networks or adapt to an
existing wireless network.
SECTION 1, INTRODUCTION
3
SECTION 1
INTRODUCTION
Appendix E
Appendix F
Security Code Information provides instructions for
configuring the wireless security code if you have an
existing wireless network or complex network.
Manual Installation Of The Wireless Adapter Software
shows you how to manually install the wireless
adapter software without plug-and-play wizards.
Related Documentation
The following resources provide information that can be used with
the simplefi Digital Audio Receiver:
• simplefi Getting Started Guide
• simplefi Tutorial (on simplefi)
Document Conventions
Before you begin using simplefi, familiarize yourself with the stylistic
conventions used in this manual:
Bold type
SMALL CAPS
Italic type
Indicates text that you must type exactly as it
appears, indicates a default value, or text appearing
on a button control in a dialog box or window
Denotes silk screening on the equipment, typically
representing front- and rear-panel controls and
input/output (I/O) connections, and LEDs
Denotes a displayed variable, a variable that you
must type, or is used for emphasis
If You Need Help
If you need assistance while working with the Motorola simplefi
Digital Audio Receiver in the U.S. and Canada:
• Call 1-800-942-7721, 24 hours a day, seven days a week
• Check our website at www.motorola.com/broadband
SECTION 1, INTRODUCTION
4
SECTION 2
OVERVIEW
simplefi Digital Audio Receiver connects to your stereo. The wireless
adapter and SimpleWare software, which are included, enable you to
install a home wireless network and stream digital audio wirelessly
from your PC to simplefi.
This section provides information on the following topics:
• System requirements
• simplefi Digital Audio Receiver components
• SimpleWare™ Software
System Requirements
Your computer must meet the following requirements:
•
•
•
•
•
•
•
Computer with Pentium class or faster processor
Windows® 98SE™, Windows Me™, or Windows 2000™
Minimum 64 MB RAM (128 MB recommended)
Minimum 100 MB of available hard disk space
CD-ROM drive for installation
An available USB port for the wireless USB network adapter
Computer monitor configured for more than 256 colors
simplefi Digital Audio Receiver Components
The following items are packaged with the simplefi Digital Audio
Receiver:
•
•
•
•
•
•
simplefi remote control
2 AAA batteries
simplefi AC adapter
RCA cable
Wireless USB network adapter
SimpleWare™ CD-ROM with Wireless USB Network Adapter driver
software
SECTION 2, OVERVIEW
5
SECTION 2
OVERVIEW
Figure 2 -1
simplefi Digital Audio
Receiver Components
simplefi
Wireless USB
Network
Adapter
SimpleWare
CD-ROM
RCA cable
simplefi AC
Adapter
Software
simplefi requires software, which is included, to configure and
operate the wireless network. Your simplefi includes SimpleWare
and Wireless USB Network Adapter software on a CD-ROM.
To enable your wireless network, install the following software from
the SimpleWare CD-ROM. See Section 3, Installation for instructions
on installing these components.
SimpleWare Software
Install the SimpleWare software before installing the wireless adapter
drivers. After you install the SimpleWare software and the wireless
adapter drivers, you will have wireless connectivity between the PC
and simplefi.
Wireless USB Network Adapter Driver Software
The wireless adapter drivers enable the Wireless USB Network
Adapter to work with the computer on which it is installed. The
wireless adapter driver software is included on the SimpleWare
CD-ROM.
SECTION 2, OVERVIEW
6
SECTION 3
INSTALLATION
Follow the step-by-step installation procedure in this section to
ensure you set up your simplefi, install the wireless adapter, wireless
adapter software, and SimpleWare software correctly. You should be
able to complete the installation procedure in less than 15 minutes.
This section contains the following topics.
•
•
•
•
•
Setting up simplefi
Installing SimpleWare software
Installing the wireless network
Discovering your simplefi
Activating your Online Guide
Setting Up simplefi
Plug your simplefi into your home stereo:
1
2
Place simplefi near or on top of your stereo receiver and plug
in the AC adapter.
Plug one end of the audio signal cable into the RCA jacks on the
back of simplefi. Plug the other end of the audio cable into the
corresponding left and right RCA jacks on your stereo receiver.
Use either the CD inputs or the auxiliary inputs (or other inputs if
these are already in use).
Reset switch
AC adapter
Figure 3 -1
Connecting simplefi
to your stereo
RCA jacks
SECTION 3, INSTALLATION
Audio signal cable
7
SECTION 3
INSTALLATION
3
4
Switch on your stereo receiver, and ensure that the stereo
receiver is in the correct input mode (if you used the auxiliary
inputs, ensure your stereo is in auxiliary mode; if you used the
CD inputs, ensure your stereo is in CD mode).
Your simplefi is preset to discovery mode. The screen
should read:
Looking for PC…
simplefi is in
discovery mode.
If your simplefi is not in discovery mode, see Appendix C,
Troubleshooting for information on how to set the simplefi to
discovery mode.
Your simplefi is in “discovery mode” which means it’s ready to
connect to your PC. Now you’re ready to install the SimpleWare
and wireless adapter software to connect simplefi to your PC.
Installing SimpleWare Software
SimpleWare software enables you to stream digital audio to the
simplefi and manage your music collection with Media Manager
playlist editor.
To install SimpleWare software on your computer:
1
Insert the SimpleWare CD-ROM into your CD-ROM drive. The
installation program displays a start-up dialog box.
NOTE: If an installation start-up dialog box does not display,
browse to your SimpleServe CD-ROM and find file setup.exe in
the \ directory. Double-click on the setup.exe icon.
SECTION 3, INSTALLATION
8
SECTION 3
INSTALLATION
2
SimpleWare Welcome screen launches. Click Next to begin
installation.
3
Read the License Agreement, select I accept the terms of the
License Agreement, and click Next.
Figure 3-2
Figure 3-3
SECTION 3, INSTALLATION
9
SECTION 3
INSTALLATION
4
Use the default folder for installation (C:\Program
Files\SimpleWare) and click Install.
5
SimpleWare installation software displays the following dialog
box while installing the SimpleWare applications.
Figure 3-4
Figure 3-5
SECTION 3, INSTALLATION
10
SECTION 3
INSTALLATION
6
When SimpleWare installation is nearly complete, the installation
application displays the following dialog box, prompting you to
plug in your Wireless USB Network Adapter. Click Done to
complete installation of the SimpleWare software.
7
Plug the Wireless USB Network Adapter into a USB port on your
PC. USB ports are located on the back of most PCs. However,
some PCs have USB ports on the front panel.
Figure 3-6
Figure 3-7
PC with Wireless
USB Network
Adapter
Desktop Computer
8
USB Adapter
Now, follow the instructions in the next section to install drivers
for your Wireless USB Network Adapter.
SECTION 3, INSTALLATION
11
SECTION 3
INSTALLATION
Installing The Wireless Network Adapter
Windows 98SE, Windows Me, and Windows 2000 support Wireless
USB Network Adapters. The installation procedure and dialog boxes
shown in this section for Windows 98SE are nearly identical to those
for Windows Me and Windows 2000.
The following installation instructions use a Windows feature called
plug-and-play. When you insert your Wireless USB Network Adapter
into a USB port on your PC, Windows displays a series of dialog
boxes to help you install the wireless driver files. If Windows does
not display these dialog boxes, your PC hardware may not fully support
plug-and-play. If your PC does not fully support plug-and-play, see
Appendix F, Manual Installation Of Wireless Adapter Software.
The Wireless USB Network Adapter requires a powered USB port.
USB ports, for example, on the back (or front) of your PC are powered.
However, USB ports on keyboards are normally not powered and do
not work with Wireless USB Network Adapters.
Follow these steps to install driver software on your PC for the
Wireless USB Network Adapter:
NOTE: You might need to insert your Windows operating system
disk during the installation procedure.
1
If you haven’t done so already, plug your Wireless USB Network
Adapter into a USB port.
Figure 3-8
SECTION 3, INSTALLATION
12
SECTION 3
INSTALLATION
2
Windows Add New Hardware Wizard automatically detects the
Wireless HomeRF USB Network Adapter. Click Next to
begin installation.
3
Select Search for the best driver for your device
(Recommended) and click Next.
Figure 3-9
Figure 3-10
SECTION 3, INSTALLATION
13
SECTION 3
INSTALLATION
4
Select Specify a location, click the Browse button to browse the
SimpleWare CD-ROM.
5
Click on the (+) symbol next to the SimpleWare folder.
Figure 3-11
Figure 3-12
a.
b.
d.
Click on (+) symbol next to Wireless Drivers folder.
Click on WIN 9X folder.
(Windows Me users should select Windows Me folder,
while Windows 2000 users should select
Windows 2000.)
Click OK.
SECTION 3, INSTALLATION
14
SECTION 3
INSTALLATION
6
Windows displays the folder you selected. If Floppy disk drives
or CD-ROM drive is selected, disable these selections.
Click Next.
7
Windows locates the driver files. Click Next.
8
Windows prompts you to insert the Windows 98SE CD-ROM.
Insert the Windows 98SE CD-ROM and click OK.
Figure 3-13
Figure 3-14
Figure 3-15
SECTION 3, INSTALLATION
15
SECTION 3
INSTALLATION
9
Windows copies files to your hard disk.
Figure 3-16
10 Windows prompts you for the Proxim HomeRF driver install disk.
Your SimpleWare CD-ROM includes the Proxim HomeRF driver
files. Insert your SimpleWare CD-ROM and click OK. When you
insert your SimpleWare CD-ROM, Windows requires a few
seconds to recognize the CD-ROM. You may need to click OK
several times until Windows recognizes the CD-ROM.
Figure 3-17
NOTE: If Windows displays the SimpleWare installation screen
again, click Cancel in the SimpleWare installation screen and Quit in
the following dialog box. Otherwise, Windows attempts to re-install
SimpleWare.
SECTION 3, INSTALLATION
16
SECTION 3
INSTALLATION
11 You have successfully installed the Wireless USB Network
Adapter driver. Click Finish.
Figure 3-18
12 You should now restart your PC. Be sure to eject the disk in your
CD-ROM drive before you restart your PC.
13 When you restart your PC, SimpleServe Console starts
automatically.
Figure 3-19
14 Congratulations! You have finished installing the software. Now,
follow the instructions in the next section to connect your
simplefi and PC.
SECTION 3, INSTALLATION
17
SECTION 3
INSTALLATION
Device Discovery
This section describes the procedure to connect your simplefi and
PC. This procedure is known as device discovery.
NOTE:
simplefi is set to discovery mode at the factory. Your simplefi may
not be in discovery mode, for example, if you are already using
simplefi and intend to install simplefi and SimpleWare software on
another PC.
If simplefi is not in discovery mode (does not display the following
text), see Appendix C, Troubleshooting for information on how to
reset your simplefi to discovery mode.
Looking for PC…
simplefi is in
discovery mode.
1
After restarting your PC, a dialog box prompts you to enter the
last three characters of your simplefi serial number. You can
find the simplefi serial number on a sticker located on the
bottom of your simplefi. You can also find the simplefi serial
number on the inside cover of the User Guide, and on the
Getting Started guide.
Before device discovery, exit other Windows applications.
If you do not use device discovery to connect your simplefi and
PC after installing SimpleWare, you can perform device
discovery later by clicking on the add device button in the
SimpleServe Console.
SECTION 3, INSTALLATION
18
SECTION 3
INSTALLATION
Enter the last three characters of your simplefi serial number.
Figure 3-20
2
Windows displays a dialog box while your PC discovers and
connects to your simplefi.
Figure 3-21
Your PC will discover and connect to your simplefi. If your PC does
not find your simplefi, try again by clicking the add device button on
SimpleServe Console. Ensure you enter the last three characters of
your serial number correctly.
If you already have a wireless network, see Appendix D, Configuring
IP Address Information for help on setting IP addresses.
NOTE: When your PC successfully discovers your simplefi, you will
not need to repeat the discovery procedure. After you successfully
discover your simplefi, you will only need to use the add device
button if you change your network settings.
SECTION 3, INSTALLATION
19
SECTION 3
INSTALLATION
3
Enter a name for your simplefi, for example, Alice’s simplefi, and
click Accept Device.
Figure 3-22
You’re now ready to play music on your simplefi. Go to your
simplefi, and press PLAY on the remote control. You will hear a
brief tutorial explaining how to use the remote control to access
music on your simplefi. To skip the tutorial, navigate to other
tracks and press the PLAY button.
Figure 3-23
Now, to gain access to thousands of Internet radio stations and use
exciting new features such as TagIt!, follow the instructions in the
next section.
SECTION 3, INSTALLATION
20
SECTION 3
INSTALLATION
Activating Your Online Guide
After you close the above window, you will see an activation screen
for the SimpleWare Online Guide.
Online Guide provides you with pre-programmed music and live
Internet radio stations streamed directly to your simplefi. Online
Guide also gives you TagIt!™ for learning more about the music you
hear, BounceIt™ for sharing music you like with friends, and other
features.
Take a moment now to activate your Online Guide subscription. If
you choose to activate Online Guide later, use your mouse to rightclick on the SimpleServe Console and select Activate Now from the
menu.
1
Click Activate Now in the Online Guide activation window.
2
An activation window appears. Enter a user name and password
for your Online Guide account. Your user name is not casesensitive and should have 5 to 24 characters or numbers. Spaces
and punctuation (except underscore, _ ) are not allowed. Your
password should have 6 to 10 characters; spaces are not allowed.
Figure 3-24
SECTION 3, INSTALLATION
21
SECTION 3
INSTALLATION
Click submit.
Figure 3-25
3
Fill in user information. Fields marked with a red asterisk are
required fields. Click next.
Figure 3-26
SECTION 3, INSTALLATION
22
SECTION 3
INSTALLATION
4
The next screen shows services available to you from our Internet
content partners. You may see different Internet content
partners, depending on the services that are available to you.
Click next.
Figure 3-27
5
You’re almost done. Click finish.
Figure 3-28
SECTION 3, INSTALLATION
23
SECTION 3
INSTALLATION
Congratulations! Your simplefi is set up and ready to go. Launch
your Media Manager playlist editor by clicking the media manager
button on the SimpleServe Console. Use Media Manager to create
your own channels and playlists, or click on your Online Guide to
customize Internet channels. For more information on these and
other great features, see Section 4, Playing Music On Your simplefi.
SECTION 3, INSTALLATION
24
SECTION 4
PLAYING MUSIC ON YOUR SIMPLEFI
To help you get started playing music on your simplefi, this section
covers the following topics:
•
•
•
•
•
•
•
Before you start
Channels, playlists, and tracks
Remote control
Browsing channels, playlists, and tracks
Browsing content while a track is playing
Repeating a channel, playlist, or track
Adjusting headphone volume
Before You Start
Before you start playing music on your simplefi:
1
Ensure SimpleServe Console software is running on your PC.
After you install SimpleWare, SimpleServe Console launches
automatically each time you start your PC.
2
Is simplefi turned on? If not, turn on your simplefi.
3
Ensure the Wireless USB Network Adapter is plugged into a
USB port on your PC. The light on your wireless adapter should
be green.
SECTION 4, PLAYING MUSIC ON YOUR SIMPLEFI
25
SECTION 4
PLAYING MUSIC ON YOUR SIMPLEFI
Channels, Playlists, and Tracks
Media Manager playlist editor stores your music in:
Channels
Consists of one or more playlists. For example, Susan’s
channel may contain playlists named “Rock”, “Reggae”,
and “Swing”. Rick’s channel may contain “Hip Hop”,
“Classic” and “Saturday Morning Tunes” playlists.
Playlists
Consists of one or more songs, also known as tracks.
Tracks
Individual songs, which can be tracks on your PC or
individual Internet radio streams.
simplefi displays channels, playlists, and tracks in a three-line display. The top line displays the channel. The middle line shows the
playlist, and the bottom line displays the track.
The figure below illustrates the relationship between the content on
your simplefi and Media Manager.
Figure 4-1
simplefi display
Remote Control
The simplefi remote control has buttons that are similar to those
found on a CD player, with a few additional features:
SECTION 4, PLAYING MUSIC ON YOUR SIMPLEFI
26
SECTION 4
PLAYING MUSIC ON YOUR SIMPLEFI
Figure 4-2
Remote Control
3
1
2
5
4
10
7
8
9
12
11
6
13
Button
Description
1
Navigate Left
Navigates left to the previous channel, playlist,
or track.
2
Navigate Right
Navigates right to the next channel, playlist,
or track.
3
Navigate Up
Navigates up one line.
4
Navigate Down Navigates down one line.
5
Select
Selects a highlighted item.
6
Menu
Opens and closes the menu. The menu enables
you to adjust the headphone volume and
reconfigure simplefi.
7
Play/Pause
Plays the currently selected track/pauses the
currently playing track.
8
Stop
Stops the currently playing track.
9
Previous Track
Plays the previous track.
10 Next track
Plays the next track.
11 Repeat
Sets the repeat mode (repeat channel, playlist,
or track).
12 TagIt!
Tags the currently playing track.
13 Power
Turns simplefi on and off.
SECTION 4, PLAYING MUSIC ON YOUR SIMPLEFI
27
SECTION 4
PLAYING MUSIC ON YOUR SIMPLEFI
Browsing Channels, Playlists, and Tracks
Browsing Channels
1
Press the Up button on the simplefi remote control to navigate
up until the Channel name line (top) is selected.
2
When the Channel name line is highlighted, press the Navigate
Left and Right buttons to browse your music channels.
Figure 4-3
Channel name line
Channel line selected
Browsing Playlists
3
After you’ve selected a channel, press the Navigate Down
button to navigate down to the Playlist name line (middle) to
choose a playlist within that channel.
4
Press the Navigate Left and Right buttons to browse playlists in
the selected channel.
Figure 4-4
Playlist name line
Playlist line selected
Browsing Tracks
5
Now that you’ve selected a playlist, you can press Play to listen
to it, or you can press the Navigate Down button to navigate
down to the Track name line (bottom) to select individual songs
or Internet radio stations.
6
Press the Navigate Left and Right buttons to browse tracks in
the selected playlist.
Figure 4-5
Track name line
Track line selected
SECTION 4, PLAYING MUSIC ON YOUR SIMPLEFI
28
SECTION 4
PLAYING MUSIC ON YOUR SIMPLEFI
7
When the desired track appears in the simplefi display, press the
Play button to play the track.
NOTE: If you press the Play button when a new channel is selected,
simplefi plays the first track of the first playlist in the selected channel. If you press Play when a new playlist is selected, simplefi plays
the first track in the selected playlist.
Browsing Content While a Track is Playing
You can browse channels, playlists, and tracks while a track is playing. Use the Navigate Left, Right, Up, and Down buttons to display other channels, playlists, and tracks while the current track is
playing.
While browsing, if you see another track that you want to play, press
the Play button on the remote control. simplefi stops playing the
currently playing track, and starts playing the newly selected track.
If you don’t find another track you want to play, press the Menu
button. The simplefi changes to display information about the
currently playing track. Or, you can wait fourteen seconds and the
simplefi display changes back to the currently playing track.
Repeating a Channel, Playlist, or Track
simplefi is pre-programmed to repeat tracks within a channel. When
simplefi reaches the last track of a playlist within a channel, simplefi
automatically starts playing the next playlist within the same channel.
When simplefi reaches the last playlist, simplefi goes back to the
first playlist in a continuous loop.
You can program your simplefi to repeat a playlist or track by pressing the Repeat button on the remote control. When you press the
Repeat button, the simplefi displays one of three repeat options:
SECTION 4, PLAYING MUSIC ON YOUR SIMPLEFI
29
SECTION 4
PLAYING MUSIC ON YOUR SIMPLEFI
• Repeat Channel (default setting)
• Repeat Playlist
• Repeat Track
Press the Repeat button again. simplefi displays the next repeat
option. To select a repeat option, continue pressing the Repeat button until simplefi displays the desired repeat option. After a few
seconds, the display returns to the currently playing channel, playlist,
and track, which indicates simplefi is now programmed to the
desired repeat option.
Adjusting Headphone Volume
Press the Menu button on the simplefi remote control to control
headphone volume. Then, press the Navigate Up and Down
buttons to raise or lower the headphone volume. Navigate Up
raises the volume, while Navigate Down lowers the volume.
When you are finished, press the Menu button to return the display
to the current channel, playlist, and track.
SECTION 4, PLAYING MUSIC ON YOUR SIMPLEFI
30
SECTION 5
SIMPLESERVE CONSOLE
AND MEDIA MANAGER
Three software applications power your simplefi system.
• SimpleServe Console
• Media Manager
• Online Guide
This section describes how to use SimpleServeTM Console and Media
Manager to collect, organize, and play music on your simplefi. For
information on Online Guide, see Section 6, Online Guide.
Understanding each of these applications will help you quickly find,
organize, and play your music.
SECTION 5, SIMPLESERVE CONSOLE AND MEDIA MANAGER
31
SECTION 5
SIMPLESERVE CONSOLE
AND MEDIA MANAGER
SimpleServe Console
SimpleServe Console is the control panel for the simplefi system.
Use SimpleServe Console to easily access your content and set preferences.
1
Figure 5 -1
SimpleServe Console
2 3
9
10
5
6
Control
7
8
4
Feature
1
Window control buttons Provides standard window control
buttons - help, minimize, and close
application.
2
Hide
Hides SimpleServe Console along the
right or left side of your screen.
3
Restore
Restores SimpleServe Console to
full size.
4
Hidden Console
Keeps SimpleServe Console on your
desktop in an unobtrusive, yet
easy-to-access format.
5
Media Manager
Organizes your music into channels,
playlists, and tracks.
6
Online Guide
Accesses Internet radio stations offered
by our Internet partners. Before you
can access the Online Guide, you must
discover your simplefi. For
information on discovering your
simplefi, see Section 3, Installation.
7
My Tags
Shows additional information, such as
concert dates, discography, etc. for
songs you tag using the TagIt! button
on your remote control. Before you can
access tags, you must discover your
simplefi. For information on
discover ing your simplefi, see
Section 3, Installation.
8
Add Device
Discovers your simplefi.
9
simplefi
Opens Media Manager.
10 Other Features
Sets preferences - right-mouse-click on
the console pops up an options menu.
SimpleServe Console launches automatically when you turn on your PC.
SECTION 5, SIMPLESERVE CONSOLE AND MEDIA MANAGER
32
SECTION 5
SIMPLESERVE CONSOLE
AND MEDIA MANAGER
SimpleServe Console Options
When you right-click on the gray portion of SimpleServe Console,
the console displays a menu of options.
Figure 5-2
SimpleServe Console
Options
Menu Item
Description
About SimpleServe Console Displays your user name (if you
previously activated your Online Guide
account), SimpleServe version, and the
serial number of your simplefi (if your
PC previously discovered your
simplefi).
Login
Select Login to enter a user name and
password.
If you previously activated an online
account, the dialog box displays your
user name and password.
If you already have an online account
and the user name is blank, enter your
user name and password. The user
name field is blank, for example, if
you’ve installed SimpleWare on a
second PC and already have an online
account. Enter your user name and
password to access your online
account.
Preferences
To display the SimpleServe Console on
top of other Windows applications,
select Preferences and enable Always
on Top.
Advanced Settings
Select this option to configure network
settings, such as IP addresses. For
information on configuring network
settings, see Appendix D, Configuring
IP Address Information.
Close
Select this option to stop SimpleServe.
SECTION 5, SIMPLESERVE CONSOLE AND MEDIA MANAGER
33
SECTION 5
SIMPLESERVE CONSOLE
AND MEDIA MANAGER
NOTE: If you stop SimpleServe, music streaming to your simplefi
stops. To restart SimpleServe, open the Start menu on your PC and
select Programs > SimpleWare > SimpleServe Console.
Media Manager
Use your Media Manager playlist editor to collect and organize your
music. To launch Media Manager, press the media manager button
on the SimpleServe Console.
Use Media Manager to organize your MP3 files into channels,
playlists, and tracks.
• Channels – Collection of playlists (highest level of organization)
• Playlists – Collection of tracks
• Tracks – Individual songs
2
Figure 5 - 3
Media Manager
Window
3
1
4
5
12
11
6
13
7
10
9
8
SECTION 5, SIMPLESERVE CONSOLE AND MEDIA MANAGER
34
SECTION 5
SIMPLESERVE CONSOLE
AND MEDIA MANAGER
Media Manager includes the following features:
Item
Description
1
Preview Track player
Plays audio content on your PC. To
play content on simplefi, use the
simplefi remote control.
2
Search text box
Enables you to search your Music
Library for songs, artists, etc.
3
Window control buttons Provides standard window control
buttons – help, minimize, and close
application.
4
Options button
Allows you to create new channels and
import playlists.
5
Add Music button
Allows you to add music to your
Music Library.
6
Add Track button
Allows you to add music to your
playlists.
7
New Playlist button
Creates a new playlist.
8
Right pane
Shows playlists when a channel is
selected in the left pane. Shows tracks
when a playlist is selected in the left
pane.
9
Left pane
Shows channels and playlists.
10 Online Guide button
Opens Online Guide in a mini Web
browser (requires an Internet
connection).
11 Top pane
Shows your Music Library and search
results.
12 Music Library button
Opens and closes the top pane.
13 Refresh button
Refreshes your Featured Channels
offered by Internet content partners.
After using Online Guide to change
your Internet audio preferences, click
on the Refresh button to update your
Featured Channels.
SECTION 5, SIMPLESERVE CONSOLE AND MEDIA MANAGER
35
SECTION 5
SIMPLESERVE CONSOLE
AND MEDIA MANAGER
Adding Music to Your PC
Several MP3 songs are included with Media Manager for your enjoyment. To add more songs to your playlists:
•
•
Convert songs on your CDs to MP3 tracks, also known as
“ripping CDs”
Download songs from the Internet
Ripping CDs
CD-ripping is a process to copy music from a CD to your hard disk.
CD-ripping stores your music in digital files called MP3 files.
simplefi software makes it easy to store your entire music collection
in one convenient location on your computer. With simplefi, you
can listen to your music collection on your stereo system without the
hassle of managing numerous CDs.
Copying music from your CDs to your computer’s hard disk is easy.
A variety of CD-ripping software programs are available for download from the Internet. MusicMatch Jukebox, Audiograbber, and
Real Jukebox are examples of applications you can download from
the Internet to rip CDs.
After downloading and installing CD-ripping software, simply insert a
CD into your CD-ROM drive and select the tracks to rip. CD-ripping
software converts these tracks into MP3 files onto your hard disk.
NOTE: We recommend ripping songs from CDs at a minimum bit
rate of 128kbps, which is near CD-quality. Songs ripped at 96kbps or
lower require less hard disk space, but are poorer quality. Many CDripping applications default to 128kbps.
SECTION 5, SIMPLESERVE CONSOLE AND MEDIA MANAGER
36
SECTION 5
SIMPLESERVE CONSOLE
AND MEDIA MANAGER
Downloading From the Internet
You can download MP3s from sites on the Internet onto your hard
disk. Simply go to an MP3 provider, search for a desired song, and
download the song to your hard drive.
IMPORTANT NOTE
Unauthorized duplication or distribution of copyrighted songs may
be a violation of the rights of the copyright owner. Please be sure to
obtain songs from legal sources.
After downloading new songs to your hard drive, add the
downloaded songs to Media Manager by dragging and dropping
them directly from your desktop into the Music Library. Or, you can
create a new playlist and add the tracks to the playlist with the add
track button on Media Manager.
Organizing Music With Media Manager
Use Media Manager to organize your music for use with simplefi.
Media Manager is a critical tool for using your simplefi, since the
channels, playlists and tracks that you create and organize in Media
Manager are available at your simplefi. When browsing music on
your simplefi, you will navigate through channels and playlists that
you set up in Media Manager.
Media Manager also includes a Music Library, which contains every
audio file that you add to Media Manager. Music Library automatically stores your music in one convenient location for easy access
when building playlists.
To launch Media Manager, click the media manager button on your
SimpleServe Console.
SECTION 5, SIMPLESERVE CONSOLE AND MEDIA MANAGER
37
SECTION 5
SIMPLESERVE CONSOLE
AND MEDIA MANAGER
Channels
A channel is a collection of playlists. There are two types of
channels:
Custom channels are created by you and contain your playlists. For
instance, you can create a “Rock” Channel that contains playlists of rock
music, or “John’s Channel”, which contains playlists of John’s favorite
artists. A channel named “Sample Channel” containing a sample
playlist has been created to help you get started.
Featured channels contain playlists created for you by Internet music
and radio services. Featured channels cannot be edited within Media
Manager. Use Online Guide to add, remove, and configure these
channels. After modifying a featured channel in Online Guide, click the
refresh button in Media Manager to update your featured channels.
Figure 5 -4
Channels
Pre-installed
custom channel
Featured channel
Custom channel
Creating a New Custom Channel
To create a new custom channel:
1
2
3
Click options in the upper-right corner of Media Manager.
Select Create Channel from the menu.
In the New Channel text box in the left pane, type a name for
the channel.
Media Manager adds your new channel to the channel list in the left
pane.
SECTION 5, SIMPLESERVE CONSOLE AND MEDIA MANAGER
38
SECTION 5
SIMPLESERVE CONSOLE
AND MEDIA MANAGER
NOTE: To add playlists to a channel, see below Creating a
New Playlist.
Deleting an Existing Custom Channel
To delete an existing custom channel:
1
Right-click on the channel you wish to delete in the
left pane.
2
Select Delete Channel from the menu.
3
When asked if you are sure you want to delete the selected
channel, click Yes.
Media Manager deletes the selected channel.
NOTE: Featured channels cannot be deleted within Media Manager.
Use Online Guide to modify featured channels.
Renaming an Existing Channel
To rename an existing channel:
1
Right-click the channel you wish to rename in the left pane.
2
Select Rename Channel from the menu.
3
Type a new name for the channel in the Channel text box in the
left pane.
The new name for the channel appears in the channel list in the left
pane.
NOTE: Featured channels cannot be renamed or edited within
Media Manager. Use Online Guide to modify featured channels.
SECTION 5, SIMPLESERVE CONSOLE AND MEDIA MANAGER
39
SECTION 5
SIMPLESERVE CONSOLE
AND MEDIA MANAGER
Playlists
A playlist is a customized list of tracks, or audio files, on your computer, your network, or the Internet. A playlist enables you to group
various tracks together to be played in the order that you specify.
You can create a playlist that includes a mix of MP3s. Or, you can
create a playlist that contains songs from a particular artist or genre,
e.g., Madonna playlist or Flamenco guitar playlist. You can also
import an existing playlist from another application.
Creating a New Playlist
To create a new playlist:
1
Choose a channel to add your playlist to.
2
Click on the channel in the left pane of Media Manager.
3
Click New Playlist in the right pane of Media Manager.
4
Type a name for the playlist in the New Playlist text box in the
left pane.
Media Manager adds your new playlist to the selected channel in the
left pane.
NOTE: To add tracks to a playlist, see below Adding Tracks to a
Playlist.
Importing a Playlist
Media Manager can import M3U playlists. These playlists normally
have an M3U suffix in the name, e.g., jazz.m3u. To import an M3U
playlist:
1
Click on the channel in the left pane to which you want to add an
imported playlist.
2
Click on options in the upper-right corner of Media Manager.
3
Select Import Playlist from the menu.
SECTION 5, SIMPLESERVE CONSOLE AND MEDIA MANAGER
40
SECTION 5
SIMPLESERVE CONSOLE
AND MEDIA MANAGER
4
Browse for a desired playlist (file extension .m3u)
5
Select the desired playlist and click Open.
Media Manager adds the imported playlist to the selected channel in
the left pane.
Deleting an Existing Playlist
To delete an existing playlist:
1
Right-click the playlist you wish to delete in the left pane.
2
Select Delete Playlist from the menu.
3
When asked if you are sure you want to delete the selected
playlist, click Yes.
Media Manager deletes the selected playlist.
NOTE: Featured playlists cannot be deleted within Media Manager.
Use Online Guide to modify featured Internet channels and playlists.
Renaming an Existing Playlist
To rename an existing playlist:
1
Right-click the playlist you wish to rename in the left pane.
2
Select Rename Playlist from the menu.
3
Type the new name for the playlist in the Playlist text box in
the left pane.
The new name for the playlist appears in the left pane.
NOTE: Featured playlists cannot be renamed or edited within
Media Manager. Use Online Guide to modify featured Internet
channels and playlists.
SECTION 5, SIMPLESERVE CONSOLE AND MEDIA MANAGER
41
SECTION 5
SIMPLESERVE CONSOLE
AND MEDIA MANAGER
Tracks
A track is any music file on your computer, network, or the Internet,
such as MP3 files on your hard disk or URL links to Internet MP3s or
radio stations. Tracks are grouped in playlists, usually with other similar
tracks. For example, tracks might be grouped by genre, artist, theme,
or album.
Add tracks to your custom playlists, or store them in the Music Library
for later use. When you add an audio file or URL to a playlist that is
not already in the Music Library, Media Manager also adds the track to
the Music Library.
Adding Tracks to Music Library
To add tracks to Music Library:
1
Click music library in the upper-left corner of Media Manager.
The top pane opens, displaying the contents of Music Library. If
the top pane is already open, skip Step 1.
2
Click add music in the top pane.
3
Browse for the desired audio file(s).
4
Select the desired audio file(s) and click OK.
Media Manager adds the audio file(s) to the Music Library in the top
pane.
NOTE: You can also drag and drop local MP3 files into the top pane
of Media Manager. Click and hold down the left mouse button on
an MP3 file, then drag the MP3 file into the top pane of Media
Manager and unclick. Media Manager adds the MP3 file to Music
Library.
SECTION 5, SIMPLESERVE CONSOLE AND MEDIA MANAGER
42
SECTION 5
SIMPLESERVE CONSOLE
AND MEDIA MANAGER
Figure 5 - 5
Adding Tracks to
Music Library
Adding Tracks to a Playlist (Drag and Drop)
To add tracks to a playlist using drag and drop:
1
Click on the playlist in the left pane to which you want to add
tracks.
2
Click and hold down the left mouse button on the desired track
in your Music Library, then drag the track icon into the right pane
of Media Manager and unclick.
Media Manager adds the track to the selected playlist. To add multiple tracks at once, hold down the Shift button on your keyboard and
click on multiple files, then drag them into the right pane of the
Media Manager.
SECTION 5, SIMPLESERVE CONSOLE AND MEDIA MANAGER
43
SECTION 5
SIMPLESERVE CONSOLE
AND MEDIA MANAGER
Adding Tracks to a Playlist (Add Track Dialog)
To add tracks to a playlist using the Add Track dialog.
1
Click on the playlist in the left pane to which you want to add
audio files.
2
Click add track in the right pane.
3
Browse for the desired audio file(s).
4
Select the desired audio file(s) and click OK.
Media Manager adds the audio file(s) to the selected playlist in the
right pane.
Removing a Track
To remove an existing track:
1
Right-click on the track you want to delete.
2
3
Select Delete Track from the menu.
When asked if you are sure you want to delete the selected track,
click Yes.
Media Manager removes the selected track from the Media
Manager. The track, however, is not deleted from your hard disk.
NOTE 1: If you delete a track from Music Library, Media Manager
also deletes the track from any playlist containing that track. If you
delete a track from a playlist, the track remains in Music Library.
NOTE 2: Tracks in featured channels cannot be deleted within Media
Manager. Use Online Guide to modify featured Internet channels.
Editing Track Information
To edit track information:
1
Right-click on the track for which you want to edit information.
2
Select Edit Track Information from the menu.
3
Edit the track’s title, genre, album, year, or artist.
The edited track information now appears for the selected track.
NOTE: Tracks in featured channels cannot be edited within Media
Manager. Use Online Guide to modify featured Internet channels.
SECTION 5, SIMPLESERVE CONSOLE AND MEDIA MANAGER
44
SECTION 5
SIMPLESERVE CONSOLE
AND MEDIA MANAGER
Searching for Music in Music Library
To find a song in your Music Library:
1
2
Type in a song title or artist, etc., in the search text box
Click the adjacent search button.
A list of results matching your query appears in the top pane.
search text box
Figure 5 - 6
Searching for Music
in Music Library
search button
search
results
Playing Music on Your PC
You can play music at your PC with the Media Manager audio player.
Locate the audio player controls at the top left of Media Manager.
Note the local audio player does not play tracks on your simplefi.
Rather, the Media Manager audio player plays tracks locally on your
computer speakers. Use the audio player to preview tracks at your
PC before adding them to custom playlists.
To play tracks on your simplefi, use the simplefi remote control to
navigate your music, then press the Play button on the remote control.
SECTION 5, SIMPLESERVE CONSOLE AND MEDIA MANAGER
45
46
SECTION 6
ONLINE GUIDE
Thousands of Internet Songs and Radio Stations
Online Guide provides you with online services and audio content
from our Internet partners, including thousands of Internet radio
streams, MP3s, syndicated audio programming (news, talk shows,
comedy, and more) and other online content to help you discover
new music and enhance your experience with simplefi.
Click online guide on the SimpleServe Console or the online guide
button located at the lower-left corner of Media Manager to gain
access to thousands of online MP3s and Internet radio broadcasts.
When you activate your account, Media Manager installs featured
channels from our Internet content providers. To customize these
online channels, go to the Channels link within Online Guide, and
click on the link to a channel to customize it.
Customize Your Internet Radio Stations
Online Guide connects you to our Internet partner sites. Because
each Internet content provider offers different services, Online Guide
displays instructions to help you customize each featured channel.
These instructions appear within your browser window and are tailored to the individual Internet partner’s customization requirements.
Bookmark Your Favorite Songs
Online Guide also contains a link to your Tags page, which displays
additional information about songs, including concert dates and
discography, that you tag using the TagIt! button on your remote
control. After you tag a song, you can share a link to the song with
friends and family, also known as “bouncing” a song.
Online Guide provides additional services, software updates and
other important information to ensure you have the most up-to-date
services and utilities for your simplefi.
NOTE: You must be connected to the Internet to access
Online Guide.
SECTION 6, ONLINE GUIDE
47
SECTION 6
ONLINE GUIDE
Online Guide
The following figure shows Online Guide features.
1
2
3
4
5
6
7
8
9
10
11
Figure 6 -1
Online Guide
Item
Description
1
Featured Channels
Shows featured Internet channels,
highlighting Internet content partners
and services available to you.
2
Home
Returns you to the Online Guide start
page.
3
Channels
This page links to and displays
information on the channels you’ve
subscribed to.
4
Tags
Opens your Tags page, which enables
you to get more information about your
songs. BounceIt!, a feature available in
your Tags pages, enables you to share
information about tagged songs with
friends and family.
5
Account Info
Links you to your account information.
Use this link to check on the status of
your subscriptions and update user
information.
SECTION 6, ONLINE GUIDE
48
SECTION 6
ONLINE GUIDE
6
Support
Provides frequently asked questions,
help information, and downloads of
software updates and new utilities.
7
Back button
Returns you to the previous page.
8
Forward button
Returns you to the page before you
clicked the back button.
9
Stop button
Stops loading the page you are
currently opening.
10 Refresh button
Opens the most recent version of the
current page.
11 Window control buttons Provides standard window control
buttons: help and close application.
Activating Online Guide
To activate your Online Guide subscription, ensure you can access
the Internet from your PC.
To access music and other audio content from Internet content partners, you must first activate your account. For information on activating your account, see Section 3, Installation.
If you did not activate your account while installing SimpleWare, click
on the online guide button in SimpleServe Console. If you have not
previously activated your online account, Online Guide helps you
activate your account.
Channels
The Channels link in Online Guide connects you to featured
channels. To modify an online channel, click on the link to that
channel. Then, follow the instructions within the browser window
to modify and customize the online channel.
NOTE: Your featured channels may be different than those shown
here, depending on the services available to you.
SECTION 6, ONLINE GUIDE
49
SECTION 6
ONLINE GUIDE
click on an online channel
Figure 6-2
Online Guide
After making changes to your online channels, click the refresh
button in Media Manager to update featured channel information.
Figure 6-3
Refreshing Featured
Channel Information
refresh button
SECTION 6, ONLINE GUIDE
50
SECTION 6
ONLINE GUIDE
TagIt!
simplefi’s unique TagIt! feature enables you to bookmark a song,
then learn more about the song on your PC.
To tag a song, simply press the TagIt! button (the big orange one)
on the remote control while a song is playing. The simplefi display
briefly flashes the TagIt! logo on the right portion of the display to
indicate you successfully tagged the currently playing track.
Now, go to your PC. Click my tags on the SimpleServe Console to
open your Tags page, which is also accessible from within Online
Guide. The Tags page displays a list of songs you’ve previously
tagged.
Keep in mind your PC must be able to access the Internet to view
your Tags page. If your PC is not connected to the Internet,
SimpleWare retains your tags. When you again
connect to the Internet, SimpleWare uploads your tags to your
Tags page.
Figure 6-4
Tags Page
To view tag information for a song, click on the title of the song.
Online Guide displays information about the song, including artist,
label, release date, reviews, similar albums, how to purchase the CD,
concert tour dates, and more.
SECTION 6, ONLINE GUIDE
51
SECTION 6
ONLINE GUIDE
Figure 6-5
Tag Information Page
BounceIt!
BounceIt! enables you to send information on a tagged song to a
friend.
1
Click my tags on the SimpleServe Console to open your
Tags page.
2
Check the box next to the song for which you wish to send
information, and click BounceIt!.
Enter the email address of a friend in the box next to the add
button.
3
4
Click the add button to add that email address to the list of
recipients.
5
Add other friends to your list of recipients by repeating steps 3
and 4.
6
Include a message, if you like, to personalize the song
information you’re sending.
7
Click Send. Email is sent to your friend(s) about your tagged
song.
SECTION 6, ONLINE GUIDE
52
SECTION 6
ONLINE GUIDE
Account Information
The Account Info link in Online Guide displays information about
your account. Use this feature to update personal information.
Note: When you update your user profile, you will need to type
your user name and password in again. This is for your security and
protection.
SimpleWare Updates
When you installed SimpleWare, the installation program included a
feature to check for software updates.
Updating your SimpleWare software ensures you have the latest features and upgrades. Before you check for updates, ensure you can
access the Internet from your PC.
To check for SimpleWare updates:
1
From the Windows Start menu select
Programs > SimpleWare > Check For Latest Version.
2
Follow the instructions.
SECTION 6, ONLINE GUIDE
53
54
APPENDIX A
SPECIFICATIONS
System Requirements
Your computer must meet the following requirements:
•
•
•
•
•
•
•
Computer with Pentium class or faster processor
Windows® 98SE™, Windows Me™, or Windows 2000™
Minimum 64 MB RAM (128 MB RAM recommended)
Minimum 100 MB of available hard disk space
CD-ROM drive for installation
An available USB port for the wireless USB network adapter
Computer monitor configured for more than 256 colors
Wireless USB Network Adapters
Radio Data Rate
10 Mbps – Radio
Wireless Standard
SWAP (Shared Wireless Access Protocol)
Frequency Band
2.4 – 2.483 GHz (in the U.S.)
(Spread-spectrum frequency-hopping)
Output Power
100 mW
Range
Radius up to 150 feet
Operating Temperature
0o to + 40o C
APPENDIX A, SPECIFICATIONS
55
56
APPENDIX B
FAQ
Frequently Asked Questions
Answers to the most frequently asked questions about simplefi.
How does simplefi connect to my PC?
simplefi uses HomeRF™ wireless Ethernet to connect to your
home PC. With this system, you don’t need to install wires or
move your stereo. Future versions may support 802.11b,
802.11a, wired Ethernet, HomePNA, HomePlug, and other networking
technologies.
How far apart can my PC and stereo be?
Approximately 150 feet through walls.
Does my wireless USB network adapter require a powered
USB port?
Yes, plug the wireless USB network adapter into a powered USB
port on the back of your PC, or into a powered USB hub (ensure
the USB hub is powered by an external power supply). Some
PCs have powered USB ports on the front of the PC. USB ports
on keyboards are not powered and are not appropriate for the
wireless USB network adapter.
I updated my Live365 and MP3.com content, but Media
Manager does not list my new content.
Click the Refresh button in Media Manager. Media Manager
requires a connection to the Internet to refresh your Internet
content.
How many MP3s can I store in my simplefi?
None! simplefi plays music files stored in Media Manager on
your home PC. Your PC can store hundreds or thousands of
MP3s (depending on free space on your hard disk). Your music is
centrally stored and accessed wirelessly at your stereo.
How does simplefi connect to the Internet?
simplefi uses your home PC and your existing Internet connection. There are no additional costs or connections to set up.
APPENDIX B, FAQ
57
APPENDIX B
FAQ
Can simplefi play music from the Internet?
Yes. simplefi supports a number of free and subscription Internet
music services. Check Online Guide to find out which
services are currently available.
What audio formats does simplefi support?
Currently, simplefi supports MP3 files with bit rates up to 320
kbps, depending on the speed of your PC. Future versions of
simplefi will support other file formats as well. Your simplefi is
upgradeable, so check periodically for updates that support
other music file formats.
What is that big orange TagIt!™ button?
Press the TagIt! button when you want to know more about the
song or audio stream currently playing. Next time you’re at your
PC, check the Tags page by clicking my tags on your
SimpleServe Console to see information on the tracks you
tagged. Ensure your computer is connected to the Internet
when accessing your Tags page.
Does it come with a remote control?
The simplefi remote control’s innovative bi-axial design works
both docked to simplefi and as a standalone remote.
How do I add my MP3s to Media Manager?
Either drag and drop MP3 tracks into Media Manager or use the
add music button in Media Manager.
How do I add new Internet music channels?
simplefi has several featured music channels built in. To add
Internet music to a channel, visit Online Guide and click on the
featured-channel provider you’re interested in. When you’re at
the provider’s site, follow the instructions provided within your
Online Guide to add Internet radio stations to Media Manager.
Then, click the Refresh button in Media Manager.
What are channels?
Channels are a new way to organize your music. You can make a
custom channel filled with your own playlists. Or, you can enjoy
channels created by our featured content partners that contain
Internet radio stations, online music lockers, Internet radio
directories, and more.
APPENDIX B, FAQ
58
APPENDIX B
FAQ
What is Music Library?
Music Library contains every audio file and Internet URL that you
add to Media Manager. Music Library stores all of your music in
one convenient location for easy access when building playlists.
On your simplefi, Music Library appears as a channel; select
Music Library on your simplefi to listen to your entire music
collection.
What is Online Guide?
Online Guide is the place to go to find new music, audio
programming and other services available to you from our
Internet partners.
How do I separate my playlists from my roommate’s?
Create two custom channels, one for you and one for your
roommate, and move your playlists into your channel. To create
a new channel, click the options button in Media Manager and
select Create New Channel. To listen to your music on simplefi,
select your channel.
What do the simplefi messages indicate?
simplefi provides a wizard to help you connect simplefi to the
PC. The wizard displays the following screens on your simplefi.
Connecting to PC…
simplefi is looking for SimpleServe. simplefi will now attempt
to ping the PC running SimpleServe.
Connecting to PC…
Press PLAY button for help.
simplefi is looking for SimpleServe. simplefi displays this
message after “Connecting to PC…”, indicating simplefi successfully pinged the PC running SimpleServe.
APPENDIX B, FAQ
59
APPENDIX B
FAQ
Connecting to PC…PC on?
No.
Yes.
simplefi is looking for SimpleServe. simplefi did not successfully ping the PC running SimpleServe. Is your PC turned on? If
not, turn on your PC. If your PC is turned on, is your wireless
adapter plugged into the PC? Check the IP address of your
wireless adapter. For help on IP addresses, see Appendix D,
Configuring IP Address Information. Try rediscovering simplefi.
For help on rediscovering simplefi, see troubleshooting tip
(Auto-discovery is not detecting simplefi) in Appendix C,
Troubleshooting.
Turn on your PC.
Then press PLAY button.
simplefi displays this message to remind you to turn on your
PC. Turn on your PC, then press the PLAY button to continue.
SimpleServe running on PC?
No.
Yes.
simplefi displays this message if you press the PLAY button
when the display shows “Connecting to PC…Press PLAY button
for help.” This message is a reminder to launch SimpleServe on
your PC. If SimpleServe is running on your PC, use the navigation buttons on your remote control to select Yes, then press the
Select button. Otherwise, select No and press the Select
button.
APPENDIX B, FAQ
60
APPENDIX B
FAQ
Start SimpleServe on PC.
Then press PLAY button.
simplefi displays this message to remind you to launch
SimpleServe on your PC. SimpleServe normally launches
automatically when you turn on your PC. However, if you
remove SimpleServe from your AutoStart folder, you must
manually launch SimpleServe. Launch SimpleServe from the
Windows Start menu - select Programs > SimpleWare >
SimpleServe Console.
Reconfigure simplefi?
No.
Yes.
simplefi displays this message to prompt you to reset simplefi.
IMPORTANT: Keep in mind that if you reset simplefi, you must
rediscover your simplefi by pressing on the add device button
on SimpleServe Console. For help on discovering simplefi, see
Section 3, Installation.
To reset simplefi, use the Navigate DN button to select Yes,
then press the Select button. Otherwise, select No.
Looking for PC…
simplefi is in
discovery mode.
simplefi displays this message when it is in discovery mode. To
discover the simplefi, click the add device button on
SimpleServe Console. For help on discovering simplefi, see
Section 3, Installation.
APPENDIX B, FAQ
61
62
APPENDIX C
TROUBLESHOOTING
Troubleshooting
This section describes troubleshooting tips for the most common
problems.
Auto-discovery is not detecting simplefi
If your PC cannot find simplefi during discovery, press the Reset
button on the back of your simplefi. If this does not fix your
problem, you may need to reset your simplefi to factory default
settings. This may be necessary for a number of reasons,
including:
• You changed your network connections and/or IP addresses,
and need to connect (re-discover) simplefi.
• You purchased a new PC and want to install SimpleServe on
your new PC.
• You reformatted your hard disk and reinstalled Windows. You’ll
need to re-install SimpleServe as well.
The procedure to reset simplefi depends on whether simplefi is
connected to SimpleServe, as described below.
To reset simplefi while simplefi is connected to SimpleServe
If simplefi displays channel, playlist and track information, press
the Menu button on your remote control. simplefi displays the
headphone volume configuration screen. Press the Navigate
Right button on the remote control. simplefi prompts you to
reconfigure simplefi. Use the Navigate Dn button to select Yes.
Press the Select button on the remote control to reset simplefi.
simplefi indicates it is reset by displaying:
Looking for PC…
simplefi is in
discovery mode.
APPENDIX C, TROUBLESHOOTING
63
APPENDIX C
TROUBLESHOOTING
Press the add device button on SimpleServe Console to
discover simplefi again. For help on discovery, see Section 3,
Installation.
To reset simplefi while simplefi is attempting to connect to
SimpleServe (PC turned on)
If simplefi displays:
Connecting to PC…
Press PLAY button for help.
simplefi is looking for SimpleServe. To reset simplefi, press the
Play button on your remote control. simplefi displays a message asking if your PC is on. Use the Navigate Dn button to
select Yes. When simplefi asks you whether to reconfigure simplefi, select Yes. simplefi indicates it is reset by displaying:
Looking for PC…
simplefi is in
discovery mode.
Press the add device button on SimpleServe Console to discover simplefi again. For help on discovery, see Section 3,
Installation.
To reset simplefi while simplefi is attempting to connect to
SimpleServe (PC not turned on)
If simplefi displays:
Connecting to PC…PC on?
No.
Yes.
simplefi cannot find (ping) your PC. To reset simplefi, use the
Navigate Dn button to select Yes. When simplefi asks you
whether SimpleServe is running on the PC, select Yes. When
simplefi asks you whether to reconfigure simplefi, select Yes.
APPENDIX C, TROUBLESHOOTING
64
APPENDIX C
TROUBLESHOOTING
simplefi indicates it is reset by displaying:
Looking for PC…
simplefi is in
discovery mode.
Press the add device button on SimpleServe Console to
discover simplefi again. For help on discovery, see Section 3,
Installation.
Discovery is still not detecting simplefi
Before performing device discovery, exit other Windows
applications first. Some applications, such as HyperTerminal, can
periodically prevent device discovery from occurring successfully.
Also, review the next troubleshooting tip.
PC can’t discover simplefi. AutoIP assigned IP addresses to
two network adapters on my PC.
If AutoIP assigns IP addresses to two, or more, network adapters
on your PC, your PC network is improperly configured. Access
to both networks will not be reliable. In addition, your PC will
not be able to discover simplefi.
To check for this problem, open an MS-DOS Prompt window
from the Windows Start menu, select MS-DOS Prompt. Enter
“ipconfig” and press the Return key. If the IP addresses of two
or more network adapters begins with 169.254, AutoIP is assigning IP addresses to these adapters, and you’ll need to
reconfigure them.
To fix this problem, assign a static IP address to the wireless
adapter. For help, see Appendix D, Configuring IP Address
Information.
APPENDIX C, TROUBLESHOOTING
65
APPENDIX C
TROUBLESHOOTING
simplefi screen continues to display “Connecting to PC…”
but does not connect to PC
•
•
•
•
•
•
•
•
Your simplefi is out of range of your PC. Move your PC
closer to simplefi.
The wireless network is not working.
Your wireless adapter is not plugged into your PC or is not
plugged in correctly.
The wireless adapter software is not installed.
SimpleWare software is not installed.
simplefi is surrounded by a metal surface that blocks wireless
access to your PC.
simplefi has not been discovered.
Try turning the broad end of your Wireless USB Network
Adapter toward your simplefi.
AutoIP is assigning my wireless adapter different IP
addresses. What can I do?
If AutoIP is assigning your wireless adapter different IP addresses, your simplefi will not connect to the PC. AutoIP may assign
your wireless adapter a different IP address if, for example, your
wireless network supports many computers. When you turn off
your computer, a wireless adapter on another computer can take
the IP address previously used by your PC.
You should assign a static IP address to your wireless adapter.
For more information, see Appendix D, Configuring IP Address
Information.
SimpleWare software won’t install
The monitor on your PC must be configured for more than 256
colors for you to be able to install SimpleWare. To set your display to more than 256 colors:
APPENDIX C, TROUBLESHOOTING
66
APPENDIX C
TROUBLESHOOTING
1
2
3
4
5
From the Windows Start menu, select Settings >
Control Panel.
Double-click on the Display icon.
Click on the Settings tab.
Choose more than 256 colors.
Click OK.
Re-insert the SimpleWare CD to launch the installer.
The light on wireless adapter is not green
A green light indicates a working adapter. Check the following:
•
•
•
Ensure the Wireless Adapter is plugged into a USB port on
your PC.
Ensure the Wireless USB Network Adapter is enabled.
Ensure your PC supports USB ports. For more information,
contact your PC vendor.
If the light on your wireless adapter is dark, install your wireless
adapter software. For help on installing the driver software, see
Section 3, Installation.
If the light on your wireless adapter is orange, your wireless
adapter may be disabled (Windows 2000 users only) or you
need to install your wireless adapter driver software. For help
on installing the driver software, see Section 3, Installation.
To re-enable your wireless adapter (Windows 2000 users only):
1
2
3
4
From the Windows Start menu, select Settings >
Control Panel.
Double-click on the Network and Dial-Up Connections
icon.
If your wireless adapter is disabled, the icon for the adapter
is de-highlighted.
To re-enable the wireless adapter, right-click on the icon and
select Enable from the menu.
APPENDIX C, TROUBLESHOOTING
67
APPENDIX C
TROUBLESHOOTING
The Wireless USB Network Adapter is plugged into a USB
port, but the light doesn’t come on.
Make sure you’ve plugged the Wireless USB Network Adapter
into a powered USB port on the back of your PC, or into a powered USB hub (ensure the USB hub is powered by an external
power supply). Some PCs have powered USB ports on the front
of the PC.
USB ports on keyboards are not powered and are not appropriate for the Wireless USB Network Adapter.
Not all my MP3.com songs are being refreshed in Media
Manager. Why?
MP3.com does not permit some songs to be played anywhere
other than from the MP3.com website directly. By design, Media
Manager does not include these songs in the My.MP3.Com
Artists channel.
Media Manager won't let me refresh – Refresh selection is
grayed-out
Media Manager is currently refreshing the channel or playlist. A
refresh request on a specific channel or playlist is not allowed
until a previous refresh of the channel or playlist has completed.
APPENDIX C, TROUBLESHOOTING
68
APPENDIX C
TROUBLESHOOTING
I use a dial-up modem to connect to the Internet. Some
Internet radio streams stop playing every several seconds.
Why?
Your Internet connection may not be fast enough to play that
particular Internet radio station. For example, if your connection
to the Internet is 24,000 bps, you cannot play Internet streams
that require an Internet connection that is faster than 24,000
bps. If you try to play one of these Internet streams, the stream
plays for a few seconds, stops for a few seconds, plays a few
more seconds, and so on. Also, the sound may be garbled.
To display the speed of your dial-up connection, hover your
mouse cursor over the dial-up icon in the Windows System Tray
(icon with two PCs). Windows displays the speed of your dial-up
connection. Note that even if you have a 56k dial-up modem,
the actual speed of your connection depends on the quality of
your connection to the telephone company. The following figure shows a dial-up connection of 24,000 bps on a 56k modem.
Figure C-1
To display the speed required by an Internet stream, use Media
Manager to browse to your featured Internet radio stations.
Review the bit-rate field of the Internet stream you want to hear.
The following figure shows Internet streams in the Live365
Editor’s Picks playlist. If, for example, your dial-up connection
supports 24,000 bps, you will only be able to play streams with
bit-rates of 24kbps, or less. In the sample playlist below,
streams that require 56kbps will be garbled and stop periodically
on your 24,000 bps dial-up modem connection. To play these
higher bit-rate streams, consider a broadband DSL/Cable connection to the Internet.
APPENDIX C, TROUBLESHOOTING
69
APPENDIX C
TROUBLESHOOTING
Internet stream bit-rate
Figure C-2
simplefi display indicates a song is playing, but I can’t hear
the music.
•
•
•
•
•
•
Check the stereo connections and settings.
Ensure your stereo is turned on, the volume is up, and mute
is off.
Ensure simplefi is connected to proper inputs on the back of
the stereo.
Confirm the “source” selected on your stereo corresponds to
the inputs used to connect simplefi. For example, if you
connected simplefi to your CD inputs, ensure your stereo
displays CD as the input source.
Ensure Tape Monitor is turned off on your stereo.
Ensure the Wireless USB Network Adapter light is green.
There are no songs on the simplefi display.
Ensure there is music in Music Library within Media Manager.
APPENDIX C, TROUBLESHOOTING
70
APPENDIX C
TROUBLESHOOTING
320kbps MP3 files sound choppy.
Your PC may not be fast enough to process 320kbps MP3 files.
Re-rip your MP3 files at a lower bit rate, for example, 128kbps.
I can’t play Internet music.
Confirm your PC can access the Internet.
simplefi does not turn on.
Ensure simplefi’s power cord is plugged in. If the simplefi display is still not on, press the green On/Off button on the simplefi remote control.
simplefi remote control doesn’t work.
Ensure the remote control batteries are fresh and installed
correctly. Point the remote control directly at simplefi. To check
the freshness of your batteries, turn your remote control over
and press a button. A red LED should light each time you press
a button on the remote control. The green LED on simplefi also
blinks each time you press a button.
I changed the IP address of my wireless adapter, and simplefi
doesn’t work anymore.
If you change the IP address of your Wireless USB Network
Adapter, you must restart SimpleServe Console. Close
SimpleServe Console. Then, restart SimpleServe Console.
APPENDIX C, TROUBLESHOOTING
71
APPENDIX C
TROUBLESHOOTING
Note that if you change the IP address of your Wireless USB
Network Adapter, you may need to discover your simplefi
again. For information on configuring IP addresses, see
Appendix D, Configuring IP Address Information.
I unplugged my wireless adapter, plugged it back in, and simplefi stopped working.
Restart your PC.
When I clicked add device on the SimpleServe Console, the
music playing on simplefi stopped.
If you attempt to discover simplefi while it is playing, the audio
stream is temporarily disrupted because your PC is attempting
to find another simplefi.
APPENDIX C, TROUBLESHOOTING
72
APPENDIX D
CONFIGURING IP ADDRESS
INFORMATION
Configuring IP Address Information
The installation procedure described in Section 3 assumes default
network settings for IP addresses. Default network settings are sufficient for most installations. The installation procedure is designed so
that you do not need to know anything about wireless networking to
install these products successfully.
However, if you have an existing wireless network, or a more complex network, read this appendix for information on configuring IP
addresses.
AutoIP, DHCP, and Static IP Addresses
simplefi supports the following methods to get an IP address:
•
•
•
DHCP
AutoIP
Manually configure a static IP address
When you install a simplefi and a Wireless USB Network Adapter
with default values, simplefi and the Wireless USB Network Adapter
attempt to get IP addresses from a DHCP server.
If a DHCP server is available on your wireless network, simplefi and
your Wireless USB Network Adapter get IP address information from
the DHCP server. IP addresses for simplefi and the Wireless USB
Network Adapter are determined by the DHCP server.
If a DHCP server is not available, simplefi and your Wireless USB
Network Adapter get IP address information using AutoIP. AutoIP
allots IP addresses in the 169.254.x.x range (subnet mask
255.255.0.0). (AutoIP is the most common method to get IP addresses in home networks.)
Under some circumstances, if the PC and simplefi use AutoIP or
DHCP, the wireless adapter on the PC may be assigned a different IP
address on different days. If this occurs, your PC will no longer be
able to communicate with simplefi.
APPENDIX D, CONFIGURING IP ADDRESS INFORMATION
73
APPENDIX D
CONFIGURING IP ADDRESS
INFORMATION
Why would this occur? Your PC might select a different IP address
for your Wireless USB Network Adapter if, for example, you have
many PCs on your wireless network. When you turn off your PC,
another PC arriving on the network can take the IP address last used
by your PC. Likewise, DHCP may assign a different IP address to
your wireless adapter when you restart Windows.
DHCP and AutoIP do not normally, in practice, assign different IP
addresses to the same network adapter. But, this can occasionally
occur.
To fix this problem, you can do one of two things:
(1) Rediscover your simplefi. For more information, see Section 3,
Installation.
(2) Configure the simplefi IP address, and re-discover the simplefi.
Then, set the IP address of your PC Wireless USB Network
Adapter to a static IP address. The procedure to specify
a static IP address for the PC Wireless USB Network Adapter
follows. For help on configuring the simplefi IP address, see
Set simplefi IP Address below.
Set Static IP Address for Wireless Adapter
To set a static IP address for your Wireless USB Network Adapter,
follow the steps below.
NOTE: The following procedure is similar for all of the supported
operating systems, but the dialog boxes may look slightly different
from the Windows 98SE dialog boxes shown in this installation
procedure.
1
2
Open the Start menu on your PC and select Settings>Control
Panel. Double-click Network icon.
Scroll down until you find a TCP/IP entry for the HomeRF
Adapter. Double-click on the TCP/IP entry.
APPENDIX D, CONFIGURING IP ADDRESS INFORMATION
74
APPENDIX D
CONFIGURING IP ADDRESS
INFORMATION
Figure D-1
3
Enter IP address information for your HomeRF Wireless USB
Network Adapter. The sample screen below shows how to set
the static IP address for your Wireless USB Network Adapter to
169.254.197.68, with Netmask set to 255.255.0.0.
4
Click OK. Repeat the procedure described in Device Discovery
of Section 3, Installation to connect simplefi to your PC.
Figure D-2
APPENDIX D, CONFIGURING IP ADDRESS INFORMATION
75
APPENDIX D
CONFIGURING IP ADDRESS
INFORMATION
Advanced TCP/IP Settings
You will normally never need to modify TCP/IP settings for simplefi.
However, if for example, you use hard-coded IP addresses for your
wireless network, your network has a proxy server, or the IP address
for your wireless adapter changes occasionally (as described earlier
in this appendix), you may want to set your PC and simplefi to use
static IP addresses and configure proxy server settings.
SimpleServe Console enables you to configure the following
advanced TCP/IP settings:
•
•
Dynamic or static IP address settings
Proxy server settings
Set simplefi IP Address
1
To set the IP address of your simplefi, right-click on the simplefi
icon in the SimpleServe Console. Select the Properties menu
item.
2
Click on Network Settings.
3
Enter a range of IP addresses to assign simplefi. SimpleServe
assigns simplefi an IP address from this range during discovery.
Figure D-3
Figure D-4
APPENDIX D, CONFIGURING IP ADDRESS INFORMATION
76
APPENDIX D
CONFIGURING IP ADDRESS
INFORMATION
Figure D-5
4
Click OK. SimpleServe Console transfers the modified IP settings
to simplefi when you discover simplefi again. For help on
discovering simplefi again, see Device Discovery in Section 3,
Installation.
Working With Proxy Servers
1
Your home network does not likely have a proxy server. If your
home does not have a proxy server, you can safely skip this
section. Many companies, however, use proxy servers in their
networks.
2
If you are using simplefi in an environment that has a proxy
server, right-click on the simplefi icon in the SimpleServe
Console. Select the Properties menu item.
Figure D-6
APPENDIX D, CONFIGURING IP ADDRESS INFORMATION
77
APPENDIX D
CONFIGURING IP ADDRESS
INFORMATION
3
Click on Network Settings.
Figure D-7
4
Click Proxy Server Settings tab. Enter proxy server IP address
and other information for the proxy server. SimpleServe supports
None and Basic authentication schemes. For help, ask an IT
specialist in your company.
5
Click OK to save proxy server settings.
Figure D-8
APPENDIX D, CONFIGURING IP ADDRESS INFORMATION
78
APPENDIX D
CONFIGURING IP ADDRESS
INFORMATION
If your network has a proxy server, you will also need to modify
Windows to bypass your proxy server for local IP addresses. To
bypass your proxy server for local IP addresses, follow these steps:
1
2
3
4
5
6
From the Windows Start menu, select Settings > Control Panel.
Double-click on the Internet Options icon.
Click on the Connections tab.
Click LAN Settings….
Select Bypass proxy server for local addresses, and click OK.
Click OK.
APPENDIX D, CONFIGURING IP ADDRESS INFORMATION
79
80
APPENDIX E
SETTING HOMERF SECURITY CODE
The installation procedure described in Section 3, Installation
assumes default settings for HomeRF parameters. Default network
settings are sufficient for most installations. In other words, the
installation procedure is designed so that you do not need to
know anything about wireless networking to install these products
successfully.
However, if you have an existing wireless network or a more complex
network at home, you may need to manually configure the wireless
security code, also known as a network ID, for your wireless adapter.
You do not need to explicitly configure the security code for
simplefi, since simplefi learns and adapts to the security code of
the wireless adapter connected to your PC.
If you’re having a problem with discovering simplefi, your problem
may be related to network settings. For more information, see
Appendix D, Configuring IP Address Information. Also, read
Appendix C, Troubleshooting.
Security Codes – Windows 98SE and Me
Follow the instructions below to manually configure the wireless
security code, also known as a network ID, of the wireless adapter
connected to your PC. The following dialog boxes describe how to
set the security code for Windows 98SE users. Windows Me dialog
boxes are similar. This appendix lists Windows 2000 instructions following the Windows 98SE description.
1
Right-click the Network Neighborhood icon on your desktop.
Select Properties from the drop-down menu.
APPENDIX E, SETTING HOMERF SECURITY CODE
81
APPENDIX E
SETTING HOMERF SECURITY CODE
2
Select the wireless adapter and click Properties.
3
In the wireless adapter properties dialog box, select the
Advanced tab.
Figure E-1
Figure E-2
APPENDIX E, SETTING HOMERF SECURITY CODE
82
APPENDIX E
SETTING HOMERF SECURITY CODE
4
Click Network ID in the Property list and enter a security code
that is appropriate for your wireless network in the Value field.
Click OK.
Figure E-3
Security Codes – Windows 2000
Follow the instructions below to manually configure the security
code, also known as a network ID, of the wireless adapter connected
to your PC. The following dialog boxes describe how to set the
security code for Windows 2000 users.
1
From the Windows Start menu, select Settings > Network and
Dial-Up Connections.
2
Double-click on the Local Area Connection icon corresponding to
your HomeRF Adapter (not your Ethernet card). You’ll be able to
differentiate the two by rolling your mouse over the icon. The
corresponding text designates the icon as either HomeRF or
Ethernet (the actual text depends on the vendor of your
Ethernet adapter).
3
In the Local Area Connection Status dialog box, click Properties.
APPENDIX E, SETTING HOMERF SECURITY CODE
83
APPENDIX E
SETTING HOMERF SECURITY CODE
Figure E-4
4
In the Local Area Connection Properties dialog box,
click Configure.
Figure E-5
APPENDIX E, SETTING HOMERF SECURITY CODE
84
APPENDIX E
SETTING HOMERF SECURITY CODE
5
In the Home RF Adapter Properties dialog box, select the
Advanced tab.
6
Click Network ID in the Property list and enter a security code
that is appropriate for your wireless network in the Value field.
Click OK.
Figure E-6
Figure E-7
APPENDIX E, SETTING HOMERF SECURITY CODE
85
86
APPENDIX F
MANUAL INSTALLATION OF
WIRELESS ADAPTER SOFTWARE
If your PC does not fully support Windows plug and play, Windows
may not automatically display driver installation wizard dialogs when
you plug your Wireless USB Network Adapter into a USB port. If this
happens, you must locate and install the wireless driver files manually.
Guidelines for manually installing the Wireless Adapter drivers follow,
however, be aware that not all of these steps may appear on your
computer exactly as they do here. Use this section as a guideline for
identifying an alternate path to locating and installing the driver software.
First, ensure the Wireless Adapter is plugged into a USB port on
your computer.
1
From the Windows Start menu, select Settings > Control Panel.
Double-click the Add New Hardware Icon.
2
Windows displays an Add New Hardware Wizard. Click Next.
Figure F-1
APPENDIX F, MANUAL INSTALLATION OF WIRELESS ADAPTER SOFTWARE
87
APPENDIX F
MANUAL INSTALLATION OF
WIRELESS ADAPTER SOFTWARE
3
Windows displays a message informing you it’s searching for new
Plug and Play devices. Click Next.
4
If you see HomeRF Adapter in the device window, choose Yes,
the device is in the list and click on HomeRF Adapter. It’s also
possible that the Wireless Adapter won’t appear in the device
window. If you don’t see it, choose No, the device isn’t in the
list and click Next.
Figure F-2
Figure F-3
APPENDIX F, MANUAL INSTALLATION OF WIRELESS ADAPTER SOFTWARE
88
APPENDIX F
MANUAL INSTALLATION OF
WIRELESS ADAPTER SOFTWARE
5
Windows will search for the wireless adapter. Choose Yes
(Recommended) and click Next.
6
Click Next. You will then see a progress bar while Windows is
searching. The process can take a few minutes.
Figure F-4
Figure F-5
APPENDIX F, MANUAL INSTALLATION OF WIRELESS ADAPTER SOFTWARE
89
APPENDIX F
MANUAL INSTALLATION OF
WIRELESS ADAPTER SOFTWARE
7
At this point, Windows will either find the wireless adapter and
allow you to locate driver software for it, or you’ll see the
following dialog box, instructing you to manually locate the
device. Click Next.
8
You’ll be asked to select the type of hardware you want to install.
Scroll down to Network Adapters and click Network Adapters.
Click Next.
Figure F-6
Figure F-7
APPENDIX F, MANUAL INSTALLATION OF WIRELESS ADAPTER SOFTWARE
90
APPENDIX F
MANUAL INSTALLATION OF
WIRELESS ADAPTER SOFTWARE
9
The installation software for the wireless adapter is on the
SimpleWare CD-ROM. Your SimpleWare CD-ROM should already
be in your CD-ROM drive. If it isn’t, insert the SimpleWare
CD-ROM now. Click Have Disk.
Figure F-8
10 A dialog box prompts you to insert the disk and locate the
software files. Click Browse.
Figure F-9
11 Locate the D: Drive to select the SimpleWare CD-ROM.
• Double-click on the Wireless Drivers folder.
• Double-click on the Windows 9x folder. If Windows Me,
select Windows Me folder. If Windows 2000,
Select Windows 2000 folder.
APPENDIX F, MANUAL INSTALLATION OF WIRELESS ADAPTER SOFTWARE
91
APPENDIX F
MANUAL INSTALLATION OF
WIRELESS ADAPTER SOFTWARE
Click OK.
Figure F- 10
12 Windows displays Install From Disk window with the correct
path. Click OK.
Figure F-11
13 Windows locates the wireless adapter driver software on the
SimpleWare CD-ROM. Ensure the Motorola BB160 PC Home
RF Adapter is highlighted. Click OK.
Figure F-12
APPENDIX F, MANUAL INSTALLATION OF WIRELESS ADAPTER SOFTWARE
92
APPENDIX F
MANUAL INSTALLATION OF
WIRELESS ADAPTER SOFTWARE
14 Windows locates the hardware and is ready to install the software
for the wireless adapter. Click Next.
Windows rebuilds the driver information database. You may see a
number of progress indicator boxes as Windows copies files and
builds driver information for the wireless adapter.
Figure F-13
15 Windows copies files to your hard drive to install the driver
software. Windows notifies you when the software is installed.
Click Finish.
Figure F-14
16 Now, proceed to Device Discovery in Section 3, Installation.
APPENDIX F, MANUAL INSTALLATION OF WIRELESS ADAPTER SOFTWARE
93
94
INDEX
A
AC adapter 7
Account Information 48, 53
Activating Online Guide 21
Add Device 18, 32
Add music 35, 42
Add New Hardware 87
Add track 35, 44
Adding Music to Your PC 36
Adding Tracks to a Playlist 43, 44
Adding Tracks to Music Library 42
Advanced Settings, SimpleServe Console 33
Advanced TCP/IP Settings 76
Audio formats 58
Audio player controls 45
Auto-discovery 63
AutoIP 65, 66
AutoStart folder 61
Auxiliary inputs 7
B
Battery Freshness 71
Before You Start 25
Bit rate 36
Bit-rate field 69
Bookmark Songs 47
BounceIt! 52
Browsing Channels 28
Browsing Content While a Track is Playing 29
Browsing Playlists 28
Browsing Tracks 28
C
Configuring IP Address Information 73
AutoIP 73
DHCP 73
DHCP server 73
Hard-coded IP addresses 76
Manually configure a static IP
address 73
Connecting simplefi to your stereo 7
Creating a New Channel 38
Creating a New Playlist 40
Custom channels 38
D
Deleting Channel 39
Deleting Playlist 41
Deleting Track 44
Device Discovery 18
Dial-up modem 69
Discovery mode 8
Downloading From the Internet 37
Drag and drop 42, 43
E
Editing Track Information 44
F
Factory default settings 63
Featured channels 38, 48
H
Headphone Volume 30
Help 4
Hidden Console 32
Home RF Adapter Properties 85
Home RF Security Code 81
HyperTerminal 65
CD inputs 7
CD-ripping 36
Channel name line, simplefi display 28
Channels 48
Channels link in Online Guide 49
Components 5
INDEX
93
INDEX
I
O
Importing a Playlist 40
Installing SimpleWare Software 8
Installing The Wireless Network Adapter 12
Internet Radio Stations 47
Internet stream bit-rate 70
IP addresses 60, 65, 76
Ipconfig 65
Online Guide 32, 47
Online Guide button 35
Options button 35
Organizing Music 37
P
Password 53
Playing music on simplefi 25
Playing Music on Your PC 45
Playlist name line 28
Playlists 26
Plug and play 12, 87
Power 27
Pre-installed custom channel 38
Preferences 33
Preview Track player 35
Proxim HomeRF driver install disk 16
Proxy Server Settings 78
Proxy Servers 77
L
Left pane 35
License Agreement 9
Login 33
M
M3U playlists 40
Manual Installation of Wireless Adapter
Software 87
Media Manager 32, 34, 44
Media Manager audio player 45
Media manager button 37
Menu 27, 29, 30
Monitor settings - 256 colors 66
MP3.com 68
MS-DOS Prompt 65
Music Library 37
Music Library button 35
My Tags 32, 51
R
Range of IP addresses 76
RCA jack 7
Reconfiguring simplefi 61
Refresh button 35
Refreshing Featured Channel Information 50
Remote Control 26
Removing a Track 44
Renaming a Channel 39
Renaming a Playlist 41
Repeat 27, 30
Reseting simplefi 63
Reset switch 7
Restarting SimpleServe 34
Right pane 35
N
Network and Dial-Up Connections 67
network ID 81
Network Settings 76, 78
New Channel text box 38
New Playlist 40
New Playlist button 35
INDEX
94
INDEX
S
U
Search button 45
Search text box 35
Searching for Music in Music Library 45
Security Codes 81
Select button 27
Setting Up simplefi 7
Wireless USB Network Adapter 12
Setup.exe 8
Simplefi display 26
Simplefi messages 59
serial number 18
SimpleServe Console 17, 32
SimpleServe Console Options 33
SimpleServe running on PC? 60
SimpleWare Software 6
SimpleWare Updates 53
Static IP address 65, 74
Stereo receiver 8
Support 49
System Requirements 5, 55
Output Power 55
Radio Data Rate 55
Range 55
Wireless Standard 55
USB port 12
W
Window control buttons 32, 35
Windows Add New Hardware Wizard 13
Windows operating system disk 12
Wireless Drivers 91
Wireless USB Network Adapter 6, 55
T
Tag Information Page 52
TagIt! 27, 51
TagIt! button 51
Tags 48
Tape Monitor 70
TCP/IP entry 74
Top pane 35
Track name line 28
Tracks 26, 42
Troubleshooting 63
Tutorial 20
INDEX
95