1
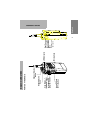
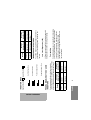
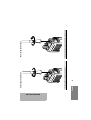
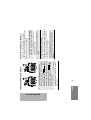
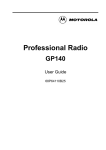
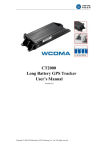
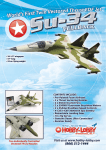
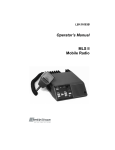
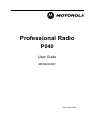
Professional Radio
P040
User Guide
68P66533D01
Issue: April 2002
3
4
4
4
4
4
4
6
6
6
6
6
Battery Information. . . . . . . . . . . . . . . . . . . 7
Battery Care and Tips . . . . . . . . . . . . . . 7
Recycling or Disposal of Batteries . . . . 8
Charging your Battery . . . . . . . . . . . . . . 8
Accessory Information . . . . . . . . . . . . . . . . 9
Attaching the Battery. . . . . . . . . . . . . . . 9
Removing the Battery . . . . . . . . . . . . . . 9
Attaching the Antenna. . . . . . . . . . . . . 10
Getting Started . . . . . . . . . . . . . . . . . . . . . 7
Parts of the Radio . . . . . . . . . . . . . . . . . . .
On-Off/Volume Knob. . . . . . . . . . . . . . .
Channel Selector Knob . . . . . . . . . . . . .
Push-to-Talk (PTT) Button . . . . . . . . . .
Microphone . . . . . . . . . . . . . . . . . . . . . .
LED Indicator . . . . . . . . . . . . . . . . . . . .
Programmable Buttons . . . . . . . . . . . . .
Indicator Tones . . . . . . . . . . . . . . . . . . . . .
Programmable Buttons’ Audio Indicators. .
Improved Audio Features. . . . . . . . . . . . . .
Low Level Expansion (LLE) . . . . . . . . .
Companding . . . . . . . . . . . . . . . . . . . . .
Radio Overview . . . . . . . . . . . . . . . . . . . . 3
CONTENTS
1
English
Starting or Stopping a Scan Operation . . .15
Talkback . . . . . . . . . . . . . . . . . . . . . . . . . .15
Deleting a Nuisance Channel . . . . . . . . . .15
Adding a Deleted Nuisance Channel
back to the Scan List . . . . . . . . . . . . . . . . .16
Prioritization of a Scan List member . . . . .16
Scan . . . . . . . . . . . . . . . . . . . . . . . . . . . . .15
Repeater or Talkaround Mode. . . . . . . . . .14
Setting Tight or Normal Squelch . . . . . . . .14
Setting the Power Level. . . . . . . . . . . . . . .14
Radio Call Information . . . . . . . . . . . . . .14
Removing the Antenna . . . . . . . . . . . . .10
Attaching the Belt Clip . . . . . . . . . . . . .11
Removing the Belt Clip . . . . . . . . . . . . .11
Turning the Radio On or Off . . . . . . . . . . .12
Adjusting the Radio’s Volume . . . . . . . . . .12
Selecting a Radio Channel . . . . . . . . . . . .12
Sending a Call . . . . . . . . . . . . . . . . . . . . . .13
Receiving a Call. . . . . . . . . . . . . . . . . . . . .13
CONTENTS
CONTENTS
English
2
Safety Information . . . . . . . . . . . . . . . . . 17
The products described in this manual may include copyrighted computer
programmes stored in semiconductor memories or other media. Laws in the
United States of America and other countries preserve for Motorola Europe
and Motorola Inc. certain exclusive rights for copyrighted computer
programmes, including the right to copy or reproduce in any form the
copyrighted computer programme. Accordingly, any copyrighted computer
programmes contained in the products described in this manual may not be
copied or reproduced in any manner without the express written permission of
the holders of the rights. Furthermore, the purchase of these products shall not
be deemed to grant either directly or by implication, estoppel, or otherwise, any
licence under the copyrights, patents, or patent applications of the holders of
the rights, except for the normal non-exclusive royalty free licence to use that
arises by operation of the law in the sale of the product.
Computer Software Copyright
Push-to-Talk
(PTT) Button
Side Button 2
(programmable)
Side Button 1
(programmable)
On-Off/Volume
Knob
Channel Selector
Knob
PARTS OF THE RADIO
RADIO OVERVIEW
Microphone
LED Indicator
(Pull down from
top to open)
Dust Cover
covering the
Accessories
Port
3
English
RADIO OVERVIEW
RADIO OVERVIEW
On-Off/Volume Knob
English
4
Radio Call
Continuous Red
Blinking Red
Scan
Blinking Green
Low Battery
Blinking Red when
sending message
LED State/Colour
Basic Features
Low battery level.
Scanning for activity.
Sending message.
Receiving message.
Indication
Provides visual feedback on radio status. The
operation of the indicator depends upon how the
radio has been programmed by your dealer.
LED Indicator
Speak clearly into the microphone when sending a
message.
Microphone
Press and hold down to talk; release it to listen.
Push-to-Talk (PTT) Button
Switches the radio to different channels.
Channel Selector Knob
Turns the radio on or off, and adjusts the radio’s
volume.
Sending message in high power.
Sending message in low power.
Indication
Indication
Battery is fully charged.
Battery is optimally charged.
Battery is half charged.
Low battery level.
Very low battery level.
Check with your dealer for a complete list of the
functions your radio’s programmable buttons
support.
Your radio’s two side buttons can be programmed
by your dealer as short-cut buttons for many of the
radio’s features.
Programmable Buttons
Battery Status
(while pressing PTT)
Blinking Green
Continuous Green
Continuous Orange
Continuous Red
Blinking Red
LED State/Colour
Optional Transmit Battery Status
Indicator
Power Level
Continuous Red
Continuous Green
LED State/Colour
Optional Transmit Power Level Indicator
—
—
—
—
Deletes a nuisance channel while scanning.
Toggles your radio’s transmit power level between High
and Low settings.
Toggles between using a repeater and transmitting
directly to another radio.
Toggles your radio’s squelch level between tight and
normal settings.
Nuisance Channel
Delete
Power Level
Repeater/
Talkaround
Squelch
—
5
Sounds a tone for adjusting the
radio’s volume level.
Starts or stops the Scan operation.
—
Volume Set
English
Monitors the selected channel for
any activity.
Hold Down
Scan
—
• hold down- pressing and holding down the
programmable buttons while checking status
or making adjustments.
Depending on how your radio has been
programmed by your dealer, these functions are
activated EITHER through short press OR long
press, but NOT both.
Short Press/Long Press
Monitor
Button
The table below shows the functions available by
• short press - quickly pressing and releasing
the programmable buttons, or
• long press - pressing and holding the
programmable buttons for a period of time
(programmable by your dealer) before
releasing, or
RADIO OVERVIEW
RADIO OVERVIEW
Negative Indicator Tone
Positive Indicator Tone
Self Test Fail Tone
Self Test Pass Tone
Low pitched tone
6
Radio transmits at
high power
Power
Level
English
Start Scan
operation
Positive
Indicator Tone
Scan
Button
Radio transmits at
low power
Stop Scan
operation
Negative
Indicator Tone
Some programmable keys function as toggles
(alternating between two different choices). These
keys use audio indicators to indicate the change.
PROGRAMMABLE BUTTONS’ AUDIO
INDICATORS
High pitched tone
INDICATOR TONES
Radio uses the
repeater
Radio operates in
normal squelch
Radio operates in
tight squelch
Radio DOES NOT
use the repeater
Negative
Indicator Tone
Positive
Indicator Tone
Companding improves voice quality by compressing
your voice at transmission, and expanding it when
receiving. Companding also reduces extraneous
noise. However, to enjoy this benefit, ALL
transmitting and receiving radios must have this
feature activated.
Companding
LLE improves voice quality by reducing unwanted
background noise when receiving a message.
Low Level Expansion (LLE)
Your radio may be programmed by your dealer to
utilise ONE of the following audio enhancement
features.
IMPROVED AUDIO FEATURES
Repeater/
Talkaround
Squelch
Button
Do not return fully charged batteries to the
charger for an “extra boost”. This action will
significantly reduce cycle life.
Do not leave your radio and battery in the
charger when not charging. Continuous charging
will shorten battery life. (Do not use your charger
as a radio stand.)
For optimum battery life and operation use only
Motorola brand chargers. They were designed to
operate as an integrated energy system.
•
•
•
Charge your new battery overnight (14-16
hours) before using it to obtain maximum
battery capacity and performance.
Charging in non-Motorola equipment may lead
to battery damage and void the battery warranty.
When charging a battery that is attached to the
radio, turn the radio off to ensure a full charge.
The battery should be at about 25°C (room
temperature) whenever possible. Charging a
cold battery (below 10°C) may result in leakage
of electrolyte and ultimately, in failure of the
battery.
•
•
•
•
English
Batteries which have been in storage should be
charged overnight.
•
The following battery tips will help you obtain the
highest performance and longest cycle life from your
Motorola rechargeable battery.
7
New batteries can be stored up to two years
without significant cycle loss. Store new/unused
batteries in a cool dry area.
•
This product is powered by a nickel-cadmium (NiCd)
or a nickel-metal-hydride (NiMH) rechargeable
battery.
Battery Care and Tips
BATTERY INFORMATION
Charging a hot battery (above 35°C) results in
reduced discharge capacity, affecting the
performance of the radio. Motorola rapid-rate
battery chargers contain a temperature-sensing
circuit to ensure that the battery is charged
within these temperature limits.
•
GETTING STARTED
GETTING STARTED
GETTING STARTED
NiCd
English
8
NOTE: Since new batteries or batteries that have
not been used for several months could
prematurely indicate full charge (solid green
LED), charge the batteries for 14 to 16 hours
prior to initial use to achieve optimal
performance.
Place the radio with the battery attached or the
battery alone in the charger. The charger’s LED
indicator will indicate the charging progress.
When the battery level is very low, a blinking red
LED indicator lights up during transmit mode, and
an alert tone sounds. You will need to recharge the
battery before you can continue to use your radio.
Charging your Battery
Motorola endorses and encourages the recycling of
all re-chargeable batteries. Contact your local
Motorola dealer for further information.
At the end of its useful life, the NiCd battery
can be recycled. However, recycling facilities may
not be available in all areas.
Recycling or Disposal of
Batteries
Charger is getting ready to
charge.
Battery is charging.
Battery is 90% charged.
Battery is fully charged.
Flashing Yellow
Red
Flashing Green†
Green
* Remove the battery from charger and use a pencil eraser to
clean the four metal contacts on the bottom of the battery.
Place the battery back into the charger. If the LED indicator
continues to ?ash red, replace the battery.
† A standard battery may require one hour to charge to 90%
capacity.
Battery is unchargeable.
Successful charger power-up.
Status
Flashing Red*
Single flash of Green
LED color
Fit the extensions at the bottom of the battery
into the slots at the bottom of the radio’s
body.
Press the top part of the battery toward the
radio until you hear a click.
1.
2.
1
2
Attaching the Battery
ACCESSORY INFORMATION
9
English
Pull the top part of the battery away from the
radio body.
Slide the battery latches on both sides of the
battery downwards.
2.
3.
Turn off the radio, if it is turned on.
3
1.
2
battery latches
Removing the Battery
GETTING STARTED
GETTING STARTED
English
10
Turn the antenna clockwise to attach it.
Attaching the Antenna
Turn the antenna counter-clockwise to remove it.
Removing the Antenna
1.
2.
Align the grooves of the belt clip with those of
the battery.
Press the belt clip downward until you hear a
click.
1.
2.
Attaching the Belt Clip
11
Slide the belt clip upward to remove it.
English
Use a key to press the belt clip tab away
from the battery.
2
1
belt clip tab
Removing the Belt Clip
GETTING STARTED
GETTING STARTED
12
To turn off the radio, turn the On-Off/Volume
Control knob counter-clockwise, until you
hear a click.
2.
English
Turn the On-Off/Volume Control knob
clockwise to turn on the radio. You will hear
the Self Test Pass Tone (
) and
see a green LED if the radio powers up successfully. If the radio fails its self test, you will
hear the Self Test Fail Tone (
).
Switch off and on again and if fault persists
contact your dealer.
OFF
1.
ON
TURNING THE RADIO ON OR OFF
Turn the Channel Selector knob clockwise or
counter-clockwise until you reach the desired
channel.
Your radio offers 16 channels for easy access to
required conventional channels. Some channels on
your radio may not be programmed. Check with
your dealer for more information.
SELECTING A RADIO CHANNEL
Release the preprogrammed Volume Set
button.
Turn the On-Off/Volume Control knob and
adjust the volume level.
2.
3.
Press and hold the preprogrammed Volume
Set button; you will hear a continuous tone.
1.
If one of the radio side buttons has been
programmed as a Volume Set button by your
dealer, it may be used as follows:
ADJUSTING THE RADIO’S VOLUME
Use the Channel Selector knob to select the
desired channel.
Hold the radio in a vertical position, press the
PTT button, and talk at a distance of about
2.5 to 5 cm (one to two inches) from the
microphone.
Release the PTT button to listen.
2.
3.
4.
Turn your radio on.
Adjust the radio’s volume.
Switch to the desired channel.
If at any time a call comes through, you will
hear the call at the volume level you have
set.
1.
2.
3.
4.
RECEIVING A CALL
Turn your radio on.
1.
SENDING A CALL
13
English
GETTING STARTED
RADIO CALL INFORMATION
English
14
Use this feature to filter out nuisance (unwanted)
calls and/or background noise. However, tightening
squelch could cause calls from remote locations to
be filtered out as well. In this case, normal squelch
may be more desirable.
SETTING TIGHT OR NORMAL SQUELCH
Press the Repeater/Talkaround button (only
available if programmed by your dealer) to toggle
between the two modes. A positive indicator tone
indicates that the radio is in talkaround mode, while
a negative indicator tone indicates that the radio is
in repeater mode.
—or—
• your radio is out of the repeater’s range but
within communicating distance of another
radio.
Talkaround Mode enables you to communicate with
another radio when either:
• the repeater is not operating
REPEATER OR TALKAROUND MODE
RADIO CALL INFORMATION
Press the Power Level button (only available if
programmed by your dealer) to toggle between low
and high transmit power level. A positive indicator
tone indicates that the radio is in high power mode,
while a negative indicator tone indicates that the
radio is in low power mode.
Your radio has a predefined transmit power level
that can be changed.
• High power allows the radio to transmit over
greater distances.
• Low power conserves the battery’s charge.
SETTING THE POWER LEVEL
Press the Squelch button (only available if
programmed by your dealer) to toggle between tight
and normal squelch. A positive indicator tone
indicates that the radio is operating in tight squelch,
while a negative indicator tone indicates that the
radio is operating in normal squelch.
NOTE: The LED indicator will blink (green) during a
scan operation.
2. Press the preprogrammed Scan button again
to stop the scan operation. You will hear a
negative indicator tone.
1. Press the Scan button (only available if
programmed by your dealer) to start a scan
operation. You will hear a positive indicator
tone.
To start or stop a scan operation:
STARTING OR STOPPING A SCAN
OPERATION
Once the radio’s scan operation is activated and the
radio detects a call coming through a channel in its
scan list, it switches to that channel for you to
receive the call.
You can monitor several channels in order to
receive any call that is transmitted on any of these
channels.
SCAN
15
English
NOTE: You cannot perform a Nuisance Channel
Delete on a priority channel or if there is only
one remaining channel in the scan list.
2. Release the Nuisance Channel Delete
button. The nuisance channel is deleted.
1. While the radio is on the Nuisance Channel,
press the Nuisance Channel Delete button
(only available if programmed by your dealer)
until you hear a tone.
If a channel continually generates unwanted calls or
noise (a “nuisance” Channel), you can temporarily
remove it from the scan list by performing a
Nuisance Channel Delete operation.
DELETING A NUISANCE CHANNEL
If the programmable Talkback option is set, you can
respond to any calls received during the scan
operation by pressing the PTT before the
programmed hang-time ends. Check with your
dealer for details.
TALKBACK
SCAN
SCAN
English
16
You may want your radio to check a particular
channel more frequently for calls. Prioritization of
scan list members is done by your dealer using the
Customer Programming Software. Check with your
dealer for details.
PRIORITIZATION OF A SCAN LIST
MEMBER
2. Press the Scan button again to re-start the
scan operation. The Deleted Nuisance
Channel is reinstated to the scan list.
1. Press the Scan button to stop the scan
operation.
ADDING A DELETED NUISANCE CHANNEL
BACK TO THE SCAN LIST
Ch2➠Ch1➠Ch2➠Ch3➠
Ch2➠Ch4➠Ch2➠...Ch1
Ch1➠Ch2➠Ch3➠
Ch4➠...Ch1
Scanning Sequence
Even though your radio has switched to a nonpriority channel, your radio will still check for activity
on the priority channel. If activity is detected the
radio will switch to the priority channel.
Channel 2
None specified
Priority Channel
Note: Before using this radio, refer to Important
Safety and General Information contained in
the separate booklet 68P64117B25_
enclosed with your radio.
SAFETY INFORMATION
17
English
SAFETY INFORMATION
NOTES
English
NOTES
18