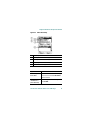
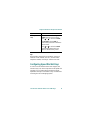
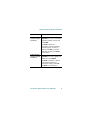
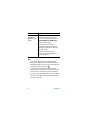
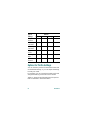
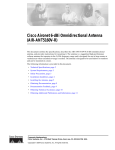
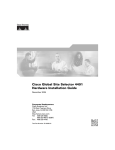
1
Phone Guide
Cisco Wireless
IP Phone 7920 for
Cisco CallManager
INCLUDING LICENSE AND WARRANTY
Corporate Headquarters
Cisco Systems, Inc.
170 West Tasman Drive
San Jose, CA 95134-1706 USA
http://www.cisco.com
Tel: 408 526-4000
800 553-NETS (6387)
Fax: 408 526-4100
Customer Order Number: DOC-7814564=
Text Part Number: 78-14564-03
CCSP, the Cisco Square Bridge logo, Cisco Unity, Follow Me Browsing,
FormShare, and StackWise are trademarks of Cisco Systems, Inc.;
Changing the Way We Work, Live, Play, and Learn, and iQuick Study are
service marks of Cisco Systems, Inc.; and Aironet, ASIST, BPX, Catalyst,
CCDA, CCDP, CCIE, CCIP, CCNA, CCNP, Cisco, the Cisco Certified
Internetwork Expert logo, Cisco IOS, Cisco Press, Cisco Systems, Cisco
Systems Capital, the Cisco Systems logo, Empowering the Internet
Generation, Enterprise/Solver, EtherChannel, EtherFast, EtherSwitch, Fast
Step, GigaDrive, GigaStack, HomeLink, Internet Quotient, IOS, IP/TV, iQ
Expertise, the iQ logo, iQ Net Readiness Scorecard, LightStream, Linksys,
MeetingPlace, MGX, the Networkers logo, Networking Academy,
Network Registrar, Packet, PIX, Post-Routing, Pre-Routing, ProConnect,
RateMUX, Registrar, ScriptShare, SlideCast, SMARTnet, StrataView Plus,
SwitchProbe, TeleRouter, The Fastest Way to Increase Your Internet
Quotient, TransPath, and VCO are registered trademarks of Cisco
Systems, Inc. and/or its affiliates in the United States and certain other
countries.
All other trademarks mentioned in this document or Website are the
property of their respective owners. The use of the word partner does not
imply a partnership relationship between Cisco and any other company.
(0406R)
Cisco Wireless IP Phone 7920 for Cisco CallManager
Copyright © 2004 Cisco Systems, Inc. All rights reserved.
Contents
CHAPTER
1
Getting Started 1
How to Use this Guide 2
Safety and Performance Information 4
Battery Safety Notices 6
Accessories for the Cisco Wireless IP Phone
7920 9
Installing the Battery 10
Charging the Phone Battery 12
CHAPTER
2
Overview of the Cisco Wireless
IP Phone 7920 15
Powering On the Phone 18
Main Screen and Display Indicators 19
Shortcut Keys for Phone Functions 20
Document Conventions 22
Using the Phone Menus 23
Setting the LEAP Username and Password 24
Setting the Username or Password 24
Entering and Editing Text 25
Cisco Wireless IP Phone 7920 for Cisco CallManager
iii
CHAPTER
3
Basic Call Handling 27
Placing Calls 27
Answering and Ending Calls 29
Muting Calls 29
Adjusting the Speaker Volume 30
Placing Calls on Hold 31
Transferring Calls 32
Making Conference Calls 33
Making Meet-Me Conference Calls 34
Forwarding Your Calls to Another Number 35
CHAPTER
4
Using Advanced Call Features 37
Parking and Retrieving Parked Calls 37
Redirecting a Ringing Call to Your Phone By Using
Call PickUp 38
Understanding Shared Lines 39
CHAPTER
5
Using the Phone Book and
Speed Dial Features 41
Using the Phone Book 41
Adding or Changing Entries in the Phone Book 42
Configuring Speed Dial Hot Keys 45
CHAPTER
6
Using Voice Messaging and
Call History Logs 49
Playing Voice Messages 49
Viewing and Placing Calls from the Call History
Menu 50
iv
78-14564-03
CHAPTER
7
Using and Changing Profiles 53
Options for Profile Settings 54
Configuring Profiles 55
CHAPTER
8
Customizing Phone Settings and
Viewing Phone Status 59
Change Phone Settings 59
Changing Ring Tone Settings 60
Changing Phone Display Settings 61
Changing Phone Access Settings 62
Viewing Phone Status 64
Cisco One-Year Limited Hardware Warranty
Terms 65
Cisco Wireless IP Phone 7920 for Cisco CallManager
v
vi
78-14564-03
CH A P T E R
1
Getting Started
Before using your Cisco Wireless IP Phone 7920,
make sure that the following items are in the box:
•
Cisco Wireless IP Phone 7920
•
Standard battery
•
Power supply
•
Cisco Wireless IP Phone 7920 Guide
•
Regulatory Compliance and Safety Information
for the Cisco Wireless IP Phone 7920
•
Cisco Wireless IP Phone 7920 Accessory Guide
Inform your system administrator or supplier if any
items are missing.
Note
The radio frequency (RF) for this phone is
configured for a specific regulatory domain.
If you use this phone outside of its regulatory
domain, the phone will not function
properly, and you might violate local
regulations.
Cisco Wireless IP Phone 7920 for Cisco CallManager
1
How to Use this Guide
This guide provides you with an overview of the
features that are available on your phone. For
information about common tasks, refer to the
following table. Contact your system administrator if
you have problems or need more information about
your phone.
If you want to...
Then...
Review safety
information
See the “Safety and Performance
Information” section on page 4.
Install the battery
See the “Installing the Battery”
section on page 10.
Charge the battery
See the “Charging the Phone
Battery” section on page 12.
Use your phone
Start with the “Overview of the
Cisco Wireless IP Phone 7920”
section on page 15.
Set LEAP password
See the “Setting LEAP Password”
section on page 24.
Understand the
phone screen
See the “Main Screen and Display
Indicators” section on page 19.
Make calls
See the “Placing Calls” section on
page 27.
Change the
speaker volume
See the “Adjusting the Speaker
Volume” section on page 30.
2
78-14564-03
Getting Started
If you want to...
Then...
Put calls on hold
See the “Placing Calls on Hold”
section on page 31.
Transfer calls
See the “Transferring Calls”
section on page 32.
Mute calls
See the “Muting Calls” section on
page 29.
Make conference
calls
See the “Making Conference
Calls” section on page 33.
Listen to voice
messages
See the “Playing Voice Messages”
section on page 49.
Set up speed dial
See the “Configuring Speed Dial
Hot Keys” section on page 45.
Lock and unlock
the phone
See the “Changing Phone Access
Settings” section on page 62
Choose ring types
for different
conditions
See the “Configuring Profiles”
section on page 55.
Set up a personal
phone book
See the “Using the Phone Book”
section on page 41.
Change ring tones
See the “Changing Ring Tone
Settings” section on page 60.
Change phone
display settings
See the “Changing Phone Display
Settings” section on page 61.
Get information
about phone
accessories
See the “Accessories for the Cisco
Wireless IP Phone 7920” section
on page 9.
Cisco Wireless IP Phone 7920 for Cisco CallManager
3
Safety and Performance Information
Before installing and using your phone Cisco Wireless
IP Phone 7920 read the following safety notices.
Warning
This warning symbol means danger. You
are in a situation that could cause bodily
injury. Before you work on any equipment,
be aware of the hazards involved with
electrical circuitry and be familiar with
standard practices for preventing
accidents. Use the statement number
provided at the end of each warning to
locate its translation in the translated
safety warnings that accompanied this
device.
Warning
Read the installation instructions before
connecting the system to the power
source.
Warning
This equipment will not be able to access
emergency services during a power
outage because of reliance on utility
power for normal operation. Alternative
arrangements should be made for access
to emergency services. Access to
4
78-14564-03
Getting Started
emergency services can be affected by
any call-barring function of this
equipment.
Warning
The use of the Cisco Wireless IP
Phone 7920 in hazardous environments
such as areas where high levels of
explosive gas may be present is not
recommended. Check with the site safety
engineer before using any type of wireless
device in such an environment.
Warning
The plug-socket combination must be
accessible at all times, because it serves
as the main disconnecting device.
Warning
This product requires short-circuit
(overcurrent) protection, to be provided as
part of the building installation. Install
only in accordance with national and
local wiring regulations.
Cisco Wireless IP Phone 7920 for Cisco CallManager
5
Battery Safety Notices
These battery safety notices apply to the batteries that
are approved by the Cisco Wireless IP Phone 7920
manufacturer.
Warning
There is the danger of explosion if the
battery is replaced incorrectly. Replace
the battery only with the same or
equivalent type recommended by the
manufacturer. Dispose of used batteries
according to the manufacturer’s
instructions.
Warning
Do not dispose of the battery pack in fire or
water. The battery may explode if placed
in the fire.
Caution The battery pack is intended for use only
with this device.
Caution Do not disassemble, crush, puncture, or
incinerate the battery pack.
6
78-14564-03
Getting Started
Caution To avoid risk of fire, burns, or damage to
your battery pack, do not allow a metal
object to touch the battery contacts.
Caution Handle a damaged or leaking battery with
extreme care. If you come in contact with
the electrolyte, wash the exposed area
with soap and water. If the electrolyte has
come in contact with the eye, flush the eye
with water for 15 minutes and seek
medical attention.
Caution Do not charge the battery pack if the
ambient temperature exceeds 104 degrees
Fahrenheit (40 degrees Celsius).
Caution Do not expose the battery pack to high
storage temperatures (above 140 degrees
Fahrenheit, 60 degrees Celsius).
Cisco Wireless IP Phone 7920 for Cisco CallManager
7
Caution When discarding a battery pack, contact
your local waste disposal provider
regarding local restrictions on the disposal
or recycling of batteries.
Caution To obtain a replacement battery, contact
your local dealer. Use only the batteries
that have a Cisco part number.
Standard battery—CP-BATT-7920-STD
Extended use battery—CP-BATT-7920-EXT
Caution Only use the Cisco power supply that was
provided with your phone. If you need to
replace your power supply, refer to the list of
Cisco part numbers.
North America—CP-PWR-7920-NA
Central Europe—CP-PWR-7920-CE
United Kingdom—CP-PWR-7920-UK
China—CP-PWR-7920-CN
Japan—CP-PWR-7920-JP
To see translations of the warnings that appear in this
publication, refer to the Regulatory Compliance and
Safety Information for the Cisco Wireless
IP Phone 7920 document that accompanied this
product.
8
78-14564-03
Getting Started
Accessories for the Cisco Wireless
IP Phone 7920
The following phone accessories are available for
your phone:
•
Standard and extended batteries
•
Power supplies for various regions
•
Desktop charger
•
Standard wired earphone
•
Carrying cases
For a complete list of accessories, refer to the
Cisco Wireless IP Phone 7920 Accessory Guide that is
included in the phone box.
Cisco Wireless IP Phone 7920 for Cisco CallManager
9
Installing the Battery
You must install and charge the battery before you
can use the Cisco Wireless IP Phone 7920. To install
or remove the battery, follow these steps.
1.
To install the battery, insert the battery catches
(as shown in Figure 1-1) in the corresponding
slots at the bottom of the Cisco Wireless
IP Phone 7920. Make sure that the metal
contacts on the battery and the phone are facing
each other.
2.
Press the battery to the body of the phone until it
locks into place.
3.
To remove the battery, press down on the locking
catch, then lift and remove the battery.
10
78-14564-03
Getting Started
Figure 1-1 Installing and Removing the Battery
79675
1
3
2
2
1
Locking catch—Press to release the battery.
2
Catches—Insert these into the slots near the
bottom of the phone at battery installation.
3
Metal contact—Match the contact on the
battery to the contact on the phone.
Cisco Wireless IP Phone 7920 for Cisco CallManager
11
Charging the Phone Battery
The Cisco Wireless IP Phone 7920 is powered by a
rechargeable battery. To charge the battery, follow
these steps:
1.
Connect the cable from the power supply to the
outlet in the phone.
2.
Connect the power supply to an AC wall outlet as
shown in Figure 1-2.
If the phone is turned off, the screen displays the
message, “Battery Charging.” When the battery
is charged, “Charging Complete” displays.
If the phone is turned on, the battery indicator
bar blinks and displays the current power level.
When the battery is charged, the indicator bar
stops blinking.
3.
12
When the battery is fully charged, disconnect the
charger from the phone, and unplug the power
cord from the AC wall outlet.
78-14564-03
Getting Started
Figure 1-2 Charging the Phone Battery
3
DE
2
AB
1
M
5
JK
4
G
W
TU
7
XY
Z
#
V
0
79
20
79676
P
S
QR
NO
9
L
8
HI
F
6
C
Tips
•
The phone detects when the battery power level
is low and displays the warning message,
“Battery Low” with the warning tone specified in
your profile.
Cisco Wireless IP Phone 7920 for Cisco CallManager
13
•
The standard battery requires about 3.5 hours to
become fully charged and provides up to 3.5
hours of active service time or 21 hours of
standby time.
•
The extended battery provides up to 4.25 hours
of active service time or 30 hours of standby time.
The battery becomes fully charged in about 4.5
hours. For more information about charging the
battery, refer to the “Desktop Charger” section in
the Cisco Wireless IP Phone 7920 Accessory
Guide.
14
78-14564-03
CH A P T E R
2
Overview of the
Cisco Wireless IP Phone 7920
The Cisco Wireless IP Phone 7920 provides the
following features:
•
Wireless access to your corporate phone
extension and phone services
•
Multiline appearances
•
Up to eight speed dial hot keys
•
Caller ID for incoming calls
•
Call handling features such as forward, transfer,
hold, call park, conference, call pickup, and
group pickup
•
Softkey access to menus and your personal
phone book
•
Choice of profiles for personal use
Figure 2-1 on page 16 shows the Cisco Wireless
IP Phone 7920. The callout table describes the
functions of the keys on the phone.
Cisco Wireless IP Phone 7920 for Cisco CallManager
15
Figure 2-1 Cisco Wireless IP Phone 7920
1
1
5
2
6
1
3
2
3
DEF
ABC
4
GHI
5
6
MNO
JKL
7
PQRS
8
9
WXYZ
4
16
0
#
7
7920
74962
TUV
78-14564-03
Overview of the Cisco Wireless IP Phone 7920
Left and right softkeys—Activates the
item in the label above the softkey.
1
or
Answer/Send (green) key—Answers a
call or dials a number.
2
3
1
Number keys (0-9)—Use these to enter
numbers and characters.
2
Number keys (2-9)—Use these to
activate Speed Dial hot keys.
ABC
Asterisk (*) key—Toggles between ring
and vibrate mode.
4
Toggles between upper and lower case.
See the “Entering and Editing Text”
section on page 25.
5
Arrow key—Moves from one function
to another. This guide uses these
directional arrows
,
, , or .
6
Power/End (red) key—Turns the phone
on or off, silences a ringing call, or ends
a connected call. See the “Answering
and Ending Calls” section on page 29.
7
#
Pound (#) key—Toggles between
locking and unlocking the keypad.
Allows you to access special characters
when you are entering text.
Cisco Wireless IP Phone 7920 for Cisco CallManager
17
Powering On the Phone
To turn the phone on, press and hold the
key for
two to three seconds. The phone authenticates, then
associates with a wireless access point, and connects
to the IP telephony network. In a Cisco Light
Extensible Authentication Protocol (LEAP)
environment, you might have to set the LEAP
password. See the “Setting the LEAP Username and
Password” section on page 24 for more information.
After connecting to the network, the phone displays
the main screen, as shown in Figure 2-2. The phone is
in standby mode and is ready to place or receive calls.
The signal icon in the upper right corner shows the
strength of the signal between the access point and
your phone. Your phone must have an adequate signal
before you can place or receive calls. The icon displays
six vertical bars for a strong signal. If the icon displays
fewer than three bars, the signal is weak.
Tips
•
When the phone receives a weak signal, the
phone displays this warning message, “Weak
signal detected” and sends a warning tone or
vibration as specified in your active profile. See
the “Configuring Profiles” section on page 55 for
more information.
•
To secure your phone, you can activate a phone
lock password. See the “Changing Phone Access
Settings” section on page 62 for more
information.
18
78-14564-03
Overview of the Cisco Wireless IP Phone 7920
Main Screen and Display Indicators
Figure 2-2 shows the icons that display in the main
screen in standby mode.
Figure 2-2 Main Screen
1
Battery icon—Shows level of charge in battery
2
Vibration icon—Indicates vibration mode
3
Key lock icon—Indicates keypad is locked
4
Signal icon—Shows degree of signal strength
5
Extension numbers—Identify each phone line
6
Right softkey label—Displays the idle softkey
(PhBook) or, during a call, displays a feature
7
Left softkey label—Displays Menu or a feature
option during a call
8
Welcome message—Shows modifiable message
Cisco Wireless IP Phone 7920 for Cisco CallManager
19
Shortcut Keys for Phone Functions
The phone keypad provides the following shortcuts to
frequently used functions.
Shortcut
Key
Function
#
Notes
Locks or
unlocks the
phone
keypad
Press and hold the # key.
The
icon displays at the
top of the Main screen.
Toggles
between
ringing and
vibrating
mode
Press and hold the
key.
The screen displays
“Vibration On” and the
icon appears at the top. The
phone does not ring in
vibrating mode.
Press and hold the # key to
toggle key lock off. The
screen displays the “Keylock
Off?” prompt, then press
OK. The
icon
disappears.
To switch back to the ring
mode, press and hold the
key. The screen displays
“Vibration Off,” and the
icon disappears.
The default setting is “ring
mode.”
20
78-14564-03
Overview of the Cisco Wireless IP Phone 7920
Shortcut
Key
Function
1
2
ABC
2–9
Notes
Accesses
voice
messaging
Press and release the 1 key.
The phone connects to your
voice messaging system.
Accesses
the speaker
volume
adjustment
Press and release the
arrow on the navigation key
to access the speaker volume
adjustment screen. Increase
the volume by pressing or
decrease the volume by
pressing .
Activates
the speed
dial
number
Press and hold one of the
numeric keys (2–9) for the
speed dial number that you
want to use.
Tips
•
To make the phone vibrate and ring, use the
Profiles menu. See the “Options for Profile
Settings” section on page 54 for information.
•
To access the volume adjustment when you are on
line 2, you must press
twice.
Related Topics
•
Playing Voice Messages, page 49
•
Adjusting the Speaker Volume, page 30
•
Configuring Speed Dial Hot Keys, page 45
Cisco Wireless IP Phone 7920 for Cisco CallManager
21
Document Conventions
To simplify the instructions for using phone features
and for changing phone settings, this guide uses the
following conventions and terms.
Action Keys
Using
or
softkeys
with labels
Navigation Instructions in This Guide
When you must press the softkey for a
menu, feature, or action label, this
guide states: Press (softkey label).
Example: Press PhBook
Using the
To move left or right between menu
or arrows tabs or softkey labels, this guide states:
Use
or to switch to (item name).
Example: Use
or to switch to the
Directory
Using the
To move up or down between menu
or
arrows options or list items, this guide states:
Scroll to (item name).
Using the
“Select”
softkey
Example: Scroll to Speed Dial
When you must press the “Select”
softkey to use a menu option or item
that you have highlighted, this guide
states: Select (item name).
Example: Select Speed Dial
Using menus To advance through several menu
and options options, the guide states: Choose Menu
> (menu option) > (menu option)
Example: Choose Menu > Directory >
Phone Book > Speed Dial
22
78-14564-03
Overview of the Cisco Wireless IP Phone 7920
Using the Phone Menus
The phone menus provide access to phone features
and settings. When you press Menu, the name of the
first menu displays on your phone screen with a set of
overlapping tabs for the other phone menus.
To access a specific menu, press
or until you see
the desired menu name, such as Directory. Press Select
(by using
). Use
or
to scroll between the
menu options.
To choose a menu option, such as Speed Dial in the
Directory menu, scroll to Speed Dial and press Select.
This table lists reference information for the phone
menus.
Menu
Section in Phone Guide
Directory
“Using the Phone Book and
Speed Dial Features” section on
page 41.
Messages
“Playing Voice Messages”
section on page 49.
Call History
“Viewing and Placing Calls
from the Call History Menu”
section on page 50.
Profiles
“Using and Changing Profiles”
section on page 53.
Services
This menu is not available.
Cisco Wireless IP Phone 7920 for Cisco CallManager
23
Menu
Section in Phone Guide
Phone Settings
“Customizing Phone Settings
and Viewing Phone Status”
section on page 59.
Network Config
“Setting the LEAP Username
and Password” section on
page 24.
Your system administrator can
provide you with information
about network configuration
settings.
Setting the LEAP Username and
Password
When powering on your phone for the first time, you
might need to set your LEAP user name and password.
Your administrator can provide LEAP information.
You must access the Network Configuration menu
and navigate to the 802.11b Configuration options.
Use the following steps to set your username and
password.
Setting the Username or Password
1.
Press Menu, then press
or until you see the
Network Config menu, and press Select.
2.
Scroll to 802.11b Configuration and press Select.
3.
Scroll to LEAP and press Select.
24
78-14564-03
Overview of the Cisco Wireless IP Phone 7920
4.
Scroll to Username or Password and press Select.
5.
Press Edit and enter your username or password.
See the “Entering and Editing Text” section on
page 25, for assistance.
Note
6.
The LEAP password entry can be up to
32 characters.
Press OK to confirm the changes, then press Back
several times to return to the main screen.
Entering and Editing Text
You can enter characters, numbers, and special
characters for passwords and phone book entries.
When you press a numeric key on the keypad, each
press moves to another character choice.
If you want to...
Then...
Enter characters
Press the numeric key once to
enter the first character. Press it
twice to enter the second
character or press it three times to
enter the third character.
Enter numbers
Press the numeric key four times
to enter the number.
Cisco Wireless IP Phone 7920 for Cisco CallManager
25
If you want to...
Then...
Delete the last
character
Press Clear once to delete the last
character or number in the string.
Delete the entire
string
Press and hold Clear to delete the
entire text or number string.
Use upper case
characters
Press
to switch between
uppercase and lowercase.
or
appears on the right corner
of the screen to indicate the case.
Enter a space
Press or
to enter a space
between characters.
Enter special
characters and
symbols
Press # . Doing so displays the
symbol table, as shown in
Figure 2-3. Use
,
, , or
to select the desired symbol . Press
Use to insert the symbol into text.
Cancel editing
mode
Press Back as needed to return to
the menu option or main screen.
Figure 2-3 Symbol Table
26
78-14564-03
CH A P T E R
3
Basic Call Handling
Basic call-handling tasks such as placing, answering,
transferring, and conferencing calls are available to
most phone users.
Placing Calls
If you want to...
Then...
Dial a phone
number
Enter the phone number using the
numerical keys.
Delete the last digit
dialed
Press Clear to delete the last
dialed digit.
To delete the entire dialed
number, press and hold Clear.
Place the call
After dialing, press
to place your call.
(green key)
Place the call on a
secondary line
Before or after dialing the number,
press
to change to another line
and press
to make the call.
Redial the last
dialed number
Press to switch to Redial, then
press Redial to make the call.
Cisco Wireless IP Phone 7920 for Cisco CallManager
27
If you want to...
Then...
Redial a number
from the list of
previously placed
calls
Press
to display the list. Scroll
to the desired phone number and
press
to make the call.
Dial a phone
number from your
phone book
Press PhBook and scroll to the
desired entry. Press
to dial the
number.
The previously placed calls list
contains 10 records.
See the “Using the Phone Book”
section on page 41 for more
information.
Speed dial a phone
number using a
Speed Dial hot key
Press and hold 2 (2-9) for the
Speed Dial number that you want
to use. The phone displays and
dials the number stored for that
hot key.
ABC
See the “Configuring Speed Dial
Hot Keys” section on page 45.
Place a call when
another call is
active
Press Hold to hold the active call,
then press or to switch to
New Call and press it. Dial,
redial, or speed dial a number.
Tips
•
If you make a mistake while entering a phone
number, press Clear to erase one or more digits.
•
To redial the last number, you can also press
two times.
28
78-14564-03
Basic Call Handling
Answering and Ending Calls
If you want to...
Then...
Answer a call
Press and release
(green key) to
connect to the incoming call.
Silence the ring
for an incoming
call
Press
(red key) to silence the
ringing. The call continues silently,
then forwards to the no answer
target, such as voice messaging or
another phone.
End the call
Choose EndCall or
hang up.
(red key) to
Muting Calls
To turn off the microphone on your phone, you can
use the Mute feature.
If you want to...
Then...
Mute the call
During a call, press MuteOn. The
label changes to MuteOff.
Cancel the mute
Press MuteOff. The label changes
to MuteOn.
Cisco Wireless IP Phone 7920 for Cisco CallManager
29
Adjusting the Speaker Volume
If you want to...
Then...
Change the volume
during a call
Press
to adjust the speaker
volume for a call on line 1. Press
twice for a call on line 2.
Change the volume
for your calls
Press or until you see Volume
and press it to start adjusting the
speaker volume.
Adjust the volume
Increase the volume by pressing
or decrease the volume by
pressing as shown in
Figure 3-1. Volume setting
remains until you power off the
phone.
Tip
To maintain the speaker volume adjustment after
powering off the phone, see the “Change the speaker
volume for the active profile” section on page 57.
Figure 3-1 Adjusting the Speaker Volume
30
78-14564-03
Basic Call Handling
Placing Calls on Hold
You can have only one active call at a time, so you
must place calls on hold while you answer another
call.
If you want to...
Then...
Place a call on
hold
During a connected call, press
Hold. The label changes to
Resume.
Resume a held call
Press Resume to reconnect to a
holding call.
Choose between
two connected
calls
Scroll between different calls that
are displayed on the screen. See
Figure 3-1.
Tip
Avoid putting a conference call on Hold because
activating Hold usually generates music.
Cisco Wireless IP Phone 7920 for Cisco CallManager
31
Transferring Calls
You can transfer a connected caller to another party
by using the Transfer feature. The target is the number
that receives the transferred call.
If you want to...
Then...
Transfer a call
without talking to
the transfer
recipient
During a call, press or to
switch to Trnsfer and press it.
Enter the target phone number.
When you hear the call ringing,
press or , then press Trnsfer
again to complete the transfer
operation.
Talk to the transfer
recipient before
transferring the
call
During a call, press or to
switch to Trnsfer and press it.
Enter the target phone number
and wait for the call recipient to
answer. If the recipient accepts the
call, press or then press
Trnsfer again.
If the recipient refuses the call,
press Resume to return to the
original call.
32
78-14564-03
Basic Call Handling
Making Conference Calls
Conference calling allows from three to sixteen
parties to participate simultaneously in a call. Your
Cisco IP Phone supports several types of conference
calls depending on your configuration. The softkeys
identify which methods are available on your phone:
•
Confrn—To establish standard conferences by
calling each participant. Standard conference
calling is available on most phones.
•
Meet-Me—To host a conference requiring that
participants call an established number at a
specific time. Your system administrator must
configure this special feature for you.
If you want to...
Then...
Set up a standard
During a call, press
or
to
conference call by switch to Confrn. To add another
calling participants party to the call, press Confrn
(press or to find softkey) and
enter the participant’s phone
number.
After the call connects and you
have spoken to the participant,
press Confrn again to add the
party to your conference call.
Follow this procedure to add each
participant to the conference call.
Cisco Wireless IP Phone 7920 for Cisco CallManager
33
If you want to...
Then...
Drop the last
participant added
to the conference
During a conference call, press
or to switch to RmLstC and
press the softkey.
You can only remove participants
if you initiated the conference
call.
End a standard
conference call
Choose EndCall or
conference call.
to end the
Tip
The number of parties that you can add to a
conference call is set by your system administrator.
Making Meet-Me Conference Calls
A Meet-Me conference allows participants to dial a
Meet-Me conference number at a pre-determined time
to join the conference call.
If you want to...
Then...
Establish a
Meet-Me
conference
Contact your system
administrator for the Meet-Me
conference number.
Press
or
to switch to
MeetMe. Press MeetMe and dial
the Meet-Me conference number.
34
78-14564-03
Basic Call Handling
If you want to...
Then...
Connect to a
Meet-Me
conference call
Dial the Meet-Me conference
number provided by the
conference initiator.
You are connected to the
conference after the conference
initiator has dialed in and
established the conference.
Tips
•
A Meet-Me conference call requires a special
conference number that your system
administrator preconfigures for this purpose.
•
You do not need to press Confrn to connect to a
Meet-Me conference call.
Forwarding Your Calls to Another
Number
You can use the Call Forward All feature to redirect
your calls to any phone number, although your system
administrator might restrict call forwarding to phone
numbers within your company.
Cisco Wireless IP Phone 7920 for Cisco CallManager
35
If you want to...
Then...
Set up call
forwarding on your
primary line
Press or to switch to
CFwdAll. Press CFwdAll and
enter a target extension or phone
number.
The screen displays “Forwarded
to (target number).”
Cancel call
forwarding on your
primary line
Press CFwdAll.
Set up or cancel
call forwarding for
any line
Log in to your IP Phone User
Options web page and choose
your Cisco 7920 device. Choose
Forward all calls... from the main
menu.
The “Forwarded to” message
disappears.
You can set up or cancel call
forwarding for each line on your
phone. Refer to Customizing Your
Cisco IP Phone on the Web for
more information.
Tips
•
Enter the Call Forward All target number exactly
as you would dial it, including any access codes
or area codes.
•
You must configure call forwarding for each line
on your phone.
36
78-14564-03
CH A P T E R
4
Using Advanced Call Features
Advanced call handling tasks require access to special
features. Your system administrator might configure
these features for your phone depending on your
call-handling needs and work environment.
Parking and Retrieving Parked Calls
You can use the Call Park feature to store a connected
call in the Cisco CallManager system, then you or a
co-worker can retrieve the parked call from another
phone in a conference room or in a co-worker’s office.
If you want to...
Then...
Store an active call
by using Call Park
During a call, press
or to
switch to Park and press the
softkey.
The system stores the call and
displays the call park number.
Note the call park number that
you must use to retrieve the
parked call.
Cisco Wireless IP Phone 7920 for Cisco CallManager
37
If you want to...
Then...
Retrieve a parked
call
From any phone in the
Cisco CallManager system, dial
the call park number to connect to
the call.
Tips
•
If the screen does not display a call park number,
then the Call Park feature is not available for
your phone.
•
You have a limited amount of time to retrieve the
parked call before it reverts to ringing at its
original destination. See your system
administrator for this time limit.
Redirecting a Ringing Call to Your
Phone By Using Call PickUp
Call PickUp allows you to redirect a call that is
ringing on a co-worker’s phone to your own phone so
you can answer it. Your system administrator can set
up a Call Pickup group for extensions that share call
handling responsibilities.
When you want to answer calls to phones that do not
belong to your Call Pickup group, you need to have
the call group pickup code. Your system administrator
defines Call Pickup groups and group pickup codes.
38
78-14564-03
Using Advanced Call Features
If you want to...
Then...
Answer a call that
is ringing on
another phone
within your Call
Pickup group
Choose any available line on your
phone and press or to switch
to PickUp and press the softkey.
Answer a call that
is ringing on an
extension outside
your Pickup group
Choose any available line on your
phone and press or to switch
to GPickup.
Calls directed to the other phone
extension will now ring on your
phone.
Press GPickup and dial the call
group pickup code. Any call
directed to the other Pickup group
now rings on your phone.
Obtain the call group pickup code
from the system administrator.
Tip
If several calls come in when you activate Pickup or
Group Pickup, the first unanswered call rings at your
phone.
Understanding Shared Lines
Your system administrator might give you a “shared”
line. Shared line features do not apply to standard,
unshared lines. Typically, a shared line has two main
uses:
Cisco Wireless IP Phone 7920 for Cisco CallManager
39
•
One person applies a shared line to multiple
phones—For example, your shared line, 23456,
applies to your wireless IP phone and to your
office desktop phone. An incoming call to 23456
rings on your desk and on your wireless IP phone,
and you can use either phone to answer the call.
•
Multiple people share a line—For example, you
are a manager who shares a line and extension
number with your assistant. An incoming call to
the extension rings on both of the phones.
If you want to...
Then...
See if a co-worker
has an active call
on the shared line
When the shared line is in use
from another phone, “In Use
Remotely” appears on the status
line and the calling party ID
appears next to the line number.
Add yourself to call
in progress on a
shared line
Select an in-use-remotely call on
your screen and press Barge. The
shared-line user hears a tone and
“To Barge” displays on the screen.
You will be disconnected from a
barged call if the shared-line call
is put on hold, transferred, or
conferenced. You can only join a
call that a desktop phone (with
Barge enabled) initiates.
Move a call to
Place the shared-line call on hold.
another shared line Press Resume on another phone
with the shared line.
40
78-14564-03
CH A P T E R
5
Using the Phone Book and
Speed Dial Features
Your Cisco Wireless IP Phone 7920 comes with a
personal phone book feature. You can use the
Directory menu to view phone book entries, to add or
edit phone book entries, and to set up speed-dial
numbers. You can access entries in your phone book
by pressing the PhBook softkey.
Using the Phone Book
If you want to...
Then...
Browse the phone
book to see a list of
entries
Press PhBook. The phone displays
entry names.
View an entry in
the phone book
Scroll to the desired phone book
entry and press Detail. The phone
book entry item displays the name
with the list of associated phone
numbers.
If there are no phone book
entries, “Empty” displays.
Cisco Wireless IP Phone 7920 for Cisco CallManager
41
If you want to...
Then...
Dial a number from
the Phone Book
Press PhBook and scroll to an
entry.
Press
to dial the number. The
phone dials the first number in the
phone book entry.
Dial a specific
number from the
Phone Book
Press PhBook and scroll to an
entry. Press Detail and scroll to
the desired phone number.
Press
Edit an existing
phone book entry
to dial the number.
Press PhBook and scroll to an
entry. Press Detail and scroll to
the item in the entry to edit. See
Figure 5-1.
Press Edit and follow the
instructions in the “Entering and
Editing Text” section on page 25.
When you have edited the entry,
press OK, then press Save.
Adding or Changing Entries in the
Phone Book
You can add a new phone book entry or change an
existing entry by using the Directory menu. You must
enter the phone number for each phone book entry
exactly as you would dial the number. You can add the
information as shown in Figure 5-1.
42
78-14564-03
Using the Phone Book and Speed Dial Features
Figure 5-1 Phone Book Entry
1
Contact person’s name
2
Office phone number entry
3
Home phone number entry
4
Cellular phone number entry
5
E-mail address entry
If you want to...
Then...
Browse the phone
book entries
Press Menu and select Directory,
then scroll to and select Names to
see the entries.
View the
information in a
phone book entry
Scroll to a phone book entry and
press Detail.
Cisco Wireless IP Phone 7920 for Cisco CallManager
43
If you want to...
Then...
Add a new phone
book entry
Choose Menu > Directory > Add.
The screen displays as shown in
Figure 5-1.
Scroll to the entry item and press
Select. Enter the name or phone
number by following instructions
in the “Entering and Editing
Text” section on page 25.
When you have finished the entry,
press OK, then press Save.
Press or to switch to Back and
press the softkey twice to return
to the Directory menu.
Edit an existing
phone book entry
Choose Menu > Directory >
Names, then scroll to an entry.
Press Detail and scroll to the item
to edit, such as Home number.
Edit the item by following
instructions in “Entering and
Editing Text” section on page 25.
When you have finished, press
OK, then press Save.
Press or to switch to Back and
press the softkey twice to return
to the Directory menu.
44
78-14564-03
Using the Phone Book and Speed Dial Features
If you want to...
Then...
Erase a phone book
entry
Choose Menu > Directory >
Names, then scroll to an entry.
Press
or to switch to Erase.
Press Erase and press OK to
confirm that you want to erase the
phone record.
Press
or to switch to Back
and press the softkey twice to
return to the Directory menu.
Tip
When adding external phone numbers, enter your
external access number, such as 9, and the entire
telephone number, including 1 and the area code.
Configuring Speed Dial Hot Keys
On the Cisco Wireless IP Phone 7920 keypad, the
numeric keys (2-9) are hot keys that access speed-dial
numbers.You can assign phone numbers to eight
Speed Dial hot keys. The number 1 key is reserved for
accessing the voice messaging system.
Cisco Wireless IP Phone 7920 for Cisco CallManager
45
If you want to...
Then...
Access the Speed
Dial menu
Press Menu and select Directory.
Scroll to and select Speed Dial.
The Speed Dial hot keys display as
shown in Figure 5-2.
Check marks appear when the
Speed Dial number hot keys
already have assigned phone
numbers.
View the phone
number assigned to
the Speed Dial hot
key
Choose Menu > Directory > Speed
Dial. Scroll to the Speed Dial
number hot key and press Detail.
See Figure 5-2.
Figure 5-2 Speed Dial Menu
46
78-14564-03
Using the Phone Book and Speed Dial Features
If you want to...
Then...
Assign a phone
number to a Speed
Dial hot key.
Choose Menu >Directory >
Speed Dial. Scroll to an available
Speed Dial number hot key and
press Detail.
Press Edit to enter the
information. See the “Entering
and Editing Text” section on
page 25. Press OK to save the
speed-dial number, then Back to
exit the menu.
Change the phone
number on a Speed
Dial hot key
Choose Menu > Directory >
Speed Dial. Scroll to a Speed Dial
number and press Detail.
Press Edit to change or clear an
existing phone number. To
confirm the change, press OK,
then Back to exit the menu.
Cisco Wireless IP Phone 7920 for Cisco CallManager
47
If you want to...
Then...
Add or change
Speed Dial
numbers on your
screen
Log in to your IP Phone User
Options web page and choose
your Cisco 7920 device. Choose
Add/Update Your Speed Dials...
from the main menu.
You can set up or change
speed-dial numbers by entering
the phone number and name on
this web page.
Refer to Customizing Your
Cisco IP Phone on the Web for
more information.
Tips
•
Your screen displays the first few names for
speed-dial numbers set up on the User Options
web page.To make a call from your speed dial list,
scroll to the name and press
.
•
You must enter the external phone number
exactly as you would dial it, including an access
code, such as 9, and the area code, if required.
•
To make a call using Speed Dial, see the “Speed
dial a phone number using a Speed Dial hot key”
section on page 28.
48
78-14564-03
CH A P T E R
6
Using Voice Messaging and
Call History Logs
The Cisco Wireless IP Phone 7920 main menu
provides access to the voice messaging service and to
call history logs.
Playing Voice Messages
When the phone displays, “You have voice mail,” you
can access your messages by using the Messages menu
or the shortcut key 1 .
Cisco Wireless IP Phone 7920 for Cisco CallManager
49
If you want to...
Then...
Access and play
your voice
messages
Press Menu, then press to select
Messages. Select Voice Mail Box.
Enter your password and follow
the voice instructions to listen to
your messages.
Access your voice
messages using
the shortcut key.
While in standby mode, press and
release 1 , for immediate access.
Enter your voice messaging
password and follow the voice
instructions to listen to your
messages.
Tips
•
For accurate and detailed information about
using your voice messaging service, refer to the
documentation for your voice messaging system.
•
Your system administrator will provide a default
password for your voice messaging service.
Viewing and Placing Calls from the
Call History Menu
You can view a list of missed calls, received calls, and
placed calls in the Call History logs. You can dial a
number directly from one of the lists.
50
78-14564-03
Using Voice Messaging and Call History Logs
If you want to...
Then...
View a call that
you missed
Press Menu, then press to select
Call History. Scroll to and select
Missed Calls.
Scroll to the appropriate number,
then press Detail to see
information about the call.
Dial a number from
the Missed Calls
list
Select the number that you want
to redial. Press EditDial to change
the number, if necessary.
Press
View a call that
you received
to dial the number.
Press Menu > Call History. Scroll
to and select Received Calls.
Scroll to the appropriate number,
then press Detail to see
information about the call.
Dial a number from
the Received Calls
list
Select the number that you want
to redial. Press EditDial to change
the number, if necessary.
Press
View a call that
you placed
to dial the number.
Press Menu > Call History. Scroll
to and select Placed Calls.
Scroll to the appropriate number,
then press Detail to see
information about the call.
Cisco Wireless IP Phone 7920 for Cisco CallManager
51
If you want to...
Then...
Dial a number from
the Placed Calls
list
Select the number that you want
to redial. Press EditDial to change
the number, if necessary.
Press
Erase the Call
History
to dial the number.
Press Menu > Call History. Scroll
to and select Erase Call History.
Press OK to erase the entire call
history. Or press Cancel to return
to the Call History menu.
Tip
After you erase the call history, all logs in the Call
History menu are empty.
52
78-14564-03
CH A P T E R
7
Using and Changing Profiles
The Cisco Wireless IP Phone 7920 comes with
predefined profiles that allow you to quickly change
rings and tones on your phone. You can choose
between the following profiles for different work
environments.
•
Normal
•
Silent
•
Meeting
•
Outdoors
For example, when you are working outside, choosing
the Outdoors profile automatically increases the ring
volume and speaker volume. When you choose the
Meeting profile, the ring volume is decreased to the
lowest level or you can choose the Silent profile and
turn off the ringer.
The following table lists the default settings for the
profiles.
Cisco Wireless IP Phone 7920 for Cisco CallManager
53
Type of
Settings
Profiles
Normal
Silent
Meeting
Outdoors
Ring
Volume
4
0
1
6
Incoming
Call Alert
On
Off
On
On
Vibrating
Call Alert
Off
Off
Off
On
Keypad
Tones
Off
Off
Off
On
Warning
Style
Tone
Off
Off
Tone
Speaker
Volume
3
3
3
5
Options for Profile Settings
You can choose a profile from the Profiles menu and
use the default settings, or you can adjust the settings
to meet your needs.
For example, you can choose the Normal profile and
change the Warning Tone from Tone to Vibrate.
Table 7-1 shows the profile settings and the options
that are available in the Profiles menu.
54
78-14564-03
Using and Changing Profiles
Table 7-1
Options for Changing Profile Settings
Profile Settings
Setting Options
Activate
Select
Deselect
Ring Volume
Up
Down
Incoming Call Alert
On
Off
Vibration Call Alert
On
Off
Keypad Tones
On
Off
Warning Style
Off
Tone
Speaker Volume
Up
Down
Vibration
Configuring Profiles
You can activate a profile, then you can adjust the
settings for the profile.
If you want to...
Then...
View the active
profile
Press Menu, then press to
switch to Profiles and press Select.
The active profile has a check
mark next to it.
Choose a different
profile
Scroll to a different profile and
press Select to access the settings
for that profile. Select Activate to
change the profile. The check
mark appears next to the new
profile.
Cisco Wireless IP Phone 7920 for Cisco CallManager
55
If you want to...
Then...
Change the ring
volume for the
active profile
Choose Menu > Profiles, then
select the active profile. Scroll to
and select Ring Volume.
Press to increase the volume or
to decrease the volume. Press
Back to make the change.
Change the
incoming call alert
for the active
profile
Choose Menu > Profiles, then
select the active profile. Scroll to
and select Incoming Call Alert.
Scroll to and select Off or On to
control the incoming call alert
function.
Change the
vibrating call alert
for the active
profile
Choose Menu > Profiles, then
select the active profile. Scroll to
and select Vibration Call Alert.
Change the keypad
tone for the active
profile
Choose Menu > Profiles, then
select the active profile. Scroll to
Keypad Tone and select it.
Scroll to and select Off or On to
control the vibrating call alert
function.
Scroll to and select Off or On to
control the keypad tone function.
56
78-14564-03
Using and Changing Profiles
If you want to...
Then...
Change the
warning style for
the active profile
Choose Menu > Profiles, then
select the active profile. Scroll to
Warning Style and select it.
Scroll to one of the following:
Tone—Makes a sound with
warning messages.
Vibration—Vibrates with warning
messages.
Off—Sends no warning messages.
Press Select to change the warning
style.
Change the
speaker volume for
the active profile
Choose Menu > Profiles, then
select the active profile. Scroll to
Speaker Volume and select it.
Press to increase the volume or
to decrease the volume.
Press Back to make the change.
Tips
•
If the phone detects a weak signal or a low
battery, it displays warning messages and sends
the warning tone or vibration.
•
A check mark displays next to the active profile
setting.
•
To maintain the speaker volume setting after
powering off the phone, change the volume in the
active profile.
Cisco Wireless IP Phone 7920 for Cisco CallManager
57
58
78-14564-03
CH A P T E R
8
Customizing Phone Settings
and Viewing Phone Status
You can personalize your phone by adjusting phone
settings such as ring tones and screen messages.
You can secure access to your phone by enabling the
phone lock feature. After powering on the phone, you
must enter a password before the phone can
authenticate with the wireless network.
For troubleshooting phone problems with your
system administrator, you might need to view
information about the software configuration for
your phone. See the “Viewing Phone Status” section
on page 64 for this information.
Change Phone Settings
You can choose between several phone setting options
for your Cisco Wireless IP Phone 7920 by using the
Phone Settings menu. If the Phone Settings menu
options do not appear, your system administrator has
restricted local configuration for the phone.
Cisco Wireless IP Phone 7920 for Cisco CallManager
59
Changing Ring Tone Settings
To access phone settings, press Menu, then press
or to switch to the Phone Settings menu. Select
Phone Settings and the list of phone setting options
appear.
If you want to...
Then...
Change ring tones
for your phone
Scroll to and select Ring Tones,
then scroll to and select Select
Ring Tone.
Scroll to and select the desired
ring tone. The chosen ring tone
plays and a check appears next to
it.
You can choose among two
default ring tones and one user
downloaded ring tone.
Download a ring
tone from
Cisco CallManager
Scroll to and select Ring Tones,
then select Download Ring Tone.
Scroll to and select the desired
ring tone from list. Press
or
until you see Play and press it to
hear the selected ring tone.
Press Select to download a ring
tone to your phone. The ring tone
appears in the list of ring tones for
your phone.
60
78-14564-03
Customizing Phone Settings and Viewing Phone Status
Changing Phone Display Settings
Choose Menu > Phone Settings to change settings that
control the phone screen and displayed information.
If you want to...
Then...
Choose the
language that
displays on the
phone screen.
Scroll to and select Language,
then scroll to and select the
desired language.
Change the start up
message on the
phone screen
Scroll to and select Greeting
Message, then press Edit. Enter a
message up to 15 characters in
length. See the “Entering and
Editing Text” section on page 25.
Press OK to save the change, then
Back to return to Phone Settings.
Change the main
phone screen
message
Scroll to and select Welcome
Message, then press Edit. Enter a
message up to 10 characters in
length. See the “Entering and
Editing Text” section on page 25.
Press OK to save the change and
Back to return to Phone Settings.
Change the back
light for the phone
display
Scroll to and select Backlight.
Scroll to Off or to On and press
Select.
The displayed language
immediately changes on the
screen and a check mark displays
next to the selected language.
Cisco Wireless IP Phone 7920 for Cisco CallManager
61
Changing Phone Access Settings
Choose Menu > Phone Settings menu to change these
settings that control access to the phone and phone
records.
If you want to...
Then...
Require the use of a
password to unlock the
phone when powering it
on
Scroll to and select Phone
Lock, then scroll to and select
On/Off. Scroll to Off to
disable the phone lock or On
to require a phone lock
password and press Select.
Change the phone lock
password
Scroll to and select Phone
Lock, then scroll to and select
Password. Press Edit to enter
the phone lock password (up
to 10 numbers including * or
#). Press OK to confirm the
change and Back to return to
Phone Settings.
Note
Enable the USB port for
phone configuration
The default password
is set to 12345.
Scroll to and select USB
Enable/Disable. Scroll to
Enable and press Select.
The system administrator
uses the USB port for
configuring your phone.
62
78-14564-03
Customizing Phone Settings and Viewing Phone Status
If you want to...
Then...
Erase the local phone
configuration and reset
to factory default
settings
Scroll to and select Factory
Default. The “Restore to
Default?” message displays.
Note
All customized phone
settings will be erased
including network
settings.
Press OK to reset the phone
or Cancel to retain settings.
Tips
• If you enable the Phone Lock feature and have
not changed the password, enter 12345 (default
password) to unlock the phone.
•
If you change the Phone Lock password and
forget it, you must contact the system
administrator to have the phone unlocked and
reset. You will lose all your personal settings
including your Phone Book entries.
•
Be aware that restoring factory default settings
erases your Speed Dial, Call History, and
customized settings. The network settings are
changed to defaults so your phone cannot access
the network. Only Phone Book data is preserved.
•
The system administrator uses the USB port only
for phone configuration. When the phone is
powered off, the USB port reverts to disabled.
Cisco Wireless IP Phone 7920 for Cisco CallManager
63
Viewing Phone Status
For troubleshooting purposes, you might need to view
the software, firmware, and hardware releases on
your phone that are described in the table below.
If you want to...
Then...
View the Phone
Status Options
Press Menu and press
or to
switch to the Phone Settings
menu. Select Phone Settings, then
select Phone Status.
View the current
configuration
filename
Scroll to and select Current
Config File to see the number.
View network
statistics
Scroll to and select Network
Statistics to see your network
connection time and other
statistics.
View the firmware
version number
Scroll to and select Firmware Info.
Then scroll to and select
Firmware Version.
View the board
support package
(Bsp) load ID
Scroll to and select Firmware Info.
Scroll to and select Bsp Load ID.
View the boot
load ID
Scroll to and select Firmware Info.
Scroll to and select Boot Load ID.
View the hardware
information
Scroll to and select Hardware Info
to see the current Hardware
release.
64
78-14564-03
Cisco One-Year Limited
Hardware Warranty Terms
There are special terms applicable to your hardware
warranty and various services that you can use during
the warranty period. Your formal Warranty
Statement, including the warranties and license
agreements applicable to Cisco software, is available
on Cisco.com. Follow these steps to access and
download the Cisco Information Packet and your
warranty and license agreements from Cisco.com.
1.
Launch your browser, and go to this URL:
http://www.cisco.com/univercd/cc/td/doc/es_inpck/
cetrans.htm
The Warranties and License Agreements page
appears.
2.
To read the Cisco Information Packet, follow
these steps:
a. Click the Information Packet Number field,
and make sure that the part number
78-5235-03A0 is highlighted.
b. Select the language in which you would like
to read the document.
Cisco Wireless IP Phone 7920 for Cisco CallManager
65
c. Click Go.
The Cisco Limited Warranty and Software
License page from the Information Packet
appears.
d. Read the document online, or click the PDF
icon to download and print the document in
Adobe Portable Document Format (PDF).
Note
3.
You must have Adobe Acrobat
Reader to view and print PDF files.
You can download the reader from
Adobe’s website:
http://www.adobe.com
To read translated and localized warranty
information about your product, follow these
steps:
a. Enter this part number in the Warranty
Document Number field:
78-10747-01C0
b. Select the language in which you would like
to view the document.
c. Click Go.
d. The Cisco warranty page appears.
e. Read the document online, or click the PDF
icon to download and print the document in
Adobe Portable Document Format (PDF).
66
78-14564-03
You can also contact the Cisco service and support
website for assistance:
http://www.cisco.com/public/Support_root.shtml.
Duration of Hardware Warranty
One (1) Year
Replacement, Repair, or Refund Policy for
Hardware
Cisco or its service center will use commercially
reasonable efforts to ship a replacement part within
ten (10) working days after receipt of a Return
Materials Authorization (RMA) request. Actual
delivery times can vary, depending on the customer
location.
Cisco reserves the right to refund the purchase price
as its exclusive warranty remedy.
Cisco Wireless IP Phone 7920 for Cisco CallManager
67
To Receive a Return Materials Authorization
(RMA) Number
Contact the company from whom you purchased the
product. If you purchased the product directly from
Cisco, contact your Cisco Sales and Service
Representative.
Complete the information below, and keep it for
reference.
Company product
purchased from
Company telephone
number
Product model
number
Product serial number
Maintenance contract
number
68
78-14564-03