1
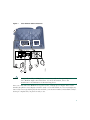
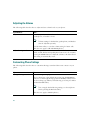
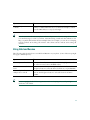
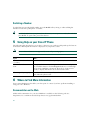
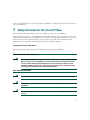
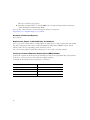
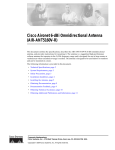
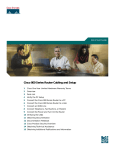
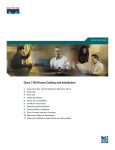
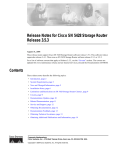
At A Glance
Cisco IP Phone 7960G and 7940G
Including License and Warranty
1
Overview
2
Connecting Your Cisco IP Phone
3
Introducing Your Cisco IP Phone
4
Using Your Cisco IP Phone
5
Using Help on your Cisco IP Phone
6
Where to Find More Information
7
Safety Information for Your Cisco IP Phone
8
Cisco One-Year Limited Hardware Warranty Terms
1 Overview
This guide is designed to help you quickly set up and use your Cisco IP Phone. To access complete
phone documentation on the Web, see the “Documentation on the Web” section on page 12.
2 Connecting Your Cisco IP Phone
Your system administrator or a technician will likely connect your new Cisco IP Phone to the corporate
IP telephony network. If that is not the case, connecting your phone is easy.
Note
Be sure to read the “Safety Information for Your Cisco IP Phone” section on page 13 before
connecting or using your phone.
Refer to Figure 1 to locate connections on the back of your phone and to the following table for
descriptions of the phone connections.
1
DC Adaptor port (DC48V) for phones not
provided with inline power
5
Access port (10/100 PC) for connecting your
phone to your computer.
2
AC-to-DC power supply
6
Handset port
3
AC power cord
7
Headset port
4
Network port (10/100 SW) for connecting to
the network
8
Footstand button
2
Figure 1
Cisco IP Phone Cable Connections
8
1
AUX
10/100 SW
10/100 PC
+
DC48V
7
2
3
4
Caution
5
113656
6
Using a cell, mobile, or GSM phone, or a two-way radio in close proximity to a
Cisco IP Phone might cause interference. For more information, refer to the
manufacturer's documentation of the interfering device.
Once you connect the Cisco IP Phone to its power source, a startup process begins. After several
minutes, the phone’s screen displays a neutral “ready” screen. The details on your screen might vary,
but a ready screen typically displays the date and time, your extension number, and available softkeys.
Startup is complete and your phone is ready to use.
3
Tip
Softkeys point to feature options displayed along the bottom of your phone’s screen. Softkeys
are flexible—they change depending on the status of your phone. For example, you can see
one set of softkey options when you pick up the handset, and another set when the phone is
not in use.
Headset Information
To use a headset, connect it to the headset port on the back of your phone.
Although Cisco Systems performs some internal testing of third-party headsets for use with the
Cisco IP Phones, Cisco does not certify or support products from headset or handset vendors. Because
of the inherent environmental and hardware inconsistencies in the locations where Cisco IP Phones are
deployed, there is not a single "best" solution that is optimal for all environments. Cisco recommends
that customers test the headsets that work best in their environment before deploying a large number
of units in their network.
In some instances, the mechanics or electronics of various headsets can cause remote parties to hear
an echo of their own voice when they speak to Cisco IP Phone users.
Cisco Systems recommends the use of good quality external devices, like headsets that are screened
against unwanted radio frequency (RF) and audio frequency (AF) signals. Depending on the quality of
these devices and their proximity to other devices such as cell phones and two-way radios, some audio
noise may still occur. See the “Using External Devices with Your Cisco IP Phone” section on page 14
for more information.
The primary reason that support of a headset would be inappropriate for an installation is the
potential for an audible hum. This hum can either be heard by the remote party or by both the remote
party and the Cisco IP Phone user. Some potential humming or buzzing sounds can be caused by a
range of outside sources, for example, electric lights, being near electric motors, large PC monitors. In
some cases, a hum experienced by a user may be reduced or eliminated by using a local power cube
(CP-PWR-CUBE-2). See the “Using an External Power Supply” section on page 14 for more
information.
Subjective to the User
Beyond the physical, mechanical and technical performance, the audio portion of a headset must
sound good to the user and the party on the far end. Sound is subjective and Cisco cannot guarantee
the performance of any headsets or handsets, but some of the headsets and handsets on the sites listed
below have been reported to perform well on Cisco IP Phones.
Nevertheless, it is ultimately still the customer's responsibility to test this equipment in their own
environment to determine suitable performance.
For information about headsets, see:
http://vxicorp.com/cisco
http://plantronics.com
4
3 Introducing Your Cisco IP Phone
A Cisco IP Phone is a full-feature telephone that provides voice communication over an IP (Internet
Protocol) network. This phone functions much like a traditional analog phone, allowing you to place
and receive telephone calls. It also supports features that you have come to expect from a
telephone—such as speed dialing, redial, call transfer, conference calling, and voice message access.
Your Cisco IP Phone offers features that might surprise you. Because it is part of an IP network, your
Cisco IP Phone can provide not only telephony services, but data services too—including
up-to-the-minute information and services from the network. With a Cisco IP Phone, you have access
to a whole range of communication features that are not available on a traditional telephone.
Why Does One Cisco IP Phone Behave Differently from Another?
The features exhibited by your Cisco IP Phone depend upon the call processing agent (or “protocol”)
that your phone uses.
To determine the protocol that your Cisco IP Phone uses, pick up the handset and then return the
handset to its cradle to reset the phone’s screen. The phone must be connected to a power source.
Observe your phone’s screen and compare it to the descriptions in Table 1. See the “Documentation
on the Web” section on page 12 for information about getting a user guide and other documentation
specific to your phone’s protocol.
5
Table 1
Identifying the Protocol Used by Your Cisco IP Phone
If you see
Your phone uses
“Your current options” near the bottom of the
screen and no icon on the black banner in the
top right corner of the screen:
Cisco CallManager
A “SIP” icon on the black banner in the top
right corner of the screen.
Session Initiation Protocol (SIP)
An MGCP icon (the letter “m” topped by a
Media Gateway Control Protocol (MGCP)
curved line) on the black banner in the top right
corner of the screen.
“CM Fallback Service Operating” near the
bottom of the screen.
Survivable Remote Site (SRS) Telephony
“Cisco CME” near the bottom of the screen.
Cisco CallManager Express
Identifying Buttons and Hardware
Figures 2 and 3 identify the buttons and hardware on your Cisco IP Phone.
6
Figure 2
Cisco IP Phone 7960G
Figure 3
Cisco IP Phone 7940G
7
1
Handset light strip
Indicates an incoming call and new voice message.
2
Phone screen
Shows phone features such as the time, date, your phone number, caller
ID, line/call status, and softkey tabs.
3
Model type
Indicates your Cisco IP Phone model.
4
Programmable buttons
Configurable buttons that provide access to:
• Different phone lines, or extensions (line buttons)
• Frequently dialed phone numbers (speed dial buttons)
• Web-based phone services (service buttons)
• Specialized phone features, such as privacy (privacy button)
5
Footstand button
Allows you to adjust the angle of the phone base.
6
Directories button
Opens/closes the Directories menu. Use it to access call logs and
corporate directories (if available).
Help button
or
i
Activates the Help menu.
8
Settings button
Provides access to phone settings such as contrast and ringer sound,
network configuration, and status information.
9
Speaker button
Toggles the speaker on or off.
10
Mute button
Toggles the mute feature on or off.
11
Headset button
Toggles the headset on or off.
12
Volume button
Increases or decreases volume for the handset, headset, or
speakerphone (depending upon which is currently active). Also
controls the ringer volume (if on-hook), and the screen contrast.
13
Services button
Provides access to phone services (if available).
8
14
Messages button
Provides access to a voice message system (if available).
15
Navigation button
Allows you to scroll through menus and highlight items. Use in
conjunction with softkeys to activate highlighted items.
16
Keypad
Allows you to dial phone numbers, enter letters, and choose menu
items.
17
Softkey buttons
Each activates a softkey. Softkeys point to options displayed along the
bottom of the phone screen. Softkey options can change depending on
the status of your phone (for example, if the phone is active or idle).
4 Using Your Cisco IP Phone
The following sections provide brief instructions for some of the features available to you.
• Adjusting the Volume, page 10
• Customizing Phone Settings, page 10
• Using Hold and Resume, page 11
• Redialing a Number, page 12
9
Adjusting the Volume
The following table describes how to adjust and save volume levels on your phone.
If you want to...
Then...
Adjust the volume for a call
Press the up or down Volume button when the handset,
speakerphone, or headset is in use.
Note
Volume settings for the handset, speakerphone, and headset
must be adjusted separately.
Press the Save softkey to save the volume setting for future calls.
(This does not apply to SIP and MGCP phones.)
Adjust the ringer volume
Press the up or down Volume button while the handset is in its
cradle, and the headset and speakerphone buttons are off. Continue
pressing the Volume button to adjust the volume to the desired level.
This setting is automatically saved.
Customizing Phone Settings
The following table describes how to customize the ringer sound and the screen contrast on your
phone.
If you want to...
Then...
Change the ringer sound
Choose Settings > Ring Type.
Select a phone line or the default ring setting. Use the Navigation
button to scroll through the ring types. Press the Play softkey to hear
the selected ring type. When you find the ring you want, press Select
and then the OK softkey.
Note
You can apply the default ring setting to a selected phone
line by pressing the Default softkey.
(This does not apply to MGCP phones.)
10
If you want to...
Then...
Change the phone screen
contrast
Choose Settings > Contrast > Base Phone. Press the Up or Down
softkeys (or the Volume buttons) to set the desired display contrast.
Press the OK softkey to accept your changes.
Tip
You can customize the way your phone indicates the presence of an incoming call or a new
voice mail message for each of your lines. Customized ring sounds and other indicators can
help you quickly differentiate between multiple lines. For example, you can choose a chirping
sound to indicate an incoming call on Line 1 and a chime sound to indicate an incoming call
on Line 2.
Using Hold and Resume
The following table describes how to use Hold and Resume on your phone. (Some of these steps might
not apply to MGCP phones.)
If you
Then...
Want to put a call on hold
Make sure the call you want to put on Hold is highlighted (scroll to
the call if necessary). Press the Hold softkey.
Want to remove a call from
hold
Press the Resume softkey. If multiple calls are on hold, use the
Navigation button to select the desired call before you press Resume.
Have multiple calls on
multiple lines on hold
Press the line button for the line to which you want to switch, and
then use the Navigation button to select the desired call. Press
Resume.
Tip
Because engaging the Hold feature generates music or a beeping tone, avoid putting a
conference call on hold.
11
Redialing a Number
To redial the most recently dialed number, press the Redial softkey. Doing so without lifting the
handset activates the speakerphone or headset.
Tip
By default, Redial uses your primary line. However, you can open a secondary line and then
press Redial. To open a line, press a line button.
5 Using Help on your Cisco IP Phone
The following table describes how to use the i / ? button to get on-the-spot help with specific buttons
and features. This helpful information is displayed on your phone’s screen.
Note
The i / ? button feature is not supported by some call processing agents.
If you
Then...
Want to learn about a button
or softkey
Press the i / ? button once, then quickly press any button or softkey.
Want to learn about a menu
item
First, press the Directories, Settings, or Services button to display a
list of available features. Use the Navigation button to scroll through
the list and to highlight a menu item. Press the i / ? button twice
quickly to display information about the selected feature.
Want to get help using help
Press the i / ? button twice quickly (without first selecting a menu
item) when the phone is idle.
6 Where to Find More Information
Your system administrator should be your first point of contact if you have problems installing or
using your Cisco IP Phone.
Documentation on the Web
Additional documentation for your Cisco IP Phone is available on the following web site:
http://www.cisco.com/univercd/cc/td/doc/product/voice/c_ipphon/index.htm
12
Your system administrator can also supply titles and URLs for additional documentation relevant to
your Cisco IP Phone.
7 Safety Information for Your Cisco IP Phone
Please read the following information before installing or using your Cisco IP Phone.
These safety notices apply to Cisco IP Phone models in the 7900 series. For translated versions and
compliance information, refer to the Regulatory Compliance and Safety Information for the Cisco IP
Phone 7900 Series that is included with your phone and is accessible at the following web site:
http://www.cisco.com/univercd/cc/td/doc/product/voice/c_ipphon/index.htm
Installing and Using Your Phone
Read the following safety notices before installing or using your Cisco IP Phone:
IMPORTANT SAFETY INSTRUCTIONS
Warning
This warning symbol means danger. You are in a situation that could cause bodily injury.
Before you work on any equipment, be aware of the hazards involved with electrical
circuitry and be familiar with standard practices for preventing accidents. Use the
statement number provided at the end of each warning to locate its translation in the
translated safety warnings that accompanied this device.
SAVE THESE INSTRUCTIONS
Warning
Read the installation instructions before you connect the system to its power source.
Warning
Ultimate disposal of this product should be handled according to all national laws and
regulations.
Warning
Do not work on the system or connect or disconnect cables during periods of lightning
activity.
13
Warning
To avoid electric shock, do not connect safety extra low voltage (SELV) circuits to
telephone network voltage (TNV) circuits. LAN ports contain SELV circuits, and WAN
ports contain TNV circuits. Some LAN and WAN ports use RJ-45 connectors. Use caution
when connecting cables.
Using an External Power Supply
The following warnings apply when you use the external power supply with the Cisco IP Phone:
Warning
This product relies on the building's installation for short-circuit (over current)
protection. Ensure that a fuse or circuit breaker no larger than 120 VAC, 15A U.S. (240 VAC,
10A international) is used on the phase conductors (all current-carrying conductors).
Warning
The device is designed to work with TN power systems.
Warning
The plug-socket combination must be accessible at all times because it serves as the
main disconnecting device.
Caution
Use only a Cisco-approved power supply.
Using External Devices with Your Cisco IP Phone
The following information applies when you use external devices with the Cisco IP Phone:
Cisco recommends the use of good quality external devices (speakers, microphones, and headsets) that
are screened against unwanted radio frequency (RF) and audio frequency (AF) signals.
Depending on the quality of these devices and their proximity to other devices such as mobile phones
or two-way radios, some audio noise may still occur. In these cases, Cisco recommends that you take
one or more of the following actions:
• Move the external device away from the source of the RF or AF signals.
• Route the external device cables away from the source of the RF or AF signals.
• Use screened cables for the external device, or use cables with a better screen and connector.
• Shorten the length of the external device cable.
14
• Apply ferrites or other such devices on the cables for the external device.
Cisco cannot guarantee the performance of the system because Cisco has no control over the quality
of external devices, cables, and connectors. The system will perform adequately when suitable devices
are attached using good quality cables and connectors.
Caution
Caution: In European Union countries, use only external speakers, microphones, and
headsets that are fully compliant with the EMC Directive [89/336/EC].
8 Cisco One-Year Limited Hardware Warranty Terms
There are special terms applicable to your hardware warranty and various services that you can use
during the warranty period. Your formal Warranty Statement, including the warranties and license
agreements applicable to Cisco software, is available on Cisco.com. Follow these steps to access and
download the Cisco Information Packet and your warranty and license agreements from Cisco.com.
1. Launch your browser, and go to this URL:
http://www.cisco.com/univercd/cc/td/doc/es_inpck/cetrans.htm
The Warranties and License Agreements page appears.
2. To read the Cisco Information Packet, follow these steps:
a. Click the Information Packet Number field, and make sure that the part number
78-5235-03A0 is highlighted.
b. Select the language in which you would like to read the document.
c. Click Go.
The Cisco Limited Warranty and Software License page from the Information Packet appears.
d. Read the document online, or click the PDF icon to download and print the document in
Adobe Portable Document Format (PDF).
Note
You must have Adobe Acrobat Reader to view and print PDF files. You can download
the reader from Adobe’s website: http://www.adobe.com
3. To read translated and localized warranty information about your product, follow these steps:
a. Enter this part number in the Warranty Document Number field:
78-10747-01C0
b. Select the language in which you would like to view the document.
c. Click Go.
15
The Cisco warranty page appears.
d. Read the document online, or click the PDF icon to download and print the document in
Adobe Portable Document Format (PDF).
You can also contact the Cisco service and support website for assistance:
http://www.cisco.com/public/Support_root.shtml.
Duration of Hardware Warranty
One (1) Year
Replacement, Repair, or Refund Policy for Hardware
Cisco or its service center will use commercially reasonable efforts to ship a replacement part within
ten (10) working days after receipt of a Return Materials Authorization (RMA) request. Actual
delivery times can vary, depending on the customer location.
Cisco reserves the right to refund the purchase price as its exclusive warranty remedy.
To Receive a Return Materials Authorization (RMA) Number
Contact the company from whom you purchased the product. If you purchased the product directly
from Cisco, contact your Cisco Sales and Service Representative.
Complete the information below, and keep it for reference.
Company product purchased from
Company telephone number
Product model number
Product serial number
Maintenance contract number
16
17
18
19
Corporate Headquarters
Cisco Systems, Inc.
170 West Tasman Drive
San Jose, CA 95134-1706
USA
www.cisco.com
Tel: 408 526-4000
800 553-NETS (6387)
Fax: 408 526-4100
European Headquarters
Cisco Systems International BV
Haarlerbergpark
Haarlerbergweg 13-19
1101 CH Amsterdam
The Netherlands
www-europe.cisco.com
Tel: 31 0 20 357 1000
Fax: 31 0 20 357 1100
Americas Headquarters
Cisco Systems, Inc.
170 West Tasman Drive
San Jose, CA 95134-1706
USA
www.cisco.com
Tel: 408 526-7660
Fax: 408 527-0883
Asia Pacific Headquarters
Cisco Systems, Inc.
168 Robinson Road
#28-01 Capital Tower
Singapore 068912
www.cisco.com
Tel: +65 6317 7777
Fax: +65 6317 7799
Cisco Systems has more than 200 offices in the following countries. Addresses, phone numbers, and fax numbers are listed on the
Cisco Web site at www.cisco.com/go/offices
Argentina • Australia • Austria • Belgium • Brazil • Bulgaria • Canada • Chile • China PRC • Colombia • Costa Rica • Croatia • Cyprus • Czech Republic • Denmark
Dubai, UAE • Finland • France • Germany • Greece • Hong Kong SAR • Hungary • India • Indonesia • Ireland • Israel • Italy • Japan • Korea • Luxembourg
Malaysia • Mexico • The Netherlands • New Zealand • Norway • Peru • Philippines • Poland • Portugal • Puerto Rico • Romania • Russia • Saudi Arabia • Scotland
Singapore • Slovakia • Slovenia • South Africa • Spain • Sweden • Switzerland • Taiwan • Thailand • Turkey • Ukraine • United Kingdom • United States • Venezuela
Vietnam • Zimbabwe
Copyright © 2004 Cisco Systems, Inc. All rights reserved. CCSP, the Cisco Square Bridge logo, Cisco Unity, Follow Me Browsing, FormShare, and StackWise are trademarks of Cisco
Systems, Inc.; Changing the Way We Work, Live, Play, and Learn, and iQuick Study are service marks of Cisco Systems, Inc.; and Aironet, ASIST, BPX, Catalyst, CCDA, CCDP,
CCIE, CCIP, CCNA, CCNP, Cisco, the Cisco Certified Internetwork Expert logo, Cisco IOS, Cisco Press, Cisco Systems, Cisco Systems Capital, the Cisco Systems logo, Empowering
the Internet Generation, Enterprise/Solver, EtherChannel, EtherFast, EtherSwitch, Fast Step, GigaDrive, GigaStack, HomeLink, Internet Quotient, IOS, IP/TV, iQ Expertise, the iQ
logo, iQ Net Readiness Scorecard, LightStream, Linksys, MeetingPlace, MGX, the Networkers logo, Networking Academy, Network Registrar, Packet, PIX, Post-Routing, PreRouting, ProConnect, RateMUX, Registrar, ScriptShare, SlideCast, SMARTnet, StrataView Plus, SwitchProbe, TeleRouter, The Fastest Way to Increase Your Internet Quotient,
TransPath, and VCO are registered trademarks of Cisco Systems, Inc. and/or its affiliates in the United States and certain other countries.
All other trademarks mentioned in this document or Website are the property of their respective owners. The use of the word partner does not imply a partnership relationship
between Cisco and any other company. (0406R)
Printed in Malaysia
78-13280-05