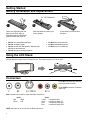
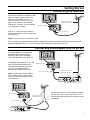
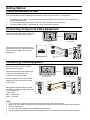
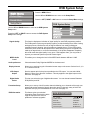
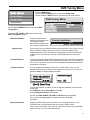
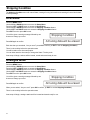
1
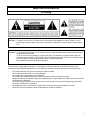
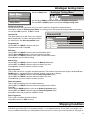
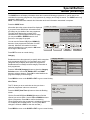
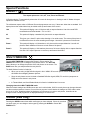
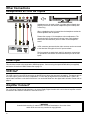
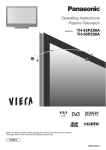
TX-32LWD500A
TX-27LWD500A
High Definition Digital Wide Screen LCD Television
Panasonic
®
TM
Operating Instructions
Please read these operating instructions completely before operating this set. Retain the booklet for future
reference.
®
Trade Mark of the DVB Digital Video Broadcasting Project (1991 to 1996)
Registration number 3727 (32LWD500A), 3725 (27LWD500A)
HDMI, the HDMI logo and High-Definition Multimedia Interface are trademarks or registered
trademarks of HDMI Licensing LLC.
Trademark of the SD Card Association
TM
Dolby and the double-D symbol are trademarks of Dolby Laboratories.
Manufactured under licence from Dolby Laboratories.
TQB4CM039-1
Panasonic and the Environment
REDUCE ~ REUSE ~ RECYCLE
Dear Panasonic Customer
Thank you for choosing to buy a Panasonic colour television. This product was assembled at our Panasonic Television Factory
in Penrith, New South Wales, Australia under our Quality and Environmental Management System. You can therefore be
assured that you have purchased a quality product incorporating environmentally friendly features including low standby power
usage and lead free soldering. Our company is also continuously improving the environmental performance of our product
through the elimination of hazardous chemicals including brominated flame retardants and Chromium 6.
As part of our commitment to conserving natural resources, we recognize that product packaging can be a valuable resource
and if not disposed of properly, contributes the waste stream and or end up in landfill. As part of our commitment to conserving
natural resources we provide the following information about the reuse, recycling and disposal of your packaging.
CARDBOARD
Cardboard comprises the majority of the packaging in your Panasonic TV and all of our cartons are
manufactured with optimum levels of recycled fibre.
1.
Reuse
Cartons can be readily folded and packed flat for storage and made up when required for later use.
2.
Recycling
If you, or someone else has no further use for the carton, it can be flattened or cut up and placed into the recycle bin or
service provided by your local council (applicable for most parts of Australia). By recycling the cardboard you are
benefiting the environment by reducing waste to landfill and reducing the dependence on virgin forest timbers for paper
fibre.
PLASTICS
Panasonic is reducing the number of different plastics used in both the television and its packaging.
Unfortunately you are unable to include the type of plastic used in television packaging in the curbside-recycling program.
Polystyrene foam and other plastic will need to be placed in your general waste bin.
ABOUT PANASONIC
Panasonic companies world wide are committed to an environmental Policy that envisions a world where humanity co-exists with
the global environment where each company strives to realize this vision by continuing to minimise the environmental impacts of
all business operations and offering products and services that further improve the quality of life. Please visit the Panasonic
group website on http://panasonic.co.jp/global/
Panasonic Australia Pty Limited and Panasonic AVC Networks Australia Pty Ltd are signatories to the
‘National Packaging Covenant’. The covenant is an agreement between governments and member
companies aimed at reducing the amount of waste going to landfill through REDUCING, REUSING and
RECYCLING.
Panasonic Australia Pty Limited and Panasonic AVC Networks Australia Pty Ltd have Environmental
Management Systems in place. Both companies are committed to reducing, reusing and recycling and
contribute funding to support the curbside recycling of packaging and the recycling of colour television receivers.
Panasonic Australia Pty Limited and Panasonic AVC Networks Australia Pty Ltd are active participants in CESA (Consumer
Electronics Supplier Association). This group is currently working on how to manage end-of-life disposal of manufactured
products in an environmentally responsible manner and are collaborating with government, industry and other stakeholders in
striving for best practice in Product Stewardship.
2
Important Information
Warning
WARNING: To reduce the risk of fire or electric shock, do not expose this apparatus to rain or moisture. Do not
place liquid containers (flower vase, cups, cosmetics, etc.) above the set (including on shelves above,
etc.).
WARNING: 1) To prevent electric shock, do not remove cover. No user serviceable parts inside. Refer servicing to
qualified service personnel.
2) Do not remove the grounding pin on the power plug. This apparatus is equipped with a three pin
grounding-type power plug. This plug will only fit a grounding-type power outlet. This is a safety feature.
If you are unable to insert the plug into the outlet, contact an electrician.
Do not defeat the purpose of the grounding plug.
This television is heavy (please see page 31). Although the television has been tilt tested and meets current
Australian and International Standards, we recommend that great care be taken when positioning the television.
*
*
*
*
*
*
*
*
Do not allow the front of the set to overhang the stand or cabinet.
Do not allow anyone to climb or sit on the television.
Do not place any heavy weights on the television.
Do not block any ventilation openings. Install in accordance with this instruction manual.
Apparatus shall not be exposed to dripping or splashing and no objects filled with liquids, such as vases, shall
be placed on the apparatus.
To reduce the risk of electric shock, do not remove cover (or back). No user-serviceable parts inside. Refer
servicing to qualified service personal.
The apparatus must be connected to a mains socket outlet with a protected earthing connection.
Keep 10cm minimum distance around the apparatus for sufficient ventilation.
3
Analogue and Digital television - what are they?
Analogue transmission is the system that has been used for many years for broadcasting television programmes.
With continuous improvements in technology it is now possible to transmit programmes in a digital format, allowing
clearer pictures, more stations and other services to be displayed on screen. Digital television is provided in three
different ways; it can be sent along a cable connection direct to your house, broadcast from a satellite, or broadcast
using traditional land based (terrestrial) transmitters. The first two options require you to have an extra 'set top box'
decoder and in the case of satellite, a receiving dish mounted outdoors.
While allowing you to receive traditional analogue transmissions in the usual way, this television can also receive
terrestrial digital services using an integrated (Digital Video Broadcasting) decoder. This allows you to enjoy the
new era of digital terrestrial television without the need for a 'set top box' or satellite dish - a good quality roof
mounted antenna should be all you need.
Customer’s Record
The serial number of this product can be found on its rear cover and on the carton. It is recommended that you note
the serial number and other details in the space provided and retain this booklet in a safe place as a permanent
record of your purchase to aid in identification in the event of theft or loss.
Model No.
Serial No.
Purchase Date
Purchased From
Pixel Statement (LCD)
An image on an LCD panel is created by many dots known as pixels. The more pixels on the panel, the more
detailed image can be displayed. To create a colour image each pixel is made up of three tiny coloured dots (1 each
of red, green and blue). This gives a total far in excess of one million individual dots manufactured into the panel.
Each one of these dots is precisely controlled by the electronics of the TV to produce the picture.
Whilst Panasonic maintains the highest standards in manufacturing technology and processes in the construction of
these panels, there are a number of allowable Pixel/Dot failures that would still allow the panel to be defined as a
good panel. It is not possible to guarantee absolutely no pixel loss.
4
Contents
Getting Started..............................................................................................................................................6 ~ 12
Battery Installation and Replacement ............................................................................................6
Battery Precautions........................................................................................................................6
Using the LCD stand ......................................................................................................................6
Connectors.....................................................................................................................................6
Connecting the Antenna ................................................................................................................7
Connecting DVD Players and VCRs etc ........................................................................................7
Which connectors to use................................................................................................................8
Connecting Component Video equipment .....................................................................................8
Connecting Video equipment.........................................................................................................8
Turn on the television.....................................................................................................................9
Front Panel Controls ......................................................................................................................9
Remote Control Buttons...............................................................................................................10
Auto Setup ...................................................................................................................................11
Using the On-Screen Displays.....................................................................................................11
Picture Menu .....................................................................................................................................................12
Sound Menu .....................................................................................................................................................13
Setup Menu .....................................................................................................................................................14
DVB System Setup
.....................................................................................................................................15
Favourites Setup.................................................................................................................................................16
DVB Tuning Menu...............................................................................................................................................17
Shipping Condition.............................................................................................................................................18
Analogue tuning menu.......................................................................................................................................19
Special buttons ...........................................................................................................................................20 ~ 22
i Information ...................................................................................................................................20
Coloured Buttons (for AV Selection) ............................................................................................20
Guide............................................................................................................................................21
Aspect .........................................................................................................................................22
Multi Window................................................................................................................................22
Audio ............................................................................................................................................22
Teletext Operation ..............................................................................................................................................23
Card Reader .............................................................................................................................................24 ~ 25
Setup............................................................................................................................................24
Slideshow Setup ..........................................................................................................................25
Preferences Setup .......................................................................................................................25
Other Connections .............................................................................................................................................26
Headphones.................................................................................................................................26
Front AV Connections..................................................................................................................26
HDMI input ...................................................................................................................................26
VCR Out .....................................................................................................................................26
Monitor Out and Audio Out ..........................................................................................................26
Customer Information ................................................................................................................................27 ~ 31
Warnings and Cautions................................................................................................................27
Frequently Asked Question..........................................................................................................28
Troubleshooting ...........................................................................................................................29
Specifications ...............................................................................................................................31
5
Getting Started
Battery Installation and Replacement
2 x “AA” Batteries
1
2
Place your fingernail under the
battery cover hook. Apply a
slight downward and backward
pressure and lift the cover off.
3
Insert the batteries ensuring the
correct polarity.
• Do Not use rechargeable batteries.
• Do Not mix battery types
• Do Not mix old and new batteries. Replace both
batteries at the same time.
• Do Not attempt to recharge batteries.
Fit the battery cover and click it
into place.
• Do Not short circuit batteries.
• Do Not disassemble batteries.
• Do Not heat or burn batteries.
Using the LCD Stand
You can adjust the angle of the LCD panel to suit. The panel can swivel 15° left or right.
15°
15°
Connectors
F and RF connectors are used for
connecting antenna leads.
F
RF
S-VIDEO
RCA
The S-VIDEO connector is used for
Video only.
RCA connectors are used for video and audio connections.
Audio
Red
Right
White
Left
Video
Yellow
Composite video
Green
Component Video (Y)
Red
Component Video (Pr)
Blue
Component Video (Pb)
NOTE: take care not to mix the two red RCA connectors.
6
Getting Started
Connecting the Antenna
Connect the television to the antenna wall
plate and a good quality outside / roof
antenna. This television uses an “F”
connector for the RF input. If your wall
plate or antenna lead is the standard
“Belling Lee” connector, use the supplied
“F” to “Belling Lee” adaptor.
75Ohm Coaxial Cable
(RG59 Quad Shield)
Antenna Terminal
“F” Type Connector
Plug the “F” connector firmly into the TV
antenna input and then lock it in place with
the locking nut.
NOTE: Turn the nut only, do not turn the cable.
For your safety any external antenna should be installed by a reputable qualified installer and should comply with
Australian Standard AS1417.1. The RF (Antenna) Input impedance of this television is 75Ω.
Connecting DVD players and VCRs etc
For optimal Digital TV reception, use
an antenna splitter (bottom page
illustration) when also connecting a
VCR / DVD Recorder to the digital TV.
Traditionally, with analogue TV, you will
have connected the antenna to the
VCR and then connected the VCR to
the TV. If your signal strength is
sufficient, this method can be used.
Antenna Terminal
“F” Type Connector
Note: It might require that the VCR or
DVD recorder has to be turned on to
ensure that the signal passes through
to the television.
75Ohm Coaxial Cable
(RG59 Quad Shield)
VCR / DVD Recorder etc.
Antenna Terminal
75Ohm Coaxial Cable
(RG59 Quad Shield)
Splitter
We recommend that you use a splitter to connect
the antenna to the TV and to the VCR etc. This
should ensure that signal loss is reduced as much
as possible.
“F” Type Connector
VCR / DVD Recorder etc.
7
Getting Started
Which connectors to use
First you must determine what video input connectors you have on your television. You might have:
1.
2.
3.
Component Video (YPbPr) - represented by Red, Green and Blue RCA connectors. This connection will
produce the best picture.
S-Video - represented by the S-Video connector. This produces the next best picture.
Composite Video (CVBS) - represented by a single Yellow RCA connector.
Connecting Component Video Equipment
Component Video (also called YPbPr, DVD,
YUV or YCbCr) will give the best picture.
Back of TV
TX-32LWD500A
TX-27LWD500A
OUTPUT
AUDIO INPUT
These connectors are coloured Green (Y),
Blue (Pb) and Red (Pr). Make sure that you
match the colours when you make your
connections.
L
R
L
AUDIO
R
L (White)
R (Red)
Y
Pb
Y (Green)
Pb (Blue)
Pr (Red)
Pr
V
V
VID EO
VIDEO
L
L
AUDIO
AUDIO
R
R
Note: Take care not to swap the two
red leads.
VGA
V
Y
L
Pb B
G
AUDIO
R
PC AUDIO IN
Pr R
TX-32LWD500A
Pr R
L
AUDIO
Y
G
R
Pb B
V
TX-27LWD500A
Connecting Video Equipment
Connect the antenna to the TV and the
VCR as shown on page 7.
Back of TV
Connect the equipment using either the SVideo connector (preferred) or the
Composite video (Yellow) cable.
TX-32LWD500A
S-Video equipment uses a 4Pin Mini Din
(Male) plug for the video and RCA plugs
for the audio.
V
VIDEO
OUTPUT
S-Video
Most standard Videocassette Recorders
use RCA type video and audio connectors.
The connectors are:
Yellow: Video
Red
Right Audio
White Left Audio
TX-27LWD500A
VIDEO
L
AUDIO
R
L
S-Video
AUDIO
R
V (Yellow)
L (White)
R (Red)
V
V
VIDEO
VIDEO
L
L
AUDIO
AUDIO
R
R
V
VIDEO
V
Y
L
Pb B
G
L
AUDIO
R
AUDIO
R
Pr R
TX-32LWD500A
TX-27LWD500A
Notes:
1. If you cannot use Component video connections then S-Video is the next best choice.
2. When an S-Video cable is connected to an S-Video input terminal, the RCA video terminal for that AV position
will be disconnected.
3. The Audio and Video cables are not supplied with this television.
4. If your equipment has different type connectors please refer to the manufacturer’s instruction book for details.
8
Getting Started
Turn on the television
Push the Power Switch to turn the
television ON.
Panasonic
Notes:
1.
The TV takes approximately 10 seconds to turn ON. Like your computer, it has to run a number of diagnostic
and software checks before it can display any broadcast channels.
2.
The indicator will be red when the television is in Standby, green when the TV is operating and off when the
TV is unplugged.
3.
The indicator will flash when a valid code is received from the remote control when a button is pressed.
4.
If the television is not going to be used for an extended period, remove the power plug from the wall outlet.
Front Panel Controls
Push the Power Switch to turn the
television ON. Unless your dealer has
already programmed your television then
Auto Setup will begin Please refer to
page 11.
Open the front panel door to gain access
to the Television Controls.
Lift the door at the symbol on
the bottom right hand corner.
P an aso nic
TV / AV
This button is used to select the input to be displayed on the screen. Pressing the button shows
in turn: DVB, Analogue, AV1, AV2, AV3, AV4, HDMI, PC and back to DVB.
MENU
This button displays the main menu. From this menu you can select the Picture, Sound and
Setup menus. See pages12, 13 and 14.
< VOLUME >
These buttons are used to turn audio volume lower or higher.
If user menu is displayed these buttons are used to access or adjust user menu options.
\/ CHANNEL /\
These buttons are used to select the next lower / higher programme number.
If user menu is displayed these buttons are used to move up or down to select user menu
options.
Notes:
1.
When the television is in Stand-By it is possible to turn it back on by pressing the POWER Button on the front
panel.
2.
This television is designed for the Australian Standard Mains Voltage of 240V 50Hz.
9
Getting Started
Remote Control Buttons
Standby
SD
Mode
Guide
TV/AV
Cursor
OK
Menu
Exit
Coloured buttons
TV/ Text
STTL
Index
Hold
N
Mute
Channel up/down
Volume up/down
Switches TV on or off (standby).
Switches the SD Card reader on or off.
Switches between viewing DVB and Analogue modes.
Displays the DVB Guide (see page 21).
Switches between viewing TV or AV input.
Used to make selections and adjustments.
Used to confirm selections and choices.
Press to access the Picture, Sound and Setup menus
Used to exit the menu system.
Used for the selection, navigation and operation of various
functions. (See page 20 for AV selection)
Switches between TV and Teletext modes
Displays subtitles if available (see page 23).
Selects the teletext index page.
Freezes the Teletext page. Press again to return to normal.
(Normalise). Will recall stored settings.
Switches the sound mute on or off.
(/\ \/) Selects the next higher or lower channel.
(+ -) Increases or decreases the volume.
Numeric buttons Used for: - Programme / channel change.
C
(Direct channel access) - During analogue TV viewing or when in the
Tuning menu, press and then enter channel number using the numeric
buttons. (Press again for special channels).
(Information) - Shows status information for the current Programme
position.
Aspect
Changes the aspect ratio of the TV (see page 22).
Ambience
Turns the “Surround Sound” on or off.
MULTI WINDOW (see page 22)
AUDIO
(see page 22).
i
The Remote Control is capable of operating some functions of selected Panasonic VCRs and DVD (Digital Versatile
Disc) equipment. Some VCR and DVD equipment have different functions, so to ensure compatibility please refer to
the equipment's instruction book or consult your dealer for details.
Record
Standby
VCR/DVD Switch
Press this button to start recording
Switches the VCR or DVD player on or off (standby).
The position of this switch selects whether the remote control operates a VCR or DVD
player.
Programme up/down Selects the next higher or lower channel on the VCR.
Skip / Fast Forward /
VCR: Press to fast forward the tape. In Play mode,
Cue
press to view the picture rapidly forward.
DVD: Press once to skip to next track. Press and hold to view
the picture rapidly forward.
Skip / Rewind / Review VCR: Press to rewind the tape. In Play mode, press to view the
picture rapidly backwards.
DVD: Press once to skip to next track. Press and hold to view
the picture rapidly forward.
Stop
Press to stop the tape or DVD.
Pause/Still
Press in Play mode, the picture will pause. Press again to restart.
Play
Press to start the VCR or DVD playing.
10
Getting Started
Auto Setup
Plug the television into the mains and switch it on.
Unless your dealer has already programmed the television
for your state or territory, you will have to perform an Auto
Setup.
Use the UP or DOWN buttons to select the state or
territory in which you live.
Press the OK button to start the Auto Setup.
AUTO SETUP IN PROGRESS
SEARCHING
05
PLEASE WAIT
The television will search for the digital and analogue
stations simultaneously. TV stations will be located and
stored ready for use.
DVB channels are stored into logical channel numbers.
Analogue stations are stored in the order in which they
are found. The programme order depends on the TV
signal, the broadcasting system and reception conditions.
Using the On-Screen Displays
This TV has a comprehensive system of On-Screen Display (OSD) menus to access adjustments and options
Picture Menu
Sound Menu
Setup Menu
Some selections, for example, Contrast, Brightness, Colour and Sharpness will allow you to increase or decrease
their level.
Some selections, for example, Power On Preference, allow a change of setting to be made.
Some selections, for example, Tuning Menu, will lead to a further menu.
The OK button is used in some menus to store settings after adjustments have been made or options have been
set: for example DVB System Setup.
The MENU button will take you back to the previous menu. The EXIT button is used to exit the menu system and
return to the normal viewing screen.
11
Picture menu operation
Press the MENU Button.
Picture Menu
Sound Menu
Setup Menu
Use the UP and
DOWN buttons to
move to the
Picture Menu.
Press the LEFT,
RIGHT or OK
button to access
the Picture Menu
settings.
Picture Menu
32
Contrast
Brightness
32
Colour
25
03
Sharpness
Tint
Backlight
Colour Balance
P-NR
28
Auto
Normal
Medium
Use the LEFT and RIGHT buttons to adjust the level or change the option.
Viewing mode
The Viewing mode menu allows you to change the picture setting between
Standard, Dynamic, Game and Custom.
Standard
Dynamic
Game
Custom
Contrast
Brightness
Colour
Sharpness
The Contrast, Brightness, Colour and Sharpness levels can be adjusted to
suit your own preferences. These adjustments are only available in the
Custom mode.
Tint
The Tint adjustment will only appear as a menu item if you have an NTSC
signal source connected to the TV. You will be able to adjust the picture hue.
Backlight
The television has a built in backlight to provide the brightness levels needed
to display the picture. You can set the backlight level to Auto, Low, Medium
or High. In Auto mode the TV will sense the ambient brightness and adjust
the backlight automatically.
Colour balance
P-NR
12
For viewing in normal (evening lighting) environments. This
menu selects the normal levels of Brightness and Contrast.
For viewing in brightly lit rooms. This menu selects higher than
normal levels of Brightness and Contrast.
Used for playing video games or viewing a PC. Provides sharper
picture and brighter colours
This mode allows you to set your own personal preferences for
Contrast, Brightness, Colour, Sharpness and Tint (NTSC only).
The Colour balance setting allows you to set the overall colour tone of the
picture. You can switch between Cool, Normal and Warm.
P-NR will automatically reduce unwanted picture noise.
Sound menu operation
Press the MENU Button.
Use the UP and DOWN
buttons to move to the
Sound Menu.
Picture Menu
Sound Menu
Setup Menu
Press the LEFT, RIGHT
or OK button to access
the Sound Menu
settings.
Sound Menu
Bass
18
Treble
18
Balance
Headphone Volume
32
23
Analogue MPX
Stereo
Ambience
On
Audio Delay
Off
Use the LEFT and RIGHT buttons to adjust the level or change the option.
Mode
The sound can be improved during Music, Cinema, Speech or Custom mode
by selecting the appropriate function.
Music
Cinema
Speech
Custom
Bass
Treble
Balance
Headphone volume
Analogue MPX
Ambience
Audio Delay
For shows which have a mainly musical content – video clips,
music shows etc.
Use to recreate the ambience of a cinema. Used mainly for
movies.
For shows where speech is the main audio content – news, chat
shows etc
This mode allows you to set your own personal preferences for
Bass and Treble.
Bass adjustment will emphasise the lower, deeper frequencies and can be
increased or decreased. This is only adjustable in Custom mode.
Treble adjustment will emphasise the sharper, higher frequencies and can be
increased or decreased. This is only adjustable in Custom mode.
Balance affects the levels of sound between the left and right speakers.
Adjustment can be made so that the level from the speakers will suit your
listening position.
The headphone volume can be adjusted independently of the TV speakers
so that everyone can enjoy listening at their own comfort level.
Switch between Stereo and Mono.
If analogue reception deteriorates it is advisable to switch to Mono.
Used to turn the Surround sound On or Off.
This feature can be used to correct minor audio synchronisation problems.
The range of adjustment is 10ms ~ 25ms. The feature is usually turned Off.
13
Setup menu operation
Press the MENU Button.
Picture Menu
Sound Menu
Setup Menu
Setup Menu
Use the UP and
DOWN buttons to
move to the Setup
Menu.
Power On Preference
Volume Correction
Analogue Tuning Menu
DVB System Setup
Press the LEFT,
RIGHT or OK button
to access the Setup
Menu settings.
DVB Tuning Menu
HDMI Audio
PC Input Setup
Use the LEFT and RIGHT buttons to adjust the level or change the option.
AV4 In Select
Allows you to select which video source to apply to the AV4 input. You can
switch between Component (YPbPr), RGB and CVBS (Standard video).
Power On Preference
This feature allows you to decide what mode the TV will be in when you turn
it on. You can choose between DVB (Digital), TV (Analogue) and Last
Memory (whatever mode the TV is in when you turn it off).
Volume correction
Volume correction (in AV mode only) allows you to adjust the volume level of
each AV input to compensate for any differences in audio levels from
external equipment.
Analogue Tuning Menu
DVB System setup
The DVB System setup provides access to various specialised DVB options.
See page 15.
DVB Tuning Menu
DVB Auto setup allows you to clear all current digital tuning data and scan for
new services. Please refer to page 17.
HDMI Audio
This lets you select which audio input connectors to use. If you are using a
HDMI source, set this option to HDMI. If you are using a DVI source, set the
input to RCA.
PC Input Settings
14
Allows access to the Analogue Tuning Menu (Please refer to page 19)
This allows the TV to act as a PC
monitor. You can adjust the
horizontal size, horizontal position,
vertical position and clock phase
to suit your computer.
PC Input Setup
H Size
H Position
V Position
Clock Phase
12
25
25
16
DVB System Setup
Press the MENU Button.
Picture Menu
Use the UP and DOWN buttons to move to the Setup Menu.
Sound Menu
Setup Menu
Press the LEFT, RIGHT or OK button to access the Setup Menu settings.
DVB System Setup
Use the UP and DOWN buttons to move to the DVB System
Setup menu.
Press the LEFT or RIGHT button to access the DVB System
Setup menu settings
Signal Quality
This function displays an indication of signal quality for each DVB programme position.
The DVB system requires a good quality signal to provide the best picture. When viewing
analogue pictures, interference such as signal reflection from nearby buildings or
mountains causes ‘ghosting’, but still provides a viewable picture. For the DVB system,
interference such as this can disrupt the flow of data causing the picture to appear to be
made up of large blocks, or to freeze intermittently. If the picture disappears completely,
this could mean that signal quality is very poor. If this happens often, you may need to
improve your antenna system to provide a better signal.
MPEG Audio
Level
This allows you to change the level of the MPEG audio between 0dB and -12dB.
Audio preference
Display timeout
Choose between Dolby Digital and MPEG for the best sound.
Allows you to set how long the information banner stays on the screen. Select from 2, 4, 8
or 16 second timeouts.
VCR Output
Aspect
Sets the aspect ratio for the picture provided to the VCR output. You can select Wide,
Normal / Centre Cut or Normal / Letterbox. This only applies to the digital output on the
IRD block. See page 26
Digital Audio
Select
This lets you select the type of digital audio stream. You can choose between Bitstream
PCM (Stereo) and Off.
Favourites Setup
Allows you to set up a list of favourite channels allowing you to channel surf through your
personal favourites instead of through the entire range of channels, many of which are
duplicates set up by the broadcasters for future use. See page 16.
DVB Information
This feature gives you technical
information about the television which
might be required in the event of
problems or software upgrades.
DVB Information
Loader Version
Serial ID
Model Name
Model Version
HW Description
0001.0001
FFFFFFFF
QTM230
00088C 11.AI
MTM0230.AI
15
Favourites Setup
Allows you to set up a list of favourite channels allowing you to ‘channel surf’ through your personal favourites
instead of through the entire range of channels. Many channels are duplicated. They have been set up by the
broadcasters for future use.
Favourites Setup
TV
1 TEN Digital
2 ABC TV Sydney
3 SBS DIGITAL 1
4 FTV guide
7 7 Digital
9 NINE DIGITAL
10 TEN Digital
11 TEN Guide
Access the DVB System Setup (see page 15)
and select Favourites Setup.
You can use the Favourite Setup to change
channel.
Use the Up and Down buttons to select the
channel you want.
Press the OK button to watch the selected
channel.
The Channel Up (/\) button to display the next
eight channels in the list.
The Channel Down (\/) button to display the
previous eight channels in the list.
1 TEN Digital
favourites
The RED button allows you to turn the tick mark On and Off. When a channel is ticked, it is in your list of favourites.
lock / unlock
The GREEN button lets you lock a channel to prevent anyone watching a particular broadcast or station.
Locking a channel
Press the GREEN button. You will be asked for your
password.
When your password has been entered, a lock symbol will
appear alongside the selected channel. Pressing the GREEN
button again will unlock the channel.
Note: The default password is 0000.
If you cannot remember your password, please refer to page 17 “Change Password” for instructions on
how to reset the password
Whenever anyone wants to watch the locked channel they will be asked to enter the password.
Unlocking a channel
Press the GREEN button. You will be asked for your password.
When your password has been entered, the lock symbol will disappear from the selected channel.
select all
Pressing the YELLOW button will toggle between selecting and de-selecting all the channels. After selecting all
channels, individual channels can be added using the RED button.
16
DVB Tuning Menu
Press the MENU Button.
Use the UP and DOWN buttons to move to the Setup menu.
Press the LEFT or RIGHT button to access the Setup menu settings.
Picture Menu
DVB Tuning Menu
Sound Menu
Setup Menu
Use the UP and DOWN buttons to move to the DVB
Tuning Menu.
Press the LEFT, RIGHT or OK button to access the
DVB Tuning Menu settings
Channel Installation
Auto Scan Channels will
perform an automatic tuning
of all digital channels.
Manual Channel Search will
tune selected channels only.
Channel Installation
Region Select
Even though you have tuned the television to the channels in your region, you still
have to make sure that the time is set correctly. The time contained in the
broadcast stream is UTC (Universal time, coordinated). This function allows you
to offset UTC to your local time. Use the Left and Right buttons to select your
region.
Parental Guidance
You can stop people watching certain programmes by choosing which programme
classifications can be shown. The level can be set to None, All, G, PG, M, MA15+,
AV15+ or R. This feature only works if the broadcaster is transmitting programme
classification information.
Change Password
You can change your password at any time. You will need to enter your old
password first before any change can be made. Do not forget, or lose, your new
password. Note: The default password is 0000.
To reset the password to “0000” (in case of forgotten password) use the remote
control and:
Press MENU and Select Setup Menu. Press OK
Select DVB System Setup and Press OK
i
Press , then RED, GREEN, YELLOW and BLUE buttons sequentially.
The on screen message appears: Password reset to default 0000
Press OK
Shipping Condition
Shipping condition allows you to reset the TV to its original condition, i.e. no
channels tuned in and all settings reset to the factory default values.
This is useful; for example, if you move to a different area when you will probably
want to tune the TV to your new local stations.
17
Shipping Condition
The Shipping Condition menu will reset all data; clearing all tuning information and resetting all control levels back
to factory settings.
DVB Mode
Press the MENU Button.
Use the UP and DOWN buttons to move to the Setup Menu.
Press the LEFT or RIGHT button to access the Setup Menu.
Use the UP and DOWN buttons to move to the Shipping Condition feature.
Use the LEFT and RIGHT buttons to access the Shipping Condition feature
Press EXIT to exit or press OK to start
You will be given a warning message followed by two
chances to change your mind.
Press OK again to confirm.
Shipping Condition
All tuning data will be erased
Each time that you are asked, “Are you sure?” press OK to confirm, (or EXIT to exit the Shipping Condition)
There is a short delay before the operation starts.
You will be taken to the Auto setup option.
You can either start the Auto setup or change the State / Territory code.
Auto setup will begin, stations will be located, sorted and stored ready for use.
Analogue Mode
Press the MENU Button.
Use the UP and DOWN buttons to move to the Setup Menu.
Press the LEFT or RIGHT button to access the Setup Menu.
Use the UP and DOWN buttons to move to the Shipping Condition feature.
Use the LEFT and RIGHT buttons to access the Shipping Condition feature
Press EXIT to exit or press OK to start
You will be given a warning message followed by two
chances to change your mind.
Press OK again to confirm.
Shipping Condition
All tuning data will be erased
When you are asked, “Are you sure?” press OK to confirm, (or EXIT to exit the Shipping Condition).
There is a short delay before the operation starts.
Auto setup will begin, analogue stations will be located and stored ready for use.
18
Analogue tuning menu
Press the MENU Button.
Select the Setup Menu.
Analogue Tuning Menu
Picture Menu
Sound Menu
Setup Menu
Use the UP or DOWN buttons to move to the Analogue tuning menu.
Use the LEFT or RIGHT buttons to access the Analogue tuning menu.
Analogue Auto Setup
Use the automatic tuning procedure only if you wish to reset ALL Programme Location Numbers.
Press OK to access the Analogue Auto Setup. You will be given a warning that all analogue data will be erased.
You can press OK to confirm, or EXIT to cancel.
Channel Edit
This option allows you to add, name, tune, skip and
delete programmes. To make a change permanent
you must store it. See Store Programme below.
Channel Edit
Programme No
Use the LEFT and RIGHT buttons to select the
Programme No to edit. Press OK.
Edit Name
Use the LEFT and RIGHT buttons to select the Edit Name option.
Use the UP and DOWN buttons to select the character you want.
Use the LEFT and RIGHT buttons to move to the next character position.
Press OK when you are finished editing.
Manual Tune
Use the LEFT and RIGHT buttons to access the Manual Tune option.
Use the LEFT and RIGHT buttons to select the channel you want.
Press OK when you have found the channel you want.
Skip Programme
This is used to skip over, or bypass, unwanted channels. This function only works when using the channel UP and
DOWN buttons – you can still select a “Skipped” channel using the 0 ~ 9 buttons.
Use the LEFT and RIGHT buttons to select the Skip Programme option.
Use the LEFT and RIGHT buttons to select the channel you want.
Press OK when you have found the channel you want.
Delete Programme
This is used to completely remove unwanted channels.
Use the LEFT and RIGHT buttons to select the Programme No to Delete.
Press OK
Use the UP and DOWN buttons to move to the Delete Programme option.
Use the LEFT and RIGHT buttons to select the Delete Programme option.
Press OK to delete the programme, or EXIT to cancel.
Store Programme
This is used to complete all Channel editing.
Press OK to confirm, or EXIT to cancel.
Shipping Condition
This allows you to reset the TV to its original condition, i.e. no channels tuned in. This is useful; for example, if you
move to a different area when you will probably want to tune the TV to tune to your new local stations. See page 18.
19
Special Buttons
Information
i
The Information banner provides access to information on current and upcoming programmes and easy switching
between all channels or just those in your Favourites list.
Press the Information
3. SBS DIGITAL 1
button. An information
banner will appear with
Le Journal
details of the current
programme being
9:22AM - 9:57AM
broadcast. You can set how
long the information banner
News
SD
CC
stays on screen. See page
15. You can press the EXIT button at any time to return to normal viewing mode.
i Button operation
st
1 Press:
2nd Press:
3rd Press:
4th Press:
Rating: Minutes left: 28
I-II
90%
3. SBS DIGITAL 1
Display “Now” i-plate
Display “Now” i-plate with program
synopsis
Display “Next” i-plate with program
synopsis
Exit
i - plate symbol descriptions
SD
HD
Radio
CC
TXT
I-II
9:29AM
9:29AM
Le Journal
9:22AM - 9:57AM
Rating: Minutes left: 28
News via satellite from FRS, in French, no subtitles
News
SD
CC
I-II
90%
Standard Definition broadcast
High Definition broadcast
Digital Radio broadcast
Programme contains Closed Captions
This channel carries a Teletext service
This programme contains MPEG and Dolby Digital audio
Notes:
1.
2.
3.
All i-plate information is broadcaster dependent.
Antenna signal strength is an indicative signal strength only.
Pressing the button in analogue mode will display channel information such as Channel / AV number,
Stereo / Mono and Aspect ratio.
i
Coloured Buttons (for AV Selection)
The coloured buttons can be used to switch between the different AV inputs.
Press the TV/AV button and the four coloured blocks will appear.
AV1/HDMI
AV2/PC
AV3
Press the RED button to select AV1. Press it again to select HDMI.
Press the GREEN button to select AV2. Press it again to select PC.
Press the YELLOW button to select AV3.
Press the BLUE button to select AV4.
Press the TV/AV button at any time to return to normal viewing.
20
AV4
Special Buttons
GUIDE (DVB only)
The GUIDE button will display information about the current and following programmes. It can be used to set
reminders for upcoming programmes, list programmes by category and change channels. The GUIDE button only
operates in digital mode.
NOTE: Not all broadcasters transmit this information and not all information transmitted is complete.
Press the GUIDE button.
Information about the current show will be displayed.
If you press Cursor DOWN the information screen
will change to give details of the next programme.
The right panel displays the synopsis of the
selected event. If the synopsis exceeds one page,
you can press RED or GREEN button to view
previous or next page of synopsis.
2 ABC TV Sydney
8:34AM
9:00AM
Sesame Street
Boo! - Garden
Thursday 18 August 2005
18/8
8:34AM - 8:59AM
Sesame Street
Children’s Rating G
Join Big Bird, Oscar, Elmo, Bert,
Cookie Monster, the Count and many
other characters to learn the alphabet
and to count with Count von Count,
but most of all just have a good time.
You can use the Channel UP (/\) and DOWN (\/)
buttons to view programme information for other
channels. Whenever information for another
channel is displayed you can press the OK button
and change to that channel.
Press EXIT to return to normal viewing.
Category
Broadcasters have the opportunity to specify which categories
their programme will fall into. You can select one or more
categories and just display those particular programmes.
Broadcasters do not always transmit category information in
their programmes.
Category Selection
All categories
Movie
Entertainment
Children’s
Arts / Culture
Education / Science
Special
Drama
Undefined
News
Sports
Music / Dance
Current affairs
Infotainment
Comedy
Documentary
Press the YELLOW (Category) button to show the Category
Selection menu. Use the UP, DOWN, LEFT and RIGHT
buttons to select a category. Press OK to select/deselect the
programme display for that category.
Press MENU to return to the GUIDE or EXIT to go to normal viewing.
View Timers
This TV allows you to set reminders to alert you when a
particular programme is about to commence.
Press the BLUE (View Timer s) button to show the Booking
screen.
Use the Channel UP (/\) and DOWN (\/) buttons to find the
channel you want to watch. Use the UP and DOWN buttons to
select a programme. Press OK to confirm the booking.
(Three minutes before the programme is scheduled to begin the
TV will display the reminder screen. You can press OK to
change the channel or EXIT to clear the reminder.)
Booking
8:39AM Thursday 18 August 2005
TV 2 ABC TV Sydney
18/8 9:02AM - 9:12AM
Boo! - Garden
Children’s
Rating: G
Would you like to arm a timer for this program?
Press MENU to return to the GUIDE or EXIT to go to normal viewing.
21
Special Functions
ASPECT
This button is used to move through the different aspect ratios.
The aspect options are: 16:9, 4:3, Just, Zoom1 and Zoom2.
In Digital mode the TV automatically selects the 16:9 mode for best picture. In Analogue and AV Modes all aspect
options are available for use.
The widescreen aspect ratios of different films and programmes can vary. If these are wider than a standard 16:9
aspect picture then a black band may be visible at the top and bottom of the screen.
16:9
This option will display a true 16:9 picture with no aspect distortion. Use with normal DVB
transmission and DVDs labeled 1.78:1 or 2.35:1.
4.3
This option will display a standard 4:3 picture with no aspect distortion.
Just
This gives you a “best fit” option when showing 4:3 on wide screen. The centre of the picture is
not affected but there is some stretching at the edges. Use with 4:3 pictures to fill the screen
Zoom 1
This option will display a 16:9 letterbox or 4:3 picture with no aspect distortion. Use with 4:3
pictures. Black sidebars will be seen on both sides of the picture.
Zoom 2
This option will display a 16:9 letterbox picture as a full screen display with no aspect distortion.
Use with 2.35:1 aspect pictures to remove top and bottom black bars.
MULTI WINDOW
Pressing MULTIWINDOW will access the Picture in Picture option. The
GREEN button allows you to change the sub picture source. The YELLOW
button allows you to change the position of the sub-picture on the screen. The
BLUE button lets you swap between the two pictures.
The Multi Window function is limited to:
• When you are using a High Definition signal in AV4 / HDMI / PC as main picture source the BLUE button
will disable from swapping between pictures.
•
Since the sub picture source is limited to Standard Definition signal; HDMI, PC and AV4 (component or
RGB) can not be shown in sub picture.
•
In Teletext Mode, and Card Reader Mode, this function is disabled and vice versa.
Changing channels in MULTI WINDOW mode
When there both Analogue and DVB sources are use in multi window, ONLY the main picture can change channels
use the normal programme. However, if one of the two sources in multi window is Analogue or DVB, and the other
source is AV, then, regardless where the Analogue or DVB source is in main or sub picture, channels can be
change use the normal programme on displayed Analogue or DVB source.
AUDIO (DVB only)
Pressing the AUDIO button shows which audio type you have selected. If there is more than
one audio type, you can change to other types by pressing the AUDIO or Cursor UP /
DOWN button.
Audio
I-II
English (Dolby Digital)
22
Teletext operation
Teletext is only available on certain broadcast channels. The time taken to display the teletext is determined by the
broadcaster and not by the television.
Teletext is also used for Closed Captioning of television programmes for the hearing impaired. Closed captions can
be found on Teletext Page 801.
Not all broadcast stations transmit closed captions in the same way. Some, but not all, of the methods are listed
below:
1.
A teletext screen appears and the closed captions are accessed like any other teletext page.
2.
The picture remains on the screen while you type in 801.
3.
The picture disappears while you type in 801. The picture stays black until the page is reached.
4.
The picture disappears while you type in 801. The picture stays black until a programme containing closed
captions is broadcast.
Some broadcast stations will have a message on the screen to tell you that closed captions are not available for this
programme. Some broadcast stations give you no indication at all.
The current preferred method of operation of Teletext in Australia is TOP (Table Of Pages). TEXT In this mode the
red button moves to the previous page number and the green button moves to the next page number. The yellow
and blue buttons correspond to different subjects. Pushing the coloured button can access these subjects.
TV/TEXT
Press the TEXT button. The screen will display the Teletext page. Press TEXT again
when you wish to return to TV mode.
If you press the TEXT button while viewing a station that is not transmitting text, the TV
will briefly display a message advising you that teletext is not available.
STTL
Displays subtitles (if available). This is the same as turning the teletext ON and selecting
page 801. Press the STTL button to turn subtitles off.
HOLD
Used to hold the Teletext page when viewing multi-page information.
Press again to return to automatic page update.
INDEX
Press INDEX to return to the main index page.
Depending on the way information is transmitted, this may have to be pressed more than
once to return to the main index page.
Page Selection
In DVB mode, pages can be selected in three ways:
a.
Press the Cursor UP / DOWN or Channel UP / DOWN buttons to increase or
decrease the page number by one.
b.
Press the Red or Green buttons to increase or decrease the page number by one
c.
By entering the page number, using 0 - 9 on the remote control.
Sub-pages can be selected using the Cursor LEFT and RIGHT buttons.
In Analogue mode, pages can be selected in three ways:
a.
Press the Cursor UP / DOWN or Channel UP (/\) / DOWN (\/) buttons to increase or
decrease the page number by one.
b.
Press the Red or Green buttons to increase or decrease the page number by one
c.
By entering the page number, using 0 - 9 on the remote control.
23
Card Reader
This television has a built in Card Reader. You can insert six
different types of card: - CF I, CF II, SD, SMC, MMC and MS.
One or two cards can be inserted into the front panel card reader
at any time.
Photo Viewer
Music Player
Movie Viewer
File Explorer
Music Album
Photo Viewer
This feature will show thumbnail views of all picture files on the card. Use the Up, Down,
Left and Right buttons to highlight the picture you want and press OK. The picture will fill
the screen. Press EXIT to return to the menu.
Music Player
Provides a list of all music files on the card. Use the Up and Down buttons to highlight
the file you want and press OK. The music file will play. Press EXIT to return to the menu.
Movie Viewer
Show a list of all movie files on the card. Use the Up, Down, Left and Right buttons to
highlight the file you want and press OK. The movie will play. Press EXIT to return to the
menu.
File Explorer
Show a list of all folders and files on the card, similar to a computer menu. Use the Up
and Down buttons to highlight the folder press OK. The contents of the folder will be
displayed. Press EXIT to return to the menu.
Music Album
Displays all pictures on the card as a slideshow. If there are music files on the card they
will be played in the background while you view the pictures. Press EXIT to return to the
menu.
Setup
Press the MENU button.
Use the UP or DOWN buttons to move to the Setup Menu.
Use the OK button to access the Setup Menu.
Setup Menu
Music Setup
Slideshow Setup
Preferences Setup
Music Setup
Sideshow
Settings
Preferences
Setup
This allows you to set whether a music track, or tracks, will be repeated, The settings are
One (single track repeat), >All (all tracks repeated) and Off (no repeats).
Allows you to customise the slideshow settings. Items such as repeat , interval auto /
manual start and fade control can be adjusted. Please refer to page 25.
This option allows you to change preferences such as, default reset. Please refer to
page 25.
Note: Do not remove the memory card(s) when the LED is blinking. It might damage the card reader and the
memory card. (The blinking LED means that data is being transferred)
24
Card Reader
Slideshow Setup
Press the MENU button.
Use the UP or DOWN buttons to move to the Slideshow Menu.
Use the OK button to access the Slideshow Menu.
Use the UP or DOWN buttons to move to the option you want to
change.
Use the OK button to access the option you want to change.
Slideshow Setup
Slideshow
Folder Repeat
Interval Time
Fade Mode
Return To Setup Menu
Slideshow
You can choose between automatic and manual slideshow operation.
Repeat Mode
This turns the repeat function ON or OFF.
Interval Time
Sets the time that a picture is displayed before the next one appears.
You can choose between 1, 3, 5, 10, 15, 30, 60 and 90 seconds.
Fade Mode
Selects the method by which one picture is replaced by another. You have a number of
options to choose from.
Return To Setup
Menu
Returns you to the Setup Menu.
Preferences Setup
Press the MENU button.
Use the UP or DOWN buttons to move to the Preferences Menu.
Use the OK button to access the Preferences Menu.
Use the UP or DOWN buttons to move to the option you want to
change.
Use the OK button to access the option you want to change.
Preferences Setup
Defaults
Return To Setup Menu
Soft Firmware
Firmware Update
Defaults
This returns all settings to the factory presets.
Return To Setup
Menu
Returns you to the Setup Menu.
Soft Firmware
Tells you the latest version of the card reader software.
Firmware
Update
From time to time, new software may become available for this TV. This feature allows
the new software to be updated using an SD card.
25
Other Connections
Headphones & Front AV inputs
Panasonic
AV3 INPUT
AV3 INPUT
S-VIDEO
VIDEO
S- VIDEO
VIDEO
L AUD IO R
L AUDIO R
Headphones can be used to listen in private and not disturb other
people in the house. Use stereo headphones (Not included) with
3.5mm Plug.
When a headphone plug is inserted into the headphone socket the
internal speakers will not operate.
Please refer to page 13 for headphone volume adjustment. The
normal television sound controls (volume, bass, treble, balance,
sound mode and ambience) have no effect on the headphone
sound.
VCRs, cameras, games and other video sources can be connected
to the television through the front AV input terminals.
The front panels are particularly useful for temporary connections.
For permanent connections we recommend that you use the rear
inputs.
HDMI input
This television is able to be connected to HDMI equipment. Connect using the special HDMI cable (not supplied)
and set the AV audio to HDMI. Please refer to page 14.
VCR Out*
The VCR output is a set of RCA connectors on the IRD block (where the antenna is plugged in). The aspect ratio on
this video output (yellow connector) is adjustable. You can also get digital audio from the IRD block. There is an
optical cable connector on the side of the block. You can decide what form the digital audio will take. Please refer to
page14.
Amplifier Connect*
For a full Home Theatre sound experience, an external Dolby Digital decoder and a multi-channel amplifier must be
connected to the DIGITAL AUDIO OUT terminal on the TV.
* WARNING
Unauthorised recording of material from Television Broadcasts or from other video
and/or audio sources may contravene copyright laws.
26
Customer information
Warnings and cautions
To keep your Panasonic Television in good working order please observe the following warnings and cautions.
Please be careful with this television. Like all electrical equipment it can cause serious injury or damage if it is mistreated.
Safety First
In the advent of unusual operation (e.g. odd sounds, smoke or aromas), turn the television Off and remove the
power cord from the wall socket. Then call the Television Service Centre: this may reduce the possibility of
expensive repair costs. Turn the power OFF before connecting other electrical equipment.
Danger
Do not insert foreign objects. (Keep metal or easily flammable objects out of this television).
Do not remove the rear cover.
Always pull the plug out of the wall outlet by holding the plug itself. Do not pull the plug by the power cord.
Do not touch the antenna cable and metal parts of the television when there is lightning around. During storms
switch the television off.
Do not place any containers of water or other liquids on or near this television.
Adequate ventilation is essential. Allow a gap of at least 10cm around the TV, even in a cabinet or between
shelves.
Remove the Power Plug from the wall socket when the Television is not going to be used for an extended period
of time.
Cabinet Care
The cabinet can be kept in good condition by wiping with a clean, lint free cloth moistened with mild detergent and
water. For safety, remove the plug from the power outlet when cleaning.
Do not use solutions containing petroleum or other chemicals. For safety, remove the plug from the power outlet
when cleaning.
Caring for the remote control
The lens of the Remote Control should be kept clean and free of dirt and grease. Use a soft cloth moistened with
water and a mild detergent to keep the lens clean.
Lens
Remote Control
27
Customer information
Frequently asked questions
Some minor problems can be corrected very quickly and easily without the cost of a service call. Panasonic has a
Customer Care Centre that can answer most questions over the phone. Before you contact the Customer Care
Centre with your question we have included the most commonly asked questions.
If the answer to your problem is not in this list, determine the symptoms and make a few simple checks as shown
on the next page. The location of the nearest service centre can be obtained from the Panasonic Customer Care
Centre on 132600.
Question: Why does the TV take so long to turn on?
Answer:
Like your computer, the TV has to run a number of diagnostic and software checks before it can
display any broadcast channels.
Question: The channel number is still on the screen. How do I turn it off?
Answer:
The channel number is being broadcast by the television station. There is no way to turn this off.
Question: How do I tune my stations?
Answer:
The instructions for tuning the stations are on page 17 for DVB channels and on page 19 for analogue
channels.
Question: Why doesn’t the channel change when I press the channel button?
Answer:
The television might be switched to Teletext mode. If it has been switched to text mode for closed
captions and they are not being transmitted there may not be any indication on the screen to let you
know that you are in Text mode. See page 23.
DVB Questions
Question: Why are there no DVB channels listed in the “Guide” after Auto Setup?
Answer:
Not all areas are covered by DVB transmissions. You may need to point your antenna to another
transmitter.
It could also be caused by poor signal quality. Check analogue channels. If the picture quality is poor
you may need to change or improve your antenna system. Consult a reputable installer.
Question: I get “blocky” interference and sometimes the picture freezes?
Answer:
This could be caused by poor signal quality. To check the quality of your signal use the Signal Quality
feature described on page 14. It is also possible that the interference is coming from the broadcaster.
Question: I have a good antenna system but still cannot receive DVB stations?
Answer:
Not all areas are covered by DVB transmissions. You may need to point your antenna to another
transmitter. See “DTV Reception Trouble Shooting Guide on page 29.
Question: Why does the television not have all the channels?
Answer:
It is possible that the signal level for a channel might have been low for some reason during the tuning
procedure. Repeat the DVB Setup procedure on page 17.
28
Customer Information
Trouble Shooting Guide
Problem
Possible causes
What to do
The display on the panel
does not light up.
Power Mains cable is not
connected.
Check that the mains cable is plugged in to
the power socket.
No sound or picture.
The A/V cord is not properly
connected.
Wrong selection of input mode.
Battery exhausted.
Fluorescent light interfering with the
remote control.
Remote control is incorrectly aimed
TV antenna is not plugged in or
digital TV is not available in this
area.
See “DTV Reception Trouble
Shooting Guide” below.
See “DTV Reception Trouble
Shooting Guide” below.
Check the cable connections and other
equipment connected to your TV.
The remote control is not
working.
Unable to tune channels.
Small “block type
squares” sometimes
appear on the picture, or
the picture freezes.
The digital receiver does
not receive all the local TV
channels.
The signal strength of some of the
RF channels may be too low.
See “DTV Reception Trouble
Shooting Guide” below.
Change the batteries.
Switch off the light.
Aim the remote control at the TV.
Check the antenna cable connections or if an
upgrade to your antenna is required to
receive digital TV signals in this area.
If ‘signal quality’ or ‘signal strength’ bar is not
green, it indicates that the digital receiver is
not receiving an adequate signal. The
antenna and/or cable system needs to be
checked (maybe replaced) by an antenna
installer.
Check that the antenna is suitable to receive
all RF channels. Try doing channel tuning
installation again.
DTV Reception Trouble Shooting Guide
After a channel scan, some channels or no channels are found
1.
Did you connect your antenna as illustrated pages 6 and 7?
If you have a pay TV box, VCR or other device connected then the TV must be connected to the
antenna using a splitter.
2.
Is the antenna wall socket in good condition?
For optimum and reliable contact performance, the antenna wall connector should be an ‘F’ (screw)
type connector.
3.
Are you using a quality antenna fly lead between antenna wall socket and HD-STB?
The use of RG6 or RG59 Quad Shield 75 ohm coaxial cable fly leads with metal ‘F’ connectors
provides a secure, reliable connection that also greatly reduces impulse noise pickup. Low cost
antenna fly leads with right-angled plastic moulded connectors are a common cause of poor reception
and impulse noise pickup.
Digital TV or some channels (services) may not have yet commenced in your area.
There are some towns and regions in Australia that cannot yet receive digital television. In some towns and
regions not all broadcasters have commenced their digital services. You can check the digital coverage for
your area at the Reception Locator on the DBA website (www.dba.org.au/reception).
29
Customer Information
DTV Reception Trouble Shooting Guide
Signal Strength
The signal received may be too poor to allow the digital receiver to find some or all available channels.
Your old antenna may not be designed to receive all DTV channels.
Antenna reception performance has deteriorated due to weathering, corrosion of antenna connections /
cabling and broken elements.
If you live within 5-10Km of DTV transmission towers, a combined VHF/UHF antenna should be adequate.
Outside this area, separate VHF and UHF antennas provide superior reception performance.
Depending on DTV signal conditions, some installations may instead require a VHF/UHF masthead amplifier.
In a shared antenna system the existing Master Antenna TV (MATV) system may have been originally
designed for analogue PAL TV only, and may require a substantial upgrade or replacement to also carry DTV
signals. Please consult your Body Corporate.
For your safety any external antenna should be installed by a reputable qualified installer and should comply
with Australian Standard AS1417.1.
Some channels display ‘No Signal’ or ‘Loss of Signal’
Received signal is “too weak” (i.e.; poor quality) to generate a stable picture. Please check antenna & cabling
or contact your local TV antenna installer.
There are some towns and regions in Australia that cannot yet receive digital television. In some towns and
regions not all broadcasters have commenced their digital services.
Picture regularly breaks up on some channels
The received signal may be too weak to allow the digital TV receiver to reliably “lock” to the desired signal
and generate a stable picture. Please check antenna & cabling or contact your local TV antenna installer.
Impulse Noise
Interference from household appliances such as fluorescent lights, refrigerators, washing machines, electric
stoves etc may cause pictures to break up and audio to mute or distort momentarily
In the first instance, replace antenna fly-lead with a quality RG6 or RG59 Quad Shield 75 ohm coaxial cable
fly lead. If problem persists, check / improve antenna & cabling or contact your local TV antenna installer. The
possible cause could be poor quality coaxial cable installed in the walls or ceiling picking up impulse noise.
This coaxial cable will need to be replaced with quad shield.
A masthead amplifier may be “over-boosting” the antenna signal, which is overloading the DTV tuner,
resulting in poor reception on some or all channels.
Picture very infrequently breaks up on some or all channels
Electrical atmospheric interference caused by local or distant lighting storms or heavy rain with wind in “leafy”
locations may cause pictures to break up and audio to mute or distort momentarily.
Impulse noise interference from an infrequently used electrical appliance, or a passing vehicle or lawn mower
with a “noisy” ignition system.
30
Customer Information
Specifications
Receiving Systems
Antenna Impedance
Tuning System
PAL 576i, NTSC (AV Input only)
75Ω Unbalanced coaxial
Frequency synthesized.
Power Requirements
Power Consumption
LCD Panel
Screen size (mm):
Pixel pitch (mm):
Luminance (nits):
Contrast ratio:
Display colours:
Response time:
Viewing angle:
Audio Output
Dimensions
TX-32LWD500A
220-240V ~ 50/60Hz
175W Max
LCD 32” 16:9
708.95 x 398.58
0.173 (H) x 0.519 (V)
550
1000:1
16.7M 8 bit
8ms Grey to Grey
176° V & H
4 Speakers 10W + 10W
w(cm) d(cm) h(cm)
96.4
13.0
57.5
Teletext
TOP 250 Pages Level 1.5
Terminals
AV1 (Rear):
AV2 (Rear):
AV3 (Front):
AV4 (Rear):
PC (Rear)
HDMI (Rear)
Card (Front):
Headphone (Front)
Signal levels:
Wt(kg Net)
24.0
TX-27LWD500A
220-240V ~ 50/60Hz
145W
LCD 27” 16:9
597.12 x 335.88
0.1555 (H) x 0.4665 (V)
550
600:1
16.7M 8 bit
16ms Grey to Grey
170° V & H
2 Speakers 10W + 10W
w(cm) d(cm) h(cm)
81.6
12.6
50.7
Wt(kg Net)
17.5
CVBS Video In RCA (Yellow) / S-Video In 4-pin Mini DIN / Audio In L-R 2 RCA (White, Red)
CVBS Video In RCA (Yellow) / S-Video In 4-pin Mini DIN / Audio In L-R 2 RCA (White, Red)
CVBS Video In RCA (Yellow) / S-Video In 4-pin Mini DIN / Audio In L-R 2 RCA (White, Red)
Component Video In 3 RCA (Green (Y), Red (Pr), Blue (Pb))
CVBS Video Sync RCA (Yellow) Audio In L-R 2 RCA (White, Red)
15 Pin DIN for VGA, SVGA and XGA Display and 3.5m Stereo Socket
Type A HDMI Video and Audio In.
SD, CF I/II, MMC, MS, SM
3.5m Stereo Socket
Video:
Audio:
Supported HDMI and
Component Video:
DVB-T MP@HL and MP@HL
CVBS Video In RCA (Yellow) 1.0Vp-p, 75Ω
Y: 1.0Vp-p 75Ω C: 0.3Vp-p 75Ω
Approx. 400mV 47kΩ
HDMI Audio L.PCM (IEC60958) 32kHz, 44.1kHz & 48kHz
720x576i at 50Hz
720x576p at 50Hz
1280x720p at 50Hz
1920x1080i at 50Hz
720x480i at 60Hz
640x480p at 60Hz
720x480p at 60Hz
1280x720p at 60Hz
1920x1080i at 60Hz
Supported Screen
Resolutions on PC input
VGA: 640x480 at 60, 72, 75 and 85Hz refresh rates.
SVGA: 800x600 at 56, 60, 72, 75 and 85Hz refresh rates.
XGA: 1024x768 at 60, 70, 75 and 85Hz refresh rates
VGA and XVGA are trademarks of International Business Machines.
SVGA is a trademark of the Video Electronics Standard Association
Supported Card File
Formats
Photo: JPEG, Audio: MP3
Video: MPEG1, MPEG 2, MPEG 4 SP, DIVX 3.11/4.x/5.x, M-JPEG
Video file format: AVI, ASF, MP4, DAT, VOB, MPG.
Monitor Out
Video Out: 1.0Vp-p, 75Ω
Accessories Supplied
Remote Control EUR7636010R
“F” – “F” Cable
Instruction Manual TQB4CM039-1
Note:
Design and Specifications are subject to change without notice.
Weight and Dimensions shown are approximate.
Audio Out: Approx. 400mV
2 Batteries Type ‘AA’
“F” – “Belling Lee” Adaptor
31
Panasonic Warranty
1. The product is warranted for 12 months from the date of purchase. Subject to the conditions of this warranty Panasonic or it's
Authorised Service Centre will perform necessary service on the product without charge for parts or labour if, in the opinion of
Panasonic, the product is found to be faulty within the warranty period.
2. This warranty only applies to Panasonic products purchased in Australia and sold by Panasonic Australia or its Authorised
Distributors or Dealers and only where the products are used and serviced within Australia or it's territories. Warranty cover
only applies to service carried out by a Panasonic Authorised Service Centre and only if valid proof of purchase is presented
when warranty service is requested.
3. This warranty only applies if the product has been installed and used in accordance with the manufacturer’s
recommendations (as noted in the operating instructions) under normal use and reasonable care (in the opinion of
Panasonic). The warranty covers normal domestic use only and does not cover damage, malfunction or failure resulting from
use of incorrect voltages, incorrect installation, accident, misuse, neglect, build-up of dirt or dust, abuse, maladjustment of
customer controls, mains supply problems, thunderstorm activity, infestation by insects or vermin, tampering or repair by
unauthorised persons (including unauthorised alterations), exposure to abnormally corrosive conditions or any foreign object
or matter having entered the product.
4. This warranty does not cover the following items unless the fault or defect being complained of existed at the time of
purchase.
(a) Video or Audio Tapes
(b) Video or Audio Heads and Stylii resulting
from wear and tear in normal use
(c) Shaver Heads or Cutters
(d)
(e)
(f)
Cabinet Parts
User replaceable Batteries
Thermal Paper, Toner/Ink Cartridges,
Drums, Developer, Film (Ink/Ribbon),
Film Cartridge, Printer Heads
(g)
(h)
Microwave Oven cook plates.
Kneader mounting shaft unit
(bread bakery)
5. If warranty service is required you should:
• Telephone Panasonic’s Customer Care Centre on 132600 or visit our website and use the Service Centre Locator for the
name/address of the nearest Authorised Service Centre.
• Send or bring the product to a Panasonic Authorised Service Centre together with your proof of purchase receipt as a
proof of purchase date. Please note that freight and insurance to and / or from your nearest Authorised Service Centre
must be arranged by you.
• Note that home or pick-up/delivery service is available for the following products in the major metropolitan areas of
Australia or the normal operating areas of the nearest Authorised Service Centres:
(a) Picture tube (CRT) based Television Receivers (screen
sizes greater than 66cm); Rear Projection TV’s; Plasma/LCD
televisions / displays (screen size greater than 103 cm)
(b) Convection/Combination Microwave Ovens
(c) Whiteboard (except portable type)
6. The warranties hereby conferred do not extend to, and exclude, any costs associated with the installation, de-installation or
re-installation of a product, including costs related to the mounting, de-mounting or remounting of any screen, (and any other
ancillary activities), delivery, handling, freighting, transportation or insurance of the product or any part thereof or replacement
of and do not extend to, and exclude, any damage or loss occurring by reason of, during, associated with, or related to such
installation, de-installation, re-installation or transit.
Panasonic Authorised Service Centres are located in major metropolitan areas and most regional centres of Australia, however,
coverage will vary dependant on product. For advice on exact Authorised Service Centre locations for your product, please
telephone our Customer Care Centre on 132600 or visit our website and use the Service Centre Locator.
Unless otherwise specified to the consumer the benefits conferred by this express warranty are additional to all other conditions,
warranties, guarantees, rights and remedies expressed or implied by the Trade Practices Act 1974 and similar consumer
protection provisions contained in legislation of the States and Territories and all other obligations and liabilities on the part of the
manufacturer or supplier and nothing contained herein shall restrict or modify such rights, remedies, obligations or liabilities.
October 2005
THIS WARRANTY CARD AND THE PURCHASE DOCKET (OR SIMILAR PROOF OF PURCHASE)
SHOULD BE RETAINED BY THE CUSTOMER AT ALL TIMES
If you require assistance regarding warranty conditions or any other enquiries, please
contact the Panasonic Customer Care Centre via the website
www.panasonic.com.au or by phone on 132 600
If phoning in, please ensure you have your operating instructions available.
Panasonic Australia Pty. Limited
ACN 001 592 187 ABN 83 001 592 187
Locked Bag 505, Frenchs Forest, NSW 2086
www.panasonic.com.au
PRO-031-F01 Issue: 2.0
01-10-2005
Panasonic AVC Networks Australia Pty. Ltd.
P.O. Box 326 Penrith NSW 2751
ABN: 25 000 611 389
Printed in Taiwan
TQB4CM039-1