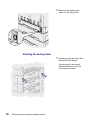
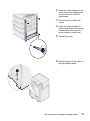
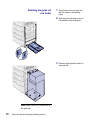
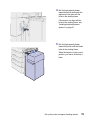
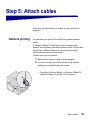
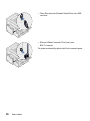
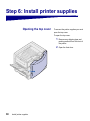
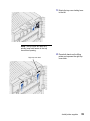
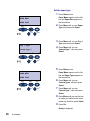
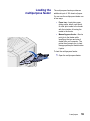
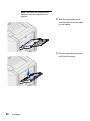
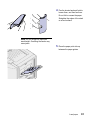
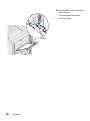
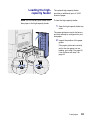
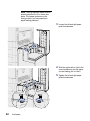
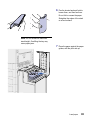
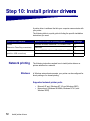
1
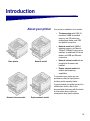
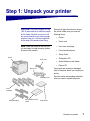
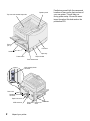
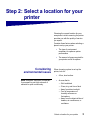
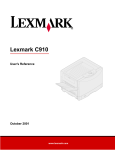
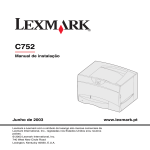
Infoprint Color 1228
Setup Guide
S510-2222-00
Infoprint Color 1228
Setup Guide
S510-2222-00
Edition: October 2001
© Copyright 2001 Lexmark International, Inc.
All rights reserved.
UNITED STATES GOVERNMENT RESTRICTED RIGHTS
This software and documentation are provided with RESTRICTED RIGHTS. Use, duplication or disclosure by the Government is subject to restrictions
as set forth in subparagraph (c)(1)(ii) of the Rights in Technical Data and Computer Software clause at DFARS 252.227-7013 and in applicable FAR
provisions: Lexmark International, Inc., Lexington, KY 40550.
FCC emissions information
This color laser printer has been tested and found to comply with the limits for a Class A digital device, pursuant to Part 15 of the FCC Rules. Operation
is subject to the following two conditions: (1) this device may not cause harmful interference, and (2) this device must accept any interference received,
including interference that may cause undesired operation. Refer to the Publications CD for additional details.
Any questions on this statement should be directed to:
Director of Lab Operations
Lexmark International, Inc.
740 West New Circle Road
Lexington, KY 40550
(859) 232-3000
Safety information
•
•
•
•
•
If your product is NOT marked with this symbol
, it MUST be connected to an electrical outlet that is properly grounded.
The power cord must be connected to an electrical outlet that is near the product and easily accessible.
Refer service or repairs, other than those described in the operating instructions, to a professional service person.
This product is designed, tested, and approved to meet strict global safety standards with the use of specific Lexmark components. The safety
features of some parts may not always be obvious. Lexmark is not responsible for the use of other replacement parts.
Your product uses a printing process that heats the print media, and the heat may cause the media to release emissions. You must understand
the section in your operating instructions that discusses the guidelines for selecting print media to avoid the possibility of harmful emissions.
Conventions
It may help you to recognize the caution and warning conventions used in this book. These appear in the left column for easy reference.
CAUTION! A caution identifies something that could cause you harm.
Warning! A warning identifies something that could damage your printer hardware or software.
Table of contents
Introduction . . . . . . . . . . . . . . . . . . . . . . . . . . . . . . . . . . . . . . . v
About your printer . . . . . . . . . . . . . . . . . . . . . . . . . . . . . . . . . . . v
Other sources of information . . . . . . . . . . . . . . . . . . . . . . . . . vi
Step 1: Unpack your printer . . . . . . . . . . . . . . . . . . . . . . . . . 1
Step 2: Select a location for your printer . . . . . . . . . . . . . . 3
Considering environmental issues . . . . . . . . . . . . . . . . . . . . . .3
Allowing enough space . . . . . . . . . . . . . . . . . . . . . . . . . . . . . . .4
Step 3: Set up the printer and paper handling options . . . 8
Installing the printer base or cabinet . . . . . . . . . . . . . . . . . . . . .9
Installing a 550-sheet drawer . . . . . . . . . . . . . . . . . . . . . . . . .10
Positioning the printer . . . . . . . . . . . . . . . . . . . . . . . . . . . . . . .11
Installing an optional duplex unit . . . . . . . . . . . . . . . . . . . . . . .12
Installing an optional high-capacity feeder . . . . . . . . . . . . . . .15
Attaching the paper tray labels . . . . . . . . . . . . . . . . . . . . . . . .23
Step 4: Install memory and option cards . . . . . . . . . . . . . 24
Removing the system board access cover . . . . . . . . . . . . . . .24
Installing a memory card . . . . . . . . . . . . . . . . . . . . . . . . . . . . .27
Installing a firmware card . . . . . . . . . . . . . . . . . . . . . . . . . . . .28
Installing a hard disk . . . . . . . . . . . . . . . . . . . . . . . . . . . . . . . .30
Installing an option card . . . . . . . . . . . . . . . . . . . . . . . . . . . . .31
Reinstalling the system board access cover . . . . . . . . . . . . . .34
Step 5: Attach cables . . . . . . . . . . . . . . . . . . . . . . . . . . . . . 35
Network printing . . . . . . . . . . . . . . . . . . . . . . . . . . . . . . . . . . .35
Local printing . . . . . . . . . . . . . . . . . . . . . . . . . . . . . . . . . . . . .37
Table of contents
iii
Step 6: Install printer supplies . . . . . . . . . . . . . . . . . . . . . . 38
Opening the top cover . . . . . . . . . . . . . . . . . . . . . . . . . . . . . .38
Installing the photodevelopers . . . . . . . . . . . . . . . . . . . . . . . .41
Installing the toner cartridges . . . . . . . . . . . . . . . . . . . . . . . . .44
Attaching the Quick Reference booklet sleeve . . . . . . . . . . . .47
Attaching an adhesive operator panel overlay . . . . . . . . . . . .48
Closing the top cover . . . . . . . . . . . . . . . . . . . . . . . . . . . . . . .49
Step 7: Load paper . . . . . . . . . . . . . . . . . . . . . . . . . . . . . . . 51
Loading the paper trays . . . . . . . . . . . . . . . . . . . . . . . . . . . . .52
Loading the multipurpose feeder . . . . . . . . . . . . . . . . . . . . . .59
Loading the high-capacity feeder . . . . . . . . . . . . . . . . . . . . . .63
Step 8: Verify printer setup . . . . . . . . . . . . . . . . . . . . . . . . 67
Turning on the printer . . . . . . . . . . . . . . . . . . . . . . . . . . . . . . .67
Printing a menu settings page . . . . . . . . . . . . . . . . . . . . . . . .68
Printing a network setup page . . . . . . . . . . . . . . . . . . . . . . . .69
Step 9: Configure for TCP/IP . . . . . . . . . . . . . . . . . . . . . . . 70
Setting the printer IP address . . . . . . . . . . . . . . . . . . . . . . . . .70
Verifying the IP settings . . . . . . . . . . . . . . . . . . . . . . . . . . . . .71
Configuring for Pull Printing . . . . . . . . . . . . . . . . . . . . . . . . . .71
Network printing . . . . . . . . . . . . . . . . . . . . . . . . . . . . . . . . . . .72
Local printing . . . . . . . . . . . . . . . . . . . . . . . . . . . . . . . . . . . . .74
Identifying printer users . . . . . . . . . . . . . . . . . . . . . . . . . . . . .77
Finding information . . . . . . . . . . . . . . . . . . . . . . . . . . . . . . . . .77
Distributing the information . . . . . . . . . . . . . . . . . . . . . . . . . . .78
Storing the Quick Reference . . . . . . . . . . . . . . . . . . . . . . . . . .78
Index . . . . . . . . . . . . . . . . . . . . . . . . . . . . . . . . . . . . . . . . . . . 79
iv
Table of contents
Introduction
About your printer
Base printer
Network model
Your printer is available in four models:
•
The base printer with 2400 IQ
resolution, 64MB of standard
memory, one 550-sheet tray,
multipurpose feeder, and USB
and parallel connectors.
•
Network model with 64MB of
standard memory, an Ethernet
10BaseT/100BaseTx print server
installed, an additional 550-sheet
drawer, and USB and Ethernet
connectors.
•
Network internet model with an
ImageQuick firmware card
installed.
•
Duplex network model with
network and duplexing
capabilities.
To customize your printer you can
purchase a variety of input options
including a high-capacity feeder.
If you purchased your printer as part of a
multifunction device, refer to the
documentation that came with the device
for information about setting up
components other than the printer.
Network internet model
Duplex network model
v
Other sources of
information
If you need more information after you
have completed setup, refer to the other
printer documentation.
Publications CD
The Publications CD provides
information about loading paper, clearing
error messages, ordering and replacing
supplies, installing maintenance kits, and
troubleshooting. It also provides general
information for administrators.
Quick Reference
The Quick Reference provides easy
access to information about loading print
media, printing confidential jobs,
understanding printer messages, and
clearing jams.
Drivers CD
The drivers CD contains all the
necessary printer drivers to get your
printer up and running.
Depending on which version of the
drivers CD shipped with your printer, it
may also contain MarkVision™
Professional, other printer utilities,
worldwide customer support phone
numbers, screen fonts, and additional
documentation.
vi
Step 1: Unpack your printer
CAUTION! The printer weighs 69.9 kg
(154 Ib) and requires at least four people
to lift it safely. Anytime you move or lift
the printer make sure you have enough
people to help you. Use the handholds
on the side of the printer when lifting.
Remove all items from the box except
the printer. Make sure you have the
following items:
•
Printer
•
Power cord
Note: Leave the printer in the box until
•
Four toner cartridges
you are ready to install memory options
or place it into position.
•
Four photodevelopers
•
Setup Guide
•
Publications CD
•
Quick Reference and sleeve
•
Drivers CD
Printer
Power cord
If any items are missing or damaged,
refer to the place where you bought your
printer.
Drivers CD
Publications CD
Save the carton and packing material in
case you need to repack the printer.
Toner
cartridges
Photodevelopers
Quick Reference and
sleeve
Setup Guide
Unpack your printer
1
Operator panel
Top cover and standard output bin
Exit tray
(bin 1)
Front door
Handholds
Paper tray
Paper size dial
Power switch
Door release latch
High-capacity feeder
connector
Rear cover
Parallel or Ethernet
connector
Option slot cover
USB connector
2
Unpack your printer
Power cord Duplex unit Handholds
socket
cover
Familiarize yourself with the names and
locations of items on the front and rear of
your new printer. This will help you
during printer setup. We use the same
terms throughout this book and on the
publications CD.
Step 2: Select a location for your
printer
Choosing the correct location for your
new printer is vital to ensuring the printer
provides you with the quality of service
you expect.
Consider these factors when selecting a
place to set up your printer:
Considering
environmental issues
Note: Adequate ventilation is important
if you expect to print high volumes of
materials or print continuously.
•
The type of environment
necessary for optimum printer
performance
•
The amount of space required for
your printer and all its options
When choosing a place to set up the
printer, look for:
•
A firm, level surface
•
An area that is:
—
—
—
—
Well ventilated
Clean, dry, and free of dust
Away from direct sunlight
Free of temperature or
humidity extremes or
fluctuations
— Away from the direct airflow of
heaters, air conditioners, or
ventilators
Select a location for your printer
3
Allowing enough space
Base printer
734.9 mm
(29 in.)
102 mm
(5 in.)
1241.8 mm
(56 in.)
4
152.1 mm
(6 in.)
508 mm
(26 in.)
329.5 mm
(13 in.)
Select a location for your printer
1178.4 mm
(46.5 in.)
When choosing a place to set up your
printer, be sure to allow enough space
for the printer and any options you may
have purchased. It’s also important to
allow space for proper ventilation around
the printer.
When selecting a location for your
printer, make sure you have at least the
amount of space indicated in the figure.
Network and internet printers
The network and internet models are
configured with two 550-sheet drawers.
Make sure you have at least the amount
of space indicated in the figure.
869.2 mm
(34.3 in.)
102 mm
(5 in.)
1241.8 mm
(56 in.)
152.1 mm
(6 in.)
508 mm
(26 in.)
329.5 mm
(13 in.)
1355.8 mm
(53.5 in.)
Select a location for your printer
5
Duplex network printers
869.2 mm
(34.3 in.)
102 mm
(5 in.)
329.5 mm
(13 in.)
1241.8 mm
(56 in.)
6
508 mm
(26 in.)
329.5 mm
(13 in.)
Select a location for your printer
1355.8 mm
(53.5 in.)
The duplex network printer is configured
with two 550-sheet drawers and an
internal duplex unit. Make sure you have
at least the amount of space indicated in
the figure.
Printer with
high-capacity feeder
You can add a high-capacity feeder to
your printer if you have a printer cabinet
or if you have a printer stand with
optional drawers.
When attaching a high-capacity feeder,
make sure you provide the additional
space indicated in the figure.
1110 mm
(43.8 in.)
102 mm
(5 in.)
1241.8 mm
(56 in.)
494.2 mm
(30 in.)
508 mm
(26 in.)
329.5 mm
(13 in.)
17.84.1 mm
(70.4 in.)
Select a location for your printer
7
Step 3: Set up the printer and
paper handling options
Note: Be sure to set up the items in the
order listed in the table.
8
Use the following table to locate the
instructions you need to set up your
printer and any paper handling options
you may have purchased.
Topic
Go to page...
Installing the printer base or cabinet
9
Installing a 550-sheet drawer
10
Positioning the printer
11
Installing an optional duplex unit
12
Installing an optional high-capacity feeder
15
Set up the printer and paper handling options
Installing the printer
base or cabinet
You can purchase an optional printer
cabinet or printer base.
The instructions for installing the printer
cabinet or printer base are the same.
To install the printer cabinet:
1
Remove the printer cabinet from
the box.
2
Remove all packing material from
the printer cabinet.
3
Follow the instructions that came
with the option to assemble or
prepare the cabinet or base for
installation.
4
Place the printer cabinet in the
location you have chosen for your
printer.
Set up the printer and paper handling options
9
Installing a
550-sheet drawer
Your printer supports a total of up to
three optional 550-sheet drawers.
1
Unpack the 550-sheet drawer and
remove any packing material.
2
Place the 550-sheet drawer on the
optional printer cabinet, optional
printer base, or in the location you
have chosen for your printer.
3
If you have additional 550-sheet
drawers:
a Align the positioning posts on
the lower drawer with the holes
in the 550-sheet drawer.
b Lower the 550-sheet drawer
into place. Make sure it is
seated securely on the other
drawer.
4
10
Set up the printer and paper handling options
Go to “Positioning the printer” on
page 11.
Positioning the printer
CAUTION! The printer weighs 69.9 kg
(154 Ib) and requires at least four people
to lift it safely. Anytime you move or lift
the printer make sure you have enough
people to help you. Use the handholds
on the side of the printer when lifting.
Once you have selected a location and
set up any optional 550-sheet drawers,
you are ready to position the printer.
1
Have others help you lift the
printer out of the box.
Use the handholds on the sides of
the printer.
Set up the printer and paper handling options
11
2
Have three other people help you
place the printer in the location
you have chosen.
If you are installing the printer on
a 550-sheet drawer, align the
positioning posts on the option
with the holes in the printer. Make
sure the printer is seated securely
on the option.
3
Installing an optional
duplex unit
Remove any tape or packing
material from the outside of the
printer.
Your printer supports an optional duplex
unit that provides two-sided printing.
To install the duplex unit:
12
Set up the printer and paper handling options
1
Remove the duplex unit from its
packing material.
2
Remove any shipping tape and
additional packing material from
the duplex unit.
3
Open the duplex unit access door
on the left side of the printer.
4
Align the duplex unit with the slots
in the printer.
5
Slide in the duplex unit.
Set up the printer and paper handling options
13
14
Set up the printer and paper handling options
6
Align the thumbscrews on the
duplex unit with the holes in the
printer.
7
8
Tighten the thumbscrews .
Close the duplex unit door.
Installing an optional
high-capacity feeder
Your printer supports an optional highcapacity feeder. You can load up to
3,000 sheets of paper in the highcapacity feeder.
Note: You must have an optional printer
cabinet or an optional printer stand with
optional drawers to install a highcapacity feeder.
High-capacity
feeder
Docking
frame
Interface
cable
Power
cord
Guide rail
Four docking
frame screws
1
Remove and unpack all items
from the box.
2
Make sure you have the following
items:
—
—
—
—
—
—
—
—
High-capacity feeder
Docking frame
Guide rail
Interface cable
Power cord
Four docking frame screws
Cable holder
Eight height adjustment
spacers
— Wrench
If any items are missing or damaged,
refer to the place where you bought your
printer.
Cable
holder
Eight height
adjustment spacers
Wrench
Set up the printer and paper handling options
15
3
Make sure the printer power
switch is in the Off position.
1
Remove the two side covers from
the top 550-sheet drawer.
Attaching the docking frame
You may need to use a small
flathead screwdriver to pry the
covers up and outward.
16
Set up the printer and paper handling options
2
Insert two screws through the top
screw holes of the docking frame
and into the holes in the 550sheet drawer.
3
Use the wrench to tighten the
screws.
4
Insert two screws through the
bottom screw holes of the docking
frame and into the holes in the
printer cabinet or printer base.
5
Tighten the screws.
6
Place the wrench in the holder on
the high-capacity feeder.
Set up the printer and paper handling options
17
Attaching the guide rail
and feeder
Note: Make sure all four casters are on
the guide rail.
18
Set up the printer and paper handling options
1
Align the two holes on guide rail
with the studs on the docking
frame.
2
Slide the guide rail down until it is
fully seated on the docking rail.
3
Place the high-capacity feeder on
the guide rail.
4
Roll the high-capacity feeder
toward the printer and check the
alignment of the pins with the
holes in the docking frame.
If the pins do not align with the
holes in the docking frame, see
“Installing height adjustment
spacers” on page 21.
5
Roll the high-capacity feeder
toward the printer until the feeder
locks to the docking frame.
When the feeder is in the correct
position, you hear a click when it
locks.
Set up the printer and paper handling options
19
CAUTION! Do not install the highcapacity feeder power cord at this time.
20
Set up the printer and paper handling options
6
Attach the interface cable to the
back of the printer and tighten the
thumbscrews.
7
Attach the interface cable to the
side of the high-capacity feeder
and tighten the thumbscrews.
8
Insert the point on the cable
holder into the hole on the back of
the top optional drawer.
9
Place the high-capacity feeder
cable into the holder.
10
Installing height adjustment
spacers
Close the cable holder.
If the pins on the high-capacity feeder
did not align with the holes in the docking
frame you can adjust the height of the
feeder.
You can either remove the factory
installed spacer or add two
spacers between each caster and
the bottom of the high-capacity
feeder.
Use the following steps to add or remove
spacers.
1
Determine the height difference
between high-capacity feeder
alignment pins and the docking
frame.
Set up the printer and paper handling options
21
2
Place the high-capacity feeder on
the floor or adequate work
surface.
3
Remove the four screws securing
one of the casters to the highcapacity feeder.
4
Add or remove spacers.
To add spacers:
a Insert the four screws through
the caster.
b Place the spacers on the
screws.
c Align and insert the screws
into the screw holes on the
high-capacity feeder.
To remove the factory installed
spacer:
a Remove the spacer from the
top of the caster.
b Insert the four screws through
the caster.
c Align and insert the screws
into the screw holes on the
high-capacity feeder.
22
Set up the printer and paper handling options
5
Tighten the four screws to secure
the caster to the high-capacity
feeder.
6
Repeat steps 3 through 5 to add
or remove spacers on the
remaining three casters.
7
Return to step 5 on page 19.
Attaching the paper
tray labels
Paper tray labels are included with each
paper tray option. Use the labels to
indicate the tray number and help
identify paper jams and change paper
tray menu options.
Refer to the illustrations to determine
where to place the tray numbers for your
printer configuration.
Set up the printer and paper handling options
23
Step 4: Install memory and
option cards
You can customize your printer memory
capacity and connectivity by adding
optional cards or hard disk.
Removing the system
board access cover
CAUTION! If you are installing memory
or option cards after initial printer setup,
turn the printer off and unplug the power
cord. If you have any other devices
connected to the printer, turn them off as
well and unplug any cables going to the
printer.
Rear cover
24
Install memory and option cards
You must remove the system board
cover to install memory cards, a
firmware card, a hard disk, or an option
card.
You need a number 2 Phillips
screwdriver to remove the system board
cover.
1
Loosen the eight screws on the
system board cover. Do not
remove the screws completely.
2
Slide the cover up and away from
the printer.
Screws
Screws
Install memory and option cards
25
3
Use the illustration to locate the
connector for the card you want to
install.
4
Use the following table to locate
the instructions you need.
Memory and flash memory
card connectors
Option card connector
Parallel
connector
Ethernet
connector
USB
connector
Optional
ImageQuick
firmware card
Optional hard disk
Option card cover
26
To install a...
Go to page...
Memory card
27
Firmware card
28
Hard disk
30
Option card
31
Install memory and option cards
Installing a
memory card
Note: Memory options designed for
other printers may not work with your
new printer.
Warning! Printer memory and flash
memory cards are easily damaged by
static electricity. Touch something metal
such as the printer frame before you
touch a memory card.
Complete the following instructions to
install either a printer memory card or a
flash memory card. Memory cards must
have 168-pin connectors.
The system board has three connectors
for optional memory cards. You can
install any combination of printer
memory and flash memory cards in the
connectors. However, the printer only
recognizes one flash memory card at a
time.
1
Remove the system board access
cover (see page 24).
2
Push open the latches on both
ends of the memory connector
you want to use.
3
Unpack the memory card.
Avoid touching the connection
points along the edge of the card.
Save the packaging.
Install memory and option cards
27
4
Align the notches on the bottom of
the card with the notches on the
connector.
5
Push the memory card firmly into
the connector until the latches on
either end of the connector snap
into place.
It may require some force to fully
seat the card.
6
Installing a
firmware card
Make sure each latch fits over the
notch on the end of the card.
Follow the instructions in this section to
install a firmware card.
If you have a network internet model, an
ImageQuick™ firmware card is already
installed.
Note: Firmware cards designed for
other printers may not work with your
new printer.
If an option card has been installed, you
need to remove the option card before
installing the firmware card.
1
28
Install memory and option cards
Remove the system board access
cover (see page 24).
Warning! Firmware cards are easily
damaged by static electricity. Touch
something metal such as the printer
frame before you touch a card.
2
Alignment pins
Unpack the firmware card.
Avoid touching the metal pins on
the bottom of the card. Save the
packaging.
System board holes
3
Holding the card by its sides, align
the pins on the card with the holes
on the system board.
4
Push the firmware card firmly into
place.
The entire length of the connector
on the firmware card must touch
the system board.
Be careful not to damage the
connectors.
Install memory and option cards
29
Installing a hard disk
Warning! Hard disks are easily
damaged by static electricity. Touch
something metal such as the printer
frame before you touch the hard disk.
30
Install memory and option cards
Follow the instructions in this section to
install an optional hard disk.
If an option card has been installed, you
need to remove the option card before
installing the hard disk.
1
Remove the system board access
cover (see page 24).
2
Align and press the ribbon cable
connector into the connector on
the system board.
3
Installing an
option card
Flip the hard disk over, and then
press the three posts on the
mounting plate into the holes on
the system board. The hard disk
snaps into place.
Your printer has one expansion card slot
that supports a number of option cards.
The following table describes their
function.
Card
Function
MarkNet™ internal print server
Adds an Ethernet or Token-Ring port to connect your printer to a network.
Install a MarkNet N2501e or N2401e internal print server if you received either
of these cards as part of a multifunction printer upgrade.
USB/Parallel 1284-C Interface Card Adds a Universal Serial Bus (USB) port or a parallel port.
Coax/Twinax Adapter for SCS
Adds a coaxial/twinaxial port.
Tri-Port Adapter
Adds LocalTalk, serial, and infrared ports. For details on setting up and using
the Tri-Port Adapter, refer to the documentation that shipped with the card.
Infrared Adapter
Adds infrared functionality.
Install memory and option cards
31
Note: The network, internet network,
and duplex network printers ship with an
Ethernet print server already installed.
You need a small Phillips screwdriver to
install these options.
1
Remove the system board access
cover (see page 24).
2
Remove the screw from the metal
plate that covers the connector
slot, and then lift the plate off.
Save the screw.
Warning! Option cards are easily
damaged by static electricity. Touch
something metal such as the printer
frame before you touch an option card.
32
Install memory and option cards
3
Unpack the option card.
Save the packing materials.
4
Align the connector on the option
card with the connector on the
system board.
The cable connectors on the side
of the option card must fit through
the connector slot.
5
Push the option card firmly into
the option card connector.
6
Secure the card to the system
board with the screws.
Install memory and option cards
33
Reinstalling the system
board access cover
Screw slot
34
Install memory and option cards
After you have finished installing cards
on the printer system board, you must
reinstall the system board access cover.
1
Align the holes on the access
cover with the screws on the
printer as shown.
2
Place the cover against the printer
and slide it down.
3
Tighten the eight screws.
Step 5: Attach cables
Your printer can be attached to a network or locally (directly to a
computer).
Network printing
You can attach your printer to a network using standard network
cables.
A 10BaseT/100BaseTX Fast Ethernet port is standard on the
network, internet network, and duplex network printers. You can add a
Token-Ring or 10Base2 Ethernet port to any printer model by
installing an optional internal print server.
To attach the printer to a network:
1
2
Make sure the printer is turned off and unplugged.
Connect the printer to a LAN drop or hub using standard
cabling that is compatible with your network:
— Token-Ring, Ethernet 10BaseT, or Ethernet 100BaseTX
networks (Category 5) use an RJ-45 connector
Attach cables
35
— Token-Ring networks (Shielded Twisted Pair) use a DB9
connector
— Ethernet 10Base2 networks (Thin Coax) use a
BNC T-connector
The printer automatically adjusts itself for the network speed.
36
Attach cables
Local printing
Note: All Windows operating
systems support parallel
connections. However, only the
Windows 98, Windows Me, and
Windows 2000 operating
systems support USB
connections. Some UNIX, Linux,
and Macintosh computers also
support USB connections. Refer
to your computer documentation
to see if your system supports
USB.
You can attach your printer locally using either a USB port or a
parallel port.
•
A USB port requires a USB printer cable.
•
A parallel port requires an IEEE-1284 compliant parallel cable.
If you install an optional USB/Parallel Interface Card to the network,
internet network, or duplex network printer, you need a 1284 A-C
parallel cable, or a USB cable.
If you have installed an optional Tri-Port Adapter, you can locally
attach the printer with a serial cable. For details on LocalTalk or
infrared connections, refer to the documentation that shipped with the
Tri-Port Adapter.
To attach the printer to a computer:
1
Make sure the printer, computer, and any other attached
devices are turned off and unplugged.
2
Connect the printer to the computer using a parallel or USB
cable.
— Use an IEEE-1284 compliant parallel cable to ensure that
you can access all of your printer functions.
— Be sure to match the USB symbol on the cable to the USB
symbol on the printer.
Attach cables
37
Step 6: Install printer supplies
Opening the top cover
To access the printer supplies you must
open the top cover.
To open the top cover:
38
Install printer supplies
1
Remove any shipping tape and
packing material from the front of
the printer.
2
Open the front door.
3
Rotate the top cover locking lever
to the left.
4
Place both hands on the lifting
points and squeeze the right top
cover latch.
Note: The top cover will open very
quickly, keep both hands on the top
cover when opening.
Right top cover latch
Install printer supplies
39
5
6
40
Install printer supplies
Lift the top cover until it stops.
Remove any shipping tape and
yellow packing material from
inside the printer.
Installing the
photodevelopers
Your printer ships with four color-coded
photodevelopers which you must place
inside the top cover . Each
photodeveloper has its own color-coded
position inside the printer.
Warning! Do not touch, drop, or place
anything on the transfer belt. Touching
the surface of the transfer belt or placing
items on it may damage it.
1
Lift and remove the four shipping
spacers from the transfer belt.
2
Remove any shipping tape and
packing material from inside the
printer.
Transfer belt
Install printer supplies
41
3
Remove one of the
photodevelopers from its packing
material.
You can install the
photodevelopers in any order.
However, it may be easier to
install them from left to right:
black, yellow, cyan, and magenta.
4
Remove the tape from the
photodeveloper.
The photodeveloper has a cover
over the green glass tube. Do not
touch the glass. Touching the
glass may damage it and reduce
print quality. Do not remove the
cover until you begin installing the
photodeveloper.
5
42
Install printer supplies
Align the photodeveloper with the
slot in the printer as shown.
6
While holding the photodeveloper
with your left hand and the
photodeveloper cover with your
right hand, slide the
photodeveloper in until the unit is
fully seated.
As the photodeveloper slides in,
remove the photodeveloper cover.
7
Repeat steps 3 through 6 to install
the remaining photodevelopers.
Install printer supplies
43
Installing the toner
cartridges
Your printer ships with four color-coded
starter toner cartridges. Starter toner
cartridges have a yield of up to 8,000
pages.
You must install the toner cartridges
inside the top cover of the printer. Each
cartridge has its own color-coded
position.
Note: Use a brush or cold water to
remove any toner that has soiled
clothing.
1
You can install the cartridges in
any order. However, it may be
easier to install them from left to
right: black, yellow, cyan, and
magenta.
Waste toner arm
2
44
Install printer supplies
Remove one of the toner
cartridges from its packing
material.
Gently shake the toner cartridge
to distribute the toner evenly.
3
Remove the shipping tape and
any additional packing material.
4
Align the toner cartridge with its
slot in the printer.
The toner cartridge is placed to
the right of the corresponding
colored label.
Colored label
Install printer supplies
45
46
Install printer supplies
5
Slide the toner cartridge in until
the cartridge is fully seated.
6
Push the waste toner arm onto
the photodeveloper until it snaps
into place.
7
Repeat steps 2 through 6 to install
the remaining toner cartridges.
Attaching the Quick
Reference booklet
sleeve
The adhesive sleeve that came with your
printer is a handy place to store your
Quick Reference.
1
Remove the protective paper from
the back of the Quick Reference
pouch.
2
Firmly press the adhesive-backed
sleeve onto the area inside the
front door.
Install printer supplies
47
Attaching an adhesive
operator panel overlay
If English is not your preferred language
attach the overlay that has the
appropriately translated button names:
1
Locate the adhesive overlay
packaged with your printer.
2
3
Peel the backing off the overlay.
4
Peel the covering away from the
overlay.
Align the holes in the overlay with
the buttons on the operator panel,
and then press it into place.
Refer to the publications CD for
instructions on changing the language of
the text displayed on the operator panel.
48
Install printer supplies
Closing the top cover
CAUTION! Before closing the top
cover, make sure the area under the
cover is free of hands, clothing, and
other items.
1
Place both hands on the top cover
as shown.
2
Press down firmly until the top
cover clicks into place.
Install printer supplies
49
3
Rotate the top cover locking lever
to the right.
If you cannot rotate the locking
lever, the cover is not fully closed.
a Place both hands on the lifting
points and squeeze the right
top cover latch.
b Lift the top cover.
c Press down firmly until the top
cover clicks into place.
4
50
Install printer supplies
Close the front door.
Step 7: Load paper
The following table lists page numbers
where you can find loading instructions
for the standard and optional trays, as
well as for the multipurpose feeder.
Go to
page...
Source
Paper sizes
Paper types
Capacity
Tray 1
Letter, A4, Legal, Tabloid1,
A3, B4
Paper, glossy paper
• 550 sheets of 20 lb paper
• 130 sheets of glossy paper
52
Trays 2-4
Letter, A4, Legal, Tabloid,1
A3, B4, Universal1
Paper
• 550 sheets of 20 lb paper
52
Heavy media
tray
Letter, A4, Legal, Tabloid1,
A3, Universal1
Paper, glossy paper,
transparencies,
labels, card stock
• 150 transparencies
• 250 sheets of labels or
card stock
• 500 sheets of glossy paper
52
Multipurpose
feeder
Letter, A4, A5, Legal,
Tabloid2, A3, Executive,
B4, JIS B5, Universal1
Paper, glossy paper,
transparencies,
labels, card stock
•
•
•
•
•
59
7¾, 9, 10, DL, C4, C5, B5,
other3
Envelopes
10 envelopes
Letter, A4
Paper
3000 sheets of 20 lb paper
High capacity
feeder
1
Tabloid paper is 278.8 x 430.8 mm (11 x 17 in.)
2
Universal setting lets you select the following custom sizes:
100 sheets of 20 lb paper
50 sheets of glossy paper
50 transparencies
30 sheets of labels
50 sheets card stock
63
– 139.7 x 210 mm to 215.9 x 355.6 mm (5.5 x 8.27 to 8.5 x 14 in.),
– 69.85 x 127 mm to 229 x 355.6 mm (2.75 x 5 to 9.01 x 14 in.)
– 148 x 182 mm to 215.9 x 355.6 mm (5.83 x 7.17 to 8.5 x 14 in.)
3
You can use other envelope sizes if they are: 98.4 x 162 mm to 176 x 250 mm (3.87 x 6.38 to 6.93 x 9.84 in.)
Load paper
51
Your printer supports a wide variety of
paper types, sizes, and weights. The
standard tray (tray 1) and optional trays
2, 3, and 4 are marked with stack height
letters A, B, and C. The optional heavy
media tray is marked with stack height
letters D, E, and F.
The following table lists recommended
media, weights, and the stack height
guide to use when loading the paper
trays.
Stack height letter
Recommended media
A
Lexmark Glossy Paper*: Letter (P/N 12A5950), A4 (P/N 12A5951)
B
11x17, Legal, B4, A3 (90–105 g/m2, 24–28 lb bond)
C
Letter, A4 (60–105 g/m2, 16–28 lb bond)
11x17, Legal, B4, A3 (60 - 90 g/m2, 16 - 24 lb bond)
D
Lexmark Transparency**: Letter (P/N 12A5940), A4 (P/N 12A5941)
E
Lexmark Glossy Paper*: Letter (P/N 12A5950), A4 (P/N 12A5951)
Paper Labels: Letter, A4 (up to 180 g/m2, 48 lb bond)
F
Letter, A4 (105–128 g/m2, 28–34 lb bond)
*
Lexmark Glossy Paper is 120 g/m2, 80 lb. book, 32 lb bond.
**
Lexmark Transparency weight is 120 g/m2.
Loading the paper trays
Each paper tray provides an input of 550
sheets of paper.
Note: If you have an optional heavy
Follow these instructions to load paper in
all the paper trays.
media paper tray, make sure you review
the heavy media tray section in the table
on page 51 and follow the heavy media
tray instructions on page 57.
52
Load paper
1
Pull the paper tray out until it
stops.
2
Press the metal plate down until it
locks.
Load paper
53
Note: The position of the left paper
guide tells the printer the size of the
paper in the tray. If the left paper guide is
in the wrong position, you may
experience paper feeding problems or
incorrect page formatting.
3
Squeeze the left guide and slide it
to the position for the size paper
you are loading.
4
Release the paper guide.
5
Flex the sheets back and forth to
loosen them, and then fan them.
Do not fold or crease the paper.
Straighten the edges of the stack
on a level surface.
54
Load paper
Note: Do not exceed the maximum
stack height. Overfilling the tray may
cause jams.
6
Place the paper in the tray, print
side down.
7
Squeeze the front paper guide
lever and slide the guide until it
lightly touches the stack of paper.
Load paper
55
56
Load paper
8
Rotate the paper size dial until the
size of the paper in the tray is
indicated.
9
Push the tray completely in the
printer.
Using the heavy media tray
Note: Using the heavy media tray with
lighter weight paper such as 16–26 lb
plain paper may cause jams.
The optional heavy media tray replaces
tray 1. The heavy media tray is specially
designed for use with heavier plain
paper, transparencies, labels, and card
stock. For instructions on installing the
heavy media tray, refer to your
publications CD.
When the heavy media tray is installed, it
turns the auto size sensing off. You must
set the operator panel to the size and
type of media you have placed in the
tray.
Set the paper size
Note: For more information about using
1
Follow the instructions for
“Loading the paper trays” on
page 52 to place your print media
in the heavy media paper tray.
2
Press Menu until you see
Paper Menu, and then press
Select.
3
Press Menu until you see Paper
Size, and then press Select.
4
Press Menu until you see Tray 1
Size, and then press Select.
5
Press Menu until the size paper
you placed into the tray appears,
and then press Select.
the operator panel and changing menu
settings, refer to the publications CD.
PAPER MENU
PAPER SIZE
1
Menu
2
Select
Go
3
Return
5
Stop
4
6
Load paper
57
Set the paper type
1
Paper Menu appears on the first
line and Paper Size appears on
the second line.
PAPER MENU
PAPER TYPE
1
Menu
2
Select
Go
3
Return
5
Stop
4
2
Press Menu until you see Paper
Type, and then press Select.
3
Press Menu until you see Tray 1
Type, and then press Select.
4
Press Menu until you see
Custom Type 1, and then press
Select.
5
Press Return once.
6
Tray 1 Type
Custom Type 1
1
Menu
2
Select
Go
3
Return
5
Stop
4
6
Paper Menu appears on the first
line and Paper Type appears on
the second line.
PAPER MENU
PAPER TYPE
1
Menu
2
Press Return once.
Select
Go
3
Return
5
Stop
4
6
Press Menu until you see
Custom Types, and then press
Select.
6
7
Press Menu until you see
Custom Type 1, and then press
Select.
8
Press Menu until you see the type
of media you loaded in the heavy
media tray, and then press Select.
9
Press Go.
Ready is displayed.
58
Load paper
Loading the
multipurpose feeder
The multipurpose feeder provides an
additional input of 100 sheets of paper.
You can use the multipurpose feeder one
of two ways:
•
Paper tray—Load plain paper,
glossy paper, labels, card stock,
or other print media in the feeder
with the intention of leaving the
media in the feeder.
•
Manual bypass feeder—Send a
print job to the feeder while
specifying the type and size of
media from your computer. The
printer then prompts you to load
the appropriate print media before
it prints.
To load the multipurpose feeder:
1
Open the multipurpose feeder.
Load paper
59
Note: The guides are interconnected,
when you move one, they both move
together.
60
Load paper
2
Slide the paper guides to the
correct position for the size paper
you are loading.
3
Press the paper feed plate down
until it locks into place.
4
Flex the sheets back and forth to
loosen them, and then fan them.
Do not fold or crease the paper.
Straighten the edges of the stack
on a level surface.
Note: Do not exceed the maximum
stack height. Overfilling the feeder may
cause jams.
5
Place the paper print side up
between the paper guides.
Load paper
61
6
Move the SET button to the left to
unlock the tray.
The multipurpose tray can be
closed by lifting it.
Set button
62
Load paper
Loading the highcapacity feeder
Note: Do not load any print media other
The optional high-capacity feeder
provides an additional input of 3,000
sheets of paper.
To load the high-capacity feeder:
than paper in the high-capacity feeder.
1
Open the high-capacity feeder top
cover.
The paper guides are set at the factory
and may already be configured for your
size paper.
2
Inspect the position of the paper
guides.
If the paper guides are correctly
set for the size paper you are
loading, go to step 6 on page 65,
if not continue with step 3 on
page 64.
Load paper
63
Note: The high-capacity feeder must be
properly adjusted for A4 or Letter size
paper. If the paper guides are in the
wrong position, you may experience
paper feeding problems.
64
Load paper
3
Loosen the left and right paper
guide thumbscrews.
4
Slide the guides left or right to the
correct position for the size paper
you are loading (A4 or Letter).
5
Tighten the left and right paper
guide thumbscrews.
6
Flex the sheets back and forth to
loosen them, and then fan them.
Do not fold or crease the paper.
Straighten the edges of the stack
on a level surface.
Note: Do not exceed the maximum
stack height. Overfilling the tray may
cause paper jams.
7
Place the paper against the paper
guides, with the print side up.
Load paper
65
Note: If there is only a partial stack
of paper in the tray, the paper low
sensor will not allow the tray to go
down. Add more paper to lower the
tray.
8
Press the Paper Tray button.
The paper tray lowers so you can
load another 500 sheets of paper.
9
Place the paper against the paper
guides, with the print side up.
10
Repeat step 8 and step 9 until you
have filled the tray or loaded the
desired quantity.
11
Close the high-capacity feeder top
cover.
Make sure the high-capacity
feeder is pushed completely
against the printer.
66
Load paper
Step 8: Verify printer setup
Turning on the
printer
Note: To prevent an electrical
overload, plug your printer into a
well-grounded outlet on a nonground fault interrupter (GFI)
circuit.
1
Plug one end of the power cord into the socket on the side of
the printer and the other end into a properly grounded outlet.
Verify printer setup
67
2
Plug one end of the high-capacity feeder power cord into the
socket on the side of the high-capacity feeder and the other
end into a properly grounded outlet.
3
Turn on the printer. If the printer is attached locally (directly to a
computer), leave the computer and any other attached devices
turned off. You will turn these on in a later step.
The message Performing Self Test appears on the display
while the printer warms up.
After the internal tests complete, the Ready message indicates
the printer is ready to receive jobs. If you see a message other
than Ready , refer to your quick reference booklet or the
publications CD for instructions on clearing the message. Click
Printing, and then Understanding printer messages.
4
If you attached your printer to a network, continue with “Printing
a network setup page” on page 69.
Otherwise, go on to “Printing a menu settings page” on
page 68.
Printing a menu
settings page
Print the menu settings page to review the default printer settings and
to verify that printer options are installed correctly.
Note: For more information
1
about using the operator panel
and changing menu settings,
refer to the publications CD.
Press Menu until you see Utilities Menu, and then press
Select.
2
Press Menu until you see Print Menus, and then press
Select to print the page.
The message Printing Menus is displayed.
3
UTILITIES MENU
1
Menu
2
Select
Go
68
3
Return
5
Verify printer setup
Stop
Verify the options you installed are correctly listed under
“Installed Features.”
If an option you installed is not listed, turn the printer off, unplug
the power cord, and reinstall the option.
4
4
Verify the amount of memory installed is correctly listed under
“Printer Information.”
5
Verify the paper trays are configured for the sizes and types of
paper you loaded.
6
Printing a network
setup page
If the printer is attached to a network, print a network setup page to
verify the network connection. This page also provides important
information that helps you configure for network printing.
Note: If an optional MarkNet
1
card is installed in slot 1, you
see Print Net1 Setup on the
display.
Press Menu until you see Utilities Menu, and then press
Select.
2
Press Menu until you see Print Net Setup, and then press
Select. The network setup page prints and the printer returns
to Ready status.
3
Check the first section on the network setup page and confirm
that Status is “Connected.”
UTILITIES MENU
1
Menu
2
Select
3
Return
If Status is “Not Connected,” your LAN drop may not be active
or your network cable may be malfunctioning. Consult your
network support person, and then print another network setup
page to verify that you are connected to your network.
4
Save the network setup page for later use.
Go
5
Stop
6
What do I do next?
Task
Go to page…
Configure for TCP/IP
70
Install printer drivers
72
Verify printer setup
69
Step 9: Configure for TCP/IP
If you have TCP/IP available on your network, we recommend that
you assign an IP address to the printer.
Setting the printer
IP address
Note: You can find instructions
for other methods of setting the
IP address in the online
documentation on the
drivers CD that shipped with
your printer. Launch the CD,
click View Documentation, and
then click Network Printer
Install.
70
Configure for TCP/IP
If your network is using DHCP, an IP address is automatically
assigned after you connect the network cable to the printer.
1
Look for the address under the TCP/IP heading on the network
setup page you printed in “Printing a network setup page” on
page 69.
2
Go to “Verifying the IP settings” on page 71 and begin with
step 2.
If your network is not using DHCP, you must manually assign an IP
address to the printer. One of the easiest ways is to use the operator
panel:
1
Press Menu until you see Network Menu, and then press
Select.
2
Press Menu until you see Standard Network, and then press
Select.
Standard Network appears if you purchased a printer with a
network port on the printer system board. If you have an
optional MarkNet card installed, you see Network Option 1.
3
Press Menu until you see Std Net Setup or Network 1 Setup,
and then press Select.
4
5
Press Menu until you see TCP/IP, and then press Select.
Press Menu until you see Set IP Address, and then press
Select.
6
Change the address by pressing Menu to increase or decrease
each number. Press Select to move to the next segment. Press
Select when you are finished.
The message Saved appears briefly.
Verifying the
IP settings
7
Press Menu until you see Set IP Netmask, and then press
Select.
8
9
Repeat step 6 to set the IP Netmask.
10
11
Repeat step 6 to set the IP Gateway.
1
Press Menu until you see Set IP Gateway, and then press
Select.
When you are finished, press Go to return the printer to the
Ready state.
Print another network setup page. Look under the “TCP/IP”
heading and make sure the IP address, netmask, and gateway
are what you want.
See “Printing a network setup page” on page 69 if you need
help.
Note: On Windows computers,
click Start Programs
Command Prompt.
2
Ping the printer and verify that it responds. For example, at a
command prompt on a network computer type “ping” followed
by the new printer IP address:
ping xxx.xxx.xxx.xx
If the printer is active on the network, you will receive a reply.
Configuring for
Pull Printing
If your printer has an optional ImageQuick firmware card installed, it
can be configured for Pull Printing once an IP address has been
assigned.
For detailed configuration instructions, refer to the CD that shipped
with the ImageQuick card.
Configure for TCP/IP
71
Step 10: Install printer drivers
vers
A printer driver is software that lets your computer communicate with
your printer.
The following table is a quick guide to finding the specific installation
instructions you need.
Type of printer installation
Network environment or operating system
Go to page
Network
Windows 95/98/Me, Windows NT 4.0, Windows 2000
72
(Ethernet or Token-Ring connections)
Macintosh
73
Local
Windows 95/98/Me, Windows NT 4.0, Windows 2000
74
(parallel or USB connections)
Macintosh
75
Network printing
Windows
The following instructions explain how to install printer drivers on
printers attached to a network.
In Windows network environments, your printer can be configured for
direct printing or for shared printing.
Supported network printer ports
•
•
72
Install printer drivers
Microsoft IP port (Windows NT 4.0 and Windows 2000)
Network port (Windows 95/98/Me, Windows NT 4.0, and
Windows 2000)
Supported printer drivers
Note: Using the color laser
custom printer driver and a
network port provides enhanced
functionality, such as printer
status alerts.
•
•
Windows system printer driver
Color laser custom printer driver
System drivers are built into Windows operating systems. Custom
drivers are available on the drivers CD.
Supported printing methods
•
•
Direct IP printing—when you just want to print directly to a
printer on your network
Shared printing (point and print, peer-to-peer)—when you need
to centrally manage network printers
You can find detailed information about using each of these printing
methods on the drivers CD. Click View Documentation and look for
information about network printer installation.
Creating ports and installing drivers
Read the detailed instructions on the drivers CD. Click View
Documentation and look for information about network printer
installation for your specific Windows environment.
If you choose to install without using the instructions on the
drivers CD, you need a basic understanding of network printing on
TCP/IP networks, installing printer drivers, and the process involved
in creating new network ports.
Macintosh
Note: A PostScript Product
Description (PPD) file provides
detailed information about the
capabilities of a printer to UNIX
or Macintosh drivers or
applications.
Your printer connects automatically to AppleTalk networks and
becomes readily visible to other network clients.
You must create a printer object (icon) on the desktop of each
network client using the LaserWriter 8 printer driver and the printer’s
PPD file.
Specific information about installing the printer on your AppleTalk
network can be found in the online documentation on the drivers CD
that shipped with your printer.
Depending upon which version of the drivers CD shipped with your
printer, you may also find this software on the drivers CD. Launch the
Install printer drivers
73
PPD Installer and follow the instructions to install the PPDs. Send a
test print job when you have finished.
Other network
environments
Local printing
Windows
Contact your point of purchase to obtain information about support for
other network environments.
In order to print, you must install a printer driver on the computer
attached to the printer.
Not all Windows operating systems support all types of connections.
In addition to the following information, you may need to refer to the
documentation that shipped with your computer and your Windows
software.
Installation instructions
Read the detailed online instructions on the drivers CD. Click View
Documentation and look for information about local printer
installation. Detailed instructions are provided for parallel and USB
connections.
Supported connections
Parallel or USB refers to the type of printer cable you used in “Attach
cables” on page 35 to attach the printer to your computer.
•
Parallel (works with Windows 95/98/Me, Windows NT 4.0, and
Windows 2000)
•
USB (works with Windows 98/Me and Windows 2000 only)
Supported printer drivers
Note: Using the printer’s
custom printer driver provides
enhanced functionality, such as
printer status alerts.
74
Install printer drivers
•
•
Windows system printer driver
The printer’s custom printer driver
System drivers are built into Windows operating systems. Custom
drivers are available on the drivers CD.
Macintosh
You must install the printer’s PPD and use it with the LaserWriter 8
printer driver or the Adobe PostScript driver.
You can find the printer’s PPD and specific information about local
printer installation on Macintosh computers on the drivers CD that
shipped with your printer. Click View Documentation and look for
information about local printer installation.
After the printer is installed, print a test page to verify your printer is
correctly set up.
Install printer drivers
75
Step 11: Distribute information
to users
Identifying printer
users
Several types of users may need access to the information stored on
the Publications CD. These include:
•
•
•
•
Finding
information
Users sending print jobs
Network printer administrators
Help desk personnel
Information Technology support staff
Launch the CD and browse the contents to see a complete list of the
available information. If you have a version of Acrobat capable of full
text searching, we have created catalog entries to help you find the
information you need.
The type of helpful information provided on the Publications CD
includes:
•
•
•
•
•
•
Tips for successful printing
Ways to improve print quality
Information about using the operator panel
Instructions for replacing print cartridges and other supply
items
Solutions to common printing problems
Instructions for clearing jams
Distribute information to users
77
Distributing the
information
You can give users access to the information on the publications CD
in several ways:
•
Give the publications CD to a system administrator or the Help
desk.
•
Copy the entire contents of the CD (or just specific topics) to a
shared network drive or Intranet site.
Each topic on the publications CD is a separate PDF. Launch
the CD, click Other resources, and then click File locations.
This will provide a brief overview of each PDF file.
•
Storing the Quick
Reference
Congratulations!
78
Print the information on the publications CD and store it near
the printer for easy access. For printing instructions, launch the
CD, and then click Navigation or Print as Book from the
Home page.
In addition to the Publications CD, your printer shipped with a Quick
Reference. We recommend that you store this booklet in the
convenient sleeve. The sleeve should be attached inside the front
door of the printer.
You are now ready to use your new printer. Save this book if you
anticipate purchasing or installing printer options in the future.
Distribute information to users
Index
A
accessing supplies 38
attaching
550-sheet drawers 10
BNC T-connector 36
DB9 connector 36
duplex unit 12
high-capacity feeder 15
memory cards 27
operator panel overlay 48
option cards 31
parallel cable 37
print server 31
Quick Reference sleeve 47
RJ-45 connector 35
USB cable 37
card stock 51
CD
drivers vi
publications vi
Coax/Twinax Adapter for SCS 31
D
dpi v
drivers 72
drivers CD vi
duplex network (dn) 6
duplex unit, installing 12
E
environmental issues 3
exit tray 2
B
base printer 4
bin 1 2
C
cables
Ethernet 35, 36
parallel 37
power 67
Token-Ring 35, 36
USB 37
F
FCC emissions information ii
firmware card, installing 28
flash memory, installing 27
H
hard disk 30
heavy media paper tray 57
high-capacity feeder 15
Index
79
I
M
ImageQuick 71
Infrared Adapter 31
installing
Coax/Twinax Adapter 31
firmware card 28
flash memory 27
hard disk with adapter card 31
internal print server 31
MarkNet print server 31
memory cards 27
option cards 31
parallel interface card 31
photodevelopers 41
print servers 31
printer drivers 72
printer memory 27
supplies 38
toner cartridges 44
Tri-Port Adapter 31
USB/Parallel Interface Card 31
internal print server 31
introduction v
IP address, setting 70
IP settings, verifying 71
Macintosh 73
MarkNet internal print servers 31
maximum stack height
550-sheet trays 55
high-capacity feeder 65
multipurpose feeder 61
memory cards
flash 27
installing 27
printer 27
menu settings page 68
L
labels
paper tray 23
printing 51
Linux 74
loading
high capacity feeder 63
multipurpose feeder 59
paper trays 52
local printing
cables 37
drivers 74
LocalTalk network
port on Tri-Port adapter 31
80
Index
N
NetWare 74
network printer 5
printer location 5
network printing
cables 35
drivers 72
network setup page 69
O
operator panel 69
operator panel overlay, attaching 48
option cards
Coax/Twinax Adapter for SCS 31
Infrared Adapter 31
installing 31
internal print server 31
Tri-Port Adapter 31
USB/Parallel Interface Card 31
options
heavy media tray 57
interface cards 31
internal print server 31
memory 27
paper handling 8
printer stand 9
output bins
bin 1 2
standard 2
P
S
paper
loading 51
sizes 51
types 51
paper handling 8
paper size, setting 57
paper tray, heavy media 57
paper type, setting 58
parallel cable 37
photodevelopers, installing 41
print media 51
print server
installed in network models v
installing 31
printer
base 9
cabinet 9
lifting 11
memory v, 27
models v
turning the power on 67
unpacking 1
printer drivers 72
printer location 3, 4, 5, 6, 7
printer view, front and rear 2
printer with high-capacity feeder 7
publications CD
distributing 78
information vi
Pull Printing 71
safety information
located on inside front cover
setting
paper size 57
paper type 58
sources of information vi
space requirements 4, 5, 6, 7
stack height, maximum
550-sheet trays 55
high-capacity feeder 65
multipurpose feeder 61
system board, accessing 24
Q
Quick Reference
attaching booklet sleeve 47
booklet information vi, 78
R
T
TCP/IP 70
toner cartridges, installing 44
top cover
closing 49
opening 38
transparencies 51
tray, exit 2
Tri-Port Adapter 31
turning on the printer 67
U
UNIX 74
unpacking
high-capacity feeder 15
memory cards 27
option cards 32
printer 1
USB 37
USB/Parallel Interface Card 31
W
Windows 72, 74, 75, 76
resolution v
Index
81
Readers’ Comments — We’d Like to Hear from You
Infoprint Color 1228
Setup Guide
Publication No. S510-2222-00
Overall, how satisfied are you with the information in this book?
Very Satisfied
Satisfied
Neutral
Dissatisfied
Very
Dissatisfied
Overall satisfaction
h
h
h
h
h
How satisfied are you that the information in this book is:
Very Satisfied
Satisfied
Neutral
Dissatisfied
Very
Dissatisfied
Accurate
h
h
h
h
h
Complete
h
h
h
h
h
Easy to find
h
h
h
h
h
Easy to understand
h
h
h
h
h
Well organized
h
h
h
h
h
Applicable to your tasks
h
h
h
h
h
Please tell us how we can improve this book:
Thank you for your responses. May we contact you?
h Yes
h No
When you send comments to IBM, you grant IBM a nonexclusive right to use or distribute your comments in any
way it believes appropriate without incurring any obligation to you.
Name
Company or Organization
Phone No.
Address
S510-2222-00
_________________________________________________________________________________
Readers’ Comments — We’d Like to Hear from You
Cut or Fold
Along Line
Fold and Tape
Please do not staple
Fold and Tape
_____________________________________________________________________________
NO POSTAGE
NECESSARY
IF MAILED IN THE
UNITED STATES
BUSINESS REPLY MAIL
FIRST-CLASS MAIL
PERMIT NO. 40
ARMONK, NEW YORK
POSTAGE WILL BE PAID BY ADDRESSEE
IBM Corporation
Information Development IBM Printing Systems Depatment H7FE
Building 004M PO Box 1900 Boulder, CO
80301-9817
_____________________________________________________________________________
Fold and Tape
S510-2222-00
Please do not staple
Fold and Tape
Cut or Fold
Along Line
Part Number: 53P7114
S510-2222-00
(1P) P/N: 53P7114
Printed in the United States of America
on recycled paper containing 10%
recovered post-consumer fiber.