1
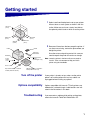
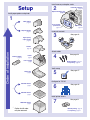
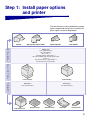
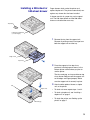
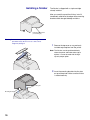
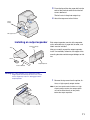
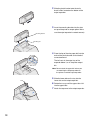
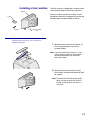
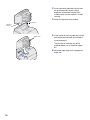
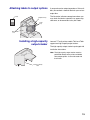
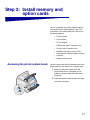
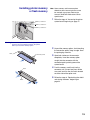
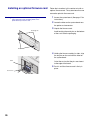
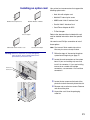
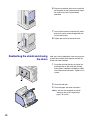
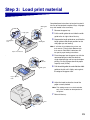
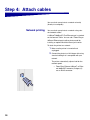
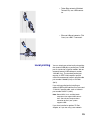
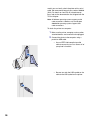
Lexmark T620 and T622
Setup Guide
January 2001
www.lexmark.com
Edition: January 2001
The following paragraph does not apply to any country where such provisions are inconsistent with local law: LEXMARK INTERNATIONAL, INC.,
PROVIDES THIS PUBLICATION “AS IS” WITHOUT WARRANTY OF ANY KIND, EITHER EXPRESS OR IMPLIED, INCLUDING, BUT NOT LIMITED TO, THE
IMPLIED WARRANTIES OF MERCHANTABILITY OR FITNESS FOR A PARTICULAR PURPOSE. Some states do not allow disclaimer of express or implied
warranties in certain transactions; therefore, this statement may not apply to you.
This publication could include technical inaccuracies or typographical errors. Changes are periodically made to the information herein; these changes will be
incorporated in later editions. Improvements or changes in the products or the programs described may be made at any time.
Comments about this publication may be addressed to Lexmark International, Inc., Department F95/032-2, 740 West New Circle Road, Lexington, Kentucky
40550, U.S.A. In the United Kingdom and Eire, send to Lexmark International Ltd., Marketing and Services Department, Westhorpe House, Westhorpe, Marlow
Bucks SL7 3RQ. Lexmark may use or distribute any of the information you supply in any way it believes appropriate without incurring any obligation to you. You
can purchase additional copies of publications related to this product by calling 1-800-553-9727. In the United Kingdom and Eire, call 0628-481500. In other
countries, contact your point of purchase.
References in this publication to products, programs, or services do not imply that the manufacturer intends to make these available in all countries in which it
operates. Any reference to a product, program, or service is not intended to state or imply that only that product, program, or service may be used. Any functionally equivalent product, program, or service that does not infringe any existing intellectual property right may be used instead. Evaluation and verification of
operation in conjunction with other products, programs, or services, except those expressly designated by the manufacturer, are the user’s responsibility.
Lexmark and Lexmark with diamond design, MarkNet, and MarkVision are trademarks of Lexmark International, Inc., registered in the United States and/or
other countries.
Sun, Sun Microsystems, Sun Ray, Solaris and the Solaris logo are trademarks or registered trademarks of Sun Microsystems, Inc. in the U.S. and other countries, and are used under license.
Other trademarks are the property of their respective owners.
© Copyright 2001 Lexmark International, Inc.
All rights reserved.
UNITED STATES GOVERNMENT RESTRICTED RIGHTS
This software and documentation are provided with RESTRICTED RIGHTS. Use, duplication or disclosure by the Government is subject to restrictions as set
forth in subparagraph (c)(1)(ii) of the Rights in Technical Data and Computer Software clause at DFARS 252.227-7013 and in applicable FAR provisions: Lexmark International, Inc., Lexington, KY 40550.
FCC emissions information
This device complies with Part 15 of the FCC Rules. Operation is subject to the following two conditions:
(1) this device may not cause harmful interference, and (2) this device must accept any interference received, including interference that may cause undesired
operation.
Any questions on this statement should be directed to:
Director of Lab Operations
Lexmark International, Inc.
740 West New Circle Road NW
Lexington, KY 40550
(859) 232-3000
Refer to the Lexmark T620/T622 Publications CD for details.
Safety information
•
•
•
•
•
•
If your product is NOT marked with this symbol
, it MUST be connected to an electrical outlet that is properly grounded.
The power cord must be connected to an electrical outlet that is near the product and easily accessible.
Refer service or repairs, other than those described in the operating instructions, to a professional service person.
This product is designed, tested and approved to meet strict global safety standards with the use of specific Lexmark components. The safety features
of some parts may not always be obvious. Lexmark is not responsible for the use of other replacement parts.
Your product uses a laser, exercise
CAUTION: Use of controls or adjustments or performance of procedures other than those specified herein may result in hazardous radiation
exposure.
Your product uses a printing process that heats the print media, and the heat may cause the media to release emissions. You must understand the
section in your operating instructions that discusses the guidelines for selecting print media to avoid the possibility of harmful emissions.
Conventions
Warning! A warning identifies something that could damage your printer hardware or software.
CAUTION! A caution identifies something that could cause you harm.
Getting started
1
Select a well-ventilated place to set up your printer.
Allow at least as much space as shown in the illustration. Make sure you have a sturdy, low table or
the optional printer stand on which to set the printer.
2
Remove all items from the box except the printer. If
any items are missing, contact the place where you
bought the printer.
137.16 cm
(4.5 ft)
304.8 mm
(12 in.)
304.8 mm
(12 in.)
304.8 mm
(12 in.)
508 mm
(20 in.)
CDs
Printer
Paper bail
and bracket
Handhold
Operator panel
overlay
(non-English only)
Power
switch
cover
Save the carton and packing material in case you
need to repack the printer for service or storage.
Note: Leave the printer in the box until you are ready to
install it. Then ask someone to help you lift the
printer using the handholds.
Power cord
Tray number decals - Lexmark
T Family T622 model only
500 sheet drawer - Lexmark T
Family T622 model only
Turn off the printer
Options compatibility
Troubleshooting
If your printer is already set up, make sure the printer
power is off and the power cord and any cables are
unplugged before installing any options.
Options compatible with Lexmark T Family printers are
labeled with a colored triangle. Label locations are indicated in the illustrations in this book.
If you encounter a problem while setting up the printer,
refer to the Lexmark T620/T622 Publications CD.
1
Install memory and option cards
Setup
Install paper options and printer
1
2
Printer/flash memory
page 19
Optional firmware card
page 20
5-Bin mailbox
page 13
*
Output expander
page 11
High-capacity
output stacker
Access printer
system board
Option cards
page 17
page 21
Load print material
3
See page 23
page 15
Finisher
Order of installation
page 10
Attach cables
Envelope feeder
Printer
page 16
page 7
4
Print cartridge
See page 24
Network printing - page 24
Local printing - page 25
page 7
Verify setup
Duplex unit
page 6
5
See page 27
Configure for TCP/IP
250-Sheet drawer
page 5
*
6
See page 29
500-Sheet drawer
page 5
Install printer drivers
2000-Sheet drawer
page 4
* Option install order
may be reversed.
7
See page 31
Network printing - page 31
Local printing - page 33
Step 1: Install paper options
and printer
The table illustrates various combinations of paper
options supported by your printer. All models support a duplex unit and envelope feeder.
High-capacity output stacker
Finisher
O
u
t
p
u
t
P
r
i
n
t
e
r
I
n
p
u
t
Output expander
5-Bin mailbox
Attach up to:
Three output expanders,
Two 5-bin mailboxes,
One of each, or
One high-capacity output stacker, or
One output expander and one high-capacity output
stacker, or
One finisher and one output expander or
One finisher and one 5-bin mailbox.
Lexmark T622(n)
Lexmark T620(n)
Attach up to:
Three optional drawers.
Attach up to:
Four optional drawers.
2000-Sheet drawer
250-Sheet drawer
500-Sheet drawer
Duplex unit
Envelope feeder
3
Installing the 2000-sheet drawer
Your printer supports one 2000-sheet drawer. It
gives your printer added capacity by letting you
load up to four reams (approximately 2,000
sheets) of 20 lb paper.
The 2000-sheet drawer is packaged with a User’s
Guide that contains detailed instructions for installation, setup, and use, including loading paper and
removing paper jams.
Lexmark T Family label
(colored triangle)
4
When you have finished installing the 2000-sheet
drawer, install any other drawers or an optional
duplex unit that you may have purchased.
Installing a 250-sheet or
500-sheet drawer
Paper drawers attach under the printer and
optional duplex unit. The printer automatically recognizes any drawer that has been installed.
A drawer consists of a paper tray and a support
unit. The 250-sheet drawer and the 500-sheet
drawer are installed the same way.
Tray labels
Lexmark T Family label
(colored triangle)
1
Remove the tray from the support unit.
Remove all packing material and tape from
both the support unit and the tray.
2
Place the support unit on top of any
previously installed paper drawers, or the
table or printer cabinet where you plan to
use the printer.
Support unit
Paper tray
The tab, round peg, and square holes on top
of any drawer help you seat the support unit
so the edges are aligned properly. Make
sure the support unit is securely in place.
3
Attach another optional drawer, a duplex
unit, or the printer:
•
To attach a drawer, repeat steps 1 and 2.
•
To attach a duplex unit, see “Installing a
duplex unit” on page 6.
•
To attach the printer, see “Setting up the
printer” on page 7.
Tab
Square hole
Round peg
5
Installing a duplex unit
The duplex unit attaches under the printer, below
the standard input tray and above any paper
drawers.
Back cover
Refer to the Lexmark T620/T622 Publications CD
for details about using the duplex unit.
Lexmark T Family
label
1
Place the duplex unit on top of any installed
paper drawers, or the table or printer cabinet
where you plan to use the printer.
The tab, peg, and holes on top of any drawer
help you seat the duplex unit so the edges
are aligned properly. Make sure it is securely
in place.
2
Tab
Square hole
Round peg
6
Attach the printer. See “Setting up the
printer” on page 7.
Setting up the printer
In order to ensure adequate clearance when
installing system board options, see “Install memory and option cards” on page 17 before you position the printer if:
•
You plan to install memory or option
cards
and
•
You will have less than 605.6 mm (24 in.)
clearance on the left side of the printer.
CAUTION! Make sure your fingers are not under
the printer when you set it down.
1
Ask someone to help you lift the printer by
the handholds and lower it onto the duplex
unit, optional drawer, table or printer cabinet.
The tab, round peg, and square holes on top
of any drawer or the duplex unit help you
seat the printer so the edges are aligned
properly. Make sure the printer is securely in
place.
Handhold
Tab
Square hole
Round peg
2
Remove the print cartridge packaging.
a Push the release latch and open the
printer upper front door.
b Grasp the print cartridge by the hand grip
and pull the print cartridge up and out.
Print cartridge
7
c Pull on each end of the plastic, V-shaped
piece and then pull the packaging material straight out. Discard all packaging
material.
Warning! Never touch the photoconductor drum on the underside of the print cartridge.
d Align the slides on the print cartridge with
the slots on the print cartridge cradle.
Use the colored arrows inside the printer
for placement.
e Guide the print cartridge down as it drops
and snaps into place.
f Close the upper front door.
3
Attach decals to the paper trays.
Decals showing the number “1” are on your
printer and the standard input tray. These
decals keep the standard input tray paired
with the printer.
Peel the decals from the sheet and attach
them to the recessed areas on the drawer
and the matching tray.
8
4
Attach the operator panel overlay.
If English is not your preferred language,
attach the overlay with the appropriately
translated names for the operator panel.
Operator panel
overlay
a Peel the protective backing off the overlay.
b Align the holes in the overlay with the
buttons on the operator panel and press
it into place.
c Rub the overlay firmly to make sure it
adheres securely to the operator panel.
d Peel the protective covering away from
the overlay.
5
Attach the paper bail. If you will be installing
a finisher or 5-bin mailbox, skip to step 6.
a Remove the printer top cover and slide
the plastic bracket onto the static brush
holder. Adjust the bracket so it is centered over the area where paper exits.
b Place the tips of the wire paper bail into
the ends of the plastic bracket so that the
bail curves downward.
c Replace the top cover.
6
Attach output options. See:
•
“Installing a finisher” on page 10
•
“Installing an output expander” on page 11
•
“Installing a 5-bin mailbox” on page 13
•
“Installing a high-capacity output stacker” on
page 15
9
Installing a finisher
The finisher is shipped with a staple cartridge
already installed.
After you carefully unpack the finisher, install it
immediately; otherwise, the edges of the mounting
brackets could damage tabletops or fabrics.
Lexmark T Family label
(colored triangle)
Warning! The finisher tray is designed to hold the weight of
print material only. Do not use it as a shelf; excess
weight may damage it.
1
Remove the top cover or any previously
installed output options from the printer.
Note: The finisher must be positioned directly
above the printer and below other output
options. It cannot be used with the highcapacity output option.
2
Mounting slot
Mounting bracket
10
Insert the mounting brackets into the slots
on top of the printer. Make sure the finisher
is seated securely.
3
Place the tips of the wire paper bail into the
ends of the plastic bracket so that the bail
curves downward.
The bail rests in the printer output tray.
4
Attach the top cover to the finisher.
Plastic
bracket
Wire paper bail
Installing an output expander
Lexmark T Family
label
Tray
Each output expander consists of the expander
and a removable tray. A paper bail, bracket, and
labels are also included.
After you carefully unpack the output expander,
install it immediately; otherwise, the edges of the
mounting brackets could damage tabletops or fabrics.
Labels
Output expander
Bracket and bail
Warning! The output expander tray is designed to hold the
weight of print material only. Do not use it as a shelf;
excess weight may cause it to disengage from the
output expander.
1
Remove the top cover from the printer, finisher, or high-capacity output stacker.
Note: If you have purchased a finisher or a highcapacity output stacker, that output option
must be installed directly on the printer,
before the output expander.
11
2
Slide the plastic bracket onto the static
brush holder, located on the bottom of the
output expander.
3
Insert the mounting brackets into the slots
on top of the printer or output option. Make
sure the output expander is seated securely.
4
Place the tips of the wire paper bail into the
ends of the plastic bracket so that the bail
curves downward.
Mounting bracket
Mounting slot
The bail rests in the output tray of the
expander below it, or in the printer output
bin.
Note: Do not attach the paper bail unless you
are mounting the output expander on
the printer or another output expander.
5
Slide the lower tabs on the tray into the
lower slots on the output expander.
6
Rotate the tray up until the upper tabs click
into the upper slots.
7
Attach the top cover to the output expander.
Slots
Tabs
12
Installing a 5-bin mailbox
Mailbox
The 5-bin mailbox is shipped with a sheet of labels
and a plastic bracket for attaching a paper bail.
After you carefully unpack the mailbox, install it
immediately; otherwise, the edges of the mounting
brackets could damage tabletops or fabrics.
Labels
Bracket
Lexmark T Family
label
Warning! The 5-bin mailbox is designed to hold the weight of
print material only. Do not use it as a shelf; excess
weight may damage it.
1
Remove the top cover from the printer, finisher, output expander, or previously
installed mailbox.
Note: If you have purchased a finisher or a highcapacity output stacker, that output option
must be installed directly on the printer,
before the mailbox.
2
Slide the plastic bracket onto the static
brush holder, located on the bottom of the 5bin mailbox.
Note: If the mailbox will be the topmost output
option, remove the paper bail from the
bracket on the top cover and store in a
safe place.
13
3
Insert the mounting brackets into the slots
on top of the printer, finisher, output
expander, or previously installed 5-bin
mailbox. Make sure the mailbox is seated
securely.
4
Attach the top cover to the mailbox.
5
Place the tips of the wire paper bail into the
ends of the plastic bracket so that the bail
curves downward.
Mounting slot
Mounting
bracket
Paper stops
The bail rests in the output tray of the
expander below it, or in the printer output
bin.
6
14
Adjust the paper stops for the appropriate
paper size.
Attaching labels to output options
Labels
Output bin tray
If you purchased an output expander or 5-bin mailbox, you received a sheet of labels for your various
output bins.
The illustration indicates some places where you
may attach the labels: output bin tray, paper stop,
side cover, or wherever best suits your needs.
Paper
stop
Side
cover
Installing a high-capacity
output stacker
Lexmark T Family printer models T622 and T620
support one high-capacity output stacker.
The high-capacity output stacker is packaged with
installation instructions.
Note: The high-capacity output stacker must be
positioned directly on the printer and before
other output options. It cannot be used with
the finisher.
Lexmark T Family
label
15
Installing the envelope feeder
Lexmark T Family
label
The envelope feeder attaches to the front of your
printer behind the lower front door. It can be
removed when you are not using it, making the
printer more compact.
Refer to the Lexmark T620/T622 Publications CD
for details about using the envelope feeder.
Release latch
1
Push the release latch and open the printer
lower front door.
2
Lift open the envelope feeder connector
door.
3
Align the tabs on the envelope feeder with
the slots on both sides of the printer, and
then gently push the envelope feeder into
the opening until it snaps into place.
Envelope feeder
connector door
Slots
The envelope feeder tilts downward at a
slight angle when it is installed properly.
16
Step 2: Install memory and
option cards
You can customize your printer memory capacity
and connectivity by adding optional cards. The
instructions in this section help you install any of
the following options:
Accessing the printer system board
•
Printer memory
•
Flash memory
•
Tri-Port Adapter
•
USB/Parallel 1284-C Interface Card
•
Parallel 1284-C Interface Card
•
MarkNet internal print servers (also
called internal network adapters or INAs)
•
Hard disk
•
Optional firmware card
You must access the printer system board to install
printer memory, flash memory, or an option card.
1
Make sure the printer power is off, the
printer power cord is unplugged, and all
cables are disconnected from the back of
the printer.
2
Press the release latches to open the upper
and lower front doors.
17
3
Press down on the side door latches and
open the side door.
4
Loosen, but do not remove, the six screws
on the shield.
You need a small Phillips screwdriver to
loosen these screws.
Note: Screws are used to give added protection
against memory theft.
Screws
5
Use the tabs to slide the shield up until the
top three screws fit into the three keyholes
on the shield.
6
Hold the shield by the tabs and lift it off.
Keyhole
Tab
Tab
18
Installing printer memory
or flash memory
Note: Some memory and firmware options
offered for other Lexmark printers cannot
be used with your printer. Refer to the
Lexmark T620/T622 Publications CD for
specifications.
1
Follow the steps in “Accessing the printer
system board” beginning on page 17.
2
Unpack the memory option. Avoid touching
the connection points along its edge. Save
the packaging materials.
3
Open both latches on the connector
completely. Insert the memory option
straight into the connector with the
connection points pointing toward the
system board.
4
Push the memory card firmly into the
connector until it snaps into place. Make
sure each latch fits over the notch located
on either side of the option card.
5
Follow the steps in “Reattaching the shield
and closing the doors” beginning on
page 22.
Memory connector 1
Memory connector 2
Memory connector 3
Warning! Electronic components can be damaged by static
electricity. Touch something metal on the printer
before you touch the memory option.
Latch
Connection points
Latch
Notch
19
Installing an optional firmware card
Warning! Optional firmware cards are easily damaged by
Follow the instructions in this section to install an
optional firmware card. The system board has one
connection point for firmware cards.
1
Access the system board. (See page 17 for
instructions.)
2
Locate the holes on the system board near
the option card connectors.
3
Unpack the firmware card.
static electricity. Touch something metal on the
printer before you touch a card.
Resting posts
Avoid touching the metal pins on the bottom
of the card. Save the packaging.
Pins
4
Card
Orient the card so that the pins are closest
to the edge of the board.
5
Connectors
20
Holding the firmware card by its sides, align
the two pins on the card with the holes on
the system board.
Push in until the firmware card is firmly in
place.
Installing an option card
Your printer has two connectors that support the
following option cards:
• Hard disk with adapter card
• MarkNet™ internal print server
MarkNet N2501e or N2401e
MarkNet internal print server
• USB/Parallel 1284-C Interface Card
• Parallel 1284-C Interface Card
• Coax/Twinax Adapter for SCS
• Tri-Port Adapter
Refer to the documentation included with each
card for detailed information about that specific
card.
Tri-Port adapter
You need a small Phillips screwdriver to install
these options.
USB/Parallel 1284-C interface card
hard disk with adapter
Warning! Electronic components are easily damaged by
Note: The Lexmark T622n model ships with an
Ethernet print server already installed.
1
Follow the steps in “Accessing the printer
system board” beginning on page 17.
2
Locate the card connectors on the system
board. If you are installing only one card,
install it in connector 1. If you are installing
two cards on a model with multiple
connectors, use connector 1 first and then
connector 2.
3
Locate the two screws on the back of the
printer that attach the metal plate to the slot.
4
Remove and save the two screws. Remove
and discard the plate.
5
Unpack the card. Save the packaging
materials.
static electricity. Touch something metal on the
printer before you touch the card.
Connector 1
Connector 2
21
Reattaching the shield and closing
the doors
6
Align the connection points on the card with
the connector on the system board and push
the card firmly into the system board
connector.
7
Insert the two screws saved from the metal
plate (or the extra screws shipped with the
card) into the holes.
8
Tighten the screws to secure the card.
After you have installed option cards on the printer
system board, follow these steps to reattach the
shield and close the doors.
1
Grasp the shield by the tabs and align the
three keyholes on the shield with the top
three screws. Holding the shield by the tabs,
slide it down onto the screws. Tighten all six
screws.
2
Close the side door.
3
Close the upper and lower front doors.
Tabs
Note: If you have not completed the section
“Setting up the printer” beginning on
page 7, do so now.
22
Step 3: Load print material
Width guide
tab
Length guide
Length guide
lever
Complete these instructions to load print material
into any of the standard or optional trays. All paper
trays are loaded in the same way.
1
Remove the paper tray.
2
Pull the width guide tab and slide the width
guide to the far right side of the tray.
3
Squeeze the length guide lever and slide the
length guide to the correct position for the
size paper you are loading.
Width guide
Note: If a finisher is installed on the printer, see
the Lexmark T Family Quick Reference or
the Lexmark T620/T622 Publications CD
for special paper loading instructions.
Paper size indicators
.
4
Place the paper into the paper tray with the
recommended print side face down for
single-sided printing and face up for duplex
printing. Do not fill paper above the paper
capacity mark (fill line).
5
Pull the width guide tab and slide the width
guide to the left until it lightly rests against
the edge of the paper stack.
6
Adjust the knob to show the size of the
paper currently loaded.
Width
guide tab
Width guide
Paper capacity
mark
Note: This setting serves as a visual reminder
only; it has no effect on the operation of
the printer.
7
Reinstall the tray.
Knob
23
Step 4: Attach cables
You can attach your printer to a network or locally
(directly to a computer).
Network printing
You can attach your printer to a network using standard network cables.
A 10BaseT/100BaseTX Fast Ethernet port is standard
on the Lexmark T622n. You can add a Token-Ring or
10Base2 Ethernet port to either printer model by
installing an optional MarkNet internal print server.
To attach the printer to a network:
1
Make sure the printer is turned off and
unplugged.
2
Connect the printer to a LAN drop or hub using
standard cabling that is compatible with your
network.
The printer automatically adjusts itself for the
network speed.
– Token-Ring, Ethernet 10BaseT, or Ethernet 100BaseTX networks (Category 5)
use an RJ-45 connector.
24
– Token-Ring networks (Shielded
Twisted Pair) use a DB9 connector.
– Ethernet 10Base2 networks (Thin
Coax) use a BNC T-connector.
Local printing
You can attach your printer locally using either
the standard USB port or parallel port. A USB
port is standard on all printer models. We recommend Lexmark USB cable part number
12A2405 (2 m). The standard parallel port
requires an IEEE-1284 compliant parallel
cable. We recommend Lexmark parallel cable
part number 1329605 (10 ft) or 1427498
(20 ft).
If you add a parallel port by installing an
optional USB/Parallel Interface Card, you need
a 1284 A-C parallel cable, such as Lexmark
part number 43H5171 (9.8 ft).
Note: Some UNIX, Linux, and Macintosh
computers also support USB connections. Consult your computer documentation to see if your system
supports USB.
If you have installed an optional Tri-Port
Adapter, or if you are using a non-network
25
model, you can locally attach the printer with a serial
cable. We recommend Lexmark part number 1038693
(50 ft). For details on LocalTalk or infrared connections, refer to the documentation that shipped with the
Tri-Port Adapter.
Note: All Windows operating systems support parallel
cable connections. However, only the Windows
2000/98/Me operating systems support USB
cable connections.
To attach the printer to a computer:
1
Make sure the printer, computer, and any other
attached devices are turned off and unplugged.
2
Connect the printer to the computer using a
parallel or USB cable.
– Use an IEEE-1284 compliant parallel
cable to ensure that you can access all of
your printer’s functions.
– Be sure to match the USB symbol on the
cable to the USB symbol on the printer.
26
Step 5: Verify printer setup
Turning on the printer
1
Plug one end of the printer power cord into the
socket at the back of the printer and the other end
into a properly grounded outlet.
2
Turn on the printer. If the printer is attached locally
(directly to a computer), leave the computer and any
other attached devices turned off. You will turn
these on in a later step.
The printer requires time to warm up after you turn it
on. During this period, the message Performing
Self Test appears on the operator panel display.
After the printer completes its internal tests, the
Ready message indicates the printer is ready to
receive jobs.
If you see other messages on the display, refer to
the Lexmark T620/T622 Publications CD for instructions on clearing the message. Click Printing, and
then click Understanding printer messages.
3
Go to “Printing a menu settings page” on page 28. If
you attached the printer to a network, see“Printing a
network setup page”.
Note: You can change the language that appears on the
operator panel display. Refer to the Lexmark
T620/T622 Publications CD for instructions.
Printing a network setup page
If the printer is attached to a network, print a network
setup page to verify the network connection. This page
also provides important information that will help you configure for network printing.
27
1
Press Menu until you see Utilities Menu, and then
press Select.
2
Press Menu until you see Print Net Setup, and then
press Select to print the page.
The network setup page prints and the printer
returns to Ready status.
3
Check the first section on the network setup page
and confirm that Status is “Connected.”
Note: If an optional MarkNet card is installed in slot 1, you
see Print Net1 Setup. If the card is installed in slot
2, you see Print Net2 Setup.
If Status is “Not Connected,” your LAN drop may not
be active or your network cable may be malfunctioning. Consult your network support person, and then
print another network setup page to verify that you
are connected to your network.
Save the network setup page for use with later
instructions.
4
Printing a menu settings page
See “Printing a menu settings page”.
Print the menu settings page to review the default printer
settings and to verify that printer options are installed correctly. For more information about using the printer operator panel and changing menu settings, refer to the
Lexmark T620/T622 Publications CD.
1
Press Menu until you see Utilities Menu, and then
press Select.
2
Press Menu until you see Print Menus, and then
press Select to print the page.
The message Printing Menus is displayed.
3
Verify that the options you installed are listed under
“Installed Features.”
If an option you installed is not listed, turn the printer
off, unplug the power cord, and reinstall the option.
28
4
Verify the amount of memory installed is correctly
listed under “Printer Information.”
5
Verify that the paper trays are configured for the
sizes and types of paper you loaded in the printer.
Step 6: Configure for TCP/IP
If you have TCP/IP available on your network, we recommend that you assign an
IP address to the printer.
Setting the printer
IP address
If your network is using DHCP, an address is automatically assigned.
1
Look for the address under the TCP/IP heading on the network setup page
you printed in “Printing a network setup page” on page 27.
2
Go to “Verifying the IP settings” on page 30 and begin with step 2.
Note: You can find instructions for other methods of setting the IP address in the
online documentation on the drivers CD that shipped with your printer.
If your network is not using DHCP, then you must manually assign an IP address.
One of the easiest ways is to use the operator panel:
1
Press Menu until you see Network Menu, and then press Select.
2
Press Menu until you see Standard Network, and then press Select.
Standard Network appears if you purchased a printer with an on-board network port. If you have an optional MarkNet card installed in slot 1, you see
Network Option 1. If the card is installed in slot 2, you see Network
Option 2.
3
Press Menu until you see Std Net Setup, and then press Select.
4
Press Menu until you see TCP/IP, and then press Select.
5
Press Menu until you see Set IP Address, and then press Select.
6
Change the address by pressing Menu to increase (or decrease) each
number. Press Select to move to the next segment. Press Select when you
are finished.
The message Saved appears briefly.
7
Press Menu until you see Set IP Netmask, and then press Select.
8
Repeat step 6 to set the IP Netmask.
9
Press Menu until you see Set IP Gateway, and then press Select.
10
Repeat step 6 to set the IP Gateway.
11
When you are finished, press Go to return the printer to the Ready state.
29
Verifying the IP
settings
1
Print another network setup page and make sure the IP Address, Netmask,
and Gateway are what you expected.
Use the information in “Printing a network setup page” on page 27 if you
need help.
2
Ping the printer and verify that it responds.
For example, at a command prompt on a network computer type “ping” followed by the new printer IP address:
ping xxx.xxx.xxx.xx
If the printer is active on the network, you should receive a reply.
Configure for Pull
Printing
(ImageQuick)
30
If your printer has an ImageQuick™ optional firmware card installed, you can configure for Pull Printing once an IP address has been assigned to your printer.
For detailed configuration instructions, refer to the online documentation on the
ImageQuick CD. The ImageQuick CD is shipped with printers that have the
ImageQuick optional firmware card pre-installed, and also with the firmware card if
you purchased it separately.
Step 7: Install printer drivers
A printer driver is software that lets your computer communicate with your printer.
The following table is a quick guide to finding the specific instructions you need.
Type of printer installation
Network environment or operating system
Page
Network
Windows
31
(Ethernet or Token-Ring connections)
(Windows 95/98/Me, Windows NT 4.0, Windows 2000)
Macintosh
32
UNIX/Linux
32
NetWare
33
Local
Windows
33
(parallel or USB connections)
(Windows 95/98/Me, Windows NT 4.0, Windows 2000)
Network printing
Windows
Macintosh
34
UNIX/Linux
34
The following instructions explain how to install printer drivers on printers attached
to a network.
Ports
The following network printer ports are supported:
•
Microsoft IP port (Windows NT 4.0 and Windows 2000)
•
Lexmark network port (Windows 95/98/Me, Windows NT 4.0, and Windows 2000)
Printer drivers
Note: Using the Lexmark T Family custom printer driver and a Lexmark network
port provides enhanced functionality, such as printer status alerts.
The following printer drivers are supported:
•
Windows system printer driver
•
Lexmark T Family custom printer driver
System drivers are built into Windows operating systems. Custom drivers are
available on the drivers CD.
Updated system and custom drivers are available on the Lexmark Web site at
www.lexmark.com/drivers.
31
Printing methods
The following network printing methods are supported:
•
Direct IP printing
•
Shared printing (point and print, peer-to-peer)
Creating ports and installing drivers
Read the detailed instructions on the drivers CD. Click View documentation and
look for network printer installation.
If you choose to install without using the instructions on the drivers CD, you need
a basic understanding of network printing on TCP/IP networks, printer driver
installation, and the process involved in adding new network ports.
Macintosh
Your Lexmark T Family printer connects automatically to AppleTalk networks and
becomes readily visible to other network clients.
You must create a printer object (icon) on the desktop of each network client using
the LaserWriter 8 printer driver and the Lexmark T Family PostScript Printer
Description (PPD) file.
Note: A PPD file provides detailed information about the capabilities of a printer to
UNIX or Macintosh drivers or applications.
A printer object (icon) must be created on the desktop of each network client using
the LaserWriter 8 printer driver and the Lexmark T Family PostScript Printer
Description (PPD) file.
Specific information about installing the printer on your AppleTalk network can be
found in the online documentation on the drivers CD that shipped with your printer.
A Lexmark PPD Installer is provided in the downloadable Web package available
on the Lexmark Web site at www.lexmark.com.
Depending upon which drivers CD shipped with your printer, you may also find this
software on the drivers CD. Launch this utility and follow the instructions to install
the PPDs. Send a test print job when you have finished.
UNIX/Linux
Your printer supports many UNIX platforms, such as Sun Solaris and Linux.
Note: The Sun Solaris package is located both on the drivers CD and on the Lexmark Web site at www.lexmark.com/drivers.
Lexmark provides a printer driver package for each supported UNIX platform containing all the necessary drivers and PPDs. The user’s guide contained in each
package gives detailed instructions for installing and using Lexmark printers in
UNIX environments.
32
You can download these printer driver packages from Lexmark’s Web site at
www.lexmark.com/drivers. Depending on which drivers CD shipped with your
printer, you may also find the driver package you need on the CD.
NetWare
Your Lexmark T Family printer works with both Novell Distributed Print Services
(NDPS) and regular queue-based NetWare environments.
Novell Distributed Print Services (NDPS)
If you have an NDPS environment, we recommend you install the Lexmark NDPS
IP Gateway. The gateway tightly integrates your printers with NDPS so you can
easily monitor, control, and print to them.
You can get the gateway, the snap-ins, the support files and a white paper with
installation instructions on the Web at www.lexmark.com/networking/ndps.html.
Additional information about network printer installation can be found at www.lexmark.com/publications or on the drivers CD that shipped with your printer.
Non-NDPS (queue-based)
For the latest information about Lexmark support for non-NDPS (queue-based)
environments, click View Documentation on the drivers CD and look for network
printer installation. This documentation is also available on the Lexmark Web site
at www.lexmark.com/publications.
Local printing
Windows
The following instructions explain how to install a printer driver on a printer
attached to a computer using a parallel or USB connection.
Supported connections
The following printer connections are supported:
•
Parallel (Windows 95/98/Me, Windows NT 4.0, and Windows 2000)
•
USB (Windows 98/Me and Windows 2000)
Note: Using the Lexmark T Family custom printer driver provides enhanced functionality, such as printer status alerts.
Printer drivers
The following printer drivers are supported:
•
Windows system printer driver
•
Lexmark T Family custom printer driver
System drivers are built into Windows operating systems. Custom drivers are
available on the drivers CD.
33
Updated system and custom drivers are available at www.lexmark.com/drivers.
Installation instructions
Read the detailed online instructions on the drivers CD. Click View documentation
and look for information about local printer installation. Detailed instructions are
provided for parallel and USB connections.
Macintosh
If you are setting up the printer for local printing, you need to install the Lexmark T
Family PPD and use it with the LaserWriter 8 printer driver or the Adobe PostScript driver.
The Lexmark T Family PPD and specific information about local printer installation
on Macintosh computers can be found on the drivers CD that shipped with your
printer.
After the printer is installed, print a test page to verify your printer is correctly set
up.
UNIX/Linux
Your printer supports many UNIX platforms, such as Sun Solaris and Linux.
Note: The Sun Solaris package is located both on the drivers CD and on the Lexmark Web site at www.lexmark.com/drivers.
Lexmark provides a printer driver package for each supported UNIX platform containing all the necessary drivers and PPDs. The user’s guide contained in each
package gives detailed instructions for installing and using Lexmark printers in
UNIX environments.
All the driver packages support local printing using a parallel connection. The
driver package for Sun Solaris systems also supports USB connections to Sun
Ray appliances and Sun workstations.
You can download these printer driver packages from Lexmark’s Web site at
www.lexmark.com/drivers. Depending on which drivers CD shipped with your
printer, you may also find the driver package you need on the CD.
34
P/N 11K3092
E.C. 1K0911
Lexmark and Lexmark with diamond design are trademarks of Lexmark International, Inc.,
registered in the United States and/or other countries.
© 2001 Lexmark International, Inc.
740 West New Circle Road
Lexington, Kentucky 40550
www.lexmark.com