1
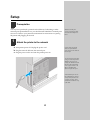
MarkNet internal
print servers
MarkNet N2000 series and
MarkNet S
Quick Start
Jan 2000
www.lexmark.com
Edition: January 2000
The following paragraph does not apply to any country where such provisions are inconsistent with local law:
LEXMARK INTERNATIONAL, INC., PROVIDES THIS PUBLICATION “AS IS” WITHOUT WARRANTY OF ANY
KIND, EITHER EXPRESS OR IMPLIED, INCLUDING, BUT NOT LIMITED TO, THE IMPLIED WARRANTIES OF
MERCHANTABILITY OR FITNESS FOR A PARTICULAR PURPOSE. Some states do not allow disclaimer of
express or implied warranties in certain transactions, therefore, this statement may not apply to you.
This publication could include technical inaccuracies or typographical errors. Changes are periodically made to the
information herein; these changes will be incorporated in later editions. Improvements or changes in the products
or the programs described may be made at any time.
Comments about this publication may be addressed to Lexmark International, Inc., Department F95/035-3, 740
West New Circle Road, Lexington, Kentucky 40550, U.S.A. In the United Kingdom and Eire, send to Lexmark
International Ltd., Marketing and Services Department, Westhorpe House, Westhorpe, Marlow Bucks SL7 3RQ.
Lexmark may use or distribute any of the information you supply in any way it believes appropriate without
incurring any obligation to you. You can purchase additional copies of publications related to this product by calling
1-800-553-9727. In the United Kingdom and Eire, call 0628-481500. In other countries, contact your point of
purchase.
Lexmark and Lexmark with diamond design, MarkNet and MarkVision are trademarks of Lexmark International,
Inc., registered in the United States and/or other countries. PostScript is a trademark or registered trademark of
Adobe Systems Incorporated. Other trademarks are the property of their respective owners.
© Copyright 1999, 2000 Lexmark International, Inc.
All rights reserved.
UNITED STATES GOVERNMENT RESTRICTED RIGHTS
This software and documentation are provided with RESTRICTED RIGHTS. Use, duplication or disclosure by the
Government is subject to restrictions as set forth in subparagraph (c)(1)(ii) of the Rights in Technical Data and
Computer Software clause at DFARS 252.227-7013 and in applicable FAR provisions: Lexmark International, Inc.,
Lexington, KY 40550.
MarkNet
internal print server
Quick Start
Setup - - - - - - - - - - - - - - - - - - - - 4
Prerequisites - - - - - - - - - - Attach the printer to the network Print a network setup page - - - Configure and print- - - - - - - -
-
-
-
-
-
-
-
-
-
TCP/IP - - - - - - - - - - - - - - - - - - - - - - Step 1: Set the IP address, netmask and gateway
Step 2: Set up to print - - - - - - - - - - - - - Novell NetWare- - - - - - - - - - - - - - - - - - NDPS (Novell Distributed Print Services)- - - Non-NDPS (queue-based) - - - - - - - - - - - AppleTalk- - - - - - - - - - - - - - - - - - - - - OS/2 Warp Server - - - - - - - - - - - - - - - - -
-
-
-
-
-
-
-4
-4
-5
-5
-
-
-
-
-5
-5
-7
-9
-9
-9
10
10
Troubleshooting - - - - - - - - - - - - - - 11
TCP/IP - - - - - - - - - - - - - - - - - - - - - - - - - - - - 11
Novell NetWare - - - - - - - - - - - - - - - - - - - - - - - 12
NDPS (Novell Distributed Print Services)- - - - - - - - - - 12
Non-NDPS (queue-based) - - - - - - - - - - - - - - - - - - 12
Windows NT Server 4.0- - - AppleTalk- - - - - - - - - - Other network environments Lexmark customer support - -
3
-
-
-
-
-
-
-
-
-
-
-
-
-
-
-
-
13
14
14
15
Setup
Prerequisites
You may have purchased a printer that has Ethernet, Token-Ring or other
network ports preinstalled. If not, you should install a MarkNet™ internal print
server now. Refer to your printer documentation for instructions on opening
the printer and plugging in the card.
1
MarkNet internal print
servers are sometimes called
internal network adapters or
INAs.
Attach the printer to the network
a Turn printer power off. Unplug the power cord.
b Plug the network cable into the network port.
c Plug the power cord in and turn the printer power on.
Connect only one network
cable even if the MarkNet
print server has more than one
network port.
You never have to worry about
setting the network speed on a
MarkNet print server. For
example, the MarkNet 10/100
Ethernet card automatically
senses if your network is 10
Mbps or 100 Mbps and
adjusts itself for that speed.
Some MarkNet print servers
have additional ports that are
used for other functions such
as copying or faxing. These
functions are outside the scope
of this book.
4
Look for the UAA (universally
administered address) under
the Network heading on the
setup page. The UAA is a
12-digit number. The left
column shows the address in
MSB form and the right
column shows the address in
canonical form.
The UAA is preset at the
factory. However, you can
override it with an optional
locally administered address
(LAA) if you want some
particular physical address for
this print server.
2
Print a network setup page
Use the printer operator panel to print the network setup page. (Hint: Network
Menu/Network Option x/Network x Setup/Print/Print Setup Page).
The network setup page shows the physical address (UAA) of the MarkNet
print server and other important data. Save this page because you will use it
later.
3
Configure and print
Network environment
Page
TCP/IP (Windows, OS/2, UNIX)
”Step 1: Set the IP address, netmask and gateway”
5
”Step 2: Set up to print”
7
Novell NetWare
”NDPS (Novell Distributed Print Services)”
9
”Non-NDPS (queue-based)”
9
AppleTalk
10
OS/2 Warp Server
10
About the Drivers, MarkVision and Utilities CD
You may have more than one version of this CD, received at different times
with different Lexmark products. Always use the latest version CD.
TCP/IP
Step 1: Set the IP address, netmask and gateway
For instructions on other ways
to set the IP address, look on
the Drivers, MarkVision and
Utilities CD. Click View
Documentation and look for
the MarkNet link.
You must assign an IP address, netmask and gateway to the MarkNet print
server for other network devices to find the printer on the network.
• If you have DHCP, the proper address values are automatically assigned.
To verify the assignment has happened, print a network setup page and
make sure the IP address, netmask and gateway appear as non-zero.
5
• If you don’t have DHCP, there are other methods you can use to manually
assign the address, such as the printer operator panel, static ARP and
telnet, RARP and telnet, BOOTP, or MarkVision or other Lexmark utility.
Instructions for three of these methods follow.
Printer operator panel
A simple way to set the IP address, netmask and gateway inside the print server
is to use the printer operator panel. You need to be standing at the printer to use
this method.
1
On the printer operator panel, choose Network Menu, Network Option x,
Network x Setup, TCP/IP, Set IP Address. (Hint: Press Menu> until you see
the correct menu item, and then press Select.)
2
When the current IP address is displayed, use the buttons to change the
address. (Hint: Pressing Select advances to the next segment in the address.
Pressing Menu> increases the number by one. <Menu decreases the number by
one.)
3
When you finish setting the IP address, press Select until the word SAVED
appears briefly.
4
5
Set the IP netmask and gateway in a similar way.
“x” designates which option
slot is being used. For
example, if you install the
MarkNet print server in
option slot 2, the operator
panel selection would read:
Network Option 2.
Print a new network setup page to verify the parameters are set as you
intended.
Static ARP and telnet
You can use this method from any Windows, OS/2, or UNIX workstation. You
need to know the physical address of the print server to use this method.
1
Find the physical address (UAA) of the print server (for example,
00200022012F) on the network setup page you printed earlier. If you have
an Ethernet network, use the number in the right column (canonical). If
you have a Token-Ring network, use the number in the left column (MSB).
2
Set the IP address in your workstation ARP table. At a command prompt,
type a command similar to the following, inserting the IP address you
want to assign and the UAA:
arp -s 192.168.236.24 00-20-00-22-01-2F
3
Set the IP address, netmask and gateway in the print server. To do this,
telnet to port 9000 on the MarkNet print server by typing a command
similar to the following:
telnet 192.168.236.24 9000
4
Verify the print server is up and running on the network.
ping 192.168.236.24
6
The workstation and the
printer must be on the same
subnet.
Print server TCP/IP setup utility
It doesn’t matter which form of
the UAA you use (MSB or
canonical).
You can use this simple utility to initialize the printer IP address if your
workstation is running Windows 95, Windows 98 or Windows NT and is on the
same subnet as the printer. You need to know the 12-digit physical address of
the print server to use this method.
Information on installing,
using and troubleshooting the
utility resides on the CD.
To install the utility, launch the Drivers, MarkVision and Utilities CD, do a
custom install to add network support, and select Print Server TCP/IP Setup
Utility.
Link to the
MarkNet
resident
web pages
Once the IP address has been set (using any method), you can
use your browser to remotely view and manage the network
printer. Functions include viewing printer status in real time,
resetting the printer, changing settings, and so forth. Type the
print server IP address in the URL field of the browser (for
example, http: //192.168.236.24) and press Enter.
Step 2: Set up to print
There are many ways to send a print job, including FTP, TFTP, LPR/LPD,
point-to-point (LexIP) and various queue-based methods. Instructions for two
of the methods follow.
Print to a queue on a Windows NT server
If you are using Windows NT
Server 4.0 or later and
running TCP/IP, you can use
Network Plug and Print to
automate your printer setup
process.
This section explains the setup for queue-based printing where network users
print to a queue defined on a Windows NT server. The MarkNet print server
services this queue. To use this method, you must have at least one server
running Windows NT Server software and TCP/IP.
The following instructions apply to Windows NT Server versions 4.0 and later.
1
Install the TCP/IP software component on the server that contains the
print queue. This software is necessary to establish the link between the
MarkNet print server and the queue. Look on the Drivers, MarkVision and
Utilities CD for the software. (Hint: Do a custom install to add network
support, and select TCP/IP.)
2
Set up a print queue on the server. Do this by creating a printer object.
a
b
c
d
Click Start, Settings, Printers, Add Printer.
When prompted, select My Computer (not Network printer server).
Click Add Port.
Select Lexmark Network Port, and then click New Port. Follow the
instructions on the screen.
e Share the queue.
7
3
Set up your Windows 95, Windows 98, or Windows NT clients in the usual
way. (Hint: Start, Settings, Printers, Add Printer.)
Point-to-point printing (LexIP)
You can print from any Windows 95, Windows 98 or Windows NT workstation
directly to a Lexmark printer located anywhere on the IP network. No server is
required.
1
Install the TCP/IP software component on the workstation. Look on the
Drivers, MarkVision and Utilities CD for the software. (Hint: Do a custom
install to add network support, and select TCP/IP.)
2
Create a printer object on the workstation:
These are the Windows 95/98
instructions. Instructions for
Windows NT are on the
Drivers, MarkVision and
Utilities CD.
a Click Start, Settings, Printers, Add Printer.
b When prompted, select Local Printer (not Network). This gives you
access to the Lexmark Network Printer Monitor later.
c Select the correct printer driver.
d Select any port (LPT, COM, or FILE) for the initial setup. Later, you will
change the port to a logical port.
e Click Next, and continue following the instructions on the screen until
the printer object has been created.
3
Associate the printer object with the physical printer.
a Select the newly created printer object in the printers folder.
b Click File, Properties, Details, Add Port.
c Click Other, Lexmark Network Printer Monitor, OK. A list of available
print servers is shown. If your print server does not appear in the list,
click Add Adapter and follow the instructions on the screen until it
does appear.
d Find the IP address of your print server in the list and select it.
e Specify a logical port name to associate with the printer, and click OK.
f Verify that the logical port name you assigned to the printer now shows
in the box labeled Print to the following port.
g Click OK.
8
You can obtain the latest
Lexmark printer drivers from
our web site located at:
www.lexmark.com.
Novell NetWare
NDPS (Novell Distributed Print Services)
Some versions of the Drivers,
MarkVision and Utilities CD
contain the Lexmark NDPS IP
Gateway. To find out if your
CD contains the gateway, look
on the CD for a subdirectory
named NDPS.
If you have MarkNet print servers in an NDPS environment, we recommend
that you install the Lexmark NDPS IP Gateway. This allows your printers to be
tightly integrated with NDPS so that you can easily monitor, control and print
to them.
You can get the gateway plus all support files and installation procedures from
the Lexmark web site (www.lexmark.com).
Non-NDPS (queue-based)
The easiest way to configure the print server for NetWare jobs in a non-NDPS
environment is to use MarkVision. MarkVision automatically creates all the
necessary NetWare objects (print queue objects, print server objects, and printer
objects).
Do the following from a Windows NT workstation running Novell NetWare
Client32 software, or from a Windows 95 or Windows 98 workstation running
either Novell Client32 or Microsoft Client for NetWare networks.
The default login name
contains the characters !LEX
plus the UAA of the MarkNet
print server (for example,
!LEX00200022012F).
1
Install the NetWare software component on the workstation. Look on the
Drivers, MarkVision and Utilities CD for the software. (Hint: Do a custom
install to add network support, and select NetWare.)
2
Launch MarkVision. In the MarkVision main window, find the new
network printer. Look for the line item containing your print server’s
physical address (the MSB form of the print server UAA).
3
Double-click the network printer. Configure the MarkNet print server by
doing the following:
a Set a unique NetWare login name. This is the name the print server uses
to log in to the NetWare server.
b Enable the MarkNet port.
c Select PSERVER mode.
For information about
choosing PSERVER or
RPRINTER mode, look on the
CD. Click View
Documentation and look for
the MarkNet link.
4
•
If you want to manage NDS queues, you must specify the NDS tree
and context where the MarkNet print server is defined. You also
need to create or select queues to be serviced.
•
If you want to manage bindery queues, you must first specify the
file servers. Afterward, you must create or select queues to be
serviced.
If prompted to reset the print server, select Yes to immediately begin
servicing the queues.
9
AppleTalk
The MarkNet print server works automatically with AppleTalk networks. You
simply connect the power and the network cables, and you’re up and running.
However, if you would like to use a zone and printer name different from the
defaults you can use MarkVision for Macintosh to change these settings.
MarkVision for Macintosh
resides on the Drivers,
MarkVision and Utilities CD.
Each Macintosh user on the AppleTalk network who wants to use the printer
should do the following steps.
1
2
In the Chooser, select the LaserWriter 8 driver.
3
Select the new printer. If you don’t know which printer to select, look on
the network setup page under AppleTalk. The default name of the printer
is listed beside Name.
4
5
Click Create.
6
Look for an icon to appear in the Chooser next to the printer name. This
means you have successfully set up the new printer. A new desktop
printer icon is placed on your desktop, too.
7
In the Chooser, select the printer you want to use now and close the
Chooser window.
If you have a routed network, there is a list of zones you can select from.
The new printer is in the default zone for the network. Select this zone. If
you don’t know which zone to select, look on the network setup page
under AppleTalk for Zone.
If you are prompted to select a PPD (PostScript Printer Description), you
need to install the proper PPD from the Drivers, MarkVision and Utilities
CD. To do this, launch the CD, click Lexmark Installer, select the
appropriate PPD for your printer, and then click Install. Go back to the
Chooser and try to create the new printer again.
OS/2 Warp Server
MarkNet print servers work on OS/2 Warp Server networks. Users can print to
the network printer from any client that can successfully attach to the network.
For instructions on configuring the print server for OS/2 networks, look on the
Drivers, MarkVision and Utilities CD. Click View Documentation and look for
the MarkNet link.
10
A PPD describes the printer or
printer family. For example,
the PPD lists which options
are valid for the printer.
Troubleshooting
For expanded troubleshooting
information, look on the
Drivers, MarkVision and
Utilities CD. Click View
Documentation and look for
the MarkNet link.
Free firmware updates for any Lexmark print server are available on the web
site at www.lexmark.com.
TCP/IP
1
Make sure the TCP/IP protocol is turned on (activated) in the print server.
To find out, print a network setup page and look in the paragraph under
TCP/IP.
2
Issue a ping command to the print server.
ping 192.168.236.24
The file you use with FTP can
be in PCL or PostScript
emulations, PDF, HTML or
any other language the printer
understands. If the file prints,
this confirms the TCP/IP
protocol is working properly in
the MarkNet print server.
To use the MarkNet resident
web server, type the print
server IP address in the
URL field of your browser
(for example:
http: //192.168.236.24).
3
Establish an FTP session with the print server.
ftp 192.168.236.24
4
Using the FTP put command, print a file to the network printer.
put mytest.ps
5
6
Check the port settings on the printer object.
7
8
For non-UNIX networks: Uninstall Lexmark software.
9
10
Check all settings in the print server, using the MarkNet resident web
server or MarkVision.
For non-UNIX networks: Reinstall Lexmark software. During the
reinstallation, select only those network protocols you actually use (for
example, TCP/IP).
Try printing again.
If you are still having trouble, contact Lexmark for help. See “Lexmark
customer support” on page 15.
11
Novell NetWare
NDPS (Novell Distributed Print Services)
1 Make sure the TCP/IP protocol is turned on (activated) in the print server.
To find out, print a network setup page and look in the paragraph under
TCP/IP.
2
Make sure your NetWare file server has TCP/IP support configured and
loaded.
3
4
5
Make sure you are running NDPS version 2.0 or later.
6
Make sure you’ve created and loaded an NDPS Manager.
Read the online documentation about Lexmark’s NDPS support. Look for
a README file or a technical white paper either on the Drivers,
MarkVision and Utilities CD or in the package you downloaded from
Lexmark’s web site.
If you are still having trouble, contact Lexmark for help. See “Lexmark
customer support” on page 15.
Non-NDPS (queue-based)
1 Make sure the NetWare protocol is turned on (activated) in the print server.
To find out, print a network setup page and look in the paragraph under
NetWare.
2
3
Find out if the print server is servicing your NetWare queue.
4
If your queue still does not appear in the list of queues being serviced, you
have a print server setup problem. Reconfigure the MarkNet print server.
5
Try printing from some other application. If the job prints from the second
application, you’ve narrowed the problem to the first application. Make
sure you are using the current version of the driver for the problem
application.
6
Place a job in the queue using a Novell utility such as PCONSOLE. If the
job doesn’t print, contact Lexmark for help. See “Lexmark customer
support” on page 15.
If your queue doesn’t appear in the list of queues being serviced, reset the
printer, wait a few minutes, and look for the queue in the list again.
12
Windows NT Server 4.0
1
Make sure you are using TCP/IP for communications between the
Windows server and the MarkNet print server.
2
Make sure TCP/IP is turned on (activated) in the print server. To find out,
print a network setup page and look in the paragraph under TCP/IP.
3
Verify that TCP/IP is installed properly on the Windows server. (Hint:
Start, Settings, Control Panel, Network, Protocols).
4
Issue a ping command to the print server.
ping 192.168.236.24
5
The file you use with FTP can
be in PCL or PostScript
emulations, PDF, HTML or
any other language the printer
understands. If the file prints,
this confirms the TCP/IP
protocol is working properly in
the MarkNet print server.
Establish an FTP session with the print server.
ftp 192.168.236.24
6
Using the FTP put command, print a file.
put mytest.ps
7
8
9
See if the network printer shows up in MarkVision.
•
If it doesn’t, the print server may have downlevel firmware.
•
If it does but you still cannot print, try removing and then readding the Lexmark Network Port on the printer object.
Reset both the print server and the printer.
If possible, shut down Windows NT Server and restart the server. There
could be a spooler problem that requires a restart.
10
Uninstall, and then reinstall MarkVision. During the reinstallation, select
only the network protocols you actually use (for example, TCP/IP). This
also helps MarkVision run faster.
11
12
Try printing again.
If you are still having trouble, contact Lexmark for help. See “Lexmark
customer support” on page 15.
13
AppleTalk
1
Make sure the AppleTalk protocol is turned on (activated) in the print
server. To find out, print a network setup page and look under AppleTalk.
2
Make sure the status of the MarkNet print server is “connected”. To find
out, look on the network setup page for Status.
3
Do you see the printer in the Chooser? If not, restart the Macintosh
workstation and look again.
4
If you still don’t see the printer in the Chooser, make sure AppleTalk is
active on the workstation (look in the AppleTalk control panel).
5
If the job prints but the print quality is poor, refer to the printing tips
provided on the CD. These tips can save you a lot of time. To download the
document to your workstation, launch the CD, click Lexmark Installer,
select Documentation, and then click Install. Look in the Lexmark Extras
folder for the document titled Optimize Lexmark Printer Output.
6
If you are still having trouble, contact Lexmark for help. See “Lexmark
customer support” on page 15.
Other network environments
For troubleshooting information about other network environments, look on
the Drivers, MarkVision and Utilities CD. Click View Documentation and look
for the MarkNet link.
14
Be aware that if you’re on a
non-routed network, you can
only see the printer if your
workstation connection
(LocalTalk, Ethernet or
Token-Ring) matches the
connection on the printer. For
example, if the Macintosh
workstation is on LocalTalk,
you cannot see a printer on
Ethernet unless there is a
router on the network.
Lexmark customer support
World Wide Web
www.lexmark.com
CompuServe
Go Lexmark
Internet
ftp.lexmark.com
U.S. and Canada,
technical support and any
other customer needs
1-800-LEXMARK
Lexmark phone numbers
(worldwide)
On the Drivers, MarkVision and Utilities CD,
click Contact Lexmark, Customer Support.
15
Electronic Emission Notices
Federal Communications Commission (FCC) Compliance
Information Statement
The MarkNet internal print server has been tested and found to comply with the limits
for a Class A digital device, pursuant to Part 15 of the FCC Rules. Operation is subject to
the following two conditions: (1) this device may not cause harmful interference, and (2)
this device must accept any interference received, including interference that may cause
undesired operation.
The FCC Class A limits are designed to provide reasonable protection against harmful
interference when the equipment is operated in a commercial environment. This
equipment generates, uses, and can radiate radio frequency energy and, if not installed
and used in accordance with the instruction manual, may cause harmful interference to
radio communications. Operation of this equipment in a residential area is likely to
cause harmful interference, in which case the user will be required to correct the
interference at his own expense.
The manufacturer is not responsible for any radio or television interference caused by
using other than recommended cables or by unauthorized changes or modifications to
this equipment. Unauthorized changes or modifications could void the user's authority
to operate this equipment.
Industry Canada Compliance Statement
This Class A digital apparatus meets all requirements of the Canadian InterferenceCausing Equipment Regulations.
Avis de conformité aux normes d’Industrie Canada
Cet appareil numérique de la classe A respecte toutes les exigences du Règlement sur le
matériel brouilleur du Canada.
European Community (EC) Directives Conformity
This product is in conformity with the protection requirements of EC Council directives
89/336/EEC and 73/23/EEC on the approximation and harmonization of the laws of
the Member States relating to electromagnetic compatibility and safety of electrical
equipment designed for use within certain voltage limits.
A declaration of conformity with the requirements of the Directive has been signed by
the Director of Manufacturing and Technical Support, Lexmark International, S.A.,
Boigny, France.
This product satisfies the Class A limits of EN 55022 and safety requirements of EN
60950.
CISPR 22
WARNING: This is a Class A product. In a domestic environment, this product may
cause radio interference, in which case the user may be required to take adequate
measures.
16
AVERTISSEMENT: Ce produit appartient à la classe A. Dans un environnement
résidentiel, ce produit risque de provoquer des interférences radio, auquel cas
l'utilisateur devra prendre les mesures adéquates.
AVVERTENZA: Questo prodotto appartiene alla Classe A. In ambiente domestico,
questo prodotto può causare interferenze radio, nel qual caso è necessario adottare
adeguate precauzioni.
WARNUNG: Bei diesem Gerät handelt es sich um ein Produkt der Klasse A.
In Wohngebieten kann dieses Gerät Störungen des Radio- und Fernsehempfangs
verursachen. Der Benutzer muß in diesem Fall geeignete Maßnahmen ergreifen.
ADVERTENCIA: Este es un producto de Clase A. En un entorno doméstico, este
producto puede causar interferencias de radio, en cuyo caso, se solicitará al usuario que
adopte las medidas oportunas.
AVISO: Este produto pertence à classe A. Em um ambiente doméstico, ele pode causar
interferências em transmissões de rádio. Nesse caso, será necessário que o usuário adote
as medidas adequadas.
Japanese VCCI Notice
The United Kingdom Telecommunications Act 1984
This apparatus is approved under the approval number NS/G/1234/J/100003 for the
indirect connections to the public telecommunications systems in the United Kingdom.
17
18
Lexmark and Lexmark with diamond design are trademarks of Lexmark International, Inc.,
registered in the United States and/or other countries.
© 2000 Lexmark International, Inc.
740 West New Circle Road
Lexington, Kentucky 40550
www.lexmark.com