1
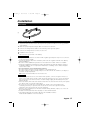
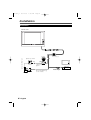
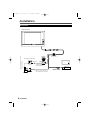
LZ-601_K
02.12.16
1:00 PM
Page 1
LZ-601
6.4-inch LCD MONITOR
INSTRUCTION MANUAL
MONITEUR LCD 6,4 pouces
MODE D’EMPLOI
Take the time to read through this instruction manual.
Familiarity with installation and operation procedures will help
you obtain the best performance from your new monitor.
For your records
Record the serial number, found on the back of the unit, in the
spaces designated on the warranty card, and in the space provided
below. Refer to the model and serial numbers whenever you call
upon your KENWOOD dealer for information or service on the
product.
Model LZ-601 Serial number
© PRINTED IN JAPAN B64-2286-00 (K)(DT)
LZ-601_K
02.12.16
1:00 PM
Page 2
Safety Precautions
2WARNING
To prevent injury and/or fire, take the following precautions:
• Ensure that the unit is securely installed. Otherwise it may fly out of place during collisions
and other jolts.
• When extending the ignition or ground wires, make sure to use automotive-grade wires or
other wires with an area of 0.75mm2 (AWG18) or more to prevent wire deterioration and
damage to the wire coating.
• To prevent short circuits, never put or leave any metallic objects (e.g., coins or metal tools)
inside the unit.
• If the unit starts to emit smoke or strange smells, turn off the power immediately and
consult your Kenwood dealer
• Do not touch the liquid crystal fluid if the LCD is damaged or broken due to shock. The liquid
crystal fluid may be dangerous to your health or even fatal.
• If the liquid crystal fluid from the LCD contacts your body or clothing, wash it off with soap
immediately.
2CAUTION
To prevent damage to the machine, take the following precautions:
• Make sure to ground the unit to a negative 12V DC power supply.
• Do not open the covers of the unit.
• Do not install the unit in a spot exposed to direct sunlight or excessive heat or humidity. Also
avoid places with too much dust or the possibility of water splashing.
• Do not subject the monitor unit to excessive shock, as it is a piece of precision equipment.
• When replacing a fuse, only use a new one with the prescribed rating. Using a fuse with the
wrong rating may cause your unit to malfunction.
• To prevent short circuits when replacing a fuse, first disconnect the wiring harness.
NOTE
If you experience problems during installation, consult your Kenwood dealer.
This video unit is set for rear passenger use only. Use of this video unit in any front seat
and/or where it may be visible to the driver may be illegal in some states and may
cause driver distraction and accident which could injure or kill you.
Operation
Power On
When video signal is input to the Video input terminal, this monitor is turned on.
7 Press the [ 5 ] button for brighter
screen.
7 Press the [ ∞ ] button for darker
screen.
2 - English
LZ-601_K
02.12.16
1:00 PM
Page 3
Installation
Accessorie
1
Installation Procedure
1 To prevent short circuits, remove the key from the ignition and disconnect the · terminal
of the battery.
2
3
4
5
6
Make the proper input and output cable connections for each unit.
Connect the wiring harness cables in the following order: ground, ignition.
Connect the wiring harness connector to the unit.
Install the unit in your car.
Reconnect the · terminal of the battery.
2WARNING
• This product is intended for use with 12V DC negative ground power only. Do not connect it
to any other power supply
• To prevent shorting, disconnect the battery wire from the negative terminal of the battery
during installation.
• Be sure to firmly stabilise this product. Do not install it in a location which is not stable.
• Follow the installation and wiring procedures described in this manual. Improper wiring or
modified installation can not only result in malfunction or damage to the unit but may also
result in an accident.
• Do not install the unit in the following locations.
•A location which interferes with the operation of the air bag system.
•A location subject to direct sunlight, subject to the air from the air conditioner, or subject to
moisture or high temperature.
\This may cause deformation of the monitor unit.
2CAUTION
• If your car's ignition does not come with an ACC position, connect the ignition wires to a
power source that can be turned on and off with the ignition key. If you connect the ignition
wire to a power source that receives a constant voltage supply, as with battery wires, the
battery may die.
• If the fuse blows, first make sure that the wires have not caused a short circuit, then replace
the old fuse with one with the same rating.
• Do not let unconnected wires or terminals touch metal on the car or anything else
conducting electricity. To prevent short circuits do not remove the caps from unused
terminals or from the ends of the unconnected wires.
• After the unit is installed, check whether the brake lamps, blinkers, wipers, etc. on the car
are working properly.
• Insulate unconnected wires with vinyl tape or other similar material.
• Thoroughly wipe away oil and other dirt from the installation surface.
Please avoid installation on uneven surfaces.
English - 3
LZ-601_K
02.12.16
1:00 PM
Page 4
Installation
Connection
Monitor Unit
Fuse
Accessory 1
Car fuse box (Main fuse)
Ignition key switch
ACC
(3A)
Ignition wire (Red)
ª12V
VIDEO OUT
+
–
Battery
4 - English
Ground wire (Black) ·
(To car chassis)
Video input
LZ-601_K
02.12.16
1:00 PM
Page 5
Troubleshooting Guide
What might appear to be a malfunction in your unit may just be the result of
slight misoperation or miswiring. Before calling service, first check the
following table for possible problems.
PROBLEM
The power does not turn
on.
The screen is dark.
POSSIBLE CAUSE
SOLUTION
The fuse has blown.
After checking for short circuits in the
wires, replace the fuse with one having
the same rating.
No ACC position on vehicle
ignition.
Connect the same wire to the ignition as
the battery wire.
No video signal is input to the
Video input terminal.
Input the video signal.
The unit is in a location where
temperature is low.
If the temperature of the monitor unit
drops, the screen may appear darker when
power is first turned on due to the
characteristics of a liquid crystal panel.
Wait a while after turning power on for the
temperature to rise. Normal brightness will
return.
Specifications
Specifications subject to change without notice.
Monitor Unit
Screen size ..............................................................................................6.4 inches (Normal)
130.8(W) x 98(H) x 162.5(Diagonal) mm
5-3/16 (W) x 3-7/8 (H)x 6-7/16 (D) inch
Display system..............................................................................Transparent TN LCD panel
Drive system ..................................................................................TFT active matrix system
Number of pixels ........................................................224,640 pixels (320 H x 234 V xRGB)
Effective pixels ..........................................................................................................99.99%
Pixel arrangement ..........................................................................RGB striped arrangement
Back lighting ..............................................................................................Cold cathode tube
Color System..........................................................................................................NTSC/PAL
Video Input Level................................................................................................1 Vp-p/ 75 Ω
General
Operating voltage ..............................................................................14.4 V DC (11 to 16 V)
Consumed Power ..........................................................9 W (6 W during normal operations)
Operational temperature range ......................................................................–10°C to +60°C
Storage temperature range............................................................................–30°C to +85°C
Size ..........................................................................................188(W) x 130(H) x 31(D) mm
7-3/8(W) x 5-1/8(H) x 1-1/4(D) inch
Mass ..............................................................................................................460 g (1.0 LBS)
Although the effective pixels for the liquid crystal panel is given as 99.99% or more, 0.01% of
pixels may not light or may light incorrectly.
FCC WARNING
This equipment may generate or use radio frequency energy. Changes or modifications to this
equipment may cause harmful interference unless the modifications are expressly approved in the
instruction manual. The user could lose the authority to operate this equipment if an unauthorized
change or modification is made.
English - 5
LZ-601_K
02.12.16
1:00 PM
Page 6
Précautions de sécurité
2AVERTISSEMENT
Pour éviter toute blessure et/ou incendie, veuillez prendre les
précautions suivantes:
• Assurez-vous que l’appareil soit corectement installé. Sinon il risquerait d’être déplacé en cas
de collisions ou de cahots.
• Si vous prolongez un câble d’alimentation, de batterie ou de masse, assurez vous d’utiliser un
câble pour automobile ou un câble avec une section de 0,75mm2 (AWG18) afin d’éviter tout
risque de détérioration ou d’endommagement de l’isolation des câbles.
• Pour éviter les court-circuits, ne jamais mettre ou laisser d’objets métalliques (comme une
pièce de monnaie ou un outil ) à l’intérieur de l’appareil.
• Si l’appareil émet de la fumée ou une odeur bizarre, mettez immédiatement l’appareil hors
tension et consultez un revendeur Kenwood.
• Ne touchez pas le cristal liquide si l’affichage LCD était endommagé ou cassé à cause d’un
choc. Le cristal liquide peut être dangereux pour votre santé et même mortel. Si le cristal
liquide de l’affichage LCD entrait en contact avec votre corps ou un vêtement, lavez-le
immédiatement avec du savon.
2ATTENTION
Pour éviter tout dommage à l’appareil, veuillez prendre les précautions
suivantes:
• Assurez-vous de mettre l’appareil à la masse sur une alimentation négative de 12V CC.
• N’ouvrez pas le couvercle de l’appareil.
• N’installez pas l’appareil dans un endroit exposé directement à la lumière du soleil, à une
chaleur excessive ou à l’humidité. Evitez aussi les endroits trop poussiéreux et où l’appareil
risque d’être éclaboussé.
• Ne faites pas subir de chocs excessifs à la façade car elle fait partie d’un équipement de
précision.
• Lors du remplacement d’un fusible, utilisez seulement un fusible neuf avec la valeur
indiquée. L’utilisation d’un fusible d’une valeur différente peut être la cause d’un mauvais
fonctionnement de votre appareil.
• Pour éviter les courts-circuits lors du remplacement d’un fusible, déconnectez d’abord le
faisceau de câbles.
REMARQUE
Si vous rencontrez des problèmes pendant l’installation, consultez votre revendeur
Kenwood.
Operation
L’appareil est allumé
Lorsque le terminal d’entrée vidéo reçoit un signal vidéo, ce moniteur s’allume.
7 Appuyer sur la touche [ 5 ] pour
obtenir un écran plus clair.
7 Appuyer sur la touche [ ∞ ] pour
obtenir un écran plus foncé.
6 - Français
LZ-601_K
02.12.16
1:00 PM
Page 7
Installation
Accessoire
1
Procédure d’installation
1 Pour éviter les courts-circuits, retirez la clef de contact et déconnectez la borne · de la
batterie.
2
3
4
5
6
Effectuez correctement les connexions d’entrée et sortie de chaque appareil.
Connectez le faisceau de câbles dans l’ordre suivant: masse, allumage.
Branchez le connecteur du faisceau à l’appareil.
Installez l’appareil dans votre voiture.
Reconnectez la borne · de la batterie.
2AVERTISSEMENT
• Ce produit est destiné à être utilisé uniquement avec une masse négative de 12 V CC. Ne le
connectez pas à un autre type d’alimentation.
• Pour éviter un court-circuit, débranchez le câble de la batterie de la borne négative de la batterie
pendant l’installation.
• Assurez-vous de bien stabiliser ce produit. Ne l’installez pas dans un endroit instable.
• Suivez les procédures d’installation et de câblage décrites dans ce manuel. Un câblage incorrect ou
une installation modifiée peut provoquer non seulement un mauvais fonctionnement ou
endommager l’appareil, mais aussi provoquer un accident.
• N’installez pas l’unité dans les endroits suivants.
•Des endroits qui gênent le fonctionnementdu système d’air bag.
•Des endroits soumis aux rayons directs du soleil, à l’air d’un climatiseur, ou des endroits humides
ou des endroits où régne une température élevée.
\ Cela risque de provoquer une déformation du moniteur.
2ATTENTION
• Si l’allumage de votre voiture n’a pas de position ACC, connectez le câble d’allumage à une source
d’alimentation qui peut être mise sous et hors tension avec la clef de contact. Si vous connectez le
câble d’allumage à une source d’alimentation constante, comme un câble de batterie, la batterie
risque de se décharger.
• Si un fusible grille, assurez-vous d’abord que les câbles n’ont pas causé de court-circuit puis
remplacez le vieux fusible par un nouveau de même valeur.
• Ne laissez pas des câbles non-connectés ou des prises toucher les parties métalliques de la voiture
ou autres conducteurs électriques. Pour éviter, les courts-circuits, ne retirez pas non plus les
capuchons à l’extrémité des câbles non-connectés ou des prises.
• Après avoir installé l’appareil, vérifiez si les feux de freinage, les indicateurs, les clignotants, etc de
la voiture fonctionnent correctement.
• Isolez les câbles non-connectés avec un ruban adhésif en vinyle ou autre matériel similaire.
• Essuyer à fond la poussière ou de la graisse de l’emplacement d’installation à l’aide d’un chiffon imbibé
dans une solution de nettoyage neutre et essoré sec. Fixer le socle après avoir séché l’emplacement
d’installation.
Français - 7
LZ-601_K
02.12.16
1:01 PM
Page 8
Installation
Connexion
Boîte á fusibles de la voiture
(Fusible principal)
Unité moniteur
Fusible
Accessoire 1
Interrupteur d’allumage
Allumage
(3A)
Câble d’allumage
(Rouge) ª12V
VIDEO OUT
+
–
Batterie
8 - Français
Câble de masse (Noir) ·
(Au châssis de la voiture)
Entrée vidéo
LZ-601_K
02.12.16
1:01 PM
Page 9
Guide de depannage
Ce qui peut apparaître comme un mauvais fonctionnement de votre appareil
n’est peut être que le résultat d’une mauvaise opération ou d’une mauvaise
connexion. Avant d’appeler un centre de service, vérifiez d’abord dans le
tableau suivant les problèmes possibles.
PROBLEME
L’appareil ne se met pas sous
tension.
L’écran est sombre.
CAUSE POSSIBLE
SOLUTION
Le fusible a grillé.
Après avoir vérifiez qu’il n’y a
pas de court-circuits dans les
câbles, remplacez le fusible par
un de la même valeur.
Pas de position ACC sur
l’allumage du véhicule.
Connectez le même câble à
l’allumage comme câble de
batterie.
Le terminal d’entrée vidéo ne
reçoit aucun signal vidéo.
Entrer le signal vidéo.
L’appareil est dans un endroit où
la température est basse.
Si la température du moniteur
tombe, l’écran peut apparaître
plus sombre lorsque l’appareil est
allumé pour la première fois à
cause des caractéristiques du
panneau à cristaux liquides.
Attendre un moment après la
mise sous tension pour que la
température monte. La
luminosité normale va revenir.
Spécifications
Les spécifications sont sujettes à changements sans notification.
Unité moniteur
Taille d’écran ........................................................................................6,4 pouces (Normal)
................................................................................130,8(L) x 98(H) x 162,5(Diagonal) mm
..............................................................................5-3/16 (L) x 3-7/8 (H)x 6-7/16 (D) pouces
Système d’affichage ................................................................Panneau LCD TN transparent
Système d’entraînement ......................................................Système de matrice active TFT
Nombre de pixels ........................................................224.640 pixels (320 H x 234 V xRGB)
Pixels effectifs ..........................................................................................................99,99%
Pixel arrangement ......................................................................Disposition par bandes RGB
Eclairage arrière....................................................................................Tube cathodique froid
Système de couleur ..............................................................................................NTSC/PAL
Niveau d’entrée vidéo ........................................................................................1 Vp-p/ 75 Ω
Général
Tension de fonctionnement ..................................................................14,4 V DC (11 à 16 V)
Courant absorbé............................................9 W (6 W au cours du fonctionnement normal)
Fourchette de température de fonctionnement ..............................................–10°C à +60°C
Fourchette de température de rangement ......................................................–30°C à +85°C
Taille............................................................................................188(L) x 130(H) x 31(P) mm
....................................................................................7-3/8(L) x 5-1/8(H) x 1-1/4(P) pouces
Masse ............................................................................................................460 g (1,0 LBS)
Bien que le taux de pixels effectifs du panneau à cristaux liquides soit estimé à 99,99 % ou
plus, O,O1 % de pixels peuvent ne pas éclairer ou peuvent éclairer incorrectement.
Français - 9
LZ-601_K
02.12.16
1:01 PM
Page 10
LZ-601_K
02.12.16
1:01 PM
Page 11
LZ-601_K
02.12.16
1:01 PM
Page 12