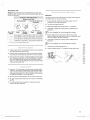
1
Electric
Dryer
Models 8907*
Code No. : DC68-02865A-02
Sears Canada Inc., Toronto, Ontario, Canada M5B 2C3
www.sears.ca
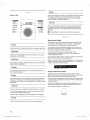
TABLE OF CONTENTS
TABLE OF CONTENTS
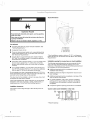
PROTECTION
KENMORE
...............................
AGREEMENTS
APPLIANCE
..........................
WARRANTY
...................
PROTECTION AGREEMENTS
2
2
3
DRYER SAFETY .....................................
4
iNSTALLATiON
5
iNSTRUCTiONS
........................
Tools and Parts ....................................
5
Optional Accessories
5
................................
Location
Requirements
..............................
6
Electrical
Requirements
..............................
8
Venting Requirements
...............................
10
Install Vent System .................................
Connect Vent .....................................
11
11
Connecting
11
Level Dryer .......................................
12
Reverse Door Swing
13
Installation
...............................
Check List ..............................
DRYER USE .......................................
Starting Your Dryer .................................
Cycles ..........................................
Options
.........................................
LAUNDRY
v'
_/
Fast help by phone - we call it Rapid Resolution - phone
support from a Sears representative on all products. Think of
us as a "talking owner's manual."
19
20
Cycle Chart ......................................
"No=lemon _ guarantee - replacement of your covered
product if four or more product failures occur within twelve
months.
16
.........................
TROUBLESHOOTING
...............................
information Codes .................................
21
_/
22
22
22
Dryer Results .....................................
23
product can't be fixed.
Check at your request
against electrical
damage
due to
$250 Food Loss Protection
annually for any food spoilage
that is the result of mechanical failure of any covered
refrigerator or freezer.
Rental reimbursement
if repair of your covered
takes longer than promised.
v'
BACK COVER
if your covered
Maintenance
Power surge protection
power fluctuations.
20
Check these points if your dryer .......................
SERVICE NUMBER .......................
service, as often
Product replacement
Lint .........................
TIPS ............................
Unlimited
service calls and nationwide
as you want us, whenever you want us.
Annual Preventive
- no extra charge.
19
SPECIAL
Expert service by a force of more than 10,000 authorized
Sears service technicians,
which means someone you can
trust will be working on your product.
15
16
DRYER CARE ......................................
Accumulated
Parts and labor needed to help keep products operating
properly under normal use, not just defects. Our coverage
goes well beyond the product warranty. No deductibles,
no functional failure excluded from coverage-real
protection.
15
18
Removing
The Master Protection Agreement also helps extend the life of
your new product. Here's what the Agreement* includes:
14
Drying Rack ......................................
Cleaning the Dryer Location
Congratulations
on making a smart purchase. Your new
Kenmore product is designed and manufactured for years of
dependable operation. But like all products, it may require
preventive maintenance or repair from time to time. That's when
having a Master Protection Agreement can save you money and
aggravation.
9
Plan Vent System ..................................
the Inlet Hose ...........................
Master Protection Agreements
product
10% discount off the regular price of any non-covered
service and related installed parts.
repair
Once you purchase the Agreement, a simple phone call is all that
it takes for you to schedule service. You can call anytime day or
night, or schedule a service appointment online.
The Master Protection Agreement is a risk free purchase. If you
cancel for any reason during the product warranty period, we
will provide a full refund. Or, a prorated refund anytime after
the product warranty period expires. Purchase your Master
Protection Agreement today!
*Coverage in Canada varies on some items. For full details
call Sears Canada at 1 =800=361 =6665.
Sears Installation
Service
For Sears professional installation of home appliances, garage
door openers, water heaters, and other major home items, in the
Canada call 1 =800=4=MY-HOME ®.
KENMORE APPLIANCE WARRANTY
ONE YEAR LiMiTED
WARRANTY
DiSCLAiMER
REMEDIES
When installed, operated and maintained according to
instructions supplied with the product, if this appliance
to a defect in material or workmanship
within one year
date of purchase, call 1-800-4-MY-HOME
_ to arrange
repair.
all
fails due
from the
for free
If this appliance is used for other than private family purposes,
this warranty applies for only 90 days from the date of purchase.
THIS WARRANTY COVERS ONLY DEFECTS IN MATERIAL
AND WORKMANSHIP. SEARS WILL NOT PAYFOR:
OF iMPLiED
WARRANTIES;
LiMiTATiON
OF
Customer's sole and exclusive remedy under this limited
warranty shall be product repair as provided herein. Implied
warranties, including warranties of merchantability
or fitness
for a particular purpose, are limited to one year or the shortest
period allowed by law. Sears shall not be liable for incidental
or consequential damages. Some states and provinces do not
allow the exclusion or limitation of incidental or consequential
damages, or limitations on the duration of implied warranties of
merchantability
or fitness, so these exclusions or limitations may
not apply to you.
Expendable items that can wear out from normal use,
including but not limited to filters, belts, light bulbs, and
bags.
This warranty
Canada.
2.
A service technician to instruct the user in correct product
installation, operation or maintenance.
This warranty gives you specific legal rights, and you may also
have other rights which vary from state to state.
3.
A service technician
4.
Damage to or failure of this product if it is not installed,
operated or maintained according to all instructions supplied
with the product.
5.
Damage to or failure of this product resulting from accident,
abuse, misuse or use for other than its intended purpose.
In the space below, record your complete model number, serial
number, and purchase date. Model plate is located on the lower
part of the door opening and on the rear right side of the unit.
6.
Damage to or failure of this product caused by the use of
detergents, cleaners, chemicals or utensils other than those
recommended in all instructions supplied with the product.
Have this information available to help you obtain assistance or
service more quickly whenever you contact Sears concerning
your appliance.
7.
Damage to or failure of parts or systems resulting from
unauthorized modifications made to this product.
Model number
1.
to clean or maintain
applies only while this appliance
is used in the
Sears Canada Inc.
Toronto, Ontario, Canada M5B 2C3
this product.
PRODUCT
RECORD
Serial number
Purchase
date
Save these instructions
reference.
PEDESTAL
PRODUCT
and your sales receipt
for future
RECORD
In the space below, record your complete model number, serial
number, and purchase date. You can find this information on the
model and serial number label located on the product.
Have this information available to help you obtain assistance or
service more quickly whenever you contact Sears concerning
your pedestal.
Model number
Serial number
Purchase
date
Save these instructions
reference.
and your sales receipt
for future
3
I
I
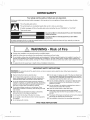
DRYER SAFETY
Your safety and the safety of others are very important.
We have provided
messages.
many important safety messages
in this manuN and on your appliance.
Always read and obey all safety
This is the safety alert symbol.
This symbol alerts you to potential
All safety messages
®
hazards that can kill or hurt you and others.
will follow the safety alert symbol and either the word "WARNING"
or "CAUTION."
These words mean:
You can be killed or seriously injured if you don_t immediately
follow instructions.
Youinstructions.can
be killed or seriously injured if you don_t follow
All safety messages will tell you what the potentiN
happen if the instructions are not followed.
i
hazard is, tell you how to reduce the chance of injury, and tell you what can
WARNING
by a qualified
- Risk of Fire
[]
Clothes dryer installation must be performed
[]
Install the clothes dryer according
[]
Do not install a clothes dryer with flexible plastic venting materials. If flexible metal (foil type) duct is installed, it must be of a
specific type identified by the appliance manufacturer as suitable for use with clothes dryers. Flexible venting materials are
known to collapse, be easily crushed, and trap lint. These conditions will obstruct clothes dryer Nrflow and increase the risk of
fire.
[]
To reduce the risk of severe injury or death, follow all installation
to the manufacturer's
installer.
instructions
and local codes.
instructions.
iMPORTANT SAFETY iNSTRUCTiONS
WARNING:
To reduce the risk of fire, electric shock, or injury to persons when using the dryer, follow
including the following:
[]
Read all instructions before using the dryer.
[]
Do not place items exposed to cooking oils in your dryer.
Items contaminated
with cooking oils may contribute to a
chemical reaction that could cause a load to catch fire.
[]
Do not dry articles that have been previously cleaned in,
washed in, soaked in, or spotted with gasoline, drycleaning
solvents, or other flammable or explosive substances as
they give off vapors that could ignite or explode.
[]
Do not allow children to play on or in the dryer. Close
supervision of children is necessary when the dryer is used
near children.
[]
Before the dryer is removed from service or discarded,
remove the door to the drying compartment,
[]
Do not reach into the dryer if the drum is moving,
[]
Do not install or store the dryer where it will be exposed
the weather,
[]
basic precautions,
[]
Do not repair or replace any part of the dryer or attempt any
servicing unless specifically recommended in this Use and
Care Guide or in published user-repair instructions that you
understand and have the skills to carry out.
[]
Do not use fabric softeners or products to eliminate static
unless recommended
by the manufacturer of the fabric
softener or product.
[]
Do not use heat to dry articles containing
similarly textured rubber-like materials.
[]
[]
Clean lint screen before or after each load.
[]
The interior of the dryer and exhaust vent should be cleaned
periodically by qualified service personnel.
[]
See installation instructions for grounding
to
foam rubber or
Keep area around the exhaust opening and adjacent
surrounding areas free from the accumulation
of lint, dust,
and dirt.
requirements.
Do not tamper with controls.
SAVE THESE iNSTRUCTiONS
[BETTER]592-89075-02865
A-02
EN.indd
4
2011-03-23
i,_ft
9:48:59
I
I
I
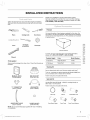
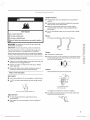
iNSTALLATiON iNSTRUCTiONS
Gather the required tools and parts before starting installation.
Read and follow the instructions provided with any tools listed
here.
Mobile home installations require metal exhaust system
hardware available for purchase from your local Sears store or
Sears Service Center. For further information, please call 1=800=
4=MY=HOME e (1 =800=469=4663).
Pedestal
--..>_
Pliers
Cutting
knife
Nut drivers
©
flat=blade
screwdriver
Level
You have the option of purchasing a pedestal for this dryer. You
may select a 14"(35.5cm) pedestal. Remember that the pedestal
will add to the total height of the unit. The pedestals are available
in several colors.
Duct tape
Qptional
pedestal
To order, call your local Sears store. For further information,
please call 1-800-4-MY-HOME
e (1-800-469-4663).
Wrench
Parts suppUed
14"(35.5cm)
Remove parts package from dryer drum. Check that all parts are
included.
14" (35.5cm)
Night Sky Blue
19106
Tango Red
19109
i
Stacking
Kit
Are you planning to stack your Kenmore washer and dryer?
To do so, purchase an optional stacking kit (Model:18888)
your local Sears store or Sears Service Center.
MANUAL=BOOK
(DC68-02865A)
DIE=RACK DRY
(DC61-02773A)
from
Follow instructions included with the kit.
Side Vent Kit
i'i
Use the Side Vent Kit (Model : 18004) for venting directly on
either side or on the bottom.
Follow instructions included with the kit.
"Y"=CONNECTOR
(DC97-15103A)
HOSE WATER
(DC97-15692A)
SHORT iNLET HOSE
(DC97-15249A)
NOTE: Do not use leveling legs supplied
on a pedestal..
RUBBER WASHER
(DC62-40178A)
Vent cap
Elbow
Duct Back-Left
Duct Back-Right
Duct Front
Duct Front-Bottom
with dryer if installing
5
[BETTER]592-89075-02865
A-02
EN.indd
5
2011-03-23
i,_ft
9:49:04
I
I
I
Dryer Dimensions
-.
Explosion
Keep flammable
materials
away from dryer.
i
Hazard
and vapors,
such as gasoline,
Place dryer at least 18 inches {46 cm) above the floor for
a garage installation.
Failure to do so can result in death, explosion,
or fire.
You willneed
[]
A location that allows for proper exhaust installation. See
"Venting Requirements."
[]
A separate 30-amp
[]
If you are using a power supply cord, a grounded electrical
outlet located within 2 ft (61 cm) of either side of the dryer.
See "Electrical Requirements."
[]
A sturdy floor to support the total dryer weight of 200 Ibs
(90.7 kg). The combined weight of a companion appliance
should also be considered.
[]
A level floor with a maximum slope of 1" (2.5 cm) under entire
dryer. If slope is greater than 1", clothes may not tumble
properly and automatic sensor dry cycles may not operate
correctly.
[]
A: 39"(99. Ocm)
B : 27"(68.6crn)
C : 49"(124.5crn)
D : 29.4"(74.7crn)
circuit.
For a garage installation, you will need to place the dryer at
least 18" (46 cm) above the floor. If you are using a pedestal,
you will need 18" (46 cm) to the bottom of the dryer.
Do not operate your dryer at temperatures below 45°F (7°C). At
lower temperatures, the dryer might not shut off at the end of an
automatic cycle. Drying times can be extended.
* Most installations require a minimum 5" (12.7 cm) clearance
behind the dryer for the exhaust vent with elbow. See "Venting
Requirements."
installation spacing for recessed area or closet installaSon
The following spacing dimensions are recommended for this
dryer. This dryer has been tested for spacing of 0" (0 cm)
clearance on the sides and rear. Recommended
spacing should
be considered for the following reasons:
[]
Additional spacing should
installation and servicing.
[]
Additional clearances
floor moldings.
[]
Additional spacing should be considered
dryer to reduce noise transfer.
[]
For closet installation, with a door, minimum ventilation
openings in the top and bottom of the door are required.
Louvered doors with equivalent ventilation openings are
acceptable.
[]
Companion
The dryer must not be installed or stored in an area where it will
be exposed to water and/or weather.
Check code requirements. Some codes limit, or do not permit,
installation of the dryer in garages, closets, mobile homes, or
sleeping quarters. Contact your local building inspector,
Installalion
clearances
The location must be large enough to allow the dryer door to
open fully.
Custom
appliance
undercounter
be considered
for ease of
might be required for wall, door and
on all sides of the
spacing should also be considered.
installation
- Dryer only
0 rain.
(ocm)
(_.0 cm)
R
(2._cm)
_r_-(
II
m)=_ _'-
'
(2._cm)
* Required spacing
[BETTER]592-89075-02865
A-02
EN.indd
6
2011-03-23
;_ft
9:49:10
]
I
I
Closet installation
- Dryer only
Recommended
instalia_on spacing for recessed
instaJJation, with stacked
washer
and dryer
The dimensions
(2.5cm) 174.7cm)
shown are for the recommended
or closet
spacing.
d2.7cm)
A
B
A. Side view - closet or confined
B. Closet door with vents
_-t _
, o>
area
24 in._ *
J_
._-- 1"' (2.5cn_)
(155 cm_)
* Required spacing
** For side or bottom
Recessed
venting, 2" (5.1 cm) spacing
is allowed.
* Required spacing
or cJoset instaJJation = Dryer on pedestaJ
=
t
14" m_.'
olo
18I' .rain.*
76"
(193 cm)
\'-_J/
1,, --> I<--(68.6cm)
1,,
(2.5cm)
(2.5 cm)
1"*
12.5 cm)
29.4"
(/4.7 cm)
_-"
5"_
(12.7 cm)
* Required spacing
A. Recessed area
B. Side view - closet or confined
** For venting out the side, 2" (5.1 cm) spacing is allowed.
area
Mobile home =additional installation requirements
* Required spacing
Installa_on
[]
(2.5 cm)
(68.6cm)
A
** For side or bottom
(2.5cm)
venting, 2" (5.1 cm) spacing
spacing
for cabinet
is allowed.
installation
For cabinet installation, with a door, minimum ventilation
openings in the top of the cabinet are required.
7" 117,8cm)
7'" (17.8 cm)
0""
(22.0 cm)
The installation of the Dryer in mobile homes must conform to
the Manufactured Home Construction
and Safety Standard Title
24 CFR, Part 32-80 {formerly the Federal Standard for Mobile
Home Construction
and Safety, Title 24, HUD (Part 280), 1975}
for the United States) or CSA Standards Z240 (for Canada).
When installing a Dryer in a mobile home, provisions for
anchoring the Dryer to the floor must be made. Locate an area
that has adequate fresh air.
A minimum of 72 in2 (183 cm 2) of unobstructed
space is
required.
All mobile home installations must be exhausted to the outside
with the exhaust duct termination securely fastened to the
mobile home structure, using materials that will not support
combustion.
The exhaust duct may not terminate underneath the mobile
home.
See Exhausting section for more information.
IVlobile home installations
(12.7cm)
_/4.7cm)
12.5cm)
12.5cm) (6&6cm) (2.5cm)
require:
[]
Metal exhaust system hardware, which is available for
purchase from your local Sears store or Sears Service
Center.
[]
Special provisions must be made in mobile homes to
introduce outside air into the dryer. The opening (such as a
nearby window) should be at least twice as large as the dryer
exhaust opening.
* Required spacing
** For side or bottom
venting, 2" (5.1 cm) spacing
is allowed.
7
[BETTER]592-89075-02865
A-02
EN.indd
7
2011-03-23
i,_ft
9:49:12
I
I
I
GROUNDING
[]
Electrical
Plug into a grounded 4 prong outlet.
in death or electrical
shock.
it is your responsibility
a qualified
electrical
cord-connected
dryer:
This dryer must be grounded. In the event of malfunction or
breakdown, grounding will reduce the risk of electric shock
by providing a path of least resistance for electric current.
This dryer is equipped with a cord having an equipmentgrounding conductor and a grounding plug. The plug
must be plugged into an appropriate outlet that is properly
installed and grounded in accordance with all local codes
and ordinances.
Shock Hazard
Failure to do so can result
For a grounded,
INSTRUCTIONS
[]
To contact
[]
To be sure that the electrical connection is adequate and
in conformance with the Canadian Electrical Code, 022.1 latest edition and all local codes. A copy of the above
codes standard may be obtained from: Canadian Standards
Association, 178 Rexdale Blvd., Toronto, ON M9W 1 R3
Canada.
installer.
[]
To supply the required 4 wire, single phase, 120/240 volt, 60
Hz., AC only electrical supply on a separate 30-amp circuit,
fused on both sides of the line. A time-delay fuse or circuit
breaker is recommended.
Connect to an individual branch
circuit.
[]
This dryer is equipped with a CSA International Certified
Power Cord intended to be plugged into a standard 14-30R
wall receptacle. The cord is 5 ft (1.52 m) in length. Be sure
wall receptacle is within reach of dryer's final location.
WARNING=
= Improper connection of the equipmentgrounding conductor can result in a risk of electric shock.
Check with a qualified electrician or service representative
or personnel if you are in doubt as to whether the dryer is
properly grounded. Do not modify the plug provided with the
dryer: if it will not fit the outlet, have a proper outlet installed
by a qualified electrician.
[]
For Gas Models
Your Dryer has a cord with an equipment-grounding
conductor and a grounding plug.
The plug must be plugged into an appropriate outlet that is
properly installed and grounded in accordance with all local
codes and ordinances.
Do not modify the plug provided with your Dryer - if it
doesn't fit the outlet, have a proper outlet installed by a
qualified electrician.
NEVER CONNECT GROUND WIRE TO PLASTIC PLUMBING
LINES, GAS LINES, OR HOT WATER PIPES.
SAVE THESE INSTRUCTIONS
©
4-wire receptacle 14-30R
[]
Do not use an extension
cord.
If you are using a replacement power supply cord, it is
recommended that you use Power Supply Cord Replacement
Part Number DC96-OO762A. For further information, please ca!!
1-800-4-MY-HOME®
(1-800-469-4663).
[BETTER]592-89075-02865
A-02
EN.indd
8
2011-03-23
i,_ft
9:49:13
I
I
I
=iiidiiiii::::!_,ii_'ii
iii:iiiil_iii!!!!!iii:iI
!i:;:iii@(_:iiiii;iiiiil,'
@1ii?,;@iiiii
iiil]!ii;
Flexible metal vent
Fire Hazard
[]
Flexible metal vents are acceptable
cleaning.
[]
Flexible metal vent must be fully extended
when the dryer is in its final location.
[]
Remove excess flexible metal vent to avoid sagging
and kinking that may result in reduced airflow and poor
performance.
[]
Do not install flexible metal vent in enclosed
floors.
only if accessible
for
and supported
walls, ceilings
Use a heavy metal vent.
Elbows
Do not use a plastic vent.
Do not use a rnetal foil vent.
Failure to follow
fire.
WARNING:
45 ° elbows
these instructions
EXHAUSTED
To reduce the risk of fire, this dryer MUST BE
OUTDOORS.
IMPORTANT:
Observe all governing
better airflow than 90 ° elbows.
codes and ordinances.
The dryer exhaust must not be connected into any gas vent,
chimney, wall, ceiling or a concealed space of a building.
Please read the following instructions carefully before installing
the dryer. These instructions should be kept for future reference.
If using an existing
provide
can result in death or
Good
Clamps
[]
Use clamps to seal all joints.
[]
Exhaust vent must not be connected or secured with screws
or other fastening devices that extend into the interior of the
duct. Do not use duct tape.
vent system
[]
Clean lint from the entire length of the system and make sure
exhaust hood is not plugged with lint.
[]
Replace any plastic or metal foil vent with rigid or flexible
heavy metal vent.
[]
Review Vent system chart. Modify existing vent system if
necessary to achieve the best drying performance.
Better
Clamp
Exhaust
Recommended
hood styles are shown here.
if this is a new vent system
B
Vent material
[]
Use a heavy metal vent. Do not use plastic or metal foil vent.
[]
4" (10.2 cm) heavy metal exhaust vent and clamps
used.
must be
(10.2cm)
A. Louvered hood style
B. Box hood style
The angled hood style (shown here) is acceptable.
4" (10.2 cm) heavy metal exhaust vent
[]
Rigid metal vent
[]
For best drying performance,
recommended.
rigid metal vents are
[]
Rigid metal vent is recommended
kinking.
An exhaust hood should cap the vent to keep rodents and
insects from entering the home.
(10.2 cm
4"
to avoid crushing
)__
and
•" '" (6.4cm)
9
[BETTER]592-89075-02865
A-02
EN.indd
9
2011-03-23
i,_ft
9:49:15
I
I
I
[]
Exhaust hood must be at least 12" (30.5 cm) from the ground
or any object that may be in the path of the exhaust (such as
flowers, rocks or bushes, snow line, etc.).
[]
Do not use an exhaust
hood with a magnetic
improper venting can cause moisture
indoors, which may result in:
[]
Moisture damage to woodwork,
wallpaper, carpets, etc.
[]
Housecleaning
problems
latch.
Optional
exhaust installations
This dryer can be converted
side, or through the bottom,
the dryer converted,
to exhaust out the right side, left
Contact your local dealer to have
and lint to collect
furniture,
paint,
and health problems.
A
B
A. Standard
rear offset exhaust installation
B. Left or right side exhaust installation
C. Bottom exhaust installation (not an option
pedestal installations)
LOCATIONCONSiDERATiONS
The dryer should be located where there is enough space at
the front for loading the dryer, and enough space behind for the
exhaust system. This dryer is factory-ready for rear exhaust. To
exhaust out the bottom, left or right (for gas dryer, bottom or
left), contact your local dealer to have the dryer converted. It's
important to make sure the room has enough fresh air. The dryer
must be located where there is no air-flow obstruction.
with
Special provisions for mobile home installations
The exhaust vent must be securely fastened to a
noncombustible
portion of the mobile home structure and must
not terminate beneath the mobile home. Terminate the exhaust
vent outside.
THE DRYER MUST NOT BE INSTALLED OR STORED IN
AND AREA WHERE IT WILL BE EXPOSED TO WATER AND
/OR WATHER. THE DRYER AREA IS TO BE KEPT CLEAR
OF COMBUSTIBLE
MATERIALS, GASOLINE, AND OTHER
FLAMMABLE VAPORS AND LIQUIDS. A DRYER PRODUCES
COMBUSTIBLE
LINT. THE AREA AROUND THE DRYER
SHOULD BE KEPT LINT-FREE.
Choose your exhaust
Recommended
installation type
exhaust installations
Determine
Typical installations vent the dryer from the rear of the dryer.
Other installations are possible.
[]
Select the route that will provide the straightest
direct path outdoors.
[]
Plan the installation
turns.
[]
When using elbows or making turns, allow as much room as
possible.
[]
Bend vent gradually to avoid kinking.
B
A
......................
vent path
[]
to use the fewest number
t
i
..............................................................................................................................................................................................................................................................................
Determine vent length
performance
Dryer
Elbow
Wall
Exhaust hood
E.
E
G.
H.
Clamps
Rigid metal or flexible metal vent
Vent length necessary to connect
Exhaust outlet
elbows
of elbows and
Use the fewest 90 ° turns possible.
i
A.
B.
C.
D.
and most
and elbows
needed for best drying
[]
Use the following Vent system chart to determine type of
vent material and hood combinations
acceptable to use.
[]
NOTE: Do not use vent runs longer than those specified in
the Vent system chart. Exhaust systems longer than those
specified will:
[]
Shorten the life of the dryer.
[]
Reduce performance, resulting in longer drying times and
increased energy usage.
The Vent system chart provides venting requirements
help to achieve the best drying performance.
that will
10
[BETTER]592-89075-02865
A-02EN.indd
10
2011-03-23
i,_ft
9:49:16
I
I
I
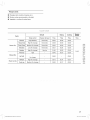
Vent system
chart
NOTE: Side and bottom exhaust installations have a 90 ° turn
inside the dryer. To determine maximum exhaust length, add one
90 ° turn to the chart.
Weather
Recommended
The dryer must be connected to the cold water faucet using the
new inlet hoses. Do not use old hoses.
Hood Type
,
METHOD1
Use oNy for short-run
installation
1.
if space permits, attach the brass female end of the "Y"
connector to the cold water faucet.
2. Turn the cold water faucet off.
3. Attach
4.
4" (10.16
No. ofg0 °
elbows
*
Rigid
cm)
2.5" (6.35 cm)
Metallic
Flexible*
Rigid
Metallic
Flexible*
0
24.4 m(80 ft.) 12.4 m(41 ft.) 22.6 m(74 ft.) 10.1 m (33 ft.)
1
20.7 m(68 ft.) 11.2 m(37 ft.) 18.9 m(62 ft.) 8.8 m(29 ft.)
2
17.4 m(57 ft.) 10.1 m(33 ft.) 15.5 m(51 ft.) 7.6 m(25 ft.)
3
14.3m (47 ft.) 9.0 m (29 ft.)
12.5m(41
ft.) 6.5m(21
ft.)
the straight
end of long hose to "Y' connector.
Using pliers, tighten the coupling with an additional
thirds turn.
_Do
not overtighten,
two-
as it may damage the coupling.
5. Attach angled end of long hoses to fill the valve at the
bottom of the dryer's rear frame. Screw on coupling by hand
until it is seated on fill valve connector.
6.
Using pliers, tighten the coupling with an additional
thirds turn.
two-
Do not use non-metallic flexible duct.
[_Do
1,
Install exhaust hood. Use caulking compound
wall opening around exhaust hood.
2.
Connect vent to exhaust hood. Vent must fit inside exhaust
hood. Secure vent to exhaust hood with 4" (10.2 cm) clamp.
not overtighten,
as it may damage the coupling.
7.
Check that the water faucets are on.
8.
Check for leaks around "Y" connector
faucets
and hoses.
to seal exterior
/'
/
,3. Run vent to dryer location. Use the straightest path possible.
See "Determine vent path" in "Plan Vent System." Avoid 90 °
turns. Use clamps to seal all joints. Do not use duct tape,
screws or other fastening devices that extend into the interior
of the vent to secure vent.
1,
Using a 4" (10.2 cm) clamp, connect vent to
in dryer, if connecting to existing vent, make
clean. The dryer vent must fit over the dryer
and inside the exhaust hood. Check that the
to exhaust hood with a 4" (10.2 cm) clamp.
2,
Move dryer into its final location. Do not crush or kink vent.
3.
(On gas models)
gas line.
4,
Once the exhaust vent connection
corner posts and cardboard.
//
exhaust outlet
sure the vent is
exhaust outlet
vent is secured
Check that there are no kinks in the flexible
is made, remove the
11
[BETTER]592-89075-02865
A-02EN.indd
11
2011-03-23
/,_f19:49:17
I
I
I
Method2
The dryer must be connected to the cold water faucet using the
new inlet hoses. Do not use old hoses.
1.
if "Y" connector cannot be attached directly to the cold
water faucet, the short hose must be used.
2. Turn the cold water faucet off.
,1. Attach short inlet hose to cold water faucet.
Screw on coupling by hand until it is seated on the faucet.
4.
Using pliers, tighten the coupling
thirds turn.
_Do
not overtighten,
with an additional
as it may damage the coupling.
Attach 'Y" connector to brass male end of small hose. Screw
on coupling by hand until it is seated on connector.
6.
Using pliers, tighten the coupling
thirds turn.
not overtighten,
with an additional
twoRetract
Attach angled end of long hoses to the fill valve at the
bottom of the dryer rear frame. Screw on coupling by hand
until it is seated on fill valve connector.
8.
Using pliers, tighten the coupling
thirds turn.
9.
not overtighten,
fully
Then loosen
as it may damage the coupling.
7.
(_Do
Adjust the leveling feet only as much as necessary to level the
dryer. Extending the leveling feet more than necessary can
cause the dryer to vibrate.
two-
5.
_Do
To set the dryer to the same height as the washer, fully retract
the leveling feet by turning them counterclockwise,
then loosen
the legs by turning them clockwise
with an additional
two-
as it may damage the coupling.
Check that the water faucets
are on.
10. Check for leaks around "Y" connector,
faucets
and hoses.
12
[BETTER]592-89075-02865
A-02EN.indd
12
2011-03-23
i,_ft
9:49:18
I
I
I
i_:::;::ii_!!;_,_i::!!!:_'S_:!i!!_
Cili_O_,O_
¸'¸_¸
S;wiii_i_ii_iii,!!!!iiiiilI
1.
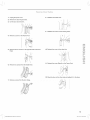
Unplug the power cord.
2.
Remove two door hinge screws.
8.
Reattach the holder lever.
9.
Reattach the screws in the remaing holes.
,9. Lift the door and remove it.
4.
Remove a screw on the Frame Front
5,
Remove the two screws on the opposite
hinge.
side of the door
10. Reinsert the screw in the other hole.
\
////'
11. Reinsert the screw (Step 4) on the Frame Front
6.
Remove two screws from the holder lever.
12. Place the door on the other side and reattach it to the dryer.
i
7.
Remove a screw from the door hinge.
13
[BETTER]592-89075-02865
A-02
EN.indd
13
2011-03-23
i,_fi
9:49:20
I
I
I
1.
Check that all parts are now installed. If there is an extra part,
go back through the steps to see which step was skipped.
2.
Check that you have all of your tools.
,3. Dispose of/recycle
all packaging
materials.
4.
Be sure the water faucets
are on.
5.
Check for leaks around "Y"-connector,
6.
Check the dryer's final location.
crushed or kinked.
faucet and hoses.
Be sure the vent is not
7.
Check that the dryer is level. See "Level Dryer."
8.
For power supply cord installation,
9.
Remove the blue protective
remaining on the dryer.
plug into an outlet.
film on the door and any tape
10. Read "Dryer Use."
11. Wipe the dryer drum interior thoroughly
remove any dust.
with a damp cloth to
12. If you live in a hard water area, use of a water softener is
recommended to control the buildup of scale through the
water system in the dryer. Over time, the buildup of lime
scale may clog different parts of the water system, which will
reduce product performance.
Excessive scale buildup may
lead to the need for certain part replacement or repair.
1,3. Select a Timed Dry heated cycle, and start the dryer. Do not
select the Air Only Temperature setting.
if the dryer
wii not start, check the following:
[]
Controls are set in a running or "On" position.
[]
Start button has been pushed firmly.
[]
Dryer is plugged
connected.
[]
Household fuse is intact and tight,
not tripped.
[]
Dryer door is closed.
into an outlet and/or
electrical
supply is
or circuit breaker has
This dryer automatically runs an installation diagnostic
the start of its first cycle.
routine at
NOTE: You may notice a burning odor when the dryer is first
heated. This odor is common when the heating element is first
used. The odor will go away.
14
[BETTER]592-89075-02865
A-02EN.indd
14
2011-03-23
i,_ft
9:49:20
I
I
I
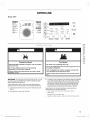
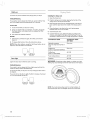
DRYER USE
Models : 8907*
S_<hage
_capteu,
HeavyDuty
Mise en Marche
_ Timed Dry
CIO.OD
Normal
Grande
Power
Programme minLl_
Normal
S_cha_e
aMi.ute.e
_Air
Fluff
Fluxd'_ir
Renden]ent
PermPress_
{:} Very Dry
Pe mPress
(:::}High
(:::)50 rain.
................
Cycles
a vapeurs
Delicates_
Refresh
D_ica_
R{lfrakhi_ement
Sanitize_
_
_T_i,j,
:i) More
Dry
Medium /) 4Omin,
NormalDry
_Touch-Up
Anti4roissement
5terSsatio_
::_t_oo::} LessDry
Low
::: Extralow
Niv_lJ
de _chage
Softer
::_ 20rain,
Dryness
LevelTemperature Time
J
Louder
30min,
Iemp_ratLire
Temps
Star!(Pause
.............................
Off
_1_1
CycleSignal
Signal
Je programme
i
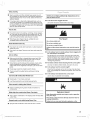
Explosion
Keep flammable
materials
away from dryer.
Fire Hazard
Hazard
and vapors,
such as gasoline,
can result in death,
WARNING:
To reduce the risk of fire, electric shock, or injury
to persons, read the IMPORTANT SAFETY INSTRUCTIONS
before operating this appliance.
Follow these basic steps to start your dryer. Please refer to
specific sections of this manual for more detailed information.
1.
Clean lint screen before each load. See "Cleaning
Screen."
2.
Place laundry
in dryer and shut door.
can completely
remove
oil.
Do not dry an_hing
that has ever had any type of oil on it
(including
cooking oils).
Do not dry anything that has ever had an_hing
flammable
on it (even after washing).
Failure to follow these instructions
explosion, or fire.
No washer
the Lint
Items containing
on a clothesline
foam, rubber, or plastic must be dried
or by using an Air Cycle.
Failure to follow
fire.
these instructions
can result
in death or
3. To select a cycle, rotate the Cycle Selector dial to the desired
cycle. The indicator light by the cycle name will illuminate.
The Normal, Hea W Duty, Perm Press and Delicates cycles
are Sensor Dry cycles. Sensor Dry automatically senses
the moisture in the load and shuts the dryer off when the
selected dryness level (very dry to less dry) is reached.
Under Sensor Dry, the estimated time remaining will vary
depending on the following variables:
Type of fabric being dried.(i.e., towels, light cottons)
Mixed loads
Wetness of the load being dried
Selected Dryness Level(i.e., More Dry, Normal Dry, Less Dry)
15
[BETTER]592-89075-02865
A-02
EN.indd
15
2011-03-23
_,,_ft
9:49:21
I
I
I
Refresh
Models : 8907*
This cycle is best for smoothing out wrinkles and reducing odors
from loads consisting of one to four dry items. In this cycle
a small amount of water is sprayed into the dryer drum after
several minutes of tumbling with heat.
f
S_dlage
_ capteur
Programme inimut_
Normal
Touch Up
TimedDry
Normal
S_chage _ MinLLterie
_Air
HeavyDuty
Fluff
Grande Rendement
This cycle will release wrinkles from items that have been left
in the dryer too long. In this cycle a small amount of water is
sprayed into the dryer drum after several minutes of tumbling
with heat.
Flu× d'a#
PermPress
Perm Press
Cy¢le_ _ vapeurs
Delicates_
__
D_icats
Refresh
RaflaTdlissement
Sanitize_
_Touch-Up
St_riJisation
_
Anti-froissement
Overloading
the dryer may not yield the same results.
Digital GraphicDisplay
The display window shows the estimated time remaining in the
cycle after the Start/Pause button is pressed. The estimated
time remaining may fluctuate as the cycle progresses.
Normal
Use this cycle to dry loads such as cotton, underwear,
Heavy
If you select a course, the Indicator lights for the cycles to be
performed are turned on. (E.g. If you select Normal, the Drying
and Cooling Indicator lights are turned on.)
and linen.
Duty
When the operation begins, the Indicator light of the
corresponding
cycle blinks and if the cycle is complete,
Indicator light is turned off.
Use this cycle to get high heat for heavy fabrics such as jeans,
corduroys, or work clothes.
Perm
If you press the 'Pause' button during an operation,
light that was blinking turns on permanently.
Press
Dry wrinkle-free cottons, synthetic
press fabrics automatically.
fabrics,
the
the Indicator
When a cycle is complete, 'END' disappears if (b 5 minutes have
passed, ® the door is opened and then closed, or ® the Power
button or the Start button is pressed.
knits, and permanent
Delicates
The Delicates cycle is designed to dry heat-sensitive
low drying temperature.
items at a
Dryness Level Salec_on Button
P
Sanitize
To select the dry level in the Normal, Hea W Duty, or other
Sensor Dry cycles, press the Dryness Level button. An indicator
light will illuminate next to the desired dryness level.
This course allows you to sanitize garments by permeating high
temperature heat deep into the fabric during the drying cycle.
Use this course to keep your bedding and curtains clean through
Press the button repeatedly to scroll through the settings. Larger
or bulkier loads may require the Very Dry or More Dry setting for
complete dryness.
sanitization.
......................................................................................................................
The Less Dry setting is best suited for lightweight fabrics or for
leaving some moisture in the clothing at the end of the cycle.
Timed
Dry
Use for items that lay flat or hang to dry.
Time Dry allows you to select the desired cycle time in minutes.
Turn the Cycle Selector dial to Time Dry, then press the Adjust
Time up arrow to set the drying time.
Press the arrow repeatedly
to scroll through
the time settings.
O
Dryness
Level
NiV_LI de s_hage
Air Fluff
The Air Fluff cycle tumbles
the load in room temperature
air.
16
[BETTER]592-89075-02865
A-02
EN.indd
16
2011-03-23
L_,_ft9:49:22
I
I
I
Temp Selection Button
WrinMe Guard
To select the correct temperature for the load, press the Temp
button. An indicator light will illuminate next to the desired
temperature. Press the button repeatedly to scroll through the
settings.
Wrinkle Guard provides approximately 90 minutes of intermittent
tumbling in unheated air at the end of the cycle to reduce
wrinkling. Press the Wrinkle Guard button to activate this feature.
O
The indicator light above the pad will illuminate
Guard is selected.
when Wrinkle
The load is dry, and can be removed at any time during the
Wrinkle Guard cycle.
f-'---------m
Temperature
Wrinklerq Pr6venti0ndu
Telnp&atule
Guard______U
fr0issement
[]
High - For sturdy cottons
or those labeled Tumble Dry.
[]
Medium
cottons,
[]
Low - For heat sensitive
Tumble Dry Warm.
[]
Extra Low - Provides the lowest heated dry temperature
possible.
- For permanent press, synthetics, lightweight
or items labeled Tumble Dry Medium.
items labeled Tumble Dry Low or
Time Selection Button
When using Manual Dry cycles, time can be adjusted
pressing the time selection button.
Mixed Load Bell
This is an alarm that notifies the user when the average
dry level is damp dry (80% dried). This is useful when the
laundry contains various types of clothing you do not want
to dry completely. An alarm sounds for five (5) seconds while
continuing to perform the cycle.
This function can only be selected in the Sensor Dry course, and
the dry level can only be selected from among Normal Dry, More
Dry, and Very Dry.
by
Brass6e
During the Sensory Dry cycle, the time light indicator is off
because exact drying times are determined by fluctuating
humidity levels.
Rack
©
Dry
Rack Dry is available at Time Dry cycle. Temperature
only to Extra Low. (See next page for detail.)
When the cycle is complete,
Time
Temps
Cycle Signal Selection
mlxte
will be set
a chime will sound.
When the Wrinkle Guard option is selected, the chime will sound
intermittently.
Button
When the cycle is complete,
a chime will sound.
Suppo_de
When the Wrinkle Guard option is selected, the chime will sound
intermittently.
Adjust the volume of the chime or turn it off by pressing the
Signal button.
Press the button repeatedly
to scroll through
the choices.
s6chage
Start/Pause selection Button
Press to pause and restart programs.
Start / Pause
©
Delnarrelt Pause
CycleSignal
Sign4
Adjust
te
i)r0_ramme
Time
Time can be added or subtracted from the automatically set
times in the Manual Dry cycles (Time Dry, Air Fluff cycles).
To add or subtract time from the cycle, press the Adjust Time
arrow pad up or down until the desired time is displayed.
Power button
Press once to turn your Dryer on, press again to turn it off.
If your dryer is left on for more than 10 minutes without any
buttons being touched, the power automatically turns off.
Power
Mke
_
AjusL
du temps
en Marche
@
dtl temps
aju_
17
[BETTER]592-89075-02865
A-02
EN.indd
17
2011-03-23
_,_ft
9:49:24
I
I
I
Child
Lock
A function
to prevent children from playing with your dryer.
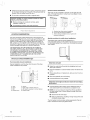
Installingthe drying rack
1. Open the Dryer door.
Setting/Releasing
if you want to set or release the Child Lock, press both the Time
and Cycle Signal buttons simultaneously
for 3 seconds.
2.
Position drying rack in tumbler, placing the front lip of the
drying rack on the top of the lint filter.
3.
Place the rear legs in the two recessed areas of the dryer's
back wall then push down the middle of the drying rack to
fix.
4.
Place the items to be dried on the rack, leaving space
between them so air can circulate.
How to Set:
1=
It can be set while your dryer is running.
2.
Once you set the Child Lock function, no button, except for
the Power button, will respond until you release the Child
Lock function.
6. Use the Time Dry cycle. Select the time according to the
,.1. The Child Lock indicator will be lit.
moisture and weight of the items. Start the Dryer. It may be
necessary to reset the timer if a longer drying time is needed.
NOTES:
1.
if the dryer is powered
stays on.
on again, the Child Lock function
2. To release that function,
follow the instructions
O°O
Temps
Drum
SUGGESTED
ITEMS
SUGGESTED
SETTINGS
TEMP.
above.
NOTE: When other buttons, except for the Power button, do not
respond, check the Child Lock indicator.
Time
5. Close the Dryer door.
Cycle Signal
Sigrl_ de programme
Light
Lights the dryer drum while the dryer is running.
Washable sweaters
(block to shape and lay flat on
rack)
Extra Low
Stuffed toys
(cotton or polyester fiberfilled)
Extra Low
Stuffed toys
(foam or rubber-filled)
Air Fluff
Foam rubber pillows
Air Fluff
Sneakers
Air Fluff
WARNING:
Drying foam rubber, plastic, or rubber on a heat
setting may cause damage to the item and lead to a fire hazard.
Setting/Releasing
If you want to set or release the Drum Light, press both the Dry
Level and Temp. buttons simultaneously.
It can be set while your dryer is not only running but also when it
is stopped.
If you do not turn the Drum Light off within 5 minutes of turning it
on, it is automatically turned off.
DrynessLevel Temperature
N]_eatl de _chage
Ternl)_rature
NOTE: You must remove dryer rack for normal tumbling. To
remove the dryer rack, lift it straight up and out of the dryer.
18
[BETTER]592-89075-02865
A-02
EN.indd
18
2011-03-23
i,_ft
9:49:25
I
I
I
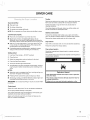
DRYER CARE
Tumbler
Remove any stains such as crayon, ink, or fabric dye (from new
items such as towels or jeans) with an all purpose cleaner.
Cleanthe lintfilter
Tumble old towels or rags to remove any excess stain or
cleaning substance.
[]
After each load.
[]
To shorten drying time.
[]
To operate
Once these steps are followed, stains may still be visible, but
should not transfer to subsequent loads.
more energy efficiently.
NOTE: Do not operate your Dryer without the lint filter in place.
Stainless steel tumbler
Load the dryer properly
To clean the stainless steel tumbler, use a damp cloth with a
mild, non-abrasive cleaner suitable for stainless steel surfaces.
[]
Place only one washload
[]
Mixed loads of heavy and lightweight fabrics will dry
differently, which may result in lightweight fabrics being dry
while heavy fabrics remain damp at the end of a drying cycle.
[]
Add one or more similar items to your Dryer when only one
or two articles of clothing need drying. This improves the
tumbling action and drying efficiency.
[]
in your Dryer at a time.
Overloading restricts tumbling action, resulting in uneven
drying as well as excessive wrinkling of some fabrics.
Remove the cleaner residue and dry with a clean cloth.
Dryer exterior
Clean with a soft, damp cloth. Do not use abrasive substances.
Protect the surface
Dryer exhaust
from sharp objects.
system
Should be inspected and cleaned yearly to maintain optimum
performance.
Getting started
1.
Load your Dryer loosely-
2.
Close the door.
3.
Select the appropriate
cycle and options
4.
Press the Start/Pause
button.
5.
The Dryer indicator light will illuminate.
The outside exhaust hood should
ensure proper operation.
DO NOT overload.
be cleaned more frequently
to
for the load.
6. The estimated cycle time will appear in the display. The time
may fluctuate to better indicate drying time remaining in the
cycle.
NOTES:
[]
When the cycle is completed, the Door Lock light will go out
and "End" will appear in the display.
Explosion Hazard
[]
Pressing Power cancels the cycle and stops your Dryer.
Keep flammable
materials
away from dryer.
[]
The Drying, Cooling, and Wrinkle Prevent indicator lights will
illuminate during those portions of the cycle.
Place dryer at least 18 inches {46 cm) above the floor
a garage installation.
WARNING:
is running.
Do not place anything on top of your dryer while it
and vapors,
such as gasoline,
Failure to do so can result in death, explosion,
for
or fire.
Contzol panel
Clean with a soft, damp cloth. Do not use abrasive substances.
Do not spray cleaners directly on the panel.
The control panel finish may be damaged by some laundry
treatment soil and stain remover products.
pre-
Apply such products away from your Dryer and wipe up any
spills or overspray immediately.
19
[BETTER]592-89075-02865
A-02EN.indd
19
2011-03-23
i,_ft
9:49:26
I
I
I
SPECIAL LAUNDRY TiPS
From inside the Dryer Cabinet
Please follow
the care label or manufacturer's
instructions
for drying special items.
if care label instructions are not available, use the following
Lint should be removed every 2 years, or more often, depending
on dryer usage. Cleaning should be done by a qualified person.
information
Fromthe ExhaustVent
Lint should be removed
on dryer usage.
every 2 years, or more often, depending
Bedspreads
as a guide.
& Comforters
[]
Follow the care label instructions or dry on the Normal cycle
and High temperature.
[]
Make sure the item is thoroughly
Operate your dryer only when you are at home. If you will be on
vacation or not using your dryer for an extended period of time,
you should:
[]
May require repositioning
1.
Unplug dryer.
[]
2.
Clean lint screen. See "Clean the lint filter."
Use Normal cycle and dry only one blanket at a time for best
tumbling action.
[]
Make sure the item is thoroughly
Non-Use
Moving
or Vacation Care
dry before using or storing.
to ensure even drying.
Blankets
dry before using or storing.
care
Curtains & Draperies
For power supply cord-connected
dryers:
1.
Unplug the power supply cord.
2.
Make sure leveling legs are secure in dryer base.
[]
Use the Perm Press cycle and Low or Extra Low temperature
to help minimize wrinkling.
[]
Dry these in small loads for best results and remove as soon
as possible.
,3. Use masking tape to secure dryer door.
For direct=wired
dryers:
Cloth Diapers
[]
Use the Normal cycle and the High temperature settings for
soft, fluffy diapers.
Down-filed
items (jackets, sleeping
bags, comforters,
etc.}
[]
Use the Normal cycle and the Low or Extra Low temperature
setting.
[]
Adding a couple of dry towels shortens
absorbs moisture.
Foam
Rubber
(rug becks,
stuffed
drying time and
toys, shoulder
pads, etc.}
[]
DO NOT dry on a heat setting.
heat).
Use the Air Fluff cycle (no
[]
WARNING - Drying a rubber item with heat may damage it or
be a fire hazard.
Pilows
[]
Use the Normal cycle.
[]
Add a couple of dry towels
fluff the item.
[]
DO NOT dry kapok or foam pillows
Use the Air Fluff cycle.
to help the tumbling
action and to
in the Dryer.
Plastica (shower curtains, outdoor furniture covers, etc.}
[]
Use the Air Fluff cycle or the Time Dry cycle and the Low or
Extra Low temperature settings depending on the care label
instructions.
20
[BETTER]592-89075-02865
A-02
EN.indd
20
2011-03-23
i,_ft
9:49:26
I
I
I
Things to avoid:
[]
Fiberglass items (curtains, draperies,
[]
Woolens,
unless recommended
[]
Vegetable
or cooking oil-soaked
etc.).
on the label.
items.
Default
Cycle
Temp control
Drying
Cooling
Wrinkle
Guard
Time
Sensor dry level
Time
Time
Time
i
Sensor Dry
Manual
Normal
High (Medium)
Normal dry
00:42
00:39
00:03
Heavy Duty
High (No change)
Normal dry
00:58
00:55
00:03
Normal dry
00:32
00:29
00:03
Perm Press
Medium
(No change)
Delicates
Low (No change)
Normal dry
00:27
00:24
00:03
Sanitize
High (No change)
Very dry
01:00
00:55
00:05
Time Dry
High
00:40
00:37
00:03
01:30
Dry
Air Fluff
00:20
00:20
No change
Refresh
High (No change)
00:15
00:14
00:01
_i_i_¸ _Ji_,
¸¸
Steam Cycles
...................
...................................
.................................................................................
-......................................................................................
00120
.............................................................
00177
.....................................................
£01£3
......................................
21
[BETTER]592-89075-02865
A-02EN.indd
21
2011-03-23
i,_ft
9:49:26
I
I
I
TROUBLESHOOTING
First try the solutions suggested
here and possibly avoid the cost of a service call...
(iil;iiiii_:!!i_Cili_ill
iiiii!_ii_:!?S_i!!!!_
ii:::i;i_Oiiiiiiiiiiii_ii_S
ii;i;i_i)
¸¸;ii!i_i_,,_i:ilTi_i_ii!i,i,i
¸_¸_
il;;:!i!_i_i_i_)j_!i:_!_ii,il
...........
Dryer displaying
[]
Doesn_
code message
"tS _, "tO _, "tE _ = Clogged
Lint Screen. Vent is restricted.
Clean the screen or vent.
if the problem continues
[]
"dO",
call for service.
"dE" = Door is not closed
properly
to run the dryer.
[]
if the problem continues
Be sure the power cord is plugged
[]
Check the home's circuit breaker and fuses.
[]
Press the Start/Pause
during the cycle.
call for service.
"dF _ = Door is not closing
Doesn_
"bE",
"bl=2" - Button
stuck
for more than 75 sees.
Make sure a button is NOT being pressed
restarting the cycle.
if the problem continues
[]
"od"
continuously.
Try
call for service.
[]
Se(ect a heat setting other than Air Fluff.
[]
On a gas dryer, check that the gas supply is on.
[]
Clean the lint filter and exhaust duct.
[]
Dryer may have moved into the cool-down
cycle.
Doesn_ dry.
"Et" = EEPROM
Try restarting
is not communicating
Frequency.
the cycle.
If the problem continues
[]
call for service.
"FE" = invalid power source
Try restarting
properly.
[]
Check a(( of the above, plus...
[]
Be sure the exhaust
close freely.
[]
Check exhaust system for lint buildup.
inspected and cleaned annually.
[]
Use a 4" rigid metal exhaust duct.
the cycle.
If the problem continues
[]
phase of the
heating Temp when running the dryer.
Call for service.
[]
heat.
Check the home's circuit breaker and fuses.
= Invalid Dry time.
"hE" - Invalid
outlet.
button again if the door is opened
[]
Call for service.
[]
into a live electrical
properly.
Call for service.
[]
Be sure the door is latched shut.
[]
Close the door and then restart.
[]
run.
call for service.
"9E" - Communication error between SUB PBA and MAiN PBA.
hood outside the home can open and
Ducting
should be
[]
Do not overload.
[]
Sort heaw
[]
Large, bulky items like blankets or comforters
repositioning to ensure even drying.
[]
Check that the washer is draining
adequate water from the load.
[]
Load may be too small to tumble properly. Add a few towels.
Call for service.
1 wash load = 1 dryer load.
items from lightweight
items.
may require
properly to extract
is noisy.
[]
Check the load for objects such as coins, loose buttons,
nails, etc. Remove promptly.
[]
It is normal to hear the dryer gas valve or heating
cycle on and off during the drying cycle.
[]
Be sure the Dryer is leveled properly as outlined
installation instruction.
[]
It is normal for the Dryer to hum from the high velocity of air
moving through the dryer drum and exhaust system.
element
in the
22
[BETTER]592-89075-02865
A-02
EN.indd
22
2011-03-23
i,_fi
9:49:26
]
I
I
Dries unevenly.
[]
[]
Seams, pockets, and other similarly heavy areas may not
be completely dry when the rest of the load has reached the
selected dryness level. This is normal. Select the More Dry
setting if desired.
If one heavy item is dried with a lightweight load, such as
one towel with sheets, it is possible that the heaw item will
not be completely dry when the rest of the load has reached
the selected dryness level. Sort heavy items from lightweight
items for best drying results.
Clothes are not drying
eaSsfactorily,
drying times
are too
long, or lead istoo hot
[]
Is the lint screen clogged
with lint?
Lint screen should be cleaned before each load.
Has an odor.
[]
Household odors from painting, varnishing, strong cleaners,
etc. may enter the dryer with the surrounding room air. This
is normal as the Dryer draws the air from the room, heats it,
pulis it through the tumbler, and exhausts it outside.
[]
When these odors linger in the air, ventilate the room
completely before using the Dryer.
Shuts off before
Fire Hazard
Use a heavy metal vent.
Do not use a plastic vent.
load is dry
Do not use a metal foil vent.
[]
Dryer load is too small. Add more items or a few towels and
restart the cycle.
[]
Dryer load is too large. Remove some items and restart the
dryer.
Failure to follow
fire.
[]
Lint on clothes
[]
Make sure the lint filter is cleaned before every load. With
some loads that produce high amounts of lint, it may be
necessary to clean the filter during the cycle.
[]
Some fabrics are lint producers (for example, a fuzzy white
cotton towel)and they should be dried separately from
clothes that are lint trappers(for example, a pair of lack linen
pants)
[]
Divide larger loads into smaller loads for drying
[]
Check pockets
clothes.
thoroughly
s_ill wrinkled
[]
[]
Small loads of 1 to 4 items work best.
[]
Load fewer garments.Load
Odors
[]
remain
in clothing
Fabrics containing
normal cycle.
Water drips from
[]
with
Are fabric
softener
sheets
blocking
the lint screen
grille?
Is the exhaust vent the correct
length?
Check that the exhaust vent is not too long or has too many
turns. Long venting will increase drying times. See "Plan Vent
System."
Is the exhaust vent diameter
the correct
size?
Use 4" (10.2 cm) diameter vent material.
garments.
strong odors should be washed
nozzle when
Steam=Care
The dripping
water is not visible during
Sprayed water is difficult
exhaust hood clogged
after Refresh.
This is steam condensation.
a short time.
Sprayed
[]
similar-type
in death or
Use only one fabric softener sheet, and use it only once.
[]
before washing and drying
after Wrinkle=Care
Is the exhaust vent or outside
lint, restricting air movement?
can result
Run the dryer for 5-10 minutes. Hold your hand under the
outside exhaust hood to check air movement. If you do not
feel air movement, clean exhaust system of lint or replace
exhaust vent with heaw metal or flexible metal vent. See
"Venting Requirements."
[]
Garments
these instructions
in a
starts
water will stop after
Explosion
Keep flammable
materials
away from dryer.
Hazard
and vapors,
such as gasoline,
Place dryer at least 18 inches {46 cm} above the floor
a garage installation.
Steam=Care
Failure to do so can result in death,
explosion,
for
or fire.
to see when the door is closed
23
[BETTER]592-89075-02865
A-02
EN.indd
23
2011-03-23
i,_ft
9:49:26
I
I
I
[]
Is the dryer located in a room with temperature
45°F (7°C)?
below
Loadsare wrinkled
Proper operation of dryer cycles requires temperatures
above 45°F (7°0).
[]
is the dryer
[]
Has an air dry cycle
[]
being dried.
[]
is the load too large and heaw
Are clothes
wet spots?
Loads are still wrinkled following
SteamCare
cycle?
to dry quickly?
Make sure water is connected to the dryer. Check that water
inlet hose is connected to both the faucet and dryer's water
inlet valve. Check that the water supply is turned on. This
cycle is best for smoothing out wrinkles and reducing odors
from loads consisting of wrinkle-free cotton, cotton polyester
blends, common knits and synthetic garments.
Separate the load to tumble freely.
[]
Was the dryer overloaded?
Dry smaller loads that can tumble freely. Smaller loads of
1-4 garments yield best results with Refresh Cycle. Results
may also vary depending on fabric type. This cycle is best
for reducing wrinkles and odors from loads consisting of
wrinklefree cotton, cotton polyester blends, common knits
and synthetics.
been selected?
Select the right cycle for the types of garments
See "Modifiers."
[]
at the end of the cycle?
Select Touch Up Cycle to tumble the load with water and
heat to help smooth out wrinkles from a load left in the dryer.
located in a closet?
Closet doors must have ventilation openings at the top and
bottom of the door. The front of the dryer requires a minimum
of 1" (2.5 cm) of airspace, and, for most installations, the
rear of the dryer requires 5" (12.7 cm). See "Installation
instructions."
[]
Was the load removed from dryer
coming out of the Refresh cycle with damp
or
Under certain environmental or installation conditions you
may experience underdrying. Select the Touch Up cycle (20
rain. default time), which can be customized by selecting
High temperature and/or additional cycle time by pressing
the Timed Cycle Adjust More Time button.
NOTE: Refer to garment care label instructions. Dry clean
only garments are not recommended.
Odors
Cycle time too short
[]
Have you recently been painting, staining or varnishing
the area where your dryer is located?
in
If so, ventilate the area. When the odors or fumes are gone
from the area, rewash and dry the clothing.
[]
is the dryer
being used for the first time?
The new electric heating element may have an odor. The
odor will be gone after the first cycle.
[]
[]
is the automatic
cycle
ending early?.
The load may not be contacting
dryer.
the sensor strips. Level the
[]
Change the dryness level setting on Automatic
Cycles.
increasing or decreasing the dryness level will change the
amount of drying time in a cycle.
Do not use a dryer rack with an automatic
is water connected
to the dryer?
Check that water inlet hose is connected to both the faucet
and dryer's water inlet valve. Check that the water supply is
turned on.
To remove odors left in garments after wearing, select Steam
Refresh for small loads of 1-4 garments. This cycle is best for
reducing wrinkles and odors from loads consisting of wrinkle
free cotton, cotton polyester blends, common knits and
synthetics.
cycle.
Lint on load
[]
is the lint screen
clogged?
Clean lint screen.
Check for air movement.
Stains on load or drum
[]
Was dryer fabric
softener
properly used?
Add dryer fabric softener sheets at the beginning
cycle.
of the
Fabric softener sheets added to a partially dried load can
temporarily stain your garments. Do not use fabric softener
sheets with SteamCare cycles.
[]
Drum stains are caused by dyes in clothing (usually blue
jeans). This will not transfer to other clothing.
24
[BETTER]592-89075-02865
A-02
EN.indd
24
2011-03-23
/,,_d19:49:27
I
I
I
I
-89075-02865
A-02EN.indd
25
2011-03-23
/,_,i9:49:27
]
I
I
_,,
Your Home
.....
_'!_!_!_!i!ii!ii!
iiiiiiiiiiiiiiiiii
..................
iiiiiiiiiiiiiiiiii
iiiiiiiiiiiiiiiiii
..................
For repair - in your home - of all major brand appliances,
Iawn an d g arden equ ip ment or heating and cooling systems
no matter who made it, no matter who so
iiiiiiiiiiiiiiiiii
Idit!
iiiiiiiiiiiiiii_
iiiiiiiiiiiiiiii_
iiiiiiiiiiiiiii!_
'"'"'"'"'"_
iiiiiiiiiiiiiii!:_
iiiiiiiiiiiiiii!:_
'"'"'"'"'"
iiiiiiiiiiiiiii!
_
For the re pl acemen t p arts accessories and owners
that you need to do-it-yourself,
manuals
iiiiiiiiiiiiiiiil
.................
iiiiiiiiiiiiiiill
iiiiiiiiiiiiiii:
iiiiiiiiiiiiiiiii
For Sears professional installation of home appliances and
it ems like garage door openers and water heaters,
iiiiiiiiiiiiiiiiii
iiiiiiiiiiiiiiiiii
1 =800=4=
iiiiiiiiiiiiiiiiii
iiiiiiiiiiiiiiiiii
,,,,,,,,,,,,,,,,,,
'"'"'"'"'"'"
(1-800-469-4663}
Call anytime, day or night (Canada)
www.sears.ca
iiiiiiiiiiiiiiiiii
iiiiiiiiiiiiiiiiii
iiiiiiiiiiiiiiiiii
MY-HOME@
1-800-361-6665
iiiiiiiiiiiiiii!
_
.................
iiiiiiiiiiiiiiiil
.................
iiiiiiiiiiiiiiiil
iiiiiiiiiiiiiii!
_
iiiiiiiiiiiiiii!
_
To purchase a protection agreement (Canada)
on a product serviced by Sears:
iiiiiiiiiiiiiiiiii
iiiiiiiiiiiiiii!:,
iiiiiiiiiiiiiii_
iiiiiiiiiiiiiii!,
iiiiiiiiiiiiiiii_
iiiiiiiiiiiiiii;_
_,
(Canada)
Seal, S
@Registered
@ 2009 Sears
[BETTER]592-89075-02865
Brands
A-02
EN.indd
LLC
26
Trademark
/
IM
under
Trademark
licensee
/
SM
3/10
Service
Mark of Sears Brands
by Sears Canada.
LLC,
Printed
in Korea
2011-03-23
/,_f19:49:27
]