1
®
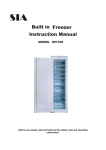
OWNER'S MANUAL
REFRIGERATOR
Model No. 62042
Read and Follow all Safety Rules and
Operating Instruction before first use of
this Product.
The model number and serial number of
your refrigerator is located on the model
number plate at the upper corner on the
cabinet back.
When requesting service or ordering
parts, always provide the following
information:
Product Type
•
Model Number
•
Part Number
•
Part Description
•
Safety Instructions
•
Operation
•
CareAnd
•
•
Troubleshooting
Parts List
Maintenance
Full One Year Warranty
Refrigerator
on
furnished with the product,
refrigerator, free of charge,
material or workmanship.
Sears will repair this
if defective in
Full Five Year Warranty on
Sealed Refrigeration System
For five years from the date of purchase, when
this refrigerator is operated and maintained
according to owner's instruction attached to or
furnished with the product, Sears will repair the
sealed system (consisting of refrigerant,
connecting tubing and compressor
motor), free
of charge, if defective in material or
workmanship.
The above warranty coverage applies only to
refrigerators
which are used for storage of food
for private household purposes.
For future use, please record the model number, serial
number and the date you purchased your Keumore
refrigerator in the spaces provided below. They are on a
small label on the back of the refrigerator.
Model #
Warranty
For one year from the date of purchase, when
this refrigerator
is operated and maintained
according to owner's instructions attached to or
Caution:
•
•
Serial #
Warranty service is available by contacting
the nearest Sears Service Center/Department
in the United States.
This warranty:applies
only while this product is in
use in the United States. This warranty gives you
specific legal rights, and you may also have
other rights which vary from state to state.
Date Purchased
Sears, Roebuck and Co., Dept. 817WA
Hoffman Estates, IL 60179
Sears, Roebuckand Co., HoffmanEstates,IL 60179 U.S.A.
Pdntedin Mexico
PaA No. 8336460154300H
(smo81)
Sears Roebuck and Co. U.S.A.
Pad No. 303075
(01/31/2007)
To Start
Start / Adjust Control
Plug the refrigeratorinto a wall outlet. Set the refrigerator
temperature control on "3". Wait 24 hours. Check the food.
Adjust the control if needed.
Your refrigerator must he reasonably level.
Use the screw-type adjustable leveling legs on the front corners
of the refrigerator. Leveling makes the refrigerator morn
efficient and quieter.
Adjusting The Temperature
Adjust the refrigerator temperature using the cold control in
the refrigerator compartment.
•
The "MIN" position is the warmest setting on each
section.
•
For ordinary use, set the temperature control in the "3"
position.
•
If either section is not cold enough, turn the control
toward "MAX".
•
If either section is too cold, turn the control toward
"MIN". After adjusting the control, wait 24 hours. Then,
make another change, if needed.
In the summer or when the refrigerator door is opened often,
you may need to turn the control in the re_'ri-gerator toward
"MAX" so more cold air will enter the refrigerator section.
Don't turn the refrigerator temperature control off unless
both freezer and refrigerator sections are completely empty.
The control will shut off refrigeration in both sections.
Your Kenmore refrigerator needs three inches of air space at the
top and a one inch space between the wall and the condenser on
the back of the refrigerator.
CAUTION:
flammables,
for storage
Do not operate
refrigerator
such as gasoline.
near
Do not use
of flammables.
Your refrigerator
must be grounded.
Use a
120 Volts, 60 Hz outlet. Do not use an
Use And Care Information
extension
cord.
Everyday care is listed on the inside door. Special cleaning
instructions are on individual parts.
Before You Move Your Kenmore
to a New
Location.
•
Remove all food (pack dry ice around any food you're
keeping). Unplug the refrigerator and tape the power cord
securely to the back.
Take out all removable shelves and storage drawers. Pack
carefully. Clean and dry your refrigerator thoroughly.
Tape all doors, drawers, and shelves that you didn't
remove.
•
Move your refrigerator in an upright position, never leave
it on its back or side.
Use a 3-prong plug with 3-prong grounded wall outlet. (Only
this method complies with National Electrical Code, local codes
and ordinances.)
WARNING!Un!ess
method
the above grounding
is followed,
you are not protected
against severe or lethal shock in the event
of a short circuit of an electrical
component
or wiring
of refrigerator.
Clean Your Refrigerator
Thoroughly Twice A Year
DANGER - ELECTRICAL
SHOCK HAZARD.
DISCONNECT
POWER BEFORE SERVICING.
Clean The Condenser
I
I
The condenser (tubing and wire attachment) is on the back of
the refrigerator. Clean it with a vacuum eleanex. Do not bend or
twist the tubes. If you have moved the refrigerator, make sure
the doors seal tightly. If they don't, level the refrigerator.
1
Always remove the power cord fi'ornthe wall outlet when cleaning in
the vicinity.of electrical parts (bulb, switch, control, etc.).
Use a mild detergent or baking soda and water.
How To Clean The Inside
1.
2.
Turn the Cold Control to "OFF". UNPLUG THE POWER
CORD FROM THE WALL OUTLET.
Remove food from the section or sections to be cleaned. Pack
frozen food in a picnic chest or cardboard box or wrap in
several thicknesses of newspaper so it will remain frozen.
3.
Take out removable parts and wash with a mild detergent,
rinse and wipe dry.
4.
Wash the inside with two tablespoons of baking soda mixed
in one quart of warm water. If necessary, use soap or mild
detergent and water. Rinse well and dry.
Remove
Perishables
Before Taking
Vacations
Before going on any long vacations, remove all perishables
such as fresh meats, milk, eggs, butter, fruits and vegetables.
Anytime you won't be using your refrigerator regularly, for an
extended period of time or are putting it into storage, empty and
unplug it. Clean the evaporation tray. Clean inside and block the
doors open. Air moying through your refrigerator will help
prevent odors.
WARNING:
(l) Strong detergents, scouring powder or pads, will crack the
plastic. Do not use them. (2) Do not wash any parts in a
dishwasher unless marked "dishwasher safe." (3) Do not clean
with ammonia or bleach type chemicals which will damage
your cooling unit.
How to Clean the Outside
Exterior Cabinet: Use a mild detergent or soap solution and
rinse well. Do not use scouring powder or pads.
Hot-Line
With the freezer-refrigerator in operation, it is possible that the
cabinet will feel warm at the front edges. This does not indicate
trouble. It is attributable to the hot-line design adopted for this
freezer-refrigerator which consists of piping hot gas from the
(motor-driven) compressor along the front edges of the cabinet
This has nothing to do with the storage temperature inside.
In some climates it may be advisable to help protect the cabinet
finish by waxing it. Use a good quality automotive type wax,
taking care not to wax any plastic parts.
How to Clean theEvaporation
Tray
Since dust accumulated on the evaporation tray will decrease
the evaporation efficiency, remove the tray and clean it.
Save the Servicing
Information
Technical servicing information is attached under the back of
the refrigerator. Please, do not remove this information. It may
someday assist your serviceman should repairs be required.
The evaporation tray is set on refrigerator back. To remove,
unscrew and pull it out.
Replace the evaporation tray by following the removal
instructions in reverse and be sure to secure it properly.
If the tray is not securely in place, defrosted water may spill out
or the evaporation process may be hindered.
3
Before Calling for Service
Caution:
lee Has an Odd Flavor
Your l_enmore refrigerator is an electrical appliance and should
be unplugged before changing the light bulb or other servicing
that involves the electrical system.
Ice, regardless of how it is made, will sometimes develop an
off flavor or color if it is kept too long. To avoid this, empty
the trays and make a completely new supply about once a
month.
Before
Replacing
Light Bulb
Instructions for changing light bulb is on the permanent use and
care label on the inside door of your refrigerator.
To Further
Add To The Value of Your Kenmore,
Buy a Sears Maintenance
See if your questions can be answered on this page.
My Refrigerator
is Too Warm
1.
Check the light bulb.
2.
Make sure the power cord plug is making full contact in the
wall outlet. Check the outlet with another appliance or
lamp.
3.
Check the fuse box for a blown fuse or tripped circuit
breaker.
My Refrigerator
Has Stopped
Running
and The
Light is Not On
1.
2.
Keep the refrigerator
When the power is off for more than 5 hours, fill extra
space in freezer with dry ice or transfer the food to the
nearest food locker.
Sounds
Is At Your Service
Yotir Kenmore has added value when you consider that Sears
has over 2,000 service units staffed by Sears-trained
technicians...professional
technicians specifically trained on
Sears appliances, having the parts, tools and equipment to
ensure that we meet our pledge to you..."We
Service What
We Sell"
3.
Check to be sure food containers or bottles inside the
refrigerator are not touching or rattling.
There
is an Odor in My Refrigerator
Check covers on food containers in bath sections. Cheek
for spilled foods.
Clean both sections.
Location
If you ever need service, be sure to give the complete ten digi
model number. It's on a small label on the back of the
refrigerator. For example if you have Kenmore 99482 Your
complete number may be 564.99482990
Noisy
Make sure the cabinet is level from side to side and from
front to back. Make sure the cabinet is not touching the
wall and rests squarely on the floor.
Make sure the condenser is free of lint and dust.
2.
Service
Model Number
2.
l.
Sears
door closed to keep food cold until
returns.
My Refrigerator
1.
Sears Kenmore refrigerators are designed, manufactured and
tested for years of dependable operation. Yet, any modern
appl.iance may require service from time to time. The Sears
warranty plus the Sea¢s maintenance agreement provides
protection from unexpected repair bills.
Check the power source.
power
3.
Agreement
To Order Repair Parts, See The List That Came
With Your Refrigerator.
Food Storage
Times and Tips
Use these storage times as a guide.
since food quality always varies.
For the Refrigerator
Actual Storage times vary,
When loading
Section
Moving air is the best way to cool food, but it can carry o !ors
and dry out food. If not wrapped, most food becomes limp,
stale and unappetizing. To protect food from air, cover it or
place it in a freezer container or bag before refrigerating. Wrap
all foods unless you're putting it in the storage drawers.
Bread: Refrigeration slows molding. But bread soil gets stale
with time, so use within 3 days.
Dairy
cottage
plastic
month.
keeps
Products:
Keep cartons closed. Use milk, cream or
cheese within 5 days. Wrap cheese tightly with foil or
wrap. Hard cheese (cheddar, etc.) will keep as long as a
Soft cheeses will keep up to 2 weeks. Wrapped butter
about 2 weeks.
Eggs:
Store unwashed.
Use within
Label and date each package.
First.
Freezer Storage
Refrigerator
Storage
Times
No longer
Bacon and other Smoked
Meats
Cold Cuts . . . (Date on Package)
Ground
...............
Meat ...............................
Liver and other Organ
Steaks
................
Meats
and Roast (Fresh)
than
Section
Food to go to the freezer needs special packaging. Many times
supertanker
wrappings are not good enough. Foods must have
a second wrapping or be repackaged
if it will be stored longer
than a week or two.
Wrap carefully and seal. Contact with air shortens the life of
food. So containers
must be airtight. Fresh foods that are
already packaged, such as bread or poultry, should be
rewrapped.
Use heavy duty aluminum
tape or special freezer containers.
Freeze food only when it is fresh
refreeze.
foil freezer paper and
and in top condition.
Do not
Bacon, other Smoked Meats ...................
Beef or Lamb ............................
1 Month
5-6 Months
Ground Meat .............................
2-3 Months
Liver, other "variety Meats ..................
Pork or ',real .............................
34 Months
8-9 Months
Energy Saving
Ways
to Save
your
Kenmore.
Power,
4-6 Months
3 Months
12 Months
Tips
Save
Money,
and
Still
enjoy
1.
Close the door as soon as you can. Make sure the door is
fully shut atter each use, so cold air doesn't escape.
2.
Keep the condenser
coils clean. Your Kenmore's motor
works harder when coils are dusty. Clean the coils at least
every 3 months. They are on the back of your refrigerator.
Allow 3 inches of air space above your Kenmore so air
circulates freely.
3.
Adjust the cold control. Try a warmer setting. Your
refrigerator may be colder than needed. Check the
refrigerator temperature with milk. As long as it keeps well,
your refrigerator is cold enough.
4.
Don't
5.
Don't allow more the tA" of frost
frozen food'_slt6rage section.
6.
Reduce
door openings,
to run as often.
so your
7.
Keep your t_efrigerator
reasonably
Vegetables: Wash, drain and store in crisper. Or store unwashed
in plastic wrap.
For the Freezer
3 Months
12 Months
1 Month
6 Months
Poultry ..................................
Poultry Giblets .............................
Vegetables .................................
2-3 Days
Poultry: Rinse before storing. Wrap loosely in foil or plastic
wrap and seal. (Wrap giblets separately.) Use within 2 days.
2-9 Months
3 Months
Fish (packaged frozen) .......................
Fruits .....................................
Ice Cream ..........
2 .......................
Juice Concentrate
...........................
Meats-
1-2 Days
.....................
Refrigerator
No longer than
6 Months
Butter, Margarine
..........................
Cooked Dishes ..........
....................
I-2 Days
..................
Times
Bread .....................................
14 Days
or 3 Days
space at the front to let
2-Door
Fish: Clean. Wrap tightly. Freeze unless you use it the same day
you buy it.
Meat: Wrap meats loosely (and seal). Wrap smoked meats
dghfly. Use foil or plastic wrap. Store in meat drawer or on
lower shelf. For best results, use within recommended times.
allow enough
the door close completely and seal.
2 weeks.
Fruits: Wash, dry and store in crisper. Store fruits with strong
aromas (apples, melons) in plastic bags. Berries keep up to 3
days, if stored unwashed,
in a shallow open bowl.
the freezer,
Use food with the oldest date
put hot foods in the refrigerator.
to build
cooling
up in the
system
won't
have
level, so the door seals
Oghfly. When the door is closed, the door gaskets should
touch the refrigerator all the way around. If not, make your
refrigerator more level. Use the adjustment screw under the
refrigerator.
Keep
sources.
the refrigerator
A cool
away
and dry place
from
the stove
lets your
or other
refrigerator
heat
work
best.
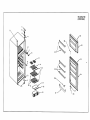
Parts List
564.62042100
SR1081SW
Use Sears part number on all orders, not the illustration number.
(Please
Illus.
No.
refer to the illustration on the next page.)
Part No.
1
Description
Illus.
No.
Part No.
Description
300033
Cover Hinge Top
White
25
26
300864
300307
Stop Door, R
Screw
300036
Almond
27
302580
Screw
2
302009
Screw
28
302468
Plate Mtg. Fan Motor
3
4
301718
300032
Hinge Top
Shim
29
30
302025
302583
Grommet Fan Motor
Fan Motor
302372
Plug Buttons
White
31
32
302584
302581
Screw
Plate Mtg. Motor
5
302708
Almond
33
30! 925
Fan Blade
6
302612
Shim Hinge Middlle
34
302589
Plate Cover
7
8
303082
302010
Hinge Middle
Screw
35
36
302817
302590
Cover F. Bottom
Screw
302372
Plug Buttons
White
37
38
302590
302591
Screw
Case
9
302708
Almond
39
303092
Wiring Assy. (Harness D)
10
11
302426
302009
Bottom Hinge
Screws
40
41
302590
302595
Screw
Ins. Tray Drip
12
300885
Leg
42
302719
Bi-metal Thermostat
13
14
302486
302615
Ice Cube Tray
Freezer Shelf
43
44
392597
302598
Evaporator, Fin Type
Defrost Heater
15
302242
Trim Shelf
45
303084
Defrost Reflector Support
16
303085
R-Shelf
46
303080
Thermal Fuse Assy
17
302409
Glass Shelf
47
302601
Insulation Duct
18
302234
Trim Shelf Crisper
48
302602
Seal
19
20
303091
302617
Crisper
Door Rack M
49
50
302603
303073
Defrost Timer
Thermostat ATB-3U1092
21
302694
Door Rack L
51
303083
Duct
302388
Cap Grommet
White
52
53
302606
302607
Door Switch
Knob Thermo
302709
Almond
54
302608
Screw
303071
F-Foamed Door Assy
White
55
56
303089
302610
Lamp Reflector
Lamp
302620
Almond
57
302864
Socket
R-Foamed Door Assy
58
302818
Rack L Partition
303072
White
59
303088
Grommet Hinge Collar Spacer
302622
Almond
60
303987
Shutter
22
23
24
564.620421 O0
(SR1081SW)
23
\
I
t
\
26 ¸
564.62042100
(SR1081SW)
3O
33
34
35
cO
4O
39
_41
4O
56
55
Parts List
564.62042100
SR1081SW
Use Sears part number
on all orders,
(Please
on the next page.)
Illus.
No.
refer to the illustration
Part No.
Description
not the illustration
number.
Illus.
No.
Part No.
Description
1
300103
Condenser bracket
14
302823
Overload Relay
2
302624
Condenser
15
302649
Running Capacitor
3
302317
Screw
16
302814
Nylon Clamp
4
5
302731
30t 730
Nylon Tie
Splicer Box
17
18
300308
302009
Screw
Screw
6
300308
Screw
19
303081
Cabinet Base Plate
7
8
301172
301991
Drain Trap
Screw
20
21
301775
300308
Drain Tray
Screw
9
301744
Power Cord SPT-3
22
302820
Compressor Grommet
10
301817
Cord Clamp
23
302865
Compressor Bolt
11
300308
Screw
24
302828
Compressor DC51 C72RCU6
12
302625
Relay Cover
25
302246
Double Dryer
13
302626
PTC Starter
26
303074
Wiring Diagram
Parts Not Illustrated
303075
Owner's Manual
302023
Use & Care Label
Mascot
302340
302423
Kenmore, white
Kenmore, brown
302827
300316
Technical sheet
302779
Tube Condenser Support
302824
Shim, Bottom Hinge
302707
Stop Door, F
Door Switch
302606
Screw Hinge
564.62042100
(SR1081SW)
26
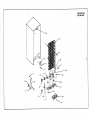
0
O
e.,_..__ 7
f8
lo-,_ __/_o
24
23
I
22
19
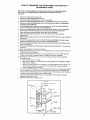
HOW
TO TRANSFER
THE
DOOR
REVERSIBLE
HINGE
LOCATION
OF A
DOOR
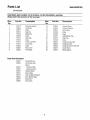
Refer to the disassembly diagram and change the door hinges in the following procedure.
The numbers in the diagram (see back page) indicate the procedure order in the
instructions.
I.
2.
Remove the hinge cap by twisting it off,
Remove the upper hexagonal head screws:
The upper hinge and the freezer door can now be removed.
3.
Remove the middle hexagonal
4.
Remove the screws for middle hinge hotes on the left side and re-attach it symmetrically to
the holes on the opposite side.
Tilt the refrigerator back or lay it on its back for steps 6, 7. and 8. Use a pad or blanket to
5.
6.
7.
8.
9.
head screws. The refrigerator
door can now be removed.
protect the floor and to avoid scratching the painted finish.
Remove the leveling legs by turning them counterclockwise.
Remove the lower hexagonal
head screws, two on the hinge side and one near the front comer of the other side
Attach the bottom hinge symmetrically to the other side of the cabinet,
Attach the left side leg and leg spacer to the other side hole whichwas positioned
symmetrically.
Remove the plug buttons and insert them in Ihe holes from which the screws were removed in
Procedure 2.
10. Take off the hinge grommet caps from both the Freezer and the Refrigerator doors using a
screwdriver and insert them in the hinge collars on the opposite sides.
I. ]. Remove the freezer door hinge stopper and the hinge Stopper screws and install them in the
other side of the door.
] 2, Remove the refrigerator
of the door.
13. Attach the refrigerator
door hinge stopper and the screws and install them in the other side
door to the bottom hinge
14. Rotate the middle hinge 180. Attadh it Io the refrigerator
not tighten the screw completely.)
door and secure it with a screw. (Do
] 5, Attach the upper hinge to the freezer door. Attach the freezer door to the middle hinge and
use the screw to attach the upper hinge.(Do not tighten the screws completely.)
16. The direction in which the door openshas now been changed; however, the tot|owing points
should be checked:
a.
b.
Make sure the door is on straight.
Make sure that there is no space between the door gasket and the refrigerator
when the deor is closed.
c.
Make sure that the gasket on the hinge side is not caught between'the door and the unit
when the door is opened or closed. (If the door is forced closed when the gasket is
caught, the gasket may be damaged.)
unit itself
When checking the above points, if it is discovered that the door is not installed propedy (this
is apt to happen at the first try), loosen the screws holding the upper hinge, straighten the
door and tighten the screws slowly with the socket wrench. After making sure that the door is
installed correctly, tighten all the screws holding the hinge.
If they are not tightened, the door may slip out of position or there may be an opening
between the door and th_ unit.
17. Sta{,d the unit back in the upright position.
Hinge
Plug
Cap
Button
Spacer
GrOmmet
Cap
F-Door
SLOpper
Hexa9ona!
Heed
Screws
11
Your Home
For repair-in your home-of all major brand appliances,
lawn and garden equipment, or heating and cooling system,
no matter who made it, no matter who sold it!
For the replacement parts, accessories and
owner's manuals that you need to do-it-yourself.
For Sears professional installation of home appliances
and items like garage door openers and water heaters.
1-800-4-MY-HOME ®
(1-800-469-4663)
Call anytime, day or night (U.S.A. and Canada)
www.sears.com
www.sears.ca
Our Home
For repair of carry-in items like vacuums, lawn equipment,
and electronics, call orgo on-line for the location of your nearest
Sears Parts & Repair Center.
1-800-488-1222
Call anytime, day or night (U.S.A. only)
www.sears.com
To purchase a protection
_-_
_:_:_
_
agreement
on a product serviced by Sears:
1-800-827-6655 (U.S.A.)
1-800-361-6665 (Canada)
Para pedir servicio
Au Canada pour service
a domicilio,
de reparaci6n
y para ordenar
1-888-SU-HOGAR
?'__'__:_........
(1-888-784-6427)
piezas:
SM
en fran_:ais:
1-888-LE-FOYER Mc
ww.sears.ca
......
® Registered Trademark/TM Trademark! s. Service Mark of Sears, Roebuck and Co.
® Marca Registradai"
Marca de F_brica/_" Marca de Servicio de Sears, Roebuck and Co.
"c Marque commerce/_ Marque d_posbe de Sears, Roebuck and Co.
Printed in Mdxico
>.::>.:::::::::