1
Owner's Manual
Manual Del Propietario
Vacuum Cleaner
Aspiradora
Model,
Modelo
116.36722
CAUTION:
Read and follow all
safety and operating
instructions before first
use of this product.
CUIDADO:
Lea y sigue todas las
instrucciones de operaci6n
y seguridadantes del uso de
este producto.
Sears, Roebuck and Co., Hoffman Estates, IL 60179 U.S.A.
www.sears.com
Part No, C01ZCUY20U00
- KCO1ZCUYZOUO
Impreso en China
Printed in China
Before Using Your New
Vacuum Cleaner
....................
Kenmore Vacuum Cleaner Warranty
Important Safety Instructions .........
Parts and Features ..................
Assembly
Instructions
.............
Operating Instructions
...............
How To Start .......................
Pile Height Selection and Setting ........
Releasing the Handle .................
ON/OFF Switch .....................
Attachments ........................
Attachment Use Chart ...............
Vacuuming Tips ....................
Performance Features ..............
Vacuum
2
... 3
4
5
6-7
7
7
8
8
8
9
10
10
; 11
Please read this guide. It will help you assemble
cleaner in the safest and most effective way.
Cleaner
Care ...............
12
Cleaning Exterior and Attachments .....
12
Dust Bin Cleaning ..................
13
Dust Bin Assembly ..................
14
Dust Bin Filter Changing/Cleaning ......
15
Primary Filter Replacement ...........
15
Secondary Filter Cleaning ............
18
Filter Changing/Cleaning .............
17
Belt Changing and Agitator Cleaning .. 18-20
Clog Removal .....................
21
Light Bulb Changing .................
22
Agitator Servicing ...................
23
Troubleshooting
....................
Requesting Assistance
Or Service ...................
24
Back Page
and operate your new Kenmore vacuum
For more information about vacuum cleaner care and operation, call your nearest Sears store.
You will need the complete model and serial numbers when requesting information.Your
vacuum cleaner's model and serial numbers are located on the Model and Serial Number Plate.
Use the space below to record the model number and serial number of your new Kenmore
vacuum cleaner.
Model No.
Serial No.
Date of Purchase
Keep this book and your sales check (receipt) in a safe place for future reference.
OneYear
Limited
Warranty
When assembled,
operated and maintained according to all instructions supplied with
the product, if this vacuum cleaner fails due to a defect in material or workmanship
within
one year from the date of purchase, return it to any Sears store, Sears Parts & Repair
Center or other Kenmore outlet for free repair.
If this vacuum cleaner is used for other than private family purposes,
applies for only 90 days from the date of purchase.
this warranty
This warranty
pay for:
Sears will NOT
covers
only defects
in material
and workmanship.
1. Expendable items that can wear out from normal
filters, belts, light bulbs, and bags.
2. A service technician
maintenance.
to instruct
the user in correct
use, including
product
3. A service technician to clean or maintain this product.
4. Damage to or failure of this product if it is not assembled,
according to all instructions supplied with the product.
5.
Damage to or failure of this product
other than its intended purpose.
6. Damage
to or failure of this product caused
chemicals or utensils
the product.
7.
resulting
warranties;
operated
operation
abuse, misuse
in all instructions
from unauthorized
or
or maintained
by the use of detergents,
resulting
limitation
assembly,
from accident,
other than those recommended
Damage to or failure of parts or systems
made to this product.
but not limited to
or use for
cleaners,
supplied
with
modifications
Disclaimer
of implied
of remedies
Customer's
sole and exclusive remedy under this limited warranty shah be product repair
as provided herein. Implied warranties, including warranties of merchantability
or fitness
for a particular purpose, are limited to one year or the shortest period allowed by law.
Sears shall not be liable for incidental or consequential damages. Some states and
provinces do not alrow the exclusion or limitation of incidental or consequential damages,
or limitations on the duration of implied warranties of merchantability
or fitness, so these
exclusions or Nmitations may not apply to you.
This warranty
Canada.
applies
only while this vacuum
This warranty gives you specific
vary from state to state.
cleaner
is used in the United States
and
legal rights, and you may also have other rights which
Sears, Roebuck and Co., Hoffman Estates, IL 60179
Sears Canada Inc.,Toronto,
Ontario, Canada M5B 2B8
3
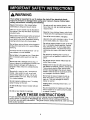
kWARNING
Your safety is important to us. To reduce the risk of fire, electrical shock,
injury to persons or damage when using your vacuum cleaner, follow basic
safety precautions
including the following:
Read all instructions in this manual before
assembling or using your vacuum cleaner.
Do not use with any opening blocked; keep
free of dust, lint, hair, and anything that may
reduce air flow.
Use your vacuum cleaner only as described in
this manual. Use only with Sears recommended attachments.
Keep hair, loose clothing, fingers, and all parts
of body away from openings and moving parts.
Disconnect electrical supply before servicing or
cleaning out the brush area. Failure to do so
could result in the brush unexpectedly starting,
causing personal injury from moving parts.
Turn off all controls before unplugging.
Usa extra care when cleaning on stairs. Do not
put on chairs, tables, etc. Keep on floor.
Do not use vacuum cleaner to pick up flammable or combustibleliquids (gasoline, cleaning
fluid, perfumes, etc.), or use in areas where
they may be present. The fumes from these
substances can create a fire hazard or explosion.
Do not leave vacuum cleaner when plugged in.
Unplug from outlet when not in use and before
servicing.
To reduce the risk of electrical shock - Do not
use outdoors or on wet surfaces.
Do not pick up anything that is burning or
smoking, such as cigarettes, matches, or hot
ashes.
Do not allow to be used as a toy. Close attention is necessary when used by or near children.
Do not use vacuum cleaner without dust bin
and/or filters in place.
Do not use with a damaged cord or plug. If
vacuum cleaner is not working as it should, has
been dropped, damaged, left outdoors, or
dropped in water, return it to a Sears Service
Center.
Always clean the dust bin after vacuuming carpet c_eanersor f_eshenar,powders, and fine dust.
These products clog the filters, reduce airflow
and can cause damage to the vacuum cleaner.
Failure to clean the dust bin could cause permanent damage to the vacuum cleaner.
Do not pull or carry by cord, use cord as a
handle, close a door on cord, or pull cord
around sharp edges or corners. Do not run
vacuum cleaner over cord. Keep cord away
from heated surfaces.
Do not use the vacuum cleaner to pick up
sharp hard objects, small toys, pins, paper
clips, etc. They may damage the vacuum
cleaner or dust bin.
Do not unplug by pulling on cord. To unplug,
grasp the plug, not the cord.
Unplug before connecting Handi-mate Jr. (if
applicable).
Do not handle plug or vacuum cleaner with wet
hands.
You are responsible for making sure that your
vacuum cleaner is not used by anyone unable
to operate it properly.
Do not put any objects into openings.
SAVE THESE INSTRUCTIONS
Proper assembly and safe use of your vacuum cleaner are your responsibilities.
Your
vacuum cleaner is intended for Household
use. Read this Owner's Manual carefully for
important use and safety information. This guide contains safety statements under warning
and caution symbols.
4
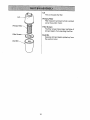
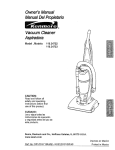
It is importantto knowyour vacuumcleaner'spartsandfeaturesto assureitsproperandsafe
use.Reviewthesebeforeusingyourvacuumcleaner.
Object
Style No.
Part No.
in USA
Part No.
in Canada
Exhaust Filter
EF-2
20-86880
20-40320
Primary Filter
DCF-1
20-82720
20-40319
20-5248
Headlight Bulb
Belt
UB-1
20-40096
20-5275
_
Power Cord
HandI.Mate Jr.®-Handle ---_
Dust Bin
Release
Handle-Primary
Filter
(Inside)--_
Dust
Dusting
Brush
Hose
Exhaust
Filter
Height
Adjustment
Carry
Tool
Handle
Release
Wands
Furniture
Guard
Base
Belt
(Underneath)
Numbers
_--Agitator
(Underneath)
IA
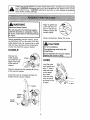
Please pay special attention to these hazard alert boxes, and follow any instructions
given. WARNING statements alert you to such dangers as fire, electric shock, burns
and personal injury. CAUTION statements alert you to such dangers as personal
injury and/or property damage.
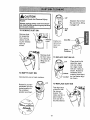
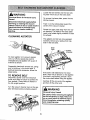
WARNING
Electrical
Shock Hazard
Do not plug into the electrical supply
until the assembly is complete. Failure
to do so could result in electrical shock
Dr injury.
Begin to tighten
screw with your
gers. It may be
essary to adjust
handle slightly.
the
finnecthe
Using a screwdriver,
Before assembling vacuum cleaner, check
the PACKING LIST on the cover of the separate Repair Parts List. Use this list to verify
that you have received all the components
of your new Kenmore vacuum cleaner.
HANDLE
tighten the screw.
CAUTION
Do not overtighten.
Overtightening
screw holes.
could strip the
Do not operate the vacuum cleaner
without the screw in place.
Remove the
screw located
HOSE
just below the top
edge of the back
of the vacuum
cleaner.
-
Loop the hose
_,_,_
over handle and
Slide the handle into the opening at the top
of the vacuum cleaner.
align "J" slots in _,
hose with tabs
on the exten-
Insert the screw so it passes through
handle into the vacuum cleaner.
sion wand.
Push the hose
the
onto the wand
and twist to lock
in place.
Han die
t
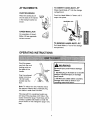
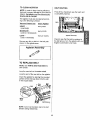
ATTACHMENTS
DUSTING
TO INSERT
JR ®
Place Handi-Mate Jr.® into the storage
compartment.
BRUSH
Push the Handi-Mate
Place the dusting brush
into the back of the handle
snaps
Jr. ®down
until it
into place.
in the storage location as
shown.
HANDI-MATE
HANDI-MATE
Handi-Mat® Jr.®
JR.®
For operation of HandiMate Jr.® see seperate
owners manual.
TO REMOVE
Pull Handi-Mate
compartment.
HANDI-MATE
Jr. ® out of the storage
OPERATING INSTRUCTIONS
Push the power
cord into the cord
WARNING
locking notch on
the back of the
handle.
notch
Plug the polarized
power cord into a
120 Volt outlet
located near the
floor.
Note: To reduce the risk of electric shock,
this vacuum cleaner has a polarized plug,
one blade is wider than the other.
This plug will fit in a polarized outlet only
one way. If the plug does not fit fully in the
outlet, reverse the plug. If it still does not fit,
contact a qualified electrician to install the
proper outlet. Do not change the plug in any
way.
7
JR. ®
To select a pile height setting:
SUGGESTED
Turn off vacuum cleaner. Select a pile height
setting by tilting the vacuum cleaner back
until front wheels are lifted slightly off the
floor as illustrated.
You may need to raise the height to make
some jobs easier, such as scatter rugs and
longer pile carpets. Suggested settings are:
Slide the adjustment
setting.
lever to the correct
PILE HEIGHT SETTINGS
HIGH: shag carpet, long pile, plush, scatter
rugs.
MED: medium to long pile.
LOW: short to medium pile.
BARE FLOOR: very low pile.
Release the handle by pressing down on
the handle release pedal with your foot and
pulling back and down on the handle with
your hand.
J
Handle
Release
Pedal
To start the vacuum cleaner, push the
On/Off switch from the OFF position to the
ON position. To stop the vacuum cleaner,
push the On/Off switch to the OFF position.
=teJr.®
TO USE ATTACHMENTS
Dusting
Brush.
Remove the lower end of the stretch hose
from the vacuum cleaner by grasping the
hose collar, twisting and pulling straight out.
The attachments can now be added to the
hose.
Hose
e
Tool
Note: The motor protector may open
when using attachments
or when cleaning new carpet, due to reduced airflow
by the attachments
themselves or by
new carpet fuzz filling the dust bin
quickly. See the
TROUBLESHOOTING
section.
Wands
The attachments
will fit on the hose or
the wand. In addition, the dusting brush
will also fit on the crevice tool.
The hose can be pulled off the wand by
grasping the cuff and twisting while pulling
up.
Identi_ each of the attachments
above.
shown
The attachments can be added to the hose
if the item to be cleaned is not far from the
vacuum cleaner.
IbCAUTION
NOTE: When vacuum cleaner is turned on,
the hose will have a tendency to collapse
due to suction of the vacuum cleaner.
When using attachments,
be careful
not to overextend
the stretch hose
when reaching. Trying to reach
beyond the hose stretch capability
could cause the vacuum cleaner to tip
over.
If more reach is needed:
Crevice
CAUTION
Wand
Attachments
used in dirty areas, such
as under refrigerator,
should not be
used on other surfaces until they are
washed. They could leave marks.
An extra wand, without tabs, is included.
This extra wand can be added to the wand
with tabs for extra reach. Insert wand and
twist a quarter of a turn to secure fit.
, WARNING
Electrical
Hazard
Tool
If the dusting brush/combination
brush is
being used and more reach is needed, the
crevice tool can be added to the wand, then
the dusting brush can be added to the
crevice tool.
Shock And Personal Injury
Disconnect electrical supply before
servicing or cleaning the vacuum
cleaner. Failure to do so could result in
TO STORE ATTACHMENTS
electrical shock or personal injury from
vacuum cleaner suddenly starting.
Return the hose to its position on the wand
and the attachments to their holders.
9
CLEANING AREA
ATTACHMENT
Furniture*
Dusting Brush
Y
Crevice Tool
Y
Handi-iate
Jr. ®
_
Between
Cushions*
Drapes*
4
4
4
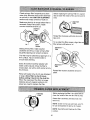
Carpet edges
Guide either side or the front of the nozzle
For best cleaning
results, keep the
airflow passage
clear.
along a baseboard. The full width agitator
brushes help remove dirt at carpet edges.
Stairs
Occasionally,
check each of the
areas indicated
for clogs.
Put handle in full upright position. Use the
crevice tool or fabric brush. Set the On/Off
switch to ON.
Unplug the
vacuum cleaner
from the outlet
before checking.
kWARNING
Hazard
Use care if vacuum cleaner is placed on
stairs. If it falls, personal injury or
property damage could result.
10
Walls
4
4
/
*Always clean attachments before using on fabrics.
Personal Injury
Stairs
MOTOR PROTECTION
SYSTEM
Motor Protector
This vacuum
cleaner has a
Thermal Protector
motor protector
by-pass valve
which
This vacuum cleaner has a thermal protector
which automatically trips to protect the
vacuum cleaner from overheating. If a clog
prevents the normal flow of air to the motor,
the thermal protector turns the motor off
automatically to allow the motor to cool in
order to prevent possible damage to the
vacuum cleaner.
Motor
automatically
opens to provide
cooling air to the
motor when a
clog prevents the normal flow of air to
the motor. If the by-pass valve opens to
prevent motor overheating
and possible
damage to the vacuum cleaner, you will
notice a change of sound as air rushes
through the valve opening.
To correct problem: If this occurs, turn the
vacuum cleaner off and unplug the power
cord from the outlet to allow the vacuum
cleaner to cool and the thermal protector to
reset. Check for and remove clogs, if
necessary.
Also check and clean/replace
any clogged filters. Wait approximately
thirty (30) minutes and plug the vacuum
cleaner in and turn back on to see if the
motor protector has reset. The motor
protector will net reset if the vacuum
cleaner is net turned off even if the
vacuum cleaner has cooled down.
Note: Do not block motor protector.
To correct problem:
SHOOTING
chart.
See the TROUBLE-
Note: The motor protector may open when
using attachments
or when cleaning new
carpet, due to reduced airflow by the
attachments
themselves or by new carpet
fuzz filling the dust bin quickly. See the
TROUBLESHOOTING
section.
11
VACUUM CLEANER CARE
Always follow all safety precautions
cleaning and servicing the vacuum
cleaner.
when
WARNING
Electrical Shock And Personal
Hazard
Injury
Disconnect electrical supply before
servicing or cleaning the vacuum
cleaner. Failure to do so could result in
electrical shock or personal injury from
vacuum cleaner suddenly starting.
Unplug cord from wall outlet.
CAUTION
Clean exterior using a clean, soft cloth that
has been dipped in a solution of mild liquid
detergent and water, then wrung dry. Wipe
dry after c)eaning. DO NOT drip water on
vacuum cleaner.
Do not use attachments if they are
wet. Attachments used in dirty
areas, such as under a refrigerator,
should not be used on other
surfaces until they are washed. They
could leave marks.
Wash attachments in warm soapy water,
rinse and air dry. Do not clean in dishwasher.
12
CAUTION
Lid
Electrical Shock And Personal
Hazard
Injury
Separate
the dust bin by lifting
it straight off.
Always unplug power cord from electrical outlet before performing any service
on vacuum cleaner.
TO REMOVE
Remove
the lid from
"-Dust
Bin
DUST BIN
\
dust
bin assembly
from vacuum
Dust
cleaner by lifting the release
]ever as
shown.
Empty contents into a
trash container.
Lever
Tr sh- l
C°ntainer
Remove dust
bin from vacu-
TO REPLACE
Lid
DUST BIN
- Un Io ck
Hold dust bin over a trash container.
Lid
TO REPLACE
Rotate lid counterclockwise from the
locked position
the unlocked
position
First align base
of dust bin with
the vacuum
cleaner. Then
to
as shown,
.....
rotate dust bin in
_lace making
sure dust bin is
j'Y
j-"
j"
securely latched.
,/
,/
,/
.7
13
I
/
DUST BIN LID
um cleaner by
tilting out as
shown.
TO EMPTY
I
Place dust bin lid
assembly back
onto top of dust
bin. Align marks
with bin marks as
shown. Rotate lid
clockwise while
pressing downward
so that marks align
as shown.
DUST BIN
Lid
The Lid houses the filter.
Primary Filter
Filter traps dirt and debris that is picked
up by the suction motor.
Pr/mary
Filter Screen
The filter screen traps larger particles of
dirt and debris from reaching the filter.
Dust Bin
Filter Screen
Captures dirt and debris
the suction motor.
Dust Bin _..__
14
picked up from
Check primary
filter frequently
and clean
Before replacing the primary filter it is a good
idea to clean the inside of the dust bin and lid
when dirty. Remove the dust bin assembly
as outlined in the DUST BIN CLEANING
section
and empty contents
area.
of dust bin.
AIIgnment
Make sure dust bin is empty before filter is
removed. Grasp filter screen, rotate
counter-clockwise
and lift out.
- Primary
Rotate filter clockwise
tabs in lid.
Filter
To re-install the filter screen, align tabs on
filter screen with tabs on lid.
Filter
Screen
Grasp
primary
Alignment
filter, rotate counter-
Tabs
clockwise and lift out. Clean primary filter
by gently tapping over a trash container.
The filter may be cleaned
by tapping
firm surface. Tap on several
ensure best cleaning.
until slots lock onto
_
_
it on a
sides to
"; _
@
Every 6 months rinse filter exterior with
water under a faucet. Once the filter is
rinsed clean, dry with a cloth and let air dry
for 24 hours.
Rotate filter screen clockwise to lock in
place.
Rinse with water only, do not use detergent
or soap. Allow filter to dry 24 hours
before putting it back into the dust bin.
When the cleaning of the filter no longer
restores vacuum cleaner suction to full
power you need to replace
the filter.
Before replacing the filter it is a good idea to
clean the inside of the dust bin and lid area.
Filter
Rotate filter clockwise until slots lock onto
tabs in lid.
NOTE: 'Under normal use and care, your filter can be expected to last up to 3 years.
NOTE: See Parts and Features for Filter
number.
Lid
15
The secondary
motor.
filter screen
protects
the
Always check filter screen when cleaning
dust bin.
If dirty or clogged,
filter screen.
remove
debris from
Secondary
Filter_
16
IbWARNING
Electrical
Pull out on
both sides of
the exhaust
Shock Hazard
Unplug power cord from electrical outlet. Do not operate the vacuum cleaner
without the primary or exhaust filters.
Be sure the filters are properly installed
to prevent motor failure and/or electrical shock.
//
filter cover.
and pull out to
remove from
vacuum
cleaner.
EXHAUST FILTER
_,_//___
Exhaust
Filte
The exhaust filter must be replaced when
dirty. It should be replaced regularly
depending on use conditions.
-_ Pull Here
_'_ Exhaust
er Cover
Remove the
exhaust filter
cartridge.
The filter CANNOT be washed as it will
lose its dust trapping ability.
Push only on filter
cartridge frame,
not on filter
material itself.
NOTE: See PARTS AND FEATURES
for the exhaust filter number.
Exhaust
/
Replace the exhaust filter cover by placing
tabs in slots and pushing in until cover
snaps into place.
17
Locate the two latches
kWARNING
Electrical
Hazard
Shock Or Personal
ing tabs which secure
Injury
the base plate.
To remove the base plate, press the two
latches inward.
Disconnect electrical supply before
servicing or cleaning the vacuum
cleaner. Failure to do so could result in
Push in on the locking tabs toward the
center of the vacuum creaner.
electrical shock or personal injury
from vacuum cleaner suddenly
starting,
CLEANING
and the two lock-
Rotate the base plate away from the nozzle housing. The sides of the base plate
need to be pulled slightly outward to clear
the wheels.
AGITATOR
The agitator and belt are now exposed.
Carefully remove any residue that may
exist in the belt area.
Motor
Shaft
Agftator
Assembly
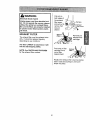
To clean agitator turn vacuum cleaner
over, cut off any carpet pile and lint
entangled around agitator with a pair of
scissors as shown.
Frequently check and remove hair, string
and lint build-up in the brush area. If
build-up becomes excessive, follow the
steps below.
Belt
If the belt is stitl attached
shaft, there will be tension on the agitator.
If the belt is not broken, remove it from
the motor shaft before lifting the agitator.
TO REMOVE BELT
Disconnect power cord from electrical
outlet, and place on paper to protect the
floor surface. Place vacuum cleaner in
the full upright
to the motor
Carefully lift the one end of the agitator
and then lift the other end.
posiiton.
Turn the vacuum cleaner over so the agitator and base plate are facing upward.
IbWARNING
Personal
Injury Hazard
Be careful when removing
the agitator
+as the belt tension is high. Failure to
do so could result in personal injury
from the agitator releasing quickly
and snapping away.
-Locking
Tabs
18
TO CLEAN AGITATOR
BELT
NOTE: In order to keep cleaning efficiency
high and to prevent damage to your vacuum
cleaner, the aqitator must be cleaned every
time the belt is changed.
Press firmly, checking to see that each end
is completely inserted.
ROUTING
The agitator must also be cleaned according to the following schedule:
Vacuum
Cleaner
HEAVY
-
Use
Clean Agitator
every week
(used daily)
MODERATE
-
every month
(used 2-3 times/week)
LIGHT -
Agitator Assernbly
every 2 months
(used 1 time/week)
Check to see that the belt is centered in
the belt groove. Turn the agitator with your
fingers to see that it turns freely.
Remove any dirt or debris in the belt path
area or in the agitator area.
Agitator Assembly
TO REPLACE BELT
NOTE: See PARTS AND FEATURES
belt number.
for
Loop the new belt on the motor shaft.
Loop the end of the new belt on the agitator.
Insert the agitator by placing the rounded
portion of the end cap down into the slot
in the nozzle base.
Motor
Shaft
Belt Groove
I
NOTE: Care must be taken due to the belt
tension during reassembly.
19
To re-attach the base plate, insert the tabs
into the slots along the front edge of the
base. Place the vacuum cleaner in full
upright position.
original position.
-Locking
Lower the base plate to its
Tabs
A gentle pull outward may assist in reassembly.
Press the base plate down until the two locking tabs snap into place.
Slide the right latch to the right and the left
latch to the left to secure.
Tabs
As the base is lowered the inner areas will
brush against the dust compartment wheels.
Return the vacuum cleaner to the upright
position before plugging into the electrical
outlet.
20
Reassemble the stretch hose to the extension wand.
Always follow all safety precautions when
cleaning and servicing the vacuum cleaner.
IbWARNING
Electrical
Hazard
_Stretch
Shock Or Personal Injury
Disconnect electrical supply before
servicing or cleaning the vacuum
cleaner. Failure to do so could result in
electrical shock or personal injury from
vacuum cleaner suddenly starting,
If the vacuum cleaner does not seem to
have adequate suction, first check if the
dust bin is full or if a filter is clogged. See
DUST BIN CLEANING and FILTER
CHANGING.
If the dust bin and filter areas and the hose
areas are free of clogs, check the nozzle
area. To check this area, see the section on
BELT CHANGING AND AGITATOR
CLEANING.
If the dust bin and filter areas are free of
clogs, check the hose area. Remove the
lower end of the stretch hose from the vacuum cleaner by grasping the hose collar,
twisting, and pulling straight out.
kWARNING
Personal
Injury Hazard
DO NOT place hands or feet underneath
the vacuum cleaner at any time. The
agitator will be revolving rapidly when
the vacuum cleaner is turned on and is
In the carpet setting.
Return vacuum cleaner to the upright position before plugging into an electrical outlet.
Plug in the vacuum cleaner and turn it on,
Stretch the hose to maximum length and
then allow the hose to return to its storage
length.
Turn the vacuum cleaner off and unplug the
vacuum cleaner.
Visually inspect the hose and the base area
into which the hose is inserted.
Remove any visible clog.
21
kWARNING
Electrical Shock Or Personal Injury
Hazard
Disconnect electrical supply before servicing or cleaning the vacuum cleaner.
Failure to do so could result in electrical shock or personal injury from vacuum cleaner suddenly starting.
CAUTION
Do not use a bulb rated over 13 V AC9W. During extended use, heat from the
bulb could overheat surrounding plastic
parts.
Ensure
ON-OFF
Disconnect
switch is OFF.
power cord from electrical
Press handle
release
handle down so the vacuum
ing flat on the floor.
um cleaner is completely
reassembled.
cleaner
Pry out light lens at slots. Remove
Do not plug in or turn on until the vacu-I
outlet.
pedal and rotate the
is lay-
old bulb
from the socket by pulling from socket.
I
Replace burb by pressing into socket. Only
use a bulb rated 13 V AC-9 Watts.
Reinstall
light lens by snapping into place.
Return the vacuum
position.
22
cleaner
to the upright
TO REPLACE AGITATOR
WARNING
Electrical
Hazard
Remove the nozzle cover, agitator cover,
and agitator assembly. See BELT CHANGING AND AGITATOR CLEANING.
Shock Or Personal Injury
Disconnect electrical supply before servicing or cleaning the vacuum cleaner.
Failure to do so could result in electri-
Replace the agitator assembly with a new
one,
cal shock or personal injury from vacuum cleaner suddenly starting,
Reassemble the belt, agitator, agitator cover
and nozzle cover. See "To replace belt" in
BELT CHANGING AND AGITATOR
CLEANING section.
TO CHECK AGITATOR
Turn the vacuum
cleaner over to
check for worn
brushes. When
brushes are worn
to the level of the
Base Plate Belt Guard
base belt guard,
replace the agitator.
23
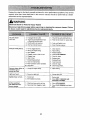
Review this chart to find do-it-yourself solutions for minor performance problems. Any service
needed, other than those described in this owner's manual, should be performed by a Sears
authorized service representative.
IbWARNING
Electrical
Shock Or Personal
Injury Hazard
Disconnect electrical supply before servicing or cleaning the vacuum cleaner. Failure
to do so could result in electrical shock or personal injury.
Vacuum cleaner
won't run.
Poorjob of dirt pick-up.
1. Unplugged at wall outlet.
2, Tripped circuit breakedblown fuse
at household service panel.
3. On/off swilch not turned on.
1. Plug in firmly,pushon/offswitchto on.
4. Thermal protector tripped.
4. Reset thermal protector.
1. Full or clogged dust bin.
2. Wrong pile height setting.
3.
4.
5.
6.
Worn agitator.
Clogged nozzle or dust bin port.
Clogged hose.
Hole in hose.
7. Broken/misplacedbelt.
8. Hose not inserted fully.
g. Motor protection system activated.
10. Dirty filters.
2. Reset circuit breaker or replace fuse.
3, Push on/off switch to on.
1. Clean dust bin.
2. Adjust setting.
3. Replace agitator.
4. Check CLOG REMOVAL.
5. Check for clogs.
6. Replace hose.
7. Replacelfixbelt.
8. Insert hose fully.
9. Check for clogs.
10. Clean/change filters.
Vacuum cleaner picks up
moveable rugs or
pushes too hard.
1. Wrong pile height setting.
1. Adjust setting.
Light won't work.
1. Burned out light bulb.
1. Change light bulb.
Agitator does not turn,
1. Brokenbelt.
2. Belt installedincorrectly.
I. Replace belt.
2. Check BELT CHANGING AND
AGITATOR CLEANING.
Air flow restricted
with attachment use,
Sound changes,
1. Attachment use restrictsair flow.
2, New carpet fuzz clogged air path.
1. Check ATTACHMENTS,
2. Check CLOG REMOVAL and clean
hose.
24
Your Home
ii!ililili!ii:iliiii!i
''¸
]:iiiiii!!iiii,
.......
_ii_!!_i!i
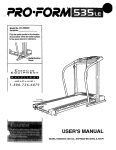
For repair - in your home - of all major brand appliances,
lawn and garden equipment, or heating and cooling systems,
no matter who made it, no matter who sold itl
_;i_i i _
iiiiii;_ii
_i!i
_;i!_i_i; __;i!
For the replacement parts, accessories and
owner's manuals that you need to do-it-yourself.
For Sears professional installation of home appliances
and items like garage door openers and water heaters.
1-800-4-MY-HOME ® Anytime, day or night
_!i]_] III i !!_i
!/i_i]ii_!
_i!!!iJ i! !i!!ii_
!
(1-800-469-4663)
.....
ii
!iiiii_i_il
i!iii!;
(U,S.A. and Canada)
www.sears.com
www,sears.ca
Our Home
For repair of carry-in products like vacuums, lawn equipment,
and electronics, call or go on-line for the nearest
iJi h!il III !!_
iiil;i!iiiiiiiiiiii
Sears Parts and Repair Center.
1-800-488-1222
Anytime, day or night (U.S.A. only)
!jiiii!i_!_!iii
www.sears.com
To purchase
a protection
agreement
i
!ii!iiiii!iJEii!
(U.S.A.)
.....
or m aint eRance agreem e nt (Canad) a on a produ ct se rvic e d by Se ars: ..............
i_ii!iii il;!i
1-800-827-6655
i;%iiii
iiii!!ili_!iii_i
(U.S.A.)
Para pedir servicio de reparaciSn
a domicilio, y para ordenar piezas:
1-888-SU-HOGAR ®
t-800-361-6665
(Canada)
Au Canada pour service en francis:
1-800-LE-FOYER Mc
(1.800-533-6937)
www,sears.ca
....
{
:
© Sears, Roebuck and Co.
® Registered Trademark / t_ Trademark / SMService Mark of Sears Brand, LLC
® Marca Registrada / TMMama de F_brica / sa Mama de Servicio de Sears Bra Roebuck ands, LLC
MCMarque de commerce / Me Marque d6pos_e de Sears Brands, LLC