1
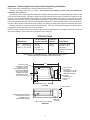
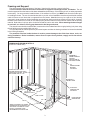
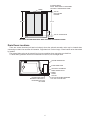
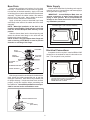
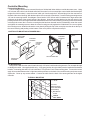
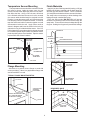
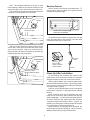
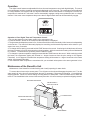
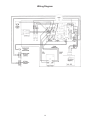
SEDONA™
Steam & Shower Base
INSTALLATION/OPERATING INSTRUCTIONS
IMPORTANT SAFETY INFORMATION
READ ALL INSTALLATION INSTRUCTIONS
Jacuzzi Whirlpool Bath does not recommend prolonged periods of use of the steamer. Prolonged use of the steam
system can raise excessively the internal human body temperature and impair the body’s ability to regulate its internal
temperature (hyperthermia). Consult your physician about your safety and comfort before using the steam system.
Limit your use of steam to 10–15 minutes until you are certain of your body’s reaction. A cooling shower spray can
be used simultaneously with the steam to assist in regulating your body temperature.
Alcohol and certain drugs or medications, such as tranquilizers, affect a person’s ability to withstand high temperatures
and may produce dangerous side effects. Don’t use alcohol or drugs when using steam.
The elderly, the infirm, and children should not use the steamer unattended. Pregnant women and people with heart
conditions should consult their physicians before using the steamer.
The wet surfaces of steam enclosures can be slippery. Use care when entering and exiting.
Do not place or use electrically connected devices, such as television, radio, or stereo speakers, lights, hair dryers,
or telephones, within 1.5 m (5 feet) of a steam enclosure, shower, or bath.
Read and follow manufacturer’s safety information with all optional equipment.
The steam head is hot. Do not touch the steam head or the steam within one foot distance of the head or surfaces
surrounding the steam head.
Do not block or obstruct the steam head in any manner.
Do not store or use flammable liquids near the steam generator.
Note: This is a professional grade product. A good knowledge of construction techniques, plumbing and
electrical installation according to codes are required for proper installation and user satisfaction. We
recommend that a licensed contractor perform the installation of all Jacuzzi Whirlpool Bath products. Our
warranty does not cover improper installation related problems.
Optional Accessories
• Steam Enclosure (U194865 Chrome Finish with Clear Glass, U194866 Brass Finish with Clear Glass.
U195865 Chrome Finish with Frosted Glass, U195866 Brass Finish with Frosted Glass
• Dome (U192000)
• Digital Controller with Timer and Temperature Sensor (S063829 Bright Brass). Chrome Standard with Unit.
• Automatic Drain Down Valve (S066000)
• Steam Nozzle (E203829 Brass). Chrome standard and installed on unit.
• Wall Mount Shower Set (C994959 White, C994829 Bright Brass, C994827 Chrome)
• Optica™ 100 Single Handle Mixer (C997959 White, C997829 Bright Brass, C997827 Chrome)
• Large Tear Drop Handle for Optica 100 (C998959 White, C998829 Bright Brass, C998827 Chrome)
• Bright Brass Strainer (A175829)
CONTENTS
Specifications _________________________________________________________________________ 2
Roughing-in Reference _________________________________________________________________ 2
Framing and Support ___________________________________________________________________ 3
Steam Enclosure
_____________________________________________________________________ 4
SteamPro™ Drain Down Configurations
___________________________________________________ 4
Digital Control & Temperature Sensor Rough-in
_____________________________________________ 5
Drain Information ______________________________________________________________________ 6
Plumbing and Water Supply ______________________________________________________________ 6
Electrical Connections ___________________________________________________________________ 6
Digital Controller Mounting _______________________________________________________________ 7
Temperature Sensor Mounting ____________________________________________________________ 8
Flange Mounting _______________________________________________________________________ 8
Finish Materials
______________________________________________________________________ 8-9
Service Access _______________________________________________________________________ 9
Operation ____________________________________________________________________________ 10
Maintenance __________________________________________________________________________ 10
Troubleshooting _______________________________________________________________________ 11-12
SteamPro™ Wiring Diagram ______________________________________________________________ 13
SteamPro™ Warranty __________________________________________________________________ 15-16
Base Warranty ________________________________________________________________________ 17-18
Save These Instructions for Future Use.
Owner's Record
Date Purchased ____________________________________________________________
Purchased From ____________________________________________________________
Installed By ________________________________________________________________
Serial Number (Base) ________________________________________________________
Serial Number (Steam Generator) ______________________________________________
Model ____________________________________________________________________
1
Important: Read complete instructions before beginning installation.
Each shower base is shipped with a drain and stainless steel strainer
Remove the shower base from the carton. Do not destroy the shipping carton until after satisfactory
inspection of the product.
Immediately upon receipt, inspect the base before installing. Should inspection reveal any damage or defect in the
finish, do not install the base. Damage or defect to the finish claimed after the base is installed is excluded from the
warranty. Jacuzzi Whirlpool Bath’s responsibility for shipping damage ceases upon delivery of the products in good
order to the carrier. Refer any claims for damage to the carrier. For definitions of warranty coverage and limitations,
refer to the published warranty information packaged with the product. Jacuzzi Whirlpool Bath is not responsible for
any defect that could have been discovered, repaired, or avoided by following this inspection and testing procedure.
Plan the installation in relation to the finished wall surfaces. Take into account the dimensions of both the shower
base and the shower door enclosure to be used with it.
NOTE: Damage or defects which could have been discovered and repaired prior to installation and which are claimed
after final installation of the product are excluded from our warranty.
SPECIFICATIONS
DIMENSIONS
60"
(1524 mm) L
32"
( 813 mm) W
18-5/8" ( 473 mm) H
TOTAL WEIGHT/
FLOOR LOADING
PRODUCT
WEIGHT
310 lbs
(141 kg)
/23 lb/sq. ft.
(112 kg/sq. m)
110 lb
(50 kg)
ELECTRICAL
*230 VAC, 60 Hz.
40 AMP, 3 Wire
Requires a
Dedicated Separate
Circuit.
*SteamPro supplied with NEMA 6-50P plug. NEMA 6-50R receptacle required.
Product specifications are subject to change without notice.
60"
LOCATION FOR
INCOMING WATER
SUPPLY LINE TO
STEAMER (INSTALLED
AND PREPLUMBED
WITH 3/8" COPPER
TUBINGTO STEAM
GENERATOR WITH
SHUT OFF VALVE) 16-5/8"
32"
RECEPTACLE
LOCATION
(RECEPTACLE TO BE
ACCESSIBLE FROM
SERVICE ACCESS)
STEAM
GENERATOR
SHUT OFF
VALVE
8-1/2"
45-3/8"
TOP VIEW
1" TILE FLANGE
18-5/8"
STEAM HEAD AND SHIELD
( PRE-INSTALLED AND
CONNECTED TO
STEAM GENERATOR)
(LEFT HAND UNIT SHOWN)
SIDE VIEW
2
SERVICE
ACCESS
Framing and Support
The drain extends below the bottom of the base. Note that this requires a cutout in the floor.
The floor structure beneath the base must be able to support a total weight of base, and bather. The unit
must be supported from the bottom of the base and not from the tile flange. If the subfloor is level, no other preparation
is necessary. You can proceed to install the base. If the subfloor is not level, you MUST level the entire surface prior
to installing the base. The use of materials that shim or provide a level installation are allowed provided the method
used will ensure a level base that is supported from the bottom. Materials that may be used are a floor leveling
compound, mortar, plaster or minimal expansion structural foam having a minimum density of 5 lbs/cubic ft.; however
the base must remain level in order for it to drain properly and the foam feet must make full contact with the leveling
material. Both sides of a joint or splice of subfloor should be level to each other. When attaching the base flanges
to stud wall, use shims to fill any gaps between the tile flange and studs.
The shower base should be installed after construction of the studwall and after rough plumbing is in place using
the self drilling screws provided with your unit.
It is important that the framed pocket be plumb and square and that the framing members be located as detailed
in the framing illustration.
The protective film liner inside the base is used to prevent damage to the finish from shoes, tools, etc.
during installation. Before installation, remove liner to inspect for any defects, reapply and do not remove
until final cleanup.
FRAMING AND ROUGH-IN DETAILS
(FOR LEFT HAND UNIT)
MINIMUM 6"
FROM FINISHED
CEILING
OR BOTTOM OF
OPTIONAL DOME
TO
TEMPERATURE
SENSOR
LOCATION
HEIGHT OF UNIT WITH
JACUZZI WHIRLPOOL BATH
STEAM ENCLOSURE: 83-3/8" ±1/4".
WITH DOME ADD 2" ±1/4"
MAXIMUM 7'
FROM FLOOR
90º
TO DIGITAL
CONTROLLER
LOCATION
15-3/8"
17-7/8"
10-1/2" x 5"
33-1/4"
DRAIN CUT-OUT
FR
ON
SUB-FLOOR
TO
FD
OU
BL
ES
90º
60-1/4"
TU
DS
FROM STEAM
GENERATOR
AREA FOR DRAIN OF STEAM
GENERATOR WITH MANUAL OR
OPTIONAL AUTOMATIC VALVE.
EXACT LOCATION TO BE
DETERMINED BY INSTALLER
3
2" DOME HEIGHT
NOTE: ADDITIONAL 2" REQUIRED
TO INSTALL OR REMOVE DOME
DOME
TOP OF
ENCLOSURE
HEADER
85-3/8"
77-1/2"
12-3/4"
5-7/8"
TOP OF THRESHOLD
UNIT WITH JACUZZI WHIRLPOOL BATH OPTIONAL STEAM ENCLOSURE
Drain Down Locations
There are several locations (left hand unit shown) where the optional automatic valve may be located when
connecting to a drain line as shown in illustration. Right hand unit is mirror image. Exact location to be determined
by installer.
The manual drain valve can be moved from its current position when connecting to a drain line.
To allow steam generator removal for maintenance or service, use a straight union.
STEAM GENERATOR
FLOW DIRECTION
OPTIONAL AUTOMATIC
DRAIN DOWN VALVE
DRAIN
DOWN
OUTLET
DRAIN DOWN VALVE
MOUNTED VERTICALLY
REQUIRES CUT-OUT
IN FLOOR
4
THIS LOCATION MAY REQUIRE
CUT OUT IN STUD WALL
Control and Temperature Sensor Cable Rough-in
A rough-in wiring kit is provided with unit to allow installer to locate and run wires to the temperature sensor
and digital controller before finish walls are installed.
Control Cable Rough-in
The low voltage control can be mounted up to 25 feet from the generator either inside or outside the steam room.
String the 25' cable from the generator through 1/2" holes in the wall studs or ceiling joists to the controller location.
Note: Do not staple through or damage cable. An option for tile rooms is to use the 1 gang rough-in box (provided)
and install at the desired control mounting location. A mounting plate with proper 2" diameter hole is included with the
control kit. Tile up to the 2" hole in the mounting plate.
Temperature Sensor Rough-in
It is recommended that the sensor be mounted in the steam room 6" from the ceiling or below bottom of dome, but
not directly over the steam dispersion head or more than 7 feet above the floor. String the sensor cable from the sensor
location through 1/2" holes in the wall studs or ceiling joists to the generator location. Leave 12" of slack at the sensor
location. Note: Do not staple through or damage cable.
Leave a couple of feet of sensor and control cable free behind the steam generator to allow for removal
through access panel for maintenance or servicing if necessary.
WATER SUPPLY
TO
TEMPERATURE
SENSOR
MANUAL WATER
SUPPLY SHUTOFF
VALVE (PROVIDED)
TO DIGITAL
CONTROLLER
TO STEAM HEAD
(STEAM OUTPUT
FACTORY INSTALLED)
PRESSURE RELIEF VALVE
3/4 NPT (PROVIDED)
REDUCTION FROM 3/4 NPT
TO 1/2 NPT PERMITTED.
NOTE: PRESSURE RELIEF DRAIN LINE,
DRAIN LOCATION AND METHOD AS
REQUIRED BY LOCAL CODES. (TO BE
1/2 INCH MINIMUM SIZE COPPER)
TANK DRAIN DOWN MANUAL VALVE (PROVIDED)
NOTE: SITE DRAIN OR OTHER METHOD AS
REQUIRED BY LOCAL CODES. (WITH AUTOMATIC
DRAIN OPTION WATER DISCHARGED IS LESS
THAN 140°F.)
OPTIONAL AUTOMATIC
DRAIN VALVE
NOTE: ALL COPPER PIPE SIZES ARE TO BE INDUSTRY NOMINAL SIZES
AND FITTINGS ARE NOT PROVIDED UNLESS OTHERWISE NOTED.
Minerals in the water or poor water quality can shorten the life of the steam generator or cause erratic
operation if the tank is not drained regularly. Drain the tank frequently. Jacuzzi Whirlpool Bath also strongly
recommends purchasing and installing the optional automatic drain down valve. The tank will be drained
automatically after each use after the water temperature lowers. Water filters and other conditioners are
strongly recommended if the water is of poor quality.
The Automatic Tank Drain Valve must be installed where the steam generator may be exposed to freezing
temperatures, e.g., in seasonal-use homes. (Water supply lines and water solenoid valve must not be allowed
to freeze.) This option prevents standing water from remaining in the tank. The tank will be automatically
drained through this valve when the water has cooled.
Read all warranty provisions before selecting a manual drain valve or the automatic drain down option.
5
Base Drain
Water Supply
Remove the stainless steel strainer from the drain
assembly. Disassemble the locknut and two gaskets
from the back of the drain assembly. Apply a 1/4" bead
of caulking (silicone) to the drain hole and insert the drain
assembly. Replace the rubber washer, fiber washer,
and lock nut in that order. Hand tighten the locknut.
Remove excess sealant from finished side.
Apply a lubricant (common household liquid soap
works well) to the inside of the rubber seal of the drain
assembly.
NOTE: Watertight installation of the drain is the
installer's responsibility. Drain leakage is excluded
from the Jacuzzi Whirlpool Bath warranty of this
product.
Slide the shower base into the framed opening and
attach the shower base flange to the stud wall and
blocking with screws provided.
NOTE: If there is any gap between base flange and
stud or blocking, shims MUST be used to prevent
distortion or cracking of the flange.
Consult local authorities for plumbing code requirements in your area. Connect house cold water supply to
steam generator supply tubing.
IMPORTANT: Jacuzzi Whirlpool Bath does not
warrant connections of water supply fittings and
piping or drain systems. Nor is it responsible for
damage to the shower base which occurs during
any installation procedure.
WATER SUPPLY (3/8" COPPER TUBING)
SHUT OFF VALVE
DRAIN ASSEMBLY
APPLY
LUBRICANT
DRAIN
ASSEMBLY
STRAINER
Electrical Connections
A separate circuit is required. Install a NEMA 6-50R
receptacle to the studwall at least 4 inches above the
floor. The receptacle is not provided.
SILICONE
SEALANT
SHOWER
BASE
RUBBER WASHER
FIBER WASHER
NUT
With a large screwdriver and the tool included with the
drain, tighten the inside compression nut to seal the
drain pipe connection. After drain is fully installed, test
for proper drainage. If the shower base does not drain
properly, rectify this condition before proceeding with
the installation. Jacuzzi Whirlpool Bath is not responsible for removal and/or reinstallation costs.
LOCATE RECEPTACLE IN THIS AREA.
RECPTACLE TO BE ACCESSIBLE
FROM SERVICE ACCESS
TIGHTEN SEALING NUT
TOOL
(INCLUDED)
6
Controller Mounting
Finished Wall Mounting
The low voltage control can be mounted directly to a finished wall either inside or outside the steam room. Using
a 2" hole saw, drill a hole in the finished wall where the control is to be mounted (the control cable should already be
roughed-in to this location). Locate the control cable, pull it out through the 2" hole and plug it into the connector on
the back of the control housing. With the decorative cover removed, screw the two 3" control housing mounting screws
1/4" into the mounting bracket. See diagram. Run a bead of 100% silicon caulk in between the 2 ridges around the
perimeter on the back of the control housing. See diagram. Insert the mounting bracket into the wall cavity by first
pushing with the control housing and then with a hard flat surface on the control housing mounting screws which extend
out through the control face. Once the mounting bracket has been inserted into the finished wall, center the control
and tighten the mounting screws to draw the control housing securely against the finished wall. Do not over tighten
the mounting screws. Install the decorative cover plate by sliding the top of the cover plate over the tab on the top of
the control housing and pushing on the bottom of the cover plate to complete the snap fit.
CONTROLLER MOUNTING IN FINISHED WALL
WALL
MOUNTING
BRACKET
CONTROL
HOUSING
CONTROL
HOUSING
CONTROL
COVER
PLATE
CONTROL
COVER
PLATE
CONTROL
HOUSING
SILICON SEALANT
MOUNTING
SCREWS
Tile Wall Mounting
String the 25' cable from the control location through 1/2" holes in wall studs to the generator. Do not staple through
or damage the cable. Use supplied cable only. A one gang junction box (provided) must be installed at the desired
location. A mounting plate with a 2" hole is included. Tile up to the 2" hole in the mounting plate. To mount the control
apply silicon sealant between the 2 ridges around the perimeter on the back of the control housing and press control
against tile. Clean up any excess sealant. Connect the cable from the back of the steam generator to the digital
controller.
TILE WALL MOUNTING
STUD
TILE
SINGLE GANG
JUNCTION BOX
(PROVIDED)
MOUNTING
PLATE
TILE UP
TO 2" HOLE
7
Temperature Sensor Mounting
Finish Materials
The temperature sensor should be mounted 6" below
the ceiling or dome, inside the steam room, but not
directly over the steam dispersion head or more than 7
feet above the floor. Using a 7/8" hole saw, drill a hole
in the finished wall where the sensor is to be mounted
(the sensor cable should already be roughed-in to this
location). Locate the sensor cable, pull it out through the
hole and plug it into the temperature sensor. It is best to
tape the sensor and cable connection together to avoid
disconnection inside the wall. Apply silicon caulk as
shown in diagram and insert the sensor in the hole. An
optional trim ring is included with the sensor. If the 7/8"
hole is jagged or is cut too large the trim ring may be used
to cover the exposed edges. Make sure that the sensor
probe is pointing down once installed. Tape the sensor
in place while the silicone hardens.
Apply tile (or other finishing material) leaving a 1/8" gap
between the finishing material and the base flange lip.
Seal this gap with silicone sealant. Leave a minimum
1/4" weep hole at the back and front corners of the base .
The weep holes are necessary to allow drainage from
leakage through unsealed tiled grout.
Filling the area marked DO NOT FILL will prevent
moisture from draining back into the base through the
weep holes. This moisture is due to leakage through the
tile grout. Sealing the tile grout will prevent this leakage.
WALL
ADHESIVE
CEMENT
BOARD
SILICONE
SEALANT
TILE
SILICONE SEALANT
DO NOT
FILL
STUD
PROBE MUST
POINT
DOWNWARD
PIGTAIL
OPTIONAL
TRIM RING
7/8" HOLE
FRONT WEEP HOLE
SILICONE
SEALANT
Flange Mounting
After base is in position secure flange to studs with
screws provided. If there is a gap between flange and
stud shims MUST be used.
TYPICAL FLANGE MOUNTING DETAIL
1/4" MINIMUM
WEEP HOLE
STUD
FLANGE
REAR WEEP HOLE
ATTACH WITH
SCREWS
PROVIDED
TILE
SHIM IF NECESSARY TO
FILL GAPS BETWEEN
STUD AND FLANGE
1/4" MINIMUM
WEEP HOLE
STUD
SILICONE
SEALANT
8
Note: The combined thickness of the tile (or other
finish material), adhesive and cement board must not
exceed the edge of the vertical wall on the drain side.
This condition will not allow the wall jamb of the steam
enclosure to sit flat against the vertical wall.
Service Access
Service access is through the removable panel. To
remove panel, grab the middle of the panel and bow
outwards till clips disengage.
SERVICE ACCESS PANEL
FINISH SURFACE
DRAIN
TILE FLUSH WITH
VERTICAL WALL
GRAB PANEL IN MIDDLE
AND BOW OUTWARDS
To reinstall the panel hold at an angle to the skirt and
insert clip under edge of skirt opening. Bow the panel
outward and insert clip on other side.
If there is a gap between the finish surface and the
vertical wall, a filler piece (included with steam enclosure) may be required. Gap must not exceed 3/16".
Silicone sealant will also be necessary to eliminate any
additional gaps that may be present.
ACCESS
PANEL
FINISH SURFACE
DRAIN
BOW ACCESS
PANEL OUTWARD
FROM CENTER
SHELL
3/16"
MAXIMUM
GAP
TILE NOT FLUSH WITH
VERTICAL WALL
VERTICAL WALL
Clean-Up After Installation
To avoid dulling and scratching the surface of the
shower base, never use abrasive cleaners. A mild liquid
detergent and warm water will clean soiled surfaces.
Remove spilled plaster with a wood or plastic edge.
Metal tools will scratch the surface. Spots left by plaster
or grout can be removed if lightly rubbed with detergent
on a damp cloth or sponge.
Paint, tar, or other difficult stains can be removed with
paint thinner, turpentine, or isopropyl alcohol (rubbing
alcohol).
Minor scratches which do not penetrate the color
finish can be removed by lightly sanding with 600-grit
wet/dry sandpaper. You can restore the glossy finish to
the acrylic surface of the shower base with a special
compound, Meguiar's #10 Mirror Glaze. If that is not
available, use automotive rubbing compound followed
by an application of automotive paste wax.
Major scratches and gouges which penetrate the
acrylic surface will require refinishing. Ask your Jacuzzi
Whirlpool Bath dealer for special instructions.
9
Operation
The digital control features an adjustable 60 minute time and temperature control with digital display. The actual
room temperature and time remaining are alternately displayed every 5 seconds. The temperature can be adjusted
in a range between 100 degrees and 125 degrees Fahrenheit with an initial default of 120 degrees. Once the set
temperature is reached the ‘’soft steam’’ feature automatically engages cutting steam production back to a single
element. If the steam room temperature drops more than 5 degrees both elements will automatically engage.
Operation of Your Digital Time and Temperature Control
1. Be sure the power circuit and water supply to the generator are on.
2. Press the ON/OFF button on the control until the temperature is displayed.
3. The generator should produce steam in 5 to 10 minutes and will turn off automatically in 60 minutes or less depending
on the set time. The control will alternately display time remaining and the actual temperature at the sensor in your
steam room every 5 seconds.
4. To change the time setting press and hold the TIME button on the control. Continuing to hold the button will cause
the time to increase in 5 minute increments from the prior setting. At 60 minutes the time setting will scroll backwards
to 5 minutes. To shut down the generator press the ON/OFF button.
5. To change the preset temperature setting press and hold the TEMP button on the control. While continuing to hold
the button, the temperature display will increase in 1 degree increments from the prior setting to 125 degrees
Fahrenheit. At 125 degrees Fahrenheit the temperature setting will decrease in 1 degree increment to the lowest
setting, 100 degrees Fahrenheit.
6. The TIME and TEMP set points are remembered for your next bath unless power to the steam generator is lost.
Maintenance of the SteamPro Unit
Maintenance of the SteamPro includes flushing and visually inspecting for water leaks.
To remove the unit remove the access panel. Turn off power to the unit and disengage the power cord. Turn the
water supply off at the shut off valve and drain the tank (if necessary). Disconnect all plumbing. Cut and discard
shipping restraint. Remove 2 screws holding mounting bracket to wood plank. Slide unit toward front of base and
remove. The reinstallation is the reverse of the removal procedure. It is not necessary to replace the shipping restraint.
SHIPPING RESTRAINT
WATER SUPPLY
SHUT OFF VALVE
TO STEAM HEAD
MOUNTING BRACKET
REMOVE SCREWS
DRAIN DOWN
10
Troubleshooting
There are no user serviceable parts in the Generator. All repair should be performed by a qualified service person.
For additional assistance or the factory authorized service person nearest you call the Service Department at 1-800363-0251 (This number is only for service for the steam generator.). The Trouble Shooting Guide below is meant as
a general aid only. Follow ACTION TO BE TAKEN in order until the problem is resolved.
11
Troubleshooting
12
Wiring Diagram
13
PRODUCT SPECIFICATIONS ARE SUBJECT TO CHANGE WITHOUT NOTICE.
USE INSTALLATION INSTRUCTIONS SUPPLIED WITH PRODUCT.
Jacuzzi Whirlpool Shower base has obtained applicable code (standards) listings generally available on a national basis for
products of this type. It is the responsibility of the installer/owner to determine specific local code compliance prior to installation
of the product. Jacuzzi Whirlpool Shower base makes no representation or warranty regarding, and will not be responsible for any
code compliance.
Jacuzzi Whirlpool Bath National Headquarters
P.O. Drawer J, Walnut Creek, CA 94596 (925) 938-7070
Service Support: Call (800) 288-4002
©2002 Jacuzzi Whirlpool Bath T87100B 2/04
Printed on Recycled Paper
Printed in the U.S.A.
14
Jacuzzi Whirlpool Bath Limited Warranty
Steam Generator Products
Jacuzzi Whirlpool Bath, warrants that its Steam Generators (warranted products) are free of manufacturing defects
both as to workmanship and material for 5 years and it will replace or repair defective parts or equipment for the period
of time and in accordance with the conditions set forth below. The terms of the warranty will be administered by
Saunatec Inc. dba, AMEREC.
1. Applicability. This warranty applies when the warranted product (a) is installed in accordance with installation
instructions provided, (b) is properly and reasonably maintained, and (c) has not been subjected to damage, misuse,
or abuse.
2. Registration. This warranty becomes valid only after the Limited Warranty Registration form, provided with this
warranty, is completely filled in and signed by the original purchaser and mailed to AMEREC within sixty (60) days from
the date of original installation. This warranty is nontransferable and shall extend only to the original purchaser.
3. Duration of Warranty. AMEREC or it’s authorized representative will provide parts to replace those with
manufacturing or workmanship defects for a period of five (5) years from the date of original installation, except when
the warranted product is installed in commercial locations such as clubs, condominiums, apartments, spas or military
facilities. In commercial locations, AMEREC or its authorized representative will provide parts to replace those with
manufacturing or workmanship defects for a period of one (1) year from the date of original installation. Additionally,
for noncommercial locations in the United States AMEREC or its authorized representative will provide reasonable
labor to replace defective parts for a period of two (2) years from the date of original installation and three
(3) additional years if the product is returned to the factory.
4. Warranty Work. All warranty work must be (a) authorized by AMEREC before it is performed; and (b) performed
only by authorized AMEREC representatives. This warranty shall not apply to any charges for parts or labor incurred
before receiving approval by AMEREC.
5. Return Authorization Number. A return authorization number assigned by an AMEREC representative must
accompany all returned parts. Parts which are returned without a return authorization number may not be repaired
or replaced.
Jacuzzi Whirlpool Bath
C/O AMEREC
P.O. Box 2258
Woodinville WA, 98072
6. Procedure. Requests for repair or replacement, a return authorization number, or warranty information should be
directed to AMEREC by calling toll-free 1-800-363-0251 or by writing to AMEREC, 17683 128th Place N.E.,
Woodinville, WA 98072. Defective product or parts returned for repair or replacement must be shipped prepaid to
AMEREC at the above address. Shipping costs for return of replacement product or parts to the purchaser will be at
the expense of the purchaser.
7. Limitations, Exclusions, and Remedies. There are no warranties which extend beyond the descriptions on the face
hereof. This limited warranty is in lieu of all warranties, expressed or implied, and of all other obligations or liabilities
on the part of Jacuzzi Whirlpool Bath. There shall be no implied warranty of merchantability. Jacuzzi Whirlpool Bath
neither assumes nor authorizes any person to assume for it any other obligation or liability in connection with the sale
of its products. Damages for breach of this warranty shall not exceed the lesser of the cost of repair or replacement.
Repair or replacement shall be the exclusive remedy available to the purchaser.
Under no circumstances shall Jacuzzi Whirlpool Bath be liable by virtue of this warranty or otherwise for any special,
indirect, secondary, incidental, or consequential damage of any nature to any person or property arising directly or
indirectly out of the use or inability to use a warranted product.
Some States do not allow limitations on how long an implied warranty lasts, or the exclusion or limitation of incidental
or consequential damages, so the above limitations and exclusions may not apply to you.
8. Disputes. Any lawsuit alleging breach of this limited warranty shall be commenced within one year from the date
of breach. In addition, any such lawsuit may be commenced only in King County, Washington.
This warranty gives you specific legal rights, and you may also have other rights which vary from State to State.
LIMITED WARRANTY REGISTRATION FORM
Please fill out and return within 60 days of installation to:
AMEREC, P.O. Box 2258, Woodinville WA 98072
The undersigned hereby acknowledges the receipt of Jacuzzi Whirlpool Bath Limited Warranty and affirms that the
date of installation was_____________________20____, further that installation of the equipment has been
completed according to the Jacuzzi Whirlpool Bath installation instructions furnished with the equipment and that I
have read, understand and agree to the conditions and terms of the Jacuzzi Whirlpool Bath Limited Warranty in its
entirety.
Name of Purchaser ___________________________________________________________________
Address ______________________ City __________________ St. ___________________ Zip _____
Phone _____________________________________________________________________________
Purchaser’s Signature _________________________________________________________________
Model No. & Serial No. ________________________________________________________________
Jacuzzi Whirlpool Bath Limited Warranty
Builder Group Bath Product
WARRANTY COVERAGE
Jacuzzi Whirlpool Bath (the “Company”) offers the following express limited warranty to the original purchaser of any Jacuzzi Whirlpool Bath Builder Group
Bath Product (“unit”) who purchases the product for personal or single family use (“user”). The Company will repair or replace, at its option, the unit or its
equipment in accordance with the following terms and conditions.
ONE YEAR LIMITED WARRANTY ON BATHS
Our warranty on Builder Group Bath products is for one (1) year. Our warranty covers the unit and factory-installed components (e.g., pump, motor)
against defects in material or workmanship. Warranty coverage begins on the date the unit was originally purchased by the user.
NINETY DAY (PARTS ONLY) LIMITED WARRANTY ON OPTIONS AND ACCESSORIES
Our warranty on options and accessories manufactured by the Company is for ninety (90) days for parts only. Our warranty covers options and accessories
manufactured by the Company (e.g., fill spout kits, trim kits, skirts) against defects of material or workmanship. Warranty coverage begins on the date the option
or accessory was originally purchased by the user.
WARRANTY LIMITATIONS
Our warranty does not cover defects, damage, or failure caused by the common carrier, installer, user, or other person, or resulting from, without limitation,
any of the following: careless handling (lifting unit by plumbing, abrading finish, etc.) including its own negligence; modification of any type for any reason
(including modification to meet local codes); improper installation (including installation not in accordance with instructions and specifications provided with
the unit); connections supplied by the installer of the equipment; improper voltage supply or unauthorized electrical modification; misuse; incorrect operation,
or lack of proper routine maintenance; operation of the unit without specified minimum amount of water or at inappropriate water temperature; use of abrasive
or improper cleaners; or acts of God, such as lightning, floods, earthquakes, etc.
In addition, THE COMPANY WILL NOT BE RESPONSIBLE FOR INCIDENTAL OR CONSEQUENTIAL DAMAGES or losses arising from any cause
(e.g., water damage to carpet, ceiling, loss of use, etc.) including its own negligence; damages to, respecting, or resulting from: plated parts when pool and/or spa
chemicals are used in the unit; optional bath equipment not manufactured by the Company, supplied by Dealer, installer or the Company; the unit's prior usage
as an operational display; or defects that should have been discovered before installation. This limited warranty does not include: labor, transportation, or other
costs incurred in the removal and/or reinstallation of the original unit and/or installation of a replacement unit; any costs relating to obtaining access for repair;
or loss of use damage, including loss of sales, profit or business advantage of any kind under any circumstances. Bath units in commercial use are excluded from
any warranty coverage if any addition, deletion, or modification of any kind whatsoever has been made to the unit (or to any component).
Warranty coverage is provided in the United States of America and Canada.
IMPLIED WARRANTIES
Implied warranties of merchantability and fitness for a particular purpose are disclaimed altogether or to the full extent allowed by law.
NOTICE: This warranty gives you specific legal rights, and you may also have other rights which vary from state to state. There are no warranties applicable
to Jacuzzi Whirlpool Bath products except as expressly stated herein or as implied by applicable state and federal laws. The Company will not be responsible for
any statements or representations made in any form that go beyond, are broader than or are inconsistent with any authorized literature or specifications furnished
by the Company.
Some states do not allow limitations on how long an implied warranty lasts, or the exclusion or limitation of incidental or consequential damages, so the above
limitations and exclusions may not apply to you.
RETURN OF WARRANTY CARD
The attached Warranty Registration Card MUST be filled out by the purchaser within thirty (30) days from purchase and mailed to Jacuzzi Whirlpool Bath
in order for this warranty to become effective.
Jacuzzi Whirlpool Bath
P.O. Drawer J
Walnut Creek, CA 94596-9885
RESPONSIBILITIES OF OTHERS
Inspecting the unit prior to installation is the responsibility of the installer or building contractor who acts on behalf of the user. They are responsible for ensuring
the unit is free of defect or damage. Notices are placed on and in the unit and on the shipping carton advising the installer of this responsibility. In the event of
a problem, the unit must not be installed. The Company is not responsible for failures or damage that could have been discovered, repaired, or avoided by proper
inspection and testing prior to installation.
Damage occurring in transit is the responsibility of the carrier. The user or installer MUST open the crate and inspect the unit for damage when it is delivered.
If damage is discovered, it must be reported immediately to the seller and the carrier in writing, and an inspection requested. Failure of the carrier to respond should
be reported to the seller and the carrier. Your freight claims should be filed promptly thereafter.
It is the responsibility of the installer, building contractor, or user to provide access for service. The Company is not responsible for any costs relating to
obtaining access for repair. The user shall bear such costs and, if appropriate, must seek recovery from the installer.
Damage occurring to the unit during installation is the responsibility of the installer and/or building contractor and damage occurring thereafter is the
responsibility of the user.
Failure of any optional equipment is the sole responsibility of the equipment manufacturer. (Options and accessories manufactured by the Company are
warranted for ninety (90) days from the original date of purchase for parts only.)
The Distributor or Dealer is responsible for knowing local code requirements and notifying the installing contractor and/or user of these requirements at the
time of purchase. The Company is not responsible for costs to modify any product to obtain any code approval, such as city, county, or state building codes in
U.S.A. or municipal or provincial codes in Canada.
WARRANTY SERVICE
For the customer's benefit, the Company maintains a list of independent service personnel to perform required warranty service repairs. Such firms are not agents
or representatives of the Company and cannot bind the Company by words or conduct.
The Company will provide the warranty service described above when the following conditions have been met: the failure is of the nature or type covered
by the warranty; the user has informed an Authorized Jacuzzi Whirlpool Bath Service Agent or Warranty Service Department Representative of the nature of the
problem during the warranty period; conclusive evidence (e.g., proof of purchase or installation) is provided to the foregoing by the user proving that the failure
occurred or was discovered within the warranty period; an authorized independent service person or Company representative has been permitted to inspect the
unit during regular business hours within a reasonable time after the problem was reported by the user.
In order to obtain warranty service, consult your local telephone book for the location of the nearest Jacuzzi Whirlpool Bath Authorized Service Agent. Describe
the problem and the Authorized Service Agent will inspect the unit and provide the required warranty service.
If you are unable to contact a Jacuzzi Whirlpool Bath Authorized Service Agent, call or write:
Jacuzzi Whirlpool Bath
Warranty Service Department
P.O. Drawer J
Walnut Creek, California 94596
Call: (800) 288-4002
To obtain warranty replacement for factory-installed components for Company supplied options and accessories manufactured and supplied by the Company,
call or write the above. Provide a description of the problem and proof of purchase. You will be instructed how to obtain replacements and where to return, at
your expense, the failed component(s), option(s), or accessory(ies).
All replacement parts, equipment, and repairs shall assume the remaining warranty period of the part(s) replaced.
The Company's warranty obligation shall be discharged upon tender of replacement or repair. The customer's refusal to accept the tender terminates the
Company's warranty obligation.
©2002 Jacuzzi Whirlpool Bath T871000B 2/04
Ninety-Day
Parts Only
Limited Warranty
On
Accessory(ies)
Warranty
Registration Card
Purchaser's Address _______________________________________
This card must be filled out and returned to the address printed on the other
side within thirty (30) days from date of purchase in order for this warranty to
be come effective.
Purchaser's Name ________________________________________
Date of Purchase _________________________________________
City _____________________________ State _____ Zip ________
Serial Number ___________________________________________
Model Name _____________________________________________
Dealer's Address __________________________________________
Dealer's Name ___________________________________________
T871000B
1. How did you first hear about this Jacuzzi® product?
( ) Article in Magazine/Newspaper
( ) Advertisement
( ) Yellow Pages
( ) Visited Dealer/Plumbing Supplier
( ) Decorator/Architect
( ) Builder/Plumber/Remodeler
( ) Visited Retailer/Home Center Store
( ) Word of Mouth . . . Friend/Relative/Acquaintance
( ) Other (Please Describe) _______________________________
2. Who first gave you specific information about this product (specifications,
prices, etc.)?
( ) Remodeler
( ) Builder
( ) Dealer/Plumbing Supplier
( ) Retailer/Home Center Store
( ) Plumbing Contractor
( ) Already Installed
( ) Decorator/Architect
3. What was the main reason for purchase?
( ) Product Features
( ) Warranty Service
( ) Styling
( ) Hydrotherapy
( ) Price
( ) Brand Name
( ) Home Resale _______________________________________
( ) Other _____________________________________________
4. Who finally decided which product you would buy?
( ) Self and Spouse Together
( ) Spouse
( ) Self
( ) Designer/Architect
( ) Other Family Member
( ) Already Installed
( ) Builder/Plumber/Remodeler
( ) Already installed/New Home
5. Who installed?
( ) Contractor/Plumber when remodeling
( ) Self/Spouse when remodeling
( ) Other _____________________________________________
6. What is the current market value of this property?
Please estimate $ _______________________________________
7. What is the age of the head of the household? _____________ years
8. What other manufacturers did you consider?
( ) Aqua Glass
( ) Lasco ( ) Price Pfister
( ) Eljer
( ) Sterling
( ) American Standard
( ) Kohler
( ) Other (Specify) _____________________________________
9. How long did you shop before purchasing unit?
( ) 2 months-6 months
( ) 1 day
( ) 6 months-1year
( ) 2-7 days
( ) 1 year-2 years
( ) 1 week-2 weeks
( ) +2 years
( ) 2 weeks-4 weeks
( ) 1 month-2 months
10. Approximately how long have you lived in this home? ___________
11. Please indicate, approximately, the total annual income of your
household.
( ) $50,000 to $74,999
( ) Up to $24,999
( ) $75,000 to $99,999
( ) $25,000 to $29,999
( ) $100,000 to $149,999
( ) $30,000 to $39,999
( ) $150,000 and Above
( ) $40,000 to $49,999
12. Was your purchase process?
( ) Very Difficult
( ) Difficult
( ) Very easy ( ) Easy
Ninety-Day
Parts Only
Limited Warranty
On
Accessory(ies)