1
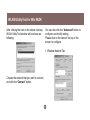
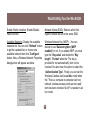
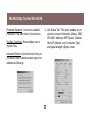
Wireless-G Notebook Network Card
User Manual for Win 98/2000 (GWP511)
®
®
Welcome
Thank you for choosing IOGEAR® to serve your wireless needs. Soon, you will be sharing files or surfing the
Internet wirelessly. We hope you will have as much fun using your IOGEAR® Wireless-G Notebook Network
Card, as we had designing it.
Rest assured, your IOGEAR® Wireless-G Notebook Network Card is built rock-solid to ensure maximum uptime for you to stay up-and-running. If for any reason you have a problem, we stand behind our products with
an industry-leading 3 year factory warranty, so you can have peace-of-mind with your current and future
IOGEAR® purchases.
We want you to be happy with your purchase, so we have made every effort to ensure product quality,
reliability, and ease-of-use.
©2003 IOGEAR. All Rights Reserved. PKG-M0092
IOGEAR®, the IOGEAR® logo is the trademark or registered trademark of IOGEAR®, Inc. Microsoft® and Windows® are
registered trademarks of Microsoft® Corporation. IBM is a registered trademark of International Business Machines, Inc.
Macintosh, G3/G4 and iMac are registered trademarks of Apple Computer, Inc. IOGEAR® makes no warranty of any kind with
regards to the information presented in this document. All information furnished here is for informational purposes only and is
subject to change without notice. IOGEAR®, Inc. assumes no responsibility for any inaccuracies or errors that may appear in
this document.
Table of Contents
Package Contents
Introduction
Features
Requirements
Win 98/2K Installation
WLAN Utility Tool for Win 98/2K
Troubleshooting
Specification
Technical Support
Radio and TV Interference Statement
Limited Warranty
○
○
○
○
○
○
○
○
○
○
○
○
○
○
○
○
○
○
○
○
○
○
○
○
○
○
○
○
○
○
○
○
○
○
○
○
○
○
○
○
○
○
○
○
○
○
○
○
○
○
○
○
○
○
○
○
○
○
○
○
○
○
○
○
○
○
○
○
○
○
○
○
○
○
○
○
○
○
○
○
○
○
○
○
○
○
○
○
○
○
○
○
○
○
○
○
○
○
○
○
○
○
○
○
○
○
○
○
○
○
○
○
○
○
○
○
○
○
○
○
○
○
○
○
○
○
○
○
○
○
○
○
○
○
○
○
○
○
○
○
○
○
○
○
○
○
○
○
○
○
○
○
○
○
○
○
○
○
○
○
○
○
○
○
○
○
○
○
○
○
○
○
○
○
○
○
○
○
○
○
○
○
○
○
○
○
○
○
○
○
○
○
○
○
○
○
○
○
○
○
○
○
○
○
○
○
○
○
○
○
○
○
○
○
○
○
○
○
○
○
○
○
○
○
○
○
○
○
○
○
○
○
○
○
○
○
○
○
○
○
○
○
○
○
○
○
○
○
○
○
○
○
○
○
○
○
○
○
○
○
○
○
○
○
○
○
○
○
○
○
○
○
○
○
○
○
○
○
○
○
○
06
○
○
○
○
05
○
○
○
04
○
○
○
03
○
○
○
○
○
○
○
○
○
○
○
○
○
○
○
○
○
○
○
○
17
18
○
○
08
15
○
○
07
○
19
20
Package Contents
The package you have received should contain the following items:
• IOGEAR® Wireless 802.11g PC Card
• CD ROM containing Driver, Utility Software, and User’s Manual
• Quick Start Guide
• Acrobat Reader 6.0
3
Introduction
IOGEAR®’s Wireless-G Notebook Network Card is a sleek and versatile device for both small
and home office users. With IOGEAR, you can surf the Internet, share files, chat with your
friends, and....Wirelessly!
Our simple, easy-to-use, web-based setup wizard will have you up-and-running in minutes.
Moreover, our turn-key FireWall and Wireless Security packages keep you safe on the ‘net.
Remember, IOGEAR®’s Wireless-G Notebook Network Card gives you the wireless connectivity all in a small, cost-effective, and reliable setup. Go with IOGEAR®, and go Wireless!
4
Features
Features
• 54 Mbps wireless connection speed - up to five
times faster than previous 802.11b technology
• Sleek, low-profile, high-gain antenna is designed
for maximum reception
• Backward compatible with 802.11b wireless
networks, access points, hot spots and other
devices
• Includes software to turn your notebook into a
wireless access point
• Ultra-easy installation in just a few simple steps
• Solid 3-year manufacturer warranty - built to last!
5
Requirements
System Requirement:
• Pentium® class notebook computers with one
available CardBus slot
• Microsoft® Windows® 98SE, ME, 2000, XP
• CD-ROM drive
6
Win 98/2K Installation
Software Installation
1.Insert the IOGEAR® CD (packed with the product) into CD-ROM, wait for automatic pop-up
window and then click “Install Configruation Utility” to proceed with the installation.
2.After the installation process is complete, re-start your notebook PC. Insert the IOGEAR®
Wireless 802.11g PC Card into Cardbus (PCMCIA) slot. A new hardware wizard will pop up
and guide you to install drivers in your system.
3. First from right to bring up WLAN Utility Tool – In Windows 9X or 2000, a tray icon (shown
below) should be seen. Double click the icon
7
WLAN Utility Tool for Win 98/2K
After clicking the icon on the above icon-tray,
WLAN Utility Tool window will be shown as
following.
You can also click the “Advanced” button to
configure and modify setting.
Please click on the tabs on the top of the
screen to configure.
1. Wireless Network Tab
Choose the network that you want to connect,
and click the “Connect” button.
8
WLAN Utility Tool for Win 98/2K
Enable Radio checkbox: Enable/Disable
Radio function.
Network Name (SSID): Stations which link
together should be set to the same SSID.
Available Networks: Display the available
networks list. You can click “Refresh” button
to get the updated list, or choose one
available network then click “Configure”
button. Now, a Wireless Network Properties
dialogue box will appear as below.
Wireless Network Key (WEP): – You can
decide to use “Data encryption (WEP
enabled)” or not. If you enable WEP, you must
type the “Key value” and decide the “Key
length”, “Format” when the “The key is
provided for me automatically” item not be
checked. You also have the option to select the
“Authentication Type”. Finally, you can set the
Wireless Cardbus card be ad hoc mode when
the “This is a computer-to-computer (ad hoc)
network; wireless access points are not used.”
item has been checked. No AP is needed in ad
hoc mode.
9
WLAN Utility Tool for Win 98/2K
Preferred Networks: Connect to available
networks in the order listed in the text box.
SysTray Checkbox: Show wireless icon in
System Tray.
2. Link Status Tab: This option enables you to
view the connect information (Status, SSID,
AP’s MAC Address, WEP, Speed, Channel,
Client IP Address, and Connection Type),
and signal strength (Signal, noise).
Advanced Button: Use the function that you
can decide what network access type to be
adapted as following.
10
WLAN Utility Tool for Win 98/2K
3. Statistics Tab: Choosing the “Statistics”
option, you can view the Current Activity
and Accumulated Totals.
4. Site Monitor Tab: This option enables you to
view the available networks. At the same time,
you can also know every network’s Standard,
Support Rates and Signal Strength. The
“Freeze” button can stop the network search
and update process. As for the “Advanced”
button, it will show more detail information.
11
WLAN Utility Tool for Win 98/2K
5. Diagnostics Tab: This section let you select 6. AP Config Tab: This page allows you to set
what items do you want to test included
your Notebook to be used as an Access
Control Registers, SPROM Format
Point.
Validation, Memory Tests, Interrupt Test,
Loopback Test and LED Test. This tool will
help you to examine the hardware device
quickly and easily.
12
WLAN Utility Tool for Win 98/2K
Enable AP Checkbox: Allows you to use your Notebook as an Access Point.
Network Name (SSID): This field is the network name shared among all devices in a wireless
network. The SSID must be identical for all devices in the wireless network. It is case-sensitive
and must not exceed 32 alphanumeric characters, which may be any keyboard character.
Make sure this setting is the same for all devices in your wireless network.
Channel: Select the appropriate channel from the list provided to correspond with your network
settings. All devices in your wireless network must use the same channel in order to function
correctly.
Data Encryption: Selecting “None” disables WEP data encryption. Selecting WEP enables
WEP data encryption.
WEP: Enter 5 ASCII characters (0~9, a~z) or 10 hexadecimal digits (0~9, a~f) for a 64-bit key.
Enter 13 ASCII characters or 26 hexadecimal digits for a 128-bit key.
WEP Key Index: Select which network key index is used for encrypting outbound data and/or
authenticating clients.
13
WLAN Utility Tool for Win 98/2K
54g Mode: Select the mode to 54g Auto for the widest compatibility. Select the mode to 54g
Performance for the fastest performance among 54g certified equipment. Set the mode to
54g LRS if you are experiencing difficulty with legacy 802.11b equipment.
Protection: In Auto mode the router will use RTS/CTS to improve 802.11g performance in
mixed 802.11g/802.11b networks. Turn protection off to maximize 802.11g throughput under
most conditions.
Rate: The default setting is “Auto”. The range is from 1 to 54Mbps. The rate of data transmission should be set depending on the speed of your wireless network. You can select from one
transmission speed, or keep the default setting, Auto, to have the router automatically use the
fastest possible data rate.
Basic Rateset: Select the basic rate that wireless clients must support.
Note: If you want to pass the received packets to another network (for example: internet), you
must have an Ethernet network card (connect to internet) and build a bridge between the AP
and network card. Then, all end users connect to the AP can travel in the internet via this
bridge.
14
Troubleshooting
1. Adapter Installation Problems
If your computer cannot find the IOGEAR® Wireless-G Notebook Network Card 802.11g
Wireless Cardbus Adapter or the network driver is not installed correctly, check the
followings,
• Make sure the adapter is securely inserted in the Cardbus slot. When you insert the
wireless PC card into the notebook’s slot, a click should be heard if the PC card is properly
inserted. Check for any hardware problems, such as physical damage to the card
connector.
• Try the card in another CardBus slot. If this also fails, test your computer with another
wireless LAN Cardbus that is known to operate correctly.
If you feel hard to connect or transfer data to 802.11b device, please click Start->Setting>Control Panel->System->Hardware Tab->Device Manager->Network Adapter->WLAN
Network Adapter->Properties->Advanced Tab to enter the configuration page. Find the
IBSS 54g (tm) Protection Mode field and replace the default value off with Auto.
You also can change the default value of Locale field to comply with the local laws.
15
Troubleshooting
2. Diagnostics Utility
• Make sure your computer is using the latest BIOS.
• If there are other network adapters in the computer, they may be causing conflict, remove
all other adapters from the computer and test the wireless adapter separately.
• Check for a defective computer Cardbus slot. Try the adapter in another computer
Cardbus slot that is known to operate correctly.
16
Specification
Data Rate
Standard
Operating Range
Radio Signal Type
Input Voltage
Antenna
LED Indicator
Host Interface
Operating Temperature
Storage Temperature
Humility
54, 48, 36, 24, 18, 12, 11, 9,
5.5,6, 2 and 1 Mbps, Auto Fallback
IEEE 802.11g
Up to 100m indoors
Up to 300m outdoors
CCK – 11, 5.5 Mbps
DQPSK – 2Mbps
DBPSK – 1Mbps
OFDM –54, 48, 36, 24, 18, 12, 9, and 6 Mbps
3.3 V
Built-in chip-antenna
Power, Link
68-pin connector to Cardbus slot
0-50 C (32 – 140 F)
0-70 C (32 – 158 F)
5 to 80% (non-condensing)
17
Technical Support
If you are still experiencing problems after reading Product User Manual and the Troubleshooting section, you may either contact our technical support at: 1-949-453-8782
OR, simply click our URL address www.iogear.com to go to our company website and
check the latest version and other information about the product and/or software.
18
Radio & TV Interference Statement
WARNING!!! This equipment generates, uses and can radiate radio frequency energy and, if
not installed and used in accordance with the instruction manual, may cause interference to
radio communications. This equipment has been tested and found to comply with the limits for
a Class B computing device pursuant to Subpart J of Part 15 of FCC Rules, which are designed
to provide reasonable protection against such interference when operated in a commercial
environment. Operation of this equipment in a residential area is likely to cause interference, in
which case the user at his own expense will be required to take whatever measures may be
required to correct the interference.
19
Limited Warranty
IN NO EVENT SHALL THE DIRECT VENDOR’S LIABILITY FOR DIRECT, INDIRECT,
SPECIAL, INCIDENTAL OR CONSEQUENTIAL DAMAGES RESULTING FROM THE USE OF
THE PRODUCT, DISK OR ITS DOCUMENTATION EXCEED THE PRICE PAID FOR THE
PRODUCT.
The direct vendor makes no warranty or representation, expressed, implied, or statutory with
respect to the contents or use of this documentation, and especially disclaims its quality,
performance, merchantability, or fitness for any particular purpose.
The direct vendor also reserves the right to revise or update the device or documentation
without obligation to notify any individual or entity of such revisions, or updates. For further
inquires please contact your direct vendor.
20
®
Contact info.
23 Hubble
•
Irvine, CA 92618
•
(P) 949.453.8782
•
(F) 949.453.8785
•
www.iogear.com