1
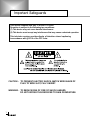
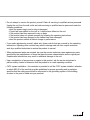
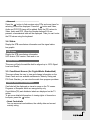
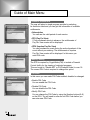
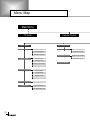
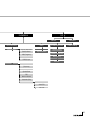
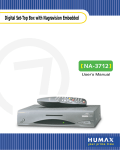
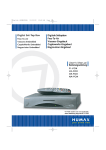
CR-3510
Digital Set-Top Box
for CryptoWorks Embedded
Contents
Important Safeguards ................................... 1 ~ 4
Support & Copyright .................................... 5
Reference .................................................... 6
Connecting the Set-Top Box ......................... 7 ~ 10
Remote Control Unit ..................................... 11 ~ 12
Guide of Functions ....................................... 13 ~ 15
Guide of Main Menu ..................................... 16 ~ 30
Troubleshooting Guide.................................. 31 ~ 32
Menu Map ..................................................... 33 ~ 34
Specification.................................................. 35 ~ 36
Important Safeguards
This device complies with part 15 of the FCC Rules.
Operation is subject to the following two conditions:
(1) This device may not cause harmful interference.
(2) This device must accept any interference that may cause undesired operation.
This television receiver provides display of television closed captioning
in accordance with §15.119 of the FCC rules.
CAUTION - TO PREVENT ELECTRIC SHOCK, MATCH WIDE BLADE OF
PLUG TO WIDE SLOT, FULLY INSERT.
WARNING - TO REDUCE RISK OF FIRE OF SHOCK HAZARD,
DO NOT EXPOSE THIS RECEIVER TO RAIN OR MOISTURE.
1
Always be careful when using your product. To reduce the risk of fire electrical shock and
other injuries, keep these safety precautions in mind when installing, using and maintaining
your machine.
• Read all safety and operating instructions before operating your product.
• Keep the safety and operating instructions for future reference.
• Heed all warnings on the product receiver and in the operating instructions.
• Follow all operating and use instructions.
• Unplug the product from the wall outlet before cleaning.
Use a damp cloth. Do not use liquid or aerosol cleaners.
Use a damp cloth for cleaning.
• Never add any attachments and/or equipment without approval
of the manufacturer. Such additions can increase the risk of fire,
electric shock or other personal injury.
• Do not use the product where contact with or immersion in water
is a possibility, such as near bathtubs, sinks, washing machines,
swimming pools etc.
• Do not place the product on an unstable cart, stand, tripod, bracket or table where it can fall.
A falling product can cause serious injury to a child or adult and serious damage to the appliance.
Use only with a cart, stand, tripod, bracket or table recommended by the manufacturer or sold
with the product. Follow the manufacturer’s instructions when mounting the unit and use a mounting
accessory recommended by the manufacturer. Move the product and cart with care.
Quick stops, excessive force and uneven surfaces can make the unit and cart unsteady and likely
to overturn.
• Provide ventilation for the product. The unit is designed with slots in the cabinet for ventilation to
protect it from overheating. Do not block these openings with any object and do not place the
product on a bed, sofa, rug or other similar surface. Do not place it near a radiator or heat register.
If you place the product on a rack or bookcase, ensure that there is adequate ventilation and that
you’ve followed the manufacturer’s instructions for mounting.
2
Important Safeguards
• Operate your product only from the type of power source indicated on the marking label.
If you are not sure of the type of power supplied to your home, consult your appliance dealer
or local power company.
• Use only a grounded or polarized outlet. For your safety, this product is equipped with a
polarized alternating current line plug having one blade wider than the other. This plug will
fit into the power outlet only one way. If you are unable to insert the plug fully into the outlet,
try reversing the plug. If the plug still does not fit, contact your electrician to replace your outlet.
• Protect the power cord. Power supply cords should be routed so that they won’t be walked on
or pinched by objects placed on or against them. Pay particular attention to cords at plugs,
convenience receptacles and the point where they exit from the unit.
• Unplug the product from the wall outlet and disconnect the antenna or cable system during
a lightning storm or when left unattended and unused for long periods of time.
This will prevent damage to the unit due to lightening and power-line surges.
• Avoid overhead power lines. An outside antenna system should not be placed in the vicinity
of overhead power lines or other electric light or power circuits or where it can fall into such
power lines or circuits. When installing an outside antenna system, be extremely careful to
keep from touching the power lines or circuits. Contact with such lines can be fatal.
• Do not overload the wall outlet or extension cords. Overloading can result in fire or electric shock.
• Do not insert anything through the openings in the unit, where they can touch dangerous
voltage points or damage parts. Never spill liquid of any kind on the product.
• Ground outdoor antennas. If an outside antenna
is connected to the product, be sure the antenna
is grounded so as to provide some protection
against voltage surges and built-up static charges.
Section 810 of the National Electrical Code,
ANSI/NFPA No.70-1984, provides information
about proper grounding of the mast and supporting
structure, grounding of the lead-in wire to
an antenna discharge unit, size of grounding
conductors, location of antenna discharge unit,
connection to grounding electrodes and
requirements for the grounding electrode.
3
EXAMPLE OF
ANTENNA GROUNDING
ANTENNA
LEAD IN WIRE
GROUND CLAMP
ELECTRIC
SERVICE
EQUIPMENT
ANTENNA
DISCHARGE UNIT
(NEC SECTION 810-20)
GROUNDING
CONDUCTORS
(NEC SECTION 810-21)
GROUND CLAMPS
NEC NATIONAL ELECTRICAL CODE
POWER SERVICE GROUNDING
ELECTRODE SYSTEM
(NEC ART 250, PART H)
• Do not attempt to service the product yourself. Refer all servicing to qualified service personnel.
Unplug the unit from the wall outlet and refer servicing to qualified service personnel under the
following conditions:
- when the power-supply cord or plug is damaged
- if liquid has been spilled on the unit or if objects have fallen into the unit
- if the product has been exposed to rain or water
- if the product does not operate normally by following the operating instructions
- if the product has been dropped or the cabinet has been damaged
- when the product exhibits a distinct change in performance
• If you make adjustments yourself, adjust only those controls that are covered by the operating
instructions. Adjusting other controls may result in damage and will often require extensive
work by a qualified technician to restore the product to normal.
• When replacement parts are required, be sure the service technician uses replacement parts
specified by the manufacturer or those that have the same characteristics as the original part.
Unauthorized substitutions may result in additional damage to the unit.
• Upon completetion of any service or repairs to this product, ask the service technician to
perform safety checks to determine that the product is in a safe operating condition.
• CATV system installation : this reminder is provided to call the CATV system installer’s attention
to article 820-40 of the nec that provides guidelines for proper grounding and in particular,
specifies that the cable ground shall be connected to the grounding system of the building,
as close to the point of cable entry as practical.
4
Support & Copyright
First and foremost, our knowledge of the set top box marketplace along with technical expertise
differentiates HUMAX. Moreover, we maintain very close working relationships with our
customers. We take a highly disciplined engineering approach to product design, manufacture,
testing, acceptance and to technical and maintenance support. We conduct comprehensive
testing of the units, provide complete documentation and support and deliver the highest quality,
most consistent products on time and every time.
HUMAX supports you via its homepage with useful information and new software of the
HUMAX’s homepage.
Homepage : http://www.humaxdigital.com
To provide you the convenience of usage HUMAX has the right to make changes and
improvements to any of the products described in this manual and the manual of the
products without notice.
Copyright © 2000. HUMAX Co., Ltd.
All rights reserved.
Warning
HUMAX cannot be held responsible for any kind of problems caused by the use of unofficial
softeware. The use of software versions other than HUMAX official software will void the
manufacturer’s warranty.
It is advised that only the formal software released from HUMAX should be used in all
HUMAX product range.
5
Reference
1. Connect a Satellite antenna
To the digital receiver, you can connect either a single satellite antenna directly or through converter
box several antennas or LNB of multi-feed equipment.
You can connect a further Sat-receiver (for example analog), with the receiver of common
antenna equipment that has satellite signals.
2. Loop Through
If you have another analogue or digital STB and you wish to use the same LNB then you can connect
it via the loop through. Connect one end of a Coaxial cable to the LNB OUT on the STB and connect
the other end to the LNB IN on your second STB.
3. Software Upgrade
HUMAX digital set-top box is a highly sophisticated product - incorporating one of the best software
applications. Whenever a problem is found with this software or, in fact, extra functions or enhanced
applications are added, the software in the equipment has to be upgraded.
In order to maintain proper performance of the product, it is essential to have the most up to date
software. The latest news and release of software versions may be found at
HUMAX website - http://www.humaxdigital.com.
It is recommended that users register to HCSA (HUMAX Customer Service Area) and periodically
check for the availability of software upgrade.
There are three methods to upgrade the software:
(a) set-top box to set-top box download (copies the software of the main unit into slave unit);
(b) pc to set-top box download (downloads the software directly from pc to the model requiring upgrade);
6
Connecting the Set-Top Box
Front & Real Panel
1
,
Press to change services down and up.
2 SMART CARD SLOT
Insert the SMART CARD with it’s
IC-Chip part facing the bottom side.
3 ERROR LED (AMBER)
Indicates that the STB has an error.
4 STANDBY LED (RED)
Indicates that the STB is under Standby.
1 LNB IN
Use to connect an antenna.
2 LNB OUT
Use it when connecting to another STB.
3 RS-232C
Use it when connecting to your PC.
4 S-VIDEO
Use to connect an S-VIDEO signal from
your STB to an S-VIDEO input jack on a
VCR or TV.
5 OPERATING LED (GREEN)
Indicates that the STB is operating.
6 TV/RADIO
Press to switch between TV and
Radio modes.
7 STANDBY
Press to switch between Operation and
Standby modes.
5 RCA AUDIO OUTPUT
Use to connect an audio signal from your
STB to an audio input jack on a VCR or TV.
6 RCA VIDEO OUTPUT
Use to connect video signal from your
STB to a video input jack on a VCR or TV.
7 RF OUT
Use to connect a RF signal from your
STB to RF(ANT) input jack on your TV.
8 RF IN
Use to connect a general AIR ANT and
CABLE jacks to a RF in jack on the STB.
7
Connecting the Set-Top Box to Your TV (using a RF CABLE)
From Cable/ Antenna Source
TV Rear Panel
1. Connect a parabola antenna cable to the LNB IN jack.
Connect an AIR or Cable Box Antenna out terminal to the RF IN jack.
2. Connect between the RF OUT jack on the STB and the ANT INPUT
(RF INPUT) jack on the TV.
Viewing the STB programs
3. Turn on your STB and TV.
4. Tune the STB to VHF Channel 3 or Channel 4.
5. Tune the TV to Channel 3 or Channel 4 (same as you tune the STB).
6. Operate the STB to select a program you want to watch.
Viewing the Free-To-Air or CABLE programs
7. Switch to the STB Standby Mode.
8. Select a channel you want to watch using the TV remote control.
8
Connecting the Set-Top Box
Connecting the Set-Top Box to Your TV (using a RCA CABLE)
From Cable/ Antenna Source
TV Rear Panel
1. Connect a parabola antenna cable to the LNB IN jack.
Connect an AIR or Cable Box Antenna out terminal to the RF IN jack.
2. Connect between the RF OUT jack on the STB and the ANT INPUT
(RF INPUT) jack on the TV.
3. Connect a set of audio, video cables between the AUDIO, VIDEO OUT jacks on the STB
and the AUDIO, VIDEO INPUT jacks on the TV.
Viewing the STB programs
4. Turn on your STB and TV.
5. Switch to the Video mode using the TV remote control.
6. Operate the STB to watch a program you want.
An S-Video Cable produces better picture quality than a Video Cable.
Viewing the Free-to-Air or CABLE programs
7. Switch to the STB Standby mode.
8. Switch to the TV Air mode using the TV remote control and then select a TV channel
you want to watch.
Using a HI-FI SYSTEM for sound
9. Connect a set of audio cables between the AUDIO OUT jacks on the STB
and the AUDIO (LINE, AUX) INPUT jacks on the HI-FI SYSTEM.
9
Connecting the Set-Top Box to Your TV and VCR
You can view a STB program and record it using a VCR at the same time.
From Cable/ Antenna Source
TV Rear Panel
VCR Rear Panel
1. Connect a parabola antenna cable to the LNB IN jack.
Connect an AIR or Cable Box Antenna out terminal cable to the RF IN jack.
2. Connect between the RF OUT jack on the STB and the ANT INPUT
(RF INPUT) jack on the TV.
3. Connect a set of audio, video cables between the AUDIO, VIDEO OUT jacks on
the STB and the AUDIO, VIDEO INPUT jacks on the VCR.
Recording a program from STB
• Turn on the VCR to record a program from the STB.
• When you record a STB program of a specific time, set the Wakeup Time and Service No.
of the STB Time Setting Mode to meet the starting time of the program and then do ON
• Time and Recording Time of the VCR Time Setting Mode.
(See your VCR manual for VCR ON Time and setting the Recording Time.)
Viewing a program from the STB, Free-To-Air or CABLE
• See “Connecting the Set-Top Box to your TV (using a RF CABLE).”
10
Remote Control Unit
STANDBY
NUMBER BUTTONS
TV/SAT (Reserved)
TV/RADIO
MUTE
INFORMATION (RED)
SOUNDTRACK (GREEN)
MENU
SUBTITLE (Reserved)
PAUSE (BLUE)
CURSOR
TIME (WHITE)
OK
EXIT
P+/P-
V+/V-
HELP
EPG
RCL (Recall)
RS-101N
11
1
NUMBER BUTTONS
10
TV/SAT (Reserved)
Press to select a service, enter your
PIN Code or Numbers on the menu.
11
TV/RADIO
Press to switch between TV and Radio modes.
2
INFORMATION (RED)
Press to display the program information box
on the screen. This button functions same
as the RED button on the menus.
12
Press to temporarily cut off the sound.
13
3
SOUNDTRACK (GREEN)
Press to display the soundtrack list for the
current service. And this button functions
same as the GREEN button on the menus.
4
SUBTITLE (Reserved)
5
PAUSE (BLUE)
Press to pause the moving picture for seeing
more careful. And this button functions same
as the BLUE button on the menus.
6
7
14
CURSOR
Press to move the highlight bar for selecting
options on the menus.
And this button is used to change services
(up/down) and increase or decrease the audio
volume.
15
OK
Press to display the service list.
This button is used to select the item on
the menus.
16
P+/PProgram up/down buttons.
Press to tune to the next or previous service.
Press to move up or down pages on the menus.
EXIT
Press to return to the previous menu
and screen.
MENU
Press to display the Main Menu on the screen
or return to the screen from a sub menu screen.
TIME (WHITE)
Press to display the current time on the screen.
Press to reserve services on the Information
box or EPG. And this button functions same as
the WHITE button on the menus.
MUTE
17
HELP
Press to display the help box on the screen.
8
V+/VVolume up/down buttons.
Press to increase or decrease the volume.
9
18
EPG
Electronic Program Guide button displays
the TV/Radio Program guide.
STANDBY
Press to switch between Operation and
Standby modes.
19
RCL (Recall)
Press to select the channel that was previously
viewed.
• Please note : The design of Remote Control Unit may be changed without notice in advance.
12
Guide of Functions
Information Box (I-Plate)
The details of Service Part and Event Part are automatically
displayed on the I-Plate when pressing the(
)button or changing
services. I-Plate is divided into Service Part and Event Part.
SERVICE-PART (Left side of the box)
Service Part consists of the following item :
• I-Plate icon, Current Time
• Service Name, Service Number, icon
• Subtitle, Teletext, Scrambling Service Symbol
(These are automatically displayed when the broadcasting
station provides appropriate information.)
• Signal Quality Bar
EVENT-PART (Right side of the box)
EVENT PART consists of the following items:
• Event name, Event duration time
• Description of event, State of reserved event
Event Part shows the current and next event information.
button : Use to move from the current event information to the
next event information.
button : Use to move from the next event information to the
current event information.
When the Help(
)button is pressed under I-Plate display,
the help window will appear on the screen.
The Help window shows the extended current event information,
including: Satellite Name, Frequency, Polarization, Symbol Rate, FEC...
The detailed information for the event can be displayed by pressing the
Help(
)button in the I-Plate with event data displaying mode.
You can reserve the program in the event data display mode by using
the Time(
)button.
When the current data is displaying on the screen, you can reset timer
program Once, Daily or Weekly mode.
When you release the timer program mode, then you will be asked to
confirm the action.
Volume Control
13
To adjust the volume level, use the
buttons or
buttons.
To temporarily stop the volume, press the Mute(
)button.
To cancel Mute, press the Mute(
)button again or press the
buttons or
buttons.
Changing Services
To change services, do in the following sequence:
1. Press the Number buttons(0~9) on the remote control.
2. Press the
buttons or
buttons.
Or press the Recall(
), Service-List(
), EPG(
)button.
To switch between TV and Radio services, press the TV/Radio
(
)button.
To select the previous viewed service, press the Recall(
)button.
Soundtrack
When you want to watch the Audio Language of soundtrack under
servicing, press the Soundtrack(
)button firstly.
The on-screen menu is displayed on the top to left side of the screen.
To change the audio language:
1.
buttons
: Use to select the Audio on the left, right or both.
2.
buttons
: Use to select the audio language you want.
3.
,
button : When this button is pressed, the menu
screen will disappear keeping the selected audio
soundtrack constant.
When the current service is switched, the audio language returns to
the audio language that was selected in previoius service. If the
returned audio language is invalid, the audio language that you
selected from the audio language menu has the priority of playback.
Teletext
Use your TV remote control unit to control the Teletext service.
The teletext button doesn’t exist on the STB remote control unit.
When the service supports Teletext, the Teletext icon( ) is displayed
on the i-plate.
14
Guide of Functions
Service List
To select the desired service in the service list, you should firstly
display the service list using
button. Use
buttons to
select a service and press
button. Also use
buttons to
select a service directly in the service list.
The Service List consists of Service All and Service Favorite.
On the Service List, you can change the attributes of a service
through the Service Configuration.
button : Use to move to the previous or next service
button : Use to move to the forward or backward
service (maximum 6 services).
Red button (
) : Service All
Green button(
) : Service Favorite
Service Configuration
To change the attributes of a service.
1. Use the
buttons to move a service you want to change
in the Service All or Service Favorite mode.
2. Press the Menu(
)button.
3. Use the
buttons to move to an item (such as favorite,
lock, skip, delete) you want on the Service Configuration screen.
4. Use the
buttons to select. Press the
button to complete.
Service All
1. To display the service list, press the
button.
Use Red(
)button to select the Service All List.
2. Select the desired service by using the
buttons.
3. Press the
button to view the selected service.
The right side scroll-bar of the screen displays the location
of the selected service in relation to All Services.
Service Favorite
1. To add the services to the Service Favorite, use the Service
Configuration at Service All or Service Organizing menu.
2. When you press the Green(
)button in the Service List,
the favorite service list will be displayed on the screen.
3. When you want to see the services added to the favorite group,
use the
button.
15
Guide of Main Menu
1. TV Guide
Your STB has an Electronic Program Guide(EPG) to help you
navigate through all the possible viewing options.
The TV Guide supplies information such as program listings and
start and end times for all available services.
In addition, detailed information about the program listings and
start and end times for all available services.
In addition, detailed information about the program is often
available in the EPG(the availability and amount of these
program details will vary, depending on the particular broadcaster).
2. Parental Control
Access to services and programs is controlled by a PIN Code
(i.e., a 4-digit secret code that is defined by the user).
The very first time you attempt to lock all services(or lock
programs by ratings), the on-screen menu will instruct you to assign
a PIN Code (Later on, if necessary, you can change it).
3. Installation
The Installation mode allows you to have the information of setting
services and newly set services (language, time, organize, search,..)
Furthermore, you can recognize the states of hardware and
software versions and signals from your STB.
4. Utility
This menu provides Calendar and Biorhythm.
16
Guide of Main Menu
1. TV Guide
You can watch a program being shown and reserve it in the
TV Guide mode.
To enter the TV Guide mode
Press the EPG(
)button on the remote control unit or select the
TV Guide on the Main Menu.
To select the TV/Radio Guide
Press the
button on the remote control unit and TV Guide will
be switched to the Radio Guide.
TV Guide mode includes four different modes.
To select each mode, use the following buttons:
•
•
•
•
Red (
Green (
Yellow(
Blue (
)button : Use to display the current or next program list.
)button : Use to display the program list for one-week.
)button : Use to display the reserved program list.
)button : Use to display the simple TV Guide list.(Quick mode)
NOW / NEXT mode
Show the informations of the program that are played now or
will be played next time.
This mode consists of the service name, event name, event
duration time, current time and on-screen-display window.
To watch a program you want through the display window :
• Use the
buttons to select a program you want.
The selected service will appear on the right display window.
• Use the
buttons to select a program you want.
And then press the
button on the remote control unit.
The selected service will appear on the right display window.
The selected OSD will be highlighted every time the cursor moves.
To reserve a program you want :
• Select a program you want by using the
buttons or
buttons. And then press the White(
)button.
Press the
buttons to watch the program of previous
page or the program of next page.
Press the Yellow(
)button to watch the reserved program list.
17
Weekly mode
Shows the information of programs that will be played for a week.
Select a day you want using the
buttons.
To watch and reserve a program you want, do the same steps with
the NOW/NEXT mode.
Reserved mode
Shows the program lists that you have already reserved on the
TV Guide or Information Box. Maximum twenty programs can be
reserved. This program list includes service name, date, duration
time, reservation mode and event name.
To cancel the Reserved service, select a program you want to
cancel using the
buttons and then press the White(
)button.
Quick mode
Shows a simple TV Guide like an Information box.
This mode shows in the A/V playback mode.
• Blue vertical line : Indicates the current time.
• Black/white bar : Shows the proceeding state of program.
• Time range of bar : This consists of three blocks by 30 minutes
per block.
18
Guide of Main Menu
2. Parental Control
You can set a parental guidance rating to each program in this
mode.
1. When the
button is pressed after selecting the highlighted
parental control on the initial menu screen, a display window
for entering the PIN Code will appear on the center of screen.
** The default PIN Code is 0 0 0 0 .
2. Enter the PIN Code on the display window.
(If any problem occurs when entering a PIN Code, you cannot
switch to the next mode.)
3. Set the parental guidance rating of highlighted censorship
classification.
Classification: no block or total block.
Enter the PIN Code to unlock or lock programs.
4. To change your PIN Code:
Select the highlighted Old Pin Code using the
buttons
and then enter your Old PIN Code.
Enter a New PIN Code in the highlighted new PIN Code
using the
buttons.
To verify the New PIN Code, re-enter a new PIN Code in the
highlighted Verify Changed PIN Code.
5. When the entered PIN Code is correct, then all settings are
completed. (If the PIN Code is wrong, the message “PIN Code
mismatch” will be displayed on the display window. When the
button is pressed at this time, the old PIN Code is valid and the
cursor is located in the first position of this menu.)
3. Installation
This mode allows you to customize, add a new service and displays
the state of the STB. Enter the submenus after selecting the
Installation Mode in the Main Menu.
3-1. System Setting
The System Setting mode supports the STB internal settings
according to the connection of the receiver and external units.
This mode includes Language Setting, Time Setting,
A/V Output Setting, VHF Tuning and Other Setting.
19
Language Setting
Select the language for Menu, Audio or Subtitle.
1. Select the highlighted Language Setting using the
buttons
in the System Setting mode and then press the
button.
2. Select the highlighted Menu(or Audio, Subtitle) Language and
press the
buttons and the language list will be displayed.
3. Use the
buttons to move to a language you want and then
press the
button to finish setting.
Menu Language
Select a language for the menu or banner OSD in this mode.
Only English is provided.
Audio Language
Select the Default Language for audio when changing services.
If you change the current service, your STB will initially select
the previously memorized Audio Language. If the Audio Language
of current service is not provided, at this time, you should reselect
a language on the Audio Language menu.
Languages provided:
Chinese, Czech, Danish, Dutch, English, Finnish, French, German,
Greek, Hungarian, Italian, Portuguese, Rumanian, Russian,
Spanish, Swedish, Turkish and more.
If no language is provided, then the default language of current
service will be automatically selected.
Subtitle Language
Select the Default Language for Subtitle when changing services.
Language provided:
Chinese, Danish, English, Finnish, French, German, Italian,
Norwegian, Portuguese, Spanish, Swedish and more.
20
Guide of Main Menu
Time Setting
You can set the Current Time and Wakeup Time in this mode.
Furthermore, the Service Number in the Wakeup Time mode and
Sleep Time (standby mode) can be set. When a VCR is connected,
recording can be automatically done according to Wakeup/Sleep
Time Setting.
Current Time
To set the Current Time, enter the Offset value using the
standardized information of current service area.
The time setting will be used as the standardized time for the
I-Plate, TV Guide, Wakeup and Sleep timer.
Time Offset
Current time is based on TDT (Time and Data Table) at the stream
of the current service.
Wakeup Time
Select the time when STB is turned on.
Use the Number buttons(0~9) on the remote control unit to enter
your Wakeup Time.
Wakeup Service No.
Use the
buttons to set the service number provided for the set
Wakeup Time.
Use the TV/Radio(
)button on the remote control unit to toggle
TV/Radio service.
Service Name
The Service Name that has been determined by the
Wakeup Service No. will be shown.
Sleep Time
Depending on Time Setting, select the time when STB is turned off.
21
A/V Output Setting
Audio Output
Set the Audio mode which is output from RCA/Cinch Jack.
(Stereo/Mono)
Screen Mode
Select the aspect ratio of TV which is connected to STB(4:3 or 16:9).
Display Format
Select the format which the video is to be displayed on screen.
When your TV set is 4:3 and video source is 16:9,
STB will display in Letter-box or Center mode as selected.
When your TV set is 16:9 and video source is 4:3,
STB will display in the Pillar-box or Full mode as selected.
NTSC Mode
Adjust this value between 3.58 and 4.43 if your TV displays the video
only in black and white color. Normally NTSC 3.58 mode is used
worldwide, but some TV sets can support only NTSC 4.43 mode.
VHF Tuning
When you watch TV after connecting a cable between
the RF OUT jack on STB and the Input jack (RF Input) on TV.
If you select Channel 3 or Channel 4 and then set VHF Tuning to
Channel 3 or Channel 4, all services from STB will be viewed
through TV Channel 3 or Channel 4.
Other Setting
Select the OSD transparency and Information Box Display Time.
OSD Transparency
Select the OSD transparent type. It affects Information Box, Service
List, Time and Quick mode of TV Guide. Use the
buttons to
toggle transparent and opaque.
Info. Box Display Time
Set the display duration of Information Box displayed on the screen
after changing services. The time ranges from 0 to 20 seconds.
22
Guide of Main Menu
3-2. Service Organizing
This menu gives users access to options that allow them to organize
their Networks, TV services and Radio services.
** The default PIN Code is 0 0 0 0 .
Organize TV Services
Organize services that are included in memory for TV.
Organize All Services
Delete, Move, Lock, Skip or Rename each TV service on all
TV service list.
• Delete
1. Use the
buttons to select a service you want to delete.
2. When the Red(
)button is pressed, the service will be colored
in gray.
3. When the
button is pressed, the message “Saving changed
Service Information” will appear on the center of screen and
simultaneously the service will be deleted.
If you don’t want to delete, then press the
button.
If the message “Do you want to save?” appear on the center of
screen, press the
button.
• Move
1. Use the
buttons to select a service you want to move.
2. When the Green(
)button is pressed, the icon( ) will appear
in front of the service number.
3. Use the
buttons to move to the location you want
to use.
4. When the
button is pressed, the message “Saving
changed Service Information” will appear on the center of screen
and simultaneously the location of service will be changed.
If you don’t want to move, press the
button.
23
• Lock
1. Use the
buttons to select a service to be locked by your
PIN Code.
2. Press the Yellow(
)button and the symbol ( ) will be
displayed at the right side of the service name.
3. Press the
button and the message “Saving changed Service
Information” will appear on the center of screen and
simultaneously the selected service will be locked.
If you don’t want to lock, then press the
button on the
remote control.
If the message “Do you want to save?” appears on the center of
screen, then select
.
To watch the locked service, be sure to enter your registered
PIN Code.
• Skip
1. Use the
buttons to select a service you want to skip.
2. Press the Blue(
)button and the symbol(
) will appear
at the right side of the service name.
3. Press the
button, and the message “Saving changed Service
Information” will appear and simultaneously the selected service
will be skipped.
If you don’t want to skip, then press the
button.
If the message “Do you want to save?” appears on the center of
screen, select
.
When the
buttons or
buttons are used to select
channels, the skipped service channels will not be shown.
To watch the skipped service channels, use the
Number buttons(0~9), Service List or the EPG mode.
• Rename
1. Use the
buttons to select a service you want to rename.
2. Press the White(
)button and the keyboard image will appear
on the center of screen.
3. Use the
press the
buttons to select a new name and then
button.
4. Press the Yellow(
)button to finish renaming.
24
Guide of Main Menu
Organize Favorite Services
Delete, Move, Lock, Skip or Rename each TV service in a
favorite TV group and re-group them into your favorite TV group.
This mode has the same operating methods as
“Organize All Services”.
Moving the favorite group from the service group:
1. Press the
button to move to “Services”-Plate (right window).
2. Use the
buttons to select a service channel you want to
move.
3. Press the
button and the selected service channel will be
moved to “Favorites”-Plate (left window).
4. To finish this menu:
• Press the
button to move to “Favorites”-Plate (left window).
• Press the
button and the message “Saving changed
Service Information” will appear on the center of screen.
Press the
button and the message “Do you want to save?”
will appear on the center of screen.
At this time, press the
button.
note :
1.
2.
buttons : Use to move services and favorite window.
buttons : Use to move to the previous page and the next
page.
Organize Radio Services
Same functions as “Organize TV Services”
Organize Networks
You can edit services using the network unit.
The network names are displayed on the left side of screen,
and the TV/Radio Services included in the highlighted network are
displayed on the right side of screen.
Only the Delete, Rename Function can be used in this mode.
25
3-3. Service Searching
Search for new services.
This mode includes Antenna Setting and Manual Search.
Antenna Setting
Select LNB parameters and switching connections.
Antenna Alternative
Use the
buttons to select an antenna number for the required
satellite. Antenna alternative 16 is fixed for SMATV and its name
can’t be changed.
Satellite Name
Selects the satellite name that corresponds to the value of the
Antenna Alternative.
Press the
buttons and the satellite names you can memorize
will be listed on the screen.
Use the
buttons to select a satellite name and then press
the
button.
This name will help you Select Antenna Alternative In Manual
Search menu.
n o t e : Press User defined and the keyboard image will appear
on the screen. Then you can enter satellite names.
LNB Frequency
Use the
buttons to select a LNB frequency or type on the dish.
You can select the LNB Frequency.
If the required LNB frequency is not available, then press the
Number buttons(0~9) on the remote control.
22KHz Tone
Use the
buttons to select the antenna tone switch when LNB
Frequency is universal.
22KHz tone will be switched automatically.
DiSEqC Input
Use the
buttons to select a DiSEqC antenna switch type.
(according to the option and location of DiSEqC switch)
• Type : Disabled, Tone Burst A to B, DiSEqC A, DiSEqC B,
DiSEqC C, DiSEqC D
26
Guide of Main Menu
Manual Search
Find the services manually in the transponder you select.
This search mode included normal advanced and SMATV search.
Antenna Alternative
Use the
buttons to select an antenna number for the required
satellite. The satellite name will help you select antennas.
If you want to search in SMATV mode, then select the
Antenna Alternative 16.
Frequency
Use the
buttons to enter the Frequency of the transponder you
want to find (MHz). Or use the Number buttons(0~9) on the remote
control.
Polarization
Use the
buttons to select the Polarization of the transponder.
Horizontal : 18 V are output through LNB line
Vertical
: 13.5 V are output through LNB line
Symbol Rate
Inputs the Symbol Rate of the transponder you want to find.
FEC (Forward Error Correction)
Use the
buttons to select the Forward Error Correction of the
transponder. You can select the value of auto, 1/2, 2/3, 3/4, 5/6
and 7/8.
Network Search
Select “Yes” and you can find more services using the home
network.
Automatic Skip
If you want to find free services, then select “Yes”.
The scrambled services will not be automatically stored.
27
Advanced
Press the
button to find services using PIDs and more items for
selecting PIDs will be displayed. Press the
button and Video,
Audio and PCR PID items will be added. Enter the PID values for
Video, Audio and PCR. When the Number buttons(0~9) are
pressed, a hexadecimal table will be displayed. Then you can’t enter
the PID values using the keyboard.
3-4. Status
Display the STB manufacture information and the signal status
bar graphic.
STB Status
Display the STB manufacture information.
H/W version, S/W version, Date and so on.
Signal Dection
This menu will help the satellite dish be aligned up to 100% Signal
Level and Quality.
3-5. Conditional Access (for CryptoWorks Embedded)
This menu allows the user to view and change information on the
Smart Cards such as available entitlements, Maturity Rating and
PIN Code. Besides, you can view the mails from program providers.
General Smart Card Information
Card label will be displayed as issuer’s name on the TV screen.
Programs or Bouquets which are encrypted by only
CryptoWorks(TM) and distributor labels are displayed on the TV
screen.
To get more detailed information of viewing rights of channels or
bouquets, press the
button.
• Smart Card details
You can see smart card address, the validity date and current
maturity rating.
28
Guide of Main Menu
Available Entitlements
The user will select a single program provider by selecting
its distributor label and you can get the information of available
entitlements.
• Subscription
You can see the valid period of each service.
• PPV (Pay Per View)
If You purchased events in advance, the entitlements of
Pay Per View events will be displayed.
• IPPV (Impulse Pay Per View)
You can purchase an event during the active broadcast of the
event without pre-ordering. The entitlements of Impulse
Pay Per View events will be displayed. In this menu you
need PIN code.
Maturity Rating
The STB is required by CryptoWorks(TM) to include a Parental
Control facility for the viewing of restricted programs.
This can be set to “Disable MR” or PG(Parental Guide) to over 18.
The correct PIN Code is required to change this option.
PIN Code
In this menu you can make PIN Code enabled, disabled or changed.
• Enable PIN Code
You can enable the PIN Code.
• Disable PIN Code
You can disable the PIN Code.
• Modify PIN Code
You can change the PIN Code by using the Number buttons(0~9)
on the RCU. You will need to enter the old PIN Code before you
can enter new PIN Code.
29
Mail Box
The STB can receive maximum 10 mails from program providers.
To check and see the mails press the
button.
In the Mail list you can view or delete the mails.
If you store 10 mails and a new mail arrives, the oldest mail will be
erased and the new mail will be stored.
3-6. Default Setting
Reset STB to the default start set in the factory.
Enter the PIN Code ‘ 0 0 0 0 ’ and the message “The default values
are restored” will appear on the center of screen.
If you want to restore again, select “OK”. Otherwise, select “EXIT”.
4. Utility
STB supports additional functions such as Calendar and
Biorythm.
At the Biorhythm use the
buttons to adjust your birth
year and date to see your current biorhythm status.
30
Troubleshooting Guide
Problem
Does not display any LED
on the front panel or STB
has no power.
Solution
About STB
• Check the main power cable and check that it is plugged into a suitable power outlet.
• Check whether STB is in Standby mode.
No Picture
• Ensure that the STB is switched on (see above).
• Check the video output port (RCA/RF) is firmly connected to the TV or VCR.
• Check that you have selected the correct channel or Video Output on your TV.
• Check the brightness level of the TV.
Poor picture quality
• See “No Picture” above.
• Check the signal level, if this is low then try adjusting the alignment of your dish.
No Sound
• See “No Picture” above.
• Check the volume level of the TV and STB.
• Check the Mute status of the TV and STB.
Remote Control does not
operate
• Point remote control directly towards the STB.
• Check and replace batteries.
No or Bad Signal
• Check the LNB - replace LNB if necessary.
• Check the cable from the LNB.
• Check the position of the dish - realign dish if necessary.
• If you are using a DiSEqC 1.0 switch, check that you have connected the LNBs to
the correct connections on the switch.
• Check the “Signal Level” and the “Signal Quality” in the Signal Status menu.
“No Signal” in manual
search
• Check the “Signal Level” and the “Signal Quality” in the Signal Status menu.
• Check the LNB - replace LNB if necessary.
• Check the cable from the LNB.
• Check the position of the dish - realign dish if necessary.
• DiSEqC 1.0
Check that you have connected the LNBs to the correct connections on the switch.
Check that you have set the connected setting in the Antenna Setting menu.
On-Screen Error Messages
Service Search
31
Problem
Amber only:
Invalid system ID
Solution
LED Error Message
• Check whether the system ID is different for Software and STB.
Amber & Red:
Incorrect data block CRC
error
• You need to contact your retail shop.
Amber & Red & Green:
Incorrect application CRC
error
• You need to contact your retail shop.
• If you can’t solve the problem even referring this Troubleshooting Guide, contact us
via our homepage.
Homepage : http://www.humaxdigital.com
32
Menu Map
Main Menu
Parental Control
TV Guide
Service Organizing
System Setting
Language Setting
Menu Language
Organize TV Services
Audio Language
Subtitle Language
Time Setting
Organize Favorite
Organize Radio Services
Wakeup Time
Sleep Time
A/V Output Setting
Audio Output
Screen Mode
Display Format
NTSC Mode
VHF Tuning
Other Setting
Channel
OSD Transparency
Info. Box Display Time
33
Organize All Services
Organize Favorite
Current Time
Wakeup Service No.
Organize All Services
Organize Networks
Utility
Installation
Calender
Status
Conditional Access
Antenna Alternative
STB Status
Satellite Name
Signal Detection
General Smart
Card Information
Service Searching
Antenna Setting
LNB Frequency
Available Entitlements
22KHz Tone
Maturity Rating
DiSEqC Input
PIN Code
Biorthythm
Default Setting
Mail Box
Manual Search
Antenna Alternative
Frequency
Polarization
Symbol Rate
FEC
Network Search
Automatic Skip
Advanced..
Video PID
Audio PID
PCR PID
34
Specification
Conditional Access Interface
CryptoWorks Embedded
1 Slot Smart Card
Tuner & Channel
Input Connector
Frequency Range
Input Impedance
Signal Level
IF
IF Band width
LNB Power &
Polarisation
22 KHz Tone
DiSEqC Control
Demodulation
Input Symbol Rate
FEC Decorder
F-type, IEC 169-24, Female
950 MHz to 2150 MHz
75Ω unbalanced
-25 to -65dBm
480 MHz
36 MHz
Vertical : +13.5V
Horizontal : +18V
Current : 500mA Max. Overload Protection
Frequency : 22 ± 4KHz
Amplitude : 0.6 ± 0.2V
Version 1.0
QPSK
2-31 Ms/s
Convolutional Code Rate 1/2, 2/3, 3/4, 5/6 and 7/8
with Constraint Length K=7
MPEG Transport Stream A/V Decoding
Transport Stream
Profile Level
Input Rate
Aspect Ratio
Video Resolution
Audio Decoding
Audio Mode
Sampling
MPEG-2 ISO/IEC 13818
Transport stream specification
MPEG-2 MP@ML
60 Mbit/s Max
4:3, 16:9
720 x 576
MPEG/MusiCam Layer I & II
Single channel / Dual channel / Joint stereo / Stereo
32, 44.1 and 48KHz
Memory
Main Processor
Flash Memory
Graphic(MPEG) &
System DRAM
35
TMIPS R3930(81MHz)
3Mbyte
4Mbyte
A/V & Data In/Out
VIDEO
AUDIO R/L
RS-232C
S-VIDEO
RCA/Cinch
RCA/Cinch Volume and Mute Control
(Resolution : 20 bits DAC, Max. 2 Vrms)
Transfer rate 115,200 bps, 9pin D-sub Type
Y-C separated Video output for High Quality
RF-Modulator
RF-Connector
Frequency
Output Channel
TV Standard
Preset Channel
75Ω, IEC 169-2, Male / Female
61.25 MHz, 67.25 MHz
CH3, 4 for the Remodulator
NTSC-M
CH3. Software changeable by Menu.
Power Supply
Input Voltage
Type
Power Consumption
Standby Power
Protection
100 - 250V AC, 50/60 Hz
SMPS
Max. 30W
≤ 8W
Separate internal fuse. The input shall have lightening Protection
Physical Specification
Size (W x H x D)
Weight (Net)
Operating Temp
Storage Temp
Storage Humidity
260 x 50 x 180 mm
Around 1.3 kg
0°C to + 45°C
-10°C to + 70°C
5% ~ 95% RH (Non-Condensing)
• Please note : The specification of the STB may be changed without notice in
advance.
36
HTCR3510.700
• Do not attempt to service the product yourself. Refer all servicing to qualified service personnel.
Unplug the unit from the wall outlet and refer servicing to qualified service personnel under the
following conditions:
- when the power-supply cord or plug is damaged
- if liquid has been spilled on the unit or if objects have fallen into the unit
- if the product has been exposed to rain or water
- if the product does not operate normally by following the operating instructions
- if the product has been dropped or the cabinet has been damaged
- when the product exhibits a distinct change in performance
• If you make adjustments yourself, adjust only those controls that are covered by the operating
instructions. Adjusting other controls may result in damage and will often require extensive
work by a qualified technician to restore the product to normal.
• When replacement parts are required, be sure the service technician uses replacement parts
specified by the manufacturer or those that have the same characteristics as the original part.
Unauthorized substitutions may result in additional damage to the unit.
• Upon completetion of any service or repairs to this product, ask the service technician to
perform safety checks to determine that the product is in a safe operating condition.
• CATV system installation : this reminder is provided to call the CATV system installer’s attention
to article 820-40 of the nec that provides guidelines for proper grounding and in particular,
specifies that the cable ground shall be connected to the grounding system of the building,
as close to the point of cable entry as practical.
4