1
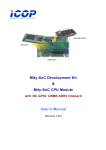
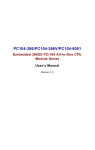
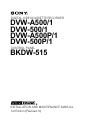
DIGITAL VIDEOCASSETTE RECORDER
DVW-A500/1
DVW-500/1
DVW-A500P/1
DVW-500P/1
BKDW-515
CONTROL PANEL
INSTALLATION AND MAINTENANCE MANUAL
1st Edition (Revised 3)
! WARNING
This manual is intended for qualified service personnel only.
To reduce the risk of electric shock, fire or injury, do not perform any servicing other than that
contained in the operating instructions unless you are qualified to do so. Refer all servicing to
qualified service personnel.
! WARNUNG
Die Anleitung ist nur für qualifiziertes Fachpersonal bestimmt.
Alle Wartungsarbeiten dürfen nur von qualifiziertem Fachpersonal ausgeführt werden. Um die
Gefahr eines elektrischen Schlages, Feuergefahr und Verletzungen zu vermeiden, sind bei
Wartungsarbeiten strikt die Angaben in der Anleitung zu befolgen. Andere als die angegeben
Wartungsarbeiten dürfen nur von Personen ausgeführt werden, die eine spezielle Befähigung
dazu besitzen.
! AVERTISSEMENT
Ce manual est destiné uniquement aux personnes compétentes en charge de l’entretien. Afin
de réduire les risques de décharge électrique, d’incendie ou de blessure n’effectuer que les
réparations indiquées dans le mode d’emploi à moins d’être qualifié pour en effectuer d’autres.
Pour toute réparation faire appel à une personne compétente uniquement.
DVW-A500/1
DVW-500/1
DVW-A500P/1
DVW-500P/1
BKDW-515
Serial
Serial
Serial
Serial
Serial
No.
No.
No.
No.
No.
50001
50001
50001
50001
10001
and
and
and
and
and
Higher
Higher
Higher
Higher
Higher
BKDW-515
Voor de klanten in Nederland
CAUTION
Danger of explosion if battery is incorrectly
replaced.
Replace only with the same or equivalent type
recommended by the manufacturer.
Dispose of used batteries according to the
manufacturer's instructions.
Dit apparaat bevat een (CF)n-Li batterij voor memory
back-up.
Raadpleeg uw leverancier over de verwijdering van de
batterij op het moment dat u het apparaat bij einde
levensduur afdankt.
Gooi de batterij niet weg. maar lever hem in als KCA.
Vorsicht!
Explosionsgefahr bei unsachgemäßem
Austausch der Batterie.
Ersatz nur durch denselben oder einen vom
Hersteller empfohlenen ähnlichen Typ.
Entsorgung gebrauchter Batterien nach Angaben
des Herstellers.
ATTENTION
Il y a danger d'explosion s'il y a remplacement
incorrect de la batterie.
Remplacer uniquement avec une batterie du
même type ou d'un type équivalent recommandé
par le constructeur.
Mettre au rebut les batteries usagées
conformément aux instructions du fabricant.
ADVARSEL!
Lithiumbatteri-Eksplosionsfare ved fejlagtig
håndtering.
Udskiftning må kun ske med batteri
af samme fabrikat og type.
Levér det brugte batteri tilbage til leverandøren.
BKDW-515
Bij dit produkt zijn batterijen geleverd.
Wanneer deze leeg zijn, moet u ze niet
weggooien maar inleveren als KCA.
Table of Contents
Manual Structure
Purpose of this manual .............................................................................................. 3
Contents ..................................................................................................................... 3
Relative manuals ....................................................................................................... 4
1. Installation
1-1.
1-2.
1-3.
1-4.
1-5.
1-6.
1-7.
1-8.
Installation of Control Panel ....................................................................... 1-1
SYS1, SYS2 ROM Versions ....................................................................... 1-2
Removal of Control Panel / Replacement of Arms ..................................... 1-2
Installation of Sub Panel Cover and Switch Cover ..................................... 1-3
Installation of Control Panel ....................................................................... 1-3
Installation Space ........................................................................................ 1-4
Full Reset of Control Panel ......................................................................... 1-5
Extension of Control Panel ......................................................................... 1-5
2. Service Information
2-1.
2-2.
2-3.
2-4.
Location and Function of Printed Circuit Boards ....................................... 2-1
Replacing the Battery for Memory Backup ................................................ 2-2
EL Panel Replacement ................................................................................ 2-3
Error Message ............................................................................................. 2-4
2-4-1. Operation when Checksum Error
of Current Setup Data Occurs .................................................... 2-4
2-4-2. Correction when Checksum Error
of VTR Bank Data Occurs ......................................................... 2-4
2-4-3. Correction when Checksum Error
of Memory Card Data Occurs .................................................... 2-4
3. Setup Menu
3-1.
BKDW-515
ITEM-F Series ............................................................................................. 3-1
1
4. Maintenance Menu
4-1.
4-2.
4-3.
4-4.
ROM Version .............................................................................................. 4-1
VTR Maintenance Menu ............................................................................. 4-1
Panel Maintenance Menu ............................................................................ 4-2
4-3-1. Card Interface Test ..................................................................... 4-2
4-3-2. Buzzer Test ................................................................................. 4-2
4-3-3. EL Panel Test ............................................................................. 4-3
4-3-4. Key Test ..................................................................................... 4-3
4-3-5. Dial Test ..................................................................................... 4-3
Error Logger ................................................................................................ 4-4
5. Block Diagram
6. Spare Parts
6-1.
6-2.
6-3.
6-4.
6-5
2
Notes on Repair Parts .................................................................................. 6-1
Spare Parts List for VTR ............................................................................. 6-2
Packing Materials and Supplied Accessories List for VTR ........................ 6-3
Spare Parts List for Control Panel ............................................................... 6-4
Packing Materials and Supplied Accessories List for BKDW-515 ............ 6-6
BKDW-515
Manual Structure
Purpose of this manual
This Manual describes the installation instructions for the digital videocassette
recorder DVW-A500/1, 500/1, A500P/1, 500P/1 and the Control panel BKDW-515.
This manual contains the information necessary when supplying and installing the
unit, assuming use by system/service engineers.
Contents
The sections covered in the manual are summarized below to give you a general
under standing of the manual.
Section 1 Installation
Explains the installation of the control panel.
Section 2 Service Overview
Explains replacement of the memory backup battery and EL panel.
Section 3 Setup Menu
Explains Setup menu of ITEM-F series only. As for ITEM-H00 to ITEM-900 series,
refer to Operation Manual.
Section 4 Maintenance Menu
Explains VTR Maintenance Menu and PANEL Maintenance menu.
Section 5 Block Diagram
Describes the overall block diagram.
Section 6 Spare parts
Describes the exploded views for the this unit, mounted boards list, packing list, and
standard accessories list.
BKDW-515
3
Relative manuals
Besides this “Installation and Maintenance Manual”, the following manuals are
available.
• Operation Manual (Supplied with the VTR or the BKDW-515)
This manual is necessary for application and operation of the VTR.
• Installation Manual (Supplied with the VTR)
This manual describes the items are required to install the VTR and its peripherals.
If the BKDW-514 control panel is used, refer to this manual.
• Maintenance Manual Part 1 (Supplied with the VTR)
This manual describes the periodic maintenance and servicing information
necessary for the principal block and board replacement.
• Maintenance Manual Part 2 (available on request)
These manuals describes detailed information necessary for general parts replacement and includes alignments, schematic diagrams, board layouts, detailed parts
list, etc.
Please contact the Sony service organization to obtain a copy of the manuals.
• Protocol Manual (available on request)
PROTOCOL OF REMOTE-1 (9Pin) CONNECTOR
This Manual describes the protocol information necessary for controlling the VTR
via RS-422A (9-pin serial remote).
4
BKDW-515
Section 1
Installation
n
The BKDW-515 cannot be installed in the BKDW-511
Control Panel Case.
for DVW-A500/1, DVW500/1,
DVW-A500P/1, DVW-500P/1
1-1. Installation of Control Panel
1. Fix a dummy panel for shipping use at 90 degrees.
2. Loosen the two black screws on the dummy panel.
(Loosen the screws until screw’s top are exposed from
the surface of the dummy panel.)
3. While pushing the loosened black screws in the
direction of the arrow, remove the dummy panel
assembly from the arms.
4. Fix the both arms at 45 degrees.
5. Connect the harness of the control panel to the connector (CN580) on the system set-up panel.
6. Set the notches of the control panel to the claws of the
arms, and push the control panel until making a click
sound.
n
Push the head of the two screws when the hook does
not move smoothly and when the panel is difficult to
attach. This facilitates the attaching.
7. Then tighten the two screws.
Dummy panel
Screw
(B3x12)
Claws
Notches
CN580
Claws
Control panel
Notches
Screw
(B3x12)
Screw(B3x12)
BKDW-515
1-1
1-2. SYS1, SYS2 ROM Versions
1-3. Removal of Control Panel / Replacement of Arms
for DVW-A500, DVW500,
DVW-A500P, DVW-500P
4. While pushing the loosened black screws in the
direction of the arrow, remove the lower control panel
assembly from the arms.
1-2. SYS1, SYS2 ROM Versions
The control panel BKDW-515 is applicable to the ROMs
on the SS-52 board with the following version.
SYS1: 4.0 and higher
SYS2: 4.0 and higher
If the ROMs with lower version than above are used,
please contact Sony’s service organization.
Make sure the ROM’s version through the maintenance
mode before replacement of the control panel.
Lower control panel
Screw(B3x12)
1-3. Removal of Control Panel /
Replacement of Arms
1. Fix a lower control panel at 90 degrees.
2. Disconnect the connector (CN580) in the system setup panel.
3. Loosen the two black screws on the lower control
panel. (Loosen the screws until screw’s top are
exposed from the surface of the lower control panel.)
Screw(B3x12)
5. Remove the screws as shown in Figure, and remove
both side arms.
Lower control panel
Screws
(B3x6)
Screw
(B3x6)
Arm
6. Install the arms supplied with BKDW-515.
SLIDER AD (R) ASSY: X-3678-375SLIDER AD (L) ASSY: X-3678-376-
CN580
System setup
panel.
Screw(B3x12)
Screws
(B3x6)
Screw
(B3x6)
Arm
1-2
BKDW-515
1-4. Installation of Sub Panel Cover and Switch Cover
1-5. Installation of Control Panel
1-4. Installation of Sub Panel Cover and
Switch Cover
1. Install the sub panel cover supplied with BKDW-515
to sub control panel.
1-5. Installation of Control Panel
1. Fix the both arms at 45 degrees.
2. Connect the harness of the control panel to the connector (CN580) on the system set-up panel.
3. Set the notches of the control panel to the claws of the
arms, and push the control panel until making a click
sound.
n
Push the head of the two screws when the hook does
not move smoothly and when the panel is difficult to
attach. This facilitates the attaching.
4. Then tighten the two screws.
Screw
(BVTT3x6)
Sub panel cover
Claws
Notches
Screw
(BVTT3x6)
CN580
2. Install the switch cover supplied with BKDW-515 to
system set-up panel.
Claws
Control panel
Notches
Screw
(B3x12)
Screw
(BVTT3x6)
Switch cover
Screw
(BVTT3x6)
BKDW-515
1-3
1-6. Installation Space
1-6. Installation Space
Notes on Installation on Cart Machine
. When the digital Betacam recorder is to be mounted on
the LMS, you can install not the control panel BKDW515 but the BKDW-514 to the recorder.
. When the digital Betacam recorder is to be mounted on
the FLEXICART, you can install both of BKDW-514/
515 to the recorder.
As for how to mount the unit in a rack, refer to the Installation Manual supplied with the DVW series.
DVW-A500/1
500/1
A500P/1
500P/1
434
427
553
166.5
112.5
457.5
568.5
11.5
31.5
364
427
18.3
19
218
33
BKDW-515
23.3
1-4
46.2
22
26.5
45.5
51.7
16.3
177.6
9.6
80.4
424
93.4
118.5
377.4
BKDW-515
1-7. Full Reset of Control Panel
1-8. Extension of Control Panel
1-7. Full Reset of Control Panel
1-8. Extension of Control Panel
After installing the control panel in DVW-A500 and
DVW-500 (DVW-A500P and DVW-500P for PAL),
perform the full-reset operation of the control panel only
once before it is used.
To extend the BKDW-515, prepare the following BKDW510 (Control Panel Extension Kit), AC adapter and the
connector box.
m
. When the full-reset operation of the control panel is
performed, all settings of the current setup data and VTR
bank (1-8) stored on the control panel are reset to the
factory-setting value. The registration data in a PF1/2
menu is then reset to the key layout at the factory
corresponding to the VTR in which the control panel
was installed. Cue point data is also cleared.
. During installation of the control panel, the set value of
the current setup data and VTR bank can also be delivered directly. In this case, do not perform the full-reset
operation. However, if the function and option of the
VTR in which the control panel was installed differ
before and after installation, the key in a PF1/2 menu
that does not function by the VTR after installation is
deleted automatically. For the key in a PF1/2 menu that
has been deleted because it does not function by the
VTR before installation, assign it manually by the VTR
after installation as required.
Parts Required
. 10m Extension Cable (BKDW-510)
. AC Adapter
Sony Part No.: 1-473-822-11
. Connector Box
Sony Part No.: A-8277-618-A
n
The control panel BKDW-515 can not be installed to the
control panel case BKDW-511 (sold separately).
Connection
. AC100V and AC200V acceptable for AC adapter
. There is power switch on the connector box.
1. Connect the connector of the BKDW-515 to connector
of the connector box.
2. Connect the connector of an AC adapter to connector
CN3 of the connector box.
AC100/200V
1. Turn off the power switch.
2. Turn on the power switch while pressing and holding
the [SFT], [RCL], and [SETUP] keys on the control
panel. Maintain the state in which these keys were
pressed.
3. Release the three keys after confirming that message
“CONTROL PANEL FULL RESET” is displayed on
the EL panel.
BKDW-515
DC9V
10m Cable
AC Adaptor
to DVW-500/1
Rear panel
CN3 CN4
Power
switch
Connector box
BKDW-515
1-5
1-8. Extension of Control Panel
Notes when connecting the two BKDW-515
. Setup Setting Data
The Current Setup setting data inside of the BKDW-515
is transferred to the VTR just after the communication
between the BKDW-515 and VTR are established. The
ALARM LED on the front panel blinks during the data
communication is incomplete.
When the two BKDW-515 are connected to a single
VTR, last setting data out of two is written over the
former data as the effective setting data.
If the two BKDW-515 with different data setting are
connected to a single VTR, and if the power is turned to
ON simultaneously, un-defined setting data will be sent
to the VTR. Therefore, first, connect either BKDW-515
to a single VTR for storing the Current Setup setting data
in bank memory of VTR or in the memory card beforehand. After that, connect the two BKDW-515 to a single
VTR, turn on the power of both BKDW-515, then copy
the memorized data into Current Setup. The Current
Setup setting data among the two BKDW-515 and VTR
will be automatically renewed to keep the contents of
data identical.
. VTR Control
Control of VTR is set by an INT/EXT selection of the
System Setup Panel and ITEM 117 “CONTROL PANEL SELECTION” of the setup menu.
Notes when connection the BKDW-514 and
BKDW-515 (Extender)
When connecting the BKDW-514 and BKDW-515
(Extender) to VTR, be sure to turn on the power of
BKDW-515 first. If the power of BKDW-515 is in off,
start up a menu system (SETUP MENU BANK 1/2/3/4:
BANK 4 is effective from SYS-V3.01 and later) of DVW500 series, therefore the contents set with BKDW-515 can
not be used. If MENU lamps 1, 2, and 3 on the indicator
section of VTR’s upper control panel are off, the contents
set with BKDW-515 can be used.
Pay attention when pressing the MENU button without
pressing the SET button after renewing the Setup setting
data with BKDW-514, because renewed data will be
validated if both BKDW-514 and BKDW-515 have been
connected regardless of SET button. However, renewed
data will be invalidated if the only BKDW-514 has been
connected.
1-6
BKDW-515
Section 2
Service Information
2-1. Location and Function of Printed Circuit Boards
Board Name
Circuit Function
CP-266
Panel Control CPU, EL Control, PIO, Memory Card I/F
KY-330
Editing Operation/Tape Transport Control Switches, Memory Card Connector
SW-749
Function Control Switches
PTC-69
JOG/Shuttle Dial Sensor
SW-749
KY-330
CP-266
PTC-69
BKDW-515
2-1
2-2. Replacing the Battery for Memory Backup
2-2. Replacing the Battery for Memory Backup
BT1 inserted into a socket in IC113 (memory for storing
setup data and cue data) on the CP-266 board is a battery
for memory backup.
4. Insert the tip of a flatbladed screwdriver between
IC113 and BT1 to remove BT1.
Mark
m
. Replace a battery for memory backup every seven years.
. Store all the setup data (cue data if necessary) in a
memory card before replacing the Battery for memory
backup. (For more details on storage, refer to the Operation Manual.)
1. Turn off the power switch.
2. Disconnect the connector CN580 on the system setup
panel and remove the control panel.
3. Remove the four screws, then remove the cover.
BT1
Mark
IC113
CP-266
Flatbladed screwdriver
Screws
(BVTT3x6)
5. Align a new battery for memory backup with the 1-pin
mark of IC113, then insert.
6. Assemble the control panel and install it in the unit.
7. Access the data in a memory card.
Cover
Screw
(BVTT3x6)
Screw
(BVTT3x6)
. BT1 : 1-767-156-11 M4T28-BR12SH1 (lithium battery)
IC113
2-2
BKDW-515
2-3. EL Panel Replacement
2-3. EL Panel Replacement
5. Disconnect connector CN7 on the CP-266 board and
remove the four screws, then remove the EL panel.
1. Turn off the power switch.
2. Disconnect CN580 on the system setup panel and
remove the control panel.
3. Remove the four screws, then remove the cover.
4. Remove the seven screws and disconnect connector
CN1 on the SW-749 board with the frame lifted from
the key panel sub-ass’y.
Screws
(PSW3x10)
EL panel
Screws
(PSW3x10)
Screws(BVTT3x6)
Cover
Screw
(BVTT3x6)
Screw
(BVTT3x6)
CN7
CP266
CN1
Screw
(BVTT3x6)
Screws
(BVTT3x6)
6. Confirm that no dust adheres on the panel and install
in the reverse order of steps 1 to 5.
SW-749
Screws
(BVTT3x6)
BKDW-515
2-3
2-4. Error Message
2-4. Error Message
2-4-1. Operation when Checksum Error of
Current Setup Data Occurs
If the power switch is turned on when the current setup
data on the control panel was destroyed for some trouble,
message “CURRENT setup DATA ERROR” is displayed
on the EL panel. The current setup data is automatically
reset to the factory-setting value at the same time.
2-4-2. Correction when Checksum Error of
VTR Bank Data Occurs
If the power switch is turned on when the VTR bank data
on the control panel was destroyed for some trouble,
message “VTR bank CHECKSUM ERROR” is displayed
on the EL panel. Confirm the type of the bank data to have
been destroyed in a VTR BANK menu or MEMORY
CARD menu and copy normal bank data. The title of the
destroyed bank data is displayed as “DAMAGED.”
2-4-3. Correction when Checksum Error of
Memory Card Data Occurs
If the memory card is inserted into the slot on the control
panel when the data of a memory card was destroyed for
some trouble, message “Data DAMAGED” is displayed on
the EL panel. Confirm the destroyed bank data or cue set
data and copy normal data. The title of the destroyed data
is displayed as “DAMAGED” (for only WRITE PROTECT OFF in a memory card).
2-4
BKDW-515
Section 3
Setup Menu
This section describes the menu ITEM-F series used during adjustment. For the operation and ITEM-H00
to ITEM-900 series, refer to the Operation Manual.
3-1.
ITEM-F Series
Display the ITEM-F series according to the procedure below.
1. Press the SETUP key to enter the setup menu.
2. Press the F6 (VTR SETUP) key to enter the VTR SETUP menu.
3. Press the cursor key while pressing the PLAY button.
Item selection
Press the cursor key while pressing the PLAY button and adjust the cursor on the scroll screen to the
arbitrary item.
Data change
Press the F7 (CHANGE DATA) key to open the set change screen and select the data.
Data setting
Press the F10 (SAVE/EXIT) key.
n
These ITEM-F series are exclusively used for adjustment. After adjustment is completed, return data to
the factory setting.
ITEM
DATA
Description
No.
ITEM
No.
DATA
F01
AUDIO NR IN
SP MODE
0
1
on
switch select
This item is prepared exclusively for audio adjustment. After adjustment is
completed, return to the factory setting ‘0 (on)’.
Select the type of control to turn Dolby noise reduction ON in the metal tape
playback.
0: Dolby NR is normally ON when mental tape is used.
1: Dolby NR is switched ON and OFF depending upon the DOLBY NR switch
setting on the sub control panel.
(NOTE)
When oxide tape is used, it is controlled depending upon the DOLBY NR switch
setting on the sub control panel, regardless of the setting of this menu item.
F02
EMERGENCY
TAPE
PROTECTION
0
1
enable
disable
This item is prepared exclusively for servo and mechanical adjustments. After
adjustment is completed, return to the factory setting ‘0 (enable)’.
Select whether the emergency tape protection operation is enabled or not when
VTR detects error in tape transport mechanism.
0: Tape protection operation is enabled.
1: Tape protection operation is disabled.
F07
CONFI SELECT
IN PB MODE
0
1
disable
enable
Selects the playback by the confidence head enable or disable in the normal PB
mode of the digital mode.
0: Disables the playback by the confidence head in the normal PB mode.
1: Enables the playback by the confidence head when the CONFI mode is
entered (the CONFI lamp on the lower control panel lights) in the normal PB
mode.
BKDW-515
3-1
3-1. ITEM-F Series
ITEM
DATA
Description
No.
ITEM
No.
DATA
F13
TRACKING
CONTROL VIA
SEARCH DIAL
0
1
off
on
Select whether the tracking control operation with search dial is enabled or not
during DT head playback.
This item is prepared exclusively for DT adjustment and tracking adjustments.
After adjustment is completed, return to the factory setting ‘0 (off)’.
0: Tracking control function is disabled during DT head playback.
1: Tracking control function is enabled by rotating the search dial during PLAY
mode.
F15
ANALOG TAPE
LTC INSERT
0
1
disable
enable
Enables LTC to be inserted in an analog tape (Betacam SP)
0: Inhibits insertion of LTC in an analog tape (factory setting)
1: Enables LTC to be inserted in an analog tape
Note:
When set to “enable”, TC insert operation is executed even though the REC inhibit
tab of an analog tape used is set to REC INHIBIT.
F16
3-2
DEVICE TYPE
MODIFY:0H
0000
0001
|
FFFF
0
1
|
FFFF
Determines the response data for the 9 pin remote command
DEVICE TYPE REQUEST (00h, 11h).
0000: Returns the original device type data of the DVW.
Except 0000: Returns the values numeric as it is.
The higher-order two digits are DATA-1.
The lower-order two digits are DATA-2.
Note:
The whole operations of the VTR including TTP is not influenced at all even if this
item is set to “0000” or “except 0000”.
For except DATA: 0000 (factory setting), the control from 9 pin is not guaranteed.
BKDW-515
3-1. ITEM-F Series
ITEM
DATA
Description
No.
ITEM
No.
DATA
F20
CONFI LED
STATUS
0
1
switch
status
The condition to light CONFI LED on the control panel is selected.
0: CONFI LED lights on when CONFI switch is set to ON.
1: CONFI LED lights on when playing back with CONFI head. Note that CONFI
LED indicates the switch status only during the CONFI switch is pressed.
0
1
off
on
In case that LOCAL DISABLE command is effective via the 9pin REMOTE, or “all
disable” is selected in Setup 006: LOCAL FUNCTION ENABLE, the availability of
PROCESS CONT VR on the subcontrol panel is selected.
0: Process control is invalid.
1: Process control is active.
0
1
2
off
momentary
toggle
The unit directly goes into digital audio edit mode from playback mode by AUDIO
EDIT PRESET key.
0: Does not go into Edit mode by AUDIO EDIT PRESET key.
1: Audio editing is available while AUDIO EDIT PRESET key is pressed.
2: Audio editing is available when AUDIO EDIT PRESET key is pressed once.
When pressing once more, it returns to PLAY mode.
0
1
off
on
Audio/Video Input Select switch can be invalid during REC mode.
0: Audio/Video Input Select switch is active in REC mode.
1: Audio/Video Input Select switch is invalid in REC mode.
If Item-21 is set to ON, Audio/Video Input Select switch is active even if “1” (on) is
selected in this menu.
F24
MAXIMUM
(PAL) DIGITAL TAPE
SPEED
. CP ROM
version 1.10
and higher
0
1
2
3
x50
x42
x42/x24
x24
Maximum speed of digital tape is limited in search mode.
0: 50 times speed in FF, REW, and SHUTTLE mode
1: 42 times speed in FF, REW, and SHUTTLE mode
2: 42 times speed in FF and REW mode, and 24 times speed in SHUTTLE mode
3: 24 times speed in FF, REW, and SHUTTLE mode
F24
MAXIMUM
(NTSC) DIGITAL TAPE
SPEED
. CP ROM
version 1.10
and higher
0
1
2
3
x50
x35
x35/x24
x24
Maximum speed of digital tape is limited in search mode.
0: 50 times speed in FF, REW, and SHUTTLE mode
1: 35 times speed in FF, REW, and SHUTTLE mode
2: 35 times speed in FF and REW mode, and 24 times speed in SHUTTLE mode
3: 24 times speed in FF, REW, and SHUTTLE mode
F25
SERVO/AV REF
SEL IN PREREAD MODE
. CP ROM
version 1.10
and higher
0
1
off
on
Servo Reference in PREREAD mode is specified.
0: It works according to the setting of Item-309.
1: EXT REF VIDEO is selected.
F26
DIGITAL AUDIO
MUTE IN
SEARCH MODE
. CP ROM
version 1.10
and higher
0
1
off
on
The condition for MUTE of Digital Audio when playing back in Search mode is
selected.
0: It works according to the setting of Item-802.
1: Mute is applicable in the modes except PLAY and EE.
. CP ROM
version 1.10
and higher
F21
PROCESS
CONT VR
LOCAL
ENABLE
. CP ROM
version 1.10
and higher
F22
AUDIO ONLY
REC
. CP ROM
version 1.10
and higher
F23
A/V INPUT
SELECT
INHIBIT
. CP ROM
version 1.10
and higher
BKDW-515
3-3
Section 4
Maintenance Menu
The self-diagnosis and adjustment of the VTR and control
panel can be performed in this maintenance menu.
To enter the maintenance mode
Press the MAINTENANCE button while pressing the SFT
key.
To terminate the maintenance mode
Press the HOME key.
The following descriptions are key operations in the state
when the unit is put into the maintenance mode.
4-1. ROM Version
The versions of all ROMs are displayed. Available options
are displayed.
To display the version of ROMs
Press the F1 (ROM VER) key.
For more details of the ROM version display, refer to Part 1,
“Maintenance Mode” of the DVW-A500 Series Maintenance Manual.
4-2. VTR Maintenance Menu
The self-diagnosis and adjustment of the VTR can be
performed in this VTR maintenance menu.
When starting the VTR maintenance menu directly from
the control panel, be sure to set the switch S100-7 on the
SS board to ON.
To enter the VTR maintenance menu
Press the F6 (VTR MAINT) key.
To terminate the VTR maintenance menu
Press the F10 (EXIT) key.
For more details of the VTR maintenance menu, refer to
Part 1, “Maintenance Mode” of the DVW-A500 Series
Maintenance Manual.
n
In Part 1, “Maintenance Mode” of the DVW-A500 Series
Maintenance Manual, change the following during use.
[SET button] 8 [F8 (SELECT) key]
[MENU button] 8 [F10 (EXIT) key]
n
In Part 1, “Maintenance Mode” of the DVW-A500 Series
Maintenance Manual, change the following during use.
[KY] 8 [CP]
BKDW-515
4-1
4-3. Panel Maintenance Menu
4-3. Panel Maintenance Menu
4-3-1. Card Interface Test
The self-diagnosis of the control panel can be performed in
this panel maintenance menu.
A storage/access test for the memory card is executed.
n
Do not use the memory card in which necessary data is
stored. The data is erased.
A card can be extracted or inserted even if the power is
turned on.
To enter the panel maintenance menu
Press the F7 (PANEL MAINT) key.
To terminate the panel maintenance menu
Press the F10 (EXIT) key.
Key
Display
Description
F3
CARD I/F
Memory card interface test
F5
BUZZER
Buzzer test
F6
EL
EL panel test
F7
KEY
Rubber key, switch, and LED tests
F8
DIAL
Dial test
F10
EXIT
Returns to the maintenance menu.
1. Insert a memory card.
2. Press the F3 key.
A warning message is displayed at that time.
3. Press the F3 key while pressing the SFT key.
A storage/access test is then executed.
4. If the test is normal, message “CARD I/F test
PASSED.” is displayed. If message “CARD I/F test
FAILED.” is displayed, the card interface or card is
defective.
4-3-2. Buzzer Test
A buzzer test is executed. The setting changes to high, low,
then high every time the F5 key is pressed. The sound in
the displayed level is then generated.
4-2
BKDW-515
4-3. Panel Maintenance Menu
4-3-3. EL Panel Test
4-3-5. Dial Test
An EL panel test is executed.
The screen displayed on the EL panel appears while the F6
key is pressed.
The displays changes every time the F6 key is pressed.
ALL ON : All light.
ALL OFF : All go off.
V BAR : Displays the test pattern in a vertical line.
H BAR : Displays the test pattern in a horizontal line.
Interface test between search dial and dial interface is
executed.
4-3-4. Key Test
Rubber key, illumination switch, illumination switch LED,
and other LED tests are executed.
1. Press the F7 key to enter the menu.
2. Press each key sequentially according to the display on
the EL panel.
3. Confirm that the buzzer sounds when the key is
pressed.
Confirm that the switch lights and the buzzer sounds
when the illumination key is pressed.
4. Message “Key TEST passed.” is lastly displayed on
the EL panel. The test is completed at that time.
If abnormality occurs in the key during operation, no
sound is generated when the key was pressed. The test
can be executed no longer.
To terminate the test halfway, press the SHIFT and
CLR keys simultaneously.
1. Press the F8 key to enter the menu.
2. Confirm the display on the EL panel as follows:
Dial data
: The numeral changes when the dial is
turned. “2Ah” is displayed when the
dial is fully turned to right and left.
“0h” is displayed when the dial is in
the center position.
Dial direction : The arrow changes when the dial is
turned. “8” is displayed when the
dial is on the right of the center click
position. “7” is displayed when the
dial is on the left of the center click
position.
JOG/SHUTTLE
sensor
: JOG is displayed when the dial is
pressed. SHUTTLE is displayed
when the dial is released.
Dial mode
sensor
: Fix the panel to the 90-degree
position, loosen the screw shown in
the figure at the back of the dial, and
move the mode selection plate. The
current display then changes to
BETACAM/D-2.
Lower control panel
A portion
Search dial
Mode selection plate
B3x14
BKDW-515
4-3
4-4. Error Logger
4-4. Error Logger
After the power switch is turned on, the error logger
function always monitors the unit to detect the errors.
When any one of the conditions mentioned as follows, the
corresponding message and time code are stored.
This menu can be read and checked the contents of these
data items in list form.
. CH COND RED (Channel Condition Red)
When the red CANNEL CONDITION lamp on the
upper control panel lights
. REF ALARM (Reference Alarm)
When a reference signal is missing (no signal is input to
the INPUT REF VIDEO connector) or a REF video
input signal is not synchronized with the input video
signal
. TAPE EJECT
When the cassette tape is ejected
(If no error is occurred from when the cassette tape was
ejected last time until it is ejected this time, the preceding time code is overwritten by this time code.)
. ERROR-xx
When a trouble is detected
(The corresponding error code is recorded.)
To enter the error logger menu
Press the F9 (ERROR LOG) key.
To terminate the error logger menu
Press the F10 (EXIT) key.
Error Logger Screen
The error logger data is superimposed on the monitor
screen (output to the VIDEO OUTPUT COMPOSITE 3
connector or SERIAL V/A OUTPUT 4 connector).
A maximum of 99 error data items can be stored. To
display the error data items that are not displayed on the
screen, turn the search dial to scroll them. When 99 data
items are exceeded, the old data is erased and the data
sequence is advanced.
Tape Operation during Error Logger Screen
Display
1. The state of the error logger screen displayed, press F9
(VTR HOLD) key to VTR HOLD OFF.
2. At this time, to display a block sign on the monitor
screen. This enables the tape operation.
3. To erase the block sign, press the F9 (VTR HOLD)
key and turn on the VTR HOLD.
Error Logger Data Erasure
To erase the error logger data, press the F5 (CLEAR LOG)
key in the error logger screen display.
4-4
BKDW-515
BKDW-515
SWC-19
CN580
For FACTORY USE
CN6
CN5
POWER ON
RESET
IC3
DC-DC
CONVERTER
IC2
IC102
+5V
+12V
+8V
LED,DIAL
KEY ADDRESS
DC-DC
CONVERTER
IC1
+8V IN
RS-422
RS-232C
DRAM
4Mbit
IC208
SH7032
CPU
CN7
+12V
+5V
EL
I/F
LJ32H028
EL DISPLAY
320 x 240dot
IC115
32MHz
S101
16MHz
RESET SW
VIDEO RAM
CONTROLLER
IC207
POWER ON
RESET
IC105
IC103
32MHz
SW-749
KEY SW x 44
( 6 x 8 SCAN )
LED x 1
CN1
CN3
CPU BUS
CN2
MEMORY
CARD
64KBytes
CN3
CN4
MEMORY
CARD
I/F
PIO
IC113
SOLENOID
DRIVER
IC213
IC210
KY- 330
CN2
TACTILE SW x 16
( 6 x 3 SCAN )
LED x 23
CN1
PIO
SRAM
1Mbit X4
IC109,110
111,112
IC209
CPU BUS
FLASH ROM
4Mbit
IC114
IC201-205,220
32MHz
ADVANCED
CRT
CONTROLLER
IC206
x8
X1/2
IC104
X1
Buzzer
BZ1
BKDW-515 OVERALL
PIO
BATTERY
IC116
JOG DIAL
SENSORS
JOG
DIAL
PTC-69
IC1-5
CN1
DIAL DATA
DECODER
IC212
IC211
SRAM
64Kbit
CP-266
OVERALL
Section 5
Block Diagram
Overall
OVERALL
BKDW-515
5-1
Section 6
Spare Parts
6-1. Notes on Repair Parts
1. Safety Related Components Warning
Components marked ! are critical to safe operation.
Therefore, specified parts should be used in the case of
replacement.
2. Standardization of Parts
Some repair parts supplied by Sony differ from those
used for the unit. These are because of parts commonality and improvement.
Parts list has the present standardized repair parts.
3. Stock of Parts
Parts marked with “o” at SP(Supply Code) column of
the spare parts list may be not stocked. Therefore, the
delivery date will be delayed.
4. Parts exclusive to the DVW-A500/1, 500/1,
A500P/1 and 500P/1 are listed in this section.
Refer to the maintenance manual for some
parts that are not listed.
BKDW-515
6-1
DVW-A500/1, 500/1, A500P/1, 500P/1
6-2. Spare Parts List for VTR
B3 x 6
B3 x 6
3
BVTT3 x 6
BVTT3 x 6
5
BVTT3 x 6
BVTT3 x 6
B3 x 6
4
B3 x 6
2
1
Ref. No.
or Q’ty Part No.
1
2
3
4
5
6-2
SP Description
A-8278-252-A
X-3678-375-3
X-3678-376-3
3-689-875-01
3-689-879-02
o
s
s
o
o
PANEL ASSY, DUMMY
SLIDER AD(R)ASSY
SLIDER AD(L)ASSY
COVER,SWC
COVER,SUB PANEL
BKDW-515
DVW-A500/1, 500/1, A500P/1, 500P/1
6-3. Packing Materials and Supplied Accessories List for VTR
For DVW-A500/1, 500/1 (UC)
Ref. No.
or Q’ty Part No.
1pc
1pc
1pc
1pc
1pc
SP Description
1-551-812-11
1-772-749-11
2-990-242-01
3-181-533-02
3-181-534-02
s
s
o
o
o
CORD, POWER 3P
CARD, MEMORY (SRAM 64K)
HOLDER (B), PLUG
CUSHION (LOWER)
CUSHION (UPPER)
1pc
1pc
2pcs
1pc
1pc
3-181-535-01
3-181-536-01
3-189-078-01
3-189-456-01
3-189-457-01
o
o
o
o
o
SPACER (A)
SPACER (B)
CUSHION
PLATE, TOP
SPACER (C)
1pc
3-189-458-01 o INDIVIDUAL CARTON (for DVW-A500/1)
3-189-459-01 o INDIVIDUAL CARTON (for DVW-500/1)
3-701-634-00 o BAG, POLYETHYLENE
(for S/N 50001 thru. 50390:DVW-A500/1(UC))
(for S/N 50001 thru. 50080:DVW-500/1(UC))
7-682-965-01 s SCREW +PSW 4x16
!
1pc
4pcs
For DVW-A500P/1, 500P/1 (UC)
Ref. No.
or Q’ty Part No.
1pc
1pc
1pc
1pc
1pc
SP Description
1-551-812-11
1-772-749-11
2-990-242-01
3-181-533-02
3-181-534-02
s
s
o
o
o
CORD, POWER 3P
CARD, MEMORY (SRAM 64K)
HOLDER (B), PLUG
CUSHION (LOWER)
CUSHION (UPPER)
1pc
1pc
2pcs
1pc
1pc
3-181-535-01
3-181-536-01
3-189-078-01
3-189-456-01
3-189-457-01
o
o
o
o
o
SPACER (A)
SPACER (B)
CUSHION
PLATE, TOP
SPACER (C)
1pc
3-189-460-01
3-189-461-01
3-701-634-00
7-682-965-01
o
o
o
s
INDIVIDUAL CARTON (for DVW-A500P/1)
INDIVIDUAL CARTON (for DVW-500P/1)
BAG, POLYETHYLENE
SCREW +PSW 4x16
!
1pc
4pcs
For DVW-A500P/1, 500P/1 (CE)
Ref. No.
or Q’ty Part No.
1pc
1pc
1pc
1pc
1pc
SP Description
1-782-929-11
1-759-164-11
3-613-640-01
3-181-533-02
3-181-534-02
s
s
o
o
o
CORD, POWER SUPPLY (BS 3P)
CARD, MEMORY (SRAM 64K BYTE)
HOLDER (C), PLUG
CUSHION (LOWER)
CUSHION (UPPER)
1pc
1pc
2pcs
1pc
1pc
3-181-535-01
3-181-536-01
3-189-078-01
3-189-456-01
3-189-457-01
o
o
o
o
o
SPACER (A)
SPACER (B)
CUSHION
PLATE, TOP
SPACER (C)
1pc
3-189-460-01 o INDIVIDUAL CARTON (for DVW-A500P/1)
3-189-461-01 o INDIVIDUAL CARTON (for DVW-500P/1)
3-701-634-00 o BAG, POLYETHYLENE
(for S/N 50001 thru. 50110:DVW-A500/1(CE))
(for S/N 50001 thru. 50080:DVW-500/1(CE))
7-682-965-01 s SCREW +PSW 4x16
!
1pc
4pcs
BKDW-515
6-3
CONTROL PANEL
6-4. Spare Parts List for Control Panel
12
12
BVTT
3x6
BVTT3 x 6
*1
BVTT
3x6
PSW3 x 10
PSW3 x 10
BVTT
3x6
5
W 2.5
SMALL
10
BVTT
3x6
P2 x 8
9
11
W 2.5 SMALL
P2 x 8
24
*3
*1
23
1
*2
14
7
*5
N 2.6
17
13
*4
N 2.6
PTPWH
2.6 x 5
*6
19
22
22
17
17
PTPWH
2.6 x 5
6
PSW3 x 6
18
18
PTPWH
2.6 x 5
2
PSW3 x 6
*6
20
No.
Part No.
N 2.6
SP Description
N 2.6
PS2.6 x 10
*3
1
2
3
5
6
A-8269-119-A
A-8269-121-A
A-8269-123-A
1-810-665-12
3-668-124-00
o
o
o
s
o
MOUNTED CIRCUIT BOARD, SW-749
MOUNTED CIRCUIT BOARD, KY-330
MOUNTED CIRCUIT BOARD, CP-266
DISPLAY, EL
HOLDER, LED
7
8
9
10
11
3-668-919-00
3-689-861-03
3-689-863-02
3-689-864-03
3-689-865-02
s
o
s
s
s
ROLLER, GUIDE, SR
LID,COVER
KEY,TEN
KEY,FUNCTION A
KEY,FUNCTION B
12
13
14
15
17
3-689-866-01
3-689-869-01
3-689-870-02
3-689-871-01
3-692-673-01
o
o
s
o
s
GUARD,REC
PIN,HOLDING
HOLDER
HEAT SINK,TR
WASHER
18
19
20
21
22
3-708-877-01
3-708-895-01
3-708-933-01
4-886-821-11
4-921-411-01
s
s
s
s
o
CAP
CAP
CAP
SCREW, S TIGHT, +PTTWH 3X6
CUSHION
23
24
3-669-465-01 s WASHER(1.5), STOPPER
3-629-493-02 s SHEET, TEN KEY
3
PSW3 x 6
PSW3 x 6
15
*2
PS2.6 x 10
*5
*6
21
*4
8
21
21
BVTT3 x 6
BVTT3 x 6
6-4
BKDW-515
CONTROL PANEL
110
PWH2.6 x 5
109
BVTP3 x 8
BVTP3 x 8
PWH2.6 x 5
101
113
103
115
123
121
E-4.0
123
111
104
117
107
116
108
106
114
105
BVTP3 x 8
122
119
120
118
102
112
BVTP3 x 8
B3 x 14
BKDW-515
No.
Part No.
SP Description
101
102
103
104
105
A-8267-410-D
A-8276-585-A
1-454-606-11
2-124-691-01
2-124-693-02
s
o
s
s
s
DIAL ASSY, SEARCH
MOUNTED CIRCUIT BOARD, PTC-69
SOLENOID, PLUNGER
ROLLER
PLATE
106
107
108
109
110
2-124-695-01
2-143-603-01
2-143-613-01
3-180-632-01
3-180-633-03
o
o
s
o
s
PLATE, CUSHION
ARM, RETURN
SPRING, TORSION
KNOB, DIAL
RUBBER, DIAL KNOB
111
112
113
114
115
3-180-638-01
3-180-639-01
3-180-640-02
3-180-648-01
3-180-649-02
o
o
o
o
o
ARM, JOINT GEAR
PLATE, MODE SELECTION
GEAR, JOINT
PROTECTOR, PTC
LINK, SOLENOID
116
117
118
119
120
3-180-650-03
3-180-651-04
3-180-859-01
3-181-956-01
3-618-225-03
s
o
o
o
s
FG-RING
CAM, SD
HOLDER, SENSOR
SPRING, COMPRESSION
NUT, PLATE
121
122
123
3-645-189-11 s SPRING, TENSION
3-701-441-21 s WASHER, POLY 4mm DIA., 0.50T
3-701-443-21 s WASHER, POLY 5mm DIA., 0.50T
6-5
BKDW-515
6-5. Packing Materials and Supplied Accessories List for BKDW-515
Ref. No.
or Q’ty Part No.
1pc
1pc
1pc
1pc
1pc
1pc
2pcs
1pc
1pc
1pc
2pcs
6pcs
4pcs
6-6
SP Description
X-3678-375-3
X-3678-376-3
1-759-164-11
3-189-075-01
3-189-076-01
3-189-077-01
3-189-078-01
3-189-079-01
3-689-875-01
3-701-616-01
3-701-629-01
7-682-547-09
7-685-871-09
s
s
s
o
o
o
o
o
o
o
o
s
s
SLIDER AD(R)ASSY
SLIDER AD(L)ASSY
CARD, MEMORY (SRAM 64K BYTE)
SPACER (B)
BOX, ACCESSORY
SPACER (A)
CUSHION
INDIVIDUAL CARTON
COVER,SWC
BAG, POLYETHYLENE
BAG, POLYETHYLENE
SCREW +B 3X6
SCREW +BVTT 3x6 (S)
BKDW-515
The material contained in this manual consists of
information that is the property of Sony Corporation and
is intended solely for use by the purchasers of the
equipment described in this manual.
Sony Corporation expressly prohibits the duplication of
any portion of this manual or the use thereof for any
purpose other than the operation or maintenance of the
equipment described in this manual without the express
written permission of Sony Corporation.
Le matériel contenu dans ce manuel consiste en
informations qui sont la propriété de Sony Corporation et
sont destinées exclusivement à l’usage des acquéreurs
de l’équipement décrit dans ce manuel.
Sony Corporation interdit formellement la copie de
quelque partie que ce soit de ce manuel ou son emploi
pour tout autre but que des opérations ou entretiens de
l’équipement à moins d’une permission écrite de Sony
Corporation.
Das in dieser Anleitung enthaltene Material besteht aus
Informationen, die Eigentum der Sony Corporation sind,
und ausschließlich zum Gebrauch durch den Käufer der
in dieser Anleitung beschriebenen Ausrüstung bestimmt
sind.
Die Sony Corporation untersagt ausdrücklich die
Vervielfältigung jeglicher Teile dieser Anleitung oder den
Gebrauch derselben für irgendeinen anderen Zweck als
die Bedienung oder Wartung der in dieser Anleitung
beschriebenen
Ausrüstung
ohne
ausdrückliche
schriftliche Erlaubnis der Sony Corporation.
BKDW-515
DVW-A500/1 (UC)
DVW-500/1 (UC)
DVW-A500P/1 (CE)
DVW-500P/1 (CE)
BKDW-515 (WW) E
3-188-821-04 (2)
Sony Corporation
B&P Company
Printed in Japan
2003. 11 08
©1995