1
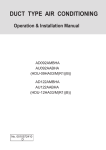
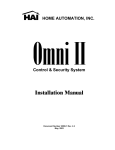
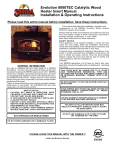
KFR-3208GW/AE
SPLIT TYPE AIR CONDITIONER
INSTRUCTION
MANUAL
INSTALLATION
Hisense Corporation
This air conditioner provides with cooling, heating, and drying functions. Details of the functions are below; refer to
these descriptions when using the air conditioner.
Compact Size
This model is smaller than its predecessors and
yet offers the same capabilities.
Microprocessor Controlled Operation
The interior compartment of the remote control
unit contains several features to facilitate
automatic operation, clearly displayed for easy
use.
Simple One-touch Wireless Remote Control
The remote control unit has several features to
facilitate automatic operation.
12-Hour ON or OFF Timer
This timer can be set to automatically turn the
unit on or off at any time within a 12-hour period.
1-Hour OFF Timer
This timer can be set to automatically turn off
the unit after one hour.
Night Setback
Pressing this SLEEP button changes the setting
of the room temperature thermostat, allowing
you to set the temperature at whatever level
that you feel comfortable.
Automatic and 3-step Fan Speed
Auto/High/Medium/Low
Air Sweep Control
This function moves a flap up and down in the air
outlet, directing air in a sweeping motion around
the room and providing comfort in every corner.
Automatic Switching between Cooling and
Heating
This unit automatically switches between cooling
operation and heating operation according to
the difference between the room temperature
and the set temperature.
Hot start Heating System
Right from the start, the air is warm and
comfortable. This system prevents any cold
blasts at the beginning while the heat pump
warming up, or even defrosting.
Automatic Restart Function for Power Failure
Even when power failure occurs, preset
programmed operation can be reactivated once
power resumes.
Anti-Mold Filter
This unit is equipped with an anti-mold filter that
inhibits the growth of mold and bacteria.
High Power Running
Run with strong power and make you feel
comfortable quickly.
RZA-0-1000-107-SM-F
Contents
Pardon not to inform you if the contents of the manual changes.
Page
Alert symbol
1
Caution statements
2
Composition of the air conditioner
3
Operation guide
8
Care and cleaning
15
Tips for energy saving
17
Troubleshooting
17
Schematic diagram
18
Appendix: Installation
19
Alert Symbols
WARNING
The symbol refers to a hazard or an unsafe practice which can result in
severe personal injury or death.
CAUTION
The symbol refers to a hazard or an unsafe practice which can result in
personal injury or product damage.
NOTICE:
! If the supply cord is damaged, it must be replaced by the manufacturer or its service
agent or a similarly qualified person in order to avoid hazard.
! The appliance should be installed with local wiring regulation.
! The plug must be easily accessible after installation.
! The waste battery shall be disposed properly.
! The breaker of the air conditioner should be all-pole switch;and the distance
between its two contacts should be no less than 3mm. Such means for disconnection
must be incorporation in the fixed wiring.
! The appliance should be installed on strong enough suppoter.
1
Caution Statements
WARNING
1.We recommend that this air conditioner be installed properly by
qualified installation technicians in accordance with the installation
instructions provided with the unit.
2.Before installation, check if the voltage of the electric supply in your
home or office is the same as the voltage shown on the nameplate.
WARNING
3.Do not install the air conditioner where there are fumes or flammable
gases, or in an extremely humid space such as a greenhouse.
4.Do not install the air conditioner where excessively high heatgenerating objects are placed.
Avoid:
To protect the air conditioner from heavy corrosion, avoid installing the outdoor
unit where salty sea water can splash directly onto it or in sulphurous air near a
spa.
1.All wiring must conform to the local electrical codes.
2.Each unit must be properly grounded.
3.Wiring must be done by a qualified electrician.
4.Consider the capacity of the electric current of your electrical kilowatthour meter wires and socket before installation.
5.Power for this air-conditioner is supplied by individual electrical wire.
6.There must be at least one ventilation intake in the area where the
heat-pump is mounted.
1.Read this manual carefully before using this air conditioner. If you still have
any diffculties or problems, consult your dealer for help.
2.The air conditioner is designed to give you comfortable room conditions.
Use this only for its intended purpose as described in this instruction
manual.
WARNING
CAUTION
3.Never use store gasoline or other flammable vapor or liquid near the
air conditioner - it is very dangerous.
4.The air conditioner has no ventilator for intaking fresh air from
outdoors. You must open doors or windows frequently when you
use gas or oil heating appliances in the same room, which consume
a lot of oxygen from the air. Otherwise there is a risk of suffocation
in an extreme case.
1.Do not turn the air conditioner on and off from the power mains
switch. Use the ON/OFF operation button.
2.Do not stick anything into the air outlet of the outdoor unit. This is
dangerous because the fan is rotating at high speed.
3.Do not let the children play with the air conditioner.
4.Do not cool or heat the room too much if babies or invailds are
present.
2
Composition of the Air Conditioner
1.Diagram of Structure
Air intake grille
INDOOR UNIT
Air outlet
Drain hose
Refrigerant tubes
Remote
control
unit
OUTDOOR UNIT
Air outlet
The appearance of the appliance may differ from some pictures.
NOTE
This air conditioner consists of an indoor unit and an outdoor unit. You can
control the air conditioner with the remote control unit.
Air Intake
Air Outlet
Remote Control Unit
Refrigerant Tubes
Outdoor(Condensing)Unit
Drain Hose
Air from the room is drawn into this section and passes
through air filters which remove dust.
Conditioned air is blown out of the air conditioner through
the air outlet.
The wireless remote control unit controls power ON/OFF,
operation mode selection, temperature, fan speed, timer
setting, and air sweeping.
The indoor and outdoor unts are connected by copper
tubes through which refrigerant gas flows.
The outdoor units contains the compressor, fan motor, heat
exchanger coil, and other electrical components.
Moisture in the room condenses and drains off through this hose.
3
2.Introduction of the Indoor ControI Unit
INDOOR UNIT
OPERATING lamp
TIMER lamp
POWER lamp
IMPORTANT:
POWER
Avoid using radio equipment
such as mobile phone near
(within 1m) the indoor unit.
Some radio equipment may
cause maIfunction of the unit.
HI POWER
TIMER
HIGH
POWER
lamp
OPERATING
ON/OFF
If the troubIe happens, disconnect power and restart the
air conditioner after a few
minutes.
REMOTE CONTROL receiver
ON/OFF button
REMOTE CONTROL
receiver
This section picks up infrared signals from the remote control unit
(transmitter)
POWER lamp
This lamp lights when the air conditioner is in the operation
mode.(But the compressor may not run at this time.)
TIMER lamp
OPERATING lamp
This lamp lights when the system is being controlled by the timer.
This lamp lights when the outdoor unit is electrified.
HIPOWER lamp
This lamp lights when the air conditioner run efficiently.
ON/OFF button
This button is set for emergent state.Please use the remote control
unit to operate the air conditioner in the common state. If you have
lost the remote control unit or it has trouble, use this button to turn
on/off you air conditioner.(See operation without the remote control
unit.)
4
3.Introduction of Display
Displayed when setting temperature
A
TEMP SET
Displayed when transmitting data
C
Displayed when temperature is shown
Displayed when temperature setting
is at the upper or lower allowable
limits
Displayed when one-hour
OFF timer is enable
1HOUR
Displayed when Night Setback is
running
HOUR
Displayed when setting timer
Displayed when main unit sensor is in
use
A
ON
OFF
A
Symbols
(1) Operation mode
AUTO
(3) Set temperature
16-30
When set to 28
Current temperature
indication
A
COOL
(4) Timer
HEAT
MILD DRY
12-hour ON Timer
FAN
12-hour OFF Timer
1-hour OFF Timer
(2) Fan speed
(5) NIGHT SETBACK
Automatic operation
A
(6) Confirmation of
transmission
HIGH
MEDIUM
(7) Flap angle indication
LOW
(8) Sweep indication
(9) Indoor unit sensor
5
C
4.Introduction of the Remote control Unit
SENSOR
Transmitter
A
T E M P SS E T
C
1HOUR
1С
ʱ
HOUR
A
Display
ON
OFF
1 HR
A
FAN
SPEED
TEMP
FAN SPEED selector button
1 HR. TIMER button
H
.
.P
O
HIGH POWER button
N
/O
FF
ON/OFF button
TEMP.setting button
FLAP
MODE
MODE selector button
FLAP button
ON
OFF
TIMER ON/OFF button
SLEEP
SET
CANCEL
SLEEP button
TIMER SET/CANCEL
button
A/C SENSOR
ACL
ACL button
A/C SENSOR button
(Cover closed)
Battery compartment
(pull off the cover to expose the
batteries.)
NOTE
Transmitter
SENSOR
Display
SLEEP
button
TEMP. Setting buttons
ON/OFF operation
button
The illustration above pictures the remote control unit after the cover has
been lowered and removed.
When you press the buttons on the remote control unit,the
mark appears in
the display to transmit the setting changes to the receiver in the air conditioner.
A temperature sensor inside the remote control unit senses the room
temperature.
Information on the operating conditions is displayed while the remote control
unit is switched on. If the unit is turned off, only the mode that was set
previously is still displayed.
For details, see Night Setback Mode . When you press this button, in the
HEAT, DRY or COOL mode, the
mark appears in the display, the remote
control unit will automatically adjust the set temperature to save energy.
Press the
button to increase the set temperature.
Press the
button to reduce the set temperature.
This button is for turning the air conditioner on and off.
6
Remote Control Unit(continued)
TIMER ON button
TIMER OFF button
TIMER SET/CANCEL button
MODE selector button
(AUTO)
(HEATING)
(DRY)
(COOLING)
(FAN)
FLAP button
FAN SPEED selector
button
1 HR TIMER button
(1-HOUR OFF TIMER)
!
:The air conditioner starts at the set time.
:The air conditioner stops at the set time.
This button is used to set/cancel the time at which you wish the air conditioner to go on or off.
Use this button to select AUTO, HEATING, DRY or COOLING mode.
A :When this setting is selected, the air conditioner calculates the difference between the
set thermostat and the room temperature and automatically switches to the "COOLING"
or "HEATING” mode appropriately.
:The air conditioner makes the room warm.
:The air conditioner reduces the humidity in the room.
:The air conditioner makes the room cool.
:The air conditioner makes the room's temperature suitable.
Press this button either to select to set the airflow direction to one of the six possible
positions manually, or to select the sweep function, which moves the flap up and down
automatically.
:The airflow direction can be set manually.(six positions)
:The flap moves up and down automatically.
:Press the FLAP button and set the airflow directions as desired. (refer to Adjust the
A
Airflow Direction).
A
:The air conditioner automatically decides the fan speeds.
: High fan speed.
:Medium fan speed.
:Low fan speed.
:When you press this button, regardless of whether the unit is operating or stopping,
the unit operates for one hour and then shuts down.
1HOUR
ACL button
Puts the remote control unit into pre-operation status. Always press this button after
replacing the batteries.
A/C SENSOR button
When you press this button (use a small-tipped object such as a ballpoint pen), the
mark
will appear at the display. And the room temperature is detected by the sensor which is built
into the indoor unit and the air conditioner is controlled accordingly.
NOTE
If the remote control is located near a heat source, such as a space heater or
indirect sunlight, press the A/C SENSOR button to switch to the sensor in the
indoor unit.
Automatic switching between cooling and heating
This unit automatically switches between cooling operation and heating operation according to the difference
between the room temperature and the set temperature.
NOTE
The remote control unit sends the temperature signal to the air conditioner regularly at three
minute intervals. If the signal from the remote control unit stops for more than ten minutes due
to the loss of the remote control unit or other trouble, the air conditioner will switch to the
temperature sensor which is built into the indoor unit and control the room temperature. In
these cases, the temperature around the remote control unit may differ from the temperature
detected at the air conditioner,s position.
7
Operation Guide
HOW TO INSTALL BATTERIES
1. Slide the cover in the direction indicated by the arrow and remove it.
2. Install two AAA alkaline batteries. Make sure the batteries point in the direction
m arked in the battery compartment.
3. Use a thin object such as the tip of a pen to press the ACL button.
+
-
+
!
NOTE
Sliding cover
Replace the batteries when the remote control unit's display fails to light, or when the
remote control unit cannot be used to change the air conditioner's settings.
Use two fresh leak-proof type-AAA alkaline batteries.
In replacing batteries, follow the instructions as mentioned in the sub-section "How
to Install Batteries".
If you do not use the remote control unit more than 1 month, take out the batteries.
HOW TO USE THE REMOTE
CONTROL UNIT
When using the remote control unit, always point the unit's transmitter head
directly at the air conditioner's receiver.
Air conditioner
(Indoor unit)
Receiver
Remote control
unit
REMOTE CONTROL UNIT
INSTALLATION POSITION
(Transmitter head)
To ensure that the air conditioner operates correctly, DO NOT install the remote control
unit in the following places:
DO NOT
In direct sunlight
Behind a curtain or other places where it is covered
More than 8 meters away from the air conditioner
In the path of the air conditioner's airstream
Where it may become extremely hot or cold
Where it may be subject to electrical or magnetic noise
Where there is an obstacle between the remote control unit and the air conditioner
8
Operation with the Remote Control Unit(continued)
C
A
A
1 HR
FAN
SPEED
TEMP
STEP 4
H
.
.P
O
FLAP
N
/O
FF
STEP 2
MODE
STEP 1
STEP 5
ON
SLEEP
SET
OFF
CANCEL
ACL
A/C SENSOR
NOTE
STEP 3
Check that the circuit breaker on the power panel is turned on and that the operation selector of the indoor unit is
in the ON position.
If the automatic operation settings of the unit do not meet your needs, press the setting buttons as described
below and change the settings as desired.
STEP 1
STEP 2
To start the air conditioner, press the ON/OFF operation button.
STEP 3
Press the TEMP setting button to change the temperature setting to the desired temperature .
Adjustable temperature range:
30 max. 16 min.
STEP 4
!
Press the MODE selector button and select the desired mode.
For heating operation
For dehumidifying operation
For cooling operation
A
For automatic operation
For fan operation
NOTE
STEP 5
Set the FAN SPEED selector button to choose the fan speed you want.
If the fan speed is set to A (Automatic), the fan speed switches automatically,
according to the difference between the actual room temperature and the set temperature.
Press the FLAP button and set the airflow direction as desired.
To stop the air conditioner, press the ON/OFF operation button again.
9
Adjusting the Fan Speed
A. Automatic
A
Simply set the FAN SPEED selector to the
position.
A microprocessor in the air conditioner automatically controls the fan speed when the
A
mode is selected. When the air
co nditioner starts operating, the difference between the room temperature and the set temperature is detected by
the microprocessor which then automatically switches the fan speed to the most suitable level.
B. Manual
If you want to adjust fan speed manually during operation, just set the FAN SPEED selector
as desired.[
(High),
(Medium), or
(Low)]
Adjusting the Airflow Direction
1. Horizontal
!
CAUTION
2. Vertical
The horizontal airflow can be adjusted
by moving the vertical vanes with your
hands to the left or right.
When the humidity is high, the vertical vanes should be in the front
position during the cooling or dehumidifying operation. If the vertical
vanes are positioned all of the way to the right or left, condensation may
begin to form around the air vent and drip down.
The vertical airflow can be adjusted by moving the flap with the remote control unit Do not
move the flap with your hands.Confirm that the remote control unit has been turned on.
Then, use the FLAP button to set either the sweep function or one of
the six airflow direction settings.
6
FLAP
ON
SLEEP
SET
5
COOL
and
DRY
MODE
4
3
OFF
2
CANCEL
SWEEP
A/C SENSOR
A.Sweep function
1
HEAT
ACL
B.Automatic Function
The flap starts moving up and down to
The flap moves up and down automatically
deliver air over the sweep range.
from
to
during the cooling or drying
operation, from
to
during the heating
operation. Referring to the above illustration.
!
!
NOTE
CAUTION
The flap automatically closes when the unit is off.
¡ñ
Use the FLAP button on the remote control to adjust the position of the flap.
If you move the flap by hand, the flap position according to the remote control
and the actual flap position may no longer match.If this happens,shut off the
unit, wait for the flap to close, and then turn on the unit again; the flap
position will now be normal again.
¡ñ
Do not have the flap pointed down during cooling operation. Condensation
may begin to form around the air vent and drip down.
10
Night Setback / Simultaneous Use Energy Saving
TEMP SET
C
A
A
1 HR
FAN
SPEED
TEMP
H
.
.P
O
FLAP
N
/O
¡ñ
Night Setback Mode
Night Setback Mode is used for saving energy. Press the SLEEP button
in operation. The
mark appears in the display. To release the night
setback function, press the SLEEPbutton again.
FF
NOTE
This function loses in automation or airflow mode.
MODE
OFF
ON
SLEEP
SET
CANCEL
ACL
A/C SENSOR
HIGH POWER Operation
This operation makes higher or lower temperature airflow than usual, in winter or
summer, which makes you feel comfortanble as soon as you go home.
C
Setting procedure:
Press the High Power button on the remote control unit gently, with a whisper, and
the HIPOWER-lamp on the display panel is lighted , so the high efficient operation
A
comes to work. It may last the longest time of 15 minutes.
A
1 HR
POWER
FAN
SPEED
TEMP
HI POWER
HIGH POWER lamp
TIMER
OPERATING
H
.
.P
O
N
/O
FF
ON/OFF button
ON/OFF
FLAP
MODE
ON
OFF
Cancellation procedures:
SLEEP
SET
A/C SENSOR
CANCEL
Press the HIGH POWER button again, with a second whisper, the lamp is out.
ACL
11
Using the 12-Hour ON and OFF Timer
1.TIMER ON mode
(Example)
After the length of time set for TIMER ON elapses, the unit begins operating.
The display depicted at left indicates that the air conditioner will begin operating in
three hours.
Setting Procedures:
C
STEP 1
Press the MODE button and set the desired operation mode and
press the ON/OFF operation button.
STEP 2
Press the timer ON button to set the time at which you want
operation to begin. The time can be set for one to twelve hours,
in one hour steps.
1
2
3....... 12
STEP 3
Press the timer SET button (which advances the time displayed).
HOUR
1 HR
FAN
SPEED
TEMP
H
.
.P
O
FLAP
N
/O
FF
MODE
STEP 1
OFF
ON
The display changes immediately to its status previous to timer setting, but the
STEP 2
SLEEP
SET
CANCEL
indication remains.
To check the status of the timer while it is counting down, press the timer SET
STEP 3
button .
ACL
A/C SENSOR
Cancellation procedure: Press the CANCEL button once again.
2.TIMER OFF mode
(Example)
C
After the length of time set for TIMER OFF elapses, the unit stops operating.
The display depicted at left indicates that the air conditioner will stop operating in
five hours.
Setting Procedure:
STEP 1
HOUR
A
A
Press the timer OFF button to set the time at which you want
operation to stop.
The time can be set for one to twelve hours, in one hour steps.
1
1 HR
H
.
.P
O
FLAP
2
3....... 12
FAN
SPEED
TEMP
N
/O
FF
STEP 2
MODE
Press the timer SET button (which advances the time displayed).
The display changes immediately to its status previous to timer setting, but the
indication remains.
ON
STEP 1
SLEEP
SET
OFF
To check the status of the timer while it is counting down, press the timer SET
CANCEL
button .
STEP 2
Cancellation procedure: Press the CANCEL button once again.
A/C SENSOR
ACL
12
Using the 1-Hour OFF Timer
This function causes the unit to operate for one hour and then stop, regardless
of whether the unit is on or off when this button is pressed.
The
1HOUR
indicator in the display indicates that this function is operating.
C
1HOUR
1С
ʱ
Setting procedure:
A
Regardless of whether the unit is operating or stopped, press the 1 HR .TIMER button.
A
1HOUR
1 HR
Appears in the display.
FAN
SPEED
TEMP
H
.
.P
O
N
/O
FF
Cancellation procedure:
Press the ON/OFF operation button to turn the unit off, wait for the unit to stop operating,
and then press the ON/OFFoperation button again. The 1-Hour Timer function is now
FLAP
MODE
ON
cancelled and the unit operates normally.
OFF
NOTE
SLEEP
SET
CANCEL
¡ñ
If, while the 1-Hour Timer function is operating, the 1 HR.TIMER button is
pressed once to cancel the function and then again, the unit continues to
A/C SENSOR
ACL
operate for one hour from that point in time and then stops.
¡ñ
If the 1 HR.TIMER button is pressed while the TIMER OFF function operates,the
OFF Timer is cancelled and the unit will stop operating one hour later.
13
Special Remarks
Heating (
) Operation
Heating performance
Because this air conditioner heats a room by drawing on the heat of the outside air
(heat pump system), the heating efficiency will fall off when the outdoor temperature
is very low. If sufficient heat cannot be obtained with this air conditioner, use another
heating appliance in conjunction with it.
Defrosting
When the outdoor temperature is low, frost or ice may from in the heat exchanger
coil, reducing heating performance. When this happens, a microcomputer defrosting
system will operate. At the same time the fan on the indoor unit stops ( or runs at
very low speed in some cases). Heating operation restarts after several minutes.
(This interval will vary slightly depending upon the outdoor temperature and the way
in which frost forms).
For several minutes after the start of heating operation, the indoor fan will not start
running until the indoor heat exchanger coil has warmed up sufficiently. This is
because the COLD DRAFT PREVENTION SYSTEM is operating.
POWER lamp
Power failure
during operation
Clicking Sound
Clicking sound is
heard from the air
conditioner
The POWER lamp also remains lit during defrosting or when the compressor has
been turned off by the thermostat when the system is in the heating mode.
In the event of power failure, the unit will stop. When the power is resumed,
the unit will restart automatically after three minutes.
In heating or cooling operation. Some plastic parts may expand of shrink due to a
sudden temperature change. In this event, a clicking sound may occur. This is normal,
and the sound will soon disappear.
The remote control unit sends the temperature signal to the air conditioner regularly
at three-minute intervals. If the signal from the remote control unit stops for more
than ten minutes due to the loss of the remote control unit or other trouble, the air
conditioner will switch to the temperature sensor which is built into the indoor unit
and control the room temperature. In these cases, the temperature around the
remote control unit may differ from the temperature detected at the air conditioner s
position.
14
Operation without the Remote Control Unit
POWER
HI POWER
TIMER
OPERATING
ON/OFF button
ON/OFF
If you have lost the remote control unit or it has trouble, follow the steps below.
1.When the air conditioner is not running
If you want to turn on the air conditioner, pressing the ON/OFF button once.
2.When the air conditioner is running
If you want to turn off the air conditioner, pressing the ON/OFF button once.
NOTE
Pressing buttons cannot last too long time, or the air conditioner may
operate abnormally.
Care and Cleaning
!
WARNING
1.For safety, be sure to turn the air conditioner off and also to disconnect
the power before cleaning.
2.Do not pour water on the indoor unit to clean it. This will damage the
internal components and cause an electric shock hazard.
Clean the casing and grille of the indoor unit with a vacuum cleaner brush, or
wipe them with a clean, soft cloth.
If these parts are stained, use a clean cloth moistened with a mild liquid
deteraent. When cleaning the grille, be careful not to force the vanes out of
place.
!
CAUTION
1.Never use solvents, or harsh chemicals when cleaning the indoor unit.
Do not wipe the plastic casing using very hot water.
2.Some metal edges and the fins are sharp and may cause injury if
handled improperly; be especially careful when you clean these parts.
3.The internal coil and other components of the outdoor unit must be
cleaned every year.Consult your dealer or service center.
15
Care and Cleaning (continued)
Anti-Mold Filter
How to remove the
anti-mold filter
The anti-mode filter behind the air intake grille should be checked and cleaned
at least once every three weeks.
1.Grasp both ends of the air intake grille and pull it out and up.
2.Push the anti-mold filter up slightly, and then pull it down.
Air intake grille
Anti-mold filter
Anti-Mold Filter
Cleaning
How to replace the
anti-mold filter
Use a vacuum cleaner to remove light dust. If there is sticky dust on the filter,
wash the filter in lukewarm, soapy water, rinse it in clean water, and dry it.
1.Slide the anti-mold
filter up into the unit and then lower the handle into the
groove on the unit.
2.After installing the anit-mold filter, press the locations marked by the arrows
(
) and close the air intake grille.
Air intake grille
Anti-mold filter
Air Clean Filter
(not provided)
!
WARNING
How to install the air clean
filter
The air cleaning filter removes dust and dirt from the air, and reduces odors and
somke from tobacco.
This air clean filter cannot remove harmful gases or vapors nor ventilate
air in the room. You must open doors or windows frequently when you
use gas or oil heating appliances.Otherwise there is a risk of suffocation
in extreme cases.
The air clean filter needs to be installed behind the anti-mold filter.
1. Remove the anti-mold filter.
2. Install the air clean filter in the position shown in the diagram.
3. Reinstall the anti-mold fillter.
Air
clean
filter
16
Tips for Energy Saving
Do not
Do
Block the air intake and outlet of the unit. If they are obstructed, the unit
will not work well, and may be damaged.
Let sunlight directly into the room. Use sunshades, blinds or curtains.
If the walls and ceiling of the room are warmed by the sun, it will take
longer time to cool the room.
Always try to keep the air filter clean. (Refer to Care and Cleaning .)A
clogged filter will impair the performance of the unit.
To prevent conditioned air from escaping, keep windows, doors and any
other openings closed.
Troubleshooting
If your air conditioner does not work properly, first check the following points before requesting service. If it still does not work
properly, contact your dealer or service center.
Trouble
Possible Cause
Air conditioner does not run at
all.
1.Power failure.
2.Leakage breaker tripped.
3.Line voltage is too low.
4.Operation button is OFF.
5.Batteries in remote control unit have
run down.
OPERATING lamp flashes
while air conditioner does
not operate.
Trouble in wiring system.
Compressor runs but soon
stops.
Poor cooling (or heating)
performance
Remedy
1.Restore power.
2.Contact service center.
3.Consult your electrician or dealer.
4.Press the button again.
5.Replace batteries.
Contact servicer center.
Obstruction in front of condenser coil.
Remove obstruction.
1.Dirty or clogged air filter.
2.Heat source or many people in room.
3.Doors and/or windows are open.
4.Obstacle near air intake or air
discharge port.
5.Thermostat is set too high for
cooling(or too low for heating).
6.(Outdoor temperature is too low.)
7.(Defrosting system does not work.)
1.Clean air filter to improve airflow.
2.Eliminate heat source if possible.
3.Shut them to keep the heat (or cold)
out.
4.Remove it to ensure good airflow.
5.Set the temperature lower.(or higher)
Clicking sound is heard from
the air conditioner.
In heating or cooling operation, some
plastic parts may expand or shrink due
to a sudden temperature change. In
this event, a clicking sound may occur.
OPERATING lamp lights but
outdoor unit will not run.
1.The use of portable telephones near
the air conditioner may cause
disturbance to its normal operation.
2.Restart the air conditioner after turn
off the power immediately.
17
6.(Try to use a back-up heater.)
7.(Consult your dealer.)
This is normal, and the sound will soon
disappear.
1.Turn off the power then restart the air
conditioner after 3 minute.
2.The unit will restart automatically
after three minutes.
Schematic Diagram
1. Refrigerant Flow Diagram
Outdoor unit
Indoor unit
Compressor
Wide tube
Accumulator
Wide
service
valve
Heat exchanger
Heat exchanger
4-way valve
Capillary
Narrow tube
Narrow
service
tube
Capillary
Cooling cycle
Heating cycle
Check valve
2. Permitted ambient temperature for the air conditioner is following:-7
~+43
.
3. Electric Wiring Diagram
1
1
2
2
3
3
4
4
5
5
INDOOR
UNIT
OUTDOOR
UNIT
18
Appendix: Installation
Make a wood or metal frame to support the appliance if
necessary.
----When the appliance is mounted in a room,
Properly insulate the tube of indoor unit, and make sure
there is no water drops on the appliance or on the floor.
----When the appliance is installed on a damp or uneven area,
Make a flat concrete base and place the base under the
outdoor unit.
----When the appliance is installed in an area of strong winds.
U sing anchor bolts and metal frames to fix the properly
covered outdoor unit.
----When the appliance (Model Heat Pump) is installed in an
area of heavy snow.
The outdoor unit must be installed in a position above the
snow accumulation.
Warning: Carrying out operations displaying this
symbol may result in fatal injury.
Caution: Carrying out operations displaying this
symbol may result in serious injury.
This operation manual has explicit information for installation
and maintenance in most conditions. Contact the local
distributor or after-sales service for further information.
A. Wiring
Only qualified professionals should carry out wiring of the
appliance.
Disconnect the power supply before completion of wiring,
piping or checking the appliance.
Voltages generated by the appliance is fatal.
Read the electrical schematic diagram and explanation
before installation. Improper installation and earth
connection may result in fatal injury.
C onnect the earth as required by local wiring regulations.
Tightly fasten all the wiring connections to prevent
overheating or fire.
Special power source, switches and sockets are required for
the power supply of the appliance.
Electric meter capacity must be larger than or equivalent to
16A.
D. Connection
Use the shortest tubes possible
Using a flaring method
Smear some refrigeration oil between the flared surface and
the connected tube.
Fa sten the nuts with a torque wrench to prevent leakage of
refrigerant.
Check for leakage before trial operation.
E. Maintenance
Disconnect the power before checking the electrical
components and the circuits.
Avoid contact with the moving parts of the appliance.
C lear the site and make sure there is no installation debris
left in the appliance.
B. Transport
C arefully move the outdoor unit.
C. Installation
----When the appliance is mounted to the ceiling or the wall,
Make sure that the ceiling or the wall is strong enough for the
appliance.
F. Other
Keep the room well ventilated during installation.
1. Summery
Read the operation manual before installation and keep this
manual in a safe place.
1. Following table indicates that tubes should be cut with an
additional length of 30cm-40cm, to reduce the vibration from the
outdoor unit.
1-1 Tools
1. Screwdriver
2. Phillips head screwdriver
3. Knife or wire stripper
4. Steel ruler
5. Spirit level
6. Hammer
7. Percussion drill
8. Tube cutter
9. Tube flarer
10. Tube bender
11. Adjustable spanner
Narrow tube
Outside Diameter
6.35mm
Wide tube
Thickness
0.8mm
Outside Diameter Thickness
9.52mm
0.8mm
2. The insulation materials for the copper tubes should conform
to the required length and the wall thickness should not be
less than 8mm.
3. Insulated copper wires should be used for wiring and the
specification should depend on the length.
1-5 Additional materials for installation
1. white tape
2. nails or clips (as required)
3. putty
4. refrigeration oil
5. clips for fixing refrigerant tubes
1-2 Attachment
(see the packing list)
1-3 Parts Package
Copper tubes, components and insulation materials for the
outdoor unit.
1-4 Type of the copper tube and insulation materials
19
Appendix: Installation
2. Location
2-1 Indoor unit
2-2 Outdoor unit
The outdoor unit should be installed away from the following:
Heat source and fan exhausting ;
Director sunlight;
WARNING: Maintain the required space around the
appliance to prevent overheat.
The area for installation of the appliance should not be in an area
with the following:
Di rect sunlight
H eat resource
Inflammable gas
Thick oil fog
The appliance should be installed in an area,
Where the inside space can be evenly conditioned, or
Which is strong enough for the appliance, or,
Having the shortest distance for the copper tubes and water
drain hose, and
Having desired space around the appliance for maintenance
and ventilation.
8
The outdoor unit should be installed in an area with,
Cool temperature;
Good ventilation;
Desired space for air inlet, outlet and maintenance
Min. 5cm
Min. 5cm
Min. 5cm
Top obstacle
H
Add. Refrigerant
(g/m)
Provided Tube(M)
15
7
25
4
Min. 5cm
Air outlet
Valve side
Min. 25cm
Blockage
L
Min. 10cm
Air outlet
Air inlet
Tube arrangement
Min. 40cm
L: Maximum length of the tube connecting the indoor unit and the
outdoor unit.
H: The height difference between the indoor unit and the outdoor
unit.
Ground
Min.10cm
Air inlet
2
Strong base (10x40cm concrete or alike). The appliance
should be placed not less than 10cm high.
Tube length(L)
Indoor unit
Anchor bolts(4)
Height difference(H)
Outdoor
unit
Air inlet
Min. 10cm
Concrete or alike
Ab
If the length of the tube is between 7.5m to 15m(maximum
length), an additional 25g/m of refrigerant should be added .
Additional compressor oil must not be added.
CAUTION:
m
t 10c
ou
t4
Abou
0c
m
Fix the base with anchor bolts to reduce vibration and noise.
The indoor unit should not be
installed below a height of 1.8m.
20
Appendix: Installation
3. Installation of the indoor unit
Wall plate
Fixing screw
Remove the wall plate
(1)Remove the fixing screws and keep them for future use (not used
during installation).
(2)Press the two triangular signs on the outer shell and remove the fixing
clip.
(3)Remove the wall plate.
Fixing clip
Mount the wall plate
(1)Determine the correct position of the plate with a level (never use the
naked eyes!). The plate should be level.
(2)Fix the plate with §¶
6mm expansion bolts for cement walls and with
wood screws for wood or plaster walls.
Caution: Adequate space should be reserved for the
installation of the indoor unit. To avoid running noise and
vibration, the wall plate should be fixed tightly on the wall.
Make the wall hole
Select the position of the hole according to the positions of the indoor and
outdoor units. The hole should be slightly lower than the wall plate.
The diameter of the hole is 65mm and the hole should be made with the
outside end a little lower.
The site should be cleaned after the hole is made.
Left tube
hole center
75
75
Indoor
Right tube
hole center
Outdoor
Caution: Check carefully before the hole is drilled to make
sure that there is no cables or tubes in the area.
Connect the tubes of the indoor unit
A. Connect the electric wires
(1)Open the front panel and remove the cover of the electric box.
(2)Remove the wire clip in the electric box.
(3)Put in the wires from the back of the indoor unit and pull them out from the
front.
(4)Connect the wires firmly to the terminal panel.
(5)Fix the wires with the clip, replace the cover and close the front panel.
Caution: Make sure that the numbers of the terminals are the same
as those of the terminal panel.
B. Connect the tubes
(1)Do not let dust, dirt, air and water into the tubes during installation, so never
remove the tube plugs if installation is not due.
(2)Remove the nuts at the tube joints of the indoor unit, align the center of the
tube flare (apply anti-freezing oil on the cone head), tighten the cone-shaped
nuts with the hand first, then tighten up with a spanner.
Caution: Avoid leakage from loose connection or damage of
the flare from over-tightening.
21
Anti-freezing oil
is applied here
Set the outdoor unit
Connecting
tube
Flared
tube
Set the indoor unit
Appendix: Installation
(3)Any part of the drainpipe should be below the outlet of the indoor unit
and the joints should be wrapped with waterproof adhesive tape to
prevent leakage of condensed water.
(4)Bind the tubes, wires and the drainpipe tightly with binding tape, with
the drainpipe under the wires.
(5)Press down the clamping plate of the tubes and fix the bound wires.
Tube clamping plate
Wire outlet
Tubes
Tubes
Drainpipe
Drainpipe
Install the indoor unit
(1)Pull the bound wires out through the wall hole and put the indoor wires
together with the indoor unit at the corresponding place of the wall plate.
(2)Hook the indoor unit onto the retaining claws on the wall plate and
move the unit body slightly to make sure that it is firm.
(3)Hold the two sides of the unit body and press it to the wall plate to
ensure secure connection.
Wires
Wall plate
Tubes
4. Installation of the outdoor unit
Mount the outdoor unit
A. Mount the outdoor unit in the selected place.
B. If the outdoor unit is to be mounted on the wall, the wall and the
installation bracket should have sufficient intensity to bear the weight of
the outdoor unit.
(1)Place the outdoor unit carefully onto the bracket.
(2)Fix the unit onto the bracket with four bottom bolts. The bolts should
have anti-vibration pads to prevent falling down of the unit from vibration.
Connect the tubes of the outdoor unit
A. Electric wires
(1)Remove the wire cover of the outdoor unit with a screwdriver.
(2)Remove the wire clip.
(3)Connect the wires to the corresponding terminals on the terminal
panel.
Wires
Drainpipe
Tube clamping plate
Caution: All the " Y " -shaped terminals should be plugged into
the line bank and the grounding loop terminal should be
connected fully.
Wire cover
(4)Tighten all the screws to ensure good connection.
(5)Put the wires into place with a clip and replace the wire cover.
Caution: Never put extra wires into the wire compartment to
avoid damage from eddying flow heating.
B. Tubes
The connection of the outdoor tubes is the same as steps (1) and (2) of
the indoor unit.
22
Appendix: Installation
5.Air purging
Air and moisture remaining in the refrigerant system have
undesirable effects as indicated below. Therefore, they must be
purged completely.
pressure in the system rises
operating current rises
cooling efficiency drops
moisture in the air may freeze and block capillary tubing
water may lead to corrosion of parts in the refrigerant system
Air Purging with a Vacuum Pump (for Test Run)
(1)Check that each tube (both narrow and wide tubes between
the indoor and outdoor units have been properly connected
and all wiring for the test run has been completed. Note that
both narrow and wide tube service valves on the outdoor
unit are kept closed at this stage.
(2)Using an adjustable wrench or box wrench, remove the valve
caps from the service valve on both narrow and wide tubes.
(3) Connect a vacuum pump and a manifold valve (with
pressure gauges) to the service port on the wide tube
service valve.(Fig.A)
Indoor unit
Outdoor unit
Pressure
gauge
Lo
Hi
Manifold valve
Vacuum pump
Fig.A
90 (1/4 turn)
Narrow tube
Hex wrench
Be sure to use a manifold valve for air
purging. If it is not available, use a
stop valve for this purpose. The ¡°Hi
¡±
knob of the manifold valve must
CAUTION always be kept closed.
(4)With the ¡°
Lo¡±
knob of the manifold valve open, run the vacuum
pump. The operation time for the vacuum pump varies with
tubing length and the capacity of the pump. The following table
shows the amount of time for evacuation:
Table
Required time for evacuation when capacity
of 100 liter/h vacuum pump is used
If tubing length is less than 10 m
If tubing length is more than 10 m
10 min. or more
15 min. or more
NOTE
The required time in the above table is calculated based
on the assumption that the ideal (or target) vacuum
condition is around 10 mmHg abs.
(5) With the vacuum pump still running, close the
Lo
knob of the manifold valve. Then stop the vacuum
pump.
(6)With the accessory hex wrench, turn the valve stem on
the narrow tube service valve counterclockwise by 90
degrees (1/4 turn) for 10 seconds, and then turn the
stem clockwise to close it again. (Fig.B)
Be sure to completely insert the hex
wrench before attempting to turn the
valve.
CAUTION
23
Wide tube
Valve cap
Vacuum hose to manifold valve
Fig.B
(7)Leak test all joints at the tubing (both indoor and outdoors)
with liquid soap. Bubbles indicate a leak. Be sure to wipe off
the soap with a clean cloth.
(8)With the hex wrench, turn the wide tube service valve stem
counter-clockwise to fully open the valve.
(9)Turn the narrow tube service valve stem counter-clockwise
to fully open the valve.
(10)Loosen the vacuum hose connected to the wide tube
service port slightly to release the pressure. Then, remove
the hose.
(11)Replace the bonnet and flare nut on the wide tube service
port and fasten the flare nut securely with an adjustable
wrench or box wrench. Next, mount the valve cap and
tighten it with a torque wrench (the cap needs to be
tightened with the torque of 200kg-cm). This process is
very important to prevent gas from leaking from the system.
(12)Test run the air conditioner.
(13)While the air conditioner is running, apply liquid soap to
check for any gas leaks around the service valves or caps.
(14)If there is no leakage, stop the air conditioner.
(15)Wipe off the soap on the tubing.
This completes air purging with a vacuum pump and
the air conditioner is ready for actual operation.
6. Please contact the technical service for further
information.
PACKING LIST
NAME
AMOUNT
1.
OUTDOOR UNIT
1
2.
POWER CABLE
1
3.
DRAINAGE ELBOW *
1
4.
AIR FRESH FILTER
1
5.
INDOOR UNIT
1
6.
MANUAL
1
7.
REMOTE CONTROL UNIT
1
8.
BATTERY
2
9.
NAIL SPECIAL
6
NO.
THE SYMBOL "*" STANDS FOR THE PART TO BE PICKED AND MADE PURCHASE.