1
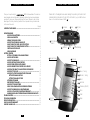
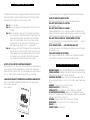
WORLD RECEIVER
Lextronix / Grundig
P.O. Box 2307, Menlo Park, CA 94026
Phone 650-361-1611 • Fax 650-361-1724
Shortwave Hotlines: (US) 1-800-872-2228
(CN) 1-800-637-1648
www.grundigradio.com
O P E R AT I O N
M A N U A L
HOW TO USE
YOUR GRUNDIG
DO YOU NEED HELP? We've tried to make these instructions easy to follow.
Please read them carefully.
If you need help call us toll free:
Monday-Friday, 8:30 a.m. - 4:00 p.m., Pacific Standard Time.
1-800-872-2228 from the U.S.
1-800-637-1648 from Canada
1-650-361-1611 from anywhere
3
T A B L E
O F
C O N T E N T S
Thank you for purchasing the
AM/FM shortwave Radio. This radio has
been designed and manufactured to high quality standards, and will provide reliable
operation for many years. Please carefully read the Owner’s Manual in order to take
advantage of the many interesting features that will provide listening to radio broadcasts around the world.
Page #
FRONT
DESCRIPTION
Please refer to the diagram below when reading the operating instructions. Each
numbered item is discussed in the text of the instructions. (e.g. the SLEEP button is
shown in the instructions below as SLEEP
18
IMPORTANT SAFE GUARDS ................................................................................... 6
OPERATION GUIDE
HOW TO INSTALL BATTERIES ..................................................................... 7
USING AN AC ADAPTOR
7
OPENING THE HINGED COVER
7
HOW TO TURN THE RADIO ON AND OFF
7
ON/OFF USING THE 'SLEEP' AND 'OFF' BUTTONS
7
ON/OFF USING THE 'POWER/STANDBY' BUTTON ....................................... 8
CONTROLLING THE VOLUME
8
USING EARPHONES
8
GETTING STARTED
8
SETTING UP THE RADIO FOR AM BAND TUNING
8
HOW TO USE THE RADIO
8
HOW TO TUNE MANUALLY ......................................................................... 9
HOW TO USE THE AUTOSCAN FEATURE
9
HOW TO STORE STATIONS INTO MEMORY
9
HOW TO OVERWRITE THE CONTENTS OF A MEMORY
9
HOW TO ACCESS WHAT YOU HAVE STORED INTO MEMORY
9
HOW TO SET THE CLOCK .......................................................................... 10
HOW TO SET, ACTIVATE AND DEACTIVATE THE ALARM
10
SETTING THE ALARM-ON TIME
10
SETTING THE ALARM-OFF TIME
10
ACTIVATING THE ALARM
10
DEACTIVATING THE ALARM...................................................................... 11
HOW TO SET THE SLEEP TIMER
11
USING YOUR eTRAVELLER FOR SHORTWAVE LISTENING
11
HOW TO TUNE AROUND IN A SHORTWAVE BAND
11
HOW TO GO TO A SPECIFIC SHORTWAVE FREQUENCY............................. 12
LEARNING MORE ABOUT INTERNATIONAL SHORTWAVE BROADCASTS 12
TROUBLE SHOOTING ........................................................................................... 13
TECHNICAL INFORMATION
13
SERVICE INFORMATION ....................................................................................... 14
ONE YEAR LIMITED WARRANTY
14
MEMORY CHANNEL LOG...................................................................................... 16
PANEL
17
16
11
).
Volume
Ear
19
20
DC Jack
Reset
9/10 KHz
Switch
15
12
10
Time Set
14
Hinged Cover
Off
1
13
Power/Standby
Antenna
Bottom
Battery Cover
Base/Stand
4
5
2
LCD
3
Hour, + Tuning
4
Minutes, - Tuning
5
Band
6
Autoscan
7
Channel up (CH-UP)
8
Store
9
Timer
10
Sleep
I M P O R T A N T
S A F E
G U A R D S
IMPORTANT NOTE: To prevent the loss
of clock and memory settings, always
turn the radio off when installing or
removing batteries and when plugging
or unplugging the AC adaptor into or
from the radio.
O P E R A T I O N
G U I D E
HOW TO INSTALL BATTERIES
If the radio already has batteries in it, turn the radio off. Slide the battery compartment cover 11 , on the bottom left, away from the radio until it opens.
Install 2 AA alkaline batteries, following the diagram imprinted on the back of
the radio near the battery compartment. The + side of each battery faces
toward the battery compartment cover.
USING AN AC ADAPTOR (read the IMPORTANT NOTE, on page 6)
Turn the radio off. Plug the adaptor into an AC outlet, then into the radio's DC
jack 20 . Before unplugging the AC adaptor, turn the radio off. Use only an AC
adaptor with the following specifications: output, 3 VDC, negative polarity.
Plug-tip diameters: outer, 3.4 mm; inner, 1.3 mm. Rated at 250 milliamperes or
greater. Before you purchase an AC adaptor, please call us at one of the numbers shown on page 3. We can advise you as to where you can purchase a suitable one that will not damage your radio.
OPENING THE HINGED COVER
Open the hinged cover 12 by pulling on the latch (middle right side). The cover
is hinged on the left side and opens to the left.
HOW TO TURN THE RADIO ON AND OFF
There are two ways to turn the radio on and off. Both are shown below:
ON/OFF using the 'SLEEP' button 10 and 'OFF' button 14 and ON/OFF using the
'POWER/STANDBY' button 13 . The 'SLEEP' method only works if the clock is set.
ON/OFF USING THE 'SLEEP' AND 'OFF' BUTTONS
To turn it on, press the 'SLEEP' button 10 . To turn it off, press the 'OFF' button
14 . When initially turned on, "60" will appear in the LCD for 5 seconds before
the frequency display appears. Please note that the radio will automatically turn
off after "60" minutes. This helps prevent batteries from running down if the
radio is turned on accidentally. Turning the radio on in this manner is associated
with the sleep timer function. See the section below titled HOW TO SET THE
SLEEP TIMER page 11 for more details.
6
7
O P E R A T I O N
G U I D E
ON/OFF USING THE 'POWER/STANDBY' BUTTON
This method only works if the clock is set (see HOW TO SET THE CLOCK,
below). Turn off the radio. After pressing the POWER/STANDBY button 13
once, 'STANDBY' appears in the display. Now the radio can be turned on and
off by pressing the POWER/STANDBY button 13 . It can also be turned off by
pressing the OFF button 14 . To deactivate the STANDBY feature, press-andrelease the POWER/STANDBY button 13 until 'STANDBY' disappears from the
display.
CONTROLLING THE VOLUME
Control the volume with the volume control knob
USING EARPHONES
Plug the earphones into the earphone jack
3.5 mm (1/8 inch) plug will work.
G E T T I N G
19
18 .
. Most earphones with a standard
S T A R T E D
SETTING UP THE RADIO FOR AM BAND TUNING
AM stations in North, Central and South America are spaced in 10 kilohertz
tuning intervals. Other parts of the world use 9 kilohertz tuning intervals. The
selector switch is located on the top-left of the radio 16 .
To set the radio up for 10 kilohertz tuning, turn the radio off. Then slide
the selector switch to the left. Then turn the radio on.
To set the radio up for 9 kilohertz tuning, turn the radio off. Then slide
the selector switch to the right. Then turn the radio on.
O P E R A T I O N
G U I D E
HOW TO TUNE MANUALLY
Turn the radio on. Make sure that the AUTOSCAN feature is not engaged (see
below). Select FM, AM or SW. Use quick, short presses of the +/- buttons to
move up or down frequency. The + button is used to tune up frequency, the button is used to tune down frequency. If your previous radios had a tuning
knob, these buttons perform the same function, but in a much more efficient,
precise manner.
HOW TO USE THE AUTOSCAN FEATURE
Turn the radio on. Select FM, AM or SW. Press-and-release the AUTOSCAN button 6 once. 'AUTOSCAN' appears in the upper left of the LCD. Then press-andrelease either the + or - tuning button 3 , 4 . The + button is used to autoscan
up frequency, the - button is used to autoscan down frequency. The tuner will
automatically stop on stations. To deactivate the autoscan feature, press-andrelease the AUTOSCAN button 6 . 'AUTOSCAN' will disappear from the LCD.
HOW TO STORE STATIONS INTO MEMORY
There are 30 memories, 10 each for FM, AM and SW. Turn the radio on, then
tune to the station that you wish to store into memory. Press-and-release the
STORE button 8 . A memory digit will flash in the upper right corner of the LCD
2 . Then decide which of the 10 memories to store it into. To store it, press the
CH-UP button 7 until it reaches your flashing chosen memory channel, on the
top right of the LCD 2 . Then press-and-release the STORE button 8 again.
HOW TO OVERWRITE THE CONTENTS OF A MEMORY
Store a new frequency into it, using the procedure outlined above. Memories
are never empty, or blank, therefore it is best to store a known station into
each memory position.
HOW TO USE THE RADIO
Turn the radio on. Each press of the BAND button 5 causes AM, FM or SW to
appear in the left side of the display. Frequencies are displayed as numbers in
the display. AM frequencies are in Kilohertz; FM and SW frequencies are in
Megahertz. Extend the antenna 1 when listening to FM or shortwave. It need
not be extended when listening to AM stations.
Note: a detailed example on how to tune shortwave is given later in this manual. See USING YOUR
FOR SHORTWAVE LISTENING.
HOW TO ACCESS WHAT YOU HAVE STORED INTO MEMORY
Turn the radio on. To access a station that you have stored into memory, pressand-release the CH-UP button 7 until you reach the station that you wish to
hear. The station's frequency and the memory number will appear in the display.
To auto-scan the memories, press the CH-UP button 7 for two seconds, then
release it. The scanner will stop on each memory for about 5 seconds, then
move on. To stop the scan, press-and-release the CH-UP button 7 .
8
9
O P E R A T I O N
G U I D E
O P E R A T I O N
G U I D E
HOW TO SET THE CLOCK
NOTE: this is a 24-hour clock system, e.g., 6 p.m. is shown as 18:00 hours. The
clock can be set with the radio turned on or off. While keeping the TIME SET
button 15 pressed-in, press the + button 3 to set the hour and the - button 4
to set the minutes. Release the TIME SET button 15 when finished.
DEACTIVATING THE ALARM
Press-and-release the POWER/STANDBY button 13 until 'STANDBY' no longer
appears in the display. Then press-and-release the TIMER button 9 until
'TIMER' disappears from the display.
HOW TO SET, ACTIVATE AND DEACTIVATE THE ALARM
The alarm feature can be set to turn the radio on and off at a specified time.
Setting the alarm ON/OFF times can be done while the radio is turned on or off.
NOTE: in the setting procedures outlined below, each successive step must be
performed within 5 seconds of the previous step, otherwise, the setting procedure must be started again.
HOW TO SET THE SLEEP TIMER
The sleep timer allows the radio to play for a specified number of minutes
before it turns off. It operates independently of the alarm feature. This is done
with the SLEEP button 10 and can be done with the radio turned on or off. The
first press-and-release of the SLEEP button 10 sets the sleep timer for 60 minutes (60 appears in the display). Each successive press-and-release reduces the
time to 50, 40, 30, 20, 10 and 0 minutes. The radio will automatically turn off
after playing for the selected time period. Selecting 0 minutes simply deactivates the sleep timer.
SETTING THE ALARM-ON TIME
1. Press-and-release the TIMER button 9 until 'TIMER ON' is in the
display.
2. While keeping the TIME SET button 15 pressed-in, press the + button
to set the hour and the - button 4 to set the minutes for the alarm
turn-on time.
3. Release the TIME SET button 15 . After setting, 'TIMER ON' in the
display will change to 'TIMER'.
SETTING THE ALARM-OFF TIME
1. Press-and-release the TIMER button 9 until 'TIMER OFF' is in the
display.
2. While keeping the TIME SET button 15 pressed-in, press the + button
to set the hour and the - button 4 to set the minutes for the alarm
turn-off time.
3. Release the TIME SET button 15 . After setting, 'TIMER OFF' in the
display will change to 'TIMER'
ACTIVATING THE ALARM
Press-and-release the TIMER button 9 until 'TIMER ON' is in the display.
'TIMER ON' will change to 'TIMER' after 5 seconds. Now press-and-release the
POWER/STANDBY button 13 . 'STANDBY' appears in the display above 'TIMER'.
The alarm is now activated. Remember to select your desired station and
volume level before activating the alarm function.
10
3
USING YOUR
SHORTWAVE LISTENING
Thoroughly read the SHORTWAVE LISTENING GUIDE included with your radio. It
completely explains everything needed to successfully enjoy shortwave listening.
Once you have read about shortwave "bands", use the examples below to try
out your radio's shortwave abilities. Refer to pages 6 through 9 of the SHORTWAVE LISTENING GUIDE.
Note: your radio shows shortwave frequencies in megahertz (MHz).
3
HOW TO TUNE AROUND IN A SHORTWAVE BAND
Let's use a specific example to learn how to "tune around" in a shortwave
band and find stations. It's really no different from tuning around in the AM
and FM bands for finding local stations. We will use the shortwave 31 meter
band, an evening band, in the example below, but you can substitute any other
band based on it's suitability for the time of day that you are listening, e.g., 19
meters during daylight hours. Refer to pages 6 through 9 of the SHORTWAVE
LISTENING GUIDE.
11
O P E R A T I O N
G U I D E
The traditional 31 meter band is considered a night band, covering the frequency
range 9.5-9.9 MHz. In practice, broadcasts may be found starting at 9.2 MHz
and extending all the way up to, but not including 10 MHz.
Step 1. Turn on the radio.
Step 2. Tune to the frequency at the beginning of the band, in this case,
9.5 MHz.
Step 3. Now tune manually, using quick, short over-and-over presses on
the + tuning button. Each press advances the frequency by 5 KHz.
Shortwave broadcast stations are spaced in these 5 KHz steps.
Now, tune through the band, listening to any stations that you
find interesting. You can move around in the band, going up or
down frequency, by pressing the + or - tuning buttons.
Step 4. Alternatively, use the AUTO SCAN feature. The tuner will automatically stop when it encounters a station strong enough to stop the
scanner. Weaker stations may be missed when using this method
in shortwave. If you are looking for stations that may be weak,
use the manual tuning method outlined in step 3 above.
HOW TO GO TO A SPECIFIC SHORTWAVE FREQUENCY
Press-and-hold the + or - button until the tuner gets into the general frequency
range of where the specific desired frequency is located. Then, release-pressrelease the button to stop the scan. Then, use individual, quick, short presses of
the + or - buttons to get to the exact frequency that you are selecting.
LEARNING MORE ABOUT INTERNATIONAL SHORTWAVE BROADCASTS
Refer to the GRUNDIG SHORTWAVE LISTENING GUIDE that came with your
radio, contact us by phone or
visit our web site.
12
T R O U B L E
S H O O T I N G
Contact Grundig if none of the suggestions below restore normal operation.
SHUTS OFF ABRUPTLY WHILE PLAYING
Dead batteries. Replace them with new, fresh AA alkaline batteries.
WILL NOT TURN ON AND LCD IS ACTIVE
Dead batteries - as above.
WILL NOT TURN ON AND LCD IS BLANK
Probably dead batteries. If not, a 'reset' may be needed. To perform a 'reset',
remove the batteries or unplug AC adaptor for about one minute. Then, reapply
power. The display should become active and the radio should turn on.
WILL NOT TURN ON USING THE 'POWER/STANDBY' BUTTON
The clock must be set to turn the radio on/off with this method. - : - - must not
appear in the clock display.
CLOCK DISPLAY READS - : - - AND MEMORIES ARE LOST
The radio was turned on when batteries were replaced or when an AC adaptor
was plugged in or out.
THE ALARM FEATURE DID NOT WORK
After setting the ALARM-ON time, 'STANDBY' was not activated to appear in
the LCD. See the instructions for SETTING THE ALARM-ON TIME.
T E C H N I C A L
I N F O R M A T I O N
FREQUENCY RANGE: FM 87.5-108 MHz; MW (AM) 530-1710 KHz; SW 2-30 MHz.
TUNING CONTROLS: Up/Down tuning buttons. Autoscan and manual tuning.
30 Memories with memory scan, 10 each, AM, FM, SW.
ADDITIONAL FEATURES: Dual conversion superheterodyne AM and SW circuitry. Liquid Crystal Display - 2.2 x 3.5 cm. Clock. Alarm - wake to radio. Sleep
Timer.
SPEAKER: 57 mm (2-1/4 inch); 16 ohm; .25 watt.
EARPHONE SOCKET: 3.5 MM (1/8 inch)
POWER SUPPLY: Two AA batteries. 3 VDC AC adaptor (not supplied).
AC ADAPTOR SPECIFICATIONS: (adaptor is not included with purchase)
Output, 3 VDC, negative polarity, 250 milliamperes or greater; Plug tip diameter
dimensions, 3.4 mm outer, 1.3 mm inner.
ANTENNA: Telescopic for FM, SW. Ferrite Bar (internal) for AM.
DIMENSIONS: 11.5 x 6.5 x 2.4 cm. 4 1/2 x 2 9/16 x 7/8 inch.
WEIGHT: 165 g.
CABINET COLOR: Titanium Silver
13
S E R V I C E
I N F O R M A T I O N
You may contact GRUNDIG Service Department for additional information or
assistance by calling 1(800) 872-2228 in the U.S.A. or 1(800) 673-1648 in
Canada. Monday through Friday, 8:30 a..m. - 4:00 p.m. (PST) except on holidays.
Should you want to return your unit for service, pack the receiver carefully using
the original carton or other suitable container. Write your return address clearly
on the shipping carton and on an enclosed cover letter describing the service
required, symptoms or problems. Also, include your daytime telephone number
and a copy of your proof of purchase. The receiver will be serviced under the
terms of the GRUNDIG Limited Warranty and returned to you.Call for a Return
Authorization prior to shipping your unit.
ONE YEAR
LIMITED WARRANTY
GRUNDIG warrants to the original purchaser this product shall be free from
defects in material or workmanship for one year from the date of original
purchase.
During the warranty period GRUNDIG or an authorized GRUNDIG service facility
will provide, free of charge, both parts and labor necessary to correct defects in
material and workmanship. At their option, GRUNDIG may replace a defective
unit.
(1) Complete and send in the Warranty Registration Card within ten (10) days
of purchase.
(2) Call Lextronix or the nearest authorized service facility, as soon as possible
after discovery of a possible defect. Have ready
(a) the model and serial number.
(b) the identity of the seller and the approximate date of purchase.
(c) a detailed description of the problem, including details on the electrical connection to associated equipment and the list of such equipment.
14
ONE YEAR
LIMITED WARRANTY
(3) Lextronix will issue a Return Authorization number and the address to which
the unit can be shipped. Ship the unit in its original container or equivalent,
fully insured and shipping charges prepaid.
Correct maintenance, repair, and use are important to obtain proper performance from this product. Therefore carefully read the Instruction Manual. This
warranty does not apply to any defect that GRUNDIG determines is due to:
(1) Improper maintenance or repair, including the installation of parts or accessories
that do not conform to the quality and specification of the original parts.
(2) Misuse, abuse, neglect or improper installation.
(3) Accidental or intentional damage.
(4) Battery leakage.
All implied warranties, if any, including warranties of merchantability and fitness
for a particular purpose, terminate one (1) year from the date of the original
purchase.
The foregoing constitutes GRUNDIG’s entire obligation with respect to this
product, and the original purchaser shall have no other remedy and no claim
for incidental or consequential damages, losses, or expenses. Some states do
not allow limitations on how long an implied warranty lasts or do not allow the
exclusions or limitation of incidental or consequential damages, so the above
limitation and exclusion may not apply to you.
This warranty give you specific legal rights and you may also have other rights
which vary from state to state.
For service information contact:
LEXTRONIX, INC.
3520 Haven Avenue, Unit L
Redwood City, CA 94063-4605 U.S.A.
1 (650) 361-1611
Customer Service Center Phone:
1 (800) 872-2228 (U.S.A.) or 1 (800) 637-1648 (Canada)
Telefax:
1 (650 361-1724
World Wide Web Site:
http://www.grundigradio.com
15
30
29
28
MODE
BW
S METER
AGC
SYNCHRO
M E M O R Y
27
26
25
24
FREQUENCY
L O G
23
22
21
20
19
18
17
16
15
14
13
STATION NAME
C H A N N E L
12
11
10
09
08
07
06
05
04
03
02
01
00
CHANNEL
M E M O R Y
C H A N N E L
L O G