1
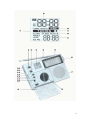
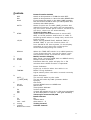
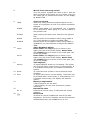
TRAVELLER II PE
OWNER’S MANUAL
HOW TO USE
YOUR GRUNDIG
TRIIPE AM/FM/SW Radio
NEED HELP? HERE’S HOW TO CONTACT US:
• From the United States: 1-800-872-2228
• From Canada: 1-800-637-1648
• From everywhere else: 650-903-3866
• e-mail: [email protected]
• World Wide Web: www.grundigradio.com
• Eton Corporation/Grundig
1015 Corporation Way
Palo Alto, California 94303
United States
Controls............................................................................................................................. 4
Power Supply.................................................................................................................... 6
Setting the Time................................................................................................................ 7
Home Time............................................................................................................... 7
World Time ............................................................................................................... 7
Select the World Time.............................................................................................. 7
Radio Operation................................................................................................................ 8
Switching on ............................................................................................................. 8
Selecting the wave band........................................................................................... 8
Tuning-in a station.................................................................................................... 8
Volume ..................................................................................................................... 8
Switching off ............................................................................................................. 8
Antennas .................................................................................................................. 8
Headphones ............................................................................................................. 8
Alarm Operation................................................................................................................ 9
Setting the alarm time .............................................................................................. 9
Alarm by radio .......................................................................................................... 9
Alarm by Buzzer sound ............................................................................................ 9
Sleep Set Operation/Automatic Disconnection................................................................. 9
Precautions ..................................................................................................................... 10
2
3
Controls
1
OFF
ON
HWS
AUTO
2
STOP
12/24
RECALL
3
A
B
00:00
SLEEP
C
•
TUNING
D
AUTO
HWS (SNZ)
E
00:00
ALARM
F
24
AM
PM
4
5
6
7
fm
mw
sw1...sw5
tuning
volume
Behind the cover
Power Function Switch
Switch to this position to TURN the radio OFF.
Switch to this position to have the radio POWER ON
If you locate this switch in the HWS (SNZ) position,
the unit buzzies at alarm time you have preset and
continue with HWS system.
Same function as on HWS (SNZ) position but
instead of buzzing, the radio will be automatically turned on at the alarm time to continue for
one hour, then turn off automatically
Triple Function Key
When POWER FUNCTION switch is set to OFF,
SNZ, or AUTO position and buzzer or radio is
sounding within alarm or sleep time, touch this
knob to stop.
When setting HOME TIME, WORLD TIME or
ALARM TIME, if you are used to either 12 hour AM.PM or 24 hour system, fix the display
according to your choice by touching this
switch before adjusting the times.
When the TIME SET switch is on LOCK position,
if you forget the time you set for alarm, push
and hold this knob to recall the alarm rime.
Multi Function Display
Main Timer (current HOME time or WORLD time).
Sleep Function Indicator.
Indicates that the radio will play for 1-59
minutes when SLEEP function is operated.
Power Indicator.
Lights up or blinks when the radio is on.
Radio Tuning Indicator.
Lights steady when the radio is tuned correctly
Alarm Indicator
The set will wake by the radio
The set will wake by HWS (Humane Wake:
System)
Sub Timer
Current WORLD time or HOME time
Alarm time
Time System Indicator
24-hour system
12-hour AM system 00:00 to 1 1:59 (ante meridiem)
12-hour PM system 1 2:00 to 1 1:59 (post meridiem)
Telescopic antenna FM/SW
Band Selector
FM
medium wave
short wave 1...5
Tuning Control
Volume Control
4
8
World Time Selecting switch
Turn the pointer towards the name of the c with the
same longitude as the place you v to locate, then you
can easily get it's present time shown on the display
as WORLD TIM
9
LOCK
SLEEP
ALARM
HOME
WORLD
10
home
world
11
Minute
12
Reset
13
Hour
14
15
Dc 3v
16
Time Set switch
When any timing has been properly adjust put the
switch in this position to lock it to prevent accidental
changed.
Before using HOUR (13) and MINUTE (11) 1 Adjustor
to fix sleep timer when going to t set the switch in
this position first.
When setting the alarm time, switch to this position
first.
Set the switch in this position before using HOUR It
(11) Time Adjustor to adjust the HOME TIME.
Set the switch in this position before using HOUR (1
3)/MINUTE (11) Time Adjustor to adjust the WORLD
TIME.
Timer Exchange Switch
Home Timer with large figures is shown in the
upper part (3A) of the main display. World Time
with smaller figures is shown in the lower part (3E)
of the sub display.
Home Timer with large figures is shown in the
upper part (3A) of the main display. World Time
with smaller figures is shown in the lower part (3E)
of the sub display.
Time Adjustor
To adjust MINUTE shown on the display. The button
can be press either continuously or intermittently. If
it is pressed continuously, the display will advance
quickly.
To reset the clock system to its normal and initial
condition.
To adjust Hour shown on the display. The button can
be pressed either continuously or intermittently. If it
is pressed continuously, the display will advance
quickly.
Battery Compartment
2 UM-3 batteries for the radio
1 UM-3 battery for the clock movement( always
necessary)
External DC Jack
External DC source input, 3 Volts/200 mA, Center
negative.
Phone Jack
Terminal for stereo headphones with 26-32 Ohm
impedance. The built-in speaker will be disconnected
automatically when the headphone is in use.
5
Power Supply
a) Battery operation
- Open the battery compartment lid (14) by pushing in the lock of the
lid and lift it off.
- Insert one >AA< size battery for CLOCK movement and 2 >AA> size
batteries for RADIO into the battery compartment. The batteries must
be installed in position with polarity as indicated in the battery
compartment. Place the ribbon under the batteries for
replacement. Then close the lid.
-Always remove the batteries for the radio if the unit is not going
to be used for a month or more, or if it used with AC exclusively,
but not remove the innermost battery used for clock movement.
Batteries left in the unit may leak and cause damage.
b) Mains operation
Plug an external DC source of which the output should be 3 Volts,
center negative for 200mA into the external DC jack. When the
jack is plugged in, battery power for the radio will be
disconnected automatically.
Note:
Be sure to remove the adaptor plug from the jack when you
operate the unit on the battery power.
6
Setting the Time
Home Time
- Set the TIME SET switch (9) to HOME position.
- Press the triple function key (2) to select 12-hour AM/PM or 24 hour
display mode.
-Use >H< (13) and >M< (11) TIME ADJUSTOR for your home time on
the MAIN TIME display (3A).
Use the >M< key (11) to set the second TO >00< on the SUB TIME
display (3E).
-Put the TIME SET switch (9) to LOCK position.
World Time
- Set the TIME SET switch (9) to WORLD position.
- Turn the WORLD TIME SELECTING switch (8) towards the city with the same
time zone as that of your hometown.
- Use the >H< (13) and >M< (11) TIME ADJUSTOR to adjust the time in the SUB
TIME display (3E) with exactly the same Hour and Minute fixed on the MAIN
TIME display (3A).
- Put the TIME SET switch (9) back to LOCK position.
Select the World Time
Turn the WORLD TIME SELECTING switch (8) towards the name of any city
with the same time zone as the place you want to locate, shown on the time
scale and on the cover.
You can easily read it's present time shown on the display as WORLD time. At
the same time you can read your home time, shown on the display as HOME
time.
Notes:
The MAIN TIMER with large figures shown on part (3A) of the display is
normally fixed as HOME TIME, and the SUB-TIMER on lower part (3E) with
smaller figures normally shows WORLD TIME when the switch HOME-WORLD
is positted on HOME.
However, the 2 timings can be exchanged for both positions and figures when
this switch be set to WORLD position.
-When installing the clock battery or the unit be wrongly operated, maybe it
will cause the LCD to show abnormal figures or the colons of clock stop blinking
or even not display at all, use a toothpick or any equivalent to sting the RESET
HOLE (12) slightly so that the clock system will reset to its normal and initial
condition.
If not necessary do not try to sting the RESET hole.
7
Radio Operation
Switching on
Slide switch POWER FUNCTION (1) to position ON. The TUNING indicator
(3c) will be lighted
Selecting the wave band
Slide the BAND SELECTING switch (5) to the desired wave band.
Position
FM 87.5 - 108 MHz
MW 520 - 1620 kHz
SW1 49 m band (5.80 - 6.20 MHz)
SW2 41 m band (7.10 - 7.50 MHz)
SW3 31 m band (9.50 - 9.90 MHz)
SW4 25 m band (11.65 - 12.05 MHz)
SW5 19 m band (15.10 - 15.60 MHz)
The frequencies available within each band are marked on the
corresponding dial scale.
Tuning-in a station
The desired station is tuned-in by turning the knob TUNING (6). When the dot
and the TUNING indicator (3C) lights steady, the station is tuned-in correctly.
When receiving a weak signal station the TUNING indicator (3C) is flashing.
Volume
Turn control VOLUME (7) upward (louder) or downward (softer).
Switching off
Slide switch POWER FUNCTION (1) to position OFF.
Antennas
For FM pull out the telescopic antenna (4) fully and position it for the best
possible reception by adjusting the length and direction. For SW pull out the
telescopic antenna fully.
For the reception of medium wave stations, the unit is equipped with a ferrite
directional antenna. By turning the unit, reception can often be improved and
interfering stations faded out.
When listening in a train, car or building, use the radio near a window to obtain
best possible reception.
Headphones
If you don't want to bother other people around you, use an earphone or a
stereo headphone and insert the plug into the built-in PHONE JACK (16) for
private listening.
The built-in speaker is switched off automatically.
8
Alarm Operation
Setting the alarm time
- Set the TIME SET switch (9) to ALARM position. The actual time indication
is faded out.
- Press button HOUR (13) until the alarm hour is reached. For exact time,
press button MINUTE (11) until the correct alarm time is shown.
- Set the TIME SET switch (9) back to LOCK position. The actual time
indication returns.
Note:
The set alarm time may be checked by pressing button RECALL (2).
Alarm by radio
Slide switch POWER FUNCTION (1) to ON, tune in the desired station and
volume and then slide switch POWER FUNCTION (1) to position AUTO. In this
manner, the set is turned off again and switched over the alarm time. The
ALARM indicator AUTO (3D) lights.
As soon as the alarm time has been reached, the unit switches on
automatically and wakes you with the programme of the tuned-in station.
Approximately 59 minutes later, the unit switches off again automatically.
If you wish to listen to the radio for more than 59 minutes, slide the switch
POWER FUNCTION (1) to position ON; should you wish to switch off the set
after being roused, press the button (2). This will turn the radio off for 24
hours, till the wake up time on the following day.
Alarm by Buzzer sound
Set switch POWER FUNCTION (1) to position HWS (Humane Wake System)
(the ALARM indicator HWS (SNZ)(3D) lights). At the selected alarm time the
unit switches on automatically and wakes you with buzzer sound.
The buzzer sound starts very low and slowly gets louder and louder. After
about one minute the buzzer sound stops. The alarm will be repeated at an
interval of approx. 4 minutes up to 5 times. So you get waked up very gentle
and sure.
To turn off the buzzer simply press the STOP button (2). (The radio will wake up
automatically on the following day), or slide the switch POWER FUNCTION (1) to
OFF position. However, should music be desired, slide the switch POWER
FUNCTION (1) to position ON.
Note:
As long as the switch POWER FUNCTION (1) is set at the position AUTO or
HWS the ALARM indicator (3D) lights and you will be awakened by radio or
buzzer at the same time everyday. Set switch POWER FUNCTION (1) to OFF
position if you do not wish the radio or buzzer awaking you at the next day.
Sleep Set Operation/Automatic Disconnection
- Set POWER FUNCTION switch (1) in any position among OFF, SNZ or AUTO.
- Set the TIME SET switch (9) to SLEEP position.
- By pressing button HOUR (13) the set switches on, plays for 59 minutes
and then disconnects automatically.
You may also set a shorter playing time than 59 minutes. Then press the
button MINUTE (11) until the desired playing time between 1 and 59
minutes is indicated. The unit may be disconnected within the set playing
time by pressing the STOP button (2).
Note:
Set the TIME SET switch (9) back to LOCK position. The actual time indication
returns.
9
Precautions
Do not expose the set to direct sun radiation. Especially in cars it may suffer
from excessive heat during the hot summer months. Do not position the set in
the direct vicinity of radiators and protect if from humidity. Proper operation is
ensured between 00 and 40 0 C.
Only use a piece of soft cloth and a mild detergent solution for cleaning, but never
any chemicals, benzene etc.
10