1
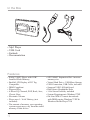
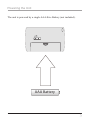
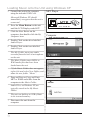
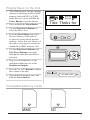
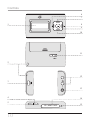
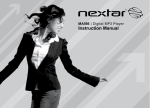
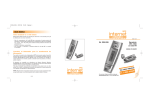
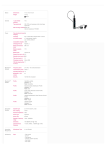
MW338B 1GB INSTRUCTION MANUAL Contents Warnings & Precautions.................................................................................... 2 Important Safety Instructions............................................................................. 3 In the Box & Features........................................................................................ 4 Powering the Unit.............................................................................................. 5 Loading Music onto the Unit using Windows XP............................................... 6 Playing Music on the Unit.................................................................................. 7 Using the Microphone to Record Audio............................................................. 8 Main Menu......................................................................................................... 9 Controls and Definitions............................................................................. 10-11 Service Information......................................................................................... 12 Warnings and Precautions TO PREVENT FIRE OR SHOCK HAZARDS, DO NOT EXPOSE THIS UNIT TO RAIN OR MOISTURE. This symbol, located on back or bottom of the unit, is intended to alert the user to the presence of uninsulated “dangerous voltage” within the product’s enclosure that may be of sufficient magnitude to constitute a risk of electric shock to persons. This symbol, located on back or bottom of the unit, is intended to alert the user to the presence of important operating and maintenance (servicing) instructions in the literature accompanying the appliance. CAUTION: TO PREVENT ELECTRIC SHOCK, MATCH WIDE BLADE OF PLUG TO WIDE SLOT, FULLY INSERT. To reduce the risk of electric shock, do not remove cover (or back). There are no user-serviceable parts inside. Please refer any servicing to qualified service personnel. WARNING: Changes or modifications to this unit not expressly approved by the party responsible for compliance could void the user’s authority to operate the equipment. NOTE: This equipment has been tested and found to comply with the limits for a Class B digital device, pursuant to Part 15 of the FCC Rules. These limits are designed to provide reasonable protection against harmful interference in a residential installation. This equipment generates, uses, and can radiate radio frequency energy and, if not installed and used in accordance with the instructions, may cause harmful interference to radio communications. However, there is no guarantee that interference will not occur in a particular installation. If this equipment does cause harmful interference to radio or television reception, which can be determined by turning the equipment off and on, the user is encouraged to try to correct the interference by one or more of the following measures: • Reorient or relocate the receiving antenna. • Increase the separation between the equipment and receiver. • Connect the equipment into an outlet on a circuit different from that to which the receiver is connected. • Consult the dealer or an experienced radio/TV technician for help. In the Box • Mp3 Player • USB Cord • Earbuds • Documentation Features • WMA™/MP3 Player with 1GB* Installed Flash Memory • Backlit LCD Display is ID3 Tag Compatible • DRM Compliant • Plug and Play • 6-Preset EQ: Normal, POP, Rock, Jazz, Classic, Bass • Electronic Volume • Player uses 1-’AAA’ Battery, (not included) • The amount of memory your operating system reports may vary from the stated memory of this device. • SD™/MMC Expansion Slot - increase memory size • Virtual Hard Drive - USB Mass Storage • USB Connection, USB Cable, included • Supports USB 2.0 High Speed • Dual Stereo Headphone Jacks • 1-Set Stereo Earbuds, included • System Requirements: Windows™XP • On-Line WMA™ music downloads with DRM require Windows™ XP & Windows Media Player™10 Powering the Unit The unit is powered by a single AAA-Size Battery (not included). HOLD AAA Battery Loading Music onto the Unit using Windows XP 1 Connect the unit to the computer using the included USB Cord. Microsoft Windows XP should immediately recognize that the unit is connected. MP3 Player FS 2 Press the Menu Button on the unit until the LCD Display reads MTP. 3 Click the Start Button on the computer, then double click the My Computer icon. 4 Double Click on the drive labelled Audio Player. 5 Double Click on the icon labelled Audio Player. The Mic Folder stores any audio recorded from the built in microphone on the unit. The Music Folder stores MP3s or WMA audio files that have been loaded onto the unit. * If the Music Folder does not appear, right-click and select New Folder, and name the new folder “Music”. 6 Drag and Drop or Copy and Paste MP3 or WMA audio files from the computer to the Music Folder. Audio Files, on Windows XP, are typically stored in the My Music Folder. The unit can hold up to 1GB of data in the internal memory. 7 Disconnect the unit from the computer. MTP Ver3.10.00.01 Computer Playing Music on the Unit 1 After loading music into the internal memory or inserting an SD or MMC memory card with MP3 or WMA audio files on it, press and hold the Power Button to turn the unit on. 2 Press and hold the Menu Button. WMA 192 00:00 01/04 25 Title: Thnks for 3 Use the Skip/Search Buttons to select the Music Icon. 4 Press the Menu Button and select Internal Memory if the audio to be played is stored on the internal memory. Select External Memory if the audio to be played is stored on a loaded SD or MMC memory card. POWER 5 Use the Skip/Search Buttons and Play/Pause Buttons to navigate through the audio files and make a selection. v+ 6 Plug a set of headphones, or the included earbuds into one of the Headphone Outputs. 7 Press the V+ or V- Buttons to adjust the volume of the unit. v- MENU REC 8 When finished listening, press and hold the Power Button. SD / MMC CARD MIC Compatible Memory Cards MMC SD Using the Microphone to Record Audio 1 With the unit powered on, press and hold the Menu Button to access the menu. v+ 2 Select the Voice Icon. * If no files have been recorded, the Voice Icon will not be available. To record a file without going to the Voice Icon, go to Music Mode, and press and hold the Record Button to begin recording audio through the built-in Microphone. 3 Press and hold the Record Button to start recording audio through the built-in Microphone. 4 Press the Play/Pause Button to pause and continue the recording. 5 Press the Record Button to stop recording. In Music Mode, press and hold the Record Button to begin recording audio through the built-in Microphone. Audio can only be recorded onto the Internal Memory. 6 To play previously recorded audio, select the Voice Icon in the menu, then skip through and play the audio files the same way files are played in Music Mode. (See “Playing Music on the Unit” on page 7) v- MENU REC SD / MMC CARD MIC Main Menu Press and hold the Menu Button to access the Main Menu. Press the Play/Pause Button to make selections in the menu. Music Access and play music files stored on the unit or on a loaded SD or MMC memory card. Voice Access and play audio files recorded from the built-in microphone. Settings Adjust the EQ, Play Mode, Display, Sleep Timer, Shutdown Time, and Record Settings. System View the current storage capacity, change the language, load the defaults, or delete all of the files on the internal storage. Exit Select the Exit Icon to return to the last used mode (either Music or Voice) Settings Menu EQ Equalizer Adjust the equalizer between six settings: Normal, Pop, Rock, Classical, Jazz, and Bass. Play Mode Normal, Repeat One, Repeat All, Shuffle Repeat, Repeat Folder, and Preview. Display Adjust the Contrast, Backlight, and Title Information. Sleep Timer Set the Sleep Timer to 30, 60, or 90 minutes. Shutdown Set the Shutdown time to 2, 5, or 10 minutes. Record Settings Adjust the Record Settings to 8000Hz, 11000Hz, 16000Hz, or 22000Hz. System Menu Memory/FW View the current storage capacity. Language Switch between English, Español, and France. Load Defaults Restore the unit’s settings to the factory default. Delete All Select the Delete All icon to delete all files stored on the internal memory. Controls 6 7 v+ 1 8 9 v- 10 11 HOLD 2 12 POWER 3 4 5 14 MENU 15 REC SD / MMC CARD 13 MIC Control Definitions 1 LCD Display The LCD Display shows all of the unit’s operations and music information. 9 2 Lanyard Connection Use the Lanyard Connection to connect a lanyard or string to the unit. 10 V- (Volume) Button Press the V- Button to decrease the unit’s volume. 3 Mini-USB Connection Use the Mini-USB Connection and the included USB cable to connect the unit to a computer. 4 REC (Record) Button Press the REC Button to record a voice or sounds into the microphone. (The unit can only record onto the internal memory.) 11 Hold Switch Use the Hold Switch to lock the keys on the unit to keep them from accidentally getting pushed. 5 Menu Button Press and hold the Menu Button to access the unit’s menu. Press the Menu Button to navigate the internal or external memory on the unit. 6 (Skip/Search) Button Press the Skip/Search Button to skip between tracks. Press and hold the Skip/Search Button to search through an individual track. 7 V+ (Volume) Button Press the V+ Button to increase the unit’s volume. 8 (Skip/Search) Button Press the Skip/Search Button to skip between tracks. Press and hold the Skip/Search Button to search through an individual track. Play/Pause Press the Play/Pause Button to play or pause an audio track on the unit. 12 Headphone Outputs Use the Headphone Outputs to listen to music from the unit on a set of headphones or earbuds. 13 Power Button Press and hold the Power Button to turn the unit off and on. 14 SD/MMC Card Slot The SD/MMC Card Slot is a receptacle for SD and MMC memory cards. 15 MIC (Microphone) The Microphone records external audio from the unit when in Voice or Music Mode. LCD Display Equalizer Settings Track Time Repeat Setting Battery Life File Type Bit Rate Play/Pause Hold WMA 192 00:00 01/04 25 Title: Thnks for Volume Track Number Track Title Service Information Address Phone Fax Email Website 2116 Carr Street, St. Louis MO, 63106 1-314-621-2881 1-314-588-1805 [email protected] www.gpx.com To download this Instruction Manual in English, Spanish, or French visit the Support section at www.gpx.com. © 2007 DPI, Para descargar este manual de instrucción en inglés, español, o francés visite la sección de la ayuda en www.gpx.com. Pour télécharger ce manuel d’instruction en anglais, espagnol, ou le Français visitez la section de soutien à www.gpx.com. Inc. All trademarks appearing herein are the property of their respective owners. All products subject to change without notice.