1
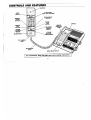
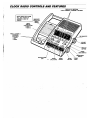
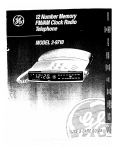
Telephone/FM=AM
Clock Radio
WARNING: TO PREVENT
ELE~RIC
SHOCK HA~RD,
=POSE
THIS PRODU~
~
MOISTURE.
FIRE OR
DO NOT
RAIN OR
INTRODUCTION
TABLE OF CONTENTS
Your Telephone/Clock Radio is a carefully engineered, highquality,
durable product with natural sound quality, modern features and
elegant styling. It is designed to give you the quality and convenience
you expect in a telephone andaclwk
radio.
CONTROLS
AND FEATURES . . . . . . . . . . . . . . . . . . . ...3
SET-UP OPERATION
. . . . . . . . . . . . . . . . . . . . . . . . . . ...4
PULSWONE
SWITCH . . . . . . . . . . . . . . . . . . . . . . . . . ...5
MAKING AND RECEIVING CALLS . . . . . . . . . . . . . . . ...5
AUTOMATIC REDIALING . . . . . . . . . . . . . . . . . . . . . . . ...5
MEMORY . . . . . . . . . . . . . . . . . . . . . . . . . . . . . . . . . ...5-6
●
Emergency Quick Dialing
●
Frequently Called Numbers
. Other Storing Procedures
PAUSE FUNCTION . . . . . . . . . . . . . . . . . . . . . . . . . . . ...6
PABXAND PBX USE . . . . . . . . . . . . . . . . . . . . . . . . . . ...6
CHAIN DIALING . . . . . . . . . . . . . . . . . . . . . . . . . . . . . . ...7
BATTERY REPLACEMENT . . . . . . . . . . . . . . . . . . . . . . ...7
REPLACEABLE TELEPHONE CORD . . . . . . . . . . . . . ...8
PRODUCT CARE . . . . . . . . . . . . . . . . . . . . . . . . . . . . . ...8
TROUBLE OR MALFUNCTION.
. . . . . . . . . . . . . . . . . ...9
SERVICE . . . . . . . . . . . . . . . . . . . . . . . . . . . . . . . . . . . . ...9
IMPORTANT INFORMATION
. . . . . . . . . . . . . . . . . . . ...10
CLOCK RADIO CONTROLS AND FEATURES
. . . . . ...11
OPERATING THE RADIO . . . . . . . . . . . . . . . . . . . . . . ...12
SETT;NG THE TIME . . . . . . . . . . . . . . . . . . . . . . . . . . ...12
SETTING THE WAKE TIME . . . . . . . . . . . . . . . . . . . . ...12
. Wake to Alarm
●
Sleepto
Music
●
Sleeo to Music and Wake to Music or Alarm
ADJUSTING
THE DISPLAY BRIGHTNESS . . . . . . . . ...14
ANTENNAS . . . . . . . . . . . . . . . . . . . . . . . . . . . . . . . . . ...14
NO-WORRY BATTERY BACKUP SYSTEM . . . . . . . . . ...14
IN CASE OF DIFFICULTY
. . . . . . . . . . . . . . . . . . . . . ...17
WARRANTY
. . . . . . . . . . . . . . . . . . . . . . . . . . . . . . . . ...18
To familiarize yourself with all its features, please read the following
instructions carefully. Retain this Guide for future reference.
FCC NUMBERIS ~CATED ONTHE BOTTOM OFTE~PHONE
HANOSET
REN NUMBER IS ~TED
ON THE SOTTOM OF TE~PHONE HANOSET
OTHER IMPORTANT INFORMATIONON SACKCOVEROF THISGUIOE
TELEPHONE
OUTLET REQUIREMENTS
A modular (Universal Service Order
Code) USOC: RJ1lC outlet jack
(illustrated) is required.
w
Installation of this telephone in Iotations with 4-prong jacks or with hardwired outlets will require additional
Gonveflers (not included). The dealer
from whom~upurchas~
yourphone
oratelephone supply storecanadvise
you regarding the proper Converter.
2
,.,:
..
CONTROLS AND FEATURES
~
, EARPIECE
3 ONE-TOUCH
QUICK DIAL BUTTONS
‘f
I
CRADLE
MICROPHONE
00000
—00000
00000
—
LITHIUM
BATERY
cOMPARTMENT
.
For convenience,
keep this page open while reading instructions
3
....... .. .. . ..
.
.. .
I
SEFUP
OPERATION
MODULAR
(RJIIC)
TELEPHONE
OUTLET
A. Plug coiled cord into the Handset Modular Jack.
B. Plug telephone cord (on back
of clock radio) into Modular
(RJ1lC) telephone outlet.
c.
Plug the power cord into an AC
outlet.
D. Set Ringer Switch to “HI”.
●
LO = sound will be lower.
●
OFF = telephone will not
ring.
D
E. Set PULS~NE
Switch to
~NE.
If dialing cannot be accomplished, switch to PULSE.
You are not ready to try your new
telephone.
4
.-
AC OUTLET
PULSE/TONE
SWITCH
MEMORY
Enables your phone to work on both Touch-Tone and Pulse dialing
systems.
Pulse Position
.
;ach of the 12 MEMORY Locations is capable of storing a telephone
lumber of up to 16 digits. The telephone number stored in the 3
:mergency/Quick Dial positions can be automatically dialed with one
Duch. MEMORY positions 1-9 are automatically dialed with two
Duches (MEMORY
DIAL & number buttons corresponding to
AEMORY Location).
- Compatible with most local telephone companies’
dialing systems.
Touch Tone - Provides tone signals required for some long distance
and special tone-dialing service.
●
●
.
STORING
Generally, telephone companies charge extra for Tone service.
Not available in all localities.
Ememency/Quick
If not available locally, phone will not work with switch in this
position.
Pulse~one
Combination Dialing - If a combination of both Pulse
and Tone dialing is needed to reach your number or special phone
service, switch to the required dialing mode at that point in your dialing sequence.
Dial Numbem:
●
1. PICK-UP
2“
To Receive A Call:
1.PICK-UP
(Make sure Ringer Volume
switch is not in “OFF”
position.)
m
DIAL
Phone
Number
~
Handset.
2. Wait for DIAL TONE.
3. DIAL Phone Number.
4. When finished, HANG UP
PRESS
m:&
CAUTION
~
MAKING TEST CALLS TO EMERGENCY NUMaERS:
1. Remain on the line and briefly explain to the dispatcher the reason for the
call before hanging up.
2. Pefiorm such activities in the off-peak hours, such as early morning hours
or late evenings.
When phone rings:
1. PICK-UP Handset and TALK.
2. When finished HANG-UP
.
w
-
3. HANG UP
&
4. WRITE reference for stored number in corresponding MEMOR’
location on the Directory Card.
MAKING AND RECEIVING CALLS
To Make a Call:
m
Handset.
F@quently
NOTE: Handset must be returned to cradle for radio play and
alarm kyatam operation.
1. PICK-UP
Called Numbem:
Handset.
AUTOMATIC REDIALING
.
The telephone automatically remembers the last number dialed (up
to 16 digits long).
The number will remain in “REDIAU’
until another number is dialed.
4. WRITE reference for stored number in corresponding
Memory location on the Directory Card.
1. To redial a number that you dialed manually, PRESS -].
2. To redial a number that you dialed from Memory, use the Memory
keys again.
5
. .. ..
..
.
DIALING
Emergency/Quick
1. PICK-UP
‘ PAUSE FUNCTION
Dial Numbem:
Used for storing a momentary delay in the dialing sequence of a
stored telephone number. This is generally used when a “PAUSE”
is needed to wait for a dial tone (e.g. after dialing 9 for an outside
line) or a computer tone (e.g. for some long distance sewices) before
you can proceed to dial.
Handset.
2. Wait for DIAL TONE
3. PRESS ~
Frequently
1.PICK
or ~]
or ~
At point where
called numbers
(already
in Memory):
NOTE:
●
2. Wait for DIAL TONE.
●
g
~:;;
DIAL] -
Location
Number.
“m
●
OTHER STORING PROCEDURES
Changing
1.PICK-UP
DIAL
*
●
-]
Number
~
pRESS
●
~
~o;~t;~n
~
@
Number.
3. HANG UP
Correcting
PAUSE is pre-set for a short delay. If a longer PAUSE is required, press REDIAL again.
Memory and Redial may require the use of a “PAUSE” when initially dialing or storing outside numbers. The sequence, then, for dialing or storing an outside number would be, for example:
Handset.
m ~~;ne
The REDIAL key will place a pause in the dialing sequence
anytime it is pressed after dialing a number. When storing
Pause in MEMORY, each pause counts as one stored digit.
PABX AND PBX USE
a Stored Number:
2. PRESS [~]
.,
PRESS [~j
UP Handset.
3. PRESS I MEMORY
pauae is required.
an Error While Storing:
1. HANG UP
2. Repeat Procedure for Storing Numbers in Memory.
6
CHAIN DIALING
BATTERY REPLACEMENT (cont.)
Allows you to dial in succession a chain of numbers in different
memory locations. This is handy when you must dial more than one
number in memory to complete a call, such as with frequent calls
via an independent long distance sewice. (e.g. MCI or SPRINT.
To Replace
Baffe~:
1. UNPLUG telephone
phone wall outlet.
For Example:
Memory
Location
Local Access Number of Long Distance Service
and two (or three) Pauses at end.
is in
m
Authorization
is in
m
is in
m
Code (ID Number).
Long Distance Phone Number you wish to call.
2. UNPLUG
line from
handset cord.
3. Use pointed object to remove
telephone number pldc cover,
card and battery cover to expose battery holder.
4. Using a small flat screwdriver,
insert in opening at either end
of battery holder and pop up.
5. Slide battev holder out and
dispose of immediately in the
proper manner. (Do Not Touch
Battery).
To Initiate Chain Dialing:
Dials # in
Dials # in
Dials # in
Memory Location 7
Memory Location 8
Memory Location 9
6. Insert replacement battev and
holder. (Holder can be inserted
only one way.) Snap into place.
7. Replace battery cover, telephone number card, and plastic
cover.
8. PLUG teleDhone line cord into
phone wali outlet.
REPLACEMENT
9. Connect the coiled cord to the
handset.
A consumer replaceable long-life Lithium Battery (3V) is installed in
the phone to provide back-up power for retaining numbem in memory.
10. R-ram
7
num%
into~.
I
BATTERY REPLACEMENT
PRODUCT CARE
I
To keep your GE Telephone working and looking good, follow these
few simple rules:
B8ttew
Safety Precautions
For your safety, please follow these simple precautions:
● Do not recharge,
disassemble, mutilate, wet or dispose of
Battery in fire.
. tiep Battery out of reach of children.
● Replace
only with GE Cat. #5-2313. Accessory Order Form
included in this guide.
●
●
REPLACEABLE TELEPHONE CORD
The telephone cord (from handset to telephone wall outlet) is actua
Iy one cord which is easily replaced if damaged.
Avoid putting lelephone new heating
appliances or other
high temperature
sources.
Ty to avoid putting
telephone near
heating appliances
and devices that
generate ele~tical
noise ~.e., motors,
fluorescent lamps).
✎
✠
To replace:
1. Remove modular plug from telephone wall outlet and handse
2. Remove screw from telephone cord strain relief housing locate
on the bottom of the clock radio.
3. Lift off housing and unwrap cord around the strain relief, as il
dicated in the illustration, and replace housing and screw.
a
Telephone should not
be exposed to direti
sunlight or moisture.
Awid dropping the
Handset as well as
other rough treatment to the phone.
“.,,,% “
O
.
&
Clean telephone with a
soft cloth dampened
with water. (Remember
to first unplug phone
b
from wall outlet.)
Never use a strong
cleaning agent or
abrasiva powder, as
this will damage the
finish.
Retain the original
pachging, should PU
need to ahip the phone
at a later date.
If still inoperative, disconnect the phone and try another phone Of
one is available) or another cord to determine whather the problem
is in the telephone, the cord or the line. If in the phone, discontinue
its use and follow the SERVICE procedure in this manual. If in the
line, notify the telephone company immediately. The telephone company will charge for a service call if the problem is attributable to
equipment you own.
TROUBLE OR MALFUNCTION
Should your phone not operate properly, check the following before
seeking service.
PROBLEM
1. No dial tone.
SOLUTION
●
●
2. Phone does no
ring.
~
Check HOOK SWITCH: Does it fully extend
when Handset is
removed?
●
Is RINGER
position?
●
Are you using too many phones on one line?
me total REN of all phones on the same line
should not be greater than the maximum REN
for your calling area. Usually 5. See (“FCC
Registration Information” on back cover.)
●
VOLUME
SWITCH
in OFF
Perform checks under #1.
3. Incoming and
outgoing voice
volume too low
or none at all
. Are other phones off hmk at same time?
If so, this is normal condition as wlume drops
when additional phones are used simultaneously.
4. Light and tone
●
feedback flutter
when dialing in
Pulse mode.
I
Check Cords: Are they inserted properly
and securely?
Are they damaged?
5. Memory Dialing
Problems
6. Loss of Memoo
●
●
●
●
This is normal as power is fluctuating when
the phone dails.
Dld you program numbers correctly?
Did you follow proper diating sequence?
(Review Memory Section)
Is 3V Lithium Batte~ in place correctly?
Does it need to be replaced?
9
2. Rights of the Teiephone
IMPORTANT INFORMATION
HEARING AID COMPATIBILITY
This telephone system is judged to be hearing aid compatible per
FCC/DOC standards.
FCC REGISTRATION
Company.
Should your equipment cause trouble on your line which may harm
the telephone network, the telephone company shall, where practicable, notify you that temporary discontinuance of service may
be required. Where prior notice is not practicable and the circumstances warrant such action, the telephone company may temporarily discontinue sewice immediately. In case of such tempora~
discontinuance, the telephone company must: (1) promptly notify
you of such temporay discontinuance, (2) afford you the opportunity to correct the situation and (3) inform you of your right to
bring a complaint to the Commission pursuant to procedures set
forth in Subpart E of Part 68, FCC Rules and Regulations.
INFORMATION
The telephone company may make changes in its communications facilities, equipment, operations of procedures where such
action is required in the operation of its business and not inconsistent with FCC Rules and Regulations. If these changes are expected to affect the use or performance of your telephone
equipment, the telephone company must give you adequate notice,
in writing, to allow you to maintain uninterrupted sewice.
Your GE telephone equipment is registered with the Federal Communications Commission and is in compliance with parts 15J and
68, FCC Rules and Regulations.
1. Notification
to the Locai Teiephone Company
On the bottom of this equipment is a label indicating among other
information, the FCC Registration number and Ringer Equivalence
Number (REN) for the equipment. You must, upon request, provide this information to your telephone company.
INTERFERENCE
The REN is useful to determine the number of devices you may
connect to your telephone line and still have all these devices ring
when your telephone number is called. In most (but not all) areas,
the sum of the REN’s of all devices connected to one line should
not exceed 5. To be certain of the number of devices you may connect to your line as determined by the REN, you should contact
your local telephone company.
INFORMATION
This equipment generates and uses radio frequency energy which
may interfere with residential radio and television reception if not pro
perly installed and used in accordance with instructions contained
in this manual. Reasonable protection against such interference is
ensured, although there is no guarantee this will not occur in a given
installation. If interference is suspected and verified by switching this
equipment on and off, the user is encouraged to try to correct the
interference by one or more of the following measures: Reorient the
radiohelevision receiver’s antenna, relocate the equipment with
respect to the receiver, plug the equipment and receiver into separate
circuit outlets. The user may also wish to consult a qualified
radi~elevision technician for additional suggestions. This equipment
has been fully tested and complies with all limits for Class B computing devices pursuant to part 15, Sub-part J, FCC Rules and
Regulations
NOTES: This equipment may not be used on coin service provided by the telephone company.
Party lines are subject to state tariffs, and therefore, you may not
be able to use your own telephone equipment if you are on a party line. Check with your local telephone company.
Notice must be given to the telephone company upon permanent
disconnection of your telephone from your line.
10
CLOCK RADIO CONTROLS AND FEATURES
DIS~Y
●FAST FORWARD
SET BU~NS
●FORWARD
●R~ERSE
WA
R
.
To adjust the clock to the desired time:
CLOCK RADIO OPERATION
1. Press and hold the TIME SET button.
When AC power is interrupted (disconnected) for a shoti period, both
time and alarm Stilngs will change (unless optional battery is installed). After AC power is restored (reconnected), the Digital Display will
blink to indicate that power was interruptad and you may have to readjust the TIME and ALARM settings, To stop display from blinking,
press any Display Set Button.
2
While holding down the TIME SET button, press the FAST FORWARD button to change time rapidly and, then, the FORWARD
button as you approach the time you want.
OPERATING THE RADIO
Plug the power cord into any 11OVAC household outlet. Display will
blink. Press any DISPLAY SET button to stop the blinking.
Press RADIO ONIOFF
To change time in the reverse direction, press the REVERSE
ton while holding down the TIME SET button.
button to turn radio on.
Slide the FM/AM band switch to desired broadcast band.
3. Release
but-
the TIME SET button.
SETTING THE WAKE TIME
You can select two different wake times for the radio or alarm to turn
Dn automatically.
WAKE 1
1.Press
and hold down the Wake 1 WAKE SET button. The display
will change to wake time for WAKE 1.
2. While holding down the WAKE SET button, press the FAST FORWARD button to change time rapidly and, then, the FORWARD
button as you approach the desired AM or PM wake time.
Rotate TUNING
knob to select a station.
Adjust VOLUME
to your listening preference.
Press RADIO ONIOFF
To change time in the reverse direction, press the REVERSE
ton while holding down the WAKE SET button,
but-
3. Release the WAKE SET button and the current time is once again
displayed.
button to turn radio off.
WAKE 2
SETTING THE TIME
1. Select desired AM or FM station (see “OPEMTING
The digital clock timer operatee on a 2+hour cycle. The PM indicator
to the left of the time display will light when the clock is reading PM
time. You can change time in either the fomard of the reverse
direction.
2. Turn the radio off with the RADIO ON/OFF
THE RADIO”),
button.
3. Set the wake time (see “SETTING THE WAKE TIME”) using the
WAKE 1 or WAKE 2 WAKE SET button.
12
4. Slide the corresponding WAKE FUNCTION Selector to the MUSIC
position. The WAKE SET Indicator will light in the display.
The radio is now on and you can select your station in the usual way.
Play will be for the chosen length of time (up to 59 minutes), and
then the radio will turn itself off. If you decide to turn the radio off
sooner, press the RADIO ON/OFF button.
The radio will turn on at the wake time you have set and will turn
itself off after approximately 1 hour. TOturn the radio off sooner, press
RADIO ON/OFF button. (This ends the wake cycle while leaving the
wake system in place, ready to turn itself on again at the same time
the next day. The WAKE SET Indicator will remain in the display.)
SLEEP TO MUSIC AND
WAKE TO MUSIC OR ALARM
To turn off the wake system, slide the WAKE FUNCTION Selector
to the OFF position. The WAKE SET Indicator will light in the display.
You can set your digital clock radio to lull you to sleep, turn itself off,
then awaken you at a preset time — all automatically.
WAKE TO ALARM
1. Set the wake time.
1. Set the wake time (see, “SE~lNG
THE WAKE TIME”) using the
WAKE 1 or WAKE 2 WAKE SET button.
2. Follow the steps under WAKE TO MUSIC or WAKE TO ALARM.
2. Slide the corresponding WAKE FUNCTION seletior to the AURM
position. The WAKE SET Indicator will light in the display.
(NOTE: Be sure the appropriate FUNCTION
position.)
An alarm tone will sound at the wake time you have set and will turn
itself off after about 1 houc To turn the alarm off sooner, press RADIO
ON/OFF button or slide the WAKE FUNCTION Selector to the OFF
position.
SNOOZ-ALARM@ CONTROL OPERATION
3. Then, proceed with Steps 1 through 3 under SLEEP TO MUSIC.
The Snooz-Alarm
is in WAKE
control has three functions:
1. It allows extra sleep time after the radio comes on in the WAKE
TO MUSIC mode. Press SNOOZ bar to silence the radio. About
7 minutes later, the radio will play again.
NOTE: The VOLUME Control setting determines the loudness of the
alarm.
2. It allows extra sleep time in the WAKE TO ALARM mode. When
the alarm sounds, touch the SNOOZ bar to silence the alarm.
About 7 minutes later, the alarm will sound again.
SLEEP TO MUSIC
You can drift off to sleep to music knowing that the radio will turn
itself off automatically, Simply
You can use the SNOOZ feature repeatedly for up to one hour,
after which the radio or alarm will turn off until the next day.
1.With
the radio turned off, press and hold the SLEEP button. The
time display will exhibit 0:59, and the radio will turn on
automatically.
control can also be used to show seconds
3. The SNOOZ-AURM
in the digital display. Simply press SNOOZ at any time other than
during an active WAKE interval and the display will change from
hours and minutes to minutes (O-9 only) and seconds. (Pressing
TIME SET and FORWARD while holding down SNOOZ button will
advance display to the next whole minute.) Release SNOOZ button and hours and minutes are once again displayed.
2. Hold down the SLEEP button to select any sleep time between
59 minutes and 1 minute, depending on how long you wish the
radio to play.
●
After pressing the SLEEP button, there is a delay of approximately 2 seconds before automatic countdown starts.
3. Release the SLEEP
displayed.
SELE~R
button and current time is once again
13
and alarm settings. When on battery power, the digital display will
not light. However, should WAKE TIME occur during the power interruption, the radio will operate or the alarm will sound if remaining
battery power is adequate. Normal operation will resume after AC
power is restored so you will not have to reset time or alarm.
ADJUSTING THE DISPLAY BRIGHTNESS
The light intensity of the digital display can be adjusted for day/nigh!
lighting conditions. With each press of the BRIGHTNESS switch, the
brightness will toggle between high and low.
ANTENNAS
Install battery as follows:
1. To remove battey compartment door (located on bottom of radio),
push the door latch in the direction of the arrow on the battery
door and lift door off cabinet.
2. Connect a 9-volt batte~ to connectors.
AM Antenna - A built-in ferrite rod antenna eliminates the need for
an outside antenna for AM reception. Rotating the unit slightly may
improve reception for distant AM stations.
FM Antenna - The power cord acts as your FM antenna. The power
cord picks up moderate to strong stations and eliminates the need
for an external antenna in most strong signal areas. For best reception, be sure the power cord is stretched out to its full length. Do not
coil or bunch the cord together. Changing position of the power cord
may improve reception.
3. Insert battery in compartment
and replace compartment door.
NOTE: Alkaline batteries are recommended. Carbon-zinc batteries
may be used but memory holding time will be substantially reduced.
Memory holding time for a fresh alkaline battery is approximately 4
hours, which should take care of short, nuisancetype AC power
failures. To preserve battery power, the unit should remain plugged
into an AC outlet. Aa batteries get older, their voltage drops and
memory may be lost. Be sure to replace the batte~ periodically and
dispose of the “dead” batte~ in a proper manner, in accordance with
your State and local regulations. Remove battery if the unit will be
unplugged or stored for more than a few weeks. A leaky battery can
damage the unit.
NO-WORRY BATTERY BACKUP SYSTEM
The clock radio is equipped with a memory holding system that can
be powered by a customer-installed 9 volt alkaline battery (not included). The power failure protection circuit will not operate unless a battery is installed.
When normal household power is interrupted, or AC line cord is
unplugged, the battery will power the clock radio to maintain time
14
FCC INFORMATION
IN CASE OF DIFFICULTY
This device complies with Part 15 of the FCC Rules. Operation is sub
ject to the following two conditions: (1) This device may not cause
harmful interference, and (2) This device must accept any interference
received, including interference that may cause undesired operation.
SERVICE
FCC requires this product be serviced only by the manufacturer or
its authorized service agents. For instructions on how to obtain service, refer to the warranty included in this Guide or call Consumer
Information (309) 685-5563.
.
In accordance with FCC requirements, changes or modifications not
expressly approved by Thomson Consumer Electronics could void
the user’s authority to operate this product.
~ch
your ~es receipt to the bklet
for future reference or jot down
the date this product was purchased or received as a gift. This information will be valuable if service should be required during the warranty period.
Purchase date
Name of store
15
,,,%
.
TWO-YEAR
LIMITED
What does your warranty covefl
. Any defect in material or workmanship.
~r
●
●
how long afier the original purchase?
Two years.
The warranty for rental units begins with the first rental.
What will we do?
●
●
Provide you with a new, or at our option, a reconditioned unit.
The exchange unit is warranted for the remainder of your product’s original two-year warrant y period.
How do you make a warranty claim?
Properly pack your unit. Include any cables, etc., which were
originally provided with the product. We recommend using
the original carton and packing materials.
●
Include in the package a copy of the sales receipt or other
evidence of date of original purchase. If the unit was a gift,
provide a statement specifying the date received. Also print
your name and address and a description of the defect.
o Ship the unit standard UPS or equivalent to:
Thomson Consumer Electronics, Inc.
Product Exchange Center
32 Spur Drive
El Paso, Texas ~906
●
●
WARRANTY
Pay any charges billed to you by the Exchange Center for service not covered by the warranty.
A new or reconditioned unit will be shipped to you prepaid
freight.
What does your warranty not covefl
●
●
●
●
●
●
●
Customer instruction. Your Owner’s Manual provides information regarding operating instructions and user controls. %r
additional information, ask your dealer.
Installation and set-up service adjustments.
Batteries.
Damage from misuse or neglect.
Product which have been modified or incorporated into other
products.
Product purchased or serviced outside the USA.
How does state law relate to this warranty?
G This warranty gives you specific legal rights, and you may also
have other rights which vary from state to state.
What if you purchased your unit in Canada?
●
Refer to the Canadian
fir products purchased outside the United States and Canadar
see dealer for warranty.
Thomson Consumer
Print@ in U,S.A
Warranty.
Electronics, Inc.