1
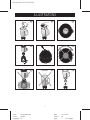
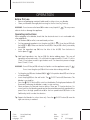
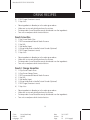
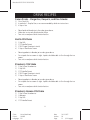
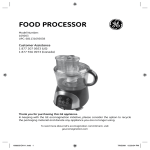
Barcode: 690 5020 10 000 6 00226
Blender
Model Number:
169169
UPC: 681131691697
Customer Assistance
1 877 207 0923 (US)
1 877 556 0973 (Canada)
Thank you for purchasing this GE appliance.
In keeping with the GE ecomagination initiative, please consider the option to recycle
the packaging material and donate any appliance you are no longer using.
To read more about GE's ecomagination commitment, visit:
ge.ecomagination.com
Client:
AirLux (Wal*Mart)
Project:
169169
Language: EN
Date:
Version:
Page:
29.12.2007
09
(of 18 pages)
Barcode: 690 5020 10 000 6 00226
IMPORTANT SAFEGUARDS
When using electrical appliances, basic safety precautions should always be followed,
including the following:
•
Read all instructions.
•
To protect against risk of electrical shock do not put the cord or the blender’s base
in water or other liquid.
•
•
Close supervision is necessary when any appliance is used by or near children.
Unplug from outlet when not in use, before putting on or taking off parts, and before
cleaning.
•
Avoid contacting moving parts.
•
Do not operate appliance with a damaged cord or plug, or after the appliance
malfunctions or is dropped or damaged in any manner. Call our toll-free customer
assistance number for information on examination, repair, or adjustment.
•
The use of attachments, including jars, not recommended by the manufacturer
may cause injury to persons.
•
Do not use outdoors or in a damp area.
•
Do not let cord hang over edge of table or counter.
•
Keep hands and utensils out of container while blending to reduce the risk of severe
injury to persons or damage to the blender. A scraper may be used but must be
used only when the blender is not running.
•
Blades are sharp. Handle carefully.
•
Always operate blender with lid in place.
•
Do not blend hot liquids.
•
Container must be properly in place before operating the appliance.
•
Do not use appliance for other than intended use.
Save these instructions!
Client:
AirLux (Wal*Mart)
Project:
169169
Language: EN
Date:
Version:
Page:
29.12.2007
09
(of 18 pages)
Barcode: 690 5020 10 000 6 00226
ADDITIONAL SAFEGUARDS
This appliance is for HOUSEHOLD USE ONLY.
DO NOT OPERATE APPLIANCE IF THE LINE CORD SHOWS ANY DAMAGE OR IF
APPLIANCE WORKS INTERMITTENTLY OR STOPS WORKING ENTIRELY.
EXTENSION CORDS
A short power-supply cord is to be provided to reduce the risk resulting from becoming
entangled in or tripping over a longer cord. Longer detachable power-supply cords or
extension cords are available and may be used if care is exercised in their use. If a longer
detachable power-supply cord or extension cord is used,
1) The marked electrical rating of the cord set or extension cord should be at least as
great as the electrical rating of the appliance, and
2) The longer cord should be arranged so that it will not drape over the countertop or
tabletop where it can be tripped over, snagged, or pulled on unintentionally
(especially by children).
POLARIZED PLUG
This appliance has a polarized plug (one blade is wider than the other). To reduce the
risk of electric shock, this plug is intended to fit into a polarized outlet only one way. If
the plug does not fit fully into the outlet, reverse the plug. If it still does not fit, contact a
qualified electrician. Do not attempt to modify the plug in any way.
Client:
AirLux (Wal*Mart)
Project:
169169
Language: EN
Date:
Version:
Page:
29.12.2007
09
(of 18 pages)
Barcode: 690 5020 10 000 6 00226
parts
24
23
22
21
20
1
19
14
2
18
13
12
3
4
5
17
11
6
10
7
16
9
15
1.
2.
3.
4.
5.
6.
7.
8.
9.
10.
11.
12.
13.
14.
15.
16.
17.
18.
19.
20.
21.
22.
23.
24.
ON/OFF button
Drink button
Pulse button
Beat/Crumb button
Liquefy/Chop button
Whip/Blend button
High speed indicator
High speed button
Low speed button
Low speed indicator
Mince/Stir button
Grate/Aerate button
8
Grind/Puree button
Salsa button
Power cord with plug
Base
Pitcher base
Blade
Scale
Handle
Glass jar with cutting assembly
Mouth
Lid
Ingredient cap
Client:
AirLux (Wal*Mart)
Project:
169169
Language: EN
Date:
Version:
Page:
29.12.2007
09
(of 18 pages)
Barcode: 690 5020 10 000 6 00226
Illustratons
a
b
c
d
e
f
h
i
g
over 60°C
Client:
AirLux (Wal*Mart)
Project:
169169
Language: EN
Date:
Version:
Page:
29.12.2007
09
(of 18 pages)
Barcode: 690 5020 10 000 6 00226
OPERATION
Before first use
•
•
Remove all packaging materials, labels and/or stickers from your blender.
Clean your blender thoroughly before using for the first time ( Cleaning).
WARNING: Do not immerse the base (16) in water or any liquids (ill. g ). This may cause
electric shock or damage the appliance.
Operating instructions
Before plugging in the blender, check that the electrical circuit is not overloaded with
other appliances.
• Set the base (16) on a flat, even and steady surface.
• Put the prepared ingredients into the glass jar (21) (ill. a ). Cover the jar (21) with
the lid (23) (ill. b ). Make sure that the mouth (22) of the jar (21) is firmly covered by
the lid (23).
• Insert the ingredient cap (24) into the hole of the lid (23). Turn clockwise to
lock in place (ill. c ).
Tip: Add liquid ingredients into the jar (21) first before adding pieces. This way all
ingredients are mixed evenly. Cut solid food into approximately 0.5 inch (1.3 cm) to
1 inch (2.5 cm) cubes in order to get the best result. Cut cheese into pieces no larger
than 0.5 inch (1.3 cm).
WARNING: Do not fill the jar (21) with any hot liquid or run the appliance empty (ill. h ).
Do not rinse the glass jar (21) with hot water after making cold food.
•
•
•
•
Put the glass jar (21) onto the base (16) (ill. d ). Fit the pitcher base (17) onto the top
of the base (16).
Insert the plug (15) into the wall outlet. The ON/OFF button (1) illuminates. The
blender is on stand-by.
Press the ON/OFF button (1) to switch on the blender. The high speed indicator (7)
illuminates, indicating the blender is ready to start working.
Select and press the desired function button. There are 10 function buttons. For
some functions the blending speed can be alternated between high speed and low
speed. Press the high speed button (8) or the low speed button (9). Refer to the
( Blending table) to make the selection.
Tip: Operate the blender for a short time only. Press the
right consistency is reached.
ON/OFF button (1) once the
Client:
AirLux (Wal*Mart)
Project:
169169
Language: EN
Date:
Version:
Page:
29.12.2007
09
(of 18 pages)
Barcode: 690 5020 10 000 6 00226
OPERATION
•
Press the ON/OFF button (1) to stop the blender. Press the button once more to
enter stand-by status. Unplug the blender from the wall outlet before you take the
jar (21) from the base.
Blending programs
Button
Program
Description
salsa (14)
Program runs for 65 seconds, changing Prepare Mexican salsa.
between low speeds. Can not be combined
with hi and lo button.
drink (2)
Program runs for 50 seconds, changing Prepare drink.
between high and low speeds. Can not be
combined with hi and lo button.
pulse (4)
Blender works only when button is pressed. For quick and efficient
Can be combined with hi and lo button.
blending.
Blending table and PerfectBlend™ technology
The following settings all run on the PerfectBlend™ technology. The blender cycles
between the set speed and a lower speed. When lowering speed the food is settling
down. This way a smooth blending result is guaranteed.
Button
Speed button Description
mince (11)
hi (8)
Chops ingredients into very fine pieces. The blender
cycles between the set speed and a lower speed.
stir (11)
lo (9)
Mixes ingredients. The blender cycles between the set
speed and a lower speed.
grate (12)
hi (8)
Cuts ingredients into small pieces. The blender cycles
between the set speed and a lower speed.
aerate (12)
lo (9)
Aerates ingredients. The blender cycles between the set
speed and a lower speed.
Client:
AirLux (Wal*Mart)
Project:
169169
Language: EN
Date:
Version:
Page:
29.12.2007
09
(of 18 pages)
Barcode: 690 5020 10 000 6 00226
OPERATION
Button
Speed button Description
grind (13)
hi (8)
Crushes ingredients into powder. The blender cycles
between the set speed and a lower speed.
puree (13)
lo (9)
Blends ingredients into a puree. The blender cycles
between the set speed and a lower speed.
beat (4)
hi (8)
Mixes ingredients rapidly into a mixture. The blender
cycles between the set speed and a lower speed.
crumb (4)
lo (9)
Breaks ingredients into small pieces. The blender cycles
between the set speed and a lower speed.
liquefy (5)
hi (8)
Turns ingredients into liquid. The blender cycles between
the set speed and a lower speed.
chop (5)
lo (9)
Chops ingredients into small pieces. The blender cycles
between the set speed and a lower speed.
whip (6)
hi (8)
Beats ingredients into a froth or foam. The blender cycles
between the set speed and a lower speed.
blend (6)
lo (9)
Mixes ingredients into uniform mixture. The blender
cycles between the set speed and a lower speed.
•
The maximum amount for blending is 48Oz. (1500ml).
WARNING:
1. Always turn blender to “off” and unplug when not in use. Motor will continue to
rotate when a function button is pressed even if jar (21) is not mounted.
2. Never open the lid (23) during operation.
3. After 5 minutes without operation, blender automatically enters standby status.
STORAGE
Clean and dry all parts before storing ( Cleaning). Store the blender in its box or in
a clean, dry place. Never wrap the cord (15) around the blender. Always use the cord
storage on the bottom of the blender (ill. e ).
Client:
AirLux (Wal*Mart)
Project:
169169
Language: EN
Date:
Version:
Page:
29.12.2007
09
(of 18 pages)
Barcode: 690 5020 10 000 6 00226
CLEANING
Clean the blender after every use. This appliance contains no user serviceable parts and
requires little maintenance. Leave any servicing or repairs to qualified personnel.
•
•
•
•
•
•
•
•
Clean the outside of the base (16) with a damp soft cloth.
Clean the jar (21) thoroughly after using.
Wash the ingredient cap (24), lid (23) and glass jar (21) by hand in warm soapy
water then rinse and dry completely.
Do not use abrasive cleansers.
Do not put the jar (21) or any other part in boiling water (ill. h ).
Unscrew the pitcher base (17) to clean it thoroughly (ill. i ).
Be careful not to damage or lose the sealing ring.
Refit the pitcher base (17) to the jar (21).
WARNING: Never immerse the base (16) in water or other liquids (ill. g ).
CAUTION: The blades (18) are very sharp. Clean carefully. Danger of injuries.
Drink RECIPES
Strawberry Smoothie
1)
2)
3)
4)
5)
6)
1 Cup Frozen Fruit
1 Cup Milk
1 Cup Strawberry Yogurt
½ Scoop Unflavoured or Strawberry Protein Powder (Optional)
2 TBSP Sugar (Sweeten to taste)
1 Cup of Ice
•
•
•
•
Place ingredients in blender jar in the order given above.
Make sure ice is evenly distributed over the mixture.
Protein powder if used should be evenly distributed over the ingredients.
Turn unit on and press drink function button.
Strawberry Banana Smoothie
1)
2)
3)
4)
5)
1 Cup Frozen Fruit
1 Cup Milk
½ Banana
1 Cup Strawberry Yogurt
1/2 Scoop Unflavored or Strawberry Protein Powder (Optional)
Client:
AirLux (Wal*Mart)
Project:
169169
Language: EN
Date:
Version:
Page:
29.12.2007
09
(of 18 pages)
Barcode: 690 5020 10 000 6 00226
Drink RECIPES
6) 2 TBSP Sugar (Sweeten to taste)
7) 1 Cup of Ice
•
•
•
•
Place ingredients in blender jar in the order given above.
Make sure ice is evenly distributed over the mixture.
Protein powder if used should be evenly distributed over the ingredients.
Turn unit on and press drink function button.
Peach Smoothie
1)
2)
3)
4)
5)
6)
7)
1 Cup Frozen Peach Slice
1 TBSP unsweetened Natural Peach Preserve
1 Cup Milk
1 Cup Vanilla Yogurt
½ Scoop Unflavored or Vanilla Protein Powder (Optional)
2 TBSP Sugar (Sweeten to taste)
1 Cup of Ice
•
•
•
•
Place ingredients in blender jar in the order given above.
Make sure ice is evenly distributed over the mixture.
Protein powder if used should be evenly distributed over the ingredients.
Turn unit on and press drink function button.
Peach / Mango Smoothie
1)
2)
3)
4)
5)
6)
7)
8)
½ Cup Frozen Peach Slices
½ Cup Frozen Mango Pieces
1 TBSP unsweetened Natural Peach Preserve
1 Cup Milk
1 Cup Vanilla Yogurt
½ Scoop Unflavored or Vanilla Protein Powder (Optional)
2 TBSP Sugar (Sweeten to taste)
1 Cup of Ice
•
•
•
•
Place ingredients in blender jar in the order given above.
Make sure ice is evenly distributed over the mixture.
Protein powder if used should be evenly distributed over the ingredients.
Turn unit on and press drink function button.
10
Client:
AirLux (Wal*Mart)
Project:
169169
Language: EN
Date:
Version:
Page:
29.12.2007
09
10 (of 18 pages)
Barcode: 690 5020 10 000 6 00226
Drink RECIPES
Frozen Drinks – Margaritas, Daqueris, and Pina Coladas
1) 16 oz Drink Mix
2) 4 oz alcohol – Tequila, Rom, or as recommended by drink mix instructions
3) 4 Cups of Ice
•
•
•
Place liquids in blender jar in the order given above.
Make sure ice is evenly distributed in the jar
Turn unit on and press drink function button.
Vanilla Milk Shake
1)
2)
3)
4)
1 Cup Milk
1 TSP Vanilla Extract
2 TBSP Sugar (Sweeten to taste)
2 Cups of Vanilla Ice Cream
•
•
Place Ingredients in blender jar in order given above.
Do not pack the ice cream to tight. Liquids should be able to flow through the ice
cream.
Turn unit on and press drink function button.
•
Strawberry Milk Shake
1)
2)
3)
4)
5)
1 Cup Frozen Strawberries
1 Cup Milk
1 TSP Vanilla Extract
2 TBSP Sugar (Sweeten to taste)
2 Cups of Vanilla Ice Cream
•
•
Place Ingredients in blender jar in order given above.
Do not pack the ice cream to tight. Liquids should be able to flow through the ice
cream.
Turn unit on and press drink function button.
•
Strawberry Banana Milk Shake
1)
2)
3)
4)
1 Cup Frozen Strawberries
½ Banana
1 Cup Milk
1 TSP Vanilla Extract
11
Client:
AirLux (Wal*Mart)
Project:
169169
Language: EN
Date:
Version:
Page:
29.12.2007
09
11 (of 18 pages)
Barcode: 690 5020 10 000 6 00226
Drink RECIPES
5) 2 TBSP Sugar (Sweeten to taste)
6) 2 Cups of Vanilla Ice Cream
•
•
•
Place Ingredients in blender jar in order given above.
Do not pack the ice cream to tight. Liquids should be able to flow through the ice
cream.
Turn unit on and press drink function button.
Chocolate Milk Shake
1)
2)
3)
4)
5)
1 Cup Milk
1 TBSP Chocolate Syrup
1 TSP Vanilla Extract
2 TBSP Sugar (Sweeten to taste)
2 Cups of Chocolate Ice Cream
•
•
Place Ingredients in blender jar in order given above.
Do not pack the ice cream to tight. Liquids should be able to flow through the ice
cream.
Turn unit on and press drink function button.
•
Tootie-Fruity Milk Shake
1)
2)
3)
4)
5)
6)
7)
1 Cup Milk
1 TSP Vanilla Extract
½ Cup frozen strawberries
½ Cup Canned pineapple tidbits
¼ Cup Maraschino Cherries
2 TBSP Sugar (Sweeten to taste)
2 Cups of Vanilla Ice Cream
•
•
Place Ingredients in blender jar in order given above.
Do not pack the ice cream to tight. Liquids should be able to flow through the ice
cream.
Turn unit on and press drink function button.
•
12
Client:
AirLux (Wal*Mart)
Project:
169169
Language: EN
Date:
Version:
Page:
29.12.2007
09
12 (of 18 pages)
Barcode: 690 5020 10 000 6 00226
Salsa Recipes
Canned Tomato Salsa
1)
2)
3)
4)
5)
6)
7)
28 Oz Can Whole Can Tomatoes
2 Cloves Garlic
1 TBSP Lemon Juice
1 TSP Salt
2 Jalapeno Peppers (Increase or decrease to taste)
1 Medium Onion
½ Cup Cilantro
•
•
Drain whole tomatoes
Place half of the tomatoes in the blender jar. Make sure that the tomatoes are evenly
distributed in the jar.
Place Garlic, Lemon Juice and Salt in the jar next.
Quarter the jalapeno peppers and place in the jar.
Cut onion into eighths and put into jar. Remove outer layer of onion before placing
in the jar.
Make sure to remove the stems of the Cilantro. Use only the leaves. Distribute the
Cilantro evenly in the jar.
Place the remaining tomatoes in the jar.
Turn unit on and press salsa function button
•
•
•
•
•
•
Fresh Tomato Salsa
1)
2)
3)
4)
5)
6)
7)
8)
4 Roma Tomatoes
½ Cup Tomato Juice
2 Clove Garlic
½ TBSP Lemon Juice
½ TSP Salt
1 Jalapeno Peppers (Increase or decrease to taste)
1 Small Onion
¼ cup or he leaves from 5 to 10 Cilantro sprigs
•
•
Cut Roma Tomatoes in eighths
Place 2 tomatoes in the blender jar. Make sure that the tomato is evenly distributed
in the jar.
Place Garlic, Lemon Juice and Salt in the jar next.
Quarter the jalapeno pepper and place in the jar.
Cut onion into eighths and put into jar. Remove outer layer of onion before placing
in the jar.
•
•
•
13
Client:
AirLux (Wal*Mart)
Project:
169169
Language: EN
Date:
Version:
Page:
29.12.2007
09
13 (of 18 pages)
Barcode: 690 5020 10 000 6 00226
Salsa Recipes
•
•
•
Make sure to remove the stems of the Cilantro. Use only the leaves. Distribute the
Cilantro evenly in the jar.
Place the remaining tomato in the jar. Be sure to cut tomato into eight equal parts
Turn unit on and press salsa function button.
Tomato / Tomatillo Salsa
1)
2)
3)
4)
5)
6)
7)
8)
14,5 Oz Can Whole Can Tomatoes
4 Tomatillos
2 Cloves Garlic
1 TBSP Lemon Juice
1 TSP Salt
2 Jalapeno Peppers (Increase or decrease to taste)
1 Medium Onion
½ Cup Cilantro
•
•
Drain whole tomatoes
Place the tomatoes in the blender jar. Make sure that the tomatoes are evenly
distributed in the jar.
Place Garlic, Lemon Juice and Salt in the jar next.
Quarter the jalapeno peppers and place in the jar.
Cut onion into eighths and put into jar. Remove outer layer of onion before placing
in the jar.
Make sure to remove the stems of the Cilantro. Use only the leaves. Distribute the
Cilantro evenly in the jar.
Place the Tomatillos in the jar. Tomatillos should be quartered.
Turn unit on and press salsa function button.
•
•
•
•
•
•
Sauce
Marinara Sauce
1)
2)
3)
4)
5)
6)
7)
28 Oz Can Whole Can Tomatoes
6 Oz Can Tomato Paste
1 Cloves Garlic
4 TBSP Chopped Parsley
1 TSBP Oregano
1 TSP Salt
¼ TSP Black Pepper
14
Client:
AirLux (Wal*Mart)
Project:
169169
Language: EN
Date:
Version:
Page:
29.12.2007
09
14 (of 18 pages)
Barcode: 690 5020 10 000 6 00226
Sauce
8) 1 Small Onion
9) ½ Cup White Wine
10) 6 TBSP Olive Oil
•
•
•
•
•
•
•
Drain whole tomatoes
Place the tomatoes in the blender jar. Make sure that the tomatoes are evenly
distributed in the jar.
Place Garlic, Parsley, Oregano, Salt and Black Pepper in the jar next.
Cut onion into eighths and put into jar. Remove outer layer of onion before placing
in the jar.
Add white wine and 6 TBSP Olive Oil.
Turn unit on and press salsa function button.
After the blender stops place ingredients in a sauce pan and simmer for 20
minutes.
Using the PerfectBlend™
Oreo Milk Shake Treat
1)
2)
3)
4)
5)
1/2 Cup Milk
1 TSP Vanilla Extract
2 TBSP Sugar (Sweeten to taste)
2 Cups of Vanilla Ice Cream
1 Cup Oreo Cookies (Whole)
•
•
Place Ingredients in blender jar in order given above.
Do not pack the ice cream to tight. Liquids should be able to flow through the ice
cream.
Turn unit on and press the high speed function button. Set speed to whip. Run until
ingredients are completely mixed.
Thicken treat by adding more ice cream after ingredients have been blended. Be
sure to stop unit before adding ice cream. Thicken shake to preference. Limit ice
cream to no more than 3 cups per batch.
•
•
Heath Bar Milk Shake Treat
1) 1/2 Cup Milk
2) 1 TSP Vanilla Extract
3) 2 TBSP Sugar (Sweeten to taste)
15
Client:
AirLux (Wal*Mart)
Project:
169169
Language: EN
Date:
Version:
Page:
29.12.2007
09
15 (of 18 pages)
Barcode: 690 5020 10 000 6 00226
Using the PerfectBlend™
4) 2 Cups of Vanilla Ice Cream
5) 1/2 Cup small Heath bars or crushed Heath bar
•
•
•
Place Ingredients in blender jar in order given above.
Do not pack the ice cream to tight. Liquids should be able to flow through the ice
cream.
Turn unit on and press the high speed function button. Set speed to whip. Run
until ingredients are completely mixed. Thicken treat by adding more ice cream
after ingredients have been blended. Be sure to stop unit before adding ice cream.
Thicken shake to preference. Limit ice cream to no more than 3 cups per batch.
Chocolate, Cherry and Caramel Milk Shake Treat
1)
2)
3)
4)
5)
6)
7)
1/2 Cup Milk
1 TSP Vanilla Extract
1 TSBP Caramel Syrup
1 TSBP Chocolate Syrup
2 TBSP Sugar (Sweeten to taste)
2 Cups of Vanilla Ice Cream
¼ Cup Maraschino Cherries
•
•
Place Ingredients in blender jar in order given above.
Do not pack the ice cream to tight. Liquids should be able to flow through the ice
cream.
Turn unit on and press the high speed function button. Set speed to whip. Run
until ingredients are completely mixed. Thicken treat by adding more ice cream
after ingredients have been blended. Be sure to stop unit before adding ice cream.
Thicken shake to preference. Limit ice cream to no more than 3 cups per batch.
•
16
Client:
AirLux (Wal*Mart)
Project:
169169
Language: EN
Date:
Version:
Page:
29.12.2007
09
16 (of 18 pages)
Barcode: 690 5020 10 000 6 00226
Troubleshooting
Problem
Possible Cause
Solution
The motor rotates
very slowly.
Too many foods in the
jar (21).
Remove some foods and
restart.
The motor does not
rotate.
Too many foods in the
jar (21).
The blender is at
stand-by status.
The motor is damaged.
Remove some foods and
restart.
Press the ON/OFF
button (1) to start.
If additional assistance is needed, please contact our Customer Assistance at
1.877.207.0923 (U.S.) or 1.877.556.0973 (Canada).
Technical data
Rated voltage:
Rated current:
Rated power input:
Capacity:
Dimensions:
Weight (without package):
120V ~60Hz
5A
600W
1.5L
196x181x428mm
3200g
17
Client:
AirLux (Wal*Mart)
Project:
169169
Language: EN
Date:
Version:
Page:
29.12.2007
09
17 (of 18 pages)
Barcode: 690 5020 10 000 6 00226
Customer Assistance
If you have a claim under this warranty, please call our Customer Assistance Number. For faster
service, please have the model number and product name ready for the operator to assist you. This
number can be found on the bottom of your appliance and on the front page of this manual.
Model Number: __________________
Product Name: __________________
Customer Assistance Number 1.877.207.0923 (U.S.) or 1.877.556.0973 (Canada).
Keep these numbers for future reference!
For more information, please visit us at WWW.GEHOUSEWARES.COM
Two-year limited warranty
What does your warranty cover?
• Any defect in material or workmanship.
For how long after the original purchase?
• Two years.
What will we do?
• Provide you with a new one.
• For those items still under warranty but
no longer available, WAL-MART reserves
the right to replace with a similar GE
branded product of equal or greater
value.
How do you make a warranty claim?
• Save your receipt.
• Properly pack your unit. We recommend
using the original carton and packing
materials.
• Return the product to your nearest WAL-MART store or call Customer
Assistance at 1-877-207-0923 (U.S.) or 1-877-556-0973 (Canada).
What does your warranty not cover?
• Parts subject to wear, including, without
limitation, glass parts, glass containers,
cutter/strainer, blades, seals, gaskets,
clutches, motor brushes, and/or agitators,
etc.
• Commercial use or any other use not
found in printed directions.
• Damage from misuse, abuse, or
neglect, including failure to clean
product regularly in accordance with
manufacturer's instructions.
is a trademark of General Electric
Company and is used under the
license by Wal-Mart Stores Inc.,
Bentonville, AR 72716
Client:
AirLux (Wal*Mart)
Project:
169169
Language: EN
How does state law relate to this warranty?
• This warranty gives you specific legal
rights, and you may also have other rights
which vary from state to state or province
to province.
• This warranty is in lieu of any other
warranty or condition, whether express or
implied, written or oral, including, without
limitation, any statutory warranty or
condition of merchantability or fitness for
a particular purpose.
• WAL-MART, GE and the product
manufacturer expressly disclaim all
responsibility for special, incidental, and
consequential damages or losses caused
by use of this appliance. Any liability is
expressly limited to an amount equal to
the purchase price paid whether a claim,
however instituted, is based on contract,
indemnity, warranty, tort (including
negligence), strict liability, or otherwise.
Some states or provinces do not allow
this exclusion or limitation of incidental
or consequential losses, so the foregoing
disclaimer may not apply to you.
What if you encounter a problem with this
product while using it outside the country of
purchase?
• The warranty is valid only in the country of
purchase and if you follow the warranty
claim procedure as noted.
Marketed in Canada by:
Wal-Mart Canada Corp.
1940 Argentia Road, Mississauga,
Ontario L5N1P9
Date:
Version:
Page:
29.12.2007
09
18 (of 18 pages)