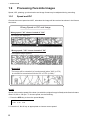
1
OPERATOR'S MANUAL
FACSIMILE RECEIVER
MODEL
FAX-408
www.furuno.co.jp
The paper used in this manual
is elemental chlorine free.
・FURUNO Authorized Distributor/Dealer
9-52 Ashihara-cho,
Nishinomiya, 662-8580, JAPAN
Telephone : +81-(0)798-65-2111
Fax
: +81-(0)798-65-4200
All rights reserved.
Printed in Japan
A : SEP . 2006
B : JUN . 15, 2009
Pub. No. OME-62620-B
(AKMU )
FAX-408
*00016160811*
*00016160811*
* 0 0 0 1 6 1 6 0 8 1 1 *
IMPORTANT NOTICES
General
• The operator of this equipment must read and follow the descriptions in this manual. Wrong operation or maintenance can cancel the warranty or cause injury.
• Do not copy any part of this manual without written permission from FURUNO.
• If this manual is lost or worn, contact your dealer about replacement.
• The contents of this manual and equipment specifications can change without notice.
• The example screens (or illustrations) shown in this manual can be different from the screens
you see on your display. The screens you see depend on your system configuration and equipment settings.
• Save this manual for future reference.
• Any modification of the equipment (including software) by persons not authorized by FURUNO
will cancel the warranty.
• All brand and product names are trademarks, registered trademarks or service marks of their
respective holders.
How to discard this product
Discard this product according to local regulations for the disposal of industrial waste. For disposal
in the USA, see the homepage of the Electronics Industries Alliance (http://www.eiae.org/) for the
correct method of disposal.
How to discard a used battery
Some FURUNO products have a battery(ies). To see if your product has a battery(ies), see the
chapter on Maintenance. Follow the instructions below if a battery(ies) is used.
In the European Union
The crossed-out trash can symbol indicates that all types of batteries
must not be discarded in standard trash, or at a trash site. Take the
used batteries to a battery collection site according to your national
legislation and the Batteries Directive 2006/66/EU.
Cd
In the USA
The Mobius loop symbol (three chasing arrows) indicates that Ni-Cd
and lead-acid rechargeable batteries must be recycled. Take the used
batteries to a battery collection site according to local laws.
In the other countries
Ni-Cd
Pb
There are no international standards for the battery recycle symbol. The number of symbols can
increase when the other countries make their own recycle symbols in the future.
i
SAFETY INSTRUCTIONS
The user and installer must read the appropriate safety instructions before attempting to install
or operate the equipment.
WARNING
Indicates a potentially hazardous situation which, if not avoided,
could result in death or serious injury.
CAUTION
Indicates a potentially hazardous situation which, if not avoided,
may result in minor or moderate injury.
Warning, Caution
Prohibitive Action
Mandatory Action
Safety Instructions for the Operator
WARNING
WARNING
Do not open the equipment except to
replace paper.
Make sure no rain or water splash leaks
into the equipment.
Only qualified personnel should work
inside the equipment.
Fire or electrical shock can result if water
leaks in the equipment.
Immediately turn off the power at the
switchboard if water leaks into the
equipment or something is dropped
into the equipment.
Use the proper fuse.
Continued use of the equipment can cause
fire or electrical shock. Contact a FURUNO
agent for service.
Handle the LCD with great care. Strong
shock may break it.
Fire, electrical shock or serious injury can
result.
If the LCD breaks, LCD liquid may leak out.
Do not swallow or touch the liquid - it is
toxic if swallowed. If it is swallowed or
contacts eyes, rinse the contacted area
thoroughly with water and contact a
physician immediately.
Do not place liquid-filled containers on
the top of the equipment.
The power supply shall conform to
the recommended rating.
Fire or electrical shock can result if a liquid
spills into the equipment.
Fire or electrical shock may result if an
improper power supply is used.
Do not disassemble or modify the
equipment.
Immediately turn off the power at the
switchboard if the equipment is emitting
smoke or fire.
Continued use of the equipment can cause
fire or electrical shock. Contact a FURUNO
agent for service.
ii
Use of a wrong fuse can result in damage
to the equipment or cause fire.
CAUTION
Do not use commercial cleaners to
clean the main unit.
Commercial cleaners may remove paint
and markings. Remove dust from the main
unit with a soft cloth. For stubborn dirt, use
water-diluted mild detergent and a soft
cloth.
WARNING LABEL
A warning label is attached to the main unit.
Do not remove the label. If the label is missing
or damaged, contact a FURUNO agent or
dealer about replacement.
WARNING
To avoid electrical shock, do not
remove cover. No user-serviceable
parts inside.
Name:
Warning Label 1
Type:
86-003-1011-2
Code No.: 100-236-232-10
Safety Instructions for the Installer
WARNING
Turn off the power at the switchboard
before beginning the installation.
CAUTION
Observe the following compass safe
distances to prevent interference to a
compass:
Fire or electrical shock can result if the
power is left on.
Facsimile
Receiver
Standard
compass
Steering
compass
0.7 m
0.5 m
Observe the following cautions when
choosing a mounting location:
- Locate away from area subject to rain
or water splash.
- Provide adequate ventilation.
- Locate out of direct sunlight.
- Choose location where shock and
vibration are minimal.
iii
TABLE OF CONTENTS
FOREWORD ............................................................................................... vi
EQUIPMENT LIST ..................................................................................... vii
SYSTEM CONFIGURATION .................................................................... viii
1. OPERATION .......................................................................................... 1
1.1
1.2
1.3
1.4
1.5
1.6
1.7
1.8
1.9
1.10
1.11
1.12
1.13
1.14
Control Description ....................................................................................................... 1
Turning the Power On/Off............................................................................................. 3
Adjusting LCD Contrast ................................................................................................ 3
Adjusting LCD Brilliance and LED Brightness .............................................................. 3
Channel and Frequency Displays................................................................................. 3
1.5.1 Channel setting................................................................................................ 3
1.5.2 Selection of desired frequency, fine adjustment of frequency ......................... 4
Automatic Receiving ..................................................................................................... 4
Manual Receiving ......................................................................................................... 5
Timer Receiving............................................................................................................ 5
1.8.1 Registering timer programs ............................................................................. 5
1.8.2 Choosing timer programs for timer reception .................................................. 6
1.8.3 Disabling timer operation when awaiting reception ......................................... 7
1.8.4 Unlocking the keyboard during timer reception ............................................... 7
1.8.5 Confirming timer programs .............................................................................. 7
Processing Facsimile Images ....................................................................................... 8
1.9.1 Speed and IOC................................................................................................ 8
1.9.2 Manual phasing ............................................................................................... 9
1.9.3 Synchronization ............................................................................................... 9
1.9.4 Reverse mode ................................................................................................. 9
Sleep Timer ................................................................................................................10
1.10.1 Activating the sleep timer .............................................................................. 10
1.10.2 Unlocking the keyboard ................................................................................. 10
1.10.3 Disabling the sleep timer ............................................................................... 10
Setting the Date and Time.......................................................................................... 11
Adding Facsimile Channels ........................................................................................ 11
ISB Function ...............................................................................................................13
1.13.1 Enabling, disabling ISB function ..................................................................... 13
1.13.2 Setting ISB shift width..................................................................................... 13
Operation with an External Receiver .......................................................................... 14
1.14.1 Enabling, disabling external receiver use ...................................................... 14
1.14.2 Operation....................................................................................................... 14
2. MAINTENANCE ................................................................................... 15
2.1
2.2
2.3
2.4
2.5
iv
Cleaning .....................................................................................................................15
Replacement of Recording Paper .............................................................................. 15
Replacement of Fuse ................................................................................................. 16
Backup Battery ........................................................................................................... 19
Clearing the RAM ....................................................................................................... 19
3. INSTALLATION................................................................................... 21
3.1
3.2
3.3
3.4
Main Unit .................................................................................................................... 21
Antenna...................................................................................................................... 22
3.2.1 General antenna connection ......................................................................... 22
3.2.2 Whip or wire antenna .................................................................................... 23
3.2.3 Installation of optional preamp unit (FAX-5) .................................................. 23
Wiring ......................................................................................................................... 24
3.3.1 Power, ground ............................................................................................... 24
3.3.2 External equipment ....................................................................................... 24
3.3.3 Whip or wire antenna .................................................................................... 25
3.3.4 Setting of SW S1 on RCV board (when preamp unit is used)....................... 26
Changing Display Language ...................................................................................... 27
FACSIMILE STATION TABLES ............................................................... 29
SPECIFICATIONS................................................................................. SP-1
PACKING LIST.........................................................................................A-1
OUTLINE DRAWINGS .............................................................................D-1
INTERCONNECTION DIAGRAM.............................................................S-1
v
FOREWORD
A Word to the Owner of the FAX-408
FURUNO Electric Company thanks you for purchasing the FURUNO FAX-408 Facsimile Receiver. We are confident you will discover why the FURUNO name has become synonymous with
quality and reliability.
For over 60 years FURUNO Electric Company has enjoyed an enviable reputation for quality and
reliability throughout the world. This dedication to excellence is furthered by our extensive global
network of agents and dealers.
Your equipment is designed and constructed to meet the rigorous demands of the marine environment. However, no machine can perform its intended function unless properly installed and
maintained. Please carefully read and follow the operation, installation and maintenance procedures set forth in this manual.
We would appreciate feedback from you, the end-user, about whether we are achieving our purposes.
Thank you for considering and purchasing FURUNO.
Features
The FAX-408 uses an Individual scanning recording thermal head to produce high quality facsimile images.
• Electronic scanning with thermal head recording system provides clear image, quiet operation.
• Programmed with all existing facsimile stations and frequencies. User may also program
channels and edit existing channels.
• Fully automatic facsimile operation with built-in schedule timer. Storage for 16 timer programs.
• Fully automatic selection of speed, IOC, phase alignment and frequency. Manual selection
also available.
• 9-tone gradation recording provides clear and detailed weather images.
• ISB shift function tracks frequency of SSB multiplex broadcasts whose frequencies typically
shift 1-2 kHz.
• Signal from external receiver may also be recorded.
• Automatic start/stop circuit provided in accordance with WMO standard.
vi
EQUIPMENT LIST
Standard supply
Name
Type
Code No.
Qty
—
1
Facsimile Receiver
FAX-408
Installation Materials
CP08-02101
000-163-087
1 set
Accessories
FP08-01000
000-163-088
1 set
Spare Parts
SP08-02301
000-163-082
1 set
Remarks
See the Packing Lists at
the end of this manual.
Optional supply
Name
Preamp Unit
Type
Code No.
Remarks
FAX-5
000-075-016
w/15 m cable
FAX-5
000-075-049
w/1 m cable
04S4176
000-153-122
2.6 m, for use with FAX-5
FAW-6R2
000-572-108
6m
FAW-6R2A
000-107-921
6 m, w/mounting bracket
Hose Clamp
OP08-11
005-946-960
For mounting preamp unit
Matching Box
ARD-1
005-502-230
Antenna Cable
Extension Kit
OP04-2 *10M*
000-041-174
OP04-2 *20M*
000-041-175
OP04-2 *30M*
000-041-176
OP04-2 *40M*
000-041-177
OP04-2 *50M*
000-041-178
Coaxial Plug
FM-MP-7
000-108-859
Adapter
MP-M3A
000-108-860
MP-M5A
000-108-861
PR-62
000-013-484
100 VAC
000-013-485
110 VAC
000-013-486
220 VAC
000-013-487
230 VAC
Whip Antenna
Rectifier
Connector (M)
FMA-1
10 m, 3D-2V, w/MP3 connector at
both ends
20 m, 3D-2V, w/MP3 connector at
both ends
30 m, 3D-2V, w/MP3 connector at
both ends
40 m, 3D-2V, w/MP3 connector at
both ends
50 m, 3D-2V, w/MP3 connector at
both ends
000-152-964-00
vii
SYSTEM CONFIGURATION
Choose one
WHIP ANTENNA
(2.6 m)
PREAMP UNIT
FAX-5
WHIP ANTENNA
(6 m)
WIRE ANTENNA
OR
MATCHING BOX
ARD-1
12-24 VDC
External
Receiver
FACSIMILE RECEIVER
FAX-408
: Standard supply
: Optional suppply
: Local supply
viii
1.
OPERATION
1.1
Control Description
Control panel
Paper cutter
Paper compartment
cover
TIMER
PRG FRQ
1
2
3
RCD
DIM CH
4
5
6
SYNC
SPD REV
7
8
9
IOC RCD
C
0
E
TUNE
POWER
ON
VOLUME
FACSIMILE RECEIVER FAX-408
OFF
PAPER FEED
Control description
Control,
indicator
Description
POWER
ON
Turns power on and off.
OFF
VOLUME
Adjusts volume of Rx signal and key beep.
SYNC
Fine tunes the phasing signal.
1
1. OPERATION
Control description (con’t from previous page)
Control,
indicator
PRG
FRQ
Description
• Enables a setting mode (in combination with numeric key). Press the key followed by appropriate numeric key to choose setting mode.
1- Chooses internal or external receiver.
2- Sets timer reception functions.
3- Sets sleep timer.
4- Adds or edit channels.
5- Sets date and time.
6- Sets ISB shift.
7- Adjusts LCD contrast.
9- Clears RAM.
• Returns to top page in setting mode.
• Changes from channel mode to frequency mode.
• Sets frequency in frequency mode.
DIM
Adjust LCD brilliance and LED brightness, in five levels.
CH
• Changes from frequency mode to channel mode.
• Sets channel in channel mode.
SPD
Chooses recording speed.
REV
• Reverses recording format (from black on white to white on black and vice
versa).
• Inserts decimal point when entering frequency, asterisk when entering channel.
• Chooses + or -.
IOC
Chooses IOC (Index of Cooperation).
RCD
Starts and stops recording in manual recording.
E
Confirms setting.
C
• Clears data in setting mode.
• Switches from setting mode to standby mode.
2
Raises channel in channel mode, or raises frequency in frequency mode.
4
Manual phasing (leftward) in recording. Each press shifts the recording leftward
by about 5 mm.
5
Displays date and time.
6
Manual phasing (rightward) in recording. Each press shifts the recording rightward by about 5 mm.
8
Lowers channel in channel mode, or lowers frequency in frequency mode.
0
Feeds paper.
TUNE
TIMER
RCD
2
The top, middle or bottom LED lights when the receive frequency is higher, the
same or lower than programmed frequency, respectively.
Lights when the timer mode or sleep mode is active.
• Flashes when receiving start signal.
• Lights when recording is in progress.
1. OPERATION
1.2
Turning the Power On/Off
Press the POWER key to turn the power on or off. When the power is applied, the last-used
channel appears.
1.3
Adjusting LCD Contrast
1. Press the PRG key.
2. Press the 7 key to show the contrast setting screen.
SET CONTRAST
by S/T KEY
3. Press S or T key to adjust the contrast, in 10 levels (0-9). The chosen level is indicated on
the LCD.
4. Press the E key.
5. Press the C key to return to the standby display.
1.4
Adjusting LCD Brilliance and LED Brightness
Use the DIM key to adjust LCD brilliance and LED brightness, in five levels.
1.5
Channel and Frequency Displays
The channel display may be chosen with the CH key; the frequency display with the FRQ key.
The channel number is displayed in three digits. In the example below the channel number is 000.
CH No. Call Sign
"C" denotes channel
display mode.
C000
S120
JMH
I576
Speed IOC
Channel display
1.5.1
Frequency
3622.5
CH No. Call Sign
Frequency
000
S120
3622.5
JMH
I576
Speed IOC
F
"F" denotes frequency
display mode.
Frequency display
Channel setting
In the channel display mode, press S or T key to choose channel number. A channel may also
be selected manually by pressing the CH key when in the channel display mode and then entering
channel number with the numeric keys. An asterisk (*) may be entered (with REV/ key) at the 3rd
digit location to receive the most sensitive frequency of a channel group automatically.
z
3
1. OPERATION
1.5.2
Selection of desired frequency, fine adjustment of frequency
Frequency may also be entered manually by pressing the FRQ key, and then entering frequency
by using the numeric keys and the REV/ key (for entering decimal point). The available frequency
range is 2000.0 - 24999.9 kHz.
z
In the frequency display mode, use the S or T key to fine tune a frequency when in the frequency
display mode, in resolution of 0.1 kHz. When properly tuned, the center TUNE LED (green) lights.
If the upper TUNE LED (red) is lit, use the S key, and if the lower TUNE LED (red) is lit, use the
T key.
1.6
Automatic Receiving
Once you choose the facsimile station from which to receive, the system goes into standby to
await the start signal from the facsimile station. Recording starts when the start signal is received.
1. Press the CH key to show the channel display.
C00*
S120
JMH
I576
3622.5
* Asterisk indicates automatic
frequency selection.
2. Press the S or T key to choose channel desired.
Note: Alternatively, you may enter the frequency of the broadcasting station by pressing the
FRQ key and entering frequency with the numeric keys and the REV/ key (for decimal point).
z
When the start signal is received, the message "AUTO START SEARCHING FRAME" appears
and the RCD LED (orange) flashes. Speed and IOC are automatically adjusted when recording
starts. The RCD LED lights during recording.
Note: The TUNE LED goes off when the RX level goes below a certain level or the equipment is
not receiving. Even if the TUNE LED goes off, the equipment records the fax signal as long as the
S/N ratio is suitable. Therefore, this is not a sign of TUNE LED trouble or equipment malfunction.
Stopping recording
Recording stops automatically when the stop signal is received. You may also stop the recording
manually by pressing the RCD key. The RCD LED goes off when recording is stopped.
4
1. OPERATION
1.7
Manual Receiving
This section shows you to manually receive a facsimile broadcast. For example, you may want to
receive a facsimile broadcast already in progress or receive from a facsimile station that does not
use start and stop signals.
1. Press the CH key to show the channel display.
C000
S120
JMH
I576
3622.5
2. Press the S or T key to choose channel desired.
Note: Alternatively, you may enter the frequency of the broadcasting station by pressing the
FRQ key and entering frequency with the numeric keys and the REV/ key (for decimal point).
z
3. Press the RCD key to start receiving.
MANUAL START SEARCHING FRAME appears on the display and the RCD LED (orange)
flashes.
4. If recording does not start after a while, press the RCD key again. The RCD LED stops flashing
and lights when recording starts.
5. If necessary, use the SPD key and IOC keys to choose rotation speed and IOC, respectively,
referring to paragraph 1.9.1.
Stopping recording
Recording stops automatically when the stop signal is received. To stop recording manually, press
the RCD key. The RCD LED goes off when recording is stopped.
1.8
Timer Receiving
Most facsimile stations transmit facsimile images in accordance with a schedule issued by relative
meteorological observatory. (You can find facsimile schedules in the publication “Meteorological
Facsimile Broadcasts,” available through meteorological observatory bodies.) If you wish to
receive a certain facsimile broadcast on a regular basis, therefore, the timer mode will virtually
allow you “hands-off” automatic operation. 16 timer programs may be set.
1.8.1
Registering timer programs
1. Press the PRG key to display the setting mode.
[PRG] key
C000
S120
JMH
I576
SET PRG. No. 1-9
ESC PUSH C KEY
3622.5
[C] key
Standby display
Setting mode
2. Press the 2 key to show the timer reception setting mode.
TIMER RCV : 1-OFF
2-ON 3-RCL 4-STR
5
1. OPERATION
3. Press the 4 key to choose STR (Store).
STORE TIMER REG
SET REG No. 0-F
4. Use the S or T key to choose timer program number and press the E key. For example,
choose “1” and the display then looks something like the one below.
R1 SET CHANNEL
No. in 3 FIGURES
5. Enter a channel number and press the E key.
R1 C000 SET DAY
of THE WEEK by ST
6. Set the day of the week which to receive the program, using the S or T key. Choose the
asterisk (*) to get a broadcast daily at the same time.
7. Press the E key.
R1 C000 MON
SET START/STOP
8. Set start and stop times, in 24-hour notation, using the numeric keys. (When registering programs which follow one another consecutively, the time between programs should be set at
least one minute apart. For example, you have two programs to register, the first at 12:00-12:30
and the second at 12:30-13:00. In this case, set the time for the second program to 12:3113:00.)
9. Press the E key.
10.Press the C key.
1.8.2
Choosing timer programs for timer reception
Choose timer programs to use in timer reception as follows:
1. Press the PRG key and the 2 key to show the timer reception setting mode.
TIMER RCV : 1-OFF
2-ON 3-RCL 4-STR
2. Press the 2 key to choose ON.
SET REG No. 0-F
PUSH S/T&X& E KEY
3. Use the S or T key to choose timer program number to activate, and press the X key.
TIMER RCV No.: 4
4
4. Repeat step 3 as necessary to choose other programs.
5. After choosing all programs necessary, press the E key.
The start and stop times of the earliest program are displayed. The TIMER LED (orange) lights
when timer recording is enabled. Note that all keys except the PRG key are locked.
6
1. OPERATION
1.8.3
Disabling timer operation when awaiting reception
Timer programs may be deleted from the timer reception schedule as follows.
1. Press the PRG key, and the message shown below appears.
TIMER RCV : OFF?
PUSH E KEY
2. Press the E key.
1.8.4
Unlocking the keyboard during timer reception
All keys except the PRG key are locked during recording to prevent accidental adjustment of the
equipment. If you need to operate the keyboard when timer reception is active, do the following:
1. Press the PRG key, and the following screen appears.
KEY LOCK : OFF?
PUSH E KEY
2. Press the E key to unlock the keyboard.
1.8.5
Confirming timer programs
Do the following to confirm timer programs that you have entered.
1. Press the PRG key and the 2 key to show the timer reception setting mode.
2. Press the 3 key to choose RCL (Recall).
RECALL TIMER REG
SET REG No. 0-F
3. Use the S or T key to choose timer program number, and the contents of the timer program
selected are displayed.
4. Press the C key several times to return to the standby display.
7
1. OPERATION
1.9
Processing Facsimile Images
Speed, IOC, phasing, synchronization and image format may be adjusted during recording.
1.9.1
Speed and IOC
Choose the correct speed and IOC, otherwise the image will be received as shown in the illustration below.
Wrong Speed or IOC and Image
Wrong speed: "60" chosen instead of "120"
Two images are displayed.
Wrong speed: "120" chosen instead of "60"
Overlapped image appears.
Wrong IOC
The image will be extended (or foreshortened) when "288" (or 576)
is selected for transmission with the IOC of "576 (or 288)."
Speed
Speed is the rotation speed of the drum (on which the original image is fitted) at the facsimile transmitter: 60, 90 or 120 rpm. To choose speed, do the following:
1. Press the SPD key to show the speed display.
SPEED: 120
1-120 2-90
3-60
2. Press the 1, 2 or 3 key as appropriate to choose correct speed.
8
1. OPERATION
IOC
IOC is an acronym meaning Index of Cooperation, and it is the line density standard assigned by
WMO: IOC 576, high density, IOC 288, low density. To choose IOC, do the following:
1. Press the IOC key to show the IOC display.
IOC: 576
1-576 2-288
2. Press the 1 or 2 key to choose appropriate IOC.
1.9.2
Manual phasing
When the FAX-408 starts recording a broadcast already in progress, or noise prevents detection
of the phasing signal, a dead sector (black or white stripe) may appear on the recording. This phenomenon is due to phase mismatching. When this occurs, adjust recording position as shown
below.
Dead sector (can be white)
To adjust phasing, use the W or X key. Press W to shift leftward; X to shift rightward. Each press
shifts the recording leftward (rightward) by about 5.0 mm.
1.9.3
Synchronization
If the dead sector is plotted at an angle even when the phase is properly selected, adjust the synchronization to display the dead sector straightly, using the SYNC control. Rotate the control counterclockwise if the picture is skewed leftward, or rotate it clockwise if the picture is skewed
rightward.
(SYNC)
Rotate
counterclockwise
Rotate
clockwise
If picture is
skewed leftward
1.9.4
If picture is
skewed rightward
Reverse mode
Most facsimile stations transmit facsimile images with black text on a white background. Some
stations, however, print reversely of that format. If you want to record a facsimile in a format different from how it is being received, do the following:
1. Press the REV/ key to display the screen shown below.
z
REVERSE: OFF
1-OFF 2-ON
2. Press the 1 key to turn OFF reverse or the 2 key to turn ON reverse.
9
1. OPERATION
1.10
Sleep Timer
The sleep timer feature sleeps the set after reception has passed. Fax signal will not be received
when the sleep timer is active.
1.10.1
Activating the sleep timer
1. Press the PRG key.
2. Press the 3 key to show the sleep mode setting mode.
SLEEP MODE : OFF
1-OFF
2-ON
3. Press the 1 key to disable the sleep timer or the 2 key to enable it.
4. If the 1 key was pressed at step 3, press the E key to turn off the sleep mode. If the 2 key was
pressed, the display shown below appears. Go to step 5.
SLEEP TIME:
SET SLEEP TIME
5. Using the numeric keys, set the amount of time (within 23h59m) to sleep the set. To sleep the
set 30 minutes later, for example, enter [0], [0], [3], [0].
6. Press the E key.
The TIMER LED (orange) lights. IN SLEEP!! is displayed when the sleep function becomes active.
1.10.2
Unlocking the keyboard
All keys except the PRG key are locked when the sleep timer function is in standby (before specified time passes). To unlock the keyboard in this case, do the following:
1. Press the PRG key to show the following menu.
KEY LOCK : OFF?
PUSH E KEY
2. Press the E key to unlock the keyboard and enable all operations.
1.10.3
Disabling the sleep timer
To disable the sleep timer, do the following:
1. Press the PRG key to show the following menu.
SLEEP MODE : OFF
PUSH E KEY
2. Press the E key.
10
1. OPERATION
1.11
Setting the Date and Time
1. Press the PRG key.
2. Press the 5 key to display the screen shown below.
SET MONTH
by S/T KEY
3. Use the S or T key to set month, and press the E key.
FEB
SET
DATE
in
2FIG
4. Use the numeric keys to set date in two digits, and press the E key.
FEB 22 SET DAY
of THE WEEK by ST
5. Use the S or T key to set day of the week, and press the E key.
FEB
SET
22 WED
YEAR in
'
2FIG
6. Use the numeric keys to set year in two digits, and press the E key.
SET
:
TIME in
4FIG
7. Using 24-hour notation, enter time in four digits, and press the E key. The date and time appear
momentarily.
8. Press the C key to return to the standby display.
1.12
Adding Facsimile Channels
The FAX-408 provides a free memory for the user to store newly added channels (164 max.). The
procedure below shows how to add facsimile channels, using CH711 as an example.
1. Press the PRG key followed by the 4 key.
CHANNEL PROGRAM
SET CH in 3 FIGS
2. Enter channel number with the numeric keys, and press the E key. For example, enter 711.
C711 SET CALL SIGN by ST WX KEY
3. Press any arrow key to go the call sign entry screen.
Cursor (flashing)
CALL SIGN: JMH
PUSH E KEY
11
1. OPERATION
4. Enter call sign (3 characters), using the arrow keys, and press the E key. (Use the W or X key
to choose location (with the cursor); use the S or T key to change character.) For example,
enter JMH, and the display should look something like the one below.
C711 JMH 0.0
SET FREQUENCY
5. Enter frequency, using the numeric keys and the REV/ key (for decimal point), and press the
E key.
z
SET SPEED 120-60
1-120 2-90 3-60
6. Press the 1, 2 or 3 key as appropriate to choose speed, and press the E key.
SET IOC 576/288
1-576 2-288
7. Press the 1 or 2 key as appropriate to choose IOC, and press the E key.
SET
REVERSE
1-OFF 2-ON
8. Press the 1 key to print facsimile in the format it is received, or the 2 key for format reversal.
9. Press the E key. The data for the channel is momentarily displayed and then the setting mode
display appears.
10.Press the C key to return to the standby display.
Existing channels may be edited similarly. Choose existing channel at step 2 and follow the
remaining steps.
12
1. OPERATION
1.13
ISB Function
The frequency of certain SSB multiplex broadcasts (fax and teletype) randomly shifts 1-2 kHz. To
receive these broadcasts steadily, enable the ISB* function to track frequency.
* ISB is a single sideband mode which is used with some SSB transmissions. Normally each sideband carries identical information, but ISB modulates two different input signals - one on the upper
sideband, the other on the lower sideband.
1.13.1
Enabling, disabling ISB function
1. Press the PRG key followed by the 6 key.
ISB +0.0kHz : OFF
1-OFF 2-ON 3-QTY
2. Press the 1 or 2 key to disable or enable the ISB shift function, respectively.
3. Press the E key.
4. Press the C key.
When the ISB function is enabled, the ISB shift width set in the procedure below is applied to the
frequency shown on the frequency display. Further, the frequency shift is applied to ALL channels.
1.13.2
Set ISB shift width
Set the ISB shift width (from nominal frequency) to use as follows:
1. Press the PRG key followed by the 6 key.
2. Press the 3 key to choose QTY.
SET
+/-
3.
4.
5.
6.
ISB in 2FIGS
by
KEY
Press the REV/ key to display the + or – sign as appropriate.
Enter ISB shift width in two digits, using the numeric keys.
Press the E key.
Press the C key to return to the standby display.
z
13
1. OPERATION
1.14
Operation with an External Receiver
When the receive signal is particularly weak or the internal receiver is producing only blurred
recordings, you may wish to receive facsimile broadcasts with an external receiver.
1.14.1
Enabling, disabling external receiver use
1. Press the PRG key followed by the 1 key.
AF IN : INT
1-INT 2-EXT
2. Press the 1 key to use the internal receiver, or press the 2 key to use an external receiver.
3. Press the E key.
1.14.2
Operation
Beat adjustment
When using an external receiver whose beat frequency is adjustable within a range of ±2 kHz or
more by means of a beat knob, set the frequency dial so the deflection of the receiver’s S-meter
is maximum, and adjust the beat knob so that the center LED of the tuning indicator of this unit is
lit. When a signal from a station with ISB communication (U.S. Naval Station Guam, Pearl Harbor,
San Francisco, etc.) is received, sometimes an adjustment of the frequency is necessary, with a
variable condenser, because the frequency may shift from the nominal frequency of the station by
±2 kHz.
Bandwidth
Increase bandwidth when noise is few, and lower bandwidth by about 1 kHz when noise is great.
Recording
Set up for recording referring to paragraph 1.6 (automatic) or paragraph 1.7 (manual). For reverse
reception, set the mode on the external receiver to BFO (Beat Frequency Oscillator), or switch
between LSB (Lower Sideband) and USB (Upper Sideband).
14
2.
MAINTENANCE
NOTICE
WARNING
Do not open the equipment except to
replace paper.
Only qualified personnel should work
inside the equipment.
2.1
Do not apply paint, anti-corrosive sealant
or contact spray to coating or plastic
parts of the equipment.
Those items contain organic solvents that
can damage coating and plastic parts,
especially plastic connectors.
Cleaning
Dust and dirt may be removed from the main unit with a soft cloth. For stubborn dirt, water diluted
mild detergent may be used. DO NOT use chemical-based cleaners to clean the cabinet or control
panel, as they can remove paint and markings.
Random lines or dots appear on the recording when the thermal head is dirty. Clean the thermal
head as shown in the procedure below, using the head cleaning sheet (#2000, supplied) and
paper sensor jig, an ordinary white piece of paper cut and folded to the dimensions shown below.
25
Mountain fold*
5
Mountain fold*
*Mountain fold
15
25
Dimensions in mm
1. Turn off the power.
2. Unfasten two screws from the top of the unit and then remove paper compartment cover and
paper cutter.
3. Push the paper release lever downward and detach roll paper.
4. With the longer end of the paper sensor jig up, set it to the paper feed slot as shown in the illustration on the next page. Confirm that the paper sensor jig is touching the paper stopper.
5. With the shiny side of the head cleaning sheet up, insert it above the paper sensor jig and continue inserting it until it comes out. Straighten the sheet if necessary.
6. Set the paper release lever upward.
15
2. MAINTENANCE
7. Turn on the power.
8. Press the 0 key until the sheet feeds out 5-15 cm.
9. Set the paper release lever downward and remove the head cleaning sheet and paper sensor
jig.
10.Re-set the roll paper, paper compartment cover and paper cutter.
Paper release lever
!
Paper sensor jig
Paper stopper
Note: Do not use the head cleaning sheet more than once per cleaning session and do not use a
sheet whose grade is coarser than #2000. A coarser grade will damage the thermal head.
If the recording is still dirty
Turn off the power. Moisten a cotton swab with ethyl alcohol and insert between the thermal head
and rubber roller, until about 4 mm of the swab is inserted. Move the swab to clean. USE ONLY
ethyl alcohol to clean.
Use only a slight amount of ethyl alcohol. Excessive amount may dissolve corrosive components
in printing chaff, which can damage the thermal head. Further, be sure the alcohol has dried completely before turning on the power.
2.2
Replacement of Recording Paper
Use only the recording paper specified by FURUNO. Use of other recording paper may degrade
performance, damage the thermal head and prevent detection of "paper out".
When the paper is nearly out, the message PAPER OUT!! appears on the display and recording
is automatically stopped. When about 3 m of paper remains, a red line of 2-3 mm in width begins
to appear on the paper. When this happens, replace the paper as shown in the procedure on the
next page.
Part name
Recording paper
16
Type
TP-0820B
Code No.
000-157-755-10
1. Open the paper cutter by loosening its two
screws. Detach it together with the paper
compartment cover. Put the paper feed lever
in the downward position. See Figure 1.
(1)
Figure 1
2. While pushing the paper guide (2) in the
direction indicated, remove the remaining roll
paper. See Figure 2.
(2)
Paper guide
Figure 2
3. Pass the recording paper between the
paper-end detector lever and rubber roller.
Hold the edge of the paper which is above
the roller and pull upward. See Figure 3.
Figure 3
17
2. MAINTENANCE
4. Pull the paper feed lever upward. Draw out the
paper so that it will be a little past the front of the
unit. See Figure 4.
(3)
Figure 4
5. Attach the paper compartment cover. See Figure
5.
Figure 5
6. Attach the paper cutter and tighten its two
screws. The recording paper should be protruding past the paper cutter. See Figure 6.
Note: The thermal head is weak against
humidity and moisture. For this reason do not
allow water or moisture near the recording
paper, to prevent paper jam due to wet recording
paper.
Figure 6
18
2. MAINTENANCE
2.3
Replacement of Fuse
A fuse at the rear of the main unit protects the equipment from overcurrent and equipment fault.
If the power cannot be turned on, the fuse may have blown.
WARNING
Use the proper fuse.
Use of a wrong fuse can result in damage
to the equipment or cause fire.
Parts name
Fuse
Type
FGBO 125V 7A PBF
2.4
Code No.
000-155-831-10
Backup Battery
The manganese lithium battery inside the main unit is used to keep the clock running, and its life
is about five years. When the battery voltage is low the time is “slow.” Have a qualified technician
replace the battery when this occurs.
Parts name
Battery
2.5
Type
U130002 (CR-2032)
Code No.
000-159-813
Clearing the RAM
The RAM stores frequency data of fax transmitting stations throughout the world. If part of the
RAM was deleted in error, the data for fax transmitting stations can be retrieved from the ROM. In
this case it is necessary to clear the RAM. Be sure that it is all right to clear the RAM as all data
(frequency, etc.) stored there will be deleted.
1. Press the PRG key followed by the 9 key.
RAM CLEAR ! !
PUSH E KEY
2. Press the E key to clear the RAM.
3. Press the C key to return to the standby display.
Note: Do not confuse RAM error with keyboard lockup. The keyboard may lock if some abnormal
operation is detected. If this occurs, turn the power off and on again.
19
2. MAINTENANCE
This page intentionally left blank.
20
3.
INSTALLATION
3.1
Main Unit
The main unit may be mounted on a tabletop or a bulkhead, using 5×25 self-tapping screws (supplied).
When choosing a mounting location, consider the following points:
• It is essential that the mounting surface is flat, otherwise blurred recordings may result, as in the
example below. If it is necessary to level the unit, insert flat washer (supplied) between unit and
mounting surface at appropriate location(s).
Blurred recording
Self-tapping screw
Flat washer
• Locate the unit out of direct sunlight because of heat that can build up inside the cabinet.
• For bulkhead mounting, be sure the mounting location is strong enough to support the unit
under the vibration normally encountered on board the vessel.
• Choose a location where vibration and shock are minimal.
• Choose a location where the control panel can be easily operated.
• Leave sufficient space around the unit for servicing and maintenance. Refer to the outline
drawing for recommended maintenance space.
• Locate the unit away from areas subject to water splash and rain.
• A magnetic compass will be disturbed if the unit is placed too close to it. Separate the unit from
a magnetic compass by the distance noted on page iii to prevent interference to the compass.
21
3. INSTALLATION
3.2
Antenna
The performance of the facsimile receiver is directly related to the antenna installation. In general,
the antenna should be installed as high as possible on the vessel, free from the influence of nearby
antennas, rigging and masts. Be sure to locate the antenna well away from TX antennas and noise
generating equipment. Pay particular attention to the antennas of MF and HF radio equipment they can damage the facsimile receiver through induction. (For better protection against induction,
use the preamp unit.)
The FAX-408 can use the following antennas:
• Preamp unit FAX-5 (optional supply) + 2.6 m whip antenna (optional supply)
• Whip antenna (6 m, optional supply)
• Wire antenna (local supply)
3.2.1
General antenna connection
Connect the antenna to the facsimile receiver as shown below.
Wire Antenna
2.6 m Whip Antenna
Preamp Unit
Coaxial Cable
Facsimile ANT
Receiver
Preamp Used
22
6 m Whip
Antenna
OR
Matching Box
Facsimile ANT
Receiver
Preamp Not Used
3. INSTALLATION
3.2.2
Whip or wire antenna
• Either a long wire or whip antenna may be used. A wire antenna should be 10 meters or longer
including the vertical section. A whip antenna should be 6 meters long. Generally a whip
antenna is suitable for reception over 6 MHz and wire antenna is suitable for reception under 6
MHz.
• The antenna can be shared with other receivers; use an antenna switch.
• If, when using a wire antenna, sensitivity is low, install the preamp unit (option).
3.2.3
Installation of optional preamp unit (FAX-5)
Small boats may not afford the space to install a long wire
antenna. In this case it is recommended to install the preamp
unit with 2.6 meter whip antenna. The preamp unit can be
installed two ways:
• The base of the preamp unit is designed to accept a
threaded extension of one-inch diameter. The pitch of the
thread should be 14 threads per inch. The mast itself
should be no longer than 1.5 meters to prevent flexing in
heavy winds.
• Attach the preamp unit to a mounting post with stainless
steel hose clamps (option).
Mounting
1. Fix the preamp unit to the mounting location.
2. Screw the whip antenna onto the preamp unit.
3. If the mast is metallic, run a ground wire (local supply)
between the mast and the ground terminal on the preamp
unit.
4. Waterproof the junction and other exposed metallic parts
with silicone sealant.
5. Connect its coaxial cable directly to the antenna connector on the FAX-408. Note that an extension cable kit
(option) is available, in lengths of 10, 20, 30, 40 and 50 m.
50
Thread
(14 threads/inch)
Inch Pipe
INCH PIPE
Spring
Washer
Hose
Clamp
(option)
2.6 m Whip
Antenna
Post
Ground
Spot
HOSE CLAMP (option) ON POST
Screw
Antenna Wire
Wire Antenna
Fixture
Preamp Unit
WIRE ANTENNA
Note 1: A wire antenna several meters in length can be connected instead of the whip antenna.
In this case, install the wire antenna fixture (supplied with preamp unit) between the antenna wire
and the preamp unit as illustrated above.
Note 2: The preamp unit is powered by the facsimile receiver. To power the preamp unit, turn on
the Switch S1 on the RCV board in the main unit. See page 24 for the location of the DIP switch.
23
3. INSTALLATION
3.3
Wiring
See the diagram on page S-1 for detailed wiring information.
3.3.1
Power, ground
Battery
Connect black wire to “-” (negative) and red wire to “+” (positive).
+: RED
-: BLACK
Ground
Run the ground wire (supplied) between the GND terminal at the rear of the main unit and ship’s
superstructure. Do not share ground with other equipment.
3.3.2
External equipment
External equipment, such as a receiver, are connected to the terminal at the rear of the main unit.
How to connect wiring to terminal
Terminal at rear
of main unit.
Insert thin-bladed
screwdriver.
Spring-loaded button
Insert wire while pressing
and holding down
button with
screwdriver.
Wire
Hole for wire
Remove vinyl sheath
by 10 mm.
24
3. INSTALLATION
External receiver connection
An external receiver may be used in place of the internal receiver. In this case, the receiver should
have a local oscillator with very good frequency stability. Connect the external receiver to the EXT
AF IN terminal at the rear of the set. This terminal operates against an input of greater than
50 mV. Excessive input is protected with a protective circuit. However, if direct current is used,
input should be passed through a non-polarized capacitor of about 1 µF.
FACSIMILE
RECEIVER
EXT AF IN
(+)
(-)
EXTERNAL
RECEIVER
1 μF capacitor
3.3.3
Whip or wire antenna
If the preamp unit is not used, a matching box is required. Connect a feeder line between the
antenna and matching box. Attach a connector to the coaxial cable and connect it between the
receiver and the antenna. Use coaxial cable RG-10/UY or
RG-12/UY.
How to attach M-connector
1.
2.
3.
4.
5.
6.
Remove sheath by 30 mm.
Make the length of the conductor 23 mm. Expose braided shield by 5 mm.
Insert coupling ring onto cable.
Insert plug assembly onto cable.
Solder braided shield and plug assy. through hole in plug assy.
Tighten coupling ring to plug assy.
30 mm
Sheath
Plug assy.
5 mm
Contact sleeve
2 mm
Solder here.
Conductor
Braided
shield
Insulator
Coupling ring
Cut conductor here.
Solder both
sides of hole.
25
3. INSTALLATION
3.3.4
Setting of SW S1 on RCV board (when preamp unit is used)
If the preamp unit is installed, turn on SW S1 on the RCV board in the facsimile receiver to power
the preamp unit.
1. Unfasten two screws marked with arrows in the figure below to detach the paper cutter and the
paper compartment cover. Unfasten four screws to remove the main unit cover.
Main unit cover
Unfasten four screws:
two in front, two at rear
2. Unfasten four screws marked with arrows and pull the LCD assy. forward. Use a plastic-bladed
screwdriver to change position of S1 to ON. Reassemble the unit.
OFF
ON
S1
LCD Assy.
26
3. INSTALLATION
3.4
Changing Display Language
Display language is available in English, Dutch, Finnish, Norwegian, Swedish, Danish, Portuguese, Italian, German, Spanish and French, and the default language is English.
To change the display language, do the following:
1. Turn on the power while pressing and holding down the PRG key.
TEST MODE (HR3)
ESC POWER OFF
2. Press the 8 key to show the following display.
LANG: English
PUSH S/T &E KEY
3. Use the S or T key to choose language desired.
4. Press the E key.
5. Turn off the power and turn it on again.
27
3. INSTALLATION
This page intentionally left blank.
28
FACSIMILE STATION TABLES
This section shows the location and frequency data of all the existing frequencies of facsimile
transmitting stations programmed into this unit’s ROM. This data is for reference purposes. Data
is subject to change without notice.
Area map of sxisting stations
RBW
VFA
VFF
GYA
Šû
OXT
DDK
SVJ
IM B
RCC
CKN
RBV
RBX
AOK
ATP
BA F
3SD Šû HLL
BDF
Šû
BM F Šû
JM H
ŠûJFC
JJC
VCO
Šû
Šû
CFH
NMF
NM C
NMG
KVM
HSW
9âVU
Šû OXT
NOJ
5YE
PWZ
VM W
VM C
ZSJ
CBV
ZKLF
LOR
29
30
020
BAF
BAF
045
040
BAF
BAF
034
044
HLL
033
043
HLL
032
BAF
HLL
031
BAF
HLL
030
042
HLL
024
041
JFC
JFC
023
JFC
JFC
015
JFC
JJC
014
022
JJC
013
021
JJC
JJC
012
JJC
JMH
002
JJC
JMH
001
011
JMH
000
010
CALL SIGN
CHANNEL NO.
BEIJING
BEIJING
BEIJING
BEIJING
BEIJING
BEIJING
SEOUL
SEOUL
SEOUL
SEOUL
SEOUL
JAPAN
JAPAN
JAPAN
JAPAN
JAPAN
MALAYSIA
MALAYSIA
MALAYSIA
MALAYSIA
MALAYSIA
MALAYSIA
JAPAN
JAPAN
JAPAN
STATION
18236.9
16025.9
14366.9
10116.9
8121.9
5526.9
13570.0
9165.0
7433.5
5857.5
5385.0
16907.5
13074.0
8658.0
6414.5
4274.0
17430.0
22542.0
17069.6
16971.0
12745.5
8467.5
13988.5
7795.0
3622.5
[kHz]
FREQUENCY
094
093
092
091
090
084
083
082
081
080
074
073
072
071
070
064
063
062
061
060
052
051
050
CHANNEL NO.
VMC
VMC
VMC
VMC
VMC
ZKLF
ZKLF
ZKLF
ZKLF
ZKLF
BMF
BMF
BMF
BMF
BMF
BDF
BDF
BDF
BDF
BDF
3SD
3SD
3SD
CALL SIGN
FACSIMILE STATION TABLE
CHARLEVILLE
CHARLEVILLE
CHARLEVILLE
CHARLEVILLE
CHARLEVILLE
AUCKLAND
AUCKLAND
AUCKLAND
AUCKLAND
AUCKLAND
TAIPAI
TAIPAI
TAIPAI
TAIPAI
TAIPAI
SHANGHAI
SHANGHAI
SHANGHAI
SHANGHAI
SHANGHAI
BEIJING
BEIJING
BEIJING
STATION
20469.0
13920.0
11030.0
5100.0
2628.0
16340.1
13550.5
9459.0
5807.0
3247.4
18560.0
13900.0
8140.0
5250.0
4616.0
18940.0
11420.0
7420.0
5100.0
3241.0
16903.9
12831.9
8461.9
[kHz]
FREQUENCY
FACSIMILE STATION TABLES
5YE
ZSJ
ZSJ
ZSJ
ZSJ
170
171
172
173
ATP
141
5YE
ATP
140
161
HSW
131
160
HSW
130
GYA
KV M
123
153
KV M
122
GYA
KV M
121
152
KV M
120
GYA
V LM
110
GYA
V MW
104
150
V MW
103
151
V MW
V MW
102
V MW
100
101
CALL SIGN
CHANNEL NO.
CAPE NAV AL
CAPE NAV AL
CAPE NAV AL
CAPE NAV AL
NAIROBI
NAIROBI
PERSIAN GULF
PERSIAN GULF
PERSIAN GULF
PERSIAN GULF
NEW DELHI
NEW DELHI
BANGKOK
BANGKOK
HONOLULU
HONOLULU
HONOLULU
HONOLULU
CASEY
WILUNA
WILUNA
WILUNA
WILUNA
WILUNA
STATION
18238.0
13538.0
7508.0
4014.0
17447.5
9044.9
18261.0
14436.0
6834.0
3289.5
14842.0
7404.9
17520.0
7396.8
23331.5
16135.0
11090.0
9982.5
7470.0
18060.0
15615.0
10555.0
7535.0
5755.0
[kHz]
FREQUENCY
CFH
CFH
242
243
CFH
CFH
NMF
NMF
NMF
NMF
NMG
241
240
233
232
231
230
223
NMG
NMG
222
NMG
221
CBV
212
220
CBV
CBV
PWZ
211
210
201
PWZ
LOR
191
200
LOR
6V U
6V U
6V U
CALL SIGN
190
182
181
180
CHANNEL NO.
HALIFAX
HALIFAX
HALIFAX
HALIFAX
BOSTON
BOSTON
BOSTON
BOSTON
NEW ORLEANS
NEW ORLEANS
NEW ORLEANS
NEW ORLEANS
V ALPARAISO
V ALPARAISO
V ALPARAISO
RIO DE JANEIRO
RIO DE JANEIRO
PUERTO BELGRANO
PUERTO BELGRANO
DAKAR
DAKAR
DAKAR
STATION
13510.0
10536.0
6496.4
4271.0
12750.0
9110.0
6340.5
4235.0
17146.4
12789.9
8503.9
4317.9
17146.4
8677.0
4228.0
16978.0
12665.0
12672.0
5705.0
19750.0
13667.5
4790.5
[kHz]
FREQUENCY
FACSIMILE STATION TABLES
31
32
XL17
XL17
281
282
AIRBORNE ICE T.
AIRBORNE ICE T.
AIRBORNE ICE T.
NOJ
NOJ
NMC
NMC
NMC
NMC
NMC
IMB
IMB
IMB
SV J
SV J
302
303
310
311
312
313
314
320
321
322
330
331
ATHENS
ATHENS
ROMA
ROMA
ROMA
PT.REYES
PT.REYES
PT.REYES
PT.REYES
PT.REYES
KODIAK
KODIAK
KODIAK
NOJ
XL17
280
INUV IK
301
V FA
270
SYDNEY,NOV A SCOTIA
KODIAK
V CO
261
SYDNEY,NOV A SCOTIA
NOJ
V CO
260
IQALUIT & RESOLUTE
300
V FF
251
IQALUIT & RESOLUTE
COST GUARD ICE B.
V FF
250
STATION
290
CALL SIGN
CHANNEL NO.
8105.0
4481.0
13597.4
8146.6
4777.5
22527.0
17151.2
12786.0
8682.0
4346.0
12412.5
8459.0
4298.0
2054.0
14770.0
7708.1
6915.1
4616.0
8457.8
6915.0
4416.0
7710.0
3253.0
[kHz]
FREQUENCY
DDK
OXT
393
OXT
OXT
391
392
OXT
390
DDK
381
382
DDH
GYA
GYA
GYA
GYA
RBW
RBW
RBW
380
373
372
371
370
363
362
361
RBW
ROM
354
360
RCH
RIJ
RBX
353
352
351
RBX
RBV
350
RCH
345
RBX
344
343
RPJ
RBV
342
RBV
CALL SIGN
341
340
CHANNEL NO.
SKAMLEBAEK
SKAMLEBAEK
SKAMLEBAEK
SKAMLEBAEK
HAMBURG
HAMBURG
HAMBURG
NORTHWOOD
NORTHWOOD
NORTHWOOD
NORTHWOOD
MURMANSK
MURMANSK
MURMANSK
MURMANSK
TASHKENT2
TASHKENT2
TASHKENT2
TASHKENT2
TASHKENT2
TASHKENT
TASHKENT
TASHKENT
TASHKENT
TASHKENT
TASHKENT
STATION
17510.0
13855.0
9360.0
5850.0
13882.5
7880.0
3855.0
11086.5
8040.0
4610.0
2618.5
10130.0
7908.8
6445.5
5336.0
13947.0
9150.0
8083.0
5285.0
3280.0
14982.5
9340.0
7570.0
5890.0
4365.0
3690.0
[kHz]
FREQUENCY
FACSIMILE STATION TABLES
CALL SIGN
RCC
RCC
RCC
RCC
RCC
RDD
RCC
PRIV
CHANNEL NO.
400
401
402
403
404
405
406
410 - 733
MOSCOW
MOSCOW
MOSCOW
MOSCOW
MOSCOW
MOSCOW
MOSCOW
STATION
x5
12961.0
11617.0
10980.0
7695.0
6987.0
5008.0
3830.0
[kHz]
FREQUENCY
CHANNEL NO.
CALL SIGN
STATION
[kHz]
FREQUENCY
FACSIMILE STATION TABLES
33
FURUNO
FAX-408
SPECIFICATIONS OF FACSIMILE RECEIVER
FAX-408
1
RECEIVER
1.1
Reception
Synthesized double superheterodyne
1.2
Frequency range
MF/HF 2.0000 – 24.99999 MHz
1.3
Mode
F3C
1.4
Selectivity
2.0 kHz at -6 dB
1.5
Number of channels
314 channels (150 pre-set channels, 164 user channels)
1.6
Sensitivity
MF/HF 2µV at 20 dB SINAD
1.7
Channel selection
Automatic or manual, with numeric keys
1.8
Tuning indicator
3 LEDs
1.9
Display
LCD, 32 characters in 2 lines
1.10 External signal input
1500 Hz (black) and 2300 Hz (white), FSK or FM signal
2
RECORDER
2.1
Recording system
Electronic scanning w/thermal head
2.2
IOC
Index of Cooperation, 576 and 288
2.3
Recording speed
60, 90, 120 scans per minute
2.4
Gradation
9 tones (white, 7 gray levels and black)
2.5
Recording paper
Thermal paper (216 mm × 20 m)
2.6
Line density
8 dots/mm (total number of dots: 1696)
3
AUTOMATIC RECORDING CONTROL
3.1
Start/stop
Automatic start or stop by timer program and/or WMO
Standard, remote control signal (or manual)
3.2
Recording rate
Automatic selection of recording rate (or manual)
3.3
IOC
Automatic selection of IOC by WMO start signal (or manual)
3.4
Phase
Automatic selection of phase matching by passing signal
(or manual)
4
POWER
4.1
Power source
5
ENVIRONMENTAL CONDITIONS
5.1
Temperature
-10°C to +50°C
5.2
Humidity
95% relative humidity (35°C)
5.3
Waterproofing (IEC60529) IPX0
5.4
Vibration
12-24 VDC: 2.3 – 1.15 A
3 mm/480 rpm - 0.2 mm/3000 rpm
SP - 1
E6262S01A
FURUNO
FAX-408
6
COATING COLOR
6.1
Main unit
7
PREAMP UNIT FAX-5 (option)
7.1
Frequency range
80 kHz – 30 MHz
7.2
Antenna
Wire antenna or 2.6 m whip antenna
7.3
Input protection
Withstand a 30 Vrms antenna input for 15 minutes
7.4
Output impedance
50 ohms
7.5
Power
9 VDC, fed from facsimile receiver via coaxial cable
N2.5
SP - 2
E6262S01A
NAME
OUTLINE
INSTALLATION MATERIALS
ACCESSORIES
SPARE PARTS
UNIT
000-867-553-00
5X25 SUS304 1シュ
000-500-512-00
M-P-7 FMP-1C
000-161-860-00
343200G02
000-157-755-10
TP-0820B
000-164-342-10
F081267 (#2000)
000-155-831-10
**
1
Q'TY
4
1
1
CP08-02101
1
1
FP08-01000
2
SP08-02301
FGBO 125V 7A PBF
000-010-130-00
FAX-408*
DESCRIPTION/CODE №
FAX-408-J/E
(略図の寸法は、参考値です。 DIMENSIONS IN DRAWING FOR REFERENCE ONLY.)
コ-ド番号末尾の[**]は、選択品の代表コードを表します。
CODE NUMBER ENDING WITH "**" INDICATES THE CODE NUMBER OF REPRESENTATIVE MATERIAL.
SELF-TAPPING SCREW
+ナベタッピンネジ
CONNECTOR
コネクタ(M)
GROUNDING WIRE (DC)
アース線(DC)
工事材料
THERMAL PAPER
サーマル紙
HEAD CLEANING SHEET
ヘツドクリーニングシート
付属品
FUSE
ヒューズ
予備品
FACSIMILE RECEIVER
ファクシミリ受画装置
ユニット
PACKING LIST
DOCUMENT
OUTLINE
000-161-609-0*
MLG-62620-*
000-161-607-0*
OM*-62620-*
000-864-029-00
M6 SUS304
**
DESCRIPTION/CODE №
1/1
1
1
5
Q'TY
TWO TYPES AND CODES MAY BE LISTED FOR AN ITEM. THE LOWER PRODUCT MAY BE SHIPPED IN PLACE OF THE
UPPER PRODUCT. QUALITY IS THE SAME.
08AY-X-9851
型式/コード番号が2段の場合、下段より上段に代わる過渡期品であり、どちらかが入っています。 なお、品質は変わりません。
OPERATOR'S GUIDE (MLG)
操作要領書(多言語)
OPERATOR'S MANUAL
取扱説明書
図書
FLAT WASHER
小型丸平座金
NAME
08AY-X-9851 -1
A-1
D-1
D-2
D-3
D-4
D-5
Jan. 27 '05
H.Hayashi
D-6
Jul.07'06
T.Matsuguchi
S-1
1
2
3
A
選択 SELECT
6m
*2
ホイップアンテナ
WHIP ANTENNA
FAW-6R2/6R2A
2.6m
ホイップアンテナ
WHIP ANTENNA
04S4176 *2
プリアンプ
PREAMP UNIT
FAX-5 *2
空中線接続箱
MATCHING BOX
ARD-1 *2
ファクシミリ受画装置
FACSIMILE RECEIVER
FAX-408
12-24VDC
付属ケーブル
ASSY.CABLE,5m
アカ RED
クロ BLK
(+)
(-)
ANT
C
1m
*3
M-P-3
*3
M-P-3
*2
FMA-1
*2
FMA-1
*3
M-P-3
M-P-7
M-P-7
*3
M-P-3
3D-2V,15m,φ6
*3
M-P-3
延長ケーブルキット
CABLE EXTENSION KIT
*2
OP04-2,10/20/30/40/50m,φ6
DPYCS-1.5 *1
EXT AF (+)
IN (-)
100/110/115/ DPYC-1.5 *1
220/230VAC,
5 6
1 2
50/60Hz,1φ
整流器 (+)(-)
RECTIFIER
PR-62 *2
*1
IV-8sq.
*1
RG-10/UY
B
*1
*1
RG-12/UY or RG-10/UY
1 2
外部受信機
EXTERNAL RECEIVER
GND
343200G02,2m
*1
IV-2sq.
D
注記
*1)造船所手配。
*2)オプション。
*3)プラグは工場で取付済み。
NOTE
*1. SHIPYARD SUPPLY.
*2. OPTION.
*3. CONNECTOR PLUG FITTED AT FACTORY.
DRAWN
Aug. 16 '06
CHECKED
APPROVED
SCALE
DWG.No.
TITLE
Maki
名称
TAKAHASHI.T
Hatai
MASS
C6262-C01- B
NAME
kg
REF.No.
1m
*1
IV-2sq.
FAX-408
ファクシミリ受画装置
相互結線図
FACSIMILE RECEIVER
INTERCONNECTION DIAGRAM