1
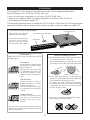
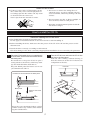
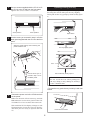
Model
CD-1A
(CD-RW drive for the VF160)
Installation Manual
Introduction
The Model CD-1A is designed exclusively for the VF160 digital multitracker.
By installing the CD-1A to the VF160, you can;
* save or load your song data to or from a CD-R/CD-RW disc,
* make your original audio CD using materials recorded on the VF160, or
* load song data from an audio CD.
This manual describes how to install the CD-1A in the VF160. See the VF160 operation
manual for details about how to save/load song data or how to make an audio CD.
<Check the contents in the package>
This product includes the
following in the package.
If you cannot find all of the
contents listed above,
please contact your dealer
or local Fostex sales office.
* a CD-RW drive unit
* two screws for mounting the drive
* a blank panel
<Usable discs>
<Notes on handling of discs>
With the CD-1A, you can use discs of following types.
• When handling a disc, be careful not to dirty
or scratch the surface of the disc.
We recommend that you hold the disc with
your finger on the disc edge and center hole.
<CD-R discs>
Can be used for saving or loading song data, as well as making an audio CD.
Note that you can record data
to a CD-R disc only once. You
cannot record data to a disc
which has been recorded before.
• Do not stick any paper, etc. on the label side.
Also do not scratch the label side, which may
cause problems during playback or
recording. Use only a felt pen or equivalent
for writing any memo on the label side. Using
a ball-point pen, pencil, etc. that has a hard
tip may damage a disc.
<CD-RW discs>
Can be used for saving or
loading song data, as well as
making an audio CD.
You can record or erase data
to a CD-R disc as many times
as wish.
<Audio CD discs>
As these are read-only discs,
you only can use them for
loading track data to the
VF160.
• Never use a warped or chipped disc, which
may damage the CD-RW drive.
See the VF160 operation manual for details
about how to save/load song data or how to
make an audio CD.
2
<Notes on care of disc>
• If there is a dust, dirt or fingerprints on the
disc, which may cause error in playback or
recording, wipe the disc with a soft, dry cloth
or alcohol from the center out.
Never wipe from the outside to center.
• Do not use a cleaner for analog discs or
antistatic spray, as well as volatile solvents
such as benzine, which may damage the disc
surface.
• Do not expose any disc to direct sunlight, or
leave it in hot, moist or cold places.
• Read the attached manual packed with the
disc before using it.
How to install the CD-1A
<Notes on installing the CD-RW drive>
• The CD-RW drive is made of precision parts.
Do not apply a mechanical shock or use excessive force when installing it.
• Before installing the drive, make sure that the power of the VF-160 is off and the power cord is
disconnected.
• Install the drive correctly according to this manual.
Note that damage to the drive caused by inappropriate installation is not covered by the guarantee.
1
Place the VF160 upside down on a material such
as a soft cloth, and unscrew the screw that fixes
the blank panel.
2
Turn the VF160 over and insert the CD-1A into
the slot on the front panel.
Push the CD-1A firmly, without forcing, so
that the connector of the CD-1A fits into its
companion in the slot.
Be careful not to drop the VF160 or give a
strong shock to the VF160, which may damage the hard-disk drive built into it.
connector
Keep the blank panel for future use in case
you unmount the CD-1A.
Unfasten the screw that fixes the blank panel.
CD-1A
Blank panel
Remove the blank
panel.
Keep the screw mentioned above, which
will be used in step 4 below after installing the CD-RW drive.
3
3
Use two screws supplied with the CD-1A to fix
the CD-1A to the VF160 from the front panel.
Opening/closing the tray
• To open the tray, press the eject switch lightly.
Tighten the screws with a screwdriver.
Pressing the switch will open the tray slightly.
Then pull out the tray gently by hand to fully open
it.
screw position
4
screw position
Eject switch
Use the screw you removed in step 1 to fix the
blank panel supplied with the CD-1A to the front
panel.
Slant the panel slightly when inserting the
panel inside the unit.
The tray slightly opens.
lens
Pull out the tray to fully open it.
Use the screw you removed in step 1 to fix
the blank panel.
<Caution!>
Do not touch the lens when pulling out
the tray, doing so may damage it and may
cause a malfunction.
• To close the tray, push the tray inside by hand until
locked.
5
Connect the power cord of the VF160 and turn
on the power.
Make sure that the VF160 starts up, and the
LED indicator on the front panel of the CD1A blinks for a few seconds then turns off.
Wait until the VF160 display changes to the
Normal display from the start-up display,
and then you are ready to operate the CD1A.
Push until it is locked.
4
Placing/removing a disc
The following are some notes on placing and/
or removing a disc.
<IMPORTANT!>
When placing a disc on the tray, support the
tray from the bottom by your hand. If you push
the disc to fit into the pivot on the tray without
supporting the tray, the tray/drive may be damaged or broken. Also note that the disc must be
pushed until it clicks so that it is locked into
the pivot securely. Closing the tray without locking the disc may damage the disc.
<Note for removing a disc from the tray>
When removing a disc from the tray, also support the tray from the bottom by your hand.
Also be careful not to unlock the disc from the
pivot forcibly, which may damage the tray.
• Place the disc with the label side up.
When placing the disc, support the tray from the
bottom by your hand as shown in the illustration
below, and push the disc gently until it clicks so
that the disc is locked into the pivot.
Push the disc until it clicks so that the disc is locked
into the pivot.
disc
Support the tray from the
bottom by your hand.
<Caution!>
Do not touch the lens when placing a disc
or removing a disc, doing so may damaged may cause a malfunction.
5
Declaration of EC Directive
This equipment is compatible with the EMC Directive (89/336/EEC) - Directive on approximation of
member nation's ordinance concerning the electromagnetic compatibility. This equipment is compatible
only when connected to fostex specified product.
The Affect of Immunity on This Equipment
The affect of the European Specification EN50082-1 (coexistence of electromagnetic waves - common immunity
specification) on this equipment are as shown below.
In the electrical fast transient/burst requirements, surge, conducted disturbances by radio-frequency fields,
power frequency magnetic field, radiate electromagnetic field requirements and static electricity discharging
environment, this could be affected by generation of noise.
FOSTEX DISTRIBUTORS LIST IN EUROPE
* Including non-EU countries.
* underlined: contracted distributors (as of August, 2000)
<AUSTRIA>
<ITALY>
NAME: ATEC Audio-u. Videogeraete VertriebsgesmbH.
ADD: Im Winkel 5, A-2325 Velm, Austria
TEL: (+43) 2234-74004, FAX: (+43) 2234-74074
NAME: General Music S.p.A.
ADD: Via delle Rose, 12 S. Giovanni M. (RN), Italy
TEL: (+39) 0541-959511, FAX: (+39) 0541-957404
<BELGIUM>
<THE NETHERLANDS>
NAME: EML Sound Industries NV
ADD: Bijvennestraat 1A, B3500 Hasselt, Belgium
TEL: (+32) 11-232355, FAX: (+32) 11-232172
NAME: IEMKE ROOS AUDIO B. V.
ADD: Kuiperbergweg 20, 1101 AG Amsterdam, The
Netherlands
TEL: (+31) 20-697-2121, FAX: (+31) 20-697-4201
<DENMARK>
<NORWAY>
NAME: SC Sound ApS
ADD: Malervej 2, DK-2630 Taastrup, Denmark
TEL: (+45) 4399-8877, FAX: (+45) 4399-8077
NAME: Siv. Ing. Benum A/S
ADD: P. O. Box 145 Vinderen, 0319 Oslo 3, Norway
TEL: (+47) 22-139900, FAX: (+47) 22-148259
<FINLAND>
<PORTUGAL>
NAME: Noretron Oy Audio
ADD: P. O. Box 22, FIN-02631 Espoo, Finland
TEL: (+358) 9-5259330, FAX: (+358) 9-52593352
NAME: Caius - Tecnologias Audio e Musica, Lda.
ADD: Rua de Santa Catarina, 131 4000 Porto, Portugal
TEL: (+351) 2-2086009/2001394,
FAX: (+351) 2-2054760/2087488
<FRANCE>
NAME: Musikengro
ADD: ZAC de Folliouses, B. P. 609, 01706 Les Echets,
France
TEL: (+33) 472 26 27 00, FAX: (+33) 472 26 27 01
<SPAIN>
NAME: Multitracker, S. A.
ADD: C/Garcilaso No.9, Madrid 28010, Spain
TEL: (+34) 91-4470700, 91-4470898, FAX: (+34) 915930716
<GERMANY>
NAME: Studio sound & Music GmbH
ADD: Industriestrasse 20, D-35041 Marburg, F. R.
Germany
TEL: (+49) 6421-92510, FAX: (+49) 6421-925119
<SWEDEN>
NAME: Professional Television AB
ADD: Kavallerivagen 24, 172 48 Sundbyberg, Sweden
TEL: (+46) 8-59798000, FAX: (+46) 8-59798001
<GREECE>
<SWITZERLAND>
NAME: Bon Studio S. A.
ADD: 6 Zaimi Street, Exarchia, 106.83 Athens, Greece
TEL: (+30) 1-3809605-8, 3302059, FAX: (+30) 13845755
NAME: Audio Bauer Pro AG
ADD: Bernerstrasse-Nord 182, CH-8064 Zurich,
Switzerland
TEL: (+41) 1-4323230, FAX: (+41) 1-4326558
<ICELAND>
<UK>
NAME: I. D. elrf. electronic Ltd.
ADD: ARMULA 38 108 REYKJAVIK, ICELAND
TEL: (+354) 588 5010, FAX: (+354) 588 5011
NAME: SCV London
ADD: 3A 6-24 Southgate Road, London N1 3JJ,
England, UK
TEL: (+44) 171-923-1892, FAX: (+44) 171-241-3644
6