1
Model
8360 Owner’s Manual
(Ether card for the Model D2424 / D2424LV)
Table of Contents
Introduction ...............................................................................2
Installing the ether card ............................................................2
FTP client application ...............................................................2
Connecting to a personal computer .......................................3
One to one connection ..............................................3
Connection to an existing LAN .................................4
TCP/IP setting (recorder's initial setting) ...............................5
IP address setting .......................................................6
Subnet mask setting ..................................................6
Anonymous setting ...................................................7
Login name (password) setting ...............................7
Ether mode setting ....................................................8
Personal computer setting ......................................................9
TCP/IP setting ............................................................9
Setting for connection ..............................................9
Transferring files .....................................................................10
Getting files from the recorder ..............................10
Putting files to the recorder ...................................11
Notes on transferring files .....................................................11
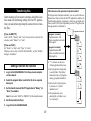
Introduction
<Note>
There is the possibility of damaging the hard disk when
transporting the recorder. Before transporting the recorder to our service department for the installation of
the Ether Card, remove the hard disk from the recorder.
Be sure to keep the removed hard disk carefully.
Thank you very much for purchasing the Fostex
product.
The Model 8360 is an ether card dedicated for the
D2424/D2424LV digital multitrack recorder.
By installing the 8360 to the recorder, it can be
used as an "FTP (File Transfer Protocol) server".
If you connect the recorder which is equipped with
the ether card to a personal computer using a LAN
cable, you can transfer audio files between the recorder and personal computer over the TCP/IP.
To transfer file data, an appropriate FTP client application must be used.
FTP client applications
Currently we confirm that the following FTP client
applications can be used with the Model 8360.
• for Windows: WS-FTP (shareware)
• for Macintosh: Fetch (shareware)
Installing the ether card
<Note>
The ether card should be installed into the recorder
at a Fostex service station. Do not try to install the
card by yourself. Ask your local Fostex dealer for
the installation after purchasing the Model 8360.
We confirm that the Windows FTP Explorer cannot be
used with the Model 8360.
<Note>
By installing the ether card to the D2424/D2424LV, the
"TCP/IP setting" menu is added to the setup mode on the
recorder.
2
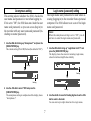
Connecting to a personal computer
There are two types for connecting the recorder to a personal computer using the LAN cable; one to one
connection and LAN connection. The following describes how to make connection for each type.
One to one connection
To connect the recorder to a personal computer on a "one to one" basis, use a "cross cable of category 5 or
higher" for connection between the recorder and a personal computer, as shown below.
To use the ether card as an FTP server, see "TCP/IP setting (recorder's initial setting)" and "Personal computer setting" described later.
D2424LV/D2424 with the ether card
1
2
3
4
5
6
7
8
1
2
3
4
5
6
7
8
Cross cable of category 5 or higher
Personal computer with an FTP application installed
<Note>
A personal computer must be equipped
with a LAN card which works correctly.
3
Connection to an existing LAN
To connect the recorder to an existing LAN, use a "straight cable of category 5 or higher" for connection
between the recorder and a hub, as shown below.
<Note>
When connecting the recorder to an existing LAN, set the IP address and subnet mask correctly. Otherwise, whole LAN system may have a trouble. Before setting the IP address and subnet mask, consult the
network administrator. To use the ether card as an FTP server, see "TCP/IP setting (recorder's initial
setting)" and "Personal computer setting" described later.
Hub connected to a LAN
D2424LV/D2424 with the ether card
Straight cable of category 5 or higher
1
2
3
4
5
6
7
8
1
2
3
4
5
6
7
8
4
Personal computer with an FTP application installed
<Note>
A personal computer must be equipped
with a LAN card which works correctly.
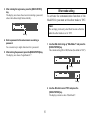
TCP/IP setting (recorder's initial setting)
Make the settings in the "TCP/IP Setup?" menu
which is added to the setup mode of the recorder
so that the Model 8360 can be used as an FTP server.
SETUP
1. Turn on the recorder's power.
flashing
2. Press the [SETUP] key to enter the setup mode.
SETUP
3. Use the JOG dial to bring up the "TCP/IP Setup?" menu
and press the [EXECUTE/YES] key.
The first time you enter the TCP/IP setup mode, the display
shows the screen for selecting the ether mode on or off.
flashing
SETUP
SETUP
flashing
flashing
SETUP
SETUP
flashing
flashing
SETUP
4. Use the JOG dial to select the screen from among those
required for the TCP/IP setting.
flashing
5
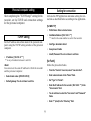
IP address setting
Subnet mask setting
You must set the IP address for the recorder.
You must set the subnet mask value for the recorder.
1. Use the JOG dial to bring up "IP Addr.?" and press the
[EXECUTE/YES] key.
1. Use the JOG dial to bring up "Sub net.?" and press the
[EXECUTE/YES] key.
The display shows the screen for entering the subnet mask.
By default, it is set to "0. 0. 0. 0" and the leftmost 0 flashes.
The display shows the screen for entering the IP address.
By default, it is set to "0. 0. 0. 0" and the leftmost 0 flashes.
SETUP
SETUP
flashing
flashing
SETUP
SETUP
flashing
flashing
2. Use the shuttle to select the flashing digit and use the JOG
dial to select the value.
2. Use the shuttle to move the flashing digit and use the JOG
dial to select a value.
When connecting the recorder to a personal computer
on a "one to one" basis, set the IP address to "192. 168.
0. ***" ( *** is any desired number between 1 and 254).
When connecting the recorder to a personal computer on a
"one to one" basis, set the IP address to "255. 255. 255. 0".
When connecting the recorder to an existing LAN, ask the
administrator for the IP address.
When connecting the recorder to an existing LAN, ask the
administrator for the IP address.
3. After entering the subnet mask value, press the
[EXECUTE/YES] key.
3. After entering the IP address, press the [EXECUTE/YES]
key.
The entered value is confirmed and the display shows
"Sub net ?".
The entered value is confirmed and the display shows
"IP Addr.?".
6
Anonymous setting
Login name (password) setting
This setting selects whether the 8360 checks the
user name and password or not when logging in.
If it is set to "ON", the 8360 does not check the user
name and password, so you can access (log in) to
the recorder with any user name and password (including no name/password).
The login name and password are used when accessing (logging in) to the recorder from a personal
computer. The 8360 allows to set a set of the login
name and password.
<Note>
When the anonymous setting is set to "ON", you do
not have to enter the login name and password.
1. Use the JOG dial to bring up "Anonymous?" and press the
[EXECUTE/YES] key.
1. Use the JOG dial to bring up "LoginName Usr 01?" and
press the [EXECUTE/YES] key.
The current setting (ON or OFF) flashes (the default is "OFF").
The display shows the screen for entering a login name,
where the leftmost digit flashes initially.
SETUP
SETUP
flashing
SETUP
flashing
SETUP
flashing
2. Use the JOG dial to select "ON" and press the
[EXECUTE/YES] key.
flashing
The anonymous setting is completed and the display shows
"Anonymous ?".
2. Use the shuttle to move the flashing digit and use the JOG
dial to select a character.
You can enter up to eight characters for a login name.
7
3. After entering the login name, press the [EXECUTE/YES]
key.
Ether mode setting
The display now shows the screen for entering a password,
where the leftmost digit flashes initially.
To activate the communication function of the
Model 8360, you must set the ether mode to "ON".
SETUP
<Note>
The settings previously described become effective
when the ether mode is set to "ON".
flashing
4. Enter a password in the same manner as entering a
password.
1. Use the JOG dial to bring up "EtherMode?" and press the
[EXECUTE/YES] key.
You can enter up to eight characters for a password.
The current setting (ON or OFF) flashes (the default is "OFF").
5. After entering the password, press the [EXECUTE/YES] key.
The display now shows "LoginName01 ?".
SETUP
flashing
SETUP
flashing
2. Use the JOG dial to select "ON" and press the
[EXECUTE/YES] key.
The display returns to show "EtherMode?".
8
Personal computer setting
Setting for connection
After completing the "TCP/IP Setup?" setting for the
recorder, set the TCP/IP and connection settings
for the personal computer.
Activate the FTP application and make setting for connection as described below according to the application.
[for WS-FTP]
TCP/IP setting
Profile Name: Enter a desired name.
•
HostName/Address: [192. 168. 0. ***]
*** must be the same number as set for the recorder.
Set the IP address and subnet mask of the personal computer using the TCP/IP setting window of the personal
computer.
•
•
•
HostType: Automatic detect
•
Anonymous: Enable
•
UserID, Password: You do not have to set them.
IP address: [192. 168. 0. ***]
*** is any of numbers between 1 and 254.
[for Fetch]
<Note>
Follow the procedure below.
You cannot set the same IP address for both the recorder
and the personal computer.
•
From the "Custom" menu bar, select "new shortcut".
•
Subnet mask value: [255. 255. 255. 0]
•
Enter a desired name to the "Name" field.
•
Default gateway: You do not have to set this.
•
Set "Type" to "Folder".
•
Enter the IP address for the recorder (192. 168. 0. ***) to the
"Server name" field.
•
You do not have to enter the "User name" and "Password"
fields.
•
Enter "/" (slash) to the "Directory" field.
9
Transferring files
<Files shown on the personal computer monitor>
On the personal computer monitor, you can see the file configuration of the recorder in the FTP application window. In
the following example, programs 1 and 2 are recorded onto
the recorder. (Note that, depending on the FTP application,
the appearance is different.)
After making all necessary settings described earlier, make the following setting for the FTP application you use before opening the connection to transfer files.
[program 1 contents]
Program name: AAA
Data is recorded on tracks
1 through 4.
[If you use WS-FTP]
From "ASCII", "Binary" and "Auto" shown in the center of the
window, select "Binary" or "Auto".
[If you use Fetch]
[program 2 contents]
Program name: BBB
Data is recorded on tracks
1 through 16.
Set "Mode" to "Auto" and "Type" to "Auto".
When you store a file to the D2424/D2424LV, set the "PutFile"
dialog to "RawData".
Getting a file from the recorder
1. Log in to the D2424/D2424LV from the personal computer
via the network.
2. Select the program folder in which the file to be acquired
belongs to.
the uppermost directory
/AAA_01
/AAA_01/tr01.wav
/AAA_01/tr02.wav
• "/" is shown on the icon
of the uppermost directory.
/AAA_01/tr03.wav
• Each program corresponds
to each folder. The folder
name is shown as "(program
name)_(program number)".
/AAA_01/tr04.wav
• Each track in the program
is shown as "tr (track
number).wav".
3. Set the transfer mode of the FTP application to "Binary" (or
"Auto", if available).
"/"
/BBB_02
/BBB_02/tr01.wav
/BBB_02/tr02.wav
• The permission of an
existing file or folder is set
to "read-only".
Note: Do not select "ASCII" or "EBCDIC" for the transfer mode.
4. Get the desired track file(s).
/BBB_02/tr16.wav
5. Log out from the D2424/D2424LV.
10
Putting files to the recorder
Notes on transferring files
1. A file name must be "tr (track number).wav". Other file
names cannot be accepted.
1. Log in to the D2424/D2424LV from the personal computer
via the network.
2. Only a mono-track, 16/24-bit, 96/88.2/48/44.1-kHz WAV
file can be transferred (for both direction).
2. Select the program folder to which you are going to put the
file.
3. If a track WAV file, which has the different quantization bit
size from the recorder's hard disk format, is sent to the
recorder from a personal computer using FTP, it is not
accepted. For example, you cannot store 24-bit file data to a
16-bit formatted hard disk on the recorder using FTP.
If you want to put the file to a new program, create a new
folder. Specify only a program name as the folder name.
You do not need to specify a program number. When you
create a folder to which only the program name is specified,
the recorder automatically adds the program number to the
name (you cannot specify a desired program number).
4. If a track WAV file, whose Fs is different from the track data
already stored on the recorder's hard disk, is sent to the
recorder from a personal computer using FTP, the file is
stored with the original Fs. Therefore, when the program is
played back, only the associated track is played back as if it
is pitch-controlled. For example, if you store 48-kHz data
for track 16 ("tr16.wav") to an existing program with
44.1-kHz track data, track 16 is stored with 48-kHz data.
Functions of the FTP application
Functions of the recorder
Creates the "CCC" folder.
By updating the FTP application
window in which the folder contents are shown, the newly created folder "CCC_03" appears.
Creates a new program "CCC".
A program number is
assigned (for example,
"03" is assigned).
5. If the combination of the program name which is set as the
folder name and program number does not match the data
stored in the recorder, you cannot store the file. In such a
case, update the personal computer monitor window which
shows the folder contents of the FTP application, then carry
out the store operation again.
<Example of creating a new folder>
6. Because the permission of existing track files on the recorder
is read-only, you cannot overwrite the file. Each track data
in a program is stored as an individual WAV file, therefore,
you can store only a WAV file of the track whose WAV file
does not exist on the recorder. For example, if WAV files for
tracks 1 through 10 on the program are stored, you can
store the track 11 WAV file ("tr11.wav.").
3. Set the transfer mode of the FTP application to "Binary" (or
"Auto").
4. Put the desired track file(s) to the recorder.
5. Log out from the D2424/D2424LV.
11
Declaration of EC Directive
This equipment is compatible with the EMC Directive (89/336/EEC) - Directive on approximation of member nation's ordinance concerning the electromagnetic
compatibility. This equipment is compatible only when connected to fostex specified product.
The Affect of Immunity on This Equipment
The affect of the European Specification EN50082-1 (coexistence of electromagnetic waves - common immunity specification) on this equipment are as shown
below.
In the electrical fast transient/burst requirements, surge, conducted disturbances by radio-frequency fields, power frequency magnetic field, radiate electromagnetic
field requirements and static electricity discharging environment, this could be affected by generation of noise.
FOSTEX DISTRIBUTORS LIST IN EUROPE
* Including non-EU countries. (As of August, 2002)
<AUSTRIA>
<GREECE>
<PORTUGAL>
NAME: ATEC Audio-u. Videogeraete VertriebsgesmbH.
ADD: Im Winkel 5, A-2325 Velm, Austria
TEL: (+43) 2234-74004, FAX: (+43) 2234-74074
NAME: Bon Studio S. A.
ADD: 6 Zaimi Street, Exarchia, 106.83 Athens, Greece
TEL: (+30) 1-3809605-8, 3302059
FAX: (+30) 1-3845755
NAME: Caius - Tecnologias Audio e Musica, Lda.
ADD: Rua de Santa Catarina, 131 4000 Porto, Portugal
TEL: (+351) 2-2086009/2001394,
FAX: (+351) 2-2054760/2087488
<ICELAND>
<SPAIN>
NAME: I. D. elrf. electronic Ltd.
ADD: ARMULA 38 108 REYKJAVIK, ICELAND
TEL: (+354) 588 5010, FAX: (+354) 588 5011
NAME: Multitracker, S. A.
ADD: C/Garcilaso No.9, Madrid 28010, Spain
TEL: (+34) 91-4470700, 91-4470898
FAX: (+34) 91-5930716
<BELGIUM>
NAME: EML Sound Industries NV
ADD: Bijvennestraat 1A, B3500 Hasselt, Belgium
TEL: (+32) 11-232355, FAX: (+32) 11-232172
<DENMARK>
NAME: SC Sound ApS
ADD: Malervej 2, DK-2630 Taastrup, Denmark
TEL: (+45) 4399-8877, FAX: (+45) 4399-8077
<FINLAND>
NAME: Noretron Oy Audio
ADD: P. O. Box 22, FIN-02631 Espoo, Finland
TEL: (+358) 9-5259330, FAX: (+358) 9-52593352
<FRANCE>
NAME: Guillard Musiques
ADD: ZAC de Folliouses, B. P. 609, Les Echets, 01706
Miribel France
TEL: (+33) 472 26 27 00, FAX: (+33) 472 26 27 01
<GERMANY>
NAME: Studiosound & Music GmbH
ADD: Industriestrasse 20, D-35041 Marburg, F. R.
Germany
TEL: (+49) 6421-92510, FAX: (+49) 6421-925119
<ITALY>
NAME: Proel S.p.A.
ADD: Zona Via Alla Ruenia, 37/43 64027 - Sant’Omero
(Teramo), Italy
TEL: (+39) 0861-81241, FAX: (+39) 0861-887862
<SWEDEN>
<THE NETHERLANDS>
<SWITZERLAND>
NAME: IEMKE ROOS AUDIO B. V.
ADD: Kuiperbergweg 20, 1101 AG Amsterdam, The
Netherlands
TEL: (+31) 20-697-2121, FAX: (+31) 20-697-4201
NAME: Audio Bauer Pro AG
ADD: Bernerstrasse-Nord 182, CH-8064 Zurich, Switzerland
TEL: (+41) 1-4323230, FAX: (+41) 1-4326558
<NORWAY>
NAME: SCV London
ADD: 40 Chigwell Lane, Oakwood Hill Industrial Estate,
Loughton, Essex IG10 3NY U.K.
TEL: (+44) 020-8418-0778, FAX: (+44) 020-8418-0624
NAME: Siv. Ing. Benum A/S
ADD: P. O. Box 145 Vinderen, 0319 Oslo 3, Norway
TEL: (+47) 22-139900, FAX: (+47) 22-148259
NAME: TTS Scandinavia AB
ADD: Kavallerivagen 24, 172 48 Sundbyberg, Sweden
TEL: (+46) 8-59798000, FAX: (+46) 8-59798001
<UK>