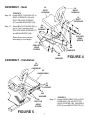
1
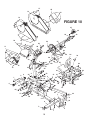
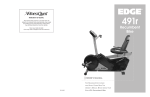
Dedication to Quality
Fitness Quest warrants this product to be free from all
defects in material and workmanship when used
according to the manufacturer’s instructions.
See Limited Warranty & Service for details.
If you have any comments or questions contact our
Customer Service Department, toll free at 1-800-321-9236,
Monday through Friday, 9:00 am to 5:00 pm, Eastern Time.
Please record the following information and keep for reference.
Serial #: ___________________
Date Of Purchase: ___________
Save your sales receipt.
(You may wish to staple it into this manual.)
©2002 Fitness Quest® Inc. All rights reserved.
Edge™ is a trademark of Fitness Quest® Inc. Made in Taiwan.
No part of this booklet may be reproduced or utilized in any form, by any means, electronic,
mechanical or otherwise, without the express written consent of the copyright holder.
5/31/02
TM
Model 491pr
Programmable
Recumbent
Exercise Bike
Congratulations on purchasing your
Edge™ 491pr Recumbent Bike
With this product in your home, you have everything you need to start your own workout program
to tone and firm the major muscle groups of your lower body. This is vital for all of us, regardless
of age, sex, or fitness level, and regardless of whether your primary goal is toning, health
maintenance, or more energy for daily activities.
Proper exercise, including a low fat diet, strength training and aerobic exercise, tones and
conditions the muscles we use every day to stand, walk, lift, and turn. It can actually transform our
body composition by reducing body fat and increasing the proportion of lean muscle in our bodies.
Be sure to read through this Owner’s Manual carefully.
It is the authoritative source of information about your Edge 491pr Recumbent Bike.
Retain this manual for future reference.
Table of Contents:
Important Safety Instructions........................................................3
Comments or Questions and Parts Identification.........................4
Assembly Instructions..............................................................5 - 9
Exercise Program.................................................................10 - 13
Computer Instructions..........................................................14 - 18
Parts List and Repair Parts .................................................18 - 19
Owner’s Purchase Record............................................Back Cover
2
17
45
12
14
13
FIGURE 10
14
37
16
34
36
14
10
37
52
44
14
11
40
17
35
47 48
14
50
51
15
49
16
26
18
53
48
14
43
39
4
31
25
49
16
41
43
15
28
42
24
29
33
4
6
2
24 4
4
38
4
6
64
57
67
62
63
70
24
24
66
65
4
30
46
19
4
23
22
7
9
69
4
3
24
5
8
7
4
1
19
20
27
51
71
31
28
54
56
68
60 59
32
31 21
20
55
61 4
59 58
24
31
1
5
28
72
60
27
COMPUTER INSTRUCTIONS (cont.)
Customer
Service:
800 - 321 - 9236
DIRECTIONS
BPM
1. Press START/PAUSE for 2 seconds to
clear monitor.
2. Press
to select desired program.
Press ENTER.
3. Press
to set desired time.
4. Enter AGE if program 11 or 12 was selected.
5. Press START and begin riding.
6. Press MODE while riding to select a function.
ITEM QTY. PART NAME
1
2
3
4
5
6
7
8
9
10
11
12
13
14
15
16
17
18
19
20
21
22
23
24
25
26
27
28
29
30
31
32
33
34
35
36
37
4
1
1
18
4
2
2
1
1
1
1
1
1
24
2
6
6
1
1
2
1
1
1
8
1
2
8
8
1
2
6
2
2
1
1
1
2
M8 x 1.25 x 60mm Carriage Bolt
Front Foot Tube
Frame
M8 ID x 18.8mm OD Flat Washer
M8 x 1.25 Cap Nut
Foot Cap
End Cap
Rear Foot Tube
Support Tube
Right Rear Cover
Left Rear Cover
Right Front Cover
Left Front Cover
M4 x 12mm Sheet Metal Screw
M4 x 16mm Sheet Metal Screw
M5 x 115mm Machine Screw
M5 Hex Nut
Seat Carriage Plug
Seat Carriage
Seat Carriage Bushing
Grip
Square Plug
Carriage Tube
M8 x 15mm Button Head Screw
Seat Cushion
Back Cushion
M6 x 1 x 12mm Phillips Head Screw
M6 Washer
Handlebar
M8 x 45mm Button Head Screw
M8 Locknut
Sleeve
Handlebar Plug
Right Pedal
Left Pedal
Crank
Pedal Strap
Heart Rate Training Zones
165
Aerobic
145 155
Max Fat Burn
Fat Burn
125 138 145
120 130 140
115 125 130
110 118 125
105 110 115
95 103
90
Age 20
30
40 50 60 70 80
PARTS LIST
18
ITEM QTY. PART NAME
38
39
40
41
42
43
44
45
46
47
48
49
50
51
52
53
54
55
56
57
58
59
60
61
62
63
64
65
66
67
68
69
70
71
72
73
1
1
1
1
2
8
1
1
1
1
2
2
1
6
1
1
1
1
1
1
1
2
2
1
1
1
1
1
1
2
2
1
3
2
1
1
Reed Switch
Console Tube
Console
Front Handlebar
M8 x 60mm Machine Screw
M6 x 1 x 10mm Machine Csrew
Book Holder
Center Cover
Spring
"V" Belt
M10 Washer
M10 Cap Nut
Pulley
M6 x 1 Nut
Magnet
Mag Brake
Belt Tension Bracket
M6 x 1 x 20mm Machine Screw
M8 x 45mm Button Head Screw
Idler Bushing
Idler Pulley
Bearing Cup
Bearing
Slotted Bearing Nut
Notched Bearing Nut
Crank Washer
Crank Nut
Gear Box
Gear Box Plate
Eyebolt
Adjustment Channel
M6 x 1 Locknut
M3.5 x 15mm Sheet Metal Screw
M4 x 16mm Sheet Metal Screw
Crank Washer
Owner's Manual
IMPORTANT SAFETY INSTRUCTIONS
Read all instructions before using this machine.
CAUTION: Exercise of a strenuous nature, as is customarily done on this equipment,
should not be undertaken without first consulting a physician. No specific
health claims are made or implied as they relate to the equipment.
1. Know your heart rate and / or pulse, and your physician recommended target heart rate
training zone.
2. Proper medical clearance is recommended for anyone beginning an exercise program
especially if you are over 35 years of age or suffer from heart or respiratory problems.
3. Warm up before any exercise program by stretching, followed by 8 minutes of aerobic activity.
4. Wear comfortable clothes that allow freedom of movement and that are not tight or restricting.
5. Wear comfortable shoes made of good support with non-slip soles.
6. Breathe naturally, never holding your breath during an exercise.
7. Avoid over training. You should be able to carry on a conversation while exercising.
8. After an exercise session, cool down with slow walking or stretching.
9. This machine should not be used by or near children.
10 Handicapped or disabled people must have medical approval before using this machine
and should be under close supervision when using any exercise equipment.
11. Use this machine only for its intended use as described in this manual. Do not use
attachments not recommended by the manufacturer.
12. Only one person at a time should use this machine.
13. Do not put hands, feet, or any foreign objects on or near this machine when in use by others.
14. Always use this machine on a level surface.
15. Never operate the machine if the machine is not functioning properly.
16. Start exercise slowly and gradually increase the amount of resistance.
17. If the user experiences dizziness, nausea, chest pain, or any other abnormal symptoms,
stop exercise at once and consult a physician immediately.
18. Use caution not to pinch fingers or hands in moving parts when using the unit.
KEEP THESE INSTRUCTIONS
3
Comments or Questions?
Dear Customer,
Congratulations on your purchase of the Edge™ 491PR Recumbent Bike.
We're sure that you will be completely satisfied with the product and we invite your comments so that we
can hear about your success.
Please write or call our Customer Service Specialists at the address or phone number listed below, or
contact us on our web site, with any comments or questions you may have.
Edge™ 491PR Recumbent Bike
Customer Service Department
1400 Raff Road SW, Canton, OH 44750-0001
1-800-321-9236, Monday through Friday - 9:00am to 5:00pm, Eastern Time
www.fitnessquest.com
Ordering Missing or Defective Parts
When ordering parts, always provide the following information:
1. NAME, MAILING ADDRESS AND TELEPHONE NUMBER
2. DATE OF PURCHASE
3. WHERE PRODUCT IS PURCHASED (NAME OF RETAIL STORE, CITY)
4. MODEL NUMBER (EXB01491)
5. PART ORDER NUMBER AND DESCRIPTION
All details depicted in this Owner's Manual, and of the product itself, are subject to change without notice.
Manual Packet contains: Manual and Warranty Card
Fastener Pack: Hex Head Tool w/ Phillips Screw Driver
6mm Allen Tool
8 Phillips head Screws for Back and Seat
8 M6 Washers
Electronic
Console
Weight in box
98 lbs.
Length
55-1/2"
Width
9-3/4"
Height
25"
Weight out of box
93 lbs.
Length
52"
Width
21"
Height
45"
Book Holder
Front Handlebar
with Pulse Grips
Right Front Cover
Console Tube
Seat
Cushion
Front Foot
Tube
Parts Identification
Back Cushion
Seat Carriage
Wheel
Handlebar
Carriage Tube
Left Pedal
Left Front Cover
Support Tube
Locking Arm Grip
Locking Arm
Rear Foot Tube
Foot Tube Caps
4
COMPUTER INSTRUCTIONS (cont.)
Graphic LCD Display Discription and Function (small window)
TIME: Press the MODE button until the arrow points to the TIME function. If the TIME is not set, it will
count up in one- second intervals up to 99.59.
To set the desired time:
STEP 1
Press the ENTER button to enter the TIME setting function.
Press the "UP" or "DOWN" button to choose your desired workout time. Range- 5:00-99.00.
STEP 2
Press START to begin. After workout time is completed the computer will beep for 12 seconds. To stop
beeping press any key.
SPEED: Press the MODE key until the arrow points to SPEED. This will display your current speed.
The display value will be updated every 2-3 seconds.
DISTANCE: Press the MODE key until the arrow points to the DISTANCE function.
The computer will count in KM or Miles by using adjustment button on back of console. Once the display
value reaches 999, it will reset to "0" and count from 0.1 again.
CALORIE: Press the MODE key until the arrow points to the CALORIE function.
The computer will count up in 0.1 increments. After the display value reaches 999, it will reset to "0"
and begin counting from 0.1 again.
AGE: During the stop mode, press the MODE key until the arrow points to the AGE function. It will
default at 25.
STEP 1
Press the ENTER button to enter the AGE function.
Press the "UP" or "DOWN" button to input your age. The digit will be flashing.
Press ENTER to go to another function or START to begin exercising.
SCAN: User must manually scan through all functions once before computer starts scan mode
automatically.
.
PULSE: Press the MODE button until the arrow points to the PULSE function. This will display your
current heartbeat at a rate in beats per minute.
The PULSE rate will be displayed after 4 stable pulse signals have been detected. Each pulse signal
will be accompanied by a symbol flash.
If there is no pulse input detected for over 8 seconds, the computer will turn off the pulse circuit autoautomatically. Press START button to re-start pulse function.
LCD contrast calibration
The contrast of the screen can be adjusted by the following steps. During the STOP mode press and
hold the ENTER and "UP" buttons together for over 2 seconds. This will open the LCD contrast calibration mode. Then press the "UP" or "DOWN" buttons to adjust the contrast of the screen. Press START/
STOP button to set the desired level of contrast. There are 16 levels of contrast.
17
COMPUTER INSTRUCTIONS (cont.)
PROGRAM GRAPHICS
PROGRAM 1
PROGRAM 5
MANUAL
PROGRAM 2
RAMP
PROGRAM 6
ROLLING
PROGRAM 3
INTERVALS
PROGRAM 10
FITNESS TEST
PROGRAM 7
MOUNTAIN
PROGRAM 11
RANDOM
VALLEY
PROGRAM 43
PROGRAM 9
PROGRAM 8
FAT BURN
PROGRAM 12
PLATEAU
Operating Instructions
STEP 1
Press START/ STOP key 2 seconds to clear out previous program .
STEP 2
Press the "UP" or "DOWN" buttons to choose the desired Heart rate program ( program 11 or 12).
STEP 3
Press ENTER for TIME mode. Press the "UP" or "DOWN" buttons for the desired TIME setting.
STEP 4
Press ENTER for AGE mode. Press the "UP" or "DOWN" buttons for the desired AGE setting.
STEP 5
You are now ready to begin exercising.
16
NOTE: Occasionally our products contain components that are pre-lubricated at the factory.
We recommend that you protect flooring, or anything else the parts may contact, with
newspaper or cloth.
ASSEMBLY - Foot Tube
IMPORTANT
PLEASE READ ALL INSTRUCTIONS CAREFULLY BEFORE ASSEMBLING.
5
M8 x 1.25
CAP NUT
FIGURE 1
Step 1. Remove the two M8 x 1.25 x 60 CARRIAGE BOLTS (1), M8 WASHERS (4)
and M8 x 1.25 CAP NUTS (5) from the
FRONT FOOT TUBE (2).
4
M8
WASHER
1
M8 x 1.25 x 60
Step 2. Attach FRONT FOOT TUBE (2) to front CARRIAGE BOLT
of FRAME (3) with hardware removed
in Step 1. Make sure to insert BOLTS
through "square holes" first.
3
FRAME
2
FRONT
FOOT
TUBE
9
SUPPORT
TUBE
FIGURE 2
Step 3. Remove the two M8 x 1.25 x 60 CARRIAGE BOLTS (1), M8 WASHERS (4)
5
and M8 x 1.25 CAP NUTS (5) from the
M8 x 1.25
REAR FOOT TUBE (8).
CAP NUT
Step 4. Insert two M8 x 1.25 x 60 CARRIAGE
BOLTS (1) through "square holes" in
4
REAR FOOT TUBE (8), FRAME (3)
M8
and SUPPORT TUBE (9) and fasten
WASHER
with M8 WASHERS (4) and M8 x 1.25
CAP NUTS (5).
NOTE: It will be difficult to attach
8
NUTS, but they will fit. DO NOT
REAR
tighten these NUTS until you
FOOT
have completed Step 9.
TUBE
5
M8 x 1.25
CAP NUT
4
M8
WASHER
FIGURE 1
3
FRAME
1
M8 x 1.25 x 60
CARRIAGE BOLT
5
FIGURE 2
ASSEMBLY - Seat Frame
FIGURE 3
Step 5. Remove BUTTON HEAD SCREW (24) and M8 WASHER (4) from end of CARRIAGE TUBE
(23).
Step 6.
Push LOCKING ARM up, insert CARRIAGE TUBE (23) through SEAT CARRIAGE (19) and
release LOCKING ARM. This will hold CARRIAGE TUBE in place.
Step 7.
Remove BUTTON HEAD SCREWS (24) and M8 WASHERS (4) from FRAME (3).
Step 8.
Slide CARRIAGE TUBE (23) over end of FRAME (3) and fasten with hardware removed in
Step 7.
Step 9.
Attach CARRIAGE TUBE (23) to SUPPORT TUBE (9) with hardware
removed in Step 5. Secure REAR FOOT TUBE NUTS now.
19
SEAT
CARRIAGE
24
BUTTON
HEAD
SCREW
23
CARRIAGE
TUBE
4
M8
WASHER
LOCKING
ARM
3
FRAME
9
SUPPORT
TUBE
4
M8
WASHER
24
BUTTON
HEAD
SCREW
FIGURE 3
6
COMPUTER INSTRUCTIONS (cont.)
Buttons and Definitions
MODE: This button selects functions of TIME, SPEED, DISTANCE, CALORIES, AGE, TARGET HEART
RATE, and PULSE.
ENTER: This button allows users to set the chosen mode for exercising. (During the STOP mode,
press the enter button to enter the TIME or AGE setting.
START/STOP: This button allows the user to STOP or START exercising. (By holding this button for
2 to 4 seconds the user can enter the initial and rest all values to "0". The monitor will turn off automatically
after approx. 4.5 minutes of non use. All values will then be reset to "0".
"UP" BUTTON: This button allows the user to increase the values of the load level, Time, and Age.
"DOWN" BUTTON: This button allow the user to decrease the values of the load level Time, and Age.
Graphic LCD Display Discription and Function (large window)
This system offers 12 programs that you can preset the workout time and will divide the time by 10
intervals. If you do not preset the workout time the system will count up the workout time in onesecond increments.
PROGRAMS 1-10:
See program graphics on next page.
STEP 1
Begin by pressing the START/STOP button for over 2 seconds. This will clear any other chosen
function.
STEP 2
Next press the "UP" or "DOWN" buttons to scroll to the desired exercise program. Then press ENTER.
The program will be displayed on the LCD window.
STEP 3
The TIME setting mode should now be displayed. Press the "UP" or "DOWN" buttons to set the
desired workout time.
STEP 4 Press the START button to begin exercising. (If you want to exit the Program press the
ENTER button.
Once you begin exercising your present workout interval will be flashing. You can also increase or
decrease your workout resistance by pressing the "UP" or the "DOWN' buttons. To PAUSE your
exercising program press the STOP button, then to resume press the START button.
PROGRAMS 11 and 12:
These unique programs allow the monitor to adjust the workout resistance according to your heart rate
automatically. Grasp the pulse rate grips and hold with a firm grip. If the current heart rate is greater
than the Target heart rate the computer will decrease the workout resistance automatically. If your
current heart rate is less than your target heart rate it will increase your resistance.
Program 11: 60% of max. heart rate. Formula: Max. heart rate = 220 - your age.
Program 12: 85% of max heart rate. Formula: Max heart rate = 220- your age.
15
COMPUTER INSTRUCTIONS
INTRODUCTION
Your bike is equipped with a programmable computer to help you track your progress and motivate you
to reach your fitness goals.
This computer provides different programs designed to tailor to your fitness goals. Simply choose the
program you like, set the time limit and begin exercising - your monitor will then show your pulse,
approximate calories burned, elapsed time, speed and distance traveled.
IMPORTANT: Always consult with your physician before beginning any exercise program. If you
are taking medication which may affect your heart rate, a physician's advise is absolutely essential.
WARNING: The batteries must be installed as instructed in this manual. Do not carry batteries
loosely, such as in a purse or pocket. The batteries may explode or leak and cause
injury if installed improperly, misused, disposed of in a fire or recharged.
FUNCTIONS and FEATURES:
TIME: Shows your elapsed workout time in minutes and seconds. Your computer will automatically
count up from 0:00 to 99:59 in one second intervals. You may also program your computer to count
down from a set value by using the UP and DOWN buttons. If you continue exercising once the time
has reached 0:00, the computer will begin counting at the programmed time setting. Example: If your
time setting was 30 minutes and the computer has reached 0:00, the computer will stop tracking time
after four seconds of inactivity and will continue once you resume exercising.
SPEED: Displays your workout speed in miles per hour.
DISTANCE: Displays the cumulative distance traveled during each workout up to a maximum of 99.9
miles. The distance will be displayed in hundredths of a mile until you reach 10 miles. Then distance
will be displayed in tenths of a mile. Example: 00.00-9.99 miles, then 10.0-99.9 miles.
CALORIES: Your computer will estimate the cumulative calories burned at any given time during your
workout. Calorie expenditure on your computer is based on realistic expectations; however, your
computer is not individually programmable for all necessary variables to accurately monitor actual
calories burned.
AGE: Your computer is age-programmable from 16 to 99 years when you choose program 11 or
program 12. The default age is 25 years.
PULSE: Your computer displays your pulse rate in beats per minute during your workout. After your
workout, the computer will display your average heart rate covering your entire exercise session.
Pulse handgrips, located on the handlebars enable the user to read his/her pulse rate. By grasping the
grips and holding firmly the display will read your pulse rate in the display window. This can be read at
any time in any program.
14
ASSEMBLY - Seat
25
SEAT
CUSHION
FIGURE 4
Step 10. Attach SEAT CUSHION (25) to
SEAT CARRIAGE (19) with
PHILLIPS HEAD SCREWS
(27) and M6 WASHERS (28).
26
BACK
CUSHION
19
SEAT
CARRIAGE
28
Step 11. Attach BACK CUSHION (26) to
M6
one of "four" positions with
WASHER
PHILLIPS HEAD SCREWS (27)
and M6 WASHERS (28).
27
PHILLIPS
HEAD
SCREW
Select the proper position
according to your height.
27
PHILLIPS
HEAD
SCREW
28
M6
WASHER
28
M6
WASHER
ASSEMBLY - Handlebar
FIGURE 4
19
SEAT
CARRIAGE
29
HANDLEBAR
31
M8
LOCKNUT
4
M8
WASHER
30
BUTTON
HEAD
SCREW
FIGURE 5
7
FIGURE 5
Step 12. Attach HANDLEBAR (29) to SEAT
CARRIAGE (19) with BUTTON
HEAD SCREWS (30), M8 WASHERS (4), and M8 LOCKNUTS (31).
ASSEMBLY - Pedals
SHAFT
FIGURE 6
Step 13. Thread SHAFTS of PEDALS (34 RIGHT and
35 LEFT) into CRANK (36) and tighten with
wrench.
37
PEDAL
STRAP
34
RIGHT
PEDAL
Step 14. Select desired slot and attach PEDAL STRAPS
(37) to PEDALS (34 & 35).
36
CRANK
37
PEDAL
STRAP
SHAFT
35
LEFT
PEDAL
ASSEMBLY - Console Tube
EXTENSION
WIRE
FIGURE 6
PICKUP
WIRE
39
CONSOLE
TUBE
24
BUTTON
HEAD
SCREW
4
M8
WASHER
3
FRAME
24
BUTTON Step 15.
HEAD
SCREW
FIGURE 7
Remove BUTTON HEAD SCREWS
(24) and M8 WASHERS (4) from
FRAME (3).
Step 16. Connect the PICKUP WIRE and
EXTENSION WIRE to WIRES in
FRAME (3).
4
M8
Step 17. Slide CONSOLE TUBE (39) over
WASHER
WIRES and into FRAME (3). Fasten
with hardware removed in Step 15.
NOTE: DO NOT pinch wires while attaching CONSOLE TUBE.
24
BUTTON
HEAD
SCREW
FIGURE 7
8
WARMING UP
The greatest improvements are achieved when muscles are warm. Stretches should be slow, steady,
and held for 15 to 30 seconds, then gradually release back to the starting position. Stretch to a point
where tension is felt, not pain. Never bounce or jerk while stretching. The most important feature of
balanced fitness is to be consistent. Begin each workout period by first warming up. Start your warm up
by walking in place or around in the house for 2 to 5 minutes, then perform the stretches suggested
below. This will slowly increase your body temperature and blood flow, so your muscles are more
flexible, thus preventing muscle strain and injuries. The idea is to gradually build up your entire system
for the workout period, then after you workout, gradually return to normal.
Some suggested warm-up exercise are as follows:
WAIST TWIST: With your feet shoulder width apart, slowly twist your upper body right and left.
CALF STRETCH: Lean against a wall or a solid object keeping your body straight. Slowly raise up
and down on the balls or your feet.
SQUATS: From a standing position, balance yourself by holding onto a solid object or the wall. Slowly
squat down until the upper portion of your legs are level with your knees. Return to the standing
position.
WORKING OUT
Too much... two little... how much is enough?
The key to a healthful program is defining your personal goals and establishing an exercise/nutrition
program that will help you to be successful. At approximately 20 minutes into an aerobic exercise your
body shifts into what is called the ìfat-burning phaseî. During this phase your are able to attack greater
amounts of stored fat. Although it is often neglected, stretching can effectively reduce muscle tension,
help good posture, increase range of motion and improve the loss of movement. It is a good idea to
drink cool water before, during and after your workout.
CAUTION: Immediately after a workout if you are over-heated, do not drink lots of ice cold water. Cool
your body down gradually using cool water. Drinking after a workout replaces the water that you have
lost by sweating during your workout.
If the water is not replaced, it could result in heat exhaustion and/or dehydration. Drinking eight glasses
of water a day is generally recommended. After completing the stretches and warm-up, you are ready
to begin.
13
HEART RATE TARGET ZONE FOR CARDIOVASCULAR FITNESS
TABLE 1
200
195
190
190
185
180
180
175
170
170
165
165
161
160
160
157
155
153
Heart Rate
(Beats/Min)
150
150
148 144
145
140
140
140
136
136
133
130
131
129
127
129
129
Maximum
Attainable
Heart Rate
123
119
120
119
115
112
108
110
105
101
98
100
20
25
30
35
40
45
50
55
60
65
70
75
80
AGE (YRS)
TABLE 2
Exercise
Week
1&2
3&4
5&6
7&8
9 & 10
11 & 12
Warm Up
Period
4
5
5
5
5
5
THR%
Minutes
60-65% -8
65-70% -10
70-75% -15
70-80% -20
70-85% -25
70-85% -25
Cool Down
Period
5
5
5
5
5
5
12
Total
Time
17
20
25
30
35
35
85%
Target
Zone
Sessions
Per Wk.
3
3
3
3
3
3
Total Time
Per Wk.
51
60
75
90
105
105
70%
Target
Zone
ASSEMBLY - Console & Handlebar
FOUR "C" SIZE
BATTERIES
FIGURE 8
Step 18. Remove BATTERY DOOR of CONSOLE
(40) and insert four "C" SIZE BATTERIES
and replace BATTERY DOOR.
NOTE: DO NOT use rechargeable batteries. Using rechargeable batteries will cause a short circuit and
destroy CONSOLE (40).
BATTERY
DOOR
IMPORTANT
Your monitor includes low grade batteries
that will operate the computer for display
purposes only. You will need to replace the
batteries shortly after using the bike for the
first few times.
FIGURE 8
44
BOOK
HOLDER
40
CONSOLE
FIGURE 9
Step 19. Insert PULSE WIRES from FRONT
HANDLEBAR (41) through HOLE in CONSOLE TUBE (39) and pull PULSE WIRES
up through top of CONSOLE TUBE.
SLOT
EXTENSION
WIRE
PULSE
WIRES
43
MACHINE
SCREW
40
CONSOLE
PICKUP
WIRE
4
M8
WASHER
31
Step 20.
M8
LOCKNUT
PULSE
GRIP
Attach FRONT HANDLEBAR (41), with
PULSE GRIPS up, to CONSOLE TUBE
(39) with MACHINE SCREWS (42), M8
WASHERS (4), and M8 LOCKNUTS (31).
NOTE: DO NOT pinch wires between
HANDLEBAR and CONSOLE
TUBE.
42
MACHINE
Step 21. Carefully plug PICKUP WIRE, EXTENSION
SCREW
WIRE and PULSE WIRES into bottom of
CONSOLE (40).
PULSE
41
GRIP
Step 22. Remove MACHINE SCREWS (43) from
FRONT
HANDLEBAR
bottom of CONSOLE (40) and attach CONSOLE to CONSOLE TUBE (39) with MA39
CHINE SCREWS (43).
CONSOLE
TUBE
Step 23. Snap BOOK HOLDER (44) into SLOT in
CONSOLE (40).
FIGURE 9
9
HOW TO BEGIN
WARNING: Prior to undertaking any exercise, or program of exercise that requires a major increase in physical activity, consultation with a competent medical authority is strongly
recommended. In addition, anyone who has a physical handicap, who suffers from a
prolonged illness, or who has increased risk factors such as obesity, hypertension,
cardiocirculatory problems, etc., should consult a competent medical authority before
undertaking any exercise, or engaging in a continuing program of exercise.
By first doing the above, you will then have a starting point from which to measure
your increased physical improvement.
CAUTION:
Stop exercising if you experience any of the following symptoms.
_ Pressure, tension, or pain in your chest, shoulders, neck, jaw, or arms.
_ Noticeable pain of any kind (i.e. leg or stomach cramps).
_ Lightheaded or dizziness (fainting-lack of vision).
_ Abnormal breathing (rapid or lack of air).
_ Sudden unsteadiness, weakness or numbness of the face, arms, legs or body.
_ Loss of speech, problems speaking, or understanding speech.
_ Unusual fatigue.
_ Lowering of your heart rate with increased exercise demands.
_ Fluttering in your chest (heart palpitations).
If any of these symptoms occur, call your doctor immediately. If exercise is new to you, don't push
yourself too fast. Be conscious of your body and what it is telling you. If pain develops anywhere in your
body, slow down.
SET FITNESS GOALS
General guidelines to follow.
The key to a healthful program is defining your personal goals, and establishing an exercise/nutrition
program that will help you to be successful.
What your individual exercise goals are will depend on many factors, some of which includes your age,
current fitness level, sex, heredity, and according to your lifestyle, the amount of time available to
exercise.
Disciplining yourself not to skip a workout period is a very important short term goal. Many exercise
programs fail because this goal is not set as a priority. Just some of the advantages that you will receive
with a consistent long term exercise program include; a decrease in the percentage of stored fat, firmer
better toned muscles, increased vitality, and improved overall health in all areas of your physical and
mental efficiency.
10
PLANNING AN EXERCISE PROGRAM
When and how much exercise to do.
Probably the most important part of exercising, especially if exercise is new for you, is commitment,
commitment, commitment! Maintaining a physically fit body does not require hours and hours of your
time. For an average non-exercising person, a safe and generally accepted schedule is to exercise
consistently for 20 to 30 minutes, three times per week to maintain cardiovascular fitness.
Keeping a written record will help you to see your progress and may serve to help you keep your
commitment. It is extremely important to start out slow and not to overdo, especially for the first month
or two. Two reasonable times to workout, if it fits your schedule, is in the morning before breakfast, or
early evening before your evening meal.
Research shows that to increase your fitness level you should workout at a level of 70 to 80 percent of
your maximum heart rate. This is the target zone for best results. Exceeding your target zone will not
increase your fitness level, and could be very dangerous.
MONITORING YOUR HEART RATE
Before beginning your workout, check your normal resting heart rate. Place your fingers lightly against
your neck, or against your wrist over the main artery. After feeling your pulse, count the number of
beats for 10 seconds. Multiply the number of beats by six to determine your pulse rate per minute. A
chart is provided for you to log your heart rate at rest; after warming up, during your workout, and two
minutes during your cool down, then 10 minutes after your cool down. We recommend taking your
heart rate at these times to accurately track your progress as it relates to better physical fitness.
Your maximum heart rate and aerobic capacity naturally decreases as you age. In general, to determine your maximum heart rate, subtract your age from 220. This may vary from one person to another,
but use this number to find your approximate effective target zone.
(MHR)= Maximum Heart Rate
(THR)= Target Heart Rate
220 - age = maximum heart rate (MHR). MHR x .70 = 70% of your heart rate.
MHR x .85 = 85% of your maximum heart rate.
For example, if you are 30 years old, your calculations will be as follows:
220 - 30 = 190
190 x .70 = 133 (Low end or 70% of THR)
190 x .85 = 161 (High end or 85% of THR)
See Table No. 1 for additional calculations.
If exercise is new to you, donít push yourself too fast. Be conscious of your body and what it is telling
you. If pain develops anywhere in your body, slow down. Heart rhythm disturbances may occur if you
stop abruptly, so always remember to cool down.
You are an individual and your body is unique. All of the information in this manual is for an average
person with average physical fitness. Use these instructions as a guide.
11