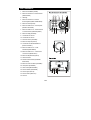
1
INSTRUCTION MANUAL
GUIDE D'UTILISATION
R227
Internet Radio
Webradio
Help Line: 1-800-263-2244
Ligne d’assistance:1-800-263-2244
Mon-Fri, 9AM-5PM (Eastern)
Du lundi au vendredi, de 9h à 17h (heure de l’Est)
SANYO Canada Inc.
www.sanyo.ca
ENGLI SH
US-1~U S-27
FR ANÇAIS
FR -1~F R-27
SAFETY PRECAUTIONS
TO PREVENT FIRE OR SHOCK HAZARD, DO NOT USE THIS PLUG WITH AN EXTENSION CORD, RECEPTACLE OR OTHER
OUTLET UNLESS THE BLADES CAN BE FULLY INSERTED TO PREVENT BLADE EXPOSURE. TO PREVENT FIRE OR SHOCK
HAZARD, DO NOT EXPOSE THIS APPLIANCE TO RAIN OR MOISTURE.
CA UT ION
RISK OF ELECTRIC SHOCK
DO NOT OPEN
CAUTION: TO REDUCE THE RISK OF ELECTRIC
SHOCK, DO NOT REMOVE COVER(OR BACK). NO
U S E R - S E RV I C E A B L E PA RT S I N S I D E . R E F E R
SERVICING TO QUALIFIED SERVICE PERSONNEL.(The
Caution Marking and Rating Plate is located at the bottom
enclosure of the unit.)
DANGEROUS VOLTAGE
The lightning fash with arrowhead symbol
within an equilateral triangle is intended to alert
the user to the presence of uninsulated
dangerous voltage within the product’s
enclosure that may be of sufficient magnitude
to constitute a risk of electric shock to persons.
ATTENTION
The exclamation point within an equilateral
triangle is intended to alert the user to the
presence of important operating and
maintenance (servicing) instructions in the
literature accompanying the appliance.
INFORMATION:
This equipment has been tested and found to comply with
the limits for a Class B digital device, pursuant to Part 15
of the FCC Rules. These limits are designed to provide
reasonable protection against harmful interference in a
residential installation. This equipment generates, uses
and can radiate radio frequency energy and, if not
installed and used in accordance with the instructions,
may cause harmful interference to radio communications.
However, there is no guarantee that interference will not
occur in a particular installation. If this equipment does
cause harmful interference to radio or television reception,
which can be determined by turning the equipment off
and on, the user is encouraged to try to correct the
interference by one or more of the following measures:
● Reorient or relocate the receiving antenna.
● Increase the separation between the equipment and
receiver.
● Connect the equipment into an outlet on a circuit
different from that to which the receiver is connected.
● Consult the dealer or an experienced radio / TV
technician for help.
FCC WARNING:
This equipment may generate or use radio frequency
energy. Changes or modifications to this equipment
may cause harmful interference unless the
modifications are expressly approved in the instruction
manual. The user could lose the authority to operate
this equipment if an unauthorized change or
modification is made.
Changes or modifications to this unit not expressly
approved by the party responsible for compliance
could void the user’s authority to operate the
equipment.
Shielded cables must be used this unit to ensure
compliance with Class B FCC limits.
Caution: To maintain compliance with the FCC’s RF
exposure guidelines place the base unit at least 20 cm
from the nearby persons.
Use only the supplied antenna. Unauthorized
antennas, modifications, or attachments could damage
the transmitter and may violate FCC regulations.
SURGE PROTECTORS:
It is recommended to use a surge protector for AC
connection. Lightning and power surges ARE NOT
covered under warranty for this product.
This device complies with Part 15 of the FCC Rules.
Operation is subject to the following two conditions:
(1) this device may not cause harmful interference, and
(2) this device must accept any interference received,
including interference that may cause undesired operation.
IMPORTANTES MESURES DE SÉCURITÉ
Certaines mesures de sécurité doivent être prises pendant
l’utilisation de matérial équipment afin de réduire les risques
d’incendie, de choc électrique et de blessures. En voici
quelquesunes:
1. Ne pas utiliser l’appareil près de l’eau, p.ex., près d’une
baignoire, d’un lavabo, d’un évier de cuisine, d’un bac
à laver, dans un sous-sol humide ou près d’une piscine.
2. Éviter d’utiliser le équipment (sauf s’il s’agit d’un
appareil sans fil) pendant un orage électrique. Ceci
peut présenter un risque de choc électrique causé
par la foudre.
3. Utiliser seulement le cordon d’alimentation et le type
de piles indiqués dans ce manuel. Ne pas jeter les
piles dans le feu: elles peuvent exploser. Se conformer
aux règlements pertinents quant à l’élimination des
piles.
CONSERVER CES INSTRUCTIONS
US-1
IMPORTANT SAFETY INSTRUCTIONS
1.)
Read these instructions.
2.)
Keep these instructions.
3.)
Heed all warnings.
4.)
Follow all instructions.
5.)
Do not use this apparatus near water.
6.)
Clean only with dry cloth.
7.)
Do not block any ventilation openings. Install in accordance with the manufacturer’s
8.)
Do not install near any heat sources such as radiators, heat registers, stoves, or other
9.)
Do not defeat the safety purpose of the polarized or grounding-type plug. A polarized plug has
instructions.
apparatus(including amplifiers) that produce heat.
two blades with one wider than the other. A grounding type plug has two blades and a third
grounding prong. The wide blade or the third prong is provided for your safety. If the provided
plug does not fit into your outlet, consult an electrician for replacement of the obsolete outlet.
10.) Protect the power cord from being walked on or pinched particularly at plugs, convenience
receptacles, and the point where they exit from the apparatus.
11.) Only use attachments/accessories specified by the manufacturer.
12.) Use only with a cart, stand, tripod, bracket, or table specified by
the manufacturer, or sold with the apparatus. When a cart is used,
use caution when moving the cart/apparatus combination to avoid
injury from tip-over.
13.) Unplug this apparatus during lightning storms or when unused for long periods of time.
14.) Refer all servicing to qualified service personnel. Servicing is required when the apparatus
has been damaged in any way, such as power-supply cord or plug is damaged, liquid has
been spilled or objects have fallen into the apparatus, the apparatus has been exposed to rain
or moisture, does not operate normally, or has been dropped.
15.) The apparatus shall not be exposed to dripping or splashing and that no objects filled with
liquids, such as vases, shall be placed on apparatus.
16.) Main plug is used as disconnect device and it should remain readily operable during intended
use. In order to disconnect the apparatus from the mains completely, the mains plug should
be disconnected form the mains socket outlet completely.
When using your equipment, basic safety precautions should always be followed to reduce the
risk of fire, electric shock and injury to persons, including the following:
17.) Avoid using a equipment during an electrical storm. There may be a remote risk of
electric shock from lightning.
18.) Use only the power cord and batteries indicated in this manual. Do not dispose of batteries
in a fire. They may explode. Check with local codes for possible special disposal instructions.
US-2
Introduction
Thank you for choosing this SANYO product which has been designed and manufactured to give
you many years of trouble-free service.
Due to the relatively new concept of a standalone internet radio, please take time to read these
instructions they have been written to ensure you get the very best from your purchase.
Patience
Internet Radio is a fast-growing but young phenomenon, and is only going to get better as time
goes by. Sometimes a connection, station, or network glitch may frustrate you, but working through
the issue will be well worth the effort.
Reach us toll-free Canada-wide at 800-263-2244, 9-5 eastern time, weekdays for assistance.
Power source
●
100-240V AC 60/50Hz.
Servicing
●
This unit contains no user serviceable parts. Refer to qualified service personnel.
●
Consult your dealer if you are ever in doubt about the installation, operation or safety of this
product.
US-3
Contents
Introduction…………………………………………………………………………………………..... . 3
Contents................................................................................................... . . . . . . . . . . . . . . . . 4
Overview.......................................................................................................................6
Internet radio front, side and rear view……………………………………………………………….. 6
Remote control top view……………………………………………………....……………………..… 7
Summary of Controls......................................................................................7
Display overview………………………………………………………………………………………....8
Installation………………………………………………………………………………………..……...9
Remote Control Battery……………………………………………………………………………..…10
Configure menu.......................................................................................................... 10
Choosing the option you want from the Configure menu........................................... 10
<Network Config>....................................................................................... 10
<Version>.................................................................................................10
<Upgrade Firmware>....................................................................................11
<Language>..............................................................................................11
<Factory Reset>......................................................................................... 11
<Register>................................................................................................11
<Clock Set Up>...........................................................................................11
<Backlight>...............................................................................................11
<WiFi Strength>..........................................................................................11
Internet Radio Connection Requirements....................................................................11
What you need before you can use your Internet radio............................................. 11
Steps for connecting your Internet radio to your wireless network...............................12
Step 1 - Power up the Internet radio...................................................................12
Step 2 Scan for a wireless network connection.....................................................12
Step 3 Connect to the wireless network............................................................. 13
Choosing a radio station to listen to............................................................................14
Changing the volume....................................................................................14
Presetting your favorite internet radio stations……………………………………………………. 15
Playing a preset internet radio station.................................................................15
Requesting a internet station that is currently unavailable........................................ 15
Internet Station which enable you to choose what you listen to................................... 15
Troubleshooting..........................................................................................................16
Media Player Operation…………………………………...……………………………...……...….16
Set up your Windows PC to allow the radio to access your audio files via Windows Shares.. .16
Locating audio files via Windows Shares............................................................. 16
Listening to a single shared track......................................................................17
Listening to a complete shared album.................................................................17
Queuing up tracks for playback later.................................................................. 17
Queuing up albums for playback later.................................................................17
Controlling playback.....................................................................................17
US-4
Browsing the list of tracks currently queued up for playback....................................... 18
Removing tracks from the queue.......................................................................18
Playing tracks in random order.........................................................................18
Playing tracks in the queue repeatedly................................................................18
Set up a Windows PC to allow the Internet radio to access your audio files via a Upnp
server......................................................................................................18
Locating and playing media files using the radio and Upnp.......................................... 19
Queuing up UPnP tracks for playback later...........................................................19
Queuing up UPnP albums for playback later......................................................... 19
Controlling playback later.............................................................................. 19
Browsing the list of tracks currently queued up for playback.......................................19
Removing UPnP tracks from the queue...............................................................20
Playing UPnP tracks in random order................................................................. 20
Playing UPnP tracks in the queue repeatedly……………………………………………………....20
Setting the clock..........................................................................................................20
Setting the sleep timer.................................................................................................21
Setting the alarms....................................................................................................... 22
Playing FM Radio………………………………………………………………………….………….. 24
Presetting your favorite FM radio stations…………………………………………………………. 24
Playing a preset FM radio station……………………………………………………………………. 24
Optional Connections……………………………………………………………………………….. 25
Auxiliary Jack ……………………………….................................……………………...………..25
Headphone Jack ………………………………............................……………………...……….. 25
Line Out Jack………..………………………………………................................……...………..25
Cabinet Cleaning........................................................................................................ 25
Specifications.............................................................................................................26
License Information.................................................................................................... 26
Warranty………………………………………………………………………………………………… 27
US-5
Overview
1.
SLEEP BUTTON
2.
SEEK ▼ BUTTON
Internet radio front view
2
1
3.
LCD DISPLAY
4.
SEEK ▲/BROWSE BUTTON
5.
BACK BUTTON
6.
RADIO P2/ ►/ II / RADIO P6 BUTTON
7.
RADIO P1/ I◄ / RADIO P5/■ BUTTON
8.
SNOOZE BUTTON
9.
VOLUME + BUTTON
4
3
7
9
15
19 17
18
8
6
5
16
11
13
14
12
10. VOLUME - BUTTON
Internet radio side view
11. HEADPHONE JACK
12. REPLY BUTTON
13. SELECT BUTTON / SCROLL ▲/▼ CONTROL
14. RADIO P4/MEDIA MODE / RADIO P8 BUTTON
15. RADIO P3/ ►I / RADIO P7 BUTTON
16. SHIFT BUTTON
20
17. IR SENSOR
Internet radio rear view
18. STANDBY INDICATOR
19. STANDBY/ON BUTTON
20. SPEAKER
21. FM ANTENNA
22. NETWORK JACK
23. AUX IN JACK
23
21
24. LINE OUT JACK
22
25. AC SOCKET
US-6
25
24
10
Remote control top view
1.
2.
3.
4.
5.
6.
7.
8.
9.
10.
11.
12.
13.
STANDBY/ON BUTTON
BACK BUTTON
SNOOZE BUTTON
RADIO P1/ I◄ BUTTON
RADIO P4/MEDIA MODE BUTTON
RADIO P7 BUTTON
SCROLL ▲ BUTTON
SCROLL ▼ BUTTON
SLEEP BUTTON
SELECT BUTTON
REPLY BUTTON
RADIO P2/ ►/ II BUTTON
RADIO P3/ ►I BUTTON
14.
15.
16.
17.
18.
19.
20.
RADIO P5 /■ BUTTON
RADIO P6 BUTTON
SEEK ▲/BROWSE BUTTON
RADIO P8 BUTTON
SEEK ▼ BUTTON
VOLUME + BUTTON
VOLUME - BUTTON
1
9
10
11
2
3
7
12
13
14
15
16
17
18
19
8
20
4
5
6
Remote sensor
To operate the unit with the remote control, point the remote at the Remote Sensor on the front of
the main unit and press the appropriate button. The remote control has an effective operating
range of approximately 20 feet and an angle of no more than 30°.
NOTE: Bright sunlight may interfere with the operation of the remote control.
Summary of Controls - Unit and Remote
Control
STANDBY/ON
SELECT
SCROLL▲/▼
Media Player mode
Internet Radio mode
Press to turn on/off the Internet Radio
Turn the knob to change options. Press the knob to SELECT
Press ▲ or ▼ to select options when using the remote control
No function
Display Queue information
Reply
For future applications. No function at present.
No function at present
Back
Go back to previous menu page
Browse
P1
Press and hold to save Preset station P1, Press to load
preset station P1
Previous Track
P2
Press and hold to save Preset station P2, Press to load
Preset station P2
Play/Pause
P3
Press and hold to save Preset station P3, Press to load
Preset station P3
Next Track
P4
Press and hold to save Preset station P4, Press to load
Preset station P4
Repeat On/Off,
Shuffle On/Off
P5
Press and hold to save Preset station 5, Press to load
Preset station P5
Stop
US-7
Control
Media Player mode
Internet Radio mode
P6
Press and hold to save Preset station 6, Press to load
Preset station P6
P7
Press and hold to save Preset station 7, Press to load
Preset station P7
P8
Press and hold to save Preset station 8, Press to load
Preset station P8
SHIFT
Press shift button then press P1 to change P1 or P5,
P2 or P6..etc
Vol +/-
Increase volume by pressing +, Decrease volume by pressing -
Seek ▲
Seek ▼
Tune up FM radio station by pressing ▲, tune down by
pressing ▼
SLEEP
Press this button to set the sleep timer (15/30/60/90 min)
SNOOZE
Press this button to turn on the snooze function (9 mins)
Browse
Most of the functions of this unit can be operated by pressing the buttons on the front panel or the
corresponding buttons on the remote control handset.
Display overview
Icons are displayed on the bottom row of the display. The meaning of these icons is explained
below.
11:00
Sleep timer.
Alarm set indicator
Internet Radio
AM
Zz
Zz Snooze
Remarks:
Time will show in the middle of display(at its maximum size)when unit is turned Off.
When unit is turn ON, the time information will be shown at the bottom of the display.
Display list:
Stations
Media Player
Configure
Tuner
Auxiliary Input
Alarm Clock
US-8
Installation
If this Internet radio has been moved from a cold place to a warm place, DO NOT plug it in for 2-3
hours (e.g. from a cold car to a warm room). There is a possibility that moisture may have
condensed in the Internet radio, this can cause damage to your Internet radio. To avoid damage
please unpack your Internet radio and allow it to stand at room temperature for 2-3 hours before
use. This will help any moisture evaporate and prevent unnecessary damage to your Internet radio.
AC CONNECTION
Unwind the AC cord and extend it to its full length. Insert the AC plug
into any convenient 100-240V 60/50Hz household outlet. Please note
that this unit is equipped with a polarized AC plug which has one blade
wider than the other. This is a safety feature to reduce the likelihood of
electric shock. This polarized AC plug will only fit in a polarized AC
outlet. If you find that you cannot insert this plug into your outlet, you
may have an obsolete non polarized outlet. Please do not try to defeat
this safety feature by using a non-polarized adapter or by filing the
wider blade to make it fit into your outlet. If this plug does not fit into
your outlet, you should contact a qualified licensed electrician to
replace your obsolete outlet.
AC Outlet
AC Plug
IMPORTANT NOTES:
● Before moving or lifting the unit, make sure the AC plug is disconnected from the power source.
● In case of malfunction due to electrostatic discharge, just reset the product (reconnect of
power source may be required) to resume normal operation. Should any trouble occur,
remove the power source and refer to qualified personnel.
● If there is a power failure or the AC cord is disconnected for a short period of time, the clock
time will not be kept. When the power is resumed or the AC cord is connected again, the clock
time will be reset from the internet connection. If the internet connection is down or not
available the clock can be set manually.
RJ-45 JACK (if not using a wireless router)
Insert the RJ-45 connector into the RJ-45 jack on the unit.
RJ-45 Jack
Broadband RJ-45 Connector Connect ethernet Broadband modem
(with integrated router)
Router
modem
OR
Broadband
service
Broadband
service
Use a commercially available straight LAN cable (Category 5/CAT 5 or better with RJ-45
connector).
Do not plug-in an ethernet cable if intending to use a wireless network, to avoid confusion to the
circuitry. If intending to use an ethernet connection, attach cable to both modem/wired router and
radio before powering up radio.
US-9
REMOTE CONTROL BATTERY
1.
2.
3.
Press firmly on the battery cover and then rotate
it in counter clockwise direction, the cover will
come off.
Place the battery (CR2032) into the battery
compartment according to the polarity markings,
with the “+” sign facing up.
Place back the battery cover, press down slightly
and rotate it in clockwise direction until it is firmly
closed.
** Battery Included **
Note: Remove the battery from the remote control if
not in use for a long period of time. When the battery
becomes weak, the remote control will not function
properly. Replace with new battery.
BATTERY PRECAUTIONS
Follow these precautions when using a battery in this device:
1. Warning -Danger of explosion if battery is incorrectly replaced. Replace only with the same or
equivalent type.
2.
Use only the size and type of battery specified.
3.
Be sure to follow the correct polarity when installing the battery as indicated in the Battery
Compartment. A reversed battery may cause damage to the device.
4.
If the device is not to be used for a long period of time, remove the battery to prevent damage
or injury from possible battery leakage.
5.
Do not try to recharge a battery not intended to be recharged; it can overheat and rupture.
(Follow battery manufacturer's directions.)
6.
Battery shall not be exposed to excessive heat such as sunshine, fire or the like.
Configure Menu
Choosing the option you want from the Configure menu
1. Press the SELECT button.
(Note: if you make a mistake at any point, press the BACK button to go back to the previous
screen.)
2. Turn the knob until 'Configure' is displayed
3. Press the SELECT button.
4. Turn the knob until the display shows the option you want.
5. Press the SELECT button to choose the option shown on the display. The options are
explained below.
<Network Config>
Enables you to scan again for connection to another wireless network, or to manually
configure the network parameters. Use this if you take the Internet radio to another building
where you want to use it.
<Version>
Displays the version numbers of the various parts of software on your Internet radio.
US-10
<Upgrade Firmware>
Use this option to download new firmware for the radio from the Reciva portal on the Internet.
If there is new firmware available, then the radio will prompt you if you want to download it or
not.
Note, at this stage, you can press the radio's BACK button to cancel the radios, beginning a
firmware upgrade. A firmware upgrade may take several minutes, so do not switch off the
power to the radio until the operation is complete otherwise the radio may become
permanently damaged.
<Language>
Allows you to change the display language.
<Factory Reset>
Puts all the settings back to their defaults as they were when they left the factory. If you
perform a factory reset on your radio, you will lose all your presets and your wireless network
connection.
<Register>
This will display a key that can be used to register the radio (recommended) on the SANYO
Reciva Customer portal: http://www.reciva.com/ . Registering enables you to request a
station or podcast to be added to just your unit.
<Clock Set Up>
Selecting this option can set the clock of the unit.
IMPORTANT: the first time you connect this internet radio to AC outlet, this unit will
automatically set the time zone to Zone 2 which is the initial default setting. If you do not live in
this time zone, you must change the default zone display to your own zone. You only do this
one time and the unit will remember the new default zone.
<Backlight>
Selecting this option enables you to choose the Internet radio's backlight brightness.
1. After selecting the 'Backlight' menu item, the radio will display its list of two menu modes:
● The 'active' state is when the unit is “ON”.
● 'Standby' is the state when the radio has been turned off.
2. Rotate the knob to highlight the desired menu mode and press SELECT.
3. The radio will now display the current backlight value for this menu mode. You can alter this
value by rotating the knob to increase or decrease it.
<WiFi Strength>
The strength of the WiFi signal will be displayed. Strength should be over 60% for stable
streaming. Relocate this radio or re-orient the wireless router, or buy a wireless booster if
necessary.
Internet Radio Connection Requirements
What you need before you can use your Internet radio
Before you can use your Internet radio, you need the following:
*
A broadband Internet connection.
*
If wireless operation is desired - a wireless access point (Wi-Fi) connected to your broadband
Internet, preferably via a router.
*
If your wireless network is configured to use Wired Equivalent Privacy (WEP) or Wi-Fi
protected Access (WPA) data encryption then you need to know the WPA passcode so you can
get the Internet radio to communicate with the network.
*
If your wireless network is configured for “trusted products” you will need to enter the radio's
MAC address into your wireless access point. To find the radio's MAC address use menu items
as follows: Configure->Network Config->View Config->MAC Address
*
To enter the MAC address into your wireless access point, you must read the instructions
supplied with the wireless access point.
The Internet radio should work anywhere within the specified range of the wireless access point
device.
Before you continue, make sure that your wireless access point is powered up and connected to
your broadband Internet. To get this part of the system working you must read the instructions
supplied with the wireless access point.
US-11
Steps for connecting your radio to your wireless network
Step 1-Power up the radio
First, connect the AC power. In use, the radio can be switched on or off with the standby button,
the display on the front of the radio will light up and say:
SANYO
After a few seconds, this will change to show:
Initializing network
After a few seconds, this will change to show:
< Scan for networks >
Enter network
View Config
Step 2 Scan for a wireless network connection
When the display says<Scan for networks>, press the SELECT button.
(Note: if you make a mistake at any point, press the BACK button to go back to the previous
screen.)
The radio will now scan for all available wireless networks and will display:
Scanning
If it can't find one then the display will say:
No networks
Found
If this happens then you will have to get your wireless access point working. See the instructions
supplied with it.
When the radio finds your wireless network, it displays the ESSID for the access point on the
screen this is a name that is allocated to the access point by the person who set up the network
for example:
< My Home Network >
US-12
It is possible, and in some locations highly likely, that your radio will find more than one wireless
access point, in which case you can choose which one you want to connect to. Turn the knob on
the radio to see the ESSID of each access point the radio has found.
Step 3 Connect to the wireless network
When the ESSID for the access point you want is displayed on the screen, press the SELECT
button. If your network is not configured to need an encryption code, the screen should say:
Connecting to network
Then:
Network OK
If the screen displays either:
Enter WEP key
Or:
Enter WPA key
Then the network is using one of the encryption systems: Wired Equivalent Privacy (WEP) or WiFi Protected Access (WPA). You therefore need to enter the correct WEP or WPA code or “Key”
into the radio to get it to communicate with your network.
Only the person who set up the network in the first place knows this code; if that person is not
you then you need to find out what it is.
After 3 seconds, the display goes into the code entry mode. To enter the code, use the knob to
select each character of the code in turn, pressing the SELECT button after each character.
Note that WEP and WPA codes are sensitive to upper and lower case characters so you must
enter them exactly.
Use the BACK button to erase incorrect characters.
After the final character, use the knob to select the <END> character and press the SELECT
button.
The radio should now be able to connect to the network. If the display shows “Invalid key” or
“Network Error”, an incorrect password has probably been entered.
US-13
Choosing a radio station to listen to
Quick-Listen: “WFUV” for Preset station 1 and “CKUA” for Preset station 2 were programmed at
the factory - 1 each from the US and Canada for your immediate listening enjoyment. ( You can
reset them at any time. See page 15.)
Station searching: Follow next steps.
1. Press the SELECT button . Choose Stations and press SELECT button.
(Note: if you make a mistake at any point, press the BACK button to go back to the previous
screen.)
< Stations >
Media Player
Configure
2. Turn the knob to choose from<Location> or <Genre>.
<Location> enables you to choose from the radio stations provided by any country which you
choose from a list.
<Genre> enables you to choose radio stations according to their content, for example Classic
Rock. Sport, News, etc.
3. Press the SELECT button to choose the option you want.
<Location>
1.Turn the knob until the display shows the region you want (or select 'All' to display all
countries),
2. Press the SELECT button.
3. Turn the knob until the display shows the country you want.
4. Press the SELECT button.
5. Turn the knob until the display shows the station you want.
6. Press the SELECT button and wait until the radio connects to that station.
Note that some radio stations do not broadcast 24 hours per day, and some stations are not
always on line.
If this station has on demand content (that is, it gives the option of listening to programs which
have already been broadcast), see “Stations which enable you to choose what you listen to”.
<Genre>
1. Turn the knob until the display shows the type of content you want, then press the SELECT
button.
2. Turn the knob until the display shows the station you want.
3. Press the SELECT button and wait until the radio connects to that station.
Changing the volume
When a radio station is playing, you can change the volume simply by using Volume + and
Volume buttons located on the unit or on the remote control. The volume bar will appear on
display to show the volume change level.
US-14
Presetting your favorite internet radio stations
Up to maximum 8 stations can be stored in memory with this unit.
While a radio station is playing, hold down one of the preset buttons (numbered 1 to 8) until the
screen says
Assigned to preset #
Where # is the number of the button you held down.
Presets 1 and 2 were programmed at the factory and can be reset.
To assign a radio station to one of the presets numbered 5 to 8, press SHIFT and then press and
hold one of the preset keys. When you are using the remote control, simply press and hold the
desired preset number button.
Playing a preset internet radio station
When an internet radio is playing, briefly press the preset button (1 to 4) for the station you want
or also press SHIFT button for station 5 to 8. (Note, do not hold the button down. If you do then
the station currently playing will overwrite the one stored in the preset; be careful.)
Requesting an internet station that is currently unavailable
If you want to listen to a particular radio station which is currently not available online, you can
visit the Reciva website at http://www.reciva.com/ and put in a request to add the station to the
list.
Internet stations which enable you to choose what you listen to
Some internet radio stations can provide a number of options associated with their station; for
example, some stations enable you to listen to programmes that have already been broadcast.
When you select a radio station that has this facility, the station does not start playing
immediately, but instead the display shows:
< Live >
On Demand
1. Turn the knob to choose <Live> or <On Demand>, then press the SELECT button.
If you choose <Live> then the radio plays the current output from this station as normal.
If you choose <On Demand> then more screens are displayed where you choose what you
want to listen to.
What is displayed will depend on the station you have chosen the following steps are only a
guide.
2. When you choose <On Demand>, the display shows the names of the programmes. Turn the
knob to choose the program you want, then press the SELECT button.
3. When you have chosen the programme you want to listen to, either it will just start playing, or
the display may show a list of days for you choose from use the knob to set the day the
programe was broadcast, then press the SELECT button.
4. After you have chosen the day, you may be able to choose the Start Time. Set the Start Time
using the knob and press the SELECT button.
5. Programmes which enable you to choose the time also enable you to fast-forward and rewind
to the part you want while the radio is playing. The elapse time is displayed. Using the Skip +
(P3) or Skip - (P1) button to skip forward or backward in 30 second intervals.
US-15
Troubleshooting
You may find it useful to visit the help section on the webpage of our associates at Reciva:
http://radio.reciva.com/
This model has a built-in wireless internet capability. If you have trouble connecting to your
wireless network, these steps may help to resolve the problem:
1. Confirm that a Wi-Fi connected PC can access the Internet (i.e. can browse the web) using the
same network.
2. Check that a DHCP server is available, or that you have configured a static IP address on the
radio. To configure the DHCP, you must read the instructions supplied with the wireless
access point.
3. Check that your firewall is not blocking any outgoing ports. As a minimum the radio needs
access to UDP and TCP ports 80,554,1755,5000 and 7070. To configure the Access Port
Control, you must read the instructions supplied with the wireless access point.
4. Check your access point does not restrict connections to particular MAC addresses. You can
view the radio's MAC address using the menu item Configure-> Network Config-> View
Config-> MAC address.
5. If you have an encrypted network, check that you have entered the correct key or passphrase
into the radio. Remember that text-format keys are case sensitive. See pages 19-20.
If your radio can connect to the network successfully, but is unable to play particular stations, it
may be due to one of the following causes:
1. The station is not broadcasting at this time of the day (remember it may be located in a
different time zone).
2. The station has reached the maximum allowed number of simultaneous listeners.
3. The station is not broadcasting anymore.
4. The link on the radio is out of date.
5. The Internet connection between the server (often in a different country) and you is slow.
Try turning your radio off and on again. If unsuccessful, unplug and replug power cord. If still not
helpful, use a PC (if available) to check play back of the stream via the broadcaster's web site.
If you can play back the station with a PC, use the form at
http://www.reciva.com/stations/add_station.asp to notify us so that we can change the station
data that is used by the radio.
Media Player
NOTE: This function is for more advanced users.
The built-in Media Player allows you to play unprotected audio files (AAC, AIFF, MP3, RM,
WAV, WMA) including itunes TM, and playlists (M3U) stored on a networked PC(not Mac). It has
been verified to work on Windows 2000 and Windows XP.
Set up your Windows PC to allow the radio to access your audio files via Windows Shares
1. Please ensure that your PC is available on the network for your Internet radio, then, using
Windows Explorer, locate the folder where your audio files are stored.
2. Right click on the folder.
3. Select 'Properties'.
4. Click on 'Sharing'.
5. Select “Share this folder on the network” and “Allow network user to change my files”.
Locating audio files via Windows Shares
1. Power up the radio.
2. Wait for “Stations” to be displayed on the radio, or press the BACK button repeatedly until
“Stations” is displayed.
US-16
3. Turn the knob until the radio display shows “Media Player”.
4. Press the SELECT button and turn the knob until “Windows Shares” is displayed.
5. Press the SELECT button, turn the knob until “Scan for PCs” is displayed and press SELECT
again.
6. The radio will now display “Finding PCs”, once the radio has finished, turn the knob to
highlight the correct PC.
7. Press the SELECT button. The radio will search for shared folders.
8. Turn the knob to highlight the correct shared folder and press SELECT.
9. The radio will display 'File Scan…' as it scans through the media files in the shared folder. Text
on the bottom row of the display will change to indicate that the file scan is in progress. If you
have a large number of audio files this could take several minutes to complete.
10. Once the radio has finished scanning, it will display 'By Album' You can now browse through
the scanned media files, which will now be organized “By Album”,”By Artist” and “Playlists” if
available.
Note that the first time the file scan is done a file called 'reciva_media_cache' is written to the
folder where the audio files are stored. This is in order to speed up subsequent file scans.
Listening to a single shared track
1. Turn the knob until 'By Artist' is displayed.
2. Press the SELECT button.
3. Turn the knob until the required artist is displayed.
4. Press the SELECT button.
5. Turn the knob until the required album name is display.
6. Press the SELECT button. '<Add to Queue>' will be displayed.
7. Turn the knob until the required track is displayed.
8. Press the SELECT button. The track will begin playing.
Listening to a complete shared album
1. Turn the knob until 'By Artist' is displayed.
2. Press the SELECT button.
3. Turn the knob until the required artist is displayed.
4. Press the SELECT button.
5. Turn the knob until the required album name is displayed.
6. Press the SELECT button. '<Add to Queue>' will be displayed.
7. Press the SELECT button. The album will begin playing.
Queuing up tracks for playback later
1. Highlight the required track.
2. Press the SELECT button. 'Track Added To Queue' will be displayed.
Queuing up albums for playback later
1. Highlight the required album.
2. Press the SELECT button.
3. Turn the knob until '<Add To Queue>' is displayed.
4. Press the SELECT button. 'Tracks Added to Queue' will be displayed.
Controlling playback
1. Use the STOP button to stop playback.
2. Use the PLAY / PAUSE button to either pause a currently playing track or to restart a currently
paused track or to restart a stopped track.
3. Use the SKIP TO PREVIOUS TRACK button to start playback of the previous track in the
queue.
4. Use the SKIP TO NEXT TRACK button to start playback of the next track in the queue.
US-17
Browsing the list of tracks currently queued up for playback
1. Press the BROWSE button. The currently playing track name will be displayed.
2. Turn the knob to see which tracks are queued up for playback.
3. If you want to jump to a particular place in the queue then press the SELECT button when the
required track is displayed.
Removing tracks from the queue
1.
2.
3.
4.
5.
6.
7.
Press the BROWSE button. The currently playing track name will be displayed.
Turn the knob to select the track you want to remove from the queue.
Press and hold the STOP button for 2 seconds and the radio will display: 'Delete Track?'
Turn the knob to highlight 'Yes' or 'No'.
Press SELECT to confirm whether you actually want to delete the track from the queue.
If 'Yes' was selected then 'Removed From Queue' will be displayed.
To remove all tracks from the queue, keep pressing BACK until the 'Media Player' menu item
is selected, press SELECT and then turn the knob to select 'Clear Queue' and press SELECT
again.
Playing tracks in random order
1.
2.
3.
4.
5.
6.
7.
8.
Select the individual tracks as described previously.
Navigate to top-level menu item 'Media Player' using the SELECT and BACK buttons.
Press the SELECT button.
Turn the knob until 'Playback Mode' is displayed.
Press the SELECT button.
Turn the knob until 'Shuffle' is display.
Press the SELECT button.
Turn the knob to select YES/NO to confirm that shuffle mode should be enabled.
Playing tracks in the queue repeatedly
1.
2.
3.
4.
5.
6.
7.
8.
Select the individual tracks as described previously.
Navigate to top-level menu item 'Media Player' using the SELECT and BACK buttons.
Press the SELECT button.
Turn the knob until ' Playback Mode' is displayed.
Press the SELECT button.
Turn the knob until 'Repeat' is displayed.
Press the SELECT button.
Turn the knob to select YES/NO to confirm that repeat mode should be enabled.
Set up a Windows PC to allow the radio to access your audio files via a UPnP server
1. If your PC is running Microsoft Windows XP, then you can use Windows Media Connect to act
as your UPnP (Universal Plug and Play) media server 1.0. Windows Media Player 11 may be
downloaded from Microsoft's website and installed by following the instructions detailed in its
installation wizard.
2. Once installed, Windows Media Player 11 will create a library from all the media files available
to it on your PC. To add new media files to the library, select “File>Add to Library..> Advanced
Options”, click “Add” and choose the files you wish to add and click “OK”.
3. You will now need to connect your Internet radio to Windows Media Player 11 and configure it
to allow the radio to access your media library. In order to do this, you will need to do the
following:
a)Keep pressing BACK to get to the radio's top-level menu and then turn the rotary knob to
select “Media Player”.
b) Press SELECT and then turn the knob to highlight “UPnP Servers”.
c) Press SELECT and the radio will scan for all available UPnP servers. Note, this may take a
few seconds for the radio to complete its scan and before the scan has completed, the radio
will display “EMPTY”. The radio will continue to display “EMPTY” if no UPnP servers are
found.
d) After a successful scan, select you UPnP server, by rotating the knob if there is more than one
UPnP server, and then press SELECT (note, your radio will display “Access Denied” at this
stage).
US-18
4. Your PC will now prompt you that a device has attempted to connect to your UPnP server. In
order to allow the radio to have access to the media files, you will need to click the “Library”
tab from Windows Media Player 11 and select the “Media Sharing…” item to open the “Media
Sharing” window.
5. From the “Media Sharing” window, the radio will be listed as an unknown device. Click on the
unknown device listed, then click the “Allow” button and then click “OK”.
Locating and playing media files using the radio and UPnP
Once the UPnP server is configured to share media files with the Internet radio, you can play the
files by doing the following on the radio:
a. Keep pressing BACK to get to the radio's top-level menu and then turn the knob to select
'Media Player'.
b. Press SELECT and then turn the knob to highlight 'UPNP Servers'.
c. Press SELECT and the radio will scan for all available UPnP servers. This may take a few
seconds for the radio complete its scan and before the scan has completed, the radio will
display '(Empty)'. The radio will continue to display '(Empty)' if no UPnP servers are found.
d. After a successful scan, select your UPnP server, by rotating the knob if there is more than
one UPnP server, and than press SELECT.
e. The radio will now list the media categories available from the UPnP server, e.g. 'Music',
'Playlists' etc. Turn the knob to select which category you wish to browse, press SELECT
and turn the knob to highlight a sub category and press SELECT again. For example, you
could select 'Music' and then 'Album'
f. Turn the knob to highlight the media files that you wish to play and press SELECT.
g. The radio will display “Add to Queue”, press SELECT and the radio will add the tracks to its
queue and begin playing them automatically.
Queuing up UPnP tracks for playback later
1. Highlight the required track.
2. Press the SELECT button. 'Track Added To Queue' will be displayed.
Queuing up UPnP albums for playback later
1. Highlight the required album.
2. Press the SELECT button.
3. Turn the knob until '(Add To Queue)' is displayed.
4. Press the SELECT button. 'Tracks Added to Queue' will be displayed.
Controlling playback
1. Use the STOP button to stop playback.
2. Use the PLAY/PAUSE button to either pause a currently playing track or to restart a currently
paused track or to restart a stopped track.
Browsing the list of tracks currently queued up for playback
1. Press the BROWSE button. The currently playing track name will be displayed.
2. Turn the knob to see which tracks are queued up for playback.
3. If you want to jump to a particular place in the queue then press the SELECT button when the
required track is displayed.
4. It is important to note here that media files scanned from the radio's “Windows Shares”
function can also be added to the radio's queue.
5. Use the SKIP TO PREVIOUS TRACK button to start playback of the previous track in the
queue.
6. Use the SKIP TO NEXT TRACK button to start playback of the next track in the queue.
US-19
Removing UPnP tracks from the queue
1. Press the BROWSE button. The currently playing track name will be displayed.
2. Turn the knob to select the track you want to remove from the queue.
3. Press and hold the STOP button for 2 seconds.
4. Turn the knob to highlight 'Yes' or 'No'.
5. Press SELECT to confirm whether you actually want to delete the track from the queue.
6. If 'Yes' was selected then 'Removed From Queue' will be displayed.
7. To remove all tracks from the queue, keep pressing BACK until the 'Media Player' menu item
is selected, press SELECT and then turn the knob to select 'Clear Queue' and press SELECT
again.
Playing UPnP tracks in random order
1. Select the individual tracks as described previously.
2. Navigate to top-level menu item 'Media Player' using the SELECT and BACK buttons.
3. Press the SELECT button.
4. Turn the knob until 'Playback Mode' is displayed.
5. Press the SELECT button.
6. Turn the knob until 'Shuffle' is display.
7. Press the SELECT button.
8. Turn the knob to select YES/NO to confirm that shuffle mode should be enabled.
Playing UPnP tracks in the queue repeatedly
1. Select the individual tracks as described previously.
2. Navigate to top-level menu item 'Media Player' using the SELECT and BACK buttons.
3. Press the SELECT button.
4. Turn the knob until ' Playback Mode' is displayed.
5. Press the SELECT button.
6. Turn the knob until 'Repeat' is displayed.
7. Press the SELECT button.
8. Turn the knob to select YES/NO to confirm that repeat mode should be enabled.
Note:
1. If the shared folders contain more songs than the Internet Radio memory limit, it will display
“Too many files”
2. Repeatedly pressing button P4 will toggle the Repeat and Shuffle modes.
Setting the clock
1. Press the SELECT button. (Note: if you make a mistake at any point, press the BACK button
go back to the previous screen.)
2. Turn the knob until the display says <Configure>
Stations
Media Player
< Configure
>
3. Press the SELECT button.
4. Turn the knob until the display says <Clock Setup>
<
US-20
Register
Clock Setup
Backlight
>
5. Turn the knob until the display says <Set Time>.
<
Set Time / Date >
6. Before setting Time and Date, you need to choose the correct time zone. There are 7 time
zones to choose.
7. After setting the time zone, you need to set the time.
8. Press the SELECT button.
Set Time
10:30 AM
9. Turn the knob until the hour setting is correct, then press the SELECT button.
Set Time
10:03 AM
10.Turn the knob until the minute setting is correct, then press the SELECT button.
Set Date
01 Jan 2008
11.Then we can continue to set the date, month and year.
Finally, the display returns to the Set Time/Date mode.
After finished setting, when the unit is turned on, the time information will always show on
bottom right hand corner of the display. When the unit power is off, the time information will
show in the middle of the display at its maximum size.
Setting Sleep Timer
Selecting this option will enable the radio to switch itself off after a set period.
1. Press the Sleep button, the display will show “Sleep Timer 15 minutes” and the radio will
continue to play as normal for 15 minutes and go into standby mode automatically.
2. To increase the amount of time that the radio will play before shutting off, press the Sleep
button again to change the display to the desired sleep time. When Sleep button is pressed
each time, the sleep timer prolongs 15 minutes, up to a maximum of 90 minutes.
3. To turn the radio on again, simply press the Standby button.
US-21
Setting the alarms
1. Press the SELECT button. (Note: if you make a mistake at any point, press the BACK button to
go back to the previous screen.)
2. Turn the knob until the display says <Alarm Clock>.
Tuner
Auxiliary Input
<
Alarm Clock
>
3. Press the SELECT button.
4. Turn the knob until the display says <Set Alarms>.
<
Set Alarms
>
5. There are three options to choose from:
Disable All : a quick way to disable both alarms, when choose this option, both alarm will be OFF
Alarm 1: for setting, enable or disable alarm 1, factory default is “ 1.OFF 12:00 AM”
Alarm 2: for setting, enable or disable alarm 2, factory default is “2 OFF 12:00 AM”
<
Disable all
>
1. OFF 12:00 AM
2. OFF 12:00 AM
6. Press the SELECT button to confirm your selection.
Set Alarm
12:00 AM
7. Turn the knob until the hour setting is correct, then press the SELECT button.
Set Alarm
07 : 06 AM
8. Turn the knob until the minute setting is correct, then press the SELECT button.
US-22
9. There are five alarm modes to select for either alarm. The alarm modes are:
Once: Alarm will turn on once
Everyday: Alarm will turn on all 7 days
Weekly: Alarm will turn on once every week
Weekdays: Alarm will only turn on Monday through Friday
Weekends: Alarm will only turn on Saturday and Sunday
Once
Every Day
Weekly
10.There are three wake up options for either alarm:
Wake to Buzzer
Wake to Internet Radio
Wake to FM Radio
Note:
1. You are unable to choose wake to internet radio if there is no preset station being set or you
are not currently listening to the internet radio
2. Ensure the volume has been set to the desired level when choosing wake to internet radio or
FM radio
Buzzer
Internet Radio
FM Tuner
Once information is all set, the alarm icon appears on bottom left hand side of the display.
Checking the Wake up Times and Alarm Mode
For checking the alarm information, select Alarm Clock, then Set Alarms. If alarm is set,
information will be shown in following sequence “ Alarm/ alarm time/alarm mode/wake up
option”.
For example, when alarm 1 is set at 9:30am, turns on everyday, wake to buzzer, alarm 2 is set at
10:30am, turns on everyday, wake to buzzer, display will show:
Disable All
1. 9:30 AM Daily Buzzer
2. 10:30 AM Daily Buzzer
Moreover, if alarm has been set, alarm icon is shown on the display during Standby mode . Clock
information is shown at its maximum size during Standby mode.
Radio will play for about 1 hour after alarm start and then shut off. Press the standby button to
stop earlier. Press again to turn on manually.
11:00
US-23
AM
Snooze/Repeat Alarm
After the alarm turns “On” in the morning, you can press the Snooze button on unit's front panel
or on remote control for a few extra minutes sleep.
The alarm will stop for approximately 9 minutes and then comes “On” again.
11:00
AM
Zz
Playing FM Radio
This Internet radio also has an FM tuner; you will be able to access standard FM stations from it.
1. Press the SELECT button. (Note: if you make a mistake at any point, press the BACK button to
go back to the previous screen.)
2. Turn the knob until the display says <Tuner>.
<
Media Player
Configure
Tuner
>
3. Press the SELECT button.
Turn the knob to choose your desired station. When a strong FM stereo signal is received,
Stereo appears on display. Or press Seek up/down to search for a strong signal station.
98.5 MHz
Stereo
4. Use VOLUME + or - buttons to adjust the desired volume level.
5. Unravel the FM antenna wire at the back of the cabinet and position for best reception.
Presetting your favorite FM radio stations
Up to maximum 8 FM stations can be stored in memory with this unit.
While an FM radio station is playing, hold down one of the preset buttons (numbered 1 to 8) until
the screen says
Assigned to preset #
Where # is the number of the button you held down.
To assign a FM radio station to one of the presets numbered 5 to 8, press SHIFT and then press
and hold one of the preset keys.
Playing a preset FM radio station
When a FM radio stations is playing, briefly press the preset button (1 to 4) or together with the
SHIFT button for the preset stations 5 to 8 for the FM station you want. (Note, do not hold the
button down. If you do then the station currently playing will overwrite the one stored in the
preset; be careful.)
US-24
Optional connections
AUXILIARY JACK
You can connect an external source to this unit, such as an MP3 or CD player, etc. Connect an
audio cable (not included) from the AUX IN jack at the back of this unit to the external unit's AUX
OUT jack. This will allow you to amplify the external unit's sound through this unit's speakers.
1. Press the SELECT button. (Note: if you make a mistake at any point, press the BACK button
go back to the previous screen.)
2. Turn the knob until the display says <Auxiliary Input>
<
Tuner
Auxiliary Input
Alarm Clock
>
3. Press the SELECT button.
Aux In
4.
Connect the external unit's AUDIO OUT jack on the rear of the unit via an audio cable (not
included). Turn on the external unit, set its volume control (if there is one) to mid-position at
first and operate it as usual. Distortion will result if the external unit's volume setting is too
high.
5. The sound will be heard through this unit's speaker.
6. Use VOLUME + or - buttons on this unit to adjust the desired volume level.
7. When finished listening, turn off the power of the external unit. Press SELECT or BACK
button on this unit to go back to main menu for FM or Internet listening, especially if wake
alarms are programmed.
NOTES:
● When connecting the external unit, refer to the owner's manual of the external unit, as well
as this manual.
● Examples of External Audio Sources that can be connected to this unit are: Portable MP3
Player, Cassette Player, Mini Disc Player, DVD player..etc
HEADPHONE JACK
For private listening, connect 3.5mm (32 ohm) stereo headphones (not included) to this jack.
The speakers are automatically disconnected when the headphone plug is inserted in the jack.
IMPORTANT:
Excessive sound pressure from earphones and headphones can cause hearing loss.
LINE OUT JACK
A stereo line out jack is located on the back of the unit, which enables the connection to an
external audio system.
Cabinet Cleaning
Use only a soft cloth on the high-gloss cabinet surface. Do not use a paper towel to avoid
scratching.
US-25
Specifications
Power Supply: AC 100-240V~60/50Hz
Output Power: 2W x2
Unit Dimension: 220(L) x 112.5(W) x 135(H)mm
Weight: 1.9 kg
Radio Section
Tuning ranges: FM 87.5 -108 MHz
Aerials: Wire antenna (FM)
General
Terminals-Output: 3.5mm stereo headphone
Line Out: 3.5mm Jack
Aux In: 3.5mm Jack
*** Specifications subject to change without notice ***
License Information
This product contains software licensed under version 2 of the GNU Public License and version 2.1
of the GNU Lesser Public License. The source code for this software is available from
http://www.reciva.com/gpl
This product includes technology owned by Microsoft Corporation and under a license from
Microsoft Licensing GP. Use or distribution of such technology outside of this product is prohibited
without a license from Microsoft Corporation and/or Microsoft Licensing, GP as applicable.
US-26
SANYO COMFORT WARRANTY
CONSUMER PRODUCTS
WARRANTY APPLICATION
New, unused SANYO products purchased through
a SANYO authorized dealer in Canada are
warranted against manufacturing defects in
materials and workmanship for ONE YEAR from
the date of purchase by the original retail
purchaser for non-commercial use. This Warranty
only applies in favour of the original retail
purchaser of the warranted product.
You, the original retail purchaser, are responsible
for any costs of TRANSPORTING the product to
and from SANYO Canada Inc. or an authorized
SANYO Service Depot. You also are responsible
for the cost of any MAINTENANCE necessary in
respect of the product.
WARRANTY BECOMES VOID
SANYO CANADA INC.’S RESPONSIBILITY
During the warranty period, SANYO Canada Inc.
will repair, or at our option, replace a product
which shows evidence of a manufacturing defect
in materials or workmanship. Replacement PARTS
are warranted for the remaining portion of the
warranty period.
WHAT IS NOT COVERED
(a) Products purchased outside Canada.
(b) Products purchased in a used condition.
(c) Problems due to product set up and
installation.
(d) Adjustments that are outlined in the
Operating Manual.
(e) Accessory items including antenna,
batteries.
(f) Damage in or due to transportation.
(g) Damage due to improper maintenance,
improper wiring, accident, abuse, misuse
or negligence.
(h) Damage caused by lightning and power
surges.
(i) The cost of removal and reinstallation of a
product designed for automobile use.
(j) The rubber seal of the water-proof digital
movie camera.
This Warranty becomes void if the product’s serial
numbers are altered or removed or if any repair to
the product is made other than by SANYO Canada
Inc. or by an authorized SANYO Service Depot.
LIMITATIONS
(a) SANYO Canada Inc. reserves the right to
change or improve the design of the model
of the product warranted hereunder
without incurring any obligation to make
any modifications to or to install any
improvement in or on the product.
(b) In no event shall SANYO Canada Inc. or
any of its Authorized Dealers be liable for
special or consequential damage arising
from the use of this product.
STATUTORY WARRANTIES
The above provisions do not preclude the operation of any applicable provincial statute which in
certain circumstances may not allow some of the
limitations and exclusions described in this
Warranty. Where any terms of this Warranty are
prohibited by such a statute, they shall be
deemed null and void but the remainder of this
Warranty shall remain in effect.
HOW TO OBTAIN WARRANTY SERVICE
Please contact SANYO at:
ORIGINAL RETAIL PURCHASER’S
RESPONSIBILITY
You, the original retail purchaser, must present
your original, dated bill of sale together with this
Warranty to SANYO Canada Inc. or to an
authorized SANYO Service Depot when you make
a claim under this Warranty.
SANYO Canada Inc.
1-300 Applewood Cres.
Concord, Ontario L4K 5C7
1-800-263-2244
www.sanyo.ca
US-27
FR-1
CONSIGNES DE SÉCURITÉ IMPORTANTES
1.
2.
3.
4.
5.
6.
7.
8.
9.
10.
11.
12.
13.
14.
15.
16.
17.
18.
19.
20.
21.
Lisez les instructions.
Conservez les instructions.
Respectez les avertissements.
Suivez les instructions.
N’utilisez pas cet appareil à proximité de l’eau.
Nettoyez l’appareil avec un chiffon sec.
N’obstruez pas les orifices de ventilation.
Placez l’appareil à l’écart des sources de chaleur comme les radiateurs, registres de
chauffage, cuisinières ou autres dispositifs (y compris les amplificateurs) qui dégagent de la
chaleur.
Ne tentez pas de neutraliser le dispositif de sécurité de la fiche de courant alternatif polarisée
ou une fiche de mise à la terre. Une fiche de courant alternatif polarisée est munie de deux
lames dont une lame est plus large que l’autre. Une fiche de mise à la terre est dotée de deux
lames et d’une troisième lame de mise à la terre. Cette troisième lame ou la lame plus large
sert de protection. Si vous ne pouvez pas insérer cette fiche à fond dans la prise,
adressez-vous à un électricien qualifié pour qu’il remplace votre prise désuète.
Installez les cordons d’alimentation de façon à ce qu’ils ne se trouvent pas écrasés ou
pincés surtout au niveau de la fiche, prise de courant et à l’endroit où ils sont reliés à l’appareil.
N’utilisez que des accessoires ou pièces recommandés par le fabriquant.
Débranchez l’appareil de la prise de courant pendant un orage ou s’il est
inutilisé pendant de longue périodes.
Confiez les réparations à un technicien qualifié. L’appareil doit être réparé
en présence des conditions suivantes : le cordon d’alimentation ou sa
fiche est endommagé; un liquide a été renversé sur l’appareil ou un objet
a pénétré dans l’appareil; l’appareil a été exposé à la pluie ou à l’humidité;
l’appareil ne fonctionne pas normalement; ou l’appareil a été échappé.
Lorsque vous utilisez un appareil, vous devez toujours suivre des consignes de sécurité de
base afin de réduire les risques d’incendie, de secousse électrique ou de blessures, dont les
suivantes :
Placez l’appareil uniquement sur un chariot, un support, un trépied, une console ou une table
recommandé par le fabricant ou vendu avec l’appareil. Si vous utilisez un chariot, déplacez
avec précaution l’ensemble appareil et chariot pour éviter toute blessure.
Évitez d’utiliser l’appareil pendant un orage électrique. La foudre peut causer une secousse
électrique.
N’utilisez que le cordon d’alimentation et les piles mentionnées dans ce guide d’utilisation. Ne
jetez pas les piles dans le feu, car elles risquent d’exploser. Vérifiez les règlements locaux
pour connaître la façon appropriée de vous défaire des piles.
Avertissement : Pour réduire les risques d’incendie ou de secousse électrique, n’exposez pas
l’appareil à la pluie ou à l’humidité.
Cet appareil ne doit pas être exposé au dégouttement ou aux éclaboussures; ne placez
aucun récipient contenant un liquide, par exemple un vase, sur l’appareil.
La fiche principale sert au débranchement de l’appareil et doit être fonctionnelle pendant
l’utilisation prévue. Débranchez l’appareil de la prise de courant alternatif en saisissant la fiche
principale.
Laissez une distance minimale de 3 cm autour de l’appareil afin d’assurer une ventilation
adéquate. Ne couvrez pas les orifices de ventilation avec des articles tels qu’un journal, une
nappe, des rideaux ou autres.
Ne placez aucune source de flamme nue sur l’appareil, telle qu’une chandelle allumée.
FR-2
Introduction
Merci d’avoir choisi cet appareil SANYO qui a été conçu et fabriqué pour vous procurer des
années durant de plaisir d’écoute.
En raison du concept relativement nouveau de cette webradio autonome, nous vous
recommandons de lire attentivement le présent guide d’utilisation et les instructions qu’il
renferme afin d’optimiser le rendement de cet appareil.
Soyez patient!
Bien que très en demande, la technologie de cette webradio est un phénomène assez récent
qui est appelé à évoluer avec le temps. Il peut arriver qu’un problème survienne au niveau du
réseau, de la station de radio ou du raccordement de l’appareil, ce qui peut causer quelques
frustrations; cependant, avec un peu de patience, tout finira par rentrer dans l’ordre.
En cas de problèmes, vous pouvez nous joindre partout au Canada au numéro sans frais
800.263.2244, du lundi au vendredi, de 9 heures à 17 heures, heure de l’Est.
Alimentation
z
CA de 120 volts, 60 Hz
.
Entretien
z
Cet appareil ne contient aucune pièce réparable par l’utilisateur.
réparation à un technicien qualifié.
z
Si vous avez des doutes sur le type d’alimentation, l’installation, le fonctionnement de cet
appareil ou les consignes de sécurité, communiquez avec votre marchand..
FR-3
Veuillez confier toute
Table des matières
Introduction……………………………………………………………………………………………..……3
Table des matières………………………………………………………………………………….………4
Vue d’ensemble…………………………………………………………………………………….………..6
Vue avant et arrière de la webradio…………………………………..…………………………….………6
Vue de dessus de la télécommande………………………………………..…………………………..… 7
Résumé des commandes……………………………………………………………………………………7
Vue d’ensemble de l’écran………………………………………………………..…………………………8
Installation………………………………………………………………………..…………………………. 9
Pile de la télécommande………………………………………………………………………………..….10
Menu de configuration……………………………………………………………………………………10
Choix de l’option désirée à partir du menu de configuration……………………………………………10
< Network Config > (Configuration du réseau)………………………………………………………...…10
<Version>……………………………………………………………………………………………...……..10
< Upgrade Firmware > (Micrologiciel de mise à jour)…………………………………………...……….11
<Language> (Langue)………………………………………………………………………….........……..11
<Factory Reset> (Remise à l’état initial)……………………………………………………………..……11
<Register> (Inscription)………………………………………………………………………………..……11
<Clock Set Up> (Réglage de l’horloge)…………………………………………………………………...11
<Backlight> (Rétroéclairage)……………………………………………………………………………….11
<WiFi Strength> (Signal Wi-Fi)…………………………………………………………………………….11
Connexion de la webradio……………………………………………………………………………….11
Exigences requises avant d’utiliser la webradio…………………………………………………………11
Connexion de la webradio au réseau local sans fil…………………………………………………12
Étape 1 – Mise en marche de la webradio………………………………………………………………12
Étape 2 – Recherche d’une connexion au réseau local sans fil……………………………………….12
Étape 3 – Connexion au réseau local sans fil……………………………………………………………13
Sélection de la station radio à écouter……………………………………………………………………14
Réglage du volume………………………………………………………………………………………….14
Préréglage de vos stations webradio préférées…………………………….…………………………...15
Écoute d’une station webradio préférée…………………………………………………………………15
Demande d’une station webradio non disponible présentement………………………………………15
Stations webradio vous permettant de choisir ce que vous désirez écouter…………………………15
Guide de dépannage………………………………………………………………………………………16
Lecteur multimédia…………………………………...……………………………...………………….…..16
Installation de l’ordinateur pour permettre à la radio d’accéder aux fichiers son sur Windows Shares…..16
Repérage de fichiers son sur Windows Shares..………………………………………………………...16
Écoute d’une seule plage partagée………………………………………………………………………..17
Écoute d’un album partagé complet……………………………………………………………………….17
Mise en file d’attente de plages à écouter plus tard……………………………………………………..17
Mise en file d’attente d’albums à écouter plus tard………………………………………………………17
Contrôle de l’écoute…………………………………………………………………………………………17
FR-4
Navigation dans la liste des plages à écouter présentement dans la file d’attente ……..…..18
Élimination de plages de la file d’attente………………………………………………………………..18
Écoute aléatoire des plages………………………………………………………………………………18
Écoute répétée de plages de la file d’attente……………………………………………………………18
Installation de l’ordinateur pour permettre à la webradio d’accéder aux fichiers son sur un serveur UpnP.....18
Repérage et écoute de fichiers à contenu multimédia sur la radio et le serveur UpnP...........19
Mise en file d’attente des plages UPnP à écouter plus tard……………………………………………19
Mise en file d’attente des albums UPnP à écouter plus tard…………………………………………..19
Contrôle de l’écoute………………………………………………………………………………………...19
Navigation dans la liste des plages à écouter présentement dans la file d’attente……….…..19
Élimination des plages UPnP de la file d’attente…………………………………………………………20
Écoute aléatoire des plages UPnP………………………………………………………………………..20
Écoute répétée des plages UPnP de la file d’attente…………………………………………….……..20
Réglage de l’horloge………………………………………………………………………………………20
Réglage de la minuterie d’arrêt différé…………………………………………………………………21
Réglage des alarmes………………………………………………………………………………………22
Écoute d’une station radio FM…………………….…………………………………….….………….. 24
Préréglage de vos stations radio FM préférées………………………………………………………… 24
Écoute d’une station radio FM préréglée…………………………………………………………………24
Connexions optionnelles……………………………………………………………………………………25
Prise auxiliaire ……………………………………………………………………………...………...…..25
Prise d’écouteur ………………….……………………………………………………….......……………25
Prise de sortie de ligne…………………………………………………………………….....…………….25
Nettoyage du boîtier……………………………….………………………………………......………….25
Fiche technique...............................................................................................................................26
Licence d’utilisation…....................................................................................................................26
Garantie……………………………………………………………………………………...………………27
FR-5
VUE D’ENSEMBLE
1. Bouton d’arrêt différé (SLEEP)
2. Bouton de recherche en marche arrière
(SEEK DOWN)
1
2
3
4
5
6
8
7
9
10
3. Affichage
4. Bouton de recherche en marche
avant/navigation (SEEK UP/BROWSE)
5. Bouton de retour (BACK)
6. Bouton de radio P2-P6 – lecture/pause
(Media PLAY/PAUSE)
7. Bouton de radio P1-P5 – arrêt/évitement
en marche arrière (Media Stop/SKIP-)
19 17
18
8. Bouton de répit (SNOOZE)
15
13
14
16
11
12
9. Commande de volume +
10. Commande de volume11. Prise d’écouteurs (PHONES)
12. Bouton de réponse (REPLY)
13. Commande de sélection/défilement
(SELECT/SCROLL)
14. Bouton de radio P4-P8 – mode
multimédia (Media MODE)
15. Bouton de radio P3-P7 – évitement en
marche avant (Media SKIP+)
20
16. Bouton de déplacement (SHIFT)
17. Télécommande
18. Indicateur Marche/Arrêt (STANDBY
INDICATOR)
19. Bouton de mise en attente (STANDBY)
20. Haut parleur (SPEAKER)
21. Antenne FM (FM ANTENNA)
22. Prise de réseau (NETWORK)
23. Prise de ligne (AUX IN)
21
24. Prise de sortie (LINE OUT)
25. Prise CA
FR-6
22
23
24
25
Vue de dessus de la télécommande
1.
2.
3.
4.
5.
6.
7.
8.
9.
10.
11.
12.
13.
14.
15.
16.
17.
18.
19.
20.
Bouton de mise en attente (STANDBY)
Bouton de retour (BACK)
Bouton de répit (SNOOZE)
Bouton de radio P1/évitement en marche
arrière (Radio P1/SKIP-)
Bouton de radio P4/mode (P4/MODE)
Bouton de radio P7
Bouton de défilement en marche avant
(SCROLL UP)
Bouton de défilement en marche arrière
(SCROLL DOWN)
Bouton d’arrêt différé (SLEEP)
Bouton de sélection (SELECT)
Bouton de réponse (REPLY)
Bouton de radio P2/lecture/pause
(P2/PLAY/PAUSE)
Bouton de radio P3/évitement en marche avant
(P3/SKIP+)
Bouton de radio P5/arrêt (P5/STOP)
Bouton de radio P6
Bouton de recherche avant/navigation (SEEK
UP/BROWSE)
Bouton de radio P8
Bouton de recherche en marche arrière (SEEK
DOWN)
Bouton de volume+
Bouton de volume-
TÉLÉCOMMANDE
Pour faire fonctionner l’appareil à l’aide de la télécommande, il suffit de diriger celle-ci vers le capteur
de télécommande situé à l’avant de l’appareil et d’appuyer sur la touche appropriée. La
télécommande a une portée de fonctionnement d’environ 20 pieds et un angle maximum de 30
degrés.
REMARQUE : La lumière directe du soleil peut interférer avec le fonctionnement de la
télécommande.
Résumé des commandes (appareil et télécommande)
Commande
Mode Webradio
STANDBY
SELECT
SELECT▲/▼
Sert à mettre en marche/arrêter la webradio
Tournez le bouton pour modifier les options. Appuyez sur le bouton pour sélectionner une option.
Appuyez sur ▲ ou ▼pour sélectionner une option lors de l’utilisation de la télécommande.
Mode Lecteur multimédia
Browse
Aucune fonction.
Affiche le contenu de la file d’attente.
Reply
Pour des applications futures. Pas de fonction pour le moment.
Pas de fonction pour le moment.
Back
Pour retourner au menu précédent.
P1
Appuyez sur ce bouton et tenez-le enfoncé pour sauvegarder la station préréglée P1; appuyez
sur ce bouton pour télécharcher la station préréglée P1.
Plage précédente
P2
Appuyez sur ce bouton et tenez-le enfoncé pour sauvegarder la station préréglée P2; appuyez
sur ce bouton pour télécharcher la station préréglée P2.
Lecture/Pause
P3
Appuyez sur ce bouton et tenez-le enfoncé pour sauvegarder la station préréglée P3; appuyez
sur ce bouton pour télécharcher la station préréglée P3.
Plage suivante
P4
Appuyez sur ce bouton et tenez-le enfoncé pour sauvegarder la station préréglée P4; appuyez
sur ce bouton pour télécharcher la station préréglée P4.
Écoute répétée et aléatoire
activée/désactivée
P5
Appuyez sur ce bouton et tenez-le enfoncé pour sauvegarder la station préréglée P5; appuyez
sur ce bouton pour télécharcher la station préréglée P5.
Arrêt
FR-7
Commande
Mode Webradio
Mode Lecteur multimédia
P6
Appuyez sur ce bouton et tenez-le enfoncé pour sauvegarder la station préréglée P6; appuyez sur ce bouton pour télécharcher la station
préréglée P6.
P7
Appuyez sur ce bouton et tenez-le enfoncé pour sauvegarder la station préréglée P7; appuyez sur ce bouton pour télécharcher la station
préréglée P7.
P8
Appuyez sur ce bouton et tenez-le enfoncé pour sauvegarder la station préréglée P8; appuyez sur ce bouton pour télécharcher la station
préréglée P8.
SHIFT
Appuyez sur ce bouton puis sur P1 pour passer de P1 à P5, de P2 à P6, etc.
Vol +/-
Appuyez sur VOLUME+ pour augmenter le volume et sur VOLUME- pour le baisser.
Seek +
Appuyez sur SEEK+ pour syntoniser une station radio FM en marche avant et sur SEEK- pour
une station radio en marche arrière.
Seek SLEEP
Appuyez sur ce bouton pour régler la minuterie d’arrêt différé (15/30/60/90 minutes).
SNOOZE
Appuyez sur ce bouton pour activer la fonction de répit (9 minutes).
Browse
La plupart des fonctions de cet appareil peuvent être activées en appuyant sur les boutons du panneau en avant ou sur les
boutons correspondants de la télécommande même.
Vue d’ensemble de l’écran
Les icônes apparaissent au bas de l’écran. Voici leur signification.
Minuterie d’arrêt différé
Sonnerie d’alarme
Webradio
Zz
Répit
Remarques :
L’heure apparaît au centre de l’écran (grandeur maximale) lorsque l’appareil est éteint.
Lorsque l’appareil est en marche, l’heure apparaît au bas de l’écran.
Liste d’affichage:
Stations
Media Player
Configure
Tuner
Auxiliary Input
Alarm Clock
FR-8
Installation
Si la webradio est transportée de l’extérieur à l’intérieur (ou d’un endroit froid dans un endroit chaud),
ATTENDEZ 2 à 3 heures avant de la brancher. Il se peut que de la condensation se soit formée dans
la webradio, ce qui risque de l’endommager. Pour éviter ceci, déballez la webradio puis laissez-la
reposer à la température ambiante de 2 à 3 heures avant de l’utiliser. Cela permettra à la
condensation de s’évaporer et ne causera ainsi aucun dommage à l’appareil.
RACCORDEMENT AU COURANT ALTERNATIF (CA)
Déroulez le cordon d’alimentation CA à sa pleine longueur. Insérez la fiche CA dans une prise de
courant murale de 120 volts, 60 Hz.
Cet appareil est doté d’une fiche CA polarisée dont une lame est plus large
que l’autre. Ceci est un dispositif de sécurité visant à réduire les risques de
secousse électrique. Cette fiche CA polarisée s’insère dans une prise
murale que d’une seule façon. Si cette fiche ne s’insère pas à fond dans la
prise de courant, il se peut que la prise de courant soit désuète ou ne soit
pas conçue pour recevoir une fiche polarisée. Ne tentez pas de neutraliser
le dispositif de sécurité en recourant à un adaptateur non polarisé ou en
limant la lame plus large pour qu’elle puisse s’insérer dans la prise de
courant. Si la fiche ne s’insère pas dans la prise de courant, veuillez
consulter un électricien qualifié pour remplacer cette prise de courant.
REMARQUES IMPORTANTES :
• Avant de déplacer ou de soulever l’appareil, débranchez la fiche CA de la prise de courant.
• Si l’appareil fonctionne mal en raison d’une décharge électrostatique, débranchez-le et
branchez-le à nouveau. S’il ne fonctionne toujours pas, débranchez-le et communiquez avec un
électricien qualifié.
• Lors d’une panne de courant ou du débranchement du cordon d’alimentation CA pendant une
brève période de temps, les données de l’horloge disparaîtront de l’écran. Lorsque le courant
reviendra et que vous rebrancherez le cordon d’alimentation, les données de l’horloge seront
restituées à partir de la connexion à l’internet. Par contre, si la connexion à l’internet est rompue
ou n’est pas disponible, vous pouvez régler l’horloge manuellement (voir page 20).
PRISE RJ-45 (si vous n’utilisez pas un routeur sans fil)
Insérez le connecteur RJ-45 dans la prise RJ-45 de l’appareil.
Utilisez un câble de réseau local droit offert commercialement (catégorie 5/CAT 5 ou avec connecteur
RJ-45).
Ne branchez pas un câble Ethernet si vous avez l’intention d’utiliser un réseau sans fil afin de ne pas
créer de confusion dans les circuits. Si vous avez l’intention d’utiliser une connection Ethernet, reliez
le câble au routeur-modem/routeur filaire et à la radio avant de mettre la radio sous tension.
FR-9
PILE DE LA TÉLÉCOMMANDE
1.
2.
3.
Appuyez fermement sur le couvercle de
compartiment à piles et tournez-le vers la
gauche pour le retirer.
Insérez la pile (CR2032) dans le
compartiment en respectant la polarité (le
signe « + » doit être dirigé vers le haut).
Pour remettre le couvercle, appuyez
légèrement sur celui-ci et tournez-le vers la
droite jusqu’à ce qu’il soit fermement en
place.
Pile incluse
Remarque : Retirez les piles de la télécommande
lorsque celle-ci n’est pas utilisée pendant une
période prolongée. La télécommande ne
fonctionnera pas convenablement lorsque les
piles sont faibles. Insérez alors des piles neuves.
PRÉCAUTIONS À PRENDRE AVEC LA PILE
Veuillez prendre les précautions suivantes lorsque vous utilisez une pile avec cet appareil.
1. Avertissement – Danger d’explosion si la pile n’est pas remplacée correctement. Utilisez
uniquement une pile de même marque ou d’un type équivalent.
2. Utilisez uniquement une pile de format et de type spécifiés.
3. Respectez la polarité (signes + et -) indiquée dans le logement de piles lorsque vous insérez une
pile. Si vous insérez une pile à polarité inversée, cela risque d’endommager l’appareil.
4. Si vous n’utilisez pas l’appareil pendant une période prolongée, retirez la pile pour éviter tout
dommage ou blessure causé par une fuite possible de la pile.
5. Ne tentez pas de recharger une pile qui n’est pas conçue pour être rechargée, car elle peut
surchauffer et se rompre. (Veuillez suivre les directives du fabricant de la pile.)
6. N’exposez pas la pile à une chaleur excessive, c.-à-d. les rayons du soleil, un feu ou autre.
Menu de configuration
Choix de l’option désirée à partir du menu de configuration
1. Appuyez sur SELECT (8).
(Remarque : Si vous faites une erreur, appuyez sur BACK pour retourner à l’écran précédent.)
2. Tournez le bouton jusqu’à ce que « Configure » (Configurer) apparaisse à l’écran.
3. Appuyez sur SELECT.
4. Tournez le bouton jusqu’à ce que l’option désirée apparaisse à l’écran.
5. Appuyez sur SELECT pour sélectionner l’option affichée à l’écran. Voici la liste des options et une
brève description.
<Network Config> (Configuration du réseau)
Permet de rechercher une connexion sur une autre réseau local sans fil ou de configurer
manuellement les paramètres du réseau. Servez-vous de cette option si vous utilisez la webradio
dans un autre édifice.
<Version>
Affiche les numéros de version des diverses parties du logiciel de la webradio.
FR-10
<Upgrade Firmware> (Micrologiciel de mise à jour)
Sert à télécharger un nouveau micrologiciel pour la webradio à partir du portail SANYO Reciva sur
l’Internet. Si un nouveau micrologiciel est disponible, la radio vous demandera si vous désirez le
télécharger. À noter qu’à cette étape, vous pouvez appuyer sur BACK pour annuler la mise à jour du
micrologiciel par la radio. Une mise à jour prend habituellement quelques minutes; assurez-vous de ne
pas éteindre la radio tant que la mise à jour ne sera pas terminée. Sinon, cela peut endommager la radio
de façon permanente.
<Language> (Langue)
Permet de changer la langue d’affichage.
<Factory Reset> (Remise à l’état initial)
Remet tous les réglages à leur valeur par défaut, c.-à-d. la valeur qui leur a été attribuée à l’usine. Si
vous effectuez une remise à l’état initial sur la webradio, vous perdrez tous les préréglages et la
connexion au réseau local sans fil.
<Register> (Inscription)
Une clé s’affiche et peut être utilisée pour inscrire la webradio sur le portail client Reciva de SANYO :
www.sanyo.ca. L’inscription de la radio (qui est recommandée) vous permet de faire ajouter une
station ou un balado sur votre appareil.
<Clock Set Up> (Réglage de l’horloge)
Permet de régler l’horloge de l’appareil.
IMPORTANT : La première fois que vous branchez la webradio sur une prise CA, l’appareil adoptera
automatiquement le fuseau horaire 2 (réglage initial par défaut). Si vous ne vivez pas dans ce fuseau
horaire, vous devez changer ce fuseau horaire pour celui dans lequel vous vivez. Vous n’avez à le
changer qu’une seule fois, car l’appareil le gardera en mémoire.
<Backlight> (Rétroéclairage)
Permet de choisir la luminosité du rétroéclairage de la webradio.
1. Sélectionnez l’option « Backlight » au menu. L’appareil affichera deux modes de menus :
« Active » (Actif), lorsque l’appareil est en marche; et
« Standby » (En attente), lorsque l’appareil est éteint.
2. Tournez le bouton pour surligner le mode désiré, puis appuyez sur SELECT.
3. L’appareil affiche la valeur actuelle du rétroéclairage pour le mode choisi. Vous pouvez
cette valeur (l’augmenter ou la diminuer) en tournant le bouton.
changer
<WiFi Strength> (Signal Wi-Fi)
La force du signal Wi-Fi s’affiche. Ce signal doit être supérieur à 60 % afin d’assurer un flux de données
stable. Pour ce faire, déplacez la radio, redirigez le routeur sans fil ou achetez un suramplificateur sans
fil au besoin.
Connexion de la webradio
Exigences requises avant d’utiliser la webradio
Avant de pouvoir utiliser la webradio, assurez-vous d’avoir ce qui suit :
* une connexion à haut débit à Internet
* un point d’accès sans fil (Wi-Fi) connecté à l’accès à haut débit à Internet, de préférence par l’entremise
d’un routeur, pour le fonctionnement sans fil
* le code de passe WPA pour établir la communication entre la webradio et le réseau si votre réseau local
sans fil est configuré pour utiliser une clé de chiffrement de données WEP (Wired Equivalent Privacy) ou
WAP (Wi-Fi Protected Access)
* l’adresse MAC de la webradio. Si votre réseau local sans fil est configuré pour les « produits sécurisés »,
vous devez entrer cette adresse au point d’accès sans fil. Pour trouver cette adresse, procédez comme
suit à partir du menu : Configure->Network Config->View Config->MAC Address (Configuration->
Configuration réseau->Voir configuration->Adresse MAC)
* Veuillez lire les instructions fournies pour le point d’accès sans fil pour entrer l’adresse MAC au point
d’accès sans fil.
La webradio est conçue pour fonctionner n’importe où à l’intérieur de la plage spécifiée pour le point
d’accès sans fil.
Avant de continuer, assurez-vous que votre point d’accès sans fil est en marche et branché sur votre accès
à haut débit à Internet. Pour que cette partie du système puisse fonctionner, veuillez lire les instructions
fournies pour le point d’accès sans fil.
FR-11
Connexion de la webradio au réseau local sans fil
Étape 1 – Mise en marche de la webradio
Tout d’abord, branchez la radio sur une prise de courant CA. Une fois ce raccordement effectué, il
suffit d’utiliser le bouton STANDBY par la suite pour mettre la radio en marche et pour l’arrêter.
L’écran à l’avant de l’appareil s’allume et affiche ce qui suit :
SANYO
Au bout de quelques secondes, le message
suivant s’affichera :
Initializing network
Puis, le message suivant s’affichera :
< Scan for networks >
Enter network
View Config
Étape 2 – Recherche d’une connexion au réseau local sans fil
Lorsque le message <Scan for networks> (Recherche réseau) s’affiche, appuyez sur SELECT.
(Remarque : Si vous faites une erreur, appuyez sur BACK pour retourner à l’écran précédent.)
La radio effectuera une recherche pour trouver tous les réseaux locaux sans fil disponibles et
affichera le message suivant :
Scanning
Si elle ne peut pas trouver un réseau, l’affichage indique :
No networks
Found
Lorsque ce message apparaît, vous devez faire fonctionner le point d’accès sans fil (voir les
instructions fournies).
Lorsque la radio trouve votre réseau local sans fil, le mot « ESSID » du point d’accès apparaît à
l’écran. « ESSID » est un nom assigné au point d’accès par la personne qui établit le réseau. Par
exemple :
< My Home Network >
FR-12
Dans certains endroits, il se peut que la radio trouve plus d’un point d’accès sans fil. Dans un tel cas,
vous pouvez choisir celui auquel vous voulez être connecté. Tournez le bouton de la radio pour voir
chaque point d’accès sans fil qui a été trouvé.
Étape 3 – Connexion au réseau local sans fil
Lorsque le nom ESSID du point d’accès que vous désirez est affiché à l’écran, appuyez sur SELECT.
Si votre réseau n’est pas configuré pour utiliser un code de chiffrement de données, l’écran
affichera :
Connecting to network
Puis ce qui suit :
Network OK
Si l’écran affiche soit :
Enter WEP key
Ou:
Enter WPA key
cela signifie que le réseau utilise l’un des systèmes de chiffrement de données suivants : WEP
(Wired Equivalent Privacy) ou WAP (Wi-Fi Protected Access). Dans ce cas, vous devez entrer le
code WEP ou WAP approprié pour établir la communication entre la webradio et le réseau.
Seule la personne qui établit le réseau connaît ce code. Si vous n’êtes pas cette personne, vous
devez obtenir ce renseignement. Au bout de trois secondes, l’écran passe au mode d’entrée du
code. Pour entrer le code, utilisez le bouton pour sélectionner chaque caractère du code et appuyez
sur SELECT après avoir entré chaque caractère. Les codes WEP et WAP sont sensibles aux lettres
majuscules et minuscules. Entrez-les correctement.
Appuyez sur BACK pour effacer les caractères erronés. Une fois le dernier caractère entré, utilisez
le bouton pour sélectionner <END> (Fin), puis appuyez sur SELECT.
La radio devrait maintenant pouvoir se connecter au réseau. Si le message « Invalid Key » (Touche
invalide) ou « Network Error » (Erreur de réseau) apparaît à l’écran, c’est que vous avez entré le
mauvais mot de passe.
FR-13
Sélection de la station radio à écouter
Écoute rapide – Les préréglages 1 et 2 ont été établis à l’usine, un chacun provenant du Canada et
des États-Unis pour vous permettre d’écouter la radio immédiatement. (Vous pouvez les
reprogrammer en tout temps. Reportez-vous la page 15.)
Recherche d’une station de radio : Suivez les étapes suivantes.
1.
Appuyez sur SELECT. Sélectionnez les stations radio et appuyez sur SELECT.
(Remarque : Si vous faites une erreur, appuyez sur BACK pour retourner à l’écran précédent.)
< Stations >
Media Player
Configure
2.
3.
Tournez le bouton pour choisir l’option <Location> ou <Genre>.
<Location> permet de choisir les stations radio offertes par les pays identifiés sur la liste.
<Genre> permet de choisir les stations radio en fonction de leur contenu, par exemple, musique
classique, rock, sport, nouvelles, etc.
Appuyez sur SELECT pour sélectionner l’option que vous désirez.
<Location>
1. Tournez le bouton jusqu’à ce que la région que vous désirez apparaisse à l’écran (ou
sélectionnez « All » pour afficher tous les pays).
2. Appuyez sur SELECT.
3. Tournez le bouton jusqu’à ce que le pays que vous désirez apparaisse à l’écran.
4. Appuyez sur SELECT.
5. Appuyez sur le bouton jusqu’à ce que la station que vous désirez apparaisse à l’écran.
6. Appuyez sur SELECT et attendez que la radio se raccorde à cette station.
Remarque : Certaines stations radio ne diffusent pas d’émissions 24 heures par jour tandis que
d’autres ne sont pas toujours en ligne.
Si la station sélectionnée offre un contenu sur demande (c.-à-d. elle offre la possibilité d’écouter des
émissions qui ont déjà été diffusées), reportez-vous à la section Stations webradio vous permettant
de choisir ce que vous désirez écouter.
<Genre>
1. Tournez le bouton jusqu’à ce que le contenu que vous désirez apparaisse à l’écran, puis appuyez
sur SELECT.
2. Appuyez sur le bouton jusqu’à ce que la station que vous désirez apparaisse à l’écran.
3. Appuyez sur SELECT et attendez que la radio se raccorde à cette station.
Remarque : Si la station sélectionnée offre un contenu sur demande (c.-à-d. elle offre la
possibilité d’écouter des émissions qui ont déjà été diffusées), reportez-vous à la section Stations
webradio vous permettant de choisir ce que vous désirez écouter.
Réglage du volume
Pendant que vous écoutez une station radio, vous pouvez changer le volume en appuyant sur les
boutons Volume + et Volume- qui se trouvent sur l’appareil ou sur la télécommande. La barre du
volume s’affichera à l’écran pour montrer le niveau de volume.
FR-14
Préréglage de vos stations webradio préférées
Vous pouvez programmer un maximum de 8 stations radio dans la mémoire de l’appareil. Pendant
que vous écoutez une station radio, appuyez et tenez enfoncé l’un des boutons de préréglage (de 1
à 8) jusqu’à ce que l’écran affiche
Assigned to preset #
Le symbole # correspond au numéro du bouton que vous tenez
enfoncé.
Les préréglages 1 et 2 ont été établis à l’usine et peuvent être reprogrammés.
Pour assigner une station radio à l’un des préréglages de 5 à 8, appuyez sur SHIFT, puis appuyez et
tenez enfoncé l’un des boutons de préréglage. Si vous utilisez la télécommande, appuyez
simplement sur le bouton de préréglage désiré et tenez-le enfoncé.
Écoute d’une station webradio préréglée
Lorsque vous écoutez une station webradio, appuyez brièvement sur le bouton de préréglage (de 1
à 4) de la station désirée ou appuyez sur SHIFT pour une station de 5 à 8. (Remarque : Ne tenez
pas le bouton enfoncé, car la station en cours de lecture aura priorité sur la station préréglée; faites
attention.)
Demande d’une station webradio non disponible présentement
Si vous désirez écouter une statio radio précise qui n’est pas disponible en ligne, visitez le site
Reciva au http://www.reciva.com/ et faites une demande pour ajouter cette station à la liste.
Stations webradio vous permettant de choisir ce que vous désirez écouter
Certaines stations webradio offre un certain nombre d’options. Par exemple, certaines stations
permettent d’écouter des émissions qui ont déjà été diffusées. Lorsque vous sélectionnez une
station radio qui offre cette option, la station ne commencera pas à diffuser cette émission
immédiatement. L’écran affichera ce qui suit :
< Live >
On Demand
1. Tournez le bouton pour sélectionner <Live> (En direct) ou <On Demand> (Sur demande), puis
appuyez sur SELECT. Si vous sélectionnez <Live>, la radio joue l’émission présentement
diffusée par cette station. Si vous sélectionnez <On Demand>, des écrans supplémentaires
s’afficheront vous permettant de choisir ce que vous désirez écouter. Le contenu à l’affichage
varie selon la station choisie. Les étapes suivantes ne servent que de guide.
2. Lorsque vous sélectionnez <On Demand>, le nom des émissions s’affiche à l’écran. Tournez
alors le bouton pour choisir l’émission désirée, puis appuyez sur SELECT.
3. Après avoir choisi l’émission désirée, celle-ci commencera à jouer ou l’écran affichera la liste
des jours à choisir. Utilisez le bouton pour régler le jour de diffusion de l’émission, puis appuyez
sur SELECT.
4. Une fois le jour choisi, vous serez en mesure de choisir l’heure du début de la diffusion. Utilisez
le bouton pour régler l’heure du début, puis appuyez sur SELECT.
5. Les émissions qui permettent de choisir l’heure permettent également d’avancer ou de reculer
rapidement vers la partie que vous désirez pendant que la radio est en marche. Le temps écoulé
s’affiche. Appuyez sur SKIP+ (P3) ou SKIP- (P1) pour avancer ou reculer rapidement par
intervalle de 30 secondes.
FR-15
Guide de dépannage
N’hésitez pas à consulter la section Aide sur le document Web de nos associés chez Reciva :
http://radio.reciva.com/
Cet appareil est capable d’accéder à l’Internet mobile. Si vous éprouvez des difficultés lors de la
connexion à votre réseau local sans fil, les étapes suivantes peuvent vous aider à régler le problème.
1. Assurez-vous qu’un ordinateur personnel connecté à un réseau local sans fil Wi-Fi peut avoir accès
à l’Internet (c.-à-d. il peut naviguer sur l’Internet) au moyen du même réseau.
2. Assurez-vous qu’un serveur DHCP est disponible ou que vous avez configuré une adresse IP
statique sur la radio. Pour configurer le serveur DHCP, veuillez lire les instructions fournies pour le
point d’accès sans fil.
3. Vérifiez que le coupe-feu ne bloque pas les ports de sortie. La radio doit avoir accès aux ports UDP
et TCP 80,554,1755,5000 et 7070 (exigences requises). Pour configurer la porte d’accès, veuillez
lire les instructions fournies pour le point d’accès sans fil.
4. Le point d’accès ne doit pas limiter les connexions à des adresses MAC particulières. Pour voir
l’adresse MAC de la radio, utilisez l’option du menu suivante : Configure-> Network Config-> View
Config-> MAC address (Configuration->Configuration réseau->Voir configuration->Adresse MAC).
5. Si vous possédez un réseau chiffré, assurez-vous d’avoir entré la bonne touche ou phrase de
passe dans la radio. N’oubliez pas que les touches de format alphabétique sont sensibles aux
lettres majuscules et minuscules (voir pages 19-20).
Si la connexion au réseau est réussie, mais qu’il soit impossible d’écouter des stations radio
précises, veuillez vérifier les points suivants :
1. La station ne diffuse aucune émission à ce moment précis de la journée (il se peut qu’elle soit
située dans un fuseau horaire différent).
2. La station a atteint le nombre maximum d’auditeurs simultanés.
3. La station ne diffuse plus d’émissions.
4. Le lien sur la radio est périmé.
5. La connexion entre le serveur (qui se trouve souvent dans un autre pays) et vous est lente.
Éteignez et rallumez la radio, ou débranchez et i nsérez la fiche CA. Si cela ne suffit pas, utilisez un
ordinateur (si disponible) pour faire jouer le flux de données par le biais du site Internet du
radiodiffuseur.
Si vous pouvez écouter la station au moyen d’un ordinateur, veuillez nous le faire savoir en utilisant
le formulaire qui se trouve au http:/www.reciva.com/stations/add_station.asp . Nous pourrons ainsi
modifier les données de la station utilisées par la radio.
Lecteur multimédia
REMARQUE : Cette fonction est réservée aux utilisateurs plus avancés.
Le lecteur multimédia incorporé permet d’écouter des fichiers son non protégés (AAC, AIFF, MP3,
RM, WAV, WMA) itunesTM inclus, ainsi que des listes d’écoute (M3U), sauvegardés dans un
ordinateur (sauf un “Mac”) interconnecté en réseau. Cet appareil supporte les systèmes
d’exploitation Windows 2000 et Windows XP.
Installation de l’ordinateur pour permettre à la radio d’accéder aux fichiers son sur Windows Shares
1. Assurez-vous que l’ordinateur est connecté au réseau de la webradio. À l’aide du logiciel
Windows Explorer, repérez le dossier dans lequel les fichiers son sont sauvegardés.
2. Cliquez à droite sur le dossier.
3. Sélectionnez « Properties » (Propriétés).
4. Cliquez sur « Sharing » (Partage).
5. Sélectionnez « Share this folder on the network » (Partager ce fichier sur le réseau) et « Allow
network user to change my files » (Autoriser l’utilisateur du réseau à changer mes fichiers).
Repérage de fichiers son sur Windows Shares
1. Mettez la radio en marche.
FR-16
2. Attendez jusqu’à ce que « Stations » apparaisse à l’écran, ou appuyez plusieurs fois sur BACK
jusqu’à ce que « Stations » s’affiche.
3. Tournez le bouton jusqu’à ce que « Media Player » (Lecteur multimédia) apparaisse à l’écran.
4. Appuyez sur SELECT et tournez le bouton jusqu’à ce que « Windows Shares » apparaisse à
l’écran.
5. Appuyez sur SELECT, tournez le bouton jusqu’à ce que « Scan for PCs » (Recherche
d’ordinateurs) apparaisse à l’écran et appuyez à nouveau sur SELECT.
6. « Finding PCs » (Ordinateur trouvé) apparaît à l’écran. Une fois que la radio a terminé, tournez le
bouton pour surligner le bon ordinateur.
7. Appuyez sur SELECT; la radio cherchera les utilisateurs partagés.
8. Tournez le bouton pour surligner le bon dossier partagé et appuyez sur SELECT.
9. « File Scan…» (Recherche de dossiers) apparaît à l’écran pendant que l’appareil recherche les
fichiers à contenu multimédia dans le dossier partagé. Le texte figurant au bas de l’écran change
pour indiquer que la recherche des fichiers s’effectue. Si vous avez un grand nombre de fichiers
son, la recherche prendra plusieurs minutes.
10. Une fois la recherche terminée, « By Album » (Par album) s’affichera. Vous êtes maintenant en
mesure de naviguer dans ces fichiers à contenu multimédia, lesquels sont classés par album (By
Album), par interprète (By Artist) et listes d’écoute (Playlists), si disponible.
Remarque : La première fois que s’effectue la recherche des fichiers, un fichier intitulé
<reciva_media_cache> s’inscrit au dossier dans lequel les fichiers son sont sauvegardés. Ceci
permet d’accélérer tout processus ultérieur de recherche de fichiers.
Écoute d’une seule plage partagée
1. Tournez le bouton jusqu’à ce que « By Artist » (Par interprète) s’affiche.
2. Appuyez sur SELECT.
3. Tournez le bouton jusqu’à ce que l’interprète désiré s’affiche.
4. Appuyez sur SELECT.
5. Tournez le bouton jusqu’à ce que le nom de l’album désiré s’affiche.
6. Appuyez sur SELECT. « Add to Queue » (Ajouter à la file d’attente) s’affiche.
7. Tournez le bouton jusqu’à ce que la plage désirée s’affiche.
8. Appuyez sur SELECT et la plage commencera à jouer.
Écoute d’un album partagé complet
1. Tournez le bouton jusqu’à ce que « By Artist » (Par interprète) s’affiche.
2. Press the SELECT button.
3. Tournez le bouton jusqu’à ce que l’interprète désiré s’affiche.
4. Appuyez sur SELECT.
5. Tournez le bouton jusqu’à ce que le nom de l’album désiré s’affiche.
6. Appuyez sur SELECT. « Add to Queue » (Ajouter à la file d’attente) s’affiche.
7. Appuyez sur SELECT et l’album commencera à jouer.
Mise en file d’attente de plages à écouter plus tard
1. Surlignez la plage désirée.
2. Appuyez sur SELECT. « Track Added to Queue » (Plage ajoutée à la file d’attente) s’affiche.
Mise en file d’attente d’albums à écouter plus tard
1. Surlignez l’album désiré.
2. Appuyez sur SELECT.
3. Tournez le bouton jusqu’à ce que « Add to Queue » (Ajouter à la file d’attente) s’affiche.
4. Appuyez sur SELECT. « Albums Added to Queue » (Albums ajoutés à la file d’attente) s’affiche.
Contrôle de l’écoute
1. Appuyez sur STOP pour mettre fin à l’écoute.
2. Appuyez sur PLAY/PAUSE pour arrêter momentanément l’écoute de la plage courante, pour
recommencer l’écoute d’une plage momentanément arrêtée ou pour recommencer l’écoute
d’une plage qui avait été arrêtée.
3. Appuyez sur SKIP- pour commencer l’écoute de la plage précédente dans la file d’attente.
4. Appuyez sur SKIP+ pour commencer l’écoute de la prochaine plage dans la file d’attente.
FR-17
Navigation dans la liste des plages à écouter présentement dans la file d’attente
1. Appuyez sur BROWSE. Le nom de la plage actuellement en train d’être écoutée s’affiche.
2. Tournez le bouton pour voir les plages à écouter qui sont dans la file d’attente.
3. Si vous désirez passer à une plage particulière dans la file d’attente, appuyez sur SELECT lorsque cette
plage s’affiche.
Élimination de plages de la file d’attente
1. Appuyez sur BROWSE. Le nom de la plage actuellement en train d’être écoutée s’affiche.
2. Tournez le bouton pour sélectionner la plage que vous désirez éliminer de la file d’attente.
3. Appuyez sur STOP et tenez-le enfoncé pendant 2 secondes. « Delete Track? » (Effacer plage?)
s’affiche.
4. Tournez le bouton pour surligner « Yes » ou « No ».
5. Appuyez sur SELECT pour confirmer votre choix.
6. Si vous avez sélectionné « Yes », alors « Remove From Queue » (Éliminer de la file d’attente) s’affiche.
7. Pour éliminer toutes les plages de la file d’attente, continuez à appuyer sur BACK jusqu’à ce que l’option
« Media Player » (Lecteur multimédia) soit sélectionné, puis appuyez sur SELECT. Tournez le bouton
pour sélectionner « Clear Queue » (Vider la liste d’attente) et appuyez à nouveau sur SELECT.
Écoute aléatoire des plages
1. Sélectionnez les plages individuelles selon la marche à suivre susmentionnée.
2. Appuyez sur SELECT et BACK pour vous déplacer jusqu’à l’option de menu supérieure « Media Player
» (Lecteur multimédia).
3. Appuyez sur SELECT.
4. Appuyez sur le bouton jusqu’à ce que « Playback Mode » (Mode d’écoute) s’affiche.
5. Appuyez sur SELECT.
6. Appuyez sur le bouton jusqu’à ce que « Shuffle » (Mélanger) s’affiche.
7. Appuyez sur SELECT.
8. Tournez le bouton pour sélectionner « YES/NO » et confirmer que le mode d’écoute aléatoire doit être
activé.
Écoute répétée de plages de la file d’attente
1. Sélectionnez les plages individuelles selon la marche à suivre susmentionnée.
2. Appuyez sur SELECT et BACK pour vous déplacer jusqu’à l’option de menu supérieure « Media
Player » (Lecteur multimédia).
3. Appuyez sur SELECT.
4. Appuyez sur le bouton jusqu’à ce que « Playback Mode » (Mode d’écoute) s’affiche.
5. Appuyez sur SELECT.
6. Appuyez sur le bouton jusqu’à ce que « Repeat » (Écoute répétée) s’affiche.
7. Appuyez sur SELECT.
8. Tournez le bouton pour sélectionner « YES/NO » et confirmer que le mode d’écoute répétée doit
être activé.
Installation de l’ordinateur pour permettre à la webradio d’accéder aux fichiers son sur un
serveur UPnP
1. Si votre ordinateur utilise le logiciel Microsoft Windows XP, servez-vous de Windows Media
Connect à titre de serveur multimédia 1.0 UPnP (Universal Plug and Play). Vous pouvez
télécharger Windows Media Player 11 à partir du site Internet de Microsoft. Pour l’installer, suivez
les instructions fournies dans l’Assistant installation.
2. Une fois installé, le Windows Media Player 11 créera une bibliothèque à partir de tous les fichiers
à contenu multimédia disponibles sur votre ordinateur. Pour ajouter de nouveaux fichiers à
contenu multimédia dans la bibliothèque, sélectionnez « File>Add to Library..> Advanced Options
» (Fichier>Ajouter à la bibliothèque…> Options avancées). Cliquez sur « Add » (Ajouter),
sélectionnez les fichiers que vous désirez ajouter et cliquez sur « OK ».
3. Vous devez maintenant connecter votre webradio au Windows Media Player 11 et le configurer
pour permettre à la radio d’accéder à la bibliothèque à contenu multimédia. Pour ce faire,
procédez de la manière suivante :
a) Tenez enfoncé le bouton BACK pour atteindre le menu supérieur; tournez le bouton pour
sélectionner « Media Player » (Lecteur multimédia).
b) Appuyez sur SELECT puis tournez le bouton pour surligner « UPnP Servers » (Serveurs UPnP).
FR-18
c)
Appuyez sur SELECT et la radio recherche tous les serveurs UPnP disponibles. Ceci peut
prendre quelques secondes. Pendant ce temps, « EMPTY» (Vide) s’affiche. Cette mention
continuera à s’afficher si la radio ne trouve aucun serveur UPnP.
d) Une fois la recherche réussie, sélectionnez le serveur UPnP en tournant le bouton s’il y a plus
d’un serveur UPnP. Appuyez ensuite sur SELECT. (À noter que la mention « Access Denied »
(Accès refusé) s’affichera à ce moment.)
4. L’ordinateur vous informera qu’un appareil a tenté de se brancher sur votre serveur UPnP. Afin de
permettre à la radio d’accéder aux fichiers à contenu multimédia, cliquez sur « Library »
(Bibliothèque) du Windows Media Player 11. Sélectionnez l’option « Media Sharing… » (Partage
de lecteur multimédia…) pour ouvrir cette fenêtre.
5. À partir de la fenêtre « Media Sharing… » (Partage de lecteur multimédia…), la radio sera
identifiée comme appareil inconnu. Cliquez sur « Unknown Device » (Dispositif inconnu); cliquez
sur « Allow » (Autoriser), puis sur « OK ».
Repérage et écoute de fichiers à contenu multimédia sur la radio et le serveur UPnP
Une fois que le serveur UPnP est configuré pour partager des fichiers à contenu multimédia avec la
webradio, vous pouvez écouter les fichiers en procédant ainsi :
a. Tenez enfoncé le bouton BACK pour atteindre le menu supérieur de la radio, puis tournez le
bouton pour sélectionner « Media Player » (Lecteur multimédia).
b. Appuyez sur SELECT et tournez le bouton pour surligner « UPnP Servers » (Serveurs UPnP).
c. Appuyez sur SELECT et la radio recherche tous les serveurs UPnP disponibles. Ceci peut
prendre quelques secondes. Pendant ce temps, « EMPTY » (Vide) s’affiche. Cette mention
continuera à s’afficher si la radio ne trouve aucun serveur UPnP.
d. Une fois la recherche réussie, sélectionnez le serveur UPnP en tournant le bouton s’il y a plus
d’un serveur UPnP. Appuyez ensuite sur SELECT.
e. La radio énumérera les catégories à contenu multimédia disponibles sur votre serveur UPnP
(p. ex. « Music » (Musique), « Playlists » (Listes d’écoute), etc.). Tournez le bouton pour
sélectionner la catégorie dans laquelle vous désirez naviguer. Appuyez sur SELECT et tournez
le bouton pour surligner une sous-catégorie et appuyez à nouveau sur SELECT. Par exemple,
vous pouvez sélectionner « Music », puis « Album ».
f. Tournez le bouton pour surligner les fichiers à contenu multimédia que vous désirez écouter et
appuyez sur SELECT.
g. « Add to Queue » (Ajouter à la file d’attente) s’affiche. Appuyez sur SELECT; la radio ajoutera
ces plages dans la file d’attente et commencera à les faire jouer automatiquement.
Mise en file d’attente des plages UPnP à écouter plus tard
1. Surlignez la plage désirée.
2. Appuyez sur SELECT. « Track Added to Queue » (Plage ajoutée à la file d’attente) s’affiche.
Mise en file d’attente des albums UPnP à écouter plus tard
1. Surlignez l’album désiré.
2. Appuyez sur SELECT.
3. Tournez le bouton jusqu’à ce que « Add to Queue » (Ajouter à la file d’attente) s’affiche.
4. Appuyez sur SELECT. « Albums Added to Queue » (Albums ajoutés à la file d’attente) s’affiche.
Contrôle de l’écoute
1. Appuyez sur STOP pour arrêter l’écoute.
2. Appuyez sur PLAY/PAUSE pour arrêter momentanément l’écoute d’une plage, pour
recommencer l’écoute d’une plage momentanément arrêtée ou pour recommencer l’écoute d’une
plage qui avait été arrêtée.
Navigation dans la liste des plages à écouter présentement dans la file d’attente
1. Appuyez sur BROWSE. Le nom de la plage actuellement en train d’être écoutée s’affiche.
2. Tournez le bouton pour voir les plages à écouter qui sont dans la file d’attente.
3. Si vous désirez passer à une plage particulière dans la file d’attente, appuyez sur SELECT
lorsque cette plage s’affiche.
FR-19
4. Il est important de noter que les fichiers à contenu multimédia faisant l’objet d’une recherche à
l’aide de la fonction « Windows Shares » peuvent être ajoutés dans la file d’attente de la radio.
5. Appuyez sur SKIP- pour commencer l’écoute de la plage précédente dans la file d’attente.
6. Appuyez sur SKIP+ pour commencer l’écoute de la prochaine plage dans la file d’attente.
Élimination des plages UPnP de la file d’attente
1. Appuyez sur BROWSE. Le nom de la plage actuellement en train d’être écoutée s’affiche.
2. Tournez le bouton pour sélectionner les plages que vous désirez éliminer de la file d’attente.
3. Appuyez sur STOP et tenez-le enfoncé pendant 2 secondes.
4. Tournez le bouton pour surligner « Yes » ou « No ».
5. Appuyez sur SELECT pour confirmer votre choix.
6. Si vous avez sélectionné « Yes », alors « Removed From Queue » (Éliminer de la file d’attente)
s’affiche.
7. Pour éliminer toutes les plages de la file d’attente, continuez à appuyer sur BACK jusqu’à ce que
l’option « Media Player » (Lecteur multimédia) soit sélectionné, puis appuyez sur SELECT.
Tournez le bouton pour sélectionner « Clear Queue » (Vider la file d’attente) et appuyez à
nouveau sur SELECT.
Écoute aléatoire des plages UPnP
1. Sélectionnez les plages individuelles selon la marche à suivre susmentionnée.
2. Appuyez sur SELECT et BACK pour vous déplacer jusqu’à l’option de menu supérieure « Media
Player » (Lecteur multimédia).
3. Appuyez sur SELECT.
4. Appuyez sur le bouton jusqu’à ce que « Playback Mode » (Mode d’écoute) s’affiche.
5. Appuyez sur SELECT.
6. Appuyez sur le bouton jusqu’à ce que « Shuffle » (Mélanger) s’affiche.
7. Appuyez sur SELECT.
8. Tournez le bouton pour sélectionner « YES/NO » et confirmer que le mode d’écoute aléatoire a
été activé.
Écoute répétée des plages UPnP de la file d’attente
1. Sélectionnez les plages individuelles selon la marche à suivre susmentionnée.
2. Utilisez SELECT et BACK pour vous déplacer jusqu’à l’option de menu supérieure « Media
Player » (Lecteur multimédia).
3. Appuyez sur SELECT.
4. Appuyez sur le bouton jusqu’à ce que « Playback Mode » (Mode d’écoute) s’affiche.
5. Appuyez sur SELECT.
6. Appuyez sur le bouton jusqu’à ce que « Repeat » (Écoute répétée) s’affiche.
7. Appuyez sur SELECT.
8. Tournez le bouton pour sélectionner « YES/NO » et confirmer que le mode d’écoute répétée doit
être activé.
Remarques :
1. Si les dossiers partagés contiennent un plus grand nombre de chansons que le nombre limite
permis sur la mémoire de la webradio, « Too many files » (Trop de fichiers) s’affiche.
2. Le fait d’appuyer plusieurs fois sur le bouton P4 fera alterner les modes d’écoute répétée et
aléatoire.
Réglage de l’horloge
1. Appuyez sur SELECT. (Remarque : Si vous faites une erreur, appuyez sur BACK pour retourner à
l’écran précédent.)
2. Tournez le bouton jusqu’à ce que « Configure » (Configurer) s’affiche.
Stations
Media Player
< Configure
>
FR-20
3. Appuyez sur SELECT.
4. Tournez le bouton jusqu’à ce que « Clock Setup » (Mise à l’heure de l’horloge) s’affiche.
<
Register
Clock Setup
Backlight
>
5. Tournez le bouton jusqu’à ce que « Set Time » (Régler l’heure) s’affiche.
<
Set Time / Date >
6. Avant de régler l’heure et la date, vous devez choisir le fuseau horaire approprié. Il existe
7fureaux horaires.
7. Une fois le fuseau horaire sélectionné, vous devez régler l’heure.
8. Appuyez sur SELECT.
Set Time
10 :30 AM
9. Tournez le bouton jusqu’à ce que le réglage de l’heure soit correct, puis appuyez sur SELECT.
Set Time
10: 03 AM
10. Tournez le bouton jusqu’à ce que le réglage des minutes soit correct, puis appuyez sur SELECT.
Set Date
01 Jan 2008
11. Procédez au réglage de la date, du mois et de l’année.
En dernier lieu, l’écran retourne au mode de réglage de l’heure et de la date.
Une fois le réglage terminé, ces données apparaîtront toujours dans le coin inférieur droit de l’écran
lorsque l’appareil est mis sous tension. Lorsque l’appareil est hors tension, ces données
apparaissent au milieu de l’écran et à leur pleine grandeur.
Réglage de la minuterie d’arrêt différé
Cette option permet à la radio de se mettre sous et hors tension à un moment prédéterminé.
1. Appuyez sur SLEEP. « Sleep Timer 15 minutes » (Minuterie d’arrêt différé 15 minutes) s’affiche.
La radio continue de jouer normalement pendant 15 minutes puis passe automatiquement au
mode d’attende.
2. Pour allonger la période pendant laquelle la radio continuera à jouer avant de se mettre hors
tension, appuyez à nouveau sur SLEEP pour modifier l’heure à l’écran. Chaque fois que vous
appuyez sur SLEEP, la minuterie augmente de 15 minutes à la fois, jusqu’à un maximum de 90
minutes.
3. Pour mettre la radio sous tension une fois de plus, appuyez simplement sur STANDBY.
FR-21
Réglage des alarmes
1. Appuyez sur SELECT. (Remarque : Si vous faites une erreur, appuyez sur BACK pour retourner à
l’écran précédent.)
2. Tournez le bouton jusqu’à ce que « Alarm Clock» (Réveil) s’affiche.
Tuner
Auxiliary Input
<
Alarm Clock
>
3. Appuyez sur SELECT.
4. Tournez le bouton jusqu’à ce que « Set Alarms » (Régler les alarmes) s’affiche.
<
Set Alarms
>
5. Vous avez maintenant 3 options :
Disable All (Désactiver tout) : pour désactiver les deux alarmes; les alarmes s’éteindront.
Alarm 1 (Alarme 1) : pour régler, activer ou désactiver l’alarme 1; la valeur établie à l’usine est «
1.OFF 12:00 AM » (1. DÉSACTIVÉE 12:00 AM).
Alarm 2 (Alarme 2) : pour régler, activer ou désactiver l’alarme 2; la valeur établie à l’usine est «
2.OFF 12:00 AM » (2. DÉSACTIVÉE 12:00 AM).
<
Disable all
>
1. OFF 12:00 AM
2. OFF 12:00 AM
6. Appuyez sur SELECT pour confirmer votre choix.
Set Alarm
12 :00 AM
7. Tournez le bouton jusqu’à ce que le réglage de l’heure soit correct, puis appuyez sur SELECT.
Set Alarm
07 : 06 AM
8. Tournez le bouton jusqu’à ce que le réglage des minutes soit correct, puis appuyez sur SELECT.
FR-22
9. Chaque alarme comporte cinq modes, à savoir :
(Tous les jours) : l’alarme se met en marche
7 jours par semaine
Weekly (Une fois par semaine) : l’alarme se met en marche une fois par semaine
Weekdays (Tous les jours de la semaine) : l’alarme se met en marche seulement du lundi au vendredi
Weekends (Toutes les fins de semaine) : l’alarme se met en marche seulement le samedi et le dimanche
Once
Every Day
Weekly
10. Il existe également trois options de réveil pour chaque alarme :
Wake to Buzzer (Réveil au son de l’avertisseur)
Wake to Internet Radio (Réveil au son de la webradio)
Wake to FM Radio (Réveil au son de la radio FM)
Remarques :
1. Il vous sera impossible de choisir le réveil au son de la webradio si aucune station n’a été
préréglée ou si vous n’êtes pas en train d’écouter la webradio.
2. Assurez-vous que le volume a été réglé au niveau désiré lorsque vous choisissez l’option de
réveil au son de la webradio ou de la radio FM.
Buzzer
Internet Radio
FM Tuner
Une fois tous ces renseignements établis, l’icône de l’alarme apparaît dans le coin inférieur gauche
de l’écran.
Vérification des heures de réveil et du mode d’alarme
Pour vérifier ces informations, sélectionnez ALARM CLOCK puis SET ALARMS. Si l’alarme a été
réglée, les renseignements apparaîtront dans l’ordre suivant : <Alarm/alarm time/alarm mode/wake
up option> (Alarme/heure de l’alarme/mode d’alarme/option de réveil). Par exemple, l’alarme 1 est
réglée à 9 h 30 et se mettra en marche tous les jours au son de l’avertisseur; l’alarme 2 est réglée à
10 h 30 et se mettra en marche tous les samedis et dimanches au son de l’avertisseur. L’écran
affichera ce qui suit :
Disable All
1. 9:30 AM Daily Buzzer
2. 10:30 AM Daily Buzzer
De plus, si l’alarme a été réglée, l’icône de l’alarme apparaît à l’écran au mode d’attente. Les
renseignements sur l’horloge apparaissent à leur grandeur maximum au mode d’attente.
La radio se fera entendre pendant une heure environ après le début de la mise en marche de
l’alarme, puis s’arrêtera. Appuyez sur STANDBY pour la mettre hors tension plus tôt. Appuyez à
nouveau sur ce bouton pour la mettre sous tension manuellement.
FR-23
Répit/alarme répétée
Lorsque l’alarme retentit le matin, appuyez sur SNOOZE sur le panneau de dessus de l’appareil ou
sur la télécommande pour dormir pendant quelques minutes supplémentaires. L’alarme s’arrêtera
pendant environ 9 minutes, puis retentira à nouveau par la suite.
Zz
Écoute d’une station radio FM
Cette webradio est également dotée d’un syntonisateur FM qui vous permettra d’accéder aux
stations radio FM standard.
1. Appuyez sur SELECT. (Remarque : Si vous faites une erreur, appuyez sur BACK pour retourner à
l’écran précédent.)
2. Tournez le bouton jusqu’à ce que « Tuner » (Syntonisateur) s’affiche.
<
Media Player
Configure
Tuner
>
3. Appuyez sur SELECT.
Tournez le bouton pour sélectionner la station radio désirée. Lorsqu’un signal FM stéréo clair est reçu,
<Stereo> s’affiche. Dans le cas contraire, appuyez sur SEEK+/- pour chercher un signal fort.
98.5 MHz
Stereo
4. Appuyez sur VOLUME+/- pour régler le volume au niveau désiré.
5. Déployez l’antenne FM située à l’arrière de l’appareil et tournez-la pour obtenir la meilleure
réception qui soit.
Préréglage de vos stations radio FM préférées
Vous pouvez sauvegarder un maximum de 8 stations radio FM dans la mémoire de l’appareil. Lors
de l’écoute d’une station FM, tenez enfoncé l’un des boutons de préréglage (de 1 à 8) jusqu’à ce que
l’écran suivant apparaisse.
Assigned to preset #
Le symbole # correspond au numéro du bouton que vous
tenez enfoncé.
Pour assigner une station radio FM à l’un des préréglages de 5 à 8, appuyez sur SHIFT, puis tenez
enfoncé l’un des boutons de préréglage.
Écoute d’une station radio FM préréglée
Lorsque vous écoutez une station radio FM, appuyez brièvement sur le bouton de préréglage (de 1
à 4) de la station FM désirée ou appuyez sur SHIFT pour une station préréglée de 5 à 8. (Remarque :
Ne tenez pas le bouton enfoncé, car la station en cours d’écoute aura priorité sur la station préréglée;
faites attention.)
FR-24
Connexions optionnelles
PRISE AUXILIAIRE
Vous pouvez connecter à la webradio un appareil externe (lecteur MP3, lecteur de CD, etc.). Branchez
un câble audio (non fourni) de la prise AUX IN de la radio à la prise AUX OUT de l’appareil externe.
Ceci permettra d’amplifier le son provenant de l’appareil externe au moyen du haut-parleur de la radio.
1.
Appuyez sur SELECT. (Remarque : Si vous faites une erreur, appuyez sur BACK pour retourner à
l’écran précédent.)
2.
Tournez le bouton jusqu’à ce que « Auxiliary Input » (Entrée auxiliaire) s’affiche.
<
3.
Tuner
Auxiliary Input
Alarm Clock
>
Appuyez sur SELECT.
Aux In
4.
5.
6.
7.
Connectez un câble audio (non fourni) de la prise AUDIO OUT de l’appareil externe à la prise
AUX IN de la radio. Mettez en marche l’appareil externe; réglez le volume à la position médiane et
faites-le fonctionner normalement. Si le volume de l’appareil externe est trop élevé, cela créera de
la distorsion.
Le son proviendra du haut-parleur de l’appareil.
Appuyez sur VOLUME +/- pour régler le volume au niveau désiré.
Une fois l’écoute terminée, mettez l’appareil externe hors tension. Appuyez sur SELECT ou
BACK pour retourner au menu principal et écoutr une station FM ou une station webradio, surtout
si les alarmes de réveil sont programmées.
Remarques:
‧ Lors du branchement de l’appareil externe, reportez-vous au guide d’utilisation de cet appareil,
ainsi qu’au présent manuel.
‧ Voici des exemples d’appareils audio externes qui peuvent être branchés sur la webradio : lecteur
MP3 portatif, lecteur de cassette, lecteur de mini-disque, lecteur de DVD, etc.
PRISE D’ÉCOUTEUR
Pour une écoute en privé, branchez des écouteurs stéréo (non fournis) de 3,5 mm (32 ohms) sur la
prise de sortie. Lorsque vous insérez la fiche des écouteurs dans cette prise, les haut-parleurs se
débranchent automatiquement.
IMPORTANT:
Un son excessivement fort provenant des écouteurs peut endommager votre ouïe.
PRISE DE SORTIE DE LIGNE
Une prise de sortie de ligne se trouve au dos de l’appareil pour vous permettre de relier la radio à une
chaîne stéréo externe.
Nettoyage du boîtier
N’utilisez qu’un linge doux pour nettoyer la surface très brillante du boîtier. N’utilisez pas de serviette en
papier, car cela pourrait égratigner la surface.
FR-25
Fiche technique
Dimensions (l x h x p) : 220 x 112.5 x 135 mm
Poids : 2 kg
Section Radio
Gamme de syntonisation : FM 87,5 – 108 MHz
Système d’antenne : Antenne filaire (FM)
Généralités
Haut-parleur : 36,6 mm x 2,75 (8 ohms)
Borne de sortie : Écouteurs stéréo de 3,5 mm
Alimentation : CA de 120 volts, 60 Hz
Prise d’entrée auxiliaire : Prise RCA de 3,5 mm
Les spécifications peuvent changer sans préavis.
Licence d’utilisation
Cet appareil contient un logiciel sous licence du GNU Public License (version 2) et du GNU Lesser
Public License (version 2.1). Le code source de ce logiciel est disponible sur http://www.reciva.com/gpl
Cet appareil fait usage de la technologie de Microsoft Corporation et est sous license de Microsoft
Licensing GP. Tout usage ou distribution de cette technologie pour tout autre produit est formellement
interdit sans l’autorisation de Microsoft Corporation et(ou) de Microsoft Licensing GP, le cas échéant.
FR-26
GARANTIE DE FIABILITÉ SANYO
PRODUITS GRAND PUBLIC
APPLICATION DE LA GARANTIE
Les appareils SANYO, achetés au détail, neuts et non
utilisés, chez un marchand autorisé SANYO au Canada
sont garantis contre tous défauts de fabrication et de
matériaux, pour une période d’UN AN à partir de la date
d’achat par l’acheteur à des fins non commerciales. La
présente garantie s’applique uniquement à l’acheteur au
détail initial de l’appareil garanti.
OBLIGATIONS DE SANYO CANADA INC.
Durant la période de garantie, SANYO Canada Inc.
réparera ou, à sa disceétion, remplacera tout appareil
présentant effectivement un défaut de matériel ou de
fabrication. Les PIÈCES de remplacement sont garanties
jusqu’à l’expiration de la garantie initale de l’appareil.
Vous assumez tous les frais de TRΛNSPORT
occasionnés par l’expédition de l’appareil à SANYO
Canada Inc. ou à un centre de service SANYO autorisé
et par son retour. Vous assumez aussi tous les frais
d’ENTRETIEN que l’appareil pourrait nécessiter.
INVALIDATION DE LA GARANTIE
La présente garantie devient invalide si les numéros de
série de l’appareil sont modifiés ou effacés ou si
l’appareil a été réparé par quiconque autre que SANYO
Canada Inc. ou un centre de service SANYO autorisé.
RESTRICTIONS
(a) SANYO Canada Inc. se réserve le droit de
modifier ou d’améliorer le concept du modèle
de l’appareil faisant l’objet de la présente
garantie sans avoir l’obligation de modifier
de quelque façon que ce soit ou d’installer
quelque amélioration que ce soit dans ou sur
l’appareil de l’acheteur.
(b) SANYO Canada Inc. ou ses détaillants
autorisés ne seront en aucun cas tenus
responsables des dommages spéciaux ou
indirects résultant de l’utilisation de cet
appareil.
LA GARANTIE NE COUVRE PAS
(a) Les appareils achetés à l’extérieur du Canada.
(b) Les appareils achetés usagés.
(c) Les problèmes résultant de l’installation et des
réglages initiaux.
(d) Les réglages décrits dans le manuel
d’instructions.
(e) Les accessoires, y compris antenne et piles.
(f) Les dommages subis durant le transport ou y
étant attribuables.
(g) Les dommages dus à un entretien incorrect,
à un mauvais montage, à un accident, à un
mauvais traitement, à un usage non approprié
ou à la négligence.
(h) Les dommages causés par la foudre ou par
une surtension.
(i) Les frais d’enlèvement et de réinstallation
d’un appareil conçu pour les véhicule
automobiles.
(j) Le joint en caoutchouc de la caméra numérique
étanche.
OBLIGATIONS DE L’ACHETEUR AU DÉTAIL
INITIAL
Vous, l’acheteur au détail initial, devez présenter votre
facture originale datée et cette garantie à SANYO
Canada Inc. ou à un centre de service SANYO autorisé
lorsque vous désirez vous prévaloir du recours en
garantie.
GARANTIES STATUTAIRES
Les dispositions qui précèdent n’empêchent
aucunement l’application de lois provinciales qui, dans
certaines circonstances, peuvent interdire certaines des
restrictions et exclusions figurant dans la présente
garantie. Dans un tel cas, les conditions ainsi interdites
en vertu de ces lois seront nulles et non avenues, mais
le reste de la présente garantie demeurera en vigueur.
COMMENT SE PRÉVALOIR DU RECOURS EN
GARANTIE
Veuillez joindre SANYO Canada Inc. à l’adresse
suivante:
SANYO Canada Inc.
1-300 Applewood Cres.
Concord, ON L4K 5C7
1-800-263-2244
www.sanyo.ca
FR-27
CODE NO.:112114700
SANYO Electric Co., Ltd.
Printed in China