1
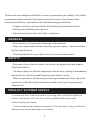
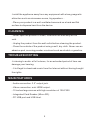
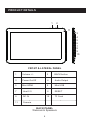
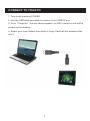
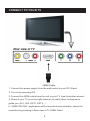
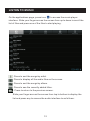
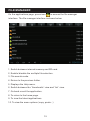
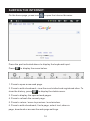
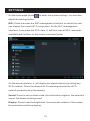
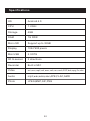
EXLB3B
10" Pro Series Tablet
User Manual
Please read this manual before operating your
device. Keep it for future reference.
SECURITY INFORMATION ........................................................ 4
GENERAL ................................................................................. 4
SAFETY .................................................................................... 4
PRODUCT’S POWER SUPPLY ................................................... 5
PLACING OF THE PRODUCT ..................................................... 5
CLEANING ............................................................................... 5
TROUBLESHOOTING ............................................................... 5
MAIN FEATURES ..................................................................... .5
PRODUCT DETAILS .................................................................. 6
CONNECT TO YOUR PC .............................................................7
CONNECT TO YOUR TV .............................................................8
HOW TO USE YOUR TABLET...................................................... 9
• TURN ON/OFF ..................... ........................................................... 9
• ENABLE/DISABLE LCD .................................................................... 9
• OPERATION OF THE TOUCH SCREEN ............................................. 9
2
HOME PAGE .......................................................................................... 10
UNDERSTAND THE ICONS .................................................................... 10
WATCH A VIDEO .................................................................................... 11
LISTEN TO MUSIC ................................................................................. 12
VIEW YOUR PHOTOS ............................................................................ 14
FILE MANAGER ..................................................................................... 15
SURFING THE INTERNET: ..................................................................... 16
INSTALL AN APPLICATION .................................................................... 17
SETTINGS ............................................................................................ 18
Specifications .................................................................................. 20
3
This device was designed and built in order to guarantee your safety. The safety
mecanisms implemented in the product will protect you if you observe the
following installation, operation and troubleshooting procedures:
- Please carefully read and follow the following instructions before
handling and installing your device.
- Keep these instructions for further reference.
GENERAL
- Don't shake, or it may lead to damage to the product.
- Only use components and accessories (power supply...)recommended
by the manufacturer.
- The illustrations of the product may vary from actual product.
SAFETY
-To prevent fire or electric shock, do not put the appliance near objects
filled with liquids ;
- If a heavy object or liquid is dropped on the device, unplug it immediately
and send it to check by qualified personnel before re-use ;
- When in operation, the housing surface generates heat; Only place the
product on a flat and rigid surface and avoid covering it or placing any
objects on it.
PRODUCT’S POWER SUPPLY
-In case you don’t use the product for a long time or during a lightning
storm, unplug the unit from the outlet by grabbing the plug itself,
without pulling the cable.
- The included power adapter is specific to the product. Using a different
adapter may cause damage or accidents.
4
-Install the appliance away from any equipment with strong magnetic
attraction such as microwave ovens, big speakers...
- Place your product in a well ventilated area and on a hard and flat
surface to disperse heat from the device.
CLEANING
- Never open the product to clean, otherwise the warranty will be
void.
- Unplug the product from the wall outlet before cleaning the product.
- Clean the outside of the product using a soft, dry cloth. Never use an
abrasive pad, scouring powder or solvent such as alcohol or gasoline.
TROUBLESHOOTING
-Listening to audio at full volume, for an extended period of time can
damage your hearing.
- It is illegal to download music from the Internet without having bought
the rights.
MAIN FEATURES
- Audio connection: 3.5” output jack.
- Video connection: mini HDMI output.
- 10 inches large screen with high resolution of 1024*600
- Integrated Card Reader (Micro SD).
- PC USB port and USB Host.
5
TABLE
OF OF
CONTENTS
PLACING
THE PRODUCT
PRODUCT
DETAILS
SECURITY
INFORMATION
1
2
11
3
4
5
6
7
8
9
10
FRONT & LATERAL PANEL
1
Volume +/-
2
BACK button
3
Power On/Off
4
Audio Output
5
Mini HDMI
6
Mini USB
7
Host 2.0
8
RESET
9
DC IN
10
TF Card
11
Camera
BACK PANEL
Webcam & Speakers
6
CONNECT TO YOUR PC
1. Turn on by pressing POWER.
2. Use the USB cable provided to connect to the USB PC port.
3. Go to "Computer", the unit should appear, for MAC users the unit will be
shown on the desktop.
4. Select your files/folders then slide or Copy/Paste all the selected files
into it .
7
CONNECT TO YOUR TV
1. Connect the power supply from the wall socket to your DC IN port.
2. Turn on by pressing ON.
3. Connect the HDMI cable from the unit to your TV (see illustration above).
4. Check if your TV is on the right channel, normally there is diagram to
guide you (AV1, AV2, EXT1, EXT2…).
5. "HDMI SWITCH" application will be launched auto matically, select the
resolution by pressing it.Rear view of TV HDMI Cable
8
HOW TO USE YOUR TABLET
TURN ON/OFF
Press the POWER button for 3 seconds. To turn off select " turn off the MID".
ENABLE/DISABLE LCD
Once it is turned on, short press POWER to turn off the LCD screen, and
you will save energy. To turn on the LCD screen, press POWER again.
Note: The screen is locked when the screen is off; to unlock the screen,
pull the lock icon from bottom to up.
OPERATION OF THE TOUCH SCREEN
There are three ways to operate the screen of your tablet:
1. Touch any icon on the screen to launch the application.
2. Hold: touch any icon on the home screen and hold. For example, touch an
icon on the home screen and hold, a trash icon (
) will appear on the right
screen; drag the selected icon on the trash to remove the icon from the
home screen.
3. Drag: Drag your finger from left to right or vice versa to scroll the screen.
9
HOME PAGE
Once it is turned on, the following screen will be displayed on your tablet.
1
2
3
4
5
6
1
Applications
2
Back
3
Home
4
Last applications
5
Volume
6
Notifications bar
Clock, Battery &
Wifi status
* The displayed screen can change according to the applications and the
backgrounds that are installed.
UNDERSTAND THE ICONS
: To return to the home page.
: Drag up to see the system notifications.
: To show the current state of the network connection,
battery and system time.
: To return to the previous page.
: Press to display all the applications installed on the tablet.
10
WATCH A VIDEO
On the applications page, press the icon
to access the interface of
the video player. Slide your finger across the screen from up to down to
scroll the list of files and press one of the files to start playing.
The icons in the toolbar above are the functions of the video playback:
: Press to increase or decrease the volume.
: To visualize the playback time or to move to a
specific point of the video.
: Press to display the list of the files.
: Press to play the previous / next video.
: Long press for fast forward / rewind of the video.
: Press to pause / resume playback.
: Press to display the submenu that includes the following options:
- Display mode (normal, full screen, 4:3 and 16:9).
- Resume Play mode (on, off).
- Play mode (repeat all, repeat one).
- Brightness (1,2,3,4).
11
LISTEN TO MUSIC
On the applications page, press icon
to access the music player
interface. Slide your finger across the screen from up to down to scroll the
list of files and press one of the files to start playing.
: Press to sort the songs by artist.
: Press to display all the audio files on the screen.
: Press to sort the songs by album.
: Press to see the recently added titles.
: Press to return to the previous screen.
Slide your finger across the screen from top to bottom to display the
list and press any to access the audio interface to as follows:
12
The icons in the toolbar above are functions of the audio playback:
: To visualize the playback time or to move to a
specific point of the audio file.
: Press to play the previous or next music.
: Long press for fast forward / rewind of the music.
: Press to pause or resume playback.
: Press to display the list of audio files.
: Press to enable / disable the shuffle.
: Press to set the repeat mode, repeat all, repeat one or deactivate.
:Press to increase / decrease the volume.
: Press to return to the previous page.
13
VIEW YOUR PHOTOS
On the applications page, press icon
to access the picture player
interface. The picture player interface is displayed below:
The icons of the toolbar displayed on the interface above have the following
functions:
: Press to zoom in / out the displayed image.
: Press to start the slideshow.
: Press to display the menu (share, delete, or more)
- Delete: To delete your photo.
- Plus (more details, define as, crop, rotate left, rotate right).
14
FILE MANAGER
On the applications page, press icon
to access the file manager
interface. The file manager interface is shown below:
1. Switch between internal memory and SD card.
2. Enable/disable the multiple file selection.
3. File search mode.
4. Return to the previous folder.
5. Displays the Help menu.
6. Switch between the "thumbnails" view and "list" view.
7. Go back or exit the application.
8. To return to the home page.
9. To view the latest applications.
10. To view the menu options (copy, paste…).
15
SURFING THE INTERNET:
On the home page, press icon
to open the internet browser.
Press the part indicated above to display the keyboard input.
Press
to display the menu below.
1. Press to open a new web page.
2. Press to add a bookmark, view the most visited and registered sites. To
clear the history, press
to display the delete menu.
3. Press to display the opened web pages.
4. Press to refresh the current page.
5. Press to return / move to previous / next window.
6. Press to add a bookmark, find a page, select text, share a
page, download or access the web page settings.
16
INSTALL AN APPLICATION
Supports application management with the APK extension.
On the home page, touch and then
touch "AppInstall"
to enter
the application management interface. You can then install any type of
application with APK extension. Select the application to be installed and
follow the installation steps.
NOTE: It is possible that some applications may not be compatible with
the version of operating system.
17
SETTINGS
On the home page, press
to enter the system settings. You can then
adjust the settings below:
Wifi: Press to access the WiFi management interface, on which the user
can display the current Wi-Fi connection. On the Wi-Fi management
interface, if you press the Wi-Fi item, It will then scan all Wi-Fi networks
available and list them on the screen as shown below:
On the above interface, it will display the signal status by touching any
Wi-Fi network. Press the desired Wi-Fi network and enter the Wi-Fi
network protection key if necessary.
Sound: Press to set on silent mode, the notification ringtone, the selection
sound, the screen locking sound.
Display: Press to set the brightness, the automatic rotation of the screen,
the animations and time display.
18
Calibrate the touch screen: If you have difficulty using the touch screen,
please re-calibrate the screen. To start, press the calibration of the touch
screen. Press on the "+" point to calibrate.
Location & security: Press to set the location and the system security.
Applications: Press to enter application management.
Confidentiality: Press to enter the confidentiality settings.
SD card and storage device: Press to display the SD card and the storage
devices.
Language & Keyboard: Press to set the system language and the text
input mode.
Voice: audio input and output.
Accessibility: press to set the accessibility mode.
Date and time: Press to set the time and date.
About: Press to display the information.
19
Specifications
OS
Android 4.0
CPU
1.2Ghz
Storage
4GB
RAM
1G DDR
Micro SD
Support up to 32GB
Display
1024*600 pixels
Mini USB
2.0OTG
3D G-sensor
3 directions
Recorder
Built in MIC
Video
avi,mov,mp4,asf,wmv,vob,rm,rmvb,3GP,dat,mpg,flv,mkv
Audio
mp3,wav,wma,aac,APE,FLAC,AMR
Photo
JPEG,BMP,GIF,PNG
20