1
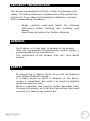
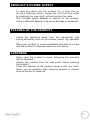
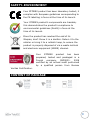
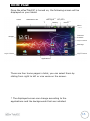
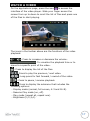
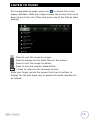
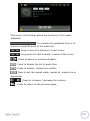
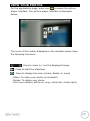
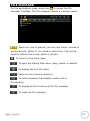
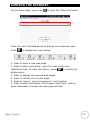
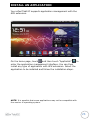
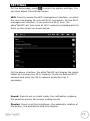
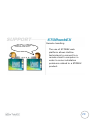
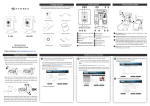
QUICK INSTALLATION GUIDE
1
2
TABLE OF CONTENTS
SECURITY INFORMATION .................................................. 5
GENERAL ........................................................................ 5
SAFETY ........................................................................... 5
PRODUCT’S POWER SUPPLY ............................................... 6
PLACING OF THE PRODUCT ............................................... 6
CLEANING ....................................................................... 6
TROUBLESHOOTING ......................................................... 7
IMPORTANT NOTE ............................................................ 7
SAFETY-ENVIRONMENT ..................................................... 8
CONTENT OF PACKAGE ..................................................... 8
INTRODUCTION ............................................................... 9
OPERATION ..................................................................... 9
MAIN FEATURES ............................................................. 10
PRODUCT DETAILS ......................................................... 11
CONNECT EZEE’TAB10C TO YOUR PC ................................ 12
CONNECT EZEE’TAB10C TO YOUR TV ................................ 13
HOW TO USE EZEE’TAB10C ............................................. 14
3
• TURN ON/OFF EZEE’TAB10C...................................... 14
• ENABLE/DISABLE LCD .............................................. 14
• OPERATION OF THE TOUCH SCREEN .......................... 14
HOME PAGE ................................................................... 15
UNDERSTAND THE ICONS ........................................... 16
WATCH A VIDEO ............................................................ 17
LISTEN TO MUSIC .......................................................... 18
VIEW YOUR PHOTOS ....................................................... 20
FILE MANAGER............................................................... 21
SURFING THE INTERNET: ................................................ 22
INSTALL AN APPLICATION ............................................... 23
SETTINGS ..................................................................... 24
GUARANTEE CONDITIONS ............................................... 26
STOREX WEBSITE .......................................................... 28
WARRANTY REGISTRATION ............................................. 28
4
SECURITY INFORMATION
This device was designed and built in order to guarantee your
safety. The safety mecanisms implemented in the product will
protect you if you observe the following installation, operation
and troubleshooting procedures:
-
-
Please carefully read and follow the following
instructions before handling and installing your
device,
Keep these instructions for further reference.
GENERAL
-
Don't shake, or it may lead to damage to the product.
Only use components and accessories (power supply...)
recommended by the manufacturer,
The illustrations of the product may vary from actual
product.
SAFETY
-
-
To prevent fire or electric shock, do not put the appliance
near objects filled with liquids ;
If a heavy object or liquid is dropped on the device,
unplug it immediately and send it to check by qualified
personnel before re-use ;
When in operation, the housing surface generates heat;
Do place the product on a flat and rigid surface and avoid
covering it or placing any object on it.
5
PRODUCT’S POWER SUPPLY
-
-
In case you don’t use the product for a long time or
during a lightning storm, unplug the unit from the outlet
by grabbing the plug itself, without pulling the cable.
The included power adapter is specific to the product.
Using a different adapter may cause damage or accidents.
PLACING OF THE PRODUCT
-
-
Install the appliance away from any equipment with
strong attraction such as microwave ovens, big speakers
...
Place your product in a well ventilated area and on a hard
and flat surface to disperse heat from the device.
CLEANING
-
Never open the product to clean, otherwise the warranty
will be canceled ;
Unplug the product from the wall outlet before cleaning
the product ;
Clean the outside of the product using a soft, dry cloth.
Never use an abrasive pad, scouring powder or solvent
such as alcohol or gasoline.
6
TROUBLESHOOTING
-
Refer
all
troubleshooting
to
qualified
personnel.
Troubleshooting is required when the appliance has been
damaged in any way: plug or cord is damaged, liquid
spilled into the product, introduction of small objects in
the product, exposure to rain or moisture, malfunction,
drop of the product...
IMPORTANT NOTE
-
At full volume, for an extended period of time can
damage your hearing.
It is illegal to download music from the Internet
without having bought the rights. STOREX is not
responsible for the use of the STOREX product with
illegal music downloading.
7
SAFETY-ENVIRONMENT
Your STOREX product has been laboratory tested; it
complies with European guidelines corresponding to
the CE labelling in force at the time of its launch.
Your STOREX product's components are tracable;
this demonstrates the product's compliance to
environmental guidelines (RoHS) in force at the
time of its launch.
Once the product has reached the end of its
lifespan, don't throw it in a dustbin. Return it to the
retailer or bring it to a rubbish heap, to ensure the
product is properly disposed of via a waste lectrical
and electronic equipment (WEEE) channel.
Your STOREX product has been
prepared, tested and packaged in a
French
company,
ISO9001:
2008
certified by an annual audit performed
by a qualified person from Bureau
Veritas Certification.
CONTENT OF PACKAGE
8
INTRODUCTION
Your "eZee’Tab10C" offers all the innovation of Google Android
operating system for browsing and applications. Lightweight,
ultra-connected, tactile..., the eZee’Tab10C is the answer to
all your mobility needs!
On a 10-inch touch screen evolving under Android 2.3, access
the Internet using Wi-Fi and customize your applications
through Android Market.
Your "eZee’Tab10C" is a transportable audio/video system
that can play movies and music in high definition.
Your "eZee’Tab10C" becomes an authentic multimedia
gateway once is connected to your TV.
OPERATION
- Your "eZee’Tab10C" allow you to watch your HD content
with ease.
- Watch your movie or pictures, listen your music everywhere
with your "eZee’Tab10C".
- Transform your "eZee’Tab10C" in a multimedia gateway;
connect it to your TV with the mini HDMI port.
9
MAIN FEATURES
- Audio connection: 3.5” output jack.
- Video connection: mini HDMI output.
- 10 inches large screen with high resolution of 1024*600
- Integrated Card Reader (Micro SD).
- PC USB port and USB Host.
10
PRODUCT DETAILS
1
BACK button
2
USB Host 2.0
3
TF Card
4
Mini USB
5
Micro
6
DC IN
7
Mini HDMI
8
Audio Output
9
Webcam
10
Power On/Off
Home Button
Volume – (long press)
12
Menu Button
Volume + (long press)
11
11
CONNECT EZEE’TAB10C TO YOUR PC
1.Turn on your "eZee’Tab10C" by pressing POWER.
2.Use the USB cable provided to connect your "eZee’Tab10C"
to the USB PC port.
3.Go to "Computer", the STOREX unit should appear, for MAC
users the unit will be shown on the desktop.
4.Select your files/folders then slide or Copy/Paste all the
selected files into "eZee’Tab10C".
IMPORTANT HINT: The MAC OS users can use the "eZee’Tab10C" on
the computer to transfer files if it is formatted in NTFS, unless please
install additional driver like "NTFS-3G.
12
CONNECT EZEE’TAB10C TO YOUR TV
Rear view of TV
HDMI Cable
1. Connect the power supply from the wall socket to your
"eZee’Tab10C" DC IN port.
2. Turn on the eZee’Go7 by pressing ON.
3. Connect the HDMI cable from the unit to your TV (see
illustration above).
4. Check if your TV is on the right channel, normally there is
diagram to guide you (AV1, AV2, EXT1, EXT2…).
5. "HDMI SWITCH" application will be launched automatically,
select the resolution by pressing it.
13
HOW TO USE EZEE’TAB10C
• TURN ON/OFF EZEE’TAB10C
To turn on / off eZee’Tab10C, press the POWER button for 3
seconds. To turn off select " turn off the MID".
• ENABLE/DISABLE LCD
Once the eZee’Tab10C is turned on, short press POWER to turn
off the LCD screen, and you will save energy. To turn on the
LCD screen, press POWER again.
Note: The screen is locked when the screen is off; to unlock
the screen, pull the lock icon from bottom to up.
• OPERATION OF THE TOUCH SCREEN
There are three ways to operate the screen of your tablet:
1. Touch any icon on the screen to launch the application.
2. Hold: touch any icon on the home screen and hold. For
example, touch an icon on the home screen and hold, a trash
icon ( ) will appear on the right screen; drag the selected
icon on the trash to remove the icon from the home screen.
3. Drag: Drag your finger from left to right or vice versa to
scroll the screen.
14
HOME PAGE
Once the eZee’Tab10C is turned on, the following screen will be
displayed on your tablet.
Home
Notification bar
Wifi signal
Time
Vol-/Vol+
Battery
Return
Menu
Internet
browser
Widget
Pages avalables
Settings
Pages avalables
Pages avalables
Applications
There are four home pages in total; you can select them by
sliding from right to left or vice versa on the screen.
* The displayed screen can change according to the
applications and the backgrounds that are installed.
15
UNDERSTAND THE ICONS
: To return to the home page.
: Drag down to see the system notifications.
: To show the current state of the network
connection, battery and system time.
: To increase or decrease the volume.
: To return to the previous page.
: To display the menu below:
1. Press to add program shortcuts, widget, folders, or
wallpaper to the home page.
2. Press to set the background of the home page.
3. Press to activate the search function.
4. Press to display the system notifications.
5. Press to enter the configuration page.
Press to display all the applications installed in your
eZee’Tab10C
16
WATCH A VIDEO
On the applications page, press the icon
to access the
interface of the video player. Slide your finger across the
screen from up to down to scroll the list of files and press one
of the files to start playing.
The icons in the toolbar above are the functions of the video
playback:
: Press to increase or decrease the volume.
: To visualize the playback time or to
move to a specific point of the video.
: Press to display the list of the files.
: Press to play the previous / next video.
: Long press for fast forward / rewind of the video.
/
: Press to pause / resume playback.
Press to display the submenu that includes the
following options:
- Display mode (normal, full screen, 4:3 and 16:9).
- Resume Play mode (on, off).
- Play mode (repeat all, repeat one).
- Brightness (1,2,3,4).
17
LISTEN TO MUSIC
On the applications page, press icon
to access the music
player interface. Slide your finger across the screen from up to
down to scroll the list of files and press one of the files to start
playing.
: Press to sort the songs by singer.
: Press to display all the audio files on the screen.
: Press to sort the songs by album.
: Press to see the recently added titles.
: Press to return to the previous screen.
Slide your finger across the screen from top to bottom to
display the list and press any to access the audio interface to
as follows:
18
The icons in the toolbar above are functions of the audio
playback:
: To visualize the playback time or to
move to a specific point of the audio file.
: Press to play the previous or next music.
: Long press for fast forward / rewind of the music.
/
: Press to pause or resume playback.
: Press to display the list of audio files.
: Press to enable / disable the shuffle.
: Press to set the repeat mode, repeat all, repeat one or
deactivate.
: Press to increase / decrease the volume.
: Press to return to the previous page.
19
VIEW YOUR PHOTOS
On the applications page, press icon
to access the picture
player interface. The picture player interface is displayed
below:
The icons of the toolbar displayed on the interface above have
the following functions:
: Press to zoom in / out the displayed image.
: Press to start the slideshow.
: Press to display the menu (share, delete, or more)
- Share: To share your photo via bluetooth.
- Delete: To delete your photo.
- Plus (more details, define as, crop, rotate left, rotate right).
20
FILE MANAGER
On the applications page, press icon
to access the file
manager interface. The file manager interface is shown below:
: When this icon is grayed, you can play music, movies or
photos directly. When lit, it is used to select files. This will be
used for editing files (copy, paste or delete).
: To return to the home page.
: To open the editing files menu (copy, paste, or delete).
: To display the sort file menu.
: Return to the previous directory.
: To switch between files display modes (list or
thumbnails).
: To display all the functions of the file manager.
: To close the file manager.
21
SURFING THE INTERNET:
On the home page, press icon
to open the internet browser.
Press the part indicated above to display the keyboard input.
Press
to display the menu below.
1. Press to open a new web page.
2. Press to add a bookmark, view the most visited and
to display the
registered sites. To clear the history, press
delete menu.
3. Press to display the opened web pages.
4. Press to refresh the current page.
5. Press to return / move to previous / next window.
6. Press to add a bookmark, find a page, select text, share a
page, download or access the web page settings.
22
INSTALL AN APPLICATION
Your eZee’Tab10C supports application management with the
APK extension.
and then touch "AppInstall"
to
On the home page, touch
enter the application management interface. You can then
install any type of application with APK extension. Select the
application to be installed and follow the installation steps.
NOTE: It is possible that some applications may not be compatible with
the version of operating system.
23
SETTINGS
On the home page, press
to enter the system settings. You
can then adjust the settings below:
Wifi: Press to access the WiFi management interface, on which
the user can display the current Wi-Fi connection. On the Wi-Fi
management interface, if you press the Wi-Fi item, the
eZee’Tab10C will then scan all Wi-Fi networks available and list
them on the screen as shown below:
On the above interface, the eZee’Tab10C will display the signal
status by touching any Wi-Fi network. Press the desired Wi-Fi
network and enter the Wi-Fi network protection key if
necessary.
Sound: Press to set on silent mode, the notification ringtone,
the selection sound, the screen locking sound.
Display: Press to set the brightness, the automatic rotation of
the screen, the animations and time display.
24
Calibrate the touch screen: If you have difficulty using the
touch screen, please re-calibrate the screen. To start, press the
calibration of the touch screen. Press on the "+" point to
calibrate.
Location & security: Press to set the location and the system
security.
Applications: Press to enter application management.
Confidentiality: Press to enter the confidentiality settings.
SD card and storage device: Press to display the SD card
and the storage devices.
Language & Keyboard: Press to set the system language and
the text input mode.
Voice: audio input and output.
Accessibility: press to set the accessibility mode.
Date and time: Press to set the time and date.
About: Press to display the information in the eZee’Tab10C.
25
GUARANTEE CONDITIONS
STOTEX’s available guarantee is valid for 1 year for
"eZee’Tab10C" and 3 months long for its accessories (remote
control, AV cables, power supply ...).
STOREX guarantees your products against any manufacturing
or assembling faults. This guarantee only applies to the first
purchase of the "eZee’Tab10C" by the end user and is not
transferable if the device is resold. This warranty does not
cover any incompatibilities found by end user apart from
recommendations specified on the packaging, or any other
incompatibility generated by other hardware or software on the
computer that is connected to the "eZee’Tab10C".
Proof of purchase must be presented to our services to apply
STOREX guarantee.
The guarantee doesn’t cover failures or defects induced by
non-compliance to this manual’s instructions, neglect,
alteration, improper installation or maintenance, reparation or
alteration not authorized by STOREX, improper tests, accident
or external factor such as (not exhaustive) excessive heat or
dampness, power failures or bad installation / uninstalling of
"eZee’Tab10C".
26
The only contractual obligation endorsed by STOREX pertains
to the reparation or replacement of a defective product. In no
case, STOREX cannot be held responsible for any loss of data,
or its consequences induced by operational fault or a product
failure. In any case, STOREX won't be bound to any financial
responsibility for any amount exceeding the value of the
product purchased by the end user.
This guarantee is well defined and cannot be modified,
decreased or increased without written consent from STOREX.
In addition, STOREX cannot be held responsible for any
technical advice or service provided in relation to
"eZee’Tab10C".
For any request not covered by this guarantee, please contact
STOREX support or log on to www.e-storex.com to order
accessories.
You are not the grantee of this current warranty. This warranty
covers only your "eZee’Tab10C" and is governed by French
law.
Note:
STOREX ™ reserves the right to modify the user manual
without prior notice according to the product's evolutions. You
can find the latest version of the manual on our website:
http://www.storex.eu
27
STOREX WEBSITE
Go to http://www.storex.eu.
Select “Multimedia Lablet” and then select "eZee’Tab10C".
You will be able to download the latest full version of the
manual and software updates.
WARRANTY REGISTRATION
In order to facilitate the management of your issue, should you
contact our support team, we invite you to register your
"eZee’Tab10C" guarantee on our website at the following
address:
http://garantie.storex.eu
For repairing, contact your dealer to repair your "eZee’Tab10C"
under guarantee, or send your request via email to the
following address:
[email protected]
or by phone at:
France: 0155858200 (local call charge to Paris)
Spain: 902110572 ([email protected])
England : ([email protected])
Monday to Thursday from 9:30 to 19:30 p.m.
Friday from 9:30 to 18:30 p.m.
28
Remote handling
"Hello, I can't install my
external hard drive"
The use of STOREX web
platform allows Hotline
technicians to connect to a
remote client's computer in
order to solve installation
problems related to a STOREX
product.
29
HINTS :
_______________________________
_______________________________
_______________________________
_______________________________
_______________________________
_______________________________
_______________________________
_______________________________
_______________________________
_______________________________
_______________________________
_______________________________
_______________________________
_______________________________
30
31
www.storex.eu
© STOREX –2012
All trademarks are patended by their respective owners.
32