1
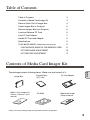
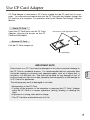
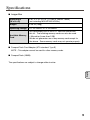
Media Card Imager Kit
MODEL EVW-100
INSTALLATION AND OPERATION
OF THE IMAGER BOX
This Media Card Imager kit is an optional
kit to project image data in various format
and files created with Microsoft PowerPoint
with our projector. Image data can be easily projected just by attaching the Imager
Box to a projector without any connection
with a computer.
This kit is only used for our projectors that
have a terminal for the Imager Box.
OWNER'S MANUAL
日本語
The data played back through the Imager
Box is edited with Media Card Imager software included in the kit. For operation of
the software, refer to separately included
"Media Card Imager" Owner's Manual.
Italiano Deutsch Español Français English
This manual explains the installation of the
Imager Box and its operation.
Compliances
Federal Communication Commission Notice
This equipment has been tested and found to comply with the limits for a Class B
digital device, pursuant to part 15 of the FCC Rules. These limits are designed to
provide reasonable protection against harmful interference in a residential
installation. This equipment generated, uses and can radiate radio frequency energy
and, if not installed and used in accordance with the instructions, may cause harmful
interference to radio communications. However, there is no guarantee that
interference will not occur in a particular installation. If this equipment does cause
harmful interference to radio or television reception, which can be determined by
turning the equipment off and on, the user is encouraged to try to correct the
interference by one or more of the following measures :
– Reorient or relocate the receiving antenna.
– Increase the separation between the equipment and receiver.
– Connect the equipment into an outlet on a circuit different from that to which the
receiver is connected.
– Consult the dealer or an experienced radio/TV technician for help.
Do not make any changes or modifications to the equipment unless otherwise specified in the manual. If such changes or modifications should be made, you could be
required to stop operation of the equipment.
Trademark
Microsoft, Windows, and PowerPoint are registered trademarks of Microsoft Corp. in
the U.S.A.
Microdrive is a trademark of IBM in the U.S.A.
CompactFlash is a trademark of SanDisk Corporation in the U.S.A.
Each name of corporations or products in Owner's Manual is a trademark or a registered trademark of its respective corporation.
2
Table of Contents
Table of Contents
3
Contents of Media Card Imager Kit
3
Name of Each Part of Imager Box
4
Attach Imager Box to Projector
5
Remove Imager Box from Projector
6
Load and Remove CF Card
6
Use CF Card Adapter
7
Handle CF Card and Adapter
8
Specifications
9
PLAY BACK IMAGE (OPERATING PROJECTOR)
11
PLAYING BACK IMAGE IN THE MEMORY CARD
11
PICTURE IMAGE ADJUSTMENT
15
PICTURE SIZE ADJUSTMENT
17
Contents of Media Card Imager Kit
Imager Box
Media Card Imager Kit
Owner's Manual (this
manual)
CompactFlash
(CF) Card
* CD-ROM
English
The package contains following items. Make sure you have all of it.
CF Card Adapter
* MediaCard Imager
Owner's Manual
*Those are used for editing image data played back with the Imager Box.
3
Name of Each Part of Imager Box
Imager Box
INDICATOR
LATCH
BUTTON
(lights while
accessing)
CF CARD SLOT
CF CARD EJECT
BUTTON
CONNECTOR
PLUG
SWITCH
BUTTON
MOUNTING HOOK
4
Attach Imager Box to Projector
CAUTION : Turn off the projector when attaching the Imager Box to the projector.
Do not attach or remove while the projector is turned on. It may damage
the equipment.
1
Remove 4 covers attached to a projector. Insert the
MOUNTING HOOKs (A) into the projector to the arrow
direction. (Fig.-1)
2
Plug the CONNECTOR PLUG into the DVI Terminal of the
projector while pressing the Imager Box LATCH BUTTON,
and release it.
(Fig.-1)
cover
Remove 4 covers.
LATCH BUTTON
(A)
English
(Fig.-2)
DVI Terminal
COMPUTER IN
DIGITAL
R – AUDIO IN – L (MONO)
S – VIDEO
The SWITCH BUTTON of the Imager
Box is placed on
the switch of the
projector.
VIDEO
Y – Pb / Cb – Pr / Cr
AUDIO IN
COMPUTER
R – AUDIO OUT – L
MCI
COMPUTER IN
ANALOG
USB
CONTROL PORT
CONNECTOR
PLUG
5
Remove Imager Box from Projector
CAUTION : Do not remove the Imager Box from the projector while the projector is
on. It may damage data in a memory card and the card itself.
CAUTION :Removing by force may
damage the Imager Box.
Press the LATCH BUTTON to the arrow
direction. Then pull and remove the
Imager Box.
(Fig.-3)
Press the LATCH
BUTTON.
Pull and remove the
Imager Box.
Load and Remove CF Card
Load CF Card
Insert the CF Card into the CF Card slot
of the Imager Box until the EJECT BUTTON pops out.
CF CARD
EJECT BUTTON
INDICATOR
• Do not insert it in the wrong way. It may damage
the equipment.
Remove CF Card
1
Press the CF CARD EJECT BUTTON. The CF Card is released.
2
Pull out the CF Card from the Imager
Box.
Insert the CF Card with the
mark ▲ ahead.
(Fig.-4)
Do not remove a CF Card while
the indicator is lighting. It may
damage the card and the data
CAUTION
in it.
6
Use CF Card Adapter
CF Card Adapter is used when a CF Card is loaded into the PC card slot of a computer. You can write and rewrite data into the CF Card with the Adapter through the
PC card slot of a computer. For operation, refer to the "Media Card Imager" Owner's
Manual.
Attach CF Card
Insert the CF Card firmly into the CF Card
Adapter, aligning the arrows on the CF
Card and the adapter.
Insert the CF Card aligning the arrows.
Remove CF Card
Pull the CF Card straight out.
CF Card
CF Card Adapter
IMPORTANT NOTE
English
Data stored on a CF Card may be damaged or lost due to physical damage to
the CF Card or accidental erasure. It is recommended that any important data
should be copied as a backup onto separate media, such as a floppy disk, a
hard disk, or a MO disk, etc. We shall not be liable for any damage or loss of
profits arising from the loss of data caused by the misoperation or the damage to
a CF Card or its appliances.
The following may result in damaged or lost data:
• Misoperation of the CF Card.
• Turning off the projector or the computer or removing the CF Card / Adapter
while the CF Card is in access operations (writing, reading, or deleting the
files).
• Exposure to a strong static electric charge.
• The CF Card has reached the end of its life.
7
Handle CF Card and Adapter
● CF Cards / Adapters are high-precision electronic devices. Do not bend, drop,
apply strong forces or shock or place it where a strong static electrical charge may
be generated.
● Do not touch the surface of the contact area with your fingers or allow it to be
stained with foreign materials.
● Do not attempt to disassemble or alter CF Cards.
● Moving CF Card rapidly between hot and cold temperatures may cause condensation (water droplets) to form on it, leading to malfunctions. Avoid this problem
by placing the CF Card in a plastic bag and letting it slowly adjust to temperature
changes before removing it from the bag. If condensation should occur, maintain
the CF Card at a constant temperature and let the moisture evaporate naturally.
● Store CF Cards / Adapters in the protective case.
● Do not use or store CF Cards / Adapters in places subject to the following conditions:
• strong magnetic fields
• abundant dirt or dust
• high temperatures, high humidity
ENVIRONMENT of CF Card operation
Operating Temperature : 41 ˚F ~ 95 ˚F (5 ˚C ~ 35 ˚C)
Storage Temperature : 14 ˚F ~ 140 ˚F (-10 ˚C ~ 60 ˚C)
8
Specifications
■ Imager Box
Dimensions
(W x H x D)
4.61" x 2.76" x 0.75" (117mm x 70mm x 19mm)
(not including MOUNTING HOOKs)
Weight
5.29 oz (150g)
Operating Voltage
DC 5V 450mA, DC 3.3V 600mA
Available Memory
Card
We recommend you to use a CF card that comes with
this kit. The following memory cards can also be used.
• Microdrive (lower than 1GB)
We do not guarantee use of any memory card except for
the above. Some memory cards may not operate properly.
■ CompactFlash Card Adapter (ATA standard Type-II)
NOTE ; This adapter cannot be used for other memory cards.
■ CompactFlash (16MB)
English
The specifications are subject to change without notice.
9
10
IMAGE PLAYBACK (OPERATING PROJECTOR)
PLAYING BACK IMAGE IN THE MEMORY CARD
1
Attach Imager Box to your projector properly (P5), and turn the projector on. Refer to Owner’s Manual
of your projector for operation.
2
3
Load a memory card into CF Card Slot of Imager Box. (P6)
Projector automatically turns to MCI mode and shows the image data in a memory card.
NOTE ; Refer to Owner’s Manual of your projector for location of each button and basic operation.
MENU BAR
Press MENU button while in MCI mode.
SCREEN MENU
Used to select
input source
either Computer
(MCI) or Video.
(Refer to P12)
IMAGE SELECT MENU
Used to select image
level among Standard,
Real and Image 1 ~ 4.
(Refer to P15)
Used to adjust size
of image to Normal
or True, or expand /
compress image
(Digital zoom +/–).
(Refer to P17)
SETTING MENU
Used to change settings
of projector or reset Lamp
Reset Counter.
(Refer to Owner’s Manual
of your projector.)
GUIDE WINDOW
VIEW MENU
IMAGE ADJUST MENU
SOUND MENU
Shows selected
item of ONSCREEN Menu.
Used to display
image data in a
memory card.
(Refer to P13, 14)
Used to adjust picture image.
[Contrast / Brightness / White
balance (Red/Green/Blue) /
Gamma]
(Refer to P16)
Used to adjust volume
or mute sound. (Refer
to Owner’s Manual of
your projector.)
English
INPUT MENU
11
IMAGE PLAYBACK (OPERATING PROJECTOR)
SELECTING INPUT SOURCE
When a memory card is loaded into Imager Box connected to the projector, MCI mode is
automatically selected. The first Page of the latest Index in a memory card is displayed on a
screen.
To switch to MCI mode manually, operate as follows.
DIRECT OPERATION
INPUT button
Choose Computer by pressing INPUT button on
Top Control or on Remote Control Unit.
If projector cannot reproduce proper image, select
correct input source through MENU OPERATION.
Computer
Video
MENU OPERATION
1
Press MENU button and ON-SCREEN MENU
will appear. Press POINT LEFT/RIGHT button
to move a red frame pointer to INPUT Menu
icon.
2
Press POINT DOWN button to move a red
arrow pointer to Computer and then press
SELECT button. Source Select Menu will
appear.
3
INPUT MENU
INPUT Menu icon
Move a pointer (red arrow)
to Computer and press
SELECT button.
Move a pointer to MCI and then press SELECT
button.
Quit
Source Select Menu
Move a pointer to MCI
and press SELECT
button.
Closes Source Select Menu.
INDEX AND PAGE
Image data edited with Media Card Imager
(software) is Index format consisting of several
Pages. To project desirable image, select Index
and then select Page in the Index.
Select Index
Index
Pages in Index
12
IMAGE PLAYBACK (OPERATING PROJECTOR)
To project desirable image, select Index and then Page as follows.
SELECTING INDEX
1
Press MENU button and ON-SCREEN MENU
will appear. Press POINT LEFT/RIGHT button
to move a red frame pointer to VIEW Menu
icon.
2
Press POINT DOWN button to move a red
frame pointer to Index icon and then press
SELECT button. The table of Indexes in the
memory card is displayed.
Press RIGHT CLICK button on Remote Control
Unit to stop table display. (✽1)
VIEW MENU
VIEW Menu icon
3
Press POINT LEFT/RIGHT/UP/DOWN buttons
to move a pointer to the Index to be projected
and then press SELECT button. The first Page
of the selected Index is displayed.
Press POINT UP/DOWN button to turn
previous/next Page over. (✽2)
POINT UP button ··· returns to previous page.
POINT DOWN button ··· goes to next page.
Move a red frame pointer to Index
icon and press SELECT button.
✽1 When RIGHT CLICK button is
pressed during table display, each
Index/Page is displayed as an icon.
This operation reduces time for
displaying all image data.
✽2 When ON-SCREEN MENU is
displayed, Page cannot be turned
over to next/previous one.
SELECTING PAGE
Press MENU button and ON-SCREEN MENU
will appear. Press POINT LEFT/RIGHT button
to move a red frame pointer to VIEW Menu
icon.
2
Press POINT DOWN button to move a red
frame pointer to Page icon and then press
SELECT button. The table of all Pages of
selected Index is displayed.
Press RIGHT CLICK button on Remote Control
Unit to stop table display. (✽1)
VIEW MENU
English
1
VIEW Menu icon
3
Move a red frame pointer to Page
icon and press SELECT button.
Press POINT LEFT/RIGHT/UP/DOWN buttons
to move a pointer to the Page to be projected
and then press SELECT button.
Press POINT UP/DOWN button to turn
previous/next Page over. (✽2)
POINT UP button ··· returns to previous page.
POINT DOWN button ··· goes to next page.
Table of Pages can be also displayed by
pressing SELECT button when Page is
displayed on full screen.
13
IMAGE PLAYBACK (OPERATING PROJECTOR)
AUTO PLAY FUNCTION
1
Press MENU button and ON-SCREEN MENU
will appear. Press POINT LEFT/RIGHT button
to move a red frame pointer to VIEW Menu
icon.
2
Press POINT DOWN button to move a red
frame pointer to Auto play icon and then press
SELECT button. Auto play setting dialog box
will appear
VIEW MENU
VIEW Menu icon
3
On
When setting Auto play function on, move a red
arrow pointer to “On,” adjust interval (sec.) by
pressing POINT LEFT RIGHT button, and then
press SELECT button. Projected image is
turned over to next automatically with interval.
This Auto play function can be pausing by
pressing POINT UP button and restarts with
POINT DOWN button.
✽ When auto play setting is previously set with
Media Card Imager (software), interval set by
Media Card Imager has priority over interval
with this menu.
Auto play setting dialog box
Press POINT LEFT/RIGHT
button(s) to adjust the interval
and press SELECT button.
Off
To cancel Auto play function, move a red arrow
pointer to “Off” and then press SELECT button.
Auto play setting set with Media Card Imager
(software) is also suspended by setting to “Off.”
Quit
Closes Auto play setting dialog box.
CAUTION
14
Do not remove a memory card from Imager Box while Auto play function is
operated or Indicator of Imager Box is lighting or flashing. It may damage a
memory card or data in a memory card.
Before removing a memory card from Imager Box, be sure to set Auto play
function to “Off” or interrupt input signal from Imager Box by changing input
source.
IMAGE PLAYBACK (OPERATING PROJECTOR)
PICTURE IMAGE ADJUSTMENTS
IMAGE LEVEL SELECT (DIRECT OPERATION)
Select Image Level among Standard, Real, Image
1, Image 2, Image 3 and Image 4 by pressing
IMAGE button on Top Control or on Remote
Control Unit.
IMAGE button
Standard
Real
Standard
Normal picture level preset on this projector.
Real
Picture level with improved halftone for graphics.
Image 1 ~ 4
User preset picture adjustment in IMAGE ADJUST
Menu (refer to P16).
Image 1
Image 2
Image 3
Image 4
IMAGE LEVEL SELECT (MENU OPERATION)
Press MENU button and ON-SCREEN MENU
will appear. Press POINT LEFT/RIGHT button
to move a red frame pointer to IMAGE SELECT
Menu icon.
2
Press POINT DOWN button to move a red
frame pointer to the Image Level that you want
to set and then press SELECT button.
Standard
Normal picture level preset on this projector.
Real
Picture level with improved halftone for graphics.
IMAGE SELECT MENU
IMAGE SELECT
Menu icon
Move a red frame pointer to the
Image Level and press SELECT
button.
Image Level being selected.
Image 1 ~ 4
User preset picture adjustment in IMAGE ADJUST
Menu (refer to P16).
15
English
1
IMAGE PLAYBACK (OPERATING PROJECTOR)
IMAGE LEVEL ADJUSTMENT
1
Press MENU button and ON-SCREEN MENU
will appear. Press POINT LEFT/RIGHT
buttons to move a red frame pointer to IMAGE
ADJUST Menu icon.
2
Press POINT DOWN button to move a red
frame pointer to the item that you want to
adjust, and then press SELECT button. The
level of each item is displayed. Adjust each
item by pressing POINT LEFT/RIGHT buttons.
Contrast
Press POINT LEFT button to decrease contrast,
and POINT RIGHT button to increase contrast.
(From 0 to 63.)
IMAGE ADJUST MENU
IMAGE ADJUST
Menu icon
Move a red frame pointer to
the item to be adjusted and
then press SELECT button.
Selected Image Level (P15)
Brightness
Press POINT LEFT button to adjust image darker,
and POINT RIGHT button to adjust brighter. (From
0 to 63.)
White balance (Red/Green/Blue)
Press POINT LEFT button to lighten tone of each
color, and POINT RIGHT button to deepen tone.
(From 0 to 63.)
Gamma
Press POINT LEFT button or POINT RIGHT button
to obtain better balance of contrast. (From 0 to 31.)
3
Press POINT LEFT/RIGHT
buttons to adjust value.
Store icon
Press SELECT button at this icon
to store the adjustment.
Store
To store manually preset image level, move a
red frame pointer to Store icon and press
SELECT button. IMAGE LEVEL SET MENU
will appear. Move a red frame pointer to Image
1 ~ 4 where you want to set and then press
SELECT button.
Reset
Reset all adjustment to previous value.
Quit
Closes IMAGE ADJUST MENU.
16
IMAGE LEVEL SET MENU
Move a red frame pointer to
Image 1 ~ 4 and then press
SELECT button.
IMAGE PLAYBACK (OPERATING PROJECTOR)
PICTURE SIZE ADJUSTMENT
This projector has a picture screen resize function, which enables you to display the desirable
image size.
1
Press MENU button and ON-SCREEN MENU
will appear. Press POINT LEFT/RIGHT
buttons to move a red frame pointer to
SCREEN Menu icon.
2
Press POINT DOWN button and move a red
frame pointer to the function that you want to
select and then press SELECT button.
SCREEN MENU
SCREEN Menu
icon
Move a red frame pointer to the
function and press SELECT button.
Normal
Provides image to fit screen size.
True
Provides image in its original size. When the
original image is larger than screen size, the
projector automatically enters “Digital zoom +”
mode.
English
Digital zoom +
When Digital zoom + is selected, ON-SCREEN
MENU disappears and the message “D. Zoom +” is
displayed. Press SELECT button to expand image
size. And press POINT UP/DOWN/LEFT/RIGHT
button(s) to pan the image. Panning function can
work only when the image is larger than screen
size.
Projected image can be also expanded by pressing
D. Zoom ▲ button on Remote Control Unit.
Digital zoom –
When Digital zoom – is selected, ON-SCREEN
MENU disappears and the message “D. Zoom –” is
displayed. Press SELECT button to compress
image size.
Projected image can be also compressed by
pressing D. Zoom ▼ button on Remote Control
Unit.
To cancel Digital Zoom +/– mode, press any button
except D. ZOOM ▲ /▼ , SELECT, POINT and
LASER buttons.
17
18