1
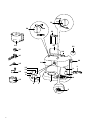
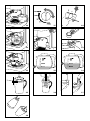
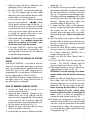
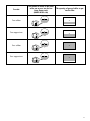
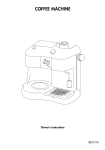
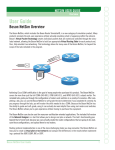
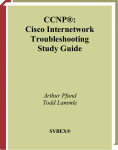
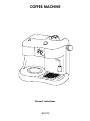
COFFEE MACHINE
Owner’s instructions
BCO70
21
20
22
19
23
25
17
24
16
26
18
15
14
1
12
11
2
10
9
3
4
13
8
7
6
5
2
1
2
3
4
5
6
7
8
9
10
11
12
13
14
15
3
16
17
18
19
20
21
22
23
24
25
26
27
5 mm
28
4
IMPORTANT SAFEGUARDS
When using electrical appliances, basic safety precautions should always be followed, including the following:
• Read all instructions.
• Do not touch hot surfaces. Use handles and knobs.
• To protect against fire, electrical shock and personal injury, do not immerse cord, plug or
appliance in water or other liquid.
• Close supervision is necessary when any appliance is used by or near children.
• Unplug from the outlet when not in use and before cleaning. Allow to cool before fitting or
taking off parts, and before cleaning the appliance.
• Do not operate with a damaged cord or plug, or after the appliance malfunctions, or has
been damaged in any manner. Return the appliance to the nearest authorized service facility for examination, repair or adjustment.
• The use of accessory attachments or spare parts not recommended by the appliance manufacturer may result in fire, electrical shock or personal injury.
• Do not use outdoors.
• Do not let the cord hang over the edge of the table or counter, or touch hot surfaces.
• Do not place on or near a hot gas or electrical burner, or in a heated oven.
• Plug cord into the wall outlet. To disconnect, turn any control to “off”, then remove plug from wall outlet.
• Do not use the appliance for other than the intended use.
• DO NOT unscrew or remove boiler cap while the machine is in operation. Wait until brewing cycle is completed and all water and steam has been used up.
• Appliances with Glass Containers:
A. The container is designed for use with this appliance. It must never be used on a range top.
B. Do not set a hot container on a wet or cold surface.
C. Do not use a cracked container or a container having a loose or weakened handle.
D. Do not clean container with cleansers, steel wool pads, or other abrasive material.
SAVE THESE INSTRUCTIONS
THIS PRODUCT IS FOR HOUSEHOLD USE ONLY
SHORT CORD INSTRUCTIONS
-
-
A short power cord is provided to reduce risks resulting from becoming entangled in or tripping
over a longer cord.
Longer, detachable power supply cords or extension cords are available and may be used if care
is exercised in their use.
If an extension cord is used, the marked electrical rating should be at least as great as the electrical rating of the appliance. If the appliance is provided with 3- wire, grounding type cord, the
extension should be a GROUNDING TYPE 3 - WIRE CORD. The longer cord should be arranged
so that it will not drape over the counter-top or table top where it can be pulled on by children or
tripped over.
Your product is equipped with a polarized alternating current line plug (a plug having one blade
wider than the other). This plug will fit into the power outlet only one way. This is a safety feature.
If you are unable to insert the plug fully into the outlet, try reversing the plug. If the plug should
still fail to fit, contact your electrician to replace your obsolete outlet. Do not defeat the safety purpose of the polarized plug.
5
ENGLISH
Please read this instructions manual carefully
before installing and using the appliance. Only
by following these directions will you be able to
obtain the best results from the appliance and in
complete safety.
DESCRIPTION OF THE APPLIANCE
The following terms are used throughout the
instructions manual.
1. Power supply cable
2. Tube for steam escape
3. Cappuccino maker
4. Drip collection pan
5. Boiler outlet
6. Warming plate
7. ON/OFF switch espresso coffee/cappuccino
8. 5/10 cup drip coffee switch
9. ON/OFF switch drip coffee
10. ON indicator light drip coffee
11. 5/10 cup drip coffee indicator light
12. ON indicator light espresso coffee/cappuccino
13. Small coffee pot for espresso coffee/cappuccino
14. Two cup attachment for espresso coffee
15. Measuring spoon
16. Filter holder for espresso coffee
17. Filter for espresso coffee
18. Filter holder for drip coffee
19. Drip coffee pot
20. “ACCUFLAVOR” drip coffee aroma selector
switch
21. “Vario system” espresso coffee aroma selector
switch
22. Removable water tank
23. Lid for water tank
24. Boiler
25. Boiler cap
26. Steam release knob
INSTALLATION
• Place the appliance on a flat work surface
away from water sources such as taps or sinks.
• Check that the voltage of the electrical power
line corresponds to the voltage indicated on the
appliance label. Connect the appliance only to
a power source having a minimum load
capacity of 10 amps and having a proper
grounding feature. The manufacturer takes no
responsibility for any accidents caused by the
lack of a grounding device for the appliance.
• Never install the machine in an environment
which can reach a temperature of less than or
equal to 0°C (if the water inside the machine
freezes, the machine might be damaged):
HOW TO PREPARE DRIP COFFEE
• Raise the lid and remove the water tank (fig.
1).
• Fill the tank with cold, clean water, up to the
level indicated on the tank corresponding to
the number of cups of coffee that are desired
(fig. 2).
• Insert the tank into the machine by pressing it
slightly. If desired, the tank can be left in its
place and to fill it, the drip coffee pot can be
used which also has the level indicators on it
(fig. 3).
• Open the filter holder by swinging it out to the
left (fig. 4).
• Place the paper filter into the filter holder (fig.
5). We recommend using #4 type paper filters.
• Put the ground coffee into the filter by using the
measuring spoon included with the machine
and level off the grounds uniformly (fig. 6). As
a general rule, use one level measuring spoonful of coffee (about 7 grams) for each cup of
coffee (for example, use 10 measures to make
10 cups of coffee). In any case, the quantity of
ground coffee to use can vary according to the
strength desired and personal taste. Use high
quality ground coffee, with a medium grind
and the kind packaged especially for drip coffee makers.
• Close the filter holder and place the pot, with
its lid inserted, onto the hot plate.
6
• Select the aroma desired as indicated in the
paragraph “How to select the aroma”.
• Press the “ON/OFF” switch for drip coffee (fig.
7). The ON indicator light for drip coffee
above the switch itself indicates that the coffee
machine filter is functioning properly.
• If more than five cups of coffee are desired,
press the switch (with the
symbol)
(fig. 8) and the indicator light will light up. If,
on the other hand, five or fewer cups of coffee
are desired, the switch should not be pressed.
In this way, the hot water will flow more slowly through the ground coffee and a more
flavourful beverage will be obtained.
• The brewed coffee will begin to drip out after
a few seconds. It is completely normal that
during the percolation of the coffee, some
steam may escape from the machine.
• If you keep “ON/OFF” switch for drip coffee
on the ON position after the percolation, the
warming plate will maintain the hot coffee at
an ideal drinking temperature.
HOW TO SELECT THE AROMA OF THE DRIP
COFFEE
With the ACCUFLAVOR , it is possible to select the
aroma of the dripcoffee depending on personal
taste. By turning the aroma regulation knob of the
coffee filter (fig. 9), the coffee machine can be
programmed for a strong flavour (STRONG position) or a lighter flavour (LIGHT position).
The ACCUFLAVOR feature changes the flavour of
the coffee, more or less strong, while the taste of
the coffee remains unchanged.
HOW TO PREPARE ESPRESSO COFFEE
1. Unscrew the boiler cap by turning it in a
counter-clockwise direction.
2. Using the level indications stamped on the
WATER LEVEL side, fill the small pot with the
amount of water suggested (fig. 10) according
to the number of cups of espresso coffee that
are desired (see the chart at the end of this text).
3. Pour the water into the boiler (fig. 11).
4. Replace the plug in the boiler cap by turning
firmly in a clockwise direction.
5. Insert the filter for espresso coffee into the filter
holder (fig. 12).
6. Fill the filter with the ground coffee, respecting
the dosages indicated in the chart at the end of
this text and distribute it uniformly in the filter
(fig. 13). It is important to use the highest quality coffee and having a medium grind in order
to avoid the obstruction of the filter during the
brewing. Remove any excess coffee from
around the edges of the filter (fig. 14).
7. To attach the filter holder to the appliance,
position it under the boiler outlet with the handle towards the left, see fig. 15. Push
upwards, and at the same time, turn the handle towards the right. Always turn right to the
end.
8. Place the coffee pot for espresso coffee under
the filter holder so that the spout where the coffee exits is inside of the opening on the lid of
the coffee pot (fig. 16).
9. Position the “Vario System” selector according
the type of espresso coffee desired: “LIGHT”
for a lighter coffee and “STRONG” for a
stronger tasting brew (fig. 17).
10. Make sure that the steam release knob is
closed.
11. Push the ON/OFF switch for espresso/cappuccino. The ON/OFF indicator light for
espresso/cappuccino will turn on (fig. 18).
12. After approximately two minutes, the espresso
coffee will begin to flow out (fig. 19).
ATTENTION: to avoid spraying, never detach
the filter holder while the machine in brewing
coffee.
13. When the coffee no longer flows out from the
filter holder, push the ON/OFF switch for
espresso/cappuccino to turn off the hot water
heater (fig. 18). Pour the coffee into the cups.
Before removing the filter holder, it is important to eliminate all of the residual steam
from the inside of the boiler to avoid puffs of
steam. Allow it to blow out completely by
rotating the steam release knob (fig. 20).
14. To dispose of used grounds in the filter, first
remove the filter holder by turning the handle
to the left. Using the special lever in the handle
to keep the filter in place, remove the grounds
by turning the filter holder upside down and
striking gently. (fig. 21).
7
NOTE: For safety reasons, when the boiler is hot,
it is not possible to remove its boiler cap as it will
spin without opening. If for any reason it is necessary to remove it, it is important to always
release the steam in the boiler by acting on the
steam release knob as described in the previous
point.
HOW TO USE THE TWO CUP ATTACHMENT
The attachment allows espresso coffee to drip
directly into two cups at the same time. To mount
the attachment, fit it to the lower part of the filter
holder by attaching the bracket to the handle of the
filter holder (fig. 22).
CARE BEFORE INITIAL USE: The first time that coffee is prepared, it is necessary to wash all of the
accessories and the internal circuits of the
machine as follows:
• For the drip coffee machine: make at least two
pots of coffee without using the ground coffee
in the filter (following the instructions in the
paragraph How to prepare the drip coffee);
surpass the level 2, there will be no water left
in the tank to make the steam for frothing the
milk.
• Pour the coffee into 2 sufficiently large cups.
• Pour approximately 100 grams of milk into the
container for each cappuccino to be made. It
is important to use fresh milk which has not
been boiled (not UHT) and especially not preheated. When choosing the container to use
for the milk, keep in mind that the frothed milk
will increase by two or three times its original
volume.
• Immerse the frother into the milk by about 5
mm (fig. 25) and turn the steam release knob
in a counter clockwise direction, fig. 20 (by
turning the knob more or less, it is possible to
vary the amount of steam which will come out
of the frother tube). At this point, the milk
should begin to increase in volume and assume
a dense and creamy texture.
• For the espresso coffee: make at least four
cups of espresso coffee without using ground
coffee in the filter (following the instructions in
the paragraph How to prepare the espresso
coffee);
• When the volume of milk has doubled,
immerse the frother deeper into the milk to continue to froth and heat the milk (fig. 26). Turn
off the steam knob only after the steam has
been completely emptied from the hot water
tank: this will keep the milk from remaining
trapped inside the steam tube.
HOW TO PREPARE CAPPUCCINO
• Press the ON/OFF switch for espresso/cappuccino to turn off the appliance.
• To make two cappuccinos, prepare the espresso coffee as described in the paragraph “How
to prepare espresso coffee” from points 1
through 12; using however, the quantity of
water necessary to obtain 2 cappuccinos as
indicated in the chart at the end of this text.
Note that the quantity of water required for
making cappuccinos is greater that the amount
necessary for making espresso coffee: the
extra water is used for the production of steam
for frothing the milk.
• Brew the coffee into the small espresso coffee
pot. When the darker coloured coffee (which
lies under the lighter coffee coloured froth)
reaches the level 2 on the “COFFEE LEVEL”
side of the small espresso pot (fig. 23), place
the Vario System selector to the “cappuccino”
mode (fig. 17). Careful attention must be paid
to this operation: in fact, if the coffee should
8
• Pour the frothed milk over the coffee, with the
aid of a spoon. Then, as a final touch, sprinkle a bit of cocoa powder over the frothy milk
to have a perfect cappuccino.
• In order to make 4 cappuccinos, it is necessary
to repeat the previous operations, paying
attention to the quantity of ground coffee and
water, indicated in the chart at the end of the
text. Furthermore, before positioning the Vario
System selector to the Cappuccino position,
brew enough espresso coffee into the coffee
pot to reach the level 4 on the “COFFEE LEVEL”
side as indicated in figure 24.
IMPORTANT: The milk frother for cappuccinos
must be thoroughly cleaned after each use.
Proceed as follows:
• Unscrew the milk frothing bit from the tube by
turning in a clockwise direction (fig. 27) and
wash it carefully with warm water.
• Make sure that the three holes of the milk
frother, illustrated in fig. 28, are not plugged.
If necessary, clean the holes with a pin or needle and soaking the frother bit in warm water.
• Clean the steam release tube carefully so as to
not get burned.
• Screw the milk frothing bit back into place.
CLEANING AND MAINTENANCE
• Before beginning any cleaning or maintenance
operation, turn the machine off, remove the
plug from the electrical power source and let
the machine cool down.
• To clean the machine, do not use solvents or
abrasive detergents. A soft damp cloth should
be used to clean the surfaces.
• Regularly clean the filter holder, the drip collection pan, the hot water drip spout, and the
coffee pots. Do not wash the filter holder in the
dish washer.
• Never immerse the machine in water: it is an
electrical appliance.
• Check from time to time that the holes in the filter for espresso coffee are not obstructed. If
necessary, carefully clean the filter with hot
water, scrubbing with an abrasive pad.
DESCALING
If the water in your area is quite hard, the lime
from this water can accumulate with the passage
of time. Lime deposits can compromise the proper
functioning of the appliance.
The espresso coffee machine must be decalcified
every 2 to 6 months (depending on the hardness of
the water and the frequency of use) using white
wine vinegar. Proceed as follows:
• After a few minutes, the hot vinegar will begin
to flow, through the filter holder, into the coffee
pot. Release some steam every so often by
turning the steam release knob.
• When the all of the solution has gone through
the machine, turn off the appliance and let it
cool down.
• Repeat these operations at least two times
using clean water instead of vinegar in order
to remove every trace of vinegar left in the circuits.
The drip coffee machine must be decalcified every
90 cycles. The lime removal can be done by using
the special lime remover solvents made for drip
coffee machines found on the market.
Alternatively, white wine vinegar can be used, following this procedure:
• Pour two cups of white wine vinegar and three
cups of water into the tank. Insert the tank into
the machine.
• Place the coffee pot onto the hot plate and the
filter holder on this without coffee;
• Press the ON/OFF drip coffee switch, percolate the equivalent of a cup of the solution and
then turn off the appliance.
• Allow the vinegar to sit in the machine for an
hour;
• Turn the machine back on and allow the rest of
the solution to percolate through the circuits;
• To rinse the appliance, operate the machine
with plain water and without using ground coffee at least 3 more times (3 full tanks of water).
The repairs of the coffee machine due to maintenance operations that haven’t been carried out,
such as lime removal etc. will not be covered by
warranty.
• Fill the coffee pot for espresso coffee with vinegar to level 4;
• Pour the vinegar into the hot water tank and
replace the plug;
• Attach the filter holder;
• Place the small coffee pot under the filter holder;
• Turn the machine on and position the Vario
System selector to the “LIGHT” position;
9
PROBLEMS DURING OPERATION
Problem
Espresso coffee no longer
drips out
The milk froth does not form
properly when making cappuccinos
The percolation time of the
coffee is longer than
expected
The coffee has an aftertaste vinegary
10
Probable Causes
Resolution
The coffee has been ground too
finely
Use coffee with a medium grind or the
kind made for moka coffee
The hole in the spout of the filter
holder is plugged
Clean the hole in the filter holder
The filter is obstructed
Clean the filter with hot water, scrubbing with an abrasive pad
The milk is not cold enough
Always use milk cold from the refrigerator
The milk frother bit is dirty
Carefully clean the holes of the milk
frother.
The coffee machine filter needs to
be decalcified
Proceed with the decalcification operations as described in the paragraph
“Descaling”
The machine has not been rinsed
enough
Rinse the appliance as described in
the chapter “Descaling”
To make
The amount of water in the small
coffee pot to pour into the hot
water heater tank
(WATER LEVEL side)
The quantity of ground coffee to put
into the filter
-4
Two coffees
-2
-4
Two cappuccinos
-2
-4
Four coffees
Four cappuccinos
-2
-4
-2
11
Limited Warranty
What Does This Warraty Cover? We warrant each Espresso Coffee Machine to be free from defects in material and workmanship. Our obligation under this warranty is limited to replacement or repair, free of charge at our
factory or authorized service centers, of any defective part or parts there of other than parts damaged in transit,
which shall be returned to us, transportation prepaid. This warranty shall apply only if the Espresso Coffee Machine
is used in accordance with the factory directions which accompany it.
How Long Does The Coverage Last? This warranty runs for one year from the date of delivery and applies
only to the original purchaser.
What Does This Warranty Not Cover? This warranty does not cover defects or damage of the Espresso Coffee
Machine which result from repairs or alterations to the machine outside our factory or authorized service centers, nor
shall it apply to any Espresso Coffee Machine which has been subject to abuse, misuse, negligence or accidents.
Also, consequential and incidental damages resulting from the use of this product or arising out of any breach of
contract or breach of this warranty are not recoverable under this warranty. Some states do not allow the exclusion
or limitation of incidental or consequential damages, so the above limitation may not apply to you.
How Do You Get Service? If repairs become necessary or spare parts are needed, plase write to:
De’Longhi America Inc.
Park 80 West Plaza One, 4th floor
Saddle Brook NJ 07663
or call Service Tel. No 1-800-322-3848
or visit our internet site:
www.delonghiusa.com
The above warranty is in lieu of all other express warranties and representations; All implied warranties are limited
to the applicable warranty period set forth above. This limitation does apply if you enter into an extended warranty
with De’Longhi. Some states do not allow limitations on how long an implied warranty lasts, so the above exclusions
connection with the sale or use of its Espresso Coffee Machine.
How Does State Law Apply? This warranty gives you specific legal rights, and you may also have other rights
which vary from state to state.
GARANTIE
Nous garantissons que tous les APPAREILS ELECTRIQUES DE’ LONGHI sont exempts de tout
défaut de matériaux et de manufacture. Notre obligation sous cette garantie est limitée au remplacement ou à la réparation gratuite dans notre usine de toutes les pièces défectueuses autre
que les pièces endommagées durant le transport, qui nous seront retournées - transport prépayé - en dedans d’un an après la livraison à l’acheteur - utilisateur. Cette garantie ne sera
applicable que si l’appareil a été utilisé selon les instructions du fabricant qui accompagnent
l’appareil, et sur courant alternatif (AC). Cette garantie remplace toutes les autres garanties et
représentations, exprimées ou impliquées, et toute autre obligation ou responsabilité de notre
part. Nous n’autorisons aucune autre personne ou compagnie à assumer pour nous une quelconque responsabilité en relation avec la vente ou l’utilisation de nos appareils.
Cette garantie ne s’appliquera ni aux appareils qui seront réparés ou endommagés hors de
notre usine, ni aux appareils qui auront été sujets à une mauvaise utilisation, à une négligence
ou à un accident.
Si des réparations ou des pièces de rechange sont nécessaires, vous êtes priés d’écrire à:
De’Longhi America Inc.
Park 80 West Plaza One, 4th floor
Saddle Brook NJ 07663
Tel. No 1-800-322-3848
ou bien contacter notre site Internet:
www.delonghiusa.com
12