1
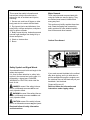
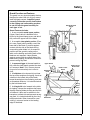
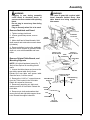
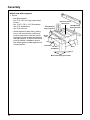
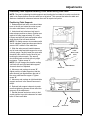
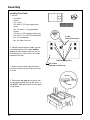
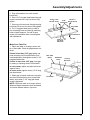
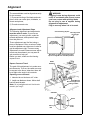
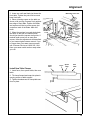
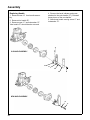
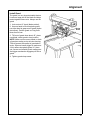
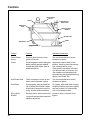
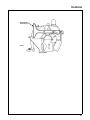
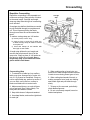
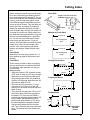
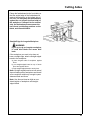
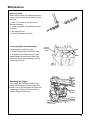
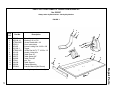
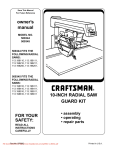
Save This Manual
For Future Reference
owner’s
manual
MODEL NO.
509347
509347 FITS THE
FOLLOWING RADIAL
SAWS:
113.19930, 113.197731,
113.197732, 113.199350
10-INCH RADIAL SAW
GUARD KIT
FOR YOUR
SAFETY:
• assembly
• operating
• repair parts
READ ALL
INSTRUCTIONS
CAREFULLY
Part No. SP5984
Printed in U.S.A.
Table of Contents
Section Title
Page
Table of Contents . . . . . . . . . . . . . . . . . . . . . . . . . . . . . . . . . . . . . . . . . . . . . . . . . . . . . . . . .
Safety . . . . . . . . . . . . . . . . . . . . . . . . . . . . . . . . . . . . . . . . . . . . . . . . . . . . . . . . . . . . . . . . . .
Assembly . . . . . . . . . . . . . . . . . . . . . . . . . . . . . . . . . . . . . . . . . . . . . . . . . . . . . . . . . . . . . . .
Adjustments . . . . . . . . . . . . . . . . . . . . . . . . . . . . . . . . . . . . . . . . . . . . . . . . . . . . . . . . . . . . .
Alignment . . . . . . . . . . . . . . . . . . . . . . . . . . . . . . . . . . . . . . . . . . . . . . . . . . . . . . . . . . . . . . .
Controls . . . . . . . . . . . . . . . . . . . . . . . . . . . . . . . . . . . . . . . . . . . . . . . . . . . . . . . . . . . . . . . .
Crosscutting . . . . . . . . . . . . . . . . . . . . . . . . . . . . . . . . . . . . . . . . . . . . . . . . . . . . . . . . . . . . .
Ripping . . . . . . . . . . . . . . . . . . . . . . . . . . . . . . . . . . . . . . . . . . . . . . . . . . . . . . . . . . . . . . . . .
Cutting Aides . . . . . . . . . . . . . . . . . . . . . . . . . . . . . . . . . . . . . . . . . . . . . . . . . . . . . . . . . . . .
Maintenance . . . . . . . . . . . . . . . . . . . . . . . . . . . . . . . . . . . . . . . . . . . . . . . . . . . . . . . . . . . . .
Repair Parts . . . . . . . . . . . . . . . . . . . . . . . . . . . . . . . . . . . . . . . . . . . . . . . . . . . . . . . . . . . . .
2
3
12
15
18
23
28
32
41
44
45
NOTE:
1. This manual is intended to be used along with your original saw manual. If you no longer have
your saw’s owners manual, call customer service at 1-800-325-1184. Have your saw’s model number when you call.
2. If you require this manual in Spanish or French, call 1-800-511-2628.
Si usted requiere que éste manual usuario en español o francés, llame 1-800-511-2628. Pedir formulario SP5984S-2.
Si vous nécesstent ce mode d’emploi en espagnol ou français, téléphonez au 1-800-511-2628.
Demander pour forme SP5984F-2.
2
Safety
This manual has safety information and
instructions to help users eliminate or
reduce the risk of accidents and injuries,
including:
1. Severe cuts, and loss of fingers or other
body parts due to contact with the blade.
2. Eye impact injuries and blindness, from
being hit by a thrown workpiece, workpiece
chips or pieces of blade.
Major Hazards
Three major hazards are associated with
using the radial arm saw for ripping. They
are outfeed zone hazard, kickback and
wrong way feed.
This section only briefly explains these hazards. Read the ripping and crosscutting
safety sections for more detailed explanations of these and other hazards.
3. Bodily impact injuries, broken bones and
internal organ damage from being hit by a
thrown workpiece.
4. Shock or electrocution.
5. Burns.
Outfeed Zone Hazard
Safety Symbol and Signal Words
An exclamation mark inside a triangle is the
safety alert symbol.
It is used to draw attention to safety information in the manual and on the saw. It is
followed by a signal word, DANGER,
WARNING or CAUTION, which tells the
level of risk:
If you reach around the blade to the outfeed
side when ripping, and try to hold down or
pull the workpiece through to complete a cut,
the rotational force of the blade will pull your
hand back into the blade.
Fingers will be cut off.
DANGER: means if the safety information is not followed someone will be seriously injured or killed.
Read and follow the information and
instructions under ripping safety.
WARNING: means if the safety information is not followed someone could be seriously injured or killed.
CAUTION: means if the safety information is not followed someone may be injured.
Read and follow all safety information
and instructions.
3
Safety
Kickback Hazard
Kickback is the uncontrolled propelling of the
workpiece back toward the user during ripping.
The cause of kickback is the binding or
pinching of the blade in the workpiece. Several conditions can cause the blade to bind
or pinch.
When a workpiece kicks back, it could hit
hard enough to cause internal organ injury,
broken bones, or death.
Read and follow the information and
instructions under ripping safety.
Wrong Way Feed Hazard
Wrong way feed is ripping by feeding the
workpiece into the outfeed side of the blade.
The rotational force of the blade can grab
and pull the workpiece.
Before you can let go or pull back, the force
could pull your hand along with the workpiece into the blade. Fingers or hand could
be cut off.
The propelled workpiece could hit a
bystander, causing severe impact injury or
death.
Read and follow the information and
instructions under ripping safety.
4
Safety
Guard Function and Features
The guard is a very important safety feature,
designed to reduce the risk of injury associated with blade contact. Install the guard
correctly. Follow the specific instructions
in the ripping and crosscutting sections
to set and use the guard correctly for
each type of cut.
Handle/Squeeze
Trigger
Guard Features Include:
1. A non-moveable metal upper portion,
(Upper Guard) which is fastened to the
motor by the guard clamp screw, and which
fully covers the upper half of the blade.
2. A moveable clear plastic portion, (Plastic Lower Guard) which partially covers the
lower half of the blade. It protects against
contact with the side of the blade during
crosscutting when blade is in its rearmost
position and the guard is resting on the
table, so the leading and trailing teeth of the
blade are not exposed. It also protects
against contact with the outfeed side of the
blade during ripping, and acts as a barrier to
prevent wrong way feed.
3. A squeeze trigger in the saw handle to
fully raise the clear plastic guard at the start
of a crosscut. Note: This is necessary because
the guard will not automatically raise to clear the
fence.
Upper Guard
Hold Down
Knob
Plastic Lower
Guard
4. A hold down to be lowered to just clear
the top of the workpiece for ripping. It acts as
a barrier to the infeed side of the blade,
keeps the workpiece from fluttering, and acts
as a sawdust deflector. It is locked/unlocked
by the hold down knob.
5. A riving knife to be lowered to the table
for ripping. It keeps the workpiece kerf open,
thereby reducing blade pinching and the risk
of kickback. It also acts as a barrier to the
hazardous outfeed side and prevents wrong
way feed. It is locked/unlocked by the riving
knife/pawls knob. When lowered for crosscutting, it acts as a barrier to the leading
edge of the blade.
Pawls, Riving
Knife Knob
Riving
Knife
Pawls
Hold Down
Workpiece
5
Safety
6. Set of pawls to be lowered to the workpiece surface for ripping. They allow the
workpiece to pass freely from infeed to outfeed side, but help stop the kickback motion
from outfeed to infeed side by grabbing into
the workpiece surface. Pawls must be reset
each time a different thickness workpiece is
cut.
7. A guard tab to manually raise the plastic
guard at the start of ripping unusual workpieces whose size/shape do not cause the
guard to raise automatically.
Hazards Associated with Clear Portion of Guard
The following safety information applies to all
blades and accessories.
Guard Tab
CAUTION
Clear plastic portion of guard can get
caught or jam in fence or table kerfs.
Read and follow the warning on the
guard:
WARNING
Clear plastic portion of guard will not
provide any protection during crosscutting if blade is pulled over your
hand, or your hand enters blade path
from front or rear of blade. Fingers or
hand can be cut or cut off.
WARNING:
TO AVOID INJURY
SHUT OFF POWER
BEFORE CLEARING A
JAMMED LOWER GUARD
WARNING
Clear plastic guard will increase risk of certain hazards:
6
• During rip and bevel cuts, narrow cut
off pieces can be pinched between
guard and blade. Cut-off pieces can
kickback.
• Cut-off pieces can jam between
guard and blade. Turn saw off and wait
for blade to stop before freeing
jammed guard or blade.
• In bevel position blade teeth are fully
exposed. Fingers or hand can be cut
off.
• Workpiece or cut-off pieces can be
violently thrown by blade. Wear safety
goggles. Stand out of workpiece path.
Safety
Safety Instructions
Read and follow all safety instructions.
Personal Safety Instructions
1. Wear safety goggles labeled ANSI Z87.1
(or in Canada CSA Z94.3-99) on the package. It means the goggles meet impact standards set by the American National
Standards Institute. Regular eyeglasses are
not safety goggles.
2. Wear close fitting clothes, short sleeved
shirts, and non-slip shoes. Tie up long hair.
Do not wear gloves, ties, jewelry, loose clothing, or long sleeves. These can get caught in
the spinning blade and pull body parts into
the blade.
Safety Goggles
Dust Mask
3. Wear dust mask to keep from inhaling
fine particles.
4. Wear ear protectors, plugs or muffs if you
use saw daily.
5. Keep good footing and balance; do not
over-reach.
Work Area Safety Instructions
Ear Protectors
1. Keep children, pets, and visitors out of
work area; they could be hit by a thrown
workpiece, workpiece chips or pieces of
blade.
2. Turn saw off, remove yellow key, and
unplug before leaving work area. Do not
leave until blade has stopped spinning.
3. Make work area child-proof: remove yellow key to prevent accidental start-up; store
key out of sight and reach; lock work area.
4. Keep floors clean and free of sawdust,
wax and other slippery materials.
5. Keep work area well lighted and uncluttered.
6. Use saw only in dry area. Do not use in
wet or damp areas.
7
Safety
Saw Safety Instructions
1. Use guard, pawls and riving knife according to instructions. Keep them in working
order.
2. Routinely check saw for broken or damaged parts. Repair or replace damaged
parts before using saw. Check new or
repaired parts for alignment, binding, and
correct installation.
7. If blade jams, turn saw off immediately,
remove yellow key, then free blade. Do not
try to free blade with saw on.
8. Turn saw off if it vibrates too much or
makes an odd sound. Correct any problem
before restarting saw.
3. Unplug saw before doing maintenance,
making adjustments, correcting alignment,
or changing blades.
9. Do not layout, assemble, or setup work
with saw on, or while blade is spinning.
4. Do not force saw. Use saw, blades and
accessories only as intended.
11. Store items away from saw. Do not climb
on saw or stand on saw table to reach items
because saw can tip over.
5. Have yellow key out and saw switched
off before plugging in power cord.
Workpiece Safety Instructions
1. Cut only wood, woodlike or plastic materials.
Do not cut metal.
2. Cut only one workpiece at a time. Stacking or placing workpieces edge to edge can
cause user to lose control of workpiece.
8
6. Before turning on saw, clear table of all
objects except workpiece to be cut and necessary fixtures, clamps, or feather-boards.
10. Keep saw table clean.
Safety
3. Rip only workpieces longer than the
diameter of the blade. Do not rip workpieces
that are shorter than the diameter of the
blade being used.
Dia.
4. Workpieces that extend beyond the saw
table can shift, twist, rise up from the table,
or fall as they are cut or afterwards. Support
workpiece with table extensions the same
height as the saw table.
5. To prevent tipping, support outer ends of
extensions with sturdy legs or an outrigger.
6. Do not use another person to help support workpieces or to aid by pushing or pulling on workpieces, because these actions
can cause kickback. Use table extensions.
7. Use clamps or vice to hold workpiece. It’s
safer than using your hands.
Blade Safety Instructions
1. Use only blades marked for at least 3450
rpm.
2. Use only 10" or smaller diameter blades.
3. Use blades for their recommended cutting procedures.
4. Keep blade sharp and clean.
5. Do not overtighten blade nut because
blade collar could warp.
6. Do not turn saw on and off in rapid
sequence because blade can loosen.
7. Blade should stop within 15 seconds after
saw is switched off. If blade takes longer, the
saw needs repair. Contact Authorized Service Center.
9
Safety
On-Product Safety Labels
There are several safety labels on the saw.
They alert the user to hazards explained in
the manual and remind the user how to
avoid the hazard.
At the outfeed side, to the right of the
guard near the saw handle is this safety
label to alert you to wrong way feed:
On the infeed side of the guard is this
safety label to remind you to lower the
hold down to just clear the top of the
workpiece for ripping:
On the rear of the yoke, visible from the
infeed side when the saw is in a rip position,
is this safety label to alert you to outfeed
zone hazard:
10
Note where they are located on the saw.
Read and follow the safety information
and instructions in these labels. Refer to
the manual for detailed explanations and
instructions.
Safety
Near the saw handle is this safety label to
alert you to thrown objects and to remind
you to wear safety goggles:
On the clear plastic guard is this OSHA
required label:
On the bottom surface of the motor, visible
when the cutting tool is horizontal, is this
safety label alerting you to use a guard
when edge molding, and to position the
cutting tool behind the fence:
(see Accessories Section)
On the front of the yoke is this general
safety instruction label:
11
Assembly
Identify Parts
The following parts are included:
Note: Before beginning assembly, check that all parts are included. If you are missing any part, do not assemble guard.
Contact Emerson Tool Co. Service Center at 1-800-325-1184 to get the missing part. Sometimes small parts can get lost
in packaging material. Do not throw away any packaging until guard is put together. Check packaging for missing parts
before contacting Emerson Tool Co. A complete parts list (Repair Parts) is at the end of the manual. Use the list to identify the number of the missing part.
List of loose parts with model 509347
A. Guard Assembly .................................
B. Rear Table 40" .....................................
C. Spacer Table 40" .................................
D. Front Table 40".....................................
E. Table Support .....................................
F. Handle Assembly.................................
G. Bag of Loose Parts ..............................
Containing:
H. Table Clamp Asm...........................
I. Tee Nut ..........................................
J. Bag of Loose Parts ..............................
Containing:
K. Guard Accessory ...........................
L. Screw Plastite #8 x 1/2 ..................
M. Washer 3/16 x 1 x 1/16..................
N. Instruction Form.............................
1
1
1
1
2
1
1
B
A
D
E
2
1
1
F
1
1
1
1
H
G
I
J
K
L
M
12
C
N
Assembly
WARNING
WARNING
Plugging in saw during assembly
could result in electrical shock, or
severe cuts from contact with spinning
blade.
Do not plug in saw at any time during
assembly.
Plug in saw only when it is to be used.
This retro fit guard kit required additional clearance behind fence. New
table boards are being supplied for
this reason.
Remove Sawblade and Guard
1. Tighten carriage lock knob.
2. Loosen guard clamp screw, remove
guard.
Pull Down
to Loosen
Blade
Rotation
3. Motor shaft has left hand threads. Hold
shaft wrench and rotate arbor wrench down
(clockwise).
4. Remove shaft nut, outer collar, sawblade,
and inner collar. Dispose of guard but retain
shaft nut, outer collar sawblade and inner
collar.
1/4-20 x 1-3/4"
Pan Hd. Screw
1/4-20 x 1"
Pan Hd. Screw
17/64"
Lockwasher
Remove Original Table Boards, and
Mounting Supports
Front Table
1/4-20 x 1"
Cup Point
Set Screw
NOTE: All original hardware (except for TNut) will be required for mounting retrofit
parts.
Lockwasher
1. Loosen the table clamps and remove the
rear table, spacer table and rip fence.
Discard the rear table and spacer table.
Save the fence, it will be reused.
2. Remove the 1/4-20 x 1" cup point screw
from the T-Nut located in the front table.
Retain this screw for future use.
3. Remove all remaining nut, bolts, and
washers and lift off front table. Discard the
front table.
4. Remove nuts, bolts and washers that
secure the left and right table support channels. Discard the support channels.
Table Mounting
Support
Hex Nut
Square Hd. Screw
5/16-18 x 3/4
Table Mounting
Support
Screws
Here
Nut
Lockwasher
Base
7/8" O.D.
Flat Washer
13
Assembly
Attach new table supports
1. Set out:
- two table supports
- four 5/16" 18 x 3/4" long square head
screws
- four 11/32" x 7/8" x 1/16" flat washers
four 5/16" lockwashers
- four 5/16" hex nuts
- Attach supports to side frame, making
sure to use correct holes in table supports and side frame: Use two screws
per support (insert screws through base
and then support); on end of each screw
put a flat washer, lockwasher and nut,
then finger tighten to table supports rest
in lower position.
Square Hd. Screw
5/16-18 x 3/4
Table Mounting
Support Channel
Table Mounting
Support Channel
Screws
Here
Nut
Lockwasher
Base
7/8" O.D.
Flat Washer
Front
Mount Rails Using These Holes
14
Adjustments
Positioning Table supports/Installing Front Table/Leveling Front Table
NOTE: The goal in adjusting the table supports and leveling the front table is to make sure that the
table is the same distance from the radial arm at all points. This ensures that when the table and
blade are installed the clearance between them will be equal at all points.
Positioning Table Supports
1. Release bevel lock lever, move bevel index
lever to the left and rotate the motor to position arbor shaft down. Lock bevel lock.
Lock
Unlock
Index Release
Position
2. Unlock and hold miter/arm lock lever in
index release position as shown. Position arm
against left stop (approximately 50° miter).
Loosen carriage lock knob and position arbor
shaft directly over left hand channel.
NOTE: For safety reasons in accordance with
the UL standard, stops have been provided to
prevent 360° rotation of the radial arm.
3. Slide the arbor wrench handle between
end of motor shaft and table support to act as
a feeler gauge. Carefully lower the motor with
elevation crank until the end of shaft is just
touching the arbor wrench. The wrench
should slide back and forth with only slight
resistance. Tighten screw “A”.
NOTE: Do not change this elevation setting
until both left and right hand table support
channels have ben adjusted.
Bevel Index
Lever
Bevel Lock
Lever
Arbor Wrench
Screw “A”
4. Move arm and carriage to screw “B”.
Adjust position of table support so that the
arbor wrench just slips between the end of
the motor shaft and the support. Tighten
screw “B”.
5. Move arm and carriage to right hand table
support and level in the same manner as in
step 4.
6. Recheck both support channels to make
sure that tightening screws did not affect the
accuracy of the adjustment.
Arbor
Wrench
7. Elevate the saw and return motor to horizontal position to provide clearance for installation of front work table.
Table Mounting
Support Channel
(Left Hand)
Screw “A”
Screw “B”
15
Assembly
Installing Front Table
1. Set out:
- front table
- tee nut
- 1/4 " U-clip
- 1/4" diam. x 7/8" long cup point set
screw
- four 1/4" diam. x 1" long pan head
screws
- 1/4" dia. x 1-3/4" long pan head screw
- five 17/64" I.D. x 5/8" O.D. flat washers
- four 1/4" lockwashers
- four 1/4" diam. hex nuts
2. Identify top and bottom of table: top has
counterbored holes. Place table bottom
side up on solid surface. Hammer tee nut
into leveling hole. (This hold is not counterbored from the top).
Tee Nut
(Install from bottom)
~
Table Mounting Holes
3. Snap u-clip onto front edge of base so
hole lines up with hold just to the left of center notch.
Top of Table
(Counterbored Holes Up
Channel
4. Place table, top side up, on saw so center counterbored hole lines up with hole in uclip. NOTE: Table will extend over front edge
of saw frame.
16
U-Clip
Assembly/Adjustments
5. Drop a flat washer into each counterbored hole.
6. Start 1-3/4" long pan head screw through
center hole and into U-clip, but do not fully
tighten.
1/4-20 x 1-3/4"
1 Screw
Pan Hd.
1/4-20 x 1"
17/64"
Pan Hd. Screw
Lockwasher
7. Start cup point set screw through leveling
hole and into tee nut, but do not fully tighten.
Front Table
8. Put 1" long pan head screw in each of
four remaining holes and through matching
holes in table supports. On end of each
screw, put lockwasher then nut and tighten
with screwdriver.
Lockwasher
1/4-20 x 1"
Cup Point
Set Screw
Hex Nut
Make Front Table Flat
1. Place rear table on its edge, across center of front table. Check for gap between surfaces.
If there is less than 1/32" gap, tighten cup
point set screw until it touches frame (look
underneath table), then tighten center (1-3/4"
long pan head screw.
Rear Table
Board
If there is more than 1/32" gap, close gap
by raising or lowering center of front table:
Hold Down
Screw
Leveling
Set Screw
to raise center, tighten cup point set screw
against frame;
to lower center, tighten center (1-3/4" long)
pan head screw.
2. When gap is closed, make sure cup point
set screw touches frame (look underneath
table), and center (1-3/4" long) pan head
screw is tightened.
Front Table
NOTE: Rip fence scale is no longer correct.
Measure distance between fence and blade
for correct distance when in rip mode.
17
Alignment
The saw and blade must be aligned correctly
for two reasons:
1) To prevent binding of the blade and workpiece, which can cause jams, kickbacks, or
thrown workpieces;
2) To make accurate cuts.
WARNING
Plugging in saw during alignment could
result in accidental start-up and severe
cuts from contact with spinning blade.
Do not plug in saw at anytime during
alignment or adjustment.
Plug in saw only when it is to be used.
Alignment and Adjustment Steps
Check Framing Square
The following alignments and adjustments
must be made in order. If you miss an
adjustment, you must go back, make the
missed adjustment, and repeat all steps
from that point on.
These adjustments are like fine tuning a
piece of equipment. Often, a series of steps
must be repeated more than once in order to
get the adjustment right. There are many
adjustments to make. Because some adjustments may be awkward, you may want to
ask someone to help you.
Before you start, make sure the framing
square is true.
Square Crosscut Travel
This edge must
be straight
Draw light
line on board
along this edge
Should be no gap or overlap here when
square is filipped over to dotted position.
Blade
Rotation
The goal of this adjustment is to make accurate crosscuts. To do so, the radial arm must
be square to the fence, otherwise, there will
be a slight miter angle in all crosscuts.
Squaring cross cut travel.
1. Index but do not lock arm at 0° miter.
2. Install saw blade as shown. Motor shaft
has left hand threads.
Shaft Wrench
End of arbor wrench
resting on table
Note: Do not overtighten arbor nut. Use the arbor
wrench to just "snug" it.
Sawblade
Outer
Collar
Arbor
Nut
18
Motor
Inner
Collar
Alignment
3. Lower arm until saw blade just clears the
front table. Tighten the yoke lock lever and
bevel lock lever.
Miter/Arm Lock Lever
4. Place a framing square on the table, as
shown, with one leg of square firmly against
rear edge of front table. Position the blade
and square until the leg of the square just
contacts a tooth of the blade. Mark this
tooth.
5. When the carriage is moved slowly back
and forth on the arm, the marked tooth
should just touch the square at all points. If
marked tooth moves into or away from
square, follow the adjustments as described
in your saws original owners manual. If you
no longer have your saws owners manual
call Customer Service at 1-800-325-1184.
Have your saws model number ready when
you call.
Install New Table Clamps
Bevel Index
Lever
Yoke Lock
Lever
Marked
Tooth
Front
Table
Fence
Spacer
Table
Bevel Lock
Lever
Rear
Table
1. Insert fence, then spacer table, then rear
table.
2. Tilt clamp forward and snap into place in
opening at rear of table support.
3. Tighten thumbscrews to clamp table sections in place.
19
Assembly
Replacing Handle
4. Remove the bevel indicator and screw
attached to the yoke handle (“E”). Reinstall
these pieces on the new handle.
1. Remove screw “A” from handle assembly.
5. Attach new handle reusing screw “C” and
lockwasher “D”.
2. Remove trim handle “B”.
3. Remove screw “C” and lockwasher “D”.
Yoke handle “E” should then be removed.
OLD HANDLE ASSEMBLY
E
D
C
A
B
NEW HANDLE ASSEMBLY
D
C
20
Alignment
Install Guard
The guard is a very important safety feature.
It covers a large part of the blade and helps
protect against severe cuts. Always use the
guard
1. Lock motor at 0° bevel (blade vertical).
2. Use one hand to lift clear plastic guard;
use other hand to grasp rear of guard (below
dust elbow). Position guard so riving knife
faces front of saw.
Riving
Knife
3. Tilt front of guard down about 45°; place
over blade; rotate guard to level position.
NOTE: Make sure two screw heads on back
of guard are resting on top of motor housing.
This will prevent movement of guard about
motor. Squeeze handle trigger to make sure
it fully raises clear plastic guard. If it does
not, remove and reinstall guard, making sure
that trigger mechanism engages pull link on
guard.
Parallel
4. Tighten guard clamp screw.
21
Alignment
Align Riving Knife to Blade
The goal of this adjustment is to position the
riving knife directly in line with the blade.
Riving knife alignment is an important safety
factor. The riving knife rides in the kerf of the
cut workpiece during ripping to keep the two
sides of the workpiece from pinching on the
blade. Blade pinching is a cause of kickback.
Correct
1. Lock yoke in in-rip position (blade towards
column, motor towards front of arm).
2. Lower arm until blade just clears table.
3. Unlock rip lock while holding up lower
plastic guard, move yoke back until blade
touches fence. Lock rip lock.
4. Loosen pawls/riving knife knob. Lower riving knife to the table and tighten knob. The
riving knife should rest flat against fence.
Wrong
Wrong
5. If adjustment is needed:
a.) loosen riving knife bracket screw.
b.) slide riving knife so it rests against
fence.
c.) secure riving knife bracket screw.
6. Raise riving knife and tighten pawls/riving
knife knob.
Riving Knife
Bracket Screw
22
Controls
Bevel Index Lever
Miter/Arm Lock Lever
On-Off Switch
Yellow Key
Control
Function
Operation/Comments
Miter/Arm Lock
Frees radial arm to move; locks in Pull lever forward to release index
any desired position; pre-set
then swing arm left or right.
indexed positions at 0°, 45°L, 45°R Hold in unlocked position while moving arm
On-Off Switch
Turns motor on/off
Pull on, push off
Requires yellow key
Yellow Key
Allows saw to be switched on
Insert into on-off switch
Remove after turning saw off
Bevel Index Lever
Indexes the sawblade to 0°, 45°, or
90° pre-set indexed positions
Move bevel index lever to the left
while positioning the blade, then
release it
23
Controls
Yoke Index
Lever
Table Clamp
Bevel Lock Lever
Elevation
Crank
24
Control
Function
OperationlComments
Bevel Lock Lever
Frees motor to rotate; locks in any
desired position
Pull lever to release and push to lock
Support motor before unlocking
because it can swing down quickly
Bevel index lever must be unindexed
before moving motor
Elevation Crank
Raises/lowers radial arm
Turn clockwise to raise, counterclockwise to lower
Table Clamp
Frees table sections to allow
changing fence position
Turn clockwise to tighten, counterclockwise to loosen
Yoke Index Lever
Frees yoke to rotate between rip
and crosscut positions
Pull the spring loaded yoke pivot
latch forward to release this pin
Controls
Rip Scale &
Rip Indicator
Rip Lock
Yoke Lock
Handle
Saw Handle
Bevel Lock Lever
Control
Function
OperationlComments
Yoke Lock Handle
Locks yoke in rip or crosscut position
Pull handle forward to release; push
handle rearward to tighten
Yoke index lever must be unindexed
before rotating yoke
Rip Lock
Locks carriage to radial arm for rip- Rotate counterclockwise to release
ping
carriage; turn clockwise to lock carriage in position
Lock before ripping
* Rip Scale & Rip
Indicators
Tells approximate distance
between blade and fence when
saw is in in-rip or out-rip position
Move blade carriage along arm to
align line on indicator with desired
number on scale
Saw Handle
Provides grasping surface so carriage can be moved.
Contains trigger mechanism to
raise clear plastic guard when
making a crosscut
Grasp to move blade carriage
Squeeze trigger to fully raise clear
and plastic guard. Clear guard must
be raised over fence to crosscut
* NOTE: After installing new guard and new table boards rip fence scale is no longer correct.
Measure distance between fence and blade for correct distance when in rip mode.
25
Controls
Guard Clamp
Screw
Guard
Pawls/Riving
Knife Knob
Hold Down
Knob
Riving Knife
Bracket
Riving Knife
Pawls
Hold Down
26
Control
Function
Operation/Comments
Guard Clamp
Screw
Secures guard to motor; frees
guard for removal
Turn counterclockwise to loosen,
clockwise to tighten
Guard
Protects against contact with upper
blade; partially protects against
contact with lower blade; acts as
sawdust deflector
Upper part remains fixed in level
position. Notch in guard fits securely
into matching tab on motor
Clear guard is moveable: fully raise
over fence at start of crosscut; See
Saw Handle; most workpieces will
automatically raise clear guard during
ripping; See Guard Tab
Hold Down Knob
Frees hold down to move up and
down; locks hold down in place
Turn counterclockwise to loosen,
clockwise to tighten
Hold Down
During ripping, acts as partial barrier to infeed side of blade; keeps
infeed side of workpiece from fluttering; acts as sawdust deflector
For ripping, lower hold down to top of
workpiece surface, then raise slightly
and lock in place. For crosscutting
lock in fully raised position
Riving Knife
Bracket
Prevents side to side movement of
riving knife and provides means for
adjusting alignment
Loosen to align riving knife, then
tighten
Controls
Pawls/Riving
Knife Knob
Pawls
Riving Knife
27
Crosscutting
Crosscutting Defined
Straight
Bevel
Miter
Crosscutting is cutting a workpiece to length.
The workpiece is held firmly against the
fence, and the blade is pulled through the
workpiece to make the cut. Straight, bevel,
miter, and compound cuts can be made.
Compound
Crosscutting Safety
The hazards associated with crosscutting
include: exposed blade teeth, rolling carriage, and thrown workpiece. This section
explains these hazards and tells how to
avoid them or reduce the risk of their happening. Read this section before making
any type of crosscut. Follow these steps
every time you make a crosscut.
Exposed Blade Teeth
WARNING
During crosscutting, blade teeth can
be exposed. To reduce risk of having
fingers, hand or arm cut off:
[Correctly install and use guard.
[Lower pawls or riving knife to clear fence
or workpiece, whichever is higher, by 1/4".
Lowered pawls or riving knife act as partial
barrier to front of blade.
[Keep hands away from blade and out of
blade path. Keep hand holding down
workpiece at least 8" from blade.
[Blade can come off table edge beyond 30°
left miter position. Use right miter position
whenever possible.
[Do not cut freehand. You will not be able to
control workpiece.
[ If blade jams, turn off saw, remove yellow
key, then free blade.
Rolling Carriage
WARNING
When saw is turned on, blade can suddenly come forward. To reduce risk of
this happening:
[Keep one hand on saw handle when turning saw on.
[Adjust leveling feet to make sure radial
arm slants slightly toward rear.
Thrown Workpiece
CAUTION
Workpiece could be picked up by spinning blade and thrown. You might be
hit by thrown workpiece. To reduce
risk of thrown workpiece:
[Make sure installed fence is at least half
as high as the workpiece, and never less
than 3/4".
[Start and finish cut with blade in rearmost
position, behind fence.
[Firmly hold workpiece flat on table and up
against fence. Cut only one workpiece at a
time.
[Pull blade through workpiece only far
enough to complete cut, and never more
than half the diameter of blade.
[Do not touch or move workpieces until
blade has stopped spinning.
[Use length stop only on end of workpiece
which is held down.
[Use table extensions to support workpieces that extend beyond table.
28
Crosscutting
Crosscut Kerfs
A kerf or shallow cut is needed in the table
and fence to serve as a path for the blade
and to ensure that the blade cuts all the way
through the workpiece. A kerf is needed for
each different cutting path.
To make an approximately 1/16" deep kerf:
1. Prepare table:
- put fence in front position
- tighten table clamps
2. Prepare blade:
- lock motor in crosscut position
- lock radial arm at desired miter angle
- lock motor at desired bevel angle*
- unlock carriage lock and push blade
to rearmost position, behind fence
- lower blade* to just clear table
- lower pawls or riving knife to clear
fence by 1/4".
* raise clear plastic guard before changing
bevel angle and when lowering beveled
blade, otherwise it may jam into table.
3. Grasp saw handle, then turn saw on.
Keep one hand on saw handle through
step 6.
4. Slowly lower blade until it touches table,
then lower one more full turn of crank.
5. Squeeze handle trigger to fully raise clear
plastic guard so it will clear fence. Pull blade
through fence and across table as far as it
will go.
6. Push blade to rearmost position, behind
fence, and turn saw off. Keep hand on saw
handle until blade stops spinning.
29
Crosscutting
Making Crosscuts
Follow these steps to make crosscuts.
1. Prepare table:
- put fence in front position
- tighten table clamps
2. Prepare blade:
- lock motor in crosscut position
- lock radial arm at desired miter angle
- lock motor at desired bevel angle*
- unlock carriage lock and push blade
to rearmost position, behind fence
- lower blade into kerf* but not touching
kerf bottom (blade should move
freely).
* raise clear plastic guard before changing
bevel angle and when lowering beveled
blade, otherwise it may jam into table.
3. Position workpiece against fence, and
lower pawls or riving knife to clear fence or
workpiece, whichever is higher, by 1/4".
4. Grasp saw handle, then turn saw on.
Keep one hand on saw handle through
step 7.
5. Hold workpiece down and against fence.
Keep hand at least 8" away from blade.
6. Squeeze handle trigger to fully raise clear
plastic guard so it will clear fence and workpiece. Pull blade through workpiece but only
far enough to complete cut, and never more
than half the diameter of blade.
7. Push blade carriage to rearmost position,
behind fence, and turn saw off. Keep hand
on saw handle until blade stops spinning.
30
8"
1/4"
Crosscutting
Repetitive Crosscutting
Repetitive crosscutting is the repeated and
continuous cutting of many pieces of lumber
to the same length. Carriage and length
stops can help make this type of crosscutting
more efficient.
A carriage stop defines the distance needed
to pull the blade through to complete each
cut. This will prevent pulling the blade
through more than the recommended distance.
Carriage
Stop
Length
Stop
To make a carriage stop use 1x2 lumber:
a) cut two pieces, each 2" long
b) clamp a piece on each side of radial arm,
so blade carriage stops at distance needed
to complete cut
c) check that clamps do not interfere with
hand grip on saw handle.
A length stop defines the cut length and
ensures that all pieces will be cut to the
same size. Clamp a piece of 1x2 lumber on
the fence to define the cut length. Use a
length stop only on the end of the workpiece which is held down.
Crosscutting Hints
1. To extend life of table top, buy auxiliary
table cover (see Accessories) or make one
out of 1/4" plywood or fiberboard. Clamp or
nail to original table top, section by section. If
you use nails, nail in the four corners to
make sure blade will not contact nails.
2. Make several fences, so each will have
only a few kerfs (See Cutting Aides). Too
many kerfs will weaken a fence.
3. Keep table clean of chips and sawdust.
5. When making miter or bevel cuts, use
extra force to hold workpiece down because
it tends to move during these types of cuts.
6. When cutting hard woods, like oak, or
making compound cuts, keep arm holding
saw handle rigid and pull blade through
slowly.
7. To keep cut line accurate, periodically
check blade alignment.
8. Do not cut severely warped, bowed or
twisted workpieces.
4. Use sharp blades, and use the right blade
for each job.
31
Ripping
Ripping Defined
Ripping is changing the width of a workpiece
by cutting along its length. The workpiece is
fed into the blade, which rotates in a fixed
position, parallel to the fence and a set distance from the fence. A solid fence (no kerfs)
serves as a guide for the workpiece. Place
the fence in the front position for narrower
workpieces, or in the rear position for wider
ones.
Rear Fence
Front Fence
Position -OR- Position
In-Rip and Out-Rip Positions
In-rip and out-rip refer to blade position.
In-rip: the blade is toward the column, and
the motor is toward the table front. In-rip is
recommended because this position allows
better visibility of the workpiece and your
hands. Use in-rip when you set the blade 1/2
to 16" from the fence.
Outfeed
Side
Out-rip: the blade is toward the table front,
and the motor is toward the column. Use
out-rip only when you set the blade 16" or
more from the fence.
Infeed and Outfeed Directions
Infeed
Side
In-Rip Position
Infeed and outfeed refer to sides of the
blade.
Infeed: the side of the blade where the
guard hold down is. Always start a rip cut
at the infeed side and push the workpiece
through to the outfeed side.
Outfeed Side
Outfeed: the side of the blade where the
pawls and riving knife are. Never start a rip
cut at the outfeed side. This is wrong way
feed. Never put hands on the outfeed side
of the blade when ripping because they
can be pulled back into the spinning
blade.
Infeed
Side
Pawls/Riving
Knife
Out-Rip Position
32
Ripping
Workpiece Positioning
Always set up so that the wider part of
the workpiece is between the blade and
fence. This gives you greater clearance for
push sticks, and allows better stability for
feeding the workpiece.
8"
Push Sticks and Push Blocks
Example: To rip 2" off a 10" wide board, set
blade in in-rip position 8" from rear fence.
Use push sticks and push blocks instead of
the hands to push the workpiece through to
complete cuts. They help keep hands away
from the blade. A push block is used with an
auxiliary fence. (see Cutting Aides).
Use a push block and auxiliary fence
when the blade is set 1/2 to 2" from the
fence.
Use a push stick when the blade is set 2" or
more from the fence.
Do not set the blade closer than 1/2 " to
the fence. The radial saw is the wrong
tool for such a narrow cut. A band saw
would be more appropriate for this type
of cut.
Ripping Safety
The hazards associated with ripping include:
outfeed zone hazard, kickback, and wrong
way feed. This section explains these hazards and tells how to avoid them or reduce
the risk of their happening. Read this section before making any type of rip cut.
Follow these steps every time you make a
rip cut.
33
Ripping
Outfeed Zone Hazard
DANGER
Rotational force of blade can pull
hands and fingers back into blade.
Touching, holding, or pulling on outfeed side of workpiece while blade is
still spinning will result in fingers,
hand or arm being cut off. To reduce
risk of outfeed hazard:
[Set pawls and riving knife; they act as partial barrier to outfeed side.
[Start and finish cut from infeed side.
[Keep both hands on infeed side.
[Keep hands away from outfeed side.
[Push workpiece through to complete cut.
Do not reach around to pull it.
[If blade jams, turn saw off, remove yellow
key, then free blade.
Kickback
Kickback is the uncontrolled propelling of the
workpiece back toward the user.
WARNING
Kickback can happen when blade is
pinched or bound by workpiece.
Pinching or binding can happen when:
• pawls and riving knife are not used or not
set correctly
• riving knife is not aligned with blade
• blade is not parallel to fence
• workpiece is twisted or warped and rocks
on table top
• pressure is put on outfeed side of workpiece
• workpiece is released before being
pushed past pawls
• user touches or tries to pull workpiece
through outfeed side before blade has
stopped spinning.
34
Ripping
To reduce risk of kickback:
[Set pawls and riving knife according to rip-
ping set-up procedure. Correctly set riving
knife is more likely to prevent workpiece
from binding or pinching blade; correctly
set pawls are more likely to grab into workpiece to stop or slow kickback if one happens.
[Check that riving knife is in line with blade
(see Alignment: Riving Knife to Blade).
[Cut only straight workpieces so surface
will lie flat on table and edge will stay tight
against fence. If you must cut an irregular
workpiece, attach a straight edge (see
Cutting Aides).
[Push workpiece through from infeed to
outfeed side until it is completely past
pawls.
[Use featherboard (see Cutting Aides).
[Keep hands away from outfeed side.
[If blade jams, turn saw off, remove yellow
key, then free blade.
[When cutting composition materials, or
other materials with one smooth and one
rough side, put rough side up so pawls will
be more likely to grab.
Wrong Way Feed
Wrong way feed is ripping by feeding the
workpiece into the outfeed side of the blade.
WARNING
Rotational force of blade will pull workpiece through violently if workpiece is
fed in same direction as blade rotates
(wrong way feed). Hands and fingers
could be pulled along with workpiece
into spinning blade before you can let
go or pull back. Fingers, hand or arm
could be cut off. Propelled workpiece
could hit bystander.
To eliminate risk of wrong way feed:
[Feed workpiece against blade rotation.
[Set pawls and riving knife; they act as partial barrier to outfeed side.
35
Hold Down Function
The hold down must be set correctly during
ripping to act as barrier against the infeed
side of the blade, to help keep the workpiece
flat on the table, and to deflect workpiece
chips. It must be lowered to just clear the
workpiece.
The hold down must be ree12(cl(.)]TJ0 -)12(e )-11(t)8(a)1(b)23(( )1m)-7(t)8(a)10(t)- TD0.002 Tw[(chi)7(at)8( )-11
36
Ripping
Ripping Set-up Procedure
Follow these steps before ripping.
These steps must be repeated each time
a different thickness workpiece is ripped.
A kerf must be made for each different
width cut. Also see the special notes for
bevel set-up that follow this section.
WARNING
If workpiece is pushed along fence
with kerfs, workpiece could get caught
on kerf, pinch blade and cause kickback. Do not use crosscutting fence
for ripping.
1. Prepare table:
- insert solid (no kerfs) fence (Note:
Use auxiliary fence when blade is set
1/2 to 2" from fence (See Cutting
Aides)
- tighten table clamps.
2. Prepare blade:
- lock radial arm at 0° miter - lock blade
in in-rip position*
- lower blade to just clear table
- lock blade carriage desired distance
from fence. Note: Make sure wider
part of workpiece will be between
blade and fence.
In-Rip Set-Up
* use out-rip position for rips 16" or wider
3. Make kerf:
a) turn saw on
b) lower blade about 1/16" into table
c) turn saw off and remove yellow key.
4. Place workpiece parallel to and up
against blade.** Note: Workpiece will be
between blade and table front.
5. Lower hold down** to workpiece, then
raise slightly so it just clears top surface of
workpiece. Lock in place.
6. Lower riving knife to table. Lower pawls
to workpiece surface.** Move workpiece
toward outfeed side until one set of pawls
rests level on workpiece surface. Lock in
place.
Setting Guard For Rip Cut
** bevel set-up: see special notes, next page
37
Ripping
7. Remove workpiece from table.
8. Ready push stick or push block.
9. Set up table extension(s) and support
their outer ends. Do not use another person to support workpieces because this
can cause kickback and it exposes helper
to potential hazards at outfeed side.
Special Notes for Bevel Set-Up
CAUTION
Bevel ripping creates unique problems
of visibility and feeding. Before cutting, check the set-up using both in-rip
and out-rip. Use the position that gives
the best combination of workpiece visibility and push stick clearance.
WARNING
Bevel the edge that is not against the
fence.
1. When setting bevel angle, raise radial
arm to allow sufficient clearance for blade
and guard to not jam in table.
2. When blade is beveled manually raise
clear plastic guard before lowering blade to
table or kerf, otherwise it may jam in the
table.
3. To set hold down, place workpiece
directly under guard nose, rather than parallel to blade.
4. To set pawls, place workpiece directly
under set of pawls closer to table. This set of
pawls will keep contact with workpiece surface.
Making Rip Cuts
Follow these steps to make in-rip cuts. For
out-rip cuts, reverse hand functions; that is,
put right hand on table and use left hand to
support and push workpiece.
1. Follow ripping set-up procedure.
38
In-Ripping
Ripping
2. Insert yellow key and turn saw on.
3. Stand at infeed side and out of line of
workpiece, in case of kickback. Start and
finish cut from infeed side.
4. Put workpiece on table, in front of hold
down, and tight against fence. To hold workpiece in position, put left hand on table, at
least 8" in front of hold down, and lightly
press fingers against workpiece. Support
workpiece with table extension or right hand.
CAUTION
For large workpieces use a feather
board in place of your hand on the
table. It gives better support. (See cutting aides)
5. With right hand, push workpiece under
hold down and into blade. Keep left hand
fixed on table, applying slight pressure to
keep workpiece against fence.
Keep Hand
Back 8"
Out-Ripping
6. Use right hand to continue to apply feed
pressure to part of workpiece close to fence.
Keep hand at least 8" in front of hold down.
Note: Most workpieces will automatically
raise clear plastic guard as they pass from
infeed to outfeed side. Unusually tall and
narrow workpieces may not raise clear
guard. When this happens, push guard tab
to raise guard, then release tab when guard
rests on top of workpiece surface.
Guard
Tab
CAUTION
Pushing guard tab means using only
one hand to control workpiece. While
pushing tab, use extra care to guide
workpiece and to keep hand at least 8"
in front of hold down.
Release tab as soon as clear guard
rests on workpiece.
7. When end of workpiece gets to table, use
push stick or block, instead of hand, on part
of workpiece between blade and fence to
push until workpiece is completely past
pawls.
Keep Hand
Back 8"
In-Ripping
8. Turn saw off and wait for blade to stop
spinning before touching workpiece.
39
Ripping
Dado Blades, Molding Heads
See Accessories for information on safety,
installation and use of dado blades and
molding heads.
Edging
Edging is the use of a dado blade or molding
head in the horizontal position. It is an
advanced technique that requires a molding
head guard and a special fence. See Accessories for information on safety, installation
and use of dado blades and molding heads
for edging. See Cutting Aides for information
on making the special fence.
Ripping Hints
1. To extend life of table top, make auxiliary
table cover out of 1/4" plywood or fiberboard.
Clamp or nail to original table top, section by
section. If you use nails, nail in the four comers to make sure blade will not contact nails.
2. Keep table clean of chips and sawdust.
3. Use sharp blades.
4. Use the right blade for each job.
5. For workpiece with one smooth and one
rough surface, such as paneling or finished
fiberboard, cut with rough surface up so
pawls will be more likely to grab in case of
kickback.
6. To keep cut line accurate, periodically
check blade alignment.
7. If you must cut an irregular workpiece,
attach a straight edge (see Cutting Aides).
40
Cutting Aides
Before cutting any wood on your saw, study
all of the Crosscutting and Ripping Instructions found on pages 45 through 57. As you
learn new radial arm saw woodworking techniques, you’ll see that many types of cuts
need different support and feeding devices,
known as jigs or fixtures. They can help you
make cuts more accurately. By helping to
steady the workpiece and keep you away
from the blade, they can help you safely use
your saw for certain cuts. Many people custom build their own jigs and fixtures. Jigs and
fixtures are often designed for a particular
cut. You can use your radial saw to easily
make many jigs and fixtures. To get you
started, we’ve included instructions for some
simple ones. After you have made a few
practice cuts, make up these jigs before
starting any projects. Make the push stick
first.
Push Sticks
Make the push stick using a piece of 1 x 2.
(see drawing top right for dimensions and
shapes)
Push Block
There are any number of ways to properly
cut your work pieces to make a push block.
The following steps describe one way you
can proceed.
Push Stick
Slightly Less Than Thickness
Of Workpiece Up To 3/8"
90° Notch
Material for Push Block
At Least 12"
At Least
5-5/8"
3/8" Thick Plywood
Base
At Least 12"
At Least
5"
3/4" Thick Plywood
Handle
Cutting Out the Base
3/8"
2-1/2" (save)
4th Cut
1st Cut
3rd Cut
5-1/8"
Making the base:
• Start with a piece of 3/8" plywood at least
5-5/8" wide or wider and 12" long or longer.
• Make two ripcuts. Perform the first ripcut
along the long side of the 3/8" plywood to
create a 3/8" wide strip. Next ripcut the 3/8"
plywood to a width of 5-1/8".
• Crosscut the 3/8" plywood to 12" long.
• Crosscut a 2-1/2" piece off of the 3/8"
wide by 3/8" thick strip and save this short
piece for later.
• The next cuts will create the 3/8" by 9-1/2"
notch in the base. Mark the long edge of
the board 2-1/2" from one end. Make a
crosscut into the edge, stopping about 3/4"
into the board. Set the saw to the in-rip
position and rip the width to 4-3/4" along
the same edge as the stopped crosscut.
Stop the ripcut where the two cuts intersect. Turn off the saw and remove the base
piece. The base should now measure as
shown.
2nd Cut
12"
Creating the Notch
1st Cut
2nd Cut
2-1/2"
4-3/4"
Finished Base
12"
At Least
5-1/8"
2-1/2"
3/8"
4-3/4"
These Edges
Must Be
Parallel
41
Cutting Aides
Clamp the featherboard to the front table, so
that the angled edge of the featherboard is
against the workpiece on the infeed side of
the blade. Do not clamp the featherboard
against the cut off part (out-feed side) of
the workpiece. If clamped to the outfeed
side, the featherboard can squeeze the
kerf closed, put binding pressure on the
blade, and cause kickback.
Straight Edge for Irregular Workpiece
WARNING
If you try to rip an irregular workpiece,
it could bind blade and cause kickback.
If the workpiece you want to rip does not
have a straight edge, attach a straight-edged
board to the workpiece:
a) place irregular side of workpiece against
fence
b) put straight-edged board on top of workpiece and against fence
c) tack straight edged board to work piece.
Note: Straight-edged board must not extend
beyond leading end of workpiece and should
cover workpiece width only enough to pass
between blade and fence.
Note: Use fence at least as high as combined heights of workpiece and straightedged board.
43
Maintenance
Replacing Pawls
Make sure the teeth of the pawls are always
sharp. If they become dull the pawls must be
replaced:
1. Use 7/16" wrench to remove hex nut.
Remove old pawls.
2. Install new pawls. Place spacers exactly
as shown.
3. Re-install hex nut.
4. Check that pawls work freely.
Lubricating Blade Guard Assembly
If guard becomes difficult to raise:
Grease
Pull Link
Here
Slider
1. Clean sawdust from the slot and slider.
2. Regrease with a small amount of light
grease applied to the slot and slider. Also
add a thin coat of grease between the Trigger and the Pull Link.
Slot
Adjusting the Trigger
If the trigger becomes loose side-to-side,
adjust the setscrews at the top of the yoke
handle. Use a 1/8" hex wrench to tighten setscrews tight. Then back off one setscrew
until the trigger moves freely.
Adjust
Screws
44
PARTS LIST CRAFTSMAN 10" RADIAL SAW GUARD KIT
No. 509347
Always order by Part Number - Not by Key Number
FIGURE 1
1
2
3
Key
No.
Part No.
1
2
3
4
5
6
7
8
9
10
11
12
13
14
—
820985
805548-10
STD610805
SP6311
803425
821354-1
STD601103
821410
818169
820573
824980
37384
818199
826284
SP5984
8
Description
Guard Accessory
Washer 3/16 x 1/16
* Screw Plastite #8 x 1/2
Form Instructions
Screw, Locking Set 1/4-20 x 3/8
Trigger
* Screw Pan Hd Ty “T” 10-32 x 1/2
Handle, Hoke Asm
Table Rear 40"
Table Spacer 40"
Table Front 40"
Nut, Tee
Table Support
Clamp Assembly
Owners Manual (Not Shown)
5
6
7
9
4
10
11
14
13
12
45
Repair Parts
* Standard Hardware Item - May be purchased locally.
46
PARTS LIST CRAFTSMAN 10" RADIAL SAW GUARD KIT
No. 509347
Always order by Part Number - Not by Key Number
FIGURE 2
Key
No
Part No.
1
2
3
4
821217
821313
STD551025
815865
5
6
7
8
9
10
11
12
13
14
15
16
17
STD601105
802392-47
808447-6
827919
STD551031
820521
820515
STD541425
815815
820517
STD512510
820512
824159
Description
Key
No.
Screw, Guard Clamp
Link, Pull
* Washer, 17/64 x 5/8 x 1/16
Screw, Hex Washer Hd Type
"TT" 1/4 - 20 x 1/2
* Screw, Pan Hd Type "TT" 10-32 x 5/16
Spacer #10 x .125
Washer, Spring
Knob, 5/16-18
* Washer 21/64 x 5/8 x 1/16
Spacer
Knife, Riving
* Nut, Lock 1/4-20
Pawl, AKB
Bushing
* Screw, Pan Hd. 1/4-20 x 1
Holder, AKB
Screw, Flat Hd Type “TT” 1/4 - 20 x 9/16
18
19
20
21
22
23
24
25
26
27
28
29
30
31
32
33
34
35
Part No.
820519
STD551225
820530
808822-1
820632-3
STD533107
809019-4
820532
821310
821311
821312
821314
828139
60413
821449
824158
825756
STD551131
Nut, Slotted 1/4 - 20
* Lockwasher 1/4
Support, Knife
Nut, Push 1/4
* Ring, Retaining
* Bolt, R.H. Short Neck 5/16 - 18 x 5/8
Bolt, Rd Hd Short Neck 5/16 - 18 x 1-3/4
Bolt 1/4-20 x 1/2
Guard, Lower
Link
Guard
Hold Down
Elbow, Dust
Nut, Push 5/16
Nut, Square 5/16 - 18 Double Lead
Strap-Retainer
Screw Guard Index
* Lockwasher
47
Repair Parts
* Standard Hardware Item - May Be Purchased Locally
Description
RZQHU·V
PDQXDO
10-INCH RADIAL SAW
GUARD KIT
MODEL NO.
509347
For Customer Service Questions
or Replacement Parts Call
1-800-325-1184
NOTE:
1. This manual is intended to be used along with your
original saw manual. If you no longer have your saw’s
owners manual, call customer service at 1-800-325-1184.
Have your saw’s model number when you call.
2. If you require this manual in Spanish or French, call
1-800-511-2628.
Si usted requiere que éste manual usuario en español o
francés, llame 1-800-511-2628. Pedir formulario
SP5984S-2.
Si vous nécesstent ce mode d’emploi en espagnol ou
français, téléphonez au 1-800-511-2628. Demander pour
forme SP5984F-2.
© 2000 Emerson Electric Co.
Part No. SP5984
Form No. SP5984-2
Printed in U.S.A. 10/00