1
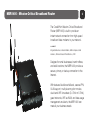
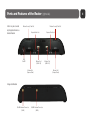
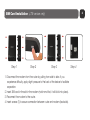
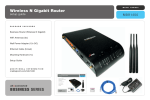
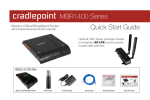
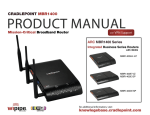
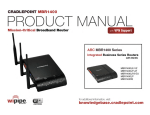
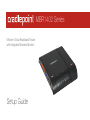
MBR1400 Series
Mission-Critical Broadband Router
with Integrated Business Modem
Setup Guide
MBR1400 - Mission-Critical Broadband Router
PACKAGE Includes
MBR1400 Router (Wireless N Gigabit)
Integrated Business-Grade Modem
(Optional)
WiFi Antennas (3x)
Modem Antennas (2x optional)
Wall Power Adapter (12v DC)
Ethernet Cable (5-feet)
Mounting Hardware (1x)
MBR1400 Series
Mission-Critical Broadband Router
with Integrated Business Modem
Setup Guide
Setup Guide
1
MBR1400 - Mission-Critical Broadband Router
2
The CradlePoint Mission-Critical Broadband
Router (MBR1400) is built to provide an
instant network connection from high-speed
broadband data modems to your network.
C O NN E C T
Integrated Business-Grade Modem, USB or ExpressCard
modems, Ethernet-Based Wired Services, WiFi
Designed for small businesses, branch offices,
and retail locations, the MBR1400 provides a
secure, primary or backup connection to the
Internet.
With features like failover/failback, secure VPN,
VLAN support, multiple encryption modes,
dual band WiFi broadcast (2.4 GHz or 5 GHz),
guest networks, WiFi as WAN, and data usage
management and alerts, the MBR1400 can
meet all your business needs.
WiFi Networking with the MBR1400
3
The MBR1400 is compatible with all major corporate network environments like Cisco, Juniper, SonicWall,
and others. It also fully supports all 802.11 a/b/g/n client adapters for WiFi networking.
Our web-based configuration and status tool supports Windows XP, Windows Vista, Windows 7, Mac OS
X, and most of the Linux distributions - allowing you to manage the router in common environments.
The MBR1400 web-based administration allows you to manage settings, backup and restore, implement
the latest firmware upgrades, plus get a complete log of diagnostic and status events for advanced
troubleshooting. Remote administration is available through WiPipe Central, SNMP, or a CLI.
The router supports custom DNS configuration with OpenDNS, DHCP server and configuration, and dualband WiFi options with multiple network names (SSIDs), 802.11 a/b/g/n modes, and broadcast channel
selection. This guide will cover additional features of advanced configuration, starting on page 13.
With an MBR1400, you have the power and flexibility you need for the most demanding small business,
branch office, or retail environment. The MBR1400 is a flexible, dependable router you can trust.
Ports and Features of the Router ( left side )
4
Modem Port
(USB 2.0)
10/100/1000 Ethernet Ports
(Configurable LAN or WAN)
Power
Switch and Port
Reset
WiFi Antenna Connector
(Reverse SMA)
WiFi Antenna Connector
(Reverse SMA)
WiFi Antenna Connector
(Reverse SMA)
Ports and Features of the Router ( right side )
Note: may be covered
by Integrated BusinessGrade Modem
Modem Security Tab Slot
Modem Security Tab Slot
ExpressCard Lock
WiFi
On/Off
Modem Port
(USB 2.0)
Modem Slot
(ExpressCard)
Integrated Modem
3G/4G Antenna Connector
(SMA)
5
3G/4G Antenna Connector
(SMA)
ExpressCard Lock
Modem Port
(USB 2.0)
Modem Slot
(ExpressCard)
SIM Card Installation (LTE version only)
Step 1
Step 2
6
Step 3
1. Disconnect the modem from the router by pulling from side to side. If you
experience difficulty, apply slight pressure to the back of the device to facilitate
separation.
2. Insert SIM card in the slot in the modem (notch end first, it will click into place).
3. Reconnect the modem to the router.
4. Insert screws (3) to secure connection between router and modem (backside).
Step 4
Getting Started
7
1. Connect the Router to a Modem / Data Source.
Keep the router in the OFF position until the modem is securely connected. Connect a CradlePoint
Business-Grade Modem, or a supported USB or ExpressCard modem to the router in their appropriate
port or slot. Your modem will require an active subscription from your service provider. If you have not
already done so, add a service plan to your Integrated Business-Grade Modem by contacting your
service provider. You will need the modem IMEI, ESN, or WiMAX MAC and SIM ID (LTE/EVDO version
only).Connect a Cable or DSL modem to the Blue Ethernet WAN port (see page 4).
2. Connect the WiFi and Modem Antennas.
Attach the three included WiFi and optional modem antennas to the connectors. Antennas are jointed,
which enables you to position them for optimal WiFi broadcast. To attach, hold the antenna straight and
twist the base of the antenna to connect, folding the joint if needed. Please note that 2.4GHz antennas are
provided. 5GHz antennas are available as accessories.
3. Connect to a Power Source.
Connect the router to the provided power supply (12V DC Wall Adapter). When you flip the power switch
to the ON ( I ) position, watch for the appropriate modem LED to illuminate. Ensure the connected modem LED is lit with a solid green light, which indicates that the modem is properly connected. For other
LED states, please see descriptions on page 11 and 12.
Getting Started (continued)
8
CradlePoint MBR1400 (Slickrock) PRODU
4. Connect to a Computer or other Network Equipment.
In order to access the MBR1400, establish a connection to the router. Connect wirelessly to the WiFi
broadcast, or with an Ethernet cable connected to your computer and then plugged into one of the
Orange Ethernet ports.
The default WiFi network name broadcast will be seen as “MBR1400-xxx”, where “xxx” is the last three
characters of your router’s MAC address, shown as SSID on the product label.
To connect to the WiFi, you will need to input the default password when prompted.
The default password is provided on the product label
found on the bottom of your router (see example below).
5. Use.
For most users, the MBR1400 Router can be used
immediately without any special configuration changes. If
you would like to change your network name, level of WiFi
security, etc. follow the First Time Setup Wizard steps on
page 9.
Model No.: MBR1400
Part No.: MBR1400
H/W ver.: 1.0
www.cradlepoint.com
Default Password : 440c1fc1
MAC Address : 0030440c1fc1
Serial No.: MM100167900418
FCC ID:UXX-MBR1400
IC: 6921A-MBR1400
SSID: MBR1400-fc1
MFG DATE: NOV 2010
12V
Made in Taiwan
1.5A
RoHS
R01
First Time Setup Wizard
9
The First Time Setup Wizard will help you customize the name of your wireless network, change passwords
to something you choose, and establish an optimal WiFi security mode. The MBR1400 comes out of the box
with a unique password at WPA2 WiFi security level.
CradlePoint recommends BEST WPA2 WiFi security.
1) Open a browser window and type “cp/” or “192.168.0.1” in the address bar. Press enter/return.
2) When prompted for your password, type the eight character Default Password found on the product label.
3) When you log-in for the first time, you will be automatically directed to the FIRST TIME SETUP WIZARD.
4) If you choose, you can change the router’s DEFAULT ADMINISTRATOR PASSWORD.
Then, select your TIME ZONE. Click NEXT.
5) CradlePoint recommends you customize your WiFi Network Name. Type in your personalized network
name here. You can also enable the Guest Network feature (see description on page 15).
First Time Setup Wizard
Choose the WIFI SECURITY MODE that best fits your needs: POOR for WEP, GOOD for WPA1/WPA2 or BEST for WPA2. Make sure your PC or other devices support the mode you choose. Choose a personalized WPA PASSWORD or WEP KEY. This password will be used to reconnect
devices to the router’s WiFi broadcast once the security settings have been saved. Click NEXT.
6)
10
If you are using a 4G WiMAX modem, you will want to establish the Realm for your carrier.
This setting ensures that the modem, when attached to the router, will properly connect to your carrier’s wireless broadband service. The MBR1400 will default to the Sprint 4G Realm. Select your carrier
from the drop-down menu. Click NEXT.
7) Review the details and record your wireless network name, administrative and wireless WPA password.
Click APPLY to save the settings and update them to your router.
NOTE: If you are currently using the MBR1400 WiFi network, reconnect your devices to the network using
the new wireless network name and security password.
LED Information
11
SIGNAL STRENGTH BUTTON Blue LED bars indicate the active modem’s signal strength. Press button to
turn on/off. 4 Solid Bars = strongest signal. 1 Blinking Bar = weakest signal.
POWER The MBR1400 must be powered using an approved 12V DC power source.
Green = Powered On. No Light = Not receiving power. Check that the unit is connected to an outlet.
Amber = Attention. Check router status page.
NETWORK LAN CONNECTION Indicates a connected device on the 1-4 LAN ports on the MBR1400.
Green = Connected to an active 10/100 Ethernet interface. Blinking Green = Traffic. Blue = Connected to an
active 10/100/1000 Ethernet interface. Blinking Blue = Traffic. No Light = Not connected, the connection is not
configured correctly, router is not configured correctly, or may not be turned on.
WPS WiFi Protected Setup. When you press the WPS button for five seconds, it allows you to use WPS
for your WiFi security. Blinking Blue = WPS setting is in progress. Solid Blue = WPS is active.
CradlePoint recommends using WPA2 WiFi Security.
WAN CONNECTION Indicates information about a data source connected to the WAN port (Blue Ethernet port).
Green = Connected to an active 10/100 Ethernet interface. Blinking Green = Traffic. Blue = Connected to an
active 10/100/1000 Ethernet interface. Blinking Blue = Traffic. No Light = Not connected, the connection is not
configured correctly, and/or router are not configured correctly or turned on.
LED Information
EC
EC
EC
WiFi BROADCAST Indicates activity on the WiFi broadcast for either the 2.4GHz and 5GHz bands.
Green = 2.4 GHz WiFi is on and operating normally.
Blue = 5GHz WiFi is on and operating normally.
Blinking Red = Error with 2.4GHz or 5GHz connection.
No Light = WiFi is off.
USB MODEMS Indicates the status of any USB or Business-Grade modems connected to the MBR1400.
A connected CradlePoint Business Grade Modem LED information will be shown on LED #1 or #2.
Green = Modem has established an active connection. Blinking Green = Modem is connecting.
Amber = Modem is not active. Blinking Amber = Data connection error. No modem connection possible.
Blinking Red = Modem is in the process of resetting.
EXPRESS CARD MODEMS Indicates the status of any ExpressCard modems connected to the MBR1400.
Green = Modem has established an active connection. Blinking Green = Modem is connecting.
Amber = Modem is not active. Blinking Amber = Data connection error. No modem connection possible.
Blinking Red = Modem is in the process of resetting.
12
Features of the MBR1400
The CradlePoint MBR1400 is a business-grade router specifically designed
for retail locations and small/branch offices. Optimized for performance,
reliability, and maximum WiFi range, the MBR1400 has access to a cloudbased tool called WiPipe Central, for group-based configuration,
management, and monitoring of remotely deployed routers.
Secure Access
The MBR1400 supports WEP, WPA, and WPA2 encryption modes to create secure Internet connections
for up to 128 connected devices via WiFi. 253 users can connect via Ethernet. Prevent unwanted access
to computers connected to your networks with an SPI Firewall and NAT (Network Address Translation).
Features like URL Filtering, Traffic Filtering, DMZ, Virtual Server, Port Forwarding, and FTP pass-through
(passive and active) are also available to enable safe Internet access for all connected users.
VPN (Virtual Private Networking), GRE (Generic Route Encapsulation)
Create, manage, and terminate secure VPN tunnels between remote computers and secure corporate
networks with IPSec. With up to 20 concurrent sessions, the MBR1400 supports both VPN and
GRE, including multiple routes in a single tunnel. Provide end-to-end protection of secure company
communications with Hash and Cipher encryption algorithm protocols.
13
Features of the MBR1400 (continued)
14
Network Failover Support
When multiple Internet sources (4G, 3G, DSL, Cable, T1, modems) are connected to the MBR1400, it can
automatically detect an Internet outage and “failover” to a secondary connection and “failback” when the
primary data service returns. Redundant connection keeps your business going.
H O W T O C O N F I G U R E : Select INTERNET from top tab and CONNECTION MANAGER from drop-down
menu. Order your connections by failover priority. Select a connection and click EDIT. Select desired
FAILURE CHECK and FAILBACK CONFIGURATION settings. Click SUBMIT.
Load Balancing
When multiple data sources are connected to the MBR1400 (up to two 4G devices), the router can be
configured to distribute all connected users or device traffic across active data connections. This feature
distributes each connected user to the best data source available, relieving congestion and pressure on
any single data source.
Dual-Band WiFi
The MBR1400 provides the option of broadcasting your WiFi network on either the 2.4GHz or 5GHz band.
This allows administrators the option to select the less used 5GHz frequency band if desired. For best
operation, use the 5GHz antenna available as an accessory.
Features of the MBR1400 (continued)
15
WiFi Networks
The MBR1400 can make four WiFi networks on either the 2.4GHz or 5GHz band. Secured SSIDs are
used for your trusted workgroup members. Guest (public) SSIDs can provide full, secure access to the
Internet - but users are restricted from accessing the router administration console or any connected
devices on the private network. Each network can be configured with its own security, QoS, and VLAN
Settings. The ability to “Hide” network names (SSIDs) from broadcast is also available.
H O W T O C O N F I G U R E : Enable the Guest Network in Step 2 of the First Time Setup Wizard. It will appear by
default as “Guest-XXX” in your available networks list (XXX = the last three characters of your routers MAC Address).
VLAN Support
Create and manage virtual LANs to segregate and secure your network.
WiFi as WAN
The MBR1400 can receive an existing WiFi signal and use it to create secure Internet access, allowing you
to connect up to 128 devices using the MBR1400’s security features. The WiFi as WAN feature can be
used as a WiFi repeater or as a WiFi to Ethernet adapter for non-WiFi devices.
H O W T O C O N F I G U R E : Enable this feature by logging in to your router (see steps 1 & 2 on page 9) and select
INTERNET on the top navigation bar and then WiFi as WAN settings in the drop-down menu.
Cloud-Based Router Management Service
WiPipe Central: Efficiently manage all your CradlePoint Routers.
CradlePoint’s cloud-based management service, WiPipe Central, gives you a consolidated router
management tool to communicate with and manage dispersed CradlePoint routers. This service allows
you to have firmware update and configuration options for the edge of your network, as well as gain
information about other data connections (4G/3G/T1/DSL/Cable/etc) across geographies and networks.
Designed to eliminate conflict with existing firewalls (using device-initiated HTTP protocols), WiPipe
Central has user-defined groups for quick communication with all grouped devices. It provides remote
access to an individual router or pre-defined group for firmware and configuration updates.
CradlePoint has a demonstration of WiPipe Central available for your use.
visit: https://services.cradlepoint.com
username: Demo
password: Demo
NOTE: This account is tied to 15 dedicated routers at CradlePoint Headquarters. The routers and account are live – you may view connection status, update firmware, and
change the configuration settings. The routers and management account are reset nightly to original settings.
To learn more about WiPipe Central, contact [email protected]
16
Integrated Business-Grade Modem
17
The CradlePoint series of Business-Grade Modems provides the highest level of data throughput at
the same location as a standard USB modem. CradlePoint optimizes and intelligently manages the
co-existence between the wireless broadband signal and the WiFi broadcast of the router, creating
a fast, wide-range, truly business-class, modem-based instant network.
FEATURES
• Business-Class modems provide optimal data throughput and co-existence
• Establish continuous uptime with optimum total cost
of ownership for broad deployment
• Flexible installation provides highest level of 3G/4G
performance
• Standardized platform and centralized remote management
• Enterprise-level security features
• Simple to install, configure and maintain - minimal impact on IT
• Ability to attach remote antennas for better signal reception
CradlePoint BusinessGrade Modem Series.
LTE/EVDO, WiMAX
and EV-DO models
available.
Antenna Positioning with Business Grade Modem
18
CradlePoint recommends the following antenna positioning for best performance.
Verizon: MBR1400LE-VZ (LTE/EVDO), MBR1400E-VZ (EVDO)
Sprint: MBR1400W-SP (WiMAX), MBR1400E-SP (EVDO)
WiFi
When connecting the provided antennas,
review the connection points.
WiFi antennas have flat circular bases.
Modem antennas have protruding pins.
Modem
Desk Mount Use
Wall Mount Use
(All modems desk mount)
(All modems wall mount)
Note: Desk mount not recommended for Sprint WiMAX