1
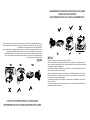
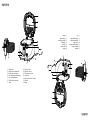
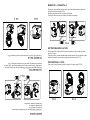
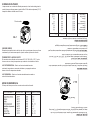
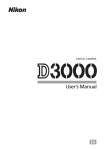
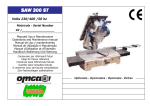
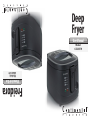
Freidora
Manual de Uso
Modelo:
CE23379
Model:
CE23379
User Manual
Deep
Fryer
Este producto es sólo para uso doméstico.
Por favor lea todas las instrucciones antes de
usar
¡NO DEJE COLGAR EL CORDÓN!
ADVERTENCIA: Podrían
ocurrir graves quemaduras con
el aceite caliente si se tira de la
olla freidora y se la hace caer
del repostero de cocina. No
deje que el cordón cuelgue del
borde del repostero en donde
pueda ser tirado por un niño o
alguien pueda tropezarse.
¡MANTENGA ALEJADO DE LOS NIÑOS!
NO UTILICE CON UN CABLE DE EXTENSIÓN
DE
SEGURIDAD
DOGUÍA
NOT USE
WITH
AN EXTENSION CORD
SAFETY
GUIDENCE
Al momento
de utilizar cualquier electrodoméstico, debe seguirse las siguientes preseguridad
básicas:
When cauciones
using electricalde
appliances
, basic safety
precautions should always be followed ,including
the following :
1.
2.
3.
4.
5.
6.
7.
8.
9.
10.
11.
12.
SAFETY GUIDENCE
1. Lea
todas las instrucciones.
Read
all instructions.
Do2.not
touch
hot surface
.Use handles or knobs.
No
toque
las superficies
calientes. Utilice los mangos o perillas.
To3.
protect
shock do
not immerse
cord, plug
and fryer no
in water
or other el
liquid.
Conagainst
el finelectric
de evitar
una
descarga
eléctrica,
sumerja
cordón, el enchufe ni la
Close
supervision
necessary
whentipo
any appliance
is used by or near children.
freidora
en isagua
u otro
de líquido.
Unplug
from outlet
when sumo
not in use
and beforesicleaning.
coolingel
before
putting on or
4. Debe
tenerse
cuidado
se vaAllow
a utilizar
electrodoméstico
cerca o en la
taking
off parts, and
cleaning the appliance.
presencia
debefore
niños.
Do not operate any appliance with a damaged cord or plug, should the appliance malfunction,
5. Desenchufe el electrodoméstico si no lo va a utilizar y antes de proceder con la
or if it has been damaged in any manner. Return appliance to the nearest authorized service
limpieza. Déjelo enfriar antes de colocar o retirar piezas y antes de limpiarlo.
facility for examination, repair or adjustment.
6. No utilice el electrodoméstico si el cordón o el enchufe se encuentran dañados. Si
The use of accessories is not recommended by the appliance manufacturer as it may cause
el electrodoméstico presentara algún desperfecto o ha sufrido cualquier tipo de daño,
injuries.
llévelo al centro de servicio técnico autorizado más cercano para que se lo examine,
Do not use the appliance outdoors.
o arregle.
Dorepare
not let cord
hang over edge of a table, or touch hot surface.
Elplace
usoonde
accesorios
no recomendados
por parte del fabricante podría causar
Do7.not
or near
a hot gas, electric
burner, or in a heated oven.
lesiones.
Extreme
caution must be taken when moving an appliance containing hot oil or other hot
8. No utilice el electrodoméstico en exteriores.
liquid.
No
que
eluse.
cordón cuelgue del borde la mesa ni que entre en contacto con
Do9.not
usepermita
appliance for
other
superficies calientes.
10. No coloque el electrodoméstico cerca de un quemador de cocina a gas o eléctrico
ni dentro de un horno caliente.
11. Debe tenerse sumo cuidado al momento de trasladar el electrodoméstico si éste
contiene aceite caliente o cualquier otro líquido caliente.
12. No utilice el electrodoméstico para otros fines.
When using electrical appliances, basic safety precautions should always be followed,
including the following:
instructions.
3. 1.ToRead
protect all
against
electric shock do not immerse cord, plug and fryer in water or other liquid.
Do supervision
not touch
hot surface
.Use
handles
knobs.
4. 2.Close
is necessary
when any
appliance
is used or
by or
near children.
To protect
against
do not Allow
immerse
plug and
5. 3.Unplug
from outlet
when notelectric
in use andshock
before cleaning.
coolingcord,
before putting
on or fryer in water or
other
taking liquid.
off parts, and before cleaning the appliance.
Close
supervision
necessary
when
anyshould
appliance
is used
by or near children.
6. 4.Do
not operate
any applianceiswith
a damaged cord
or plug,
the appliance
malfunction,
if it has been
damaged
any manner.
appliance
to the nearest
authorized
service
5.orUnplug
from
outletin when
not Return
in use
and before
cleaning.
Allow
cooling before putting
facility
for examination,
repairand
or adjustment.
on
or taking
off parts,
before cleaning the appliance.
7. 6.The
of accessories
not appliance
recommended with
by theaappliance
manufacturer
as plug,
it may cause
Dousenot
operate isany
damaged
cord or
should the appliance
injuries.
malfunction,
or if it has been damaged in any manner. Return appliance to the nearest
8. authorized
Do not use theservice
appliance outdoors.
facility for examination, repair or adjustment.
9. Do not let cord hang over edge of a table, or touch hot surface.
7. The use of accessories is not recommended by the appliance manufacturer as it
10. Do not place on or near a hot gas, electric burner, or in a heated oven.
may cause injuries.
11. Extreme caution must be taken when moving an appliance containing hot oil or other hot
8. Do not use the appliance outdoors.
liquid.
9. Do not let cord hang over edge of a table, or touch hot surface.
12. Do not use appliance for other use.
10. Do not place on or near a hot gas, electric burner, or in a heated oven.
11. Extreme caution must be taken when moving an appliance containing hot oil or
other hot liquid.
12. Do not use appliance for other use.
Subject to technical changes without notice.
2. Do not touch hot surface .Use handles or knobs.
1. Read all instructions.
the following :
When using electrical appliances , basic safety precautions should always be followed ,including
SAFETY GUIDENCE
DO NOT USE WITH AN EXTENSION CORD
DO NOT USE WITH AN EXTENSION CORD
KEEP AWAY FROM CHILDREN!
SERIOUS HOT OIL BURNS MAY
RESULT FROM THE DEEP FRYER
BEING PULLED OFF OF A COUNTER TOP. DO NOT ALLOW THE
CORD TO HANG OVER THE EDGE
OF THE COUNTER WHERE IT MAY
BE GRABBED BY CHILDREN OR
BECOME ENTANGLED WITH THE
USER.
WARNING
DO NOT DRAPE CORD!
This product is for household use only.
Please read all instructions before use
This appliance complies with ��� is engineered to the latest safety technical
requirements.
Subject to technical changes without notice.
����������������������������������������������
¡GUARDE ESTAS INSTRUCCIONES PARA CUALQUIER
����������������������������������������
CONSULTA EN EL FUTURO!
�
ESTE PRODUCTO ES SOLO PARA USO DOMÉSTICO
To ensure safe operation, excessive food or utensils must not be inserted into the fryer.
Should the fryer leak, please contact the company from which you purchased the fryer.
Before
using
time, wash the pot and basket thoroughly with warm,
Plug cord
into fryer
a 120 for
Voltthe
AC first
outlet.
soapy
water,
carefully
dry
aluminum
good aesthetic
appearance.
Before using fryer for the first time, washpot
the to
potmaintain
and basketthe
thoroughly
with warm,
soapy water,
Do
not
use
fryer
without
oil
or
fat.
Fryer
will
be
severely
damaged
if
heated
dry.
carefully dry aluminum pot to maintain the good aesthetic appearance.
This fryer has a thermal safety device. In case of thermostat failure, the electrical circuit
Do not use fryer without oil or fat. Fryer will be severely damaged if heated dry.
has an automatic cutout, thus preventing overheating.
This fryer
a thermal
safety device.
In the
casecompany
of thermostat
electrical
circuitthe
hasfryer.
an
Should
thehas
fryer
leak, please
contact
fromfailure,
whichthe
you
purchased
automatic
cutout,
thus
preventing
overheating.
To ensure safe operation, excessive food or utensils must not be inserted into the fryer.
�
�����
Plug
cord� into a 120 Volt AC outlet.
NOTE
�������
�������
�
NOTA
����� �
Enchufe el aparato a un tomacorriente de 120V AC.
Plug cord into a 120 Volt AC outlet.
Antes de utilizar la de freidora por primera vez, lave la olla y la canastilla completaBeforecon
using
fryertibia
for the
first time,Con
washcuidado
the pot and
basket
with warm,
soapy
water,
mente
agua
jabonosa.
seque
lathoroughly
olla de aluminio
para
mantener
carefully dry aluminum pot to maintain the good aesthetic appearance.
una
apariencia
estética
apropiada.
Doutilice
not uselafryer
without
or fat. Fryer
willobe
severely damaged
if heated
dry.dañarse seriaNo
freidora
sinoilcolocar
aceite
manteca.
La freidora
podría
mente si se la utiliza sinsafety
ningún
líquido.
This
fryer
has
a
thermal
device.
In case of thermostat failure, the electrical circuit has an
Este
electrodoméstico
cuenta overheating.
con un dispositivo de seguridad térmico. En caso de
automatic
cutout, thus preventing
falla del termostato, el circuito eléctrico cuenta con un sistema de corte automático
Should the fryer leak, please contact the company from which you purchased the fryer.
previniendo así el sobrecalentamiento.
ensure safe
operation,
excessive
food or utensils
must not
be inserted
into the fryer.
SiToexistiera
una
fuga o goteo,
póngase
en contacto
con
el distribuidor
en donde adquirió su freidora.
Con el fin de asegurar un buen funcionamiento, no inserte demasiados alimentos ni
utensilios dentro de la freidora.
THIS PRODUCT IS FOR HOUSEHOLD USE ONLY.
����������������������������������������������
����������������������������������������
KEEP THESE INSTRUCTIONS FOR FUTURE REFERENCE!
�
Subject to technical changes without notice.
requirements.
This appliance complies with ��� is engineered to the latest safety technical
PARTS
PARTES
�
�
�
�
8. Glass
7. Lid
2. Basket handle
10.Oil pot
3. Handle press button
11. Housing
4. Power light
12. Open lid button
5. Temperature light
13. Power cord
6. Thermostat knob
14. Base
8. Glass
9. Inner cover
10. Oil pot
11. Housing
12. Open lid button
13. Power cord
14. Base
9. Inner cover
1. Basket
1. Canastilla
2. Mango de la canastilla
3. Botón para el mango
4. Luz indicadora de energía
5. Luz de temperatura
6. Perilla del termostato
7. Tapa
1. Basket
1. Basket
2. Basket handle
3. Handle press button
4. Power light
5. Temperature light
6. Thermostat knob
7. Lid
8. Visor de vidrio
9. Cubierta interior
10. Olla para el aceite
11. Armazón
12. Botón para abrir la tapa
13. Cordón
14. Base
9. Inner cover
14. Base
6. Thermostat knob
13. Power cord
5. Temperature light
12. Open lid button
4. Power light
11. Housing
3. Handle press button
10.Oil pot
2. Basket handle
7. Lid
8. Glass
�
�
�
�
PARTS
PARTS
FIG. 5
FIG. 6
MANGO DE LA CANASTILLA
��������������
The BASKET
allows
you to raise/lower
basket
the fryer
lid is closed
El mango
de laHANDLE
canastilla
le permite
alzar / the
bajar
la when
canastilla
mientras
la(FIG.4)
tapa de la
Movese
handle
up: basketcerrada
up.
freidora
encuentre
(FIG. 4).
Pushel
handle
knobhacia
down: basket
down.
Mueva
mango
arriba:
Para alzar la canastilla.
��������������
Presione
el botón
del mango
abajo:thePara
lafryer
canastilla.
The BASKET
HANDLE
allows youhacia
to raise/lower
basketbajar
when the
lid is closed (FIG.4)
Move handle up: basket up.
Push handle knob down: basket down.
FIG. 4
����������������
BOTÓN
PARA ABRIR LA TAPA
To remove the lid, lift the lid to a vertical position and pull it upwards. (FIG.6)
REMOVE
To TO
remove
theTHE
lid,LID
lift the lid to a vertical position and pull it upwards. (FIG.6)
fried to avoid scalding
fingers (FIG.5)
TOwhen
REMOVE
THEtheLID
Push
the button,
automatically.
steam
will escape
from the deep fryer
To remove
theand
lid, fry
liftlid
thewill
lid release
to a vertical
position Thus
and pull
it upwards.
(FIG.6)
The
designed
BUTTON helps you open the lid much more easily and safely.
TOspecial
REMOVE
THELID-OPEN
LID
specialdesigned
designed LID-OPEN
BUTTON
helps helps
you open
theopen
lid much
easily and
safely.
The The
special
LID-OPEN
BUTTON
you
themore
lid much
more
easPush
the
button,
and
fry
lid
will
release
automatically.
Thus
steam
will
escape
from
the
deep
fryer will
ily and safely. Push the button, and fry lid will release automatically. Thus steam
����������������
whenfrom
fried to
avoid
scalding
fingersfried
(FIG.5)
escape
the
deep
fryerthewhen
to avoid scalding the fingers (FIG.5)
The special designed
BUTTONespecial
helps you le
open
the lid much
morelaeasily
El botón
para
abrir laLID-OPEN
tapa de diseño
ayudará
a abrir
tapaand
desafely.
manera
Push
and fry lid will release automatically. Thus steam will escape from the deep fryer
más����������������
fácilthey button,
segura.
when fried
to avoidyscalding
fingers (FIG.5)
Presione
el botón
la tapathequedará
suelta
manera el vapor
The special
designed LID-OPEN
BUTTON helps
youautomáticamente.
open the lid much more De
easilyesta
and safely.
TO REMOVE
THE
LID
saldrá
de
freidora
ylidsewillevitará
que puedaThus
quemarse
dedos
(FIG.
5).
Push
the la
button,
and fry
release automatically.
steam will los
escape
from the
deep fryer
To remove
lid, scalding
lift the lid
a vertical
position and pull it upwards. (FIG.6)
when
fried tothe
avoid
thetofingers
(FIG.5)
TO REMOVE
THE LID LA TAPA
PARA
RETIRAR
To retirar
remove the
lift the
lid to a vertical
position andvertical
pull it upwards.
Para
la lid,
tapa,
levántela
en posición
y tire(FIG.6)
hacia arriba. (FIG. 6).
����������������
LID-OPEN
BUTTON
FIG. 4
Push handle knob down: basket down.
Move handle up: basket up.
FIG. 5
FIG. 6
The BASKET HANDLE allows you to raise/lower the basket when the fryer lid is closed (FIG.4)
��������������
BASKETHANDLE
HANDLE allows
to raise/lower
the basket
the fryer
lid is closed (FIG.4)
The The
BASKET
allowsyou
you
to raise/lower
thewhen
basket
when
Move lid
handle
up: basket
up.
the fryer
is closed
(FIG.4)
Push
handle up:
knobbasket
down: basket
Move
handle
up. down.
��������������
Push
handle knob down: basket down.
BASKET HANDLE
FILTER SYSTEM
FILTER
SYSTEM
The
fittedwith
withaapermanent
permanent filter
which
collects
drops
of oiloffrom
the steam
The
lidlid
is isfitted
filtersystem,
system,
which
collects
drops
oil from
the as it
steam
it passes
the filter.
filter
replaced
(FIG.7)
passesasthrough
thethrough
filter. The
filter The
should
be should
replacedbe(FIG.7)
after
being after
used being
for 60
used
for
60
times(around
60
times).
times(around 60 times).
/.3!3.#()/2
°�
&1%-#(&1)%2
°�
.-).-2
°�
Charcoal Filter
&)2(#!*%2
°�
#14,"%$#()#*%-
°�
&)++%32
°�� � � � � � � � � ,42(1..,2
°�
�� �cuadro
� � � � � �es
� � � �referencial.
� � � � � � � ���
6(.+%2(1),/°
El tiempo
de fritura que se ofrece en este
sólo
°��6%)-'3',)-43%2
MENÚ
DE REFERENCIA
(%&17)-'3),%')5%-)-3()2#(!13)2.-+7&.11%&%1%-#%
FIG. 7
REFERENCE MENU
LUZ DE ENERGÍA – Esta luz se iluminará automáticamente cuando se
POWER LIGHT it will light automatically when the appliance is plugged.
enchufe el electrodoméstico.
and go out when the set temperature is reached.
TERMOSTATO
LUZ
DEL
PILOTO
Smear the inner Y
face
of the
viewing
window with the oil to prevent condensation forming and to
VIEWING WINDOW
Embadurne la superficie interior del visor de vidrio con aceite para evitar que se forme
condensación y de esta manera permitir el poder verificar el proceso de cocción.
VISOR DE VIDRIO
best temperature to suit the food to be fried.
TEMPERATURE LIGHT will light automatically while the temperature keeps rising and
TEMPERATURE
LIGHT iswill
light automatically while the temperature keeps rising
go out when
the set temperature
reached.
and go itout
when
set temperaturewhen
is reached.
POWER LIGHT
will
lighttheautomatically
the appliance is plugged.
THERMOSTAT AND PILOT LIGHT
Smear the inner face of the viewing window with the oil to prevent condensation forming and to
THERMOSTAT
AND PILOT
LIGHT
enable cooking process
to be checked.
The
thermostat isAND
calibrated
in steps marked, 265° ,300°F, 340° and 370°F, which ofTHERMOSTAT
PILOT LIGHT
fers
you
the best
to suit
the food
to be °!-$
fried.
The
thermostat
is temperature
calibrated in steps
marked,
° ,
°8
°�6()#(.&&%127.43(%
El termostato viene calibrado con las marcas 265°, 300° 300, 340° y 370° F, que le
enable cooking process to be checked.
ofrecen contar con la mejor temperatura que se adecúe a los alimentos a freírse.
Smear the inner face of the viewing window with the oil to prevent condensation formingVIEWING
and to enable
cooking process to be checked.
WINDOW
is calibrated in steps marked,
° ,
°8
°!-$
°�6()#(.&&%127.43(%
LUZThe
DEthermostat
TEMPERATURA
–
Esta
luz
se
iluminará
automáticamente
best temperature to suit the food to be fried.
mientras
la
temperatura
se
encuentre
elevándose y se apagará cuando se
alcance el nivel
de temperatura
deseado.
TEMPERATURE
LIGHT
will light automatically while the temperature keeps rising
VIEWING WINDOW
POWER LIGHT it will light automatically when the appliance is plugged.
REFERENCE MENU
REFERENCE
MENU
°��6%)-'3',)-43%2
FIG. 7
(%&17)-'3),%')5%-)-3()2#(!13)2.-+7&.11%&%1%-#%
The
frying time given in this chart is only for reference.
�� � � � � � � � �WEIGHT(g)
� � � � � � � � � � ���
6(.+%2(1),/°
FOOD TYPE
TEMPERATURE(°C)
TIME(minutes)
,42(1..,2
°�
Whole shrimp
265°F
300
3-5
��
� � � � � � � � &)++%32
°
Mushrooms
300°F
400
4-6
�
#14,"%$#()#*%-
°
Fillets
300°F
400
5-7
Crumbed chicken
340°F
500
12-14
�
.-).-2
°
Fish cakes
340°F
400
5-7
�
&1%-#(&1)%2
°
Onions
370°F
500
3-5
�
/.3!3.#()/2
°
French fries
370°F
600
11-13
Potato chips
370°F
500
10-15
&)2(#!*%2
°�
The lid is fitted with a permanent filter system, which collects drops of oil from the steamde
as it
La tapa
cuenta
con
un
sistema
de
filtrado
permanente,
el
cual
recolecta
las
gotas
aceite del vapor conforme
a través
delbe
filtro.
El filtro
debe after
remplazarse
(FIG.
passes
through
the filter. pasan
The filter
should
replaced
(FIG.7)
being used
for7)60
después
de haberse
utilizado unas 60 veces.
times(around
60 times).
FILTER SYSTEM
SISTEMA
DE FILTRADO
Filtro de carbón
2. As is carefulness should be taken when frying, especially when children are near by.
1. Use only metal kitchen utensils with insulated handles in hot oil.
HINTS
guide, food that has been pre-cooked in some way need a higher temperature and less
open the lid.
cooking time than those raw food.
%,.5%3(%"!2*%36)3(3(%(!-$+%&1.,3(%"1!#*%3
DE LA FREIDORA
2. USO
.41"%36%%-+)31%2.&.)+)-3.3(%&17%1(%+%5%+.&.)+,423"%"%36%%-
3(%!-$+%5%+,!1*%$.-3(%241&!#%.&3(%/.3
1. Retire la canastilla utilizando el mango.
2%.-+7'..$04!+)375%'%3!"+%.)+.1!++/41/.2%2(.13%-)-'&.1$%%/&17)-'
2. Vierta unos 2.5litros de aceite dentro de la freidora. El nivel del aceite debe quedar
433%1,!1'!1)-%.+)5%.)+.1!-),!+&!3)2-.31%#.,,%-$%$$4%3.)32+.6%1
entre
las marcas de niveles MAX y MIN indicadas en la superficie de la olla (FIG. 8).
•2,.*)-'3%,/%1!341%2
Utilice solamente aceite vegetal de buena calidad o manteca para freír. No se
recomienda la utilización de mantequilla, margarina, aceite de oliva o manteca animal
debido a sus bajas temperaturas de calentamiento.
2.spatter.
As is carefulness should be taken when frying, especially when children are near by.
Taking
into lift
account
the food
select
the temperature
for frying. As
a general
7. 3.
After
cooking,
the basket
out oftype
the oil
to drain.
Push the LID-RELEASE
BUTTON
to
NIVELES DE ACEITE
. 1.
DoUse
not add
or wet
stuff to
the cooking
even small
amounts
onlywater
metal
kitchen
utensils
with oil,
insulated
handles
in of
hotwater
oil. will cause oil to
knob down to have basket and food immersed in the oil.
HINTS
6. Place the basket back into the fryer. Remove the handle and close the lid. Turn the BASKET
3. Smear the viewing window with a little oil.
4. Plug in the mains and set thermostat to the required temperature (see the reference
3. ,%!13(%5)%6)-'6)-$.66)3(!+)33+%.)+
menu) The temperature light will go out when the set temperature is reached.
4. +4' )- 3(% ,!)-2 !-$ 2%3 3(%1,.23!3 3. 3(% 1%04)1%$ 3%,/%1!341% 2%% 3(%
5. Add food (as dry as possible) into the basket first. Do not overload basket. Place
1%&%1%-#%,%-4(%3%,/%1!341%+)'(36)++'..436(%-3(%2%33%,/%1!341%)2
food
of uniform size into the basket so that cook evenly. Be sure to dry all food before
1%!#(%$
frying.
Place the basket back into the fryer. Remove the handle and close the lid. Turn the
5. 6.
$$&..$!2$17!2/.22)"+%)-3.3(%"!2*%3&)123
BASKET
knobbasket.
down to have basket and food immersed in the oil. Do not add water or
Do
not overload
wet
stuff
to
the
cooking
oil, the
even
small
amounts
of water will cause oil to spatter.
. Place food of uniform
size into
basket
so that
cook evenly.
7. After cooking, lift the basket out of the oil to drain. Push the LID-RELEASE BUTTON
. Be sure to dry all food before frying.
to open the lid.
FIG. 8
FIG. 8
3. Embadurne el visor de vidrio con un poco de aceite.
4. Enchufe el electrodoméstico y coloque el termostato según la temperatura requerida
3. ,%!13(%5)%6)-'6)-$.66)3(!+)33+%.)+
(véase
el
menú
de referencia). La luz de temperatura se apagará cuando se alcance la
4. temperatura
+4' )- 3(%deseada.
,!)-2 !-$ 2%3 3(%1,.23!3 3. 3(% 1%04)1%$ 3%,/%1!341% 2%% 3(%
5.
Coloque los alimentos (tan secos como sea posible) dentro de la canastilla primero.
1%&%1%-#%,%-4(%3%,/%1!341%+)'(36)++'..436(%-3(%2%33%,/%1!341%)2
•1%!#(%$
No llene la canastilla demasiado.
• Coloque los alimentos de tamaño uniforme dentro de la canastilla de manera que
5. $$&..$!2$17!2/.22)"+%)-3.3(%"!2*%3&)123
puedan cocerse de forma pareja.
Do not overload basket.
•
Asegúrese
de
secar
todos
los
alimentos
antes
de freírlos.
. Place
food of
into the basket
so that
evenly. Retire el mango y cierre la tapa.
6. Vuelva
a uniform
colocarsize
la canastilla
dentro
decook
la freidora.
. Be
sure to dry
all foodde
before
frying. para sumergir la canastilla con los alimentos dentro
Presione
el botón
la canastilla
aceite.
6. del
Place
the basket back into the fryer. Remove the handle and close the lid. Turn the BASKET
•knob
No añada
ni artículos
húmedos
del aceite de cocción ya que aún las
down toagua
have basket
and food
immerseddentro
in the oil.
cantidades más mínimas de agua harán que el aceite salpique.
. Do not add water or wet stuff to the cooking oil, even small amounts of water will cause oil to
7. Después de la cocción, alce la canastilla fuera del aceite para que drene. Presione
elspatter.
botón para soltar la tapa y así poder abrirla.
7. After cooking, lift the basket out of the oil to drain. Push the LID-RELEASE BUTTON to
Use
only good quality vegetable oil or all purpose shortening for deep frying. Butter,
2,.*)-'3%,/%1!341%2
margarine, olive oil or animal fat is not recommended due to its lower smoking temperatures.
2%.-+7'..$04!+)375%'%3!"+%.)+.1!++/41/.2%2(.13%-)-'&.1$%%/&17)-'
2. Pour between 2.5 litres of oil into the fryer. The level of oil must be between the MAX
433%1,!1'!1)-%.+)5%.)+.1!-),!+&!3)2-.31%#.,,%-$%$$4%3.)32+.6%1
and
MIN level marked on the surface of the pot. (FIG.8)
3(%!-$+%5%+,!1*%$.-3(%241&!#%.&3(%/.3
1.
Remove the basket with the handle from the bracket.
DEEP FRYER USAGE
2. .41"%36%%-+)31%2.&.)+)-3.3(%&17%1(%+%5%+.&.)+,423"%"%36%%-
open the lid. PRÁCTICOS
CONSEJOS
1. Utilice utensilios de cocina de metal solamente con mangos aislados para manipular
HINTS
aceite
caliente.
1. el
Use
only metal
kitchen utensils with insulated handles in hot oil.
2. Tenga cuidado durante el proceso de fritura especialmente si hay niños presentes.
2. As is carefulness should be taken when frying, especially when children are near by.
3.Tomando en cuenta el tipo de alimento, seleccione la temperatura adecuada para la
fritura. Como regla general, los alimentos precocidos de alguna manera necesitan una
temperatura más alta y un tiempo de cocción menor que aquellos que se encuentren
crudos.
%,.5%3(%"!2*%36)3(3(%(!-$+%&1.,3(%"1!#*%3
MANTENIMIENTO Y LIMPIEZA
1. Desenchufe el electrodoméstico antes de proceder con la limpieza.
2. Vacíe la bandeja de condensación.
3. Deje que el aceite se enfríe completamente. El aceite o la manteca retienen su
temperatura durante un periodo prolongado después del uso. No intente trasladar o
mover la freidora mientras aún se encuentre caliente.
4. El aceite puede reutilizarse varias veces. Optimice el uso de su freidora teniéndola
siempre lista para cada uso. Una manera de hacer esto es mantener el aceite frío y
filtrado dentro de la olla, listo para la siguiente fritura utilizando la tapa como protector
contra el polvo.
5. El aceite debe filtrarse después de cada uso.
6. Después de retirar el aceite, la freidora debe limpiarse con papel absorbente. Luego
utilice un paño húmedo y un poco de detergente. Finalmente, limpie con un paño
seco.
7. La parte externa puede limpiarse con un paño húmedo. No utilice productos abrasivos ni esponjas para refregar.
8. La canastilla puede lavarse con agua tibia jabonosa.
9. Retire el filtro usado y reemplácelo con uno nuevo después de aproximadamente
60 sesiones de fritura.
Advertencia:
1. Este electrodoméstico no ha sido diseñado para ser utilizado por personas (incluyendo niños) con capacidades físicas, sensoriales o mentales reducidas, o con la
debida experiencia y conocimientos, a menos de que cuenten con la correspondiente
supervisión o instrucciones con respecto al uso del electrodoméstico por parte de una
persona responsable de su seguridad.
2. Debe supervisarse a los niños para asegurarse de que no jueguen con el electrodoméstico.
3. Si el cordón se dañara, éste debe ser remplazado por parte del fabricante, su
agente de servicio técnico o cualquier otra persona calificada con el fin de evitar eventualidades.
4. Este electrodoméstico no ha sido diseñado para ser utilizado por medio de un temporizador externo o un sistema de control remoto por separado.
1. This appliance is not intended for use by persons (including children) with reduced
physical, sensory or mental capabilities, or lack of experience and knowledge, unless
they have been given supervision or instruction concerning use of the appliance by a
person responsible for their safety.
2. Children should be supervised to ensure that they do not play with the appliance.
3. If the supply cord is damaged, it must be replaced by the manufacturer, its service
agent or a similarly qualified person in order to avoid a hazard.
4. The appliance is not intended to be operated by means of an external timer or a
separate remote-control system.
Warning:
1. The power supply must be cut before cleaning.
2. Empty the condensation tray.
3. Cool the oil completely. Oil or fat retains its temperature for a long time after use. Do
not attempt to move or carry the fryer while it is still hot.
4. Oil can be reused several times. Get the maximum use from your fryer by always
having it ready for use .One way of doing this is to keep the cooled and strained oils
inside ready for the next frying session with the lid acting as a dust cover.
5. Oil should be filtered after use each. time.
6. After draining the oil, the fryer should be wiped out with absorbent paper then with
damp cloth and a little detergent and finally cleaned with a dry cloth. The interior of the
fryer has a plain aluminum surface. To avoid damage, no abrasives or sharp instruments should be used.
7. The exterior can be cleaned with damp, not to use abrasives or scouring pads.
8. The basket can be washed in warm soapy water.
9. Remove the used filter and replace with a new one after approximately 60 frying sessions.
MAINTENANCE AND CLEANING
Freidora
Manual de Uso
Modelo:
CE23379
Model:
CE23379
User Manual
Deep
Fryer
NO UTILICE CON UN CABLE DE EXTENSIÓN
DE
SEGURIDAD
DOGUÍA
NOT USE
WITH
AN EXTENSION CORD
SAFETY
GUIDENCE
Al momento
de utilizar cualquier electrodoméstico, debe seguirse las siguientes preseguridad
básicas:
When cauciones
using electricalde
appliances
, basic safety
precautions should always be followed ,including
6. Do not operate any appliance with a damaged cord or plug, should the appliance malfunction,
5. Desenchufe el electrodoméstico si no lo va a utilizar y antes de proceder con la
limpieza. Déjelo enfriar antes de colocar o retirar piezas y antes de limpiarlo.
facility for examination, repair or adjustment.
6. No utilice el electrodoméstico si el cordón o el enchufe se encuentran dañados. Si
The use of accessories is not recommended by the appliance manufacturer as it may cause
el electrodoméstico presentara algún desperfecto o ha sufrido cualquier tipo de daño,
injuries.
llévelo al centro de servicio técnico autorizado más cercano para que se lo examine,
Do not use the appliance outdoors.
o arregle.
Dorepare
not let cord
hang over edge of a table, or touch hot surface.
Elplace
usoonde
accesorios
no recomendados
por parte del fabricante podría causar
Do7.not
or near
a hot gas, electric
burner, or in a heated oven.
lesiones.
Extreme
caution must be taken when moving an appliance containing hot oil or other hot
8. No utilice el electrodoméstico en exteriores.
liquid.
No
que
eluse.
cordón cuelgue del borde la mesa ni que entre en contacto con
Do9.not
usepermita
appliance for
other
superficies calientes.
10. No coloque el electrodoméstico cerca de un quemador de cocina a gas o eléctrico
ni dentro de un horno caliente.
11. Debe tenerse sumo cuidado al momento de trasladar el electrodoméstico si éste
contiene aceite caliente o cualquier otro líquido caliente.
12. No utilice el electrodoméstico para otros fines.
or if it has been damaged in any manner. Return appliance to the nearest authorized service
7.
8.
9.
10.
11.
12.
This product is for household use only.
Please read all instructions before use
cerca o en la
taking
off parts, and
cleaning the appliance.
presencia
debefore
niños.
DO NOT DRAPE CORD!
5. Unplug
from outlet
when sumo
not in use
and beforesicleaning.
coolingel
before
putting on or
4. Debe
tenerse
cuidado
se vaAllow
a utilizar
electrodoméstico
WARNING
el enchufe ni la
4. Close
supervision
necessary
whentipo
any appliance
is used by or near children.
freidora
en isagua
u otro
de líquido.
SERIOUS HOT OIL BURNS MAY
RESULT FROM THE DEEP FRYER
BEING PULLED OFF OF A COUNTER TOP. DO NOT ALLOW THE
CORD TO HANG OVER THE EDGE
OF THE COUNTER WHERE IT MAY
BE GRABBED BY CHILDREN OR
BECOME ENTANGLED WITH THE
USER.
Utilice los mangos o perillas.
3. To3.
protect
shock do
not immerse
cord, plug
and fryer no
in water
or other el
liquid.
Conagainst
el finelectric
de evitar
una
descarga
eléctrica,
sumerja
cordón,
KEEP AWAY FROM CHILDREN!
instrucciones.
2. Do2.not
touch
hot surface
.Use handles or knobs.
No
toque
las superficies
calientes.
DO NOT USE WITH AN EXTENSION CORD
DO NOT USE WITH AN EXTENSION CORD
1. Lea
todas las
1. Read
all instructions.
SAFETY GUIDENCE
the following :
SAFETY GUIDENCE
¡MANTENGA ALEJADO DE LOS NIÑOS!
When using electrical appliances , basic safety precautions should always be followed ,including
ADVERTENCIA: Podrían
ocurrir graves quemaduras con
el aceite caliente si se tira de la
olla freidora y se la hace caer
del repostero de cocina. No
deje que el cordón cuelgue del
borde del repostero en donde
pueda ser tirado por un niño o
alguien pueda tropezarse.
the following :
¡NO DEJE COLGAR EL CORDÓN!
When using electrical appliances, basic safety precautions should always be followed,
1. Read all instructions.
including the following:
2. Do not touch hot surface .Use handles or knobs.
instructions.
3. 1.ToRead
protect all
against
electric shock do not immerse cord, plug and fryer in water or other liquid.
Do supervision
not touch
hot surface
.Use
handles
knobs.
4. 2.Close
is necessary
when any
appliance
is used or
by or
near children.
To protect
against
do not Allow
immerse
plug and
5. 3.Unplug
from outlet
when notelectric
in use andshock
before cleaning.
coolingcord,
before putting
on or fryer in water or
other
taking liquid.
off parts, and before cleaning the appliance.
Close
supervision
necessary
when
anyshould
appliance
is used
by or near children.
6. 4.Do
not operate
any applianceiswith
a damaged cord
or plug,
the appliance
malfunction,
if it has been
damaged
any manner.
appliance
to the nearest
authorized
service
5.orUnplug
from
outletin when
not Return
in use
and before
cleaning.
Allow
cooling before putting
facility
for examination,
repairand
or adjustment.
on
or taking
off parts,
before cleaning the appliance.
7. 6.The
of accessories
not appliance
recommended with
by theaappliance
manufacturer
as plug,
it may cause
Dousenot
operate isany
damaged
cord or
should the appliance
injuries.
malfunction,
or
if
it
has been damaged in any manner. Return appliance to the nearest
8. authorized
Do not use theservice
appliance outdoors.
facility for examination, repair or adjustment.
9. Do not let cord hang over edge of a table, or touch hot surface.
7. The use of accessories is not recommended by the appliance manufacturer as it
10. Do not place on or near a hot gas, electric burner, or in a heated oven.
may cause injuries.
11. Extreme caution must be taken when moving an appliance containing hot oil or other hot
8. Do not use the appliance outdoors.
liquid.
9. Do not let cord hang over edge of a table, or touch hot surface.
12. Do not use appliance for other use.
10. Do not place on or near a hot gas, electric burner, or in a heated oven.
11. Extreme caution must be taken when moving an appliance containing hot oil or
other hot liquid.
12. Do not use appliance for other use.
Subject to technical changes without notice.
Este producto es sólo para uso doméstico.
Por favor lea todas las instrucciones antes de
usar
This appliance complies with ��� is engineered to the latest safety technical
requirements.
Subject to technical changes without notice.
����������������������������������������������
¡GUARDE ESTAS INSTRUCCIONES PARA CUALQUIER
����������������������������������������
CONSULTA EN EL FUTURO!
�
ESTE PRODUCTO ES SOLO PARA USO DOMÉSTICO
To ensure safe operation, excessive food or utensils must not be inserted into the fryer.
Should the fryer leak, please contact the company from which you purchased the fryer.
�������
�
����� �
NOTA
Enchufe el aparato a un tomacorriente de 120V AC.
Plug cord into a 120 Volt AC outlet.
Antes de utilizar la de freidora por primera vez, lave la olla y la canastilla completaBeforecon
using
fryertibia
for the
first time,Con
washcuidado
the pot and
basket
with warm,
soapy
water,
mente
agua
jabonosa.
seque
lathoroughly
olla de aluminio
para
mantener
carefully
dry
aluminum
pot
to
maintain
the
good
aesthetic
appearance.
una apariencia estética apropiada.
Doutilice
not uselafryer
without
or fat. Fryer
willobe
severely damaged
if heated
dry.dañarse seriaNo
freidora
sinoilcolocar
aceite
manteca.
La freidora
podría
mente
si sehas
la autiliza
sinsafety
ningún
líquido.
This fryer
thermal
device.
In case of thermostat failure, the electrical circuit has an
Este
electrodoméstico
cuenta overheating.
con un dispositivo de seguridad térmico. En caso de
automatic
cutout, thus preventing
falla del termostato, el circuito eléctrico cuenta con un sistema de corte automático
Should the fryer leak, please contact the company from which you purchased the fryer.
previniendo así el sobrecalentamiento.
ensure safe
operation,
excessive
food or utensils
must not
be inserted
into the fryer.
SiToexistiera
una
fuga o goteo,
póngase
en contacto
con
el distribuidor
en donde adquirió su freidora.
Con el fin de asegurar un buen funcionamiento, no inserte demasiados alimentos ni
utensilios dentro de la freidora.
�����
Plug
cord� into a 120 Volt AC outlet.
Before using fryer for the first time, wash the pot and basket thoroughly with warm,
Plug
cord
into
a
120
Volt
AC
outlet.
soapy water, carefully dry aluminum pot to maintain the
good aesthetic
appearance.
Before
using
fryer
for
the
first
time,
wash
the
pot
and
basket
thoroughly
with warm,
soapy water,
Do
not use
without
or fat. Fryer
willaesthetic
be severely
damaged if heated dry.
carefully
dryfryer
aluminum
pot oil
to maintain
the good
appearance.
This fryer has a thermal safety device. In case of thermostat failure, the electrical circuit
Do not use fryer without oil or fat. Fryer will be severely damaged if heated dry.
has an automatic cutout, thus preventing overheating.
This fryer has a thermal safety device. In the
casecompany
of thermostat
electrical
circuitthe
hasfryer.
an
Should
the
fryer
leak,
please
contact
fromfailure,
whichthe
you
purchased
automatic
thus preventing
overheating.
To
ensurecutout,
safe operation,
excessive
food or utensils must not be inserted into the fryer.
�
NOTE
THIS PRODUCT IS FOR HOUSEHOLD USE ONLY.
�������
����������������������������������������������
����������������������������������������
KEEP THESE INSTRUCTIONS FOR FUTURE REFERENCE!
�
Subject to technical changes without notice.
requirements.
This appliance complies with ��� is engineered to the latest safety technical
PARTS
�
�
�
�
PARTES
8. Glass
7. Lid
14. Base
6. Thermostat knob
13. Power cord
5. Temperature light
12. Open lid button
4. Power light
11. Housing
3. Handle press button
10.Oil pot
2. Basket handle
1. Basket
1. Basket
2. Basket handle
3. Handle press button
4. Power light
5. Temperature light
6. Thermostat knob
7. Lid
8. Glass
9. Inner cover
10. Oil pot
11. Housing
12. Open lid button
13. Power cord
14. Base
9. Inner cover
1. Basket
1. Canastilla
2. Mango de la canastilla
3. Botón para el mango
4. Luz indicadora de energía
5. Luz de temperatura
6. Perilla del termostato
7. Tapa
8. Visor de vidrio
9. Cubierta interior
10. Olla para el aceite
11. Armazón
12. Botón para abrir la tapa
13. Cordón
14. Base
9. Inner cover
2. Basket handle
10.Oil pot
3. Handle press button
11. Housing
4. Power light
12. Open lid button
5. Temperature light
13. Power cord
6. Thermostat knob
14. Base
7. Lid
8. Glass
PARTS
PARTS
�
�
�
�
MANGO DE LA CANASTILLA
��������������
The BASKET
allows
you to raise/lower
basket
the fryer
lid is closed
El mango
de laHANDLE
canastilla
le permite
alzar / the
bajar
la when
canastilla
mientras
la(FIG.4)
tapa de la
Movese
handle
up: basketcerrada
up.
freidora
encuentre
(FIG. 4).
Pushel
handle
knobhacia
down: basket
down.
Mueva
mango
arriba:
Para alzar la canastilla.
��������������
Presione
el
botón
del
mango
hacia
abajo:thePara
lafryer
canastilla.
The BASKET HANDLE allows you to raise/lower
basketbajar
when the
lid is closed (FIG.4)
Move handle up: basket up.
Push handle knob down: basket down.
FIG. 5
FIG. 6
FIG. 4
����������������
BOTÓN
PARA ABRIR LA TAPA
The special
BUTTONespecial
helps you le
open
the lid much
morelaeasily
El botón
paradesigned
abrir laLID-OPEN
tapa de diseño
ayudará
a abrir
tapaand
desafely.
manera
Push
the
button,
and
fry
lid
will
release
automatically.
Thus
steam
will
escape
from
the
deep
fryer
más����������������
fácil y segura.
when fried
to avoidyscalding
thequedará
fingers (FIG.5)
Presione
el
botón
la
tapa
suelta
automáticamente.
De
esta
manera
el vapor
The special designed LID-OPEN BUTTON helps you open the lid much more easily and safely.
TO REMOVE
THE
LID
saldrá
de
freidora
ylidsewillevitará
que puedaThus
quemarse
dedos
(FIG.
5).
Push
the la
button,
and fry
release automatically.
steam will los
escape
from the
deep fryer
To remove
lid, scalding
lift the lid
a vertical
position and pull it upwards. (FIG.6)
when
fried tothe
avoid
thetofingers
(FIG.5)
TO REMOVE
THE LID LA TAPA
PARA
RETIRAR
To retirar
remove the
lift the
lid to a vertical
position andvertical
pull it upwards.
Para
la lid,
tapa,
levántela
en posición
y tire(FIG.6)
hacia arriba. (FIG. 6).
To remove the lid, lift the lid to a vertical position and pull it upwards. (FIG.6)
REMOVE
To TO
remove
theTHE
lid,LID
lift the lid to a vertical position and pull it upwards. (FIG.6)
fried to avoid scalding
fingers (FIG.5)
TOwhen
REMOVE
THEtheLID
Push
the button,
automatically.
steam
will escape
from the deep fryer
To remove
theand
lid, fry
liftlid
thewill
lid release
to a vertical
position Thus
and pull
it upwards.
(FIG.6)
The
designed
BUTTON helps you open the lid much more easily and safely.
TOspecial
REMOVE
THELID-OPEN
LID
special designed LID-OPEN BUTTON helps you open the lid much more easily and safely.
The The
special
designed
LID-OPEN
BUTTON
helps
you
open
the
lid
much
more
easPush the button, and fry lid will release automatically.
Thus steam
will escape fromThus
the deep
fryer will
ily and
safely.
Push
the
button,
and
fry
lid will release
automatically.
steam
����������������
whenfrom
fried to
avoid
scalding
fingersfried
(FIG.5)
escape
the
deep
fryerthewhen
to avoid scalding the fingers (FIG.5)
����������������
LID-OPEN
BUTTON
FIG. 4
FIG. 5
FIG. 6
Push handle knob down: basket down.
Move handle up: basket up.
The BASKET HANDLE allows you to raise/lower the basket when the fryer lid is closed (FIG.4)
��������������
BASKETHANDLE
HANDLE allows
to raise/lower
the basket
the fryer
lid is closed (FIG.4)
The The
BASKET
allowsyou
you
to raise/lower
thewhen
basket
when
Move lid
handle
up: basket
up.
the fryer
is closed
(FIG.4)
Push
handle up:
knobbasket
down: basket
Move
handle
up. down.
��������������
Push
handle knob down: basket down.
BASKET HANDLE
FILTER SYSTEM
FILTER
SYSTEM
The
fittedwith
withaapermanent
permanent filter
which
collects
drops
of oiloffrom
the steam
The
lidlid
is isfitted
filtersystem,
system,
which
collects
drops
oil from
the as it
steam
it passes
the filter.
filter
replaced
(FIG.7)
passesasthrough
thethrough
filter. The
filter The
should
be should
replacedbe(FIG.7)
after
being after
used being
for 60
used
for 60 times(around
60 times).
times(around
60 times).
/.3!3.#()/2
°�
Charcoal Filter
&1%-#(&1)%2
°�
.-).-2
°�
&)2(#!*%2
°�
#14,"%$#()#*%-
°�
&)++%32
°�� � � � � � � � � ,42(1..,2
°�
�� �cuadro
� � � � � �es
� � � �referencial.
� � � � � � � ���
6(.+%2(1),/°
El tiempo
de fritura que se ofrece en este
sólo
FIG. 7
(%&17)-'3),%')5%-)-3()2#(!13)2.-+7&.11%&%1%-#%
°��6%)-'3',)-43%2
MENÚ
DE REFERENCIA
REFERENCE MENU
LUZ DE ENERGÍA – Esta luz se iluminará automáticamente cuando se
POWER LIGHT it will light automatically when the appliance is plugged.
enchufe el electrodoméstico.
and go out when the set temperature is reached.
VIEWING WINDOW
Smear the inner face of the viewing window with the oil to prevent condensation formingVIEWING
and to enable
cooking process to be checked.
WINDOW
Smear the inner face of the viewing window with the oil to prevent condensation forming and to
THERMOSTAT
AND PILOT
LIGHT
enable cooking process
to be checked.
The thermostat is calibrated in steps marked, 265° ,300°F, 340° and 370°F, which ofTHERMOSTAT
AND
PILOT
LIGHT
fers
you
the best
to suit
the food
to be °!-$
fried.
The
thermostat
is temperature
calibrated in steps
marked,
° ,
°8
°�6()#(.&&%127.43(%
best temperature to suit the food to be fried.
VIEWING WINDOW
TEMPERATURE LIGHT will light automatically while the temperature keeps rising and
TEMPERATURE LIGHT will light automatically while the temperature keeps rising
go out when
the
set
temperature
is
reached.
and go itout
when
set temperaturewhen
is reached.
POWER LIGHT
will
lighttheautomatically
the appliance is plugged.
best temperature
to suit the
to be fried.
mientras
la temperatura
se food
encuentre
elevándose y se apagará cuando se
alcance el nivel
de
temperatura
deseado.
TEMPERATURE LIGHT
will light automatically while the temperature keeps rising
THERMOSTAT AND PILOT LIGHT
is calibrated–inEsta
stepsluz
marked,
° ,
°8
°!-$
°�6()#(.&&%127.43(%
LUZThe
DEthermostat
TEMPERATURA
se iluminará
automáticamente
El termostato viene calibrado con las marcas 265°, 300° 300, 340° y 370° F, que le
enable cooking process to be checked.
ofrecen contar con la mejor temperatura que se adecúe a los alimentos a freírse.
TERMOSTATO
LUZ
DEL
PILOTO
Smear the inner Y
face
of the
viewing
window with the oil to prevent condensation forming and to
Embadurne la superficie interior del visor de vidrio con aceite para evitar que se forme
condensación y de esta manera permitir el poder verificar el proceso de cocción.
VISOR DE VIDRIO
POWER LIGHT it will light automatically when the appliance is plugged.
REFERENCE MENU
REFERENCE
MENU
(%&17)-'3),%')5%-)-3()2#(!13)2.-+7&.11%&%1%-#%
The
frying time given in this chart is only for reference.
°��6%)-'3',)-43%2
FIG. 7
�� � � � � � � � �WEIGHT(g)
� � � � � � � � � � ���
6(.+%2(1),/°
FOOD TYPE
TEMPERATURE(°C)
TIME(minutes)
,42(1..,2
°�
Whole shrimp
265°F
300
3-5
��
� � � � � � � � &)++%32
°
Mushrooms
300°F
400
4-6
�
#14,"%$#()#*%-
°
Fillets
300°F
400
5-7
Crumbed chicken
340°F
500
12-14
&)2(#!*%2
°�
�
.-).-2
°
Fish cakes
340°F
400
5-7
�
&1%-#(&1)%2
°
Onions
370°F
500
3-5
Filtro de carbón
�
/.3!3.#()/2
°
French fries
370°F
600
11-13
Potato chips
370°F
500
10-15
The lid
is fitted
with
permanent
system,
which collects
dropsrecolecta
of oil from
steamde
as it
La tapa
cuenta
con
unasistema
defilter
filtrado
permanente,
el cual
lasthegotas
aceite
del
vapor
conforme
pasan
a
través
del
filtro.
El
filtro
debe
remplazarse
(FIG.
passes through the filter. The filter should be replaced (FIG.7) after being used for7)60
después
de haberse
utilizado unas 60 veces.
times(around
60 times).
FILTER SYSTEM
SISTEMA
DE FILTRADO
%,.5%3(%"!2*%36)3(3(%(!-$+%&1.,3(%"1!#*%3
DE LA FREIDORA
2. USO
.41"%36%%-+)31%2.&.)+)-3.3(%&17%1(%+%5%+.&.)+,423"%"%36%%-
3(%!-$+%5%+,!1*%$.-3(%241&!#%.&3(%/.3
1. Retire la canastilla utilizando el mango.
2. Vierta unos 2.5litros de aceite dentro de la freidora. El nivel del aceite debe quedar
433%1,!1'!1)-%.+)5%.)+.1!-),!+&!3)2-.31%#.,,%-$%$$4%3.)32+.6%1
entre
las marcas de niveles MAX y MIN indicadas en la superficie de la olla (FIG. 8).
2,.*)-'3%,/%1!341%2
• Utilice solamente aceite vegetal de buena calidad o manteca para freír. No se
recomienda la utilización de mantequilla, margarina, aceite de oliva o manteca animal
debido a sus bajas temperaturas de calentamiento.
2%.-+7'..$04!+)375%'%3!"+%.)+.1!++/41/.2%2(.13%-)-'&.1$%%/&17)-'
NIVELES DE ACEITE
2. As is carefulness should be taken when frying, especially when children are near by.
1. Use only metal kitchen utensils with insulated handles in hot oil.
HINTS
knob down to have basket and food immersed in the oil.
HINTS
. 1.
DoUse
not add
or wet
stuff to
the cooking
even small
amounts
onlywater
metal
kitchen
utensils
with oil,
insulated
handles
in of
hotwater
oil. will cause oil to
2.spatter.
As is carefulness should be taken when frying, especially when children are near by.
Taking
into lift
account
the food
select
the temperature
for frying. As
a general
7. 3.
After
cooking,
the basket
out oftype
the oil
to drain.
Push the LID-RELEASE
BUTTON
to
guide, food that has been pre-cooked in some way need a higher temperature and less
open the lid.
cooking time than those raw food.
6. Place the basket back into the fryer. Remove the handle and close the lid. Turn the BASKET
3. Smear the viewing window with a little oil.
4. Plug in the mains and set thermostat to the required temperature (see the reference
3. ,%!13(%5)%6)-'6)-$.66)3(!+)33+%.)+
menu) The temperature light will go out when the set temperature is reached.
4. +4' )- 3(% ,!)-2 !-$ 2%3 3(%1,.23!3 3. 3(% 1%04)1%$ 3%,/%1!341% 2%% 3(%
5. Add food (as dry as possible) into the basket first. Do not overload basket. Place
1%&%1%-#%,%-4(%3%,/%1!341%+)'(36)++'..436(%-3(%2%33%,/%1!341%)2
food
of uniform size into the basket so that cook evenly. Be sure to dry all food before
1%!#(%$
frying.
Place the basket back into the fryer. Remove the handle and close the lid. Turn the
5. 6.
$$&..$!2$17!2/.22)"+%)-3.3(%"!2*%3&)123
BASKET
knobbasket.
down to have basket and food immersed in the oil. Do not add water or
Do
not overload
cooking
oil, the
even
small
amounts
of water will cause oil to spatter.
. wet
Placestuff
foodto
of the
uniform
size into
basket
so that
cook evenly.
7. After cooking, lift the basket out of the oil to drain. Push the LID-RELEASE BUTTON
to open the lid.
. Be sure to dry all food before frying.
FIG. 8
FIG. 8
3. Embadurne el visor de vidrio con un poco de aceite.
4. Enchufe el electrodoméstico y coloque el termostato según la temperatura requerida
3. (véase
,%!13(%5)%6)-'6)-$.66)3(!+)33+%.)+
el menú de referencia). La luz de temperatura se apagará cuando se alcance la
temperatura
4. +4' )- 3(%deseada.
,!)-2 !-$ 2%3 3(%1,.23!3 3. 3(% 1%04)1%$ 3%,/%1!341% 2%% 3(%
5.
Coloque los alimentos (tan secos como sea posible) dentro de la canastilla primero.
1%&%1%-#%,%-4(%3%,/%1!341%+)'(36)++'..436(%-3(%2%33%,/%1!341%)2
•1%!#(%$
No llene la canastilla demasiado.
• Coloque los alimentos de tamaño uniforme dentro de la canastilla de manera que
5. $$&..$!2$17!2/.22)"+%)-3.3(%"!2*%3&)123
puedan cocerse de forma pareja.
Do
not overloadde
basket.
• Asegúrese
secar todos los alimentos antes de freírlos.
. Place
food
of
uniform
into the basket
so that
evenly. Retire el mango y cierre la tapa.
6. Vuelva a colocarsize
la canastilla
dentro
decook
la freidora.
. Be
sure to dry
all foodde
before
frying. para sumergir la canastilla con los alimentos dentro
Presione
el botón
la canastilla
aceite.
6. del
Place
the basket back into the fryer. Remove the handle and close the lid. Turn the BASKET
•knob
No añada
ni artículos
húmedos
del aceite de cocción ya que aún las
down toagua
have basket
and food
immerseddentro
in the oil.
cantidades más mínimas de agua harán que el aceite salpique.
. Do not add water or wet stuff to the cooking oil, even small amounts of water will cause oil to
7. Después de la cocción, alce la canastilla fuera del aceite para que drene. Presione
elspatter.
botón para soltar la tapa y así poder abrirla.
7. After cooking, lift the basket out of the oil to drain. Push the LID-RELEASE BUTTON to
open the lid. PRÁCTICOS
CONSEJOS
1. Utilice utensilios de cocina de metal solamente con mangos aislados para manipular
HINTS
aceite
caliente.
1. el
Use
only metal
kitchen utensils with insulated handles in hot oil.
2. Tenga cuidado durante el proceso de fritura especialmente si hay niños presentes.
3.Tomando en cuenta el tipo de alimento, seleccione la temperatura adecuada para la
fritura. Como regla general, los alimentos precocidos de alguna manera necesitan una
temperatura más alta y un tiempo de cocción menor que aquellos que se encuentren
crudos.
2. As is carefulness should be taken when frying, especially when children are near by.
3(%!-$+%5%+,!1*%$.-3(%241&!#%.&3(%/.3
1.
Remove the basket with the handle from the bracket.
2%.-+7'..$04!+)375%'%3!"+%.)+.1!++/41/.2%2(.13%-)-'&.1$%%/&17)-'
2. Pour between 2.5 litres of oil into the fryer. The level of oil must be between the MAX
433%1,!1'!1)-%.+)5%.)+.1!-),!+&!3)2-.31%#.,,%-$%$$4%3.)32+.6%1
and
MIN level marked on the surface of the pot. (FIG.8)
Use
only good quality vegetable oil or all purpose shortening for deep frying. Butter,
2,.*)-'3%,/%1!341%2
margarine, olive oil or animal fat is not recommended due to its lower smoking temperatures.
DEEP FRYER USAGE
2. .41"%36%%-+)31%2.&.)+)-3.3(%&17%1(%+%5%+.&.)+,423"%"%36%%-
%,.5%3(%"!2*%36)3(3(%(!-$+%&1.,3(%"1!#*%3
MANTENIMIENTO Y LIMPIEZA
1. Desenchufe el electrodoméstico antes de proceder con la limpieza.
2. Vacíe la bandeja de condensación.
3. Deje que el aceite se enfríe completamente. El aceite o la manteca retienen su
temperatura durante un periodo prolongado después del uso. No intente trasladar o
mover la freidora mientras aún se encuentre caliente.
4. El aceite puede reutilizarse varias veces. Optimice el uso de su freidora teniéndola
siempre lista para cada uso. Una manera de hacer esto es mantener el aceite frío y
filtrado dentro de la olla, listo para la siguiente fritura utilizando la tapa como protector
contra el polvo.
5. El aceite debe filtrarse después de cada uso.
6. Después de retirar el aceite, la freidora debe limpiarse con papel absorbente. Luego
utilice un paño húmedo y un poco de detergente. Finalmente, limpie con un paño
seco.
7. La parte externa puede limpiarse con un paño húmedo. No utilice productos abrasivos ni esponjas para refregar.
8. La canastilla puede lavarse con agua tibia jabonosa.
9. Retire el filtro usado y reemplácelo con uno nuevo después de aproximadamente
60 sesiones de fritura.
Advertencia:
1. This appliance is not intended for use by persons (including children) with reduced
physical, sensory or mental capabilities, or lack of experience and knowledge, unless
they have been given supervision or instruction concerning use of the appliance by a
person responsible for their safety.
2. Children should be supervised to ensure that they do not play with the appliance.
3. If the supply cord is damaged, it must be replaced by the manufacturer, its service
agent or a similarly qualified person in order to avoid a hazard.
4. The appliance is not intended to be operated by means of an external timer or a
separate remote-control system.
Warning:
1. The power supply must be cut before cleaning.
2. Empty the condensation tray.
3. Cool the oil completely. Oil or fat retains its temperature for a long time after use. Do
not attempt to move or carry the fryer while it is still hot.
4. Oil can be reused several times. Get the maximum use from your fryer by always
having it ready for use .One way of doing this is to keep the cooled and strained oils
inside ready for the next frying session with the lid acting as a dust cover.
5. Oil should be filtered after use each. time.
6. After draining the oil, the fryer should be wiped out with absorbent paper then with
damp cloth and a little detergent and finally cleaned with a dry cloth. The interior of the
fryer has a plain aluminum surface. To avoid damage, no abrasives or sharp instruments should be used.
7. The exterior can be cleaned with damp, not to use abrasives or scouring pads.
8. The basket can be washed in warm soapy water.
9. Remove the used filter and replace with a new one after approximately 60 frying sessions.
MAINTENANCE AND CLEANING
1. Este electrodoméstico no ha sido diseñado para ser utilizado por personas (incluyendo niños) con capacidades físicas, sensoriales o mentales reducidas, o con la
debida experiencia y conocimientos, a menos de que cuenten con la correspondiente
supervisión o instrucciones con respecto al uso del electrodoméstico por parte de una
persona responsable de su seguridad.
2. Debe supervisarse a los niños para asegurarse de que no jueguen con el electrodoméstico.
3. Si el cordón se dañara, éste debe ser remplazado por parte del fabricante, su
agente de servicio técnico o cualquier otra persona calificada con el fin de evitar eventualidades.
4. Este electrodoméstico no ha sido diseñado para ser utilizado por medio de un temporizador externo o un sistema de control remoto por separado.