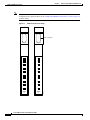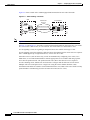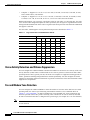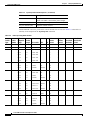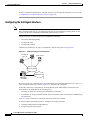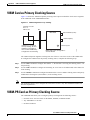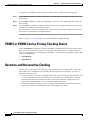
1
Cisco VISM Installation and Configuration
Guide
Release 3.0
June 2004
Corporate Headquarters
Cisco Systems, Inc.
170 West Tasman Drive
San Jose, CA 95134-1706
USA
http://www.cisco.com
Tel: 408 526-4000
800 553-NETS (6387)
Fax: 408 526-4100
Text Part Number: OL-2521-01 D0
THE SPECIFICATIONS AND INFORMATION REGARDING THE PRODUCTS IN THIS MANUAL ARE SUBJECT TO CHANGE WITHOUT
NOTICE. ALL STATEMENTS, INFORMATION, AND RECOMMENDATIONS IN THIS MANUAL ARE BELIEVED TO BE ACCURATE BUT ARE
PRESENTED WITHOUT WARRANTY OF ANY KIND, EXPRESS OR IMPLIED. USERS MUST TAKE FULL RESPONSIBILITY FOR THEIR
APPLICATION OF ANY PRODUCTS.
THE SOFTWARE LICENSE AND LIMITED WARRANTY FOR THE ACCOMPANYING PRODUCT ARE SET FORTH IN THE INFORMATION
PACKET THAT SHIPPED WITH THE PRODUCT AND ARE INCORPORATED HEREIN BY THIS REFERENCE. IF YOU ARE UNABLE TO
LOCATE THE SOFTWARE LICENSE OR LIMITED WARRANTY, CONTACT YOUR CISCO REPRESENTATIVE FOR A COPY.
The Cisco implementation of TCP header compression is an adaptation of a program developed by the University of California, Berkeley (UCB) as part of
UCB’s public domain version of the UNIX operating system. All rights reserved. Copyright © 1981, Regents of the University of California.
NOTWITHSTANDING ANY OTHER WARRANTY HEREIN, ALL DOCUMENT FILES AND SOFTWARE OF THESE SUPPLIERS ARE PROVIDED
“AS IS” WITH ALL FAULTS. CISCO AND THE ABOVE-NAMED SUPPLIERS DISCLAIM ALL WARRANTIES, EXPRESSED OR IMPLIED,
INCLUDING, WITHOUT LIMITATION, THOSE OF MERCHANTABILITY, FITNESS FOR A PARTICULAR PURPOSE AND
NONINFRINGEMENT OR ARISING FROM A COURSE OF DEALING, USAGE, OR TRADE PRACTICE.
IN NO EVENT SHALL CISCO OR ITS SUPPLIERS BE LIABLE FOR ANY INDIRECT, SPECIAL, CONSEQUENTIAL, OR INCIDENTAL
DAMAGES, INCLUDING, WITHOUT LIMITATION, LOST PROFITS OR LOSS OR DAMAGE TO DATA ARISING OUT OF THE USE OR
INABILITY TO USE THIS MANUAL, EVEN IF CISCO OR ITS SUPPLIERS HAVE BEEN ADVISED OF THE POSSIBILITY OF SUCH DAMAGES.
CCIP, CCSP, the Cisco Arrow logo, the Cisco Powered Network mark, Cisco Unity, Follow Me Browsing, FormShare, and StackWise are trademarks of
Cisco Systems, Inc.; Changing the Way We Work, Live, Play, and Learn, and iQuick Study are service marks of Cisco Systems, Inc.; and Aironet, ASIST,
BPX, Catalyst, CCDA, CCDP, CCIE, CCNA, CCNP, Cisco, the Cisco Certified Internetwork Expert logo, Cisco IOS, the Cisco IOS logo, Cisco Press,
Cisco Systems, Cisco Systems Capital, the Cisco Systems logo, Empowering the Internet Generation, Enterprise/Solver, EtherChannel, EtherFast,
EtherSwitch, Fast Step, GigaDrive, GigaStack, HomeLink, Internet Quotient, IOS, IP/TV, iQ Expertise, the iQ logo, iQ Net Readiness Scorecard,
LightStream, Linksys, MeetingPlace, MGX, the Networkers logo, Networking Academy, Network Registrar, Packet, PIX, Post-Routing, Pre-Routing,
ProConnect, RateMUX, Registrar, ScriptShare, SlideCast, SMARTnet, StrataView Plus, SwitchProbe, TeleRouter, The Fastest Way to Increase Your
Internet Quotient, TransPath, and VCO are registered trademarks of Cisco Systems, Inc. and/or its affiliates in the United States and certain other countries.
All other trademarks mentioned in this document or Website are the property of their respective owners. The use of the word partner does not imply a
partnership relationship between Cisco and any other company. (0403R)
Cisco VISM Installation and Configuration Guide
Copyright © 2004, Cisco Systems, Inc.
All rights reserved.
C O N T E N T S
Preface
xiii
Objectives
Audience
xiii
xiii
Document Organization
xiii
Related Documentation xiv
Cisco MGX 8850 (PXM45) Multiservice Switch Release 3 xiv
MGX 8850 (PXM1) Multiservice Switch Release 1.2.10 xv
MGX 8250 Edge Concentrator Release 1.2.10 xvi
MGX 8230 Edge Concentrator Release 1.2.10 xvi
Conventions
xvii
Obtaining Documentation xviii
Cisco.com xviii
Ordering Documentation xviii
Documentation Feedback
xviii
Obtaining Technical Assistance xix
Cisco TAC Website xix
Opening a TAC Case xix
TAC Case Priority Definitions xx
Obtaining Additional Publications and Information
CHAPTER
1
Overview of the VISM and VISM-PR Cards
VISM and VISM-PR Card Types 1-1
VISM and VISM-PR Card Service Types
xx
1-1
1-5
VISM and VISM-PR Card Physical Characteristics
VISM Card Architecture 1-5
1-5
VISM and VISM-PR Card Features 1-6
Redundancy and Bulk Distribution 1-8
Operating Modes 1-9
VoIP Switching and Switched AAL2 PVC Operating Modes
AAL2 Trunking Operating Mode 1-11
VoIP Trunking Operating Mode 1-12
AAL1/AAL2 SVC Operating Mode 1-12
Installing VISM Hardware and Software 1-13
Installing VISM Cards in MGX 8000 Series Chassis
1-9
1-13
Cisco VISM Installation and Configuration Guide
Release 3.0, Part Number OL-2521-01 Rev. D0, June 2004
iii
Contents
Installing VISM-PR Cards in MGX 8000 Series Chassis 1-13
MGX 8850 and MGX 8250 Chassis 1-14
MGX 8230 Chassis 1-15
Installing VISM and VISM-PR Front and Back Cards 1-15
Installing a VISM or VISM-PR Front Card 1-15
Installing a VISM Back Card 1-16
Connecting Cables to Cards 1-16
Removing VISM and VISM-PR Front and Back Cards 1-17
Removing a VISM or VISM-PR Front Card 1-17
Removing a VISM Back Card 1-17
Applying Power to the VISM Card 1-18
Installing VISM Software Upgrades 1-18
Software Upgrades 1-20
Prerequisites 1-20
VISM/VISM-PR Upgrades with PXM1 1-20
Download VISM/VISM-PR Boot Code and Firmware to PXM1 1-20
Upgrade VISM/VISM-PR Firmware with PXM1 Card 1-21
Boot Code Upgrade Procedure with PXM1 Cards 1-23
VISM-PR Upgrades with PXM1E and PXM45 1-23
Download VISM-PR Boot Code and Firmware to PXM1E and PXM45 1-24
Upgrade VISM-PR Firmware with PXM1E and PXM45 Cards 1-24
Boot Code Upgrade Procedure with PXM1E and PXM45 Cards 1-25
VISM/VISM-PR Downgrade Procedure 1-25
VISM to VISM-PR Hardware Upgrade 1-26
CHAPTER
2
Telephony Applications Using VISM
Tandem Switch Offloading
Multiservice Access
AAL2 Trunking
CHAPTER
3
2-1
2-1
2-3
2-3
VISM Functional Description
3-1
TDM Line-Handling Function
3-2
Bearer Processing Function 3-3
Echo Cancellation, Voice Compression, A/Mu Law Conversion
Voice Activity Detection and Silence Suppression 3-4
Fax and Modem Tone Detection 3-4
Jitter Control 3-5
CAS Handling 3-5
Signaling Function
3-3
3-5
Cisco VISM Installation and Configuration Guide
iv
Release 3.0, Part Number OL-2521-01 Rev. D0, June 2004
Contents
CAS Processing in VoIP Switching and Switched AAL2 PVC Operating Mode
CCS Processing in Switched AAL2 PVC Operating Mode 3-9
CAS Processing in AAL2 Trunking Operating Mode 3-11
CCS Processing in AAL2 Trunking Operating Mode 3-11
3-6
ATM Voice Data Processing Function 3-11
Transporting Voice Cells with VoIP 3-11
Transporting Voice Cells with Switched AAL2 PVC 3-13
Transporting Voice Cells with AAL2 Trunking 3-14
Transporting Voice Cells with Switched AAL1 SVC 3-14
Call Control Function 3-15
Connection Model 3-16
xGCP Extensions for AAL2 Switched PVC and AAL2 SVC Operating Modes
Endpoint Service States 3-17
Restart In Progress Command 3-18
Connection Admission Control 3-19
Embedded VISM Management Function
CHAPTER
4
Configuring VISM Features
3-17
3-19
4-1
Using the Command Line Interface 4-1
VISM Command Attributes 4-2
Connecting to Cisco MGX 8000 Series Platforms
Logging In to PXM and VISM Cards 4-3
VISM Card Prompt 4-5
Logging Out of VISM and PXM Cards 4-5
4-2
Configuring VISM Features 4-6
Initial VISM Configuration 4-6
Initial Card Level Configuration 4-8
Configuring the Operating Mode 4-8
Allocating Resources 4-9
Configuring Connection Admission Control 4-10
Placing the VISM Card In Service 4-11
Placing the VISM Card Out of Service 4-11
Configuring the TDM Side 4-11
Configuring T1 and E1 Lines 4-11
Configuring the PXM and VISM Cards Clocking Source 4-14
Configuring the PXM1E or PXM45 Card as Clocking Source
Configuring DS0 Channels 4-17
Configuring Bearer Processing 4-27
Configuring Codecs 4-27
4-17
Cisco VISM Installation and Configuration Guide
Release 3.0, Part Number OL-2521-01 Rev. D0, June 2004
v
Contents
Configuring ECAN 4-29
Configuring Jitter 4-30
Configuring PNNI for AAL1/AAL2 SVCs 4-31
Configuring the ATM Network Side 4-31
Configuring PVC Connections for All Operating Modes 4-32
Configuring VoIP Switching/Trunking Operating Mode Parameters 4-34
Configuring AAL2 Trunking Operating Mode Parameters 4-36
Configuring Switched AAL2 PVC Operating Mode Parameters 4-38
Configuring the Call Agent Interface 4-44
Configuring Domain Names and IP Addresses 4-45
Setting Up Call Agents and Protocols 4-45
Configuring Gateway Control Protocols 4-47
Configuring ISDN PRI Backhaul 4-49
Configuring Additional VISM Features 4-52
Mid-Call DTMF 4-55
Configurable Jitter Buffer 4-55
Adjustable Gain 4-55
Adjustable Music On-Hold Threshold 4-55
CALEA 4-55
MGC Redundancy 4-55
External DNS 4-56
2 IP Address Support 4-56
VoIP Trunking 4-56
T.38 Fax Relay 4-57
CAS Feature Enhancements 4-57
Programmable Tone Plans 4-57
Loop Start, DID, and Delay Dial 4-58
FGD 4-58
Configure Flash Hook and Glare Condition Attributes 4-59
Configure ANI and DNIS Digit Order 4-59
RFC 3064 Package Support 4-59
RFC 2833 Support 4-59
VISM Network Continuity Test 4-59
Configure PVC OAM Cell Parameters 4-60
PXM1E and PXM45 Card-Only Features 4-60
Call Agent-Controlled VoATM AAL1 and AAL2 SVC 4-61
AAL1 SVC-Based TDM Hairpinning 4-61
High Complexity Codec Support for VISM-PR—G.723.1 4-61
Announcement File System 4-62
Announcement Timeouts 4-62
Cisco VISM Installation and Configuration Guide
vi
Release 3.0, Part Number OL-2521-01 Rev. D0, June 2004
Contents
Announcement Direction 4-62
Broadcast Announcements 4-63
Multiple Announcement Requests for the Same Endpoint 4-63
Announcement File Server 4-63
Announcement File Server Name 4-63
Announcement File Server Directory Structure 4-63
VISM Announcement Cache Management 4-64
Announcement Expiry 4-64
Permanent Announcements 4-64
Call Agent-Controlled T.38 Fax 4-65
Additional Support for MGCP 1.0 4-66
RSVP-Based Admission Control 4-66
Clock Slip Counters 4-67
RTP Connection Statistics 4-68
CAS Immediate Start and Ground Start Glare Handling 4-68
Grooming for Local Traffic 4-68
MGX 8000 Series Implementation Enhancements 4-69
Additional VBR Enhancements 4-69
Expanded Clock Source Selection 4-69
Private Network-to-Network Interface Priority Routing 4-69
Additional SPVC Connection Management Capabilities 4-70
192 T1/248 E1 DS0 Support with High Complexity Codecs on VISM-PR
Channel Alarm Enhancement 4-70
VISM TDM Line Statistics Collection 4-70
CHAPTER
5
CLI Commands
CHAPTER
6
Troubleshooting Tips
5-1
VISM Card LEDs
6-1
6-1
VISM and PXM Display, Log, and Diagnostic Loopback Path CLI Commands
VISM Display Card CLI Command 6-3
PXM Display Log CLI Command 6-3
PXM Diagnostic Loopback Path CLI Commands 6-4
PXM1E and PXM 45 Display CLI Commands 6-4
VISM Alarms
4-70
6-2
6-5
UNIX Snoop Trace Tool
6-5
Symptoms and Solutions 6-5
VISM Card Did Not Become Active 6-6
T1/E1 Configuration Mismatch 6-6
Cisco VISM Installation and Configuration Guide
Release 3.0, Part Number OL-2521-01 Rev. D0, June 2004
vii
Contents
DSP Download Failure 6-7
VISM Front Card/Back Card Mismatch 6-8
Cannot Use the cc Command to Access a VISM Card 6-9
VISM Card Resets Intermittently 6-9
VISM Card Does Not Accept a Firmware Download 6-9
Echo Is Heard on a Voice Call 6-9
VISM Card LEDs Are Not Lighted 6-9
Firmware Does Not See the Card Insert Bit Status As Set 6-10
APPENDIX
A
VISM and VISM-PR Card Clocking Options
A-1
PXM1 Card as Primary Clocking Source
A-1
VISM Card as Primary Clocking Source
A-3
VISM-PR Card as Primary Clocking Source
A-3
PXM1E or PXM45 Card as Primary Clocking Source
Revertive and Nonrevertive Clocking
APPENDIX
B
A-4
VISM and VISM-PR—3.0 Specifications
VISM Card Specifications
A-4
B-1
B-1
VISM Card Physical Interface Specifications and Applicable Standards
General VISM Card Standards B-2
VISM Card Counters Specifications B-2
B-1
VISM-PR Card Specifications B-3
VISM-PR Card Features B-3
INDEX
Cisco VISM Installation and Configuration Guide
viii
Release 3.0, Part Number OL-2521-01 Rev. D0, June 2004
F I G U R E S
Figure 1-1
VISM T1 and E1 Front Cards
Figure 1-2
VISM-PR T1 and E1 Front Cards
Figure 1-3
VISM T1 and E1 Back Cards
Figure 1-4
Cisco MGX 8850 and VISM as a Voice Gateway
Figure 1-5
VISM Card Block Diagram
Figure 1-6
VISM Block Diagram for VoIP Switching and Switched AAL2 PVC Operating Modes
Figure 1-7
VISM Block Diagram for the AAL2 Trunking Operating Mode
Figure 1-8
Available Chassis Slots for VISM Cards in the MGX 8850 and MGX 8250—Front View
Figure 1-9
Available Chassis Slots for VISM Cards in the Cisco MGX 8230—Front View
Figure 1-10
RJ-48 PIN Connector
Figure 2-1
VISM Used in a Tandem Switch Offloading Application
Figure 2-2
VISM Used as a Voice Gateway Application
Figure 2-3
AAL2 Trunking—One End
Figure 2-4
AAL2 Trunking—Two Ends
Figure 3-1
VISM Detailed Functional Blocks
Figure 3-2
VISM Signaling Paths
Figure 3-3
CAS Processing—Message Structure
Figure 3-4
CAS Signaling in Initiating and Terminating a Call
Figure 3-5
PRI/Backhaul Path
Figure 3-6
RUDP Session Hierarchy
Figure 3-7
VoIP Protocol Stack
Figure 3-8
VoIP Cell Packetization and Transmission
Figure 3-9
AAL2 Cell Packetization and Transmission
Figure 3-10
Call Agent Communications Links
Figure 3-11
Connection Model
Figure 3-12
VISM Card Config Screen—Card Elements Display
3-20
Figure 3-13
VISM Card Config Screen—VISM Features Display
3-21
Figure 4-1
PXM Back Card
Figure 4-2
VISM to Call Agent Communication
Figure 6-1
VISM Front Card LEDs
Figure A-1
VISM Configured for Local Clocking
1-2
1-3
1-4
1-4
1-6
1-10
1-11
1-14
1-15
1-17
2-1
2-2
2-3
2-4
3-2
3-6
3-7
3-8
3-10
3-10
3-12
3-12
3-14
3-15
3-16
4-3
4-44
6-2
A-1
Cisco VISM Installation and Configuration Guide
Release 3.0, Part Number OL-2521-01 Rev. D0, June 2004
ix
Figures
Figure A-2
VISM Configured for Loop Clocking
A-3
Cisco VISM Installation and Configuration Guide
x
Release 3.0, Part Number OL-2521-01 Rev. D0, June 2004
T A B L E S
Table 1
Cisco MGX 8850 (PXM45) Multiservice Switch Release 3 Documentation
Table 2
MGX 8850 (PXM1) Multiservice Switch Release 1.2.10 Documentation
Table 3
MGX 8250 Edge Concentrator Release 1.2.10 Documentation
Table 4
MGX 8230 Edge Concentrator Documentation
Table 5
Cisco VISM Related Documentation
Table 3-1
Supported Codecs and Packetization Periods
Table 4-1
VISM Command Attributes—Log File, Card State, and Privilege Level
Table 4-2
Mandatory Initial VISM Configuration Command Sequence for All Operating Modes
Table 4-3
VISM/VISM-PR DS0 Density with Codec Support
Table 4-4
dspaal2profile Field Descriptions
Table 4-5
AAL2 Operating Mode Profiles
Table 4-6
VISM 3.0 Built-in (Preconfigured) Tone Plans
Table 4-7
VISM/VISM-PR and MGX 8000 Series Switch Support
Table 4-8
Announcement File System Feature CLI Commands
Table 4-9
MGCP 1.0 Feature CLI Commands
Table 4-10
RSVP-Based Admission Control Feature CLI Commands
Table 11
VISM/VISM-PR DS0 Density with Codec Support
Table 5-1
Tone Plan Definition File Syntax
Table 5-2
Codec Type Default Values
Table 5-3
VISM Release 2.2(0) Built-in Tone Plans
Table 6-1
VISM T1 and E1 Card Alarms
Table A-1
Revertive/Nonrevertive Clocking and PXM Back Card Support
xiv
xv
xvi
xvi
xvii
3-4
4-2
4-7
4-17
4-39
4-40
4-57
4-60
4-64
4-66
4-67
4-70
5-46
5-153
5-442
6-5
A-5
Cisco VISM Installation and Configuration Guide
Release 3.0, Part Number OL-2521-01 Rev. D0, June 2004
xi
Tables
Cisco VISM Installation and Configuration Guide
xii
Release 3.0, Part Number OL-2521-01 Rev. D0, June 2004
Preface
This preface describes the objectives, audience, organization, and conventions of the Cisco VISM
Installation and Configuration Guide.
Objectives
This document describes the features, functions, installation, operation, and command line interface of
Cisco Voice Interworking Service Module (VISM) Release 3.0.
Audience
This document is intended for the following personnel:
•
Technicians responsible for installing VISM cards on the Cisco MGX 8230, MGX 8250, and
MGX 8850 shelf.
•
Network administrators responsible for configuring the Cisco MGX 8850 shelf.
Cisco recommends that installers be familiar with electronic circuitry and wiring practices and have
experience as an electronic or electromechanical technician. Installers and network administrators
should also be familiar with Cisco switches and routers, T1 and E1 voice lines, and Cisco wide area
networks. Cisco also recommends that you have a system administrator present who is familiar with your
network and UNIX servers during the initial installation of a Cisco MGX 8000 Series platform.
Document Organization
This document contains the following chapters:
•
Chapter 1, “Overview of the VISM and VISM-PR Cards,” provides a general introduction to VISM
and describes the hardware and software modules, and installation procedures.
•
Chapter 2, “Telephony Applications Using VISM,” describes VISM applications for a variety of
voice networking situations.
•
Chapter 3, “VISM Functional Description,” describes VISM’s functional operation.
•
Chapter 4, “Configuring VISM Features,” describes the initial mandatory configuration procedures
for using VISM cards in each of the operating modes.
Cisco VISM Installation and Configuration Guide
Release 3.0, Part Number OL-2521-01 Rev. D0, June 2004
xiii
Preface
Related Documentation
•
Chapter 5, “CLI Commands,” describes the syntax and semantics of each VISM command line
interface command.
•
Chapter 6, “Troubleshooting Tips,” describes VISM troubleshooting tools and techniques.
•
Appendix A, “VISM and VISM-PR Card Clocking Options,” describes clocking configuration for
both the VISM card and MGX 8000 Series platform PXM cards.
•
Appendix B, “VISM and VISM-PR—3.0 Specifications,” describes the specifications of VISM
Release 3.0.
Related Documentation
The following sections describe documentation you may need to reference as you use the VISM product.
Cisco MGX 8850 (PXM45) Multiservice Switch Release 3
The documentation for the installation and operation of the MGX 8850 Multiservice Switch for Release
3 is listed in Table 1.
Table 1
Cisco MGX 8850 (PXM45) Multiservice Switch Release 3 Documentation
Title
Description
Cisco MGX 8850 Hardware Installation Guide, Release 3 Describes how to install the MGX 8850 multiservice switch.
(PXM45/B and PXM1E)
This guide explains what the switch does and covers site
preparation, grounding, safety, card installation, and cabling.
The MGX 8850 switch uses either a PXM45 or a PXM1E
controller card and provides support for both broadband and
narrow band service modules.
Cisco MGX 8850, MGX 8950, and MGX 8830 Command
Reference (PXM45/B and PXM1E), Release 3
Describes how to use the PXM and AXSM commands that are
available for the MGX 8850, MGX 8950, and MGX 8830
switches.
Cisco Frame Relay Software Configuration Guide and
Command Reference for the MGX 8850 FRSM12 Card,
Release 3
Describes how to use the high-speed Frame Relay (FRSM12)
commands that are available for the MGX 8850 switch.
Cisco MGX 8850 (PXM45) and MGX 8950 Software
Configuration Guide, Release 3
Describes how to configure MGX 8850 and MGX 8950 switches
with PXM45 controller cards to operate as ATM edge or core
switches. This guide also provides some operation and
maintenance procedures.
Cisco MGX and SES PNNI Network Planning Guide for
MGX Release 3 and SES Release 3
Provides guidelines for planning a PNNI network that uses the
MGX 8850 and the MGX 8950 switches and the BPX 8600
switches. When connected to a PNNI network, each BPX 8600
series switch requires a SES for PNNI route processing.
Cisco MGX Route Processor Module (RPM-XF)
Installation and Configuration Guide, Release 3
Describes how to install and configure the MGX Route Processor
Module (RPM-XF) in the MGX 8850 Release 3 switch. Also
provides site preparation, troubleshooting, maintenance, cable
and connector specifications, and basic Cisco IOS configuration
information.
Cisco VISM Installation and Configuration Guide
xiv
Release 3.0, Part Number OL-2521-01 Rev. D0, June 2004
Preface
Related Documentation
Table 1
Cisco MGX 8850 (PXM45) Multiservice Switch Release 3 Documentation (continued)
Title
Description
Cisco MGX Route Processor Module (RPM-PR)
Installation and Configuration Guide, Release 2.1
Describes how to install and configure the MGX Route Processor
Module (RPM-PR) in the MGX 8850 Release 2.1 and later
switches. Also provides site preparation, troubleshooting,
maintenance, cable and connector specifications, and basic
Cisco IOS configuration information.
Release Notes for Cisco MGX Route Processor Module
(RPM/B and RPM-PR) for Release 1.2.10 and Release 3
Provides the latest feature, upgrade, and compatibility
information, as well as known and resolved anomalies for
RPM-PR.
MGX 8850 (PXM1) Multiservice Switch Release 1.2.10
The documentation for the installation and operation of the MGX 8850 (PXM1) Multiservice Switch is
listed in Table 2.
Table 2
MGX 8850 (PXM1) Multiservice Switch Release 1.2.10 Documentation
Title
Description
Cisco MGX 8850 Multiservice Switch Installation and
Configuration, Release 1.1.3
Provides installation instructions for the MGX 8850 multiservice
switch.
Cisco MGX 8800 Series Switch Command Reference,
Release 1.1.3
Provides detailed information on the general command line for
the MGX 8850 switch.
Cisco MGX 8800 Series Switch System Error Messages,
Release 1.1.3
Provides error message descriptions and recovery procedures.
Cisco MGX 8850 Multiservice Switch Overview,
Release 1.1.3
Provides a technical description of the system components and
functionality of the MGX 8850 multiservice switch from a
technical perspective.
Cisco MGX Route Processor Module Installation and
Configuration Guide, Release 1.1
Describes how to install and configure the MGX Route Processor
Module (RPM/B and RPM-PR) in the MGX 8850, MGX 8250,
and MGX 8230 Release 1 switch. Also provides site preparation,
troubleshooting, maintenance, cable and connector
specifications, and basic Cisco IOS configuration information.
Release Notes for Cisco MGX 8230, MGX 8250, and
Provides new feature, upgrade, and compatibility information, as
MGX 8850 (Release 1), Software Version 1.2.10 (PXM1) well as known and resolved anomalies.
Release Notes for Cisco MGX Route Processor Module
(RPM/B and RPM-PR) for Release 1.2.10 and Release 3
Provides new feature, upgrade, and compatibility information, as
well as known and resolved anomalies.
Cisco VISM Installation and Configuration Guide
Release 3.0, Part Number OL-2521-01 Rev. D0, June 2004
xv
Preface
Related Documentation
MGX 8250 Edge Concentrator Release 1.2.10
The documentation for the installation and operation of the MGX 8250 Edge Concentrator is listed in
Table 3.
Table 3
MGX 8250 Edge Concentrator Release 1.2.10 Documentation
Title
Description
Cisco MGX 8250 Edge Concentrator Installation and
Configuration, Release 1.1.3
Provides installation instructions for the MGX 8250 Edge
Concentrator.
Cisco MGX 8250 Multiservice Gateway Command
Reference, Release 1.1.3
Provides detailed information on the general command line
interface commands.
Cisco MGX 8250 Multiservice Gateway Error Messages, Provides error message descriptions and recovery procedures.
Release 1.1.3
Cisco MGX 8250 Edge Concentrator Overview,
Release 1.1.3
Describes the system components and functionality of the
MGX 8250 Edge Concentrator from a technical perspective.
Cisco MGX Route Processor Module Installation and
Configuration Guide, Release 1.1
Describes how to install and configure the MGX Route Processor
Module (RPM/B and RPM-PR) in the MGX 8850, MGX 8250,
and MGX 8230 Release 1 switch. Also provides site preparation,
troubleshooting, maintenance, cable and connector specifications,
and basic Cisco IOS configuration information.
Release Notes for Cisco MGX 8230, MGX 8250, and
Provides new feature, upgrade, and compatibility information, as
MGX 8850 (Release 1), Software Version 1.2.10 (PXM1) well as known and resolved anomalies.
Release Notes for Cisco MGX Route Processor Module
(RPM/B and RPM-PR) for Release 1.2.10 and Release 3
Provides new feature, upgrade, and compatibility information, as
well as known and resolved anomalies.
MGX 8230 Edge Concentrator Release 1.2.10
The documentation for the installation and operation of the MGX 8230 Edge Concentrator is listed in
Table 4.
Table 4
MGX 8230 Edge Concentrator Documentation
Title
Description
Cisco MGX 8230 Edge Concentrator Installation and
Configuration, Release 1.1.3
Provides installation instructions for the MGX 8230 Edge
Concentrator.
Cisco MGX 8230 Multiservice Gateway Command
Reference, Release 1.1.3
Provides detailed information on the general command line
interface commands.
Cisco MGX 8230 Multiservice Gateway Error Messages, Provides error message descriptions and recovery procedures.
Release 1.1.3
Cisco MGX 8230 Edge Concentrator Overview,
Release 1.1.3
Provides a technical description of the system components and
functionality of the MGX 8250 Edge Concentrator from a
technical perspective.
Cisco VISM Installation and Configuration Guide
xvi
Release 3.0, Part Number OL-2521-01 Rev. D0, June 2004
Preface
Conventions
Table 4
MGX 8230 Edge Concentrator Documentation (continued)
Title
Description
Cisco MGX Route Processor Module Installation and
Configuration Guide, Release 1.1
Describes how to install and configure the MGX Route Processor
Module (RPM/B and RPM-PR) in the MGX 8850, MGX 8250,
and MGX 8230 Release 1 switch. Also provides site preparation,
troubleshooting, maintenance, cable and connector specifications,
and basic Cisco IOS configuration information.
Release Notes for Cisco MGX 8230, MGX 8250, and
Provides new feature, upgrade, and compatibility information, as
MGX 8850 (Release 1), Software Version 1.2.10 (PXM1) well as known and resolved anomalies.
Release Notes for Cisco MGX Route Processor Module
(RPM/B and RPM-PR) for Release 1.2.10 and Release 3
Provides new feature, upgrade, and compatibility information, as
well as known and resolved anomalies.
The documentation listed in Table 5 contain additional information related to the operation of the Cisco
VISM product.
Table 5
Cisco VISM Related Documentation
Document
Description
Cisco MGX 8850 Multiservice Switch Installation
and Configuration, Release 1.1.31
Cisco MGX 8850 shelf installation procedures—refer to the sections
describing the installation and configuration of the PXM1 card.
Cisco MGX 8800 Series Switch Command
Reference, Release 1.1.31
Cisco MGX 8800 shelf command line interface commands—refer to
the commands that apply to the PXM1 card.
Cisco MGX 8250 Edge Concentrator Installation
and Configuration, Release 1.1.31
Cisco MGX 8250 shelf installation procedures—refer to the sections
describing the installation and configuration of the PXM1 card.
Cites MGX 8250 Multiservice Gateway Command
Reference, Release 1.1.31
Cisco MGX 8250 shelf command line interface commands—refer to
the commands that apply to the PXM1 card.
Cisco MGX 8230 Edge Concentrator Installation
and Configuration, Release 1.1.31
Cisco MGX 8230 shelf installation procedures—refer to the sections
describing the installation and configuration of the PXM1 card.
Cisco MGX 8230 Multiservice Gateway Command
Reference, Release 1.1.31
Cisco MGX 8230 shelf command line interface commands—refer to
the commands that apply to the PXM1 card.
1.1.32 Version Software Release Notes Cisco WAN
MGX 8850, 8230, and 8250 Software
Hardware and software feature upgrades for the Cisco MGX 8850,
MGX 8230, and MGX 8250.
Conventions
This publication uses the following conventions to describe commands:
•
Bold type—indicates command names and user entry text.
•
Italic type—indicates arguments for which you supply values.
•
| |—vertical bars indicate optional arguments.
This publication uses the following conventions to describe examples:
font—indicates terminal sessions and system display information.
•
Courier
•
Courier bold
font—indicates user entry.
Cisco VISM Installation and Configuration Guide
Release 3.0, Part Number OL-2521-01 Rev. D0, June 2004
xvii
Preface
Obtaining Documentation
Note
Caution
Means reader take note. Notes contain helpful suggestions or references to materials not contained
in this manual.
Means reader be careful. In this situation, you might do something that could result in equipment
damage or loss of data.
Obtaining Documentation
Cisco documentation and additional literature are available on Cisco.com. Cisco also provides several
ways to obtain technical assistance and other technical resources. These sections explain how to obtain
technical information from Cisco Systems.
Cisco.com
You can access the most current Cisco documentation on the World Wide Web at this URL:
http://www.cisco.com/univercd/home/home.htm
You can access the Cisco website at this URL:
http://www.cisco.com
International Cisco websites can be accessed from this URL:
http://www.cisco.com/public/countries_languages.shtml
Ordering Documentation
You can find instructions for ordering documentation at this URL:
http://www.cisco.com/univercd/cc/td/doc/es_inpck/pdi.htm
You can order Cisco documentation in these ways:
•
Registered Cisco.com users (Cisco direct customers) can order Cisco product documentation from
the Ordering tool:
http://www.cisco.com/en/US/partner/ordering/index.shtml
•
Nonregistered Cisco.com users can order documentation through a local account representative by
calling Cisco Systems Corporate Headquarters (California, USA) at 408 526-7208 or, elsewhere in
North America, by calling 800 553-NETS (6387).
Documentation Feedback
You can submit e-mail comments about technical documentation to [email protected].
Cisco VISM Installation and Configuration Guide
xviii
Release 3.0, Part Number OL-2521-01 Rev. D0, June 2004
Preface
Obtaining Technical Assistance
You can submit comments by using the response card (if present) behind the front cover of your
document or by writing to the following address:
Cisco Systems
Attn: Customer Document Ordering
170 West Tasman Drive
San Jose, CA 95134-9883
We appreciate your comments.
Obtaining Technical Assistance
For all customers, partners, resellers, and distributors who hold valid Cisco service contracts, the Cisco
Technical Assistance Center (TAC) provides 24-hour-a-day, award-winning technical support services,
online and over the phone. Cisco.com features the Cisco TAC website as an online starting point for
technical assistance. If you do not hold a valid Cisco service contract, please contact your reseller.
Cisco TAC Website
The Cisco TAC website provides online documents and tools for troubleshooting and resolving technical
issues with Cisco products and technologies. The Cisco TAC website is available 24 hours a day, 365
days a year. The Cisco TAC website is located at this URL:
http://www.cisco.com/tac
Accessing all the tools on the Cisco TAC website requires a Cisco.com user ID and password. If you
have a valid service contract but do not have a login ID or password, register at this URL:
http://tools.cisco.com/RPF/register/register.do
Opening a TAC Case
Using the online TAC Case Open Tool is the fastest way to open P3 and P4 cases. (P3 and P4 cases are
those in which your network is minimally impaired or for which you require product information.) After
you describe your situation, the TAC Case Open Tool automatically recommends resources for an
immediate solution. If your issue is not resolved using the recommended resources, your case will be
assigned to a Cisco TAC engineer. The online TAC Case Open Tool is located at this URL:
http://www.cisco.com/tac/caseopen
For P1 or P2 cases (P1 and P2 cases are those in which your production network is down or severely
degraded) or if you do not have Internet access, contact Cisco TAC by telephone. Cisco TAC engineers
are assigned immediately to P1 and P2 cases to help keep your business operations running smoothly.
To open a case by telephone, use one of the following numbers:
Asia-Pacific: +61 2 8446 7411 (Australia: 1 800 805 227)
EMEA: +32 2 704 55 55
USA: 1 800 553-2447
For a complete listing of Cisco TAC contacts, go to this URL:
http://www.cisco.com/warp/public/687/Directory/DirTAC.shtml
Cisco VISM Installation and Configuration Guide
Release 3.0, Part Number OL-2521-01 Rev. D0, June 2004
xix
Preface
Obtaining Additional Publications and Information
TAC Case Priority Definitions
To ensure that all cases are reported in a standard format, Cisco has established case priority definitions.
Priority 1 (P1)—Your network is “down” or there is a critical impact to your business operations. You
and Cisco will commit all necessary resources around the clock to resolve the situation.
Priority 2 (P2)—Operation of an existing network is severely degraded, or significant aspects of your
business operation are negatively affected by inadequate performance of Cisco products. You and Cisco
will commit full-time resources during normal business hours to resolve the situation.
Priority 3 (P3)—Operational performance of your network is impaired, but most business operations
remain functional. You and Cisco will commit resources during normal business hours to restore service
to satisfactory levels.
Priority 4 (P4)—You require information or assistance with Cisco product capabilities, installation, or
configuration. There is little or no effect on your business operations.
Obtaining Additional Publications and Information
Information about Cisco products, technologies, and network solutions is available from various online
and printed sources.
•
Cisco Marketplace provides a variety of Cisco books, reference guides, and logo merchandise. Go
to this URL to visit the company store:
http://www.cisco.com/go/marketplace/
•
The Cisco Product Catalog describes the networking products offered by Cisco Systems, as well as
ordering and customer support services. Access the Cisco Product Catalog at this URL:
http://cisco.com/univercd/cc/td/doc/pcat/
•
Cisco Press publishes a wide range of general networking, training and certification titles. Both new
and experienced users will benefit from these publications. For current Cisco Press titles and other
information, go to Cisco Press online at this URL:
http://www.ciscopress.com
•
Packet magazine is the Cisco quarterly publication that provides the latest networking trends,
technology breakthroughs, and Cisco products and solutions to help industry professionals get the
most from their networking investment. Included are networking deployment and troubleshooting
tips, configuration examples, customer case studies, tutorials and training, certification information,
and links to numerous in-depth online resources. You can access Packet magazine at this URL:
http://www.cisco.com/packet
•
iQ Magazine is the Cisco bimonthly publication that delivers the latest information about Internet
business strategies for executives. You can access iQ Magazine at this URL:
http://www.cisco.com/go/iqmagazine
Cisco VISM Installation and Configuration Guide
xx
Release 3.0, Part Number OL-2521-01 Rev. D0, June 2004
Preface
Obtaining Additional Publications and Information
•
Internet Protocol Journal is a quarterly journal published by Cisco Systems for engineering
professionals involved in designing, developing, and operating public and private internets and
intranets. You can access the Internet Protocol Journal at this URL:
http://www.cisco.com/ipj
•
Training—Cisco offers world-class networking training. Current offerings in network training are
listed at this URL:
http://www.cisco.com/en/US/learning/index.html
Cisco VISM Installation and Configuration Guide
Release 3.0, Part Number OL-2521-01 Rev. D0, June 2004
xxi
Preface
Obtaining Additional Publications and Information
Cisco VISM Installation and Configuration Guide
xxii
Release 3.0, Part Number OL-2521-01 Rev. D0, June 2004
C H A P T E R
1
Overview of the VISM and VISM-PR Cards
This chapter provides a general introduction to VISM and VISM-PR and describes the hardware and
software modules, and installation procedures. The following topics are described:
Note
•
“VISM and VISM-PR Card Types” section on page 1-1
•
“VISM and VISM-PR Card Physical Characteristics” section on page 1-5
•
“VISM and VISM-PR Card Features” section on page 1-6
•
“Installing VISM Hardware and Software” section on page 1-13
•
“Software Upgrades” section on page 1-20
The term VISM is used to refer to the product software—either for the VISM card or for the
VISM-PR card. The terms VISM and VISM-PR are used when discussing hardware only.
The VISM card, in combination with a Cisco MGX 8000 Series platform, enables telephone calls on
conventional time-division multiplexed (TDM) voice circuits to be transported over an Asynchronous
Transfer Mode (ATM) packet-switched and VoIP networks. The VISM card is a single height card
designed to operate in the following platforms:
Note
•
Cisco MGX 8850 Release 1, wide area switch
•
Cisco MGX 8250, edge concentrator
•
Cisco MGX 8230, edge concentrator
VISM is not supported on the Cisco MGX 8260 switch.
VISM and VISM-PR Card Types
VISM and VISM-PR cards are installed in Cisco MGX 8000 Series switches as front cards and their
associated back cards—card sets. There are two types of VISM front cards (see Figure 1-1):
•
AX-VISM-8T1—Supports up to eight T1 lines carrying digitized voice
•
AX-VISM-8E1—Supports up to eight E1 lines carrying digitized voice
Cisco VISM Installation and Configuration Guide
Release 3.0, Part Number OL-2521-01 Rev. D0, June 2004
1-1
Chapter 1
Overview of the VISM and VISM-PR Cards
VISM and VISM-PR Card Types
Note
Using the Service Resource Module (SRM) and the 1:N redundancy features, other physical
configurations are supported. Refer to the “VISM and VISM-PR Card Features” section on page 1-6
for more details.
Figure 1-1
VISM T1 and E1 Front Cards
ACT
ACT
STBY
STBY
FAIL
FAIL
PORT 1
PORT 1
PORT 2
PORT 2
PORT 3
PORT 3
PORT 4
PORT 4
PORT 5
PORT 5
PORT 6
PORT 6
PORT 7
PORT 7
PORT 8
PORT 8
VISM
VISM
8T1
8E1
T1 front card
E1 front card
18738
CLEI code label
Cisco VISM Installation and Configuration Guide
1-2
Release 3.0, Part Number OL-2521-01 Rev. D0, June 2004
Chapter 1
Overview of the VISM and VISM-PR Cards
VISM and VISM-PR Card Types
There are two types of VISM-PR front cards (see Figure 1-2):
•
MGX-VISM-PR-8T1—Supports up to eight T1 lines carrying digitized voice
•
MGX-VISM-PR-8E1—Supports up to eight E1 lines carrying digitized voice
Figure 1-2
VISM-PR T1 and E1 Front Cards
Card Extractor
Release Slot
CLEI
Code Label
Status
LEDs
ACT
ACT
STBY
STBY
FAIL
FAIL
PORT 1
PORT 1
PORT 2
PORT 2
PORT 3
PORT 3
PORT 4
PORT 4
PORT 5
PORT 5
PORT 6
PORT 6
PORT 7
PORT 7
PORT 8
PORT 8
VISM
VISM
PR-8T1
PR-8T1
T1
E1
72673
Card
Extractor
Handle
The VISM and VISM-PR front cards have the same associated back cards. There are two types of
VISM/VISM-PR T1 back cards (see Figure 1-3):
•
AX-RJ48-8T1—Supports eight T1 lines using RJ-48 connectors; use with a T1 front card.
•
AX-R-RJ48-8T1—Supports eight T1 lines; use with a redundant T1 front card.
There are four types of VISM/VISM-PR E1 back cards (see Figure 1-3):
•
AX-RJ48-8E1—Supports eight E1 lines using RJ-48 connectors; use with an E1 front card.
•
AX-R-RJ48-8E1—Supports eight E1 lines; use with a redundant E1 front card.
•
AX-SMB-8E1—Supports eight E1 lines using SMB connectors; use with an E1 front card.
•
AX-R-SMB-8E1—Supports eight E1 lines; use with a redundant E1 front card.
Cisco VISM Installation and Configuration Guide
Release 3.0, Part Number OL-2521-01 Rev. D0, June 2004
1-3
Chapter 1
Overview of the VISM and VISM-PR Cards
VISM and VISM-PR Card Types
Figure 1-3
RJ48-8T1
VISM T1 and E1 Back Cards
RJ48-8E1
SMB-8E1
R-RJ48-8T1
R-RJ48-8E1
R-SMB-8E1
R
E
D
U
N
D
A
N
T
R
E
D
U
N
D
A
N
T
R
E
D
U
N
D
A
N
T
Redundant
E1-RJ48
Redundant
E1-SMB
RX1
1
1
TX1
2
2
3
3
RX2
TX2
RX3
4
4
5
5
TX3
RX4
TX4
6
6
7
7
8
8
RX5
TX5
RX6
TX6
RX7
TX7
RX8
T1-RJ48
E1-RJ48
E1-SMB
Redundant
T1-RJ48
71218
TX8
The VISM or VISM-PR card and MGX 8000 Series switch combination provides an interface, or voice
gateway, between conventional TDM networks and packet-switched networks (see Figure 1-4).
Figure 1-4
Cisco MGX 8850 and VISM as a Voice Gateway
PBX or
Central Office
T1/E1
MGX 8850
with
VISM
V
Packet Network
(IP/ATM)
Packet Networks
31427
Voice/TDM Networks
Connection to the packet network is performed by Cisco MGX 8000 Series switch Processor Module
cards—PXM1, PXM1E, and PXM45—which communicate with a VISM card through the switch’s
midplane cellbus. Refer to the documents listed in Table 5 of the “Related Documentation” section on
page xiv for more information on the MGX 8000 Series switch midplane cellbus.
Cisco VISM Installation and Configuration Guide
1-4
Release 3.0, Part Number OL-2521-01 Rev. D0, June 2004
Chapter 1
Overview of the VISM and VISM-PR Cards
VISM and VISM-PR Card Physical Characteristics
VISM and VISM-PR Card Service Types
VISM cards are configured with the following service types:
•
Constant bit rate (CBR)
Note
CBR is not supported with a combination of a PXM1 with either an RPM or external
router.
•
Variable bit rate real time, VBR (RT)
•
VBR non-real time (NRT)
VISM-PR card connections with the RPM-PR card requires the VBR (NRT) 3 service type on the
PXM1E and PXM45 platforms.
If you are using a VISM-PR card in combination with a PXM1E, PXM45, or RPM-PR card, you must
use the VBR (NRT) 3 selection when adding a connection.
The following connection service types can be configured with VISM 3.0 and higher:
•
VBR (RT) 2
•
VBR (RT) 3
•
VBR (NRT) 2
VISM and VISM-PR Card Physical Characteristics
VISM cards are equipped with the following:
•
Eight T1 or E1 ports
•
Digital signal processors (DSPs)
•
High-level data link control (HDLC) framer
•
Broadband interface to the packet network
VISM Card Architecture
VISM card architecture provides the following:
•
Flexibility that allows the incorporation of new or improved technology as it becomes available.
•
Application flexibility that allows VISM to be used in a range of situations that provide
interoperability with a wide variety of equipment types.
•
Modularity that allows equipment to be purchased and installed as it is needed for scalability.
Cisco VISM Installation and Configuration Guide
Release 3.0, Part Number OL-2521-01 Rev. D0, June 2004
1-5
Chapter 1
Overview of the VISM and VISM-PR Cards
VISM and VISM-PR Card Features
Figure 1-5 shows a simplified diagram of the VISM architecture and its major components.
Figure 1-5
VISM Card Block Diagram
VISM
Main CPU
(Control)
Cellbus
Framers
8 T1/E1 lines
from PBX or
Central Office
Digital
Signal
Processors
SAR
PXM
OC-3 to ATM
Packet Network
HDLC
Processor
31429
Secondary CPU
(Datamover)
The card is broadly divided into a TDM side and an ATM side. The T1/E1 framers, the array of DSPs,
and the HDLC processor support the TDM side. The ATM adaptation layer (AAL) and the segmentation
and reassembly (SAR) sections support the ATM side.
VISM is under the control of two independent processors. The main processor performs the control
tasks—configuration, call setup and teardown, and management. The second processor, the datamover,
handles the moving and processing of the voice and voiceband data traffic through the system.
The VISM card itself contains no ports for the connection of management stations. Workstations, PCs,
or terminals used to manage VISM must be attached via the PXM card which provides both serial
EIA/TIA-232 and Ethernet ports.
VISM and VISM-PR Card Features
VISM cards process high-density digital voice circuits and provide dynamic compression, echo
cancellation, dejittering, silence suppression, and packetization. The VISM card uses the following
features which you can configure:
•
Eight standard T1 or E1 interfaces with the following line coding:
– Bipolar 8-zero substitution (B8ZS)—for T1
– Alternate mark inversion (AMI)—for T1
– High density bipolar 3 (HDB3)—for E1
Cisco VISM Installation and Configuration Guide
1-6
Release 3.0, Part Number OL-2521-01 Rev. D0, June 2004
Chapter 1
Overview of the VISM and VISM-PR Cards
VISM and VISM-PR Card Features
•
Voice over ATM (VoATM) using AAL2 cells—No Logical Link Control/Subnetwork Access
Protocol (LLC/SNAP) encapsulation.
Note
Multiplexing is not supported for AAL2 SVCs.
•
VoIP using AAL5 cells to RFC 1889.
•
Extended Superframe (ESF) framing with or without cyclic redundancy check (CRC).
•
Pulse code modulation (PCM) A/Mu law codecs.
•
Programmable 24, 32, 48, 64, 80, 96, 112, 128 ms tail delay near end ECAN.
•
Voice compression with the following standards:
– G.711
– G.726-16k
– G.726-24k
– G.726-32k
– G.726-40k
– G.729a
– G.729ab
– G.723.1-H
– G.723.1a-H
– G.723.1-L
– G.723.1a-L
Note
The G.723.1 codecs are not supported in combination with the VISM card. The G.723.1
codecs are supported with the VISM-PR card.
•
Nx64 clear channel (N = 1 only) support.
•
Voice activity detection (VAD) and comfort noise generation (CNG) using variable threshold energy
(Cisco proprietary).
•
Call agent Simple Gateway Control Protocol (SGCP) Version 1.0, 1.1, 1.5, SGCP 1.1+, 1.5, and
Media Gateway Control Protocol (MGCP) 0.1 and 1.0.
•
Backhauling channel associated signaling (CAS) signaling to a call agent using xGCP (backhauling
can be accomplished with any supported SGCP and MGCP protocol).
•
Backhauling Primary Rate Interface (PRI) signaling via Reliable User Datagram Protocol (RUDP)
to a call agent.
•
Common channel signaling (CCS) transport across an AAL5 trunk.
•
Fax and modem VoIP bearer transmissions.
•
Dual (redundant) virtual circuits across the packet network.
•
Full continuity testing (COT). Supports origination and terminating loopback and transponder COT
between VISM and the central office on the TDM side.
•
Loop timing, which can be used as the master clock for the entire MGX 8000 Series platform and
local clock.
Cisco VISM Installation and Configuration Guide
Release 3.0, Part Number OL-2521-01 Rev. D0, June 2004
1-7
Chapter 1
Overview of the VISM and VISM-PR Cards
VISM and VISM-PR Card Features
Caution
•
Line loopback (DS1) toward the TDM lines.
•
Channel loopback (DS0) toward both the TDM lines and the ATM network.
•
Transmission and reception of bit error rate tester (BERT) signals over loopbacked lines.
•
Redundant alarm indication signal (RAI) and alarm indication signal (AIS) alarms.
•
Extracting a DS0 CCS channel and directing it to the TDM signaling function.
•
1:N cold redundancy using subrate multiplexing (SRM)-3T3 (bulk mode support for T1 lines only)
and SRM-E (for OC3) capabilities. Calls do not persist during switchover.
•
Graceful shutdown of ongoing voice calls when the VISM is taken out of service for maintenance
or other reasons. Forced shutdown is also supported.
A forced shutdown of the VISM or VISM-PR card may result in dropped calls.
Redundancy and Bulk Distribution
Redundancy for VISM cards with or without bulk distribution can be provided through the Service
Redundancy Module (SRM) and SRM-E. Redundancy for VISM is also provided by Media Gateway
Controller (MGC) redundancy groups. VISM redundancy is cold redundancy in which ongoing calls do
not persist during switchover.
Note
SRM-E is supported with PXM1 and PXM1E cards only.
Redundancy with bulk distribution requires a spare VISM card to be installed. The system uses the three
T3 ports of the SRM back card instead of the normal T1 lines on the VISM back cards. VISM cards in
bulk distribution mode do not require back cards.
The TDM voice data transmitted or received over the T3 ports are distributed to the VISM card as if they
had been received over VISM T1 back card ports in the normal manner. This feature reduces the number
of physical lines required to support VISM, but requires external equipment to multiplex and
demultiplex the T1 data onto the T3 lines.
With or without bulk distribution, redundancy allows for the spare VISM card to automatically take over
the functions of a failed VISM card. When the failed card is repaired, switching back to the repaired card
is not automatic. You must manually change the repaired card back to the active state with the command
line interface. See Chapter 4, “Configuring VISM Features.”
Note
1:1 redundancy using Y-cables is not supported by VISM.
Redundancy can also be configured at the ATM permanent virtual circuits (PVCs) level. Two separate
PVCs can be set up, each using a different PXM physical port and each routed to a separate router.
Configure one PVC as active and the other as standby. Both PVCs are monitored by heartbeat OAM F5
loopback cells every 200 ms. If three consecutive OAM cells are lost, the PVC fails, and only the
remaining PVC is active. A PVC will recover automatically when five consecutive OAM cells are
received while the PVC remains in standby mode (no automatic fallback to active state is provided).
Control and bearer PVCs can be set up with a redundant PVC.
Cisco VISM Installation and Configuration Guide
1-8
Release 3.0, Part Number OL-2521-01 Rev. D0, June 2004
Chapter 1
Overview of the VISM and VISM-PR Cards
VISM and VISM-PR Card Features
Operating Modes
The VISM/VISM-PR card performs in the following operating modes:
•
Voice over IP (VoIP) switching/trunking
•
Switched AAL1 switched virtual circuits (SVCs)
•
Switched AAL2 SVC
•
Switched AAL2 PVC—this mode is not supported in VISM Release 3.0
•
AAL2 trunking
•
VoIP and switched ATM AAL1 SVC
The VISM/VISM-PR card, in order to support the operating modes, supports connections to three major
interfaces:
•
Voice TDM network
•
ATM network
•
Call agent—signaling (either CAS or CCS but not both) and call control
In VoIP switching, switched AAL2 PVC, AAL1 SVC, and AAL2 SVC modes, all three of these
interfaces are always present and active. In AAL2 trunking mode, the interface to the call agent interface
is not present and the only active interfaces are to the TDM network and the ATM network.
The operating modes, combined with features you configure, are used by VISM cards in a wide variety
of telephony applications. For example:
•
Provide many of the functions of a tandem (Class 4) switch. VISM can be used to replace, or
partially offload, a Tandem switch by directing calls over a packet network rather than the
conventional voice TDM network.
•
Concentrate voice and data user services onto a single broadband circuit for transmission over the
packet network. In this application, VISM performs as a front end to a voice gateway.
•
The VISM/MGX combination is used to concentrate voice (and fax/modem voiceband data) user
services over a preprovisioned AAL2 trunk. VISM passes bearer and signaling data across a packet
network and does not perform call setup and teardown functions.
VoIP Switching and Switched AAL2 PVC Operating Modes
In VoIP switching mode and switched AAL2 PVC mode, VISM operates under the control of a call agent
to set up and tear down calls. When a call is set up, VISM transports voice payloads over an ATM
network to the called station destination. VISM performs either as a voice gateway or as a multiservice
access front end to a voice gateway.
Note
This document refers to the device that provides the interface between VISM and the telephone
Signaling System 7 (SS7) as a call agent. Other terms that describe the same device are Virtual
Switch Controller, Media Gateway Controller, and Gatekeeper.
Cisco VISM Installation and Configuration Guide
Release 3.0, Part Number OL-2521-01 Rev. D0, June 2004
1-9
Chapter 1
Overview of the VISM and VISM-PR Cards
VISM and VISM-PR Card Features
Figure 1-6 shows the major functional blocks and interfaces for the VoIP switching and switched AAL2
PVC operating modes.
Figure 1-6
VISM Block Diagram for VoIP Switching and Switched AAL2 PVC Operating Modes
VISM
CCS (Q.931)
Call
Agent
CAS (xGCP)
xGCP
CCS
CAS/CCS
Processing
Connection
Handling
CCS
CAS
CAS
Voice
CAS
Voice
Bearer
Processing
Connection Setup
Teardown
ATM Processing
Voice payload
To ATM
Network
53231
TDM Line
Handling
T1/E1 Lines
The CAS signaling path on the TDM side is embedded in the voice stream but is separated at the bearer
processing function. The CAS signaling then joins the CCS signaling path for CAS/CCS processing and
is backhauled to the call agent. The path between the call agent and bearer processing, via a connection
handling function, is for call setup and teardown.
Voice TDM Network Interface
The voice payload path is shown as a solid line along the bottom of Figure 1-6. All external TDM
streams arrive and depart on the T1/E1 lines. Depending on the application, these streams consist of
voice bearer channels (with or without CAS signaling) and separate CCS channels (if CCS signaling is
used). The TDM line handling function provides the physical layer interface, which includes framing,
line codes, clocking, loopbacks, physical alarms, etc. Bearer channels, including CAS, are sent to the
bearer processing function. CCS channels are sent to the CAS/CCS processing function.
Further processing of the bearer channels is performed by the DSPs. This processing provides ECAN,
compression, A/Mu law conversion, silence suppression, and fax/modem handling. If CAS signaling is
present, signaling bits are extracted at the DSP stage and sent to the CAS/CCS processing function.
ATM Network Interface
The ATM processing function receives the processed DS0 voice streams and prepares them for transport
over a packet network. The voice streams are divided into specific sample periods (for example, 5 ms or
10 ms) and formatted into service specific convergence sublayer (SSCS) packets appropriate for the
method of transport over the ATM network. The available transport methods are VoIP (using AAL5) and
voice over AAL2. Processing of the ATM packets further segments the voice payload into ATM cells for
transport over the network using a SONET port on the PXM card.
Cisco VISM Installation and Configuration Guide
1-10
Release 3.0, Part Number OL-2521-01 Rev. D0, June 2004
Chapter 1
Overview of the VISM and VISM-PR Cards
VISM and VISM-PR Card Features
Call Agent Interface
The call agent interface consists of CAS signaling or CCS signaling and call control. The path between
the call agent and bearer processing, via a connection handling function, is for call setup and teardown.
The CAS signaling path on the TDM side is embedded in the voice stream (bearer DS0s) and is separated
at the bearer processing function. The CAS signaling (robbed bits, digits, and tones) is passed to the
CAS/CCS processing function where it is passed (backhauled) to the call agent under the control of the
call agent. The mechanism for communicating between VISM and the call agent is a gateway control
protocol:
•
MGCP
•
SGCP
•
SRCP
The separate CCS signaling path channels are passed to the CAS/CCS processing function and
backhauled to the call agent. The CCS signaling is transported as ISDN Q.931 messages both on the
TDM side and on the call agent side. On the TDM side, the messages are carried in the Q.921 layer
protocol (which terminates at the VISM card). On the call agent side, communication with the call agent
consists of Q.931 messages encapsulated in RUDP/UDP/IP packets. The Q.931 connection is terminated
at the call agent and not at the VISM card.
The call control path uses MGCP, SGCP, and SRCP for call setup and teardown. Because signaling and
call control are so intertwined, both call control and CAS use the same path and protocol for the VISM
card to call agent communications.
AAL2 Trunking Operating Mode
In the AAL2 trunking operating mode, the VISM card serves as an access to one or more trunks to
preprovisioned locations. VISM may be used at both ends of the trunk, or at one end with a compatible
device at the other. In AAL2 trunking mode, VISM plays no part in call setup and teardown. Other
network elements handle call control while VISM merely handles voice transport over the trunks.
Figure 1-7 shows the major functional blocks for the AAL2 trunking operating mode.
Figure 1-7
VISM Block Diagram for the AAL2 Trunking Operating Mode
VISM
CCS
Processing
CCS
T1/E1 Lines
CAS
CCS
TDM Line
Handling
CAS
Bearer
Processing
To ATM
Trunk
Voice
53232
Voice
ATM
Processing
The AAL2 trunking mode is less complex than the VoIP switching and AAL2 PVC switched modes
because there is no call control involved—and no need for a call agent.
Cisco VISM Installation and Configuration Guide
Release 3.0, Part Number OL-2521-01 Rev. D0, June 2004
1-11
Chapter 1
Overview of the VISM and VISM-PR Cards
VISM and VISM-PR Card Features
The voice bearer path is treated in the same manner as in the VoIP switching and AAL2 PVC modes,
except that only preprovisioned AAL2 PVCs are available for transport of voice over the trunks. The
CAS signaling data is transported over the ATM network in the same AAL2 trunk as Type 3 messages.
The CCS signaling data is transported over the ATM network in a separate AAL5 PVC.
VoIP Trunking Operating Mode
The Voice over IP (VoIP) trunking feature allows the VISM to connect to the PBX, or central office
digital systems, using T1/E1 digital interfaces and converts the TDM bit stream into RTP packets, after
ECAN and compression, and transports it over the IP network.
No call agent is required for setting up and tearing down calls. You must configure the DS0 circuits. The
connection between VISM and the first router will be ATM after which it will be IP only. VISM and the
router can have one or multiple PVCs to transport the data. You have the option to configure PVC for
bearer or control. If the PVC is configured as bearer and no control PVC exists, then PRI signal traffic
and bearer traffic will go through this PVC. If you configure separate PVCs for control and bearer, PRI
signaling will go through control traffic only. You can modify some of the connection parameters after
it is added.
CAS is transported to the far end using a Cisco proprietary format (not NSEs). PRI is transported over
RUDP to the far end once the trunk is provisioned between the originating and terminating VISM.
PRI transport is handled in a way identical to PRI backhaul except that the PRI traffic is sent to remote
gateway instead of a call agent. You can configure one line for PRI trunking and another line for PRI
backhauling.
You must provision the LAPD trunk when using this feature. You must configure a line number, remote
gateway IP address, local UDP port, and remote gateway UDP port, and then open a trunk. You must
then configure the D-channel as a trunk or backhaul:
•
To configure the D channel as trunk, use the addlapdtrunk command prior to the addlapd
command. If the addlapd command has been previously executed for that line, the command is
rejected.
Note
•
Two D channels on one line are not supported.
To configure the D channel as backhaul, use the addses command prior to the addlapd command.
If you do not configure either trunk or session, the addlapd command is rejected.
AAL1/AAL2 SVC Operating Mode
Release 3.0(0) supports the AAL1 and AAL2 switched virtual circuit (SVC) operating modes for
VISM-PR cards. VoAAL1 SVC is supported with the G.711 codec and clear channel.
Note
VAD is not supported in combination with AAL1 SVCs. CAS is not supported in combination with
SVCs.
Cisco VISM Installation and Configuration Guide
1-12
Release 3.0, Part Number OL-2521-01 Rev. D0, June 2004
Chapter 1
Overview of the VISM and VISM-PR Cards
Installing VISM Hardware and Software
VoAAL2 SVC is supported with the G.711, G.726, G.729a, and G.729ab codecs and profiles 1, 2, 3, 7,
8, 100, 101, 110, and 200.
Note
The AAL1/AAL2 SVC operating modes require you to use a PXM1E or PXM45 in your MGX 8000
Series switch chassis.
Installing VISM Hardware and Software
You can install VISM cards in the following configurations:
•
Install a VISM front card and a back card as a pair. The front and back cards must occupy the same
slot.
•
Install a VISM front card with no back card. The MGX 8000 Series bulk distribution feature allows
this configuration. Access to and from the TDM lines is performed by the Service Resource Module
(SRM) and the MGX 8000 Series distribution bus.
Note
•
Note
VISM cards in bulk distribution mode do not require back cards.
Install a VISM front card as a redundant card with a redundant back card in the same slot.
VISM T1 front cards require T1 back cards and E1 front cards require E1 back cards. Ensure that
your configuration meets this requirement.
In each of these configurations, connections to the packet network are made through the MGX 8000
Series cellbus and an OC-3 port located on the MGX 8000 Series PXM card. Refer to the “VISM and
VISM-PR Card Physical Characteristics” section on page 1-5 for more information on front and back
cards.
Installing VISM Cards in MGX 8000 Series Chassis
VISM front and back cards can be installed in the following MGX 8000 Series platforms with these basic
guidelines:
•
Cisco MGX 8850 Release 1—Up to 24 slots can be used for VISM cards.
•
Cisco MGX 8250—Up to 24 slots can be used for VISM cards.
•
Cisco MGX 8230—Up to eight slots can be used for VISM cards.
The VISM card can be used with the Processor Module-1 (PXM1) card.
Installing VISM-PR Cards in MGX 8000 Series Chassis
VISM-PR front and back cards can be installed in the following MGX 8000 Series platforms with these
basic guidelines:
•
MGX 8250 and MGX 8850—Up to 24 slots can be used for VISM-PR cards.
•
MGX 8230—Up to 8 slots can be used for VISM-PR cards.
Cisco VISM Installation and Configuration Guide
Release 3.0, Part Number OL-2521-01 Rev. D0, June 2004
1-13
Chapter 1
Overview of the VISM and VISM-PR Cards
Installing VISM Hardware and Software
The VISM-PR card can be used with the following Processor Module cards:
•
PXM1
•
PXM1E
•
PXM45
You must install an additional fan tray spacer at the bottom of your MGX 8000 Series switch chassis
directly above the intake plenum if you are using the VISM-PR card in combination with the PXM45
card. Refer to the Cisco MGX 8850 Hardware Installation Guide, Release 3 for step-by-step instructions
to install a fan tray.
MGX 8850 and MGX 8250 Chassis
VISM and VISM-PR card installation in a Cisco MGX 8850 or MGX 8250 platform consists of installing
one front card and one back card (if not using the bulk distribution feature) in either the upper or lower
shelf of the chassis. You can use slots 1 to 6, 9 to 14, 17 to 22, and 25 to 30 to install VISM cards (see
Figure 1-8).
Figure 1-8
Available Chassis Slots for VISM Cards in the MGX 8850 and MGX 8250—Front View
Upper Shel f Slots
1
2
3
4
5
6
7
8
9 10 11 12 13 14 15 16
U pper
S helf
VISM
VISM
VISM
VISM
VISM
VISM
VISM
VISM
VISM
VISM
VISM
VISM
VISM
VISM
VISM
VISM
VISM
VISM
VISM
VISM
VISM
VISM
VISM
VISM
VISM
VISM
17 18 19 20 21 22 23 24 25 26 27 28 29 30 31 32
Lower Shel f Slots
Note
31 428
L ower
Shelf
If you use all the available slots, you can configure the MGX 8850 and MGX 8250 with up to 24
VISM cards. However, the two lower shelf cellbuses can each sustain a bandwidth of one
OC-3/STM-1 link. This bandwidth limits the number of E1 ports on the lower shelf, when using the
G.711 codec, to 78, which limits the number of VISM cards to 10.
Cisco VISM Installation and Configuration Guide
1-14
Release 3.0, Part Number OL-2521-01 Rev. D0, June 2004
Chapter 1
Overview of the VISM and VISM-PR Cards
Installing VISM Hardware and Software
MGX 8230 Chassis
VISM card installation in a Cisco MGX 8230 platform consists of installing one front card and one back
card (if not using the bulk distribution feature) in either a left or right shelf slot. You can use slots 3 to
6, and 10 to 13 to install VISM cards (see Figure 1-9). If you use all the available slots, you can configure
the MGX 8230 with up to eight VISM cards.
1
VISM
VISM
3
VISM
VISM
4
13
12
VISM
VISM
VISM
5
2
14
Reserved for SRM cards
6
11
VISM
7
Available Chassis Slots for VISM Cards in the Cisco MGX 8230—Front View
10
9
Reserved for PXM cards
8
57104
Figure 1-9
Installing VISM and VISM-PR Front and Back Cards
This section describes the following hardware installation procedures:
1.
Installing a VISM or VISM-PR Front Card
2.
Installing a VISM Back Card
3.
Connecting Cables to Cards
Installing a VISM or VISM-PR Front Card
Complete the following instructions to install a VISM or VISM-PR front card:
Step 1
Position the rear card guides over the appropriate slot in the chassis.
Step 2
Gently slide the card all the way into the slot and press the insertion/extractor lever until it snaps into
the vertical (MGX 8250 or MGX 8850) or horizontal (MGX 8230) position.
Caution
The card should slide in and out with only slight friction on the EMI gaskets on the adjacent board.
Do not use force. Investigate any binding.
Cisco VISM Installation and Configuration Guide
Release 3.0, Part Number OL-2521-01 Rev. D0, June 2004
1-15
Chapter 1
Overview of the VISM and VISM-PR Cards
Installing VISM Hardware and Software
Installing a VISM Back Card
Complete the following instructions to install a VISM back card:
Step 1
Ensure that the two extractor levers are at the “in” position.
When you insert the card into the slot, the levers should be vertical or horizontal along the line of the
back card.
Step 2
Position the rear card guides over the appropriate slot in the chassis.
Step 3
Gently slide the card all the way into the slot.
Step 4
Tighten the two captive screws on the back card’s faceplate.
Step 5
Tighten the upper and lower screws to prevent misalignment of the card.
Note
Do not overtighten the screws. Tighten them only enough to secure the card.
Connecting Cables to Cards
After you install the VISM front and back cards, connect the T1 or E1 cables to the RJ-48 or SMB
connectors on the back cards. The T1 and E1 cables connect the eight ports on the back cards to the voice
T1 or E1 lines. The T1 lines use RJ-48 connectors. The E1 lines use either RJ-48 or SMB connectors.
Note
In all text references to cables, “transmit” refers to a cable used for data moving away from the VISM
card, and “receive” refers to a cable used for data moving toward the VISM card.
Cabling for RJ-48 Connectors on T1 and E1 Ports
For T1 and E1 ports that connect through an RJ-48 connector, each connector has:
•
Transmit TIP (TTIP) pin
•
Transmit RING (TRNG) pin
•
Receive TIP (RTIP) pin
•
Receive RING (RRNG) pin
•
Two pins for shielded ground
Cisco VISM Installation and Configuration Guide
1-16
Release 3.0, Part Number OL-2521-01 Rev. D0, June 2004
Chapter 1
Overview of the VISM and VISM-PR Cards
Installing VISM Hardware and Software
The connector wiring is shown in Figure 1-10.
Figure 1-10 RJ-48 PIN Connector
RJ-48 Pins
IN
IN
TTIP
TRNG
2
1
5
4
RTIP
RRNG
OUT
OUT
11763
3
6
IN
IN
TEST-RNGP
TEST-TIP
7
8
ground/shield
Cabling for SMB Connectors on E1 Ports
When you use the E1 VISM back card with SMB cables, the E1 trunk cables connect the customer
DSX-1 cross-connect point or E1 channel service unit (CSU) to the node using 75-ohm coaxial cable
fitted with SMB connectors.
Removing VISM and VISM-PR Front and Back Cards
This section describes the following hardware installation procedures:
•
Removing a VISM or VISM-PR Front Card
•
Removing a VISM Back Card
Removing a VISM or VISM-PR Front Card
Step 1
Insert a small, flat-blade screwdriver into the slot in the insertion/extractor lever and press until the latch
springs open, to approximately 10°.
Step 2
Continue to lift the insertion/extractor lever to disconnect the connector.
Step 3
Gently pull the card out of the chassis.
Removing a VISM Back Card
Step 1
Remove any cables connected to the back card.
Step 2
Use a small, flat-blade screwdriver to unscrew the two retaining screws in the back card’s faceplate.
Cisco VISM Installation and Configuration Guide
Release 3.0, Part Number OL-2521-01 Rev. D0, June 2004
1-17
Chapter 1
Overview of the VISM and VISM-PR Cards
Installing VISM Hardware and Software
Step 3
Pull both of the extractor levers out to the horizontal position.
This action starts the removal of the card.
Step 4
Gently pull the card out of the chassis.
Applying Power to the VISM Card
You apply power to a VISM card by installing it in an already running MGX 8000 Series platform, or by
applying power to a chassis that has a previously installed VISM card. When power is applied, the VISM
card performs extensive testing and initialization functions. If the card has already been configured, the
initialization downloads the configuration data from the disk on the PXM. This process takes
approximately two minutes, during which the LED indicator blinks. When the Active LED becomes
solid green, the card is in the Active state and is ready to be configured (if necessary) and able to process
data.
Installing VISM Software Upgrades
VISM Release 3.0 provides a graceful upgrade procedure from Release 1.5 and higher. The existing
VISM configuration is preserved throughout the upgrade procedure, provided that the following
conditions are met:
•
The Cisco MGX 8000 Series platform must be configured with at least two VISM cards in a
redundant configuration. Refer to the add redundancy, addred, command in the Cisco MGX 8850,
MGX 8250, and MGX 8230 command reference guides for details.
•
The VISM cards must be running VISM 2.0 and be configured to the desired configuration.
•
The VISM Release 3.0 software must have been already downloaded to the Cisco MGX shelf. Refer
to Release Notes for Cisco Voice Interworking Services Module Release 3.0(0) for details.
•
Cisco recommends an upgrade in the backup boot to version 3.0.
Complete the following steps to upgrade the VISM software. In the following procedure, old-rev refers
to the firmware before the upgrade (2.0) and new-rev refers to the firmware after the upgrade (3.0).
Note
If the VISM card you are upgrading is part of a nonredundant configuration, complete Step 1 to
Step 4 only.
Step 1
Log in to the active PXM card (slot 7 or 8).
Step 2
Save the existing configuration as a contingency plan by entering:
savesmcnf <SM slot#>
where:
SM slot# is the slot number of the active VISM card.
This command saves the existing configuration to the C:\CNF directory. This file can be used during the
downgrade procedure, if necessary.
Cisco VISM Installation and Configuration Guide
1-18
Release 3.0, Part Number OL-2521-01 Rev. D0, June 2004
Chapter 1
Overview of the VISM and VISM-PR Cards
Installing VISM Hardware and Software
Step 3
Execute the PXM install command for the backup boot image:
install bt sm <SM slot#> <new bb rev>
where:
SM slot# is the slot number of the active card, and new bb rev is the version number of the new backup
boot image.
This command downloads the backup boot image to the flash in the VISM card slot you specified. The
new backup boot image takes effect upon the next card reset.
Step 4
Execute the PXM install command:
install sm <SM slot#> <new-rev>
where:
SM slot# is the slot number of the VISM card that was active before the upgrade process started, and
new-rev is the file name of the new firmware (for example, vism_8t1e1_002.001.000.000.fw).
This command causes the standby VISM card to reset and be placed in the hold state, running the
new-rev firmware. The active VISM card is unaffected by this command. At this point the primary
firmware is still the old-rev and the secondary firmware is new-rev.
Step 5
Execute the PXM newrev command:
newrev sm <SM slot#> <new-rev>
where:
SM slot# is the slot number of the VISM card that was active before the upgrade process started, and
new-rev is the filename of the new firmware.
This command causes the standby VISM card to become the active VISM card running the new-rev
firmware. The previously active VISM card is placed in the hold state, becoming the new standby VISM
card, and is still running the old-rev firmware. The primary and secondary firmware switches with the
new-rev becoming the primary firmware.
Step 6
Execute the PXM commit command:
commit sm <SMslot#> <new-rev>
where:
SM slot# is the slot number of the new standby VISM card and new-rev is the filename of the new
firmware.
This command causes both VISM cards to run the new-rev firmware. After a short time, the cards switch
automatically so that the originally active VISM card becomes the active card and the originally standby
VISM card becomes the standby card. The two VISM cards are now back to their original condition
except that both cards are now running the new-rev firmware.
Step 7
Log in to the active VISM card and use the display commands (dspendpts, dspcasvar, etc.) to confirm
that the configuration has been preserved through the upgrade process.
Cisco recommends that you further verify the configuration by making some minor modifications to the
configuration, checking that the changes have been executed correctly, and then changing the
configuration back again.
See Appendix B, “VISM and VISM-PR—3.0 Specifications” for more information about the VISM and
VISM-PR card specifications.
Cisco VISM Installation and Configuration Guide
Release 3.0, Part Number OL-2521-01 Rev. D0, June 2004
1-19
Chapter 1
Overview of the VISM and VISM-PR Cards
Software Upgrades
Software Upgrades
VISM/VISM-PR Release 3.0 provides a graceful upgrade procedure for the following releases:.
Caution
•
From VISM 1.5 to VISM 3.0
•
From VISM 2.1 to VISM 3.0
•
From VISM 2.2 to VISM 3.0
Installing VISM software upgrades from VISM Release 2.2 with CALEA to VISM Release 3.0
without CALEA is not graceful.
Prerequisites
To ensure that the VISM/VISM-PR configuration is preserved throughout the upgrade procedure, you
must complete the prerequisites listed in this section.
Before starting the graceful upgrade procedure, complete the following prerequisites:
•
Configure your MGX 8000 Series shelf with at least two VISM cards in a redundant configuration.
For more information on adding redundancy, refer to the add redundancy, addred, command in the
Cisco MGX 8250, Cisco MGX 8230, and Cisco MGX 8850 PXM1-based Command Reference
documentation and the Cisco MGX 8830 and MGX 8850 PXM1E/ PXM45-based Command
Reference documentation.
•
Ensure that the VISM/VISM-PR cards are running at least Release 2.1.
•
Download software Release 3.0 for VISM/VISM-PR to the MGX 8000 Series shelf.
•
If you are using the CALEA feature, ensure that you have the version of VISM/VISM-PR software
that supports CALEA.
VISM/VISM-PR Upgrades with PXM1
This section describes the procedures for upgrading VISM/VISM-PR software when the
VISM/VISM-PR is used with a PXM1 card.
Download VISM/VISM-PR Boot Code and Firmware to PXM1
To download the VISM/VISM-PR boot code and firmware to the PXM1 card, use TFTP.
Step 1
Log in to your TFTP server.
Step 2
Download the bootcode and firmware images from the Cisco website.
Step 3
Download the selected revision of service module boot code into the service module.
a.
tftp <node_name or IP address>
b.
bin
c.
put <backup boot> POPEYE@SM_1_0.BT
d.
quit
Cisco VISM Installation and Configuration Guide
1-20
Release 3.0, Part Number OL-2521-01 Rev. D0, June 2004
Chapter 1
Overview of the VISM and VISM-PR Cards
Software Upgrades
Step 4
Download the selected firmware file.
To upgrade all VISM cards, proceed to Step 4c. To upgrade an individual VISM card, proceed to Step 4d.
a.
tftp <node_name or IP address>
b.
bin
c.
put <FW file> POPEYE@SM_1_0.FW
quit
d.
put <FW file> POPEYE@SM_1_<slot number of card to upgrade>.FW
quit
Do not enter two put commands in the same TFTP session.
Note
Step 5
Proceed to the “Upgrade VISM/VISM-PR Firmware with PXM1 Card” section on page 1-21 to install
the download.
Upgrade VISM/VISM-PR Firmware with PXM1 Card
Software Release 3.0 is for VISM and VISM-PR cards. Ensure that the VISM and VISM-PR cards have
the minimum boot code version of vism_8t1e1_VI8_BT_3.1.00.fw.
The following versions of VISM software Release 3.0 are available:
•
003.000.000.000—without CALEA
•
003.050.000.000—with CALEA
In this procedure the following conditions apply:
•
If two VISM or VISM-PR cards are part of a redundancy group, initially the primary card is in the
active state, and the secondary card is in the standby state.
•
Old-rev refers to the firmware, Release 2.2 and prior.
•
New-rev refers to the firmware after the upgrade, Release 3.0.
Perform the firmware upgrade on the VISM or VISM-PR cards. Do not remove the VISM cards and
replace them with VISM-PR cards at this time.
Step 1
Log in to the active PXM1 card (slot 7 or 8).
Step 2
Save the existing configuration as a contingency plan by entering:
savesmcnf <SM slot#>
This command saves the existing configuration in the C:CNF directory. This file can be used during the
downgrade procedure, if necessary.
Step 3
Execute the PXM install command:
install sm <SM slot#> <new-rev>
where:
SM slot# is the slot number of the primary VISM or VISM-PR card and new-rev is the file name of the
new firmware (for example, vism_8t1e1_003.000.000.000.fw).
Cisco VISM Installation and Configuration Guide
Release 3.0, Part Number OL-2521-01 Rev. D0, June 2004
1-21
Chapter 1
Overview of the VISM and VISM-PR Cards
Software Upgrades
This command causes the secondary VISM or VISM-PR card to reset and come up in the standby state,
running the new-rev firmware. The primary VISM or VISM-PR card is unaffected by this command.
Step 4
Execute the PXM newrev command:
newrev sm <SM slot#> <new-rev>
where:
SM slot# is the slot number of the primary VISM or VISM-PR card and new-rev is the filename of the
new firmware.
This command causes the primary VISM or VISM-PR card to reset and the secondary VISM or
VISM-PR card to become active and running the new-rev firmware.
Step 5
Execute the PXM commit command:
commit sm <SM slot#> <new-rev>
where:
SM slot# is the slot number of the primary VISM or VISM-PR card and new-rev is the filename of the
new firmware.
The two VISM or VISM-PR cards are now back to their original condition except that both cards are
now running the new-rev firmware.
Step 6
Log in to the active VISM or VISM-PR card and use the display commands (for example, dspendpts,
dspcasvar, and so forth) to confirm that the configuration has been preserved through the upgrade
process.
Note
For more than one primary VISM or VISM-PR card in a redundancy group, ensure that the secondary
card is in the standby state and repeat Step 4 and Step 5 for each VISM card in the redundancy group.
It is also recommended that you perform the following verifications:
Note
•
Make minor modifications to the configuration.
•
Check that the changes have been executed correctly.
•
Change the configuration back again.
If the VISM or VISM-PR card is not part of a redundancy group, complete Step 1 to Step 3.
For more information about the VISM and VISM-PR card specifications, see “VISM and
VISM-PR—3.0 Specifications” section on page B-1.
Cisco VISM Installation and Configuration Guide
1-22
Release 3.0, Part Number OL-2521-01 Rev. D0, June 2004
Chapter 1
Overview of the VISM and VISM-PR Cards
Software Upgrades
Boot Code Upgrade Procedure with PXM1 Cards
Complete the following steps to upgrade the new backup boot code when you are using PXM1 cards in
your MGX 8230, MGX 8250, and MGX 8850 chassis:
Note
Step 1
Note
Step 2
Caution
This procedure re-programs the VISM boot code for previous VISMs using the VISM runtime image
version 1.0 to 2.0.
Telnet to MGX shelf and cc to the VISM card.
VISM must be in the active state in order to update the VISM boot code.
Access the server where the VISM boot code resides and TFTP the VISM boot code to the VISM card:
a.
Type tftp <IP address of the MGX shelf>
b.
Type bin at the tftp prompt.
Ensure that you perform Step 2b. If you to not perform Step 2b. the boot code is corrupted and not
recoverable.
c.
Caution
Type install [bt] [sm <slot>] <version> at the PXM prompt.
Do not touch the VISM card until the status comes back ('Sent xxx bytes in yyy seconds'). Failure to
follow this recommendation corrupts the boot code, which cannot be recovered.
When the boot code is being written to PROM, you will see comments displayed at the VISM prompt.
This behavior is normal and expected.
Step 3
Use the resetcd command for VISM from the PXM card for the latest boot take effect.
Step 4
Type the version command to verify the correct boot code.
Note
Step 4 is optional.
You have completed upgrading the new VISM backup boot code.
VISM-PR Upgrades with PXM1E and PXM45
This section describes the procedures for upgrading VISM-PR software when the VISM-PR is used with
a PXM1E or PXM45 card.
Cisco VISM Installation and Configuration Guide
Release 3.0, Part Number OL-2521-01 Rev. D0, June 2004
1-23
Chapter 1
Overview of the VISM and VISM-PR Cards
Software Upgrades
Download VISM-PR Boot Code and Firmware to PXM1E and PXM45
To download the VISM-PR boot code and firmware to the PXM1E or PXM45 card, use FTP.
Step 1
Access the image on the Cisco Web site.
Step 2
To download the image, enter the ftp command.
ftp node-ip
where node-ip is the IP address of the node to which you want to download the image.
Step 3
Enter your user name and password.
Step 4
Enter bin.
Step 5
Access the appropriate directory.
cd C:FW
Step 6
Download the image to your C:FW directory.
put image-version
where image-version is the downloaded image from Step 1.
Step 7
To exit the download procedure, enter bye.
Upgrade VISM-PR Firmware with PXM1E and PXM45 Cards
Ensure that the VISM-PR cards have the minimum boot code version of vism_8t1e1_VI8_BT_3.1.00.fw.
The following versions of VISM-PR software Release 3.0 are available:
•
003.000.000.000—without CALEA
•
003.050.000.000—with CALEA
Perform the firmware upgrade on the VISM-PR cards.
Step 1
Log in to the active PXM1E or PXM45 card.
Step 2
Ensure that the card is in the redundant mode, where the active card is the primary card.
Step 3
To save the existing configuration as a contingency plan, enter the saveallcnf command.
Step 4
To load the new software, enter the loadrev command.
loadrev sm-primary-slot-num new-rev
where sm-primary-slot-num is the slot number of the VISM-PR card in which you want to install the new
software; and new-rev is the new firmware version number for the VISM-PR software.
Caution
Step 5
Temporary traffic loss occurs.
To execute the download, enter the runrev command.
runrev sm-primary-slot-num new-rev
Caution
Temporary traffic loss occurs.
Cisco VISM Installation and Configuration Guide
1-24
Release 3.0, Part Number OL-2521-01 Rev. D0, June 2004
Chapter 1
Overview of the VISM and VISM-PR Cards
Software Upgrades
Step 6
To commit the new download to the VISM-PR card, enter the commitrev command.
commitrev sm-primary-slot-num new-rev
You have completed the steps. Proceed to the Boot Code Upgrade Procedure with PXM1E and PXM45
Cards, page 1-25.
Boot Code Upgrade Procedure with PXM1E and PXM45 Cards
Complete the following steps to upgrade the new backup boot code when you are using PXM1E or
PXM45 cards in your MGX 8000 Series chassis:
Step 1
Complete the steps in the VISM-PR Upgrades with PXM1E and PXM45, page 1-23 section.
Step 2
Log in to the PXM1E or PXM45 card.
Step 3
Use the burnboot sm-primary-slot-num new-rev command, where sm-primary-slot-num is the slot
number of the VISM-PR card you want to upgrade and new-rev is the firmware version number of the
new VISM software, to upgrade the VISM-PR boot code.
The VISM-PR card automatically resets and becomes active with the latest boot code image. You have
completed the boot code upgrade procedure.
VISM/VISM-PR Downgrade Procedure
Use this procedure to downgrade VISM software from software Release 3.0 to an earlier VISM release.
By following the downgrade procedure described here, the configurations are retained after the
downgrade.
Note
The configurations that existed with old-rev firmware should have been saved earlier. You
cannot downgrade from VISM-PR to VISM.
Complete the following steps to downgrade the VISM software from software Release 3.0 for
VISM/VISM-PR to Release 2.2, 2.1, 2.0, or 1.5:
Step 1
If the VISM card is in a redundancy group, remove the redundancy.
delred <SM slot#>
Step 2
Download the old-rev firmware onto the MGX shelf.
Step 3
Execute the PXM clrsmcnf command:
clrsmcnf <SM slot#>
where:
SM slot# is the slot number of the VISM card to be downgraded.
The VISM card resets on executing this command. Wait for the card to come active.
Cisco VISM Installation and Configuration Guide
Release 3.0, Part Number OL-2521-01 Rev. D0, June 2004
1-25
Chapter 1
Overview of the VISM and VISM-PR Cards
Software Upgrades
Step 4
Execute the PXM restoresmcnf command:
restoresmcnf -f <filename> -s <SM slot#>
where:
The filename is the name of the old configuration file that was saved while the old-rev firmware was
running. The file can be found in the C:CNF directory on the MGX shelf.
The SM slot# is the slot number of the VISM card to be downgraded.
The VISM card resets again. When the card becomes active, it has the old-rev firmware running with the
old configuration.
Step 5
Reconfigure redundancy group, if required.
VISM to VISM-PR Hardware Upgrade
Complete the following steps to upgrade your system from VISM cards to VISM-PR cards.
Caution
You must install the redundant (standby) VISM-PR card first. Failure to follow this recommendation
results in traffic loss. In addition, do not remove an active VISM card from your chassis. Ensure that you
configure an active VISM card to the standby state before you remove it and replace it with a VISM-PR
card.
Step 1
Remove the redundant (standby) VISM card from your chassis.
Step 2
Install a VISM-PR card in the slot you removed the VISM card from in Step 1.
Step 3
Administratively configure the VISM-PR card you installed in Step 2 as primary (active).
Step 4
Remove the now redundant VISM card from your chassis.
Step 5
Install a VISM-PR card in the slot you removed the VISM card from in Step 4.
Step 6
Log in to the redundant (secondary) VISM-PR card and execute the dspcd command. Verify that the
output from the dspcd command lists the card type under FunctionModuleType as a VISM-PR card. If
the card type still indicates the VISM card, execute the resetcd slot-num command from the PXM and
repeat the dspcd command to insure that the correct card type is shown.
Step 7
Log in to the active VISM-PR card and execute the dspcd command. Verify that the output from the
dspcd command lists the card type under FunctionModuleType as a VISM-PR card. If the card type still
indicates the VISM card, execute the resetcd slot-num command from the PXM and repeat the dspcd
command to insure that the correct card type is shown.
Step 8
If you have no other VISM cards in your chassis, you have completed the hardware upgrade procedure;
do not proceed to Step 9. If you have more VISM cards in your chassis, proceed to Step 9.
Step 9
Remove a standby VISM card from your chassis.
Step 10
Install a VISM-PR card in the slot you removed the VISM card from in Step 9.
Step 11
Repeat Step 9 and Step 10 to remove any remaining VISM cards in your chassis and replace them with
VISM-PR cards.
Step 12
Repeat Step 6 and Step 7 on the remaining VISM-PR cards to insure the correct card type is shown.
Cisco VISM Installation and Configuration Guide
1-26
Release 3.0, Part Number OL-2521-01 Rev. D0, June 2004
C H A P T E R
2
Telephony Applications Using VISM
This chapter describes the VISM card and the ways it is used in telephony applications to transport
traditional TDM voice traffic as digitized voice traffic over ATM networks. The following topics are
discussed:
•
“Tandem Switch Offloading” section on page 2-1
•
“Multiservice Access” section on page 2-3
•
“AAL2 Trunking” section on page 2-3
Tandem Switch Offloading
Figure 2-1 shows VISM used to offload a Class 4 tandem switch by transporting a portion of the voice
traffic across an ATM network instead of the Public Switched Telephone Network (PSTN). VISM acts
as the voice gateway in this application. Use VISM in the VoIP switching or switched AAL2 PVC
operating mode to enable this application.
Figure 2-1
VISM Used in a Tandem Switch Offloading Application
MGX 8850
with VISM
V
IP Network
Central
Office
SS7 Network
Call Agent
Class 4
Switch
53233
PSTN Network
Cisco VISM Installation and Configuration Guide
Release 3.0, Part Number OL-2521-01 Rev. D0, June 2004
2-1
Chapter 2
Telephony Applications Using VISM
Tandem Switch Offloading
When a call is initiated, the central office can use either the Class 4 switch or VISM to handle the call.
When calls are passed to VISM, VISM backhauls the signaling to an SGCP or MGCP compliant call
agent (such as the Cisco VSC 3000). The call agent at the near end manages the call setup in conjunction
with the call agent at the far end and the calling and called VISM cards.
Note
Although not shown in the diagram, an alternative method for handling CCS signaling is to transport
it directly between the central office and the call agent with no VISM involvement. With this
arrangement, there is no backhauling function performed in the VISM.
Each VISM card supports up to eight T1 or E1 lines for voice traffic. You can use an alternative method
to connect the voice lines to the VISM cards—the TDM lines can be carried over a T3 line to an SRM
card in the Cisco MGX shelf where the individual T1 lines are broken out and distributed to the VISM
card internally. Refer to the Cisco MGX 8250, Release 1 and the Cisco MGX 8230 installation and
configuration documents for details of the SRM card.
The VISM connects to the ATM network using either VoAAL2 or VoIP (UDP/IP packets encapsulated
in AAL5 PVCs). VISM and the call agent communicate with each other and their activities are
coordinated through either SGCP or MGCP.
For VoIP, when the call setup procedure is complete, each VISM has the IP address of the other VISM
associated with the call. An end-to-end IP bearer circuit is established between the calling and called
parties. At this point, the voice conversation can proceed.
By way of example, Figure 2-1 shows only one location for the VISM and call agent; in reality there is
a similar arrangement for each tandem switch.
Figure 2-2 shows the connection from VISM to the call agent in greater detail.
Figure 2-2
VISM Used as a Voice Gateway Application
Customer's Premises
PBX
Call Agent
SS7 Network
PSTN
Voice
Packet
Network
V
O
MGX 8850
with VISM
53234
Data
Services
Voice
Gateway
The VISM/MGX 8000 shelf is connected to the network by an OC-3 line which is used for both the voice
payload and the communication with the call agent. A network edge router moves the voice traffic across
the network to the called party’s VISM and routes call control information between the VISM and the
call agent.
For reliability, two PVCs using separate physical links to two separate edge routers to the packet network
can be established. If the primary circuit fails, transmission automatically switches to the secondary
circuit. For enhanced reliability, the physical OC-3 links to the network can be protected by the SONET
APS feature.
Using all the available slots, the Cisco MGX 8850 and the Cisco MGX 8250 can be configured with up
to 24 VISM cards and the Cisco MGX 8230 can be configured with up to 8 VISM cards.
Cisco VISM Installation and Configuration Guide
2-2
Release 3.0, Part Number OL-2521-01 Rev. D0, June 2004
Chapter 2
Telephony Applications Using VISM
Multiservice Access
Each of the two lower shelf cellbuses can sustain a bandwidth of one OC-3/STM-1 link. This bandwidth
limits the number of E1 ports on the lower shelf, when using the G.711 codec, to 78 (approximately 10
VISM cards).
Multiservice Access
A Cisco MGX 8000 series shelf, combined with one or more VISM cards, provides multiservice access
between a customer’s TDM network and a voice gateway over a packet network. The voice gateway
provides the interface to the telephone network.
When voice traffic is conveyed over a packet network using VISM and an MGX 8850—multiservice
access—the MGX 8850 is located either at the customer’s premises (probably the case for large customer
installations) or at the central office. Use VISM in the VoIP switching or switched AAL2 PVC operating
mode to enable this application.
This application is very similar to the tandem switch offloading application, except that instead of
performing as the voice gateway, VISM provides access to the voice gateway.
VISM operates in conjunction with an MGCP or SGCP compatible call agent via an edge router/switch
on the packet network. Signaling is backhauled from VISM to the call agent through this connection.
The call agent connects to the SS7 network and handles call setup and teardown across the packet
network. The VISM connects to the ATM network and handles the voice payload between the TDM
voice/data network and a voice gateway. For transmitting the voice payload to the network, VISM uses
either VoIP transported in AAL5 ATM cells or VoAAL2.
Other data services (such as frame relay) can also be accommodated by configuring the MGX 8000
series shelf with the appropriate service modules (for example, FRSM) and using separate PVCs into the
packet network.
AAL2 Trunking
A Cisco MGX 8000 series shelf, in combination with VISM cards, provides AAL2 trunking between a
voice TDM network and voice gateways over a packet network. Use VISM in the AAL2 trunking
operating mode to enable this application.
Figure 2-3 shows a trunk with a VISM-equipped MGX 8850 shelf at one end of a trunk (at the central
office) and a Cisco 3810 Multiservice Access Concentrator and a Cisco MGX 8220 edge concentrator at
the other end of the trunk (customer premises).
AAL2 Trunking—One End
CPE
Central Office
ATM Packet
Network
PBX
Cisco
3810
PBX
AAL2 (Bearer & CAS)
Cisco
MGX 8830
Cisco
3810
T1 lines
AAL5 (CCS)
V
MGX 8850
with VISM
PSTN
31438
Figure 2-3
Cisco VISM Installation and Configuration Guide
Release 3.0, Part Number OL-2521-01 Rev. D0, June 2004
2-3
Chapter 2
Telephony Applications Using VISM
AAL2 Trunking
Figure 2-4 shows a trunk with a VISM-equipped MGX 8850 shelf at each end of the trunk.
AAL2 Trunking—Two Ends
CPE
Central Office
ATM Packet
Network
PBX
AAL2 (Bearer & CAS)
V
PBX
MGX 8850
with VISM
Note
AAL5 (CCS)
T1 lines
PSTN
V
MGX 8850
with VISM
31439
Figure 2-4
Figure 2-4 shows one trunk; however, VISM can support up to 64 trunks in this arrangement.
In Figure 2-3 and Figure 2-4, the trunk is an AAL2 nonswitched ATM PVC that carries the voice traffic.
The voice traffic is delivered to, or received from, the central office over short-haul T1 lines.
If CAS signaling is used, the signaling is transported across the trunk as AAL2 type 3 cells.
If CCS signaling is used, the signaling is delivered across the ATM network as AAL5 cells over separate
PVCs. VISM supports up to eight AAL5 PVCs, one for each T1/E1 line.
Other data services (such as frame relay) can be accommodated by configuring Cisco 3810, Cisco
MGX 8220, or Cisco MGX 8000 hardware with the appropriate service modules and using separate
PVCs into the packet network. The packet network routes these other data services as required.
In AAL2 trunking mode, VISM is not involved with a call agent and the functions of call control.
Multiple calls can be transported over a single PVC using the AAL2 channel identifier (CID)
mechanism. DS1/DS0s are bound to virtual channel identifier (VCI)/CIDs so that voice traffic from any
particular DS0 is automatically passed to its bound VCI/CID (and vice versa).
Cisco VISM Installation and Configuration Guide
2-4
Release 3.0, Part Number OL-2521-01 Rev. D0, June 2004
C H A P T E R
3
VISM Functional Description
The functions performed by VISM are described in the following sections:
•
“TDM Line-Handling Function” section on page 3-2
•
“Bearer Processing Function” section on page 3-3
•
“Signaling Function” section on page 3-5
•
“ATM Voice Data Processing Function” section on page 3-11
•
“Call Control Function” section on page 3-15
•
“Embedded VISM Management Function” section on page 3-19
Figure 3-1 shows the functional blocks of VISM. Items with single asterisks indicate VoIP switching and
switched AAL2 PVC functions. Items with double asterisks indicate AAL2 trunking functions. Items
without asterisks indicate VoIP switching, switched AAL2 PVC, and AAL2 trunking functions.
Cisco VISM Installation and Configuration Guide
Release 3.0, Part Number OL-2521-01 Rev. D0, June 2004
3-1
Chapter 3
VISM Functional Description
TDM Line-Handling Function
Figure 3-1
VISM Detailed Functional Blocks
User Inputs
(CLI, CWM, SNMP)
Embedded Management Functions
Signal backhaul xGCP (CAS), Q.931 (PRI) *
Call setup/ teardown xGCP *
To Call Agent *
SRCP *
Connection
Handling *
Resource
Coordination *
CCS
TDM Line DS0
Handling Switch
CAS (AAL2, Type 3) **
CAS
CCS (AAL5) **
Bearer
Processing
Bearer
Packetization
(SSCS)
ATM CPS
(SAR)
To ATM
Network
53235
Signaling
T1/E1
Lines
Key:
* VoIP Switching and
Switched AAL2 PVC
modes only
** Trunking mode only
TDM Line-Handling Function
The TDM line-handling function provides the physical layer interface to the T1/E1 lines and handles the
following features:
•
Framing
•
Line codes
•
Physical layer alarms and failures
•
Clocking
•
Loopbacks
•
Distinguishes between bearer and CCS signaling channels
Outgoing traffic—in from the TDM network and out to the packet network—is processed by the T1/E1
framers where each DS0 is extracted from its DS1 stream and is routed by a DS0 switch to the
appropriate function. Bearer DS0s are routed to the bearer processing function. CCS signaling DS0s are
routed to the TDM signaling function.
Outgoing traffic—in from the packet network and out to the TDM network—is processed in the opposite
manner. The DS0s received from the ATM side are inserted into their respective DS1s and transmitted
over the appropriate line in the TDM network.
Cisco VISM Installation and Configuration Guide
3-2
Release 3.0, Part Number OL-2521-01 Rev. D0, June 2004
Chapter 3
VISM Functional Description
Bearer Processing Function
Bearer Processing Function
The bearer processing function processes raw bearer DS0 streams from the T1/E1 lines in preparation
for packetization and segmentation and reassembly (SAR) processing on the ATM side. Most of the
bearer processing is performed by the VISM daughter card’s DSPs.
The main processing categories are:
•
Echo cancellation, voice compression, and A/Mu law conversion
•
Voice activity detection and silence suppression
•
Fax and modem handling
•
Jitter control
•
CAS handling
Echo Cancellation, Voice Compression, A/Mu Law Conversion
Bearer DS0 streams are received from the T1/E1 line function, and each is assigned to a DSP configured
for echo cancellation (ECAN). You can configure the following ECAN parameters:
•
Residual echo control
•
Maximum tail in milliseconds (up to 128 ms)
•
Fax and modem tone detection
If voice compression is required, the ECAN voice streams are assigned to a second DSP configured with
the required codec. Available compression schemes are:
•
G.711 64 kbps (A/Mu law, user configurable)
•
G.726-16k
•
G.726-24k
•
G.726-32k
•
G.726-40k
•
G.729a
•
G.729ab
•
G.723.1-H
•
G.723.1a-H
•
G.723.1-L
•
G.723.1a-L
VISM allows the use of codec templates in which the user selects a template instead of specifying each
allowable codec individually. VISM supports the following codec templates:
•
Template 1—Supports clear channel, G.711a, G.711u, G.729a, G.729ab, G.726-16k, G.726-24k,
G.726-32k, and G.726-40k codecs.
•
Template 2—Supports clear channel, G.711a, and G.711u codecs.
Cisco VISM Installation and Configuration Guide
Release 3.0, Part Number OL-2521-01 Rev. D0, June 2004
3-3
Chapter 3
VISM Functional Description
Bearer Processing Function
•
Template 3—Supports G.711u, G.711a, G.726-16k, G.726-24k, G.726-32k, G.726-40k, G.729a,
and G.729ab codecs, clear channel.
•
Template 4—Supports G.711u, G.711a, G. 726-16k, G.726-24k, G.726-32k, G.726-40k, G.729a,
G.729ab, G.723.1-H, G.723.1a-H, G.723.1-L, G.723.1a-L codecs and clear channel.
Within each template, you can specify a preference order for each codec. At call setup time, the codec
to be used from the configured template is either specified by the call agent or negotiated between the
calling and called VISM cards. If the codec is negotiated, the most preferred codec that both VISM cards
can support is selected.
For each codec, VISM supports various packetization periods as described in Table 3-1.
Table 3-1
Supported Codecs and Packetization Periods
Codec
Packetization Period (milliseconds)
G.711u
5
10
20
—
—
—
G.711a
5
10
20
—
—
—
G.729a
—
10
20
30
40
—
G.729ab
—
10
20
30
40
—
G.726-16k, 24k, 32k, 40k 5
10
20
30
40
—
G.723.1-H
—
—
—
30
—
60
G.723.1a-H
—
—
—
30
—
60
G.723.1-L
—
—
—
30
—
60
G.723.1a-L
—
—
—
30
—
60
Clear channel
—
10
20
—
—
—
Voice Activity Detection and Silence Suppression
You can configure the VISM card DSPs to monitor the TDM voice stream for voice activity. If the voice
activity detection (VAD) feature is enabled and no voice activity (silence) is detected for more than a
specified period of time, typically 250 ms, the silent voice samples are suppressed. During periods of
silence, parameters defining background noises transmit periodically. You can configure the remote
VISM to use the background noise information to generate comfort noise at the called end while silence
suppression is in operation.
Fax and Modem Tone Detection
You can configure the VISM card DSPs to detect the modem or fax tones on the data lines. For VoIP
operating mode, the action is specified using command line interface (CLI) commands. Refer to
Chapter 5, “CLI Commands,” for more information on CLI commands. For AAL2 connections, the
action is specified in the AAL2 profile. Generally, when a modem or fax tone is detected, VAD and
ECAN are turned off and codec is changed to the specified type (for example G.711 or clear channel).
Note
If the codec is already set to clear channel, the DSP cannot detect any tones—fax and modem tones
are not detected.
Cisco VISM Installation and Configuration Guide
3-4
Release 3.0, Part Number OL-2521-01 Rev. D0, June 2004
Chapter 3
VISM Functional Description
Signaling Function
Jitter Control
The VISM card uses voice buffers on the DSP to reduce jitter on outgoing voice streams. Jitter control
operates in the following modes:
•
Fixed—Allows you to configure a fixed buffer size in the range 0 to 100 ms. This mode is used when
latency jitter is nearly constant. This is the default mode for G.711u/a and clear channel codecs, with
a 100-ms buffer size.
•
Adaptive—Allows you to configure a starting buffer size, but adapts the size of the buffer according
to the jitter. Use this mode when latency jitter varies greatly. This is the default mode for all codecs
other than G.711u/a and clear channel.
CAS Handling
In applications using CAS, you can configure the VISM card DSPs to monitor incoming traffic and
extract the following CAS signaling information:
•
ABCD bits
•
Digits
•
Tones
You can configure VISM to handle various CAS variations such as immediate start, wink start, ground
start. The extracted CAS signaling information is sent to the TDM signaling function.
Signaling Function
All TDM signaling enters and exits VISM on the T1/E1 lines and is directed to the signaling function.
CAS signaling information is received from the bearer processing function, described in the “Bearer
Processing Function” section on page 3-3. CCS signaling information arrives directly from the TDM line
handling function, described in the “TDM Line-Handling Function” section on page 3-2.
VISM depends on a combination of the following two features to determine how it handles signaling:
•
Operating mode:
– VoIP switching/trunking
– Switched AAL2 PVC
– AAL2 trunking
– AAL1 SVC
– AAL2 SVC
– AAL1/VoIP (for TDM grooming)
•
Signaling type:
– CAS
– CCS
Signaling enters from the T1/E1 lines and, depending upon the mode and the type of signaling, is
processed for the correct protocol and directed to either the call agent or the ATM trunks (see
Figure 3-2).
Cisco VISM Installation and Configuration Guide
Release 3.0, Part Number OL-2521-01 Rev. D0, June 2004
3-5
Chapter 3
VISM Functional Description
Signaling Function
Note
You can configure the VISM card to support CCS signaling without VISM card involvement. In this
configuration, a CCS channel is connected directly to the call agent that handles all necessary
processing of signaling information.
Figure 3-2
VISM Signaling Paths
CCS (Q.931 using RUDP/UDP/IP)
To Call Agent
CAS (xGCP)
Type?
CAS (xGCP)
VoIP switching/trunking,
AAL1/AAL2 SVC
TDM Grooming
T1/E1
Signaling
Mode?
Switched
AAL2
Type?
CCS (AAL5 PVC)
CAS (trunk)
AAL2 Trunking
CAS (AAL2 Type 3)
To ATM
Trunks
CCS (AAL5 PVC)
72674
Type?
CAS signaling can be configured, in the switched AAL2 PVC operating mode, to send the signaling to
the call agent or over an AAL2 PVC as in the AAL2 application.
CAS Processing in VoIP Switching and Switched AAL2 PVC Operating Mode
In the VoIP switching and switched AAL2 operating modes, CAS signaling is processed by the call agent
using SGCP.
The call agent performs the following functions:
•
Issues the SGCP Notification Request command to instruct VISM which CAS signals are to be
reported to the call agent.
•
Instructs VISM which CAS signals to send out the DS0.
The VISM card performs the following functions:
•
Responds by sending acknowledge messages in return to call agent commands.
•
Sends received CAS signals back to the call agent by using the SGCP Notify command.
•
Interfaces with the DSP drivers, which perform the detection and generation of CAS signals.
Cisco VISM Installation and Configuration Guide
3-6
Release 3.0, Part Number OL-2521-01 Rev. D0, June 2004
Chapter 3
VISM Functional Description
Signaling Function
Figure 3-3 shows the messages involved in CAS processing with the VoIP switching and switched AAL2
PVC operating modes.
CAS Processing—Message Structure
A-B bits
Digits
T1/E1 Lines
DSPs
& Drivers
A-B bits
Digits
Tones
Events
DTMF, MF, Fax, & Modem tones
Off/on hook
Hook flash
Start/End MF string
Actions
Tx A-B bits
Report A-B bits
Present dial string
Report tone generation
Begin/End tone generation
Notify
Messages
Call
Agent
Notification
Requests
53237
Figure 3-3
Figure 3-4 shows the local CAS processing call setup message sequences which occur between VISM,
the call agent, and the telephone equipment on the DS0.
Cisco VISM Installation and Configuration Guide
Release 3.0, Part Number OL-2521-01 Rev. D0, June 2004
3-7
Chapter 3
VISM Functional Description
Signaling Function
Figure 3-4
CAS Signaling in Initiating and Terminating a Call
DS0
VISM
Call Agent
Notification Request, (off hook)
Ack
Ring to Ground
VISM
Start Timer
Loop still closed
Clear Timer
Notify Message, (off hook)
Dial tone
Notification Request (dial tone,
digit collect, on-hook)
Digits
Notify Message (digit string)
Connect
CALL IN PROGRESS
On-hook
Delete Connection
Note
53238
Notify Message, (on-hook)
Figure 3-4 shows only the local CAS aspects of call setup. The entire process of call setup involves
many more messages between the local and remote call agents and the local and remote VISMs.
Refer to the “Call Control Function” section on page 3-15 for more information.
The call processing for the VoIP switching and switched AAL2 operating modes is described in the
following list:
1.
The call agent requests VISM to look for an off-hook signal when the line is idle.
2.
Upon receipt of an on-hook signal, VISM starts a timer and checks later to ensure that the line is
still off-hook.
3.
VISM notifies the call agent that the caller has gone off-hook (this timer mechanism is also used
when processing on-hook/off-hook signaling to determine flash-hook events).
4.
When the call agent is informed that the user is off-hook, the call agent instructs VISM to generate
dial tone and to look for dialed digits.
Cisco VISM Installation and Configuration Guide
3-8
Release 3.0, Part Number OL-2521-01 Rev. D0, June 2004
Chapter 3
VISM Functional Description
Signaling Function
5.
When the call agent receives the dialed number, it uses the dial plan to communicate with the remote
call agent to set up the call.
6.
The call is terminated when either the called or calling party goes on-hook.
CCS Processing in Switched AAL2 PVC Operating Mode
In the switched AAL2 PVC operating mode, CCS signaling can be configured to pass (backhaul) CCS
signals between the user PBXs and the call agents.
You can configure T1 and E1 lines for CCS signaling. You must specify a particular DS0 as an Integrated
Services Digital Network (ISDN) D channel to carry the Primary Rate Interface (PRI) signaling.
Signaling from the private branch exchange (PBX) is received on the D channel as level 3 Q.931
messages encapsulated in the information field of level 2 Q.921 LAPD information frames.
The Q.921 link is terminated at the VISM, and on the call agent side, a Redundant User Datagram
Protocol/User Datagram Protocol/Internet Protocol (RUDP/UDP/IP) connection is used to carry level 3
Q.931 signaling between VISM and the call agent. This link to the call agent flows through an
intermediate router. From VISM to the router, the RUDP/UDP/IP packets are segmented and transported
as AAL5 ATM cells.
The function of the VISM PRI/backhaul feature is to pass the Q.931 messages between the PBX and the
call agent.
VISM handles all Q.921 frame types. For information type frames, the process is described in the
following list:
1.
VISM extracts the Q.931 frame.
2.
VISM then places it in an RUDP datagram.
3.
The RUDP datagram is encapsulated in UDP and IP packets (using the IP address and a specified
port number of the destination call agent).
4.
The SAR section of VISM segments the IP message into AAL5 ATM cells for transport to the call
agent via an edge router.
In CCS processing, communication between VISM and the call agent involves both call control
information using xGCP protocols and CCS signaling using Q.931 protocol. Both are transported using
the AAL5 ATM connection.
Signaling from the call agent to the PBX is handled in the same manner but in reverse:
1.
Signaling from the call agent is stripped of its RUDP/UDP/IP headers and trailers.
2.
Signaling is then encapsulated into Q.921 information type frames for transmission to the user’s
PBX.
VISM is not involved with the signaling content but acts as an interface between the PBX and the call
agent.
Cisco VISM Installation and Configuration Guide
Release 3.0, Part Number OL-2521-01 Rev. D0, June 2004
3-9
Chapter 3
VISM Functional Description
Signaling Function
Figure 3-5 shows the VISM PRI/backhaul process.
Figure 3-5
PRI/Backhaul Path
Call Agent
Signaling
Network
PRI Backhaul
Path
PBX
D channel
Router
V
B channel
Packet
Network
Voice Payload
44387
MGX 8850
with VISM
For RUDP links between VISM and the call agents, use a session with a session manager.
A session represents a single RUDP link to a specified call agent. Sessions are organized into session
groups, and session groups are organized into session sets. VISM architecture supports up to 64 sessions
and up to 16 session groups; however, Release 2.2 supports one session.
Multiple RUDP links for a specified call agent are set up as sessions in a single group. A group is
required for each call agent for which CCS signaling is to be backhauled. Within a group, each session
is assigned a priority level. When an active session fails, the session manager switches to the next highest
priority backup session within the group. Figure 3-6 shows the hierarchy of RUDP sets, groups, and
sessions.
Figure 3-6
RUDP Session Hierarchy
Session
Group 1
Session
Group 2
Session
Group 3
Sessions to
Call Agent A
Sessions to
Call Agent B
Sessions to
Call Agent C
44388
Session
Set
VISM maintains a set of counters for the collection of statistics at both the Q.921 and Q.931 protocol
levels. The collected statistics include the number of frames/packets/bytes sent and received, the number
of resets, the number of discards and retransmissions, etc. Refer to the CCS session and LAPD display
commands in Chapter 5, “CLI Commands,” for more information on collected statistics for the CCS
session and LAPD display commands.
Cisco VISM Installation and Configuration Guide
3-10
Release 3.0, Part Number OL-2521-01 Rev. D0, June 2004
Chapter 3
VISM Functional Description
ATM Voice Data Processing Function
Use the CLI PRI/backhaul commands to do the following:
•
Create and delete session sets
•
Create, delete, configure, and display sessions and sessions groups
•
Create, delete, configure, and display D channels for CCS
•
Display PRI/backhaul statistics
Refer to Chapter 5, “CLI Commands,” for more information on CLI commands.
CAS Processing in AAL2 Trunking Operating Mode
CAS signaling is extracted from the voice data and is transported across the packet network in AAL2
trunking operating mode. The signaling is transported across the same trunk (VC) and the same channel
identifier (CID) as its associated voice stream, using AAL2 Type 3 messages in accordance with ITU-T
I.366.2. The messages are used for CAS (A,B,C, and D) robbed bits, fax/modem tones, and digits and
are transported with triple redundancy.
CCS Processing in AAL2 Trunking Operating Mode
CCS signaling is maintained as Q.931 messages and transported across the packet network using an
AAL5 PVC in AAL2 trunking operating mode. The local and remote ends of the PVC are the same as
those for the AAL2 PVC trunk carrying the associated voice data.
ATM Voice Data Processing Function
The VISM DSPs process incoming voice data (for compression, ECAN, etc.) and then the data is
prepared for transport over the ATM network. Voice samples are processed into ATM packets and then
into ATM cells in preparation for transport. VISM then transports the cells to Voice over ATM (VoATM)
networks with the following supported operating modes:
•
VoIP
•
Switched AAL2 PVC
•
AAL2 trunking
•
AAL1 SVC
Transporting Voice Cells with VoIP
The VoIP switching operating mode processes voice cells in the following order to transport them over
ATM networks:
1.
Formatted into Real-Time Transport Protocol (RTP) packets.
Note
2.
RTP allows time-stamping of the voice samples, which permits dejittering of the samples
transmitted to the destination TDM line.
Encapsulated in a UDP packet.
Cisco VISM Installation and Configuration Guide
Release 3.0, Part Number OL-2521-01 Rev. D0, June 2004
3-11
Chapter 3
VISM Functional Description
ATM Voice Data Processing Function
3.
Encapsulated in an IP packet.
4.
Converted to AAL5 ATM cells for transmission to an edge router on the network.
Figure 3-7 shows the protocol stack for VoIP.
Figure 3-7
VoIP Protocol Stack
Voice Payload (RFC 1889)
RTP
xGCP
Signaling and Control (xGCP)
UDP
AAL5
RTP
UDP
UDP
IP
IP
Call Agent
Remote Media
Gateway
IP
AAL5
ATM
ATM
ATM
VISM
PXM
Router
27911
IP
(RFC 1483)
xGCP
Figure 3-8 shows how a voice sample is packetized and transmitted as cells.
Figure 3-8
VoIP Cell Packetization and Transmission
80 bytes of packetized PCM
(10 ms sample)
80-byte packet + 12-byte RTP header
= 92 bytes
IP (20 bytes) + UDP (8 bytes) + 92 packet
= 120
3 ATM cells per 10 ms
35239
16 bytes padding
8 bytes AAL5 trailer
= 144 bytes of AAL5 PDU
At the layer containing RTP, a 12-byte header is added. At the layer containing UDP, an 8-byte header
is added and at the layer containing IP, a 20-byte header is added for a total of 120.
At the layer containing AAL5, the 8-byte AAL5 trailer is added and the data is padded with 16 bytes to
make an integral number of ATM cell payload bytes. The resulting protocol data unit (PDU) is 144 bytes
in length and is transported in three ATM cells.
A single PVC is set up between the Cisco MGX 8000 series platform and the router. All packets are sent
across the PVC regardless of their destination. The router extracts the IP addresses and routes the cells
accordingly.
Cisco VISM Installation and Configuration Guide
3-12
Release 3.0, Part Number OL-2521-01 Rev. D0, June 2004
Chapter 3
VISM Functional Description
ATM Voice Data Processing Function
To improve reliability, VISM supports two independent OC-3 interfaces, each connected to a separate
edge router and each with its own PVC. One PVC is designated the primary PVC and the other the
secondary PVC. The primary circuit is used unless it fails, in which case VISM switches automatically
to the secondary circuit. Switchover may cause a temporary 250-ms delay on the lines.
VISM communicates with the packet network about transmitting the voice payload by using the SONET
OC-3 port on the MGX 8000 series platform PXM card. Voice payload samples are formatted and sent
across the MGX 8000 series platform cellbus and onto the SONET connection.
Transporting Voice Cells with Switched AAL2 PVC
The switched AAL2 PVC operating mode transports voice cells with up to 64 PVCs. Multiple calls can
share a single AAL2 connection simultaneously using a CID. Each PVC is assigned a virtual connection
circuit identifier (VCCI). The VCCI/CID to endpoint/DS1/DS0 binding is made dynamically by the call
agent as part of the call setup procedure. However, you can permanently set the binding—which makes
VISM operate as if it were in AAL2 trunking operating mode.
The AAL2 PVC supports AAL2 profiles and mid-call upspeeds. Codec changes can be supported if they
are within the agreed upon profile. The following AAL2 profiles are supported:
•
Custom profile 100
•
Custom profile 101
•
Custom profile 110
•
ITU-T I.366.2 profile 1
•
ITU-T I.366.2 profile 2
•
ITU-T I.366.2 profile 7
•
ITU-T I.366.2 profile 8
Cisco VISM Installation and Configuration Guide
Release 3.0, Part Number OL-2521-01 Rev. D0, June 2004
3-13
Chapter 3
VISM Functional Description
ATM Voice Data Processing Function
Figure 3-9 shows the packetization process for AAL2 cells.
Figure 3-9
AAL2 Cell Packetization and Transmission
CPS
Packet Header
CID
8
CPS Packet Payload
CPS-INFO
(variable length - from SSCS)
LI UUI HEC
6
5
5
1 - 45/64 bytes
Bits
CPS - Packet
Start
Field
S
OSF N P
6
Pad
CPS - PDU
0 - 47 bytes
1 1 Bits
ATM
Header
5
Contains zero, one or more (complete or partial) CPS Packets
ATM Payload
(CPS-Packet may overlap
one or two ATM cell boundaries)
48
....
ATM
Header
5
ATM Payload
(CPS-Packet may overlap
one or two ATM cell boundaries)
48
53240
CPS-PDU Payload
Transporting Voice Cells with AAL2 Trunking
The AAL2 trunking operating mode transports voice cells with up to 64 AAL2 trunks. The CID/virtual
channel identifier (VCI) for each DS1/DS0 pair is preprovisioned, which ensures that DS0 voice streams
are automatically transported over the appropriate trunk.
For CAS applications, voice cells and CAS signaling are transported across the AAL2 trunk. If a channel
is configured for CCS signaling, the signaling is transmitted by extracting HDLC frames and forwarding
them over preprovisioned AAL5 virtual circuits (the voice cells are still transmitted using AAL2).
VISM does not support any call control functions with the AAL2 trunking operating mode. VISM passes
signal traffic across the trunk.
Alarm and packetization handling are the same as in the switched AAL2 PVC operating mode. Refer to
the “Transporting Voice Cells with Switched AAL2 PVC” section on page 3-13.
Transporting Voice Cells with Switched AAL1 SVC
VISM interacts with a call agent using an xGCP protocol over AAL5 control PVCs. In the switched
AAL1 SVC operating mode, the bearer path is VoAAL1 and the bearer connections are SVCs. VISM
dynamically sets up and tears down bearer connections.
Cisco VISM Installation and Configuration Guide
3-14
Release 3.0, Part Number OL-2521-01 Rev. D0, June 2004
Chapter 3
VISM Functional Description
Call Control Function
Call Control Function
Call control is used in the switched AAL2 PVC operating mode only and is managed by the call agents.
The call agent performs the following functions:
•
Analyzes signaling received from VISM cards and other call agents to monitor the status of all
endpoints and connections.
•
Signals VISM cards and other call agents to set up and tear down calls.
•
Reacts to fax, modem, alarm and other line conditions and events.
•
Maintains a dial plan to locate the remote call agent using the dialed number.
•
Negotiates profiles and codecs between the called and calling locations.
These functions require call agent communication with the VISM cards under call agent control and peer
call agents. Figure 3-10 shows the call agent communications links.
Figure 3-10 Call Agent Communications Links
Call Agent
C-ISUP
or SS7
Signaling
Network
Other Call
Agents
Packet
Network
Other
MGX 8850s
VISMs
V
V
MGX 8850
with VISM
53241
IP (xGCP)
The interface between the call agent and VISM cards is a gateway call control protocol generically
known as xGCP. The following gateway call control protocols are supported:
•
Media Gateway Control Protocol (MGCP) 0.1 and 1.0
•
Simple Gateway Control Protocol (SGCP) 1.5
•
Simple Resource Control Protocol (SRCP)
SRCP enables the VISM card and the call agent to resynchronize. Synchronization occurs when the call
agent first assumes control of VISM or after the call agent loses communication with VISM.
All protocols use a UDP/IP connection between the call agent and the VISM cards. The IP address of
the call agent can be resolved in the following ways:
•
Internal table which you set up with the CLI
•
External domain name server (DNS)
You can configure VISM to use the internal table and external DNS in the following ways:
•
Internal table only
•
External DNS only
•
Internal first and external second
•
External first and internal second
Cisco VISM Installation and Configuration Guide
Release 3.0, Part Number OL-2521-01 Rev. D0, June 2004
3-15
Chapter 3
VISM Functional Description
Call Control Function
VISM supports up to eleven domain names and each domain name can have up to eight internal and eight
external IP addresses.
Note
The external DNS can have up to eight internal IP addresses only.
The interface between the call agent and other call agents is either Signaling System 7 (SS7) or a Cisco
extended ISDN User Part (C-ISUP).
Connection Model
SGCP and MGCP gateway call control protocols assume a connection model where the basic constructs
are connections and endpoints. Figure 3-11 shows a basic connection model.
Figure 3-11 Connection Model
Call 1
1
Connection 1
endpoints
2
Call 2
Connection 2
4
Connection 3
5
31435
3
Connections are grouped into calls. One or more connections can belong to the same call. Several
connections, that may or may not belong to the same call, can terminate in the same endpoint.
The SGCP consists of the following commands:
•
Notification request—Used by the call agent. Requests the gateway to send notifications upon the
occurrence of specified events in an endpoint.
•
Notify Messages—Used by the gateway. Sends a list of observed events to the call agent.
•
Create connection—Used by the call agent. Sets up a new connection at the gateway.
•
Modify connection—Used by the call agent. Modifies a gateway’s view of a connection.
•
Delete connection—Used by the call agent. Terminates a connection.
The MGCP extends SGCP to include the following commands:
•
Audit endpoint—Used by the call agent. Audits information related to a given endpoint.
•
Audit connection—Used by the call agent. Audits information related to a given connection.
•
Restart in progress —Used by the gateway (VISM). Signals that an endpoint (or a group of
endpoints) is brought into or taken out of service.
•
Audit gateway—Used by the call agent. Identifies the status of the gateway.
•
Audit line—Used by the call agent. Identifies the status of a given line.
Cisco VISM Installation and Configuration Guide
3-16
Release 3.0, Part Number OL-2521-01 Rev. D0, June 2004
Chapter 3
VISM Functional Description
Call Control Function
xGCP Extensions for AAL2 Switched PVC and AAL2 SVC Operating Modes
VISM supports the following extensions to the xGCP protocols for AAL2 switched and AAL2 SVC
applications:
•
A new AAL2 Type 3 message type (coded ‘010001’) for telephone signal events (TSEs). The
following are TSEs:
– ECAN off
– Request audible ring tone
– Ack continuity test
– Request stop audible tone
– Request continuity test
•
An extended naming structure to include ATM endpoints. An ATM endpoint enables the following
to be included in the definition of an endpoint:
– ATM address
– virtual path identifier (VPI)
– VCI
– VCCI
– CID
•
An extended list of connection events in MGCP, known as an ATM Package. These events are:
– Setup complete (for AAL2 CID path)
– Setup failed (for AAL2 CID path)
– Enable CAS via type 3 packets
•
Introduction of a Profile Type in call setup commands to describe encoding techniques.
Endpoint Service States
Endpoints exist in one of two service states—in-service (IS) and out-of-service (OOS). The state of an
endpoint is determined by user configuration commands and line alarm conditions. When an endpoint is
added, it automatically assumes the state of the line.
When endpoints are taken OOS, the transition can be graceful or forced. If graceful, no new connections
are permitted while ongoing connections are allowed to terminate normally. If forced, no new
connections are permitted and all ongoing connections are terminated immediately.
You can also bring an endpoint to the IS and OOS states with the following commands, which operate
either on a line-by-line basis or on the entire VISM card:
•
cnflnis—Configure a line as IS
•
cnflnoos—Configure a line as OOS
•
cnfgwis—Configure a VISM card as IS
•
cnfgwoos—Configure a VISM card as OOS
These commands allow you to specify either a graceful or forced transition.
Cisco VISM Installation and Configuration Guide
Release 3.0, Part Number OL-2521-01 Rev. D0, June 2004
3-17
Chapter 3
VISM Functional Description
Call Control Function
If an alarm condition on a line is raised, all endpoints on the line are brought into a forced transition to
OOS. An automatic return to IS is performed when the alarm is cleared, unless a specific OOS command
is executed in the meantime.
Restart In Progress Command
The call agent is kept informed of the state of all endpoints with the xGCP Restart In Progress (RSIP)
command. The following minimum requirements must be met for this process to operate:
•
At least one call agent must be configured using the add media gateway controller (addmgc)
command.
•
A protocol must be added for each media gateway controller using the add media gateway group
entry command (addmgcgrpentry) command.
The VISM card issues an RSIP command in the following situations:
•
One or more endpoints are added or deleted with the following commands:
– addendpt
– addendpts
– delendpt
– delendpts
•
A line is configured as IS or OOS with one of the following commands:
– cnflnis
– cnflnoos
•
The VISM card (gateway) is configured as IS or OOS with one of the following commands:
– cnfgwis
– cnfgwoos
•
The VISM card is powered up or reset.
Note
In this case, the RSIP is delayed by a random amount (up to a configurable maximum
duration) to avoid an avalanche of RSIPs arriving at the call agent when an entire MGX
8000 series platform with multiple VISM cards is powered up or reset.
When the states of multiple endpoints are changed simultaneously, the VISM card minimizes the number
of RSIP commands through the use of the wildcard ( * ) convention of naming endpoints.
When an RSIP is sent to call agents, VISM expects an acknowledgment. If no acknowledgment is
received after a timeout period, the RSIP is sent again. This process is repeated a number of times, after
which, if no acknowledgment is received, an acknowledgment is assumed. You can configure both the
timeout period and the number of retries with the cnfxgcpretry command.
Cisco VISM Installation and Configuration Guide
3-18
Release 3.0, Part Number OL-2521-01 Rev. D0, June 2004
Chapter 3
VISM Functional Description
Embedded VISM Management Function
Connection Admission Control
The VISM connection admission control (CAC) feature calculates the effect of a new call on the
bandwidth utilization of the ATM PVC before a new call is either admitted or rejected.
Each call requires a connection between two endpoints and requires a certain amount of bandwidth.
Bandwidth is expressed as cells per second (cps) and depends upon the following:
•
Encapsulation method
•
Coding/compression method
•
Enabled/disabled VAD
CAC maintains a table of all currently active calls and their bandwidth requirements. When a new call
is requested, CAC calculates the total bandwidth requirements of all the current calls and adds the
bandwidth required by the newly requested call. The new total is then compared with the preprovisioned
bandwidth (cps) of the ATM PVC.
If the new bandwidth total exceeds the preprovisioned bandwidth of the PVC, the call request is rejected.
If the new bandwidth total is less than or equal to the preprovisioned bandwidth of the PVC, the call is
accepted.
You can specify the values of the following VAD parameters in the CAC algorithm:
•
Over-subscription drop ratio
•
Voice duty cycle
VAD parameter specification allows the CAC algorithm to take into account the bandwidth savings of
VAD and improves the CAC decision-making process. You can specify the values of these parameters at
the card level and at the logical channel level. The default condition is for CAC to be enabled.
Embedded VISM Management Function
VISM management tools allow you to do the following:
•
Configure VISM features
•
Provision connections
•
Display VISM configurations
•
Display VISM statistics
Use any of the following tools to manage and configure the VISM card:
•
CLI—See Chapter 4, “Configuring VISM Features,” for a description of how to configure VISM
using the CLI. See Chapter 5, “CLI Commands,” for a description of the syntax for each CLI
command.
•
Third-party Simple Network Management Protocol (SNMP) manager—Permits you to display and
manipulate the individual MIB objects.
•
Cisco WAN Manager (CWM) program—Provides a graphics-based interface on a UNIX
workstation.
Cisco VISM Installation and Configuration Guide
Release 3.0, Part Number OL-2521-01 Rev. D0, June 2004
3-19
Chapter 3
VISM Functional Description
Embedded VISM Management Function
Figure 3-12 shows an example of a CWM VISM Card Config screen with the card elements displayed.
Figure 3-12 VISM Card Config Screen—Card Elements Display
Cisco VISM Installation and Configuration Guide
3-20
Release 3.0, Part Number OL-2521-01 Rev. D0, June 2004
Chapter 3
VISM Functional Description
Embedded VISM Management Function
Figure 3-13 shows an example of a CWM VISM Card Config screen with the VISM features displayed.
Figure 3-13 VISM Card Config Screen—VISM Features Display
Refer to the WAN CiscoView for the MGX 8250 for more information on using CWM.
All three VISM management tools allow you to access and manipulate the VISM Management
Information Bases (MIBs) that contain all VISM configuration settings, operating modes, and statistics.
Cisco VISM Installation and Configuration Guide
Release 3.0, Part Number OL-2521-01 Rev. D0, June 2004
3-21
Chapter 3
VISM Functional Description
Embedded VISM Management Function
Cisco VISM Installation and Configuration Guide
3-22
Release 3.0, Part Number OL-2521-01 Rev. D0, June 2004
C H A P T E R
4
Configuring VISM Features
The command line interface (CLI) is a DOS-like interface used to configure VISM cards. This chapter
describes the following:
•
“Using the Command Line Interface” section on page 4-1
•
“Connecting to Cisco MGX 8000 Series Platforms” section on page 4-2
•
“Configuring VISM Features” section on page 4-6
Using the Command Line Interface
CLI commands may be followed by a string of required or optional argument identifiers and argument
values. The entire string, from the command to the last argument value, is referred to as a command line.
Spaces are used to separate all elements in a command line. Type the command, any necessary argument
identifiers and argument values, then press Enter.
Note
You must press the Enter key at the end of all CLI command lines to complete the command.
For example, the Add Endpoint command, addendpt, adds an endpoint to VISM and has three required
arguments. An endpoint defines one end of a connection. The addendpt command format is as follows:
addendpt endpt-num ds1-num ds0-num
When you type a command, use argument values to represent the arguments. For example, to add an
endpoint with number 10 on DS1 number 4 and DS0 number 3, the command line is as follows:
addendpt 10 4 3
Some commands require you to type an argument identifier before the argument value. For example, the
Clear Alarm command, clralm, requires you to enter an identifier, -ds1, before the argument value. The
clralm command format is as follows:
clralm -ds1 line-num
To clear alarms on line 4, the command line is as follows:
clralm -ds1 4
Cisco VISM Installation and Configuration Guide
Release 3.0, Part Number OL-2521-01 Rev. D0, June 2004
4-1
Chapter 4
Configuring VISM Features
Connecting to Cisco MGX 8000 Series Platforms
VISM Command Attributes
Use the information in Table 4-1 to determine the log file attributes, VISM card state requirements for
command use, and personnel privileges for all VISM commands.
Table 4-1
VISM Command Attributes—Log File, Card State, and Privilege Level
Commands that
begin with...
...write to the ...are usable in
log file?
what state?
...can be used by personnel
with what privilege level?
?1
No
All
All
Yes
Active
1
Yes
All
All
Yes
Active
1
clr
No
Active
1 to 5
cnf
Yes
Active
1
del
Yes
Active
1
dsp
No
Active
All
No
All
All
No
Active
All
No
Active
All
No
Active
All
add
cc
1
chkflash
1
Help1
pinglndsp
tst
version
1
1
1. The text shown represents the complete CLI command name.
Note
For a complete description of the CLI commands in this chapter, see Chapter 5, “CLI Commands.”
Connecting to Cisco MGX 8000 Series Platforms
The VISM card operates in the following MGX 8000 Series platforms:
•
Cisco MGX 8850 Release 1, wide area switch
•
Cisco MGX 8250, edge concentrator
•
Cisco MGX 8230, edge concentrator
Each platform contains a Processor Module (PXM) back card (see Figure 4-1). Connect your CLI
command administration terminal or workstation to the PXM back card’s control port—locally or
remotely through a modem.
Note
The MGX 8000 Series platform PXM back card contains all connections for managing VISM cards.
The VISM card itself has no physical management ports.
Cisco VISM Installation and Configuration Guide
4-2
Release 3.0, Part Number OL-2521-01 Rev. D0, June 2004
Chapter 4
Configuring VISM Features
Connecting to Cisco MGX 8000 Series Platforms
Figure 4-1
PXM Back Card
PXM-UI
T1
C
L
O
C
K
T1 clock
M
P
Maintenance port
C
P
Control port
L
A
N
LAN port
E1 clock source
E1 CLOCK
A
L
A
R
M
12208
Alarm outputs
Use any of the following devices to connect to a PXM back card:
•
A simple alphanumeric terminal (such as a DEC VT100 or equivalent) connected to the control port
of the MGX 8000 Series platform PXM back card.
•
A computer emulating an alphanumeric terminal (such as the Microsoft Windows Hyper Terminal
program) connected to the control port of the MGX 8000 Series platform PXM back card.
•
A computer running a Telnet session over Ethernet and connected to the LAN port on the MGX 8000
Series platform PXM back card.
Logging In to PXM and VISM Cards
Complete the following steps to log in to PXM and VISM cards:
Step 1
Physically connect your terminal or workstation to the PXM back card.
The login prompt is displayed:
Login:
Step 2
Type your user name and press Enter.
Cisco VISM Installation and Configuration Guide
Release 3.0, Part Number OL-2521-01 Rev. D0, June 2004
4-3
Chapter 4
Configuring VISM Features
Connecting to Cisco MGX 8000 Series Platforms
Note
The default user name is cisco. You may change this username after your initial login is
complete. Consult the system administrator for valid user names.
The password prompt is displayed:
password:
Step 3
Type your password and press Enter.
For security, the password is displayed as asterisks:
password: *****
Note
The default password is cisco. You may change this password after your initial login is
complete. Consult the system administrator for valid passwords.
The following prompt is displayed:
card number [7]:
Step 4
If you know the VISM card slot number of the card you want to configure, proceed to Step 5. If you do
not know the VISM card slot number of the card you want to configure, proceed to Step 6.
Step 5
Type the VISM card slot number and press Enter.
The VISM card prompt is displayed. See the “VISM Card Prompt” section on page 4-5 for more
information. You have completed logging in to the PXM and VISM cards and can now perform the
mandatory initial VISM card configuration. Proceed to the “Initial VISM Configuration” section on
page 4-6.
Step 6
Type the slot number of the active PXM card (either 7 or 8) and press Enter.
The PXM card prompt is displayed:
NODENAME.1.7.PXM.a >
Step 7
Type the dspcds command to display available card types and press Enter.
A list of available card types and associated states is displayed for the MGX 8000 Series platform with
which you are connected. The display is similar to the following:
NODENAME.1.7.PXM.a > dspcds
Slot CardState
CardType
---- ----------- -------1.1
Empty
1.2
Active
VISM-8T1
1.3
Empty
1.4
Empty
1.5
Empty
1.6
Empty
1.7
Active
PXM1-OC3
1.8
Empty
1.9
Active
VISM-8E1
1.10 Empty
1.11 Active
VISM-8T1
1.12 Boot
VISM-8T1
1.13 Active
VISM-8T1
1.14 Active
VISM-8E1
1.15 Empty
1.16 Empty
CardAlarm
--------Clear
Clear
Clear
Clear
Clear
Clear
Minor
Clear
Clear
Clear
Clear
Clear
Clear
Clear
Clear
Clear
Redundancy
-----------
Cisco VISM Installation and Configuration Guide
4-4
Release 3.0, Part Number OL-2521-01 Rev. D0, June 2004
Chapter 4
Configuring VISM Features
Connecting to Cisco MGX 8000 Series Platforms
1.17 Empty
1.18 Empty
1.19 Empty
1.20 Empty
1.21 Boot
1.22 Empty
1.25 Reserved
1.26 Empty
1.27 Empty
1.28 Active
1.29 Empty
1.30 Empty
1.31 Empty
1.32 Empty
NODENAME.1.7.PXM.a
VISM-8T1
VISM-8E1
VISM-8E1
Clear
Clear
Clear
Clear
Clear
Clear
Clear
Clear
Clear
Clear
Clear
Clear
Clear
Clear
>
Step 8
Identify, from the list displayed in Step 7, the slot number of the VISM card you want to configure.
Step 9
Type the cc command (to change card), the VISM card slot number identified in Step 8, and press Enter.
The VISM card prompt is displayed. See the “VISM Card Prompt” section on page 4-5 for more
information.
You have completed logging in to the PXM and VISM cards and can now perform the mandatory initial
VISM card configuration. Proceed to the “Initial VISM Configuration” section on page 4-6.
VISM Card Prompt
The VISM card prompt is displayed when you successfully log in to a VISM card and has the following
format:
NODENAME.1.9.VISM8.a
The VISM card prompt contains the following data:
•
Name of the MGX 8000 Series platform to which you are connected
•
Number of the shelf—always 1
•
Slot number
•
Card type
•
Card state—active (a) or standby (s)
Logging Out of VISM and PXM Cards
Enter one of the following commands to log out of the VISM and PXM cards:
•
bye
•
logout
Cisco VISM Installation and Configuration Guide
Release 3.0, Part Number OL-2521-01 Rev. D0, June 2004
4-5
Chapter 4
Configuring VISM Features
Configuring VISM Features
Configuring VISM Features
The CLI allows you to configure all features and functions of VISM. Configure mandatory commands
when you require argument values that are different from the default. Configure optional commands
when necessary.
Perform the following tasks with CLI commands to enable your VISM card applications:
1.
Perform the mandatory initial VISM configuration.
2.
Perform the initial card-level configuration.
3.
Configure the TDM side.
4.
Configure bearer processing.
Note
Configure one type of signaling—CAS or CCS—for each application.
5.
Configure the ATM network side.
6.
Configure the call agent interface.
Note
If you are using a VoIP or an AAL2 trunking application, do not configure a call agent
interface.
Initial VISM Configuration
You must execute a sequence of mandatory commands, specific to your operating mode, to make the
VISM card fully operational. The mandatory commands for each operating mode are listed in Table 4-2
in order of execution. The remainder of this chapter assists you with using these commands, and
commands specific to your operating system.
Cisco VISM Installation and Configuration Guide
4-6
Release 3.0, Part Number OL-2521-01 Rev. D0, June 2004
Chapter 4
Configuring VISM Features
Configuring VISM Features
Table 4-2
Mandatory Initial VISM Configuration Command Sequence for All Operating Modes
Operating Mode
VoIP Switching
Switched AAL2 PVC
Command
cnfvismmode
Notes
1
—
cnfvismip
—
addport
—
addrscprtn
—
adddn
—
adddnip
Use this command if you are not using an external
DNS.
addmgc
—
addmgcgrpentry
—
cnfcac
—
addln
—
cnflnsig
—
addendpt
—
addcon
—
cnftftpdn
—
addcasvar
—
cnfcasendpt
—
addmgcgrpprotocol
—
cnfdnssrvr
Use this command if you are using an external DNS.
cnfvismmode
1
—
cnfvismip
—
addport
—
addrscprtn
—
addmgc
—
cnfcac
—
addln
—
cnflnsig
—
addendpt
—
addcon
—
adddn
—
cnftftpdn
—
addcasvar
—
cnfcasendpt
—
cnfconvcci
—
Cisco VISM Installation and Configuration Guide
Release 3.0, Part Number OL-2521-01 Rev. D0, June 2004
4-7
Chapter 4
Configuring VISM Features
Configuring VISM Features
Table 4-2
Mandatory Initial VISM Configuration Command Sequence for All Operating Modes
(continued)
Operating Mode
AAL2 Trunking
Command
cnfvismmode
Notes
1
—
addport
—
addrscprtn
—
cnfcac
—
addln
—
cnflnsig
—
addendpt
—
addcon
—
addcid
—
addccs
—
1. The cnfvismmode command may be mandatory or optional, depending upon the operating mode with which the VISM card
is seen as displayed on your terminal. A VISM card that is not configured is initially displayed in the VoIP operating mode.
Subsequent accesses to the VISM card result in the card being displayed in the VoIP operating mode or in the operating
mode you have last configured for the card. If the card is displayed as being in the wrong operating mode, the cnfvismmode
command is mandatory to change the operating mode. Use the dspvismparam command to verify the VISM card’s current
operating mode.
Initial Card Level Configuration
You must complete the following configuration tasks when you initially configure your VISM card.
1.
Configure the operating mode.
2.
Allocate resources.
3.
Configure the connection admission control (CAC).
4.
Bring VISM into service.
Configuring the Operating Mode
Complete the following steps to configure the correct operating mode for your VISM card immediately
after power is applied:
Step 1
Type the dspvismparam command and press Enter to determine the current VISM operating mode.
Note
A new VISM card (one that has not been configured) is displayed by default in VoIP
operating mode.
The operating mode of the VISM card is displayed in the first line of the VISM card parameter list.
Step 2
If the VISM card operating mode displayed in Step 1 is correct for your application, proceed to the
“Allocating Resources” section on page 4-9. If the VISM card operating mode displayed in Step 1 is not
correct for your application, proceed to Step 3.
Cisco VISM Installation and Configuration Guide
4-8
Release 3.0, Part Number OL-2521-01 Rev. D0, June 2004
Chapter 4
Configuring VISM Features
Configuring VISM Features
Step 3
Type the cnfvismmode command, an oper-mode argument value, and press Enter to configure the VISM
operating mode. Specify the oper-mode argument with one of the following values:
•
1 = VoIP switching/VoIP trunking
•
2 = AAL2 trunking
•
3 = Switched AAL1 SVC
•
7 = Switched AAL2 SVC
•
8 = Switched AAL2 PVC—this mode is not supported in VISM Release 3.0
•
9 = VoIP and Switched ATM AAL1 SVC
You have completed configuring the operating mode for your VISM card. Proceed to the “Allocating
Resources” section on page 4-9.
Allocating Resources
Complete the following steps to allocate resources—virtual ports, controller resources, and codec
templates—to your VISM card.
Step 1
Type the addport command and press Enter to add a virtual port to your VISM card.
This command adds an ATM port on a VISM. There are no arguments for this command. When you add
the ATM port, the bandwidth, VPI range, and VCI range are determined. The VPI range is a single VPI
value, the slot ID. The added port is not detected by the controller until you create a resource partition
(refer to Step 2). The VISM ATM port is pseudo physical.
Step 2
Type the addrscprtn command, the control-id argument value 1, and press Enter to specify the
controller resources.
Note
Always specify the control-id argument value as 1.
A port can be controlled by more than one controller (for example PNNI and PAR), but supports only
one controller at a time. VISM can create one resource partition for each controller in a non-overlapping
way. The controller number you specify associates a resource partition to a controller. All resources of
a port are associated with the resource partition you specify. When you add a resource partition, the
associated controller detects the port as limited by the resource partition.
Step 3
Type the cnfcodectmpl command, a template-num argument value, and press Enter to specify the codec
template used with your VISM card. Specify the template-num argument with one of the following
values:
•
1 = G.711u, G.711a, G.726-16K, G.726-24K, G.726-32K, G.726-40K, G.729a, and G.729ab codecs,
and clear channel
Note
•
Template 1 is not supported for the VoIP operating mode.
2 = G.711u and G.711a uncompressed codecs, and clear channel
Cisco VISM Installation and Configuration Guide
Release 3.0, Part Number OL-2521-01 Rev. D0, June 2004
4-9
Chapter 4
Configuring VISM Features
Configuring VISM Features
•
3 = G.711u, G.711a, G.726-16k, G.726-24k, G.726-32k, G.726-40k, G.729a, and G.729ab codecs
and clear channel
Note
•
Codec template number 3 = template number 1 with T.38 support added. Maximum
channels = 120.
4 = G.711u, G.711a, G. 726-16k, G.726-24k, G.726-32k, G.726-40k, G.729a, G.729ab, G.723.1-H,
G.723.1a-H, G.723.1-L, G.723.1a-L codecs and clear channel
Note
Template 4 supports a maximum of 64 channels for VISM, and a maximum of 144
channels for VISM-PR. The G.723.1 codecs are not supported for the VISM card.
You have completed allocating resources to your VISM card. Proceed to the “Configuring Connection
Admission Control” section on page 4-10.
Configuring Connection Admission Control
Complete the following steps, which allow you to:
Step 1
•
Enable or disable CAC.
•
Define CAC parameters.
•
Configure voiceband data policies for fax/modem carrier loss and fax/modem CAC failure events.
Type the cnfcac command, a cac-enable argument value, and press Enter to enable or disable CAC on
your VISM card. Specify the argument with one of the following values:
•
1 = On
•
2 = Off
Note
Step 2
Step 3
If your application does not require CAC, specify the cac-enable argument as value 2 in Step
1 and proceed to the “Placing the VISM Card In Service” section on page 4-11.
Type the cnfcacparams command, vad-duty-cycle and vad-tol argument values, and press Enter to
configure card level CAC parameter values for VAD tolerance and duty cycle, which are used in CAC
algorithms. Specify the arguments with the following values:
•
vad-duty-cycle: In the range from 1 to 99 (default = 61)
•
vad-tol: In the range from 0 to 10000 (default = 100)
Type the cnfconcacparams command, lcn, vad-tol, and vad-duty-cycle argument values, and press
Enter to configure values for VAD tolerance and duty cycle, which are used in the CAC algorithms, for
a specified logical connection number (PVC). Specify the arguments with the following values:
•
lcn: In the range from 131 to 510
•
vad-tol: In the range from 1 to 10000 (default = 100)
•
vad-duty-cycle: In the range from 1 to 99 (default = 61)
Cisco VISM Installation and Configuration Guide
4-10
Release 3.0, Part Number OL-2521-01 Rev. D0, June 2004
Chapter 4
Configuring VISM Features
Configuring VISM Features
Step 4
Type the cnfvbdpol command, carrier-loss-pol and cac-reject-pol argument values, and press Enter to
specify card level default policies for a fax/modem carrier loss and a fax/modem CAC failure. Specify
the arguments with the following values:
•
carrier-loss-pol:
– 1 = Revert to the previous codec.
– 2 = Maintain the upspeed codec.
•
cac-reject-pol:
– 1 = Delete the connection.
– 2 = Maintain the connection and revert to the previous codec.
You have completed configuring CAC on your VISM card. Proceed to the “Placing the VISM Card In
Service” section on page 4-11.
Placing the VISM Card In Service
Type the cnfgwis command and press Enter to place the VISM card in service. The VISM card prompt
terminates with an a to indicate the in-service state:
NODENAME.1.9.VISM8.a
Placing the VISM Card Out of Service
Type the cnfgwoos command, a oos-method argument value, and press Enter to place the VISM card
out of service. Specify the oos-method argument with one of the following values:
•
2—Forceful
•
3—Graceful
The VISM card prompt terminates with an s to indicate the out-of-service (standby) state:
NODENAME.1.9.VISM8.s
Configuring the TDM Side
You must perform the following tasks to configure the TDM side of your networking application:
1.
Configure T1 and E1 lines.
2.
Configure VISM card clocking.
3.
Configure DS0 channels.
Configuring T1 and E1 Lines
This section deals with the configuration of the eight physical T1/E1 ports on the VISM back card or, if
bulk distribution is used, the equivalent ports being fed from the Service Resource Module (SRM) card.
Cisco VISM Installation and Configuration Guide
Release 3.0, Part Number OL-2521-01 Rev. D0, June 2004
4-11
Chapter 4
Configuring VISM Features
Configuring VISM Features
Complete the following steps to:
Note
Step 1
•
Add and configure your eight T1 or E1 line ports on the VISM back card.
•
Add and configure your eight T1 and E1 line ports on the SRM card if your application requires bulk
distribution.
You can configure the DS0s on a line after a line is added and configured.
Type the addln command, a line-num argument value, and press Enter to add a line to your VISM card.
Specify the line-num argument value in the range 1 to 8.
The VISM card prompt and line number are displayed.
Step 2
Type the cnfln command, line-num, line-code, line-length, clock-source, line-type, and
loopback-detection argument values, and press Enter to specify the operating parameters for the line
added in Step 1. Specify the arguments with the following values:
•
line-num: In the range from 1 to 8
•
line-code:
– 2 = B8ZS for T1 lines
– 3 = HDB3 for E1 lines
– 4 = AMI for T1 or E1 lines
•
line-length:
– 8 = AX-SMB-8E1 and AX-R-SMB-8E1 back card types
– 9 = AX-RJ48-8E1 and AX-R-RJ48-8E1 back card types
– 10 to 15 = T1 back cards, where 10 = 0 to 131 ft, 11 = 131 to 162 ft, 12 = 262 to 393 ft, 13 =
393 to 524 ft, 14 = 524 to 655 ft, and 15 = over 655 ft
•
clock-source:
– 1 = Loop clock
– 2 = Local clock
•
line-type:
– 1 = DSx1ESF
– 2 = DSx1D4
– 3 = E1
– 4 = E1CRC
– 5 = E1MF
– 6 = E1MFCRC
– 7 = E1 Clear
– 8=
– 9=
•
loopback-detection:
– 1 = Disabled
– 2 = Enabled
Cisco VISM Installation and Configuration Guide
4-12
Release 3.0, Part Number OL-2521-01 Rev. D0, June 2004
Chapter 4
Configuring VISM Features
Configuring VISM Features
Step 3
Type the cnfalm command, argument identifiers and argument values—-ds1 line-num -red red-sev -rai
rai-sev -neu ne-alarm-up -ned ne-alarm-down -net ne-alarm-thresh -feu fe-alarm-up -fed
fe-alarm-down -fet fe-alarm-thresh—and press Enter to configure a line for alarm condition handling.
Specify the arguments with the following values:
•
-ds1 line-num: In the range from 1 to 8
•
-red red-sev:
– 1 = Minor
– 2 = Major
•
-rai rai-sev:
– 1 = Minor
– 2 = Major
Step 4
•
-neu ne-alarm-up: In the range from 1 to 65535
•
-ned ne-alarm-down: In the range from 1 to 65535
•
-net ne-alarm-thresh: In the range from 1 to 65535
•
-feu fe-alarm-up: In the range from 1 to 65535
•
-fed fe-alarm-down: In the range from 1 to 65535
•
-fet fe-alarm-thresh: In the range from 1 to 65535
Type the cnflnsig command, line-num and line-signal-type argument values, and press Enter to
configure the signaling mode for the specified line. Specify the line-num and line-signal-type arguments
with the following values:
•
line-num: In the range from 1 to 8
•
line-signal-type:
– 1 = CAS
– 2 = CCS
– 3 = No signaling
Note
Step 5
If you choose CAS signaling for a VISM/VISM-PR E1 line, the supported operating
modes are AAL2 trunking and VoIP trunking.
Type the cnftrunkcond command, line-num and trunk-cond-enable argument values, and press Enter
to enable or disable trunk line conditioning on a line. Specify the arguments with the following values:
•
line-num: In the range from 1 to 8
•
trunk-cond-enable:
– 1 = On
– 2 = Off
If you enable trunk line conditioning, VISM conditions the affected DS0 when an alarm indication signal
(AIS) is detected on the ATM side. Trunk line conditioning consists of transmitting an idle code pattern
for 2.5 seconds followed by the seized code specified in the cnfcascode command.
Note
This command is not allowed if endpoints or CCS channels are enabled on the line.
Cisco VISM Installation and Configuration Guide
Release 3.0, Part Number OL-2521-01 Rev. D0, June 2004
4-13
Chapter 4
Configuring VISM Features
Configuring VISM Features
Step 6
Type the addlnloop command, a line-num argument value, and press Enter to set a specified line to the
local loopback state. Specify the line-num argument in the range from 1 to 8.
Use the dellnloop command to remove the local loopback state on a VISM line.
Note
The VISM CLI has no command for setting a line to the remote loopback state. Use the
cnfbert command on the PXM card to set a line to the remote loopback state.
You have completed configuring T1 and E1 lines for your VISM card. Proceed to the “Placing T1 and
E1 Lines In Service” section on page 4-14.
Placing T1 and E1 Lines In Service
Type the cnflnis command, a line-num argument value, and press Enter to place a T1 or E1 line in
service. Specify the line-num argument in the range from 1 to 8.
Note
If the VISM card is rebooted, this information configuration using this command is lost.
Placing T1 and E1 Lines Out of Service
Type the cnflnoos command, line-num and oos-method argument values, and press Enter to place a T1
or E1 line out of service. Specify the arguments with the following values:
•
line-num: In the range from 1 to 8
•
oos-method:
– 2 = Forceful
– 3 = Graceful
Configuring the PXM and VISM Cards Clocking Source
Complete the following steps to configure the clocking source on your PXM and VISM cards.
Note
Step 1
Refer to Appendix A, “VISM and VISM-PR Card Clocking Options,” and the “Expanded Clock
Source Selection” section on page 4-69 for additional instructions on using the commands and
specifying argument values to configure the clocking source on your PXM and VISM cards.
Examine the entire configuration of the MGX 8000 Series platform to determine the single clock source.
The type of equipment connected to the VISM T1 or E1 lines may dictate this choice. If the selected
clock source is from one of the VISM T1 or E1 lines, that line must be connected to port 1 of the VISM
back card. See Figure 1-3 on page 1-4 for more information on VISM back cards and port locations.
Cisco VISM Installation and Configuration Guide
4-14
Release 3.0, Part Number OL-2521-01 Rev. D0, June 2004
Chapter 4
Configuring VISM Features
Configuring VISM Features
Step 2
Type the cnfclksrc command, slot-num.port-num, and clk-type argument values, and press Enter to
configure the PXM card clock source. Specify the arguments with the following values:
•
slot-num.port-num:
– slot-num = 7 or 8, port-num = 1 to n.
Note
•
Ensure that you type the period with no spaces on either side, between the slot-num
argument value and the port-num argument value.
clk-type argument values:
– P = Primary
– S = Secondary
– N = Null (no external clocking source; use the PXM card’s internal crystal)
Specify the cnfclksrc command argument values according to the following rules:
•
If the clock source is the external BITS clock (a T1 or E1 port on the PXM back card), specify the
configuration as:
cnfclksrc 7.35 P
Note
•
Type 7 for the slot number regardless of the PXM card’s location in the chassis. Type 35
for the port number—the BITS port is always port 35.
If the clock source is an external signal on one of the PXM OC3 ports, specify the configuration as:
cnfclksrc 7.n P
Note
Type 7 for the slot number regardless of the PXM card’s location in the chassis. The n
port parameter value is the OC3 port number in the range 1 to 4.
•
If the clock source is the PXM’s internal crystal and no other clock source has been specified, do
not configure the clock source. The crystal is the automatic default.
•
If you want to change the clocking source from external to the PXM card’s internal crystal, specify
the configuration as:
cnfclksrc 7.X N
Note
•
Type 7 for the slot number regardless of the PXM card’s location in the chassis. The X
argument value is the either 35 or the OC3 port number, depending upon which is the
currently specified source. The null port number argument value cancels the previous
configuration and returns the clocking source to the default internal crystal.
If the clock source is from a line on a VISM card, specify the configuration as:
cnfclksrc y.1 P
Cisco VISM Installation and Configuration Guide
Release 3.0, Part Number OL-2521-01 Rev. D0, June 2004
4-15
Chapter 4
Configuring VISM Features
Configuring VISM Features
Note
Step 3
The y argument value is the actual slot number of the VISM card. Always type 1 for port
argument value, which represents the line number in this configuration. VISM-PR cards
do not have this requirement.
Type the cnfln command, the line-num, line-code, line-length, clock-source, line-type, and
loop-detection argument values, and press Enter to configure the clocking option defined in Step 2 on
your VISM card. Specify the arguments with the following values:
•
line-num: In the range from 1 to 8
•
line-code:
– 2 = B8ZS for T1
– 3 = HDB3 for E1
– 4 = AMI for T1 or E1
•
line-length:
– 8 = E1 lines with AX-SMB-8E1 and AX-R-SMB-8E1 back card types
– 9 = E1 lines with AX-RJ48-8E1 and AX-R-RJ48-8E1 back card types
– In the range from 10 to 15 = T1 lines
•
clock-source:
– 1 = Loop clock—clocking from the T1 or E1 line
Note
If the clocking source is from a line on your VISM card, you must configure that
line—which must be line 1—as loop clock. Configure all remaining lines on all
remaining VISM cards as local.
– 2 = Local—clocking from the PXM card
Note
•
You must configure all lines on all VISM cards as local if the clocking source to the
VISM cards is from the PXM card.
line-type:
– 1 = DSx1ESF
– 2 = DSx1D4
– 3 = E1
– 4 = E1CRC
– 5 = E1MF
– 6 = E1MFCRC
– 7 = E1 clear
•
loop-detection:
– 1 = Disabled
– 2 = Enabled
Cisco VISM Installation and Configuration Guide
4-16
Release 3.0, Part Number OL-2521-01 Rev. D0, June 2004
Chapter 4
Configuring VISM Features
Configuring VISM Features
You must include all argument values when using the cnfln command; however, the line-num
and clock-source are the only relevant arguments for configuring the clocking source on your
VISM cards.
Note
You have completed configuring the clocking source for your PXM and VISM cards. Proceed to the
“Configuring DS0 Channels” section on page 4-17.
Configuring the PXM1E or PXM45 Card as Clocking Source
Use the cnfncdpclksrc command to configure the PXM1E or PXM45 card as the primary clock source.
Use the following commands to display and verify your configuration:
•
dspncdpclkinfo
•
dspncdpclksrc
Refer to the “Related Documentation” section on page xiv for the appropriate document to use the
commands in this section.
Configuring DS0 Channels
You are now ready to configure the 24 (T1) or 31 (E1) DS0 channels on the VISM card’s T1 or E1 lines.
Table 4-3 describes the VISM/VISM-PR DS0 density when the cards are used in combination with the
supported codecs.
Table 4-3
VISM/VISM-PR DS0 Density with Codec Support
VISM
VISM-PR
Codec
T1
E1
T1
E1
G.711
192
248
192
248
G.723
—
—
144
144
G.726
145
145
192
248
G.729
145
145
192
248
You must complete the following tasks to configure a DS0 channel:
1.
Add and configure DS1 line and DS0 endpoints.
2.
Configure CCS or CAS signaling.
Cisco VISM Installation and Configuration Guide
Release 3.0, Part Number OL-2521-01 Rev. D0, June 2004
4-17
Chapter 4
Configuring VISM Features
Configuring VISM Features
Add and Configure DS1 Lines and DS0 Endpoints
Complete the following steps to add and configure a DS1 line and DS0 endpoints:
Step 1
Type the addendpt command, endpt-num, ds1-num, and ds0-num argument values, and press Enter to
add a DS1 line and a DS0 endpoint. This step ensures that a call with a specified endpoint is tied to a
specific line and channel. Specify the arguments with the following values.
Note
•
If you choose CAS signaling for a VISM/VISM-PR E1 line, the supported operating modes
are AAL2 trunking and VoIP trunking.
endpt-num:
– For template number 1:
For VISM, in the range from 1 to 145
For VISM-PR T1, in the range from 1 to 192
For VISM-PR E1, in the range from 1 to 248
– For template number 2:
For VISM T1, in the range from 1 to 192
For VISM E1, in the range from 1 to 248
– For template number 3:
For VISM, in the range from 1 to 120
For VISM-PR T1, in the range from 1 to 192
For VISM-PR E1, in the range from 1 to 248
– For template number 4:
For VISM-PR, in the range from 1 to 144
•
ds1-num: The physical line number in the range 1 to 8
•
ds0-num:
– For T1 lines, from 1 to 24
– For non-CAS E1 lines, from 1 to 31
– For CAS E1 lines, from 1 to 15 and 17 to 31
Note
Step 2
You must specify DS0 16 for E1 lines if your application requires CAS signaling.
Type the addendpts command, start-endpt, start-line-num, start-ds0-num, and endpt-quantity argument
values, and press Enter to add a number of endpoints in one command. Specify the arguments with the
following values:
•
start-endpt:
– For template number 1:
For VISM, in the range from 1 to 145
For VISM-PR T1, in the range from 1 to 192
For VISM-PR E1, in the range from 1 to 248
Cisco VISM Installation and Configuration Guide
4-18
Release 3.0, Part Number OL-2521-01 Rev. D0, June 2004
Chapter 4
Configuring VISM Features
Configuring VISM Features
– For template number 2:
For VISM T1, in the range from 1 to 192
For VISM E1, in the range from 1 to 248
– For template number 3:
For VISM, in the range from 1 to 120
For VISM-PR T1, in the range from 1 to 192
For VISM-PR E1, in the range from 1 to 248
– For template number 4:
For VISM-PR, in the range from 1 to 144
•
start-line-num (DS1 line): In the range from 1 to 8
•
start-ds0-num (DS0 channel):
– For T1 lines, from 1 to 24
– For non-CAS E1 lines, from 1 to 31
– For CAS E1 lines, from 1 to 15 and 17 to 31
•
endpt-quantity:
– For template number 1:
For VISM, in the range from 1 to 145
For VISM-PR T1, in the range from 1 to 192
For VISM-PR E1, in the range from 1 to 248
– For template number 2:
For VISM T1, in the range from 1 to 192
For VISM E1, in the range from 1 to 248
– For template number 3:
For VISM, in the range from 1 to 120
For VISM-PR T1, in the range from 1 to 192
For VISM-PR E1, in the range from 1 to 248
– For template number 4:
For VISM-PR, in the range from 1 to 144
Step 3
Type the addendptloop command, an endpt-num argument value, and press Enter to place a specific
endpoint—and so a specific DS1/DS0—into the loopback state in the TDM direction. Specify the
endpt-num argument value from the following ranges:
•
For template number 1:
– For VISM, in the range from 1 to 145
– For VISM-PR T1, in the range from 1 to 192
– For VISM-PR E1, in the range from 1 to 248
•
For template number 2:
– For VISM T1, in the range from 1 to 192
– For VISM E1, in the range from 1 to 248
Cisco VISM Installation and Configuration Guide
Release 3.0, Part Number OL-2521-01 Rev. D0, June 2004
4-19
Chapter 4
Configuring VISM Features
Configuring VISM Features
•
For template number 3:
– For VISM, in the range from 1 to 120
– For VISM-PR T1, in the range from 1 to 192
– For VISM-PR E1, in the range from 1 to 248
•
For template number 4:
– For VISM-PR, in the range from 1 to 144
Step 4
Type the cnfds0loop command, line-num, ds0-num, and loopback-type argument values, and press Enter
to place a specific DS1/DS0 into one of three loopback states. Specify the arguments with the following
values:
•
line-num: In the range from 1 to 8
•
ds0-num:
– In the range from 1 to 31 for E1 lines
– In the range from 1 to 24 for T1 lines
•
loopback-type:
– 1 = No loopback
– 2 = Remote loopback
– 3 = Local loopback
You have completed adding and configuring a DS1 line and DS0 endpoints. Proceed to one of the
following sections:
•
“Configuring TDM Side Signaling for Applications Using CCS” section on page 4-20.
•
“Configuring TDM Side Signaling for Applications Using CAS” section on page 4-23.
Configuring TDM Side Signaling for Applications Using CCS
Note
If your application requires CAS signaling, proceed to the “Configuring TDM Side Signaling for
Applications Using CAS” section on page 4-23.
CCS signaling uses a dedicated channel on a DS1 line to carry the signaling for the other channels on
the line. You must identify the signaling channel to the VISM card. CCS signaling is used for the
following operating modes:
•
VoIP trunking.
•
AAL2 trunking—Signaling is transported across the trunk as Q.931 messages in ATM cells using
AAL5.
•
Switched AAL2 PVC—Signaling is backhauled to the call agent using Q.921 frames on the TDM
side and RUDP/UDP/IP/Q.2931 on the call agent side.
Cisco VISM Installation and Configuration Guide
4-20
Release 3.0, Part Number OL-2521-01 Rev. D0, June 2004
Chapter 4
Configuring VISM Features
Configuring VISM Features
Complete the following steps to add and configure CCS signaling:
Step 1
Type the addccs command, line-num, ds0-num, and lcn argument values, and press Enter to add a CCS
channel to your VISM card. Specify the arguments with the following values:
•
line-num: In the range from 1 to 8
•
ds0-num:
– In the range from 1 to 24 for T1
– In the range from 1 to 31 for E1
•
lcn: In the range from 131 to 510
Step 2
If you are configuring CCS for the AAL2 trunking operating mode, the CCS configuration is complete.
Proceed to the “Configuring Bearer Processing” section on page 4-27. If you are configuring CCS for
the VoIP switching operating mode, you must create a Q.921 link access protocol for the D channel
(LAPD) link for the channel and specify its argument values. Proceed to Step 3.
Step 3
Type the addlapd command, line-num, ds0-num, |lapd-side| and |lapd-app-type| argument values, and
press Enter to add an ISDN PRI channel on a DS1/DS0.
Specify the arguments with the following values:
•
line-num: Type the value used in Step 1.
•
ds0-num: Type the value used in Step 1.
•
|lapd-side|:
– 1 = Network (default)
– 2 = User
•
|lapd-app-type|:
– 1 = PRI (default)
– 2 = GR-303 (currently unsupported)
Step 4
Type the cnflapdtype command, line-num, ds0-num, and lapd-type argument values, and press Enter to
specify the LAPD stack type. Specify the arguments with the following values:
•
line-num: Type the value used in Step 1.
•
ds0-num: Type the value used in Step 1.
•
lapd-type:
– 1 = ITU
– 3 = ATT5ESSPRA
– 4 = ATT4ESS
– 6 = NTDMS100PRA
– 7 = VN2 or 3
– 8 = INSNet
– 9 = TR6MPC
– 10 = TR6PBX
– 12 = AUSP
– 13 = NIL
– 14 = SSETSI
Cisco VISM Installation and Configuration Guide
Release 3.0, Part Number OL-2521-01 Rev. D0, June 2004
4-21
Chapter 4
Configuring VISM Features
Configuring VISM Features
– 15 = BC303TMC
– 16 = BC303CSC
– 17 = NTDMS250
– 18 = Bellcore
– 19 = NI2
Step 5
Step 6
Step 7
Type the cnflapdwinsize command, line-num, ds0-num, and iframe-num argument values, and press
Enter to specify the LAPD window size. The iframe-num value is the maximum number of outstanding
I-frames that can be accumulated before sending an acknowledgment. Specify the arguments with the
following values:
•
line-num: Type the value used in Step 1.
•
ds0-num: Type the value used in Step 1.
•
iframe-num: In the range from 1 to 127
Type the cnflapdretrans command, line-num, ds0-num, and n200 argument values, and press Enter to
specify the maximum allowable frame retransmissions. Specify the arguments with the following values:
•
line-num: Type the value used in Step 1.
•
ds0-num: Type the value used in Step 1.
•
n200: In the range from 1 to 10
Type the cnflapdtimer command, line-num, ds0-num, frame-trans-time, and frame-exchange-time
argument values, and press Enter to specify the two LAPD timers. Specify the arguments with the
following values:
•
line-num: Type the value used in Step 1.
•
ds0-num: Type the value used in Step 1.
•
frame-trans-time (time, at the end of which, a frame transmission can be initiated):
– 1000 to 1023000 for PRI (specify in increments of 50 ms)
– 100 to 350 for GR-303 (specify in increments of 50 ms)
Note
•
The specified value for frame-trans-time must be less than the specified value for
frame-exchange-time.
frame-exchange-time (maximum time allowed without frames being exchanged) argument values:
– 1000 to 1023000 for PRI (specify in increments of 10000 ms)
– 10000 to 300000 for GR-303 (specify in increments of 10000 ms)
You have completed adding and configuring CCS. Proceed to the “Configuring Bearer Processing”
section on page 4-27.
Cisco VISM Installation and Configuration Guide
4-22
Release 3.0, Part Number OL-2521-01 Rev. D0, June 2004
Chapter 4
Configuring VISM Features
Configuring VISM Features
Configuring TDM Side Signaling for Applications Using CAS
Note
If your application requires CCS, see the “Configuring TDM Side Signaling for Applications Using
CCS” section on page 4-20.
CAS signaling is used for the following operating modes:
•
VoIP trunking.
•
VoIP switching—TDM side signaling is translated in xGCP messages to the call agent.
•
AAL2 trunking—Signaling is transported across the trunk as Q.931 messages in AAL2 cells using
AAL5.
•
Switched AAL2 PVC—Signaling is backhauled to the call agent using xGCP on the TDM side and
Reliable User Datagram Protocol (RUDP)/User Datagram Protocol (UDP)/IP/Q.2931 on the call
agent side.
Complete the following steps to add and configure CAS signaling.
Note
Step 1
If you choose CAS signaling for a VISM/VISM-PR E1 line, the supported operating modes are
AAL2 trunking and VoIP trunking. In addition Step 1 through Step 8 and Step 11 through Step 13
are used only in the VoIP switching and switched AAL2 PVC operating modes.
Type the cnfcasparamsource command, endpt-num and cas-source argument values, and press Enter
to configure the source of CAS-related timer parameters for a specified endpoint. Specify the arguments
with the following values:
•
endpt-num:
– For template number 1:
For VISM, in the range from 1 to 145
For VISM-PR T1, in the range from 1 to 192
For VISM-PR E1, in the range from 1 to 248
– For template number 2:
For VISM T1, in the range from 1 to 192
For VISM E1, in the range from 1 to 248
– For template number 3:
For VISM, in the range from 1 to 120
For VISM-PR T1, in the range from 1 to 192
For VISM-PR E1, in the range from 1 to 248
– For template number 4:
For VISM-PR, in the range from 1 to 144
•
cas-source:
– 1 = CAS application file
– 2 = Current VISM MIB file
Cisco VISM Installation and Configuration Guide
Release 3.0, Part Number OL-2521-01 Rev. D0, June 2004
4-23
Chapter 4
Configuring VISM Features
Configuring VISM Features
Note
Step 2
Step 3
Step 4
Type the cnfcasonhooktime command, endpt-num and onhooktime argument values, and press Enter to
specify the minimum time an on hook-pattern must be present to be recognized as an on-hook signal.
Specify the arguments with the following values:
•
endpt-num: Type the value used in Step 1.
•
onhooktime: In the range from 10 to 1000
Type the cnfcasoffhooktime command, endpt-num and offhooktime argument values, and press Enter
to specify the minimum time an off-hook pattern must be present to be recognized as an off-hook signal.
Specify the arguments with the following values:
•
endpt-num: Type the value used in Step 1.
•
offhooktime: In the range from 10 to 1000
Type the cnfcaswinktime command, endpt-num, min-make-time, max-make-time, and min-break-time
argument values, and press Enter to specify the minimum and maximum make times and the minimum
break time. A wink begins with an on-hook pattern, goes to off-hook, and returns to on-hook. Specify
the arguments with the following values:
•
endpt-num: Type the value used in Step 1.
•
min-make-time: In the range from 10 to 1000
•
max-make-time: In the range from 10 to 3000
•
min-break-time: In the range from 10 to 1000
Note
Step 5
Step 6
The cnfcasparamsource command permits different CAS-related timer values for different
endpoints, but all are associated with the same CAS variant.
All three make and break duration time argument values must be observed for the signaling
sequence to be recognized as a wink.
Type the cnfcasglaretime command, endpt-num and glaretime argument values, and press Enter to
specify the glare time. Specify the arguments with the following values:
•
endpt-num: Type the value used in Step 1.
•
glaretime: In the range from 10 to 1000
Type the cnfcasguardtime command, endpt-num and guardtime argument values, and press Enter to
specify the guard time. Specify the arguments with the following values:
•
endpt-num: Type the value used in Step 1.
•
guardtime argument values:
– In the range from 10 to 1000
Step 7
Type the cnfcasdialdelay command, endpt-num and dial-delay argument values and press Enter to
configure the CAS dial delay (wait time).
Dial delay is the time that VISM waits before sending dialing digits after sending an off-hook event.
Note
The cnfcasdialdelay command applies to immediate start protocols only.
Specify the arguments with the following values:
Cisco VISM Installation and Configuration Guide
4-24
Release 3.0, Part Number OL-2521-01 Rev. D0, June 2004
Chapter 4
Configuring VISM Features
Configuring VISM Features
•
endpt-num: Type the value used in Step 1.
•
dial-delay: In the range from 10 to 1000
Step 8
To configure CAS for the switched AAL2 PVC operating mode, proceed to Step 11. To configure CAS
for the AAL2 trunking operating mode, proceed to Step 9.
Step 9
Type the cnfcascode command, endpt-num, |endpt-num|, idle-code, and seized-code argument values
and press Enter to specify the idle and seized codes for one or more endpoints. Specify the arguments
with the following values:
•
endpt-num: Type the value used in Step 1.
Note
•
If the |endpt-num| optional argument value is used in combination with this argument,
the endpt-num argument value is the first endpoint in a consecutive range of endpoints.
|endpt-num|:
– For template number 1:
For VISM, in the range from 1 to 145
For VISM-PR T1, in the range from 1 to 192
For VISM-PR E1, in the range from 1 to 248
– For template number 2:
For VISM T1, in the range from 1 to 192
For VISM E1, in the range from 1 to 248
– For template number 3:
For VISM, in the range from 1 to 120
For VISM-PR T1, in the range from 1 to 192
For VISM-PR E1, in the range from 1 to 248
– For template number 4:
For VISM-PR, in the range from 1 to 144
Note
The |endpt-num| optional argument value indicates the last endpoint in a consecutive
range of endpoints.
•
idle-code (4-bit idle code): In the range from 0 to 15 represents the four A, B, C, and D signaling as
bits 3, 2, 1, and 0 respectively with bit 3 the most significant.
•
seized-code (4-bit seized code): In the range from 0 to 15 represents the four A, B, C, and D
signaling as bits 3, 2, 1, and 0 respectively with bit 3 the most significant.
Cisco VISM Installation and Configuration Guide
Release 3.0, Part Number OL-2521-01 Rev. D0, June 2004
4-25
Chapter 4
Configuring VISM Features
Configuring VISM Features
Step 10
Type the cnfds0localcas command, line-num, ds0-num, local-cas-enable, and local-cas-pattern
argument values, and press Enter to configure a local CAS bit pattern for a T1 line and DS0.
Note
The cnfds0localcas command is not allowed if the line is E1 or not enabled, or the DS0 is in
a remote loop state, or if the line signaling type is CAS.
Specify the arguments with the following values:
•
line-num: 1 to 8 (T1 lines only)
•
ds0-num: 1 to 24
•
local-cas-enable:
– 1 = Enable
– 2 = Disable
•
local-cas-pattern: In the range from 1 (default) to 15
Note
Step 11
If the local-cas-enable argument value = 1, you must specify a local-cas-pattern
argument value.
Type the addcasvar command, var-name, file-name and |source| argument values, and press Enter to
add a CAS variant to your VISM card.
Note
A file containing the CAS variant information must be downloaded to your MGX 8000 Series
PXM card using a separate application (TFTP) before you can execute this command.
Specify the arguments with the following values:
•
var-name (name of the CAS variant): A text string of 1 to 64 alphanumeric characters.
•
file-name:
– wink_did_dod.o = wink start
– ground_start.o = ground start
– wink_did_dod_mf.o = wink start multifrequency
– q50.o = Q.50
– fgd_ea_incoming.o = for endpoints connected to an end office
– fgd_ea_outgoing.o = for endpoints connected to an access carrier
– fgd_os_e911.o = for endpoints connected to FDG OSS (Feature group D operator services
system.
– loop_start.o = loop start
– delay_did_dod.o = dial delay, DTMF
– delay_did_dod_mf.o = dial delay, MF
– immed_did_dod.o = immediate start
– immed_did_dod_mf.o = immediate start, MF
– In the range from 1 to 32 alphanumeric characters—user configured files only.
Cisco VISM Installation and Configuration Guide
4-26
Release 3.0, Part Number OL-2521-01 Rev. D0, June 2004
Chapter 4
Configuring VISM Features
Configuring VISM Features
•
|source| (CAS variant file location):
– 1 = Unspecified. If TFTP domain is configured, the location is the TFTP server. If not found in
the TFTP server, the file is treated as built-in.
– 2 = User configured (built-in) file location.
– 3 = External—resides on the TFTP server.
Step 12
Step 13
Type the cnfcasvar command, var-name, country-code, partial-time, critical-time, and
interdigit-timeout argument values, and press Enter to configure a CAS variant and CAS timing
parameters for the variant added in Step 11. Specify the arguments with the following values:
•
var-name: Type the value used in Step 11.
•
country-code: The two-character country code of the variant.
•
partial-time (partial dial time): In the range from 10 to 10000, in increments of 10 seconds.
•
critical-time (critical timing): In the range from 0 to 10000, in increments of 10 seconds.
•
interdigit-timeout (interdigit timeout for MF digits): In the range from 1 to 10 seconds.
Type the cnfcasendpt command, endpt-num and var-name argument values, and press Enter to
associate an endpoint with a CAS variant. Specify the arguments with the following values:
•
endpt-num: Type a value used in Step 9.
•
var-name: Type the value used in Step 11.
You have completed adding and configuring CAS signaling. Proceed to the “Configuring Bearer
Processing” section on page 4-27.
Configuring Bearer Processing
Processing of the bearer payload takes place either upon receipt of the payload from a T1 or E1 line or
prior to transmission over a T1 or E1 line. You must complete the following tasks to configure bearer
processing:
1.
Configure codecs.
2.
Configure ECAN.
3.
Configure jitter.
Configuring Codecs
Complete the following steps to assign and configure a codec template:
Step 1
Type the cnfcodectmpl command, a template-num argument value, and press Enter to specify a codec
template. Specify the template-num argument value from the following:
•
1 = G.711u, G.711a, G.726-16k, G.726-24k, G.726-32k, G.726-40k, G.729a, and G.729ab codecs,
and clear channel
Note
Template 1 is not supported for the VoIP operating mode.
Cisco VISM Installation and Configuration Guide
Release 3.0, Part Number OL-2521-01 Rev. D0, June 2004
4-27
Chapter 4
Configuring VISM Features
Configuring VISM Features
•
Step 2
2 = G.711u and G.711a codecs, and clear channel
Note
The cnfcodectmpl command is included in the “Allocating Resources” section on page 4-9
but is included here for your convenience.
•
3 = G.711u, G.711a, G.726-16k, G.726-24k, G.726-32k, G.726-40k, G.729a, and G.729ab codecs,
clear channel, and T.38 fax transfer
•
4 = G.711u, G.711a, G. 726-16k, G.726-24k, G.726-32k, G.726-40k, G.729a, G.729ab, G.723.1-H,
G.723.1a-H, G.723.1-L, G.723.1a-L codecs and clear channel
Type the cnfcodecparams command, codec-type, codec-pkt-period, |preference, codec-string, and
iana-type| argument values, and press Enter to specify various codec parameters for use in the VoIP
operating mode.
The packetization period is defined in three separate commands depending upon the ATM method used:
•
Use the cnfcodecparams command for VoIP switching applications. Complete this step.
•
Use the addcid command for AAL2 trunking applications. See the “Configuring AAL2 Trunking
Operating Mode Parameters” section on page 4-36.
•
Use the addrtpcon command for AAL2 trunking applications.
•
Use the cnfprofelemvoice command for switched AAL2 PVC applications. See the “Configuring
Switched AAL2 PVC Operating Mode Parameters” section on page 4-38.
Specify the arguments with the following values:
•
codec-type: In the range from 1 to 14.
•
codec-pkt-period:
– 10
– 20
– 30
– 40
– 60
•
preference:
– 0 = Ignore preference
– In the range from 1 (highest) to 13 (lowest).
Step 3
•
codec-string: In the range from 1 to 20 ASCII characters.
•
iana-type (IANA registered codec type): In the range from 0 to 96.
Type the cnfcodecneg command, the codec-priority argument value, and press Enter to specify a codec
preference order when there are several codec lists—from the call agent local connection option (LCO)
list, local MIB, or a list received from the remote gateway in the session description protocol (SDP) data.
Specify the codec-priority argument value with one of the following:
•
1 = LCO list, remote SDP data list, local MIB
•
2 = LCO list, local MIB, remote SDP data list
•
3 = Remote SDP data list, LCO list, local MIB
•
4 = Remote SDP data list, local MIB, LCO list
Cisco VISM Installation and Configuration Guide
4-28
Release 3.0, Part Number OL-2521-01 Rev. D0, June 2004
Chapter 4
Configuring VISM Features
Configuring VISM Features
•
5 = Local MIB, LCO list, remote SDP data list
•
6 = Local MIB, remote SDP data list, LCO list
You have completed assigning and configuring the codec template. Proceed to the “Configuring ECAN”
section on page 4-29.
Configuring ECAN
Complete the following steps to enable and configure echo cancellation (ECAN) on a line-by-line basis:
Step 1
Type the cnfecanenable command, line-num and ecan-enable argument values, and press Enter to
enable (or disable) ECAN for a line. Specify the arguments with the following values:
•
line-num: In the range from 1 to 8.
•
ecan-enable:
– 1 = Disable
– 2 = Enable
Step 2
Type the cnfecanrec command, line-num and res-echo-control argument values, and press Enter to set
the residual echo control. Specify the arguments with the following values:
•
line-num: Type the value used in Step 1.
•
res-echo-control:
– 1 = Cancel only
– 2 = Suppress residual
– 4 = Comfort noise
Step 3
Type the cnfecantail command, line-num and max-ecan-tail argument values, and press Enter to specify
the ECAN algorithm’s maximum tail length. Specify the arguments with the following values:
•
line-num: Type the value used in Step 1.
•
max-ecan-tail (defined in milliseconds):
– 24
– 32
– 48
– 64
– 80
– 96
– 112
– 128
Cisco VISM Installation and Configuration Guide
Release 3.0, Part Number OL-2521-01 Rev. D0, June 2004
4-29
Chapter 4
Configuring VISM Features
Configuring VISM Features
Step 4
Type the cnferl command, the echo-ret-loss argument value, and press Enter to specify the ECAN
algorithm’s return echo loss applied by ECAN DSPs, in decibels. Specify the echo-ret-loss argument
with one of the following values:
•
echo-ret-loss:
– 1 = 0 dB
– 2 = 3 dB
– 3 = 6 dB
– 4 = 1 dB
Step 5
Type the cnfconvbdpol command, lcn, carrier-loss-pol, and cac-reject-pol argument values, and press
Enter to specify the fax/modem upspeed connection admission control (CAC) failure and carrier loss
policies for a channel. Specify the arguments with the following values:
•
lcn (logical channel number): In the range from 131 to 510.
•
carrier-loss-pol (carrier loss policy):
– 1 = Revert to the previous codec
– 2 = Maintain the upspeed codec
– 3 = Unspecified
•
cac-reject-pol (CAC rejection policy):
– 1 = Delete the connection
– 2 = Maintain the connection
– 3 = Unspecified
You have completed enabling and configuring ECAN on your lines. Proceed to the “Configuring Jitter”
section on page 4-30.
Configuring Jitter
You can dejitter the voice payload to improve the quality of the egress voice stream.
Note
If your application uses the AAL2 trunking operation mode, you cannot change the jitter parameters
while the CIDs are active.
Complete the following steps to specify and configure jitter mode:
Step 1
Step 2
Type the cnfjtrmode command, the jitter-mode argument value, and press Enter to set the jitter mode.
Specify the jitter-mode argument with one of the following values:
•
1 = Fixed buffer size; recommended value if the jitter amount is expected to be constant or near
constant.
•
2 = Adaptive; you specify a starting buffer size and VISM adapts the buffer size to handle jitter.
If you chose a fixed buffer size in Step 1, you have completed configuring jitter. Proceed to the
“Configuring the ATM Network Side” section on page 4-31. If you chose an adaptive buffer size in
Step 1, proceed to Step 3.
Cisco VISM Installation and Configuration Guide
4-30
Release 3.0, Part Number OL-2521-01 Rev. D0, June 2004
Chapter 4
Configuring VISM Features
Configuring VISM Features
Step 3
Type the cnfjtrinitdelay command, the jitter-buffer-size argument value, and press Enter to specify the
starting buffer size. Specify the jitter-buffer-size argument (defined in bytes) with a value from one of
the following ranges:
•
For template numbers 1, 3, and 4, in the range from 0 to 100 in increments of 10.
•
For template number 2, in the range from 0 to 100 in increments of 5.
You have completed configuring jitter. Proceed to the “Configuring the ATM Network Side” section on
page 4-31.
Configuring PNNI for AAL1/AAL2 SVCs
Use the cnfpncon command to configure Private Network-to-Network Interface (PNNI) priority routing
for AAL1/AAL2 switched virtual circuits (SVCs). Refer to Chapter 5, “CLI Commands,” for more
information on using the cnfpncon command.
Configuring the ATM Network Side
Configuring the ATM network side consists of setting up ATM PVCs across the network and providing
the mechanism by which calls are routed over the correct PVC. The PVC configuration depends on the
VISM operating mode you require for your application.
•
The Voice over IP switching operating mode requires you to set up an AAL5 PVC between the
VISM card and the PXM card, and then to an edge router. A single PVC is set up (a secondary PVC
may also be set up for redundancy). The PVC is used for bearer voice traffic and gateway protocol
communication between VISM and the call agent. The router extracts the IP frames from the ATM
cells and routes the frames accordingly.
•
The AAL2 trunking operating mode requires you to set up as many as 64 AAL2 PVCs connected to
each remote location supported by the network. The PVCs carry voice traffic and optional CAS
signaling.
Each PVC is set up as three segments consisting of two local segments and one network segment.
The local segments are set up between the two VISM cards (one at the end of the PVC) and their
respective PXM cards. The network segment is set up between the two PXM cards across the
network. Refer to the Cisco MGX 8250 and MGX 8230 Release l installation and configuration
guides for more information.
In AAL2 trunking operating mode, you must bind endpoints to specific DS0s using the
addendpoint(s) commands. You must also create CIDs (connection identifiers) for each PVC that
binds the endpoints to the CID and a PVC. This ensures that calls arriving at a specific DS0 are
automatically routed to the preconfigured CID and PVC over nailed-down trunks. There is no
switched or call agent involvement.
Cisco VISM Installation and Configuration Guide
Release 3.0, Part Number OL-2521-01 Rev. D0, June 2004
4-31
Chapter 4
Configuring VISM Features
Configuring VISM Features
•
The switched AAL2 PVC operating mode requires you to set up as many as 64 AAL2 PVCs
connected to each remote location supported by the network. The PVCs carry voice traffic across
the ATM network.
Each PVC is set up as three segments consisting of two local segments and one network segment.
The local segments are set up between the two VISM cards (one at the end of the PVC) and their
respective PXM cards. The network segment is set up between the two PXM cards across the
network. Refer to the Cisco MGX 8850 Release 1 installation and configuration guides for more
information.
In switched AAL2 PVC operating mode, you must bind endpoints to specific DS0s using the
addendpoint(s) commands. You must also create VCCIs (virtual circuit connection identifiers),
which identify each PVC and associate each PVC with a specific remote ATM address. At call setup
time, the call agent informs VISM which VCCI to use for the call and instructs VISM to set up a
CID for transport across the VCCI. This ensures that the binding of a DS0 to a CID and PVC is
dynamic by using of the called address.
Configuring PVC Connections for All Operating Modes
Complete the following steps to configure PVC connections for all operating modes:
Step 1
Type the addcon command, local-vci, pref-level, pvc-conn-type, conn-app, peak-cell-rate, conn-type,
|remote-conn-id, service-type, sus-cell-rate, and max-burst-rate| argument values, and press Enter to
add an ATM PVC between the VISM card and the MGX 8000 Series platform PXM card. Specify the
addcon command arguments with the following values:
•
local-vci: In the range from 131 to 510.
•
pref-level:
– 1 = Primary
– 2 = Secondary (for redundancy)
•
pvc-conn-type:
– 1 = AAL5
– 2 = AAL2
– 3 = AAL1
•
conn-app:
– 1 = Control
– 2 = Bearer
– 3 = Signaling
•
peak-cell-rate (defined as cells per second):
– In the range from 1 to 80000 for VoIP bearer.
– In the range from 1 to 20000 for VoIP control.
– In the range from 1 to 50000 for AAL2 T1.
– In the range from 1 to 60000 for AAL2 E1.
– In the range from 1 to 400 for AAL2 signaling (trunking).
– In the range from 1 to 90000 for AAL5 bearer.
– In the range from 1 to 10000 for AAL5 control.
Cisco VISM Installation and Configuration Guide
4-32
Release 3.0, Part Number OL-2521-01 Rev. D0, June 2004
Chapter 4
Configuring VISM Features
Configuring VISM Features
•
conn-type (type of connection):
– 1 = Master
– 2 = Slave (default)
•
|remote-conn-id| (remote connection identifier):
– Type the value in the following format: nodename.slot.port.vpi.vci
Note
•
Use the optional |remote-conn-id| argument only if you selected the conn-type argument
value of 1 (master).
|service-type|:
– 1 = Constant bit rate (CBR)
– 2 = Variable bit rate real time, VBR (RT)
– 3 = Variable bit rate non-real time, VBR (NRT)
– 4 = VBR (RT) 3
– 5 = VBR (RT) 2
– 6 = VBR (NRT) 2
– 7 = VBR (NRT) 3
•
|sus-cell-rate| (sustainable cell rate):
– In the range from 1 to the value you specified for the peak-cell-rate argument.
•
|max-burst-rate| (maximum number of cells transmitted at the peak cell rate):
– In the range from 1 to 10 times the value you specified for the sus-cell-rate argument.
Step 2
Type the cnfcon command, lcn, peak-cell-rate, service-type, sus-cell-rate, and max-burst-rate argument
values and press Enter if you need to refine the configuration parameters of the connection added in Step
1 and identify the connection by the logical channel number. Specify the arguments with the following
values:
•
lcn: Type the value you entered for the local-vci argument in Step 1.
•
peak-cell-rate (defined as cells per second):
– In the range from 1 to 80000 for VoIP bearer.
– In the range from 1 to 20000 for VoIP control.
– In the range from 1 to 50000 for AAL2 T1.
– In the range from 1 to 60000 for AAL2 E1.
– In the range from 1 to 400 for AAL2 signaling (trunking).
– In the range from 1 to 90000 for AAL5 bearer.
– In the range from 1 to 10000 for AAL5 control.
Note
The peak-cell-rate argument value cannot be changed if the calls or connections for
signaling and control are active.
Cisco VISM Installation and Configuration Guide
Release 3.0, Part Number OL-2521-01 Rev. D0, June 2004
4-33
Chapter 4
Configuring VISM Features
Configuring VISM Features
•
service-type:
– 1 = Constant bit rate (CBR)
– 2 = Variable bit rate real time—VBR (RT)
– 3 = Variable bit rate non-real time—VBR (NRT)
– 4 = VBR (RT) 3
– 5 = VBR (RT) 2
– 6 = VBR (NRT) 2
– 7 = VBR (NRT) 3
•
sus-cell-rate (sustained cell rate, defined as cells per second):
– In the range from 15 to the value you specified for the peak-cell-rate argument.
•
max-burst-rate (maximum burst rate, defined as cells per second):
– In the range from 1 to 10 times the value you specified for the sus-cell-rate argument.
Step 3
Type the addconloop command, the lcn argument value, and press Enter to set a loopback on a VISM
PVC with the loopback in the direction of cellbus. Specify the lcn argument value with a value in the
range from 131 to 510.
Note
You can use the delconloop command to remove a loopback on a VISM PVC.
You have completed configuring PVC connections. Proceed to one of the following sections, as
appropriate:
•
Configuring VoIP Switching/Trunking Operating Mode Parameters, page 4-34.
•
Configuring AAL2 Trunking Operating Mode Parameters, page 4-36.
•
Configuring Switched AAL2 PVC Operating Mode Parameters, page 4-38.
Configuring VoIP Switching/Trunking Operating Mode Parameters
Complete the following steps to configure VoIP switching operating mode parameters:
Step 1
Type the cnfconprotect command, lcn, protect-enable, lock-state, and second-lcn argument values, and
press Enter to configure primary and secondary PVCs to provide protection in the event of a PVC
failure. Specify the argument with the following values:
•
lcn: In the range from 131 to 510.
•
protect-enable:
– 1 = On
– 2 = Off
•
lock-state:
– 1 = Unlock
– 2 = Lock
•
second-lcn (secondary LCN): In the range from 131 to 510.
Cisco VISM Installation and Configuration Guide
4-34
Release 3.0, Part Number OL-2521-01 Rev. D0, June 2004
Chapter 4
Configuring VISM Features
Configuring VISM Features
Step 2
Type the cnfdeftos command, control-prec, control-tos, |bearer-prec|, and |bearer-tos| argument values,
and press Enter to configure the type of service for both control and bearer IP packets.
Note
If you do not execute the cnfdeftos command, card level default values are used.
Specify the arguments with the following values:
•
control-prec: In the range from 0 to 7 (default = 3)
•
control-tos (type of service for control packets):
– 0 (default)
– 1
– 2
– 4
– 8
•
bearer-prec: In the range from 0 to 7 (default = 5)
•
bearer-tos (type of service for bearer packets):
– 0 (default)
– 1
– 2
– 4
– 8
Note
Step 3
The bearer-prec and bearer-tos arguments are used during call setup in cases where
values are not supplied by a call agent.
Type the cnfvoiptransparams command, dtmf-trans, cas-trans, and |event-neg-enable|, |event-neg-pol|,
and |sid-type| argument values, and press Enter to configure the VoIP transportation characteristics
across the network. Specify the arguments with the following values:
•
dtmf-trans (DTMF tones relayed to the other endpoint):
– 1 = On
– 2 = Off
•
cas-trans (CAS bits relayed to the other endpoint):
– 1 = On
– 2 = Off
•
event-neg-enable (Optional):
– 1 = On
– 2 = Off
Cisco VISM Installation and Configuration Guide
Release 3.0, Part Number OL-2521-01 Rev. D0, June 2004
4-35
Chapter 4
Configuring VISM Features
Configuring VISM Features
•
event-neg-pol (Optional; event negotiation policy):
– 1 = None
– 2 = Proprietary (default)
– 3 = All
•
sid-type (Optional; SID payload type): In the range from 0 to 255 (default = 13)
You have completed configuring the VoIP switching operating mode parameters. Proceed to the
“Configuring the Call Agent Interface” section on page 4-44.
Configuring AAL2 Trunking Operating Mode Parameters
Complete the following steps to configure AAL2 trunking operating mode parameters:
Step 1
Type the addcid command, endpt-num, lcn, cid-num, codec-type, profile-type, profile-num, |vad-enable,
vad-init-timer, ecan-enable, type-3-red, cas-trans, dtmf-trans, idle-code-sup, and pkt-period| argument
values, and press Enter to add a channel identifier (CID) to an AAL2 PVC.
The CID is a mechanism within AAL2 that allows multiple calls to be transported across a single AAL2
PVC. The addcid command binds an endpoint to a logical channel (PVC). Specify the arguments with
the following values:
•
endpt-num (endpoint to be related to the LCN/CID pair being added):
– For template number 1:
For VISM, in the range from 1 to 145
For VISM-PR T1, in the range from 1 to 192
For VISM-PR E1, in the range from 1 to 248
– For template number 2:
For VISM T1, in the range from 1 to 192
For VISM E1, in the range from 1 to 248
– For template number 3:
For VISM, in the range from 1 to 120
For VISM-PR T1, in the range from 1 to 192
For VISM-PR E1, in the range from 1 to 248
– For template number 4:
For VISM-PR, in the range from 1 to 144
•
lcn (LCN of the LCN/CID pair): In the range from 131 to 510.
•
cid-num (CID of the LCN/CID pair): In the range from 8 to 255.
•
codec-type:
– 1 = G.711u
– 2 = G.711a
– 3 = G.726-32k
– 4 = G.729a
Cisco VISM Installation and Configuration Guide
4-36
Release 3.0, Part Number OL-2521-01 Rev. D0, June 2004
Chapter 4
Configuring VISM Features
Configuring VISM Features
– 5 = G.729ab
– 6 = Clear channel (VAD must be off)
– 7 = G.726-16k
– 8 = G.726-24k
– 9 = G.726-40k
– 11 = G.723-H
– 12 = G.723a-H
– 13 = G.723.1-L
– 14 = G.723.1a-L
•
profile-type (used for the CID):
– 1 = International Telecommunication Union (ITU) I.366.2
– 3 = Custom
•
profile-num:
– 1 = for the ITU profile
– 2 = for the ITU profile
– 3 = for the ITU profile
– 7 = for the ITU profile
– 8 = for the ITU profile
– 12 = for the ITU profile
– 100 = for custom profiles
– 101 = for custom profiles
– 110 = for custom profiles
– 200 = for custom profiles
•
vad-enable:
– 1 = On
– 2 = Off
•
vad-init-timer (holdover timer; in milliseconds): In the range from 250 to 65535 (default = 250)
•
ecan-enable:
– 1 = On (default)
– 2 = Off
•
type-3-red (triple redundancy protection for CAS type 3 packets):
– 1 = On
– 2 = Off
•
cas-trans:
– 1 = On (default)
– 2 = Off
Cisco VISM Installation and Configuration Guide
Release 3.0, Part Number OL-2521-01 Rev. D0, June 2004
4-37
Chapter 4
Configuring VISM Features
Configuring VISM Features
•
dtmf-trans (DTMF tone transport as AAL2 type 3 packets):
– 1 = On (default)
– 2 = Off
The dtmf-trans argument value must be set to 1 (on) when the codec-type is configured
for codecs other than G.711 and G.726.
Note
•
idle-code-sup (idle code suppression):
– 1 = On
– 2 = Off
•
pkt-period (defined in milliseconds):
– 10
The pkt-period argument requires you to configure packetization in the following ways for the other
two operating modes:
– Use the cnfcodedecparams for the VoIP operating mode.
– Use the cnfprofelemvoice command for the switched AAL2 PVC operating mode. See the
“Configuring Switched AAL2 PVC Operating Mode Parameters” section on page 4-38 for more
information.
Step 2
Type the cnfaal2subcellmuxing command, the mux-enable argument value, and press Enter to enable
or disable subcell multiplexing. Specify the mux-enable argument with one of the following values:
•
1 = On
•
2 = Off
You have completed configuring the AAL2 trunking operating mode parameters.
Configuring Switched AAL2 PVC Operating Mode Parameters
Note
The switched AAL2 PVC operating mode is not supported in VISM Release 3.0.
You must complete the following tasks to configure the switched AAL2 PVC operating mode
parameters:
1.
Configure a virtual circuit connection identifier (VCCI).
2.
Modify the AAL2 PVC profile table.
Note
3.
Modifying the AAL2 PVC profile table is not mandatory.
Configure AAL2 PVC parameters.
Cisco VISM Installation and Configuration Guide
4-38
Release 3.0, Part Number OL-2521-01 Rev. D0, June 2004
Chapter 4
Configuring VISM Features
Configuring VISM Features
Configuring a Virtual Circuit Connection Identifier
Complete the following steps to configure a VCCI for the switched AAL2 PVC operating mode:
Step 1
Type the cnfconvcci command, lcn, vcci-num, addr-type, and |fe-addr| argument values, and press Enter
to create a new VCCI with an associated logical channel number and a remote ATM address. Specify the
arguments with the following values:
•
lcn: In the range from 131 to 510.
•
vcci-num: In the range from 0 to 65535.
•
addr-type (address type):
– 1 = Not applicable
– 2 = Network service access point (NSAP); a 20-byte hexadecimal address
– 3 = E.164 public network addressing; a 1- to 15-byte decimal address
– 4 = Gateway ID; a 1- to 64-byte ASCII character address
– 5 = Unspecified
•
Step 2
|fe-addr|: The actual remote address
Repeat Step 1, as needed, to configure VCCIs on other LCNs.
You have completed configuring VCCIs for the switched AAL2 PVC operating mode. Proceed to the
“Modifying the AAL2 PVC Operating Mode Profile Table” section on page 4-39.
Modifying the AAL2 PVC Operating Mode Profile Table
A profile table is associated with each AAL2 operating mode. This profile table specifies the encoding
format, which tells the card how to interpret the packets.
You can use the dspaal2profile command to see the values for a profile type. Example 4-1 shows the
default values for ITU profile type 1.
Example 4-1
Default Values for ITU Profile 1
nodename.1.28.VISM8.a > dspaal2profile 1 1
UUI
Codepoint
Range
0-15
0-15
Packet
Length
(octets)
40
40
Codec
PCMU
PCMA
SID
No SID
No SID
M
1
1
Packet Seq. No.
Time
Interval
(ms)
(ms)
5
5
5
5
Table 4-4 describes the fields shown in the display.
Table 4-4
dspaal2profile Field Descriptions
Field
Description
UUI Codepoint Range
User-to-user indication.
Packet Length (octets)
Packet length for the encoding format.
Codec
Type of codec.
SID
Silence insertion descriptor.
Cisco VISM Installation and Configuration Guide
Release 3.0, Part Number OL-2521-01 Rev. D0, June 2004
4-39
Chapter 4
Configuring VISM Features
Configuring VISM Features
Table 4-4
dspaal2profile Field Descriptions (continued)
Field
Description
M
Multiple of the service data unit (SDU) for the
profile. The SDU is the smallest packet length.
Packet Time (ms)
Voice packetization period.
Seq. No. Interval (ms)
Sequence number interval.
VISM/VISM-PR creates the profile table with the defaults that are listed in Table 4-5. This table is a
summary of the output from the dspaal2profile command.
Table 4-5
AAL2 Operating Mode Profiles
Profile
Type
Profile
Number
UUI
Codepoint
Range
Packet
Length Voice codec VAD
ITU
1
0–15
40
G.711u
ITU
2
0–15
40
ITU
3
0–15
ITU
ITU
ITU
7
8
12
Custom 100
Custom 101
M
Voice
Packet
Period
Sequence
Number
Voice Band
Interval
Data Codec
Voice Band
Data Packet
Period
Off
1
5
5
G.711u
5
G.711u
SIDG
1
5
5
G.711u
5
40
G.711u
SIDG
1
5
5
G.711u
5
0–15
10
G.726–16k
1
5
5
0–15
15
G.726–24k
1
5
5
0–15
20
G.726–32k
1
5
5
0–15
25
G.726–40k
1
5
5
0–15
40
G.711u
SIDG
1
5
5
G.711u
5
0–15
10
G.729a
Off
1
10
5
0–15
10
G.729ab
SID729
1
10
5
0–15
40
G.711u
Off
1
5
5
G.711u
5
0–15
20
G.726–32k
Off
1
5
5
0–15
10
G.729a
Off
1
10
5
0–15
10
G.729ab
SID729
1
10
5
0–15
24
G.723.1-H
Off
1
30
5
G.711u
5
0–15
24
G.723.1a-H
SID723
1
30
5
0–15
20
G.723.1-L
Off
1
30
5
0–15
20
G.723.1a-L
SID723
1
30
5
0–7
40
G.711u
SIDG
1
5
5
G.711u
5
8–15
40
G.726-32
SIDG
2
10
5
0–7
40
G.711u
Off
1
5
5
G.711u
5
8–15
40
G.726-32
Off
2
10
5
8–15
10
G.729a
Off
1
10
5
8–15
10
G.729ab
SID729
1
10
5
Cisco VISM Installation and Configuration Guide
4-40
Release 3.0, Part Number OL-2521-01 Rev. D0, June 2004
Chapter 4
Configuring VISM Features
Configuring VISM Features
Table 4-5
Profile
Type
AAL2 Operating Mode Profiles (continued)
Profile
Number
Custom 110
Custom 200
UUI
Codepoint
Range
Packet
Length Voice codec VAD
M
Voice
Packet
Period
Sequence
Number
Voice Band
Interval
Data Codec
0–7
40
G.711u
SIDG
1
5
5
8–15
40
G.726-32
SIDG
2
10
5
8–15
30
G.729a
Off
3
30
5
8–15
30
G.729ab
SID729
3
30
5
0–15
40
Clear
channel
Off
40
5
5
Voice Band
Data Packet
Period
G.711u
5
G.711u
5
Complete the following steps to assign a profile preference and to modify the packet period and SID
values of the profile table, as necessary.
Note
Step 1
Modifying the AAL2 PVC profile table is not mandatory. Proceed to the “Configuring AAL2 PVC
Parameters” section on page 4-43 if the values shown in Table 4-5 are correct for your application
and configuration requirements.
Type the cnfprofparams command, profile-type, profile-num, and profile-pref argument values, and
press Enter to specify the preference for a given profile during call setup profile negotiation. Specify
the arguments with the following values:
•
profile-type:
– 1 = ITU
– 3 = Custom
•
profile-num:
– 1 = for the ITU profile
– 2 = for the ITU profile
– 3 = for the ITU profile
– 7 = for the ITU profile
– 8 = for the ITU profile
– 12 = for the ITU profile
– 100 = for custom profiles
– 101 = for custom profiles
– 110 = for custom profiles
– 200 = for custom profiles
•
profile-pref:
– 0 = No preference; excludes a profile from negotiation
– In the range from 1 (highest) to 9 (lowest)
Cisco VISM Installation and Configuration Guide
Release 3.0, Part Number OL-2521-01 Rev. D0, June 2004
4-41
Chapter 4
Configuring VISM Features
Configuring VISM Features
Step 2
Type the cnfprofelemvoice command, profile-type, profile-num, codec-type, pvoice-pkt-period, and sid
argument values, and press Enter to configure the voice profile element for a specified profile. Specify
the arguments with the following values:
•
profile-type: Refer to the options listed in Step 1.
•
profile-num: Refer to the options listed in Step 1.
•
codec-type argument values:
– 1 = G.711u
– 2 = G.711a
– 3 = G.726-32k
– 4 = G.729a
– 5 = G.729ab
– 6 = Clear channel (VAD must be off)
– 7 = G.726-16k
– 8 = G.726-24k
– 9 = G.726-40k
– 11 = G.723.1-H
– 12 = G.723.1a-H
– 13 = G.723.1-L
– 14 = G.723.1a-L
•
pvoice-pkt-period (defined in milliseconds):
– 5
– 10
– 20
– 30
– 40
– 60
•
sid:
– 1 = VAD off
– 2 = VAD on
– 3 = SID generic
– 4 = SID 729
– 5 = SID 723
Step 3
Type the cnfprofelemvbd command, profile-type, profile-num, codec-type, and vbd-pkt-period
argument values, and press Enter to configure the voiceband data element for a specified profile. Specify
the arguments with the following values:
•
profile-type—Refer to the options listed in Step 1.
•
profile-num—Refer to the options listed in Step 1.
•
vbd-codec-type—Refer to the options listed in Step 2.
•
vbd-pkt-period (defined in milliseconds):
Cisco VISM Installation and Configuration Guide
4-42
Release 3.0, Part Number OL-2521-01 Rev. D0, June 2004
Chapter 4
Configuring VISM Features
Configuring VISM Features
– 5
– 10
– 30
Step 4
Type the cnfprofneg command, the codec-priority argument value, and press Enter to specify the
priority preference order for the profile lists. Profiles can be from the call agent local connection option
(LCO) list, local MIB, or a list received from the remote gateway in the session descriptor protocol
(SDP) data. Specify the codec-priority argument value with one of the following:
•
1 = LCO list, remote SDP data list, local MIB
•
2 = LCO list, local MIB, remote SDP data list
•
3 = Remote SDP data list, LCO list, local MIB
•
4 = Remote SDP data list, local MIB, LCO list
•
5 = Local MIB, LCO list, remote SDP data list
•
6 = Local MIB, remote SDP data list, LCO list
You have completed modifying the switched AAL2 PVC operating mode profile table. Proceed to the
“Configuring AAL2 PVC Parameters” section on page 4-43.
Configuring AAL2 PVC Parameters
Complete the following steps to configure AAL2 PVC parameters:
Step 1
Type the cnfaal2timerparams command, vad-init-timer and cid-fill-timer argument values, and press
Enter to configure the holdover and maximum wait time arguments. Specify the arguments with the
following values:
•
vad-init-timer (defined in milliseconds): In the range from 250 to 65535.
•
cid-fill-timer (defined in milliseconds): In the range from 5 to 100.
The vad-init-timer is the holdover time before activating silence suppression. The cid-fill-timer is the
maximum waiting time for filling up the cell when the next packet is not ready.
Step 2
Type the cnfaal2transparams command, dtmf-trans, cas-bits-trans, and type-3-red argument values,
and press Enter to enable or disable three parameters regarding the transport of CAS signaling.
•
dtmf-trans (transportation of DTMF digits):
– 1 = On
– 2 = Off
•
cas-bits-trans (transportation of CAS bits):
– 1 = On
– 2 = Off
•
type-3-red (transportation of AAL2 Type 3 redundancy packets):
– 1 = On
– 2 = Off
Cisco VISM Installation and Configuration Guide
Release 3.0, Part Number OL-2521-01 Rev. D0, June 2004
4-43
Chapter 4
Configuring VISM Features
Configuring VISM Features
You have completed configuring the switched AAL2 PVC operating mode parameters. Proceed to the
“Configuring the Call Agent Interface” section on page 4-44.
Configuring the Call Agent Interface
Note
The CLI call agent configuration commands are used for the VoIP switching and switched AAL2
PVC operating modes only. If your application requires the AAL2 trunking operating mode, do not
use the CLI call agent configuration commands described in this section.
VISM can use one to eight call agents to accomplish the following:
•
Receive backhauled signaling
•
Perform call setup
•
Perform call teardown
VISM uses IP connectivity in order to communicate with the call agents (see Figure 4-2).
Figure 4-2
VISM to Call Agent Communication
Call Agents
(up to 8)
TFTP Server
IP Connectivity
V
MGX 8850
with VISM
53242
ATM Network
Physical connectivity is through a PVC on an MGX 8000 Series platform PXM card’s OC-3 port, to a
router (in the IP Connectivity cloud in Figure 4-2), and then to the call agents.
Logical IP connectivity is performed by resolving domain name and IP address associations. The
associations are accomplished in the following ways:
•
Statically, by using the CLI call agent configuration commands.
•
Dynamically, by using an external domain name server (DNS), which is connected to VISM through
IP connectivity.
Figure 4-2 shows a TFTP server which also has an IP connection to VISM.
You must complete the following tasks to configure the call agent interface:
1.
Configure domain names and IP addresses.
2.
Set up call agents and protocols.
Cisco VISM Installation and Configuration Guide
4-44
Release 3.0, Part Number OL-2521-01 Rev. D0, June 2004
Chapter 4
Configuring VISM Features
Configuring VISM Features
3.
Configure gateway control protocols.
4.
Configure ISDN PRI backhaul (optional).
Configuring Domain Names and IP Addresses
Complete the following steps to configure domain names and IP addresses for VISM cards and call
agents:
Step 1
Type the cnfvismdn command, the domain-name argument value, and press Enter to specify a domain
name for a VISM card. Specify the domain-name argument with the following value:
•
A text string of up to 64 alphanumeric characters; spaces are not allowed. Default = cisco.com.
Note
Step 2
You must use the domain-name argument value you entered for Step 1 when configuring
the call agent(s) domain-name argument in Step 3.
Type the cnfvismip command, vip-addr, netmask, |bearer-ipaddr|, and |bearer-netmask| argument
values, and press Enter to specify an IP address and a subnet mask for your VISM card. Specify the
arguments with the following values:
•
vip-addr: Type the IP address of your VISM card in dotted decimal format—nnn.nnn.nnn.nnn
•
netmask (local network mask): Type 255.255.255.248
•
|bearer-ipaddr| (optional): Bearer IP address in dotted decimal format: nnn.nnn.nnn.nnn
•
|bearer-netmask| (optional): Bearer IP subnet mask in dotted decimal format: nnn.nnn.nnn.nnn
Step 3
Type the cnftftpdn command, the domain-name argument value, and press Enter to set up the domain
names and IP addresses for the call agent(s). The domain name can be a text string of 1 to 64
alphanumeric characters.
Step 4
Repeat Step 1 through Step 3 to configure your remaining VISM cards and call agents.
You have completed configuring domain names and IP addresses for VISM cards and call agents.
Proceed to the “Setting Up Call Agents and Protocols” section on page 4-45.
Setting Up Call Agents and Protocols
Complete the following steps to set up call agents and media gateway control protocols:
Step 1
Type the adddn command, the domain-num, domain-name, and |resol-type| argument values, and press
Enter to add a domain name for a call agent. Specify the arguments with the following values:
•
domain-num: A domain number used to identify the domain in the range 1 to 11.
•
domain-name (call agent name): A text string of 1 to 64 alphanumeric characters.
•
|resol-type| (the optional resolution type to configure for the specified domain name):
– 1 = Internal only
– 2 = External only
– 3 = Internal first
Cisco VISM Installation and Configuration Guide
Release 3.0, Part Number OL-2521-01 Rev. D0, June 2004
4-45
Chapter 4
Configuring VISM Features
Configuring VISM Features
– 4 = External first
Step 2
If you are not using an external DNS to resolve domain names (resol-type = 1 in Step 1), proceed to
Step 3. If you are using an external DNS to resolve domain names, proceed to Step 3.
Step 3
Type the adddnip command, resol-num, domain-name, ip-addr, and addr-order argument values, and
press Enter to add the IP address for the domain name you added in Step 1. Specify the arguments with
the following values:
Step 4
Step 5
•
resol-num (resolution number of the domain name): In the range from 1 to 88.
•
domain-name (call agent name): In the range from 1 to 64 alphanumeric characters.
•
ip-addr (IP address which corresponds to domain-name): IP address, which must be in the following
format—nnn.nnn.nnn.nnn.
•
addr-order (IP address resolution preference order): In the range from 1 (highest) to 8.
Type the addmgcgrpentry command, mgc-group, mgc-num, and mgc-priority argument values, and
press Enter to add the MGC to a redundancy group. Specify the arguments with the following values:
•
mgc-group (call agent redundancy group number): In the range from 1 to 8.
•
mgc-num (protocol number): In the range from 1 to 8.
•
mgc-priority (preference of the MGC within the group): In the range from 1 (highest) to 8.
Type the cnfmgcgrpparam command, mgc-group, state-change-notify, and the optional mgc-priority
argument values, and press Enter to change the parameters of the MGC group, if needed.
Note
This step is optional; use only if you need to change the MGC group parameters.
Specify the arguments with the following values:
•
mgc-group (call agent redundancy group): In the range from 1 to 8.
•
state-change-notify (state change message notification):
– 1 = Enable (default)
– 2 = Disable
•
Step 6
Step 7
|mgc-priority| (call agent priority): In the range from 0 to 8 (default = 1)
Type the addmgcgrpprotocol command, mgc-group and protocol-num argument values, and press
Enter to associate a call agent redundancy group with a gateway control protocol. Specify the arguments
with the following values:
•
mgc-group (call agent redundancy group): In the range from 1 to 8.
•
protocol-num (gateway control protocol): In the range from 1 to 8.
Repeat Step 1 through Step 6 for each call agent that you need to make active in your application.
You have completed setting up call agents and media gateway control protocols. Proceed to the
“Configuring Gateway Control Protocols” section on page 4-47, if necessary.
Cisco VISM Installation and Configuration Guide
4-46
Release 3.0, Part Number OL-2521-01 Rev. D0, June 2004
Chapter 4
Configuring VISM Features
Configuring VISM Features
Configuring Gateway Control Protocols
Complete the following steps to configure gateway control protocols.
Note
Step 1
Step 2
Use the configure gateway control CLI commands in this section only if you need to configure
argument values for the commands that are different than the default argument values.
Type the cnfxgcppeer command, mgc-num, protocol-num, and remote-udp-pnum, and press Enter to
configure a port number for a particular call agent and protocol. The port is used to send
gateway-initiated messages to the call agent. Specify the arguments with the following values:
•
mgc-num: In the range 1 to 8.
•
protocol-num: A protocol number which is displayed by using the dspmgcgrpprotocols command.
•
remote-udp-pnum: The remote UDP port number used for MGCP/SGCP protocol communication
with the call agent.
Type the cnfxgcpmwd command, max-wait-delay argument value, and press Enter to specify the
maximum waiting time before a Restart in Progress (RSIP) message is sent to the call agent. Specify the
max-wait-delay argument value as follows:
•
max-wait-delay (maximum wait time; defined in milliseconds): In the range from 0 to 600000;
(default = 10000; 10 seconds)
Note
Step 3
The max-wait-delay argument value sets the maximum wait time for the entire VISM
card, not for a particular call agent.
Type the cnfxgcpretry command, min-vtoca-tout, vtoca-retrans-num, and |max-vtoca-tout| argument
values, and press Enter to specify the VISM minimum and maximum wait time, and number of retries,
for a call agent message acknowledgment. Specify the arguments with the following values:
•
min-vtoca-tout (defined in milliseconds): In the range from 1 to 100000; (default = 500)
•
vtoca-retrans-num:
– Default = 3
•
Step 4
|max-vtoca-tout|: In the range from 0 to 100000.
Type the cnfxgcpbt command, network-type, vc-type, and aal-conn-type argument values, and press
Enter to specify the type of bearer channel VISM uses, if one is not specified by the call agent in
protocol local connection options. Specify the arguments with the following values:
•
network-type:
– 1 = IP
– 2 = ATM
•
vc-type:
– 1 = PVC
– 2 = SVC
Cisco VISM Installation and Configuration Guide
Release 3.0, Part Number OL-2521-01 Rev. D0, June 2004
4-47
Chapter 4
Configuring VISM Features
Configuring VISM Features
•
aal-conn-type:
– 1 = AAL1
– 2 = AAL2
– 3 = Not applicable
Note
Step 5
You must type 3 for the aal-conn-type argument if the network-type argument = 1.
Type the addxgcppersistevt command, event-num and pkg-event argument values, and press Enter to
designate xGCP events as persistent.
Note
Do not complete this step if persistent events are not required for your application.
Specify the arguments with the following values:
•
event-num: In the range from 1 to 64.
•
pkg-event:
– r/co3 = VISM initiated AAL2 type 3 packet (CO3) network continuity test
– r/co4 = Network continuity test detect
– g/ft = Fax tone
– g/mt = Modem tone
– g/vbd = Voiceband data
– g/vbdt = Voiceband data termination
– l/hu, bl/hu = On hook
– l/hd, blhd = Off hook
– ms/ans, dt/ans, md/ans, mo/ans = Answer
– ms/sup, dt/sup, md/sup = Setup
– ms/rel, dt/rel, md/rel, mo/rel = Release
– ms/rtc, dt/rlc, md/rlc, mo/rlc = Release complete
– ms/res, dt/res, md/res = Resume
– ms/sus, dt/sus, md/sus = Suspend
– md/awk = Acknowledgment wink
– mo/rbz = Reverse make busy
Step 6
Type the cnfsrcppeer command, peer-num and udp-port-num argument values, and press Enter to
specify the SRCP parameters for communication between VISM and the call agent. Specify the
arguments from the following values:
•
peer-num: The peer (call agent) identification number, as displayed in the dspsrcppeers command
list; in the range from 1 to 8.
•
udp-port-num: In the range from 1025 to 65535
Note
If you do not execute this command, the default MGCP/SGCP port number = 2428.
Cisco VISM Installation and Configuration Guide
4-48
Release 3.0, Part Number OL-2521-01 Rev. D0, June 2004
Chapter 4
Configuring VISM Features
Configuring VISM Features
Step 7
Type the cnfsrcppeergrpparam command, the mgc-group, hbeat-int, and max-udp-size argument
values, and press Enter to configure the SRCP heartbeat interval and maximum UDP size for a specified
call agent redundancy group. Specify the arguments with the following values:
•
mgc-group (call agent redundancy group): In the range from 1 to 8
•
hbeat-int (interval between heartbeats; defined in milliseconds):
– 0
– In the range from 100 to 65535.
•
Step 8
Step 9
max-udp-size (maximum allowable UDP size): In the range from 4095 to 65535.
Type the cnfsrcpretry command, srcp-min-tout, max-srcp-retries, and srcp-max-tout argument values,
and press Enter to configure the minimum and maximum timeout periods, and retry attempts, for
transmitting SRCP commands to the call agent. Specify the arguments with the following values:
•
srcp-min-tout (defined in milliseconds): In the range from 1 to 10000 (default = 500).
•
max-srcp-retries: In the range from 1 to 10.
•
srcp-max-tout: In the range from 1 to 10000 (default = 500).
Type the cnfco4timer command, a co4-timeout argument value, and press Enter to configure CO4
bearer continuity. Specify the argument with the following value:
•
co4-timeout (defined in milliseconds): In the range from 50 to 10000 (default = 1000).
You have completed configuring gateway control protocols. Proceed to the “Configuring ISDN PRI
Backhaul” section on page 4-49 if necessary.
Configuring ISDN PRI Backhaul
ISDN PRI backhaul configuration consists of setting up RUDP session structures:
•
Session sets
•
Session groups
•
Sessions
A session group applies to a specified call agent and allows automatic switching to another session in
the group if an active session fails. You can configure individual sessions when you have completed
setting up the session sets and session groups. Refer to Chapter 3, “VISM Functional Description,” for
more information on session structures.
Note
Use the commands in this section only if backhauling of ISDN PRI signaling to the call agent is
required for your application.
Cisco VISM Installation and Configuration Guide
Release 3.0, Part Number OL-2521-01 Rev. D0, June 2004
4-49
Chapter 4
Configuring VISM Features
Configuring VISM Features
Complete the following steps to configure ISDN PRI backhaul:
Step 1
Type the addsesset command, set-num and fault-tol-enable argument values, and press Enter to create
a session set. Specify the arguments with the following values:
•
set-num: In the range from 1 to 16
•
fault-tol-enable:
– 1 = Yes
– 2 = No
Step 2
Step 3
Note
Step 4
Step 5
Type the addsesgrp command, group-num, set-num, and mgc-name argument values, and press Enter
to create a session group for a session set and a call agent. Specify the arguments with the following
values:
•
group-num: In the range from 1 to 16
•
set-num: In the range from 1 to 8
•
mgc-name: A text string of up to 64 alphanumeric characters
Type the addses command, session-num, group-num, priority, local-port-num, and remote-port-num
argument values, and press Enter to create an ISDN PRI backhaul RUDP session within a specified
group. Specify the arguments from the following values:
•
session-num: In the range from 1 to 64
•
group-num: In the range from 1 to 16
•
priority: In the range from 1 (highest) to 4 (lowest)
•
local-port-num: The VISM port number you want to use for the session
•
remote-port-num: The call agent (remote) port number you want to use for the session
The following session configuration commands apply to a single session which is identified by the
first argument, the session-num.
Type the cnfsesack command, session-num, ack-timeout, and max-acks argument values, and press
Enter to change the timeout period for sending out an acknowledgment and the maximum number of
acknowledgments that can accumulated before sending them. Specify the arguments with the following
values:
•
session-num: In the range from 1 to 64
•
ack-timeout (defined in milliseconds): In the range from 100 to 65535
•
max-acks: In the range from 0 to 255
Type the cnfsesmaxreset command, session-num and max-resets argument values, and press Enter to
configure the maximum number of resets that VISM performs before a connection is reset. Specify the
arguments with the following values:
•
session-num: Type the value entered for the session-num argument in Step 4.
•
max-resets: In the range from 0 to 255
Cisco VISM Installation and Configuration Guide
4-50
Release 3.0, Part Number OL-2521-01 Rev. D0, June 2004
Chapter 4
Configuring VISM Features
Configuring VISM Features
Step 6
Step 7
Step 8
Step 9
Type the cnfsesmaxseg command, session-num and seg-size argument values, and press Enter to
configure the maximum segment size VISM can receive after sending a SYN message. Specify the arguments
with the following values:
•
session-num: Type the value entered for the session-num argument in Step 4.
•
seg-size (defined in octets): In the range from 30 to 65535
Type the cnfsesmaxwindow command, session-num and window-size argument values, and press Enter
to configure the maximum number of segments that can be sent without getting an acknowledgment for a
specific RUDP session. Specify the arguments with the following values:
•
session-num: Type the value entered for the session-num argument in Step 4.
•
window-size: In the range from 1 to 64
Type the cnfsesnullsegtmout command, session-num and null-seg-tout argument values, and press
Enter to configure the amount of idle time before sending a null segment. Specify the arguments with the
following values:
•
session-num: Type the value entered for the session-num argument in Step 4.
•
null-seg-tout (defined in milliseconds): In the range from 0 to 65535
Type the cnfsesoutofseq command, session-num and max-seq-pkts argument values, and press Enter to
configure the maximum number of out-of-sequence packets that will be accumulated before sending an
EACK packet. Specify the arguments with the following values:
•
session-num: Type the value entered for the session-num argument in Step 4.
•
max-seq-pkts: In the range from 0 to 255.
Note
Step 10
If you specify 0 for the max-seq-pkts argument, a DACK message is sent immediately
upon receiving an out-of-sequence packet.
Type the cnfsesport command, session-num, local-port-num, and remote-port-num argument values,
and press Enter to configure the local (VISM end) and remote (call agent end) port numbers for a session
number. Specify the arguments with the following values:
•
session-num: Type the value entered for the session-num argument in Step 4.
•
local-port-num: In the range from 1124 to 65535
•
remote-port-num: In the range from 1124 to 65535
This command allows the user to configure the local and remote port numbers.
Step 11
Step 12
Type the cnfsesretrans command, session-num, unack-timeout, and max-ses-retrans argument values,
and press Enter to configure the retransmission of unacknowledged packet timeout value and the maximum
number of consecutive retransmission attempts before the connection is considered failed. Specify the
arguments with the following values:
•
session-num: Type the value entered for the session-num argument in Step 4.
•
unack-timeout (in milliseconds): In the range from 100 to 65535
•
max-ses-retrans: In the range from 0 to 255
Type the cnfsesstatetmout command, session-num and tstate-tout argument values, and press Enter to
configure the amount of time VISM waits for the transfer state before executing an auto reset. Specify the
arguments with the following values:
•
session-num: Type the value entered for the session-num argument in Step 4.
•
tstate-tout (in milliseconds): In the range from 0 to 65535
Cisco VISM Installation and Configuration Guide
Release 3.0, Part Number OL-2521-01 Rev. D0, June 2004
4-51
Chapter 4
Configuring VISM Features
Configuring Additional VISM Features
Step 13
Step 14
Type the cnfsessyncatmps command, session-num and max-sync-attempts argument values, and press
Enter to configure the maximum number of attempts to synchronize VISM with the call agent. Specify the
arguments with the following values:
•
session-num: Type the value entered for the session-num argument in Step 4.
•
max-sync-attempts: In the range from 1 to 32
Repeat Step 4 through Step 13 for all additional session numbers, as required for your application.
You have completed configuring ISDN PRI backhaul.
The basic configuration of your VISM cards is complete. Use the configuration instructions in this
chapter to reconfigure VISM for your application needs as they change. Use the commands described in
Chapter 5, “CLI Commands,” to further configure your VISM cards, if necessary.
Configuring Additional VISM Features
The following features are available for users of VISM 3.0 and higher:
•
Support for the MGCP 0.1 subset of the MGCP 1.0 protocol
Note
The restart method (RM) is not defined as part of the MGCP 0.1 subset, and is not
supported.
•
Verified MGCP 0.1 protocol compliance
•
PBX CAS event delivery to a call agent using MGCP 0.1:
– DTMF: Wink and ground start
– MF: Wink
– TFTP download of CAS variant state machine
Note
•
RFC 3064 CAS packages—BL, MS, and DT—are not supported.
Interoperability enhancements:
– Configurable codec strings (IANA naming conventions as well as customized ones)
– Codec negotiation with configurable preference order
•
Exponential backoff for:
– XGCP retry timers
– SRCP retry timers
– Configurable per CAS variant
•
DTMF Relay using Cisco-rtp (FRF-11 Annex A based)
•
Enhancement to Fax/modem up-speed/pass-through procedures:
– Configurable CAC failure and carrier loss policies
– Up-speed to clear channel
Cisco VISM Installation and Configuration Guide
4-52
Release 3.0, Part Number OL-2521-01 Rev. D0, June 2004
Chapter 4
Configuring VISM Features
Configuring Additional VISM Features
•
Added support for G.726: 16, 24, 32, and 40 kbps, with packetization periods ranging from 10 to 40
ms
•
Support for VBR-rt (variable bit rate real time) and VBR-nrt (non real time) ATM traffic classes,
including traffic shaping to the relevant traffic descriptors
•
Configurable VAD model parameter for traffic engineering
•
In E1 applications, support for 31 DS0 per span and a total of 248 channels per card
•
Tested CRTP support through RPM for voice and voice band data calls
•
Verified bearer interoperability with 3810
•
Switched PVCs using SGCP 1.5:
– SDP and SGCP extensions allowing xGCP call agent control of AAL2 bearers
– Support of SGCP 1.5 digit maps and error codes
•
Support for card level coexistence of switched AAL2 mode (under Call Agent control) and trunked
AAL2 mode on PVCs, on an endpoint (DS0) basis
•
PBX CAS event delivery to a Call Agent using SGCP 1.5:
– DTMF: Wink and ground start
– MF: Wink
– TFTP download of CAS variant state machine
•
Interoperability and configuration enhancements:
– Configurable codec strings (IANA naming conventions as well as customized ones)
– Profile negotiation and configurable preference order
– Configurable voice and VBD (for example, up-speed codec) per profile
•
Added support for custom profile 110 and 200 (clear channel), ITU profiles 3 and 8
•
User-configurable AAL2 Silence Indicator Description (SID) for all profiles
•
Type 3 Packet Support for proxy ringback (xrbk), packet side bearer continuity check (co3/co4
COT), and midcall DTMF relay
•
Connection admission control (CAC) enhancements:
– Patented CAC method factoring in VAD and subcell multiplexing savings
– Configurable VAD model parameter for traffic engineering
•
Configurable AAL2 cell fill timer
•
AAL2 alarm enhancements: per span, VC, and per channel (CID) conditioning
•
Display, clear, and reset AAL2 performance related counters
•
In E1 AAL2 trunking applications, support for 31 DS0 per span and a total of 248 channels per card
•
Verified bearer interoperability with 3810 and third-party vendors
•
Infrastructure work and enhanced support for three operating modes: VoIP switching, AAL2
trunking, and switched AAL2 PVC
•
Graceful upgrade VISM 2.0 and 2.0(1) to VISM 2.1(0)
•
The ability to enable or disable the call agent protocol SDP OST feature in the event the peer
gateway may or may not support SDP OST. This feature allows interoperability with the Cisco
AS5300 Universal Access Server and other equipment
Cisco VISM Installation and Configuration Guide
Release 3.0, Part Number OL-2521-01 Rev. D0, June 2004
4-53
Chapter 4
Configuring VISM Features
Configuring Additional VISM Features
•
The ability for VISM to perform as either the network or user side of the LAPD protocol for PRI
backhaul
•
CCS/PRI backhaul between VISM and a call agent in VoIP mode
•
Support VoIP G.729ab compression
•
Idle channel suppression
•
Support for setting the IP precedence bit
•
Support for Q.50 CAS signaling variant
•
Negotiable packetization period
•
AAL2 subcell multiplexing
•
E1 back card support in AAL2 trunking mode
•
E1 back card support (VoIP mode only)
•
Provides 8 standard T1 interfaces with B8ZS, AMI and HDB3 line coding
•
Support for voice over ATM using AAL2 cells (multiplexing only, no LLC/SNAP encapsulation.
•
VoIP using AAL5 cells to RFC 1889
•
Support for both PCM a-law and u-law
•
Programmable 24, 32, 48, 64, 80, 96, 112, 128 ms near end echo cancellation
•
Voice compression to G.711 and G.726-32k standards
•
Nx64 clear channel (N = 1 only) support
•
Voice activity detection (VAD) and comfort noise generation (CNG) using variable threshold energy
(Cisco proprietary)
•
Support for call agent Simple Gateway Control Protocol (SGCP) Version 1.0, SGCP 1.1+, and
Media Gateway Control Protocol (MGCP) 0.1
•
Support for CCS signaling transport across an AAL5 trunk
•
Support for Fax and modem VoIP bearer transmissions
•
Support for dual (redundant) virtual circuits across the packet network
•
Support for full continuity testing (COT). Supports origination and terminating loopback and
transponder COT towards the packet bearer and the TDM sides
•
Support for loop timing, payload and line loopbacks
•
1:N cold redundancy using SRM-3T3 capabilities (bulk mode support for T1 lines only) for
switched calls
•
1:N hot redundancy for trunking applications only
•
Courtesy downing of ongoing voice calls when the VISM is taken out of service for maintenance or
other reasons
Cisco VISM Installation and Configuration Guide
4-54
Release 3.0, Part Number OL-2521-01 Rev. D0, June 2004
Chapter 4
Configuring VISM Features
Configuring Additional VISM Features
Mid-Call DTMF
The mid-call dual tone multifrequency (DTMF) feature enables the collection and notification of digits
to the call agent following a call setup for an endpoint, and supports the outpulsing of DTMF digits at a
call agent’s request. This feature is used for services that require two stage dialing, such as calling card
applications.
Mid-call DTMF is supported for all the CAS variants, for DTMF mode only.
Configurable Jitter Buffer
The configurable jitter buffer feature provides configuration of jitter buffer mode and initial delay time
on a codec basis. Fax, modem, and CCD calls have less packet loss with the addition of this feature.
Adjustable Gain
The adjustable gain feature allows you to adjust gain on a DS0 channel basis for both input and output
signals. The adjustable gain can be set when there is active call going on at the DS0 channel, and at both
bounded non-active and unbounded endpoints.
Adjustable Music On-Hold Threshold
The adjustable music on-hold threshold feature allows you to adjust the dB level, on a DS0 basis, of
when DSPs interpret TDM side silence or voice.
CALEA
The Commission on Accreditation for Law Enforcement Act (CALEA) feature, used with VoIP
applications, provides data (eavesdropping) about an intercepted subject (the user/subscriber) in two
forms for both the receive and transmit directions:
•
Call identifying data
•
Call content data
The call identifying data (called number) is provided by call agents. The call content data (voice) is
provided by the edge/access routers (7200, for example) and trunking gateways (MGX 8000 series
platforms) in combination with VISM cards.
The VISM CALEA implementation supports the CALEA law intercept confirmation interface.
MGC Redundancy
The media gateway controller (MGC) redundancy feature provides redundancy for call agents on VI SM
cards. You can associate one or more call agents as members of a redundancy group.
An MGC redundancy group consists of one or more MGCs (which are identified by their domain name).
An MGC can be part of one redundancy group, although there can be multiple MGCs per redundancy
group. At any given time, only one MGC in the redundant group is active.
Cisco VISM Installation and Configuration Guide
Release 3.0, Part Number OL-2521-01 Rev. D0, June 2004
4-55
Chapter 4
Configuring VISM Features
Configuring Additional VISM Features
This feature requires you to add more than one domain name and configure these as redundant call agents
or the same logical MGC. Only the IP addresses corresponding to each physical entity are returned by
the DNS server. In order to allow VISMs to traverse all the IP addresses, you must identify these physical
entities as redundant call agents.
External DNS
The external domain name server (DNS) feature allows VISM to use an external DNS to resolve the IP
address you configure. The domain names can be MGCs, call agents, or trivial file transfer protocol
(TFTP) servers used for CAS file downloads. Resolution of IP addresses can be configured with the
following methods:
•
Internal static tables only
•
External DNS only
•
External DNS, followed by the internal static tables if the external DNS method fails
•
Internal static tables, followed by the external DNS if the internal static table method fails
2 IP Address Support
The 2 IP address allows you to add separate IP addresses for the control and data paths for VISM. This
feature removes the restriction of control and data traffic going to two different domains.
VoIP Trunking
The Voice over IP (VoIP) trunking feature allows the VISM to connect to the PBX, or central office
digital systems, using T1/E1 digital interfaces and converts the TDM bit stream into RTP packets, after
ECAN and compression, and transports it over the IP network.
No call agent is required for setting up and tearing down calls. You must configure the DS0 circuits. The
connection between VISM and the first router will be ATM after which it will be IP only. VISM and the
router can have one or multiple PVCs to transport the data. You have the option to configure PVC for
bearer or control. If the PVC is configured as bearer and no control PVC exists, then PRI signal traffic
and bearer traffic will go through this PVC. If you configure separate PVCs for control and bearer, PRI
signaling will go through control traffic only. You can modify some of the connection parameters after
it is added.
CAS is transported to the far end using a Cisco proprietary format (not NSEs). PRI is transported over
RUDP to the far end once the trunk is provisioned between the originating and terminating VISM.
PRI transport is handled in a way identical to PRI backhaul except that the PRI traffic is sent to remote
gateway instead of a call agent. You can configure one line for PRI trunking and another line for PRI
backhauling.
Cisco VISM Installation and Configuration Guide
4-56
Release 3.0, Part Number OL-2521-01 Rev. D0, June 2004
Chapter 4
Configuring VISM Features
Configuring Additional VISM Features
You must provision the LAPD trunk when using this feature. You must configure a line number, remote
gateway IP address, local UDP port, and remote gateway UDP port, and then open a trunk. You must
then configure the D-channel as a trunk or backhaul:
•
To configure the D channel as trunk, use the addlapdtrunk command prior to the addlapd
command. If the addlapd command has been previously executed for that line, the command is
rejected.
Note
•
Two D channels on one line are not supported.
To configure the D channel as backhaul, use the addses command prior to the addlapd command.
If you do not configure either trunk or session, the addlapd command is rejected.
T.38 Fax Relay
The ITU T.38 recommendation for fax relay feature assists fax transmission over IP networks. You must
configure T.38 parameters—fax rate, information field size, data packet size, data redundancy, and NSF
values—to use this feature.
Note
You must use codec template 3 with the T.38 fax relay feature enabled. The T.38 feature supports 120
DS0s when enabled.
CAS Feature Enhancements
VISM Release 2.2 allows you to configure different CAS packages on different endpoints. The following
CAS feature enhancements are also added to this release.
Programmable Tone Plans
This enhancement provides you the ability to provision a tone plan in a CAS independent scenario so
that any inband call progress tone can be played on any endpoint (CAS, CCS, or clear channel) when
signaled by the call agent.
VISM Release 3.0 contains the built-in (preconfigured) version 1 tone plans shown in Table 4-6, which
you cannot modify or remove from the system.
Table 4-6
VISM 3.0 Built-in (Preconfigured) Tone Plans
Tone Plan
Tone Plan
Tone Plan
Tone Plan
Finland
Japan
Singapore
North America
France
Korea Republic
Slovakia
Argentina
Germany
Luxembourg
Slovenia
Australia
Greece
Malaysia
South Africa
Austria
Hong Kong
Mexico
Spain
Belgium
Hungary
Netherlands
Sweden
Brazil
Iceland
New Zealand
Switzerland
ITU
1
Cisco VISM Installation and Configuration Guide
Release 3.0, Part Number OL-2521-01 Rev. D0, June 2004
4-57
Chapter 4
Configuring VISM Features
Configuring Additional VISM Features
Table 4-6
VISM 3.0 Built-in (Preconfigured) Tone Plans (continued)
Tone Plan
Tone Plan
Tone Plan
Tone Plan
Canada
India
Norway
Taiwan
China
Indonesia
Philippines
Thailand
Cyprus
Ireland
Poland
Turkey
Czech Republic
Israel
Portugal
United Kingdom
Denmark
Italy
Russia
United States
1. ITU = International Telecommunications Union (formerly CCITT).
VISM Release 3.0 allows you to configure provisional tone plans if the built-in tone plans do not meet
your application needs. Provisional tone plans are created by assigning new region/country, version, and
file names, and configuring the following call progress tones:
•
Ringback
•
Busy
•
Reorder/Congestion
•
Dial
•
Stutter dial
•
Offhook alert/warning
Loop Start, DID, and Delay Dial
The exchange side (FXO) of the loop start protocol is implemented with this release. VISM can accept
calls from, and terminate calls to, loop start PBXs. When a PBX sends a subscriber call to the gateway,
it sends the loop close signal through the CAS signaling channel. To hang up, it sends the loop-open
signal.
Direct inward dial enables a caller outside a company to call internal extensions without having to go
through an operator or an attendant. VISM has this ability—it outpulses the digit stream handed down
by the call agent.
Dial delay is an E&M signaling protocol similar to wink start. The originating VISM, on receiving a
seize (AB=11) from the PBX, responds by sending the delay-dial (AB=11) signal back to the PBX.
When the originating VISM is ready to collect the digits, it sends start-dial (AB=00) signal. This
operation is symmetric. So the terminating VISM, on seizing a trunk, should receive AB=11 (as an
acknowledgment that the trunk is operational). Subsequently when it receives the start signal (AB=00)
from the connected PBX, it should outpulse the digits. The rest of the operation is similar to wink-start.
FGD
FGD enables long distance calls through one of the following methods:
•
Preselected access carrier (AC) by dialing 1 + area code + number.
•
Selecting the AC on a per call basis by dialing 101xxxx before the area code and phone number to
within a local exchange carrier’s (LEC) network in North America.
Cisco VISM Installation and Configuration Guide
4-58
Release 3.0, Part Number OL-2521-01 Rev. D0, June 2004
Chapter 4
Configuring VISM Features
Configuring Additional VISM Features
FGD supports the following protocols:
•
Terminating Protocol
•
Equal Access North American (EANA)
•
Operator Services (OS)
Configure Flash Hook and Glare Condition Attributes
You can configure both flash hook and glare condition attributes with VISM Release 2.2. Flash hook
configuration allows you to modify the duration of a flash hook. Duration shorter or longer than that
configured are interpreted as incoming calls and disconnects. Glare condition attribute configuration
allows you to control the CAS direction—incoming, outgoing, or bidirectional—and the glare handling
policy—controlling or releasing.
Configure ANI and DNIS Digit Order
You can configure the order in which a call agent sends automatic number identification (ANI)
digits—the caller’s number—and dial number identification service (DNIS) digits—the called
number—to VISM during an outgoing Feature Group D (FGD) call for the endpoints of a specified
VISM card line.
RFC 3064 Package Support
This release fully supports the following packages from RFC 3064:
•
MS—MF single stage dialing trunks. This includes wink start and immediate start PBX DID/DOD
trunks as well as basic R1 and FGD Terminating protocol.
•
DT—Immediate start and basic DTMF and dial-pulse trunks.
•
MD—North American MF FGD EANA and EAIN, which allows VISM to be at the end office, the
carrier, or the tandem side of the circuit.
•
MO—FGD Operator Services Signaling, outgoing trunks only.
•
BL—DTMF and dial pulse (DP) basic PBX trunks.
RFC 2833 Support
Support for RFC 2833 enables VISM to support DTMF relay using named telephony events (NTEs),
named signaling event (NSE) based relay, and Cisco-RTP based relay. For all other tones, VISM uses
NSEs.
VISM Network Continuity Test
You can configure VISM network continuity testing with VISM Release 2.2(0).
Cisco VISM Installation and Configuration Guide
Release 3.0, Part Number OL-2521-01 Rev. D0, June 2004
4-59
Chapter 4
Configuring VISM Features
Configuring Additional VISM Features
Configure PVC OAM Cell Parameters
This feature allows you to configure the transmitted and received permanent virtual circuit (PVC)
Operations, Administration, and Maintenance (OAM) cell parameters—cell gap, recovery cell count,
and unacknowledged cell count.
PXM1E and PXM45 Card-Only Features
Software Release 3.0(0) for VISM/VISM-PR introduces a new card—VISM-PR. You can use the
VISM-PR card in combination with any of the following MGX 8000 Series switch Processor Module
cards:
•
PXM1
•
PXM1E
•
PXM45
Table 4-7 describes the configuration requirements for VISM/VISM-PR in combination with the MGX
8000 Series switches and supported processor modules.
Table 4-7
VISM/VISM-PR and MGX 8000 Series Switch Support
VISM Module
MGX 8230
with PXM1
MGX 8830
with PXM1E
MGX 8250
with PXM1
MGX 8850
with PXM1
MGX 8850
with PXM1E
MGX 8850
with PXM45
MGX-VISM-8T1
Yes
No
Yes
Yes
No
No
MGX-VISM-8E1
Yes
No
Yes
Yes
No
No
MGX-VISM-PR-8T1
Yes
Yes
Yes
Yes
Yes
Yes
MGX-VISM-PR-8E1
Yes
Yes
Yes
Yes
Yes
Yes
Refer to the Cisco MGX 8850 Hardware Installation Guide, Release 3 for information on installing and
maintaining the PXM1, PXM1E, and PXM45 cards.
Note
You cannot use the VISM card in combination with either the PXM1E or PXM45 card.
The VISM-PR card supports 144 channels when used with the G.723.1 codec. The VISM card does not
support the G.723.1 codec.
The following software Release 3.0(0) for VISM/VISM-PR features require either the PXM1E or
PXM45 card and are not supported if you are using PXM1 cards in your MGX 8000 Series switch
chassis:
•
Call Agent-Controlled VoATM AAL1 and AAL2 SVC
•
AAL1 SVC-Based TDM Hairpinning
•
Expanded Clock Source Selection
Note
Clock source configuration support and procedures are not changed from previous
releases of software if you are using a PXM1 card in your MGX 8000 Series switch
chassis.
Cisco VISM Installation and Configuration Guide
4-60
Release 3.0, Part Number OL-2521-01 Rev. D0, June 2004
Chapter 4
Configuring VISM Features
Configuring Additional VISM Features
•
Private Network-to-Network Interface Priority Routing
•
Additional SPVC Connection Management Capabilities
Call Agent-Controlled VoATM AAL1 and AAL2 SVC
The following operating modes are supported with software Release 3.0(0) for VISM/VISM-PR:
•
VoAAL1 switched virtual circuit (SVC), supported with the G.711 codec and clear channel.
Note
•
Note
VAD is not supported in combination with AAL1 SVCs.
VoAAL2 SVC, supported with the G.711, G.726, G.729a, G.729ab, and G.723 codecs and ITU
profiles 1, 2, 3, 7, 8, and custom profiles 100, 101, 110, and 200.
CAS is not supported in combination with switched virtual circuits.
Use the cnfvismmode command to configure VISM operating modes.
Note
This feature requires you to use a PXM1E or PXM45 in your MGX 8000 Series switch chassis.
AAL1 SVC-Based TDM Hairpinning
VoAAL1 switched virtual circuit (SVC) operating mode is supported with the G.711 codec and clear
channel. The AAL1 SVC operating mode supports TDM hairpinning.
Note
VAD is not supported in combination with AAL1 SVCs. CAS is not supported in
combination with SVCs
Use the cnfvismmode command to configure VISM operating modes.
Note
This feature requires you to use a PXM1E or PXM45 in your MGX 8000 Series switch chassis.
High Complexity Codec Support for VISM-PR—G.723.1
The VISM-PR card supports high complexity codec G.723.1 in template number 4. Template number 4
supports all the codecs in template number 3 and the following:
•
G.723.1 high rate (6.3Kbps)—G.723.1-H
•
G.723.1 high rate with VAD—G.723.1a-H
•
G.723.1 low rate (5.3Kbps)—G.723.1-L
•
G.723.1 low rate with VAD—G.723.1a-L
Cisco VISM Installation and Configuration Guide
Release 3.0, Part Number OL-2521-01 Rev. D0, June 2004
4-61
Chapter 4
Configuring VISM Features
Configuring Additional VISM Features
The G.723.1 codec, used in combination with the VISM-PR card, supports 144 channels. Refer to
Table 4-3 for a description of VISM-PR DS0 density when the cards are used in combination with
supported codecs.
Several CLI commands have been modified to allow you to use the G.723.1 codec and template
number 4.
Note
The G.723.1 codecs are not supported for VISM cards.
Announcement File System
This release allows VISM to play prerecorded local announcements in switched VoIP connections.
Under the control of a call agent, announcements can be played toward any IP endpoint or toward any
VISM endpoint.
Up to 125 different announcements may be cached on the VISM card for immediate playout. A persistent
announcement storage area exists in the packet network. Announcements are downloaded on demand
from the announcement storage area and remain on the VISM card until they have reached expiry or are
replaced. If the 125 announcement maximum is reached, subsequent requests for announcements not on
the VISM card result in the replacement of “cached” announcements.
Announcements can be played over established connections in any VISM supported codec, but they must
exist on the announcement file server in the desired encoding.
Note
You must play announcements in the exact codec in which they have been recorded.
VISM announcements require the support of the MGCP 0.1/1.0 call agent.
Announcement Timeouts
VISM uses a provisionable timeout value of 5 seconds. If an announcement cannot start playing within
the timeout value of receiving the request, the action is canceled and, if requested by the call agent, an
“of” event is reported. If the call agent specifies a timeout value in the request, this value will be ignored.
Announcement Direction
Announcements can be played toward the packet network or toward the TDM network (not both). The
direction is determined by the notation of the MGCP S: line. Announcement direction examples:
S: a/ann(all-lines-busy.au)
Explanation Indicates that all-lines-busy.au is to be played toward the TDM network.
S: a/ann@connid(all-lines-busy.au)
Explanation Indicates that all-lines-busy.au is to be played toward the packet network.
Cisco VISM Installation and Configuration Guide
4-62
Release 3.0, Part Number OL-2521-01 Rev. D0, June 2004
Chapter 4
Configuring VISM Features
Configuring Additional VISM Features
Broadcast Announcements
VISM supports announcement requests for a single endpoint or connection. The request may only
specify a single announcement to be played on a single endpoint in a single direction. Broadcast
announcements are not supported.
Multiple Announcement Requests for the Same Endpoint
If an announcement is being played on an endpoint (in one direction) and a subsequent announcement
request is received for the same endpoint (in the same direction), the playing announcement will
continue and the new announcement request is ignored.
If an announcement is being played on an endpoint (in one direction) and a subsequent announcement
request is received for the same endpoint (in the other direction), the playing announcement is stopped
and the new announcement is then played. Events are not generated for the stopped announcement.
Announcement File Server
Announcements are contained in an announcement file server, which resides on an IP network reachable
from the VISM using Trivial File Transfer Protocol (TFTP).
Announcement File Server Name
You can configure the announcement file server node name on the VISM the same way that you
configure a node name for the TFTP server.
Announcement File Server Directory Structure
You may use any directory or path on the file server as the main directory for storing announcement files.
If you do not provision an announcement path prefix on VISM, the main announcement file directory is
the default TFTP directory on the server. If a path prefix is provisioned, this prefix is used as the main
announcement directory. If the prefix is not absolute (does not begin with a forward slash (/)), the prefix
is relative to the default TFTP directory.
You can configure codec subdirectories under the main announcement directory on the announcement
file server. A codec subdirectory exists for each codec used for announcement files.The subdirectories
may be one or more of the following:
•
g711u/
•
g711a/
•
g726_32k/
•
g726_24k/
•
g726_16k/
•
g729_a/
•
g7231_high_rate/
•
g7231_a_high_rate/
•
g7231_low_rate/
•
g7231_a_low_rate/
Cisco VISM Installation and Configuration Guide
Release 3.0, Part Number OL-2521-01 Rev. D0, June 2004
4-63
Chapter 4
Configuring VISM Features
Configuring Additional VISM Features
When the call agent requests that an announcement is to be played toward the TDM network on an
unconnected endpoint, you can specify the codec to be used.
Another level of directories might be configured to group announcement files by language. These
directories would be specified by the call agent (or when provisioning the VISM) as part of the
announcement file name. For example, the call agent might specify the announcement file name to be
english/ann1.au. If the file was encoded in G.729a and the prefix was /tftpboot, the file would reside at
/tftpboot/g729_a/english/ann1.au.
VISM Announcement Cache Management
VISM maintains an announcement cache in resident memory. When an announcement is requested to be
played, it is retrieved from the announcement file server and placed in the on-board announcement
cache. Subsequent requests for the same announcement do not require retrieval of the announcement file
from the announcement file server.
Note
An announcement in one encoding is a different file than the same announcement in a different
encoding.
Announcement Expiry
You can provision an announcement aging policy. Once an announcement has aged (reached expiry) in
the on-board cache, it is refreshed—retrieved again from the announcement file server. This provides
you with the means to balance the cost of file server access with the time before an announcement
changed on the file server is propagated to the VISM. In addition, you can delete dynamic files from the
announcement cache at any time.
Permanent Announcements
You can provision permanent announcements for VISM. A permanent announcement is retrieved from
the announcement file server and installed permanently in the VISM announcement file cache.
Permanent announcements are excluded from aging (and being automatically refreshed) and excluded
from being replaced if the announcement cache becomes full. Permanent announcements can only be
removed from the cache explicitly by using a CLI command. If VISM is reset or fails over to a standby
card, permanent announcements are retrieved as soon as the card becomes active. The announcement
encoding must be specified when provisioning or deleting permanent announcements.
Use the CLI commands in Table 4-8 to configure the announcement file system feature.
Table 4-8
Announcement File System Feature CLI Commands
Command
Description
addannpermanent
Configures an announcement server file and associated codec type as
permanent.
cnfannagetime
Configures the time that a nonpermanent announcement is to remain valid after
it is placed into the VISM announcement cache.
cnfanndn
Designates an announcement file server domain name.
cnfannpathprefix
Designates the main prefix directory TFTP path from which to retrieve
announcement files from the announcement file server.
Cisco VISM Installation and Configuration Guide
4-64
Release 3.0, Part Number OL-2521-01 Rev. D0, June 2004
Chapter 4
Configuring VISM Features
Configuring Additional VISM Features
Table 4-8
Announcement File System Feature CLI Commands (continued)
Command
Description
cnfannprefcodec
Configures the codec type used for announcements played on unconnected
TDM endpoints.
cnfannreqtimeout
Configures the expiration time for announcements to begin playing after the
VISM receives the announcement signal (request) from the call agent.
delannalldynamic
Deletes all announcement files and their associated codec types from the
temporary announcement files currently saved in the VISM card.
delanndynamic
Deletes an announcement file and associated codec type from the temporary
announcement files currently saved in the VISM card.
delannpermanent
Deletes a permanent announcement file and its associated codec type from the
announcement file server.
dspannagetime
Displays the time that a nonpermanent announcement is to remain valid after
it is placed into the VISM announcement cache.
dspanncache
Displays all available temporary announcement file names, and associated age
times before being refreshed from the announcement file server.
dspanncontrols
Displays a summary list of all provisionable announcement file variables,
including variables associated with all announcement file CLI commands.
dspanndn
Displays the announcement file server domain name.
dspannpathprefix
Displays the main prefix directory path from which VISM retrieves
announcement files from the announcement file server.
dspannpermanents
Displays all available permanent announcement files with their associated
codec types and identifying index numbers.
dspannprefcodec
Displays the codec type used for announcements played on unconnected TDM
endpoints.
dspannreqtimeout
Displays the expiration time for announcements to begin playing before being
aborted.
Call Agent-Controlled T.38 Fax
The call agent-controlled T.38 fax feature is an additional operational mode for MGCP 1.0 to request
T.38. This addition allows VISM to interoperate with H.323 and non-Cisco gateways, and is supported
for VoIP calls. This feature is activated based on the fax tone and signaling carried with the call agent.
The modified cnft38fxlco command allows you to configure the local connection option fax preamble
response to off. All previous options are valid.
Cisco VISM Installation and Configuration Guide
Release 3.0, Part Number OL-2521-01 Rev. D0, June 2004
4-65
Chapter 4
Configuring VISM Features
Configuring Additional VISM Features
Additional Support for MGCP 1.0
This release expands the support for the Media Gateway Control Protocol (MGCP) 1.0, which was
introduced in VISM 2.2. The following are implemented for the MGCP 1.0 feature support:
•
Restart in Progress command disconnect procedure wait delay timer value specification for the
following:
– Initial
– Minimum
– Maximum
•
Call agent redundancy group protocol configuration for the following:
– Quarantine handling method for persistent events
– Default quarantine handling method for each protocol
– Ability to keep events from previous lists, until explicitly requested to be removed
– Ability to send provisional responses
– Ability to send response acknowledgments
– Ability to provide a disconnect method
– Ability to cancel previously issued graceful restart commands
Use the CLI commands in Table 4-9 to configure the MGCP 1.0 feature.
Table 4-9
MGCP 1.0 Feature CLI Commands
Command
Description
addmgcgrpprotocol
Associates a call agent redundancy group to a gateway control protocol.
cnfdisctimers
Specifies the wait delay times for the disconnected procedure, restart in
progress command—initial, minimum, and maximum timer values.
cnfmgcgrpprotocol
Configures call agent group protocol data.
cnfxgcppeer
Configures the UDP port number used to send gateway-initiated messages to
the call agent.
delmgcgrpprotocol
Deletes an MGCP from a specified call agent redundancy group.
dspdisctimers
Displays the Restart in Progress command disconnect type method wait
delay times.
RSVP-Based Admission Control
Resource Reservation Protocol (RSVP)-based admission control signaling with MGCP is supported,
which allows for quality VoIP connections. For the connections, the RSVP-MGCP interaction results in
the following:
•
Establish or originate unidirectional resource reservation for sending voice packets for connections
established and controlled by MGCP.
•
Accept unidirectional resource reservations for receiving voice packets from MGCP controlled
connections.
Cisco VISM Installation and Configuration Guide
4-66
Release 3.0, Part Number OL-2521-01 Rev. D0, June 2004
Chapter 4
Configuring VISM Features
Configuring Additional VISM Features
Note
•
Tear down originated or established unidirectional resource reservations.
•
Tear down accepted resource reservations.
VISM supports RSVP in the VoIP switching operating mode only, with a 5 calls per second
limitation; RSVP is not supported in the VoIP trunking operating mode.
In previous releases of VISM software, the following connection data is returned in response to the call
agent initiated DLCX, and gateway initiated DLCX or AUCX commands:
•
Number of packets sent
•
Number of octets sent
•
Number of packets received
•
Number of octets received
VISM Release 3.0(0) provides the following additional connection data:
•
Number of packets lost
•
Inter-arrival jitter—If a DSP is configured to operate in the adaptive jitter buffer mode, the jitter data
provided indicates the delay that the jitter-algorithm is adapted to. If a DSP is configured to operate
in the fixed jitter buffer mode, the jitter data provided indicates the value that was configured when
the channel was opened.
Note
•
For adaptive mode you can use the value to indicate that the configured initial delay value
is too low or too high, since the algorithm adapts according to the actual network jitter.
Average transmission delay (latency)
Use the commands in Table 4-10 to configure the RSVP-based admission control feature.
Table 4-10 RSVP-Based Admission Control Feature CLI Commands
Command
Description
cnfrsvp
Configures RSVP for a specified connection.
cnfrsvprefreshmiss
Configures the number of times VISM waits for a missed RSVP minimum
refresh message for a specified connection.
Clock Slip Counters
The clock counter information feature allows you to clear the current frame slip counters for a specified
VISM or VISM-PR card line and display the current frame slip counters for a specified VISM or
VISM-PR card line. Use the new clrslipcnt and dspslipcnt to use this feature.
Cisco VISM Installation and Configuration Guide
Release 3.0, Part Number OL-2521-01 Rev. D0, June 2004
4-67
Chapter 4
Configuring VISM Features
Configuring Additional VISM Features
RTP Connection Statistics
Real-Time Transport Protocol (RTP) connection statistics are collected for individual endpoints and sent
to the call agent. Use the new dsprtpconnstat command to display collected RTP connection statistics.
Jitter delay data collection at call completion is on a per call basis. Jitter delay data and number of
packets sent and received, and number of octets sent and received, are reported to the call agent through
MGCP.
CAS Immediate Start and Ground Start Glare Handling
CAS Immediate Start—The CAS variants immediate start and immediate start, multifrequency are
supported. Use the addcasvar command to configure CAS variants.
Note
The immediate start protocol does not define glare handling procedures—do not use the immediate
start protocol on incoming or outgoing endpoints only. Endpoints are added as bidirectional by
default. To make them incoming or outgoing, use the cnfcasglarepolicy command. If the endpoints
are left as bidirectional, configured for immediate start operation, and glare occurs, the results may
be unpredictable.
Ground Start Glare Handling—This release supports CAS glare condition handling according to
RFC 3064. The VISM sends a NACK message in response to the call agent’s request for ringing with
error code 401 (off hook) in the event of a glare condition.
On receiving the request for ringing from call control, CAS transmits a seize signal to the PBX and starts
the glare timer, returning a provisional response code to call control indicating that CAS is still
processing the request. If the timer expires (normal case) or an incoming seizure is observed on the
endpoint, CAS generates an asynchronous response code to call control that is comparable to an MGCP
response code of 200 or 401, respectively.
Grooming for Local Traffic
VISM supports the call agent controlled grooming feature. Grooming allows VISM to avoid routing
local traffic through the IP network. Voice packets from a local connection are switched locally in the
ATM switch.
A call agent determines if a call needs to be setup as local. To set up a local call, the call agent selects
an ATM connection over a VoIP connection. The VISM card, as a gateway, receives the connection
request message from the call agent for an ATM connection. The VISM card allows VoIP calls and
VoAAL1 SVC calls to coexist and allows provisioning of VoIP and ATM simultaneously.
To achieve this, VISM uses VoIP and Switched ATM AAL1 SVC as local switching mode. VISM
receives an ATM AAL1 SVC call setup request from the call agent for local calls.
You must use the cnfvismmode command and select the VoIP and switched ATM AAL1 SVC operating
mode to use the grooming feature. Using this mode does not change any other settings on your card. The
type of connection for a call is determined by the connection request (CRCX) from the call agent or by
the bearer type configuration.
Cisco VISM Installation and Configuration Guide
4-68
Release 3.0, Part Number OL-2521-01 Rev. D0, June 2004
Chapter 4
Configuring VISM Features
Configuring Additional VISM Features
MGX 8000 Series Implementation Enhancements
The following enhancements are supported with this release to you with additional implementation of
your MGX 8000 Series switch:
•
Additional VBR Enhancements
•
Expanded Clock Source Selection
•
Private Network-to-Network Interface Priority Routing
•
Additional SPVC Connection Management Capabilities
•
192 T1/248 E1 DS0 Support with High Complexity Codecs on VISM-PR
•
Channel Alarm Enhancement
•
VISM TDM Line Statistics Collection
Additional VBR Enhancements
Setting connections between a VISM-PR card and a RPM-PR card in your MGX 8000 Series switch
chassis requires you to use the new VBR (NRT) 3 connection type. Use the modified addcon or cnfcon
commands to configure this connection type. In addition, the following new connection service types
can be configured with the modified commands in this release:
•
VBR (RT) 2
•
VBR (RT) 3
•
VBR (NRT) 2
Expanded Clock Source Selection
This release supports an expanded clock source selection, which allows you to configure any VISM-PR
card line as the clock source. You cannot delete a VISM-PR line that is configured as the clock source;
you must configure a different line as the clock source and then you can delete the original clock source
line. The previously released CLI commands allow you to use this feature.
Note
This feature requires you to use a PXM1E or PXM45 in your MGX 8000 Series switch chassis.
Private Network-to-Network Interface Priority Routing
This release supports the Private Network-to-Network Interface (PNNI) routing priority feature. This
feature allows you to specify connections with a routing priority. The PNNI controller uses your
configuration selections to route the higher priority connections before routing the lower priority
connections. Use the cnfpncon command to configure a routing priority for a specified connection.
Note
This feature requires you to use a PXM1E or PXM45 in your MGX 8000 Series switch chassis.
Cisco VISM Installation and Configuration Guide
Release 3.0, Part Number OL-2521-01 Rev. D0, June 2004
4-69
Chapter 4
Configuring VISM Features
Configuring Additional VISM Features
Additional SPVC Connection Management Capabilities
Use the PXM1E or the PXM 45 card in combination with the VISM-PR card in an MGX 8000 Series
switch chassis to specify a connection up or down. Specifying a connection up allows you to direct traffic
to the specified connection. Specifying a connection down allows you to prevent traffic from being
directed to a specified connection. Use the upcon and dncon commands to use this feature.
Note
This feature requires you to use a PXM1E or PXM45 in your MGX 8000 Series switch chassis.
192 T1/248 E1 DS0 Support with High Complexity Codecs on VISM-PR
VISM-PR T1 lines support up to 192 DS0 channels and VISM-PR E1 lines support up to 248 DS0
channels, with clear channel and the following codec types:
•
G.711
•
G.726
•
G.729a
•
G.729ab
Table 4-3 describes the VISM/VISM-PR DS0 density when the cards are used in combination with clear
channel and the supported codecs.
Table 11
VISM/VISM-PR DS0 Density with Codec Support
VISM
VISM-PR
Codec
T1
E1
T1
E1
G.711
192
248
192
248
G.723.1
—
—
144
144
G.726
145
145
192
248
G.729a/ab
145
145
192
248
Clear channel
192
248
192
248
Channel Alarm Enhancement
The channel alarm enhancement feature uses the modified dspconcnt command, which allows you to
view the channel status bit map data.
VISM TDM Line Statistics Collection
This release allows you to configure VISM to collect Time Division Multiplex (TDM) line statistics. Use
the dspalmcnt command to collect and display TDM line statistics. Use the cnfalmcnt command to
configure the thresholds for TDM line statistics.
Cisco VISM Installation and Configuration Guide
4-70
Release 3.0, Part Number OL-2521-01 Rev. D0, June 2004
C H A P T E R
5
CLI Commands
Command line interface (CLI) commands allow you to configure, manage, and troubleshoot VISM to
enable your applications.
The VISM CLI commands are described in the remainder of this chapter and are arranged in alphabetical
order.
For information on how to access and use the CLI commands, see Chapter 4, “Configuring VISM
Features.”
Cisco VISM Installation and Configuration Guide
Release 3.0, Part Number OL-2521-01 Rev. D0, June 2004
5-1
Chapter 5
CLI Commands
?
?
To display some or all commands associated with the current card, use the ? command in the VoIP
switching/trunking, switched AAL1 SVC, switched AAL2 SVC, switched AAL2 PVC, AAL2 trunking,
VoIP and switched ATM AAL1 SVC operating modes.
?
Syntax Description
This command has no arguments.
Command Modes
VoIP switching/trunking, switched AAL1 SVC, switched AAL2 SVC, switched AAL2 PVC, AAL2
trunking, VoIP and switched ATM AAL1 SVC
Usage Guidelines
You can enter a complete or partial command name. If you do not type the name of a command, the entire
command list is displayed.
Related Commands
Command
Description
Help
Displays commands associated with the current card.
Examples
The following example shows a list of all commands that contain the string ecan—a partial command
name:
? ecan
Available commands
-----------------cnfecancnf
cnfecannoise
cnfecannr
cnfecanrec
cnfecantail
Cisco VISM Installation and Configuration Guide
5-2
Release 3.0, Part Number OL-2521-01 Rev. D0, June 2004
Chapter 5
CLI Commands
addannpermanent
addannpermanent
To configure an announcement server file and associated codec type as permanent, use the
addannpermanent command in the VoIP switching operating mode.
addannpermanent ann-index ann-filename ann-codec-type
Syntax Description
ann-index
Announcement file server index number which you assign to identify a
permanent announcement server file. It can be in the range from 1 to 125.
ann-filename
Announcement filename. It can be from 1 to 64 alphanumeric characters,
including the following symbols—period (.), forward slash (/), underscore
(_), and hyphen (-).
ann-codec-type
Announcement filename associated codec. It can be one of the following
values:
•
1 = G.711u
•
2 = G.711a
•
3 = G.726-32k
•
4 = G.729a
•
5 = G.729ab
•
7 = G.726-16k
•
8 = G.726-24k
•
9 = G.726-40k
•
11 = G.723-H
•
12 = G.723.1a-H
•
13 = G.723.1-L
•
14 = G.723.1a-L
Command Modes
VoIP switching
Usage Guidelines
The G.723.1 codecs are supported for VISM-PR cards and are not supported for VISM cards.
Examples
The following example shows that index server number 19 is configured with the femalezero1 file in the
G.726-40K codec:
addannpermanent 19 femalezero1 9
Cisco VISM Installation and Configuration Guide
Release 3.0, Part Number OL-2521-01 Rev. D0, June 2004
5-3
Chapter 5
CLI Commands
addannpermanent
Related Commands
Command
Description
cnfannagetime
Configures the time that a nonpermanent announcement is to remain valid after
it is placed into the VISM announcement cache.
cnfanndn
Designates an announcement file server domain name.
cnfannpathprefix
Designates the main prefix directory TFTP path from which to retrieve
announcement files from the announcement file server.
cnfannprefcodec
Configures the codec type used for announcements played on unconnected
TDM endpoints.
cnfannreqtimeout
Configures the expiration time for announcements to begin playing after the
VISM receives the announcement signal (request) from the call agent.
delannalldynamic
Deletes all announcement files and their associated codec types from the
temporary announcement files currently saved in the VISM card.
delanndynamic
Deletes an announcement file and associated codec type from the temporary
announcement files currently saved in the VISM card.
delannpermanent
Deletes a permanent announcement file and its associated codec type from the
announcement file server.
dspannagetime
Displays the time that a nonpermanent announcement is to remain valid after
it is placed into the VISM announcement cache.
dspanncache
Displays all available temporary announcement file names, and associated age
times before being refreshed from the announcement file server.
dspanncontrols
Displays a summary list of all provisionable announcement file variables,
including variables associated with all announcement file CLI commands.
dspanndn
Displays the announcement file server domain name.
dspannpathprefix
Displays the main prefix directory path from which VISM retrieves
announcement files from the announcement file server.
dspannpermanents
Displays all available permanent announcement files with their associated
codec types and identifying index numbers.
dspannprefcodec
Displays the codec type used for announcements played on unconnected TDM
endpoints.
Cisco VISM Installation and Configuration Guide
5-4
Release 3.0, Part Number OL-2521-01 Rev. D0, June 2004
Chapter 5
CLI Commands
addcasvar
addcasvar
To add a channel associated signaling (CAS) variant to a VISM card, name the CAS variant file, and
optionally set the source of the file, use the addcasvar command in the VoIP switching/trunking,
switched AAL2 PVC, and AAL2 trunking operating modes.
addcasvar var-name file-name |source|
Syntax Description
var-name
Name of the CAS variant; a text string of 1 to 64 alphanumeric characters.
file-name
Name of the file that contains the signal definition for the CAS variant. It can be one of
the following values:
•
wink_did_dod.o = wink start
•
ground_start.o = ground start
•
wink_did_dod_mf.o = wink start multifrequency
•
q50.o = Q.50
•
basic_pbx.o =
•
fgd_ea_incoming.o = for endpoints connected to an end office
•
fgd_ea_outgoing.o = for endpoints connected to an access carrier
•
fgd_os_e911.o = for endpoints connected to FDG OSS (Feature group D operator
services system)
•
loop_start.o = loop start
•
delay_did_dod.o = dial delay, DTMF
•
delay_did_dod_mf.o = dial delay, MF
•
immed_did_dod.o = immediate start
•
immed_did_dod_mf.o = immediate start, MF
•
In the range from 1 to 32 alphanumeric characters—user-configured files only
Note
source
Immediate start is not supported in VISM Release 2.2(0).
(Optional) CAS variant file location. It can be one of the following values:
•
1 = Unspecified. If TFTP domain is configured, the location is the TFTP server. If
not found in the TFTP server, the file is treated as built-in.
•
2 = User-configured (built-in) file location.
•
3 = External—resides on the TFTP server.
Command Modes
VoIP switching/trunking, switched AAL2 PVC, and AAL2 trunking
Usage Guidelines
A file containing the variant information must be downloaded to the Cisco MGX 8000 Series platform
PXM card, using a separate application (such as TFTP), before you can execute this command. This
command downloads the specified file from the PXM card and configures the CAS variant on the VISM
card based upon the information in the file. You can use this command at any time to add a new CAS
variant.
Cisco VISM Installation and Configuration Guide
Release 3.0, Part Number OL-2521-01 Rev. D0, June 2004
5-5
Chapter 5
CLI Commands
addcasvar
Examples
The following example shows that a wink start CAS variant called casvar is added to a VISM card based
upon information contained in the wink_did_dod.o file, which is located in the internal (built-in)
location:
addcasvar casvar wink_did_dod.o 2
Related Commands
Command
Description
cnfcasvar
Configures CAS variant and CAS timing parameters for a variant already
created with the addcasvar command.
delcasvar
Deletes a CAS variant.
dspcasvar
Displays information about CAS variants for a given variant name.
dsplnringback
Displays the ringback tone method for a specified line on the current VISM
card.
Cisco VISM Installation and Configuration Guide
5-6
Release 3.0, Part Number OL-2521-01 Rev. D0, June 2004
Chapter 5
CLI Commands
addccs
addccs
To add a common channel signaling (CCS) channel (D channel) to a VISM card, use the addccs
command in the switched AAL2 PVC and AAL2 trunking operating modes.
addccs line-num ds0-num lcn
Syntax Description
line-num
Line number of the channel to be added in the range from 1 to 8.
ds0-num
DS0 number of the channel to be added. It can be a value from one of the following
ranges:
lcn
•
1 to 24 for T1 lines
•
1 to 31 for E1 lines
Logical channel number of the CCS channel to be added in the range from 131 to
510.
Command Modes
Switched AAL2 PVC and AAL2 trunking
Usage Guidelines
To use this command, you must select CCS signaling on the specified line with the cnflnsig command.
When you execute this command, a value called ds0IfIndex is displayed, which is used to identify the
CCS channel in subsequent CCS-related commands.
Examples
The following example shows that a CCS D channel is added to line 1, DS0 20, logical channel number
200:
addccs 1 20 200
Related Commands
Command
Description
delccs
Deletes the association between a CCS (DS0) channel and its corresponding virtual
channel.
dspccs
Displays the properties of a previously added CCS channel.
Cisco VISM Installation and Configuration Guide
Release 3.0, Part Number OL-2521-01 Rev. D0, June 2004
5-7
Chapter 5
CLI Commands
addcid
addcid
To add an AAL2 channel identifier (CID) on a VISM card, use the addcid command in the AAL2
trunking operating mode.
addcid endpt-num lcn cid-num codec-type profile-type profile-num |vad-enable vad-init-timer
ecan-enable type-3-red cas-trans dtmf-trans idle-code-sup pkt-period|
Syntax Description
endpt-num
The endpoint number which is to be related to the LCN/CID pair being added. It
can be a value from one of the following ranges:
•
For template number 1:
– For VISM, from 1 to 145
– For VISM-PR T1, from 1 to 192
– For VISM-PR E1, from 1 to 248
•
For template number 2:
– For VISM T1, from 1 to 192
– For VISM E1, from 1 to 248
•
For template number 3:
– For VISM, from 1 to 120
– For VISM-PR T1, from 1 to 192
– For VISM-PR E1, from 1 to 248
•
For template number 4:
– For VISM-PR, from 1 to 144
lcn
The logical channel number (LCN) of the LCN/CID pair in the range from 131 to
510.
cid-num
The channel identification number of the LCN/CID pair in the range from 8 to 255.
Cisco VISM Installation and Configuration Guide
5-8
Release 3.0, Part Number OL-2521-01 Rev. D0, June 2004
Chapter 5
CLI Commands
addcid
codec-type
profile-type
The type of coding/decoding to be performed on the data stream. It can be one of
the following values:
•
1 = G.711u
•
2 = G.711a
•
3 = G.726-32k
•
4 = G.729a
•
5 = G.729ab
•
6 = Clear channel (VAD must be off)
•
7 = G.726-16k
•
8 = G.726-24k
•
9 = G.726-40k
•
11 = G.723-H
•
12 = G.723a-H
•
13 = G.723.1-L
•
14 = G.723.1a-L
(Optional) The profile type to be used for the CID. It can be one of the following
values:
•
1 = International Telecommunication Union (ITU) I.366.2
•
3 = Custom
If profile-type and profile-num argument values are both 1, you cannot turn
VAD on.
Note
profile-num
|vad-enable|
(Optional) Number of the profile. It can be one of the following values:
•
1 = ITU profile type
•
2 = ITU profile type
•
3 = ITU profile type
•
7 = ITU profile type
•
8 = ITU profile type
•
12 = ITU profile type
•
100 = custom profile types
•
101 = custom profile types
•
110 = custom profile types
•
200 = custom profile types
(Optional) Enables or disables voice activity detection (VAD). It can be one of the
following values:
1 = On
2 = Off
Note
If you type 1 for both the profile-type and profile-num argument values,
VAD cannot be turned on.
Cisco VISM Installation and Configuration Guide
Release 3.0, Part Number OL-2521-01 Rev. D0, June 2004
5-9
Chapter 5
CLI Commands
addcid
|vad-init-timer|
(Optional) The VAD initial (holdover) timer in the range from 250 to 65535 ms.
Default = 250.
|ecan-enable|
(Optional) Enables or disables echo cancellation (ECAN). It can be one of the
following values:
|type-3-red|
•
1 = On
•
2 = Off
(Optional) Enables or disables triple redundancy protection for type 3 packets. It
can be one of the following values:
•
1 = On
•
2 = Off
If you select 1 for this argument value, either the cas-trans or dtmf-trans
argument value must be set to 1 (on).
Note
|cas-trans|
(Optional) Enables or disables channel associated signaling (CAS) transport as
AAL2 type3 packets. It can be one of the following values:
1 = On (Default)
2 = Off
This parameter does not affect any inbound signaling.
|dtmf-trans|
(Optional) Enables or disables DTMF tone transport as AAL2 type 3 packets. It can
be one of the following values:
1 = On (Default)
2 = Off
The dtmf-trans argument value must be set to 1 (on) when the codec-type
is configured for codecs other than G.711 and G.726.
Note
|idle-code-sup|
(Optional) Enables or disables idle code suppression for the CID. It can be one of
the following values:
1 = On
2 = Off
|pkt-period|
(Optional) Packetization period (defined in milliseconds). Applies only to G.729a
compression. It can be the following value:
•
Note
10
The pkt-period argument applies only to G.729a compression (codec-type
argument value = 4). If you have selected any other compression value,
ignore this argument.
Command Modes
AAL2 trunking
Usage Guidelines
This command establishes a relationship between an endpoint and an LCN/CID pair. The endpoint is
bound to a DS0 and the CID binds a DS0 to a logical channel—ensuring an endpoint-to-endpoint trunk.
The following conditions must be met before you use this command:
•
A previously added endpoint must exist.
•
PVC must be of bearer type and provisioned using the addcon command.
Cisco VISM Installation and Configuration Guide
5-10
Release 3.0, Part Number OL-2521-01 Rev. D0, June 2004
Chapter 5
CLI Commands
addcid
•
The current DSP template must contain the desired codec type.
This command can be used on an endpoint that has no associated CAS variant. However, if a CAS variant
is specified for the endpoint, it must be Q.50 variant (file q50.o)—the only CAS variant supported by
this command.
The G.723.1 codecs are supported for VISM-PR cards and are not supported for VISM cards.
Examples
The following example creates a CID for endpoint 10, LCN 140, with a CID number of 10. The codec
type is 2 (G.711a), profile type is 1 (ITU), profile number is 1 (ITU), VAD is 1 (on), VAD holdover is
300 milliseconds, type 3 redundancy is 1 (on), CAS transport is 1 (on), DTMF transport is 1 (on), idle
code suppression is 1 (on) and the packet period is 10 milliseconds.
addcid 10 140 10 2 1 1 1 300 1 1 1 10
Related Commands
Command
Description
delcid
Deletes the association between an endpoint and an LCN/CID pair.
dspcid
Displays the argument values of an AAL2 CID on a VISM card.
dspcids
Displays all the AAL2 CIDs for a specified LCN on a VISM card.
Cisco VISM Installation and Configuration Guide
Release 3.0, Part Number OL-2521-01 Rev. D0, June 2004
5-11
Chapter 5
CLI Commands
addcon
addcon
To add a permanent virtual circuit (PVC) connection between a VISM card and any service module (SM)
or PXM card, use the addcon command in the VoIP switching/trunking, switched AAL2 PVC, and
AAL2 trunking operating modes.
addcon local-vci pref-level pvc-conn-type conn-app peak-cell-rate conn-type |remote-conn-id
service-type sus-cell-rate max-burst-rate|
Syntax Description
local-vci
Local virtual channel identifier (VCI) to be used for the connection in the range
from 131 to 510. The value you enter for this argument is also used as the LCN.
pref-level
Preference level of the local VCI. It can be one of the following values:
pvc-conn-type
conn-app
•
1 = Primary
•
2 = Secondary
AAL type of connection. It can be one of the following values:
•
1 = AAL5
•
2 = AAL2
•
3 = AAL1
The connection’s application. It can be one of the following values:
•
1 = Control
•
2 = Bearer
•
3 = Signaling
Note
peak-cell-rate
Peak cell rate (described in cells per second). It can be a value from one of the
following ranges:
•
1 to 80000 for VoIP bearer
•
1 to 20000 for VoIP control
•
1 to 50000 for AAL2 T1
•
1 to 60000 for AAL2 E1
•
1 to 400 for AAL2 signaling (trunking)
•
1 to 90000 for AAL5 bearer
•
1 to 10000 for AAL5 control
Note
conn-type
remote-conn-id
If the connection is used for bearer and signaling, specify 2 for bearer.
The peak-cell-rate argument value must be 15 or greater if the
service-type argument value is a variable bit rate selection.
Connection type. It can be one of the following values:
•
1 = Master
•
2 = Slave (Default)
(Optional) Remote connection identifier. Specify this argument with the
following format: nodename.slot.port.vpi.vci
Note
This argument is used only when the conn-type argument is set to 1
(master).
Cisco VISM Installation and Configuration Guide
5-12
Release 3.0, Part Number OL-2521-01 Rev. D0, June 2004
Chapter 5
CLI Commands
addcon
service-type
(Optional) Service type. It can be one of the following values:
•
1 = Constant bit rate (CBR)
•
2 = Variable bit rate real time, VBR (RT)
•
3 = Variable bit rate non-real time, VBR (NRT)
•
4 = VBR (RT) 3
•
5 = VBR (RT) 2
•
6 = VBR (NRT) 2
•
7 = VBR (NRT) 3
Note
sus-cell-rate
(Optional) Sustainable cell rate (defined in cells per second). It can be in the
range from 15 to the value you configured for the peak-cell-rate argument value.
Note
max-burst-rate
Use value 7 for VISM-PR to RPM-PR connections.
This argument value is required if the service-type argument value is in
the range from 2 to 7.
(Optional) Maximum burst size—maximum number of cells transmitted at the
peak cell rate. It can be in the range from 1 cell to 10 times the value you
configured for the sus-cell-rate argument value.
Note
This argument value is required if the service-type argument value is in
the range from 2 to 7.
Command Modes
VoIP switching/trunking, switched AAL2 PVC, and AAL2 trunking
Usage Guidelines
You must execute the addport and addrscprtn commands before you use this command.
If you are using this command with the VoIP switching/trunking operating mode and dual PVCs, you
must add the primary channel before the secondary channel.
If you are using this command with the AAL2 trunking operating mode, the pvc-conn-type argument
value must be 1 (AAL5) for signaling and 2 (AAL2) for a bearer channel.
This command requires you to configure the PVC connections in the following ways for the different
operating modes:
•
VoIP switching/trunking operating mode addcon command configuration requirements:
–
•
One AAL5 PVC connection with an optional secondary AAL5 PVC connection.
AAL2 trunking operating mode addcon command configuration requirements:
– One AAL2 connection and up to 63 additional optional AAL2 connections to each remote
location.
– Up to eight AAL5 connections for CCS signaling across the trunk, if your application requires
CCS.
•
Switched AAL2 PVC operating mode addcon command configuration requirements:
– One AAL2 connection.
– One AAL5 connection for communication with the call agent and external DNS.
Cisco VISM Installation and Configuration Guide
Release 3.0, Part Number OL-2521-01 Rev. D0, June 2004
5-13
Chapter 5
CLI Commands
addcon
Examples
The following example adds a master connection as the primary channel using AAL2 for bearer traffic.
The local VCI is 160 and the remote end is named node1 in slot 4, port 2 with a VPI/VCI of 223/223.
The service type is CBR, the sustainable call rate is 500 cps, and the maximum burst rate is 6000 cells.
addcon 160 1 2 2 1000 1 node1.4.2.223.223 1 500 6000
After you execute this command, a typical local connection ID appears as node 1.5.1.0.160, where 160
is the added LCN.
Related Commands
Command
Description
cnfcalea
Enables or disables the CALEA feature on the current VISM card.
cnfcon
Configures a connection between a VISM card and an MGX 8000 Series platform
PXM card.
cnfconprotect
Configures protection on a connection (PVC).
delcon
Deletes a connection (PVC) between a VISM card and a Cisco MGX 8000 Series
platform PXM card.
dspcalea
Displays the CALEA feature configuration status of the current VISM card.
dspcon
Displays the parameters for a specified channel.
dspcons
Displays channel information for all configured connections on a VISM card.
dspvismparam
Displays the current VISM card configuration.
Cisco VISM Installation and Configuration Guide
5-14
Release 3.0, Part Number OL-2521-01 Rev. D0, June 2004
Chapter 5
CLI Commands
addconloop
addconloop
To set a cellbus connection to local loopback state on a current card, use the addconloop command in
the VoIP switching/trunking, switched AAL2 PVC, and AAL2 trunking operating modes.
addconloop lcn
Syntax Description
lcn
Command Modes
VoIP switching/trunking, switched AAL2 PVC, AAL2 trunking
Usage Guidelines
Follow standard CLI procedures for this command.
Examples
The following example places the channel number 132 in loopback state:
Logical channel number of the CCS channel to be added in the range from 131 to 510.
addconloop 132
Related Commands
Command
Description
delconloop
Deletes a local loopback state on a VISM line.
Cisco VISM Installation and Configuration Guide
Release 3.0, Part Number OL-2521-01 Rev. D0, June 2004
5-15
Chapter 5
CLI Commands
adddn
adddn
To add a domain name (call agent name, TFTP server name, domain name server (DNS) name, or
announcement server name) and optionally configure the resolution type of the domain name, use the
adddn command in the VoIP switching/trunking, and switched AAL2 PVC operating modes.
adddn domain-num domain-name |resol-type|
Syntax Description
domain-num
Domain number used to identify the domain in the range from 1 to 11.
domain-name
Call agent name. A text string of 1 to 64 alphanumeric characters.
resol-type
(Optional) Resolution type to configure for the specified domain name. It can be
one of the following values:
•
1 = Internal only. You must statistically provision all IP addresses on the VISM
card for the domain name. The VISM card does not resolve the domain name
using an external domain name server (DNS).
•
2 = External only. The VISM card attempts to resolve the domain name using
an external DNS. Statistically configured IP addresses for this domain name
are not used.
•
3 = Internal first. The VISM card attempts to resolve the domain name using
an external DNS. The VISM card uses the statistically provisioned IP
addresses for this domain name before using IP addresses from external
resolution.
•
4 = External first. The VISM card attempts to resolve the domain name using
an external DNS. The VISM card uses IP addresses from external resolution
before using the statistically provisioned IP addresses.
Command Modes
VoIP switching/trunking, switched AAL2 PVC
Usage Guidelines
Follow standard CLI procedures for this command.
Examples
The following example shows that a call agent domain name, main, with a domain number of 3 is
assigned the internal first resolution type (3):
adddn 3 main 3
Related Commands
Command
Description
adddnip
Adds the IP addresses for a domain name that you added by using the adddn
command.
cnfdn
Configures the resolution type of a specified domain name.
cnfdnssrvr
Designates a domain name as a DNS.
deldn
Deletes a domain name.
deldnip
Deletes a statistically provisioned IP address of a domain name.
Cisco VISM Installation and Configuration Guide
5-16
Release 3.0, Part Number OL-2521-01 Rev. D0, June 2004
Chapter 5
CLI Commands
adddn
Command
Description
dspdn
Displays the argument values of a call agent’s domain number.
dspdnallips
Displays all statistically provisioned IP addresses and externally resolved IP
addresses for all domain names configured on the current VISM card.
dspdnips
Displays all statistically provisioned and externally resolved IP addresses
configured for a specified domain name.
dspdns
Displays the configuration data of all domain names of a call agent.
dspdnssrvr
Displays the domain name of the configured DNS of the current VISM card.
Cisco VISM Installation and Configuration Guide
Release 3.0, Part Number OL-2521-01 Rev. D0, June 2004
5-17
Chapter 5
CLI Commands
adddnip
adddnip
To add the IP addresses for a domain name that you added by using the adddn command, use the
adddnip command in the VoIP switching/trunking, switched AAL2 PVC, and AAL2 trunking operating
modes.
adddnip resol-num domain-name ip-addr addr-order
Syntax Description
resol-num
Resolution number of the domain name. It can be in the range from 1 to 88.
domain-name
Call agent name. A text string of 1 to 64 alphanumeric characters.
ip-addr
IP address which corresponds to the domain-name argument value. It must be in the
following format: nnn.nnn.nnn.nnn.
addr-order
IP address resolution preference order in the range from 1 (highest) to 8.
Note
The preference order must be unique for all IP addresses in the call agent
name you specify with the domain-name argument.
Command Modes
VoIP switching/trunking, switched AAL2 PVC, and AAL2 trunking
Usage Guidelines
Follow standard CLI procedures for this command.
Examples
The following example shows that resolution number 22 is configured for domain name callagent35,
with IP address 209.165.200.224, and an address resolution preference order of 7 (low):
adddnip 22 callagent35 209.165.200.224 7
Related Commands
Command
Description
adddn
Adds a domain name (call agent name) and optionally configures the resolution
type of the domain name.
cnfdn
Configures the resolution type of a specified domain name.
cnfdnssrvr
Designates a domain name as a DNS.
deldn
Deletes a domain name.
deldnip
Deletes a statistically provisioned IP address of a domain name.
dspdnallips
Displays all statistically provisioned IP addresses and externally resolved IP
addresses for all domain names configured on the current VISM card.
dspdnips
Displays all statistically provisioned and externally resolved IP addresses
configured for a specified domain name.
dspdns
Displays the configuration data of all domain names of a call agent.
dspdnssrvr
Displays the domain name of the configured DNS of the current VISM card.
Cisco VISM Installation and Configuration Guide
5-18
Release 3.0, Part Number OL-2521-01 Rev. D0, June 2004
Chapter 5
CLI Commands
addendpt
addendpt
To add an endpoint on a VISM card line, use the addendpt command in the VoIP switching/trunking,
switched AAL2 PVC, and AAL2 trunking operating modes.
addendpt endpt-num ds1-num ds0-num
Syntax Description
endpt-num
Endpoint number. It can be a value from one of the following ranges:
•
For template number 1:
– For VISM, from 1 to 145
– For VISM-PR T1, from 1 to 192
– For VISM-PR E1, from 1 to 248
•
For template number 2:
– For VISM T1, from 1 to 192
– For VISM E1, from 1 to 248
•
For template number 3:
– For VISM, from 1 to 120
– For VISM-PR T1, from 1 to 192
– For VISM-PR E1, from 1 to 248
•
For template number 4:
– For VISM-PR, from 1 to 144
ds1-num
Physical line number in the range from 1 to 8.
ds0-num
DS0 configured for the endpt-num value. It can be a value from one of the following
ranges:
•
For T1 lines, from 1 to 24
•
For non-CAS E1 lines, from 1 to 31
•
For CAS E1 lines, from 1 to 15 and 17 to 31
Command Modes
VoIP switching/trunking, switched AAL2 PVC, and AAL2 trunking
Usage Guidelines
The endpoint on VISM is a logical port that consists of one DS0. The argument values entered in this
command create an endpoint ID (endpt-num) which is required by the call agent for sending the xGCP
Create Connection command (CRCX) to a VISM card. You can only configure bearer DS0s as endpoints
to a previously added line.
Note
The endpoint number is not equal to the DS0 number of the associated time slot. For example,
endpoint 1 could be associated with DS011.
If your application requires the VoIP switching/trunking operating mode, you must add the IP address
for VISM with the cnfvismip command before endpoints can be added.
Cisco VISM Installation and Configuration Guide
Release 3.0, Part Number OL-2521-01 Rev. D0, June 2004
5-19
Chapter 5
CLI Commands
addendpt
This command sends an RSIP message to each associated call agent indicating that the endpoint is in
service.
Examples
The following example adds an endpoint with the number 120, on line 5, DS0 number 5:
addendpt 120 5 5
Related Commands
Command
Description
addendpts
Adds multiple sequential endpoints to a VISM card.
delendpt
Deletes a specified endpoint on a VISM card.
dspendpt
Displays information about a specified endpoint on a VISM card.
dspendpts
Displays information about all the endpoints on a VISM card.
Cisco VISM Installation and Configuration Guide
5-20
Release 3.0, Part Number OL-2521-01 Rev. D0, June 2004
Chapter 5
CLI Commands
addendptloop
addendptloop
To place an endpoint in a loopback condition in the TDM direction, use the addendptloop command in
the VoIP switching/trunking, switched AAL2 PVC, and AAL2 trunking operating modes.
addendptloop endpt-num
Syntax Description
endpt-num
Endpoint number. It can be a value from one of the following ranges:
•
For template number 1:
– For VISM, from 1 to 145
– For VISM-PR T1, from 1 to 192
– For VISM-PR E1, from 1 to 248
•
For template number 2:
– For VISM T1, from 1 to 192
– For VISM E1, from 1 to 248
•
For template number 3:
– For VISM, from 1 to 120
– For VISM-PR T1, from 1 to 192
– For VISM-PR E1, from 1 to 248
•
For template number 4:
– For VISM-PR, from 1 to 144
Command Modes
VoIP switching/trunking, switched AAL2 PVC, and AAL2 trunking
Usage Guidelines
Follow standard CLI procedures for this command.
Examples
The following example adds an endpoint loopback to endpoint 120:
addendptloop 120
Related Commands
Command
Description
delendptloop
Takes an endpoint out of a loopback condition.
Cisco VISM Installation and Configuration Guide
Release 3.0, Part Number OL-2521-01 Rev. D0, June 2004
5-21
Chapter 5
CLI Commands
addendpts
addendpts
To add multiple consecutive number of endpoints with a single command, use the addendpts command
in the VoIP switching/trunking, switched AAL2 PVC, AAL2 trunking, and switched ATM AAL1 SVC
operating modes.
addendpts start-endpt start-line-num start-ds0-num endpt-quantity
Syntax Description
start-endpt
First endpoint number of a range of consecutive endpoints. It can be a value from
one of the following ranges:
•
For template number 1:
– For VISM, from 1 to 145
– For VISM-PR T1, from 1 to 192
– For VISM-PR E1, from 1 to 248
•
For template number 2:
– For VISM T1, from 1 to 192
– For VISM E1, from 1 to 248
•
For template number 3:
– For VISM, from 1 to 120
– For VISM-PR T1, from 1 to 192
– For VISM-PR E1, from 1 to 248
•
For template number 4:
– For VISM-PR, from 1 to 144
start-line-num
Line number to which the endpoints are added. In the range from 1 to 8.
Cisco VISM Installation and Configuration Guide
5-22
Release 3.0, Part Number OL-2521-01 Rev. D0, June 2004
Chapter 5
CLI Commands
addendpts
start-ds0-num
endpt-quantity
DS0 number to which the endpoints are added. It can be a value from one of the
following ranges:
•
1 to 24 for T1 lines
•
1 to 31 for non-CAS E1 lines
•
1 to 15 and 17 to 31 for CAS E1 lines
The quantity of endpoints added. It can be a value from one of the following
ranges:
•
For template number 1:
– For VISM, from 1 to 145
– For VISM-PR T1, from 1 to 192
– For VISM-PR E1, from 1 to 248
•
For template number 2:
– For VISM T1, from 1 to 192
– For VISM E1, from 1 to 248
•
For template number 3:
– For VISM, from 1 to 120
– For VISM-PR T1, from 1 to 192
– For VISM-PR E1, from 1 to 248
•
For template number 4:
– For VISM-PR, from 1 to 144
Command Modes
VoIP switching/trunking, switched AAL2 PVC, AAL2 trunking, and switched ATM AAL1 SVC
Usage Guidelines
Note
If you are running a VoIP application, you must use the cnfvismip command before you can add
endpoints.
This command adds a specified number of consecutive endpoints starting at a specified endpoint number,
line number, and DS0 number. As endpoints are added, the command uses the next available (not added)
endpoint numbers and DS0s. The command does not wrap around DS0 and endpoint numbers.
Note
The endpoint number is not equal to the DS0 number of the associated time slot. For example,
endpoint 1 could be associated with DS011.
Ensure that there are enough lines and DS0s before you add endpoints with this command. If you attempt
to add more endpoints than are available, only the available endpoints are added. For example, if T1 line
1 is the only line enabled and you attempt to add 25 endpoints, only 24 endpoints are added. Your
terminal display shows the actual number of endpoints added.
Cisco VISM Installation and Configuration Guide
Release 3.0, Part Number OL-2521-01 Rev. D0, June 2004
5-23
Chapter 5
CLI Commands
addendpts
This command sends an RSIP message to each associated call agent indicating that the endpoints are in
service.
Examples
The following example shows that 12 consecutive endpoints are added to line 1, starting at endpoint
number 6, DS0 number 12:
addendpts 6 1 12 12
Related Commands
Command
Description
delendpts
Deletes a consecutive number of endpoints on the VISM card.
dspendpts
Displays information about all endpoints on a VISM card.
Cisco VISM Installation and Configuration Guide
5-24
Release 3.0, Part Number OL-2521-01 Rev. D0, June 2004
Chapter 5
CLI Commands
addlapd
addlapd
To add a Link Access Protocol D channel (LAPD) from a specified DS0 to a VISM card, use the addlapd
command in VoIP switching/trunking operating mode.
addlapd line-num ds0-num |lapd-side lapd-app-type|
Syntax Description
line-num
Line number of the channel to which you want to add an ISDN D channel. In the
range from 1 to 8.
ds0-num
DS0 number of the channel to which you want to add an ISDN D channel. It can
be a value from one of the following ranges:
lapd-side
•
1 to 24 for T1 lines
•
1 to 31 for E1 lines
(Optional) The side of the LAPD link. It can be one of the following values:
lapd-app-type
•
1 = Network (Default)
•
2 = User
(Optional) Application type of the LAPD ISDN D channel. It can be one of the
following values:
1 = PRI (Default)
2 = GR-303 (currently unsupported)
Command Modes
VoIP switching/trunking
Usage Guidelines
You must complete the following before using this command:
•
Specify the line as CCS.
•
Ensure that the DS0 is available.
•
Create a session group and session to a call agent.
Use this command when the specified channel is backhauled to the call agent.
Examples
The following example shows that an ISDN PRI D channel is added to line 2 and DS0 7 on the network
side:
addlapd 2 7 1 1
Related Commands
Command
Description
dellapd
Deletes an LAPD.
dsplapd
Displays information about an LAPD.
dsplapds
Displays information about all LAPD.
Cisco VISM Installation and Configuration Guide
Release 3.0, Part Number OL-2521-01 Rev. D0, June 2004
5-25
Chapter 5
CLI Commands
addlapdtrunk
addlapdtrunk
To add a Link Access Protocol D channel (LAPD) trunk to a specific VISM card line, use the
addlapdtrunk command in the VoIP switching/trunking operating mode.
addlapdtrunk line-num lapd-rudp-num
Syntax Description
line-num
Line number of the T1 or E1 line in the range from 1 to 8.
lapd-rudp-num
LAPD RUDP number in the range from 1 to 64.
Command Modes
VoIP switching/trunking
Usage Guidelines
Follow standard CLI procedures for this command.
Examples
The following example shows that the LAPD RUDP number 1 is added to VISM card line number 2:
addlapdtrunk 2 1
Related Commands
Command
Description
addrtpcon
Adds a static RTP VoIP trunking connection.
addrudptrunk
Adds an ISDN PRI backhaul RUDP session for an LAPD trunk connection.
clrrtpcnt
Clears the RTP counters (statistics) for a specific static RTP connection.
cnflapdtrunkpvc
Assigns the PVC trunk type that carries LAPD messages for the current VISM
card.
cnflntrunkcond
Enables or disables line conditioning on a VISM card line if a network alarm
is encountered.
cnfrtpcon
Modifies an existing static RTP VoIP trunking connection.
cnfrudptrunkrmtip Modifies the remote IP address of VISM used in the ISDN PRI backhaul RUDP
trunk for a specified session.
dellapdtrunk
Deletes an LAPD configured line.
delrtpcon
Deletes a static RTP VoIP trunking connection.
delrudptrunk
Deletes an ISDN PRI backhaul RUDP session that is associated with an LAPD.
dsplapd
Displays data about an LAPD.
dsplapdtrunkpvc
Displays the assigned PVC trunk type that carries LAPD trunk messages for
the current VISM card.
dsplapdtrunks
Displays the configuration data of all LAPD trunks.
dsprtpcnt
Displays the bearer counters (statistics) for a specific RTP VoIP trunking
connection.
dsprtpcon
Displays the configuration data of a specific static RTP VoIP trunking
connection.
dsprtpcons
Displays the configuration data of all static RTP VoIP trunking connections.
Cisco VISM Installation and Configuration Guide
5-26
Release 3.0, Part Number OL-2521-01 Rev. D0, June 2004
Chapter 5
CLI Commands
addlapdtrunk
Command
Description
dsprudptrunk
Displays the configuration data of a specified ISDN PRI backhaul RUDP
session.
dsprudptrunks
Displays the configuration data of all ISDN PRI backhaul RUDP sessions.
Cisco VISM Installation and Configuration Guide
Release 3.0, Part Number OL-2521-01 Rev. D0, June 2004
5-27
Chapter 5
CLI Commands
addln
addln
To add a T1 or E1 line to a VISM card, use the addln command in the VoIP switching/trunking, switched
AAL2 PVC, and AAL2 trunking operating modes.
addln line-num
Syntax Description
line-num
Command Modes
VoIP switching/trunking, switched AAL2 PVC, and AAL2 trunking
Usage Guidelines
Follow standard CLI procedures for this command.
Examples
The following example shows that line number 1 is added to a VISM card:
Line number of the T1 or E1 line to be added in the range from 1 to 8.
addln 1
Related Commands
Command
Description
cnfln
Configures line characteristics for a specified line.
delln
Deletes a DS1 line on a VISM card.
dspln
Displays the characteristics of a specified line.
Cisco VISM Installation and Configuration Guide
5-28
Release 3.0, Part Number OL-2521-01 Rev. D0, June 2004
Chapter 5
CLI Commands
addlnloop
addlnloop
To set a specified line of the current card to the local loopback state, use the addlnloop command in the
VoIP switching/trunking, switched AAL2 PVC, and AAL2 trunking operating modes.
addlnloop line-num
Syntax Description
line-num
Command Modes
VoIP switching/trunking, switched AAL2 PVC, and AAL2 trunking
Usage Guidelines
Follow standard CLI procedures for this command.
Note
Examples
Line number of the T1 or E1 line to be added in the range from 1 to 8.
The VISM CLI has no specific command for setting a line to a remote loopback state. To set a line
to remote loopback state, use the cnfbert command on the PXM card. Refer to MGX 8000 Series
platform command line interface guides for more information.
The following example adds a local line loopback state to line 1:
addlnloop 1
Related Commands
Command
Description
dellnloop
Deletes a T1 or E1 local line loopback state for the VISM card.
Cisco VISM Installation and Configuration Guide
Release 3.0, Part Number OL-2521-01 Rev. D0, June 2004
5-29
Chapter 5
CLI Commands
addmgcgrpentry
addmgcgrpentry
To configure a call agent as part of a media gateway controller (MGC) redundancy group and assign a
priority value for the call agent, use the addmgcgrpentry command in the VoIP switching/trunking and
switched AAL2 PVC operating modes.
addmgcgrpentry mgc-group mgc-num mgc-preference
Syntax Description
mgc-group
Call agent redundancy group number. It can be in the range from 1 to 8.
mgc-num
Call agent identification number. It can be in the range from 1 to 8.
mgc-preference
Call agent preference value—The preference of the MGC within the
group. It can be in the range from 1 (highest) to 8. (Default = 1)
Command Modes
VoIP switching/trunking and switched AAL2 PVC
Usage Guidelines
You must add a call agent to a call agent redundancy group regardless of the absence of additional call
agents in the redundancy group.
Use the dspmgcgrpparams command to verify call agent redundancy group configuration data.
Examples
The following example shows that call agent redundancy group number 1 is configured with the call
agent number 5, and assigned a priority level of 3:
addmgcgrpentry 1 5 3
Related Commands
Command
Description
addmgcgrpprotocol
Associates a call agent redundancy group to a gateway control protocol.
cnfmgcgrpentry
Modifies the call agent priority level of a call agent within a call agent
redundancy group.
cnfmgcgrpparam
Modifies a call agent redundancy group state change notification policy
and priority level.
cnfsrcppeer
Configures the SRCP parameters when SRCP is the selected protocol for
communication between the VISM card and call agent.
cnfsrcppeergrpparam
Modifies the SRCP heartbeat interval and maximum UDP size for a
specified call agent redundancy group.
delmgcgrpentry
Deletes a call agent from a call agent redundancy group.
delmgcgrpprotocol
Deletes an MGCP from a specified call agent redundancy group.
dspmgcgrpparams
Displays all configured call agent redundancy group parameters.
dspmgcgrpprotocols
Displays all configured call agent redundancy group protocols.
dspmgcgrps
Displays all configured call agent redundancy groups.
dspsrcppeergrpparams
Displays the SRCP parameters for all call agent redundancy groups that
have SRCP added.
Cisco VISM Installation and Configuration Guide
5-30
Release 3.0, Part Number OL-2521-01 Rev. D0, June 2004
Chapter 5
CLI Commands
addmgcgrpprotocol
addmgcgrpprotocol
To associate a call agent redundancy group with a gateway control protocol (xGCP) and configure call
agent group protocol control data, use the addmgcgrpprotocol command in the VoIP switching/trunking
and switched AAL2 PVC operating mode.
addmgcgrpprotocol red-mgc-group protocol-num quar-persist default-quar del-negated prov-resp
resp-ack disc-proc-enable cancel-grace
Syntax Description
red-mgc-group
Call agent redundancy group number. It can be in the range from 1 to 8.
protocol-num
Protocol number. It can be one of the following values:
quar-persist
default-quar
•
1 = MGCP 0.1
•
2 = SGCP 1.1+
•
3 = SRCP 1.0.2
•
4 = SGCP 1.5
•
5 = MGCP 1.0
(Optional) Sets the quarantine handling method for persistent events. It can
be one of the following values:
•
1 = Quarantine persistent events (Default)
•
2 = Do not quarantine persistent events
(Optional) Sets the default quarantine handling method for each protocol. It
can be one of the following values:
•
1 = Step, process (Default for MGCP 1.0)
•
2 = Step, discard (Default for MGCP 0.1, SGCP 1.1+, SRCP 1.0.2, and
SGCP 1.5)
•
3 = Loop, process
•
4 = Loop, discard
Note
del-negated
prov-resp
Step = one notification command is generated per notification
request. Loop = multiple notification commands are generated per
notification request.
(Optional)
•
1 = Delete events from the previous list which are not present in the
current list.
•
2 = Delete events from the previous list, only if the event is present in
the current list with a hyphen (-) as the parameter.
(Optional) Enables or disables the sending of a provisional response. It can
be one of the following values:
1 = On (Default for MGCP 1.0)
2 = Off (Default for MGCP 0.1, SGCP 1.1+, SRCP 1.0.2, and SGCP 1.5)
Cisco VISM Installation and Configuration Guide
Release 3.0, Part Number OL-2521-01 Rev. D0, June 2004
5-31
Chapter 5
CLI Commands
addmgcgrpprotocol
resp-ack
disc-proc-enable
cancel-grace
(Optional) Enables or disables sending a response acknowledgment. It can
be one of the following values:
•
1 = On (Default for MGCP 1.0)
•
2 = Off (Default for MGCP 0.1, SGCP 1.1+, SRCP 1.0.2, and SGCP 1.5)
(Optional) Enables or disables the disconnect method, which indicates that
the endpoint has become disconnected and is now trying to establish
connectivity. It can be one of the following values:
•
1 = On (Default for MGCP 1.0)
•
2 = Off (Default for MGCP 0.1, SGCP 1.1+, SRCP 1.0.2, and SGCP 1.5)
(Optional) Enables or disables VISM cancelling a previously issued graceful
restart in progress command. It can be one of the following values:
•
1 = On (Default for MGCP 1.0)
•
2 = Off (Default for MGCP 0.1, SGCP 1.1+, SRCP 1.0.2, and SGCP 1.5)
Command Modes
VoIP switching/trunking and switched AAL2 PVC
Usage Guidelines
This command allows you to add multiple protocols to the same redundancy group.
Examples
The following example shows that call agent redundancy group number 3 is assigned gateway control
protocol number 2, SGCP 1.1+:
addmgcgrpprotocol 3 2
Related Commands
Command
Description
addmgcgrpentry
Configures call agents as part of an MGC redundancy group and assigns a
priority value for a call agent.
cnfdisctimers
Specifies the wait delay times for the disconnected procedure, restart in
progress command—initial, minimum, and maximum timer values.
cnfmgcgrpentry
Modifies the call agent priority level of a call agent within a call agent
redundancy group.
cnfmgcgrpparam
Modifies a call agent redundancy group state change notification policy and
priority level.
cnfmgcgrpprotocol
Configures call agent group protocol data.
cnfsrcppeer
Configures the SRCP parameters when SRCP is the selected protocol for
communication between the VISM card and call agent.
cnfsrcppeergrpparam
Modifies the SRCP heartbeat interval and maximum UDP size for a
specified call agent redundancy group.
delmgcgrpentry
Deletes a call agent from a call agent redundancy group.
delmgcgrpprotocol
Deletes an MGCP from a specified call agent redundancy group.
dspdisctimers
Displays the Restart in Progress command disconnect type method wait
delay times.
Cisco VISM Installation and Configuration Guide
5-32
Release 3.0, Part Number OL-2521-01 Rev. D0, June 2004
Chapter 5
CLI Commands
addmgcgrpprotocol
Command
Description
dspmgcgrpparams
Displays all configured call agent redundancy group parameters.
dspmgcgrpprotocols
Displays all configured call agent redundancy group protocols.
dspmgcprps
Displays all configured call agent redundancy groups.
dspsrcppeergrpparams
Displays the SRCP parameters for all call agent redundancy groups that
have SRCP added.
Cisco VISM Installation and Configuration Guide
Release 3.0, Part Number OL-2521-01 Rev. D0, June 2004
5-33
Chapter 5
CLI Commands
addport
addport
To add a virtual port between the VISM and PXM cards, use the addport command in the VoIP
switching/trunking, switched AAL2 PVC, AAL2 trunking, AAL1 SVC, AAL2 SVC, and AAL1/VoIP
(for TDM grooming) operating modes.
addport
Syntax Description
This command has no arguments.
Command Modes
VoIP switching/trunking, switched AAL2 PVC, AAL2 trunking, AAL1 SVC, AAL2 SVC, and
AAL1/VoIP (for TDM grooming)
Usage Guidelines
This command automatically associates the VISM card and the virtual port with the MGX 8000 Series
platform.
Note
If the VISM card is reset after executing this command but before executing the addrscprtn
command, an error message is displayed. The error has no effect on the system and can be ignored.
The port number is set to one of the following when you use this command:
Examples
•
1—for PXM1 cards
•
255—for PXM1E cards
The following example shows that a virtual port has been added between the VISM and PXM cards:
addport
Related Commands
Command
Description
delport
Deletes a VISM port on the packet network side.
Cisco VISM Installation and Configuration Guide
5-34
Release 3.0, Part Number OL-2521-01 Rev. D0, June 2004
Chapter 5
CLI Commands
addrscprtn
addrscprtn
To add a resource partition for a virtual port, use the addrscprtn command in the VoIP
switching/trunking, switched AAL2 PVC, AAL2 trunking, AAL1 SVC, AAL2 SVC, and AAL1/VoIP
(for TDM grooming) operating modes.
addrscprtn control-id
Syntax Description
control-id
The controller identification number to which the resource partition is added. It can
be one of the following:
•
1—for a PXM1 card
•
2—for a PXM1E or PXM45 card
•
In the range from 3 to 255
Command Modes
VoIP switching/trunking, switched AAL2 PVC, AAL2 trunking, AAL1 SVC, AAL2 SVC, and
AAL1/VoIP (for TDM grooming)
Usage Guidelines
You must configure a virtual port with the addport command before you use this command.
Note
If the VISM card is reset after executing an addport command but before using this command, an
error message is displayed. The error has no effect on the system and can be ignored.
If you are using a PXM1 card, this command adds an entry with resource partition number 1. If you are
using a PXM1E card, this command adds the entries with resource partition numbers 225 and 2,
respectively.
Examples
The following example shows that a resource partition is added to controller number 2:
addrscprtn 1
Related Commands
Command
Description
delrscprtn
Deletes a resource partition.
dsprscprtn
Displays information about a resource partition.
Cisco VISM Installation and Configuration Guide
Release 3.0, Part Number OL-2521-01 Rev. D0, June 2004
5-35
Chapter 5
CLI Commands
addrtpcon
addrtpcon
To add a static Real-Time Transport Protocol (RTP) VoIP trunking connection, use the addrtpcon
command in the VoIP switching/trunking operating mode.
addrtpcon conn-num endpt-num local-rtp-port remote-rtp-port remote-ip-addr codec-type
|vt-pkt-period bearer-prec bearer-tos conn-mode ecan-enable vad-enable vad-timer cas-trans
dtmf-trans idle-code-sup|
Syntax Description
conn-num
Connection identification number. It can be in the range from 1 to 248.
endpt-num
Endpoint number. It can be a value from one of the following ranges:
•
For template number 1:
– For VISM, from 1 to 145
– For VISM-PR T1, from 1 to 192
– For VISM-PR E1, from 1 to 248
•
For template number 2:
– For VISM T1, from 1 to 192
– For VISM E1, from 1 to 248
•
For template number 3:
– For VISM, from 1 to 120
– For VISM-PR T1, from 1 to 192
– For VISM-PR E1, from 1 to 248
•
For template number 4:
– For VISM-PR, from 1 to 144
local-rtp-port
Static RTP local port number. It can be an even number in the range from 49648
to 50142.
Note
remote-rtp-port
Static RTP remote port number. It can be an even number in the range from
16384 to 50142.
Note
remote-ip-addr
The odd numbers within the local-rtp-port range are reserved for
Real-Time Conferencing Protocol (RTCP) ports.
The odd numbers within the remote-rtp-port range are reserved for
RTCP ports.
IP address of the remote VISM card, in dotted decimal format
(nnn.nnn.nnn.nnn).
Cisco VISM Installation and Configuration Guide
5-36
Release 3.0, Part Number OL-2521-01 Rev. D0, June 2004
Chapter 5
CLI Commands
addrtpcon
codec-type
vt-pkt-period
The type of coding/decoding to be performed on the data stream. It can be one
of the following values:
•
1 = G.711u
•
2 = G.711a
•
3 = G.726-32k
•
4 = G.729a
•
5 = G.729ab
•
6 = Clear channel (VAD must be off)
•
7 = G.726-16k
•
8 = G.726-24k
•
9 = G.726-40k
•
11 = G.723.1-H
•
12 = G.723.1a-H
•
13 = G.723.1-L
•
14 = G.723.1a-L
(Optional) Packetization period (defined in milliseconds). It can be one of the
following values:
•
10
•
20
•
30
•
40
•
60
bearer-prec
(Optional) Bearer precedence. It can be in the range from 0 to 7. (Default = 5)
bearer-tos
(Optional) Bearer type of service (ToS). It can be one of the following values:
conn-mode
ecan-enable
•
0 (Default)
•
1
•
2
•
4
•
8
(Optional) Connection mode. It can be one of the following values:
•
1 = VISM sends packets
•
2 = VISM receives packets
•
3 = VISM sends and receives packets (Default)
•
4 = Inactive; VISM does not send or receive packets
(Optional) Enables or disables echo cancellation (ECAN). It can be one of the
following values:
•
1 = On (Default)
•
2 = Off
Cisco VISM Installation and Configuration Guide
Release 3.0, Part Number OL-2521-01 Rev. D0, June 2004
5-37
Chapter 5
CLI Commands
addrtpcon
vad-enable
(Optional) Enables or disables voice activity detection (VAD). It can be one of
the following values:
•
1 = On
•
2 = Off (Default)
vad-timer
(Optional) The VAD holdover timer (defined in milliseconds) in the range from
250 to 65535.
cas-trans
(Optional) Enables or disables CAS signaling transport. It can be one of the
following values:
dtmf-trans
•
1 = On (Default)
•
2 = Off
(Optional) Enables or disables DTMF tone transport. It can be one of the
following values:
•
1 = On (Default)
•
2 = Off
The dtmf-trans argument value must be set to 1 (on) when the
codec-type is configured for codecs other than G.711 and G.726.
Note
idle-code-sup
(Optional) Enables or disables idle code suppression for the channel identifier
(CID). It can be one of the following values:
•
1 = On
•
2 = Off (Default)
Command Modes
VoIP switching/trunking
Usage Guidelines
The G.723.1 codecs are supported for VISM-PR cards and are not supported for VISM cards.
Examples
The following example shows that the RTP trunking connection 26 is added and configured with
endpoint number 200, static RTP local port number 50000, static RTP remote port number 49648, remote
IP address 209.165.200.224, G.726/32 codec type, 20-ms packetization period, bearer precedence of 3,
bearer ToS of 1, VISM sends and receives packets, ECAN and VAD enabled, 400-ms VAD holdover
time, CAS transportation enabled, DTMF tone transportation, idle code suppression for CID enabled:
addrtpcon 26 200 50000 49648 209.165.200.224 3 20 3 1 3 1 1 400 1 1 1
Related Commands
Command
Description
addlapdtrunk
Adds an LAPD trunk to a specific VISM card line.
addrudptrunk
Adds an ISDN PRI backhaul RUDP session for an LAPD trunk connection.
clrrtpcnt
Clears the RTP counters (statistics) for a specific static RTP connection.
cnflapdtrunkpvc
Assigns the PVC trunk type that carries LAPD messages for the current VISM
card.
cnflntrunkcond
Enables or disables line conditioning on a VISM card line if a network alarm
is encountered.
Cisco VISM Installation and Configuration Guide
5-38
Release 3.0, Part Number OL-2521-01 Rev. D0, June 2004
Chapter 5
CLI Commands
addrtpcon
Command
Description
cnfrtpcon
Modifies an existing static RTP VoIP trunking connection.
cnfrudptrunkrmtip Modifies the remote IP address of VISM used in the ISDN PRI backhaul RUDP
trunk for a specified session.
dellapdtrunk
Deletes an LAPD configured line.
delrtpcon
Deletes a static RTP VoIP trunking connection.
delrudptrunk
Deletes an ISDN PRI backhaul RUDP session that is associated with an LAPD.
dsplapd
Displays data about an LAPD.
dsplapdtrunkpvc
Displays the assigned PVC trunk type that carries LAPD trunk messages for
the current VISM card.
dsplapdtrunks
Displays the configuration data of all LAPD trunks.
dsprtpcnt
Displays the bearer counters (statistics) for a specific RTP VoIP trunking
connection.
dsprtpcon
Displays the configuration data of a specific static RTP VoIP trunking
connection.
dsprtpconnstat
Displays the RTP connection statistics for a specified endpoint.
dsprtpcons
Displays the configuration data of all static RTP VoIP trunking connections.
dsprudptrunk
Displays the configuration data of a specified ISDN PRI backhaul RUDP
session.
dsprudptrunks
Displays the configuration data of all ISDN PRI backhaul RUDP sessions.
Cisco VISM Installation and Configuration Guide
Release 3.0, Part Number OL-2521-01 Rev. D0, June 2004
5-39
Chapter 5
CLI Commands
addrudptrunk
addrudptrunk
To add an ISDN PRI backhaul Reliable User Datagram Protocol (RUDP) session for a Link Access
Protocol D channel (LAPD) trunk connection, use the addrudptrunk command in the VoIP
switching/trunking operating mode.
addrudptrunk session-num lport-num rport-num remote-ip-addr
Syntax Description
session-num
Identifying session number in the range from 1 to 64.
lport-num
Local port number. It can be in the range from 1124 to 49151.
rport-num
Remote port number. It can be in the range from 1124 to 49151.
remote-ip-addr
IP address of the remote VISM card, in dotted decimal format
(nnn.nnn.nnn.nnn).
Command Modes
VoIP switching/trunking
Usage Guidelines
Follow standard CLI procedures for this command.
Examples
The following example shows that the ISDN PRI backhaul RUDP session number 40 is added to the
LAPD trunk connection with local port 1024, remote port 2006, and remote IP address 209.165.200.244:
addrudptrunk 40 1024 2006 209.165.200.244
Related Commands
Command
Description
addlapdtrunk
Adds an LAPD trunk to a specific VISM card line.
addrtpcon
Adds a static RTP VoIP trunking connection.
clrrtpcnt
Clears the RTP counters (statistics) for a specific static RTP connection.
cnflapdtrunkpvc
Assigns the PVC trunk type that carries LAPD messages for the current VISM
card.
cnflntrunkcond
Enables or disables line conditioning on a VISM card line if a network alarm
is encountered.
cnfrtpcon
Modifies an existing static RTP VoIP trunking connection.
cnfrudptrunkrmtip Modifies the remote IP address of VISM used in the ISDN PRI backhaul RUDP
trunk for a specified session.
dellapdtrunk
Deletes an LAPD configured line.
delrtpcon
Deletes a static RTP VoIP trunking connection.
delrudptrunk
Deletes an ISDN PRI backhaul RUDP session that is associated with an LAPD.
dsplapd
Displays data about an LAPD.
dsplapdtrunkpvc
Displays the assigned PVC trunk type that carries LAPD trunk messages for
the current VISM card.
dsplapdtrunks
Displays the configuration data of all LAPD trunks.
Cisco VISM Installation and Configuration Guide
5-40
Release 3.0, Part Number OL-2521-01 Rev. D0, June 2004
Chapter 5
CLI Commands
addrudptrunk
Command
Description
dsprtpcnt
Displays the bearer counters (statistics) for a specific RTP VoIP trunking
connection.
dsprtpcon
Displays the configuration data of a specific static RTP VoIP trunking
connection.
dsprtpcons
Displays the configuration data of all static RTP VoIP trunking connections.
dsprudptrunk
Displays the configuration data of a specified ISDN PRI backhaul RUDP
session.
dsprudptrunks
Displays the configuration data of all ISDN PRI backhaul RUDP sessions.
Cisco VISM Installation and Configuration Guide
Release 3.0, Part Number OL-2521-01 Rev. D0, June 2004
5-41
Chapter 5
CLI Commands
addses
addses
To add a PRI backhaul session between a VISM card and a call agent, use the addses command in the
VoIP switching/trunking and switched AAL2 PVC operating modes.
addses session-num group-num priority local-port-num remote-port-num
Syntax Description
session-num
Identifying session number in the range from 1 to 64.
Note
group-num
Up to 64 sessions can be created in a session group.
Identifying session group number to which the session is added in the range
from 1 to 16.
Note
Currently, only group 1 is supported.
priority
Priority level; determines which session becomes active if a session fails within
the same group. It can be in the range from 1 (highest) to 4 (lowest).
local-port-num
Local port number. The VISM port number used for the session. It can be in the
range from 1124 to 65535.
remote-port-num
Remote port number. The call agent port number used for the session. It can be
in the range from 1124 to 65535.
Command Modes
VoIP switching/trunking and switched AAL2 PVC
Usage Guidelines
You must add a session group for the session before you use this command.
Examples
The following example shows that PRI backhaul session number 4 is added to session group 2 between
the VISM card and the callagent1 call agent:
addses 4 2 2 1124 1124
Related Commands
Command
Description
delses
Deletes a PRI backhaul session.
dspses
Displays information about a PRI backhaul session.
dspsess
Displays information about all PRI backhaul sessions.
Cisco VISM Installation and Configuration Guide
5-42
Release 3.0, Part Number OL-2521-01 Rev. D0, June 2004
Chapter 5
CLI Commands
addsesgrp
addsesgrp
To add a PRI backhaul session group between a VISM card and a call agent, use the addsesgrp command
in the VoIP switching/trunking and switched AAL2 PVC operating modes.
addsesgrp group-num set-num mgc-name
Syntax Description
group-num
Identifying session group number in the range from 1 to 16.
set-num
In the range from 1 to 8.
Note
mgc-name
Currently, only session set number 1 is supported.
Domain name of the call agent, a text string from 1 to 64 alphanumeric characters.
Command Modes
VoIP switching/trunking and switched AAL2 PVC
Usage Guidelines
Specify the following:
Examples
•
The set number to which the group belongs.
•
The call agent the group’s sessions are to be associated.
The following example shows that the PRI backhaul session group 2 is added between the VISM card
and the Jack call agent to session set number 1:
addsesgrp 2 1 Jack
Related Commands
Command
Description
delsesgrp
Deletes a PRI backhaul session group.
Cisco VISM Installation and Configuration Guide
Release 3.0, Part Number OL-2521-01 Rev. D0, June 2004
5-43
Chapter 5
CLI Commands
addsesset
addsesset
To add a PRI backhaul session set between a VISM card and a call agent, use the addsesset command
in the VoIP switching/trunking and switched AAL2 PVC operating modes.
addsesset set-num fault-tol-enable
Syntax Description
set-num
In the range from 1 to 16.
Note
fault-tol-enable
Currently, only session set number 1 is supported.
Enable or disables fault tolerance. It can be one of the following values:
•
1 = Yes
•
2 = No
Command Modes
VoIP switching/trunking and switched AAL2 PVC
Usage Guidelines
The set-num argument value must be set to 1.
Examples
The following example shows that the PRI backhaul session set number 1 is added between a VISM card
and a call agent:
addsesset 1
Related Commands
Command
Description
delsesset
Deletes a PRI backhaul session set.
Cisco VISM Installation and Configuration Guide
5-44
Release 3.0, Part Number OL-2521-01 Rev. D0, June 2004
Chapter 5
CLI Commands
addtoneplan
addtoneplan
To add a provisional tone plan to the current VISM card, use the addtoneplan command in the VoIP
switching/trunking and switched AAL2 PVC operating modes.
addtoneplan tonep-region tonep-version tonep-file
Syntax Description
tonep-region
Tone plan country or region which you want to add to VISM. It can be in the
range from 1 to 64 alphanumeric characters and can contain underscores ( _ ).
This value is case sensitive.
tonep-version
Tone plan version number of the tone plan country or region you are adding to
VISM. It can be in the range from 1 to 65535.
tonep-file
Tone plan file name (names are located in the TFTP server /TFTPBOOT
directory). It can be in the range from 1 to 32 alphanumeric characters and can
contain underscores ( _ ), dashes ( - ), and dots ( . ).
Command Modes
VoIP switching/trunking and switched AAL2 PVC
Usage Guidelines
You must complete the following steps before using this command:
Step 1
Place the new tone plan in the TFTP server /TFTPBOOT directory.
Step 2
Use the adddn command to add the TFTP server domain name to the VISM card.
Step 3
Use the adddnip command to add the IP address of the TFTP server domain name.
Step 4
Use the cnftftpdn command to configure the parameters of the TFTP server domain name.
The addition and configuration of the TFTP domain name is complete. You can now use the
addtoneplan command.
Note
Provisional tone plans are those that you create. Built-in, or preconfigured, tone plans cannot be
added with this command. Built-in tone plans are added to the system automatically upon boot up.
You can add a maximum of 32 provisional tone plans to the system. You must create provisional tone
plan files with the following format:
System Section
version 1
description “Tone Plan defined for xxxx”
Tone Section
dial_tone 1, 2, 3, 4, 5, 6, 7
busy_tone 1, 2, 3, 4, 5, 6, 7, 8, 9, 0
stutter_tone 1, 2, 3
dtmf_digit 1, 2
Cisco VISM Installation and Configuration Guide
Release 3.0, Part Number OL-2521-01 Rev. D0, June 2004
5-45
Chapter 5
CLI Commands
addtoneplan
There is no restriction on the file name or extension of your tone plan definition file, but it must not
exceed the maximum input size of the CLI command. Both the “System Section” and the “Tone Section”
terms are mandatory keywords when creating tone plans. Use the “System Section” to define tone plans.
Use the “Tone Section” to define call progress tones. Specify each tone on a separate line and use white
spaces as delimiters. The syntax of the tone plan definition file defines call progress tones and must be
specified in the following order and on the same line (see Table 5-1 for syntax value options):
tone-name num-of-freq-comp comp-1-freq comp-1-amp |comp-2-freq comp-2-amp| cadence-1-on
cadence-1-off |cadence-2-on cadence-2-off cadence-3-on cadence-3-off cadence-4-on
cadence-4-off|
Table 5-1
Tone Plan Definition File Syntax
Syntax Item
Description
tone-name
Identifies the tone. It can be one of the following values:
num-of-freq-comp
•
dial_tone
•
stutter_tone
•
busy_tone
•
fast_busy_tone
•
ring_back_tone
•
alert_tone
Number of frequency components. It can be one of the following values:
•
1
•
2
You must specify the frequency and amplitude of all frequency
components using the following four arguments.
Note
comp-1-freq
comp-1-amp
Frequency of component 1, specified in Hz.
1
Amplitude of component 1, specified according to the following formula:
46348 * 10 to the power of dbm0/20
It can be in the range from 1 to 65535.
comp-2-freq
comp-2-amp
(Optional) Frequency of component 2, specified in Hz.
1
(Optional) Amplitude of component 2, specified according to the following
formula:
46348 * 10 to the power of dbm0/20
It can be in the range from 1 to 65535.
cadence-1-on
The first on time that the tone plays, defined in milliseconds.
cadence-1-off
The first off time that the tone does not play, defined in milliseconds.
cadence-2-on
(Optional) The second on time that the tone plays, defined in milliseconds.
cadence-2-off
(Optional) The second off time that the tone does not play, defined in
milliseconds.
cadence-3-on
(Optional) The third on time that the tone plays, defined in milliseconds.
cadence-3-off
(Optional) The third off time that the tone does not play, defined in
milliseconds.
Cisco VISM Installation and Configuration Guide
5-46
Release 3.0, Part Number OL-2521-01 Rev. D0, June 2004
Chapter 5
CLI Commands
addtoneplan
Table 5-1
Tone Plan Definition File Syntax (continued)
Syntax Item
Description
cadence-4-on
(Optional) The fourth on time that the tone plays, defined in milliseconds.
cadence-4-off
(Optional) The fourth off time that the tone does not play, defined in
milliseconds.
1. To specify amplitudes of DTMF and MFR1 tones, you must use the following syntax: dtmf_digit amp-low amp-high or
mf_r1_digit amp-low amp-high. The amp-low value = low group frequency. The amp-high value = high group frequency.
Note
If you do not specify the amplitudes of DTMF or MFR1 tones, the default value of 16384
(–9 dBm) is applied.
The appropriate tone plan file, with associated region and version, is downloaded, parsed, and stored in
memory when you use this command.
Examples
The following example shows that the tone plan file name singp_3, with region singapore and version
number 11, is added to the current VISM card:
addtoneplan singapore 11 singp_3
Related Commands
Command
Description
cnflnringback
Configures the ringback tone method for a specified line on the current VISM
card.
cnflntoneplan
Assigns a tone plan to a specified VISM card line.
cnflntonetimeout
Modifies the timeout periods of all call progress tones supported by VISM on
a specified VISM card line.
dellntoneplan
Deletes the tone plan configuration of a specified VISM card line.
deltoneplan
Deletes a previously added tone plan from the current VISM card.
dsplnringback
Displays the ringback tone method for a specified line on the current VISM
card.
dsplntoneplan
Displays the tone plan configuration of a specified VISM card line.
dsplntonetimeout
Displays the configured timeout periods for all call progress tones of a
specified VISM card line.
dsptonebuiltinplans Displays all preconfigured (built-in) tone plans on the current VISM card.
dsptoneplan
Displays the tone configuration of a specified tone plan—either a
preconfigured (built-in) or user-added tone plan.
dsptoneplans
Displays the tone configuration of all tone plans—either preconfigured
(built-in) or user-added tone plans.
dsptoneprovplans
Displays all user-added (provisional) tone plans.
dsptoneregionplans Displays a list of all tone plans for the countries and regions whose name
partially or completely matches the name you supply.
Cisco VISM Installation and Configuration Guide
Release 3.0, Part Number OL-2521-01 Rev. D0, June 2004
5-47
Chapter 5
CLI Commands
addxgcppersistevt
addxgcppersistevt
To add persistent xGCP (various gateway control protocol) events, use the addxgcppersistevt command
in the VoIP switching/trunking and switched AAL2 PVC operating modes.
addxgcppersistevt event-num pkg-event
Syntax Description
event-num
The persistent event index package event number in the range from 1 to 64.
pkg-event
The xGCP package and event string listed as persistent. It can be one of the
following:
•
r/co3 = VISM initiated AAL2 type 3 packet (CO3) network continuity test
•
r/co4 = Network continuity test detect
•
g/ft = Fax tone
•
g/mt = Modem tone
•
g/vbd = Voiceband data
•
g/vbdt = Voiceband data termination
•
l/hu, bl/hu = On hook
•
l/hd, blhd = Off hook
•
ms/ans, dt/ans, md/ans, mo/ans = Answer
•
ms/sup, dt/sup, md/sup = Setup
•
ms/rel, dt/rel, md/rel, mo/rel = Release
•
ms/rtc, dt/rlc, md/rlc, mo/rlc = Release complete
•
ms/res, dt/res, md/res = Resume
•
ms/sus, dt/sus, md/sus = Suspend
•
md/awk = Acknowledgment wink
•
mo/rbz = Reverse make busy
Command Modes
VoIP switching/trunking and switched AAL2 PVC
Usage Guidelines
This command notifies the call agent of the specified event without the need for a xGCP notification
request. There are no persistent xGCP events by default. Only valid xGCP strings (described in the
pkg-event syntax description list) can be configured with this command.
Examples
The following example shows that the persistent event index number 1 is added for the voiceband data
package:
addxgcppersistevt 1 g/vbd
Cisco VISM Installation and Configuration Guide
5-48
Release 3.0, Part Number OL-2521-01 Rev. D0, June 2004
Chapter 5
CLI Commands
addxgcppersistevt
Related Commands
Command
Description
cnfcasflashtime
Configures the minimum and maximum CAS on-hook time periods for
incoming flash hooks on a specified endpoint.
cnfcasglareattrib
Configures the direction of CAS calls and the glare policy for a specified
endpoint.
cnfcaspackage
Configures MGCP packages to notify persistent observed CAS events in the
context of incoming and outgoing CAS calls on a specified endpoint.
cnflndigitorder
Assigns the order in which ANI digits and DNIS digits are dialed during an
outgoing FGD call on the endpoints of a specified VISM card line.
delxgcppersistevt
Deletes a persistent xGCP event.
dspcasglareattrib
Displays the direction of CAS calls and the glare policy for a specified
endpoint.
dspcaspackage
Displays the MGCP packages configured to notify persistent observed CAS
events in the context of incoming and outgoing CAS calls on a specified
endpoint.
dspcastimers
Displays the currently configured CAS timers for a specified endpoint.
dsplndigitorder
Displays the order in which ANI digits and DNIS digits are dialed during an
outgoing FGD call on the endpoints of a specified VISM card line.
Cisco VISM Installation and Configuration Guide
Release 3.0, Part Number OL-2521-01 Rev. D0, June 2004
5-49
Chapter 5
CLI Commands
cc
cc
To navigate from the current (logged on) card to another card in the MGX 8000 Series platform, use the
cc command in the VoIP switching/trunking, switched AAL2 PVC, and AAL2 trunking operating
modes.
cc slot-num
Syntax Description
slot-num
Command Modes
VoIP switching/trunking, switched AAL2 PVC, and AAL2 trunking
Usage Guidelines
When you execute this command, the card residing in the slot identified by the slot-num value becomes
active and is identified in the command line prompt. If there is no card in the slot identified by the
slot-num value, an error message is displayed on your terminal.
Examples
The following example shows that the card in slot 22 was active, and now the card in slot 11 is active:
The slot number in the MGX 8000 Series platform that contains the card you want to
access and configure. It can be in the range from 1 to 32.
node1.1.22.VISM.a > cc 11
node1.1.11.VISM.a >
Related Commands
There are no related commands.
Cisco VISM Installation and Configuration Guide
5-50
Release 3.0, Part Number OL-2521-01 Rev. D0, June 2004
Chapter 5
CLI Commands
chkflash
chkflash
To verify the integrity of a VISM card’s flash memory, use the chkflash command in the VoIP
switching/trunking, switched AAL2 PVC, and AAL2 trunking operating modes.
chkflash
Syntax Description
This command has no arguments or keywords.
Command Modes
VoIP switching/trunking, switched AAL2 PVC, and AAL2 trunking
Usage Guidelines
Follow standard CLI procedures for this command.
Examples
The following example verifies the current VISM card’s flash memory:
chkflash
Related Commands
There are no related commands.
Cisco VISM Installation and Configuration Guide
Release 3.0, Part Number OL-2521-01 Rev. D0, June 2004
5-51
Chapter 5
CLI Commands
clralm
clralm
To clear alarms on a specific VISM card line, use the clralm command in the VoIP switching/trunking,
switched AAL2 PVC, and AAL2 trunking operating modes.
clralm -ds1 line-num
Syntax Description
-ds1
The mandatory line-num argument identifier.
line-num
Line number in which to clear alarms. In the range from 1 to 8.
Command Modes
VoIP switching/trunking, switched AAL2 PVC, and AAL2 trunking
Usage Guidelines
This command clears alarms caused by the collection of statistical data. Alarms caused by network
failure cannot be cleared by using this command. For example, an alarm caused by a collection of bipolar
errors can be cleared, but an alarm caused by a line failure cannot. Alarms that occur after you execute
this command are not affected.
Examples
The following example shows that any alarms caused by statistical data are cleared from line 1:
clralm -ds1 1
Related Commands
Command
Description
clralms
Clears alarms on a VISM card.
dspalm
Displays the alarms associated with a specified line.
dspalms
Displays all alarms for the selected line type (T1 or E1) on a card.
Cisco VISM Installation and Configuration Guide
5-52
Release 3.0, Part Number OL-2521-01 Rev. D0, June 2004
Chapter 5
CLI Commands
clralmcnt
clralmcnt
To clear the alarm counters and statistics on a specified VISM line, use the clralmcnt command in the
VoIP switching/trunking, switched AAL2 PVC, and AAL2 trunking operating modes.
clralmcnt -ds1 line-num
Syntax Description
-ds1
The mandatory line-num argument identifier.
line-num
Line number for which to clear alarm counters and statistics. In the range from 1 to 8.
Command Modes
VoIP switching/trunking, switched AAL2 PVC, and AAL2 trunking
Usage Guidelines
All counters are reset to 0 when you use this command.
Examples
The following example clears alarm counters and statistics from line 1:
clralmcnt -ds1 1
Related Commands
Command
Description
clralmcnts
Clears all alarm counters and statistics on a VISM card.
dspalmcnt
Displays the alarm counters and statistics on a line.
Cisco VISM Installation and Configuration Guide
Release 3.0, Part Number OL-2521-01 Rev. D0, June 2004
5-53
Chapter 5
CLI Commands
clralmcnts
clralmcnts
To clear all the alarm counters and statistics on a VISM card, use the clralmcnts command in the VoIP
switching/trunking, switched AAL2 PVC, and AAL2 trunking operating modes.
clralmcnts
Syntax Description
This command has no arguments or keywords.
Command Modes
VoIP switching/trunking, switched AAL2 PVC, and AAL2 trunking
Usage Guidelines
All counters are reset to 0 after you execute this command. The terminal display does not indicate a
response to this command.
Examples
The following example shows that the alarm counters and statistics are removed for the current VISM
card:
clralmcnts
Related Commands
Command
Description
clralmcnt
Clears the alarm counters and statistics on a VISM line.
dspalmcnt
Displays the alarm counters and statistics for the current VISM card.
Cisco VISM Installation and Configuration Guide
5-54
Release 3.0, Part Number OL-2521-01 Rev. D0, June 2004
Chapter 5
CLI Commands
clralms
clralms
To clear alarms on a VISM card, use the clralms command in the VoIP switching/trunking, switched
AAL2 PVC, and AAL2 trunking operating modes.
clralms
Syntax Description
This command has no arguments or keywords.
Command Modes
VoIP switching/trunking, switched AAL2 PVC, and AAL2 trunking
Usage Guidelines
This command can clear alarms caused only by the collection of statistical data. Alarms caused by
network failure cannot be cleared. For example, an alarm caused by a collection of bipolar errors can be
cleared, but an alarm caused by a line failure cannot. Alarms occurring after this command executes are
not affected.
Examples
The following example shows that the alarms are cleared on the current VISM card:
clralms
Related Commands
Command
Description
clralm
Clears alarms on a specific line of a VISM card.
dspalm
Displays the alarms associated with a specified line.
dspalms
Displays all alarms for the selected line type on a VISM card.
Cisco VISM Installation and Configuration Guide
Release 3.0, Part Number OL-2521-01 Rev. D0, June 2004
5-55
Chapter 5
CLI Commands
clrcacfailcntrs
clrcacfailcntrs
To reset all connection admission control (CAC) failure statistics to 0, use the clrcacfailcntrs command
in the VoIP switching/trunking, switched AAL2 PVC, and AAL2 trunking operating modes.
clrcacfailcntrs
Syntax Description
This command has no arguments or keywords.
Command Modes
VoIP switching/trunking, switched AAL2 PVC, and AAL2 trunking
Usage Guidelines
This command is used for debugging purposes to reset counters and isolate any VISM CAC-related
failures. Counter values more than zero indicate that the gateway is low on resources.
Examples
The following example shows that the CAC failure statistics are reset to 0:
clrcacfailcntrs
Related Commands
Command
Description
dspcacfailcntrs
Displays all CAC failure statistics that are reset to 0.
Cisco VISM Installation and Configuration Guide
5-56
Release 3.0, Part Number OL-2521-01 Rev. D0, June 2004
Chapter 5
CLI Commands
clrmngcidcnt
clrmngcidcnt
To clear AAL2 channel identifier (CID) counters, use the clrmngcidcnt command in the switched AAL2
PVC and AAL2 trunking operating modes.
clrmngcidcnt endpt-num
Syntax Description
endpt-num
The endpoint number for which the AAL2 counters are cleared. It can be a value from
one of the following ranges:
•
For template number 1:
– For VISM, from 1 to 145
– For VISM-PR T1, from 1 to 192
– For VISM-PR E1, from 1 to 248
•
For template number 2:
– For VISM T1, from 1 to 192
– For VISM E1, from 1 to 248
•
For template number 3:
– For VISM, from 1 to 120
– For VISM-PR T1, from 1 to 192
– For VISM-PR E1, from 1 to 248
•
For template number 4:
– For VISM-PR, from 1 to 144
Command Modes
Switched AAL2 PVC and AAL2 trunking
Usage Guidelines
Indicate the endpoint number you want to clear AAL2 counters for with the endpt-num argument value.
Examples
The following example shows that the AAL2 counters for endpoint number 140 are cleared:
clrmngcidcnt 140
Related Commands
Command
Description
dspcid
Displays a VISM card’s AAL2 channel identifier.
dspcids
Displays a VISM card’s AAL2 channel identifiers for a specified LCN.
Cisco VISM Installation and Configuration Guide
Release 3.0, Part Number OL-2521-01 Rev. D0, June 2004
5-57
Chapter 5
CLI Commands
clrrtpcnt
clrrtpcnt
To clear the Real-Time Transport Protocol (RTP) counters (statistics) for a specific static RTP
connection, as shown by the dsprtpcnt command, use the clrrtpcnt command in the VoIP
switching/trunking operating mode.
clrrtpcnt conn-num
Syntax Description
conn-num
Command Modes
VoIP switching/trunking
Usage Guidelines
Follow standard CLI procedures for this command.
Examples
The following example shows that the RTP counters for static RTP connection number 49 are cleared:
Connection identification number. It can be in the range from 1 to 248.
clrrtpcnt 49
Related Commands
Command
Description
addlapdtrunk
Adds an LAPD trunk to a specific VISM card line.
addrtpcon
Adds a static RTP VoIP trunking connection.
addrudptrunk
Adds an ISDN PRI backhaul RUDP session for an LAPD trunk connection.
cnflapdtrunkpvc
Assigns the PVC trunk type that carries LAPD messages for the current VISM
card.
cnflntrunkcond
Enables or disables line conditioning on a VISM card line if a network alarm is
encountered.
cnfrtpcon
Modifies an existing static RTP VoIP trunking connection.
cnfrudptrunkrmtip Modifies the remote IP address of VISM used in the ISDN PRI backhaul RUDP
trunk for a specified session.
dellapdtrunk
Deletes an LAPD configured line.
delrtpcon
Deletes a static RTP VoIP trunking connection.
delrudptrunk
Deletes an ISDN PRI backhaul RUDP session that is associated with an LAPD.
dsplapd
Displays data about an LAPD.
dsplapdtrunkpvc
Displays the assigned PVC trunk type that carries LAPD trunk messages for the
current VISM card.
dsplapdtrunks
Displays the configuration data of all LAPD trunks.
dsprtpcnt
Displays the bearer counters (statistics) for a specific RTP VoIP trunking
connection.
dsprtpcon
Displays the configuration data of a specific static RTP VoIP trunking
connection.
dsprtpconnstat
Displays the RTP connection statistics for a specified endpoint.
Cisco VISM Installation and Configuration Guide
5-58
Release 3.0, Part Number OL-2521-01 Rev. D0, June 2004
Chapter 5
CLI Commands
clrrtpcnt
Command
Description
dsprtpcons
Displays the configuration data of all static RTP VoIP trunking connections.
dsprudptrunk
Displays the configuration data of a specified ISDN PRI backhaul RUDP
session.
dsprudptrunks
Displays the configuration data of all ISDN PRI backhaul RUDP sessions.
Cisco VISM Installation and Configuration Guide
Release 3.0, Part Number OL-2521-01 Rev. D0, June 2004
5-59
Chapter 5
CLI Commands
clrsarcnt
clrsarcnt
To clear the segmentation and reassembly (SAR) counters on a channel, use the clrsarcnt command in
the VoIP switching/trunking, switched AAL2 PVC, and AAL2 trunking operating modes.
clrsarcnt lcn
Syntax Description
lcn
Command Modes
VoIP switching/trunking, switched AAL2 PVC, and AAL2 trunking
Usage Guidelines
Indicate the channel number you want to clear SAR counters for with an lcn argument value.
Examples
The following example shows that the SAR counters are cleared on channel 140:
Logical channel number for which the SAR counters are to be cleared, in the range
from 131 to 510.
clrsarcnt 140
Related Commands
Command
Description
dspsarcnt
Display the values of the SAR counters for a specified channel.
Cisco VISM Installation and Configuration Guide
5-60
Release 3.0, Part Number OL-2521-01 Rev. D0, June 2004
Chapter 5
CLI Commands
clrsarcnts
clrsarcnts
To clear all segmentation and reassembly (SAR) counters on a VISM card, use the clrsarcnts command
in the VoIP switching/trunking, switched AAL2 PVC, and AAL2 trunking operating modes.
clrsarcnts
Syntax Description
This command has no arguments or keywords.
Command Modes
VoIP switching/trunking, switched AAL2 PVC, and AAL2 trunking
Usage Guidelines
Follow standard CLI procedures when you use this command.
Examples
The following example shows that all SAR counters on the current VISM card are cleared:
clrsarcnts
Related Commands
Command
Description
clrsarcnt
Clears the SAR counters on a specified channel.
dspsarcnt
Displays the SAR counter values for a specified channel.
dspsarcnts
Displays the SAR counter values for a VISM card.
Cisco VISM Installation and Configuration Guide
Release 3.0, Part Number OL-2521-01 Rev. D0, June 2004
5-61
Chapter 5
CLI Commands
clrsarmsgcnt
clrsarmsgcnt
To clear the control message counters from a VISM card, use the clrsarmsgcnt command in the VoIP
switching/trunking, switched AAL2 PVC, and AAL2 trunking operating modes.
clrsarmsgcnt
Syntax Description
This command has no arguments or keywords.
Command Modes
VoIP switching/trunking, switched AAL2 PVC, and AAL2 trunking
Usage Guidelines
Follow standard CLI procedures when you use this command.
Examples
The following example shows that the SAR control message counters are cleared from the current VISM
card:
clrsarmsgcnt
Related Commands
Command
Description
dspsarmsgcnt
Displays the SAR control message counter values for a VISM card.
Cisco VISM Installation and Configuration Guide
5-62
Release 3.0, Part Number OL-2521-01 Rev. D0, June 2004
Chapter 5
CLI Commands
clrscrn
clrscrn
To clear the control terminal screen, use the clrscrn command in the VoIP switching/trunking, switched
AAL2 PVC, and AAL2 trunking operating modes.
clrscrn
Syntax Description
This command has no arguments or keywords.
Command Modes
VoIP switching/trunking, switched AAL2 PVC, and AAL2 trunking
Usage Guidelines
After you execute this command, only the current command line prompt appears on the screen.
Examples
The following example shows that your control terminal screen is cleared, other than the current
command line prompt:
clrscrn
Related Commands
There are no related commands.
Cisco VISM Installation and Configuration Guide
Release 3.0, Part Number OL-2521-01 Rev. D0, June 2004
5-63
Chapter 5
CLI Commands
clrslipcnt
clrslipcnt
To clear current clock slip counters for a specified VISM card line, use the clrslipcnt command in the
VoIP switching/trunking, switched AAL1 SVC, switched AAL2 SVC, switched AAL2 PVC, AAL2
trunking, VoIP and switched ATM AAL1 SVC trunking operating modes.
clrslipcnt line-num
Syntax Description
line-num
Command Modes
VoIP switching/trunking, switched AAL1 SVC, switched AAL2 SVC, switched AAL2 PVC, AAL2
trunking, VoIP and switched ATM AAL1 SVC
Usage Guidelines
Follow standard CLI procedures for this command.
Examples
The following example shows that the current clock slip counters for line 3 of the current VISM card are
cleared:
Line number of the DS1 line for which you want to clear current clock slip counters.
It can be in the range from 1 to 8.
clrslipcnt 3
Line 3 Slip Counters:
Uncontrolled Slip:
Frame Slip:
Related Commands
Tx Slip
0
0
Rx Slip
0
2
Command
Description
dspslipcnt
Displays the current clock slip counters for a specified VISM card line.
Cisco VISM Installation and Configuration Guide
5-64
Release 3.0, Part Number OL-2521-01 Rev. D0, June 2004
Chapter 5
CLI Commands
clrtaskinfo
clrtaskinfo
To reset the values displayed by the dsptaskinfo command, use the clrtaskinfo command in the VoIP
switching/trunking, switched AAL2 PVC, and AAL2 trunking operating modes.
clrtaskinfo
Syntax Description
This command has no arguments or keywords.
Command Modes
VoIP switching/trunking, switched AAL2 PVC, and AAL2 trunking
Usage Guidelines
When you execute this command, the values are reset to 0 and the collection of the task information
statistics begins again.
Examples
The following example shows that values displayed by the dsptaskinfo command are reset:
clrtaskinfo
Related Commands
Command
Description
dsptaskinfo
Displays information about currently operating tasks.
Cisco VISM Installation and Configuration Guide
Release 3.0, Part Number OL-2521-01 Rev. D0, June 2004
5-65
Chapter 5
CLI Commands
cnfaal2subcellmuxing
cnfaal2subcellmuxing
To enable or disable AAL2 subcell multiplexing, use the cnfaal2subcellmuxing command in the AAL2
trunking operating mode.
cnfaal2subcellmuxing mux-enable
Syntax Description
mux-enable
Enables or disables AAL2 subcell multiplexing. It can be one of the following values:
•
1 = On
•
2 = Off
Command Modes
AAL2 trunking
Usage Guidelines
When you enable multiplexing, multiple CPS packets are multiplexed onto a single AAL2 connection
without partial fill (unless there is a timeout). When you disable multiplexing, each CPS packet fills one
or two cells (with padding).
Note
The field length for each CPS packet can be up to 64 bytes.
When the multiplexing type is changed if CIDs are present, the card is reset and existing
CIDs/connections are restored with the multiplexing type.
Examples
The following example shows that subcell multiplexing is disabled:
cnfaal2subcellmuxing 2
Related Commands
There are no related commands.
Cisco VISM Installation and Configuration Guide
5-66
Release 3.0, Part Number OL-2521-01 Rev. D0, June 2004
Chapter 5
CLI Commands
cnfaal2timerparams
cnfaal2timerparams
To configure the holdover time for VAD in milliseconds before activating silence suppression on an
AAL2 PVC, use the cnfaal2timerparams command in the switched AAL2 PVC operating mode.
cnfaal2timerparams vad-init-timer cid-fill-time
Syntax Description
vad-init-timer
The VAD holdover timer (defined in milliseconds) in the range from 250 to 65535.
cid-fill-timer
Maximum wait time for cell content filling when the next packet is not ready
(defined in milliseconds), in the range from 5 to 100.
Command Modes
Switched AAL2 PVC
Usage Guidelines
If AAL2 subcell multiplexing is disabled with the cnfaal2subcellmuxing command, executing this
command produces no affect.
Examples
The following example shows that the VAD holdover timer is set for 500 ms, and will wait up to 50 ms
for a cell to fill when the next packet is not ready:
cnfaal2timerparams 500 50
Related Commands
There are no related commands.
Cisco VISM Installation and Configuration Guide
Release 3.0, Part Number OL-2521-01 Rev. D0, June 2004
5-67
Chapter 5
CLI Commands
cnfaal2transparams
cnfaal2transparams
To configure the transportation of DTMF and CAS bits to another endpoint and enable or disable type 3
packet triple redundancy feature, use the cnfaal2transparams command in the switched AAL2 PVC
operating mode.
cnfaal2transparams dtmf-trans cas-bits-trans type-3-red
Syntax Description
dtmf-trans
Enables or disables DTMF tone transport as AAL2 type 3 packets. It can be one of
the following values:
1 = On. DTMF relay using RFC 2833.
2 = Off. DTMF pass through.
Note
cas-bits-trans
type-3-red
The dtmf-trans argument value must be set to 1 (on) if you are using codecs
other than G.711 and G.726.
Enables or disables CAS bits transportation. It can be one of the following values:
•
1 = On
•
2 = Off
Enables or disables triple redundancy protection for type 3 packets. It can be one
of the following values:
•
1 = On
•
2 = Off
Command Modes
Switched AAL2 PVC
Usage Guidelines
Follow standard CLI procedures when using this command.
Examples
The following example shows that DTMF tone transportation, CAS bits transportation, and triple
redundancy protection are enabled:
cnfaal2transparams 1 1 1
Related Commands
There are no related commands.
Cisco VISM Installation and Configuration Guide
5-68
Release 3.0, Part Number OL-2521-01 Rev. D0, June 2004
Chapter 5
CLI Commands
cnfadapgain
cnfadapgain
To enable or disable the DSP adaptive gain feature, use the cnfadapgain command in the VoIP
switching/trunking, switched AAL2 PVC, and AAL2 trunking operating modes.
cnfadapgain adap-gain-enable
Syntax Description
adap-gain-enable
Enables or disables adaptive gain. It can be one of the following values:
•
1 = On
•
2 = Off
Command Modes
VoIP switching/trunking, switched AAL2 PVC, and AAL2 trunking
Usage Guidelines
Follow standard CLI procedures when using this command.
Examples
The following example shows that the adaptive gain feature is enabled:
cnfadapgain 1
Related Commands
There are no related commands.
Cisco VISM Installation and Configuration Guide
Release 3.0, Part Number OL-2521-01 Rev. D0, June 2004
5-69
Chapter 5
CLI Commands
cnfalm
cnfalm
To configure the alarm parameters for a specified line, use the cnfalm command in the VoIP
switching/trunking, switched AAL2 PVC, and AAL2 trunking operating modes.
cnfalm -ds1 line-num -red red-sev -rai rai-sev -neu ne-alarm-up -ned ne-alarm-down
-net ne-alarm-thresh -feu fe-alarm-up -fed fe-alarm-down -fet fe-alarm-thresh
Syntax Description
-ds1
The mandatory line-num argument identifier.
line-num
Line number on which to configure alarm parameters. In the range from 1 to 8.
-red
The mandatory red-sev argument identifier.
red-sev
Red alarm severity level. It can be one of the following values:
•
1 = Minor
•
2 = Major
-rai
The mandatory rai-sev argument identifier.
rai-sev
RAI alarm severity level. It can be one of the following values:
•
1 = Minor
•
2 = Major
-neu
The mandatory ne-alarm-up argument identifier.
ne-alarm-up
Near end alarm up count (defined in milliseconds), in the range from 1 to 65535.
-ned
The mandatory ne-alarm-down argument identifier.
ne-alarm-down
Near end alarm down count (defined in milliseconds), in the range from 1 to
65535.
-net
The mandatory ne-alarm-thresh argument identifier.
ne-alarm-thresh
Near end alarm threshold (defined in milliseconds), in the range from 1 to 65535.
-feu
The mandatory fe-alarm-up argument identifier.
fe-alarm-up
Far end alarm up count (defined in milliseconds), in the range from 1 to 65535.
-fed
The mandatory fe-alarm-down argument identifier.
fe-alarm-down
Far end alarm down count (defined in milliseconds), in the range from 1 to
65535.
-fet
The mandatory fe-alarm-thresh argument identifier.
fe-alarm-thresh
Far end alarm threshold (defined in milliseconds), in the range from 1 to 65535.
Command Modes
VoIP switching/trunking, switched AAL2 PVC, and AAL2 trunking
Usage Guidelines
Follow standard CLI procedures when using this command.
Examples
The following example shows that line 2 is configured with a red severity alarm of major, and an RAI
severity of minor:
cnfalm -ds1 2 -red 1 -rai 1
Cisco VISM Installation and Configuration Guide
5-70
Release 3.0, Part Number OL-2521-01 Rev. D0, June 2004
Chapter 5
CLI Commands
cnfalm
Related Commands
Command
Description
clralm
Clears alarms from a specific line of a VISM card
clralms
Clears all alarms from a VISM card.
dspalm
Displays the alarms associated with a specified line of a VISM card.
Cisco VISM Installation and Configuration Guide
Release 3.0, Part Number OL-2521-01 Rev. D0, June 2004
5-71
Chapter 5
CLI Commands
cnfalmcnt
cnfalmcnt
To configure the collection of Time Division Multiplex (TDM) line statistics, use the cnfalmcnt
command in the VoIP switching/trunking, switched AAL2 PVC, and AAL2 trunking operating modes.
cnfalmcnt -ds1 line-num -sev alarm-severity -lcv15 lcv-15min -lcv24 lcv-24hr -les15 les-15min
-les24 les-24hr -lses15 lses-15min -lses24 lses-24hr -crc15 crc-15min -crc24 crc-24hr -crces15
crces-15min -crces24 crces-24hr -crcses15 crcses-15min -crcses24 crcses-24hr -sefs15
sefs-15min -sefs24 sefs-24hr -aiss15 aiss-15min -aiss24 aiss-24hr -uas15 uas-15min -uas24
uas-24hr
Syntax Description
-ds1
The mandatory line-num argument identifier.
line-num
Line number of the T1 or E1 line for which you want to display alarms. It can be
in the range from 1 to 8.
-sev
The alarm-severity argument identifier.
alarm-severity
Alarm severity. It can be one of the following values:
•
1 = Minor
•
2 = Major
-lcv15
The lcv-15min argument identifier.
lcv-15min
The number of line code violations encountered by the line interface in the current
15-minute interval. It can be in the range from 0 to 2147483647.
-lcv24
The lcv-24hr argument identifier.
lcv-24hr
The number of line code violations in the last 24-hour period encountered by the
interface. It can be in the range from 0 to 2147483647.
-les15
The les-15min argument identifier.
les-15min
The line code violation errored seconds in the last 15 minutes encountered by the
interface. It can be in the range from 0 to 2147483647.
-les24
The les-24min argument identifier.
les-24hr
The line code violation errored seconds in the last 24 hours encountered by the
interface. It can be in the range from 0 to 2147483647.
-lses15
The lses-15min argument identifier.
lses-15min
The line code violation severely errored seconds in the last 15 minutes encountered
by the interface. It can be in the range from 0 to 2147483647.
-lses24
The lses-24hr argument identifier.
lses-24hr
The line code violation severely errored seconds in the last 24 hours encountered
by the interface. It can be in the range from 0 to 2147483647.
-crc15
The crc-15min argument identifier.
crc-15min
The number of CRC code violations in the last 15 minutes encountered by the
interface. It can be in the range from 0 to 2147483647.
-crc24
The crc-24hr argument identifier.
crc-24hr
The number of CRC code violations in the last 24 hours encountered by the
interface. It can be in the range from 0 to 2147483647.
-crces15
The crces-15min argument identifier.
Cisco VISM Installation and Configuration Guide
5-72
Release 3.0, Part Number OL-2521-01 Rev. D0, June 2004
Chapter 5
CLI Commands
cnfalmcnt
crces-15min
The number of CRC code violated errored seconds in the last 15 minutes
encountered by the interface. It can be in the range from 0 to 2147483647.
-crses24
The crcses-24hr argument identifier.
crses-24hr
The number of CRC code violated errored seconds in the last 24 hours encountered
by the interface. It can be in the range from 0 to 2147483647. It can be in the range
from 0 to 2147483647.
-crcses15
The crcses-15min argument identifier.
crcses-15min
The number of CRC code violated severely errored seconds in the last 15 minutes
encountered by the interface. It can be in the range from 0 to 2147483647.
-sefs15
The sefs-15min argument identifier.
sefs-15min
The number of severely errored framing seconds encountered in the last 15 minutes
by the interface. It can be in the range from 0 to 2147483647.
-sefs24
The sefs-24hr argument identifier.
sefs-24hr
The number of severely errored framing seconds encountered in the last 24 hours
by the interface. It can be in the range from 0 to 2147483647.
-aiss15
The aiss-15min argument identifier.
aiss-15min
The number of AIS severely errored seconds in the last 15 minutes encountered by
the interface. It can be in the range from 0 to 2147483647.
-aiss24
The aiss-24hr argument identifier.
aiss-24hr
The number of AIS severely errored seconds in the last 24 hours encountered by
the interface. It can be in the range from 0 to 2147483647.
-uas15
The uas-15min argument identifier.
uas-15min
The number of unavailable seconds in the last 15 minutes encountered by the
interface. It can be in the range from 0 to 2147483647.
-uas24
The uas-24hr argument identifier.
uas-24hr
The number of unavailable seconds in the last 24 hours encountered by the
interface. It can be in the range from 0 to 2147483647.
Command Modes
VoIP switching/trunking, switched AAL2 PVC, and AAL2 trunking
Usage Guidelines
Values higher than 2,147,483,647 for the argument values are truncated.
The following line statistics are collected:
•
Line code violations encountered by the line interface in the current 15-minute interval.
•
Line code violations in the last 15-minute period encountered by the interface.
•
Line code violations in the last 24-hour period encountered by the interface.
•
Line code violations Errored Seconds encountered by the interface.
•
Line code violations Errored Seconds in the last 15 minutes encountered by the interface.
•
Line code violations Errored Seconds in the last 24 hours encountered by the interface.
•
Line code violations Severely Errored Seconds encountered by the interface.
•
Line code violations Severely Errored Seconds in the last 15 minutes encountered by the interface.
•
Line code violations Severely Errored Seconds in the last 24 hours encountered by the interface.
Cisco VISM Installation and Configuration Guide
Release 3.0, Part Number OL-2521-01 Rev. D0, June 2004
5-73
Chapter 5
CLI Commands
cnfalmcnt
Examples
•
CRC code violations encountered by the interface.
•
CRC code violations in the last 15 minutes encountered by the interface.
•
CRC code violations in the last 24 hours encountered by the interface.
•
CRC code violated Errored Seconds encountered by the interface.
•
CRC code violated Errored Seconds in the last 15 minutes encountered by the interface.
•
CRC code violated Errored Seconds in the last 24 hours encountered by the interface.
•
P Bit code violations Severely Errored Seconds encountered by the interface.
•
CRC code violated Severely Errored Seconds in the last 15 minutes encountered by the interface.
•
CRC code violated Severely Errored Seconds in the last 24 hours encountered by the interface.
•
Severely Errored Framing Seconds encountered by the interface.
•
Severely Errored Framing Seconds in the last 15 minutes encountered by the interface.
•
Severely Errored Framing Seconds in the last 24 hours encountered by the interface.
•
AIS Severely Errored Seconds encountered by the interface.
•
AIS Severely Errored Seconds in the last 15 minutes encountered by the interface.
•
AIS Severely Errored Seconds in the last 24 hours encountered by the interface.
•
Unavailable Seconds encountered by the interface.
•
Unavailable Seconds in the last 15 minutes encountered by the interface.
•
Unavailable Seconds in the last 24 hours encountered by the interface.
•
Percentage of LCV Error Free Seconds.
•
Loss of Signal detected with or without integrating to LOS alarm.
•
Out of Frame detected with or without integrating to OOF alarm.
•
Yellow Alarms detected with or without integrating to RAI alarm.
•
Framing Pattern Errors encountered by a DS1 interface.
The following example shows that the TDM line statistics for major alarms are collected for line number
7:
cnfalmcnt -ds1 7 -sev 2
Related Commands
Command
Description
dspalmcnf
Displays the threshold data about the alarm statistics being collected.
dspalmcnt
Displays the alarm counters and statistics on a line.
Cisco VISM Installation and Configuration Guide
5-74
Release 3.0, Part Number OL-2521-01 Rev. D0, June 2004
Chapter 5
CLI Commands
cnfannagetime
cnfannagetime
To configure the time that a nonpermanent announcement is to remain valid after it is placed into the
VISM announcement cache, use the cnfannagetime command in the VoIP switching operating mode.
cnfannagetime nonpann-age-time
Syntax Description
nonpann-age-time
Nonpermanent announcement age time (defined in minutes). It can be in the
range from 0 to 65535.
Note
0 = Infinite amount of time; the nonpermanent announcement remains
valid until you replace it, if necessary.
Command Modes
VoIP switching
Usage Guidelines
When a nonpermanent announcement enters the announcement cache, it remains valid, as is, until the
time you select for the nonpann-age-time argument value expires. When the time expires, the
nonpermanent announcement is refreshed from the announcement file server. Requests to play a
nonpermanent announcement do not affect its age time or cause the file to be refreshed.
Examples
The following example shows that nonpermanent announcements are configured to expire two hours
after being placed into the VISM announcement cache:
cnfannagetime 120
Related Commands
Command
Description
addannpermanent
Configures an announcement server file and associated codec type as
permanent.
cnfanndn
Designates an announcement file server domain name.
cnfannpathprefix
Designates the main prefix directory TFTP path from which to retrieve
announcement files from the announcement file server.
cnfannprefcodec
Configures the codec type used for announcements played on unconnected
TDM endpoints.
cnfannreqtimeout
Configures the expiration time for announcements to begin playing after the
VISM receives the announcement signal (request) from the call agent.
delannalldynamic
Deletes all announcement files and their associated codec types from the
temporary announcement files currently saved in the VISM card.
delanndynamic
Deletes an announcement file and associated codec type from the temporary
announcement files currently saved in the VISM card.
delannpermanent
Deletes a permanent announcement file and its associated codec type from the
announcement file server.
dspannagetime
Displays the time that a nonpermanent announcement is to remain valid after
it is placed into the VISM announcement cache.
Cisco VISM Installation and Configuration Guide
Release 3.0, Part Number OL-2521-01 Rev. D0, June 2004
5-75
Chapter 5
CLI Commands
cnfannagetime
Command
Description
dspanncache
Displays all available temporary announcement file names, and associated age
times before being refreshed from the announcement file server.
dspanncontrols
Displays a summary list of all provisionable announcement file variables,
including variables associated with all announcement file CLI commands.
dspanndn
Displays the announcement file server domain name.
dspannpathprefix
Displays the main prefix directory path from which VISM retrieves
announcement files from the announcement file server.
dspannpermanents
Displays all available permanent announcement files with their associated
codec types and identifying index numbers.
dspannprefcodec
Displays the codec type used for announcements played on unconnected TDM
endpoints.
Cisco VISM Installation and Configuration Guide
5-76
Release 3.0, Part Number OL-2521-01 Rev. D0, June 2004
Chapter 5
CLI Commands
cnfanndn
cnfanndn
To designate the announcement file server domain name, use the cnfanndn command in the VoIP
switching operating mode.
cnfanndn ann-domain-name
Syntax Description
ann-domain-name
The announcement file server domain name. In the range from 1 to 64
alphanumeric characters. You may also use forward slashes (/), backward
slashes (\), periods, hyphens, and underscores when creating an
announcement file server domain name.
Note
Do not use forward slashes (/) or hyphens as the last character in an
announcement file server name. Do not use spaces in an
announcement file server domain name.
Command Modes
VoIP switching
Usage Guidelines
You must add the announcement file server name as a regular node name using the VISM XDNS
commands before you use this command.
Examples
The following example shows that the announcement file server is configured with the name
announceserver3:
cnfanndn announceserver3
Related Commands
Command
Description
addannpermanent
Configures an announcement server file and associated codec type as
permanent.
cnfannagetime
Configures the time that a nonpermanent announcement is to remain valid after
it is placed into the VISM announcement cache.
cnfannpathprefix
Designates the main prefix directory TFTP path from which to retrieve
announcement files from the announcement file server.
cnfannprefcodec
Configures the codec type used for announcements played on unconnected
TDM endpoints.
cnfannreqtimeout
Configures the expiration time for announcements to begin playing after the
VISM receives the announcement signal (request) from the call agent.
delannalldynamic
Deletes all announcement files and their associated codec types from the
temporary announcement files currently saved in the VISM card.
delanndynamic
Deletes an announcement file and associated codec type from the temporary
announcement files currently saved in the VISM card.
delannpermanent
Deletes a permanent announcement file and its associated codec type from the
announcement file server.
Cisco VISM Installation and Configuration Guide
Release 3.0, Part Number OL-2521-01 Rev. D0, June 2004
5-77
Chapter 5
CLI Commands
cnfanndn
Command
Description
dspannagetime
Displays the time that a nonpermanent announcement is to remain valid after
it is placed into the VISM announcement cache.
dspanncache
Displays all available temporary announcement file names, and associated age
times before being refreshed from the announcement file server.
dspanncontrols
Displays a summary list of all provisionable announcement file variables,
including variables associated with all announcement file CLI commands.
dspanndn
Displays the announcement file server domain name.
dspannpathprefix
Displays the main prefix directory path from which VISM retrieves
announcement files from the announcement file server.
dspannpermanents
Displays all available permanent announcement files with their associated
codec types and identifying index numbers.
dspannprefcodec
Displays the codec type used for announcements played on unconnected TDM
endpoints.
dspannreqtimeout
Displays the expiration time for announcements to begin playing before being
aborted.
Cisco VISM Installation and Configuration Guide
5-78
Release 3.0, Part Number OL-2521-01 Rev. D0, June 2004
Chapter 5
CLI Commands
cnfannpathprefix
cnfannpathprefix
To designate the main prefix directory Trivial File Transfer Protocol (TFTP) path from which to retrieve
announcement files from the announcement file server, use the cnfannpathprefix command in the VoIP
switching operating mode.
cnfannpathprefix ann-prefix-path
Syntax Description
ann-prefix-path
Command Modes
VoIP switching
Usage Guidelines
The prefix directory path is prefixed to the codec directory and the filename. The path prefix will be
relative to the default TFTP directory on the announcement file server. Examples of valid prefix
directory paths are:
•
<null string>
•
vism_ann
•
cisco/vism_ann
•
/cisco/vism_ann
Note
The main directory TFTP path. In the range from the null string to 64
alphanumeric characters.
The /cisco/vism_ann path starts at the root directory on the announcement file server
because it begins with a backslash (/).
If you do not use this command, the default TFTP directory on the announcement file server is used as
the prefix directory path.
You can use any directory or path on the announcement file server as the main directory for storing
announcement files. Take into consideration the following guidelines when you use this command:
•
If you do not configure an announcement path prefix on the VISM, the main announcement file
directory is the default TFTP directory on the server.
•
If you configure a path prefix, it is used as the main announcement directory.
•
If the path prefix is not absolute (does not begin with /), then the prefix is relative to the default TFTP
directory.
You must configure codec subdirectories under the main announcement directory on the announcement
file server. One or more of the following codec subdirectories, for each encoding, are used for
announcement files:
•
g711u/
•
g711a/
•
g726_32k/
•
g726_24k/
•
g726_16k/
Cisco VISM Installation and Configuration Guide
Release 3.0, Part Number OL-2521-01 Rev. D0, June 2004
5-79
Chapter 5
CLI Commands
cnfannpathprefix
Note
•
g729_a/
•
g7231_high_rate/
•
g7231_a_high_rate/
•
g7231_low_rate/
•
g7231_a_low_rate/
VISM supports G.729ab for connections and endpoints. If an announcement is to be played on a
connection or endpoint provisioned for G.729ab, it must be recorded in G.729a.
For example, if the announcement server all-lines-busy.au file is encoded in both g711a and g729a, the
following pathnames and files exist on the file server (assuming the default TFTP directory is tftpboot):
•
/tftpboot/g711_a/all-lines-busy.au
•
/tftpboot/g729_a/all-lines-busy.au
When the call agent requests that the announcement server all-lines-busy.au file be played toward one
end of an established call, the VISM determines the codec being used for that call and plays the
corresponding announcement file.
When the call agent requests that an announcement be played toward the TDM network on an
unconnected endpoint, the codec used is specified by the VISM announcement preferred codec, configured
with the cnfannprefcodec command.
You can configure another level of directories to group announcement files by language. Specify these
directories by the call agent (or when provisioning the VISM) as part of the announcement file name.
For example, the call agent might specify the english/ann1.au announcement file name. If the file is
encoded in G.729a and the prefix is /tftpboot, the file is located at /tftpboot/g729_a/english/ann1.au.
Examples
The following example shows that the /cisco/vism_ann path is designated as the prefix directory path
from which to retrieve announcement files from the announcement file server:
cnfannpathprefix /cisco/vism_ann
Related Commands
Command
Description
addannpermanent
Configures an announcement server file and associated codec type as
permanent.
cnfannagetime
Configures the time that a nonpermanent announcement is to remain valid after
it is placed into the VISM announcement cache.
cnfanndn
Designates an announcement file server domain name.
cnfannprefcodec
Configures the codec type used for announcements played on unconnected
TDM endpoints.
cnfannreqtimeout
Configures the expiration time for announcements to begin playing after the
VISM receives the announcement signal (request) from the call agent.
delannalldynamic
Deletes all announcement files and their associated codec types from the
temporary announcement files currently saved in the VISM card.
delanndynamic
Deletes an announcement file and associated codec type from the temporary
announcement files currently saved in the VISM card.
Cisco VISM Installation and Configuration Guide
5-80
Release 3.0, Part Number OL-2521-01 Rev. D0, June 2004
Chapter 5
CLI Commands
cnfannpathprefix
Command
Description
delannpermanent
Deletes a permanent announcement file and its associated codec type from the
announcement file server.
dspannagetime
Displays the time that a nonpermanent announcement is to remain valid after
it is placed into the VISM announcement cache.
dspanncache
Displays all available temporary announcement file names, and associated age
times before being refreshed from the announcement file server.
dspanncontrols
Displays a summary list of all provisionable announcement file variables,
including variables associated with all announcement file CLI commands.
dspanndn
Displays the announcement file server domain name.
dspannpathprefix
Displays the main prefix directory path from which VISM retrieves
announcement files from the announcement file server.
dspannpermanents
Displays all available permanent announcement files with their associated
codec types and identifying index numbers.
dspannprefcodec
Displays the codec type used for announcements played on unconnected TDM
endpoints.
Cisco VISM Installation and Configuration Guide
Release 3.0, Part Number OL-2521-01 Rev. D0, June 2004
5-81
Chapter 5
CLI Commands
cnfannprefcodec
cnfannprefcodec
To configure the codec type used for announcements played on unconnected Time Division Multiplex
(TDM) endpoints, use the cnfannprefcodec command in the VoIP switching operating mode.
cnfannprefcodec ann-codec-type
Syntax Description
ann-codec-type
It can be one of the following values:
•
1 = G.711u
•
2 = G.711a
•
3 = G.726-32k
•
4 = G.729a
•
5 = G.729ab
•
7 = G.726-16k
•
8 = G.726-24k
•
9 = G.726-40k
•
11 = G.723.1-H
•
12 = G.723.1a-H
•
13 = G.723.1-L
•
14 = G.723.1a-L
Command Modes
VoIP switching
Usage Guidelines
The G.723.1 codecs are supported for VISM-PR cards and are not supported for VISM cards.
Examples
The following example shows that the G.723.1-H codec type is configured for announcements played on
unconnected TDM endpoints:
cnfannprefcodec 11
Related Commands
Command
Description
addannpermanent
Configures an announcement server file and associated codec type as
permanent.
cnfannagetime
Configures the time that a nonpermanent announcement is to remain valid after
it is placed into the VISM announcement cache.
cnfanndn
Designates an announcement file server domain name.
cnfannpathprefix
Designates the main prefix directory TFTP path from which to retrieve
announcement files from the announcement file server.
Cisco VISM Installation and Configuration Guide
5-82
Release 3.0, Part Number OL-2521-01 Rev. D0, June 2004
Chapter 5
CLI Commands
cnfannprefcodec
Command
Description
cnfannreqtimeout
Configures the expiration time for announcements to begin playing after the
VISM receives the announcement signal (request) from the call agent.
delannalldynamic
Deletes all announcement files and their associated codec types from the
temporary announcement files currently saved in the VISM card.
delanndynamic
Deletes an announcement file and associated codec type from the temporary
announcement files currently saved in the VISM card.
delannpermanent
Deletes a permanent announcement file and its associated codec type from the
announcement file server.
dspannagetime
Displays the time that a nonpermanent announcement is to remain valid after
it is placed into the VISM announcement cache.
dspanncache
Displays all available temporary announcement file names, and associated age
times before being refreshed from the announcement file server.
dspanncontrols
Displays a summary list of all provisionable announcement file variables,
including variables associated with all announcement file CLI commands.
dspanndn
Displays the announcement file server domain name.
dspannpathprefix
Displays the main prefix directory path from which VISM retrieves
announcement files from the announcement file server.
dspannpermanents
Displays all available permanent announcement files with their associated
codec types and identifying index numbers.
dspannprefcodec
Displays the codec type used for announcements played on unconnected TDM
endpoints.
Cisco VISM Installation and Configuration Guide
Release 3.0, Part Number OL-2521-01 Rev. D0, June 2004
5-83
Chapter 5
CLI Commands
cnfannreqtimeout
cnfannreqtimeout
To configure the expiration time for announcements to begin playing after the VISM receives the
announcement signal (request) from the call agent, use the cnfannreqtimeout command in the VoIP
switching operating mode. Requests are aborted when the expiration time is reached and the
announcement has not started.
cnfannreqtimeout ann-req-time
Syntax Description
ann-req-time
The expiration time for a dynamic play announcement request (defined in
seconds). It can be in the range from 0 to 15. (Default = 5)
Note
If ann-req-time = 0, the expiration time is not set, no expiration occurs,
and requests are not aborted.
Command Modes
VoIP switching
Usage Guidelines
If the call agent signals the announcement to be played toward the packet network on a connection that
is not in a send mode, the request is deferred until the call agent modifies the connection. Once the
connection is placed in send mode, the expiration timer is started.
Examples
The following example shows that announcements must begin playing within 12 seconds after the VISM
receives the announcement signal from the call agent, after which time, requests are aborted:
cnfannreqtimeout 12
Related Commands
Command
Description
addannpermanent
Configures an announcement server file and associated codec type as
permanent.
cnfannagetime
Configures the time that a nonpermanent announcement is to remain valid after
it is placed into the VISM announcement cache.
cnfanndn
Designates an announcement file server domain name.
cnfannpathprefix
Designates the main prefix directory TFTP path from which to retrieve
announcement files from the announcement file server.
cnfannprefcodec
Configures the codec type used for announcements played on unconnected
TDM endpoints.
delannalldynamic
Deletes all announcement files and their associated codec types from the
temporary announcement files currently saved in the VISM card.
delanndynamic
Deletes an announcement file and associated codec type from the temporary
announcement files currently saved in the VISM card.
delannpermanent
Deletes a permanent announcement file and its associated codec type from the
announcement file server.
dspannagetime
Displays the time that a nonpermanent announcement is to remain valid after
it is placed into the VISM announcement cache.
Cisco VISM Installation and Configuration Guide
5-84
Release 3.0, Part Number OL-2521-01 Rev. D0, June 2004
Chapter 5
CLI Commands
cnfannreqtimeout
Command
Description
dspanncache
Displays all available temporary announcement file names, and associated age
times before being refreshed from the announcement file server.
dspanncontrols
Displays a summary list of all provisionable announcement file variables,
including variables associated with all announcement file CLI commands.
dspanndn
Displays the announcement file server domain name.
dspannpathprefix
Displays the main prefix directory path from which VISM retrieves
announcement files from the announcement file server.
dspannpermanents
Displays all available permanent announcement files with their associated
codec types and identifying index numbers.
dspannprefcodec
Displays the codec type used for announcements played on unconnected TDM
endpoints.
dspannreqtimeout
Displays the expiration time for announcements to begin playing before being
aborted.
Cisco VISM Installation and Configuration Guide
Release 3.0, Part Number OL-2521-01 Rev. D0, June 2004
5-85
Chapter 5
CLI Commands
cnfcac
cnfcac
To enable or disable the connection admission control (CAC) feature on a VISM card, use the cnfcac
command in the VoIP switching/trunking, switched AAL2 PVC, and AAL2 trunking operating modes.
cnfcac cac-enable
Syntax Description
cac-enable
Enables or disables CAC. It can be one of the following values:
•
1 = On
•
2 = Off
Command Modes
VoIP switching/trunking, switched AAL2 PVC, and AAL2 trunking
Usage Guidelines
If you enable CAC with this command, you can then use the cnfconcac command to enable CAC on
PVCs.
Examples
The following example shows that CAC is disabled for the current card:
cnfcac 1
Related Commands
Command
Description
cnfconcac
Enables CAC on an already added connection.
Cisco VISM Installation and Configuration Guide
5-86
Release 3.0, Part Number OL-2521-01 Rev. D0, June 2004
Chapter 5
CLI Commands
cnfcacparams
cnfcacparams
To configure connection admission control (CAC) features on a card, use the cnfcacparams command
in the VoIP switching/trunking, switched AAL2 PVC, and AAL2 trunking operating modes.
cnfcacparams vad-duty-cycle vad-tol
Syntax Description
vad-duty-cycle
VAD duty cycle—the ratio of speech and holdover duration to total duration
expressed as a percentage. Holdover is the period after silence begins and silence
suppression is turned on. In VISM, the holdover time is 250 ms. A typical value
for this parameter is 61, which means that 61% of the time is taken by speech and
holdover. It can be in the range from 1 to 99. (Default = 61)
vad-tol
VAD tolerance—the expression for VAD “over-subscription drop ratio” where:
tolerance = 10000 x over-subscription drop ratio (expressed as a percentage). A
typical value for VAD tolerance is 10. Some examples are:
•
10000 (tolerance) = 1% (over subscription drop ratio)
•
100 = 0.01%
•
10 = 0.001%
•
1 = 0.0001%
It can be in the range from 0 to 10000. (Default = 100)
Command Modes
VoIP switching/trunking, switched AAL2 PVC, and AAL2 trunking
Usage Guidelines
Follow standard CLI procedures when using this command.
Examples
The following example shows that VAD is configured for a duty cycle of 50 and a tolerance of 500:
cnfcacparams 50 500
Related Commands
Command
Description
cnfcac
Enables or disables the CAC feature on a VISM card
Cisco VISM Installation and Configuration Guide
Release 3.0, Part Number OL-2521-01 Rev. D0, June 2004
5-87
Chapter 5
CLI Commands
cnfcalea
cnfcalea
To enable or disable the Communications Assistance for Law Enforcement Act (CALEA) feature on the
current VISM card, use the cnfcalea command in the VoIP switching/trunking, switched AAL2 PVC,
and AAL2 trunking operating modes.
cnfcalea calea-enable
Syntax Description
calea-enable
Enables or disables the CALEA feature. It can be one of the following values:
•
1 = On
•
2 = Off (Default)
Command Modes
VoIP switching/trunking, switched AAL2 PVC, and AAL2 trunking
Usage Guidelines
You must ensure that you are using the VISM software version that supports CALEA in order to use the
CALEA feature. The CALEA implementation supports the CALEA law intercept confirmation interface.
Examples
The following example shows that the CALEA feature is enabled on the current VISM card:
cnfcalea 1
Related Commands
Command
Description
addcon
Adds a PVC connection between a VISM card and any SM or PXM card.
cnfcon
Configures a connection between a VISM card and an MGX 8000 Series
platform PXM card.
dspcalea
Displays the CALEA feature configuration status of the current VISM card.
dspvismparam
Displays the current VISM card configuration.
Cisco VISM Installation and Configuration Guide
5-88
Release 3.0, Part Number OL-2521-01 Rev. D0, June 2004
Chapter 5
CLI Commands
cnfcascode
cnfcascode
To configure channel associated signaling (CAS) idle code and seized code parameters for an endpoint,
use the cnfcascode command in the AAL2 trunking operating mode.
cnfcascode endpt-num idle-code seized-code |endpts-num|
Syntax Description
endpt-num
The endpoint number which is to be configured with CAS idle code and seized code
values. It can be a value from one of the following ranges:
•
For template number 1:
– For VISM, from 1 to 145
– For VISM-PR T1, from 1 to 192
– For VISM-PR E1, from 1 to 248
•
For template number 2:
– For VISM T1, from 1 to 192
– For VISM E1, from 1 to 248
•
For template number 3:
– For VISM, from 1 to 120
– For VISM-PR T1, from 1 to 192
– For VISM-PR E1, from 1 to 248
•
For template number 4:
– For VISM-PR, from 1 to 144
Note
idle-code
If the second (optional) endpt-num argument is specified, this argument value
is the first endpoint in a consecutive number of endpoints.
The 4-bit idle code. The value can be in the range from 0 to 15 and represents the four
signaling bits—A, B, C, and D—in binary, as bits 3, 2, 1, and 0 respectively, with bit
3 the most significant.
Cisco VISM Installation and Configuration Guide
Release 3.0, Part Number OL-2521-01 Rev. D0, June 2004
5-89
Chapter 5
CLI Commands
cnfcascode
seized-code
The 4-bit seized code. The value can be in the range from 0 to 15 and represents the
four signaling bits—A, B, C, and D—in binary, as bits 3, 2, 1, and 0 respectively, with
bit 3 the most significant.
endpts-num
(Optional) An optional argument value which indicates the last endpoint in a
consecutive range of endpoints. It can be a value from one of the following ranges:
•
For template number 1:
– For VISM, from 1 to 145
– For VISM-PR T1, from 1 to 192
– For VISM-PR E1, from 1 to 248
•
For template number 2:
– For VISM T1, from 1 to 192
– For VISM E1, from 1 to 248
•
For template number 3:
– For VISM, from 1 to 120
– For VISM-PR T1, from 1 to 192
– For VISM-PR E1, from 1 to 248
•
For template number 4:
– For VISM-PR, from 1 to 144
Command Modes
AAL2 trunking
Usage Guidelines
You must add the line associated with the endpt-num argument value before you use this command.
Examples
The following example shows that the idle code is binary 0100 (argument value = 4, so that A = 0, B = 1,
C = 0, D = 0), the seized code is binary 1001 (argument value = 9, so that A = 1, B = 0, C = 0, D = 1),
for endpoints 1 to 4:
cnfcascode 1 4 9 4
Related Commands
There are no related commands.
Cisco VISM Installation and Configuration Guide
5-90
Release 3.0, Part Number OL-2521-01 Rev. D0, June 2004
Chapter 5
CLI Commands
cnfcasdialdelay
cnfcasdialdelay
To configure the VISM wait time (dial delay) for outpulsing digits to the PBX after sending an off-hook
event, use the cnfcasdialdelay command in the VoIP switching/trunking and switched AAL2 PVC
operating modes.
cnfcasdialdelay endpt-num dial-delay
Syntax Description
endpt-num
The endpoint number to which the outpulsing digits wait time is configured. It can be
a value from one of the following ranges:
•
For template number 1:
– For VISM, from 1 to 145
– For VISM-PR T1, from 1 to 192
– For VISM-PR E1, from 1 to 248
•
For template number 2:
– For VISM T1, from 1 to 192
– For VISM E1, from 1 to 248
•
For template number 3:
– For VISM, from 1 to 120
– For VISM-PR T1, from 1 to 192
– For VISM-PR E1, from 1 to 248
•
For template number 4:
– For VISM-PR, from 1 to 144
dial-delay
The wait time (defined in milliseconds) for outpulsing digits to the PBX after sending
an off-hook event. It can be in the range from 10 to 1000. (Default = 500)
Command Modes
VoIP switching/trunking and switched AAL2 PVC
Usage Guidelines
You can execute this command if the following conditions are met:
Examples
•
The endpoint represented by the endpt-num argument value has been previously added.
•
The associated DS0 is configured for CAS.
•
The protocol is immediate start.
•
The MIB was chosen as the source in the cnfcasparamsource command.
The following example shows that endpoint 100 is configured with a dial delay (wait time) of 50 ms:
cnfcasdialdelay 100 50
Cisco VISM Installation and Configuration Guide
Release 3.0, Part Number OL-2521-01 Rev. D0, June 2004
5-91
Chapter 5
CLI Commands
cnfcasdialdelay
Related Commands
Command
Description
dspcastimers
Displays an endpoint’s currently configured CAS timers.
Cisco VISM Installation and Configuration Guide
5-92
Release 3.0, Part Number OL-2521-01 Rev. D0, June 2004
Chapter 5
CLI Commands
cnfcasendpt
cnfcasendpt
To associate an endpoint with a channel associated signaling (CAS) variant name, use the cnfcasendpt
command in the VoIP switching/trunking operating mode.
cnfcasendpt endpt-num var-name
Syntax Description
endpt-num
The endpoint number which is to be associated with the CAS variant identified by the
var-name argument value. It can be a value from one of the following ranges:
•
For template number 1:
– For VISM, from 1 to 145
– For VISM-PR T1, from 1 to 192
– For VISM-PR E1, from 1 to 248
•
For template number 2:
– For VISM T1, from 1 to 192
– For VISM E1, from 1 to 248
•
For template number 3:
– For VISM, from 1 to 120
– For VISM-PR T1, from 1 to 192
– For VISM-PR E1, from 1 to 248
•
For template number 4:
– For VISM-PR, from 1 to 144
var-name
Name of the CAS variant; a text string from 1 to 64 alphanumeric characters.
Command Modes
VoIP switching/trunking
Usage Guidelines
The endpoint and CAS variant must be previously added before you execute this command.
If there is no connection on an endpoint when the endpoint is associated with a CAS variant, use the
cnfcasendpt command again to change the CAS variant. However, if there is a connection on an
endpoint, you must delete the endpoint, add it back, and then execute the cnfcasendpt command to
change the CAS variant.
Examples
The following example shows that endpoint number 3 is associated with the q50.o CAS variant:
cnfcasendpt 3 q50.o
Related Commands
There are no related commands.
Cisco VISM Installation and Configuration Guide
Release 3.0, Part Number OL-2521-01 Rev. D0, June 2004
5-93
Chapter 5
CLI Commands
cnfcasflashtime
cnfcasflashtime
To configure the minimum and maximum channel associated signaling (CAS) on-hook time periods for
incoming flash hooks on a specified endpoint, use the cnfcasflashtime command in the VoIP
switching/trunking, switched AAL2 PVC, and AAL2 trunking operating modes.
cnfcasflashtime endpt-num min-flash-time max-flash-time
Syntax Description
endpt-num
The endpoint number which is to be configured with a minimum and maximum
flash time. It can be a value from one of the following ranges:
•
For template number 1:
– For VISM, from 1 to 145
– For VISM-PR T1, from 1 to 192
– For VISM-PR E1, from 1 to 248
•
For template number 2:
– For VISM T1, from 1 to 192
– For VISM E1, from 1 to 248
•
For template number 3:
– For VISM, from 1 to 120
– For VISM-PR T1, from 1 to 192
– For VISM-PR E1, from 1 to 248
•
For template number 4:
– For VISM-PR, from 1 to 144
min-flash-time
The minimum flash time (defined in milliseconds); in the range from 50 to
1550. (Default = 300)
max-flash-time
The maximum flash time (defined in milliseconds); in the range from 50 to
1550. (Default = 1400)
Command Modes
VoIP switching/trunking, switched AAL2 PVC, and AAL2 trunking
Usage Guidelines
Use this command to allow VISM to distinguish flash hooks from disconnects by configuring the
on-hook flash duration. An on-hook event with a duration that falls in the configured range is interpreted
as a flash hook. An on-hook event with a duration shorter than the configured range is ignored. An
on-hook event longer than the configured range is interpreted as a disconnect.
Examples
The following example shows that endpoint number 90 is configured with a 400-ms minimum CAS
on-hook flash time and a 1000-ms maximum CAS on-hook flash time:
cnfcasflashtime 90 400 1000
Cisco VISM Installation and Configuration Guide
5-94
Release 3.0, Part Number OL-2521-01 Rev. D0, June 2004
Chapter 5
CLI Commands
cnfcasflashtime
Related Commands
Command
Description
addxgcppersistevt
Adds persistent xGCP events.
cnfcasglareattrib
Configures the direction of CAS calls and the glare policy for a specified
endpoint.
cnfcaspackage
Configures MGCP packages to notify persistent observed CAS events in the
context of incoming and outgoing CAS calls on a specified endpoint.
dspcasglareattrib
Displays the direction of CAS calls and the glare policy for a specified
endpoint.
dspcaspackage
Displays the MGCP packages configured to notify persistent observed CAS
events in the context of incoming and outgoing CAS calls on a specified
endpoint.
dspcastimers
Displays the currently configured CAS timers for a specified endpoint.
Cisco VISM Installation and Configuration Guide
Release 3.0, Part Number OL-2521-01 Rev. D0, June 2004
5-95
Chapter 5
CLI Commands
cnfcasglareattrib
cnfcasglareattrib
To configure the direction of channel associated signaling (CAS) calls and the glare (dual seizure event)
policy for a specified endpoint, use the cnfcasglareattrib command in the VoIP switching/trunking,
switched AAL2 PVC, and AAL2 trunking operating modes.
cnfcasglareattrib endpt-num cas-direction glare-pol
Syntax Description
endpt-num
Endpoint number which is to be configured with CAS call direction and a glare
policy. It can be a value from one of the following ranges:
•
For template number 1:
– For VISM, from 1 to 145
– For VISM-PR T1, from 1 to 192
– For VISM-PR E1, from 1 to 248
•
For template number 2:
– For VISM T1, from 1 to 192
– For VISM E1, from 1 to 248
•
For template number 3:
– For VISM, from 1 to 120
– For VISM-PR T1, from 1 to 192
– For VISM-PR E1, from 1 to 248
•
For template number 4:
– For VISM-PR, from 1 to 144
cas-direction
glare-pol
CAS bits flow direction. It can be one of the following values:
•
1 = Incoming and outgoing
•
2 = Incoming
•
3 = Outgoing
Glare condition policy. It can be one of the following values:
•
1 = Controlling
•
2 = Releasing
Note
You can assign a glare-pol argument value of 2 only if the cas-direction
argument is assigned a value of 1.
Command Modes
VoIP switching/trunking, switched AAL2 PVC, and AAL2 trunking
Usage Guidelines
Use this command to assist in controlling TDM glare events. Use the cas-direction argument to allow or
disallow glare events. Use the glare-pol argument value to configure the resolution of glare events if you
allow them to occur. Resolution of glare events is either to enable VISM to release a call and accept a
call from the PBX, or wait for the PBX to release a call and enable VISM to continue with a call.
Cisco VISM Installation and Configuration Guide
5-96
Release 3.0, Part Number OL-2521-01 Rev. D0, June 2004
Chapter 5
CLI Commands
cnfcasglareattrib
Examples
The following example shows that endpoint number 136 is configured with the incoming CAS bits flow
direction and the controlling glare condition policy:
cnfcasglareattrib 136 2 1
Related Commands
Command
Description
addxgcppersistevt
Adds persistent xGCP events.
cnfcasflashtime
Configures the minimum and maximum CAS on-hook time periods for
incoming flash hooks on a specified endpoint.
cnfcaspackage
Configures MGCP packages to notify persistent observed CAS events in the
context of incoming and outgoing CAS calls on a specified endpoint.
cnflndigitorder
Assigns the order in which ANI digits and DNIS digits are dialed during an
outgoing FGD call on the endpoints of a specified VISM card line.
delxgcppersistevt
Deletes a persistent xGCP event.
dspcasglareattrib
Displays the direction of CAS calls and the glare policy for a specified
endpoint.
dspcaspackage
Displays the MGCP packages configured to notify persistent observed CAS
events in the context of incoming and outgoing CAS calls on a specified
endpoint.
dspcastimers
Displays the currently configured CAS timers for a specified endpoint.
dsplndigitorder
Displays the order in which ANI digits and DNIS digits are dialed during an
outgoing FGD call on the endpoints of a specified VISM card line.
Cisco VISM Installation and Configuration Guide
Release 3.0, Part Number OL-2521-01 Rev. D0, June 2004
5-97
Chapter 5
CLI Commands
cnfcasglaretime
cnfcasglaretime
To configure the channel associated signaling (CAS) glare time for an endpoint, use the cnfcasglaretime
command in the VoIP switching/trunking and switched AAL2 PVC operating modes.
cnfcasglaretime endpt-num glaretime
Syntax Description
endpt-num
The endpoint number which is to be configured with a glare time, identified by the
glaretime argument value. It can be a value from one of the following ranges:
•
For template number 1:
– For VISM, from 1 to 145
– For VISM-PR T1, from 1 to 192
– For VISM-PR E1, from 1 to 248
•
For template number 2:
– For VISM T1, from 1 to 192
– For VISM E1, from 1 to 248
•
For template number 3:
– For VISM, from 1 to 120
– For VISM-PR T1, from 1 to 192
– For VISM-PR E1, from 1 to 248
•
For template number 4:
– For VISM-PR, from 1 to 144
glaretime
The glare time (defined in milliseconds); in the range from 10 to 1000.
(Default = 500)
Command Modes
VoIP switching/trunking and switched AAL2 PVC
Usage Guidelines
A glare condition occurs when two stations attempt to call each other simultaneously. Glare condition
resolution involves a terminating VISM, which, upon receiving an off-hook event from the call agent,
starts a timer and verifies that the terminating PBX is also attempting an off-hook event. If so, off-hook
events from the call agent are ignored for the duration of the timer—the value you indicated with the
glaretime argument value.
To use this command, you must ensure that the endpoint indicated by the endpt-num argument value has
been previously added, and that the associated DS0 is configured for CAS.
Note
To use this command, you must choose the MIB as the source in the cnfcasparamsource command.
Cisco VISM Installation and Configuration Guide
5-98
Release 3.0, Part Number OL-2521-01 Rev. D0, June 2004
Chapter 5
CLI Commands
cnfcasglaretime
Examples
The following example shows that endpoint 100 is configured with a CAS glare time value of 50 ms:
cnfcasglaretime 100 50
Related Commands
Command
Description
dspcastimers
Displays an endpoint’s currently configured CAS timers.
Cisco VISM Installation and Configuration Guide
Release 3.0, Part Number OL-2521-01 Rev. D0, June 2004
5-99
Chapter 5
CLI Commands
cnfcasguardtime
cnfcasguardtime
To configure the channel associated signaling (CAS) guard time for an endpoint, use the
cnfcasguardtime command in the VoIP switching/trunking and switched AAL2 PVC operating modes.
cnfcasguardtime endpt-num guardtime
Syntax Description
endpt-num
The endpoint number which is to be configured with a guard time, identified by the
guardtime argument value. It can be a value from one of the following ranges:
•
For template number 1:
– For VISM, from 1 to 145
– For VISM-PR T1, from 1 to 192
– For VISM-PR E1, from 1 to 248
•
For template number 2:
– For VISM T1, from 1 to 192
– For VISM E1, from 1 to 248
•
For template number 3:
– For VISM, from 1 to 120
– For VISM-PR T1, from 1 to 192
– For VISM-PR E1, from 1 to 248
•
For template number 4:
– For VISM-PR, from 1 to 144
guardtime
The guard time (defined in milliseconds); in the range from 10 to 1000.
(Default = 800)
Command Modes
VoIP switching/trunking and switched AAL2 PVC
Usage Guidelines
Guard time is the minimum duration between the end of one call and the beginning of the next call. When
a delete connection (DLCX) command is received from a call agent, VISM starts a timer—set by the
value you indicate for the guardtime argument—and ignores any off-hook events until the timer has
expired.
To use this command, you must ensure that the endpoint indicated by the endpt-num argument value has
been previously added, and that the associated DS0 is configured for CAS.
Note
To use this command, you must choose the MIB as the source in the cnfcasparamsource command.
Cisco VISM Installation and Configuration Guide
5-100
Release 3.0, Part Number OL-2521-01 Rev. D0, June 2004
Chapter 5
CLI Commands
cnfcasguardtime
Examples
The following example shows that endpoint number 100 is configured with a CAS guard time of 500 ms:
cnfcasguardtime 100 500
Related Commands
Command
Description
dspcastimers
Displays an endpoint’s currently configured CAS timers.
Cisco VISM Installation and Configuration Guide
Release 3.0, Part Number OL-2521-01 Rev. D0, June 2004
5-101
Chapter 5
CLI Commands
cnfcasoffhooktime
cnfcasoffhooktime
To configure a minimum presence time, on an endpoint, for a CAS off-hook pattern to be recognized as
an off-hook signal, use the cnfcasoffhooktime command in the VoIP switching/trunking and switched
AAL2 PVC operating modes.
cnfcasoffhooktime endpt-num offhooktime
Syntax Description
endpt-num
The endpoint number which is to be configured with a guard time, identified by the
offhooktime argument value. It can be a value from one of the following ranges:
•
For template number 1:
– For VISM, from 1 to 145
– For VISM-PR T1, from 1 to 192
– For VISM-PR E1, from 1 to 248
•
For template number 2:
– For VISM T1, from 1 to 192
– For VISM E1, from 1 to 248
•
For template number 3:
– For VISM, from 1 to 120
– For VISM-PR T1, from 1 to 192
– For VISM-PR E1, from 1 to 248
•
For template number 4:
– For VISM-PR, from 1 to 144
offhooktime
The off-hook time (defined in milliseconds); in the range from 10 to 1000.
Command Modes
VoIP switching/trunking and switched AAL2 PVC
Usage Guidelines
To use this command, you must ensure that the endpoint indicated by the endpt-num argument value has
been previously added, and that the associated DS0 is configured for CAS.
Note
Examples
To use this command, you must choose the MIB as the source in the cnfcasparamsource command.
The following example shows that endpoint 100 is configured with a CAS offhook time of 500 ms:
cnfcasoffhooktime 100 500
Related Commands
Command
Description
dspcastimers
Displays an endpoint’s currently configured CAS timers.
Cisco VISM Installation and Configuration Guide
5-102
Release 3.0, Part Number OL-2521-01 Rev. D0, June 2004
Chapter 5
CLI Commands
cnfcasonhooktime
cnfcasonhooktime
To configure a minimum presence time, on an endpoint, for a CAS on-hook pattern to be recognized as
an on-hook signal, use the cnfcasonhooktime command in the VoIP switching/trunking and switched
AAL2 PVC operating modes.
cnfcasonhooktime endpt-num onhooktime
Syntax Description
endpt-num
The endpoint number which is to be configured with a guard time, identified by the
onhooktime argument value. It can be a value from one of the following ranges:
•
For template number 1:
– For VISM, from 1 to 145
– For VISM-PR T1, from 1 to 192
– For VISM-PR E1, from 1 to 248
•
For template number 2:
– For VISM T1, from 1 to 192
– For VISM E1, from 1 to 248
•
For template number 3:
– For VISM, from 1 to 120
– For VISM-PR T1, from 1 to 192
– For VISM-PR E1, from 1 to 248
•
For template number 4:
– For VISM-PR, from 1 to 144
onhooktime
The on-hook time (defined in milliseconds); in the range from 10 to 1000.
(Default = 300)
Command Modes
VoIP switching/trunking and switched AAL2 PVC
Usage Guidelines
To use this command, you must ensure that the endpoint indicated by the endpt-num argument value has
been previously added, and that the associated DS0 is configured for CAS.
Note
Examples
To use this command, you must choose the MIB as the source in the cnfcasparamsource command.
The following example shows that endpoint 100 is configured with an on-hook time of 500 ms:
cnfcasonhooktime 100 500
Cisco VISM Installation and Configuration Guide
Release 3.0, Part Number OL-2521-01 Rev. D0, June 2004
5-103
Chapter 5
CLI Commands
cnfcasonhooktime
Related Commands
Command
Description
dspcastimers
Displays an endpoint’s currently configured CAS timers.
Cisco VISM Installation and Configuration Guide
5-104
Release 3.0, Part Number OL-2521-01 Rev. D0, June 2004
Chapter 5
CLI Commands
cnfcaspackage
cnfcaspackage
To configure the Media Gateway Control Protocol (MGCP) packages to notify persistent observed
channel associated signaling (CAS) events in the context of incoming and outgoing CAS calls on a
specified endpoint, use the cnfcaspackage command in the VoIP switching/trunking, switched AAL2
PVC, and AAL2 trunking operating modes.
cnfcaspackage endpt-num in-package out-package
Syntax Description
endpt-num
The endpoint number which is to be configured with the source location. It can
be a value from one of the following ranges:
•
For template number 1:
– For VISM, from 1 to 145
– For VISM-PR T1, from 1 to 192
– For VISM-PR E1, from 1 to 248
•
For template number 2:
– For VISM T1, from 1 to 192
– For VISM E1, from 1 to 248
•
For template number 3:
– For VISM, from 1 to 120
– For VISM-PR T1, from 1 to 192
– For VISM-PR E1, from 1 to 248
•
For template number 4:
– For VISM-PR, from 1 to 144
Cisco VISM Installation and Configuration Guide
Release 3.0, Part Number OL-2521-01 Rev. D0, June 2004
5-105
Chapter 5
CLI Commands
cnfcaspackage
in-package
Package name to be used for persistent events observed on an incoming
telephony call. It can be one of the following values:
•
MS = PBX DID/DOD trunks and incoming or outgoing MF wink start
trunks
•
DT = DTMF and dial pulse1 trunks (except basic PBX)
•
MD = North American MF Feature Group D EANA and EAIN
•
MO = FGD Operator Services Signaling outgoing trunks only
•
BL = DTMF and dial pulse1 basic PBX trunks
•
L = Line
•
H = Handset
•
Basic = It can be one of the following:
– G—generic
– D—DTMF
– M—MF
– T—Trunk
– L—Line
– H—Handset
– R—RTP
– A—Announcement Server
– Script—Script
Note
If you set the package to anything other than basic on an endpoint with
this command, persistent events observed on that endpoint are encoded
as an event in that package if the event is defined in that package, or
dropped if they are not defined in that package. Packages N and S are
not supported.
Cisco VISM Installation and Configuration Guide
5-106
Release 3.0, Part Number OL-2521-01 Rev. D0, June 2004
Chapter 5
CLI Commands
cnfcaspackage
out-package
Package name to be used for persistent events observed on an outgoing
telephony call. It can be one of the following values:
•
MS = PBX DID/DOD trunks and incoming or outgoing MF wink start
trunks
•
DT = DTMF and dial pulse1 trunks (except basic PBX)
•
MD = North American MF Feature Group D EANA and EAIN
•
MO = FGD Operator Services Signaling outgoing trunks only
•
BL = DTMF and dial pulse1 basic PBX trunks
•
L = Line
•
H = Handset
•
Basic = It can be from the following:
– G—generic
– D—DTMF
– M—MF
– T—Trunk
– L—Line
– H—Handset
– R—RTP
– A—Announcement Server
•
Note
Script—Script
If you set the package to anything other than basic on an endpoint with
this command, persistent events observed on that endpoint are encoded
as an event in that package if the event is defined in that package, or
dropped if they are not defined in that package. Packages N and S are
not supported.
1. Dial pulse is not supported in VISM.
Command Modes
VoIP switching/trunking, switched AAL2 PVC, and AAL2 trunking
Usage Guidelines
This command enables RFC 3064 support.
Examples
The following example shows that the MGCP packages for endpoint number 83 are configured with
mgcplin as the MGCP incoming package name and mgcplout as the MGCP outgoing package name:
cnfcaspackage 83 mgcp1in mgcp1out
Related Commands
Cisco VISM Installation and Configuration Guide
Release 3.0, Part Number OL-2521-01 Rev. D0, June 2004
5-107
Chapter 5
CLI Commands
cnfcaspackage
Command
Description
addxgcppersistevt
Adds persistent xGCP events.
cnfcasflashtime
Configures the minimum and maximum CAS on-hook time periods for
incoming flash hooks on a specified endpoint.
cnfcasglareattrib
Configures the direction of CAS calls and the glare policy for a specified
endpoint.
cnflndigitorder
Assigns the order in which ANI digits and DNIS digits are dialed during an
outgoing FGD call on the endpoints of a specified VISM card line.
delxgcppersistevt
Deletes a persistent xGCP event.
dspcasglareattrib
Displays the direction of CAS calls and the glare policy for a specified
endpoint.
dspcaspackage
Displays the MGCP packages configured to notify persistent observed CAS
events in the context of incoming and outgoing CAS calls on a specified
endpoint.
dspcastimers
Displays the currently configured CAS timers for a specified endpoint.
dsplndigitorder
Displays the order in which ANI digits and DNIS digits are dialed during an
outgoing FGD call on the endpoints of a specified VISM card line.
Cisco VISM Installation and Configuration Guide
5-108
Release 3.0, Part Number OL-2521-01 Rev. D0, June 2004
Chapter 5
CLI Commands
cnfcasparamsource
cnfcasparamsource
To configure channel associated signaling (CAS)-related timer source parameters for an endpoint, use
the cnfcasparamsource command in the switched AAL2 PVC operating mode.
cnfcasparamsource endpt-num cas-source
Syntax Description
endpt-num
The endpoint number which is to be configured with the source location,
identified by the cas-source argument value. It can be a value from one of the
following ranges:
•
For template number 1:
– For VISM, from 1 to 145
– For VISM-PR T1, from 1 to 192
– For VISM-PR E1, from 1 to 248
•
For template number 2:
– For VISM T1, from 1 to 192
– For VISM E1, from 1 to 248
•
For template number 3:
– For VISM, from 1 to 120
– For VISM-PR T1, from 1 to 192
– For VISM-PR E1, from 1 to 248
•
For template number 4:
– For VISM-PR, from 1 to 144
cas-source
The CAS-related timer parameters source location. It can be one of the
following values:
•
1 = CAS application file (Default)
•
2 = Current VISM MIB
Command Modes
Switched AAL2 PVC
Usage Guidelines
You can configure different CAS-related timer values for different endpoints; however, the endpoints
must all be associated with the same CAS variant.
To use this command, you must ensure that the endpoint indicated by the endpt-num argument value has
been previously added, and that the associated DS0 is configured for CAS.
Examples
The following example shows that endpoint number 100 is configured with CAS-related timer values
located in the current VISM card’s MIB:
cnfcasparamsource 100 2
Cisco VISM Installation and Configuration Guide
Release 3.0, Part Number OL-2521-01 Rev. D0, June 2004
5-109
Chapter 5
CLI Commands
cnfcasparamsource
Related Commands
Command
Description
dspcasparamsource
Displays an endpoint’s currently configured CAS-related timer source.
Cisco VISM Installation and Configuration Guide
5-110
Release 3.0, Part Number OL-2521-01 Rev. D0, June 2004
Chapter 5
CLI Commands
cnfcasvar
cnfcasvar
To configure a previously added channel associated signaling (CAS) variant timing parameters, use the
cnfcasvar command in the VoIP switching/trunking and switched AAL2 PVC operating modes.
cnfcasvar var-name country-code partial-time critical-time interdigit-timeout
Syntax Description
var-name
Name of a previously added CAS variant; a text string of 1 to 64 alphanumeric
characters.
country-code
The country code of the variant. The value must be a two-character text string.
partial-time
The partial dial time (defined in seconds) in the range from 10 to 10000—in
increments of 10.
critical-time
The critical timing (defined in seconds) in the range from 0 to 10000—in
increments of 10.
interdigit-timeout
The interdigit timeout value for MF digits (defined in seconds) in the range from
1 to 10.
Command Modes
VoIP switching/trunking and switched AAL2 PVC
Usage Guidelines
Follow standard CLI procedures when using this command.
Examples
The following example shows that the var1 CAS variant for the nz country code is configured with a
partial timeout of 10 seconds, a critical timing of 10 seconds, and an MF interdigit timeout of 2 seconds:
cnfcasvar var1 nz 10 10 2
Related Commands
Command
Description
addcasvar
Adds a CAS variant to a VISM card.
delcasvar
Deletes a CAS variant from a VISM card.
dspcasvar
Displays information about CAS variants for a given variant name.
Cisco VISM Installation and Configuration Guide
Release 3.0, Part Number OL-2521-01 Rev. D0, June 2004
5-111
Chapter 5
CLI Commands
cnfcaswinktime
cnfcaswinktime
To configure the channel associated signaling (CAS) wink time parameters—minimum and maximum
make times, and minimum break time—for an endpoint, use the cnfcaswinktime command in the VoIP
switching/trunking and switched AAL2 PVC operating modes.
cnfcaswinktime endpt-num min-make-time max-make-time min-break-time
Syntax Description
endpt-num
The endpoint number which is to be configured with wink time parameters.
Endpoint number. It can be a value from one of the following ranges:
•
For template number 1:
– For VISM, from 1 to 145
– For VISM-PR T1, from 1 to 192
– For VISM-PR E1, from 1 to 248
•
For template number 2:
– For VISM T1, from 1 to 192
– For VISM E1, from 1 to 248
•
For template number 3:
– For VISM, from 1 to 120
– For VISM-PR T1, from 1 to 192
– For VISM-PR E1, from 1 to 248
•
For template number 4:
– For VISM-PR, from 1 to 144
min-make-time
The minimum make duration time (defined in milliseconds) of the wink. It can
be in the range from 10 to 1000. (Default = 100)
max-make-time
The maximum make duration time (defined in milliseconds) of the wink. It can
be in the range from 10 to 3000. (Default = 1000)
min-break-time
The minimum break duration time (defined in milliseconds) of the wink. It can
be in the range from 10 to 1000. (Default = 20)
Command Modes
VoIP switching/trunking and switched AAL2 PVC
Usage Guidelines
A wink is composed of the following sequential events:
1.
On-hook pattern
2.
Off-hook pattern
3.
Return to an on-hook pattern
The minimum and maximum make times are the minimum and maximum durations that the off-hook
pattern persists. The minimum break time is the minimum duration that the on-hook pattern persists
following the return to on-hook.
Cisco VISM Installation and Configuration Guide
5-112
Release 3.0, Part Number OL-2521-01 Rev. D0, June 2004
Chapter 5
CLI Commands
cnfcaswinktime
To use this command, you must ensure that the endpoint indicated by the endpt-num argument value has
been previously added, and that the associated DS0 is configured for CAS.
Note
Examples
To use this command, you must choose the MIB as the source in the cnfcasparamsource command.
The following example shows that endpoint 100 is configured with a wink time specification of 100 ms
for the minimum make time, 500 ms for the maximum wake time, and 100 ms for the minimum break
time:
cnfcaswinktime 100 500 100
Related Commands
Command
Description
dspcastimers
Displays an endpoint’s currently configured CAS timers.
Cisco VISM Installation and Configuration Guide
Release 3.0, Part Number OL-2521-01 Rev. D0, June 2004
5-113
Chapter 5
CLI Commands
cnfcasxgcp
cnfcasxgcp
To configure channel associated signaling (CAS) variant retransmission parameters, use the cnfcasxgcp
command in the VoIP switching/trunking and switched AAL2 PVC operating modes.
cnfcasxgcp var-name retrans-time start-retrans-time retrans-num
Syntax Description
var-name
Name of the CAS variant to be configured with retransmission parameters; a
text string of 1 to 64 alphanumeric characters.
retrans-time
The retransmission time (defined in milliseconds). It can be in the range from
10 to 10000.
start-retrans-time
The initial retransmission time (defined in milliseconds). It can be in the range
from 10 to 10000.
retrans-num
Maximum number of retransmission retries. It can be in the range from 0 to 10.
Command Modes
VoIP switching/trunking and switched AAL2 PVC
Usage Guidelines
Follow standard CLI procedures for this command.
Examples
The following example shows that the var1 CAS variant is configured for 100 ms retransmission time,
100 ms initial retransmission time, and up to two retransmission attempts:
cnfcasxgcp var1 100 100 10 2
Related Commands
Command
Description
addcasvar
Adds a CAS variant to a VISM card.
delcasvar
Deletes a CAS variant from a VISM card.
dspcasvar
Displays information about CAS variants for a given variant name.
Cisco VISM Installation and Configuration Guide
5-114
Release 3.0, Part Number OL-2521-01 Rev. D0, June 2004
Chapter 5
CLI Commands
cnfclksrc
cnfclksrc
To configure the PXM1, PXM1E, PXM45, VISM, or VISM-PR card clock source, use the cnfclksrc
command in the VoIP switching/trunking, switched AAL2 PVC, and AAL2 trunking operating modes.
cnfclksrc slot-num.port-num clk-type
Syntax Description
slot-num.port-num
The chassis PXM card slot number and port number for which you want to
configure the clocking source.
The slot-num can be one of the following values:
•
7
•
8
The port-num can be in the range from 1 to n, as appropriate for the physical
installation.
Note
clk-type
Ensure that you type the period with no spaces on either side, between
the slot-num argument value and the port-num argument value.
Clock type. It can be one of the following values:
•
P = Primary
•
S = Secondary
•
N = Null. No external clocking source; use the PXM card’s internal
crystal.
Command Modes
VoIP switching/trunking, switched AAL2 PVC, and AAL2 trunking
Usage Guidelines
Specify the cnfclksrc command argument values according to the following rules:
•
To configure any line except for line 1 of a VISM card, you must use a VISM-PR card in
combination with a PXM1E or PXM45 in your MGX 8000 Series switch chassis.
•
If the clock source is the external BITS clock (a T1 or E1 port on the PXM back card), specify the
configuration as:
cnfclksrc 7.35 p
Note
•
Type 7 for the slot number regardless of the PXM card’s location in the chassis. Type 35
for the port number—the BITS port is always port 35.
If the clock source is an external signal on one of the PXM OC3 ports, specify the configuration as:
cnfclksrc 7.n p
Note
Type 7 for the slot number regardless of the PXM card’s location in the chassis. The n
port parameter value is the OC3 port number in the range 1 to 4.
Cisco VISM Installation and Configuration Guide
Release 3.0, Part Number OL-2521-01 Rev. D0, June 2004
5-115
Chapter 5
CLI Commands
cnfclksrc
•
If the clock source is the PXM’s internal crystal and no other clock source has been specified, do
not configure the clock source. The crystal is the automatic default.
•
If you want to change the clocking source from external to the PXM card’s internal crystal, specify
the configuration as:
cnfclksrc 7.X n
Note
•
Type 7 for the slot number regardless of the PXM card’s location in the chassis. The X
argument value is the either 35 or the OC3 port number, depending upon which is the
currently specified source. The null port number argument value cancels the previous
configuration and returns the clocking source to the default internal crystal.
If the clock source is from a line on a VISM card, specify the configuration as:
cnfclksrc Y.1 p
Note
The Y argument value is the actual slot number of the VISM card. Always type 1 for port
argument value, which represents the line number in this configuration.
Refer to the Cisco MGX 8850 Installation and Configuration Guide and the Cisco MGX 8000 Series
Switch Command Reference for information on the following PXM card clocking commands:
Examples
•
cnfcbclk
•
cnfextclk
•
cnfsrmclksrc
•
dspcbclk
•
dspclkinfo
•
dspclksrc
•
dspcurclk
The following example shows that the clock source is configured for slot number 8, port number 35, and
is secondary:
cnfclksrc 8.35 s
Related Commands
Command
Description
cnfln
Configures line characteristics for a specified line.
Cisco VISM Installation and Configuration Guide
5-116
Release 3.0, Part Number OL-2521-01 Rev. D0, June 2004
Chapter 5
CLI Commands
cnfco4timer
cnfco4timer
To configure the bearer continuity test CO4 timer value, use the cnfco4timer command in the VoIP
switching/trunking and switched AAL2 PVC operating modes.
cnfco4timer co4-timeout
Syntax Description
co4-timeout
Command Modes
VoIP switching/trunking and switched AAL2 PVC
Usage Guidelines
A timer is started when a CO3 or xRBK message is sent. If a CO4 message is not received before the
timeout expires, a VISM initiated DLCX message is sent to the call agent.
Examples
The following example shows that the bearer continuity test CO4 timer expires at 10000 ms:
It can be a value (defined in milliseconds) in the range from 50 to 10000. (Default =
1000)
cnfco4timer 10000
Related Commands
Command
Description
dspco4timer
Displays the bearer continuity test CO4 timer value.
dspvismparam
Displays the current VISM card configuration.
Cisco VISM Installation and Configuration Guide
Release 3.0, Part Number OL-2521-01 Rev. D0, June 2004
5-117
Chapter 5
CLI Commands
cnfcodecjtrdelay
cnfcodecjtrdelay
To configure the jitter delay mode and initial delay value for a specified codec, use the cnfcodecjtrdelay
command in the VoIP switching/trunking, switched AAL2 PVC, and AAL2 trunking operating modes.
cnfcodecjtrdelay codec-type jitter-mode jitter-delay
Syntax Description
codec-type
jitter-mode
jitter-delay
Type of coding/decoding to be performed on the data stream. It can be one of the
following values:
•
1 = G.711u
•
2 = G.711a
•
3 = G.726-32k
•
4 = G.729a
•
5 = G.729ab
•
6 = Clear channel (VAD must be off)
•
7 = G.726-16k
•
8 = G.726-24k
•
9 = G.726-40k
•
11 = G.723.1-H
•
12 = G.723.1a-H
•
13 = G.723.1-L
•
14 = G.723.1a-L
Jitter delay mode. It can be one of the following values:
•
1 = Fixed. Cisco recommends fixed mode if latency jitter is constant.
•
2 = Adaptive. Cisco recommends adaptive if latency jitter is variable.
Initial jitter delay (defined in milliseconds). It can be a value from one of the
following ranges:
•
For codec templates 1, 3, and 4, in the range from 0 to 100 in increments of 10.
•
For codec template 2, in the range from 0 to 100 in increments of 5.
Command Modes
VoIP switching/trunking, switched AAL2 PVC, and AAL2 trunking
Usage Guidelines
Cisco recommends that you configure the jitter-delay argument to 20 ms when using DSP firmware
versions 3.4 and 3.6.
The G.723.1 codecs are supported for VISM-PR cards and are not supported for VISM cards.
Cisco VISM Installation and Configuration Guide
5-118
Release 3.0, Part Number OL-2521-01 Rev. D0, June 2004
Chapter 5
CLI Commands
cnfcodecjtrdelay
Examples
The following example shows that codec G.726, 24 kbps is configured with an adaptable jitter mode and
an initial jitter delay of 55 ms:
cnfcodecjtrdelay 8 2 55
Related Commands
Command
Description
dspcodecjtrdelays
Displays the configured codec jitter delay modes and associated jitter initial
delays.
Cisco VISM Installation and Configuration Guide
Release 3.0, Part Number OL-2521-01 Rev. D0, June 2004
5-119
Chapter 5
CLI Commands
cnfcodecneg
cnfcodecneg
To configure the priority order of the lists of codec list priority order, use the cnfcodecneg command in
the VoIP switching/trunking operating mode.
cnfcodecneg codec-priority
Syntax Description
codec-priority
The codec list priority scheme. It can be one of the following values:
•
1 = LCO list, remote SDP data list, local MIB
•
2 = LCO list, local MIB, remote SDP data list
•
3 = Remote SDP data list, LCO list, local MIB
•
4 = Remote SDP data list, local MIB, LCO list
•
5 = Local MIB, LCO list, remote SDP data list
•
6 = Local MIB, remote SDP data list, LCO list
Command Modes
VoIP switching/trunking
Usage Guidelines
Codec lists include the following:
Examples
•
Call agent provided list in a local connection option (LCO)
•
Remote gateway provided list in the Session Description Protocol (SDP) data
•
Local MIB provided list
The following example shows that the LCO list is the first priority, SDP data list is the second, and the
list from the local MIB is the last priority:
cnfcodecneg 1
Related Commands
There are no related commands.
Cisco VISM Installation and Configuration Guide
5-120
Release 3.0, Part Number OL-2521-01 Rev. D0, June 2004
Chapter 5
CLI Commands
cnfcodecparams
cnfcodecparams
To configure codec parameters—codec packetization period, preference, Internet Assigned Numbers
Authority (IANA) registered codec type and xGCP codec string—for AAL1 and IP calls, use the
cnfcodecparams command in the VoIP switching operating mode.
cnfcodecparams codec-type codec-pkt-period |preference codec-string iana-type|
Syntax Description
codec-type
codec-pkt-period
preference
The type of coding/decoding to be performed on the data stream. It can be one
of the following values:
•
1 = G.711u
•
2 = G.711a
•
3 = G.726-32k
•
4 = G.729a
•
5 = G.729ab
•
6 = Clear channel (VAD must be off)
•
7 = G.726-16k
•
8 = G.726-24k
•
9 = G.726-40k
•
11 = G.723.1-H
•
12 = G.723.1a-H
•
13 = G.723.1-L
•
14 = G.723.1a-L
Packetization period (defined in milliseconds). It can be one of the following
values:
•
10 (Default)
•
20
•
30
•
40
•
60
(Optional) Preference level of the codec you identified with the codec-num
argument value. It can be a value from the following list:
•
Note
•
0 = Ignore preference
A preference value of 0 results in the codec being excluded from the
list of supported codecs during codec negotiation via xGCP.
In the range from 1 (highest) to 13 (lowest)
codec-string
(Optional) The xGCP codec string. It can be from 1 to 20 ASCII characters.
iana-type
(Optional) IANA registered codec type. It can be in the range from 0 to 96.
Cisco VISM Installation and Configuration Guide
Release 3.0, Part Number OL-2521-01 Rev. D0, June 2004
5-121
Chapter 5
CLI Commands
cnfcodecparams
Command Modes
VoIP switching
Usage Guidelines
The packetization period parameter is required but the remaining parameters are optional. The
parameters of any codec can be configured regardless of whether the current codec template supports
that codec.
If you are using template 2, the G.726 and G.729 codec types are ignored and replaced with clear
channel.
The G.723.1 codecs are supported for VISM-PR cards and are not supported for VISM cards.
Examples
The following example shows that the codec with identification number 3 is configured with a
packetization period of 20 ms, has the highest priority, is not an IANA registered codec, and is
represented by the string geeseven:
cnfcodecparams 3 20 1 0 geeseven
Related Commands
There are no related commands.
Cisco VISM Installation and Configuration Guide
5-122
Release 3.0, Part Number OL-2521-01 Rev. D0, June 2004
Chapter 5
CLI Commands
cnfcodectmpl
cnfcodectmpl
To assign a codec template to an entire VISM card, use the cnfcodectmpl command in the VoIP
switching/trunking, switched AAL2 PVC, and AAL2 trunking operating modes.
cnfcodectmpl template-num
Syntax Description
template-num
Template number assigned to the current VISM card. It can be one of the following
values:
•
Note
1 = G.711u, G.711a, G.726-16k, G.726-24k, G.726-32k, G.726-40k, G.729a,
and G.729ab codecs, and clear channel
Template 1 is limited to 145 DS0s for VISM and 248 DS0s for VISM-PR.
•
2 = G.711u and G.711a uncompressed codecs, and clear channel
•
3 = G.711u, G.711a, G.726-16k, G.726-24k, G.726-32k, G.726-40k, G.729a,
and G.729ab codecs and clear channel
Note
•
Note
Codec template number 3 = template number 1 with T.38 support added.
Template 3 is limited to 120 DS0s for VISM and 248 for VISM-PR.
4 = G.711u, G.711a, G. 726-16k, G.726-24k, G.726-32k, G.726-40k, G.729a,
G.729ab, G.723.1-H, G.723.1a-H, G.723.1-L, G.723.1a-L codecs and clear
channel
Template 4 supports a maximum of 144 channels for VISM-PR.
Command Modes
VoIP switching/trunking, switched AAL2 PVC, and AAL2 trunking
Usage Guidelines
The following list describes the maximum number of channels supported by the different templates:
•
Template 1: 145 T1 channels, or 145 E1 channels.
•
Template 2: 192 T1 channels, or 248 E1 channels.
•
Template 3: 120 T1 channels, or 120 E1 channels.
Templates define allowable voice encoding types.
The execution of this command requires your confirmation because the card resets after you execute this
command.
This command is not allowed if CIDs are present.
The G.723.1 codecs are supported for VISM-PR cards and are not supported for VISM cards.
Examples
The following example shows that template number 1 is assigned to the current VISM card:
cnfcodectmpl 1
Cisco VISM Installation and Configuration Guide
Release 3.0, Part Number OL-2521-01 Rev. D0, June 2004
5-123
Chapter 5
CLI Commands
cnfcodectmpl
Related Commands
Command
Description
dspcodectmpls
Displays all entries in the VISM card’s codec template table.
Cisco VISM Installation and Configuration Guide
5-124
Release 3.0, Part Number OL-2521-01 Rev. D0, June 2004
Chapter 5
CLI Commands
cnfcompvad
cnfcompvad
To enable or disable voice activity detection (VAD) on a T1 or E1 line, use the cnfcompvad command
in the VoIP switching/trunking, switched AAL2 PVC, and AAL2 trunking operating modes.
cnfcompvad line-num vad-enable
Syntax Description
line-num
Line number of the line on which to configure VAD in the range from 1 to 8.
vad-enable
Enables or disables VAD. It can be one of the following values:
1 = On
2 = Off
Command Modes
VoIP switching/trunking, switched AAL2 PVC, and AAL2 trunking
Usage Guidelines
Follow standard CLI procedures when using this command.
Examples
The following example shows that line number 3 does not have VAD enabled:
cnfcompvad 3 2
Related Commands
There are no related commands.
Cisco VISM Installation and Configuration Guide
Release 3.0, Part Number OL-2521-01 Rev. D0, June 2004
5-125
Chapter 5
CLI Commands
cnfcon
cnfcon
To configure a connection between a VISM card and an MGX 8000 Series platform PXM card, use the
cnfcon command in the VoIP switching/trunking, switched AAL2 PVC, and AAL2 trunking operating
modes.
cnfcon lcn peak-cell-rate service-type |sus-cell-rate max-burst-rate|
Syntax Description
lcn
Logical channel number of the connection; in the range from 131 to 510.
peak-cell-rate
Peak cell rate (described in cells per second). It can be a value from one of the
following ranges:
•
1 to 80000 for VoIP bearer
•
1 to 20000 for VoIP control
•
1 to 50000 for AAL2 T1
•
1 to 60000 for AAL2 E1
•
1 to 400 for AAL2 signaling (trunking)
•
1 to 90000 for AAL5 bearer
•
1 to 10000 for AAL5 control
Note
service-type
Service type. It can be one of the following values:
•
1 = Constant bit rate (CBR)
•
2 = Variable bit rate real time—VBR (RT)
•
3 = Variable bit rate non-real time—VBR (NRT)
•
4 = VBR (RT) 3
•
5 = VBR (RT) 2
•
6 = VBR (NRT) 2
•
7 = VBR (NRT) 3
Note
sus-cell-rate
This argument value is required if the service-type argument value is in
the range from 2 to 7.
(Optional) Maximum burst size—maximum number of cells transmitted at the
peak cell rate. It can be in the range from 1 cell to 10 times the value you
configured for the sus-cell-rate argument value.
Note
Command Modes
Use values 4 to 7 for VISM-PR to RPM-PR connections.
(Optional) Sustainable cell rate. It can be in the range from 1 to the value you
configured for the peak-cell-rate argument value.
Note
max-burst-rate
The peak-cell-rate argument value must be 15 or greater if the
service-type argument value is a variable bit rate selection.
This argument value is required if the service-type argument value is in
the range from 2 to 7.
VoIP switching/trunking, switched AAL2 PVC, and AAL2 trunking
Cisco VISM Installation and Configuration Guide
5-126
Release 3.0, Part Number OL-2521-01 Rev. D0, June 2004
Chapter 5
CLI Commands
cnfcon
Usage Guidelines
Follow standard CLI procedures when using this command.
Examples
The following example shows that an LCN 160 connection is configured as CBR, with a peak cell rate
of 20000 cps, a sustained cell rate of 5000 cps, and a maximum burst rate of 10000 cps:
cnfcon 160 20000 1 5000 10000
Related Commands
Command
Description
addcon
Adds a PVC connection between a VISM card and any SM or PXM card.
delcon
Deletes a PVC connection between a VISM card and an MGX 8000 Series
platform PXM card.
dspvismparam
Displays the current VISM card configuration.
Cisco VISM Installation and Configuration Guide
Release 3.0, Part Number OL-2521-01 Rev. D0, June 2004
5-127
Chapter 5
CLI Commands
cnfconcac
cnfconcac
To configure connection admission control (CAC) on a previously added connection, use the cnfconcac
command in the AAL2 trunking operating mode.
cnfconcac lcn conn-type
Syntax Description
lcn
Logical channel number of the connection; in the range from 131 to 510.
conn-type
Connection type. It can be one of the following values:
•
1 = Master
•
2 = Slave (Default)
Command Modes
AAL2 trunking
Usage Guidelines
You must use the cnfcac command prior to using this command to enable CAC at the card level. If the
PVC has been configured as master, CAC functionality is applied to the master end of the PVC only.
Examples
The following example shows that CAC is configured at the master end of LCN 131:
cnfconcac 131 1
Related Commands
Command
Description
cnfcac
Enables or disables the CAC feature on a VISM card.
dspconcac
Displays CAC configuration data for a connection.
Cisco VISM Installation and Configuration Guide
5-128
Release 3.0, Part Number OL-2521-01 Rev. D0, June 2004
Chapter 5
CLI Commands
cnfconcacparams
cnfconcacparams
To configure connection admission control (CAC) features on a PVC, use the cnfconcacparams
command in the VoIP switching/trunking, switched AAL2 PVC, and AAL2 trunking operating modes.
cnfconcacparams lcn vad-tol vad-duty-cycle
Syntax Description
lcn
Logical channel number of the connection; in the range from 131 to 510.
vad-tol
VAD tolerance—the expression for VAD “over-subscription drop ratio” where:
tolerance = 10000 x over-subscription drop ratio (expressed as a percentage). A
typical value for VAD tolerance is 10. Some examples are:
•
10000 (tolerance) = 1% (over subscription drop ratio)
•
100 = 0.01%
•
10 = 0.001%
•
1 = 0.0001%
It can be in the range from 0 to 10000. (Default = 100)
vad-duty-cycle
VAD duty cycle—the ratio of speech and holdover duration to total duration
expressed as a percentage. Holdover is the period after silence begins and silence
suppression is turned on. In VISM, the holdover time is 250 ms. A typical value
for this parameter is 61 which means that 61% of the time is taken by speech and
holdover. It can be in the range from 1 to 99. (Default = 61)
Command Modes
VoIP switching/trunking, switched AAL2 PVC, and AAL2 trunking
Usage Guidelines
Follow standard CLI procedures when using this command.
Examples
The following example shows that VAD is configured on LCN 150 with a VAD tolerance of 500 and a
VAD duty cycle of 50:
cnfconcacparams 150 500 50
Related Commands
Command
Description
cnfcac
Enables or disables the CAC feature on a VISM card.
Cisco VISM Installation and Configuration Guide
Release 3.0, Part Number OL-2521-01 Rev. D0, June 2004
5-129
Chapter 5
CLI Commands
cnfconcacpol
cnfconcacpol
To configure the policies for fax/modem upspeed connection admission control (CAC) failure and
fax/modem carrier loss for calls added to a particular IP or AAL2 LCN, use the cnfconcacpol command
in the VoIP switching/trunking, switched AAL2 PVC, and AAL2 trunking operating modes.
cnfconcacpol lcn carrier-loss-pol cac-reject-pol
Syntax Description
lcn
Logical channel number of the connection; in the range from 131 to 510.
carrier-loss-pol
Carrier loss policy. It can be one of the following values:
•
1 = Revert to the previous codec
•
2 = Maintain the upspeed codec
•
3 = Unspecified
Note
cac-reject-pol
If you select 3 (unspecified), the card level default is used.
CAC rejection policy. It can be one of the following values:
•
1 = Delete the connection
•
2 = Maintain the connection
•
3 = Unspecified
Note
If you select 3 (unspecified), the card level default is used.
Command Modes
VoIP switching/trunking, switched AAL2 PVC, and AAL2 trunking
Usage Guidelines
If you select 3 (unspecified) for the carrier-loss-pol or cac-reject-pol argument values, the card level
default are used.
Examples
The following example shows that LCN 131 is configured with a carrier loss policy of 1 (if carrier is lost,
the LCN reverts to the previous codec) and a CAC rejection policy of 2 (the LCN connection is
maintained):
cnfconcacpol 131 1 2
Related Commands
Command
Description
cnfconvbdpol
Configures the policies for fax/modem upspeed CAC failure and fax/modem
carrier loss for calls added to a particular IP or AAL2 LCN.
Cisco VISM Installation and Configuration Guide
5-130
Release 3.0, Part Number OL-2521-01 Rev. D0, June 2004
Chapter 5
CLI Commands
cnfconprotect
cnfconprotect
To configure protection on a PVC, use the cnfconprotect command in the VoIP switching/trunking
operating mode.
cnfconprotect lcn protect-enable lock-state second-lcn
Syntax Description
lcn
Primary logical channel number of the connection (PVC); in the range from 131 to
510.
protect-enable
Enables or disables PVC protection. It can be one of the following values:
lock-state
second-lcn
•
1 = On
•
2 = Off
PVC lock state. It can be one of the following values:
•
1 = Unlock
•
2 = Lock
Secondary (fallback) logical channel number of the connection (PVC); in the range
from 131 to 510.
Command Modes
VoIP switching/trunking
Usage Guidelines
You must use the addcon command to add the primary and secondary PVCs before using this command,
and ensure that both channels have the same peak-cell-rate argument value.
Protect the primary channel using the cnfconprotect command and configure the secondary (fallback)
LCN.
The primary channel can be locked so that it is inoperative and forces a switchover to the secondary
channel. If the primary channel is locked and the secondary channel fails, the connection fails.
If the primary PVC is protected, automatic switchover to a specified secondary PVC occurs if a primary
PVC fails.
A protected channel cannot be deleted. To delete the channel, use the cnfconprotect command to
unprotect the primary channel, delete the secondary channel, and then delete the primary channel.
Examples
The following example shows that LCN 132 is protected and unlocked, and LCN 217 is the secondary
(fallback) LCN:
cnfconprotect 132 1 1 217
Related Commands
There are no related commands.
Cisco VISM Installation and Configuration Guide
Release 3.0, Part Number OL-2521-01 Rev. D0, June 2004
5-131
Chapter 5
CLI Commands
cnfconvbdpol
cnfconvbdpol
To configure the policies for fax/modem upspeed connection admission control (CAC) failure and
fax/modem carrier loss for calls added to a particular IP or AAL2 LCN, use the cnfconvbdpol command
in the VoIP switching/trunking, switched AAL2 PVC, and AAL2 trunking operating modes.
cnfconvbdpol lcn carrier-loss-pol cac-reject-pol
Syntax Description
lcn
Logical channel number of the connection; in the range from 131 to 510.
carrier-loss-pol
Carrier loss policy. It can be one of the following values:
•
1 = Revert to the previous codec
•
2 = Maintain the upspeed codec
•
3 = Unspecified
Note
cac-reject-pol
If you select 3 (unspecified), the card level default is used.
CAC rejection policy. It can be one of the following values:
•
1 = Delete the connection
•
2 = Maintain the connection
•
3 = Unspecified
Note
If you select 3 (unspecified), the card level default is used.
Command Modes
VoIP switching/trunking, switched AAL2 PVC, and AAL2 trunking
Usage Guidelines
If you select 3 (unspecified) for the carrier-loss-pol or cac-reject-pol argument values, the card level
default are used.
Examples
The following example shows that LCN 131 is configured with a carrier loss policy of 1 (if carrier is lost,
the LCN reverts to the previous codec) and a CAC rejection policy of 2 (the LCN connection is
maintained):
cnfconvbdpol 131 1 2
Related Commands
Command
Description
cnfconcacpol
Configures the policies for fax/modem upspeed CAC failure and fax/modem carrier
loss for calls added to a particular IP or AAL2 LCN.
Cisco VISM Installation and Configuration Guide
5-132
Release 3.0, Part Number OL-2521-01 Rev. D0, June 2004
Chapter 5
CLI Commands
cnfconvcci
cnfconvcci
To associate a virtual circuit connection identifier (VCCI) and a remote address with an LCN, use the
cnfconvcci in the switched AAL2 PVC operating mode.
cnfconvcci lcn vcci-num addr-type |fe-addr|
Syntax Description
lcn
Logical channel number of the connection; in the range from 131 to 510.
vcci-num
VCCI number. It can be in the range from 0 to 65535.
addr-type
Address type of the VCCI. It can be one of the following values:
•
1 = Not applicable
This address type disassociates a VCCI, far end address type, and far end
address from an LCN.
Note
fe-addr
•
2 = NSAP (20-byte hexadecimal address)
•
3 = E.164 (1- to 15-byte decimal address)
•
4 = Gateway ID (1- to 64-byte ASCII character address)
•
5 = Unspecified
(Optional) Far end IP address. This argument is optional if the addr-type value = 1 or
5. This argument is mandatory if the addr-type value = 2, 3, or 4.
Command Modes
Switched AAL2 PVC
Usage Guidelines
The VCCI number does not need to be unique for the not applicable (1) address type, and the far end
address is not used.
The combination of VCCI number and far end address must be unique for the following address types:
•
NSAP (2)
•
E.164 (3)
•
Gateway ID (4)
The VCCI number must be unique for the unspecified (5) address type, even though the far end address
is not used.
Examples
The following example shows that LCN 131 is not associated with a VCCI or far end address:
cnfconvcci 131 1
Related Commands
Command
Description
dspcon
Displays the parameters for a specified LCN.
Cisco VISM Installation and Configuration Guide
Release 3.0, Part Number OL-2521-01 Rev. D0, June 2004
5-133
Chapter 5
CLI Commands
cnfdeftos
cnfdeftos
To configure the type of service (ToS) parameters for both control and bearer IP packets, use the
cnfdeftos command in the VoIP switching/trunking operating mode.
cnfdeftos control-prec control-tos |bearer-prec bearer-tos|
Syntax Description
control-prec
Control precedence. It can be in the range from 0 to 7. (Default = 3)
control-tos
Control ToS (conforms to RFC 1349). It can be one of the following values:
•
0 = Default
•
1
•
2
•
4
•
8
bearer-prec
(Optional) Bearer precedence (conforms to RFC 791). It can be in the range from
0 to 7. (Default = 5)
bearer-tos
(Optional) Bearer ToS. It can be one of the following values:
•
0 = Default
•
1
•
2
•
4
•
8
Command Modes
VoIP switching/trunking
Usage Guidelines
The ToS bearer parameters—configured with the bearer-prec and bearer-tos arguments—are used
during call setup in cases where the parameters are not supplied by the call agent. If you do not use this
command, the card level default values are applied.
Examples
The following example shows that bearer IP packets are configured with a control precedence of 3 and
a control ToS of 2, and the control IP packets are configured with a bearer precedence of 2 and a bearer
ToS of 4:
cnfdeftos 3 2 2 4
Related Commands
There are no related commands.
Cisco VISM Installation and Configuration Guide
5-134
Release 3.0, Part Number OL-2521-01 Rev. D0, June 2004
Chapter 5
CLI Commands
cnfdisctimers
cnfdisctimers
To specify the wait delay times for the disconnected procedure, restart in progress command—initial,
minimum, and maximum timer values—use the cnfdisctimers command in the VoIP switching/trunking,
switched AAL1 SVC, switched AAL2 SVC, switched AAL2 PVC, AAL2 trunking, VoIP and switched
ATM AAL1 SVC operating modes.
cnfdisctimers init-wait-time min-wait-time max-wait-time
Syntax Description
init-wait-time
Initial disconnect waiting delay time (defined in seconds). In the range from 1 to
100.
min-wait-time
Minimum disconnect waiting delay time (defined in seconds). In the range from 0
to 100.
max-wait-time
Maximum disconnect waiting delay time (defined in seconds). In the range from 1
to 5000.
Command Modes
VoIP switching/trunking, switched AAL1 SVC, switched AAL2 SVC, switched AAL2 PVC, AAL2
trunking, VoIP and switched ATM AAL1 SVC
Usage Guidelines
You must use the cnfmgcgrpprotocol command and select the disconnect type method for Restart in
Progress commands before you can use this command.
Examples
The following example shows that an initial disconnect waiting time of 30 seconds, a minimum
disconnect waiting time of 0 seconds, and a maximum disconnect waiting time of 120 seconds is
configured for the current VISM card:
cnfdisctimers 30 0 120
Related Commands
Command
Description
addmgcgrpprotocol
Associates a call agent redundancy group to a gateway control protocol.
cnfmgcgrpprotocol
Configures call agent group protocol data.
cnfxgcppeer
Configures the UDP port number used to send gateway-initiated messages to
the call agent.
delmgcgrpprotocol
Deletes an MGCP from a specified call agent redundancy group.
dspdisctimers
Displays the Restart in Progress command disconnect type method wait
delay times.
Cisco VISM Installation and Configuration Guide
Release 3.0, Part Number OL-2521-01 Rev. D0, June 2004
5-135
Chapter 5
CLI Commands
cnfdn
cnfdn
To configure the resolution type of a specified domain name, use the cnfdn command in the VoIP
switching/trunking, switched AAL2 PVC, and AAL2 trunking operating modes.
cnfdn domain-num resol-type
Syntax Description
domain-num
Domain number used to identify the domain in the range from 1 to 11.
resol-type
(Optional) Resolution type to configure for the specified domain name. It can be one
of the following values:
•
1 = Internal only. You must statistically provision all IP addresses on the VISM
card for the domain name. The VISM card does not resolve the domain name
using an external domain name server (DNS).
•
2 = External only. The VISM card attempts to resolve the domain name using an
external DNS. Statistically configured IP addresses for this domain name are not
used.
•
3 = Internal first. The VISM card attempts to resolve the domain name using an
external DNS. The VISM card uses the statistically provisioned IP addresses for
this domain name before using IP addresses from external resolution.
•
4 = External first. The VISM card attempts to resolve the domain name using an
external DNS. The VISM card uses IP addresses from external resolution before
using the statistically provisioned IP addresses.
Command Modes
VoIP switching/trunking, switched AAL2 PVC, and AAL2 trunking
Usage Guidelines
Follow standard CLI procedures for this command.
Examples
The following example shows that the domain name represented by domain number 2 is configured for
external-only resolution type:
cnfdn 2 2
Related Commands
Command
Description
adddn
Adds a domain name (call agent name) and optionally configures the resolution type
of the domain name.
adddnip
Adds the IP addresses for a domain name that you added by using the adddn
command.
cnfdnssrvr
Designates a domain name as a DNS.
deldn
Deletes a domain name.
deldnip
Deletes a statistically provisioned IP address of a domain name.
dspdnallips
Displays all statistically provisioned IP addresses and externally resolved IP
addresses for all domain names configured on the current VISM card.
Cisco VISM Installation and Configuration Guide
5-136
Release 3.0, Part Number OL-2521-01 Rev. D0, June 2004
Chapter 5
CLI Commands
cnfdn
Command
Description
dspdnips
Displays all statistically provisioned and externally resolved IP addresses configured
for a specified domain name.
dspdns
Displays the configuration data of all domain names of a call agent.
dspdnssrvr
Displays the domain name of the configured DNS of the current VISM card.
Cisco VISM Installation and Configuration Guide
Release 3.0, Part Number OL-2521-01 Rev. D0, June 2004
5-137
Chapter 5
CLI Commands
cnfdnssrvr
cnfdnssrvr
To designate a domain name as a domain name server (DNS), use the cnfdnssrvr command in the VoIP
switching/trunking, switched AAL2 PVC, and AAL2 trunking operating modes.
cnfdnssrvr dns-domain-name
Syntax Description
dns-domain-name
Domain name which you want to designate, or remove, as a DNS. It can be one
of the following:
•
A text string of 1 to 64 alphanumeric characters.
•
NULL = removes the configured DNS from VISM.
Note
NULL is case sensitive.
Command Modes
VoIP switching/trunking, switched AAL2 PVC, and AAL2 trunking
Usage Guidelines
You must configure the domain name for internal-only resolution and provision at least one IP address
for the domain name.
Examples
The following example shows that the callagent99 domain name is configured as the DNS:
adddn 1 callagent99 1
adddnip 1 callagent99 209.165.200.224
cnfdnssrvr callagent99
Related Commands
Command
Description
adddn
Adds a domain name (call agent name) and optionally configures the resolution
type of the domain name.
adddnip
Adds the IP addresses for a domain name that you added by using the adddn
command.
cnfdn
Configures the resolution type of a specified domain name.
deldn
Deletes a domain name.
deldnip
Deletes a statistically provisioned IP address of a domain name.
dspdnallips
Displays all statistically provisioned IP addresses and externally resolved IP
addresses for all domain names configured on the current VISM card.
dspdnips
Displays all statistically provisioned and externally resolved IP addresses
configured for a specified domain name.
dspdns
Displays the configuration data of all domain names of a call agent.
dspdnssrvr
Displays the domain name of the configured DNS of the current VISM card.
Cisco VISM Installation and Configuration Guide
5-138
Release 3.0, Part Number OL-2521-01 Rev. D0, June 2004
Chapter 5
CLI Commands
cnfdpvcoamparams
cnfdpvcoamparams
To configure the transmitted and received permanent virtual circuit (PVC) Operations, Administration,
and Maintenance (OAM) cell parameters, use the cnfdpvcoamparams command in the VoIP
switching/trunking, switched AAL2 PVC, and AAL2 trunking operating modes.
cnfdpvcoamparams cell-gap recov-cell-num unack-cell-num
Syntax Description
cell-gap
Intercell gap—the time between cells (defined in milliseconds). It can be in
the range from 10 to 5000. (Default = 500)
recov-cell-num
Recovery indication cell count—the number of cells that must be received
before a PVC is considered recovered from a failure. It can be in the range
from 1 to 20. (Default = 3)
unack-cell-num
Unacknowledge indication cell count—the number of cells that must be
unacknowledged before a PVC is declared as failed. It can be in the range
from 1 to 20. (Default = 5)
Command Modes
VoIP switching/trunking, switched AAL2 PVC, and AAL2 trunking
Usage Guidelines
Follow standard CLI procedures for this command.
Examples
The following example shows that the transmitted and received PVC OAM parameters are configured
with a 20 ms intercell gap, a 5-cell recovery indication cell count, and a 10-cell unacknowledge
indication cell count:
cnfdpvcoamparams 20 5 10
Related Commands
Command
Description
dspdpvcoamparams
Displays the transmitted and received PVC OAM cell parameters.
Cisco VISM Installation and Configuration Guide
Release 3.0, Part Number OL-2521-01 Rev. D0, June 2004
5-139
Chapter 5
CLI Commands
cnfds0gain
cnfds0gain
To configure the adjustable gain for a specified DS0, use the cnfds0gain command in the VoIP
switching/trunking, switched AAL2 PVC, and AAL2 trunking operating modes.
cnfds0gain line-num ds0-num input-gain output-atten
Syntax Description
line-num
Line number of the DS0 that you want to configure the adjustable gain. In the range
from 1 to 8.
ds0-num
DS0 number on which to configure adjustable gain. It can be a value from one of
the following ranges:
•
1 to 24 for T1 lines
•
1 to 31 for E1 lines
input-gain
Input gain (defined in decibels). It can be in the range from –60 to 140 in
increments of 10.
output-atten
Output attenuation (defined in decibels). It can be in the range from 0 to 140 in
increments of 10.
Command Modes
VoIP switching/trunking, switched AAL2 PVC, and AAL2 trunking.
Usage Guidelines
Follow standard CLI procedures for this command.
Examples
The following example shows that the VISM card line number 2, DS0 number 13, is configured with a
–10-dB input gain value and a 60-dB output attenuation value:
cnfds0gain 2 13 -10 60
Related Commands
Command
Description
cnfgain
Configures the adjustable gain for a VISM card.
cnflngain
Configures the adjustable gain for all DS0s on a specified VISM card line.
dspds0gain
Displays the adjustable gain values for a specified DS0.
dspgain
Displays the adjustable gain for a specified VISM card.
dsplngain
Displays the adjustable gain for a specified VISM card line.
Cisco VISM Installation and Configuration Guide
5-140
Release 3.0, Part Number OL-2521-01 Rev. D0, June 2004
Chapter 5
CLI Commands
cnfds0localcas
cnfds0localcas
To configure a local channel associated signaling (CAS) 4-bit pattern for a T1 line and DS0, use the
cnfds0localcas command in the VoIP switching/trunking, switched AAL2 PVC, and AAL2 trunking
operating modes.
cnfds0localcas line-num ds0-num local-cas-enable |local-cas-pattern|
Syntax Description
line-num
T1 line number on which to configure a local CAS bit pattern; in the range
from 1 to 8.
ds0-num
DS0 number on which to configure a local CAS bit pattern. It can be a value
from one of the following ranges:
local-cas-enable
local-cas-pattern
•
1 to 24 for T1 lines
•
1 to 31 for E1 lines
Enables or disables the local CAS pattern indicated by the local-cas-pattern
argument. It can be one of the following values:
•
1 = Enabled
•
2 = Disabled
(Optional) The local 4-bit pattern expressed as a number in the range from 1
(default) to 15. The value specifies, in binary, the value of the A, B, C, and D
signaling bits.
Note
If local CAS is enabled (local-cas-enable argument = 1), this argument
is mandatory.
Command Modes
VoIP switching/trunking, switched AAL2 PVC, and AAL2 trunking
Usage Guidelines
If a DS0 is configured for local CAS, the framer forces the CAS bits to a value defined by the
local-cas-pattern argument in this command.
This command is not allowed if any of the following conditions are present:
Note
Examples
•
The line signaling type is CAS.
•
The line is not enabled.
•
The DS0 is in a remote loop state.
This command is allowed for T1 lines only.
The following example shows that T1 line 2, DS0 number 12 is configured with a local 4-bit pattern
represented by a value of 3 (0011 in binary):
cnfds0localcas 2 12 1 3
Cisco VISM Installation and Configuration Guide
Release 3.0, Part Number OL-2521-01 Rev. D0, June 2004
5-141
Chapter 5
CLI Commands
cnfds0localcas
Related Commands
Command
Description
dspds0localcasstatus
Displays the currently configured local CAS status for a line and DS0.
Cisco VISM Installation and Configuration Guide
5-142
Release 3.0, Part Number OL-2521-01 Rev. D0, June 2004
Chapter 5
CLI Commands
cnfds0loop
cnfds0loop
To configure a loopback type for a specified line and DS0, use the cnfds0loop command in the VoIP
switching/trunking, switched AAL2 PVC, and AAL2 trunking operating modes.
cnfds0loop line-num ds0-num loopback-type
Syntax Description
line-num
Line number of the channel to be configured for a loopback type; in the range from
1 to 8.
ds0-num
DS0 number of the channel to be configured for a loopback type. It can be a value
from one of the following ranges:
loopback-type
•
1 to 24 for T1 lines
•
1 to 31 for E1 lines
The type of loopback to be used on the channel. It can be one of the following
values:
•
1 = No loopback
•
2 = Remote loopback
•
3 = Local loopback
Command Modes
VoIP switching/trunking, switched AAL2 PVC, and AAL2 trunking
Usage Guidelines
Follow standard CLI procedures for this command.
Examples
The following example shows that the loopback type of line 2, DS0 12 is configured as remote:
cnfds0loop 2 12 2
Related Commands
There are no related commands.
Cisco VISM Installation and Configuration Guide
Release 3.0, Part Number OL-2521-01 Rev. D0, June 2004
5-143
Chapter 5
CLI Commands
cnfds0musicthreshold
cnfds0musicthreshold
To configure the music on-hold threshold for a specified DS0, use the cnfds0musicthreshold command
in the VoIP switching/trunking, switched AAL2 PVC, and AAL2 trunking operating modes.
cnfds0musicthreshold line-num ds0-num music-thresh
Syntax Description
line-num
Line number for which you want to configure the music on-hold threshold.
In the range from 1 to 8.
ds0-num
DS0 number for which you want to configure the music on-hold threshold.
It can be a value from one of the following ranges:
music-thresh
•
1 to 24 for T1 lines
•
1 to 31 for E1 lines
Music on-hold threshold (defined in decibels). It can be in the range from
–70 to –30.
Command Modes
VoIP switching/trunking, switched AAL2 PVC, and AAL2 trunking
Usage Guidelines
Follow standard CLI procedures for this command.
Examples
The following example shows that the VISM card line number 2, DS0 number 30 is configured with a
–45 dB music on-hold threshold value:
cnfds0musicthreshold 2 30 -45
Related Commands
Command
Description
cnflnmusicthreshold
Configures the music on-hold threshold for all DS0s on a specified line.
cnfmusicthreshold
Configures the music on-hold threshold value for the current VISM card.
dspds0musicthreshold
Displays the music on-hold threshold value for a specified DS0.
dsplnmusicthreshold
Displays the music on-hold threshold values for the DS0s on a specified
line.
dspmusicthreshold
Displays the music on-hold threshold values for the current VISM card.
Cisco VISM Installation and Configuration Guide
5-144
Release 3.0, Part Number OL-2521-01 Rev. D0, June 2004
Chapter 5
CLI Commands
cnfecanenable
cnfecanenable
To enable or disable echo cancellation on a line, use the cnfecanenable command in the VoIP
switching/trunking, switched AAL2 PVC, and AAL2 trunking operating modes.
cnfecanenable line-num ecan-enable
Syntax Description
line-num
Line number of the channel to be configured for a loopback type; in the range from 1
to 8.
ecan-enable
Enables or disables echo cancellation. It can be one of the following values:
•
1 = On
•
2 = Off
Command Modes
VoIP switching/trunking, switched AAL2 PVC, and AAL2 trunking
Usage Guidelines
Follow standard CLI procedures for this command.
Examples
The following example shows that ECAN is enabled on line 2 of the current VISM card:
cnfecanenable 2 1
Related Commands
Command
Description
cnfecanrec
Configures the residual echo control for DSPs on a VISM card that is used for ECAN.
cnfecantail
Configures the maximum tail length for DSPs on a VISM card that is used for ECAN.
dsplndsp
Displays the DSP information for a line.
Cisco VISM Installation and Configuration Guide
Release 3.0, Part Number OL-2521-01 Rev. D0, June 2004
5-145
Chapter 5
CLI Commands
cnfecanrec
cnfecanrec
To configure residual echo control for digital signal processors (DSPs) on a VISM card line that is used
for echo cancellation, use the cnfecanrec command in the VoIP switching/trunking, switched AAL2
PVC, and AAL2 trunking operating modes.
cnfecanrec line-num res-echo-control
Syntax Description
line-num
Line number to configure with residual echo control; in the range from 1 to 8.
res-echo-control
Residual echo control for a VISM card line. It can be one of the following values:
•
1 = Cancel only
•
2 = Suppress residual
•
4 = Comfort noise
Command Modes
VoIP switching/trunking, switched AAL2 PVC, and AAL2 trunking
Usage Guidelines
This command applies to DSPs processing data on a specified line.
Examples
The following example shows that line 1 of the current VISM card is configured with comfort noise
residual echo control:
cnfecanrec 1 4
Related Commands
Command
Description
cnfecanenable
Enables or disables ECAN on a specified VISM card line.
cnfecantail
Configures the maximum tail length for DSPs on a VISM card that is used for
echo cancellation.
dsplndsp
Displays the DSP information for a specified VISM card line.
Cisco VISM Installation and Configuration Guide
5-146
Release 3.0, Part Number OL-2521-01 Rev. D0, June 2004
Chapter 5
CLI Commands
cnfecantail
cnfecantail
To configure the maximum tail length for digital signal processors (DSPs) on a VISM card that is used
for echo cancellation, use the cnfecantail command in the VoIP switching/trunking, switched AAL2
PVC, and AAL2 trunking operating modes.
cnfecantail line-num max-ecan-tail
Syntax Description
line-num
Line number to configure maximum ECAN tail length; in the range from 1 to 8.
max-ecan-tail
Maximum tail length (defined in milliseconds). It can be one of the following
values:
•
24
•
32 (Default)
•
48
•
64
•
80
•
96
•
112
•
128
Command Modes
VoIP switching/trunking, switched AAL2 PVC, and AAL2 trunking
Usage Guidelines
This command applies to DSPs processing data on a specified line.
Examples
The following example shows that line 3 of the current VISM card is configured with a maximum ECAN
tail length of 96 ms:
cnfecantail 3 96
Related Commands
Command
Description
cnfecanenable
Enables or disables ECAN on a specified VISM card line.
cnfecanrec
Configures the residual echo control for DSPs on a VISM card that is used for
ECAN.
dsplndsp
Displays the DSP information for a specified VISM card line.
Cisco VISM Installation and Configuration Guide
Release 3.0, Part Number OL-2521-01 Rev. D0, June 2004
5-147
Chapter 5
CLI Commands
cnfendptcadence
cnfendptcadence
To configure cadence (digit tone) times for an endpoint, use the cnfendptcadence command in the VoIP
switching/trunking and AAL2 trunking operating modes.
cnfendptcadence endpt-num tone-on-time tone-off-time
Syntax Description
endpt-num
Endpoint number. It can be a value from one of the following ranges:
•
For template number 1:
– For VISM, from 1 to 145
– For VISM-PR T1, from 1 to 192
– For VISM-PR E1, from 1 to 248
•
For template number 2:
– For VISM T1, from 1 to 192
– For VISM E1, from 1 to 248
•
For template number 3:
– For VISM, from 1 to 120
– For VISM-PR T1, from 1 to 192
– For VISM-PR E1, from 1 to 248
•
For template number 4:
– For VISM-PR, from 1 to 144
tone-on-time
Length of time (defined in milliseconds) a digit tone is generated. It can be in the
range from 2 to 9999. (Default = 75)
tone-off-time
Length of time (defined in milliseconds) silence is maintained between digit tone
generation. It can be in the range from 0 to 9999. (Default = 75)
Command Modes
VoIP switching/trunking and AAL2 trunking
Usage Guidelines
Follow standard CLI procedures for this command.
Examples
The following example shows that endpoint 20 is configured with 100 ms digit tone generation time
length and 100 ms silence time length between generated tones:
cnfendptcadence 20 100 100
Related Commands
There are no related commands.
Cisco VISM Installation and Configuration Guide
5-148
Release 3.0, Part Number OL-2521-01 Rev. D0, June 2004
Chapter 5
CLI Commands
cnferl
cnferl
To configure a digital signal processor (DSP) return echo loss value, use the cnferl command in the VoIP
switching/trunking, switched AAL2 PVC, and AAL2 trunking operating modes.
cnferl echo-ret-loss
Syntax Description
echo-ret-loss
Echo return loss to be applied by echo cancellation DSPs. It can be one of the
following values:
•
1 = 0 dB
•
2 = –3 dB
•
3 = –6 dB
•
4 = –10 dB
Command Modes
VoIP switching/trunking, switched AAL2 PVC, and AAL2 trunking
Usage Guidelines
Follow standard CLI procedures when using this command.
Examples
The following example shows that a 6-dB echo return loss value is configured for the current VISM
card’s echo cancellation DSP:
cnferl 3
Related Commands
There are no related commands.
Cisco VISM Installation and Configuration Guide
Release 3.0, Part Number OL-2521-01 Rev. D0, June 2004
5-149
Chapter 5
CLI Commands
cnfgain
cnfgain
To configure the adjustable gain for a VISM card, use the cnfgain command in the VoIP
switching/trunking, switched AAL2 PVC, and AAL2 trunking operating modes.
cnfgain input-gain output-atten
Syntax Description
input-gain
Input gain (defined in decibels). It can be in the range from –60 to 140 in increments
of 10.
output-atten
Output attenuation (defined in decibels). It can be in the range from 0 to 140 in
increments of 10.
Command Modes
VoIP switching/trunking, switched AAL2 PVC, and AAL2 trunking
Usage Guidelines
This command allows you to configure the gain for an entire VISM card. The values you configure with
this command are permanent and remain on the VISM card after any resets.
Examples
The following example shows that the current VISM card is configured with a –10-dB input gain value
and a 60-dB output attenuation value:
cnfgain -10 60
Related Commands
Command
Description
cnfds0gain
Configures the adjustable gain for a specified DS0.
cnflngain
Configures the adjustable gain for all DS0s on a specified VISM card line.
dspds0gain
Displays the adjustable gain values for a specified DS0.
dspgain
Displays the adjustable gain for a specified VISM card.
dsplngain
Displays the adjustable gain for all DS0s on a specified VISM card line.
Cisco VISM Installation and Configuration Guide
5-150
Release 3.0, Part Number OL-2521-01 Rev. D0, June 2004
Chapter 5
CLI Commands
cnfgwis
cnfgwis
To configure an out-of-service VISM card to the in-service state, use the cnfgwis command in the VoIP
switching/trunking operating mode.
cnfgwis
Syntax Description
This command has no arguments or keywords.
Command Modes
VoIP switching/trunking
Usage Guidelines
This command causes an RSIP notification to be sent to the call agent.
Examples
The following example shows that the current VISM card is configured to the in-service state:
cnfgwis
The VISM card prompt terminates with an a to indicate the in-service state:
NODENAME.1.9.VISM8.a
Related Commands
Command
Description
cnfgwoos
Configures an in-service VISM card to the out-of-service state.
Cisco VISM Installation and Configuration Guide
Release 3.0, Part Number OL-2521-01 Rev. D0, June 2004
5-151
Chapter 5
CLI Commands
cnfgwoos
cnfgwoos
To configure an in-service VISM card to the out-of-service state, use the cnfgwoos command in the VoIP
switching/trunking and switched AAL2 PVC operating modes.
cnfgwoos oos-method
Syntax Description
oos-method
VISM card’s method of reaching the out-of-service state. It can be one of the
following values:
•
2 = Forceful. Existing connections are deleted and the VISM card transitions to the
“commandedOutOfService” state. New connection requests are rejected.
•
3 = Graceful. Existing connections are not released and allowed to terminate
naturally. Immediately after this command is executed, the VISM card transitions
to the “pendingOutOfService state”. New connection requests are rejected. The
VISM card transitions to the ‘commandedOutOfService’ state only when all
ongoing connections are deleted by the call agent.
Command Modes
VoIP switching/trunking and switched AAL2 PVC
Usage Guidelines
Associated call agents are notified of VISM card state changes with an RSIP notification.
Examples
The following example shows that the current VISM card is placed in the out-of-service state forcefully:
cnfgwoos 2
The VISM card prompt terminates with an s to indicate the out-of-service (standby) state:
NODENAME.1.9.VISM8.s
Related Commands
Command
Description
cnfgwis
Configures an out-of-service VISM card to the in-service state.
dspgwstate
Displays the current user-configured service states of the gateway.
Cisco VISM Installation and Configuration Guide
5-152
Release 3.0, Part Number OL-2521-01 Rev. D0, June 2004
Chapter 5
CLI Commands
cnfjtrinitdelay
cnfjtrinitdelay
To configure the initial jitter buffer delay size, use the cnfjtrinitdelay command in the VoIP
switching/trunking, switched AAL2 PVC, and AAL2 trunking operating mode.
cnfjtrinitdelay jitter-buffer-size
Syntax Description
jitter-buffer-size
Jitter buffer size setting (defined in milliseconds). It can be a value from one of
the following ranges:
•
For template numbers 1, 3, and 4, in the range from 0 to 100 in increments
of 10.
•
For template number 2, in the range from 0 to 100 in increments of 5.
Command Modes
VoIP switching/trunking, switched AAL2 PVC, and AAL2 trunking
Usage Guidelines
Determine the current jitter delay mode you configured with the cnfjtrmode command. If the mode is
set to fixed (set by the command) the jitter buffer size is fixed at the value you indicate for the
jitter-buffer-size argument for the duration of the call. If the mode is set to adaptive, the jitter buffer size
is set initially to the value you indicate for the jitter-buffer-size argument and the digital signal processor
(DSP) adapts the jitter buffer size to an optimal size.
Changing the jitter-buffer-size argument value does not affect existing channel identifiers (CIDs). The
new value is sent to the DSPs only when CIDs are open.
Table 5-2 lists the default codec type initial delay values in milliseconds.
Table 5-2
Codec Type Default Values
Codec Type
Delay Mode
Initial Delay (ms)
G.711u
Fixed
100
G.711a
Fixed
100
G.726-32k
Adaptive
60
G.729a
Adaptive
60
G.729ab
Adaptive
60
Clear channel
Fixed
100
G.726-16k
Adaptive
60
G.726-24k
Adaptive
60
G.726-40k
Adaptive
60
G.723.1-H
1
G.723.1a-H1
G.723.1-L1
G.723.1a-L1
Cisco VISM Installation and Configuration Guide
Release 3.0, Part Number OL-2521-01 Rev. D0, June 2004
5-153
Chapter 5
CLI Commands
cnfjtrinitdelay
1. The G.723.1 codecs are supported for VISM-PR
cards and are not supported for VISM cards.
Examples
The following example shows that the jitter buffer size is set to 70 milliseconds:
cnfjtrinitdelay 70
Related Commands
Command
Description
cnfjtrmode
Sets the jitter delay algorithm to fixed or adaptive.
dspcarddsp
Displays all current card level parameters for ECAN and voice compression
DSPs.
dspcodecjtrdelays
Displays the configured codec jitter delay modes and associated jitter initial
delays.
Cisco VISM Installation and Configuration Guide
5-154
Release 3.0, Part Number OL-2521-01 Rev. D0, June 2004
Chapter 5
CLI Commands
cnfjtrmode
cnfjtrmode
To configure the jitter algorithm with a fixed or adaptive buffer, use the cnfjtrmode command in the
VoIP switching/trunking, switched AAL2 PVC, and AAL2 trunking operating modes.
cnfjtrmode jitter-mode
Syntax Description
jitter-mode
Jitter delay mode. It can be one of the following values:
•
1 = Fixed. Cisco recommends fixed mode if latency jitter is constant.
•
2 = Adaptive. Cisco recommends adaptive if latency jitter is variable.
Command Modes
VoIP switching/trunking, switched AAL2 PVC, and AAL2 trunking
Usage Guidelines
Changing the jitter-mode argument value does not affect any existing CIDs. The value is sent to the
DSPs only when CIDs are open.
Examples
The following example shows that the jitter delay mode is set to adaptive:
cnfjtrmode 2
Related Commands
Command
Description
cnfjtrinitdelay
Configures the jitter buffer size.
dspcarddsp
Displays all current card-level parameters for ECAN and voice compression
DSPs.
dspcodecjtrdelays
Displays the configured codec jitter delay modes and associated jitter initial
delays.
Cisco VISM Installation and Configuration Guide
Release 3.0, Part Number OL-2521-01 Rev. D0, June 2004
5-155
Chapter 5
CLI Commands
cnflapdretrans
cnflapdretrans
To configure a maximum number of frame retransmissions for a previously added Link Access Protocol
D channel (LAPD), use the cnflapdretrans command in the VoIP switching/trunking operating mode.
cnflapdretrans line-num ds0-num n200
Syntax Description
line-num
Line number of the D channel to be configured. In the range from 1 to 8.
ds0-num
DS0 number that was specified in the addlapd command. It can be a value
from one of the following ranges:
n200
•
1 to 24 for T1 lines
•
1 to 31 for E1 lines
Maximum frame retransmissions in the range from 1 to 10.
Command Modes
VoIP switching/trunking
Usage Guidelines
Follow standard CLI procedures for this command.
Examples
The following example shows that line 2, DS0 12 is configured with a maximum number of 10 frame
retransmission attempts:
cnflapdretrans 2 12 10
Related Commands
Command
Description
cnflapdtimer
Configures two LAPD timers for a previously added LAPD.
cnflapdtype
Configures the various types of LAPD stacks for a previously added LAPD.
cnflapdwinsize
Configures the maximum number of outstanding (unacknowledged) I-frames.
Cisco VISM Installation and Configuration Guide
5-156
Release 3.0, Part Number OL-2521-01 Rev. D0, June 2004
Chapter 5
CLI Commands
cnflapdtimer
cnflapdtimer
To configure two LAPD timers for a previously added Link Access Protocol D channel (LAPD), use the
cnflapdtimer command in the VoIP switching/trunking operating mode.
cnflapdtimer line-num ds0-num frame-trans-time frame-exchange-time
Syntax Description
line-num
Line number of the D channel to be configured. In the range from 1 to 8.
ds0-num
DS0 number that was specified in the addlapd command. It can be a value
from one of the following ranges:
frame-trans-time
•
1 to 24 for T1 lines
•
1 to 31 for E1 lines
T200 timer. Time (defined in milliseconds) between frame transmission
initiations. It can be a value from one of the following ranges:
•
1000 to 1023000 for PRI—in increments of 50
•
100 to 350 for GR-303—in increments of 50
This value must be less than the value you specify for the
frame-exchange-time argument value.
Note
frame-exchange-time
T203 timer. Maximum time (defined in milliseconds) allowed without a
frame being exchanged. It can be a value from one of the following ranges:
•
1000 to 1023000 for PRI (default = 1000)—in increments of 1000
•
10000 to 300000 for GR-303 (default is 30000)—in increments of
10000
Note
This value must be greater than the value you specify for the
frame-trans-time argument value.
Command Modes
VoIP switching/trunking
Usage Guidelines
Follow standard CLI command procedures.
Examples
The following example shows that line 2, DS0 12 is configured with 10000 ms between frame
transmission initiations (timer T200) and 20000 ms as a maximum time allowed without a frame being
exchanged (timer T203):
cnflapdtimer 2 12 10000 20000
Related Commands
Command
Description
cnflapdretrans
Configures a maximum number of frame retransmissions for a previously added
LAPD.
Cisco VISM Installation and Configuration Guide
Release 3.0, Part Number OL-2521-01 Rev. D0, June 2004
5-157
Chapter 5
CLI Commands
cnflapdtimer
Command
Description
cnflapdtype
Configures the various types of LAPD stacks for a previously added LAPD.
cnflapdwinsize
Configures a maximum allowed number of outstanding (unacknowledged)
I-frames on a previously added LAPD.
Cisco VISM Installation and Configuration Guide
5-158
Release 3.0, Part Number OL-2521-01 Rev. D0, June 2004
Chapter 5
CLI Commands
cnflapdtrunkpvc
cnflapdtrunkpvc
To assign the permanent virtual circuit (PVC) trunk type that carries Link Access Protocol D channel
(LAPD) messages for the current VISM card, use the cnflapdtrunkpvc command in the VoIP
switching/trunking, switched AAL2 PVC, and AAL2 trunking operating modes.
cnflapdtrunkpvc lapd-trunk-type
Syntax Description
lapd-trunk-type
LAPD trunk PVC type. It can be one of the following values:
•
1 = Control
•
2 = Bearer (Default)
Command Modes
VoIP switching/trunking, switched AAL2 PVC, and AAL2 trunking
Usage Guidelines
Follow standard CLI procedures for this command.
Examples
The following example shows that the current VISM card is assigned the control PVC trunk type to carry
LAPD messages:
cnflapdtrunkpvc 1
Related Commands
Command
Description
addlapdtrunk
Adds an LAPD trunk to a specific VISM card line.
addrtpcon
Adds a static RTP VoIP trunking connection.
addrudptrunk
Adds an ISDN PRI backhaul RUDP session for an LAPD trunk connection.
clrrtpcnt
Clears the RTP counters (statistics) for a specific static RTP connection.
cnflntrunkcond
Enables or disables line conditioning on a VISM card line if a network alarm
is encountered.
cnfrtpcon
Modifies an existing static RTP VoIP trunking connection.
cnfrudptrunkrmtip Modifies the remote IP address of VISM used in the ISDN PRI backhaul RUDP
trunk for a specified session.
dellapdtrunk
Deletes an LAPD configured line.
delrtpcon
Deletes a static RTP VoIP trunking connection.
delrudptrunk
Deletes an ISDN PRI backhaul RUDP session that is associated with an LAPD.
dsplapd
Displays data about an LAPD.
dsplapdtrunkpvc
Displays the assigned PVC trunk type that carries LAPD trunk messages for
the current VISM card.
dsplapdtrunks
Displays the configuration data of all LAPD trunks.
dsprtpcnt
Displays the bearer counters (statistics) for a specific RTP VoIP trunking
connection.
Cisco VISM Installation and Configuration Guide
Release 3.0, Part Number OL-2521-01 Rev. D0, June 2004
5-159
Chapter 5
CLI Commands
cnflapdtrunkpvc
Command
Description
dsprtpcon
Displays the configuration data of a specified static RTP VoIP trunking
connection.
dsprtpcons
Displays the configuration data of all static RTP VoIP trunking connections.
dsprudptrunk
Displays the configuration data of a specified ISDN PRI backhaul RUDP
session.
dsprudptrunks
Displays the configuration data of all ISDN PRI backhaul RUDP sessions.
Cisco VISM Installation and Configuration Guide
5-160
Release 3.0, Part Number OL-2521-01 Rev. D0, June 2004
Chapter 5
CLI Commands
cnflapdtype
cnflapdtype
To configure the various types of Link Access Protocol D channel (LAPD) stacks for a previously added
LAPD, use the cnflapdtype command in the VoIP switching/trunking operating mode.
cnflapdtype line-num ds0-num lapd-type
Syntax Description
line-num
Line number of the D channel to be configured. In the range from 1 to 8.
ds0-num
DS0 number that was specified in the addlapd command. It can be a value from one of
the following ranges:
lapd-type
•
1 to 24 for T1 lines
•
1 to 31 for E1 lines
Type of LAPD stack to configure on the specified line and DS0. It can be one of the
following values:
•
1 = ITU
•
3 = ATT5ESSPRA
•
4 = ATT4ESS
•
6 = NTDMS100PRA
•
7 = VN2 or 3
•
8 = INSNet
•
9 = TR6MFC
•
10 = TR6PBX
•
12 = AUSP
•
13 = NIL
•
14 = SSETSI
•
15 = BC303TMC
•
16 = BC303CSC
•
17 = NTDMS250
•
18 = Bellcore
•
19 = NI2
Command Modes
VoIP switching/trunking
Usage Guidelines
Follow standard CLI procedures for this command.
Examples
The following example shows that line 2, DS0 12 is configured with the AUSP LAPD stack type:
cnflapdtype 2 12 12
Cisco VISM Installation and Configuration Guide
Release 3.0, Part Number OL-2521-01 Rev. D0, June 2004
5-161
Chapter 5
CLI Commands
cnflapdtype
Related Commands
Command
Description
cnflapdretrans
Configures a maximum number of frame retransmissions for a previously added
LAPD.
cnflapdtimer
Configures two LAPD timers for a previously added LAPD.
cnflapdwinsize
Configures a maximum number of outstanding (unacknowledged) I-frames for a
previously added LAPD.
Cisco VISM Installation and Configuration Guide
5-162
Release 3.0, Part Number OL-2521-01 Rev. D0, June 2004
Chapter 5
CLI Commands
cnflapdwinsize
cnflapdwinsize
To configure a maximum number of outstanding (unacknowledged) I-frames, use the cnflapdwinsize
command in the VoIP switching/trunking operating mode.
cnflapdwinsize line-num ds0-num iframe-num
Syntax Description
line-num
Line number of the D channel to be configured. In the range from 1 to 8.
ds0-num
DS0 number that was specified in the addlapd command. It can be a value from one
of the following ranges:
iframe-num
•
1 to 24 for T1 lines
•
1 to 31 for E1 lines
Maximum number of outstanding (unacknowledged) I-frames that can be
accumulated before sending an acknowledgment. It can be in the range from 1 to 127.
Command Modes
VoIP switching/trunking
Usage Guidelines
Follow standard CLI procedures for this command.
Examples
The following example shows that line 2, DS0 12 is configured with an LAPD window size of 10—a
maximum number of 10 I-frames can be accumulated before sending an acknowledgment:
cnflapdwinsize 2 12 10
Related Commands
Command
Description
cnflapdretrans
Configures a maximum number of frame retransmissions for a previously added
LAPD.
cnflapdtimer
Configures two LAPD timers for a previously added LAPD.
cnflapdtype
Configures the various types of LAPD stacks for a previously added LAPD.
Cisco VISM Installation and Configuration Guide
Release 3.0, Part Number OL-2521-01 Rev. D0, June 2004
5-163
Chapter 5
CLI Commands
cnfln
cnfln
To configure characteristics for a VISM card line, use the cnfln command in the VoIP
switching/trunking, switched AAL2 PVC, and AAL2 trunking operating modes.
cnfln line-num line-code line-length clock-source line-type loop-detection
Syntax Description
line-num
Line number with which to configure characteristics. In the range from 1 to 8.
line-code
Line coding method. It can be one of the following values:
line-length
clock-source
•
2 = Bipolar 8-zero substitution (B8ZS), for T1
•
3 = High-density bipolar 3 (HDB3), for E1
•
4 = Alternate mark inversion (AMI), for T1 or E1
Line length. It can be one of the following values:
•
8 = For E1 cards with an SMB back card
•
9 = For E1 cards with an RJ48 back card
•
10 = 0 to 131 feet, for T1
•
11 = 131 to 262 feet, for T1
•
12 = 262 to 393 feet, for T1
•
13 = 393 to 524 feet, for T1
•
14 = 524 to 655 feet, for T1
•
15 = More than 655 feet, for T1
Clock source. It can be one of the following values:
•
1 = Loop clock. The loop clock source is from the line specified by the
line-num argument. The local clock source is from the MGX 8000 Series
platform.
•
2 = Local clock. The local clock source is from the MGX 8000 Series platform.
Note
Refer to the “Configuring the PXM and VISM Cards Clocking Source”
section on page 4-14, the “Expanded Clock Source Selection” section
on page 4-69, and Appendix A, “VISM and VISM-PR Card Clocking
Options,” for clocking rules.
Cisco VISM Installation and Configuration Guide
5-164
Release 3.0, Part Number OL-2521-01 Rev. D0, June 2004
Chapter 5
CLI Commands
cnfln
line-type
loop-detection
Line type. It can be one of the following values:
•
1 = DSx1ESF
•
2 = DSx1D4
•
3 = E1
•
4 = E1CRC
•
5 = E1MF
•
6 = E1MFCRC
•
7 = E1 Clear
•
8=
•
9=
Loopback code detection. It can be one of the following values:
•
1 = Disabled
•
2 = Enabled
Command Modes
VoIP switching/trunking, switched AAL2 PVC, and AAL2 trunking
Usage Guidelines
You must add the line indicated by the line-num argument value with the addln command before using
this command. You must include all argument values when using this command; however, the line-num
and clock-source arguments are the only relevant arguments for configuring the clocking source on your
VISM cards.
Examples
The following example shows that line 2 is configured with HDB3 coding, SMB E1 back card line
length, loop clocking, E1 line type, and loopback detection disabled:
cnfln 2 3 8 1 3 1
Related Commands
Command
Description
addln
Adds a T1 or E1 line to a VISM card.
delln
Deletes a DS1 line on a VISM card.
Cisco VISM Installation and Configuration Guide
Release 3.0, Part Number OL-2521-01 Rev. D0, June 2004
5-165
Chapter 5
CLI Commands
cnflndigitorder
cnflndigitorder
To assign the order in which automatic number identification (ANI) digits—the caller’s number—and
dialed number identification service (DNIS) digits—the called number—are dialed during an outgoing
Feature Group D (FGD) call on the endpoints of a specified VISM card line, use the cnflndigitorder
command in the VoIP switching/trunking, switched AAL2 PVC, and AAL2 trunking operating modes.
cnflndigitorder line-num digit-order
Syntax Description
line-num
Line number for which to configure dialed digit order. In the range from 1 to 8.
digit-order
ANI and DNIS digit order. It can be one of the following values:
•
1 = ANI digits followed by DNIS digits.
•
2 = DNIS digits followed by ANI digits.
Command Modes
VoIP switching/trunking, switched AAL2 PVC, and AAL2 trunking
Usage Guidelines
The ANI and DNIS digits are sent as part of the MGCP setup message.
Examples
The following example shows that the current VISM card’s line number 7 is assigned a digit order of
DNIS digits first, followed by ANI digits, for digits dialed during an outgoing FGD call:
cnflndigitorder 7 2
Related Commands
Command
Description
cnfcasflashtime
Configures the minimum and maximum CAS on-hook time periods for
incoming flash hooks on a specified endpoint.
cnfcasglareattrib
Configures the direction of CAS calls and the glare policy for a specified
endpoint.
cnfcaspackage
Configures MGCP packages to notify persistent observed CAS events in the
context of incoming and outgoing CAS calls on a specified endpoint.
delxgcppersistevt
Deletes a persistent xGCP event.
dspcasglareattrib
Displays the direction of CAS calls and the glare policy for a specified
endpoint.
dspcaspackage
Displays the MGCP packages configured to notify persistent observed CAS
events in the context of incoming and outgoing CAS calls on a specified
endpoint.
dspcastimers
Displays the currently configured CAS timers for a specified endpoint.
dsplndigitorder
Displays the order in which ANI digits and DNIS digits are dialed during an
outgoing FGD call on the endpoints of a specified VISM card line.
Cisco VISM Installation and Configuration Guide
5-166
Release 3.0, Part Number OL-2521-01 Rev. D0, June 2004
Chapter 5
CLI Commands
cnflngain
cnflngain
To configure the adjustable gain for all DS0s on a specified VISM card line, use the cnflngain
(Configure Line Gain) command in the VoIP switching/trunking, switched AAL2 PVC, and AAL2
trunking operating modes.
cnflngain line-num input-gain output-atten
Syntax Description
line-num
Line number that you want to configure the adjustable gain. In the range from 1 to 8.
input-gain
Input gain (defined in decibels). It can be in the range from –60 to 140 in increments
of 10.
output-atten
Output attenuation (defined in decibels). It can be in the range from 0 to 140 in
increments of 10.
Command Modes
VoIP switching/trunking, switched AAL2 PVC, and AAL2 trunking
Usage Guidelines
Follow standard CLI procedures for this command.
Examples
The following example shows that the VISM card line number 2 is configured with a –10-dB input gain
value and a 60-dB output attenuation value:
cnfgain 2 -10 60
Related Commands
Command
Description
cnfds0gain
Configures the adjustable gain for a specified DS0.
cnfgain
Configures the adjustable gain for a VISM card.
cnfplngain
Configures the adjustable gain for a specified VISM card line.
dspds0gain
Displays the adjustable gain values for a specified DS0.
dspgain
Displays the adjustable gain for a specified VISM card.
Cisco VISM Installation and Configuration Guide
Release 3.0, Part Number OL-2521-01 Rev. D0, June 2004
5-167
Chapter 5
CLI Commands
cnflnis
cnflnis
To configure an out-of-service VISM card line to the in-service state, use the cnflnis command in the
VoIP switching/trunking operating mode.
cnflnis line-num
Syntax Description
line-num
Command Modes
VoIP switching/trunking
Usage Guidelines
The configured in-service state is not maintained after a VISM card reboot. If you reboot a VISM card
previously configured to the in-service state with this command, you must use this command again to
configure the associated lines back to the in-service state, as needed.
Examples
The following example shows that line 2 is configured with the in-service state:
Line number you want to bring to the in-service state. In the range from 1 to 8.
cnflnis 2
Related Commands
Command
Description
cnflnoos
Configures an in-service VISM card line to the out-of-service state.
dspgwstate
Displays the current user-configured service state of the gateway.
dsplnstate
Displays the service state of a VISM card line with respect to the xGCP protocol.
Cisco VISM Installation and Configuration Guide
5-168
Release 3.0, Part Number OL-2521-01 Rev. D0, June 2004
Chapter 5
CLI Commands
cnflnmusicthreshold
cnflnmusicthreshold
To configure the music on-hold threshold for all DS0s on a specified line, use the cnflnmusicthreshold
command in the VoIP switching/trunking, switched AAL2 PVC, and AAL2 trunking operating modes.
cnflnmusicthreshold line-num music-thresh
Syntax Description
line-num
Line number for which you want to configure the music on-hold threshold.
In the range from 1 to 8.
music-thresh
Music on-hold threshold (defined in decibels). It can be in the range from
–70 to –30.
Command Modes
VoIP switching/trunking, switched AAL2 PVC, and AAL2 trunking
Usage Guidelines
Follow standard CLI procedures for this command.
Examples
The following example shows that the VISM card line number 3 DS0s are configured with –45 dB music
on-hold threshold:
cnflnmusicthreshold 3 -45
Related Commands
Command
Description
cnfds0musicthreshold
Configures the music on-hold threshold for a specified DS0.
cnfmusicthreshold
Configures the music on-hold threshold value for the current VISM card.
dspds0musicthreshold
Displays the music on-hold threshold value for a specified DS0.
dsplnmusicthreshold
Displays the music on-hold threshold values for the DS0s on a specified
line.
dspmusicthreshold
Displays the music on-hold threshold values for the current VISM card.
Cisco VISM Installation and Configuration Guide
Release 3.0, Part Number OL-2521-01 Rev. D0, June 2004
5-169
Chapter 5
CLI Commands
cnflnoos
cnflnoos
To configure an in-service VISM card line to the out-of-service state, use the cnflnoos command in the
VoIP switching/trunking operating mode.
cnflnoos line-num oos-method
Syntax Description
line-num
Line number you want to bring to the out-of-service state. In the range from 1 to 8.
oos-method
VISM card’s method of reaching the out-of-service state. It can be one of the
following values:
•
2 = Forceful. Existing connections are deleted and the VISM card transitions to the
‘commandedOutOfService’ state. New connection requests are rejected.
•
3 = Graceful. Existing connections are not released and allowed to terminate
naturally. Immediately after this command is executed, the VISM card transitions
to the ‘pendingOutOfService state’. New connection requests are rejected. The
VISM card transitions to the ‘commandedOutOfService’ state only when all
ongoing connections are deleted by the call agent.
Command Modes
VoIP switching/trunking
Usage Guidelines
The configured in-service state is not maintained after a VISM card reboot. If you reboot a VISM card
previously configured to the out-of-service state with this command, you must use this command again
to configure the associated lines back to the out-of-service state, as needed.
Examples
The following example shows that line 3 is configured to the out-of-service state gracefully:
cnflnoos 3 3
Related Commands
Command
Description
cnflnis
Configures an out-of-service VISM card line to the in-service state.
Cisco VISM Installation and Configuration Guide
5-170
Release 3.0, Part Number OL-2521-01 Rev. D0, June 2004
Chapter 5
CLI Commands
cnflnringback
cnflnringback
To configure the ringback tone method for a specified line on the current VISM card, use the
cnflnringback command in the VoIP switching/trunking and switched AAL2 PVC operating modes.
cnflnringback line-num ringb-method
Syntax Description
line-num
Line number for which you want to configure the ringback method. In the
range from 1 to 8.
ringb-method
Ringback tone method. It can be one of the following values:
•
1 = Proxy (Default).
The VISM sends the appropriate packet—Named Signaling Event (NSE),
NSE, Network Transmission Element (NTE), or AAL2 type 3—for the
ringback tone to the originating VISM which generates the ringback tone
toward the TDM network.
•
2 = Inband.
The VISM generates the inband ringback tone toward the originating
VISM over the packet network and the originating VISM plays the
ringback tone.
Command Modes
VoIP switching/trunking and switched AAL2 PVC
Usage Guidelines
The ringback method is used when a call agent requests the terminating VISM to play the ringback tone
remotely (toward the packet network).
Examples
The following example shows that the current VISM card line 4 is configured with the inband ringback
tone method:
cnflnringback 4 2
Related Commands
Command
Description
addtoneplan
Adds a tone plan to the current VISM card.
cnflntoneplan
Assigns a tone plan to a specified VISM card line.
cnflntonetimeout
Modifies the timeout periods of all call progress tones supported by VISM on
a specified VISM card line.
dellntoneplan
Deletes the tone plan configuration of a specified VISM card line.
deltoneplan
Deletes a previously added tone plan from the current VISM card.
dsplnringback
Displays the ringback tone method for a specified line on the current VISM
card.
dsplntoneplan
Displays the tone plan configuration of a specified VISM card line.
Cisco VISM Installation and Configuration Guide
Release 3.0, Part Number OL-2521-01 Rev. D0, June 2004
5-171
Chapter 5
CLI Commands
cnflnringback
Command
Description
dsplntonetimeout
Displays the configured timeout periods for all call progress tones of a
specified VISM card line.
dsptonebuiltinplans Displays all preconfigured (built-in) tone plans on the current VISM card.
dsptoneplan
Displays the tone configuration of a specified tone plan—either a
preconfigured (built-in) or user-added tone plan.
dsptoneplans
Displays the tone configuration of all tone plans—either preconfigured
(built-in) or user-added tone plans.
dsptoneprovplans
Displays all user-added (provisional) tone plans.
dsptoneregionplans Displays a list of all tone plans for the countries and regions whose name
partially or completely matches the name you supply.
Cisco VISM Installation and Configuration Guide
5-172
Release 3.0, Part Number OL-2521-01 Rev. D0, June 2004
Chapter 5
CLI Commands
cnflnsig
cnflnsig
To configure the signaling mode for a VISM card line, use the cnflnsig command in the AAL2 trunking
operating mode.
cnflnsig line-num line-signal-type
Syntax Description
line-num
Line number you want to bring to the out-of-service state. In the range from 1 to
8.
line-signal-type
Signaling type of the line. It can be one of the following values:
1 = Channel associated signaling (CAS)
2 = Common channel signaling (CCS)
3 = No signaling
Command Modes
AAL2 trunking
Usage Guidelines
You are required to confirm your entry when using this command to ensure that the signaling type is not
changed while endpoints are configured for the line indicated by the line-num argument.
This command is not allowed when CIDs or CCS channels are present.
You must configure the line type as either E1MF or E1MFCRC for E1 lines; otherwise, this command
is invalid and does not process.
Examples
The following example shows that line 3 is configured for CCS:
cnflnsig 3 2
Related Commands
Command
Description
dspln
Displays the characteristics of a VISM card line.
Cisco VISM Installation and Configuration Guide
Release 3.0, Part Number OL-2521-01 Rev. D0, June 2004
5-173
Chapter 5
CLI Commands
cnflntoneplan
cnflntoneplan
To assign a built-in or provisional tone plan to a specified VISM card line, use the cnflntoneplan
command in the VoIP switching/trunking and switched AAL2 PVC operating modes.
cnflntoneplan line-num tonep-region tonep-version
Syntax Description
line-num
Line number for which you want to assign a tone plan. In the range from 1 to 8.
tonep-region
Tone plan country or region which you want to assign to a VISM card line. It
can be in the range from 1 to 64 alphanumeric characters and can contain
underscores ( _ ). This value is case sensitive.
tonep-version
Tone plan version number of the tone plan country or region you want to assign
to a VISM card line. It can be in the range from 1 to 65535.
Command Modes
VoIP switching/trunking and switched AAL2 PVC
Usage Guidelines
If you are assigning a provisional tone plan to a VISM card line, you must use the addtoneplan
command before you use this command. The command allows you to assign a new tone plan (overwrite
a previous configuration) to a VISM card line.
Examples
The following example shows that the VISM card line 2 is assigned the tone plan identified by tone plan
region sing_3 and tone plan version 2:
cnflntoneplan 2 sing_3 2
Related Commands
Command
Description
addtoneplan
Adds a tone plan to the current VISM card.
cnflnringback
Configures the ringback tone method for a specified line on the current VISM
card.
cnflntonetimeout
Modifies the timeout periods of all call progress tones supported by VISM on
a specified VISM card line.
dellntoneplan
Deletes the tone plan configuration of a specified VISM card line.
deltoneplan
Deletes a previously added tone plan from the current VISM card.
dsplnringback
Displays the ringback tone method for a specified line on the current VISM
card.
dsplntoneplan
Displays the tone plan configuration of a specified VISM card line.
dsplntonetimeout
Displays the configured timeout periods for all call progress tones of a
specified VISM card line.
dsptonebuiltinplans Displays all preconfigured (built-in) tone plans on the current VISM card.
dsptoneplan
Displays the tone configuration of a specified tone plan—either a
preconfigured (built-in) or user-added tone plan.
Cisco VISM Installation and Configuration Guide
5-174
Release 3.0, Part Number OL-2521-01 Rev. D0, June 2004
Chapter 5
CLI Commands
cnflntoneplan
Command
Description
dsptoneplans
Displays the tone configuration of all tone plans—either preconfigured
(built-in) or user-added tone plans.
dsptoneprovplans
Displays all user-added (provisional) tone plans.
dsptoneregionplans Displays a list of all tone plans for the countries and regions whose name
partially or completely matches the name you supply.
Cisco VISM Installation and Configuration Guide
Release 3.0, Part Number OL-2521-01 Rev. D0, June 2004
5-175
Chapter 5
CLI Commands
cnflntonetimeout
cnflntonetimeout
To modify the timeout periods of call progress tones supported by VISM on a specified VISM card line,
use the cnflntonetimeout command in the VoIP switching/trunking, AAL1 switching, switched AAL2
SVC, switched AAL2 PVC, and VoIP and switched ATM AAL1 SVC operating modes.
cnflntonetimeout line-num remote-ringb-tout local-ringb-tout busy-tout reorder-tout dial-tout
stutter-tout offhook-tout
Syntax Description
line-num
Line number for which you want to modify tone timeout periods (defined in
seconds). In the range from 1 to 8.
remote-ringb-tout
Remote ringback tone timeout period (defined in seconds). It can be in the
range from 0 to 3600. (Default = 180)
local-ringb-tout
Local ringback tone timeout period (defined in seconds). It can be in the range
from 0 to 3600. (Default = 180)
busy-tout
Busy tone timeout period (defined in seconds). It can be in the range from 0 to
3600. (Default = 30)
reorder-tout
Reorder tone timeout period (defined in seconds). It can be in the range from
0 to 3600. (Default = 30)
dial-tout
Dial tone timeout period (defined in seconds). It can be in the range from 0 to
3600. (Default = 16)
stutter-tout
Stutter dial tone timeout period (defined in seconds). It can be in the range
from 0 to 3600. (Default = 16)
offhook-tout
Offhook tone timeout period (defined in seconds). It can be in the range from
0 to 3600. (Default = 5)
Command Modes
VoIP switching/trunking, AAL1 switching, switched AAL2 SVC, switched AAL2 PVC, and VoIP and
switched ATM AAL1 SVC
Usage Guidelines
You can configure timeout periods of the following tones:
Note
•
Ringback
•
Busy
•
Reorder (also known as the fastbusy or the network congestion tone)
•
Dial
•
Stutter dial
•
Offhook alert
A tone timeout argument value set to 0 indicates an infinite timeout—the tone will play indefinitely
unless it is stopped by an event.
Cisco VISM Installation and Configuration Guide
5-176
Release 3.0, Part Number OL-2521-01 Rev. D0, June 2004
Chapter 5
CLI Commands
cnflntonetimeout
Examples
The following example shows that the VISM card line number 7 is configured with a 200-second remote
ringback tone timeout period, a 180-second local ringback tone timeout period, a 210-second busy tone
timeout period, a 400-second reorder tone timeout period, a 1000-second dial tone timeout period, a
2000-second stutter dial tone timeout period, and a 500-second offhook tone timeout period:
cnflntonetimeout 7 200 180 210 400 1000 2000 3000 500
Related Commands
Command
Description
addtoneplan
Adds a tone plan to the current VISM card.
cnflnringback
Configures the ringback tone method for a specified line on the current VISM
card.
cnflntoneplan
Assigns a tone plan to a specified VISM card line.
dellntoneplan
Deletes the tone plan configuration of a specified VISM card line.
deltoneplan
Deletes a previously added tone plan from the current VISM card.
dsplnringback
Displays the ringback tone method for a specified line on the current VISM
card.
dsplntoneplan
Displays the tone plan configuration of a specified VISM card line.
dsplntonetimeout
Displays the configured timeout periods for all call progress tones of a
specified VISM card line.
dsptonebuiltinplans Displays all preconfigured (built-in) tone plans on the current VISM card.
dsptoneplan
Displays the tone configuration of a specified tone plan—either a
preconfigured (built-in) or user-added tone plan.
dsptoneplans
Displays the tone configuration of all tone plans—either preconfigured
(built-in) or user-added tone plans.
dsptoneprovplans
Displays all user-added (provisional) tone plans.
dsptoneregionplans Displays a list of all tone plans for the countries and regions whose name
partially or completely matches the name you supply.
Cisco VISM Installation and Configuration Guide
Release 3.0, Part Number OL-2521-01 Rev. D0, June 2004
5-177
Chapter 5
CLI Commands
cnflntrunkcond
cnflntrunkcond
To enable or disable line conditioning on a VISM card line if a network alarm is encountered, use the
cnflntrunkcond command in the VoIP switching/trunking and VoIP and switched ATM AAL1 SVC
operating modes.
cnflntrunkcond line-num cond-enable
Syntax Description
line-num
Line number for which you want enable or disable line conditioning. In the
range from 1 to 8.
cond-enable
Line trunk conditioning status. It can be one of the following options:
•
1 = Enable. VISM performs trunk conditioning on each affected DS0 if an
alarm occurs on the ATM side.
•
2 = Disable. VISM sends an alarm indication signal (AIS), blue alarm, or
RAI to the line if an alarm occurs on the ATM side.
Command Modes
VoIP switching/trunking and VoIP and switched ATM AAL1 SVC
Usage Guidelines
Trunk conditioning consists of sending 0x7f or 0xff on the affected DS0s for T1 or E1 respectively. In
addition, in the case of T1, the idle code pattern is transmitted for 2 to 5 seconds followed by the seized
code pattern, as specified in the cnfcascode command.
This command is not allowed if endpoints or CCS channels are enabled on the line.
Examples
The following example shows that line 2 is configured with line conditioning if an AAL2 alarm is
encountered:
cnflntrunkcond 2 1
Related Commands
Command
Description
addlapdtrunk
Adds an LAPD trunk to a specific VISM card line.
addrtpcon
Adds a static RTP VoIP trunking connection.
addrudptrunk
Adds an ISDN PRI backhaul RUDP session for an LAPD trunk connection.
clrrtpcnt
Clears the RTP counters (statistics) for a specific static RTP connection.
cnflapdtrunkpvc
Assigns the PVC trunk type that carries LAPD messages for the current VISM
card.
cnfrtpcon
Modifies an existing static RTP VoIP trunking connection.
cnfrudptrunkrmtip Modifies the remote IP address of VISM used in the ISDN PRI backhaul RUDP
trunk for a specified session.
dellapdtrunk
Deletes an LAPD configured line.
delrtpcon
Deletes a static RTP VoIP trunking connection.
delrudptrunk
Deletes an ISDN PRI backhaul RUDP session that is associated with an LAPD.
Cisco VISM Installation and Configuration Guide
5-178
Release 3.0, Part Number OL-2521-01 Rev. D0, June 2004
Chapter 5
CLI Commands
cnflntrunkcond
Command
Description
dsplapd
Displays data about an LAPD.
dsplapdtrunkpvc
Displays the assigned PVC trunk type that carries LAPD trunk messages for
the current VISM card.
dsplapdtrunks
Displays the configuration data of all LAPD trunks.
dsprtpcnt
Displays the bearer counters (statistics) for a specific RTP VoIP trunking
connection.
dsprtpcon
Displays the configuration data of a specific static RTP VoIP trunking
connection.
dsprtpcons
Displays the configuration data of all static RTP VoIP trunking connections.
dsprudptrunk
Displays the configuration data of a specified ISDN PRI backhaul RUDP
session.
dsprudptrunks
Displays the configuration data of all ISDN PRI backhaul RUDP sessions.
Cisco VISM Installation and Configuration Guide
Release 3.0, Part Number OL-2521-01 Rev. D0, June 2004
5-179
Chapter 5
CLI Commands
cnfmgcgrpentry
cnfmgcgrpentry
To modify the call agent priority level of a call agent within a call agent redundancy group, use the
cnfmgcgrpentry command in the VoIP switching/trunking, switched AAL2 PVC, and AAL2 trunking
operating modes.
cnfmgcgrpentry mgc-group mgc-num mgc-preference
Syntax Description
mgc-group
Call agent redundancy group number. It can be in the range from 1 to 8.
mgc-num
Call agent identification number. It can be in the range from 1 to 8.
mgc-preference
Call agent priority value. It can be in the range from 1 (highest) to 8
(lowest).
Command Modes
VoIP switching/trunking, switched AAL2 PVC, and AAL2 trunking
Usage Guidelines
Follow standard CLI procedures for this command.
Examples
The following example shows that the call agent redundancy group number 1, call agent number 2, is
configured with a priority level of 4:
cnfmgcgrpentry 1 2 4
Related Commands
Command
Description
addmgcgrpentry
Configures call agents as part of an MGC redundancy group and assigns a
priority value for a call agent.
addmgcgrpprotocol
Associates a call agent redundancy group to a gateway control protocol.
cnfmgcgrpparam
Modifies a call agent redundancy group state change notification policy
and priority level.
cnfsrcppeer
Configures the SRCP parameters when SRCP is the selected protocol for
communication between the VISM card and call agent.
cnfsrcppeergrpparam
Modifies the SRCP heartbeat interval and maximum UDP size for a
specified call agent redundancy group.
delmgcgrpentry
Deletes a call agent from a call agent redundancy group.
delmgcgrpprotocol
Deletes an MGCP from a specified call agent redundancy group.
dspmgcgrpparams
Displays all configured call agent redundancy group parameters.
dspmgcgrpprotocols
Displays all configured call agent redundancy group protocols.
dspmgcgrps
Displays all configured call agent redundancy groups.
dspsrcppeergrpparams
Displays the SRCP parameters for all call agent redundancy groups that
have SRCP added.
Cisco VISM Installation and Configuration Guide
5-180
Release 3.0, Part Number OL-2521-01 Rev. D0, June 2004
Chapter 5
CLI Commands
cnfmgcgrpparam
cnfmgcgrpparam
To modify a call agent redundancy group state change notification policy and priority level, use the
cnfmgcgrpparam command in the VoIP switching/trunking, switched AAL2 PVC, and AAL2 trunking
operating modes.
cnfmgcgrpparam mgc-group state-change-notify |mgc-pref|
Syntax Description
mgc-group
Call agent redundancy group number. It can be in the range from 1 to 8.
state-change-notify
State change notification. Determines if messages, such as RSIPs, are sent
to notify the call agent of a VISM card state change. It can be one of the
following values:
mgc-pref
•
1 = Enable (Default)
•
2 = Disable
(Optional) Call agent priority value. It can be one of the following:
•
0 = No gateway initiated requests or commands are sent.
•
In the range from 1 (highest) to 8 (lowest). (Default = 1)
Command Modes
VoIP switching/trunking, switched AAL2 PVC, and AAL2 trunking
Usage Guidelines
Follow standard CLI procedures for this command.
Examples
The following example shows that call agent redundancy group number 1 is associated with the call
agent and is assigned a priority level of 5:
cnfmgcgrpparam 1 2 5
Related Commands
Command
Description
addmgcgrpprotocol
Associates a call agent redundancy group to a gateway control protocol.
cnfmgcgrpentry
Modifies the call agent priority level of a call agent within a call agent
redundancy group.
cnfsrcppeer
Configures the SRCP parameters when SRCP is the selected protocol for
communication between the VISM card and call agent.
cnfsrcppeergrpparam
Modifies the SRCP heartbeat interval and maximum UDP size for a
specified call agent redundancy group.
delmgcgrpentry
Deletes a call agent from a call agent redundancy group.
delmgcgrpprotocol
Deletes an MGCP from a specified call agent redundancy group.
dspmgcgrpparams
Displays all configured call agent redundancy group parameters.
dspmgcgrpprotocols
Displays all configured call agent redundancy group protocols.
Cisco VISM Installation and Configuration Guide
Release 3.0, Part Number OL-2521-01 Rev. D0, June 2004
5-181
Chapter 5
CLI Commands
cnfmgcgrpparam
Command
Description
dspmgcgrps
Displays all configured call agent redundancy groups.
dspsrcppeergrpparams
Displays the SRCP parameters for all call agent redundancy groups that
have SRCP added.
Cisco VISM Installation and Configuration Guide
5-182
Release 3.0, Part Number OL-2521-01 Rev. D0, June 2004
Chapter 5
CLI Commands
cnfmgcgrpprotocol
cnfmgcgrpprotocol
To configure a call agent redundancy group protocol for a previously configured redundancy group, use
the cnfmgcgrpprotocol command in the VoIP switching/trunking, switched AAL1 SVC, switched
AAL2 SVC, switched AAL2 PVC, AAL2 trunking, VoIP and switched ATM AAL1 SVC operating
modes.
cnfmgcgrpprotocol red-mgc-group protocol-num |quar-persist default-quar del-negated prov-resp
resp-ack disc-proc-enable cancel-grace|
Syntax Description
red-mgc-group
Call agent redundancy group number. It can be in the range from 1 to 8.
protocol-num
Protocol number. It can be one of the following values:
quar-persist
default-quar
•
1 = MGCP 0.1
•
2 = SGCP 1.1+
•
3 = SRCP 1.0.2
•
4 = SGCP 1.5
•
5 = MGCP 1.0
•
In the range from 6 to 8—as displayed by the dspmgcgrpprotocols
command.
(Optional) Sets the quarantine handling method for persistent events. It can be
one of the following values:
•
1 = Quarantine persistent events (Default)
•
2 = Do not quarantine persistent events
(Optional) Sets the default quarantine event handling method for each
protocol. It can be one of the following values:
•
1 = Step, process (Default for MGCP 1.0)
•
2 = Step, discard (Default for MGCP 0.1, SGCP 1.1+, SRCP 1.0.2, and
SGCP 1.5)
•
3 = Loop, process
•
4 = Loop, discard
Note
del-negated
prov-resp
Step = one notification command is generated per notification request.
Loop = multiple notification commands are generated per notification
request.
(Optional)
•
1 = Delete events from the previous list which are not present in the current
list.
•
2 = Delete events from the previous list, only if the event is present in the
current list with a hyphen (-) as the parameter.
(Optional) Enables or disables the sending of a provisional response. It can be
one of the following values:
1 = On (Default for MGCP 1.0)
2 = Off (Default for MGCP 0.1, SGCP 1.1+, SRCP 1.0.2, and SGCP 1.5)
Cisco VISM Installation and Configuration Guide
Release 3.0, Part Number OL-2521-01 Rev. D0, June 2004
5-183
Chapter 5
CLI Commands
cnfmgcgrpprotocol
resp-ack
disc-proc-enable
cancel-grace
(Optional) Enables or disables sending a response acknowledgment. It can be
one of the following values:
•
1 = On (Default for MGCP 1.0)
•
2 = Off (Default for MGCP 0.1, SGCP 1.1+, SRCP 1.0.2, and SGCP 1.5)
(Optional) Enables or disables the disconnect method, which indicates that the
endpoint has become disconnected and is now trying to establish connectivity.
It can be one of the following values:
•
1 = On (Default for MGCP 1.0)
•
2 = Off (Default for MGCP 0.1, SGCP 1.1+, SRCP 1.0.2, and SGCP 1.5)
(Optional) Enables or disables VISM cancelling a previously issued graceful
restart command. It can be one of the following values:
•
1 = On (Default for MGCP 1.0)
•
2 = Off (Default for MGCP 0.1, SGCP 1.1+, SRCP 1.0.2, and SGCP 1.5)
Command Modes
VoIP switching/trunking, switched AAL1 SVC, switched AAL2 SVC, switched AAL2 PVC, AAL2
trunking, VoIP and switched ATM AAL1 SVC
Usage Guidelines
Use this command to change the protocol for a redundancy group that has previously been assigned a
protocol with the addmgcgrpprotocol command.
Examples
The following example shows that redundancy group number 7 is assigned the SRCP 1.0.2 protocol, and
quarantines persistent events with the loop, process handling method. All optional arguments are
enabled.
cnfmgcgrpprotocol 7 3 1 3 1 1 1 1 1
Related Commands
Command
Description
addmgcgrpprotocol Associates a call agent redundancy group to a gateway control protocol.
cnfdisctimers
Specifies the wait delay times for the disconnected procedure, restart in
progress command—initial, minimum, and maximum timer values.
cnfxgcppeer
Configures the UDP port number used to send gateway-initiated messages to
the call agent.
delmgcgrpprotocol
Deletes an MGCP from a specified call agent redundancy group.
dspdisctimers
Displays the Restart in Progress command disconnect type method wait delay
times.
Cisco VISM Installation and Configuration Guide
5-184
Release 3.0, Part Number OL-2521-01 Rev. D0, June 2004
Chapter 5
CLI Commands
cnfmidcalltimers
cnfmidcalltimers
To configure the midcall dual tone multifrequency (DTMF) feature partial and critical timers for a
specified VISM card line, use the cnfmidcalltimers command in the VoIP switching/trunking, switched
AAL2 PVC, and AAL2 trunking operating modes.
cnfmidcalltimers line-num dtmf-part-timer dtmf-crit-timer
Syntax Description
line-num
Line number for which you want to configure midcall DTMF timers. It can be in
the range from 1 to 8.
dtmf-part-timer
Partial digit timer for midcall DTMF digit reporting (defined in seconds). It can
be in the range from 10 to 10000. (Default = 16)
dtmf-crit-timer
Critical digit timer for midcall DTMF digit reporting (defined in seconds). It can
be in the range from 0 to 10000. (Default = 4)
Command Modes
VoIP switching/trunking, switched AAL2 PVC, and AAL2 trunking
Usage Guidelines
Use this command for CAS and non-CAS endpoints when you want to use midcall DTMF digit
reporting.
When you use this command, the partial digit timer starts when the first digit is entered, and restarts
when each new digit is entered until a digit map match or mismatch occurs.
When you use a digit map, the critical digit timer starts when the last digit is received—when no more
digits are required for a digit map match. When the time expires, the digit map match is assumed to be
complete. When you are not using a digit map, the critical digit timer starts immediately (and not
restarted) and is cancelled as soon as a digit is entered.
Examples
The following example shows that the current VISM card line number 3 is configured with a 20-second
partial digit timer and a 4-second critical digit timer for midcall DTMF digit reporting:
cnfmidcalltimers 3 20 4
Related Commands
Command
Description
dspmidcalltimers Displays the configured partial and critical timer values for midcall DTMF digit
reporting.
Cisco VISM Installation and Configuration Guide
Release 3.0, Part Number OL-2521-01 Rev. D0, June 2004
5-185
Chapter 5
CLI Commands
cnfmusicthreshold
cnfmusicthreshold
To configure the music on-hold threshold value for the current VISM card, use the cnfmusicthreshold
command in the VoIP switching/trunking, switched AAL2 PVC, and AAL2 trunking operating modes.
cnfmusicthreshold music-thresh
Syntax Description
music-thresh
Command Modes
VoIP switching/trunking, switched AAL2 PVC, and AAL2 trunking
Usage Guidelines
This command allows you to adjust the threshold level detected by DSPs to interpret TDM side silence
or voice.
Examples
The following example shows that the current VISM card is configured with a –45-dB music on-hold
threshold value:
Music on-hold threshold (defined in decibels). It can be in the range from
–70 to –30.
cnfmusicthreshold -45
Related Commands
Command
Description
cnfds0musicthreshold
Configures the music on-hold threshold for a specified DS0.
cnflnmusicthreshold
Configures the music on-hold threshold for all DS0s on a specified line.
dspds0musicthreshold
Displays the music on-hold threshold value for a specified DS0.
dsplnmusicthreshold
Displays the music on-hold threshold values for the DS0s on a specified
line.
dspmusicthreshold
Displays the music on-hold threshold values for the current VISM card.
Cisco VISM Installation and Configuration Guide
5-186
Release 3.0, Part Number OL-2521-01 Rev. D0, June 2004
Chapter 5
CLI Commands
cnfnwcot
cnfnwcot
To configure VISM for a gateway-initiated network continuity test, use the cnfnwcot command in the
VoIP switching/trunking and switched AAL2 PVC operating modes.
cnfnwcot co3test-enable
Syntax Description
co3test-enable
Enables or disables the VISM-initiated CO3 network continuity test. It can be
one of the following values:
•
1 = On
•
2 = Off (Default)
Command Modes
VoIP switching/trunking and switched AAL2 PVC
Usage Guidelines
This command configures VISM for gateway-initiated network continuity testing. When enabled, and
after VISM receives the remote SDP information, VISM sends an Named Signaling Event (NSE) or
AAL2 type 3 packet (CO3) towards the network. If the other gateway does not respond with a NSE/Type
3 packet (CO4), the connection is deleted. VISM interprets that the gateway initiated DLCX, with a
reason code of “Network cont. failed,” is sent to the call agent.
Examples
The following example shows that VISM is configured for a gateway-initiated network continuity test:
cnfnwcot 1
Related Commands
Command
Description
cnfco4timer
Configures the bearer continuity test CO4 timer value.
dspco4timer
Displays the bearer continuity test CO4 timer value.
dspnwcot
Displays the status—enabled or disabled—of the gateway initiated network
continuity test configuration for VISM.
dspvismparam
Displays the current VISM card configuration.
Cisco VISM Installation and Configuration Guide
Release 3.0, Part Number OL-2521-01 Rev. D0, June 2004
5-187
Chapter 5
CLI Commands
cnfpncon
cnfpncon
To set priority routing for a specified connection, use the cnfpncon command in the switched AAL1
SVC, switched AAL2 SVC, switched AAL2 PVC, AAL2 trunking, and switched ATM AAL1 SVC
operating modes.
cnfpncon lcn route-priority
Syntax Description
lcn
The logical channel number. It can be in the range from 131 to 510.
route-priority
Route priority. It can be in the range from 1 to 15 (lowest). (Default = 8)
Command Modes
Switched AAL1 SVC, switched AAL2 SVC, switched AAL2 PVC, AAL2 trunking, and switched ATM
AAL1 SVC
Usage Guidelines
The Private Network-to-Network Interface (PNNI) routing priority feature requires you to use a PXM1E
or PXM45 in your MGX 8000 Series switch chassis.
Examples
The following example shows that the priority routing for connection 145 is set to the lowest priority:
cnfpncon 145 15
Related Commands
Command
Description
dspcon
Displays the parameters for a specified channel.
Cisco VISM Installation and Configuration Guide
5-188
Release 3.0, Part Number OL-2521-01 Rev. D0, June 2004
Chapter 5
CLI Commands
cnfprofelemvbd
cnfprofelemvbd
To configure the voiceband data (VBD) profile element for a profile, use the cnfprofelemvbd command
in the switched AAL2 PVC operating mode.
cnfprofelemvbd profile-type profile-num vbd-codec-type vbd-pkt-period
Syntax Description
profile-type
profile-num
vbd-codec-type
vbd-pkt-period
The profile type to be used for the CID. It can be one of the following values:
•
1 = International Telecommunication Union (ITU) I.366.2
•
3 = Custom
Number of the profile. It can be one of the following values:
•
1 = ITU profile type
•
2 = ITU profile type
•
3 = ITU profile type
•
7 = ITU profile type
•
8 = ITU profile type
•
12 = ITU profile type
•
100 = custom profile type
•
101 = custom profile type
•
110 = custom profile type
•
200 = custom profile type
The type of coding/decoding to be performed on the data stream. It can be one of
the following values:
•
1 = G.711u
•
2 = G.711a
•
3 = G.726-32k
•
6 = Clear channel (VAD must be off)
•
7 = G.726-16k
•
8 = G.726-24k
•
9 = G.726-40k
•
11 = G.723.1-H
•
13 = G.723.1-L
Packetization period (defined in milliseconds). It can be one of the following
values:
•
5
•
10
•
30
Cisco VISM Installation and Configuration Guide
Release 3.0, Part Number OL-2521-01 Rev. D0, June 2004
5-189
Chapter 5
CLI Commands
cnfprofelemvbd
Command Modes
Switched AAL2 PVC
Usage Guidelines
Use the dspaal2profile command to identify valid combinations of codec type, packetization period, and
silence insertion descriptor.
The G.723.1 codecs are supported for VISM-PR cards and are not supported for VISM cards.
Examples
The following example shows that the ITU profile type, profile number 1 is configured with G.711a
codec type and a 5-ms packetization period:
cnfprofelemvbd 1 1 2 5
Related Commands
Command
Description
cnfprofelemvoice
Configures the voice profile element for a profile.
dspaal2profile
Displays AAL2 profile type and profile number data.
dspprofparams
Displays the profile elements and the preferences for all profiles.
Cisco VISM Installation and Configuration Guide
5-190
Release 3.0, Part Number OL-2521-01 Rev. D0, June 2004
Chapter 5
CLI Commands
cnfprofelemvoice
cnfprofelemvoice
To configure the profile voice element, use the cnfprofelemvoice command in the switched AAL2 PVC
operating mode.
cnfprofelemvoice profile-type profile-num codec-type pvoice-pkt-period sid
Syntax Description
profile-type
profile-num
codec-type
The profile type to be used for the CID. It can be one of the following values:
•
1 = International Telecommunication Union (ITU) I.366.2
•
3 = Custom
Number of the profile. It can be one of the following values:
•
1 = ITU profile type
•
2 = ITU profile type
•
3 = ITU profile type
•
7 = ITU profile type
•
8 = ITU profile type
•
12 = ITU profile type
•
100 = custom profile type
•
101 = custom profile type
•
110 = custom profile type
•
200 = custom profile type
The type of coding/decoding to be performed on the data stream. It can be one of
the following values:
•
1 = G.711u
•
2 = G.711a
•
3 = G.726-32k
•
4 = G.729a
•
5 = G.729ab
•
6 = Clear channel (VAD must be off)
•
7 = G.726-16k
•
8 = G.726-24k
•
9 = G.726-40k
•
11 = G.723.1-H
•
12 = G.723.1a-H
•
13 = G.723.1-L
•
14 = G.723.1a-L
Cisco VISM Installation and Configuration Guide
Release 3.0, Part Number OL-2521-01 Rev. D0, June 2004
5-191
Chapter 5
CLI Commands
cnfprofelemvoice
pvoice-pkt-period
sid
Packetization period (defined in milliseconds). It can be one of the following
values:
•
5
•
10
•
20
•
30
•
40
•
60
Silence insertion descriptor (SID). It can be one of the following values:
1 = VAD off
2 = VAD on
3= SID generic
4 = SID 729
5 = SID 723
Command Modes
Switched AAL2 PVC
Usage Guidelines
Use the dspaal2profile command to identify valid combinations of codec type, packetization period, and
SID.
The G.723.1 codecs are supported for VISM-PR cards and are not supported for VISM cards.
Examples
The following example shows that the ITU profile type on profile number 1 is configured with the
G.711a codec type, a packetization period of 5 ms, and VAD enabled:
cnfprofelemvoice 1 1 2 5 2
Related Commands
Command
Description
cnfprofelemvbd
Configures the VBD profile element for a profile.
dspaal2profile
Displays information about a specified AAL2 profile type and profile number.
dspprofparams
Displays the profile elements and preferences for all profiles.
Cisco VISM Installation and Configuration Guide
5-192
Release 3.0, Part Number OL-2521-01 Rev. D0, June 2004
Chapter 5
CLI Commands
cnfprofneg
cnfprofneg
To configure the profile list priority order, use the cnfprofneg command in the switched AAL2 PVC
operating mode.
cnfprofneg codec-priority
Syntax Description
codec-priority
The codec list priority scheme. It can be one of the following values:
•
1 = Local connection options (LCO) list, remote Session Descriptor Protocol
(SDP) data list, local MIB
•
2 = LCO list, local MIB, remote SDP data list
•
3 = Remote SDP data list, LCO list, local MIB
•
4 = Remote SDP data list, local MIB, LCO list
•
5 = Local MIB, LCO list, remote SDP data list
•
6 = Local MIB, remote SDP data list, LCO list
Command Modes
Switched AAL2 PVC
Usage Guidelines
This command determines which list to use for determining the relative profile preferences.
Examples
The following example shows that the codec list priority configuration uses the LCO list first, the remote
SDP data list second, and the local MIB last:
cnfprofneg 1
Related Commands
Command
Description
dspvismparam
Displays the current VISM card configuration.
Cisco VISM Installation and Configuration Guide
Release 3.0, Part Number OL-2521-01 Rev. D0, June 2004
5-193
Chapter 5
CLI Commands
cnfprofparams
cnfprofparams
To configure a profile preference, use the cnfprofparams command in the switched AAL2 PVC and
AAL2 trunking operating modes.
cnfprofparams profile-type profile-num profile-pref
Syntax Description
profile-type
profile-num
profile-pref
The profile type to be used for the CID. It can be one of the following values:
•
1 = International Telecommunication Union (ITU) I.366.2
•
3 = Custom
Number of the profile. It can be one of the following values:
•
1 = ITU profile type
•
2 = ITU profile type
•
3 = ITU profile type
•
7 = ITU profile type
•
8 = ITU profile type
•
12 = ITU profile type
•
100 = custom profile types
•
101 = custom profile types
•
110 = custom profile types
•
200 = custom profile types
Profile preference. It can be one of the following values:
•
0 = No preference; exclude the profile from xGCP profile negotiation
•
In the range from 1 (highest preference; default) to 10 (lowest preference)
Command Modes
Switched AAL2 PVC and AAL2 trunking
Usage Guidelines
Follow standard CLI procedures for this command.
Examples
The following example shows that the ITU profile type, profile number 1 is configured with the midrange
preference level of 4:
cnfprofparams 1 1 4
Related Commands
Command
Description
dspprofparams
Displays the profile elements and preferences for all profiles.
Cisco VISM Installation and Configuration Guide
5-194
Release 3.0, Part Number OL-2521-01 Rev. D0, June 2004
Chapter 5
CLI Commands
cnfrsvp
cnfrsvp
To configure Resource Reservation Protocol (RSVP) for a specified connection, use the cnfrsvp
command in the VoIP switching/trunking and VoIP and switched ATM AAL1 SVC operating modes.
cnfrsvp lcn rsvp-enable
Syntax Description
lcn
The logical channel number. It can be in the range from 131 to 510.
rsvp-enable
Enables or disables RSVP. It can be one of the following values:
•
1 = On
•
2 = Off
Command Modes
VoIP switching/trunking, VoIP and switched ATM AAL1 SVC
Usage Guidelines
Follow standard CLI procedures for this command.
Examples
The following example shows that RSVP is enabled for LCN 146:
cnfrsvp 146 1
Related Commands
Command
Description
cnfrsvprefreshmiss
Configures the number of times VISM waits for a missed RSVP minimum
refresh message for a specified connection.
dsprsvpif
Displays the RSVP status of a specified connection.
dsprsvpreq
Displays the data associated with a specified RSVP request.
dsprsvpreqs
Displays all RSVP-known requests on the current VISM card.
dsprsvpresv
Displays all data associated with an RSVP bandwidth reservation.
dsprsvpresvs
Displays all incoming RSVP-known reservations on the current VISM card.
dsprsvpsenders
Displays all data associated with a specified RSVP path state.
Cisco VISM Installation and Configuration Guide
Release 3.0, Part Number OL-2521-01 Rev. D0, June 2004
5-195
Chapter 5
CLI Commands
cnfrsvprefreshmiss
cnfrsvprefreshmiss
To configure the number of times VISM waits for a missed Resource Reservation Protocol (RSVP)
minimum refresh message—a path or reservation message—(this is in addition to the time configured
for minimum refreshes) for a specified connection, use the cnfrsvprefreshmiss command in the VoIP
switching/trunking and VoIP and switched ATM AAL1 SVC operating modes.
cnfrsvprefreshmiss lcn refresh-miss-num
Syntax Description
lcn
The logical channel number. It can be in the range from 131 to 510.
refresh-miss-num
The successive number of refresh message wait times that VISM allows before
deleting the soft-state for the connection. It can be in the range from 1 to 8.
(Default = 4)
Command Modes
VoIP switching/trunking, VoIP and switched ATM AAL1 SVC
Usage Guidelines
VISM expects refresh messages at regular intervals, which are passed to VISM from the remote packet
module (RPM). If no refresh messages are sent to the VISM, VISM deletes the soft-state for the
corresponding connection. However, you can use this command to extend the wait time by configuring
the number of wait times VISM allows before tearing down a connection.
Examples
The following example shows that LCN 142 is configured to wait for 7 refresh time frames before
allowing a connection to be torn down:
cnfrsvprefreshmiss 142 7
Related Commands
Command
Description
cnfrsvp
Configures RSVP for a specified connection.
dsprsvpif
Displays the RSVP status of a specified connection.
dsprsvpreq
Displays the data associated with a specified RSVP request.
dsprsvpreqs
Displays all RSVP-known requests on the current VISM card.
dsprsvpresv
Displays all data associated with an RSVP bandwidth reservation.
dsprsvpresvs
Displays all incoming RSVP-known reservations on the current VISM card.
dsprsvpsenders
Displays all data associated with a specified RSVP path state.
Cisco VISM Installation and Configuration Guide
5-196
Release 3.0, Part Number OL-2521-01 Rev. D0, June 2004
Chapter 5
CLI Commands
cnfrtcprepint
cnfrtcprepint
To configure the Real Time Control Protocol (RTCP) report interval for a VISM card, use the
cnfrtcprepint command in the VoIP switching/trunking and VoIP and switched ATM AAL1 SVC
operating modes.
cnfrtcprepint report-interval |report-mult|
Syntax Description
report-interval
Interval (defined in milliseconds) between RTCP report packets sent to peer VoIP
endpoints. It can be in the range from 500 to 1500, in increments of 10.
report-mult
(Optional) Interval multiplier for the report-interval argument value. Use this
argument if you need to configure the report-interval argument value higher than
the maximum (1500 ms). It can be in the range from 1 to 10. (Default = 3)
Note
If report-interval = 1500 and report-mult = 3, then 1000 * 3 = 4500. So,
the interval time between RTCP report packets sent to peer VoIP
endpoints is configured as 4500 ms.
Command Modes
VoIP switching/trunking and VoIP and switched ATM AAL1 SVC
Usage Guidelines
Follow standard CLI procedures for this command.
Examples
The following example shows that the RTCP report packet interval is configured at 1000 ms:
cnfrtcprepint 1000
Related Commands
Command
Description
dspvismparam
Displays current VISM card configuration.
Cisco VISM Installation and Configuration Guide
Release 3.0, Part Number OL-2521-01 Rev. D0, June 2004
5-197
Chapter 5
CLI Commands
cnfrtpcon
cnfrtpcon
To modify an existing static Real-Time Transport Protocol (RTP) VoIP trunking connection, use the
cnfrtpcon command in the VoIP switching/trunking operating mode.
cnfrtpcon conn-num codec-type conn-mode |vt-pkt-period bearer-prec bearer-tos vad-enable
vad-timer ecan-enable cas-trans dtmf-trans idle-code-sup|
Syntax Description
conn-num
Connection identification number. It can be in the range from 1 to 248.
codec-type
The type of coding/decoding to be performed on the data stream. It can be one of
the following values:
conn-mode
vt-pkt-period
bearer-prec
•
1 = G.711u
•
2 = G.711a
•
3 = G.726-32K
•
4 = G.729a
•
5 = G.729ab
•
6 = Clear channel (VAD must be off)
•
7 = G.726-16k
•
8 = G.726-24k
•
9 = G.726-40k
•
11 = G.723.1-H
•
12 = G.723.1a-H
•
13 = G.723.1-L
•
14 = G.723.1a-L
(Optional) Connection mode. It can be one of the following values:
•
1 = VISM sends packets
•
2 = VISM receives packets
•
3 = VISM sends and receives packets (Default)
•
4 = Inactive; VISM does not send or receive packets
(Optional) Packetization period (defined in milliseconds). It can be one of the
following values:
•
10
•
20
•
30
•
40
•
60
(Optional) Bearer precedence. It can be in the range from 0 to 7. (Default = 5)
Cisco VISM Installation and Configuration Guide
5-198
Release 3.0, Part Number OL-2521-01 Rev. D0, June 2004
Chapter 5
CLI Commands
cnfrtpcon
bearer-tos
vad-enable
(Optional) Bearer type of service (ToS). It can be one of the following values:
•
0 (Default)
•
1
•
2
•
4
•
8
(Optional) Enables or disables voice activity detection (VAD). It can be one of
the following values:
•
1 = On
•
2 = Off (Default)
vad-timer
(Optional) The VAD holdover timer (defined in milliseconds) in the range from
250 to 65535.
ecan-enable
(Optional) Enables or disables echo cancellation (ECAN). It can be one of the
following values:
cas-trans
dtmf-trans
•
1 = On (Default)
•
2 = Off
(Optional) Enables or disables CAS signaling transportation. It can be one of the
following values:
•
1 = On (Default)
•
2 = Off
(Optional) Enables or disables DTMF tone transportation. It can be one of the
following values:
•
1 = On (Default)
•
2 = Off
Note
idle-code-sup
The dtmf-trans argument value must be set to 1 (on) when the codec-type
is configured for codecs other than G.711 and G.726.
(Optional) Enables or disables idle code suppression for the CID. It can be one
of the following values:
•
1 = On
•
2 = Off (Default)
Command Modes
VoIP switching/trunking
Usage Guidelines
The G.723.1 codecs are supported for VISM-PR cards and are not supported for VISM cards.
Cisco VISM Installation and Configuration Guide
Release 3.0, Part Number OL-2521-01 Rev. D0, June 2004
5-199
Chapter 5
CLI Commands
cnfrtpcon
Examples
The following example shows that the RTP trunking connection 26 is configured (modified) with
G.726/32 codec type. VISM is also configured to send and receive packets and has a 20-ms packetization
period, a bearer precedence of 3, a bearer ToS of 1, with VAD enabled, and a 400-ms VAD holdover time.
Also, ECAN, CAS, DTMF tone transport, idle code suppression for CID, and redundancy are enabled:
cnfrtpcon 26 3 3 20 3 1 1 400 1 1 1 1 1
Related Commands
Command
Description
addlapdtrunk
Adds an LAPD trunk to a specific VISM card line.
addrtpcon
Adds a static RTP VoIP trunking connection.
addrudptrunk
Adds an ISDN PRI backhaul RUDP session for an LAPD trunk connection.
clrrtpcnt
Clears the RTP counters (statistics) for a specific static RTP connection.
cnflapdtrunkpvc
Assigns the PVC trunk type that carries LAPD messages for the current VISM
card.
cnflntrunkcond
Enables or disables line conditioning on a VISM card line if a network alarm
is encountered.
cnfrudptrunkrmtip Modifies the remote IP address of VISM used in the ISDN PRI backhaul RUDP
trunk for a specified session.
dellapdtrunk
Deletes an LAPD configured line.
delrtpcon
Deletes a static RTP VoIP trunking connection.
delrudptrunk
Deletes an ISDN PRI backhaul RUDP session that is associated with an LAPD.
dsplapd
Displays data about an LAPD.
dsplapdtrunkpvc
Displays the assigned PVC trunk type that carries LAPD trunk messages for
the current VISM card.
dsplapdtrunks
Displays the configuration data of all LAPD trunks.
dsprtpcnt
Displays the bearer counters (statistics) for a specific RTP VoIP trunking
connection.
dsprtpcon
Displays the configuration data of a specific static RTP VoIP trunking
connection.
dsprtpconnstat
Displays the RTP connection statistics for a specified endpoint.
dsprtpcons
Displays the configuration data of all static RTP VoIP trunking connections.
dsprudptrunk
Displays the configuration data of a specified ISDN PRI backhaul RUDP
session.
dsprudptrunks
Displays the configuration data of all ISDN PRI backhaul RUDP sessions.
Cisco VISM Installation and Configuration Guide
5-200
Release 3.0, Part Number OL-2521-01 Rev. D0, June 2004
Chapter 5
CLI Commands
cnfrtprxtimer
cnfrtprxtimer
To enable or disable the receipt of Real-Time Transport Protocol (RTP) messages on a VISM card, use the
cnfrtprxtimer command in the VoIP switching/trunking operating mode.
cnfrtprxtimer rx-timer
Syntax Description
rx-timer
Enables or disables the receipt of RTP messages. It can be one of the following
values:
•
1 = Disable
•
2 = Enable
Command Modes
VoIP switching/trunking
Usage Guidelines
If you enable the receipt of RTP messages (rx-timer = 2) and no RTP messages are received on a
particular connection for 5 seconds, the gateway initiates a connection deletion. You cannot configure
the 5-second time limit.
Examples
The following example shows that the receipt of RTP messages is enabled for the current VISM card:
cnfrtprxtimer 2
Related Commands
There are no related commands.
Cisco VISM Installation and Configuration Guide
Release 3.0, Part Number OL-2521-01 Rev. D0, June 2004
5-201
Chapter 5
CLI Commands
cnfrudptrunkrmtip
cnfrudptrunkrmtip
To modify the remote IP address of VISM used in the ISDN PRI backhaul Reliable User Datagram
Protocol (RUDP) trunk for a specified session, use the cnfrudptrunkrmtip command in the VoIP
switching/trunking operating mode.
cnfrudptrunkrmtip session-num remote-ip-addr
Syntax Description
session-num
ISDN PRI backhaul RUDP session. It can be in the range from 1 to 64.
remote-ip-addr
IP address of the remote VISM card, in dotted decimal format
(nnn.nnn.nnn.nnn).
Command Modes
VoIP switching/trunking
Usage Guidelines
Follow standard CLI procedures for this command.
Examples
The following example shows that the remote IP address, 209.165.200.224, of VISM used in RUDP is
modified to session number 22:
cnfrudptrunkrmtip 22 209.165.200.224
Related Commands
Command
Description
addlapdtrunk
Adds an LAPD trunk to a specific VISM card line.
addrtpcon
Adds a static RTP VoIP trunking connection.
addrudptrunk
Adds an ISDN PRI backhaul RUDP session for an LAPD trunk connection.
clrrtpcnt
Clears the RTP counters (statistics) for a specific static RTP connection.
cnflntrunkcond
Enables or disables line conditioning on a VISM card line if a network alarm is
encountered.
cnfrtpcon
Modifies an existing static RTP VoIP trunking connection.
dellapdtrunk
Deletes an LAPD configured line.
delrtpcon
Deletes a static RTP VoIP trunking connection.
delrudptrunk
Deletes an ISDN PRI backhaul RUDP session that is associated with an LAPD.
dsplapd
Displays data about an LAPD.
dsplapdtrunkpvc
Displays the assigned PVC trunk type that carries LAPD trunk messages for the
current VISM card.
dsplapdtrunks
Displays the configuration data of all LAPD trunks.
dsprtpcnt
Displays the bearer counters (statistics) for a specific RTP VoIP trunking
connection.
dsprtpcon
Displays the configuration data of a specific static RTP VoIP trunking
connection.
dsprtpcons
Displays the configuration data of all static RTP VoIP trunking connections.
Cisco VISM Installation and Configuration Guide
5-202
Release 3.0, Part Number OL-2521-01 Rev. D0, June 2004
Chapter 5
CLI Commands
cnfrudptrunkrmtip
Command
Description
dsprudptrunk
Displays the configuration data of a specified ISDN PRI backhaul RUDP session.
dsprudptrunks
Displays the configuration data of all ISDN PRI backhaul RUDP sessions.
Cisco VISM Installation and Configuration Guide
Release 3.0, Part Number OL-2521-01 Rev. D0, June 2004
5-203
Chapter 5
CLI Commands
cnfsesack
cnfsesack
To configure the timeout period before sending an acknowledgment, and the maximum number of
acknowledgments that can be accumulated, use the cnfsesack command in the VoIP switching/trunking
operating mode.
cnfsesack session-num ack-timeout max-acks
Syntax Description
session-num
Identifying session number in the range from 1 to 64.
ack-timeout
Timeout period (defined in milliseconds) to send an acknowledgment. It can
be in the range from 100 to 65535.
max-acks
Maximum number of acknowledgments that can be accumulated before
sending an acknowledgment. It can be in the range from 0 to 255.
Command Modes
VoIP switching/trunking
Usage Guidelines
Use this command for a previously added PRI backhaul session.
Examples
The following example shows that session 2 is configured with an acknowledgment period of 500 ms
and the maximum number of accumulated acknowledgments can be 10:
cnfsesack 2 500 10
Related Commands
Command
Description
cnfsesmaxreset
Configures the maximum number of resets that a VISM card performs before
a connection is reset.
cnfsesmaxseg
Configures the maximum segment size, in octets, that can be received by a
VISM card after sending a synchronize message.
cnfsesmaxwindow
Configures the maximum number of segments (window) that can be sent
before receiving an acknowledgment.
cnfsesnullsegtmout
Configures the idle time before sending a null segment.
cnfsesoutofseq
Configures the maximum number of out-of-sequence packets that can be
accumulated before sending an EACK packet.
cnfsesport
Configures the port numbers of a previously added PRI backhaul session.
cnfsesretrans
Configures the timeout period for unacknowledged packets and the number
of retransmissions.
cnfsesstatetmout
Configures the number of milliseconds that VISM waits for a transfer state
before executing an auto reset.
cnfsessyncatmps
Configures the maximum number of call agent synchronization attempts.
Cisco VISM Installation and Configuration Guide
5-204
Release 3.0, Part Number OL-2521-01 Rev. D0, June 2004
Chapter 5
CLI Commands
cnfsesmaxreset
cnfsesmaxreset
To configure the maximum number of resets that a VISM card performs before a connection is reset, use
the cnfsesmaxreset command in the VoIP switching/trunking operating mode.
cnfsesmaxreset session-num max-resets
Syntax Description
session-num
Identifying session number in the range from 1 to 64.
max-resets
Maximum number of resets that the VISM card performs before a
connection is reset. It can be in the range from 0 to 255. (Default = 3)
Command Modes
VoIP switching/trunking
Usage Guidelines
Use this command for a previously added PRI backhaul session.
Examples
The following example shows that 25 is the maximum number of resets configured for session number 2:
cnfsesmaxreset 2 25
Related Commands
Command
Description
cnfsesack
Configures the timeout period before sending an acknowledgment, and the
maximum number of acknowledgments that can be accumulated.
cnfsesmaxseg
Configures the maximum segment size, in octets, that can be received by a
VISM card after sending a synchronize message.
cnfsesmaxwindow
Configures the maximum number of segments (window) that can be sent
before receiving an acknowledgment.
cnfsesnullsegtmout
Configures the idle time before sending a null segment.
cnfsesoutofseq
Configures the maximum number of out-of-sequence packets that can be
accumulated before sending an EACK packet.
cnfsesport
Configures the port numbers of a previously added PRI backhaul session.
cnfsesretrans
Configures the timeout period for unacknowledged packets and the number
of retransmissions.
cnfsesstatetmout
Configures the number of milliseconds that VISM waits for a transfer state
before executing an auto reset.
cnfsessyncatmps
Configures the maximum number of call agent synchronization attempts.
Cisco VISM Installation and Configuration Guide
Release 3.0, Part Number OL-2521-01 Rev. D0, June 2004
5-205
Chapter 5
CLI Commands
cnfsesmaxseg
cnfsesmaxseg
To configure the maximum segment size, in octets, that can be received by a VISM card after sending a
synchronize message, use the cnfsesmaxseg command in the VoIP switching/trunking operating mode.
cnfsesmaxseg session-num seg-size
Syntax Description
session-num
Identifying session number in the range from 1 to 64.
seg-size
Maximum segment size, in octets, that can be received by a VISM card after
sending a synchronize message. It can be in the range from 30 to 65535.
Command Modes
VoIP switching/trunking
Usage Guidelines
Use this command for a previously added PRI backhaul session.
Examples
The following example shows that a maximum 1000-octet segment size is configured for session number
2:
cnfsesmaxseg 2 1000
Related Commands
Command
Description
cnfsesack
Configures the timeout period before sending an acknowledgment, and the
maximum number of acknowledgments that can be accumulated.
cnfsesmaxreset
Configures the maximum number of resets that a VISM card performs before
a connection is reset.
cnfsesmaxwindow
Configures the maximum number of segments (window) that can be sent
before receiving an acknowledgment.
cnfsesnullsegtmout
Configures the idle time before sending a null segment.
cnfsesoutofseq
Configures the maximum number of out-of-sequence packets that can be
accumulated before sending an EACK packet.
cnfsesport
Configures the port numbers of a previously added PRI backhaul session.
cnfsesretrans
Configures the timeout period for unacknowledged packets and the number
of retransmissions.
cnfsesstatetmout
Configures the number of milliseconds that VISM waits for a transfer state
before executing an auto reset.
cnfsessyncatmps
Configures the maximum number of call agent synchronization attempts.
Cisco VISM Installation and Configuration Guide
5-206
Release 3.0, Part Number OL-2521-01 Rev. D0, June 2004
Chapter 5
CLI Commands
cnfsesmaxwindow
cnfsesmaxwindow
To configure the maximum number of segments (window) that can be sent before receiving an
acknowledgment, use the cnfsesmaxwindow command in the VoIP switching/trunking operating mode.
cnfsesmaxwindow session-num window-size
Syntax Description
session-num
Identifying session number in the range from 1 to 64.
window-size
Maximum number of segments that can be sent before receiving an
acknowledgment. It can be in the range from 1 to 64.
Command Modes
VoIP switching/trunking
Usage Guidelines
Use this command for a previously added PRI backhaul session.
Examples
The following example shows that a maximum number of 44 segments can be sent for session number 2
before receiving an acknowledgment:
cnfsesmaxwindow 2 44
Related Commands
Command
Description
cnfsesack
Configures the timeout period before sending an acknowledgment, and the
maximum number of acknowledgments that can be accumulated.
cnfsesmaxreset
Configures the maximum number of resets that a VISM card performs before
a connection is reset.
cnfsesmaxseg
Configures the maximum segment size, in octets, that can be received by a
VISM card after sending a synchronize message.
cnfsesnullsegtmout
Configures the idle time before sending a null segment.
cnfsesoutofseq
Configures the maximum number of out-of-sequence packets that can be
accumulated before sending an EACK packet.
cnfsesport
Configures the port numbers of a previously added PRI backhaul session.
cnfsesretrans
Configures the timeout period for unacknowledged packets and the number
of retransmissions.
cnfsesstatetmout
Configures the number of milliseconds that VISM waits for a transfer state
before executing an auto reset.
cnfsessyncatmps
Configures the maximum number of call agent synchronization attempts.
Cisco VISM Installation and Configuration Guide
Release 3.0, Part Number OL-2521-01 Rev. D0, June 2004
5-207
Chapter 5
CLI Commands
cnfsesnullsegtmout
cnfsesnullsegtmout
To configure the timeout period, in milliseconds, of idle time before a null segment is sent, use the
cnfsesnullsegtmout command in the VoIP switching/trunking operating mode.
cnfsesnullsegtmout session-num null-seg-tout
Syntax Description
session-num
Identifying session number in the range from 1 to 64.
null-seg-tout
Timeout period (defined in milliseconds) of idle time before a null segment
is sent. It can be in the range from 0 to 65535.
Command Modes
VoIP switching/trunking
Usage Guidelines
Use this command for a previously added PRI backhaul session.
Examples
The following example shows that the idle timeout period is configured at 1000 ms for session number 2:
cnfsesnullsegtmout 2 1000
Related Commands
Command
Description
cnfsesack
Configures the timeout period before sending an acknowledgment, and the
maximum number of acknowledgments that can be accumulated.
cnfsesmaxreset
Configures the maximum number of resets that a VISM card performs before
a connection is reset.
cnfsesmaxseg
Configures the maximum segment size, in octets, that can be received by a
VISM card after sending a synchronize message.
cnfsesoutofseq
Configures the maximum number of out-of-sequence packets that can be
accumulated before sending an EACK packet.
cnfsesport
Configures the port numbers of a previously added PRI backhaul session.
cnfsesretrans
Configures the timeout period for unacknowledged packets and the number
of retransmissions.
cnfsesstatetmout
Configures the number of milliseconds that VISM waits for a transfer state
before executing an auto reset.
cnfsessyncatmps
Configures the maximum number of call agent synchronization attempts.
Cisco VISM Installation and Configuration Guide
5-208
Release 3.0, Part Number OL-2521-01 Rev. D0, June 2004
Chapter 5
CLI Commands
cnfsesoutofseq
cnfsesoutofseq
To configure the maximum number of out-of-sequence packets that can be accumulated before sending
an EACK packet, use the cnfsesoutofseq command in the VoIP switching/trunking operating mode.
cnfsesoutofseq session-num max-seq-pkts
Syntax Description
session-num
Identifying session number in the range from 1 to 64.
max-seq-pkts
The maximum number of out-of-sequence packets that can be accumulated
before an EACK packet is transmitted. It can be in the range from 0 to 255.
Note
If you specify 0, a DACK message is sent immediately upon
receiving an out-of-sequence packet.
Command Modes
VoIP switching/trunking
Usage Guidelines
Use this command for a previously added PRI backhaul session.
Examples
The following example shows that a maximum of 10 out-of-sequence packets can be accumulated before
an EACK packet is transmitted for session number 2:
cnfsesoutofseq 2 10
Related Commands
Command
Description
cnfsesack
Configures the timeout period before sending an acknowledgment, and the
maximum number of acknowledgments that can be accumulated.
cnfsesmaxreset
Configures the maximum number of resets that a VISM card performs before
a connection is reset.
cnfsesmaxseg
Configures the maximum segment size, in octets, that can be received by a
VISM card after sending a synchronize message.
cnfsesnullsegtmout
Configures the idle time before sending a null segment.
cnfsesport
Configures the port numbers of a previously added PRI backhaul session.
cnfsesretrans
Configures the timeout period for unacknowledged packets and the number
of retransmissions.
cnfsesstatetmout
Configures the number of milliseconds that VISM waits for a transfer state
before executing an auto reset.
cnfsessyncatmps
Configures the maximum number of call agent synchronization attempts.
Cisco VISM Installation and Configuration Guide
Release 3.0, Part Number OL-2521-01 Rev. D0, June 2004
5-209
Chapter 5
CLI Commands
cnfsesport
cnfsesport
To configure the port numbers of a previously added PRI backhaul session, use the cnfsesport command
in the VoIP switching/trunking operating mode.
cnfsesport session-num local-port-num remote-port-num
Syntax Description
session-num
Identifying session number in the range from 1 to 64.
local-port-num
Local port number. The VISM port number used for the session. It can be in
the range from 1124 to 65535.
remote-port-num
Remote port number. The call agent port number used for the session. It can
be in the range from 1124 to 65535.
Command Modes
VoIP switching/trunking
Usage Guidelines
Follow standard CLI procedures for this command.
Examples
The following example shows that session number 4 is configured with local (VISM) port number 1200
and remote (call agent) port number 1204:
cnfsesport 4 1200 1204
Related Commands
Command
Description
cnfsesack
Configures the timeout period before sending an acknowledgment, and the
maximum number of acknowledgments that can be accumulated.
cnfsesmaxreset
Configures the maximum number of resets that a VISM card performs before
a connection is reset.
cnfsesmaxseg
Configures the maximum segment size, in octets, that can be received by a
VISM card after sending a synchronize message.
cnfsesnullsegtmout
Configures the idle time before sending a null segment.
cnfsesoutofseq
Configures the maximum number of out-of-sequence packets that can be
accumulated before sending an EACK packet.
cnfsesretrans
Configures the timeout period for unacknowledged packets and the number
of retransmissions.
cnfsesstatetmout
Configures the number of milliseconds that VISM waits for a transfer state
before executing an auto reset.
cnfsessyncatmps
Configures the maximum number of call agent synchronization attempts.
Cisco VISM Installation and Configuration Guide
5-210
Release 3.0, Part Number OL-2521-01 Rev. D0, June 2004
Chapter 5
CLI Commands
cnfsesretrans
cnfsesretrans
To configure the timeout period for unacknowledged packets and number of retransmissions, use the
cnfsesretrans command in the VoIP switching/trunking operating mode.
cnfsesretrans session-num unack-timeout max-ses-retrans
Syntax Description
session-num
Identifying session number in the range from 1 to 64.
unack-timeout
Timeout period (defined in milliseconds) to send an acknowledgment. It can
be in the range from 100 to 65535. (Default = 600)
max-ses-retrans
The maximum number of retransmissions. It can be in the range from 0 to
255. (Default = 3)
Command Modes
VoIP switching/trunking
Usage Guidelines
Use this command for a previously added PRI backhaul session.
When the maximum retransmissions have been made and there is still no acknowledgment, the session
is considered failed.
Examples
The following example shows that session number 2 is configured with a timeout period for
unacknowledged packets of 1000 ms and a maximum number of retransmission attempts of 20:
cnfsesretrans 2 1000 20
Related Commands
Command
Description
cnfsesack
Configures the timeout period before sending an acknowledgment, and the
maximum number of acknowledgments that can be accumulated.
cnfsesmaxreset
Configures the maximum number of resets that a VISM card performs before
a connection is reset.
cnfsesmaxseg
Configures the maximum segment size, in octets, that can be received by a
VISM card after sending a synchronize message.
cnfsesnullsegtmout
Configures the idle time before sending a null segment.
cnfsesoutofseq
Configures the maximum number of out-of-sequence packets that can be
accumulated before sending an EACK packet.
cnfsesport
Configures the port numbers of a previously added PRI backhaul session.
cnfsesstatetmout
Configures the number of milliseconds that VISM waits for a transfer state
before executing an auto reset.
cnfsessyncatmps
Configures the maximum number of call agent synchronization attempts.
Cisco VISM Installation and Configuration Guide
Release 3.0, Part Number OL-2521-01 Rev. D0, June 2004
5-211
Chapter 5
CLI Commands
cnfsesstatetmout
cnfsesstatetmout
To configure the number of milliseconds that VISM waits for a transfer state before executing an auto
reset, use the cnfsesstatetmout command in the VoIP switching/trunking operating mode.
cnfsesstatetmout session-num tstate-tout
Syntax Description
session-num
Identifying session number in the range from 1 to 64.
tstate-tout
Transfer state timeout. The maximum number of milliseconds that VISM
waits for a transfer state before executing an auto reset. It can be in the range
from 0 to 65535. (Default = 2000)
Command Modes
VoIP switching/trunking
Usage Guidelines
Use this command for a previously added PRI backhaul session.
Examples
The following example shows that session number 2 is configured with a 500-ms transfer state timeout:
cnfsesstatetmout 2 500
Related Commands
Command
Description
cnfsesack
Configures the timeout period before sending an acknowledgment, and the
maximum number of acknowledgments that can be accumulated.
cnfsesmaxreset
Configures the maximum number of resets that a VISM card performs before
a connection is reset.
cnfsesmaxseg
Configures the maximum segment size, in octets, that can be received by a
VISM card after sending a synchronize message.
cnfsesoutofseq
Configures the maximum number of out-of-sequence packets that can be
accumulated before sending an EACK packet.
cnfsesport
Configures the port numbers of a previously added PRI backhaul session.
cnfsesretrans
Configures the timeout period for unacknowledged packets and number of
retransmissions.
cnfsessyncatmps
Configures the maximum number of call agent synchronization attempts.
Cisco VISM Installation and Configuration Guide
5-212
Release 3.0, Part Number OL-2521-01 Rev. D0, June 2004
Chapter 5
CLI Commands
cnfsessyncatmps
cnfsessyncatmps
To configure the maximum number of attempts to synchronize with the call agent, use the
cnfsessyncatmps command in the VoIP switching/trunking operating mode.
cnfsessyncatmps session-num max-sync-attempts
Syntax Description
session-num
Identifying session number in the range from 1 to 64.
max-sync-attempts
The maximum number of attempts to synchronize with the call agent. It can
be in the range from 1 to 32.
Command Modes
VoIP switching/trunking
Usage Guidelines
Use this command for a previously added PRI backhaul session.
Examples
The following example shows that session number 2 is configured with a maximum of 10
synchronization attempts with the call agent:
cnfsessyncatmps 2 10
Related Commands
Command
Description
cnfsesack
Configures the timeout period before sending an acknowledgment, and the
maximum number of acknowledgments that can be accumulated.
cnfsesmaxreset
Configures the maximum number of resets that a VISM card performs before
a connection is reset.
cnfsesmaxseg
Configures the maximum segment size, in octets, that can be received by a
VISM card after sending a synchronize message.
cnfsesoutofseq
Configures the maximum number of out-of-sequence packets that can be
accumulated before sending an EACK packet.
cnfsesport
Configures the port numbers of a previously added PRI backhaul session.
cnfsesretrans
Configures the timeout period for unacknowledged packets and number of
retransmissions.
cnfsesstatetmout
Configures the number of milliseconds that VISM waits for a transfer state
before executing an auto reset.
Cisco VISM Installation and Configuration Guide
Release 3.0, Part Number OL-2521-01 Rev. D0, June 2004
5-213
Chapter 5
CLI Commands
cnfsrcppeer
cnfsrcppeer
To configure the port for the call agent configured with the Simple Resource Control Protocol
(SRCP)—when SRCP is the selected protocol for communication between the VISM card and call agent,
use the cnfsrcppeer command in the VoIP switching/trunking operating mode.
cnfsrcppeer peer-num udp-port-num
Syntax Description
peer-num
Peer (call agent) identification number. It can be a value from 1 to 8.
udp-port-num
User Datagram Protocol (UDP) port number. It can be in the range from 1025 to
65535.
Command Modes
VoIP switching/trunking
Usage Guidelines
If you do not use this command, the default MGCP/SGCP port number, 2428, is used for the
upd-port-num argument value.
Examples
The following example shows that peer identification number 2 is configured with UDP port number
1160:
cnfsrcppeer 2 1160
Related Commands
Command
Description
addmgcgrpentry
Configures call agents as part of an MGC redundancy group and assigns a
priority value for a call agent.
addmgcgrpprotocol
Associates a call agent redundancy group to a gateway control protocol.
cnfmgcgrpentry
Modifies the call agent priority level of a call agent within a call agent
redundancy group.
cnfmgcgrpparam
Modifies a call agent redundancy group state change notification policy
and priority level.
cnfsrcppeergrpparam
Modifies the SRCP heartbeat interval and maximum UDP size for a
specified call agent redundancy group.
delmgcgrpentry
Deletes a call agent from a call agent redundancy group.
delmgcgrpprotocol
Deletes an MGCP from a specified call agent redundancy group.
dspmgcgrpparams
Displays all configured call agent redundancy group parameters.
dspmgcgrpprotocols
Displays all configured call agent redundancy group protocols.
dspmgcgrps
Displays all configured call agent redundancy groups.
dspsrcppeergrpparams
Displays the SRCP parameters for all call agent redundancy groups that
have SRCP added.
Cisco VISM Installation and Configuration Guide
5-214
Release 3.0, Part Number OL-2521-01 Rev. D0, June 2004
Chapter 5
CLI Commands
cnfsrcppeergrpparam
cnfsrcppeergrpparam
To modify the Simple Resource Control Protocol (SRCP) heartbeat interval and maximum User
Datagram Protocol (UDP) size for a specified call agent redundancy group, use the
cnfsrcppeergrpparam command in the VoIP switching/trunking, switched AAL2 PVC, and AAL2
trunking operating modes.
cnfsrcppeergrpparam red-mgc-group hbeat-int max-udp-size
Syntax Description
red-mgc-group
Call agent redundancy group number. It can be in the range from 1 to 8.
hbeat-int
Interval between heartbeats (defined in milliseconds). It can be one of the
following values:
max-udp-size
•
0
•
In the range from 100 to 65535
Maximum allowable UDP size. It can be in the range from 4095 to 65535.
Command Modes
VoIP switching/trunking, switched AAL2 PVC, and AAL2 trunking
Usage Guidelines
Follow standard CLI procedures for this command.
Examples
The following example shows that call agent redundancy group number 3 is configured with a 250-ms
SRCP heartbeat interval and 50000-byte maximum UDP size:
cnfsrcppeergrpparam 3 250 50000
Related Commands
Command
Description
addmgcgrpentry
Configures call agents as part of an MGC redundancy group and assigns a
priority value for a call agent.
addmgcgrpprotocol
Associates a call agent redundancy group to a gateway control protocol.
cnfmgcgrpentry
Modifies the call agent priority level of a call agent within a call agent
redundancy group.
cnfmgcgrpparam
Modifies a call agent redundancy group state change notification policy
and priority level.
cnfsrcppeer
Configures the SRCP parameters when SRCP is the selected protocol for
communication between the VISM card and call agent.
delmgcgrpentry
Deletes a call agent from a call agent redundancy group.
delmgcgrpprotocol
Deletes an MGCP from a specified call agent redundancy group.
dspmgcgrpparams
Displays all configured call agent redundancy group parameters.
dspmgcgrpprotocols
Displays all configured call agent redundancy group protocols.
Cisco VISM Installation and Configuration Guide
Release 3.0, Part Number OL-2521-01 Rev. D0, June 2004
5-215
Chapter 5
CLI Commands
cnfsrcppeergrpparam
Command
Description
dspmgcgrps
Displays all configured call agent redundancy groups.
dspsrcppeergrpparams
Displays the SRCP parameters for all call agent redundancy groups that
have SRCP added.
Cisco VISM Installation and Configuration Guide
5-216
Release 3.0, Part Number OL-2521-01 Rev. D0, June 2004
Chapter 5
CLI Commands
cnfsrcpretry
cnfsrcpretry
To configure the VISM card level Simple Resource Control Protocol (SRCP) retry count, minimum
timeout, and maximum timeout, use the cnfsrcpretry command in the VoIP switching/trunking and
switched AAL2 PVC operating modes.
cnfsrcpretry srcp-min-tout max-srcp-retries |srcp-max-tout|
Syntax Description
srcp-min-tout
Minimum SRCP timeout (defined in milliseconds). It can be in the range from
1 to 10000. (Default = 500)
max-srcp-retries
Maximum number of SRCP retries. It can be in the range from 0 to 10.
(Default = 3).
srcp-max-tout
(Optional) Maximum SRCP timeout (defined in milliseconds). It can be in the
range from 1 to 10000. (Default = 500)
Command Modes
VoIP switching/trunking and switched AAL2 PVC
Usage Guidelines
If you assign a value to the optional srcp-max-tout argument, VISM exponentially increases the timeout
value between the minimum and maximum timeouts. If you do not assign a maximum timeout, the
srcp-max-tout argument value is set equal to the srcp-min-tout argument value, which disables the
exponential back off.
Examples
The following example shows that the current VISM card is configured with a 100-ms minimum SRCP
timeout period, a maximum of 5 SRCP retry attempts, and 1000-ms maximum SRCP timeout period:
cnfsrcpretry 100 5 1000
Related Commands
Command
Description
dspsrcpretry
Displays the VISM card level SRCP retry parameters—retry count, minimum
timeout, and maximum timeout.
Cisco VISM Installation and Configuration Guide
Release 3.0, Part Number OL-2521-01 Rev. D0, June 2004
5-217
Chapter 5
CLI Commands
cnft38fxlco
cnft38fxlco
To configure the fax handling instructions for a specified line, use the cnft38fxlco command in the VoIP
switching/trunking operating mode.
cnft38fxlco line-num fx-lco
Syntax Description
line-num
Line number of the channel, in the range from 1 to 8.
fx-lco
Local connection option fax preamble response. It can be one of the following
values:
•
1 = VISM controlled T.38, then fax pass through. Upon detecting a fax
preamble, VISM first attempts to complete a fax relay on the connection.
If fax relay is unsuccessful due to a lack of local resources, T.38
connection admission control (CAC) failure, or the remote side did not
acknowledge the 200 Named Signaling Event (NSE), VISM follows the
procedure for fax passthrough. If fax relay is successful, the connection is
returned to voice mode when the fax end of transfer occurs.
•
2 = VISM controlled T.38 only. Upon detecting a fax preamble, VISM
attempts to complete a fax relay on the connection. If fax relay is
unsuccessful, the connection is returned to voice mode. If the fax relay is
successful, the connection is returned to voice mode when the fax end of
transfer occurs.
•
3 = Passthrough, then VISM controlled T.38. Upon detecting a fax
preamble, VISM first attempts the procedure for fax passthrough. If fax
passthrough is unsuccessful due to a lack of local resources or an upspeed
CAC failure, VISM attempts the fax relay procedure. If both fax
passthrough and fax relay fail, the connection is returned to voice mode.
If either fax passthrough or fax relay are successful, the connection is
returned to voice mode when the fax end of transfer occurs.
•
4 = Passthrough only. Upon detecting a fax preamble, VISM attempts the
fax passthrough procedure.
•
5 = Off.
Command Modes
VoIP switching/trunking
Usage Guidelines
Follow standard CLI procedures for this command.
Examples
The following example shows that the fax preamble response configured for line number 4 is first the
fax passthrough and then VISM controlled T.38:
cnft38fxlco 4 3
Cisco VISM Installation and Configuration Guide
5-218
Release 3.0, Part Number OL-2521-01 Rev. D0, June 2004
Chapter 5
CLI Commands
cnft38fxlco
Related Commands
Command
Description
cnfcodectmpl
Assigns a codec template to an entire VISM card.
cnft38nsetimeout
Configures a specified line with a length of time in which to wait for a remote
acknowledgment of the offer to switch to fax transfer mode.
cnft38params
Configures the T.38 fax transfer parameters for a specified line.
dspcodectmpls
Displays all entries in the codec template table.
dspt38fxlco
Displays the fax handling instructions configured for a specified line.
dspt38fxlcos
Displays the fax handling instructions for all lines on the current VISM card.
dspt38nsetimeout
Displays a specified configured line with a length of time in which to wait for
a remote acknowledgment of the offer to switch to fax transfer mode.
dspt38nsetimeouts
Displays all configured lines with a length of time in which to wait for a remote
acknowledgment of the offer to switch to fax transfer mode.
dspt38params
Displays the T.38 fax transfer parameters for a specified line.
Cisco VISM Installation and Configuration Guide
Release 3.0, Part Number OL-2521-01 Rev. D0, June 2004
5-219
Chapter 5
CLI Commands
cnft38nsetimeout
cnft38nsetimeout
To configure a specified line with a length of time in which to wait for a remote acknowledgment of the
offer to switch to fax transfer mode, use the cnft38nsetimeout command in the VoIP switching/trunking
operating mode.
cnft38nsetimeout line-num nse-ack-timer
Syntax Description
line-num
Line number of the channel, in the range from 1 to 8.
nse-ack-timer
Named Signaling Event (NSE) acknowledgment timeout value (defined in
milliseconds). It can be in the range from 250 to 10000, in increments of 250.
Command Modes
VoIP switching/trunking
Usage Guidelines
Follow standard CLI procedures for this command.
Examples
The following example shows that line number 2 is configured with an NSE acknowledgment timeout
value of 600 ms:
cnft38nsetimeout 2 600
Related Commands
Command
Description
cnfcodectmpl
Assigns a codec template to an entire VISM card.
cnft38fxlco
Configures the fax handling instructions for a specified line.
cnft38params
Configures the T.38 fax transfer parameters for a specified line.
dspcodectmpls
Displays all entries in the codec template table.
dspt38fxlco
Displays the fax handling instructions configured for a specified line.
dspt38fxlcos
Displays the fax handling instructions for all lines on the current VISM card.
dspt38nsetimeout
Displays a specified configured line with a length of time in which to wait for
a remote acknowledgment of the offer to switch to fax transfer mode.
dspt38nsetimeouts
Displays all configured lines with a length of time in which to wait for a remote
acknowledgment of the offer to switch to fax transfer mode.
dspt38params
Displays the T.38 fax transfer parameters for a specified line.
Cisco VISM Installation and Configuration Guide
5-220
Release 3.0, Part Number OL-2521-01 Rev. D0, June 2004
Chapter 5
CLI Commands
cnft38params
cnft38params
To configure the T.38 fax transfer parameters for a specified line, use the cnft38params command in the
VoIP switching/trunking operating mode.
cnft38params line-num max-xmit-rate |info-fld-size d-pkt-size ls-data-red hs-data-red tcf-method
err-corr-enable nsf-oride-enable nsf-ccode nsf-vendor|
Syntax Description|
line-num
Line number of the channel, in the range from 1 to 8.
max-xmit-rate
Maximum fax transmission rate (defined in bits per second). It can be one of the
following values:
•
1 = 2400
•
2 = 4800
•
3 = 7200
•
4 = 9600
•
5 = 12000
•
6 = 14400 (Default)
info-fld-size
(Optional) Fax information field size (defined in bytes). It can be in the range
from 20 to 48. (Default = 48)
d-pkt-size
(Optional) Primary high-speed data packet size (defined in milliseconds). It can
be one of the following values:
•
10
•
20
•
30
•
40 (Default)
Note
ls-data-red
Cisco recommends that you select 30 ms for this argument value;
14400 bps fax transfers with a high speed data packet size higher than
30 ms may fail.
(Optional) Extent of the Internet fax protocol (IFP) packet transmission
redundancy for the low-speed control data exchanged during the first phase of a
T.38 fax relay connection. It can be in the range from 0 to 5. (Default = 5)
The ls-data-red argument has the following two different meanings, which
depend upon the value of the err-corr-enable argument:
hs-data-red
•
If the err-corr-enable argument = 1, the ls-data-red argument represents the
maximum number of forward error correction (FEC) messages within a User
Datagram Protocol (UDP) Transport Layer (TL) (UDPTL) packet carrying
low-speed data.
•
If the err-corr-enable argument = 2, the ls-data-red argument represents the
maximum number of prior IFP packets within a UDPTL packet carrying
low-speed data, but does not include the primary IFP packet.
(Optional) Extent of the IFP packet transmission redundancy for the high-speed
control and image data exchanged following the initial low-speed phase of a T.38
fax relay connection. It can be in the range from 0 to 2. (Default = 2)
Cisco VISM Installation and Configuration Guide
Release 3.0, Part Number OL-2521-01 Rev. D0, June 2004
5-221
Chapter 5
CLI Commands
cnft38params
tcf-method
(Optional) Training check field (TCF) verification method for UDP based fax
transport. It can be one of the following values:
•
1 = Local—for TCP-based fax transport or UDP-based fax transport.
The local TCF method implies that the media gateways are actively involved
in the training and data rate management procedure, including the generation
of the TCF signal. Data rate management is performed by one of the media
gateways on the basis of local results, which are forwarded over the IP
network by the other media gateway. The data rate management gateway
generates the TCF training signal toward its group 3 fax terminal.
•
2 = Network—for UDP-based fax transport.
The network TCF method implies that the data rate management is
performed end-to-end between the group 3 fax terminals. The TCF training
signal is passed by the IP network.
err-corr-enable
nsf-oride-enable
(Optional) Forward error correction scheme for UDP-based fax transport. It can
be one of the following values:
•
1 = On (Default)
•
2 = Off
(Optional) VISM nonstandard facilities (NSF) code override of NSF,
nonstandard facilities command (NSC), and nonstandard facilities setup (NSS)
T.30 signals. It can be one of the following values:
•
1 = On (Default)
If you enable NSF override, the group 3 fax machines are prevented from
synchronizing with each other on the basis of a protocol other than the ITU-T
recommendations.
•
2 = Off
If you disable NSF override, the group 3 fax machines synchronize to the
standard T-series protocol.
nsf-ccode
(Optional) Country code in the NFS code which identifies the country where the
NFS fax equipment was manufactured, defined as one byte. Refer to ITU T.38 for
a complete description. It can be in the range from 0 to 65535. (Default = 181)
nsf-vendor
(Optional) Vendor code of the NFS fax equipment manufacturer, defined as two
bytes. It can be in the range from 0 to 65535. (Default = 18)
Command Modes
VoIP switching/trunking
Usage Guidelines
Follow standard CLI procedures for this command.
Examples
The following example shows that the T.38 fax transfer parameters for a line number 2 are configured
with a maximum fax transmission rate of 7200 bps, a fax information field size of 28 bytes, a primary
high-speed data packet size of 20 ms, a low-speed packet transmission redundancy of 3, a high-speed
packet transmission redundancy of 0, the network TCF verification method, UDP error correction
enabled, NFS code VISM override enabled, a country code of 500, and a vendor code of 4000:
Cisco VISM Installation and Configuration Guide
5-222
Release 3.0, Part Number OL-2521-01 Rev. D0, June 2004
Chapter 5
CLI Commands
cnft38params
cnft38params 2 3 28 20 3 0 2 1 1 500 4000
Related Commands
Command
Description
cnfcodectmpl
Assigns a codec template to an entire VISM card.
cnft38fxlco
Configures the fax handling instructions for a specified line.
cnft38nsetimeout
Configures a specified line with a length of time in which to wait for a remote
acknowledgment of the offer to switch to fax transfer mode.
dspcodectmpls
Displays all entries in the codec template table.
dspt38fxlco
Displays the fax handling instructions configured for a specified line.
dspt38fxlcos
Displays the fax handling instructions for all lines on the current VISM card.
dspt38nsetimeout
Displays a specified configured line with a length of time in which to wait for
a remote acknowledgment of the offer to switch to fax transfer mode.
dspt38nsetimeouts
Displays all configured lines with a length of time in which to wait for a remote
acknowledgment of the offer to switch to fax transfer mode.
dspt38params
Displays the T.38 fax transfer parameters for a specified line.
Cisco VISM Installation and Configuration Guide
Release 3.0, Part Number OL-2521-01 Rev. D0, June 2004
5-223
Chapter 5
CLI Commands
cnftftpdn
cnftftpdn
To select the Trivial File Transfer Protocol (TFTP) domain name, use the cnftftpdn command in the
VoIP switching/trunking and switched AAL2 PVC operating modes.
cnftftpdn domain-name
Syntax Description
domain-name
Command Modes
VoIP switching/trunking and switched AAL2 PVC
Usage Guidelines
The domain name must have been added to the MGC table using the adddn command. When selected
as a TFTP server, the domain name cannot be used as the call agent domain name.
Examples
The following example shows that the configured TFTP domain name is south:
The TFTP domain name. A text string of 1 to 64 alphanumeric characters.
cnftftpdn south
Related Commands
There are no related commands.
Cisco VISM Installation and Configuration Guide
5-224
Release 3.0, Part Number OL-2521-01 Rev. D0, June 2004
Chapter 5
CLI Commands
cnflntrunkcond
cnflntrunkcond
To enable or disable trunk conditioning for a specified VISM card line, use the cnflntrunkcond
command in the VoIP switching/trunking, switched AAL2 PVC, and AAL2 trunking operating modes.
cnflntrunkcond line-num trunk-cond-enable
Syntax Description
line-num
Line number of the current VISM card line for which you want to condition a
line. It can be in the range from 1 to 8.
trunk-cond-enable
Enables or disables trunk conditioning on a line. It can be one of the following
values:
•
1 = On
•
2 = Off
Command Modes
VoIP switching/trunking, switched AAL2 PVC, and AAL2 trunking
Usage Guidelines
If you enable trunk line conditioning, VISM conditions the affected DS0 when an alarm indication signal
(AIS), a blue alarm, is detected on the ATM side. Trunk line conditioning consists of transmitting an idle
code pattern for 2.5 seconds followed by the seized code specified in the cnfcascode command.
Note
Examples
This command is not allowed if endpoints or CCS channels are enabled on the line.
The following example shows that trunk conditioning is enabled for line number 6 on the current VISM
card:
cnflntrunkcond 6 1
Related Commands
Command
Description
cnfcascode
Configures CAS idle code and seized code parameters for an endpoint.
Cisco VISM Installation and Configuration Guide
Release 3.0, Part Number OL-2521-01 Rev. D0, June 2004
5-225
Chapter 5
CLI Commands
cnfvbdcodec
cnfvbdcodec
To configure voiceband data (VBD) upspeed codec on the current VISM card, use the cnfvbdcodec
command in the VoIP switching/trunking operating mode.
cnfvbdcodec upspeed-codec
Syntax Description
upspeed-codec
Upspeed codec. It can be one of the following values:
•
1 = G.711u (Default for T1 VISM cards)
•
2 = G.711a (Default for E1 VISM cards)
•
3 = G.726-32k
•
4 = Clear channel
•
5 = G.723.1-H (Valid for template number 4 only)
•
6 = G.723.1-L (Valid for template number 4 only)
•
7 = G.726-16k
•
8 = G.726-24k
•
9 = G.726-40k
Command Modes
VoIP switching/trunking
Usage Guidelines
VISM uses the configured codec even if, for example, the configured codec is G.726-32k and VISM is
preconfigured with G.711. In this case, an actual downspeed would be performed.
If you configure clear channel, VISM does support a mixed system clock—VISM cannot be originated
at a T1 line and terminated at an E1 line, or originated at an E1 line and terminated at a T1 line.
When VISM is configured with clear channel, the codec is not used in the fax/modem upspeed session
because VISM cannot detect any tones using clear channel.
AAL2 modes obtain the upspeed codec from the AAL2 profile table. AAL1 does not support
compression and therefore does not require upspeed.
The G.723.1 codecs are supported for VISM-PR cards and are not supported for VISM cards.
Note
Examples
Cisco recommends that you do not use upspeed-codec argument values 5 or 6 with this command.
The following example shows that the VBD upspeed codec is configured as G.711u:
cnfvbdcodec 1
Related Commands
Command
Description
dspvbdcodec
Displays the upspeed codec used for voiceband data (VBD).
Cisco VISM Installation and Configuration Guide
5-226
Release 3.0, Part Number OL-2521-01 Rev. D0, June 2004
Chapter 5
CLI Commands
cnfvbdpol
cnfvbdpol
To configure VISM card level voiceband data (VBD) policies—fax/modem carrier loss and fax/modem
upspeed connection admission control (CAC) failure—use the cnfvbdpol command in the VoIP
switching/trunking, switched AAL2 PVC, and AAL2 trunking operating modes.
cnfvbdpol carrier-loss-pol cac-reject-pol
Syntax Description
carrier-loss-pol
cac-reject-pol
Carrier loss policy. It can be one of the following values:
•
1 = Revert to the previous codec
•
2 = Maintain the upspeed codec
CAC rejection policy. It can be one of the following values:
•
1 = Delete the connection
•
2 = Maintain the connection
Command Modes
VoIP switching/trunking, switched AAL2 PVC, and AAL2 trunking
Usage Guidelines
Follow standard CLI procedures for this command.
Examples
The following example shows that the current VISM card reverts to the previous codec for fax/modem
carrier loss events and maintains the connection during upspeed CAC failure events:
cnfvbdpol 1 2
Related Commands
Command
Description
dspvbdpol
Displays the current VISM card level policies for fax/modem upspeed CAC
failure and fax/modem carrier loss for call events.
Cisco VISM Installation and Configuration Guide
Release 3.0, Part Number OL-2521-01 Rev. D0, June 2004
5-227
Chapter 5
CLI Commands
cnfvismdn
cnfvismdn
To configure the current VISM card domain name, use the cnfvismdn command in the VoIP
switching/trunking and switched AAL2 PVC operating modes.
cnfvismdn domain-name
Syntax Description
domain-name
Command Modes
VoIP switching/trunking and switched AAL2 PVC
Usage Guidelines
Ensure that you configure the same domain name for the VSC as you do for the VISM card.
Current VISM card domain name. A text string of 1 to 64 alphanumeric characters.
(Default = cisco.com)
The domain name you configure is used when you create an endpoint identification number for each
endpoint on a VISM card. The endpoint identification number is used to address SGCP/MGCP
commands to a specific endpoint.
If you do not use this command, the default domain name is used.
Examples
The following example shows that the current VISM card is configured with the domain name north:
cnfvismdn north
Related Commands
Command
Description
cnfvismip
Configures the current VISM card IP address.
dspvismdn
Displays the domain name of the current VISM card.
Cisco VISM Installation and Configuration Guide
5-228
Release 3.0, Part Number OL-2521-01 Rev. D0, June 2004
Chapter 5
CLI Commands
cnfvismip
cnfvismip
To configure the current VISM card control IP address and subnet mask, and optionally, the bearer IP
address and subnet mask, use the cnfvismip command in the VoIP switching/trunking and switched
AAL2 PVC operating modes.
cnfvismip vip-addr netmask |bearer-ipaddr bearer-netmask|
Syntax Description
vip-addr
Control IP address of the current VISM card, in dotted decimal format
(nnn.nnn.nnn.nnn).
netmask
Control local network subnet mask, in dotted decimal format (nnn.nnn.nnn.nnn).
It should be assigned the value 255.255.255.248.
bearer-ipaddr
(Optional) Bearer IP address, in dotted decimal format (nnn.nnn.nnn.nnn).
bearer-netmask
(Optional) Bearer IP subnet mask, in dotted decimal format (nnn.nnn.nnn.nnn).
Command Modes
VoIP switching/trunking and switched AAL2 PVC
Usage Guidelines
You must configure the control IP address with this command before adding endpoints.
The VISM card control IP address is used to communicate with the VSC and as an identification for VoIP
endpoints.
The configured VISM card IP address and subnet mask values are stored on the MGX 8000 Series
platform PXM card hard disk and retrieved for subsequent configuration commands.
If you do not specify a bearer IP address and subnet mask, the control IP address and subnet mask are
used as both control and bearer.
Examples
The following example shows that the current VISM card is configured with control IP address
209.165.200.224 and subnet mask 255.255.255.248:
cnfvismip 209.165.200.224 255.255.255.248
Related Commands
Command
Description
dspvismip
Displays the current VISM card IP address.
Cisco VISM Installation and Configuration Guide
Release 3.0, Part Number OL-2521-01 Rev. D0, June 2004
5-229
Chapter 5
CLI Commands
cnfvismmode
cnfvismmode
To configure the initial operating mode for a VISM card, use the cnfvismmode command in the VoIP
switching/trunking, switched AAL2 PVC, and AAL2 trunking operating modes.
cnfvismmode oper-mode
Syntax Description
oper-mode
VISM card operating mode. It can be one of the following values:
•
1 = VoIP switching/VoIP trunking
•
2 = ATM Adaptation Layer Type 2 (AAL2) trunking
•
3 = Switched ATM AAL1 switched virtual circuit (SVC)
•
7 = Switched ATM AAL2 SVC
•
8 = Switched ATM AAL2 permanent virtual circuit (PVC)
•
9 = VoIP and switched ATM AAL1 SVC
Command Modes
VoIP switching/trunking, switched AAL1 SVC, switched AAL2 SVC, switched AAL2 PVC, AAL2
trunking, VoIP and switched ATM AAL1 SVC
Usage Guidelines
You should delete all connections, ports, and resource partitions (if any) before using this command.
Existing configurations on a VISM card are cleared when you use this command on the card.
Examples
The following example shows that the current VISM card is configured for the VoIP switching/trunking
operating mode:
cnfvismmode 1
Related Commands
There are no related commands.
Cisco VISM Installation and Configuration Guide
5-230
Release 3.0, Part Number OL-2521-01 Rev. D0, June 2004
Chapter 5
CLI Commands
cnfvoiptimerparam
cnfvoiptimerparam
To configure the holdover time for voice activity detection (VAD) before silence compression is
activated, use the cnfvoiptimerparam command in the VoIP switching/trunking operating mode.
cnfvoiptimerparam vad-timer
Syntax Description
vad-timer
Command Modes
VoIP switching/trunking
Usage Guidelines
Follow standard CLI procedures for this command.
Examples
The following example shows that the VAD holdover timer is configured for 360 ms:
cnfvoiptimerparam
Related Commands
The VAD holdover timer (defined in milliseconds) in the range from 250 to
65535.
360
Command
Description
cnfvoiptransparams
Configures the VoIP transportation parameters.
dspvoipparams
Displays the VoIP switching/trunking operating mode parameters.
Cisco VISM Installation and Configuration Guide
Release 3.0, Part Number OL-2521-01 Rev. D0, June 2004
5-231
Chapter 5
CLI Commands
cnfvoiptransparams
cnfvoiptransparams
To configure the VoIP transportation parameters—enable dual tone multifrequency (DTMF) and channel
associated signaling (CAS) bits transportation to the other endpoint, configure the Named Signaling
Event (NSE) triple redundancy feature for NSE packets, and optionally configure the event negotiation
policy and silence insertion descriptor (SID) payload type—use the cnfvoiptransparams command in
the VoIP switching/trunking operating mode.
cnfvoiptransparams dtmf-trans cas-trans |event-neg-enable event-neg-pol sid-type|
Syntax Description
dtmf-trans
Enables or disables DTMF tone transportation. It can be one of the following
values:
•
1 = On
•
2 = Off
The dtmf-trans argument value must be set to 1 (on) when you are using
codecs other than G.711 and G.726.
Note
cas-trans
event-neg-enable
event-neg-pol
sid-type
Enables or disables CAS signaling transportation. It can be one of the following
values:
•
1 = On
•
2 = Off
(Optional) Enables or disables whether VISM should negotiate how to send
events. It can be one of the following values:
•
1 = On. Attempt to negotiate how to send events.
•
2 = Off. Do not attempt to negotiate how to send events.
(Optional) Event negotiation policy. It can be one of the following values:
•
1 = None. Call agent driven.
•
2 = Proprietary (Default). Call agent driven and VISM proprietary events.
•
3 = All. Call agent driven and all event codecs specified by VISM.
(Optional) SID payload type. It can be in the range from 0 to 255. (Default = 13)
Command Modes
VoIP switching/trunking
Usage Guidelines
Follow standard CLI procedures for this command.
Examples
The following example shows that DTMF and CAS bit transportation are enabled and the NSE
redundancy feature is not enabled:
cnfvoiptransparams 1 1 2
Cisco VISM Installation and Configuration Guide
5-232
Release 3.0, Part Number OL-2521-01 Rev. D0, June 2004
Chapter 5
CLI Commands
cnfvoiptransparams
Related Commands
Command
Description
cnfvoiptimerparam
Configures the holdover time for VAD before silence compression is activated.
dspvoipparams
Displays the VoIP switching/trunking operating mode parameters.
Cisco VISM Installation and Configuration Guide
Release 3.0, Part Number OL-2521-01 Rev. D0, June 2004
5-233
Chapter 5
CLI Commands
cnfxgcpbt
cnfxgcpbt
To configure a default bearer type—if one is not specified by the call agent by the xGCP local connection
options—for the current VISM card, use the cnfxgcpbt command in the VoIP switching/trunking,
switched AAL2 PVC, and AAL2 trunking operating modes.
cnfxgcpbt network-type vc-type aal-conn-type
Syntax Description
network-type
vc-type
aal-conn-type
Network type. It can be one of the following values:
•
1 = IP
•
2 = ATM
Virtual circuit type. It can be one of the following values:
•
1 = Permanent virtual circuit (PVC)
•
2 = Switched virtual circuit (SVC)
Connection type. It can be one of the following values:
•
1 = ATM Adaptation Layer Type 1 (AAL1)
•
2 = ATM Adaptation Layer Type 2 (AAL2)
•
3 = Not applicable
Note
You must select 3 (not applicable) if you selected a network-type
argument value of 1 (IP).
Command Modes
VoIP switching/trunking, switched AAL2 PVC, and AAL2 trunking
Usage Guidelines
If the default bearer types (network, VC, or connection) are specified as part of the local connection
options, those types take precedence over the types specified in this command.
Examples
The following example shows that the current VISM card is configured for the IP network type and for
PVC:
cnfxgcpbt 1 1 3
Related Commands
Command
Description
dspxgcpbt
Displays the default network, VC, and connection types configured for the
current VISM card.
Cisco VISM Installation and Configuration Guide
5-234
Release 3.0, Part Number OL-2521-01 Rev. D0, June 2004
Chapter 5
CLI Commands
cnfxgcpinteropsdpost
cnfxgcpinteropsdpost
To enable or disable the Session Descriptor Protocol (SDP) OST interoperability in the call control protocol,
use the cnfxgcpinteropsdpost command in the VoIP switching/trunking operating mode.
cnfxgcpinteropsdpost sdp-ost-enable
Syntax Description
sdp-ost-enable
Enables or disables SDP OST interoperability. It can be one of the following
values:
•
1 = On (default)
•
2 = Off
Command Modes
VoIP switching/trunking
Usage Guidelines
When a CRCX or MDCX command is received from the call agent, VISM can respond by building SDP
OST (O =, S =, and T = lines).
If a peer gateway does not support SDP OST, this command can be used to prevent VISM from building
SDP OST lines.
Examples
The following example shows that SDP OST interoperability is disabled:
cnfxgcpinteropsdpost 2
Related Commands
Command
Description
dspxgcpinterops
Displays the SDP OST interoperability feature configuration.
Cisco VISM Installation and Configuration Guide
Release 3.0, Part Number OL-2521-01 Rev. D0, June 2004
5-235
Chapter 5
CLI Commands
cnfxgcpmwd
cnfxgcpmwd
To configure the maximum waiting delay (MWD) value used for sending a Restart in Progress (RSIP)
message to the call agent, use the cnfxgcpmwd command in the VoIP switching/trunking operating
mode.
cnfxgcpmwd max-wait-delay
Syntax Description
max-wait-delay
Command Modes
VoIP switching/trunking
Usage Guidelines
Use this command to limit the number of RSIP messages sent to the call agent when an MGX 8000 Series
platform configured with multiple VISM cards is started or reset. Each VISM card waits a random
amount of time (up to a maximum specified by this command) before sending an RSIP message.
Examples
The following example shows that the maximum waiting delay time to send RSIP messages to the call
agent is 300 ms:
Maximum wait delay time (defined in milliseconds) to send an RSIP message to
the call agent. It can be in the range from 0 to 600000. (Default = 10000)
cnfxgcpmwd 300
Related Commands
Command
Description
dspxgcpcnf
Displays previously configured SGCP/MGCP timeout and retry count values.
Cisco VISM Installation and Configuration Guide
5-236
Release 3.0, Part Number OL-2521-01 Rev. D0, June 2004
Chapter 5
CLI Commands
cnfxgcppeer
cnfxgcppeer
To configure the User Datagram Protocol (UDP) port number used to send gateway-initiated messages
to the call agent, use the cnfxgcppeer command in the VoIP switching/trunking and switched AAL2
PVC operating modes.
cnfxgcppeer mgc-num protocol-num remote-udp-pnum
Syntax Description
mgc-num
A number by which the call agent is identified in the range from 1 to 8.
protocol-num
Protocol number. It can be one of the following values:
remote-udp-pnum
•
1 = MGCP 0.1
•
2 = SGCP 1.1+
•
4 = SGCP 1.5
•
5 = MGCP 1.0
UDP port number. In the range from 1025 to 65535. (Default = 2427)
Command Modes
VoIP switching/trunking and switched AAL2 PVC
Usage Guidelines
Follow standard CLI procedures for this command.
Examples
The following example shows that call agent 1 is configured with protocol number 3 and remote UDP
port number 1168:
cnfxgcppeer 1 3 1168
Related Commands
Command
Description
cnfdisctimers
Specifies the wait delay times for the disconnected procedure, restart in
progress command—initial, minimum, and maximum timer values.
cnfmgcgrpprotocol
Configures call agent group protocol data.
dspdisctimers
Displays the Restart in Progress command disconnect type method wait delay
times.
dspxgcppeers
Displays all UDP peer ports used by SGCP and MGCP.
Cisco VISM Installation and Configuration Guide
Release 3.0, Part Number OL-2521-01 Rev. D0, June 2004
5-237
Chapter 5
CLI Commands
cnfxgcpretry
cnfxgcpretry
To configure VISM minimum and maximum request timeouts and retransmission attempts for
communication with the associated call agent, use the cnfxgcpretry command in the VoIP
switching/trunking and switched AAL2 PVC operating modes.
cnfxgcpretry min-vtoca-tout vtoca-retrans-num |max-vtoca-tout|
Syntax Description
min-vtoca-tout
Minimum time (defined in milliseconds) VISM waits for an acknowledgment
message from the call agent. It can be in the range from 1 to 100000.
(Default = 500)
vtoca-retrans-num
Number of times that a call agent retransmits an unacknowledged message
before determining that VISM is unreachable. (Default = 3)
max-vtoca-tout
(Optional) Maximum time (defined in milliseconds) VISM waits for an
acknowledgment message from the call agent. It can be in the range from 0 to
100000.
Command Modes
VoIP switching/trunking and switched AAL2 PVC
Usage Guidelines
If you indicate a value for the optional max-vtoca-tout argument, VISM exponentially increases the
timeout value between the minimum and maximum timeouts. If a maximum value is not specified, the
max-vtoca-tout value is set equal to the min-vtoca-tout value, which disables the exponential backoff.
Examples
The following example shows that VISM will wait a minimum time of 1000 ms and a maximum time of
2000 ms for an acknowledgment message from the call agent, and three call agent retransmission
attempts will occur before VISM is determined to be unreachable:
cnfxgcpretry 1000 3 2000
Related Commands
Command
Description
dspxgcpcnf
Displays previously configured SGCP and MGCP timeout and retransmission
attempt values.
dspxgcpretry
Displays the current xGCP retransmission attempt, minimum timeout, and
maximum timeout values.
Cisco VISM Installation and Configuration Guide
5-238
Release 3.0, Part Number OL-2521-01 Rev. D0, June 2004
Chapter 5
CLI Commands
delannalldynamic
delannalldynamic
To delete all announcement files and their associated codec types from the temporary announcement files
currently saved in the VISM card, use the delannalldynamic command in the VoIP switching operating
mode.
delannalldynamic
Syntax Description
This command has no arguments or keywords.
Command Modes
VoIP switching
Usage Guidelines
This command does not report an error if no announcement files are found.
Examples
The following example shows that all announcement files and their associated codec types are deleted
from the temporary announcement files currently saved in the VISM card:
delannalldynamic
Related Commands
Command
Description
addannpermanent
Configures an announcement server file and associated codec type as
permanent.
cnfannagetime
Configures the time that a nonpermanent announcement is to remain valid after
it is placed into the VISM announcement cache.
cnfanndn
Designates an announcement file server domain name.
cnfannpathprefix
Designates the main prefix directory TFTP path from which to retrieve
announcement files from the announcement file server.
cnfannprefcodec
Configures the codec type used for announcements played on unconnected
TDM endpoints.
cnfannreqtimeout
Configures the expiration time for announcements to begin playing after the
VISM receives the announcement signal (request) from the call agent.
delanndynamic
Deletes an announcement file and associated codec type from the temporary
announcement files currently saved in the VISM card.
delannpermanent
Deletes a permanent announcement file and its associated codec type from the
announcement file server.
dspannagetime
Displays the time that a nonpermanent announcement is to remain valid after
it is placed into the VISM announcement cache.
dspanncache
Displays all available temporary announcement file names, and associated age
times before being refreshed from the announcement file server.
dspanncontrols
Displays a summary list of all provisionable announcement file variables,
including variables associated with all announcement file CLI commands.
dspanndn
Displays the announcement file server domain name.
Cisco VISM Installation and Configuration Guide
Release 3.0, Part Number OL-2521-01 Rev. D0, June 2004
5-239
Chapter 5
CLI Commands
delannalldynamic
Command
Description
dspannpathprefix
Displays the main prefix directory path from which VISM retrieves
announcement files from the announcement file server.
dspannpermanents
Displays all available permanent announcement files with their associated
codec types and identifying index numbers.
dspannprefcodec
Displays the codec type used for announcements played on unconnected TDM
endpoints.
dspannreqtimeout
Displays the expiration time for announcements to begin playing before being
aborted.
Cisco VISM Installation and Configuration Guide
5-240
Release 3.0, Part Number OL-2521-01 Rev. D0, June 2004
Chapter 5
CLI Commands
delanndynamic
delanndynamic
To delete an announcement file and associated codec type from the temporary announcement files
currently saved in the VISM card, use the delanndynamic command in the VoIP switching operating
mode.
delanndynamic ann-filename codec-type
Syntax Description
ann-filename
Announcement file filename. It can be from 1 to 64 alphanumeric characters,
including the following symbols—period (.), forward slash (/), underscore (_),
and hyphen (-).
codec-type
The type of coding/decoding to be performed on the data stream. It can be one of
the following values:
•
1 = G.711u
•
2 = G.711a
•
3 = G.726-32k
•
4 = G.729a
•
5 = G.729ab
•
7 = G.726-16k
•
8 = G.726-24k
•
9 = G.726-40k
•
11 = G.723-H
•
12 = G.723a-H
•
13 = G.723.1-L
•
14 = G.723.1a-L
Command Modes
VoIP switching
Usage Guidelines
This command does not report an error if the requested file identified by the ann-filename argument is
not found.
The G.723.1 codecs are supported for VISM-PR cards and are not supported for VISM cards.
Examples
The following example shows that the femalezero1 announcement file and its associated codec type of
G.726-40k is deleted from the temporary announcement files currently saved in the VISM card:
delanndynamic femalezero1 9
Cisco VISM Installation and Configuration Guide
Release 3.0, Part Number OL-2521-01 Rev. D0, June 2004
5-241
Chapter 5
CLI Commands
delanndynamic
Related Commands
Command
Description
addannpermanent
Configures an announcement server file and associated codec type as
permanent.
cnfannagetime
Configures the time that a nonpermanent announcement is to remain valid after
it is placed into the VISM announcement cache.
cnfanndn
Designates an announcement file server domain name.
cnfannpathprefix
Designates the main prefix directory TFTP path from which to retrieve
announcement files from the announcement file server.
cnfannprefcodec
Configures the codec type used for announcements played on unconnected
TDM endpoints.
cnfannreqtimeout
Configures the expiration time for announcements to begin playing after the
VISM receives the announcement signal (request) from the call agent.
delannalldynamic
Deletes all announcement files and their associated codec types from the
temporary announcement files currently saved in the VISM card.
delannpermanent
Deletes a permanent announcement file and its associated codec type from the
announcement file server.
dspannagetime
Displays the time that a nonpermanent announcement is to remain valid after
it is placed into the VISM announcement cache.
dspanncache
Displays all available temporary announcement file names, and associated age
times before being refreshed from the announcement file server.
dspanncontrols
Displays a summary list of all provisionable announcement file variables,
including variables associated with all announcement file CLI commands.
dspanndn
Displays the announcement file server domain name.
dspannpathprefix
Displays the main prefix directory path from which VISM retrieves
announcement files from the announcement file server.
dspannpermanents
Displays all available permanent announcement files with their associated
codec types and identifying index numbers.
dspannprefcodec
Displays the codec type used for announcements played on unconnected TDM
endpoints.
dspannreqtimeout
Displays the expiration time for announcements to begin playing before being
aborted.
Cisco VISM Installation and Configuration Guide
5-242
Release 3.0, Part Number OL-2521-01 Rev. D0, June 2004
Chapter 5
CLI Commands
delannpermanent
delannpermanent
To delete a permanent announcement file and its associated codec type from the announcement file
server, use the delannpermanent command in the VoIP switching operating mode.
delannpermanent pann-index
Syntax Description
pann-index
Command Modes
VoIP switching
Usage Guidelines
Use the dspannpermanents command to display a list of available permanent announcement server file
names.
Examples
The following example shows that the permanent announcement server file and its associated codec type
identified by the announcement server file identification index number 19 is deleted from the
announcement file server:
Permanent announcement server file identification index number. It can be in
the range from 1 to 125.
delannpermanent 19
Related Commands
Command
Description
addannpermanent
Configures an announcement server file and associated codec type as
permanent.
cnfannagetime
Configures the time that a nonpermanent announcement is to remain valid after
it is placed into the VISM announcement cache.
cnfanndn
Designates an announcement file server domain name.
cnfannpathprefix
Designates the main prefix directory TFTP path from which to retrieve
announcement files from the announcement file server.
cnfannprefcodec
Configures the codec type used for announcements played on unconnected
TDM endpoints.
cnfannreqtimeout
Configures the expiration time for announcements to begin playing after the
VISM receives the announcement signal (request) from the call agent.
delannalldynamic
Deletes all announcement files and their associated codec types from the
temporary announcement files currently saved in the VISM card.
delanndynamic
Deletes an announcement file and associated codec type from the temporary
announcement files currently saved in the VISM card.
dspannagetime
Displays the time that a nonpermanent announcement is to remain valid after it
is placed into the VISM announcement cache.
dspanncache
Displays all available temporary announcement file names, and associated age
times before being refreshed from the announcement file server.
Cisco VISM Installation and Configuration Guide
Release 3.0, Part Number OL-2521-01 Rev. D0, June 2004
5-243
Chapter 5
CLI Commands
delannpermanent
Command
Description
dspanncontrols
Displays a summary list of all provisionable announcement file variables,
including variables associated with all announcement file CLI commands.
dspanndn
Displays the announcement file server domain name.
dspannpathprefix
Displays the main prefix directory path from which VISM retrieves
announcement files from the announcement file server.
dspannpermanents
Displays all available permanent announcement files with their associated
codec types and identifying index numbers.
dspannprefcodec
Displays the codec type used for announcements played on unconnected TDM
endpoints.
Cisco VISM Installation and Configuration Guide
5-244
Release 3.0, Part Number OL-2521-01 Rev. D0, June 2004
Chapter 5
CLI Commands
delcasvar
delcasvar
To delete a channel associated signaling (CAS) variant, use the delcasvar command in the VoIP
switching/trunking operating mode.
delcasvar var-name
Syntax Description
var-name
Command Modes
VoIP switching/trunking
Usage Guidelines
Follow standard CLI procedures for this command.
Examples
The following example shows that the CAS variant identified by the name var1 is deleted:
Name of the CAS variant you want to delete; a text string of 1 to 64 alphanumeric
characters.
delcasvar var1
Related Commands
Command
Description
addcasvar
Adds a CAS variant to a VISM card.
cnfcasvar
Configures the CAS variant timing parameters.
dspcasvar
Displays information about CAS variants for a given variant name.
Cisco VISM Installation and Configuration Guide
Release 3.0, Part Number OL-2521-01 Rev. D0, June 2004
5-245
Chapter 5
CLI Commands
delccs
delccs
To delete the association between a common channel signaling (CCS) DS0 channel and the
corresponding virtual channel, use the delccs command in the AAL2 trunking operating mode.
delccs line-num ds0-num
Syntax Description
line-num
Line number of the channel, in the range from 1 to 8.
ds0-num
DS0 number of the channel. It can be a value from one of the following ranges:
•
1 to 24 for T1 lines
•
1 to 31 for E1 lines
Command Modes
AAL2 trunking
Usage Guidelines
The original association is configured with the addccs command.
Examples
The following example shows that the CCS channel on line 2, DS0 12 is deleted:
delccs 2 12
Related Commands
There are no related commands.
Cisco VISM Installation and Configuration Guide
5-246
Release 3.0, Part Number OL-2521-01 Rev. D0, June 2004
Chapter 5
CLI Commands
delcid
delcid
To delete the association between an endpoint and an LCN/CID pair, use the delcid command in the
AAL2 trunking operating mode.
delcid lcn cid-num
Syntax Description
lcn
The logical channel number of the LCN/CID pair in the range from 131 to 510.
cid-num
The channel identification number of the LCN/CID pair in the range from 8 to 255.
Command Modes
AAL2 trunking
Usage Guidelines
Follow standard CLI procedures for this command.
Examples
The following example shows that the endpoint association for LCN 140 and CID 12 is deleted:
delcid 140 12
Related Commands
Command
Description
addcid
Adds an AAL2 CID on a VISM card.
dspcid
Displays the data of an AAL2 CID on a VISM card.
dsplncids
Displays the CID, endpoint, and AAL2 data for a specified line.
Cisco VISM Installation and Configuration Guide
Release 3.0, Part Number OL-2521-01 Rev. D0, June 2004
5-247
Chapter 5
CLI Commands
delcon
delcon
To delete a PVC between a VISM card and an MGX 8000 Series shelf PXM card, use the delcon
command in the VoIP switching/trunking, switched AAL2 PVC, and AAL2 trunking operating modes.
delcon lcn
Syntax Description
lcn
Command Modes
VoIP switching/trunking, switched AAL2 PVC, and AAL2 trunking
Usage Guidelines
You cannot delete a connection if it is protected or if CIDs are present.
Examples
The following example shows that the PVC connection for LCN 140 is deleted:
Logical channel number of the PVC to be deleted, in the range from 131 to 510.
delcon 140
Related Commands
Command
Description
addcon
Adds a PVC connection between a VISM card and any SM or PXM card.
Cisco VISM Installation and Configuration Guide
5-248
Release 3.0, Part Number OL-2521-01 Rev. D0, June 2004
Chapter 5
CLI Commands
delconloop
delconloop
To delete a local loopback state on a connection to the cellbus, use the delconloop command in the VoIP
switching/trunking, switched AAL2 PVC, and AAL2 trunking operating modes.
delconloop lcn
Syntax Description
lcn
Command Modes
VoIP switching/trunking, switched AAL2 PVC, and AAL2 trunking
Usage Guidelines
Follow standard CLI procedures for this command.
Examples
The following example shows that the local loopback state is deleted from LCN 140:
Logical channel number of the connection from which you want to delete the local
loopback state, in the range from 131 to 510.
delconloop 140
Related Commands
Command
Description
addconloop
Sets a cellbus connection to the local loopback state.
Cisco VISM Installation and Configuration Guide
Release 3.0, Part Number OL-2521-01 Rev. D0, June 2004
5-249
Chapter 5
CLI Commands
deldn
deldn
To delete a domain name, use the deldn command in the VoIP switching/trunking and switched AAL2
PVC operating modes.
deldn domain-name-num
Syntax Description
domain-name-num
Command Modes
VoIP switching/trunking and switched AAL2 PVC
Usage Guidelines
If the domain name you want to delete is the last entry in the domain table and if the domain name exists
in the list of call agents that VISM maintains (as displayed by the dspmgcs command), deletion is not
allowed.
Domain name number. It can be in the range from 1 to 11.
You must manually delete all statistically provisioned IP addresses for the domain name before you can
delete the domain name.
You should not delete a domain name if it is used as one of the following:
Examples
•
Media Gateway Controller (MGC)
•
Trivial File Transfer Protocol (TFTP) server
•
Domain name server (DNS)
•
Announcement server
The following example shows that the domain name represented by domain name number 12 is deleted:
deldn 12
Related Commands
Command
Description
adddn
Adds a domain name (call agent name) and optionally configures the
resolution type of the domain name.
adddnip
Adds the IP addresses for a domain name that you added by using the adddn
command.
cnfdn
Configures the resolution type of a specified domain name.
cnfdnssrvr
Designates a domain name as a DNS.
deldnip
Deletes a statistically provisioned IP address of a domain name.
dspdnallips
Displays all statistically provisioned IP addresses and externally resolved IP
addresses for all domain names configured on the current VISM card.
dspdnips
Displays all statistically provisioned and externally resolved IP addresses
configured for a specified domain name.
dspdns
Displays the configuration data of all domain names of a call agent.
dspdnssrvr
Displays the domain name of the configured DNS of the current VISM card.
Cisco VISM Installation and Configuration Guide
5-250
Release 3.0, Part Number OL-2521-01 Rev. D0, June 2004
Chapter 5
CLI Commands
deldnip
deldnip
To delete a statistically provisioned IP address of a domain name, use the deldnip command in the VoIP
switching/trunking, switched AAL2 PVC, and AAL2 trunking operating modes.
deldnip resol-num
Syntax Description
resol-num
Command Modes
VoIP switching/trunking, switched AAL2 PVC, and AAL2 trunking
Usage Guidelines
You cannot delete IP addresses that use external resolution of the domain name. You should not delete
the last IP address of a given domain name if it is used as one of the following:
Examples
Resolution number of the domain name. It can be in the range from 1 to 88.
•
Media Gateway Controller (MGC)
•
Trivial File Transfer Protocol (TFTP) server
•
Domain name server (DNS)
•
Announcement server
The following example shows that the IP address associated with the resolution number 46 is deleted
from a domain name:
deldnip 46
Related Commands
Command
Description
adddn
Adds a domain name (call agent name) and optionally configures the resolution type
of the domain name.
adddnip
Adds the IP addresses for a domain name that you added by using the adddn
command.
cnfdn
Configures the resolution type of a specified domain name.
cnfdnssrvr
Designates a domain name as a DNS.
deldn
Deletes a domain name.
dspdnallips
Displays all statistically provisioned IP addresses and externally resolved IP
addresses for all domain names configured on the current VISM card.
dspdnips
Displays all statistically provisioned and externally resolved IP addresses configured
for a specified domain name.
dspdns
Displays the configuration data of all domain names of a call agent.
dspdnssrvr
Displays the domain name of the configured DNS of the current VISM card.
Cisco VISM Installation and Configuration Guide
Release 3.0, Part Number OL-2521-01 Rev. D0, June 2004
5-251
Chapter 5
CLI Commands
delendpt
delendpt
To delete a specified endpoint on a VISM card line, use the delendpt command in the VoIP
switching/trunking, switched AAL2 PVC, and AAL2 trunking operating modes.
delendpt endpt-num
Syntax Description
endpt-num
Endpoint number. It can be a value from one of the following ranges:
•
For template number 1:
– For VISM, from 1 to 145
– For VISM-PR T1, from 1 to 192
– For VISM-PR E1, from 1 to 248
•
For template number 2:
– For VISM T1, from 1 to 192
– For VISM E1, from 1 to 248
•
For template number 3:
– For VISM, from 1 to 120
– For VISM-PR T1, from 1 to 192
– For VISM-PR E1, from 1 to 248
•
For template number 4:
– For VISM-PR, from 1 to 144
Command Modes
VoIP switching/trunking, switched AAL2 PVC, and AAL2 trunking
Usage Guidelines
An endpoint cannot be deleted if CIDs are present.
This command results in a graceful transition to out of service and an RSIP to be sent to each associated
call agent indicating the endpoint out-of-service state.
Examples
The following example shows that endpoint number 120 is deleted:
delendpt 120
Related Commands
Command
Description
addendpt
Adds an endpoint on a VISM card.
dspendpt
Displays data about a specified endpoint on a VISM card.
dspendpts
Displays information about all endpoints on a VISM card.
Cisco VISM Installation and Configuration Guide
5-252
Release 3.0, Part Number OL-2521-01 Rev. D0, June 2004
Chapter 5
CLI Commands
delendptloop
delendptloop
To take an endpoint out of the loopback condition, use the delendptloop command in the VoIP
switching/trunking, switched AAL2 PVC, and AAL2 trunking operating modes.
delendptloop endpt-num
Syntax Description
endpt-num
Endpoint number which is to be deleted. It can be a value from one of the following
ranges:
•
For template number 1:
– For VISM, from 1 to 145
– For VISM-PR T1, from 1 to 192
– For VISM-PR E1, from 1 to 248
•
For template number 2:
– For VISM T1, from 1 to 192
– For VISM E1, from 1 to 248
•
For template number 3:
– For VISM, from 1 to 120
– For VISM-PR T1, from 1 to 192
– For VISM-PR E1, from 1 to 248
•
For template number 4:
– For VISM-PR, from 1 to 144
Command Modes
VoIP switching/trunking, switched AAL2 PVC, and AAL2 trunking
Usage Guidelines
Follow standard CLI procedures for this command.
Examples
The following example shows that the loopback state is deleted from endpoint number 120:
delendptloop 120
Related Commands
Command
Description
addendptloop
Places an endpoint in the loopback condition in the TDM direction.
Cisco VISM Installation and Configuration Guide
Release 3.0, Part Number OL-2521-01 Rev. D0, June 2004
5-253
Chapter 5
CLI Commands
delendpts
delendpts
To delete a range of consecutive endpoints on a VISM card, use the delendpts command in the VoIP
switching/trunking, switched AAL2 PVC, and AAL2 trunking operating modes.
delendpts start-endpt endpt-quantity
Syntax Description
start-endpt
Beginning endpoint number of a range of consecutive endpoints. It can be a value
from one of the following ranges:
•
For template number 1:
– For VISM, from 1 to 145
– For VISM-PR T1, from 1 to 192
– For VISM-PR E1, from 1 to 248
•
For template number 2:
– For VISM T1, from 1 to 192
– For VISM E1, from 1 to 248
•
For template number 3:
– For VISM, from 1 to 120
– For VISM-PR T1, from 1 to 192
– For VISM-PR E1, from 1 to 248
•
For template number 4:
– For VISM-PR, from 1 to 144
endpt-quantity
The quantity of endpoints deleted. It can be a value from one of the following
ranges:
•
For template number 1:
– For VISM, from 1 to 145
– For VISM-PR T1, from 1 to 192
– For VISM-PR E1, from 1 to 248
•
For template number 2:
– For VISM T1, from 1 to 192
– For VISM E1, from 1 to 248
•
For template number 3:
– For VISM, from 1 to 120
– For VISM-PR T1, from 1 to 192
– For VISM-PR E1, from 1 to 248
•
For template number 4:
– For VISM-PR, from 1 to 144
Cisco VISM Installation and Configuration Guide
5-254
Release 3.0, Part Number OL-2521-01 Rev. D0, June 2004
Chapter 5
CLI Commands
delendpts
Command Modes
VoIP switching/trunking, switched AAL2 PVC, and AAL2 trunking
Usage Guidelines
This command results in a graceful transition to the out-of-service state for each deleted endpoint and
an RSIP to be sent to each associated call agent indicating the out-of-service state of the endpoints.
If the specified range of endpoints to be deleted contains gaps, the gaps are not counted. For example, if
the current endpoints are 3, 4, 7, 8, 9 10, 11,12 and the command specifies a start at 4 and a number of
5, the endpoints deleted are 4, 7, 8, 9, and 10.
Examples
The following example shows that 10 endpoints are deleted, starting with endpoint number 120:
delendpts 120 10
Related Commands
Command
Description
addendpt
Adds an endpoint on a VISM card.
dspendpt
Displays data about a specified endpoint on a VISM card.
dspendpts
Displays data about all endpoints on a VISM card.
Cisco VISM Installation and Configuration Guide
Release 3.0, Part Number OL-2521-01 Rev. D0, June 2004
5-255
Chapter 5
CLI Commands
dellapd
dellapd
To delete an Link Access Protocol D channel (LAPD), use the dellapd command in the VoIP
switching/trunking operating mode.
dellapd line-num ds0-num
Syntax Description
line-num
Line number of the channel from which to delete an LAPD, in the range from 1 to 8.
ds0-num
DS0 number of the channel from which to delete an LAPD. It can be a value from one
of the following ranges:
•
1 to 24 for T1 lines
•
1 to 31 for E1 lines
Command Modes
VoIP switching/trunking
Usage Guidelines
Follow standard CLI procedures for this command.
Examples
The following example shows that the D channel for line number 2, DS0 number 14 is deleted:
dellapd 2 14
Related Commands
Command
Description
addlapd
Adds an LAPD from a specified DS0 to a VISM card.
dsplapd
Displays data about an LAPD.
dsplapds
Displays data about all LAPDs.
Cisco VISM Installation and Configuration Guide
5-256
Release 3.0, Part Number OL-2521-01 Rev. D0, June 2004
Chapter 5
CLI Commands
dellapdtrunk
dellapdtrunk
To delete a Link Access Protocol D channel (LAPD) configured line, use the dellapdtrunk command in
the VoIP switching/trunking operating mode.
dellapdtrunk line-num
Syntax Description
line-num
Command Modes
VoIP switching/trunking
Usage Guidelines
You must use the dellapd command to delete the corresponding LAPD channel before you can delete
the LAPD trunk.
Examples
The following example shows that the LAPD configured line, line number 7, is deleted:
Line number to delete. In the range from 1 to 8.
dellapdtrunk 7
Related Commands
Command
Description
addlapdtrunk
Adds an LAPD trunk to a specific VISM card line.
addrtpcon
Adds a static RTP VoIP trunking connection.
addrudptrunk
Adds an ISDN PRI backhaul RUDP session for an LAPD trunk connection.
clrrtpcnt
Clears the RTP counters (statistics) for a specific static RTP connection.
cnflapdtrunkpvc
Assigns the PVC trunk type that carries LAPD messages for the current VISM
card.
cnflntrunkcond
Enables or disables line conditioning on a VISM card line if a network alarm is
encountered.
cnfrtpcon
Modifies an existing static RTP VoIP trunking connection.
cnfrudptrunkrmtip Modifies the remote IP address of VISM used in the ISDN PRI backhaul RUDP
trunk for a specified session.
delrtpcon
Deletes a static RTP VoIP trunking connection.
delrudptrunk
Deletes an ISDN PRI backhaul RUDP session that is associated with an LAPD.
dsplapd
Displays data about an LAPD.
dsplapdtrunkpvc
Displays the assigned PVC trunk type that carries LAPD trunk messages for the
current VISM card.
dsplapdtrunks
Displays the configuration data of all LAPD trunks.
dsprtpcnt
Displays the bearer counters (statistics) for a specific RTP VoIP trunking
connection.
dsprtpcon
Displays the configuration data of a specific static RTP VoIP trunking
connection.
dsprtpcons
Displays the configuration data of all static RTP VoIP trunking connections.
Cisco VISM Installation and Configuration Guide
Release 3.0, Part Number OL-2521-01 Rev. D0, June 2004
5-257
Chapter 5
CLI Commands
dellapdtrunk
Command
Description
dsprudptrunk
Displays the configuration data of a specified ISDN PRI backhaul RUDP
session.
dsprudptrunks
Displays the configuration data of all ISDN PRI backhaul RUDP sessions.
Cisco VISM Installation and Configuration Guide
5-258
Release 3.0, Part Number OL-2521-01 Rev. D0, June 2004
Chapter 5
CLI Commands
delln
delln
To delete a DS1 line on a VISM card, use the delln command in the VoIP switching/trunking, switched
AAL2 PVC, and AAL2 trunking operating modes.
delln ds1-num
Syntax Description
ds1-num
Command Modes
VoIP switching/trunking, switched AAL2 PVC, and AAL2 trunking
Usage Guidelines
You must delete endpoints and CCS channels from the line before the line can be deleted.
Examples
The following example shows that line number 4 is deleted:
Physical line number in the range from 1 to 8.
delln 4
Related Commands
Command
Description
addln
Adds a T1 or E1 line to a VISM card.
cnfln
Configures characteristics for a VISM card line.
dspln
Displays the characteristics of a specified VISM card line.
dsplns
Displays the characteristics for all lines on a VISM card.
Cisco VISM Installation and Configuration Guide
Release 3.0, Part Number OL-2521-01 Rev. D0, June 2004
5-259
Chapter 5
CLI Commands
dellnloop
dellnloop
To delete the T1 or E1 local line loopback state for a VISM card, use the dellnloop command in the VoIP
switching/trunking, switched AAL2 PVC, and AAL2 trunking operating modes.
dellnloop ds1-num
Syntax Description
ds1-num
Command Modes
VoIP switching/trunking, switched AAL2 PVC, and AAL2 trunking
Usage Guidelines
Follow standard CLI procedures for this command.
Examples
The following example shows that the local loopback for line 6 is deleted:
DS1 line number on the VISM card for which the local loop is to be deleted, in the
range from 1 to 8.
dellnloop 6
Related Commands
Command
Description
dspln
Displays the data configured on a specified line.
Cisco VISM Installation and Configuration Guide
5-260
Release 3.0, Part Number OL-2521-01 Rev. D0, June 2004
Chapter 5
CLI Commands
dellntoneplan
dellntoneplan
To delete a built-in or provisional tone plan configuration from a specified VISM card line, use the
dellntoneplan command in the VoIP switching/trunking and switched AAL2 PVC operating modes.
dellntoneplan line-num
Syntax Description
line-num
Command Modes
VoIP switching/trunking and switched AAL2 PVC
Usage Guidelines
Follow standard CLI procedures for this command.
Examples
The following example shows that the tone plan configuration for line number 5 is deleted:
Line number of the channel for which you want to delete the configured tone
plan. It can be in the range from 1 to 8.
dellntoneplan 5
Related Commands
Command
Description
addtoneplan
Adds a tone plan to the current VISM card.
cnflnringback
Configures the ringback tone method for a specified line on the current VISM
card.
cnflntoneplan
Assigns a tone plan to a specified VISM card line.
cnflntonetimeout
Modifies the timeout periods of all call progress tones supported by VISM on
a specified VISM card line.
deltoneplan
Deletes a previously added tone plan from the current VISM card.
dsplnringback
Displays the ringback tone method for a specified line on the current VISM
card.
dsplntoneplan
Displays the tone plan configuration of a specified VISM card line.
dsplntonetimeout
Displays the configured timeout periods for all call progress tones of a
specified VISM card line.
dsptonebuiltinplans Displays all preconfigured (built-in) tone plans on the current VISM card.
dsptoneplan
Displays the tone configuration of a specified tone plan—either a
preconfigured (built-in) or user-added tone plan.
dsptoneplans
Displays the tone configuration of all tone plans—either preconfigured
(built-in) or user-added tone plans.
dsptoneprovplans
Displays all user-added (provisional) tone plans.
dsptoneregionplans Displays a list of all tone plans for the countries and regions whose name
partially or completely matches the name you supply.
Cisco VISM Installation and Configuration Guide
Release 3.0, Part Number OL-2521-01 Rev. D0, June 2004
5-261
Chapter 5
CLI Commands
delmgc
delmgc
To delete a call agent from a VISM card’s list of configured call agents, use the delmgc command in the
VoIP switching/trunking and switched AAL2 PVC operating modes.
delmgc mgc-num
Syntax Description
mgc-num
Command Modes
VoIP switching/trunking and switched AAL2 PVC
Usage Guidelines
Follow standard CLI procedures for this command.
Examples
The following example shows that the call agent identified by the number 3 is deleted:
A number by which the call agent is identified, as displayed by the dspmgcs
command, in the range from 1 to 8.
delmgc 3
Related Commands
Command
Description
cnfmgcgrpparam
Modifies a call agent redundancy group state change notification policy and
priority level.
dspmgcs
Displays configuration data on all configured call agents.
Cisco VISM Installation and Configuration Guide
5-262
Release 3.0, Part Number OL-2521-01 Rev. D0, June 2004
Chapter 5
CLI Commands
delmgcgrpentry
delmgcgrpentry
To delete a call agent from a call agent redundancy group, use the delmgcgrpentry command in the VoIP
switching/trunking and switched AAL2 PVC operating modes.
delmgcgrpentry mgc-group mgc-num
Syntax Description
mgc-group
Call agent redundancy group number. It can be in the range from 1 to 8.
mgc-num
Call agent identification number. It can be in the range from 1 to 8.
Command Modes
VoIP switching/trunking and switched AAL2 PVC
Usage Guidelines
The last call agent within a call agent redundancy group cannot be deleted if there are protocols
associated with the call agent redundancy group.
A call agent redundancy group is deleted when the last call agent has been deleted from a group.
Use the dspmgcgrpparams CLI to verify your configuration.
Examples
The following example shows that call agent number 2 is deleted from call agent redundancy group
number 1:
delmgcgrpentry 1 2
Related Commands
Command
Description
addmgcgrpentry
Configures call agents as part of an MGC redundancy group and assigns a
priority value for a call agent.
addmgcgrpprotocol
Associates a call agent redundancy group to a gateway control protocol.
cnfmgcgrpparam
Modifies a call agent redundancy group state change notification policy
and priority level.
cnfmgcgrpentry
Modifies the call agent priority level of a call agent within a call agent
redundancy group.
cnfsrcppeer
Configures the SRCP parameters when SRCP is the selected protocol for
communication between the VISM card and call agent.
cnfsrcppeergrpparam
Modifies the SRCP heartbeat interval and maximum UDP size for a
specified call agent redundancy group.
delmgcgrpprotocol
Deletes an MGCP from a specified call agent redundancy group.
dspmgcgrpparams
Displays all configured call agent redundancy group parameters.
dspmgcgrpprotocols
Displays all configured call agent redundancy group protocols.
dspmgcgrps
Displays all configured call agent redundancy groups.
dspsrcppeergrpparams
Displays the SRCP parameters for all call agent redundancy groups that
have SRCP added.
Cisco VISM Installation and Configuration Guide
Release 3.0, Part Number OL-2521-01 Rev. D0, June 2004
5-263
Chapter 5
CLI Commands
delmgcgrpprotocol
delmgcgrpprotocol
To delete a Media Gateway Control Protocol (MGCP) from a specified call agent redundancy group, use
the delmgcgrpprotocol command in the VoIP switching/trunking and switched AAL2 PVC operating
modes.
delmgcgrpprotocol mgc-group protocol-num
Syntax Description
mgc-group
Call agent redundancy group number. It can be in the range from 1 to 8.
protocol-num
Protocol number. It can be one of the following values:
•
1 = MGCP 0.1
•
2 = SGCP 1.1+
•
3 = SRCP 1.0.2
•
4 = SGCP 1.5
•
5 = MGCP 1.0
In the range from 6 to 8, as displayed by the dspmgcgrpprotocols command.
Command Modes
VoIP switching/trunking and switched AAL2 PVC
Usage Guidelines
Follow standard CLI procedures for this command.
Examples
The following example shows that protocol number 2 is deleted from call agent redundancy group
number 3:
delmgcgrpprotocol 3 2
Related Commands
Command
Description
addmgcgrpentry
Configures call agents as part of an MGC redundancy group and assigns a
priority value for a call agent.
addmgcgrpprotocol
Associates a call agent redundancy group to a gateway control protocol.
cnfdisctimers
Specifies the wait delay times for the disconnected procedure, restart in
progress command—initial, minimum, and maximum timer values.
cnfmgcgrpentry
Modifies the call agent priority level of a call agent within a call agent
redundancy group.
cnfmgcgrpparam
Modifies a call agent redundancy group state change notification policy
and priority level.
cnfmgcgrpprotocol
Configures call agent group protocol data.
cnfsrcppeer
Configures the SRCP parameters when SRCP is the selected protocol for
communication between the VISM card and call agent.
Cisco VISM Installation and Configuration Guide
5-264
Release 3.0, Part Number OL-2521-01 Rev. D0, June 2004
Chapter 5
CLI Commands
delmgcgrpprotocol
Command
Description
cnfsrcppeergrpparam
Modifies the SRCP heartbeat interval and maximum UDP size for a
specified call agent redundancy group.
delmgcgrpentry
Deletes a call agent from a call agent redundancy group.
dspdisctimers
Displays the Restart in Progress command disconnect type method wait
delay times.
dspmgcgrpparams
Displays all configured call agent redundancy group parameters.
dspmgcgrpprotocols
Displays all configured call agent redundancy group protocols.
dspmgcgrps
Displays all configured call agent redundancy groups.
dspsrcppeergrpparams
Displays the SRCP parameters for all call agent redundancy groups that
have SRCP added.
Cisco VISM Installation and Configuration Guide
Release 3.0, Part Number OL-2521-01 Rev. D0, June 2004
5-265
Chapter 5
CLI Commands
delport
delport
To delete the VISM port on the packet network side, use the delport command in the VoIP
switching/trunking, switched AAL2 PVC, and AAL2 trunking operating modes.
delport
Syntax Description
This command has no arguments or keywords.
Command Modes
VoIP switching/trunking, switched AAL2 PVC, and AAL2 trunking
Usage Guidelines
You should execute this command before you remove the VISM card.
Caution
If you remove a VISM card with an undeleted port, subsequent cards inserted into the same slot may
not operate correctly. You should delete the resource partition and all PVCs before deleting the port.
When you use this command, the entry with the following port numbers is deleted in the following
manner:
Examples
•
Entry 1 is deleted from a PXM1 card
•
Entry 255 is deleted from a PXM1E card
The following example shows that the VISM port on the packet network side is deleted:
delport
Related Commands
Command
Description
dspport
Displays data about the virtual port that was created using the addport command.
Cisco VISM Installation and Configuration Guide
5-266
Release 3.0, Part Number OL-2521-01 Rev. D0, June 2004
Chapter 5
CLI Commands
delrscprtn
delrscprtn
To delete a resource partition which was created by the addrscprtn command, use the delrscprtn
command in the VoIP switching/trunking, switched AAL2 PVC, and AAL2 trunking operating modes.
delrscprtn
Syntax Description
This command has no arguments or keywords.
Command Modes
VoIP switching/trunking, switched AAL2 PVC, and AAL2 trunking
Usage Guidelines
Follow standard CLI procedures for this command.
Examples
The following example shows that the current resource partition is deleted:
delrscprtn
Related Commands
Command
Description
addrscprtn
Adds a resource partition for a virtual port.
dspsrcppeers
Displays the peer configuration data for all known SRCP peers (call agents).
Cisco VISM Installation and Configuration Guide
Release 3.0, Part Number OL-2521-01 Rev. D0, June 2004
5-267
Chapter 5
CLI Commands
delrtpcon
delrtpcon
To delete a static Real-Time Transport Protocol (RTP) VoIP trunking connection, use the delrtpcon
command in the VoIP switching/trunking operating mode.
delrtpcon conn-num
Syntax Description
conn-num
Command Modes
VoIP switching/trunking
Usage Guidelines
Follow standard CLI procedures for this command.
Examples
The following example shows that the static RTP connection number 200 is deleted:
Connection identification number. It can be in the range from 1 to 248.
delrtpcon 200
Related Commands
Command
Description
addlapdtrunk
Adds an LAPD trunk to a specific VISM card line.
addrtpcon
Adds a static RTP VoIP trunking connection.
addrudptrunk
Adds an ISDN PRI backhaul RUDP session for an LAPD trunk connection.
clrrtpcnt
Clears the RTP counters (statistics) for a specific static RTP connection.
cnflapdtrunkpvc
Assigns the PVC trunk type that carries LAPD messages for the current VISM
card.
cnflntrunkcond
Enables or disables line conditioning on a VISM card line if a network alarm
is encountered.
cnfrtpcon
Modifies an existing static RTP VoIP trunking connection.
cnfrudptrunkrmtip Modifies the remote IP address of VISM used in the ISDN PRI backhaul RUDP
trunk for a specified session.
dellapdtrunk
Deletes an LAPD configured line.
delrudptrunk
Deletes an ISDN PRI backhaul RUDP session that is associated with an LAPD.
dsplapd
Displays data about an LAPD.
dsplapdtrunkpvc
Displays the assigned PVC trunk type that carries LAPD trunk messages for
the current VISM card.
dsplapdtrunks
Displays the configuration data of all LAPD trunks.
dsprtpcnt
Displays the bearer counters (statistics) for a specified RTP VoIP trunking
connection.
dsprtpcon
Displays the configuration data of a specified static RTP VoIP trunking
connection.
dsprtpconnstat
Displays the RTP connection statistics for a specified endpoint.
dsprtpcons
Displays the configuration data of all static RTP VoIP trunking connections.
Cisco VISM Installation and Configuration Guide
5-268
Release 3.0, Part Number OL-2521-01 Rev. D0, June 2004
Chapter 5
CLI Commands
delrtpcon
Command
Description
dsprudptrunk
Displays the configuration data of a specified ISDN PRI backhaul RUDP
session.
dsprudptrunks
Displays the configuration data of all ISDN PRI backhaul RUDP sessions.
Cisco VISM Installation and Configuration Guide
Release 3.0, Part Number OL-2521-01 Rev. D0, June 2004
5-269
Chapter 5
CLI Commands
delrudptrunk
delrudptrunk
To delete an ISDN PRI backhaul Reliable User Datagram Protocol (RUDP) session that is associated
with a Link Access Protocol D channel (LAPD), use the delrudptrunk command in the VoIP
switching/trunking operating mode.
delrudptrunk session-num
Syntax Description
session-num
Command Modes
VoIP switching/trunking
Usage Guidelines
You must use the dellapdtrunk command to delete the LAPD trunk before you delete the RUDP trunk.
Examples
The following example shows that the ISDN PRI backhaul RUDP session number 51, which is
associated with an LAPD, is deleted:
Identifying session number in the range from 1 to 64.
delrudptrunk 51
Related Commands
Command
Description
addlapdtrunk
Adds an LAPD trunk to a specific VISM card line.
addrtpcon
Adds a static RTP VoIP trunking connection.
addrudptrunk
Adds an ISDN PRI backhaul RUDP session for an LAPD trunk connection.
clrrtpcnt
Clears the RTP counters (statistics) for a specific static RTP connection.
cnflapdtrunkpvc
Assigns the PVC trunk type that carries LAPD messages for the current VISM
card.
cnflntrunkcond
Enables or disables line conditioning on a VISM card line if a network alarm
is encountered.
cnfrtpcon
Modifies an existing static RTP VoIP trunking connection.
cnfrudptrunkrmtip Modifies the remote IP address of VISM used in the ISDN PRI backhaul RUDP
trunk for a specified session.
dellapdtrunk
Deletes an LAPD configured line.
delrtpcon
Deletes a static RTP VoIP trunking connection.
dsplapd
Displays data about an LAPD.
dsplapdtrunkpvc
Displays the assigned PVC trunk type that carries LAPD trunk messages for
the current VISM card.
dsplapdtrunks
Displays the configuration data of all LAPD trunks.
dsprtpcnt
Displays the bearer counters (statistics) for a specified RTP VoIP trunking
connection.
dsprtpcon
Displays the configuration data of a specified static RTP VoIP trunking
connection.
Cisco VISM Installation and Configuration Guide
5-270
Release 3.0, Part Number OL-2521-01 Rev. D0, June 2004
Chapter 5
CLI Commands
delrudptrunk
Command
Description
dsprtpcons
Displays the configuration data of all static RTP VoIP trunking connections.
dsprudptrunk
Displays the configuration data of a specified ISDN PRI backhaul RUDP
session.
dsprudptrunks
Displays the configuration data of all ISDN PRI backhaul RUDP sessions.
Cisco VISM Installation and Configuration Guide
Release 3.0, Part Number OL-2521-01 Rev. D0, June 2004
5-271
Chapter 5
CLI Commands
delses
delses
To delete a PRI backhaul session, use the delses command in the VoIP switching/trunking and switched
AAL2 PVC operating mode.
delses session-num
Syntax Description
session-num
Command Modes
VoIP switching/trunking and switched AAL2 PVC
Usage Guidelines
Follow standard CLI procedures for this command.
Examples
The following example shows that session number 3 is deleted:
Identifying session number in the range from 1 to 64.
delses 3
Related Commands
Command
Description
addses
Adds a PRI backhaul session between a VISM card and a call agent.
dspses
Displays data about an individual PRI backhaul session.
dspsess
Displays data about all PRI backhaul sessions.
Cisco VISM Installation and Configuration Guide
5-272
Release 3.0, Part Number OL-2521-01 Rev. D0, June 2004
Chapter 5
CLI Commands
delsesgrp
delsesgrp
To delete a PRI backhaul session group, use the delsesgrp command in the VoIP switching/trunking and
switched AAL2 PVC operating mode.
delsesgrp group-num
Syntax Description
group-num
Command Modes
VoIP switching/trunking and switched AAL2 PVC
Usage Guidelines
You must delete all sessions in the session group before you use this command to delete the session
group.
Examples
The following example shows that session group number 2 is deleted:
Identifying session group number in the range from 1 to 16.
delsesgrp 2
Related Commands
Command
Description
addsesgrp
Adds a PRI backhaul session group between a VISM card and a call agent.
dspsesgrp
Displays data about a PRI backhaul session group.
dspsesgrps
Displays data about all PRI backhaul session groups.
Cisco VISM Installation and Configuration Guide
Release 3.0, Part Number OL-2521-01 Rev. D0, June 2004
5-273
Chapter 5
CLI Commands
delsesset
delsesset
To delete a PRI backhaul session set, use the delsesset command in the VoIP switching/trunking and
switched AAL2 PVC operating mode.
delsesset set-num
Syntax Description
set-num
Identifying session set number. It can be in the range from 1 to 16.
Note
Currently, only session set number 1 is supported.
Command Modes
VoIP switching/trunking and switched AAL2 PVC
Usage Guidelines
You must delete all session groups in the session set before you use this command to delete the session
set.
Examples
The following example shows that session set number 1 is deleted:
delsesset 1
Related Commands
Command
Description
addsesset
Adds a PRI backhaul session set between a VISM card and a call agent.
Cisco VISM Installation and Configuration Guide
5-274
Release 3.0, Part Number OL-2521-01 Rev. D0, June 2004
Chapter 5
CLI Commands
deltoneplan
deltoneplan
To delete a provisional tone plan from the system, use the deltoneplan command in the VoIP
switching/trunking and switched AAL2 PVC operating modes.
deltoneplan tonep-region tonep-version
Syntax Description
tonep-region
Tone plan country or region which you want to delete from VISM. It can be in
the range from 1 to 64 alphanumeric characters. This argument is case
sensitive.
tonep-version
Tone plan version number of the tone plan country or region you want to delete
from VISM. It can be in the range from 1 to 65535.
Command Modes
VoIP switching/trunking and switched AAL2 PVC
Usage Guidelines
If the tone plan you want to delete is assigned to a VISM card line, you cannot delete the tone plan. Use
the dellntoneplan command to remove a tone plan assignment from a VISM card line.
This command does not delete the tone plan file from the TFTP server, which allows you to use the
addtoneplan command to add the tone plan back into the system, as needed.
Note
Examples
You cannot delete built-in tone plans from the system with this command.
The following example shows that the tone plan identified by the tone plan region name singapore and
tone plan version number 11 is deleted from the current VISM card:
deltoneplan singapore 11
Related Commands
Command
Description
addtoneplan
Adds a tone plan to the current VISM card.
cnflnringback
Configures the ringback tone method for a specified line on the current VISM
card.
cnflntoneplan
Assigns a tone plan to a specified VISM card line.
cnflntonetimeout
Modifies the timeout periods of all call progress tones supported by VISM on
a specified VISM card line.
dellntoneplan
Deletes the tone plan configuration of a specified VISM card line.
dsplnringback
Displays the ringback tone method for a specified line on the current VISM
card.
dsplntoneplan
Displays the tone plan configuration of a specified VISM card line.
dsplntonetimeout
Displays the configured timeout periods for all call progress tones of a
specified VISM card line.
dsptonebuiltinplans Displays all preconfigured (built-in) tone plans on the current VISM card.
Cisco VISM Installation and Configuration Guide
Release 3.0, Part Number OL-2521-01 Rev. D0, June 2004
5-275
Chapter 5
CLI Commands
deltoneplan
Command
Description
dsptoneplan
Displays the tone configuration of a specified tone plan—either a
preconfigured (built-in) or user-added tone plan.
dsptoneplans
Displays the tone configuration of all tone plans—either preconfigured
(built-in) or user-added tone plans.
dsptoneprovplans
Displays all user-added (provisional) tone plans.
dsptoneregionplans Displays a list of all tone plans for the countries and regions whose name
partially or completely matches the name you supply.
Cisco VISM Installation and Configuration Guide
5-276
Release 3.0, Part Number OL-2521-01 Rev. D0, June 2004
Chapter 5
CLI Commands
delxgcpcon
delxgcpcon
To delete an xGCP connection specified by the xGCP connection identification number, use the
delxgcpcon command in the VoIP switching/trunking and switched AAL2 PVC operating mode.
delxgcpcon conn-id
Syntax Description
conn-id
Command Modes
VoIP switching/trunking and switched AAL2 PVC
Usage Guidelines
Follow standard CLI procedures for this command.
Examples
The following example shows that the connection represented by the hexadecimal connection
identification B is configured for gateway-initiated DLCX commands:
Connection identification number. It can be in the range of hexadecimal numbers
from 0 to f.
delxgcpcon b
Related Commands
Command
Description
dspxgcpcon
Displays the attributes associated with a call agent established connection.
dspxgcpcons
Displays the xGCP connection ID, endpoint name, and call ID corresponding to each
call agent established connection on the gateway.
Cisco VISM Installation and Configuration Guide
Release 3.0, Part Number OL-2521-01 Rev. D0, June 2004
5-277
Chapter 5
CLI Commands
delxgcppersistevt
delxgcppersistevt
To delete a persistent xGCP event, use the delxgcppersistevt command in the VoIP switching/trunking
and switched AAL2 PVC operating modes.
delxgcppersistevt event-num
Syntax Description
event-num
Command Modes
VoIP switching/trunking and switched AAL2 PVC
Usage Guidelines
Follow standard CLI procedures for this command.
Examples
The following example shows that the persistent xGCP event represented by event number 1 is deleted:
The persistent event index package event number in the range from 1 to 16.
delxgcppersistevt 1
Related Commands
Command
Description
addxgcppersistevt
Adds persistent xGCP events.
Cisco VISM Installation and Configuration Guide
5-278
Release 3.0, Part Number OL-2521-01 Rev. D0, June 2004
Chapter 5
CLI Commands
dncon
dncon
To configure a specified connection down, preventing traffic from being passed to the specified
connection, use the dncon command in the VoIP switching/trunking, switched AAL1 SVC, switched
AAL2 SVC, switched AAL2 PVC, AAL2 trunking, VoIP and switched ATM AAL1 SVC operating
modes.
dncon lcn
Syntax Description
lcn
Command Modes
VoIP switching/trunking, switched AAL1 SVC, switched AAL2 SVC, switched AAL2 PVC, AAL2
trunking, VoIP and switched ATM AAL1 SVC
Usage Guidelines
If you use this command and the previous channel state is active (up), a connection down trap is sent.
Examples
The following example shows that connection 188 is configured to be administratively down and no
traffic is passed to it:
The logical channel number. It can be in the range from 131 to 510.
dncon 188
Related Commands
Command
Description
dspcon
Displays the parameters for a specified channel.
upcon
Configures a specified connection up, allowing traffic to be passed to the specified
connection.
Cisco VISM Installation and Configuration Guide
Release 3.0, Part Number OL-2521-01 Rev. D0, June 2004
5-279
Chapter 5
CLI Commands
dspaal2params
dspaal2params
To display AAL2 configuration parameters, use the dspaal2params command in the switched AAL2
PVC and AAL2 trunking operating modes.
dspaal2params
Syntax Description
This command has no arguments or keywords.
Command Modes
Switched AAL2 PVC and AAL2 trunking
Usage Guidelines
Use this command to display the following AAL2 configuration parameters:
Examples
•
DTMF relay status
•
CAS bit transport status
•
Type3 redundancy status
•
VAD timer value
•
CID fill timer value
The following example shows that the AAL2 configuration parameters are displayed:
dspaal2params
AAL2
AAL2
AAL2
AAL2
AAL2
Related Commands
DTMF RELAY:
CAS BITS TRANSPORT:
TYPE3 REDUNDANCY:
VAD TIMER:
CID FILL TIMER:
Off
Off
On
250
30
Command
Description
cnfaal2timerparams
Configures the holdover time for VAD before activating silence suppression
on an AAL2 PVC.
cnfaal2transparams
Configures the transportation of DTMF and CAS bits to another endpoint
and enables or disables the type 3 packet triple redundancy feature.
Cisco VISM Installation and Configuration Guide
5-280
Release 3.0, Part Number OL-2521-01 Rev. D0, June 2004
Chapter 5
CLI Commands
dspaal2profile
dspaal2profile
To display data about a specified AAL2 profile type and profile number, use the dspaal2profile
command in the AAL2 trunking operating mode.
dspaal2profile profile-type profile-num
Syntax Description
profile-type
The profile type to be used for the CID. It can be one of the following values:
profile-num
•
1 = International Telecommunication Union (ITU) I.366.2
•
3 = Custom
Number of the profile. It can be one of the following values:
•
1 = ITU profile type
•
2 = ITU profile type
•
3 = ITU profile type
•
7 = ITU profile type
•
8 = ITU profile type
•
12 = ITU profile type
•
100 = custom profile types
•
101 = custom profile types
•
110 = custom profile types
•
200 = custom profile types
Command Modes
AAL2 trunking
Usage Guidelines
The AAL2 profiles correspond to the profile types ITU and ATMF as defined in the ITU-T I.366.2 and
ATM forum AF-VTOA-0113 standards respectively.
Examples
The following example shows that the data for AAL2 profile type 1 and profile number 1 is displayed:
dspaal2profile 1 1
UUI
Codepoint
Range
0-15
0-15
Related Commands
Packet
Length
(octets)
40
40
Codec
PCMU
PCMA
SID
No SID
No SID
M
1
1
Packet
Time
(ms)
5
5
Seq. No.
Interval
(ms)
5
5
There are no related commands.
Cisco VISM Installation and Configuration Guide
Release 3.0, Part Number OL-2521-01 Rev. D0, June 2004
5-281
Chapter 5
CLI Commands
dspalm
dspalm
To display the alarms associated with a specified line, use the dspalm command in the VoIP
switching/trunking, switched AAL2 PVC, and AAL2 trunking operating modes.
dspalm -ds1 line-num
Syntax Description
-ds1
The mandatory line-num argument identifier.
line-num
Line number of the T1 or E1 line for which you want to display alarms. It can be in
the range from 1 to 8.
Command Modes
VoIP switching/trunking, switched AAL2 PVC, and AAL2 trunking
Usage Guidelines
Follow standard CLI procedures for this command.
Examples
The following example shows that the line 1 alarms are displayed:
dspalm -ds1 1
LineNum:1
LineAlarmState: Alarm(s) On -XmtRAI
RcvLOS
LineStatisticalAlarmState: No Statistical Alarms
Related Commands
Command
Description
clralm
Clears alarms on a specific VISM card line.
dspalms
Displays all alarms for a selected line type on a VISM card.
Cisco VISM Installation and Configuration Guide
5-282
Release 3.0, Part Number OL-2521-01 Rev. D0, June 2004
Chapter 5
CLI Commands
dspalmcnf
dspalmcnf
To display the threshold data about the alarm statistics being collected, use the dspalmcnf command in
the VoIP switching/trunking, switched AAL2 PVC, and AAL2 trunking operating modes.
dspalmcnf -ds1 line-num
Syntax Description
-ds1
The mandatory line-num argument identifier.
line-num
Line number of the T1 or E1 line for which you want to display alarm statistic
threshold data. It can be in the range from 1 to 8.
Command Modes
VoIP switching/trunking, switched AAL2 PVC, and AAL2 trunking
Usage Guidelines
Follow standard CLI procedures for this command.
Examples
The following example shows that the alarm statistic threshold data for line 1 is displayed:
dspalmcnf -ds1 1
LineNum:
1
RedSeverity:
RAISeverity:
NEAlarmUpCount:
NEAlarmDnCount:
NEAlarmThreshold:
FEAlarmUpCount:
FEAlarmDnCount:
FEAlarmThreshold:
StatisticalAlarmSeverity:
lCV15minThreshold:
lCV24hrThreshold:
lES15minThreshold:
lES24hrThreshold:
lSES15minThreshold:
lSES24hrThreshold:
cRC15minThreshold:
cRC24hrThreshold:
cRCES15minThreshold:
cRCES24hrThreshold:
cRCSES15minThreshold:
cRCSES24hrThreshold:
SEFS15minThreshold:
SEFS24hrThreshold:
AISS15minThreshold:
AISS24hrThreshold:
UAS15minThreshold:
Major
Minor
6
1
1500
6
1
1500
Minor
14
134
12
121
10
100
14
134
12
121
10
100
2
17
2
17
10
Cisco VISM Installation and Configuration Guide
Release 3.0, Part Number OL-2521-01 Rev. D0, June 2004
5-283
Chapter 5
CLI Commands
dspalmcnf
Related Commands
Command
Description
cnfalmcnt
Configures the collection of TDM line statistics.
dspalm
Displays the alarms associated with a specified line.
dspalms
Displays all alarms for the selected line type on a card.
Cisco VISM Installation and Configuration Guide
5-284
Release 3.0, Part Number OL-2521-01 Rev. D0, June 2004
Chapter 5
CLI Commands
dspalmcnt
dspalmcnt
To display alarm counters and statistics, use the dspalmcnt command in the VoIP switching/trunking,
switched AAL1 SVC, switched AAL2 SVC, switched AAL2 PVC, AAL2 trunking, VoIP and switched
ATM AAL1 SVC operating modes.
dspalmcnt -ds1 line-num
Syntax Description
-ds1
The mandatory line-num argument identifier.
line-num
Line number of the T1 or E1 line for which you want to alarm counters and statistics.
It can be in the range from 1 to 8.
Command Modes
VoIP switching/trunking, switched AAL1 SVC, switched AAL2 SVC, switched AAL2 PVC, AAL2
trunking, VoIP and switched ATM AAL1 SVC
Usage Guidelines
See the cnfalmcnt command description for a list of the TDM line statistics that are collected and then
displayed by this command.
Examples
The following example shows that the alarm counters and statistics for line 1 are displayed:
dspalmcnt -ds1 1
LineNum:
1
lCVCurrent:
lCVLast15minBucket:
lCVLast24hrBucket:
lESCurrent:
lESLast15minBucket:
lESLast24hrBucket:
lSESCurrent:
lSESLast15minBucket:
lSESLast24hrBucket:
cRCCurrent:
cRCLast15minBucket:
cRCLast24hrBucket:
cRCESCurrent:
cRCESLast15minBucket:
cRCESLast24hrBucket:
cRCSESCurrent:
cRCSESLast15minBucket:
cRCSESLast24hrBucket:
sEFSCurrent:
sEFSLast15minBucket:
sEFSLast24hrBucket:
aISSCurrent:
aISSLast15minBucket:
aISSLast24hrBucket:
uASCurrent:
uASLast15minBucket:
uASLast24hrBucket:
percentEFS:
RcvLOSCount:
0
0
0
0
0
0
0
0
0
0
0
0
0
0
0
0
0
0
430
900
11699
0
0
0
430
900
11696
100
1
Cisco VISM Installation and Configuration Guide
Release 3.0, Part Number OL-2521-01 Rev. D0, June 2004
5-285
Chapter 5
CLI Commands
dspalmcnt
RcvOOFCount:
RcvRAICount:
RcvFECount:
Related Commands
1
0
97997379
Command
Description
clralmcnt
Clears the alarm counters and statistics on a specified VISM card line.
clralmcnts
Clears all alarm counters and statistics on a VISM card.
dspalmcnf
Displays the threshold data about the alarm statistics being collected.
Cisco VISM Installation and Configuration Guide
5-286
Release 3.0, Part Number OL-2521-01 Rev. D0, June 2004
Chapter 5
CLI Commands
dspalms
dspalms
To display the alarms for a specified VISM card line type, use the dspalms command in the VoIP
switching/trunking, switched AAL2 PVC, and AAL2 trunking operating modes.
dspalms line-type
Syntax Description
line-type
Command Modes
VoIP switching/trunking, switched AAL2 PVC, and AAL2 trunking
Usage Guidelines
Follow standard CLI procedures for this command.
Examples
The following example shows that the alarms for the T1 line type are displayed:
Line type, -ds1 = T1 or E1 lines.
dspalms -ds1
Line
---5.1
5.2
5.3
Related Commands
AlarmState
----------No Alarms
No Alarms
No Alarms
StatisticalAlarmState
--------------------No Statistical Alarms
No Statistical Alarms
No Statistical Alarms
Command
Description
dspalm
Displays the alarms associated with a specified line.
Cisco VISM Installation and Configuration Guide
Release 3.0, Part Number OL-2521-01 Rev. D0, June 2004
5-287
Chapter 5
CLI Commands
dspannagetime
dspannagetime
To display the time that a nonpermanent announcement is to remain valid after it is placed into the VISM
announcement cache, use the dspannagetime command in the VoIP switching operating mode.
dspannagetime
Syntax Description
This command has no arguments or keywords.
Command Modes
VoIP switching
Usage Guidelines
Follow standard CLI procedures for this command.
Examples
The following example shows that the age time for nonpermanent announcements is two hours. After
two hours the nonpermanent announcements are refreshed from the announcement file server:
dspannagetime
Announcement Age Time: 120 minutes
Related Commands
Command
Description
addannpermanent
Configures an announcement server file and associated codec type as
permanent.
cnfannagetime
Configures the time that a nonpermanent announcement is to remain valid after
it is placed into the VISM announcement cache.
cnfanndn
Designates an announcement file server domain name.
cnfannpathprefix
Designates the main prefix directory TFTP path from which to retrieve
announcement files from the announcement file server.
cnfannprefcodec
Configures the codec type used for announcements played on unconnected
TDM endpoints.
cnfannreqtimeout
Configures the expiration time for announcements to begin playing after the
VISM receives the announcement signal (request) from the call agent.
delannalldynamic
Deletes all announcement files and their associated codec types from the
temporary announcement files currently saved in the VISM card.
delanndynamic
Deletes an announcement file and associated codec type from the temporary
announcement files currently saved in the VISM card.
delannpermanent
Deletes a permanent announcement file and its associated codec type from the
announcement file server.
dspanncache
Displays all available temporary announcement file names, and associated age
times before being refreshed from the announcement file server.
dspanncontrols
Displays a summary list of all provisionable announcement file variables,
including variables associated with all announcement file CLI commands.
dspanndn
Displays the announcement file server domain name.
Cisco VISM Installation and Configuration Guide
5-288
Release 3.0, Part Number OL-2521-01 Rev. D0, June 2004
Chapter 5
CLI Commands
dspannagetime
Command
Description
dspannpathprefix
Displays the main prefix directory path from which VISM retrieves
announcement files from the announcement file server.
dspannpermanents
Displays all available permanent announcement files with their associated
codec types and identifying index numbers.
dspannprefcodec
Displays the codec type used for announcements played on unconnected TDM
endpoints.
Cisco VISM Installation and Configuration Guide
Release 3.0, Part Number OL-2521-01 Rev. D0, June 2004
5-289
Chapter 5
CLI Commands
dspanncache
dspanncache
To display all available temporary announcement file names, and associated age times before being
refreshed from the announcement file server, contained in the current VISM card, use the dspanncache
command in the VoIP switching operating mode.
dspanncache
Syntax Description
This command has no arguments or keywords.
Command Modes
VoIP switching
Usage Guidelines
Follow standard CLI procedures for this command.
Examples
The following example shows that the temporary announcement file names zero and one are each
configured with an age time of 1000 minutes:
dspanncache
File Name
zero
one
Related Commands
Codec
1
2
Time Till Aged
1000
1000
Command
Description
addannpermanent
Configures an announcement server file and associated codec type as
permanent.
cnfannagetime
Configures the time that a nonpermanent announcement is to remain valid after
it is placed into the VISM announcement cache.
cnfanndn
Designates an announcement file server domain name.
cnfannpathprefix
Designates the main prefix directory TFTP path from which to retrieve
announcement files from the announcement file server.
cnfannprefcodec
Configures the codec type used for announcements played on unconnected
TDM endpoints.
cnfannreqtimeout
Configures the expiration time for announcements to begin playing after the
VISM receives the announcement signal (request) from the call agent.
delannalldynamic
Deletes all announcement files and their associated codec types from the
temporary announcement files currently saved in the VISM card.
delanndynamic
Deletes an announcement file and associated codec type from the temporary
announcement files currently saved in the VISM card.
delannpermanent
Deletes a permanent announcement file and its associated codec type from the
announcement file server.
dspannagetime
Displays the time that a nonpermanent announcement is to remain valid after
it is placed into the VISM announcement cache.
Cisco VISM Installation and Configuration Guide
5-290
Release 3.0, Part Number OL-2521-01 Rev. D0, June 2004
Chapter 5
CLI Commands
dspanncache
Command
Description
dspanncontrols
Displays a summary list of all provisionable announcement file variables,
including variables associated with all announcement file CLI commands.
dspanndn
Displays the announcement file server domain name.
dspannpathprefix
Displays the main prefix directory path from which VISM retrieves
announcement files from the announcement file server.
dspannpermanents
Displays all available permanent announcement files with their associated
codec types and identifying index numbers.
dspannprefcodec
Displays the codec type used for announcements played on unconnected TDM
endpoints.
dspannreqtimeout
Displays the expiration time for announcements to begin playing before being
aborted.
Cisco VISM Installation and Configuration Guide
Release 3.0, Part Number OL-2521-01 Rev. D0, June 2004
5-291
Chapter 5
CLI Commands
dspanncontrols
dspanncontrols
To display a summary list of all provisionable announcement file variables, including variables
associated with all announcement file CLI commands, use the dspanncontrols command in the VoIP
switching operating mode.
dspanncontrols
Syntax Description
This command has no arguments or keywords.
Command Modes
VoIP switching
Usage Guidelines
Follow standard CLI procedures for this command.
Examples
The following example shows a summary list of all provisionable announcement file variables:
dspanncontrols
Announcement
Announcement
Announcement
Announcement
Announcement
Announcement
Related Commands
Table Size:
File Server:
Age Time:
Preference Codec:
Prefix Path:
Req Timeout:
125 entries
server1
10080 minutes
G711.a
path1
5 seconds
Command
Description
addannpermanent
Configures an announcement server file and associated codec type as
permanent.
cnfannagetime
Configures the time that a nonpermanent announcement is to remain valid after
it is placed into the VISM announcement cache.
cnfanndn
Designates an announcement file server domain name.
cnfannpathprefix
Designates the main prefix directory TFTP path from which to retrieve
announcement files from the announcement file server.
cnfannprefcodec
Configures the codec type used for announcements played on unconnected
TDM endpoints.
cnfannreqtimeout
Configures the expiration time for announcements to begin playing after the
VISM receives the announcement signal (request) from the call agent.
delannalldynamic
Deletes all announcement files and their associated codec types from the
temporary announcement files currently saved in the VISM card.
delanndynamic
Deletes an announcement file and associated codec type from the temporary
announcement files currently saved in the VISM card.
delannpermanent
Deletes a permanent announcement file and its associated codec type from the
announcement file server.
Cisco VISM Installation and Configuration Guide
5-292
Release 3.0, Part Number OL-2521-01 Rev. D0, June 2004
Chapter 5
CLI Commands
dspanncontrols
Command
Description
dspannagetime
Displays the time that a nonpermanent announcement is to remain valid after it
is placed into the VISM announcement cache.
dspanncache
Displays all available temporary announcement file names, and associated age
times before being refreshed from the announcement file server.
dspanndn
Displays the announcement file server domain name.
dspannpathprefix
Displays the main prefix directory path from which VISM retrieves
announcement files from the announcement file server.
dspannpermanents
Displays all available permanent announcement files with their associated
codec types and identifying index numbers.
dspannprefcodec
Displays the codec type used for announcements played on unconnected TDM
endpoints.
dspannreqtimeout
Displays the expiration time for announcements to begin playing before being
aborted.
Cisco VISM Installation and Configuration Guide
Release 3.0, Part Number OL-2521-01 Rev. D0, June 2004
5-293
Chapter 5
CLI Commands
dspanndn
dspanndn
To display the announcement file server domain name, use the dspanndn command in the VoIP
switching operating mode.
dspanndn
Syntax Description
This command has no arguments or keywords.
Command Modes
VoIP switching
Usage Guidelines
Follow standard CLI procedures for this command.
Examples
The following example shows that the name of the announcement file server is displayed:
dspanndn
Announcement File Server: announceserver3
Related Commands
Command
Description
addannpermanent
Configures an announcement server file and associated codec type as
permanent.
cnfannagetime
Configures the time that a nonpermanent announcement is to remain valid after
it is placed into the VISM announcement cache.
cnfanndn
Designates an announcement file server domain name.
cnfannpathprefix
Designates the main prefix directory TFTP path from which to retrieve
announcement files from the announcement file server.
cnfannprefcodec
Configures the codec type used for announcements played on unconnected
TDM endpoints.
cnfannreqtimeout
Configures the expiration time for announcements to begin playing after the
VISM receives the announcement signal (request) from the call agent.
delannalldynamic
Deletes all announcement files and their associated codec types from the
temporary announcement files currently saved in the VISM card.
delanndynamic
Deletes an announcement file and associated codec type from the temporary
announcement files currently saved in the VISM card.
delannpermanent
Deletes a permanent announcement file and its associated codec type from the
announcement file server.
dspannagetime
Displays the time that a nonpermanent announcement is to remain valid after it
is placed into the VISM announcement cache.
dspanncache
Displays all available temporary announcement file names, and associated age
times before being refreshed from the announcement file server.
dspanncontrols
Displays a summary list of all provisionable announcement file variables,
including variables associated with all announcement file CLI commands.
Cisco VISM Installation and Configuration Guide
5-294
Release 3.0, Part Number OL-2521-01 Rev. D0, June 2004
Chapter 5
CLI Commands
dspanndn
Command
Description
dspannpathprefix
Displays the main prefix directory path from which VISM retrieves
announcement files from the announcement file server.
dspannpermanents
Displays all available permanent announcement files with their associated
codec types and identifying index numbers.
dspannprefcodec
Displays the codec type used for announcements played on unconnected TDM
endpoints.
Cisco VISM Installation and Configuration Guide
Release 3.0, Part Number OL-2521-01 Rev. D0, June 2004
5-295
Chapter 5
CLI Commands
dspannpathprefix
dspannpathprefix
To display the main prefix directory path from which VISM retrieves announcement files from the
announcement file server, use the dspannpathprefix command in the VoIP switching operating mode.
dspannpathprefix
Syntax Description
This command has no arguments or keywords.
Command Modes
VoIP switching
Usage Guidelines
Follow standard CLI procedures for this command.
Examples
The following example shows that a main prefix directory TFTP path is path4:
dspannpathprefix
Announcement Prefix Path: path4
Related Commands
Command
Description
addannpermanent
Configures an announcement server file and associated codec type as
permanent.
cnfannagetime
Configures the time that a nonpermanent announcement is to remain valid after
it is placed into the VISM announcement cache.
cnfanndn
Designates an announcement file server domain name.
cnfannpathprefix
Designates the main prefix directory TFTP path from which to retrieve
announcement files from the announcement file server.
cnfannprefcodec
Configures the codec type used for announcements played on unconnected
TDM endpoints.
cnfannreqtimeout
Configures the expiration time for announcements to begin playing after the
VISM receives the announcement signal (request) from the call agent.
delannalldynamic
Deletes all announcement files and their associated codec types from the
temporary announcement files currently saved in the VISM card.
delanndynamic
Deletes an announcement file and associated codec type from the temporary
announcement files currently saved in the VISM card.
delannpermanent
Deletes a permanent announcement file and its associated codec type from the
announcement file server.
dspannagetime
Displays the time that a nonpermanent announcement is to remain valid after
it is placed into the VISM announcement cache.
dspanncache
Displays all available temporary announcement file names, and associated age
times before being refreshed from the announcement file server.
dspanncontrols
Displays a summary list of all provisionable announcement file variables,
including variables associated with all announcement file CLI commands.
Cisco VISM Installation and Configuration Guide
5-296
Release 3.0, Part Number OL-2521-01 Rev. D0, June 2004
Chapter 5
CLI Commands
dspannpathprefix
Command
Description
dspanndn
Displays the announcement file server domain name.
dspannpermanents
Displays all available permanent announcement files with their associated
codec types and identifying index numbers.
dspannprefcodec
Displays the codec type used for announcements played on unconnected TDM
endpoints.
Cisco VISM Installation and Configuration Guide
Release 3.0, Part Number OL-2521-01 Rev. D0, June 2004
5-297
Chapter 5
CLI Commands
dspannpermanents
dspannpermanents
To display all available permanent announcement files with their associated codec types and identifying
index numbers, use the dspannpermanents command in the VoIP switching operating mode.
dspannpermanents
Syntax Description
This command has no arguments or keywords.
Command Modes
VoIP switching
Usage Guidelines
Follow standard CLI procedures for this command.
Examples
The following example shows that the available permanent announcement files with associated codec
types and identifying index numbers are displayed:
dspannpermanents
Number
1
Related Commands
Status
loaded
File Name
alllinesbusy.au
Codec
G.726-40K
Command
Description
addannpermanent
Configures an announcement server file and associated codec type as
permanent.
cnfannagetime
Configures the time that a nonpermanent announcement is to remain valid after
it is placed into the VISM announcement cache.
cnfanndn
Designates an announcement file server domain name.
cnfannpathprefix
Designates the main prefix directory TFTP path from which to retrieve
announcement files from the announcement file server.
cnfannprefcodec
Configures the codec type used for announcements played on unconnected
TDM endpoints.
cnfannreqtimeout
Configures the expiration time for announcements to begin playing after the
VISM receives the announcement signal (request) from the call agent.
delannalldynamic
Deletes all announcement files and their associated codec types from the
temporary announcement files currently saved in the VISM card.
delanndynamic
Deletes an announcement file and associated codec type from the temporary
announcement files currently saved in the VISM card.
delannpermanent
Deletes a permanent announcement file and its associated codec type from the
announcement file server.
dspannagetime
Displays the time that a nonpermanent announcement is to remain valid after it
is placed into the VISM announcement cache.
dspanncache
Displays all available temporary announcement file names, and associated age
times before being refreshed from the announcement file server.
Cisco VISM Installation and Configuration Guide
5-298
Release 3.0, Part Number OL-2521-01 Rev. D0, June 2004
Chapter 5
CLI Commands
dspannpermanents
Command
Description
dspanncontrols
Displays a summary list of all provisionable announcement file variables,
including variables associated with all announcement file CLI commands.
dspanndn
Displays the announcement file server domain name.
dspannpathprefix
Displays the main prefix directory path from which VISM retrieves
announcement files from the announcement file server.
dspannprefcodec
Displays the codec type used for announcements played on unconnected TDM
endpoints.
Cisco VISM Installation and Configuration Guide
Release 3.0, Part Number OL-2521-01 Rev. D0, June 2004
5-299
Chapter 5
CLI Commands
dspannprefcodec
dspannprefcodec
To display the codec type used for announcements played on unconnected Time Division Multiplex
(TDM) endpoints, use the dspannprefcodec command in the VoIP switching operating mode.
dspannprefcodec
Syntax Description
This command has no arguments or keywords.
Command Modes
VoIP switching
Usage Guidelines
Follow standard CLI procedures for this command.
Examples
The following example shows that the G.711u codec type is configured for announcements played on
unconnected TDM endpoints:
dspannprefcodec
Announcement Preference Codec: G.711u
Related Commands
Command
Description
addannpermanent
Configures an announcement server file and associated codec type as
permanent.
cnfannagetime
Configures the time that a nonpermanent announcement is to remain valid after
it is placed into the VISM announcement cache.
cnfanndn
Designates an announcement file server domain name.
cnfannpathprefix
Designates the main prefix directory TFTP path from which to retrieve
announcement files from the announcement file server.
cnfannprefcodec
Configures the codec type used for announcements played on unconnected
TDM endpoints.
cnfannreqtimeout
Configures the expiration time for announcements to begin playing after the
VISM receives the announcement signal (request) from the call agent.
delannalldynamic
Deletes all announcement files and their associated codec types from the
temporary announcement files currently saved in the VISM card.
delanndynamic
Deletes an announcement file and associated codec type from the temporary
announcement files currently saved in the VISM card.
delannpermanent
Deletes a permanent announcement file and its associated codec type from the
announcement file server.
dspannagetime
Displays the time that a nonpermanent announcement is to remain valid after it
is placed into the VISM announcement cache.
dspanncache
Displays all available temporary announcement file names, and associated age
times before being refreshed from the announcement file server.
Cisco VISM Installation and Configuration Guide
5-300
Release 3.0, Part Number OL-2521-01 Rev. D0, June 2004
Chapter 5
CLI Commands
dspannprefcodec
Command
Description
dspanncontrols
Displays a summary list of all provisionable announcement file variables,
including variables associated with all announcement file CLI commands.
dspanndn
Displays the announcement file server domain name.
dspannpathprefix
Displays the main prefix directory path from which VISM retrieves
announcement files from the announcement file server.
dspannpermanents
Displays all available permanent announcement files with their associated
codec types and identifying index numbers.
Cisco VISM Installation and Configuration Guide
Release 3.0, Part Number OL-2521-01 Rev. D0, June 2004
5-301
Chapter 5
CLI Commands
dspannreqtimeout
dspannreqtimeout
To display the expiration time for announcements to begin playing before being aborted, use the
dspannreqtimeout command in the VoIP switching operating mode.
dspannreqtimeout
Syntax Description
This command has no arguments or keywords.
Command Modes
VoIP switching
Usage Guidelines
Follow standard CLI procedures for this command.
Examples
The following example shows that the announcements must begin playing by 12 seconds or they will be
aborted:
dspannreqtimeout
Annoucement Req Timeout: 12 seconds
Related Commands
Command
Description
addannpermanent
Configures an announcement server file and associated codec type as
permanent.
cnfannagetime
Configures the time that a nonpermanent announcement is to remain valid after
it is placed into the VISM announcement cache.
cnfanndn
Designates an announcement file server domain name.
cnfannpathprefix
Designates the main prefix directory TFTP path from which to retrieve
announcement files from the announcement file server.
cnfannprefcodec
Configures the codec type used for announcements played on unconnected
TDM endpoints.
cnfannreqtimeout
Configures the expiration time for announcements to begin playing after the
VISM receives the announcement signal (request) from the call agent.
delannalldynamic
Deletes all announcement files and their associated codec types from the
temporary announcement files currently saved in the VISM card.
delanndynamic
Deletes an announcement file and associated codec type from the temporary
announcement files currently saved in the VISM card.
delannpermanent
Deletes a permanent announcement file and its associated codec type from the
announcement file server.
dspannagetime
Displays the time that a nonpermanent announcement is to remain valid after it
is placed into the VISM announcement cache.
dspanncache
Displays all available temporary announcement file names, and associated age
times before being refreshed from the announcement file server.
Cisco VISM Installation and Configuration Guide
5-302
Release 3.0, Part Number OL-2521-01 Rev. D0, June 2004
Chapter 5
CLI Commands
dspannreqtimeout
Command
Description
dspanncontrols
Displays a summary list of all provisionable announcement file variables,
including variables associated with all announcement file CLI commands.
dspanndn
Displays the announcement file server domain name.
dspannpathprefix
Displays the main prefix directory path from which VISM retrieves
announcement files from the announcement file server.
dspannpermanents
Displays all available permanent announcement files with their associated
codec types and identifying index numbers.
dspannprefcodec
Displays the codec type used for announcements played on unconnected TDM
endpoints.
Cisco VISM Installation and Configuration Guide
Release 3.0, Part Number OL-2521-01 Rev. D0, June 2004
5-303
Chapter 5
CLI Commands
dspcacfailcntrs
dspcacfailcntrs
To display the connection admission control (CAC) failure counters that are set to 0, use the
dspcacfailcntrs command in the VoIP switching/trunking, switched AAL2 PVC, and AAL2 trunking
operating modes.
dspcacfailcntrs
Syntax Description
This command has no arguments or keywords.
Command Modes
VoIP switching/trunking, switched AAL2 PVC, and AAL2 trunking
Usage Guidelines
Use this command for debugging purposes—to reset counters and isolate VISM CAC-related failures.
Counter values greater than 0 indicate that the gateway is low on resources.
Examples
The following example shows that the CAC failure counters that are set to 0 are displayed:
dspcacfailcntrs
PVC Addition Failures
SVC Addition Failures
VC CAC Failures for PVCs
PVC Upspeed Failures
SVC Upspeed Failures
Related Commands
:0
:0
:0
:0
:0
Command
Description
clrcacfailcntrs
Resets the CAC failure counters to 0.
Cisco VISM Installation and Configuration Guide
5-304
Release 3.0, Part Number OL-2521-01 Rev. D0, June 2004
Chapter 5
CLI Commands
dspcalea
dspcalea
To display the Communications Assistance for Law Enforcement Act (CALEA) feature configuration
status of the current VISM card, use the dspcalea command in the VoIP switching/trunking, switched
AAL2 PVC, and AAL2 trunking operating modes.
dspcalea
Syntax Description
This command has no arguments or keywords.
Command Modes
VoIP switching/trunking, switched AAL2 PVC, and AAL2 trunking
Usage Guidelines
Follow standard CLI procedures for this command.
Examples
The following example shows that the CALEA feature is enabled on the current VISM card:
dspcalea
CALEA: enable
Related Commands
Command
Description
addcon
Adds a PVC connection between a VISM card and any SM or PXM card.
cnfcalea
Enables or disables the CALEA feature on the current VISM card.
cnfcon
Configures a connection between a VISM card and an MGX 8000 Series
platform PXM card.
dspvismparam
Displays the current VISM card configuration.
Cisco VISM Installation and Configuration Guide
Release 3.0, Part Number OL-2521-01 Rev. D0, June 2004
5-305
Chapter 5
CLI Commands
dspcarddsp
dspcarddsp
To display all card level configuration parameters for both echo cancellation (ECAN) and voice
compression DSPs, use the dspcarddsp command in the VoIP switching/trunking, switched AAL2 PVC,
and AAL2 trunking operating modes.
dspcarddsp
Syntax Description
This command has no arguments or keywords.
Command Modes
VoIP switching/trunking, switched AAL2 PVC, and AAL2 trunking
Usage Guidelines
The packetization period and default type of service parameters apply to the VoIP switching/trunking
operating mode only.
Examples
The following example shows that the card level configuration parameters for ECAN and voice
compression DSPs are displayed:
dspcarddsp
IdlePattern:
IdleDirection:
PacketSize:
DB loss:
Jitter buffer mode:
Jitter buffer size:
Adaptive Gain Control:
Related Commands
0x7f or 0xff
Both
80 bytes
sixdb
fixed
forty msec
off
There are no related commands.
Cisco VISM Installation and Configuration Guide
5-306
Release 3.0, Part Number OL-2521-01 Rev. D0, June 2004
Chapter 5
CLI Commands
dspcasendpts
dspcasendpts
To display data about configured channel associated signaling (CAS) endpoints, use the dspcasendpts
command in the VoIP switching/trunking operating mode.
dspcasendpts
Syntax Description
This command has no arguments or keywords.
Command Modes
VoIP switching/trunking
Usage Guidelines
Follow standard CLI procedures for this command.
Examples
The following example shows that the CAS endpoint configuration data is displayed:
dspcasendpts
Endptds0Num CasVarName CasOnTime CasOffTime
----- ------ ---------- --------- --------2
2
immd
75
75
5
5
wink
75
75
10
10
wink
75
75
Related Commands
Command
Description
dspcasvarendpts
Displays all endpoints associated with a specified CAS variant name.
Cisco VISM Installation and Configuration Guide
Release 3.0, Part Number OL-2521-01 Rev. D0, June 2004
5-307
Chapter 5
CLI Commands
dspcasglareattrib
dspcasglareattrib
To display the direction of channel associated signaling (CAS) calls and the glare policy for a specified
endpoint, use the dspcasglareattrib command in the VoIP switching/trunking, switched AAL2 PVC,
and AAL2 trunking operating modes.
dspcasglareattrib endpt-num
Syntax Description
endpt-num
Endpoint number for which you want to display the CAS glare attributes. It can
be a value from one of the following ranges:
•
For template number 1:
– For VISM, from 1 to 145
– For VISM-PR T1, from 1 to 192
– For VISM-PR E1, from 1 to 248
•
For template number 2:
– For VISM T1, from 1 to 192
– For VISM E1, from 1 to 248
•
For template number 3:
– For VISM, from 1 to 120
– For VISM-PR T1, from 1 to 192
– For VISM-PR E1, from 1 to 248
•
For template number 4:
– For VISM-PR, from 1 to 144
Command Modes
VoIP switching/trunking, switched AAL2 PVC, and AAL2 trunking
Usage Guidelines
Follow standard CLI procedures for this command.
Examples
The following example shows that the CAS glare attributes for endpoint number 204 are displayed:
dspcasglareattrib 204
Ds0IfIndex:
204
Cas Diretionality: incoming
Cas Glare Policy: controlling
Cisco VISM Installation and Configuration Guide
5-308
Release 3.0, Part Number OL-2521-01 Rev. D0, June 2004
Chapter 5
CLI Commands
dspcasglareattrib
Related Commands
Command
Description
addxgcppersistevt
Adds persistent xGCP events.
cnfcasflashtime
Configures the minimum and maximum CAS on-hook time periods for
incoming flash hooks on a specified endpoint.
cnfcasglareattrib
Configures the direction of CAS calls and the glare policy for a specified
endpoint.
cnfcaspackage
Configures MGCP packages to notify persistent observed CAS events in the
context of incoming and outgoing CAS calls on a specified endpoint.
cnflndigitorder
Assigns the order in which ANI digits and DNIS digits are dialed during an
outgoing FGD call on the endpoints of a specified VISM card line.
delxgcppersistevt
Deletes a persistent xGCP event.
dspcaspackage
Displays the MGCP packages configured to notify persistent observed CAS
events in the context of incoming and outgoing CAS calls on a specified
endpoint.
dspcastimers
Displays the currently configured CAS timers for a specified endpoint.
dsplndigitorder
Displays the order in which ANI digits and DNIS digits are dialed during an
outgoing FGD call on the endpoints of a specified VISM card line.
Cisco VISM Installation and Configuration Guide
Release 3.0, Part Number OL-2521-01 Rev. D0, June 2004
5-309
Chapter 5
CLI Commands
dspcaspackage
dspcaspackage
To display the Media Gateway Control Protocol (MGCP) packages configured to notify persistent
observed CAS events in the context of incoming and outgoing CAS calls on a specified endpoint, use
the dspcaspackage command in the VoIP switching/trunking, switched AAL2 PVC, and AAL2 trunking
operating modes.
dspcaspackage endpt-num
Syntax Description
endpt-num
Endpoint number for which you want to display the CAS packages. It can be a
value from one of the following ranges:
•
For template number 1:
– For VISM, from 1 to 145
– For VISM-PR T1, from 1 to 192
– For VISM-PR E1, from 1 to 248
•
For template number 2:
– For VISM T1, from 1 to 192
– For VISM E1, from 1 to 248
•
For template number 3:
– For VISM, from 1 to 120
– For VISM-PR T1, from 1 to 192
– For VISM-PR E1, from 1 to 248
•
For template number 4:
– For VISM-PR, from 1 to 144
Command Modes
VoIP switching/trunking, switched AAL2 PVC, and AAL2 trunking
Usage Guidelines
Follow standard CLI procedures for this command.
Examples
The following example shows that the MGCP packages for incoming and outgoing calls on endpoint
number 49 are displayed:
dspcaspackage 49
Ds0fIndex:
49
incoming CAS Pkg: MS
Outgoing CAS Pkg: DT
Cisco VISM Installation and Configuration Guide
5-310
Release 3.0, Part Number OL-2521-01 Rev. D0, June 2004
Chapter 5
CLI Commands
dspcaspackage
Related Commands
Command
Description
addxgcppersistevt
Adds persistent xGCP events.
cnfcasflashtime
Configures the minimum and maximum CAS on-hook time periods for
incoming flash hooks on a specified endpoint.
cnfcasglareattrib
Configures the direction of CAS calls and the glare policy for a specified
endpoint.
cnfcaspackage
Configures MGCP packages to notify persistent observed CAS events in the
context of incoming and outgoing CAS calls on a specified endpoint.
cnflndigitorder
Assigns the order in which ANI digits and DNIS digits are dialed during an
outgoing FGD call on the endpoints of a specified VISM card line.
delxgcppersistevt
Deletes a persistent xGCP event.
dspcasglareattrib
Displays the direction of CAS calls and the glare policy for a specified
endpoint.
dspcastimers
Displays the currently configured CAS timers for a specified endpoint.
dsplndigitorder
Displays the order in which ANI digits and DNIS digits are dialed during an
outgoing FGD call on the endpoints of a specified VISM card line.
Cisco VISM Installation and Configuration Guide
Release 3.0, Part Number OL-2521-01 Rev. D0, June 2004
5-311
Chapter 5
CLI Commands
dspcasparamsource
dspcasparamsource
To display the currently configured timer source parameters for channel associated signaling (CAS) of
a specified endpoint, use the dspcasparamsource command in the VoIP switching/trunking, switched
AAL2 PVC, and AAL2 trunking operating modes.
dspcasparamsource endpt-num
Syntax Description
endpt-num
Endpoint number for which you want to display the CAS parameter source.
It can be a value from one of the following ranges:
•
For template number 1:
– For VISM, from 1 to 145
– For VISM-PR T1, from 1 to 192
– For VISM-PR E1, from 1 to 248
•
For template number 2:
– For VISM T1, from 1 to 192
– For VISM E1, from 1 to 248
•
For template number 3:
– For VISM, from 1 to 120
– For VISM-PR T1, from 1 to 192
– For VISM-PR E1, from 1 to 248
•
For template number 4:
– For VISM-PR, from 1 to 144
Command Modes
VoIP switching/trunking, switched AAL2 PVC, and AAL2 trunking
Usage Guidelines
Follow standard CLI procedures for this command.
Examples
The following example shows that the CAS parameter source for endpoint number 1 is displayed:
dspcasparamsource 1
Ds0IfIndex:
1
CasParameterSource: MibValue
Related Commands
Command
Description
cnfcasparamsource
Configures an endpoint’s CAS-related timer parameters source.
Cisco VISM Installation and Configuration Guide
5-312
Release 3.0, Part Number OL-2521-01 Rev. D0, June 2004
Chapter 5
CLI Commands
dspcastimers
dspcastimers
To display the currently configured channel associated signaling (CAS) timers for a specified endpoint,
use the dspcastimers command in the VoIP switching/trunking, switched AAL2 PVC, and AAL2
trunking operating modes.
dspcastimers endpt-num
Syntax Description
endpt-num
Endpoint number for which you want to display the currently configured CAS
timers. It can be a value from one of the following ranges:
•
For template number 1:
– For VISM, from 1 to 145
– For VISM-PR T1, from 1 to 192
– For VISM-PR E1, from 1 to 248
•
For template number 2:
– For VISM T1, from 1 to 192
– For VISM E1, from 1 to 248
•
For template number 3:
– For VISM, from 1 to 120
– For VISM-PR T1, from 1 to 192
– For VISM-PR E1, from 1 to 248
•
For template number 4:
– For VISM-PR, from 1 to 144
Command Modes
VoIP switching/trunking, switched AAL2 PVC, and AAL2 trunking
Usage Guidelines
Follow standard CLI procedures for this command.
Examples
The following example shows that the currently configured CAS timers for endpoint number 1 are
displayed:
dspcastimers 1
Ds0IfIndex:
CasOnHookMinMakeTime:
CasOffHookMinMakeTime:
CasWinkMinMakeTime:
CasWinkMaxMakeTime:
CasWinkBreakTime:
CasGlareTime:
CasGuardTime:
CasDialDelayTime:
CasFlashMinMakeTime:
CasFlashMaxMakeTime:
1
300
20
100
1000
20
500
800
500
300
900
Cisco VISM Installation and Configuration Guide
Release 3.0, Part Number OL-2521-01 Rev. D0, June 2004
5-313
Chapter 5
CLI Commands
dspcastimers
Related Commands
Command
Description
addxgcppersistevt
Adds persistent xGCP events.
cnfcasdialdelay
Configures the VISM wait time (dial delay) for outpulsing digits to the PBX
after sending an off-hook event.
cnfcasflashtime
Configures the minimum and maximum CAS on-hook time periods for
incoming flash hooks on a specified endpoint.
cnfcasglareattrib
Configures the direction of CAS calls and the glare policy for a specified
endpoint.
cnfcasguardtime
Configures the CAS guard time for an endpoint.
cnfcasoffhooktime
Configures a minimum presence time, on an endpoint, for a CAS off-hook
pattern to be recognized as an off-hook signal.
cnfcasonhooktime
Configures a minimum presence time, on an endpoint, for a CAS on-hook
pattern to be recognized as an on-hook signal.
cnfcaspackage
Configures MGCP packages to notify persistent observed CAS events in the
context of incoming and outgoing CAS calls on a specified endpoint.
dspcasglareattrib
Displays the direction of CAS calls and the glare policy for a specified
endpoint.
dspcaspackage
Displays the MGCP packages configured to notify persistent observed CAS
events in the context of incoming and outgoing CAS calls on a specified
endpoint.
Cisco VISM Installation and Configuration Guide
5-314
Release 3.0, Part Number OL-2521-01 Rev. D0, June 2004
Chapter 5
CLI Commands
dspcasvar
dspcasvar
To display data about channel associated signaling (CAS) variants for a given variant name, use the
dspcasvar command in the VoIP switching/trunking operating mode.
dspcasvar var-name
Syntax Description
var-name
Command Modes
VoIP switching/trunking
Usage Guidelines
Follow standard CLI procedures for this command
Examples
The following example shows that the CAS variant data for the CAS variant identified by the name first
is displayed:
Name of the CAS variant; a text string of 1 to 64 alphanumeric characters.
dspcasvar first
CasVariantName:
CasFileName:
Ringing time:
Digit method:
Partial dial timing:
Critical dial timing:
Interdigit timeout:
CasVariantState:
CasRowStatus:
Country code:
Related Commands
first
wink.dod
30
DTMF
16
4
1
configured
Add
US
Command
Description
addcasvar
Adds a CAS variant to a VISM card.
cnfcasvar
Configures CAS variant and CAS timing parameters for a variant already created
with the addcasvar command.
delcasvar
Deletes a CAS variant.
Cisco VISM Installation and Configuration Guide
Release 3.0, Part Number OL-2521-01 Rev. D0, June 2004
5-315
Chapter 5
CLI Commands
dspcasvarendpts
dspcasvarendpts
To display all endpoints associated with a specified channel associated signaling (CAS) variant name,
use the dspcasvarendpts command in the VoIP switching/trunking, switched AAL2 PVC, and AAL2
trunking operating mode.
dspcasvarendpts var-name
Syntax Description
var-name
Command Modes
VoIP switching/trunking, switched AAL2 PVC, and AAL2 trunking
Usage Guidelines
Follow standard CLI procedures for this command.
Examples
The following example shows that the endpoints associated with the var1 CAS variant are displayed:
Name of the CAS variant; a text string of 1 to 64 alphanumeric characters.
dspcasvarendpts var1
Related Commands
Command
Description
dspcasendpts Displays data about configured CAS endpoints.
Cisco VISM Installation and Configuration Guide
5-316
Release 3.0, Part Number OL-2521-01 Rev. D0, June 2004
Chapter 5
CLI Commands
dspcasvars
dspcasvars
To display the parameters of all channel associated signaling (CAS) variants configured on a VISM card,
use the dspcasvars command in the VoIP switching/trunking, switched AAL2 PVC, and AAL2 trunking
operating modes.
dspcasvars
Syntax Description
This command has no arguments or keywords.
Command Modes
VoIP switching/trunking, switched AAL2 PVC, and AAL2 trunking
Usage Guidelines
This command displays the following data for each CAS variant:
Examples
•
Variant name
•
File name
•
Digit method
•
Country code
The following example shows that the parameters of all configured CAS variants are displayed for the
current VISM card:
dspcasvars
VariantName
----------first
second
Related Commands
FileName
-------wink.dod
ring.dod
DigitMethod
----------DTMF
DTMF
CountryCode
----------US
US
Command
Description
addcasvar
Adds a CAS variant to a VISM card.
cnfcasvar
Configures CAS variant and CAS timing parameters for a variant already created
with the addcasvar command.
delcasvar
Deletes a CAS variant.
dspcasvar
Displays information about CAS variants for a given variant name.
Cisco VISM Installation and Configuration Guide
Release 3.0, Part Number OL-2521-01 Rev. D0, June 2004
5-317
Chapter 5
CLI Commands
dspcasxgcps
dspcasxgcps
To display timer parameters for the channel associated signaling/gateway control protocol (CAS/xGCP)
backhaul, use the dspcasxgcps command in the VoIP switching/trunking operating mode.
dspcasxgcps
Syntax Description
This command has no arguments or keywords.
Command Modes
VoIP switching/trunking
Usage Guidelines
Follow standard CLI procedures for this command.
Examples
The following example shows that the CAS/xGCP backhaul timer parameters are displayed:
dspcasxgcps
VariantName
----------first
second
Related Commands
FileName
-------wink.dod
ring.dod
ReXmitTime
----------500
500
InitReXmitTime
-------------100
100
Retry
----4
4
There are no related commands.
Cisco VISM Installation and Configuration Guide
5-318
Release 3.0, Part Number OL-2521-01 Rev. D0, June 2004
Chapter 5
CLI Commands
dspccs
dspccs
To display the configuration data of a previously added common channel signaling (CCS) channel, use
the dspccs command in the VoIP switching/trunking, switched AAL2 PVC, and AAL2 trunking
operating modes.
dspccs line-num ds0-num
Syntax Description
line-num
Line number of the previously added CCS channel in the range from 1 to 8.
ds0-num
DS0 number of the previously added CCS channel. It can be a value from one of the
following ranges:
•
1 to 24 for T1 lines
•
1 to 31 for E1 lines
Command Modes
VoIP switching/trunking, switched AAL2 PVC, and AAL2 trunking
Usage Guidelines
Follow standard CLI procedures for this command.
Examples
The following example shows that the configuration data of the CCS channel identified by line number
1 and DS0 number 10 are displayed:
dspccs 1 10
Related Commands
ds0IfIndex:
RowStatus:
LcnNum:
MaxFrameSize:
10
active
36
300
Command
Description
addccs
Adds a CCS channel (D channel) to a VISM card.
delccs
Deletes the association between a CCS (DS0) channel and its corresponding virtual
channel.
dspccschans
Displays all CCS configured channels.
Cisco VISM Installation and Configuration Guide
Release 3.0, Part Number OL-2521-01 Rev. D0, June 2004
5-319
Chapter 5
CLI Commands
dspccschans
dspccschans
To display all channels that are configured as common channel signaling (CCS) channels, use the
dspccschans command in the VoIP switching/trunking, switched AAL2 PVC, and AAL2 trunking
operating modes.
dspccschans
Syntax Description
This command has no arguments or keywords.
Command Modes
VoIP switching/trunking, switched AAL2 PVC, and AAL2 trunking
Usage Guidelines
Follow standard CLI procedures for this command.
Examples
The following example shows that all CCS configured channels are displayed:
dspccschans
ds0 If
Row
Index
Status
------- -----10
active
Related Commands
Lcn
Num
----36
Max Frame
Size
-----------300
Command
Description
addccs
Adds a CCS channel (D channel) to a VISM card.
delccs
Deletes the association between a CCS (DS0) channel and its corresponding virtual
channel.
dspccs
Displays the configuration data of a previously added CCS channel.
Cisco VISM Installation and Configuration Guide
5-320
Release 3.0, Part Number OL-2521-01 Rev. D0, June 2004
Chapter 5
CLI Commands
dspccscnt
dspccscnt
To display the common channel signaling (CCS) counter values for a specified line and DS0, use the
dspccscnt command in the VoIP switching/trunking, switched AAL2 PVC, and AAL2 trunking
operating modes.
dspccscnt line-num ds0-num
Syntax Description
line-num
Line number for which you want to display the CCS counter values. It can be in the
range from 1 to 8.
ds0-num
DS0 number of which you want to display the CCS counter values. It can be a value
from one of the following ranges:
•
1 to 24 for T1 lines
•
1 to 31 for E1 lines
Command Modes
VoIP switching/trunking, switched AAL2 PVC, and AAL2 trunking
Usage Guidelines
Follow standard CLI procedures for this command.
Examples
The following example shows that the CCS counter values for line number 1, DS0 10 are displayed:
dspccscnt 1 10
ds0IfIndex:
TxFrameCount:
RxFrameCount:
RxCRCErrorCount:
RxBufOverflowCount:
TxUnderflowCount:
TxAbortCount:
RxAbortCount:
Related Commands
10
0
0
0
0
0
0
0
There are no related commands.
Cisco VISM Installation and Configuration Guide
Release 3.0, Part Number OL-2521-01 Rev. D0, June 2004
5-321
Chapter 5
CLI Commands
dspcd
dspcd
To display the current VISM card’s configuration, status, and hardware and firmware configuration data,
use the dspcd command in the VoIP switching/trunking, switched AAL2 PVC, and AAL2 trunking
operating modes.
dspcd
Syntax Description
This command has no arguments or keywords.
Command Modes
VoIP switching/trunking, switched AAL2 PVC, and AAL2 trunking
Usage Guidelines
The VISM card configuration data displayed includes serial number and hardware and firmware revision
levels.
Examples
The following example shows that the current VISM card configuration data is displayed:
dspcd
ModuleSlotNumber:
17
FunctionModuleState:
Active
FunctionModuleType:
VISM-8T1
FunctionModuleSerialNum:
xxxxxxxxxx
FunctionModuleHWRev:
0.0
FunctionModuleFWRev:
1.5.0_11Nov01_2
FunctionModuleResetReason: ?
LineModuleType:
LM-RJ48-8T1
LineModuleState:
Present
mibVersionNumber:
21
configChangeTypeBitMap:
CardCnfChng, LineCnfChng
pcb part no - (800 level): 800-xxxxx-xx
pcb part no - (73 level): 73-xxxxx-xx
Fab Part no - (28 level): 28-xxxxx-xx
PCB Revision:
08
Daughter Card Information:
Daughter Card Serial Number:
pcb part no - (73 level):
Fab Part no - (28 level):
PCB Revision:
Related Commands
xxxxxxxxxxx
73-xxxxx-xx
28-xxxxx-xx
04
Command
Description
dspcds
Displays a list of chassis card types, with associated slot numbers, card status, alarm
status, and redundancy status.
version
Displays version-related information for a VISM card.
Cisco VISM Installation and Configuration Guide
5-322
Release 3.0, Part Number OL-2521-01 Rev. D0, June 2004
Chapter 5
CLI Commands
dspcds
dspcds
To display a list of chassis card types, with associated slot numbers, card status, alarm status, and
redundancy status, use the dspcds command in the VoIP switching/trunking, switched AAL2 PVC, and
AAL2 trunking operating modes.
dspcds
Syntax Description
This command has no arguments or keywords.
Command Modes
VoIP switching/trunking, switched AAL2 PVC, and AAL2 trunking
Usage Guidelines
Follow standard CLI procedures for this command.
Examples
The following example shows that the list of chassis card types, with associated status data, are
displayed:
dspcds
Slot
---1.1
1.2
.
.
.
1.32
Related Commands
CardState
--------Empty
Active
Active
CardType
-------VISM-8T1
CardAlarm
--------Clear
Clear
VISM-8E1
Clear
Redundancy
----------
Command
Description
dspcd
Displays the current VISM card’s configuration, status, and hardware and firmware
configuration data.
version
Displays version-related information for a VISM card.
Cisco VISM Installation and Configuration Guide
Release 3.0, Part Number OL-2521-01 Rev. D0, June 2004
5-323
Chapter 5
CLI Commands
dspcid
dspcid
To display the configuration data of an AAL2 channel identifier (CID) on the current VISM card, use
the dspcid command in the switched AAL2 PVC and AAL2 trunking operating modes.
dspcid lcn cid-num
Syntax Description
lcn
The logical channel number of the LCN/CID pair in the range from 131 to 510.
cid-num
The channel identification number of the LCN/CID pair in the range from 8 to 255.
Command Modes
Switched AAL2 PVC and AAL2 trunking
Usage Guidelines
Follow standard CLI procedures for this command.
Examples
The following example shows that the configuration data of the AAL2 CID identified by LCN 131 and
CID 101 is displayed:
dspcid 131 101
LCN number :
131
CID number:
Endpoint number :
CidRowStatus:
Type3redundancy:
VAD:
VADInitTimer:
Profile type:
Profile number:
Codec type:
Cas transport:
DTMF transport:
Ecan on/off:
ICS enable:
pkt period:
Cid state:
Related Commands
101
1
active
enabled
enabled
250
ITU
2
G.711u
enabled
enabled
enabled
Disabled
5
Active
Command
Description
addcid
Adds an AAL2 CID on a VISM card.
delcid
Deletes the association between an endpoint and an LCN/CID pair.
dspcids
Displays all AAL2 CIDs for a specified LCN on a VISM card.
Cisco VISM Installation and Configuration Guide
5-324
Release 3.0, Part Number OL-2521-01 Rev. D0, June 2004
Chapter 5
CLI Commands
dspcids
dspcids
To display all AAL2 channel identifiers (CIDs) for an LCN on the current VISM card, use the dspcids
command in the switched AAL2 PVC and AAL2 trunking operating modes.
dspcids lcn
Syntax Description
lcn
Command Modes
Switched AAL2 PVC and AAL2 trunking
Usage Guidelines
Follow standard CLI procedures for this command.
Examples
The following example shows that the AAL2 CIDs are displayed for LCN 132:
Logical channel number of the LCN for which you want to display AAL2 CIDs. It can
be in the range from 131 to 510.
dspcids 132
lcn CID Endpt Cid
Type3
VAD
Prof Prof
Codec
Cas DTMF
Num Num Num Status Redun VAD Timer Type Num
Type
Tran Tran Ecan
--- --- ----- ------ ----- --- ----- ------ ---- --------- ---- ---- ---132
9
1 active ena ena
250
ITU
1
G.711u ena ena ena
Related Commands
Command
Description
addcid
Adds an AAL2 CID on a VISM card.
delcid
Deletes the association between an endpoint and an LCN/CID pair.
dspcid
Displays the configuration data of an AAL2 CID on the current VISM card.
Cisco VISM Installation and Configuration Guide
Release 3.0, Part Number OL-2521-01 Rev. D0, June 2004
5-325
Chapter 5
CLI Commands
dspco4timer
dspco4timer
To display the bearer continuity test CO4 timer value, use the dspco4timer command in the VoIP
switching/trunking operating mode.
dspco4timer
Syntax Description
This command has no arguments or keywords.
Command Modes
VoIP switching/trunking
Usage Guidelines
Follow standard CLI procedures for this command.
Examples
The following example shows that the bearer continuity test CO4 timer is set at 1000 ms:
dspco4timer
CO4 timer value:
Related Commands
1000
Command
Description
cnfco4timer
Configures the bearer continuity test CO4 timer value.
dspvismparam
Displays the current VISM card configuration.
Cisco VISM Installation and Configuration Guide
5-326
Release 3.0, Part Number OL-2521-01 Rev. D0, June 2004
Chapter 5
CLI Commands
dspcodecjtrdelays
dspcodecjtrdelays
To display the configured codec jitter delay modes and associated jitter initial delays, use the
dspcodecjtrdelays command in the VoIP switching/trunking, switched AAL2 PVC, and AAL2 trunking
operating modes.
dspcodecjtrdelays
Syntax Description
This command has no arguments or keywords.
Command Modes
VoIP switching/trunking, switched AAL2 PVC, and AAL2 trunking
Usage Guidelines
Follow standard CLI procedures for this command.
Examples
The following example shows that the configured codec jitter delay modes and associated jitter initial
delays are displayed:
dspcodecjtrdelays
Codec
----G7.11u
.
.
.
Related Commands
JitterDelayMode
--------------fixed
JitterInitialDelay
-----------------100
Command
Description
cnfcodecjtrdelay
Configures the jitter delay mode and initial delay value for a specified codec.
Cisco VISM Installation and Configuration Guide
Release 3.0, Part Number OL-2521-01 Rev. D0, June 2004
5-327
Chapter 5
CLI Commands
dspcodecparams
dspcodecparams
To display codec parameters, use the dspcodecparams command in the VoIP switching/trunking
operating mode.
dspcodecparams
Syntax Description
This command has no arguments or keywords.
Command Modes
VoIP switching/trunking
Usage Guidelines
The following data, codec parameters, are displayed when you use this command:
Note
Examples
•
Codec type
•
xGCP codec string
•
Packetization period
•
Preference
•
IANA registered codec type
Because the preference of any codec can be configured regardless of the current codec template, all
codecs displayed by this command may not be available in the current codec template.
The following example shows that the codec parameters are displayed:
dspcodecparams
codecType
codecString
pktPeriod (ms)
Preference
ianaCodecType
------------- ---------------------------------- ------------1 - G.711u
PCMU
10
7
0
2 - G.711a
PCMA
10
8
8
3 - G.726-32K
G.726-32
10
5
2
4 - G.729a
G729a
10
2
96
5 - G.729ab
G729ab
10
1
96
6 - clr chan
CCD
10
9
96
7 - G.726-16K
G.726-16
10
3
96
8 - G.726-24K
G.726-24
10
4
96
9 - G.726-40K
G.726-40
10
6
96
Related Commands
Command
Description
cnfcodectmpl
Assigns a codec template to a VISM card.
dspcodectmpls
Displays all entries in the codec template table.
Cisco VISM Installation and Configuration Guide
5-328
Release 3.0, Part Number OL-2521-01 Rev. D0, June 2004
Chapter 5
CLI Commands
dspcodectmpls
dspcodectmpls
To display all entries in the codec template table, use the dspcodectmpls command in the VoIP
switching/trunking, switched AAL2 PVC, and AAL2 trunking operating modes.
dspcodectmpls
Syntax Description
This command has no arguments or keywords.
Command Modes
VoIP switching/trunking, switched AAL2 PVC, and AAL2 trunking
Usage Guidelines
VISM maintains a table of codec templates; each entry in the table contains the following:
Examples
•
Codec template number
•
Codecs supported
•
Maximum number of DS0s supported by the template
The following example shows that all entries in the codec template table are displayed:
dspcodectmpls
codecTemplateNumber
------------------1
2
3
Related Commands
codecSupported
-------------0x1ff
0x23
0x1ff
MaxChanCount
-----------145
192
120
Command
Description
cnfcodectmpl
Assigns a codec template to a VISM card.
dspcodecparams
Displays codec parameters.
Cisco VISM Installation and Configuration Guide
Release 3.0, Part Number OL-2521-01 Rev. D0, June 2004
5-329
Chapter 5
CLI Commands
dspcon
dspcon
To display the configuration data of a channel, use the dspcon command in the VoIP switching/trunking,
switched AAL2 PVC, and AAL2 trunking operating modes.
dspcon lcn
Syntax Description
lcn
Command Modes
VoIP switching/trunking, switched AAL2 PVC, and AAL2 trunking
Usage Guidelines
Follow standard CLI procedures for this command.
Examples
The following example shows that the configuration data for LCN 136 is displayed:
Logical channel number for which to display configuration data. It can be in the range
from 131 to 510.
dspcon 136
ChanNum:
ChanRowStatus:
ChanLocalRemoteLpbkState:
ChanTestType:
ChanTestState:
ChanRTDresult:
ChanPortNum:
ChanPvcType:
ChanConnectionType:
ChanLocalVpi:
ChanLocalVci:
ChanLocalNSAP:
ChanRemoteVpi:
ChanRemoteVci:
ChanRemoteNSAP:
ChanMastership:
ChanVpcFlag:
ChanConnServiceType:
ChanRoutingPriority:
ChanMaxCost:
ChanRestrictTrunkType:
ChanConnPCR:
ChanConnPercentUtil:
ChanPreference:
ChanRemotePCR:
ChanRemotePercentUtil:
ChanProtection:
ChanActivityState:
ChanLockingState:
ChanApplication:
ChanServiceType:
ChanScrIngress:
ChanMbsIngress:
ChanNumNextAvailable:
ChanVCCI:
136
Add
Disabled
TestOff
NotInProgress
65535 ms
1
AAL5
PVC
0
36
646174616d767232000000000000000005000100
44
44
646174616d767232000000000000000000000200
Master
Vcc
CBR
1
255
No Restriction
400
100
1
400
100
unprotected
unknown
unlock
signaling
cbr
0
0
137
0
Cisco VISM Installation and Configuration Guide
5-330
Release 3.0, Part Number OL-2521-01 Rev. D0, June 2004
Chapter 5
CLI Commands
dspcon
ChanFarEndAddrType:
ChanFarEndE164Addr:
ChanFarEndGWIDAddr:
ChanFarEndNSAPAddr:
Related Commands
notapplicable
0
.
NULL NSAP
Command
Description
addcon
Adds a PVC connection between a VISM card and any SM or PXM card.
delcon
Deletes a connection (PVC) between a VISM card and a Cisco MGX 8000 Series
platform PXM card.
Cisco VISM Installation and Configuration Guide
Release 3.0, Part Number OL-2521-01 Rev. D0, June 2004
5-331
Chapter 5
CLI Commands
dspconcac
dspconcac
To display connection admission control (CAC) configuration data for a connection, use the dspconcac
command in the VoIP switching/trunking, switched AAL2 PVC, and AAL2 trunking operating modes.
dspconcac lcn
Syntax Description
lcn
Command Modes
VoIP switching/trunking, switched AAL2 PVC, and AAL2 trunking
Usage Guidelines
Follow standard CLI procedures for this command.
Examples
The following example shows that the CAC configuration data for LCN 131 is displayed:
Logical channel number for which to display CAC configuration data. It can be in the
range from 131 to 510.
dspconcac 131
LCN
MasterShip
Vad Tolerance
Vad Duty Cycle
Rejecton Policy
Carrier Loss Policy
Accepted Connections
Rejected Connections
Effective Cell Rate
Used
Cell Rate
Available Cell Rate
Related Commands
:
:
:
:
:
:
:
:
:
:
:
131
Master
100
61
3
3
24
0
6000 cps
3200 cps
2800 cps
Command
Description
cnfconcac
Configures CAC on a previously added connection.
Cisco VISM Installation and Configuration Guide
5-332
Release 3.0, Part Number OL-2521-01 Rev. D0, June 2004
Chapter 5
CLI Commands
dspconcnt
dspconcnt
To display counter configuration data (channel state) of a connection, use the dspconcnt command in
the VoIP switching/trunking, switched AAL2 PVC, and AAL2 trunking operating modes.
dspconcnt lcn
Syntax Description
lcn
Command Modes
VoIP switching/trunking, switched AAL2 PVC, and AAL2 trunking
Usage Guidelines
Follow standard CLI procedures for this command.
Examples
The following example shows that the counter configuration data for LCN 136 is displayed:
Logical channel number for which to display counter configuration data. It can be in
the range from 131 to 510.
dspconcnt 136
ChanNum:
Chan State:
Chan XMT ATM State:
Chan RCV ATM State:
Chan Status Bit Map:
OAM Lpb Lost Cells:
AAL2 HEC Errors:
AAL2 CRC Errors:
AAL2 Invalid OSF Cells:
AAL2 Invalid Parity Cells:
AAL2 CPS Packet Xmt:
AAL2 CPS Packet Rcv:
AAL2 Invalid CID CPS:
AAL2 Invalid UUI CPS:
AAL2 Invalid Len. CPS:
AAL5 Invalid CPI:
AAL5 oversized SDU PDU:
AAL5 Invalid Len. PDU:
AAL5 PDU CRC32 Errors:
Related Commands
136
alarm
Sending AIS OAM
Receiving AIS OAM
0x6
75599
0
0
0
0
0
0
0
0
0
0
0
0
0
Command
Description
addcon
Adds a PVC connection between a VISM card and any SM or PXM card.
delcon
Deletes a connection (PVC) between a VISM card and a Cisco MGX 8000 Series
platform PXM card.
Cisco VISM Installation and Configuration Guide
Release 3.0, Part Number OL-2521-01 Rev. D0, June 2004
5-333
Chapter 5
CLI Commands
dspcons
dspcons
To display channel configuration data for all configured connections on a VISM card, use the dspcons
command in the VoIP switching/trunking, switched AAL2 PVC, and AAL2 trunking operating modes.
dspcons
Syntax Description
This command has no arguments or keywords.
Command Modes
VoIP switching/trunking, switched AAL2 PVC, and AAL2 trunking
Usage Guidelines
Follow standard CLI procedures for this command.
Examples
The following example shows that channel configuration data for all connections on the current VISM
card are displayed:
dspcons
ConnId
ChanNum Status
------------- -----datamvr2.5.1.0.135
135
datamvr2.5.1.0.136
136
ChanNumNextAvailable:
Related Commands
Preference
---------Add
Add
Protection
Active
---------------1 unprotected unknown
1 unprotected unknown
Locking
-------unlock
unlock
137
Command
Description
addcon
Adds a PVC connection between a VISM card and any SM or PXM card.
cnfcon
Configures a connection between a VISM card and a Cisco MGX 8000 Series
platform PXM card.
dspcon
Displays the parameters for a specified channel.
Cisco VISM Installation and Configuration Guide
5-334
Release 3.0, Part Number OL-2521-01 Rev. D0, June 2004
Chapter 5
CLI Commands
dspconvbdpol
dspconvbdpol
To display fax/modem upspeed, connection admission control (CAC) failure, and fax/modem carrier loss
policies for calls added to a particular IP or AAL2 logical channel number (LCN), use the dspconvbdpol
command in the VoIP switching/trunking, switched AAL2 PVC, and AAL2 trunking operating modes.
dspconvbdpol
Syntax Description
This command has no arguments or keywords.
Command Modes
VoIP switching/trunking, switched AAL2 PVC, and AAL2 trunking
Usage Guidelines
Follow standard CLI procedures for this command.
Examples
The following example shows that the voiceband data policies for LCN 131 are displayed:
dspconvbdpol 131
LcnNumer:
131
ChanCarrierLossPolicy: upspeedCodec
ChanCacRejectionPolicy: delete
Related Commands
Command
Description
cnfconvbdpol
Configures the policies for fax/modem upspeed CAC failure and fax/modem carrier
loss for calls added to a particular IP or AAL2 LCN.
Cisco VISM Installation and Configuration Guide
Release 3.0, Part Number OL-2521-01 Rev. D0, June 2004
5-335
Chapter 5
CLI Commands
dspdisctimers
dspdisctimers
To display the Restart in Progress command disconnect type method wait delay times, use the
dspdisctimers command in the VoIP switching/trunking, switched AAL1 SVC, switched AAL2 SVC,
switched AAL2 PVC, AAL2 trunking, VoIP and switched ATM AAL1 SVC operating modes.
dspdisctimers
Syntax Description
This command has no arguments or keywords.
Command Modes
VoIP switching/trunking, switched AAL1 SVC, switched AAL2 SVC, switched AAL2 PVC, AAL2
trunking, VoIP and switched ATM AAL1 SVC
Usage Guidelines
Follow standard CLI procedures for this command.
Examples
The following example shows that the Restart in Progress command disconnect type method wait delay
times are displayed:
dspdisctimers
Initial Waiting Delay: 15secs
Min Waiting Delay:
15 secs
Nax Waiting Delay:
600 secs
Related Commands
Command
Description
addmgcgrpprotocol
Associates a call agent redundancy group to a gateway control protocol.
cnfdisctimers
Specifies the wait delay times for the disconnected procedure, restart in
progress command—initial, minimum, and maximum timer values.
cnfmgcgrpprotocol
Configures call agent group protocol data.
cnfxgcppeer
Configures the UDP port number used to send gateway-initiated messages to
the call agent.
delmgcgrpprotocol
Deletes an MGCP from a specified call agent redundancy group.
Cisco VISM Installation and Configuration Guide
5-336
Release 3.0, Part Number OL-2521-01 Rev. D0, June 2004
Chapter 5
CLI Commands
dspdnallips
dspdnallips
To display all statistically provisioned IP addresses and externally resolved IP addresses for all domain
names configured on the current VISM card, use the dspdnallips command in the VoIP
switching/trunking and switched AAL2 PVC operating modes.
dspdnallips
Syntax Description
This command has no arguments or keywords.
Command Modes
VoIP switching/trunking and switched AAL2 PVC
Usage Guidelines
Follow standard CLI procedures for this command.
Examples
The following example shows that all statistically provisioned IP addresses and externally resolved IP
addresses for all domain names configured on the current VISM card are displayed:
dspdnallips
ResolutionIndex
--------------2
45
70
1
Related Commands
DomainName
---------callagent99
callagent99
callagent99
dns
IP
--------------nnn.nnn.nnn.nnx
nnn.nnn.nnn.nxn
nnn.nnn.nnn.xnn
nnn.nnn.nnx.nnn
Preference
---------1
3
4
1
Command
Description
adddn
Adds a domain name (call agent name) and optionally configures the resolution type
of the domain name.
adddnip
Adds the IP addresses for a domain name that you added by using the adddn
command.
cnfdn
Configures the resolution type of a specified domain name.
cnfdnssrvr
Designates a domain name as a DNS.
deldn
Deletes a domain name.
deldnip
Deletes a statistically provisioned IP address of a domain name.
dspdnips
Displays all statistically provisioned and externally resolved IP addresses configured
for a specified domain name.
dspdns
Displays the configuration data of all domain names of a call agent.
dspdnssrvr
Displays the domain name of the configured DNS of the current VISM card.
Cisco VISM Installation and Configuration Guide
Release 3.0, Part Number OL-2521-01 Rev. D0, June 2004
5-337
Chapter 5
CLI Commands
dspdnips
dspdnips
To display all statistically provisioned and externally resolved IP addresses configured for a specified
domain name, use the dspdnips command in the VoIP switching/trunking and switched AAL2 PVC
operating modes.
dspdnips domain-name
Syntax Description
domain-name
Command Modes
VoIP switching/trunking and switched AAL2 PVC
Usage Guidelines
Follow standard CLI procedures for this command.
Examples
The following example shows that all statistically provisioned and externally resolved IP addresses
configured for domain name callagent99 are displayed:
Call agent name. A text string of 1 to 64 alphanumeric characters.
dspdnips callagent99
ResolutionIndex
--------------2
45
70
Related Commands
DomainName
---------callagent99
callagent99
callagent99
IP
--------------nnn.nnn.nnn.nnx
nnn.nnn.nnn.nxn
nnn.nnn.nnn.xnn
Preference
---------1
3
4
Command
Description
adddn
Adds a domain name (call agent name) and optionally configures the resolution type
of the domain name.
adddnip
Adds the IP addresses for a domain name that you added by using the adddn
command.
cnfdn
Configures the resolution type of a specified domain name.
cnfdnssrvr
Designates a domain name as a DNS.
deldn
Deletes a domain name.
deldnip
Deletes a statistically provisioned IP address of a domain name.
dspdnallips
Displays all statistically provisioned IP addresses and externally resolved IP
addresses for all domain names configured on the current VISM card.
dspdns
Displays the configuration data of all domain names of a call agent.
dspdnssrvr
Displays the domain name of the configured DNS of the current VISM card.
Cisco VISM Installation and Configuration Guide
5-338
Release 3.0, Part Number OL-2521-01 Rev. D0, June 2004
Chapter 5
CLI Commands
dspdns
dspdns
To display the configuration data of all domain names of a call agent, use the dspdns command in the
VoIP switching/trunking, switched AAL2 PVC, and AAL2 trunking operating modes.
dspdns
Syntax Description
This command has no arguments or keywords.
Command Modes
VoIP switching/trunking, switched AAL2 PVC, and AAL2 trunking
Usage Guidelines
Follow standard CLI procedures for this command.
Examples
The following example shows that the configuration data of the mgc1 domain name are displayed:
dspdns
DomainNumber
-----------1
Related Commands
DomainName
---------mgc1
IP
----------nn.nn.nn.nn
State
----Active
Preference
---------1
Resolution Type
--------------internal only
Command
Description
adddn
Adds a domain name (call agent name) and optionally configures the resolution type
of the domain name.
adddnip
Adds the IP addresses for a domain name that you added by using the adddn
command.
cnfdn
Configures the resolution type of a specified domain name.
cnfdnssrvr
Designates a domain name as a DNS.
deldn
Deletes a domain name.
delnip
Deletes a statistically provisioned IP address of a domain name.
dspdnallips
Displays all statistically provisioned IP addresses and externally resolved IP
addresses for all domain names configured on the current VISM card.
dspdnips
Displays all statistically provisioned and externally resolved IP addresses configured
for a specified domain name.
dspdnssrvr
Displays the domain name of the configured DNS of the current VISM card.
Cisco VISM Installation and Configuration Guide
Release 3.0, Part Number OL-2521-01 Rev. D0, June 2004
5-339
Chapter 5
CLI Commands
dspdnssrvr
dspdnssrvr
To display the domain name of the configured domain name server (DNS) of the current VISM card, use
the dspdnssrvr command in the VoIP switching/trunking and switched AAL2 PVC operating modes.
dspdnssrvr
Syntax Description
This command has no arguments or keywords.
Command Modes
VoIP switching/trunking and switched AAL2 PVC
Usage Guidelines
Follow standard CLI procedures for this command.
Examples
The following example shows that the configured DNS of the current VISM card is callagent99:
dspdnssrvr
External DNS Server Domain Name: callagent99
Related Commands
Command
Description
adddn
Adds a domain name (call agent name) and optionally configures the resolution type
of the domain name.
adddnip
Adds the IP addresses for a domain name that you added by using the adddn
command.
cnfdn
Configures the resolution type of a specified domain name.
cnfdnssrvr
Designates a domain name as a DNS.
deldn
Deletes a domain name.
deldnip
Deletes a statistically provisioned IP address of a domain name.
dspdnallips
Displays all statistically provisioned IP addresses and externally resolved IP
addresses for all domain names configured on the current VISM card.
dspdnips
Displays all statistically provisioned and externally resolved IP addresses configured
for a specified domain name.
dspdns
Displays the configuration data of all domain names of a call agent.
Cisco VISM Installation and Configuration Guide
5-340
Release 3.0, Part Number OL-2521-01 Rev. D0, June 2004
Chapter 5
CLI Commands
dspdpvcoamparams
dspdpvcoamparams
To display the transmitted and received permanent virtual circuit (PVC) operations, administration, and
maintenance (OAM) cell parameters, use the dspdpvcoamparams command in the VoIP
switching/trunking operating mode.
dspdpvcoamparams
Syntax Description
This command has no arguments or keywords.
Command Modes
VoIP switching/trunking
Usage Guidelines
Follow standard CLI procedures for this command.
Examples
The following example shows that the transmitted and received PVC OAM cell parameters are
displayed:
dspdpvcoamparams
OAM Cell Gap
: 500ms
OAM Cell Retry Count
: 3
OAM Cell Recovery Count: 5
Related Commands
Command
Description
cnfdpvcoamparams
Configures the transmitted and received PVC OAM cell parameters.
Cisco VISM Installation and Configuration Guide
Release 3.0, Part Number OL-2521-01 Rev. D0, June 2004
5-341
Chapter 5
CLI Commands
dspds0gain
dspds0gain
To display the adjustable gain values for a specified DS0, use the dspds0gain command in the VoIP
switching/trunking, switched AAL2 PVC, and AAL2 trunking operating modes.
dspds0gain line-num ds0-num
Syntax Description
line-num
Line number of the DS0 for which you want to display the adjustable gain. In the
range from 1 to 8.
ds0-num
DS0 number on which to display adjustable gain. It can be a value from one of the
following ranges:
•
1 to 24 for T1 lines
•
1 to 31 for E1 lines
Command Modes
VoIP switching/trunking, switched AAL2 PVC, and AAL2 trunking
Usage Guidelines
Follow standard CLI procedures for this command.
Examples
The following example shows that the adjustable gain values for DS0 1 are displayed:
dspds0gain 2 1
Line Number
:
Ds0 Number
:
InputGain
:
Output Attenuation:
Related Commands
2
1
0
60
Command
Description
cnfds0gain
Configures the adjustable gain for a specified DS0.
cnfgain
Configures the adjustable gain for a VISM card.
cnflngain
Configures the adjustable gain for all DS0s on a specified VISM card line.
dspgain
Displays the adjustable gain for a specified VISM card.
dsplngain
Displays the adjustable gain for a specified VISM card line.
Cisco VISM Installation and Configuration Guide
5-342
Release 3.0, Part Number OL-2521-01 Rev. D0, June 2004
Chapter 5
CLI Commands
dspds0localcasstatus
dspds0localcasstatus
To display the currently configured local channel associated signaling (CAS) status for a specified line
and DS0, use the dspds0localcasstatus command in the VoIP switching/trunking, switched AAL2 PVC,
and AAL2 trunking operating modes.
dspds0localcasstatus line-num ds0-num
Syntax Description
line-num
Line number of the channel for which you want to display the currently local CAS
status. It can be in the range from 1 to 8.
ds0-num
DS0 number of the channel for which you want to display the currently local CAS
status. It can be a value from one of the following ranges:
•
1 to 24 for T1 lines
•
1 to 31 for E1 lines
Command Modes
VoIP switching/trunking, switched AAL2 PVC, and AAL2 trunking
Usage Guidelines
Follow standard CLI procedures for this command.
Examples
The following example shows that the currently configured local CAS status for line number 1, DS0
number 1 is displayed:
dspds0localcasstatus 1 1
ds1 line number:
ds0 number:
ds0 If Index:
local cas type:
local cas 4 bit bit pattern:
Related Commands
1
1
1
Disabled
0
Command
Description
cnfds0localcas
Configures a local CAS 4-bit pattern for a T1 line and DS0.
Cisco VISM Installation and Configuration Guide
Release 3.0, Part Number OL-2521-01 Rev. D0, June 2004
5-343
Chapter 5
CLI Commands
dspds0loop
dspds0loop
To display the loopback type for a specified line and DS0, use the dspds0loop command in the VoIP
switching/trunking, switched AAL2 PVC, and AAL2 trunking operating modes.
dspds0loop line-num ds0-num
Syntax Description
line-num
Line number of the channel for which you want to display the loopback type. It
can be in the range from 1 to 8.
ds0-num
DS0 number of the channel for which you want to display the loopback type. It
can be a value from one of the following ranges:
•
1 to 24 for T1 lines
•
1 to 31 for E1 lines
Command Modes
VoIP switching/trunking, switched AAL2 PVC, and AAL2 trunking
Usage Guidelines
Follow standard CLI procedures for this command.
Examples
The following example shows that the loopback type for line number 1, DS0 number 1 is displayed:
dspds0loop 1 1
ds1 line number:
ds0 number:
ds0 If Index:
loopback value:
Related Commands
1
1
1
noLoop
There are no related commands.
Cisco VISM Installation and Configuration Guide
5-344
Release 3.0, Part Number OL-2521-01 Rev. D0, June 2004
Chapter 5
CLI Commands
dspds0musicthreshold
dspds0musicthreshold
To display the music on-hold threshold value for a specified DS0, use the dspds0musicthreshold
command in the VoIP switching/trunking, switched AAL2 PVC, and AAL2 trunking operating modes.
dspds0musicthreshold line-num ds0-num
Syntax Description
line-num
Line number of the channel for which you want to display the DS0 music
on-hold threshold value. It can be in the range from 1 to 8.
ds0-num
DS0 number for which you want to display the music on-hold threshold
value. It can be a value from one of the following ranges:
•
1 to 24 for T1 lines
•
1 to 31 for E1 lines
Command Modes
VoIP switching/trunking, switched AAL2 PVC, and AAL2 trunking
Usage Guidelines
Follow standard CLI procedures for this command.
Examples
The following example shows that the VISM card line number 1, DS0 number 1 displays the –50 dB
music on-hold threshold configuration value:
dspds0musicthreshold 1 1
Line Number
: 1
Ds0 Number
: 1
MusicThreshold: -50
Related Commands
Command
Description
cnfds0musicthreshold
Configures the music on-hold threshold for a specified DS0.
cnflnmusicthreshold
Configures the music on-hold threshold for all DS0s on a specified line.
cnfmusicthreshold
Configures the music on-hold threshold value for the current VISM card.
dsplnmusicthreshold
Displays the music on-hold threshold values for the DS0s on a specified
line.
dspmusicthreshold
Displays the music on-hold threshold values for the current VISM card.
Cisco VISM Installation and Configuration Guide
Release 3.0, Part Number OL-2521-01 Rev. D0, June 2004
5-345
Chapter 5
CLI Commands
dspendpt
dspendpt
To display configuration data of a specified VISM card endpoint, use the dspendpt command in the VoIP
switching/trunking, switched AAL2 PVC, and AAL2 trunking operating modes.
dspendpt endpt-num
Syntax Description
endpt-num
Endpoint number. It can be a value from one of the following ranges:
•
For template number 1:
– For VISM, from 1 to 145
– For VISM-PR T1, from 1 to 192
– For VISM-PR E1, from 1 to 248
•
For template number 2:
– For VISM T1, from 1 to 192
– For VISM E1, from 1 to 248
•
For template number 3:
– For VISM, from 1 to 120
– For VISM-PR T1, from 1 to 192
– For VISM-PR E1, from 1 to 248
•
For template number 4:
– For VISM-PR, from 1 to 144
Command Modes
VoIP switching/trunking, switched AAL2 PVC, and AAL2 trunking
Usage Guidelines
Follow standard CLI procedures for this command.
Examples
The following example shows that the configuration data of endpoint number 120 is displayed:
dspendpt 120
EndptNum:
EndptLineNum:
EndptName:
EndptSpeed:
EndptState:
EndptChannelMap:
EndptEnable:
EndptLoopback:
Note
120
1
T1-1/[email protected]
64 kbps
active
1
active
disabled
The EndptChannelMap value is represented by a hexadecimal number, where each DS0 is a power
of 2—EndptChannelMap = 2 DS0 number.
Cisco VISM Installation and Configuration Guide
5-346
Release 3.0, Part Number OL-2521-01 Rev. D0, June 2004
Chapter 5
CLI Commands
dspendpt
Related Commands
Command
Description
addendpt
Adds an endpoint on a VISM card.
delendpt
Deletes a specified endpoint on a VISM card.
dspendpts
Displays information about all endpoints on a VISM card.
Cisco VISM Installation and Configuration Guide
Release 3.0, Part Number OL-2521-01 Rev. D0, June 2004
5-347
Chapter 5
CLI Commands
dspendpts
dspendpts
To display configuration data about all endpoints on a VISM card, use the dspendpts command in the
VoIP switching/trunking, switched AAL2 PVC, and AAL2 trunking operating modes.
dspendpts
Syntax Description
This command has no arguments or keywords.
Command Modes
VoIP switching/trunking, switched AAL2 PVC, and AAL2 trunking
Usage Guidelines
Follow standard CLI procedures for this command.
Examples
The following example shows that the configuration data for all endpoints on the current VISM card are
displayed:
dspendpts
EndptNum
-------1
2
3
Related Commands
Ena/Speed
--- ----act/ 64k
act/ 64k
act/ 64k
Command
Description
addendpt
Adds an endpoint on a VISM card.
addendpts
Adds multiple consecutive numbers of endpoints to a VISM card.
delendpt
Deletes a specified endpoint on a VISM card.
dspendpt
Displays configuration data about a VISM card endpoint.
Cisco VISM Installation and Configuration Guide
5-348
Release 3.0, Part Number OL-2521-01 Rev. D0, June 2004
Chapter 5
CLI Commands
dspgain
dspgain
To display the adjustable gain for a specified VISM card, use the dspgain command in the VoIP
switching/trunking, switched AAL2 PVC, and AAL2 trunking operating modes.
dspgain
Syntax Description
This command has no arguments or keywords.
Command Modes
VoIP switching/trunking, switched AAL2 PVC, and AAL2 trunking
Usage Guidelines
Follow standard CLI procedures for this command.
Examples
The following example shows that the adjustable gain values for the current VISM card are displayed:
dspgain
LineNo/Ds0No
-----------1/1
1/2
.
.
.
Related Commands
InputGain
--------0
10
OutputAttenuation
----------------100
60
Command
Description
cnfds0gain
Configures the adjustable gain for a specified DS0.
cnfgain
Configures the adjustable gain for a VISM card.
cnflngain
Configures the adjustable gain for all DS0s on a specified VISM card line.
dspds0gain
Displays the adjustable gain values for a specified DS0.
dsplngain
Displays the adjustable gain for a specified VISM card line.
Cisco VISM Installation and Configuration Guide
Release 3.0, Part Number OL-2521-01 Rev. D0, June 2004
5-349
Chapter 5
CLI Commands
dspgwstate
dspgwstate
To display the current user-configured service state of the gateway, use the dspgwstate in the VoIP
switching/trunking operating mode.
dspgwstate
Syntax Description
This command has no arguments or keywords.
Command Modes
VoIP switching/trunking
Usage Guidelines
The following possible states are displayed by this command:
•
Admin States:
– In service
– Command out of service
– Pending out of service
•
Operational States:
– Alarm
– OK
Examples
The following example shows that the user-configured gateway service states—the command out of
service administration state and the alarm operational state—are displayed:
dspgwstate
Admin State : Command_Out_Of_Service
Oper. State : Alarm
Related Commands
There are no related commands.
Cisco VISM Installation and Configuration Guide
5-350
Release 3.0, Part Number OL-2521-01 Rev. D0, June 2004
Chapter 5
CLI Commands
dsplapd
dsplapd
To display configuration data about a Link Access Protocol D channel (LAPD), use the dsplapd
command in the VoIP switching/trunking operating mode.
dsplapd line-num ds0-num
Syntax Description
line-num
Line number of the channel for which you want to display the LAPD
configuration data. It can be in the range from 1 to 8.
ds0-num
DS0 number of the channel for which you want to display the LAPD
configuration data. It can be a value from one of the following ranges:
•
1 to 24 for T1 lines
•
1 to 31 for E1 lines
Command Modes
VoIP switching/trunking
Usage Guidelines
Follow standard CLI procedures for this command.
Examples
The following example shows that the LAPD configuration data is displayed for line number 1, DS0
number 1:
dsplapd 1 1
vismRudpSessionStatNum:
vismRudpSessionAutoResets:
vismRudpSessionRcvdAutoResets:
vismRudpSessionRcvdInSeqs:
vismRudpSessionRcvdOutSeqs:
vismRudpSessionSentPackets:
vismRudpSessionRcvdPackets:
vismRudpSessionSentBytes:
vismRudpSessionRcvdBytes:
vismRudpSessionDataSentPkts:
vismRudpSessionDataRcvdPkts:
vismRudpSessionDiscardPkts:
Trunk type:
Related Commands
1
0
0
0
0
5
0
0
0
0
0
0
Backhaul
Command
Description
addlapd
Adds an LAPD.
addlapdtrunk
Adds an LAPD trunk to a specific VISM card line.
addrtpcon
Adds a static RTP VoIP trunking connection.
addrudptrunk
Adds an ISDN PRI backhaul RUDP session for an LAPD trunk connection.
clrrtpcnt
Clears the RTP counters (statistics) for a specific static RTP connection.
cnflapdtrunkpvc
Assigns the PVC trunk type that carries LAPD messages for the current VISM
card.
Cisco VISM Installation and Configuration Guide
Release 3.0, Part Number OL-2521-01 Rev. D0, June 2004
5-351
Chapter 5
CLI Commands
dsplapd
Command
Description
cnflntrunkcond
Enables or disables line conditioning on a VISM card line if a network alarm
is encountered.
cnfrtpcon
Modifies an existing static RTP VoIP trunking connection.
cnfrudptrunkrmtip Modifies the remote IP address of VISM used in the ISDN PRI backhaul RUDP
trunk for a specified session.
dellapd
Deletes an LAPD.
dellapdtrunk
Deletes an LAPD configured line.
delrtpcon
Deletes a static RTP VoIP trunking connection.
delrudptrunk
Deletes an ISDN PRI backhaul RUDP session that is associated with an LAPD.
dsplapds
Displays configuration data about all LAPDs.
dsplapdtrunkpvc
Displays the assigned PVC trunk type that carries LAPD trunk messages for
the current VISM card.
dsplapdtrunks
Displays the configuration data of all LAPD trunks.
dsprtpcnt
Displays the bearer counters (statistics) for a specific RTP VoIP trunking
connection.
dsprtpcon
Displays the configuration data of a specific static RTP VoIP trunking
connection.
dsprtpcons
Displays the configuration data of all static RTP VoIP trunking connections.
dsprudptrunk
Displays the configuration data of a specified ISDN PRI backhaul RUDP
session.
dsprudptrunks
Displays the configuration data of all ISDN PRI backhaul RUDP sessions.
Cisco VISM Installation and Configuration Guide
5-352
Release 3.0, Part Number OL-2521-01 Rev. D0, June 2004
Chapter 5
CLI Commands
dsplapds
dsplapds
To display configuration data about all Link Access Protocol for ISDN D channels (LAPDs), use the
dsplapds command in the VoIP switching/trunking operating mode.
dsplapds
Syntax Description
This command has no arguments or keywords.
Command Modes
VoIP switching/trunking
Usage Guidelines
Follow standard CLI procedures for this command.
Examples
The following example shows that the configuration data for all LAPDs is displayed:
dsplapds
Line number
DS0 number
Lapd Application Type
-----------------------------------------------1
1
PRI
Related Commands
Command
Description
addlapd
Adds an LAPD.
dellapd
Deletes an LAPD.
dsplapd
Displays configuration data about an LAPD.
Cisco VISM Installation and Configuration Guide
Release 3.0, Part Number OL-2521-01 Rev. D0, June 2004
5-353
Chapter 5
CLI Commands
dsplapdstat
dsplapdstat
To display configuration data about Link Access Protocol for ISDN D channel (LAPD) statistics
(counters) for a specific line and DS0, use the dsplapdstat command in the VoIP switching/trunking
operating mode.
dsplapdstat line-num ds0-num
Syntax Description
line-num
Line number of the channel for which you want to display the LAPD statistics. It can
be in the range from 1 to 8.
ds0-num
DS0 number of the channel for which you want to display the LAPD statistics. It can
be a value from one of the following ranges:
•
1 to 24 for T1 lines
•
1 to 31 for E1 lines
Command Modes
VoIP switching/trunking
Usage Guidelines
Follow standard CLI procedures for this command.
Examples
The following example shows that the LAPD statistic configuration data for line number 1, DS0 number
1 are displayed:
dsplapdstat 1 1
vismLapdStatsIndex:
vismLapdRxInfoFrames:
vismLapdTxInfoFrames:
vismLapdRxReadyFrames:
vismLapdTxReadyFrames:
vismLapdRxNotReadyFrames:
vismLapdTxNotReadyFrames:
vismLapdRxSABMFrames:
vismLapdTxSABMFrames:
vismLapdRxDisconFrames:
vismLapdTxDisconFrames:
vismLapdRxUAFrames:
vismLapdTxUAFrames:
vismLapdRxDiscModeFrames:
vismLapdTxDiscModeFrames:
vismLapdRxFrmRejectFrames:
vismLapdTxFrmRejectFrames:
vismLapdRxExchIdFrames:
vismLapdTxExchIdFrames:
vismLapdRxUnumInfoFrames:
vismLapdTxUnumInfoFrames:
vismLapdRxRejectFrames:
vismLapdTxRejectFrames:
vismLapdRxInvalidFrames:
1
0
0
0
0
0
0
0
0
0
0
0
0
0
0
0
0
0
0
0
0
0
0
0
Cisco VISM Installation and Configuration Guide
5-354
Release 3.0, Part Number OL-2521-01 Rev. D0, June 2004
Chapter 5
CLI Commands
dsplapdstat
Related Commands
There are no related commands.
Cisco VISM Installation and Configuration Guide
Release 3.0, Part Number OL-2521-01 Rev. D0, June 2004
5-355
Chapter 5
CLI Commands
dsplapdtrunkpvc
dsplapdtrunkpvc
To display the assigned permanent virtual circuit (PVC) trunk type that carries Link Access Protocol
D channel (LAPD) trunk messages for the current VISM card, use the dsplapdtrunkpvc command in
the VoIP switching/trunking, switched AAL2 PVC, and AAL2 trunking operating modes.
dsplapdtrunkpvc
Syntax Description
This command has no arguments or keywords.
Command Modes
VoIP switching/trunking, switched AAL2 PVC, and AAL2 trunking
Usage Guidelines
Follow standard CLI procedures for this command.
Examples
The following example shows that the control PVC trunk type carries LAPD trunk messages for the
current VISM card:
dsplapdtrunkpvc
Lapd Trunk PVC Carrier: Control
Related Commands
Command
Description
addlapdtrunk
Adds an LAPD trunk to a specific VISM card line.
addrtpcon
Adds a static RTP VoIP trunking connection.
addrudptrunk
Adds an ISDN PRI backhaul RUDP session for an LAPD trunk connection.
clrrtpcnt
Clears the RTP counters (statistics) for a specific static RTP connection.
cnflntrunkcond
Enables or disables line conditioning on a VISM card line if a network alarm
is encountered.
cnfrtpcon
Modifies an existing static RTP VoIP trunking connection.
cnfrudptrunkrmtip Modifies the remote IP address of VISM used in the ISDN PRI backhaul RUDP
trunk for a specified session.
dellapdtrunk
Deletes an LAPD configured line.
delrtpcon
Deletes a static RTP VoIP trunking connection.
delrudptrunk
Deletes an ISDN PRI backhaul RUDP session that is associated with an LAPD.
dsplapd
Displays data about an LAPD.
dsplapdtrunks
Displays the configuration data of all LAPD trunks.
dsprtpcnt
Displays the bearer counters (statistics) for a specific RTP VoIP trunking
connection.
dsprtpcon
Displays the configuration data of a specific static RTP VoIP trunking
connection.
dsprtpcons
Displays the configuration data of all static RTP VoIP trunking connections.
Cisco VISM Installation and Configuration Guide
5-356
Release 3.0, Part Number OL-2521-01 Rev. D0, June 2004
Chapter 5
CLI Commands
dsplapdtrunkpvc
Command
Description
dsprudptrunk
Displays the configuration data of a specified ISDN PRI backhaul RUDP
session.
dsprudptrunks
Displays the configuration data of all ISDN PRI backhaul RUDP sessions.
Cisco VISM Installation and Configuration Guide
Release 3.0, Part Number OL-2521-01 Rev. D0, June 2004
5-357
Chapter 5
CLI Commands
dsplapdtrunks
dsplapdtrunks
To display the data of all Link Access Protocol D channel (LAPD) configured trunks, use the
dsplapdtrunks command in the VoIP switching/trunking operating mode.
dsplapdtrunks
Syntax Description
This command has no arguments or keywords.
Command Modes
VoIP switching/trunking
Usage Guidelines
Follow standard CLI procedures for this command.
Examples
The following example shows that all LAPD configuration data of the current VISM card trunks are
displayed:
dsplapdtrunks
Trunk Num State Session Number
--------- ----- -------------1
Oos
1
Related Commands
Command
Description
addlapdtrunk
Adds an LAPD trunk to a specific VISM card line.
addrtpcon
Adds a static RTP VoIP trunking connection.
addrudptrunk
Adds an ISDN PRI backhaul RUDP session for an LAPD trunk connection.
clrrtpcnt
Clears the RTP counters (statistics) for a specific static RTP connection.
cnflapdtrunkpvc
Assigns the PVC trunk type that carries LAPD messages for the current VISM
card.
cnflntrunkcond
Enables or disables line conditioning on a VISM card line if a network alarm
is encountered.
cnfrtpcon
Modifies an existing static RTP VoIP trunking connection.
cnfrudptrunkrmtip Modifies the remote IP address of VISM used in the ISDN PRI backhaul RUDP
trunk for a specified session.
dellapdtrunk
Deletes an LAPD configured line.
delrtpcon
Deletes a static RTP VoIP trunking connection.
delrudptrunk
Deletes an ISDN PRI backhaul RUDP session that is associated with an LAPD.
dsplapd
Displays data about an LAPD.
dsplapdtrunkpvc
Displays the assigned PVC trunk type that carries LAPD trunk messages for
the current VISM card.
dsprtpcnt
Displays the bearer counters (statistics) for a specific RTP VoIP trunking
connection.
Cisco VISM Installation and Configuration Guide
5-358
Release 3.0, Part Number OL-2521-01 Rev. D0, June 2004
Chapter 5
CLI Commands
dsplapdtrunks
Command
Description
dsprtpcon
Displays the configuration data of a specific static RTP VoIP trunking
connection.
dsprtpcons
Displays the configuration data of all static RTP VoIP trunking connections.
dsprudptrunk
Displays the configuration data of a specified ISDN PRI backhaul RUDP
session.
dsprudptrunks
Displays the configuration data of all ISDN PRI backhaul RUDP sessions.
Cisco VISM Installation and Configuration Guide
Release 3.0, Part Number OL-2521-01 Rev. D0, June 2004
5-359
Chapter 5
CLI Commands
dsplinecasbits
dsplinecasbits
To display the currently transmitted and received channel associated signaling (CAS) bit values for all
the endpoints on a VISM card line, use the dsplinecasbits command in the VoIP switching/trunking,
switched AAL2 PVC, and AAL2 trunking operating modes.
dsplinecasbits line-num
Syntax Description
line-num
Command Modes
VoIP switching/trunking, switched AAL2 PVC, and AAL2 trunking
Usage Guidelines
Follow standard CLI procedures for this command.
Examples
The following example shows that the currently transmitted and received CAS bits of line number 1 are
displayed:
Line number for which you want to display the CAS bit values. It can be in the range
from 1 to 8.
dsplinecasbits 1
DS0
Tx to TDM
Rx fr TDM
-------A-B-C-D-----A-B-C-D
1
0 0 0 0
0 0 0 0
2
0 0 0 0
0 0 0 0
3
0 0 0 0
0 0 0 0
4
0 0 0 0
0 0 0 0
5
0 0 0 0
0 0 0 0
6
0 0 0 0
0 0 0 0
7
0 0 0 0
0 0 0 0
8
0 0 0 0
0 0 0 0
9
0 0 0 0
0 0 0 0
10
0 0 0 0
0 0 0 0
11
0 0 0 0
0 0 0 0
12
0 0 0 0
0 0 0 0
13
0 0 0 0
0 0 0 0
14
0 0 0 0
0 0 0 0
15
0 0 0 0
0 0 0 0
16
0 0 0 0
0 0 0 0
17
0 0 0 0
0 0 0 0
18
0 0 0 0
0 0 0 0
19
0 0 0 0
0 0 0 0
20
0 0 0 0
0 0 0 0
21
0 0 0 0
0 0 0 0
22
0 0 0 0
0 0 0 0
23
0 0 0 0
0 0 0 0
24
0 0 0 0
0 0 0 0
Cisco VISM Installation and Configuration Guide
5-360
Release 3.0, Part Number OL-2521-01 Rev. D0, June 2004
Chapter 5
CLI Commands
dsplinecasbits
Related Commands
Command
Description
addendpt
Adds an endpoint on a VISM card.
addendpts
Adds a consecutive number of endpoints to a VISM card.
addln
Adds a T1 or E1 line to a VISM card.
cnfcasendpt
Associates an endpoint with a CAS variant.
cnflnsig
Configures the signaling mode for a VISM card line.
Cisco VISM Installation and Configuration Guide
Release 3.0, Part Number OL-2521-01 Rev. D0, June 2004
5-361
Chapter 5
CLI Commands
dspln
dspln
To display the configuration data of a VISM card line, use the dspln command in the VoIP
switching/trunking, switched AAL2 PVC, and AAL2 trunking operating modes.
dspln line-num
Syntax Description
line-num
Command Modes
VoIP switching/trunking, switched AAL2 PVC, and AAL2 trunking
Usage Guidelines
Follow standard CLI procedures for this command.
Examples
The following example shows that the configuration data for the current VISM card’s line number 1 is
displayed:
Line number for which you want to display the configuration data. It can be in the
range from 1 to 8.
dspln 1
LineNum:
LineConnectorType:
LineEnable:
LineType:
LineCoding:
LineLength:
LineXmtClockSource:
LineLoopbackCommand:
LineSendCode:
LineUsedTimeslotsBitMap:
LineLoopbackCodeDetection:
LineSignalingType:
LineCcsChannels:
LineTrunkConditioning:
LineNumOfValidEntries: 8
Note
Related Commands
1
RJ-48
Enabled
dsx1ESF
dsx1B8ZS
0-131 ft
LocalTiming
NoLoop
NoCode
0x3ff
codeDetectDisabled
CAS
0x0
disable
The LineCcsChannels data applies only to the AAL2 trunking operating mode.
Command
Description
addln
Adds a T1 or E1 line to a VISM card.
cnfln
Configures characteristics for a VISM card line.
delln
Deletes a T1 or E1 line from a VISM card.
Cisco VISM Installation and Configuration Guide
5-362
Release 3.0, Part Number OL-2521-01 Rev. D0, June 2004
Chapter 5
CLI Commands
dsplncids
dsplncids
To display the channel identification (CID), endpoint, and AAL2 configuration data for a VISM card
line, use the dsplncids command in the switched AAL2 PVC and AAL2 trunking operating modes.
dsplncids line-num
Syntax Description
line-num
Command Modes
Switched AAL2 PVC and AAL2 trunking
Usage Guidelines
Follow standard CLI procedures for this command.
Examples
The following example shows that the CID, endpoint, and AAL2 configuration data for line 2 are
displayed:
Line number for which you want to display the CID, endpoint, and AAL2
configuration data. It can be in the range from 1 to 8.
dsplncids 2
lcn
Num
--33
Note
Related Commands
CID Endpt Cid
Type3
VAD
Prof Prof
Codec
Cas DTMF
Num Num Status Redun VAD Timer Type Num
Type
Tran Tran Ecan
--- ----- ------ ----- --- ----- ------ ---- --------- ---- ---- ---10
2 active ena ena
250
ITU
1
G.711u ena ena ena
If you configure the codec type as clear for the line number identified by the line-num argument, the
Type3 Redun, Cas Tran, DTMF Tran, and Ecan values are not applicable.
Command
Description
addcid
Adds an AAL2 CID on a VISM card.
Cisco VISM Installation and Configuration Guide
Release 3.0, Part Number OL-2521-01 Rev. D0, June 2004
5-363
Chapter 5
CLI Commands
dsplndigitorder
dsplndigitorder
To display the order in which automatic number identification (ANI) digits—the caller’s number—and
dialed number identification service (DNIS) digits—the called number—are dialed during an outgoing
Feature Group D (FGD) call on the endpoints of a specified VISM card line, use the dsplndigitorder
command in the VoIP switching/trunking, switched AAL2 PVC, and AAL2 trunking operating modes.
dsplndigitorder line-num
Syntax Description
line-num
Command Modes
VoIP switching/trunking, switched AAL2 PVC, and AAL2 trunking
Usage Guidelines
The ANI and DNIS digits are sent as part of the MGCP setup message.
Examples
The following example shows that the current VISM card’s line number 7 is assigned a digit order of
DNIS digits first, followed by ANI digits, for digits dialed during an outgoing FGD call:
Line number for which to configure dialed digit order. In the range from 1 to 8.
dsplndigitorder 7
LineNum
: 1
Dsx1TxDigitOrder: aniThenDnis
Related Commands
Command
Description
cnfcasflashtime
Configures the minimum and maximum CAS on-hook time periods for
incoming flash hooks on a specified endpoint.
cnfcasglareattrib
Configures the direction of CAS calls and the glare policy for a specified
endpoint.
cnfcaspackage
Configures MGCP packages to notify persistent observed CAS events in the
context of incoming and outgoing CAS calls on a specified endpoint.
cnflndigitorder
Assigns the order in which ANI digits and DNIS digits are dialed during an
outgoing FGD call on the endpoints of a specified VISM card line.
delxgcppersistevt
Deletes a persistent xGCP event.
dspcasglareattrib
Displays the direction of CAS calls and the glare policy for a specified
endpoint.
dspcaspackage
Displays the MGCP packages configured to notify persistent observed CAS
events in the context of incoming and outgoing CAS calls on a specified
endpoint.
dspcastimers
Displays the currently configured CAS timers for a specified endpoint.
Cisco VISM Installation and Configuration Guide
5-364
Release 3.0, Part Number OL-2521-01 Rev. D0, June 2004
Chapter 5
CLI Commands
dsplndsp
dsplndsp
To display the digital signal processor (DSP) data for a specified T1 or E1 line, use the dsplndsp
command in the VoIP switching/trunking, switched AAL2 PVC, and AAL2 trunking operating modes.
dsplndsp line-num
Syntax Description
line-num
Command Modes
VoIP switching/trunking, switched AAL2 PVC, and AAL2 trunking
Usage Guidelines
Follow standard CLI procedures for this command.
Examples
The following example shows that the DSP data for line 1 are displayed:
Line number for which you want to display the DSP data. It can be in the range from
1 to 8.
dsplndsp 1
VismLineNum:
ECANEnable:
ECANReenable:
ToneDisable:
MaximumTail:
ResidualEcho:
VoiceDetection:
Note
Related Commands
1
enable
ReenableOnModemData
G.165
32 milliseconds
ComfortNoise
Enable
VAD and ECAN apply to the VoIP switching/trunking operating mode only.
Command
Description
addln
Adds a T1 or E1 line to a VISM card.
delln
Deletes a T1 or E1 line from a VISM card.
Cisco VISM Installation and Configuration Guide
Release 3.0, Part Number OL-2521-01 Rev. D0, June 2004
5-365
Chapter 5
CLI Commands
dsplndsx0s
dsplndsx0s
To display the configuration data of all DS0s on a specified T1 or E1 line, use the dsplndsx0s command
in the VoIP switching/trunking, switched AAL2 PVC, and AAL2 trunking operating modes.
dsplndsx0s line-num
Syntax Description
line-num
Command Modes
VoIP switching/trunking, switched AAL2 PVC, and AAL2 trunking
Usage Guidelines
Follow standard CLI procedures for this command.
Examples
The following example shows that all DS0 configuration data for line 1 are displayed:
Line number for which you want to display all DS0 configuration data. It can be in
the range from 1 to 8.
dsplndsx0s 1
ds0 If
Index
-------1
2
3
4
5
6
7
8
9
10
11
12
13
14
15
16
17
18
19
20
21
22
23
24
Note
Robbed Bit
Signaling
-----------True
True
True
True
True
False
False
False
False
False
False
False
False
False
False
False
False
False
False
False
False
False
False
False
Idle
Seized
EndPt
If
Variant
Code
Code
Num
Type
Name
------ -------- ------- ------ ------------0
0
1
bearer
0
0
2
bearer
0
0
3
bearer
0
0
4
bearer
0
0
5
bearer
0
0
-1
0
0
-1
0
0
-1
0
0
-1
0
0
-1
0
0
-1
0
0
-1
0
0
-1
0
0
-1
0
0
-1
0
0
-1
0
0
-1
0
0
-1
0
0
-1
0
0
-1
0
0
-1
0
0
-1
0
0
-1
0
0
-1
-
Idle code, seized code and variant name apply to the VoIP switching/trunking operating mode only.
Cisco VISM Installation and Configuration Guide
5-366
Release 3.0, Part Number OL-2521-01 Rev. D0, June 2004
Chapter 5
CLI Commands
dsplndsx0s
Related Commands
Command
Description
addln
Adds a T1 or E1 line to a VISM card.
delln
Deletes a T1 or E1 line from a VISM card.
Cisco VISM Installation and Configuration Guide
Release 3.0, Part Number OL-2521-01 Rev. D0, June 2004
5-367
Chapter 5
CLI Commands
dsplnendptstatus
dsplnendptstatus
To display the status of endpoints for a specified T1 or E1 line, use the dsplnendptstatus command in
the VoIP switching/trunking, switched AAL2 PVC, and AAL2 trunking operating mode.
dsplnendptstatus line-num
Syntax Description
line-num
Command Modes
VoIP switching/trunking, switched AAL2 PVC, and AAL2 trunking
Usage Guidelines
Follow standard CLI procedures for this command.
Examples
The following example shows that the status for the endpoints on line 1 are displayed:
Line number for which you want to display the status of endpoints. It can be in the
range from 1 to 8.
dsplnendptstatus 1
ds0# Endpt# Codec VAD ECAN
-----------------------------1
1
G.711a ON ON
Related Commands
Command
Description
dspendpts
Displays information about all the endpoints on a VISM card.
dspln
Displays the characteristics of a VISM card line.
Cisco VISM Installation and Configuration Guide
5-368
Release 3.0, Part Number OL-2521-01 Rev. D0, June 2004
Chapter 5
CLI Commands
dsplngain
dsplngain
To display the adjustable gain for all DS0s on a specified VISM card line, use the dsplngain command
in the VoIP switching/trunking, switched AAL2 PVC, and AAL2 trunking operating modes.
dsplngain line-num
Syntax Description
line-num
Command Modes
VoIP switching/trunking, switched AAL2 PVC, and AAL2 trunking
Usage Guidelines
Follow standard CLI procedures for this command.
Examples
The following example shows that the adjustable gain values for all DS0s on VISM card line 3 are
displayed:
Line number for which you want to display the adjustable gain for all DS0s. In the
range from 1 to 8.
dsplngain 3
Ds0Num
-----1
2
.
.
.
Related Commands
InputGain
--------0
10
OutputAttenuation
----------------100
60
Command
Description
cnflngain
Configures the adjustable gain for all DS0s on a specified VISM card line.
Cisco VISM Installation and Configuration Guide
Release 3.0, Part Number OL-2521-01 Rev. D0, June 2004
5-369
Chapter 5
CLI Commands
dsplnmusicthreshold
dsplnmusicthreshold
To display the music on-hold threshold values for the DS0s on a specified line, use the
dsplnmusicthreshold command in the VoIP switching/trunking, switched AAL2 PVC, and AAL2
trunking operating modes.
dsplnmusicthreshold line-num
Syntax Description
line-num
Command Modes
VoIP switching/trunking, switched AAL2 PVC, and AAL2 trunking
Usage Guidelines
Follow standard CLI procedures for this command.
Examples
The following example shows that the DS0s on VISM card line number 3 music on-hold threshold values
are displayed:
Line number for which you want to display the DS0 music on-hold
threshold values. It can be in the range from 1 to 8.
dsplnmusicthreshold 3
Ds0Num
-----1
2
.
.
.
Related Commands
Musicthreshold
--------------38
-40
Command
Description
cnfds0musicthreshold
Configures the music on-hold threshold for a specified DS0.
cnflnmusicthreshold
Configures the music on-hold threshold for all DS0s on a specified line.
cnfmusicthreshold
Configures the music on-hold threshold value for the current VISM card.
dspds0musicthreshold
Displays the music on-hold threshold value for a specified DS0.
dspmusicthreshold
Displays the music on-hold threshold values for the current VISM card.
Cisco VISM Installation and Configuration Guide
5-370
Release 3.0, Part Number OL-2521-01 Rev. D0, June 2004
Chapter 5
CLI Commands
dsplnringback
dsplnringback
To display the ringback tone method for a specified line on the current VISM card, use the
dsplnringback command in the VoIP switching/trunking and switched AAL2 PVC operating modes.
dsplnringback line-num
Syntax Description
line-num
Command Modes
VoIP switching/trunking and switched AAL2 PVC
Usage Guidelines
The ringback tone method is displayed as one of the following:
Examples
Line number for which you want to display the ringback method. In the range
from 1 to 8.
•
Proxy—VISM sends the appropriate packet (NSE, NTE, or AAL2 type 3) for the ringback tone to
the originating VISM which generates the ringback tone toward the TDM network.
•
Inband—VISM generates the inband ringback tone toward the originating VISM over the packet
network and the originating VISM plays the ringback tone.
The following example shows that the current VISM card line 4 ringback tone method, inband, is
displayed:
dsplnringback 4
LineNum: 4
Dsx1RemoteRingback: inband
Related Commands
Command
Description
addtoneplan
Adds a tone plan to the current VISM card.
cnflnringback
Configures the ringback tone method for a specified line on the current VISM
card.
cnflntoneplan
Assigns a tone plan to a specified VISM card line.
cnflntonetimeout
Modifies the timeout periods of all call progress tones supported by VISM on
a specified VISM card line.
dellntoneplan
Deletes the tone plan configuration of a specified VISM card line.
deltoneplan
Deletes a previously added tone plan from the current VISM card.
dsplntoneplan
Displays the tone plan configuration of a specified VISM card line.
dsplntonetimeout
Displays the configured timeout periods for all call progress tones of a
specified VISM card line.
dsptonebuiltinplans Displays all preconfigured (built-in) tone plans on the current VISM card.
dsptoneplan
Displays the tone configuration of a specified tone plan—either a
preconfigured (built-in) or user-added tone plan.
Cisco VISM Installation and Configuration Guide
Release 3.0, Part Number OL-2521-01 Rev. D0, June 2004
5-371
Chapter 5
CLI Commands
dsplnringback
Command
Description
dsptoneplans
Displays the tone configuration of all tone plans—either preconfigured
(built-in) or user-added tone plans.
dsptoneprovplans
Displays all user-added (provisional) tone plans.
dsptoneregionplans Displays a list of all tone plans for the countries and regions whose name
partially or completely matches the name you supply.
Cisco VISM Installation and Configuration Guide
5-372
Release 3.0, Part Number OL-2521-01 Rev. D0, June 2004
Chapter 5
CLI Commands
dsplns
dsplns
To display all line configuration data for the current VISM card, use the dsplns command in the VoIP
switching/trunking, switched AAL2 PVC, and AAL2 trunking operating modes.
dsplns
Syntax Description
This command has no arguments or keywords.
Command Modes
VoIP switching/trunking, switched AAL2 PVC, and AAL2 trunking
Usage Guidelines
Follow standard CLI procedures for this command.
Examples
The following example shows that the configuration data for all lines on the current VISM card are
displayed:
dsplns
Line
---17.1
17.2
17.3
17.4
17.5
17.6
17.7
17.8
Conn
Type
----RJ-48
RJ-48
RJ-48
RJ-48
RJ-48
RJ-48
RJ-48
RJ-48
Type
-----------dsx1ESF
dsx1ESF
dsx1ESF
dsx1ESF
dsx1ESF
dsx1ESF
dsx1ESF
dsx1ESF
Status/Coding
Length
---- -------- --------Ena/dsx1B8ZS
0-131 ft
Ena/dsx1B8ZS
0-131 ft
Dis/dsx1B8ZS
0-131 ft
Dis/dsx1B8ZS
0-131 ft
Dis/dsx1B8ZS
0-131 ft
Dis/dsx1B8ZS
0-131 ft
Ena/dsx1B8ZS
0-131 ft
Ena/dsx1B8ZS
0-131 ft
XmtClock Alarm
Source
-------- ----LocalTim Yes
LocalTim Yes
LocalTim
LocalTim
LocalTim
LocalTim
LocalTim No
LocalTim No
Stats
Alarm
----No
No
No
No
LineNumOfValidEntries: 8
Related Commands
Command
Description
addln
Adds a T1 or E1 line to a VISM card.
cnfln
Configures line characteristics for a specified line.
delln
Deletes a DS1 line from a VISM card.
dspln
Displays the characteristics of a specified line.
Cisco VISM Installation and Configuration Guide
Release 3.0, Part Number OL-2521-01 Rev. D0, June 2004
5-373
Chapter 5
CLI Commands
dsplnstate
dsplnstate
To display the service state of specified T1 or E1 line with respect to the xGCP protocol, use the
dsplnstate command in the VoIP switching/trunking and switched AAL2 PVC operating modes.
dsplnstate line-num
Syntax Description
line-num
Command Modes
VoIP switching/trunking and switched AAL2 PVC
Usage Guidelines
Service states are expressed as administrative or operational. For each service state there is an actual
state and an effective state. The actual states are described in the following list:
•
Line number for which you want to display the service state. It can be in the range
from 1 to 8.
Actual administrative states:
– In service
– Pending out of service
– Command out of service
– Inactive
– Invalid state
•
Actual operational states:
– Alarm
– OK
The effective administrative state is the combination state of the gateway and the line.
The effective operational state is the combination alarm state of the gateway and the line.
Examples
The following example shows that the service states of line 1 are displayed:
dsplnstate 1
Related Commands
Line number : 1,
Actual admin. state : Inactive
Actual oper. state : OK
Line number : 1,
Effective admin. state : Inactive
Effective oper. state : OK
Command
Description
dspgwstate
Displays the current user-configured service states of the gateway.
Cisco VISM Installation and Configuration Guide
5-374
Release 3.0, Part Number OL-2521-01 Rev. D0, June 2004
Chapter 5
CLI Commands
dsplntoneplan
dsplntoneplan
To display the tone plan configuration of a specified VISM card line, use the dsplntoneplan command
in the VoIP switching/trunking and switched AAL2 PVC operating modes.
dsplntoneplan line-num
Syntax Description
line-num
Command Modes
VoIP switching/trunking and switched AAL2 PVC
Usage Guidelines
Follow standard CLI procedures for this command.
Examples
The following example shows that the tone plan configuration for the current VISM card line number 8
is displayed:
Line number for which you want to display the tone plan configuration. It can
be in the range from 1 to 8.
dsplntoneplan 8
LineNum
:8
Dsx1TonePlanRegion :singapore
Dsx1TonePlanVersion:11
Related Commands
Command
Description
addtoneplan
Adds a tone plan to the current VISM card.
cnflnringback
Configures the ringback tone method for a specified line on the current VISM
card.
cnflntoneplan
Assigns a tone plan to a specified VISM card line.
cnflntonetimeout
Modifies the timeout periods of all call progress tones supported by VISM on
a specified VISM card line.
dellntoneplan
Deletes the tone plan configuration of a specified VISM card line.
deltoneplan
Deletes a previously added tone plan from the current VISM card.
dsplnringback
Displays the ringback tone method for a specified line on the current VISM
card.
dsplntonetimeout
Displays the configured timeout periods for all call progress tones of a
specified VISM card line.
dsptonebuiltinplans Displays all preconfigured (built-in) tone plans on the current VISM card.
dsptoneplan
Displays the tone configuration of a specified tone plan—either a
preconfigured (built-in) or user-added tone plan.
dsptoneplans
Displays the tone configuration of all tone plans—either preconfigured
(built-in) or user-added tone plans.
Cisco VISM Installation and Configuration Guide
Release 3.0, Part Number OL-2521-01 Rev. D0, June 2004
5-375
Chapter 5
CLI Commands
dsplntoneplan
Command
Description
dsptoneprovplans
Displays all user-added (provisional) tone plans.
dsptoneregionplans Displays a list of all tone plans for the countries and regions whose name
partially or completely matches the name you supply.
Cisco VISM Installation and Configuration Guide
5-376
Release 3.0, Part Number OL-2521-01 Rev. D0, June 2004
Chapter 5
CLI Commands
dsplntonetimeout
dsplntonetimeout
To display the configured timeout periods for all call progress tones of a specified VISM card line, use
the dsplntonetimeout command in the VoIP switching/trunking and switched AAL2 PVC operating
modes.
dsplntonetimeout line-num
Syntax Description
line-num
Command Modes
VoIP switching/trunking and switched AAL2 PVC
Usage Guidelines
Follow standard CLI procedures for this command.
Examples
The following example shows that all call progress tones for the current VISM card line number 5 are
displayed, in seconds:
Line number for which you want to display the configured timeout periods
(defined in seconds) for all call progress tones. It can be in the range from 1 to
8.
dsplntonetimeout 5
Related Commands
LineNum:
Dsx1RingingTO:
Dsx1RingBackTO:
Dsx1BusyTO:
Dsx1ReorderTO:
Dsx1DialTO:
Dsx1StutterDialTO:
Dsx1OffHookAlertTO:
5
200 seconds
200 seconds
35 seconds
35 seconds
16 seconds
16 seconds
5 seconds
Command
Description
addtoneplan
Adds a tone plan to the current VISM card.
cnflnringback
Configures the ringback tone method for a specified line on the current VISM
card.
cnflntoneplan
Assigns a tone plan to a specified VISM card line.
cnflntonetimeout
Modifies the timeout periods of all call progress tones supported by VISM on
a specified VISM card line.
dellntoneplan
Deletes the tone plan configuration of a specified VISM card line.
deltoneplan
Deletes a previously added tone plan from the current VISM card.
dsplnringback
Displays the ringback tone method for a specified line on the current VISM
card.
dsplntoneplan
Displays the tone plan configuration of a specified VISM card line.
dsptonebuiltinplans Displays all preconfigured (built-in) tone plans on the current VISM card.
Cisco VISM Installation and Configuration Guide
Release 3.0, Part Number OL-2521-01 Rev. D0, June 2004
5-377
Chapter 5
CLI Commands
dsplntonetimeout
Command
Description
dsptoneplan
Displays the tone configuration of a specified tone plan—either a
preconfigured (built-in) or user-added tone plan.
dsptoneplans
Displays the tone configuration of all tone plans—either preconfigured
(built-in) or user-added tone plans.
dsptoneprovplans
Displays all user-added (provisional) tone plans.
dsptoneregionplans Displays a list of all tone plans for the countries and regions whose name
partially or completely matches the name you supply.
Cisco VISM Installation and Configuration Guide
5-378
Release 3.0, Part Number OL-2521-01 Rev. D0, June 2004
Chapter 5
CLI Commands
dsploops
dsploops
To display all lines and DS0s that are in the loopback condition, use the dsploops command in the VoIP
switching/trunking, switched AAL2 PVC, and AAL2 trunking operating modes.
dsploops
Syntax Description
This command has no arguments or keywords.
Command Modes
VoIP switching/trunking, switched AAL2 PVC, and AAL2 trunking
Usage Guidelines
Follow standard CLI procedures for this command.
Examples
The following example shows that the lines and DS0s that are currently in the loopback condition are
displayed:
dsploops
Line Loopbacks on this card
--------------------------Line 1: Local Loopback
ds0 loopbacks on this card
-------------------------Endpoint 1 Loopback Enabled
Related Commands
Command
Description
addconloop
Configures a cellbus connection to local loopback condition on a current card.
addendptloop
Places an endpoint in a loopback condition in the TDM direction.
Cisco VISM Installation and Configuration Guide
Release 3.0, Part Number OL-2521-01 Rev. D0, June 2004
5-379
Chapter 5
CLI Commands
dspmaxmgcs
dspmaxmgcs
To display the maximum number of Media Gateway Controllers (MGCs) that can be configured on the
current card, use the dspmaxmgcs command in the VoIP switching/trunking and switched AAL2 PVC
operating modes.
dspmaxmgcs
Syntax Description
This command has no arguments or keywords.
Command Modes
VoIP switching/trunking and switched AAL2 PVC
Usage Guidelines
Follow standard CLI procedures for this command.
Examples
The following example shows that the maximum number of MGCs that can be configured on the current
card is displayed:
dspmaxmgcs
Maximum number of MGCs: 8
Related Commands
There are no related commands.
Cisco VISM Installation and Configuration Guide
5-380
Release 3.0, Part Number OL-2521-01 Rev. D0, June 2004
Chapter 5
CLI Commands
dspmgc
dspmgc
To display the configuration data of a specified Media Gateway Control (MGC), use the dspmgc
command in the VoIP switching/trunking and switched AAL2 PVC operating modes.
dspmgc mgc-num
Syntax Description
mgc-num
Command Modes
VoIP switching/trunking and switched AAL2 PVC
Usage Guidelines
Follow standard CLI procedures for this command.
Examples
The following example shows that the configuration data for the MGC identified by the MGC number 1
is displayed:
A number by which the call agent is identified, as displayed by the dspmgcs
command, in the range from 1 to 8.
dspmgc 1
mgcNumber
mgcName
Related Commands
: 1
: mgc1
Command
Description
delmgc
Deletes a call agent from a VISM card.
dspmaxmgcs
Displays the maximum number of MGCs that can be configured on the current card.
dspmgcs
Displays the configuration data of all configured call agents.
Cisco VISM Installation and Configuration Guide
Release 3.0, Part Number OL-2521-01 Rev. D0, June 2004
5-381
Chapter 5
CLI Commands
dspmgcgrpparams
dspmgcgrpparams
To display all configured Media Gateway Control Protocol (MGCP)—call agent—redundancy group
parameters, use the dspmgcgrpparams command in the VoIP switching/trunking and switched AAL2
PVC operating modes.
dspmgcgrpparams
Syntax Description
This command has no arguments or keywords.
Command Modes
VoIP switching/trunking and switched AAL2 PVC
Usage Guidelines
Follow standard CLI procedures for this command.
Examples
The following example shows that all configured call agent redundancy group parameters are displayed:
dspmgcgrpparams
Mgc Grp Num
----------1
Related Commands
Com State
--------CommLoss
State Chg Notification
---------------------Enabled
Priority
-------1
Command
Description
addmgcgrpentry
Configures call agents as part of an MGC redundancy group and assigns a
priority value for a call agent.
addmgcgrpprotocol
Associates a call agent redundancy group to a gateway control protocol.
cnfmgcgrpparam
Modifies a call agent redundancy group state change notification policy
and priority level.
cnfmgcgrpentry
Modifies the call agent priority level of a call agent within a call agent
redundancy group.
cnfsrcppeer
Configures the SRCP parameters when SRCP is the selected protocol for
communication between the VISM card and call agent.
cnfsrcppeergrpparam
Modifies the SRCP heartbeat interval and maximum UDP size for a
specified call agent redundancy group.
delmgcgrpentry
Deletes a call agent from a call agent redundancy group.
delmgcgrpprotocol
Deletes an MGCP from a specified call agent redundancy group.
dspmgcgrpprotocols
Displays all configured call agent redundancy group protocols.
dspmgcgrps
Displays all configured call agent redundancy groups.
dspsrcppeergrpparams
Displays the SRCP parameters for all call agent redundancy groups that
have SRCP added.
Cisco VISM Installation and Configuration Guide
5-382
Release 3.0, Part Number OL-2521-01 Rev. D0, June 2004
Chapter 5
CLI Commands
dspmgcgrpprotocols
dspmgcgrpprotocols
To display all configured Media Gateway Control Protocol (MGCP)—call agent—redundancy group
protocols, use the dspmgcgrpprotocols command in the VoIP switching/trunking and switched AAL2
PVC operating modes.
dspmgcgrpprotocols
Syntax Description
This command has no arguments or keywords.
Command Modes
VoIP switching/trunking and switched AAL2 PVC
Usage Guidelines
Follow standard CLI procedures for this command.
Examples
The following example shows that all configured call agent redundancy group protocols are displayed:
dspmgcgrpprotocols
MgcGrp
Prot
Qrntn
Qrntn
Sign
Prov
RspAck
Disc
Cancel
Num
Num
Persist
Def
OnOff
Resp
Attr
Proc
Graceful
-----------------------------------------------------------------------------------------1
MGCP 0.1
Qrtn
StepDiscard DelEvtNotPrsnt NotSend NotSend
Disable NotSend
1
MGCP 1.0
Qrtn
StepProcess DelNegEvt
Send
Send
Enable
Send
Related Commands
Command
Description
addmgcgrpentry
Configures call agents as part of an MGC redundancy group and assigns a
priority value for a call agent.
addmgcgrpprotocol
Associates a call agent redundancy group to a gateway control protocol.
cnfmgcgrpparam
Modifies a call agent redundancy group state change notification policy
and priority level.
cnfmgcgrpentry
Modifies the call agent priority level of a call agent within a call agent
redundancy group.
cnfsrcppeer
Configures the SRCP parameters when SRCP is the selected protocol for
communication between the VISM card and call agent.
cnfsrcppeergrpparam
Modifies the SRCP heartbeat interval and maximum UDP size for a
specified call agent redundancy group.
delmgcgrpentry
Deletes a call agent from a call agent redundancy group.
delmgcgrpprotocol
Deletes an MGCP from a specified call agent redundancy group.
dspmgcgrpparams
Displays all configured call agent redundancy group parameters.
dspmgcgrps
Displays all configured call agent redundancy groups.
dspsrcppeergrpparams
Displays the SRCP parameters for all call agent redundancy groups that
have SRCP added.
Cisco VISM Installation and Configuration Guide
Release 3.0, Part Number OL-2521-01 Rev. D0, June 2004
5-383
Chapter 5
CLI Commands
dspmgcgrps
dspmgcgrps
To display all configured Media Gateway Control Protocol (MGCP)—call agent—redundancy groups,
use the dspmgcgrps command in the VoIP switching/trunking and switched AAL2 PVC operating
modes.
dspmgcgrps
Syntax Description
This command has no arguments or keywords.
Command Modes
VoIP switching/trunking and switched AAL2 PVC
Usage Guidelines
Follow standard CLI procedures for this command.
Examples
The following example shows that all configured call agent redundancy groups are displayed:
dspmgcgrps
mgcRedgrpNum mgcNum Preferencee State
------------ ------ ----------- ----1
1
1
Inactive
1
2
2
Inactive
Related Commands
Command
Description
addmgcgrpentry
Configures call agents as part of an MGC redundancy group and assigns a
priority value for a call agent.
addmgcgrpprotocol
Associates a call agent redundancy group to a gateway control protocol.
cnfmgcgrpparam
Modifies a call agent redundancy group state change notification policy
and priority level.
cnfmgcgrpentry
Modifies the call agent priority level of a call agent within a call agent
redundancy group.
cnfsrcppeer
Configures the SRCP parameters when SRCP is the selected protocol for
communication between the VISM card and call agent.
cnfsrcppeergrpparam
Modifies the SRCP heartbeat interval and maximum UDP size for a
specified call agent redundancy group.
delmgcgrpentry
Deletes a call agent from a call agent redundancy group.
delmgcgrpprotocol
Deletes an MGCP from a specified call agent redundancy group.
dspmgcgrpparams
Displays all configured call agent redundancy group parameters.
dspmgcgrpprotocols
Displays all configured call agent redundancy group protocols.
dspsrcppeergrpparams
Displays the SRCP parameters for all call agent redundancy groups that
have SRCP added.
Cisco VISM Installation and Configuration Guide
5-384
Release 3.0, Part Number OL-2521-01 Rev. D0, June 2004
Chapter 5
CLI Commands
dspmgcs
dspmgcs
To display configuration data about all configured call agents—Media Gateway Control (MGC)
protocols—use the dspmgcs command in the VoIP switching/trunking and switched AAL2 PVC
operating modes.
dspmgcs
Syntax Description
This command has no arguments or keywords.
Command Modes
VoIP switching/trunking and switched AAL2 PVC
Usage Guidelines
Follow standard CLI procedures for this command.
Examples
The following example shows that the configuration data about the currently configured call agents is
displayed:
dspmgcs
mgcNumber
-------1
Related Commands
mgcName
-------mgc1
Command
Description
delmgc
Deletes a call agent from a VISM card.
dspmaxmgcs
Displays the maximum number of MGCs that can be configured on the current card.
dspmgc
Displays the configuration data of a specified configured call agent.
Cisco VISM Installation and Configuration Guide
Release 3.0, Part Number OL-2521-01 Rev. D0, June 2004
5-385
Chapter 5
CLI Commands
dspmgprotocols
dspmgprotocols
To display data of all call agent—Media Gateway Control (MGC)—protocols available to VISM, use the
dspmgprotocols command in the VoIP switching/trunking and switched AAL2 PVC operating modes.
dspmgprotocols
Syntax Description
This command has no arguments or keywords.
Command Modes
VoIP switching/trunking and switched AAL2 PVC
Usage Guidelines
Follow standard CLI procedures for this command.
Examples
The following example shows that the call agent protocols available to VISM are displayed:
dspmgprotocols
Number
-----1
2
3
4
5
Related Commands
mgProcotol
---------MGCP 0.1
SGCP 1.1+
SRCP 1.0.2
SRCP 1.5
MGCP 1.0
Command
Description
delmgcgrpprotocol
Deletes an MGCP from a specified call agent redundancy group.
Cisco VISM Installation and Configuration Guide
5-386
Release 3.0, Part Number OL-2521-01 Rev. D0, June 2004
Chapter 5
CLI Commands
dspmidcalltimers
dspmidcalltimers
To display the configured partial and critical timer values for midcall dual tone multifrequency (DTMF)
digit reporting, use the dspmidcalltimers command in the VoIP switching/trunking, switched AAL2
PVC, and AAL2 trunking operating modes.
dspmidcalltimers
Syntax Description
This command has no arguments or keywords.
Command Modes
VoIP switching/trunking, switched AAL2 PVC, and AAL2 trunking
Usage Guidelines
Follow standard CLI procedures for this command.
Examples
The following example shows that the configured partial and critical timers for midcall DTMF digit
reporting are displayed:
dspmidcalltimers
LineNum
------1
2
Related Commands
DTMF Partial Timer
-----------------16
20
DTMF Critical Timer
------------------4
4
Command
Description
cnfmidcalltimers
Configures the midcall DTMF feature partial and critical timers for a specified
VISM card line.
Cisco VISM Installation and Configuration Guide
Release 3.0, Part Number OL-2521-01 Rev. D0, June 2004
5-387
Chapter 5
CLI Commands
dspmngcidcnt
dspmngcidcnt
To display the managed channel identifier (CID) count for a specified endpoint, use the dspmngcidcnt
command in the switched AAL2 PVC, and AAL2 trunking operating modes.
dspmngcidcnt endpt-num
Syntax Description
endpt-num
The endpoint number for which you want to display the managed CID count. It can
be a value from one of the following ranges:
•
For template number 1:
– For VISM, from 1 to 145
– For VISM-PR T1, from 1 to 192
– For VISM-PR E1, from 1 to 248
•
For template number 2:
– For VISM T1, from 1 to 192
– For VISM E1, from 1 to 248
•
For template number 3:
– For VISM, from 1 to 120
– For VISM-PR T1, from 1 to 192
– For VISM-PR E1, from 1 to 248
•
For template number 4:
– For VISM-PR, from 1 to 144
Command Modes
Switched AAL2 PVC and AAL2 trunking
Usage Guidelines
Follow standard CLI procedures for this command.
Examples
The following example shows that the managed CID counts for endpoint number 1 are displayed:
dspmngcidcnt 1
EndptNum:
Lcn:
Cid:
SentPkts:
RcvdPkts:
SentOctets:
RcvdOctets:
LostPkts:
Jitter:
Latency:
1
35
10
15277688
0
654128294
0
0
0
0
Cisco VISM Installation and Configuration Guide
5-388
Release 3.0, Part Number OL-2521-01 Rev. D0, June 2004
Chapter 5
CLI Commands
dspmngcidcnt
Related Commands
There are no related commands.
Cisco VISM Installation and Configuration Guide
Release 3.0, Part Number OL-2521-01 Rev. D0, June 2004
5-389
Chapter 5
CLI Commands
dspmonecanendpt
dspmonecanendpt
To monitor the echo cancellation (ECAN) activity for a specified endpoint, use the dspmonecanendpt
command in the VoIP switching/trunking, switched AAL2 PVC, and AAL2 trunking operating modes.
dspmonecanendpt endpt-num
Syntax Description
endpt-num
Endpoint number. It can be a value from one of the following ranges:
•
For template number 1:
– For VISM, from 1 to 145
– For VISM-PR T1, from 1 to 192
– For VISM-PR E1, from 1 to 248
•
For template number 2:
– For VISM T1, from 1 to 192
– For VISM E1, from 1 to 248
•
For template number 3:
– For VISM, from 1 to 120
– For VISM-PR T1, from 1 to 192
– For VISM-PR E1, from 1 to 248
•
For template number 4:
– For VISM-PR, from 1 to 144
Command Modes
VoIP switching/trunking, switched AAL2 PVC, and AAL2 trunking
Usage Guidelines
Follow standard CLI procedures for this command.
Examples
The following example shows that the ECAN additivity for endpoint number 190 is monitored:
dspmonecanendpt 190
Related Commands
Command
Description
cnfendptcadence
Configures cadence (digit tone) times for an endpoint.
Cisco VISM Installation and Configuration Guide
5-390
Release 3.0, Part Number OL-2521-01 Rev. D0, June 2004
Chapter 5
CLI Commands
dspmusicthreshold
dspmusicthreshold
To display the music on-hold threshold values for the current VISM card, use the dspmusicthreshold
command in the VoIP switching/trunking, switched AAL2 PVC, and AAL2 trunking operating modes.
dspmusicthreshold
Syntax Description
This command has no arguments or keywords.
Command Modes
VoIP switching/trunking, switched AAL2 PVC, and AAL2 trunking
Usage Guidelines
Follow standard CLI procedures for this command.
Examples
The following example shows that the current VISM card music on-hold threshold values are displayed:
dspmusicthreshold
LineNo/Ds0No
-----------1/1
1/2
.
.
.
Related Commands
Musicthreshold
--------------38
-50
Command
Description
cnfds0musicthreshold
Configures the music on-hold threshold for a specified DS0.
cnflnmusicthreshold
Configures the music on-hold threshold for all DS0s on a specified line.
cnfmusicthreshold
Configures the music on-hold threshold value for the current VISM card.
dspds0musicthreshold
Displays the music on-hold threshold value for a specified DS0.
dsplnmusicthreshold
Displays the music on-hold threshold values for the DS0s on a specified
line.
Cisco VISM Installation and Configuration Guide
Release 3.0, Part Number OL-2521-01 Rev. D0, June 2004
5-391
Chapter 5
CLI Commands
dspnwcot
dspnwcot
To display the status—enabled or disabled—of the gateway-initiated network continuity test
configuration for VISM, use the dspnwcot command in the VoIP switching/trunking and switched
AAL2 PVC operating modes.
dspnwcot
Syntax Description
This command has no arguments or keywords.
Command Modes
VoIP switching/trunking and switched AAL2 PVC
Usage Guidelines
Follow standard CLI procedures for this command.
Examples
The following example shows that VISM is configured for a gateway-initiated network continuity test:
dspnwcot
GW Initiated Network COT: On
Related Commands
Command
Description
cnfco4timer
Configures the bearer continuity test CO4 timer value.
cnfnwcot
Configures VISM for a gateway-initiated network continuity test.
dspco4timer
Displays the bearer continuity test CO4 timer value.
dspvismparam
Displays the current VISM card configuration.
Cisco VISM Installation and Configuration Guide
5-392
Release 3.0, Part Number OL-2521-01 Rev. D0, June 2004
Chapter 5
CLI Commands
dspport
dspport
To display configuration data about the virtual port that you created with the addport command, use the
dspport command in the VoIP switching/trunking, switched AAL2 PVC, and AAL2 trunking operating
modes.
dspport
Syntax Description
This command has no arguments or keywords.
Command Modes
VoIP switching/trunking, switched AAL2 PVC, and AAL2 trunking
Usage Guidelines
Follow standard CLI procedures for this command.
Examples
The following example shows that the configuration data about the virtual port created with the addport
command is displayed:
dspport
vismPortNum:
vismPortRowStatus:
vismPortSpeed:
vismPortState:
Related Commands
1
add
50000
active
Command
Description
addport
Adds a virtual port between a VISM and PXM cards.
delport
Deletes a virtual port between a VISM and PXM cards.
Cisco VISM Installation and Configuration Guide
Release 3.0, Part Number OL-2521-01 Rev. D0, June 2004
5-393
Chapter 5
CLI Commands
dspprofparams
dspprofparams
To display the profile elements and the preference for all profiles, use the dspprofparams command in
the switched AAL2 PVC and AAL2 trunking operating modes.
dspprofparams
Syntax Description
This command has no arguments or keywords.
Command Modes
Switched AAL2 PVC and AAL2 trunking
Usage Guidelines
When you execute this command, the display includes the default voice and voiceband data profile
element which correspond to each supported profile.
Examples
The following example shows that the profile elements and preferences for all profiles are displayed:
dspprofparams
- - - - - - - - - - - - - - - - - - - Profile Type
:
Profile Number
:
Profile Preference
:
Voice Profile Codec
:
Voice Profile Packetization-period(ms):
Voice Profile SID
:
VBD Profile Codec
:
VBD Profile Packetization-period (ms) :
- - - - - - - - - - - - - - - - - - - Profile Type
:
Profile Number
:
Profile Preference
:
Voice Profile Codec
:
Voice Profile Packetization-period(ms):
Voice Profile SID
:
VBD Profile Codec
:
VBD Profile Packetization-period (ms) :
- - - - - - - - - - - - - - - - - - - Profile Type
:
Profile Number
:
Profile Preference
:
Voice Profile Codec
:
Voice Profile Packetization-period(ms):
Voice Profile SID
:
VBD Profile Codec
:
VBD Profile Packetization-period (ms) :
- - - - - - - - - - - - - - - - - - - Profile Type
:
Profile Number
:
Profile Preference
:
Voice Profile Codec
:
Voice Profile Packetization-period(ms):
Voice Profile SID
:
VBD Profile Codec
:
VBD Profile Packetization-period (ms) :
- ITU
1
4
G.711u
five
VAD on
G.711u
five
- ITU
2
3
G.711u
five
sidGenric
G.711u
five
ITU
3
1
G.726-32K
five
sidGenric
G.711u
five
- ITU
7
2
G.729ab
ten
sid729
G.711u
five
Cisco VISM Installation and Configuration Guide
5-394
Release 3.0, Part Number OL-2521-01 Rev. D0, June 2004
Chapter 5
CLI Commands
dspprofparams
- - - - - - - - - - - - - - - - - - - Profile Type
:
Profile Number
:
Profile Preference
:
Voice Profile Codec
:
Voice Profile Packetization-period(ms):
Voice Profile SID
:
VBD Profile Codec
:
VBD Profile Packetization-period (ms) :
- - - - - - - - - - - - - - - - - - - Profile Type
:
Profile Number
:
Profile Preference
:
Voice Profile Codec
:
Voice Profile Packetization-period(ms):
Voice Profile SID
:
VBD Profile Codec
:
VBD Profile Packetization-period (ms) :
- - - - - - - - - - - - - - - - - - - Profile Type
:
Profile Number
:
Profile Preference
:
Voice Profile Codec
:
Voice Profile Packetization-period(ms):
Voice Profile SID
:
VBD Profile Codec
:
VBD Profile Packetization-period (ms) :
- - - - - - - - - - - - - - - - - - - Profile Type
:
Profile Number
:
Profile Preference
:
Voice Profile Codec
:
Voice Profile Packetization-period(ms):
Voice Profile SID
:
VBD Profile Codec
:
VBD Profile Packetization-period (ms) :
- - - - - - - - - - - - - - - - - - - Profile Type
:
Profile Number
:
Profile Preference
:
Voice Profile Codec
:
Voice Profile Packetization-period(ms):
Voice Profile SID
:
VBD Profile Codec
:
Related Commands
- ITU
8
5
G.729ab
ten
sid729
G.711u
five
- Custom
100
6
G.726-32K
ten
sidGenric
G.711u
five
- Custom
101
7
G.729ab
ten
sid729
G.711u
five
- Custom
110
8
G.729ab
thirty
sid729
G.711u
five
- Custom
200
9
clr chan
five
VAD off
clr chan
Command
Description
cnfprofelemvbd
Configures the VBD profile element for a profile.
cnfprofelemvoice
Configures the voice profile element for a profile.
cnfprofparams
Configures a profile preference.
Cisco VISM Installation and Configuration Guide
Release 3.0, Part Number OL-2521-01 Rev. D0, June 2004
5-395
Chapter 5
CLI Commands
dsprscprtn
dsprscprtn
To display configuration data about the resource partition which you created with the addrscprtn
command, use the dsprscprtn command in the VoIP switching/trunking, switched AAL2 PVC, and
AAL2 trunking operating modes.
dsprscprtn
Syntax Description
This command has no arguments or keywords.
Command Modes
VoIP switching/trunking, switched AAL2 PVC, and AAL2 trunking
Usage Guidelines
Follow standard CLI procedures for this command.
Examples
The following example shows that the configuration data of the resource partition created with the
addrscprtn command is displayed:
dsprscprtn
vismResPartPortNum:
vismResPartCtrlrNum:
vismResPartRowStatus:
vismResPartNumOfLcnAvail:
vismResPartLcnLow:
vismResPartLcnHigh:
vismResPartIngrPctBW:
vismResPartEgrPctBW:
vismResPartCtrlrID:
Related Commands
1
par
add
72
32
279
100
100
2
Command
Description
addrscprtn
Adds a resource partition for a virtual port.
Cisco VISM Installation and Configuration Guide
5-396
Release 3.0, Part Number OL-2521-01 Rev. D0, June 2004
Chapter 5
CLI Commands
dsprsvpif
dsprsvpif
To display the Resource Reservation Protocol (RSVP) status of a specified connection, use the dsprsvpif
command in the VoIP switching/trunking and VoIP and switched ATM AAL1 SVC operating modes.
dsprsvpif lcn
Syntax Description
lcn
Command Modes
VoIP switching/trunking and VoIP and switched ATM AAL1 SVC
Usage Guidelines
Follow standard CLI procedures for this command.
Examples
The following example shows that the RSVP status of LCN 142 is displayed:
Logical channel number of the connection for which you want to display the
RSVP status; in the range from 131 to 510.
dsprsvpif 142
Interface:
RSVP:
Refresh Interval:
Refresh Multiple:
Related Commands
142
Enable
45 sec
7
Command
Description
cnfrsvp
Configures RSVP for a specified connection.
cnfrsvprefreshmiss
Configures the number of times VISM waits for a missed RSVP minimum
refresh message for a specified connection.
dsprsvpreq
Displays the data associated with a specified RSVP request.
dsprsvpreqs
Displays all RSVP-known requests on the current VISM card.
dsprsvpresv
Displays all data associated with an RSVP bandwidth reservation.
dsprsvpresvs
Displays all incoming RSVP-known reservations on the current VISM card.
dsprsvpsender
Displays all data associated with a specified RSVP path state.
Cisco VISM Installation and Configuration Guide
Release 3.0, Part Number OL-2521-01 Rev. D0, June 2004
5-397
Chapter 5
CLI Commands
dsprsvpreq
dsprsvpreq
To display the data associated with a specified Resource Reservation Protocol (RSVP) request, use the
dsprsvpreq command in the VoIP switching/trunking and VoIP and switched ATM AAL1 SVC
operating modes.
dsprsvpreq ses-num request-num
Syntax Description
ses-num
RSVP session number. It can be in the range from 1 to 65535.
request-num
RSVP request number. It can be in the range from 1 to 65535.
Command Modes
VoIP switching/trunking and VoIP and switched ATM AAL1 SVC
Usage Guidelines
Follow standard CLI procedures for this command.
Examples
The following example shows that the data associated with the request identified by RSVP session
number 400 and RSVP request number 64521 is displayed:
dsprsvpreq 400 64521
rsvpSessionNumber
rsvpResvFwdNumber
rsvpResvFwdType
rsvpResvFwdDestAddr
rsvpResvFwdSenderAddr
rsvpResvFwdDestAddrLength
rsvpResvFwdSenderAddrLength
rsvpResvFwdProtocol
rsvpResvFwdDestPort
rsvpResvFwdPort
rsvpResvFwdHopAddr
rsvpResvFwdInterface
rsvpResvFwdService
rsvpResvFwdTSpecRate
rsvpResvFwdTSpecPeakRate
rsvpResvFwdTSpecBurst
rsvpResvFwdTSpecMinTU
rsvpResvFwdTSpecMaxTU
rsvpResvFwdRSpecRate
rsvpResvFwdRSpecSlack
rsvpResvFwdInterval
rsvpResvFwdScope
rsvpResvFwdShared
rsvpResvFwdExplicit
rsvpResvFwdRSVPHop
rsvpResvFwdLastChange
rsvpResvFwdStatus
:
:
:
:
:
:
:
:
:
:
:
:
:
:
:
:
:
:
:
:
:
:
:
:
:
:
:
400
64521
IPv4
12.12.12.1
11.11.11.1
32
32
IP
49152
49152
12.12.12.2
182
Guaranted
96000 bps
96000 bps
120 bytes
120
120
96000 bps
0 usec
30000 msec
false
true
true
5474
active
Cisco VISM Installation and Configuration Guide
5-398
Release 3.0, Part Number OL-2521-01 Rev. D0, June 2004
Chapter 5
CLI Commands
dsprsvpreq
Related Commands
Command
Description
cnfrsvp
Configures RSVP for a specified connection.
cnfrsvprefreshmiss
Configures the number of times VISM waits for a missed RSVP minimum
refresh message for a specified connection.
dsprsvpif
Displays the RSVP status of a specified connection.
dsprsvpreqs
Displays all RSVP-known requests on the current VISM card.
dsprsvpresv
Displays all data associated with an RSVP bandwidth reservation.
dsprsvpresvs
Displays all incoming RSVP-known reservations on the current VISM card.
dsprsvpsender
Displays all data associated with a specified RSVP path state.
Cisco VISM Installation and Configuration Guide
Release 3.0, Part Number OL-2521-01 Rev. D0, June 2004
5-399
Chapter 5
CLI Commands
dsprsvpreqs
dsprsvpreqs
To display all Resource Reservation Protocol (RSVP)-known requests on the current VISM card, use the
dsprsvpreqs command in the VoIP switching/trunking and VoIP and switched ATM AAL1 SVC
operating modes.
dsprsvpreqs
Syntax Description
This command has no arguments or keywords.
Command Modes
VoIP switching/trunking and VoIP and switched ATM AAL1 SVC
Usage Guidelines
A request is a generated outgoing reservation message. Use the dsprsvpresvs command to display
incoming or locally created reservations.
Examples
The following example shows that the RSVP-known request on the current VISM card is displayed:
dsprsvpreqs
Sess Resv From
To
Prot
DPort
SPort
Interval
Serv
BPS
----------------------------------------------------------------------------------------0
0
11.11.11.1
12.12.12.1 IP
49152
49152
30000
Guaranteed 96000
Related Commands
Command
Description
cnfrsvp
Configures RSVP for a specified connection.
cnfrsvprefreshmiss
Configures the number of times VISM waits for a missed RSVP minimum
refresh message for a specified connection.
dsprsvpif
Displays the RSVP status of a specified connection.
dsprsvpreq
Displays the data associated with a specified RSVP request.
dsprsvpresv
Displays all data associated with an RSVP bandwidth reservation.
dsprsvpresvs
Displays all incoming RSVP-known reservations on the current VISM card.
dsprsvpsender
Displays all data associated with a specified RSVP path state.
dsprsvpsenders
Displays all RSVP-known path states on the current VISM card.
Cisco VISM Installation and Configuration Guide
5-400
Release 3.0, Part Number OL-2521-01 Rev. D0, June 2004
Chapter 5
CLI Commands
dsprsvpresv
dsprsvpresv
To display all data associated with a Resource Reservation Protocol (RSVP) bandwidth reservation, use
the dsprsvpresv command in the VoIP switching/trunking and VoIP and switched ATM AAL1 SVC
operating modes.
dsprsvpresv ses-num resv-num
Syntax Description
ses-num
RSVP session number. It can be in the range from 1 to 65535.
resv-num
RSVP bandwidth reservation number. It can be in the range from 1 to 65535.
Command Modes
VoIP switching/trunking and VoIP and switched ATM AAL1 SVC
Usage Guidelines
An RSVP bandwidth reservation is uniquely identified by an RSVP session number and RSVP
reservation number combination.
Examples
The following example shows that the data associated with RSVP session number 200 and RSVP
bandwidth reservation number 3400 is displayed:
dsprsvpresv 200 3400
rsvpSessionNumber
rsvpResvNumber
rsvpResvType
rsvpResvDestAddr
rsvpResvSenderAddr
rsvpResvDestAddrLength
rsvpResvSenderAddrLength
rsvpResvProtocol
rsvpResvDestPort
rsvpResvPort
rsvpResvHopAddr
rsvpResvInterface
rsvpResvService
rsvpResvTSpecRate
rsvpResvTSpecPeakRate
rsvpResvTSpecBurst
rsvpResvTSpecMinTU
rsvpResvTSpecMaxTU
rsvpResvRSpecRate
rsvpResvRSpecSlack
rsvpResvInterval
rsvpResvScope
rsvpResvShared
rsvpResvExplicit
rsvpResvRSVPHop
rsvpResvLastChange
rsvpResvStatus
:
:
:
:
:
:
:
:
:
:
:
:
:
:
:
:
:
:
:
:
:
:
:
:
:
:
:
200
3400
IPv4
12.12.12.1
11.11.11.1
32
32
IP
49152
49152
12.12.12.1
0
Guaranted
96000 bps
96000 bps
120 bytes
120
120
96000 bps
0 usec
30000 msec
false
true
true
269040
active
Cisco VISM Installation and Configuration Guide
Release 3.0, Part Number OL-2521-01 Rev. D0, June 2004
5-401
Chapter 5
CLI Commands
dsprsvpresv
Related Commands
Command
Description
cnfrsvp
Configures RSVP for a specified connection.
cnfrsvprefreshmiss
Configures the number of times VISM waits for a missed RSVP minimum
refresh message for a specified connection.
dsprsvpif
Displays the RSVP status of a specified connection.
dsprsvpreq
Displays the data associated with a specified RSVP request.
dsprsvpreqs
Displays all RSVP-known requests on the current VISM card.
dsprsvpresvs
Displays all incoming RSVP-known reservations on the current VISM card.
dsprsvpsender
Displays all data associated with a specified RSVP path state.
Cisco VISM Installation and Configuration Guide
5-402
Release 3.0, Part Number OL-2521-01 Rev. D0, June 2004
Chapter 5
CLI Commands
dsprsvpresvs
dsprsvpresvs
To display all incoming Resource Reservation Protocol (RSVP)-known bandwidth reservations on the
current VISM card, use the dsprsvpresvs command in the VoIP switching/trunking and VoIP and
switched ATM AAL1 SVC operating modes.
dsprsvpresvs
Syntax Description
This command has no arguments or keywords.
Command Modes
VoIP switching/trunking and VoIP and switched ATM AAL1 SVC
Usage Guidelines
This command displays data for reservations that are incoming or created by application programming
interface (API) calls. Use the dsprsvpreqs command to display data for outgoing
reservations—requests.
Examples
The following example shows that all incoming RSVP-known bandwidth reservations are displayed:
dsprsvpresvs
Sess Resv From
To
Prot
DPort
SPort
Interval
Serv
BPS
----------------------------------------------------------------------------------------0
0
11.11.11.1
12.12.12.1 IP
49152
49152
30000
Guaranteed 96000
0
0
12.12.12.1
11.11.11.1 IP
49152
49152
30000
Guaranteed 96000
Related Commands
Command
Description
cnfrsvp
Configures RSVP for a specified connection.
cnfrsvprefreshmiss
Configures the number of times VISM waits for a missed RSVP minimum
refresh message for a specified connection.
dsprsvpif
Displays the RSVP status of a specified connection.
dsprsvpreq
Displays the data associated with a specified RSVP request.
dsprsvpreqs
Displays all RSVP-known requests on the current VISM card.
dsprsvpresv
Displays all data associated with an RSVP bandwidth reservation.
dsprsvpsender
Displays all data associated with a specified RSVP path state.
Cisco VISM Installation and Configuration Guide
Release 3.0, Part Number OL-2521-01 Rev. D0, June 2004
5-403
Chapter 5
CLI Commands
dsprsvpsender
dsprsvpsender
To display all data associated with a specified Resource Reservation Protocol (RSVP) path state, use the
dsprsvpsender command in the VoIP switching/trunking and VoIP and switched ATM AAL1 SVC
operating modes.
dsprsvpsender ses-num sender-num
Syntax Description
ses-num
RSVP session number. It can be in the range from 1 to 65535.
sender-num
RSVP sender number. It can be in the range from 1 to 65535.
Command Modes
VoIP switching/trunking and VoIP and switched ATM AAL1 SVC
Usage Guidelines
The session number and sender number combination uniquely identifies a path state.
Examples
The following example shows that the data associated with the RSVP path state identified by RSVP
session number 100 and RSVP sender number 23099 is displayed:
dsprsvpsender 100 23099
rsvpSessionNumber
rsvpSenderNumber
rsvpSenderType
rsvpSenderDestAddr
rsvpSenderAddr
rsvpSenderDestAddrLength
rsvpSenderAddrLength
rsvpSenderProtocol
rsvpSenderDestPort
rsvpSenderPort
rsvpSenderHopAddr
rsvpSenderInterface
rsvpSenderTSpecRate
rsvpSenderTSpecPeakRate
rsvpSenderTSpecBurst
rsvpSenderTSpecMinTU
rsvpSenderTSpecMaxTU
rsvpSenderInterval
rsvpSenderRSVPHop
rsvpSenderLastChange
rsvpSenderAdspecBreak
rsvpSenderAdspecHopCount
rsvpSenderAdspecPathBw
rsvpSenderAdspecMinLatency
rsvpSenderAdspecMtu
rsvpSenderAdspecGuaranteedSvc
rsvpSenderAdspecGuaranteedBreak
rsvpSenderAdspecGuaranteedCtot
rsvpSenderAdspecGuaranteedDtot
rsvpSenderAdspecGuaranteedCsum
rsvpSenderAdspecGuaranteedDsum
rsvpSenderAdspecGuaranteedHopCount
:
:
:
:
:
:
:
:
:
:
:
:
:
:
:
:
:
:
:
:
:
:
:
:
:
:
:
:
:
:
:
:
100
23099
IPv4
12.12.12.1
11.11.11.1
32
32
IP
49152
49152
12.12.12.2
182
96000 bps
96000 bps
120 bytes
120
120
30000 msec
true
4726
false
3
-855437984 bps
0 usec
1500 bytes
?
?
0 bytes
0 usec
0 bytes
0 usec
0
Cisco VISM Installation and Configuration Guide
5-404
Release 3.0, Part Number OL-2521-01 Rev. D0, June 2004
Chapter 5
CLI Commands
dsprsvpsender
rsvpSenderAdspecGuaranteedPathBw
rsvpSenderAdspecGuaranteedMinLatency
rsvpSenderAdspecGuaranteedMtu
rsvpSenderAdspecCtrlLoadSvc
rsvpSenderAdspecCtrlLoadBreak
rsvpSenderAdspecCtrlLoadHopCount
rsvpSenderAdspecCtrlLoadPathBw
rsvpSenderAdspecCtrlLoadMinLatency
rsvpSenderAdspecCtrlLoadMtu
rsvpSenderStatus
rsvpSenderTTL
Related Commands
:
:
:
:
:
:
:
:
:
:
:
0 bps
0 usec
0 bytes
1
false
0
0 bps
0 usec
0 bytes
active
253
Command
Description
cnfrsvp
Configures RSVP for a specified connection.
cnfrsvprefreshmiss
Configures the number of times VISM waits for a missed RSVP minimum
refresh message for a specified connection.
dsprsvpif
Displays the RSVP status of a specified connection.
dsprsvpreq
Displays the data associated with a specified RSVP request.
dsprsvpreqs
Displays all RSVP-known requests on the current VISM card.
dsprsvpresv
Displays all data associated with an RSVP bandwidth reservation.
dsprsvpresvs
Displays all incoming RSVP-known reservations on the current VISM card.
dsprsvpsenders
Displays all RSVP-known path states on the current VISM card.
Cisco VISM Installation and Configuration Guide
Release 3.0, Part Number OL-2521-01 Rev. D0, June 2004
5-405
Chapter 5
CLI Commands
dsprsvpsenders
dsprsvpsenders
To display all Resource Reservation Protocol (RSVP)-known path states on the current VISM card, use
the dsprsvpsenders command in the VoIP switching/trunking and VoIP and switched ATM AAL1 SVC
operating modes.
dsprsvpsenders
Syntax Description
This command has no arguments or keywords.
Command Modes
VoIP switching/trunking and VoIP and switched ATM AAL1 SVC
Usage Guidelines
Follow standard CLI procedures for this command.
Examples
The following example shows that all RSVP-known path states on the current VISM card are displayed:
dsprsvpsenders
Session Sender From
To
Prot
DPort
SPort
BPS
-----------------------------------------------------------------------0
1
11.11.11.1
12.12.12.1
IP
49152
49152
96000
1
0
12.12.12.1
11.11.11.1
IP
49152
49152
96000
Related Commands
Command
Description
cnfrsvp
Configures RSVP for a specified connection.
cnfrsvprefreshmiss
Configures the number of times VISM waits for a missed RSVP minimum
refresh message for a specified connection.
dsprsvpif
Displays the RSVP status of a specified connection.
dsprsvpreq
Displays the data associated with a specified RSVP request.
dsprsvpreqs
Displays all RSVP-known requests on the current VISM card.
dsprsvpresv
Displays all data associated with an RSVP bandwidth reservation.
dsprsvpresvs
Displays all incoming RSVP-known reservations on the current VISM card.
dsprsvpsender
Displays all data associated with a specified RSVP path state.
Cisco VISM Installation and Configuration Guide
5-406
Release 3.0, Part Number OL-2521-01 Rev. D0, June 2004
Chapter 5
CLI Commands
dsprtpcnt
dsprtpcnt
To display the bearer counters (statistics) for a specific Real-Time Transport Protocol (RTP) VoIP
trunking connection, use the dsprtpcnt command in the VoIP switching/trunking and VoIP and switched
ATM AAL1 SVC operating modes.
dsprtpcnt conn-num
Syntax Description
conn-num
Command Modes
VoIP switching/trunking and VoIP and switched ATM AAL1 SVC
Usage Guidelines
Follow standard CLI procedures for this command.
Examples
The following example shows that the bearer counters (statistics) for the static RTP connection number
132 are displayed:
Connection identification number. It can be in the range from 1 to 248.
dsprtpcnt 132
Connection Index
Packets Sent
Packets Received
Octets Sent
Octets Received
Packets Lost
Related Commands
:132
:99604
:0
:7966804
:0
:0
Command
Description
addlapdtrunk
Adds an LAPD trunk to a specific VISM card line.
addrtpcon
Adds a static RTP VoIP trunking connection.
addrudptrunk
Adds an ISDN PRI backhaul RUDP session for an LAPD trunk connection.
clrrtpcnt
Clears the RTP counters (statistics) for a specific static RTP connection.
cnflapdtrunkpvc
Assigns the PVC trunk type that carries LAPD messages for the current VISM
card.
cnflntrunkcond
Enables or disables line conditioning on a VISM card line if a network alarm
is encountered.
cnfrtpcon
Modifies an existing static RTP VoIP trunking connection.
cnfrudptrunkrmtip Modifies the remote IP address of VISM used in the ISDN PRI backhaul RUDP
trunk for a specified session.
dellapdtrunk
Deletes an LAPD configured line.
delrtpcon
Deletes a static RTP VoIP trunking connection.
delrudptrunk
Deletes an ISDN PRI backhaul RUDP session that is associated with an LAPD.
dsplapd
Displays data about an LAPD.
Cisco VISM Installation and Configuration Guide
Release 3.0, Part Number OL-2521-01 Rev. D0, June 2004
5-407
Chapter 5
CLI Commands
dsprtpcnt
Command
Description
dsplapdtrunkpvc
Displays the assigned PVC trunk type that carries LAPD trunk messages for
the current VISM card.
dsplapdtrunks
Displays the configuration data of all LAPD trunks.
dsprtpcon
Displays the configuration data of a specific static RTP VoIP trunking
connection.
dsprtpconnstat
Displays the RTP connection statistics for a specified endpoint.
dsprtpcons
Displays the configuration data of all static RTP VoIP trunking connections.
dsprudptrunk
Displays the configuration data of a specified ISDN PRI backhaul RUDP
session.
dsprudptrunks
Displays the configuration data of all ISDN PRI backhaul RUDP sessions.
Cisco VISM Installation and Configuration Guide
5-408
Release 3.0, Part Number OL-2521-01 Rev. D0, June 2004
Chapter 5
CLI Commands
dsprtpcon
dsprtpcon
To display the configuration data of a specified static Real-Time Transport Protocol (RTP) VoIP trunking
connection, use the dsprtpcon command in the VoIP switching/trunking and VoIP and switched ATM
AAL1 SVC operating modes.
dsprtpcon conn-num
Syntax Description
conn-num
Command Modes
VoIP switching/trunking and VoIP and switched ATM AAL1 SVC
Usage Guidelines
Follow standard CLI procedures for this command.
Examples
The following example shows that the configuration data for the static RTP connection number 106 is
displayed:
Connection identification number. It can be in the range from 1 to 248.
dsprtpcon 106
Connection Index
Endpoint Number
Local RTP Port
Remote RTP Port
Remote IP Address
Codec Type
Packetization Period
ECAN Status
VAD
VAD Timer
CAS Transport
DTMF Transport
ICS Enable
Triple redundancy
Bearer TOS
Connection Mode
Conn Alarm State
Related Commands
:106
:200
:50000
:49650
:nnn.nnn.nnn.nnn
:G.729a
:20
:Enable
:Enable
:300 ms
:On
:On
:On
:On
:160
:GW can send and recv packets
:
Command
Description
addlapdtrunk
Adds an LAPD trunk to a specific VISM card line.
addrtpcon
Adds a static RTP VoIP trunking connection.
addrudptrunk
Adds an ISDN PRI backhaul RUDP session for an LAPD trunk connection.
clrrtpcnt
Clears the RTP counters (statistics) for a specific static RTP connection.
cnflapdtrunkpvc
Assigns the PVC trunk type that carries LAPD messages for the current VISM
card.
cnflntrunkcond
Enables or disables line conditioning on a VISM card line if a network alarm
is encountered.
Cisco VISM Installation and Configuration Guide
Release 3.0, Part Number OL-2521-01 Rev. D0, June 2004
5-409
Chapter 5
CLI Commands
dsprtpcon
Command
Description
cnfrtpcon
Modifies an existing static RTP VoIP trunking connection.
cnfrudptrunkrmtip Modifies the remote IP address of VISM used in the ISDN PRI backhaul RUDP
trunk for a specified session.
dellapdtrunk
Deletes an LAPD configured line.
delrudptrunk
Deletes an ISDN PRI backhaul RUDP session that is associated with an LAPD.
dsplapd
Displays data about an LAPD.
dsplapdtrunkpvc
Displays the assigned PVC trunk type that carries LAPD trunk messages for
the current VISM card.
dsplapdtrunks
Displays the configuration data of all LAPD trunks.
dsprtpcnt
Displays the bearer counters (statistics) for a specific RTP VoIP trunking
connection.
dsprtpconnstat
Displays the RTP connection statistics for a specified endpoint.
dsprtpcons
Displays the configuration data of all static RTP VoIP trunking connections.
dsprudptrunk
Displays the configuration data of a specified ISDN PRI backhaul RUDP
session.
dsprudptrunks
Displays the configuration data of all ISDN PRI backhaul RUDP sessions.
Cisco VISM Installation and Configuration Guide
5-410
Release 3.0, Part Number OL-2521-01 Rev. D0, June 2004
Chapter 5
CLI Commands
dsprtpconnstat
dsprtpconnstat
To display the Real-Time Transport Protocol (RTP) connection statistics for a specified endpoint, use
the dsprtpconnstat command in the VoIP switching/trunking, switched AAL1 SVC, switched AAL2
SVC, switched AAL2 PVC, AAL2 trunking, VoIP and switched ATM AAL1 SVC operating modes.
dsprtpconnstat endpt-num
Syntax Description
endpt-num
Endpoint number. It can be a value from one of the following ranges:
•
For template number 1:
– For VISM, from 1 to 145
– For VISM-PR T1, from 1 to 192
– For VISM-PR E1, from 1 to 248
•
For template number 2:
– For VISM T1, from 1 to 192
– For VISM E1, from 1 to 248
•
For template number 3:
– For VISM, from 1 to 120
– For VISM-PR T1, from 1 to 192
– For VISM-PR E1, from 1 to 248
•
For template number 4:
– For VISM-PR, from 1 to 144
Command Modes
VoIP switching/trunking, switched AAL1 SVC, switched AAL2 SVC, switched AAL2 PVC, AAL2
trunking, VoIP and switched ATM AAL1 SVC
Usage Guidelines
Follow standard CLI procedures for this command.
Examples
The following example shows the RTP connection statistics for endpoint 202:
dsprtpconnstat 202
No. of RTP Packets Sent =
0
No. of RTP Packets Received = 0
No. of Octets Sent =
0
No. of Octets Received =
0
No. of RTP Packets Lost =
0
Interarrival Jitter =
80
Latency =
0
Cisco VISM Installation and Configuration Guide
Release 3.0, Part Number OL-2521-01 Rev. D0, June 2004
5-411
Chapter 5
CLI Commands
dsprtpconnstat
Related Commands
Command
Description
addrtpcon
Adds a static RTP VoIP trunking connection.
clrrtpcnt
Clears the RTP counters (statistics) for a specific static RTP connection.
cnfrtpcon
Modifies an existing static RTP VoIP trunking connection.
delrtpcon
Deletes a static RTP VoIP trunking connection.
dsprtpcnt
Displays the bearer counters (statistics) for a specific RTP VoIP trunking
connection.
dsprtpcon
Displays the configuration data of a specific static RTP VoIP trunking connection.
dsprtpconnstat
Displays the RTP connection statistics for a specified endpoint.
Cisco VISM Installation and Configuration Guide
5-412
Release 3.0, Part Number OL-2521-01 Rev. D0, June 2004
Chapter 5
CLI Commands
dsprtpcons
dsprtpcons
To display the configuration data of all static Real-Time Transport Protocol (RTP) VoIP trunking
connections, use the dsprtpcons command in the VoIP switching/trunking and VoIP and switched ATM
AAL1 SVC operating modes.
dsprtpcons
Syntax Description
This command has no arguments or keywords.
Command Modes
VoIP switching/trunking and VoIP and switched ATM AAL1 SVC
Usage Guidelines
Follow standard CLI procedures for this command.
Examples
The following example shows that the configuration data for all static RTP connections are displayed:
dsprtpcons
Connection Endpoint Local Rtp Remote RTP
Index
Number
Port
Port
---------- -------- --------- ---------1
1
49700
49700
2
2
49702
49702
Related Commands
Remote IP
Codec Packetization
Address
Type
Period
--------------- ----- ------------209.165.200.224
G711u
ten
209.165.200.225
G.711u
ten
Alarm
State
---------Active
Active
Command
Description
addlapdtrunk
Adds an LAPD trunk to a specific VISM card line.
addrtpcon
Adds a static RTP VoIP trunking connection.
addrudptrunk
Adds an ISDN PRI backhaul RUDP session for an LAPD trunk connection.
clrrtpcnt
Clears the RTP counters (statistics) for a specific static RTP connection.
cnflapdtrunkpvc
Assigns the PVC trunk type that carries LAPD messages for the current VISM
card.
cnflntrunkcond
Enables or disables line conditioning on a VISM card line if a network alarm
is encountered.
cnfrtpcon
Modifies an existing static RTP VoIP trunking connection.
cnfrudptrunkrmtip Modifies the remote IP address of VISM used in the ISDN PRI backhaul RUDP
trunk for a specified session.
dellapdtrunk
Deletes an LAPD configured line.
delrtpcon
Deletes a static RTP VoIP trunking connection.
delrudptrunk
Deletes an ISDN PRI backhaul RUDP session that is associated with an LAPD.
dsplapd
Displays data about an LAPD.
dsplapdtrunkpvc
Displays the assigned PVC trunk type that carries LAPD trunk messages for
the current VISM card.
dsplapdtrunks
Displays the configuration data of all LAPD trunks.
Cisco VISM Installation and Configuration Guide
Release 3.0, Part Number OL-2521-01 Rev. D0, June 2004
5-413
Chapter 5
CLI Commands
dsprtpcons
Command
Description
dsprtpcnt
Displays the bearer counters (statistics) for a specific RTP VoIP trunking
connection.
dsprtpcon
Displays the configuration data of a specific static RTP VoIP trunking
connection.
dsprtpconnstat
Displays the RTP connection statistics for a specified endpoint
dsprudptrunk
Displays the configuration data of a specified ISDN PRI backhaul RUDP
session.
dsprudptrunks
Displays the configuration data of all ISDN PRI backhaul RUDP sessions.
Cisco VISM Installation and Configuration Guide
5-414
Release 3.0, Part Number OL-2521-01 Rev. D0, June 2004
Chapter 5
CLI Commands
dsprudptrunk
dsprudptrunk
To display the configuration data of a specified ISDN PRI backhaul Reliable User Datagram Protocol
(RUDP) session, use the dsprudptrunk command in the VoIP switching/trunking operating mode.
dsprudptrunk session-num
Syntax Description
session-num
Command Modes
VoIP switching/trunking
Usage Guidelines
Follow standard CLI procedures for this command.
Examples
The following example shows that the configuration data of ISDN PRI backhaul RUDP session number
43 is displayed:
Identifying session number in the range from 1 to 64.
dsprudptrunk 43
Session Number
:43
Local Port
:1124
.
.
Trans State Timeout:2000
Related Commands
Command
Description
addlapdtrunk
Adds an LAPD trunk to a specific VISM card line.
addrtpcon
Adds a static RTP VoIP trunking connection.
addrudptrunk
Adds an ISDN PRI backhaul RUDP session for an LAPD trunk connection.
clrrtpcnt
Clears the RTP counters (statistics) for a specific static RTP connection.
cnflapdtrunkpvc
Assigns the PVC trunk type that carries LAPD messages for the current VISM
card.
cnflntrunkcond
Enables or disables line conditioning on a VISM card line if a network alarm
is encountered.
cnfrtpcon
Modifies an existing static RTP VoIP trunking connection.
cnfrudptrunkrmtip Modifies the remote IP address of VISM used in the ISDN PRI backhaul RUDP
trunk for a specified session.
dellapdtrunk
Deletes an LAPD configured line.
delrtpcon
Deletes a static RTP VoIP trunking connection.
delrudptrunk
Deletes an ISDN PRI backhaul RUDP session that is associated with an LAPD.
dsplapd
Displays data about an LAPD.
dsplapdtrunkpvc
Displays the assigned PVC trunk type that carries LAPD trunk messages for
the current VISM card.
dsplapdtrunks
Displays the configuration data of all LAPD trunks.
Cisco VISM Installation and Configuration Guide
Release 3.0, Part Number OL-2521-01 Rev. D0, June 2004
5-415
Chapter 5
CLI Commands
dsprudptrunk
Command
Description
dsprtpcnt
Displays the bearer counters (statistics) for a specific RTP VoIP trunking
connection.
dsprtpcon
Displays the configuration data of a specific static RTP VoIP trunking
connection.
dsprtpcons
Displays the configuration data of all static RTP VoIP trunking connections.
dsprudptrunks
Displays the configuration data of all ISDN PRI backhaul RUDP sessions.
Cisco VISM Installation and Configuration Guide
5-416
Release 3.0, Part Number OL-2521-01 Rev. D0, June 2004
Chapter 5
CLI Commands
dsprudptrunks
dsprudptrunks
To display the configuration data of all ISDN PRI backhaul Reliable User Datagram Protocol (RUDP)
sessions, use the dsprudptrunks command in the VoIP switching/trunking operating mode.
dsprudptrunks
Syntax Description
This command has no arguments or keywords.
Command Modes
VoIP switching/trunking
Usage Guidelines
Follow standard CLI procedures for this command.
Examples
The following example shows that the configuration data of all ISDN PRI backhaul RUDP sessions are
displayed:
dsprudptrunks
Session Number
-------------43
Related Commands
Local Port
---------1124
Local IP
--------------209.165.200.224
Remote IP
--------------209.165.200.210
Remote Port
----------1159
Session State
------------Active
Command
Description
addlapdtrunk
Adds an LAPD trunk to a specific VISM card line.
addrtpcon
Adds a static RTP VoIP trunking connection.
addrudptrunk
Adds an ISDN PRI backhaul RUDP session for an LAPD trunk connection.
clrrtpcnt
Clears the RTP counters (statistics) for a specific static RTP connection.
cnflapdtrunkpvc
Assigns the PVC trunk type that carries LAPD messages for the current VISM
card.
cnflntrunkcond
Enables or disables line conditioning on a VISM card line if a network alarm
is encountered.
cnfrtpcon
Modifies an existing static RTP VoIP trunking connection.
cnfrudptrunkrmtip Modifies the remote IP address of VISM used in the ISDN PRI backhaul RUDP
trunk for a specified session.
dellapdtrunk
Deletes an LAPD configured line.
delrtpcon
Deletes a static RTP VoIP trunking connection.
delrudptrunk
Deletes an ISDN PRI backhaul RUDP session that is associated with an LAPD.
dsplapd
Displays data about an LAPD.
dsplapdtrunkpvc
Displays the assigned PVC trunk type that carries LAPD trunk messages for
the current VISM card.
dsplapdtrunks
Displays the configuration data of all LAPD trunks.
Cisco VISM Installation and Configuration Guide
Release 3.0, Part Number OL-2521-01 Rev. D0, June 2004
5-417
Chapter 5
CLI Commands
dsprudptrunks
Command
Description
dsprtpcnt
Displays the bearer counters (statistics) for a specific RTP VoIP trunking
connection.
dsprtpcon
Displays the configuration data of a specific static RTP VoIP trunking
connection.
dsprtpcons
Displays the configuration data of all static RTP VoIP trunking connections.
dsprudptrunk
Displays the configuration data of a specified ISDN PRI backhaul RUDP
session.
Cisco VISM Installation and Configuration Guide
5-418
Release 3.0, Part Number OL-2521-01 Rev. D0, June 2004
Chapter 5
CLI Commands
dspsarcnt
dspsarcnt
To display the segmentation and reassembly (SAR) counter values for a specified channel, use the
dspsarcnt command in the VoIP switching/trunking, switched AAL2 PVC, and AAL2 trunking
operating modes.
dspsarcnt lcn
Syntax Description
lcn
Command Modes
VoIP switching/trunking, switched AAL2 PVC, and AAL2 trunking
Usage Guidelines
Follow standard CLI procedures for this command.
Examples
The following example shows that the SAR counter values for logical channel number 132 are displayed:
Logical channel number of the connection for which you want to display SAR
counter values; in the range from 131 to 510.
dspsarcnt 132
SarShelfNum:
SarSlotNum:
SarChanNum:
1
17
132
Tx
--------------Total Cells:
69486
Total CellsCLP:
0
Total CellsAIS:
0
Total CellsFERF:
0
Total CellsEnd2EndLpBk: 0
Total CellsSegmentLpBk: 0
RcvCellsDiscOAM:
Related Commands
Rx
--------------60243
0
0
0
0
0
2151467320
Command
Description
dspsarcnts
Displays the SAR counter values for a VISM card.
Cisco VISM Installation and Configuration Guide
Release 3.0, Part Number OL-2521-01 Rev. D0, June 2004
5-419
Chapter 5
CLI Commands
dspsarcnts
dspsarcnts
To display the segmentation and reassembly (SAR) counter values for a VISM card, use the dspsarcnts
command in the VoIP switching/trunking, switched AAL2 PVC, and AAL2 trunking operating modes.
dspsarcnts
Syntax Description
This command has no arguments or keywords.
Command Modes
VoIP switching/trunking, switched AAL2 PVC, and AAL2 trunking
Usage Guidelines
Follow standard CLI procedures for this command.
Examples
The following example shows that the SAR counter values for the current VISM card are displayed:
dspsarcnts
Related Commands
Command
Description
dspsarcnt
Displays the SAR counter values for a specified channel.
Cisco VISM Installation and Configuration Guide
5-420
Release 3.0, Part Number OL-2521-01 Rev. D0, June 2004
Chapter 5
CLI Commands
dspsarmsgcnt
dspsarmsgcnt
To display the segmentation and reassembly (SAR) control message counter values for a VISM card, use
the dspsarmsgcnt command in the VoIP switching/trunking, switched AAL2 PVC, and AAL2 trunking
operating modes.
dspsarmsgcnt
Syntax Description
This command has no arguments or keywords.
Command Modes
VoIP switching/trunking, switched AAL2 PVC, and AAL2 trunking
Usage Guidelines
Follow standard CLI procedures for this command.
Examples
The following example shows that the SAR control message counter values for the current VISM card
are displayed:
dspsarmsgcnt
RiscXmtCtrlMsg:
RiscRcvCtrlMsg:
SARXmtCtrlMsg:
SARRcvCtrlMsg:
SARCtrlMsgDiscLenErr:
SARCtrlMsgDiscCRCErr:
SARCtrlMsgDiscUnknownChan:
SARCtrlMsgLastUnknownChan:
Related Commands
83606
83606
83445
83606
0
0
0
0
Command
Description
clrsarmsgcnt
Clears the control message counters from a VISM card.
Cisco VISM Installation and Configuration Guide
Release 3.0, Part Number OL-2521-01 Rev. D0, June 2004
5-421
Chapter 5
CLI Commands
dspses
dspses
To display the configuration data of a Primary Rate Interface (PRI) backhaul session, use the dspses
command in the VoIP switching/trunking and switched AAL2 PVC operating mode.
dspses session-num
Syntax Description
session-num
Command Modes
VoIP switching/trunking and switched AAL2 PVC
Usage Guidelines
Follow standard CLI procedures for this command.
Examples
The following example shows that the configuration data of PRI backhaul session number 1 is displayed:
Identifying session number in the range from 1 to 64.
dspses 1
vismRudpSessionNum:
vismRudpSessionGrpNum:
vismRudpSessionPriority:
vismRudpSessionState:
vismRudpSessionCurrSession:
vismRudpSessionLocalIp:
vismRudpSessionLocalPort:
vismRudpSessionRmtIp:
vismRudpSessionRmtPort:
vismRudpSessionMaxWindow:
vismRudpSessionSyncAttempts:
vismRudpSessionMaxSegSize:
vismRudpSessionMaxAutoReset:
vismRudpSessionRetransTmout:
vismRudpSessionMaxRetrans:
vismRudpSessionMaxCumAck:
vismRudpSessionAckTmout:
vismRudpSessionMaxOutOfSeq:
vismRudpSessionNullSegTmout:
vismRudpSessionTransStateTmout:
Related Commands
1
1
1
Oos
0
xxx.xx.xx.xxx
1124
xxx.xx.xx.xx
1124
32
5
384
5
600
3
3
300
4
2000
2000
Command
Description
addses
Adds a PRI backhaul session between a VISM card and a call agent.
delses
Deletes a PRI backhaul session.
dspsess
Displays the configuration data of all PRI backhaul sessions.
Cisco VISM Installation and Configuration Guide
5-422
Release 3.0, Part Number OL-2521-01 Rev. D0, June 2004
Chapter 5
CLI Commands
dspsesgrp
dspsesgrp
To display configuration data of a Primary Rate Interface (PRI) backhaul session group, use the
dspsesgrp command in the VoIP switching/trunking and switched AAL2 PVC operating modes.
dspsesgrp group-num
Syntax Description
group-num
Command Modes
VoIP switching/trunking and switched AAL2 PVC
Usage Guidelines
Follow standard CLI procedures for this command.
Examples
The following example shows that the PRI backhaul configuration data for session group number 2 is
displayed:
Identifying session group number for which you want to display the PRI backhaul
configuration data. It can be in the range from 1 to 16.
dspsesgrp 2
vismSessionGrpNum:
vismSessionGrpSetNum:
vismSessionGrpState:
vismSessionGrpCurrSession:
vismSessionGrpTotalSessions:
vismSessionGrpMgcName:
vismSessionGrpSwitchFails:
vismSessionGrpSwitchSucesses:
Related Commands
2
1
?
0
0
abc
0
0
Command
Description
addsesgrp
Adds a PRI backhaul session group between a VISM card and a call agent.
delsesgrp
Deletes a PRI backhaul session group.
dspsesgrps
Displays data about all PRI backhaul session groups.
Cisco VISM Installation and Configuration Guide
Release 3.0, Part Number OL-2521-01 Rev. D0, June 2004
5-423
Chapter 5
CLI Commands
dspsesgrps
dspsesgrps
To display configuration data about all Primary Rate Interface (PRI) backhaul session groups, use the
dspsesgrps command in the VoIP switching/trunking operating mode.
dspsesgrps
Syntax Description
This command has no arguments or keywords.
Command Modes
VoIP switching/trunking
Usage Guidelines
Follow standard CLI procedures for this command.
Examples
The following example shows that the configuration data of the current PRI backhaul session groups is
displayed:
dspsesgrps
GrpNum SetNum State ActiveSes TotalSes
Mgc
SwitchFail SwitchSuccess
---------------------------------------------------------------------------2
1
?
0
0
abc
0
0
3
1
?
0
0
svc
0
0
Related Commands
Command
Description
addsesgrp
Adds a PRI backhaul session group between a VISM card and a call agent.
delsesgrp
Deletes a PRI backhaul session group.
dspsesgrp
Displays configuration data of a PRI backhaul session group.
Cisco VISM Installation and Configuration Guide
5-424
Release 3.0, Part Number OL-2521-01 Rev. D0, June 2004
Chapter 5
CLI Commands
dspsess
dspsess
To display configuration data about all Primary Rate Interface (PRI) backhaul sessions, use the dspsess
command in the VoIP switching/trunking operating mode.
dspsess
Syntax Description
This command has no arguments or keywords.
Command Modes
VoIP switching/trunking
Usage Guidelines
Follow standard CLI procedures for this command.
Examples
The following example shows that the current PRI backhaul sessions are displayed:
dspsess
Related Commands
Command
Description
addses
Adds a PRI backhaul session between a VISM card and a call agent.
delses
Deletes a PRI backhaul session.
dspses
Displays the configuration data of a PRI backhaul session.
Cisco VISM Installation and Configuration Guide
Release 3.0, Part Number OL-2521-01 Rev. D0, June 2004
5-425
Chapter 5
CLI Commands
dspsesset
dspsesset
To display configuration data about a specified Primary Rate Interface (PRI) backhaul session set, use
the dspsesset command in the VoIP switching/trunking and switched AAL2 PVC operating modes.
dspsesset set-num
Syntax Description
set-num
In the range from 1 to 16.
Note
Currently, only session set number 1 is supported.
Command Modes
VoIP switching/trunking and switched AAL2 PVC
Usage Guidelines
Follow standard CLI procedures for this command.
Examples
The following example shows that the configuration data for PRI backhaul session number 1 is
displayed:
dspsesset 1
vismSessionSetNum:
vismSessionSetState:
vismSessionSetTotalGrps:
vismSessionSetActiveGrp:
vismSessionSetFaultTolerant:
vismSessionSetSwitchFails:
vismSessionSetSwitchSucesses:
Related Commands
1
Idle
2
0
FT
0
0
Command
Description
addsesset
Adds a PRI backhaul session set between a VISM card and a call agent.
delsesset
Deletes a PRI backhaul session set.
Cisco VISM Installation and Configuration Guide
5-426
Release 3.0, Part Number OL-2521-01 Rev. D0, June 2004
Chapter 5
CLI Commands
dspsesstat
dspsesstat
To display configuration data about Primary Rate Interface (PRI) backhaul session statistics (counters),
use the dspsesstat command in the VoIP switching/trunking operating mode.
dspsesstat session-num
Syntax Description
session-num
Command Modes
VoIP switching/trunking
Usage Guidelines
Follow standard CLI procedures for this command.
Examples
The following example shows that the statistics (counters) for the PRI backhaul session set number 1 are
displayed:
Session number for which you want to display PRI backhaul session statistics. It can
be in the range from 1 to 64.
dspsesstat 1
vismRudpSessionStatNum:
vismRudpSessionAutoResets:
vismRudpSessionRcvdAutoResets:
vismRudpSessionRcvdInSeqs:
vismRudpSessionRcvdOutSeqs:
vismRudpSessionSentPackets:
vismRudpSessionRcvdPackets:
vismRudpSessionSentBytes:
vismRudpSessionRcvdBytes:
vismRudpSessionDataSentPkts:
vismRudpSessionDataRcvdPkts:
vismRudpSessionDiscardPkts:
vismRudpSessionRetransPkts:
Related Commands
1
0
0
0
0
5
0
0
0
0
0
0
0
Command
Description
addsesset
Adds a PRI backhaul session set between a VISM card and a call agent.
delsesset
Deletes a PRI backhaul session set.
Cisco VISM Installation and Configuration Guide
Release 3.0, Part Number OL-2521-01 Rev. D0, June 2004
5-427
Chapter 5
CLI Commands
dspslipcnt
dspslipcnt
To display the current clock slip counters for a specified VISM card line, use the dspslipcnt command
in the VoIP switching/trunking, switched AAL1 SVC, switched AAL2 SVC, switched AAL2 PVC,
AAL2 trunking, VoIP and switched ATM AAL1 SVC trunking operating modes.
dspslipcnt line-num
Syntax Description
line-num
Command Modes
VoIP switching/trunking, switched AAL1 SVC, switched AAL2 SVC, switched AAL2 PVC, AAL2
trunking, VoIP and switched ATM AAL1 SVC
Usage Guidelines
Follow standard CLI procedures for this command.
Examples
The following example shows that the current clock slip counters for line 3 of the current VISM card are
displayed:
Line number of the DS1 line for which you want to display the current clock slip
counters. It can be in the range from 1 to 8.
dspslipcnt 3
Line 3 Slip Counters:
Uncontrolled Slip:
Frame Slip:
Related Commands
Tx Slip
0
0
Rx Slip
0
2
Command
Description
clrslipcnt
Clears current clock slip counters for a specified VISM card line.
Cisco VISM Installation and Configuration Guide
5-428
Release 3.0, Part Number OL-2521-01 Rev. D0, June 2004
Chapter 5
CLI Commands
dspsrcpcnt
dspsrcpcnt
To display the Simple Resource Control Protocol (SRCP) message counters (statistics) for a specified
call agent, use the dspsrcpcnt command in the VoIP switching/trunking operating mode.
dspsrcpcnt ca-ip-address
Syntax Description
ca-ip-address
Command Modes
VoIP switching/trunking
Usage Guidelines
Follow standard CLI procedures for this command.
Examples
The following example shows that the SRCP message counters (statistics) of IP address 209.165.200.224
are displayed:
IP address of the call agent for which you want to display SRCP statistics. It can
be in dotted decimal format (nnn.nnn.nnn.nnn).
dspsrcpcnt 209.165.200.224
Ip
--------2.2.2.2
Related Commands
Name
-------mgc1
Discarded
--------0
Augw/Fail
--------0/0
Auln/Fail
--------0/0
Ntfy/Fail
--------0/0
Rqnt/Fail
--------0/0
Command
Description
dspsrcpcnts
Displays SRCP message counters (statistics) for all known call agents.
dspsrcppeer
Displays the peer configuration data for a specified SRCP peer (call agent).
dspsrcppeers
Displays the peer configuration data for all known SRCP peers (call agents).
dspsrcpport
Displays the local UDP port number used by the SRCP on VISM.
dspsrcpretry
Displays the card level SRCP retransmission parameters—maximum number
of retransmission attempts, minimum timeout, and maximum timeout.
Cisco VISM Installation and Configuration Guide
Release 3.0, Part Number OL-2521-01 Rev. D0, June 2004
5-429
Chapter 5
CLI Commands
dspsrcpcnts
dspsrcpcnts
To display the Simple Resource Control Protocol (SRCP) message counters (statistics) for all known call
agents, use the dspsrcpcnts command in the VoIP switching/trunking operating mode.
dspsrcpcnts
Syntax Description
This command has no arguments or keywords.
Command Modes
VoIP switching/trunking
Usage Guidelines
Follow standard CLI procedures for this command.
Examples
The following example shows that the SRCP message counters (statistics) for all known call agents are
displayed:
dspsrcpcnts
Ip
------2.2.2.2
Related Commands
Name
-------mgc1
Discarded
--------0
Augw/Fail
--------0/0
Auln/Fail
--------0/0
Ntfy/Fail
--------0/0
Rqnt/Fail
--------0/0
Command
Description
dspsrcpcnt
Displays the SRCP message counters (statistics) for a specified call agent.
dspsrcppeer
Displays the peer configuration data for a specified SRCP peer (call agent).
dspsrcppeers
Displays the peer configuration data for all known SRCP peers (call agents).
dspsrcpport
Displays the local UDP port number used by the SRCP on VISM.
dspsrcpretry
Displays the card level SRCP retransmission parameters—maximum number of
retransmission attempts, minimum timeout, and maximum timeout.
Cisco VISM Installation and Configuration Guide
5-430
Release 3.0, Part Number OL-2521-01 Rev. D0, June 2004
Chapter 5
CLI Commands
dspsrcppeer
dspsrcppeer
To display the peer configuration data for a specified Simple Resource Control Protocol (SRCP) peer
(call agent), use the dspsrcppeer command in the VoIP switching/trunking operating mode.
dspsrcppeer peer-num
Syntax Description
peer-num
Command Modes
VoIP switching/trunking
Usage Guidelines
Follow standard CLI procedures for this command.
Examples
The following example shows that the peer configuration data for the call agent identified by peer
number 4 is displayed:
Peer (call agent) identification number. It can be a value from 1 to 8.
dspsrcppeer 4
Related Commands
Command
Description
dspsrcpcnt
Displays the SRCP message counters (statistics) for a specified call agent.
dspsrcpcnts
Displays SRCP message counters (statistics) for all known call agents.
dspsrcppeers
Displays the peer configuration data for all known SRCP peers (call agents).
dspsrcpport
Displays the local UDP port number used by the SRCP on VISM.
dspsrcpretry
Displays the card level SRCP retransmission parameters—maximum number
of retransmission attempts, minimum timeout, and maximum timeout.
Cisco VISM Installation and Configuration Guide
Release 3.0, Part Number OL-2521-01 Rev. D0, June 2004
5-431
Chapter 5
CLI Commands
dspsrcppeergrpparams
dspsrcppeergrpparams
To display the Simple Resource Control Protocol (SRCP) parameters for all call agent redundancy
groups that have SRCP added, use the dspsrcppeergrpparams command in the VoIP switching/trunking
and switched AAL2 PVC operating modes.
dspsrcppeergrpparams
Syntax Description
This command has no arguments or keywords.
Command Modes
VoIP switching/trunking and switched AAL2 PVC
Usage Guidelines
Follow standard CLI procedures for this command.
Examples
The following example shows that the SRCP parameters for all call agent redundancy groups that have
SRCP added are displayed:
dspsrcppeergrpparams
Mgc Grp Num HeartbeatIntv TimeSinceHeartbeat MaxPdu
----------- ------------- ------------------- -----1
120
0
4096
Related Commands
Command
Description
addmgcgrpentry
Configures call agents as part of an MGC redundancy group and assigns a
priority value for a call agent.
addmgcgrpprotocol
Associates a call agent redundancy group to a gateway control protocol.
cnfmgcgrpentry
Modifies the call agent priority level of a call agent within a call agent
redundancy group.
cnfmgcgrpparam
Modifies a call agent redundancy group state change notification policy
and priority level.
cnfsrcppeer
Configures the SRCP parameters when SRCP is the selected protocol for
communication between the VISM card and call agent.
cnfsrcppeergrpparam
Modifies the SRCP heartbeat interval and maximum UDP size for a
specified call agent redundancy group.
delmgcgrpentry
Deletes a call agent from a call agent redundancy group.
delmgcgrpprotocol
Deletes an MGCP from a specified call agent redundancy group.
dspmgcgrpparams
Displays all configured call agent redundancy group parameters.
dspmgcgrpprotocols
Displays all configured call agent redundancy group protocols.
dspmgcgrps
Displays all configured call agent redundancy groups.
Cisco VISM Installation and Configuration Guide
5-432
Release 3.0, Part Number OL-2521-01 Rev. D0, June 2004
Chapter 5
CLI Commands
dspsrcppeers
dspsrcppeers
To display the peer configuration data for all known Simple Resource Control Protocol (SRCP) peers
(call agents), use the dspsrcppeers command in the VoIP switching/trunking operating mode.
dspsrcppeers
Syntax Description
This command has no arguments or keywords.
Command Modes
VoIP switching/trunking
Usage Guidelines
Follow standard CLI procedures for this command.
Examples
The following example shows that the configuration data for all known SRCP peers (call agents) are
displayed:
dspsrcppeers
Related Commands
Command
Description
dspsrcpcnt
Displays the SRCP message counters (statistics) for a specified call agent.
dspsrcpcnts
Displays SRCP message counters (statistics) for all known call agents.
dspsrcppeer
Displays the peer configuration data for a specified SRCP peer (call agent).
dspsrcpport
Displays the local UDP port number used by the SRCP on VISM.
dspsrcpretry
Displays the card level SRCP retransmission parameters—maximum number
of retransmission attempts, minimum timeout, and maximum timeout.
Cisco VISM Installation and Configuration Guide
Release 3.0, Part Number OL-2521-01 Rev. D0, June 2004
5-433
Chapter 5
CLI Commands
dspsrcpport
dspsrcpport
To display the local User Datagram Protocol (UDP) port number used by the Simple Resource Control
Protocol (SRCP) on VISM, use the dspsrcpport command in the VoIP switching/trunking operating
mode.
dspsrcpport
Syntax Description
This command has no arguments or keywords.
Command Modes
VoIP switching/trunking
Usage Guidelines
Follow standard CLI procedures for this command.
Examples
The following example shows that the local UDP port number used by the SRCP is displayed:
dspsrcpport
Related Commands
Command
Description
dspsrcpcnt
Displays the SRCP message counters (statistics) for a specified call agent.
dspsrcpcnts
Displays SRCP message counters (statistics) for all known call agents.
dspsrcppeer
Displays the peer configuration data for a specified SRCP peer (call agent).
dspsrcppeers
Displays the peer configuration data for all known SRCP peers (call agents).
dspsrcpretry
Displays the card level SRCP retransmission parameters—maximum number
of retransmission attempts, minimum timeout, and maximum timeout.
Cisco VISM Installation and Configuration Guide
5-434
Release 3.0, Part Number OL-2521-01 Rev. D0, June 2004
Chapter 5
CLI Commands
dspsrcpretry
dspsrcpretry
To display the VISM card level Simple Resource Control Protocol (SRCP) retransmission
parameters—maximum number of retransmission attempts, minimum timeout, and maximum
timeout—use the dspsrcpretry command in the VoIP switching/trunking and switched AAL2 PVC
operating modes.
dspsrcpretry
Syntax Description
This command has no arguments or keywords.
Command Modes
VoIP switching/trunking and switched AAL2 PVC
Usage Guidelines
Follow standard CLI procedures for this command.
Examples
The following example shows that the VISM card level SRCP retransmission parameters are displayed:
dspsrcpretry
Min Request Timeout :
Retry Count
:
Max Request Timeout :
Related Commands
500
3
500
Command
Description
dspsrcpcnt
Displays the SRCP message counters (statistics) for a specified call agent.
dspsrcpcnts
Displays SRCP message counters (statistics) for all known call agents.
dspsrcppeer
Displays the peer configuration data for a specified SRCP peer (call agent).
dspsrcppeers
Displays the peer configuration data for all known SRCP peers (call agents).
dspsrcpport
Displays the local UDP port number used by the SRCP on VISM.
Cisco VISM Installation and Configuration Guide
Release 3.0, Part Number OL-2521-01 Rev. D0, June 2004
5-435
Chapter 5
CLI Commands
dspt38fxlco
dspt38fxlco
To display the fax handling instructions configured for a specified line, use the dspt38fxlco command
in the VoIP switching/trunking, switched AAL2 PVC, and AAL2 trunking operating modes.
dspt38fxlco line-num
Syntax Description
line-num
Command Modes
VoIP switching/trunking, switched AAL2 PVC, and AAL2 trunking
Usage Guidelines
Follow standard CLI procedures for this command.
Examples
The following example shows that the fax handling instructions configured for line 3 are displayed:
Line number of the DS1 line for which you want to display T.38 fax handling
instructions. It can be in the range from 1 to 8.
dspt38fxlco 3
line_number: 3
FX_LCO: Gateway controlled preferred then pass-through
Related Commands
Command
Description
cnfcodectmpl
Assigns a codec template to an entire VISM card.
cnft38fxlco
Configures the fax handling instructions for a specified line.
cnft38nsetimeout
Configures a specified line with a length of time in which to wait for a remote
acknowledgment of the offer to switch to fax transfer mode.
cnft38params
Configures the T.38 fax transfer parameters for a specified line.
dspcodectmpls
Displays all entries in the codec template table.
dspt38fxlcos
Displays the fax handling instructions for all lines on the current VISM card.
dspt38nsetimeout
Displays a specified configured line with a length of time in which to wait for
a remote acknowledgment of the offer to switch to fax transfer mode.
dspt38nsetimeouts
Displays all configured lines with a length of time in which to wait for a remote
acknowledgment of the offer to switch to fax transfer mode.
dspt38params
Displays the T.38 fax transfer parameters for a specified line.
Cisco VISM Installation and Configuration Guide
5-436
Release 3.0, Part Number OL-2521-01 Rev. D0, June 2004
Chapter 5
CLI Commands
dspt38fxlcos
dspt38fxlcos
To display the fax handling instructions for all lines on the current VISM card, use the dspt38fxlcos
command in the VoIP switching/trunking, switched AAL2 PVC, and AAL2 trunking operating modes.
dspt38fxlcos
Syntax Description
This command has no arguments or keywords.
Command Modes
VoIP switching/trunking, switched AAL2 PVC, and AAL2 trunking
Usage Guidelines
Follow standard CLI procedures for this command.
Examples
The following example shows that the fax handling instructions for all lines on the current VISM card
are displayed:
dspt38fxlcos
Line_Number
----------1
2
.
.
.
8
Related Commands
Fx LCO
-----Gateway controlled preferred then pass-through
Gateway controlled preferred then pass-through
Gateway controlled preferred then pass-through
Command
Description
cnfcodectmpl
Assigns a codec template to an entire VISM card.
cnft38fxlco
Configures the fax handling instructions for a specified line.
cnft38nsetimeout
Configures a specified line with a length of time in which to wait for a remote
acknowledgment of the offer to switch to fax transfer mode.
cnft38params
Configures the T.38 fax transfer parameters for a specified line.
dspcodectmpls
Displays all entries in the codec template table.
dspt38fxlco
Displays the fax handling instructions configured for a specified line.
dspt38nsetimeout
Displays a specified configured line with a length of time in which to wait for
a remote acknowledgment of the offer to switch to fax transfer mode.
dspt38nsetimeouts
Displays all configured lines with a length of time in which to wait for a remote
acknowledgment of the offer to switch to fax transfer mode.
dspt38params
Displays the T.38 fax transfer parameters for a specified line.
Cisco VISM Installation and Configuration Guide
Release 3.0, Part Number OL-2521-01 Rev. D0, June 2004
5-437
Chapter 5
CLI Commands
dspt38nsetimeout
dspt38nsetimeout
To display a specified configured line with a length of time in which to wait for a remote
acknowledgment of the offer to switch to fax transfer mode, use the dspt38nsetimeout command in the
VoIP switching/trunking, switched AAL2 PVC, and AAL2 trunking operating modes.
dspt38nsetimeout line-num
Syntax Description
line-num
Command Modes
VoIP switching/trunking, switched AAL2 PVC, and AAL2 trunking
Usage Guidelines
Follow standard CLI procedures for this command.
Examples
The following example shows that the length of time in which to wait for a remote acknowledgment of
the offer to switch to fax transfer mode configured for line 5 is displayed:
Line number of the channel, in the range from 1 to 8.
dspt38nsetimeout 5
line_number: 5
FX_Nse_Timer: 1000 ms
Related Commands
Command
Description
cnfcodectmpl
Assigns a codec template to an entire VISM card.
cnft38fxlco
Configures the fax handling instructions for a specified line.
cnft38nsetimeout
Configures a specified line with a length of time in which to wait for a remote
acknowledgment of the offer to switch to fax transfer mode.
cnft38params
Configures the T.38 fax transfer parameters for a specified line.
dspcodectmpls
Displays all entries in the codec template table.
dspt38fxlco
Displays the fax handling instructions configured for a specified line.
dspt38fxlcos
Displays the fax handling instructions for all lines on the current VISM card.
dspt38nsetimeouts
Displays all configured lines with a length of time in which to wait for a remote
acknowledgment of the offer to switch to fax transfer mode.
dspt38params
Displays the T.38 fax transfer parameters for a specified line.
Cisco VISM Installation and Configuration Guide
5-438
Release 3.0, Part Number OL-2521-01 Rev. D0, June 2004
Chapter 5
CLI Commands
dspt38nsetimeouts
dspt38nsetimeouts
To display all configured lines with a length of time in which to wait for a remote acknowledgment of
the offer to switch to fax transfer mode, use the dspt38nsetimeouts command in the VoIP
switching/trunking, switched AAL2 PVC, and AAL2 trunking operating modes.
dspt38nsetimeouts
Syntax Description
This command has no arguments or keywords.
Command Modes
VoIP switching/trunking, switched AAL2 PVC, and AAL2 trunking
Usage Guidelines
Follow standard CLI procedures for this command.
Examples
The following example shows that the length of time in which to wait for a remote acknowledgment of
the offer to switch to fax transfer mode configured for all lines on the current VISM card is displayed:
dspt38nsetimeouts
Line_Number
----------1
2
.
.
.
8
Related Commands
NSE Timeout (ms)
---------------1000
1000
1000
Command
Description
cnfcodectmpl
Assigns a codec template to an entire VISM card.
cnft38fxlco
Configures the fax handling instructions for a specified line.
cnft38nsetimeout
Configures a specified line with a length of time in which to wait for a remote
acknowledgment of the offer to switch to fax transfer mode.
cnft38params
Configures the T.38 fax transfer parameters for a specified line.
dspcodectmpls
Displays all entries in the codec template table.
dspt38fxlco
Displays the fax handling instructions configured for a specified line.
dspt38fxlcos
Displays the fax handling instructions for all lines on the current VISM card.
dspt38nsetimeout
Displays a specified configured line with a length of time in which to wait for
a remote acknowledgment of the offer to switch to fax transfer mode.
dspt38params
Displays the T.38 fax transfer parameters for a specified line.
Cisco VISM Installation and Configuration Guide
Release 3.0, Part Number OL-2521-01 Rev. D0, June 2004
5-439
Chapter 5
CLI Commands
dspt38params
dspt38params
To display the T.38 fax transfer parameters for a specified line, use the dspt38params command in the
VoIP switching/trunking, switched AAL2 PVC, and AAL2 trunking operating modes.
dspt38params line-num
Syntax Description
line-num
Command Modes
VoIP switching/trunking, switched AAL2 PVC, and AAL2 trunking
Usage Guidelines
Follow standard CLI procedures for this command.
Examples
The following example shows that the T.38 fax transfer parameters for line 7 are displayed:
Line number of the DS1 line for which you want to display T.38 fax transfer
parameters. It can be in the range from 1 to 8.
dspt38params 7
Related Commands
line_number:
Max_Xmit_Rate:
Info_Field_Size:
Data_Pkt_size:
LS_Data_Redundancy:
HS_Data_Redundancy:
TCF_Method:
Error_Correction:
NSF_Override:
NSF_Country_Code:
NSF_Vendor_Code:
7
fx14400bps
48
40 ms
5
2
localTCF
enabled
enabled
181
18
Command
Description
cnfcodectmpl
Assigns a codec template to an entire VISM card.
cnft38fxlco
Configures the fax handling instructions for a specified line.
cnft38nsetimeout
Configures a specified line with a length of time in which to wait for a remote
acknowledgment of the offer to switch to fax transfer mode.
cnft38params
Configures the T.38 fax transfer parameters for a specified line.
dspcodectmpls
Displays all entries in the codec template table.
dspt38fxlco
Displays the fax handling instructions configured for a specified line.
dspt38fxlcos
Displays the fax handling instructions for all lines on the current VISM card.
dspt38nsetimeout
Displays a specified configured line with a length of time in which to wait for
a remote acknowledgment of the offer to switch to fax transfer mode.
dspt38nsetimeouts
Displays all configured lines with a length of time in which to wait for a remote
acknowledgment of the offer to switch to fax transfer mode.
Cisco VISM Installation and Configuration Guide
5-440
Release 3.0, Part Number OL-2521-01 Rev. D0, June 2004
Chapter 5
CLI Commands
dsptaskinfo
dsptaskinfo
To display data about currently operating tasks, use the dsptaskinfo command in the VoIP
switching/trunking, switched AAL2 PVC, and AAL2 trunking operating modes.
dsptaskinfo
Syntax Description
This command has no arguments or keywords.
Command Modes
VoIP switching/trunking, switched AAL2 PVC, and AAL2 trunking
Usage Guidelines
Follow standard CLI procedures for this command.
Examples
The following example shows that the data of the currently operating tasks is displayed:
dsptaskinfo
taskName
lastSent lastSt lastSt
FailedTask Failed Failed
MsgTyp Errno
---------- --------------- --------------- ---------- ---------- ------ -----nmimRouter 0
60
0
0
0x0
scm
1240
584
0
0
0x0
pSNMP
0
1
0
0
0x0
cmm
277
258
0
0
0x0
conn_mgr_t 1109790
29
0
0
0x0
tFiled
68
69
0
0
0x0
tSmd
237
313
0
0
0x0
logd
304
1
0
0
0x0
alarm_task 0
29
0
0
0x0
oam
5
1109778
0
0
0x0
bertd
0
1
0
0
0x0
Related Commands
msgReceivd
msgSent
msgSent
Failed
There are no related commands.
Cisco VISM Installation and Configuration Guide
Release 3.0, Part Number OL-2521-01 Rev. D0, June 2004
5-441
Chapter 5
CLI Commands
dsptonebuiltinplans
dsptonebuiltinplans
To display all built-in (preconfigured) tone plans on the current VISM card, use the dsptonebuiltinplans
command in the VoIP switching/trunking and switched AAL2 PVC operating modes.
dsptonebuiltinplans
Syntax Description
This command has no arguments or keywords.
Command Modes
VoIP switching/trunking and switched AAL2 PVC
Usage Guidelines
VISM supports version 1 of the country and region built-in tone plans listed in Table 5-3.
Table 5-3
Examples
VISM Release 2.2(0) Built-in Tone Plans
Tone Plan Name
Tone Plan Name
Tone Plan Name
Tone Plan Name
ITU
North America
Argentina
Australia
Austria
Belgium
Brazil
Canada
China
Cyprus
Czech Republic
Denmark
Finland
France
Germany
Greece
Hong Kong
Hungary
Iceland
India
Indonesia
Ireland
Israel
Italy
Japan
Korean Republic
Luxembourg
Malaysia
Mexico
Netherlands
New Zealand
Norway
Philippines
Poland
Portugal
Russia
Singapore
Slovakia
Slovenia
South Africa
Spain
Sweden
Switzerland
Taiwan
Thailand
Turkey
United Kingdom
United States
The following example shows that all preconfigured tone plans for the current VISM card are displayed:
dsptonebuiltinplans
Status
-----configure
.
.
.
configure
Tone Plan Region
---------------ITU
Version
------1
United States
1
Tone Plan File Name
------------------BUILTIN
BUILTIN
Number of Built-In Tone Plans = 48.
Cisco VISM Installation and Configuration Guide
5-442
Release 3.0, Part Number OL-2521-01 Rev. D0, June 2004
Chapter 5
CLI Commands
dsptonebuiltinplans
Related Commands
Command
Description
addtoneplan
Adds a tone plan to the current VISM card.
cnflnringback
Configures the ringback tone method for a specified line on the current VISM
card.
cnflntoneplan
Assigns a tone plan to a specified VISM card line.
cnflntonetimeout
Modifies the timeout periods of all call progress tones supported by VISM on
a specified VISM card line.
dellntoneplan
Deletes the tone plan configuration of a specified VISM card line.
deltoneplan
Deletes a previously added tone plan from the current VISM card.
dsplnringback
Displays the ringback tone method for a specified line on the current VISM
card.
dsplntoneplan
Displays the tone plan configuration of a specified VISM card line.
dsplntonetimeout
Displays the configured timeout periods for all call progress tones of a
specified VISM card line.
dsptoneplan
Displays the tone configuration of a specified tone plan—either a
preconfigured (built-in) or user-added tone plan.
dsptoneplans
Displays the tone configuration of all tone plans—either preconfigured
(built-in) or user-added tone plans.
dsptoneprovplans
Displays all user-added (provisional) tone plans.
dsptoneregionplans Displays a list of all tone plans for the countries and regions whose name
partially or completely matches the name you supply.
Cisco VISM Installation and Configuration Guide
Release 3.0, Part Number OL-2521-01 Rev. D0, June 2004
5-443
Chapter 5
CLI Commands
dsptoneplan
dsptoneplan
To display the tone configuration of a specified tone plan—either a built-in (preconfigured) or a
provisional tone plan—use the dsptoneplan command in the VoIP switching/trunking and switched
AAL2 PVC operating modes.
dsptoneplan tonep-region tonep-version
Syntax Description
tonep-region
Tone plan country or region for which you want to display the tone
configuration. It can be in the range from 1 to 64 alphanumeric characters and
can contain underscores ( _ ). This value is case sensitive.
tonep-version
Tone plan version number of the tone plan country or region for which you
want to display the tone configuration. It can be in the range from 1 to 65535.
Command Modes
VoIP switching/trunking and switched AAL2 PVC
Usage Guidelines
This command displays amplitudes as a number which corresponds to a dBm value according to the
following formula:
dBm = 20 * log10 (peek-to-peek/46348)
This formula equals the amplitude of one frequency. If both frequencies are configured for the same
level, add 6 dBm to the results of the formula to obtain the total amplitude.
Examples
The following example shows that the tone configuration for singapore tone plan region, version number
11, is displayed:
dsptoneplan singapore 11
Region Name :Singapore
Version: 1
Description: Tone Plan for Singapore (SG)
File name: BUILTIN
Related Commands
Command
Description
addtoneplan
Adds a tone plan to the current VISM card.
cnflnringback
Configures the ringback tone method for a specified line on the current VISM
card.
cnflntoneplan
Assigns a tone plan to a specified VISM card line.
cnflntonetimeout
Modifies the timeout periods of all call progress tones supported by VISM on
a specified VISM card line.
dellntoneplan
Deletes the tone plan configuration of a specified VISM card line.
deltoneplan
Deletes a previously added tone plan from the current VISM card.
dsplnringback
Displays the ringback tone method for a specified line on the current VISM
card.
Cisco VISM Installation and Configuration Guide
5-444
Release 3.0, Part Number OL-2521-01 Rev. D0, June 2004
Chapter 5
CLI Commands
dsptoneplan
Command
Description
dsplntoneplan
Displays the tone plan configuration of a specified VISM card line.
dsplntonetimeout
Displays the configured timeout periods for all call progress tones of a
specified VISM card line.
dsptonebuiltinplans Displays all preconfigured (built-in) tone plans on the current VISM card.
dsptoneplans
Displays the tone configuration of all tone plans—either preconfigured
(built-in) or user-added tone plans.
dsptoneprovplans
Displays all user-added (provisional) tone plans.
dsptoneregionplans Displays a list of all tone plans for the countries and regions whose name
partially or completely matches the name you supply.
Cisco VISM Installation and Configuration Guide
Release 3.0, Part Number OL-2521-01 Rev. D0, June 2004
5-445
Chapter 5
CLI Commands
dsptoneplans
dsptoneplans
To display the tone configuration of all tone plans—either built-in (preconfigured) or provisional tone
plans—use the dsptoneplans command in the VoIP switching/trunking and switched AAL2 PVC
operating modes.
dsptoneplans
Syntax Description
This command has no arguments or keywords.
Command Modes
VoIP switching/trunking and switched AAL2 PVC
Usage Guidelines
This command displays the status of tone plans in the following ways:
Examples
•
Configure—For a built-in (preconfigured) tone plan, and a provisional tone plan that is downloaded
properly and added to the system.
•
Lost File—For a provisional tone plan that is not downloaded properly or for a tone plan that is not
the proper one.
•
Reloading—For a provisional tone plan that is currently downloading.
The following example shows that the tone configuration for tone plans is displayed:
dsptoneplans
Status
--------configure
configure
.
.
.
Related Commands
Tone Plan Region
---------------singapore
ITU
Version
------11
1
Tone Plan File Name
------------------sing_3
BUILTIN
Command
Description
addtoneplan
Adds a tone plan to the current VISM card.
cnflnringback
Configures the ringback tone method for a specified line on the current VISM
card.
cnflntoneplan
Assigns a tone plan to a specified VISM card line.
cnflntonetimeout
Modifies the timeout periods of all call progress tones supported by VISM on
a specified VISM card line.
dellntoneplan
Deletes the tone plan configuration of a specified VISM card line.
deltoneplan
Deletes a previously added tone plan from the current VISM card.
dsplnringback
Displays the ringback tone method for a specified line on the current VISM
card.
dsplntoneplan
Displays the tone plan configuration of a specified VISM card line.
Cisco VISM Installation and Configuration Guide
5-446
Release 3.0, Part Number OL-2521-01 Rev. D0, June 2004
Chapter 5
CLI Commands
dsptoneplans
Command
Description
dsplntonetimeout
Displays the configured timeout periods for all call progress tones of a
specified VISM card line.
dsptonebuiltinplans Displays all preconfigured (built-in) tone plans on the current VISM card.
dsptoneplan
Displays the tone configuration of a specified tone plan—either a
preconfigured (built-in) or user-added tone plan.
dsptoneprovplans
Displays all user-added (provisional) tone plans.
dsptoneregionplans Displays a list of all tone plans for the countries and regions whose name
partially or completely matches the name you supply.
Cisco VISM Installation and Configuration Guide
Release 3.0, Part Number OL-2521-01 Rev. D0, June 2004
5-447
Chapter 5
CLI Commands
dsptoneprovplans
dsptoneprovplans
To display all provisional tone plans, use the dsptoneprovplans command in the VoIP
switching/trunking and switched AAL2 PVC operating modes.
dsptoneprovplans
Syntax Description
This command has no arguments or keywords.
Command Modes
VoIP switching/trunking and switched AAL2 PVC
Usage Guidelines
This command displays the status of tone plans in the following ways:
Examples
•
Configure—Downloaded properly and added to the system.
•
Lost File—Not downloaded properly or for a tone plan that is not the proper one.
•
Reloading—Currently downloading.
The following example shows that all provisional tone plans are displayed:
dsptoneprovplans
Status
--------configure
.
.
.
Tone Plan Region
---------------singapore
Version
------11
Tone Plan File Name
------------------sing_3
Number of Provisionable Tone Plans = 1.
Number of un-configured Tone Plans = 31.
Related Commands
Command
Description
addtoneplan
Adds a tone plan to the current VISM card.
cnflnringback
Configures the ringback tone method for a specified line on the current VISM
card.
cnflntoneplan
Assigns a tone plan to a specified VISM card line.
cnflntonetimeout
Modifies the timeout periods of all call progress tones supported by VISM on
a specified VISM card line.
dellntoneplan
Deletes the tone plan configuration of a specified VISM card line.
deltoneplan
Deletes a previously added tone plan from the current VISM card.
dsplnringback
Displays the ringback tone method for a specified line on the current VISM
card.
dsplntoneplan
Displays the tone plan configuration of a specified VISM card line.
dsplntonetimeout
Displays the configured timeout periods for all call progress tones of a
specified VISM card line.
Cisco VISM Installation and Configuration Guide
5-448
Release 3.0, Part Number OL-2521-01 Rev. D0, June 2004
Chapter 5
CLI Commands
dsptoneprovplans
Command
Description
dsptonebuiltinplans Displays all preconfigured (built-in) tone plans on the current VISM card.
dsptoneplan
Displays the tone configuration of a specified tone plan—either a
preconfigured (built-in) or user-added tone plan.
dsptoneplans
Displays the tone configuration of all tone plans—either preconfigured
(built-in) or user-added tone plans.
dsptoneregionplans Displays a list of all tone plans for the countries and regions whose name
partially or completely matches the name you supply.
Cisco VISM Installation and Configuration Guide
Release 3.0, Part Number OL-2521-01 Rev. D0, June 2004
5-449
Chapter 5
CLI Commands
dsptoneregionplans
dsptoneregionplans
To display a list of all tone plans for the countries and regions whose name partially or completely
matches the name you supply, use the dsptoneregionplans command in the VoIP switching/trunking and
switched AAL2 PVC operating modes.
dsptoneregionplans tonep-region
Syntax Description
tonep-region
Tone plan country or region for which you want to display associated tone
plans. It can be in the range from 1 to 64 alphanumeric characters and can
contain underscores ( _ ). This value is case sensitive.
Note
You must enter at least a partial tonep-region value and the value must
be enclosed in quotation marks.
Command Modes
VoIP switching/trunking and switched AAL2 PVC
Usage Guidelines
Follow standard CLI procedures for this command.
Examples
The following example shows that all tone plans associated with the partial tone plan region Uni are
displayed:
dsptoneregionplans “Uni”
Status
--------configure
configure
Tone Plan Region
---------------UnitedKingdon
UnitedStates
Version
------11
11
Tone Plan File Name
------------------BUILTIN
BUILTIN
Number of Matching Tone Plans = 2.
Related Commands
Command
Description
addtoneplan
Adds a tone plan to the current VISM card.
cnflnringback
Configures the ringback tone method for a specified line on the current VISM
card.
cnflntoneplan
Assigns a tone plan to a specified VISM card line.
cnflntonetimeout
Modifies the timeout periods of all call progress tones supported by VISM on
a specified VISM card line.
dellntoneplan
Deletes the tone plan configuration of a specified VISM card line.
deltoneplan
Deletes a previously added tone plan from the current VISM card.
dsplnringback
Displays the ringback tone method for a specified line on the current VISM
card.
dsplntoneplan
Displays the tone plan configuration of a specified VISM card line.
dsplntonetimeout
Displays the configured timeout periods for all call progress tones of a
specified VISM card line.
Cisco VISM Installation and Configuration Guide
5-450
Release 3.0, Part Number OL-2521-01 Rev. D0, June 2004
Chapter 5
CLI Commands
dsptoneregionplans
Command
Description
dsptonebuiltinplans Displays all preconfigured (built-in) tone plans on the current VISM card.
dsptoneplan
Displays the tone configuration of a specified tone plan—either a
preconfigured (built-in) or user-added tone plan.
dsptoneplans
Displays the tone configuration of all tone plans—either preconfigured
(built-in) or user-added tone plans.
dsptoneprovplans
Displays all user-added (provisional) tone plans.
Cisco VISM Installation and Configuration Guide
Release 3.0, Part Number OL-2521-01 Rev. D0, June 2004
5-451
Chapter 5
CLI Commands
dspvbdcodec
dspvbdcodec
To display the upspeed codec used for voiceband data (VBD), use the dspvbdcodec command in the
VoIP switching/trunking operating mode.
dspvbdcodec
Syntax Description
This command has no arguments or keywords.
Command Modes
VoIP switching/trunking
Usage Guidelines
Follow standard CLI procedures for this command.
Examples
The following example shows that the upspeed codec used for VBD is displayed:
dspvbdcodec
VBD UpSpeed Codec: G.711u
Related Commands
Command
Description
cnfvbdcodec
Configures the VBD upspeed codec.
Cisco VISM Installation and Configuration Guide
5-452
Release 3.0, Part Number OL-2521-01 Rev. D0, June 2004
Chapter 5
CLI Commands
dspvbdpol
dspvbdpol
To display the VISM card level voiceband data (VBD) policies for fax/modem upspeed connection
admission control (CAC) failure and fax/modem carrier loss for calls, use the dspvbdpol command in
the VoIP switching/trunking, switched AAL2 PVC, and AAL2 trunking operating modes.
dspvbdpol
Syntax Description
This command has no arguments or keywords.
Command Modes
VoIP switching/trunking, switched AAL2 PVC, and AAL2 trunking
Usage Guidelines
Follow standard CLI procedures for this command.
Examples
The following example shows that the VISM card level VBD policies are displayed:
dspvbdpol
Carrier Loss Policy:
CAC Rejection Policy:
Related Commands
upspeedCodec
maintain
Command
Description
cnfvbdpol
Configures VISM card level VBD policies.
Cisco VISM Installation and Configuration Guide
Release 3.0, Part Number OL-2521-01 Rev. D0, June 2004
5-453
Chapter 5
CLI Commands
dspvismdn
dspvismdn
To display the domain name of the current VISM card, use the dspvismdn command in the VoIP
switching/trunking and switched AAL2 PVC operating modes.
dspvismdn
Syntax Description
This command has no arguments or keywords.
Command Modes
VoIP switching/trunking and switched AAL2 PVC
Usage Guidelines
Follow standard CLI procedures for this command.
Examples
The following example shows that the domain name of the current VISM card is displayed:
dspvismdn
DomainName:
Related Commands
cisco.com
Command
Description
cnfvismdn
Configures the current VISM card domain name.
Cisco VISM Installation and Configuration Guide
5-454
Release 3.0, Part Number OL-2521-01 Rev. D0, June 2004
Chapter 5
CLI Commands
dspvismip
dspvismip
To display the IP address and subnet mask for the current VISM card, use the dspvismip command in
the VoIP switching/trunking operating mode.
dspvismip
Syntax Description
This command has no arguments or keywords.
Command Modes
VoIP switching/trunking
Usage Guidelines
Follow standard CLI procedures for this command.
Examples
The following example shows that the IP address and subnet mask of the current VISM card are
displayed:
dspvismip
VismIpAddress: 209.165.200.224
NetMask:
255.255.255.255
VismBearerIpAddress: 209.165.200.225
BearerNetMask: 255.255.255.255
Related Commands
Command
Description
cnfvismip
Configures the current VISM card IP address.
Cisco VISM Installation and Configuration Guide
Release 3.0, Part Number OL-2521-01 Rev. D0, June 2004
5-455
Chapter 5
CLI Commands
dspvismparam
dspvismparam
To display VISM card configuration parameters, use the dspvismparam command in the VoIP
switching/trunking, switched AAL2 PVC, and AAL2 trunking operating modes.
dspvismparam
Syntax Description
This command has no arguments or keywords.
Command Modes
VoIP switching/trunking, switched AAL2 PVC, and AAL2 trunking
Usage Guidelines
Follow standard CLI procedures for this command.
Examples
The following example shows that the configuration parameters of the current VISM card are displayed:
dspvismparam
VISM mode:
VISM features Bit Map:
CAC flag:
DS0s available:
Template number:
Percent of functional DSPs:
IP address:
Subnet mask
RTCP report interval:
RTCP receive multiplier:
RTP receive timer:
ControlPrecedence/Tos:
BearerPrecedence/Tos:
Aal2 muxing status:
Tftp Server Dn
Aggregate Clipping
Aggregate Svc Bandwidth
Codec negotiation option
Profile negotiation option
VAD Duty Cycle
VAD Tolerance
CALEA:
Note
Related Commands
voipSwitching
0x5ac
enable
192
2
100
64.68.2.1
255.255.255.252
1000 msec
3
disable
0x60
0xa0
disable
TFTPDOMAIN
enable
0
1
1
61
100
enable
The DS0 available parameter value is applicable to AAL2 trunking operating mode only. The RTCP
report interval, RTP receive timer, ControlPrecedence/Tos, and BearerPrecedence/Tos parameter
values are applicable to VoIP switching/trunking operating mode only.
Command
Description
addcon
Adds a PVC connection between a VISM card and any SM or PXM card.
cnfcac
Enables or disables the CAC feature on a VISM card.
cnfcalea
Enables or disables the CALEA feature on the current VISM card.
Cisco VISM Installation and Configuration Guide
5-456
Release 3.0, Part Number OL-2521-01 Rev. D0, June 2004
Chapter 5
CLI Commands
dspvismparam
Command
Description
cnfco4timer
Configures the bearer continuity test CO4 timer value.
cnfcodectmpl
Assigns a codec template to an entire VISM card.
cnfcon
Configures a connection between a VISM card and an MGX 8000 Series platform
PXM card.
cnfvismip
Configures the current VISM card IP address.
cnfvismmode
Configures the initial operating mode for a VISM card.
dspcalea
Displays the CALEA feature configuration status of the current VISM card.
dspco4timer
Displays the bearer continuity test CO4 timer value.
Cisco VISM Installation and Configuration Guide
Release 3.0, Part Number OL-2521-01 Rev. D0, June 2004
5-457
Chapter 5
CLI Commands
dspvoipparams
dspvoipparams
To display the VoIP switching/trunking operating mode parameters, use the dspvoipparams command
in the VoIP switching/trunking operating mode.
dspvoipparams
Syntax Description
This command has no arguments or keywords.
Command Modes
VoIP switching/trunking
Usage Guidelines
The following parameters are displayed when you use this command:
Examples
•
DTMF relay status—Displays whether the CAS bits are configured to be relayed to the other
endpoint.
•
CAS bits transport status—Displays whether the DTMF tones are configured to be relayed to the
other endpoint.
•
VAD timer value—Displays the hangover time before silence compression is invoked.
•
Event negotiation policy—None, proprietary, or all.
•
Silence insertion descriptor (SID) payload type.
The following example shows that the VoIP switching/trunking operating mode parameters are
displayed:
dspvoipparams
VoIP
VoIP
VoIP
VoIP
VoIP
Related Commands
DTMF RELAY:
CAS BITS TRANSPORT:
VAD TIMER:
EVENT NEGOTIATE POL:
SID PAYLOAD TYPE:
Off
Off
250
proprietary
13
Command
Description
cnfvoiptimerparam
Configures the holdover time for VAD before silence compression is
activated.
cnfvoiptransparams
Configures the VoIP transportation parameters.
Cisco VISM Installation and Configuration Guide
5-458
Release 3.0, Part Number OL-2521-01 Rev. D0, June 2004
Chapter 5
CLI Commands
dspxgcpbt
dspxgcpbt
To display the default network type, virtual channel (VC) type, and connection type of the current VISM
card, use the dspxgcpbt command in the VoIP switching/trunking, switched AAL2 PVC, and AAL2
trunking operating modes.
dspxgcpbt
Syntax Description
This command has no arguments or keywords.
Command Modes
VoIP switching/trunking, switched AAL2 PVC, and AAL2 trunking
Usage Guidelines
Follow standard CLI procedures for this command.
Examples
The following example shows that the default network type, VC type, and connection type of the current
VISM card are displayed:
dspxgcpbt
Network Type:
VC Type:
Conn Type:
Related Commands
IP
PVC
not-applicable
Command
Description
cnfxgcpbt
Configures a default bearer type.
Cisco VISM Installation and Configuration Guide
Release 3.0, Part Number OL-2521-01 Rev. D0, June 2004
5-459
Chapter 5
CLI Commands
dspxgcpcalls
dspxgcpcalls
To display the xGCP call ID, connection ID, and endpoint name corresponding to each call agent
established connection on the gateway, use the dspxgcpcalls command in the VoIP switching/trunking
and switched AAL2 PVC operating modes.
dspxgcpcalls
Syntax Description
This command has no arguments or keywords.
Command Modes
VoIP switching/trunking and switched AAL2 PVC
Usage Guidelines
If more than one xGCP connection ID is associated with the same call ID, each connection ID appears
on a separate line in the display.
Examples
The following example shows that the xGCP call IDs, connection IDs, and endpoint names
corresponding to all call agent established connections on the gateway are displayed:
dspxgcpcalls
xGCP Call ID
-------------------------------5898886
22263730
35040677
37233496
44147097
59925215
86098952
106425635
127810066
143146281
251336169
308712944
332811049
349719791
368644231
414134979
431808675
439592534
449708369
472992198
667869345
689149158
731314813
733047547
840095617
855162306
889601897
959868114
Related Commands
xGCP Connection ID
-----------------358a
368d
338d
3588
358c
3685
3787
3689
348f
3789
3688
338f
3690
348b
3683
3589
348e
3687
338a
368b
3392
3584
368e
3686
368a
338c
368c
3395
xGCP Endpoint Name
-----------------vism/T1-2/21
vism/T1-2/23
vism/T1-1/3
vism/T1-1/5
vism/T1-2/6
vism/T1-2/14
vism/T1-1/23
vism/T1-1/22
vism/T1-1/20
vism/T1-1/8
vism/T1-1/14
vism/T1-2/12
vism/T1-1/15
vism/T1-1/12
vism/T1-1/21
vism/T1-1/13
vism/T1-2/5
vism/T1-1/6
vism/T1-1/10
vism/T1-1/7
vism/T1-2/20
vism/T1-2/13
vism/T1-2/8
vism/T1-2/22
vism/T1-2/7
vism/T1-1/18
vism/T1-2/15
vism/T1-1/4
There are no related commands.
Cisco VISM Installation and Configuration Guide
5-460
Release 3.0, Part Number OL-2521-01 Rev. D0, June 2004
Chapter 5
CLI Commands
dspxgcpcids
dspxgcpcids
To display the logical channel number (LCN), channel identification number (CID), xGCP connection
ID, endpoint name, and call ID corresponding to each call agent established AAL2 connection on the
gateway, use the dspxgcpcids command in the VoIP switching/trunking and switched AAL2 PVC
operating modes.
dspxgcpcids
Syntax Description
This command has no arguments or keywords.
Command Modes
VoIP switching/trunking and switched AAL2 PVC
Usage Guidelines
Follow standard CLI procedures for this command.
Examples
The following example shows that the xGCP connection CID configuration data for each call agent
established AAL2 connection on the gateway is displayed:
dspxgcpcids
LCN
--132
132
132
132
132
132
132
132
132
132
132
132
132
132
132
132
132
132
132
132
132
d32
Related Commands
CID
--10
14
15
16
17
18
21
22
23
24
25
29
30
31
32
33
37
38
39
40
41
9
xGCP Connection ID
-----------------27ba
24c2
24c6
24cb
26be
27bc
24bc
24c3
24c8
25c2
26bf
24bf
24c5
24c9
26bc
26c0
24c1
24c4
24c7
25c5
26c1
26c3
xGCP Endpoint Name
-----------------vism/T1-1/2
vism/T1-1/6
vism/T1-1/7
vism/T1-1/8
vism/T1-1/9
vism/T1-1/10
vism/T1-1/13
vism/T1-1/14
vism/T1-1/15
vism/T1-1/16
vism/T1-1/17
vism/T1-1/21
vism/T1-1/22
vism/T1-1/23
vism/T1-1/24
vism/T1-2/1
vism/T1-2/5
vism/T1-2/6
vism/T1-2/7
vism/T1-2/8
vism/T1-2/9
vism/T1-1/1
xGCP Call ID
-------------------------------346350363
219196705
3124232
71993004
964845576
40023388
308615846
540211499
887014703
750350805
757994272
407192558
702316810
686445676
366717759
142297238
681759411
439143079
966681180
565100353
273412123
705499200
Command
Description
delxgcpcon
Deletes an xGCP connection specified by the xGCP connection identification
number.
dspxgcpcon
Displays the attributes associated with a call agent established connection.
Cisco VISM Installation and Configuration Guide
Release 3.0, Part Number OL-2521-01 Rev. D0, June 2004
5-461
Chapter 5
CLI Commands
dspxgcpcids
Command
Description
dspxgcpcons
Displays the xGCP connection ID, endpoint name, and call ID corresponding to
each call agent established connection on the gateway.
dspxgcpendpts
Displays the xGCP endpoint names of all endpoints added with the addendpt
command, or the SNMP equivalent.
Cisco VISM Installation and Configuration Guide
5-462
Release 3.0, Part Number OL-2521-01 Rev. D0, June 2004
Chapter 5
CLI Commands
dspxgcpcnf
dspxgcpcnf
To display previously configured Simple Gateway Control Protocol (SGCP)/Media Gateway Control
Protocol (MGCP) timeout and retransmission count values, use the dspxgcpcnf command in the VoIP
switching/trunking operating mode.
dspxgcpcnf
Syntax Description
This command has no arguments or keywords.
Command Modes
VoIP switching/trunking
Usage Guidelines
Follow standard CLI procedures for this command.
Examples
The following example shows that the SGCP/MGCP timeout and retransmission count values are
displayed:
dspxgcpcnf
MWD timeout :
Request timeout :
Retry count:
Related Commands
10000
500
3
Command
Description
cnfxgcpmwd
Configures the maximum waiting delay value used for sending an RSIP message to
the call agent.
cnfxgcpretry
Configures VISM minimum and maximum request timeouts and retransmission
attempts for communication with the associated call agent.
Cisco VISM Installation and Configuration Guide
Release 3.0, Part Number OL-2521-01 Rev. D0, June 2004
5-463
Chapter 5
CLI Commands
dspxgcpcnt
dspxgcpcnt
To display the Simple Gateway Control Protocol (SGCP)/Media Gateway Control Protocol (MGCP)
message statistics for a specified call agent, use the dspxgcpcnt command in the VoIP
switching/trunking operating mode.
dspxgcpcnt ca-ip-address
Syntax Description
ca-ip-address
Command Modes
VoIP switching/trunking
Usage Guidelines
Follow standard CLI procedures for this command.
Examples
The following example shows that the SGCP/MGCP message statistics of the call agent are displayed:
IP address of the call agent for which you want to display SGCP/MGCP message
statistics. It can be in dotted decimal format (nnn.nnn.nnn.nnn).
dspxgcpcnt 209.165.200.204
IP
--------------209.165.200.204
Related Commands
success msg
----------0
fail msg
---------4
Command
Description
dspxgcpcnts
Displays the SGCP/MGCP message statistics for all known call agents.
Cisco VISM Installation and Configuration Guide
5-464
Release 3.0, Part Number OL-2521-01 Rev. D0, June 2004
Chapter 5
CLI Commands
dspxgcpcnts
dspxgcpcnts
To display the Simple Gateway Control Protocol (SGCP)/Media Gateway Control Protocol (MGCP)
message statistics for all known call agents, use the dspxgcpcnts command in the VoIP
switching/trunking operating mode.
dspxgcpcnts
Syntax Description
This command has no arguments or keywords.
Command Modes
VoIP switching/trunking
Usage Guidelines
Follow standard CLI procedures for this command.
Examples
The following example shows that the SGCP/MGCP messages statistics for all known call agents are
displayed:
dspxgcpcnts
IP
--------2.2.2.2
Related Commands
success msg
----------0
fail msg
---------4
Command
Description
dspxgcpcnt
Displays the SGCP/MGCP message statistics for a specified call agent.
Cisco VISM Installation and Configuration Guide
Release 3.0, Part Number OL-2521-01 Rev. D0, June 2004
5-465
Chapter 5
CLI Commands
dspxgcpcon
dspxgcpcon
To display the attributes associated with a call agent established connection, use the dspxgcpcon
command in the VoIP switching/trunking and switched AAL2 PVC operating modes.
dspxgcpcon conn-id display-level
Syntax Description
conn-id
Connection identification number. It can be in the range of hexadecimal numbers
from 0 to f.
display-level
Detail level of display. It can be one of the following values:
•
1 = Abbreviated display
•
2 = Detailed display
Command Modes
VoIP switching/trunking and switched AAL2 PVC
Usage Guidelines
Follow standard CLI procedures for this command.
Examples
The following example shows that the abbreviated level of attributes associated with the call agent
identified by the connection identification number 4C5B are displayed:
dspxgcpcon 4c5b 1
*********************************************************
Attributes of Connection ID: 4c5b
*********************************************************
Call ID
= C0011
Endpoint Name
= vism/T1-1/1
Line Number
= 1
Connection ID
= 4c5b
Admitted Codec
= PCMA
Admitted Pkt. period
= 10 ms
Connection Mode
= sendrecv
Echo Cancellation
= FALSE
Type of Service
= 0xa0
Network Type
= IP
Remote Address Type
= Invalid (0)
Continuity Test
= FALSE
Loopback
= FALSE
Local RTP Port
= 49556
Remote RTP Port
= 49544
Remote RTP Port Count
= 1
Remote Address
=64.68.18.1
MGC Domain Name
= mgc1
MGC IP Address
= Unknown
MGC UDP Port
= 2427
Port in Notified Entity
= FALSE
Protocol Version
= MGCP 0.1
Silence Suppression
= FALSE
SID
= TRUE
VAD Timer
= 250 ms
CAS Type
= None
Cisco VISM Installation and Configuration Guide
5-466
Release 3.0, Part Number OL-2521-01 Rev. D0, June 2004
Chapter 5
CLI Commands
dspxgcpcon
Triple Redundancy
DTMF forwarding
Local Connection Options (lco string)
= TRUE
= FALSE
= L: e:off, s:off, a:PCMA
Remote Session Descriptor (sdp string)
-------------------------------------v=0
o=- C0011 0 IN - s=c=IN IP4 64.68.18.1
t=0 0
m=audio 49544 RTP/AVP 8
--------------------------------------
=
The following example shows that the detailed level of attributes associated with the call agent identified
by the connection identification number 4C5B are displayed:
dspxgcpcon 4c5b 2
*********************************************************
Attributes of Connection ID: 4c5b
*********************************************************
Call ID
= C0011
Endpoint Name
= vism/T1-1/1
Line Number
= 1
Connection ID
= 4c5b
Admitted Codec
= PCMA
Admitted Pkt. period
= 10 ms
Connection Mode
= sendrecv
Echo Cancellation
= FALSE
Type of Service
= 0xa0
Network Type
= IP
Remote Address Type
= Invalid (0)
Continuity Test
= FALSE
Loopback
= FALSE
Local RTP Port
= 49556
Remote RTP Port
= 49544
Remote RTP Port Count
= 1
Remote Address
=64.68.18.1
MGC Domain Name
= mgc1
MGC IP Address
= Unknown
MGC UDP Port
= 2427
Port in Notified Entity
= FALSE
Protocol Version
= MGCP 0.1
Silence Suppression
= FALSE
SID
= TRUE
VAD Timer
= 250 ms
CAS Type
= None
Triple Redundancy
= TRUE
DTMF forwarding
= FALSE
Local Connection Options (lco string)
= L: e:off, s:off, a:PCMA
Remote Session Descriptor (sdp string)
=
-------------------------------------v=0
o=- C0011 0 IN - s=c=IN IP4 64.68.18.1
t=0 0
m=audio 49544 RTP/AVP 8
-------------------------------------Timestamp Information:
Display Type
= Originating
CRCX Ack (CRCX Ack - CRCX)
= 10.000000000 ms
MDCX Command (MDCX - CRCX)
= 70.000000000 ms
Cisco VISM Installation and Configuration Guide
Release 3.0, Part Number OL-2521-01 Rev. D0, June 2004
5-467
Chapter 5
CLI Commands
dspxgcpcon
MDCX Ack (MDCX Ack - CRCX)
= 80.000000000 ms
Time since the CRCX was received
= 2016.930000000 sec
(CRCX Command is not shown since it is used as reference)
Codec List:
Pkt. Period
Pkt. Period
Pkt. Period
LCO
LCO
LCO
TDM
DSP
Related Commands
Codec[1]
List[1]: Pkt. Period[1]
Range[1] - Low
Range[1] - High
Codec List[1]
Pkt. Period Range - Low
Pkt. Period Range - High
Endpoint Connected to DSP Channel
Channel Connected to Network Endpoint
= PCMA
= 10 ms
= 10 ms
= 10 ms
= PCMA
= 0 ms
= 0 ms
= TRUE
= TRUE
Command
Description
delxgcpcon
Deletes an xGCP connection specified by the xGCP connection identification
number.
dspxgcpcids
Displays the LCN, CID, xGCP connection ID, endpoint name, and call ID
corresponding to each call agent established AAL2 connection on the gateway.
dspxgcpcons
Displays the xGCP connection identification number, endpoint name, and call
identification number corresponding to each call agent established connection on
the gateway.
dspxgcpendpts
Displays the xGCP endpoint names of all endpoints added with the addendpt
command, or the SNMP equivalent.
Cisco VISM Installation and Configuration Guide
5-468
Release 3.0, Part Number OL-2521-01 Rev. D0, June 2004
Chapter 5
CLI Commands
dspxgcpcons
dspxgcpcons
To display the xGCP connection identification number, endpoint name, and call identification number
corresponding to each call agent established connection on the gateway, use the dspxgcpcons command
in the VoIP switching/trunking and switched AAL2 PVC operating modes.
dspxgcpcons
Syntax Description
This command has no arguments or keywords.
Command Modes
VoIP switching/trunking and switched AAL2 PVC
Usage Guidelines
Follow standard CLI procedures for this command.
Examples
The following example shows that the xGCP connection identification number, endpoint name, and call
identification number of each call agent established connection on the gateway are displayed:
dspxgcpcons
xGCP Connection ID
----------------4c5b
4c5c
Related Commands
xGCP Endpoint Name
-----------------vism/T1-1/1
vism/T1-1/2
xGCP Call ID
-----------C0011
C0012
Command
Description
delxgcpcon
Deletes an xGCP connection specified by the xGCP connection identification
number.
dspxgcpcids
Displays the LCN, CID, xGCP connection ID, endpoint name, and call ID
corresponding to each call agent established AAL2 connection on the gateway.
dspxgcpendpts
Displays the xGCP endpoint names of all endpoints added with the addendpt
command, or the SNMP equivalent.
Cisco VISM Installation and Configuration Guide
Release 3.0, Part Number OL-2521-01 Rev. D0, June 2004
5-469
Chapter 5
CLI Commands
dspxgcpdefpkg
dspxgcpdefpkg
To display the Simple Gateway Control Protocol (SGCP)/Media Gateway Control Protocol (MGCP)
default package, use the dspxgcpdefpkg command in the VoIP switching/trunking operating mode.
dspxgcpdefpkg
Syntax Description
This command has no arguments or keywords.
Command Modes
VoIP switching/trunking
Usage Guidelines
Follow standard CLI procedures for this command.
Examples
The following example shows that the SGCP/MGCP default package is displayed:
dspxgcpdefpkg
Default package :
Related Commands
T
There are no related commands.
Cisco VISM Installation and Configuration Guide
5-470
Release 3.0, Part Number OL-2521-01 Rev. D0, June 2004
Chapter 5
CLI Commands
dspxgcpdetailcnt
dspxgcpdetailcnt
To display Simple Gateway Control Protocol (SGCP)/Media Gateway Control Protocol (MGCP) details
of message statistics exchanged between VISM and a specified call agent, use the dspxgcpdetailcnt
command in the VoIP switching/trunking operating mode.
dspxgcpdetailcnt ca-ip-address
Syntax Description
ca-ip-address
Command Modes
VoIP switching/trunking
Usage Guidelines
Follow standard CLI procedures for this command.
Examples
The following example shows that the SGCP/MGCP details of message statistics exchanged between
VISM and the call agent identified by the IP address are displayed:
IP address of the call agent for which you want to display detailed exchanged
message statistics. It can be in dotted decimal format (nnn.nnn.nnn.nnn).
dspxgcpdetailcnt 209.165.200.224
IP Address
CRCX Count
CRCX Fail Count
MDCX Count
MDCX Fail Count
DLCX Received Count
DLCX Received Fail Count
DLCX Sent Count
DLCX Sent Fail Count
RQNT Count
RQNT Fail Count
Notify Count
Notify Fail Count
Audit Endpoint Count
Audit Endpoint Fail Count
Audit Connection Count
Audit Connection Fail Count
RSIP Count
RSIP Fail Count
Related Commands
:
:
:
:
:
:
:
:
:
:
:
:
:
:
:
:
:
:
:
209.165.200.224
0
0
0
0
0
0
0
0
0
0
0
0
0
0
0
0
4
4
Command
Description
dspxgcpdetailcnts
Displays SGCP/MGCP details of message statistics exchanged between VISM
and all known call agents.
Cisco VISM Installation and Configuration Guide
Release 3.0, Part Number OL-2521-01 Rev. D0, June 2004
5-471
Chapter 5
CLI Commands
dspxgcpdetailcnts
dspxgcpdetailcnts
To display Simple Gateway Control Protocol (SGCP)/Media Gateway Control Protocol (MGCP) details
of message statistics exchanged between VISM and all known call agents, use the dspxgcpdetailcnts
command in the VoIP switching/trunking operating mode.
dspxgcpdetailcnts
Syntax Description
This command has no arguments or keywords.
Command Modes
VoIP switching/trunking
Usage Guidelines
Follow standard CLI procedures for this command.
Examples
The following example shows that the SGCP/MGCP details of message statistics exchanged between
VISM and all known call agents are displayed:
dspxgcpdetailcnts
IP Address
CRCX Count
CRCX Fail Count
MDCX Count
MDCX Fail Count
DLCX Received Count
DLCX Received Fail Count
DLCX Sent Count
DLCX Sent Fail Count
RQNT Count
RQNT Fail Count
Notify Count
Notify Fail Count
Audit Endpoint Count
Audit Endpoint Fail Count
Audit Connection Count
Audit Connection Fail Count
RSIP Count
RSIP Fail Count
Related Commands
:
:
:
:
:
:
:
:
:
:
:
:
:
:
:
:
:
:
:
2.2.2.2
0
0
0
0
0
0
0
0
0
0
0
0
0
0
0
0
4
4
Command
Description
dspxgcpdetailcnt
Displays SGCP/MGCP details of message statistics exchanged between VISM
and a specified call agent.
Cisco VISM Installation and Configuration Guide
5-472
Release 3.0, Part Number OL-2521-01 Rev. D0, June 2004
Chapter 5
CLI Commands
dspxgcpendpt
dspxgcpendpt
To display the attributes associated with an endpoint added using the addendpt command, or the SNMP
equivalent, use the dspxgcpendpt command in the VoIP switching/trunking and switched AAL2 PVC
operating modes.
dspxgcpendpt line-num ds0-num
Syntax Description
line-num
Line number of the endpoint for which you want to display the attributes. It can be in
the range from 1 to 8.
ds0-num
DS0 number of the endpoint for which you want to display the attributes. It can be a
value from one of the following ranges:
•
1 to 24 for T1 lines
•
1 to 31 for E1 lines
Command Modes
VoIP switching/trunking and switched AAL2 PVC
Usage Guidelines
An endpoint added with the addendpt command is considered an xGCP endpoint even though a call
agent established connection cannot be associated with the endpoint.
Examples
The following example shows that the statistics for the endpoint identified by line number 1, DS0
number 1 are displayed:
dspxgcpendpt 1 1
*********************************************************
Attributes of Endpoint Name: vism/T1-1/1
*********************************************************
Line Number
= 1
Endpoint Number
= 1
Endpoint Name
= vism/T1-1/1
Continuity Test
= FALSE
Echo Cancellation
= FALSE
Protocol Version
= Invalid Protocol
MGC IP Address
= Unknown
MGC UDP Port
= 0
Port in Notified Entity
= FALSE
Request ID
= 0
Quarantine Handling
=
Requested Event List
=
Signal Event List
=
Accumulated Event List
=
Quarantined Event List
=
Detect Event List
=
Accumulated Dialed String
=
DSP Channel Connected to Network Endpoint
= FALSE
Retry Count
= 3
Minimum Retry Timeout
= 500 ms
Maximum Retry Timeout
= 500 ms
Cisco VISM Installation and Configuration Guide
Release 3.0, Part Number OL-2521-01 Rev. D0, June 2004
5-473
Chapter 5
CLI Commands
dspxgcpendpt
Related Commands
Command
Description
delxgcpcon
Deletes an xGCP connection specified by the xGCP connection identification
number.
dspxgcpcids
Displays the LCN, CID, xGCP connection ID, endpoint name, and call ID
corresponding to each call agent established AAL2 connection on the gateway.
dspxgcpcon
Displays the attributes associated with a call agent established connection.
dspxgcpcons
Displays the xGCP connection ID, endpoint name and call ID corresponding to each
call agent established connection on the gateway.
Cisco VISM Installation and Configuration Guide
5-474
Release 3.0, Part Number OL-2521-01 Rev. D0, June 2004
Chapter 5
CLI Commands
dspxgcpendptcons
dspxgcpendptcons
To display the attributes of all connections associated with an endpoint added using the addendpt
command, or the SNMP equivalent, use the dspxgcpendptcons command in the VoIP
switching/trunking and switched AAL2 PVC operating modes.
dspxgcpendptcons line-num ds0-num display-level
Syntax Description
line-num
Line number of the endpoint connections for which you want to display the attributes.
It can be in the range from 1 to 8.
ds0-num
DS0 number of the endpoint connections for which you want to display the attributes.
It can be a value from one of the following ranges:
display-level
•
1 to 24 for T1 lines
•
1 to 31 for E1 lines
Detail level of display. It can be one of the following values:
•
1 = Abbreviated display.
•
2 = Detailed display.
Command Modes
VoIP switching/trunking and switched AAL2 PVC
Usage Guidelines
Follow standard CLI procedures for this command.
Examples
The following example shows that the attributes of all connections associated by the endpoint identified
by line number 1, DS0 number 1 are displayed in the detailed format:
dspxgcpendptcons 1 1 2
*********************************************************
Attributes of Connection ID:1
*********************************************************
Call ID
= 634
Endpoint Name
= vism/T1-1/1
Line Number
= 1
Connection ID
= 1
Admitted Codec
= PCMU
Admitted Pkt. period
= 10 ms
Connection Mode
= sendrecv
Echo Cancellation
= TRUE
Type of Service
= 0xa0
Network Type
= IP
Remote Address Type
= Invalid (0)
Continuity Test
= FALSE
Loopback
= FALSE
Local RTP Port
= 49152
Remote RTP Port
= 49154
Remote RTP Port Count
= 1
Remote Address
= nn.nnn.n.n
Remote SDP
= TRUE
MGC Domain Name
= vsc-1
Cisco VISM Installation and Configuration Guide
Release 3.0, Part Number OL-2521-01 Rev. D0, June 2004
5-475
Chapter 5
CLI Commands
dspxgcpendptcons
MGC IP Address
= Unknown
MGC UDP Port
= 2427
Port in Notified Entity
= FALSE
Protocol Version
= MGCP 0.1
Silence Suppression
= TRUE
VAD Timer
= 250
CAS Forwarding Backhaul
= 0
Triple Redundancy
= 1
DTMF forwarding
= 0
Local Connection Options (lco string)
= L:e:on
Remote Session Descriptor (sdp string)
=
Timestamp Information:
Display Type
= Terminating
CRCX Ack (CRCX Ack - CRCX)
= 10.000000000 ms
Time since the CRCX was received
= 210.280000000 sec
(CRCX Command is not shown since it is used as reference)
Codec List:Codec[1]
Pkt. Period List[1]:Pkt. Period[1]
Pkt. Period Range[1] - Low
Pkt. Period Range[1] - High
Codec List:Codec[2]
Pkt. Period List[2]:Pkt. Period[1]
Pkt. Period Range[2] - Low
Pkt. Period Range[2] - High
Codec List:Codec[3]
Pkt. Period List[3]:Pkt. Period[1]
Pkt. Period Range[3] - Low
Pkt. Period Range[3] - High
LCO Pkt. Period Range - Low
LCO Pkt. Period Range - High
TDM Endpoint Connected to DSP Channel
DSP Channel Connected to Network Endpoint
Related Commands
= PCMU
= 10 ms
= 10 ms
= 10 ms
= PCMA
= 10 ms
= 10 ms
= 10 ms
= CCD
= 10 ms
= 10 ms
= 10 ms
= 0 ms
= 0 ms
= TRUE
= TRUE
Command
Description
delxgcpcon
Deletes an xGCP connection specified by the xGCP connection identification
number.
dspxgcpcids
Displays the LCN, CID, xGCP connection ID, endpoint name, and call ID
corresponding to each call agent established AAL2 connection on the gateway.
dspxgcpcon
Displays the attributes associated with a call agent established connection.
dspxgcpcons
Displays the xGCP connection ID, endpoint name and call ID corresponding to
each call agent established connection on the gateway.
dspxgcpendpt
Displays the xGCP endpoint names corresponding to each endpoint number.
dspxgcpendpts
Displays the xGCP endpoint name corresponding to each endpoint added using the
addendpt command or the SNMP equivalent.
Cisco VISM Installation and Configuration Guide
5-476
Release 3.0, Part Number OL-2521-01 Rev. D0, June 2004
Chapter 5
CLI Commands
dspxgcpendpts
dspxgcpendpts
To display the xGCP endpoint names corresponding to each endpoint which has been added using the
addendpt command, or the SNMP equivalent, use the dspxgcpendpts command in the VoIP
switching/trunking and switched AAL2 PVC operating modes.
dspxgcpendpts
Syntax Description
This command has no arguments or keywords.
Command Modes
VoIP switching/trunking and switched AAL2 PVC
Usage Guidelines
The xGCP endpoint name is displayed with this command regardless of whether there are call agent
established connections associated with the endpoint. If there are call agent established connections
associated with the endpoint, the corresponding xGCP connection identification number and call
identification number appear on the same line as the endpoint name.
Examples
The following example shows that the endpoint names that correspond to each endpoint are displayed:
dspxgcpendpts
xGCP Endpoint Name
-----------------vism/T1-1/1
vism/T1-1/2
vism/T1-1/3
vism/T1-1/4
vism/T1-1/5
vism/T1-1/6
vism/T1-1/7
vism/T1-1/8
vism/T1-1/9
vism/T1-1/10
vism/T1-1/11
vism/T1-1/12
vism/T1-1/13
vism/T1-1/14
vism/T1-1/15
vism/T1-1/16
vism/T1-1/17
vism/T1-1/18
vism/T1-1/19
vism/T1-1/20
vism/T1-1/21
vism/T1-1/22
vism/T1-1/23
vism/T1-1/24
Related Commands
xGCP Connection ID
-----------------4c5b
4c5c
xGCP Call ID
-------------C0011
C0012
Command
Description
dspxgcpendpt
Displays the xGCP endpoint names corresponding to each endpoint number.
Cisco VISM Installation and Configuration Guide
Release 3.0, Part Number OL-2521-01 Rev. D0, June 2004
5-477
Chapter 5
CLI Commands
dspxgcperrcnt
dspxgcperrcnt
To display the Simple Gateway Control Protocol (SGCP)/Media Gateway Control Protocol (MGCP)
error counts for both unsupported protocol versions and unrecognized packets, use the dspxgcperrcnt
command in the VoIP switching/trunking operating mode.
dspxgcperrcnt
Syntax Description
This command has no arguments or keywords.
Command Modes
VoIP switching/trunking
Usage Guidelines
Follow standard CLI procedures for this command.
Examples
The following example shows that the xGCP error counts for unsupported protocol versions and
unrecognized packets are displayed:
dspxgcperrcnt
Number of msg. for an unsupported protocol version :
Number of unrecognized packets :
0
Related Commands
0
There are no related commands.
Cisco VISM Installation and Configuration Guide
5-478
Release 3.0, Part Number OL-2521-01 Rev. D0, June 2004
Chapter 5
CLI Commands
dspxgcpinterops
dspxgcpinterops
To display the status of the Session Description Protocol (SDP) OST interoperability feature, use the
dspxgcpinterops command in the VoIP switching/trunking operating mode.
dspxgcpinterops
Syntax Description
This command has no arguments or keywords.
Command Modes
VoIP switching/trunking
Usage Guidelines
Follow standard CLI procedures for this command.
Examples
The following example shows that the SDP OST interoperability status is displayed:
dspxgcpinterops
SDP OST flag: enable
Related Commands
Command
Description
cnfxgcpinteropsdpost Enables or disables the SDP OST interoperability feature.
Cisco VISM Installation and Configuration Guide
Release 3.0, Part Number OL-2521-01 Rev. D0, June 2004
5-479
Chapter 5
CLI Commands
dspxgcplncons
dspxgcplncons
To display the DS0s with active xGCP connections, the number of connections for each line, and the
number of active calls for each card, use the dspxgcplncons command in the VoIP switching/trunking
and switched AAL2 PVC operating modes.
dspxgcplncons
Syntax Description
This command has no arguments or keywords.
Command Modes
VoIP switching/trunking and switched AAL2 PVC
Usage Guidelines
Follow standard CLI procedures for this command.
Examples
The following example shows that the DS0s with active xGCP connections, the number of connections
for each line, and the number of active calls for each card are displayed:
dspxgcplncons
Connections Active Line 1: 0x00bee89e
Connections Active Line 2: 0x00b5bfc5
Connections Active Line 3: 0x0015387c
Connections Active Line 4: 0x00000000
Connections Active Line 5: 0x00000000
Connections Active Line 6: 0x00000000
Connections Active Line 7: 0x00000000
Connections Active Line 8: 0x00000000
Total Active Connections: 42
Note
Related Commands
(15)
(16)
(11)
(0)
(0)
(0)
(0)
(0)
The hexadecimal digits indicate the DS0s on which the connections exist. The parenthetical numbers
indicate the total number of active DS0s on a line. The last line of the displayed data indicates the
total number of active connections.
Command
Description
delxgcpcon
Deletes an xGCP connection specified by the xGCP connection identification
number.
dspxgcpcids
Displays the LCN, CID, xGCP connection ID, endpoint name, and call ID
corresponding to each call agent established AAL2 connection on the gateway.
dspxgcpcon
Displays the attributes associated with a call agent established connection.
dspxgcpcons
Displays the xGCP connection ID, endpoint name and call ID corresponding
to each call agent established connection on the gateway.
dspxgcpendpt
Displays the attributes associated with an endpoint.
dspxgcpendptcons
Displays the attributes of all connections associated with an endpoint.
dspxgcpendpts
Displays the xGCP endpoint names of all endpoints added with the addendpt
command, or the SNMP equivalent.
Cisco VISM Installation and Configuration Guide
5-480
Release 3.0, Part Number OL-2521-01 Rev. D0, June 2004
Chapter 5
CLI Commands
dspxgcppeers
dspxgcppeers
To display all the User Datagram Protocol (UDP) peer ports used by the Simple Gateway Control
Protocol (SGCP) or the Media Gateway Control Protocol (MGCP), use the dspxgcppeers command in
the VoIP switching/trunking operating mode.
dspxgcppeers
Syntax Description
This command has no arguments or keywords.
Command Modes
VoIP switching/trunking
Usage Guidelines
Follow standard CLI procedures for this command.
Examples
The following example shows that the UDP ports used by xGCP are displayed:
dspxgcppeers
Related Commands
mgcNumber
----------1
1
protocolNumber
------------1
2
portNumber
---------2064
2427
Command
Description
cnfxgcppeer
Configures the UDP port number used to send gateway-initiated messages to the call
agent.
Cisco VISM Installation and Configuration Guide
Release 3.0, Part Number OL-2521-01 Rev. D0, June 2004
5-481
Chapter 5
CLI Commands
dspxgcppersistevts
dspxgcppersistevts
To display all active persistent xGCP events, use the dspxgcppersistevts command in the VoIP
switching/trunking and switched AAL2 PVC operating modes.
dspxgcppersistevts
Syntax Description
This command has no arguments or keywords.
Command Modes
VoIP switching/trunking and switched AAL2 PVC
Usage Guidelines
Follow standard CLI procedures for this command.
Examples
The following example shows that the active persistent xGCP events are displayed:
dspxgcppersistevts
1
2
3
Related Commands
l/hd
l/hu
r/co4
Command
Description
addxgcppersistevt
Adds persistent xGCP events.
delxgcppersistevt
Deletes a persistent xGCP event.
Cisco VISM Installation and Configuration Guide
5-482
Release 3.0, Part Number OL-2521-01 Rev. D0, June 2004
Chapter 5
CLI Commands
dspxgcpport
dspxgcpport
To display the local User Datagram Protocol (UDP) port number used by the Simple Gateway Control
Protocol (SGCP) or the Media Gateway Control Protocol (MGCP), use the dspxgcpport command in
the VoIP switching/trunking operating mode.
dspxgcpport
Syntax Description
This command has no arguments or keywords.
Command Modes
VoIP switching/trunking
Usage Guidelines
Follow standard CLI procedures for this command.
Examples
The following example shows that the UDP port number used by SGCP/MGCP is displayed:
dspxgcpport
xgcpPortNumber: 2427
Related Commands
Command
Description
cnfxgcppeer
Configures the UDP port number used to send gateway-initiated messages to the call
agent.
Cisco VISM Installation and Configuration Guide
Release 3.0, Part Number OL-2521-01 Rev. D0, June 2004
5-483
Chapter 5
CLI Commands
dspxgcpretry
dspxgcpretry
To display the current xGCP retransmission parameters—retry (retransmission) count, minimum
timeout value, and maximum timeout value—use the dspxgcpretry command in the VoIP
switching/trunking and switched AAL2 PVC operating modes.
dspxgcpretry
Syntax Description
This command has no arguments or keywords.
Command Modes
VoIP switching/trunking and switched AAL2 PVC
Usage Guidelines
Follow standard CLI procedures for this command.
Examples
The following example shows that the current xGCP retransmission parameters are displayed:
dspxgcpretry
Min Request Timeout :
Retry Count
:
Max Request Timeout :
Related Commands
500
3
500
Command
Description
cnfxgcpretry
Configures VISM minimum and maximum request timeouts and retransmission
attempts for communication with the associated call agent.
Cisco VISM Installation and Configuration Guide
5-484
Release 3.0, Part Number OL-2521-01 Rev. D0, June 2004
Chapter 5
CLI Commands
Help
Help
To display, in an alphabetical list, all commands associated with the current VISM card, use the Help
command in the VoIP switching/trunking, switched AAL2 PVC, and AAL2 trunking operating modes.
Help
Syntax Description
This command has no arguments or keywords.
Command Modes
VoIP switching/trunking, switched AAL2 PVC, and AAL2 trunking
Usage Guidelines
This command is case sensitive—Help.
Note
Examples
You cannot use this command to obtain details about a specific command.
The following example shows that all commands associated with the current VISM card are displayed
in an alphabetical list.
Note
The list displayed in this example is a partial list—your results return a greater number of associated
commands.
Help
?
addcasvar
addccs
addcid
.
.
.
dspxgcppersistevts
dspxgcpport
dspxgcpretry
Help
pinglndsp
tstcon
tstdelay
version
Related Commands
Command
Description
?
Displays some or all commands associated with the current card.
Cisco VISM Installation and Configuration Guide
Release 3.0, Part Number OL-2521-01 Rev. D0, June 2004
5-485
Chapter 5
CLI Commands
pinglndsp
pinglndsp
To display the digital signal processor (DSP) configuration data and status for all endpoints on a
specified line, use the pinglndsp command in the VoIP switching/trunking, switched AAL2 PVC, and
AAL2 trunking operating modes.
pinglndsp line-num
Syntax Description
line-num
Command Modes
VoIP switching/trunking, switched AAL2 PVC, and AAL2 trunking
Usage Guidelines
Follow standard CLI procedures for this command.
Examples
The following example shows that the DSP configuration data and status for the VISM card line 1 is
displayed:
Line number for the DSPs you want to display configuration data and status. It can
be a value in the range from 1 to 8.
pinglndsp 1
Related Commands
Command
Description
dsplndsp
Displays the DSP information for a specified VISM card line.
Cisco VISM Installation and Configuration Guide
5-486
Release 3.0, Part Number OL-2521-01 Rev. D0, June 2004
Chapter 5
CLI Commands
tstcon
tstcon
To test a specified connection, use the tstcon command in the VoIP switching/trunking, switched AAL2
PVC, and AAL2 trunking operating modes.
tstcon lcn
Syntax Description
lcn
Command Modes
VoIP switching/trunking, switched AAL2 PVC, and AAL2 trunking
Usage Guidelines
Follow standard CLI procedures for this command.
Examples
The following example shows that the connection identified by logical channel number 136 is tested:
Logical channel number of the connection to be tested. It can be a value in the range
from 131 to 510.
tstcon 136
Related Commands
Command
Description
tstdelay
Tests the delay on a specified connection.
Cisco VISM Installation and Configuration Guide
Release 3.0, Part Number OL-2521-01 Rev. D0, June 2004
5-487
Chapter 5
CLI Commands
tstdelay
tstdelay
To test the delay on a specified connection, use the tstdelay command in the VoIP switching/trunking,
switched AAL2 PVC, and AAL2 trunking operating modes.
tstdelay lcn
Syntax Description
lcn
Command Modes
VoIP switching/trunking, switched AAL2 PVC, and AAL2 trunking
Usage Guidelines
Follow standard CLI procedures for this command.
Examples
The following example shows that the delay for the connection identified by logical channel number 136
is tested:
Logical channel number of the connection for which to test the delay. It can be a value
in the range from 131 to 510.
tstdelay 136
Related Commands
Command
Description
tstcon
Tests a specified connection.
Cisco VISM Installation and Configuration Guide
5-488
Release 3.0, Part Number OL-2521-01 Rev. D0, June 2004
Chapter 5
CLI Commands
upcon
upcon
To configure a specified connection up, allowing traffic to be passed to the specified connection, use the
upcon command in the VoIP switching/trunking, switched AAL1 SVC, switched AAL2 SVC, switched
AAL2 PVC, AAL2 trunking, VoIP and switched ATM AAL1 SVC operating modes.
upcon lcn
Syntax Description
lcn
Command Modes
VoIP switching/trunking, switched AAL1 SVC, switched AAL2 SVC, switched AAL2 PVC, AAL2
trunking, VoIP and switched ATM AAL1 SVC
Usage Guidelines
When a channel is brought up from down with the upcon command, a vismChanConUp trap is sent.
Examples
The following example shows that connection 189 is configured to be administratively up and traffic can
be passed to it:
The logical channel number. It can be in the range from 131 to 510.
upcon 189
Related Commands
Command
Description
dncon
Configures a specified connection down, preventing traffic from being passed to it.
dspcon
Displays the parameters for a specified channel.
Cisco VISM Installation and Configuration Guide
Release 3.0, Part Number OL-2521-01 Rev. D0, June 2004
5-489
Chapter 5
CLI Commands
version
version
To display version-related data—such as firmware version, operating system kernel version, date of the
software build—for the current VISM card, use the version command in the VoIP switching/trunking,
switched AAL2 PVC, and AAL2 trunking operating modes.
version
Syntax Description
This command has no arguments or keywords.
Command Modes
VoIP switching/trunking, switched AAL2 PVC, and AAL2 trunking
Usage Guidelines
Follow standard CLI procedures for this command.
Examples
The following example shows that the version-related data for the current VISM card is displayed:
version
***** Cisco Systems. MGX VISM Card *****
Firmware Version
= 003.000.000081-I
Backup Boot version = VI8_BT_3.1.01
Xilinx Firmware version = 10/ 2/1998
DSPCOM FPGA version
= 3/ 28/2001
DSPM C549 Template 1 FW Details:
Major Release
= 3
Minor Release
= 6
Build number
= 14
DSPM C549 Template 2 FW Details:
Major Release
= 3
Minor Release
= 6
Build number
= 15
DSPM C549 Template 3 FW Details:
Major Release
= 3
Minor Release
= 6
Build number
= 14
DSPM C549 Template 4 FW Details:
Major Release
= 3
Minor Release
= 6
Build number
= 14
DSPM C5421 Template 1, 2, and 3 FW Details:
Major Release
= 3
Minor Release
= 6
Build number
= 14
DSPM C5421 Template 4 FW Details:
Major Release
= 3
Minor Release
= 6
Build number
= 14
DSPM C549 E1 ECAN FW Details:
Major Release
= 7
Minor Release
= 6
Build number
= 1505
DSPM C549 T1 ECAN FW Details:
Major Release
= 7
Cisco VISM Installation and Configuration Guide
5-490
Release 3.0, Part Number OL-2521-01 Rev. D0, June 2004
Chapter 5
CLI Commands
version
Minor Release
= 6
Build number
= 4
DSPM C5421 T1 & E1 ECAN FW Details:
Major Release
= 8
Minor Release
= 13
Build number
= 0
Made by = swtools
VxWorks (for R5k PDC) version 5.3.1.
Kernel: WIND version 2.5.
Made on Mar 29 2002, 04:36:43.
Boot line:
Note
Related Commands
The display from this command is different than the one that is shown here if you are using CALEA.
There are no related commands.
Cisco VISM Installation and Configuration Guide
Release 3.0, Part Number OL-2521-01 Rev. D0, June 2004
5-491
Chapter 5
CLI Commands
version
Cisco VISM Installation and Configuration Guide
5-492
Release 3.0, Part Number OL-2521-01 Rev. D0, June 2004
C H A P T E R
6
Troubleshooting Tips
Use the following troubleshooting tools and techniques to assist you in maintaining your VISM card:
•
“VISM Card LEDs” section on page 6-1
•
“VISM and PXM Display, Log, and Diagnostic Loopback Path CLI Commands” section on page 6-2
•
“VISM Alarms” section on page 6-5
•
“UNIX Snoop Trace Tool” section on page 6-5
•
“Symptoms and Solutions” section on page 6-5
VISM Card LEDs
The VISM card uses the following three card status LEDs (see Figure 6-1) to indicate certain states:
•
ACT—Green indicates the active state.
•
STBY—Orange, or blinking orange, indicates one of the following:
– VISM is in the standby state.
– VISM is in the mismatch state.
– VISM card DSPs are currently involved in the VISM card bootup.
•
FAIL—Red indicates the failure state, or certain stages of the bootup process.
The VISM card uses eight line status LEDs (see Figure 6-1) to indicate the following states of the eight
T1 or E1 ports on the VISM back card:
•
Green—A line has been added and there is no alarm on that line.
•
Orange—A line has been added and there is a yellow alarm condition on the line.
•
Red—A line has been added and there is one of the following conditions on the line:
– Loss of signal (LOS) (red alarm condition)
– Loss of frame (LOF)
– Alarm indication signal (AIS)
Cisco VISM Installation and Configuration Guide
Release 3.0, Part Number OL-2521-01 Rev. D0, June 2004
6-1
Chapter 6
Troubleshooting Tips
VISM and PXM Display, Log, and Diagnostic Loopback Path CLI Commands
Figure 6-1
Card status
LEDs
VISM Front Card LEDs
Active
Standby
Fail
ACT
STBY
FAIL
PORT 1
PORT 2
PORT 3
Line LEDs
PORT 4
PORT 5
PORT 6
PORT 7
VISM
8E1
27981
PORT 8
E1 Front Card
VISM and PXM Display, Log, and Diagnostic Loopback Path CLI
Commands
You can use the following commands to troubleshoot your VISM card:
•
The VISM dspcd command
•
The PXM dsplog command
•
PXM diagnostic loopback commands
Cisco VISM Installation and Configuration Guide
6-2
Release 3.0, Part Number OL-2521-01 Rev. D0, June 2004
Chapter 6
Troubleshooting Tips
VISM and PXM Display, Log, and Diagnostic Loopback Path CLI Commands
Note
Refer to the Cisco MGX 8000 Series platform command reference guides for more information on
PXM commands.
VISM Display Card CLI Command
Use the VISM dspcd command to display the following types of information about your current VISM
card:
•
State of the VISM card
•
Type of VISM card
•
Version number and part numbers
•
Daughter card version numbers and part numbers
The following example shows the results of a typical dspcd command:
NODENAME.1.3.VISM8.a > dspcd
ModuleSlotNumber:
17
FunctionModuleState:
Active
FunctionModuleType:
VISM-8T1
FunctionModuleSerialNum:
SAK0331006P
FunctionModuleHWRev:
0.0
FunctionModuleFWRev:
2.0.0_11Nov01_2
FunctionModuleResetReason: ?
LineModuleType:
LM-RJ48-8T1
LineModuleState:
Present
mibVersionNumber:
21
configChangeTypeBitMap:
CardCnfChng, LineCnfChng
pcb part no - (800 level): 800-04399-01
pcb part no - (73 level): 73-03618-01
Fab Part no - (28 level): 28-02791-01
PCB Revision:
08
Daughter Card Information:
Daughter Card Serial Number:
pcb part no - (73 level):
Fab Part no - (28 level):
PCB Revision:
SAK0331003P
73-03722-01
28-02905-01
04
PXM Display Log CLI Command
Use the PXM dsplog command to display useful information for troubleshooting your VISM card. The
log is maintained by the PXM. A VISM entry is displayed in the log in the following format:
•
Date and time of the log
•
Slot number of the VISM card from which a message is logged
•
The process on the VISM card that logged that message
•
Severity of the message:
– 1 = Fatal error which causes the card to reboot
– 6 = All other errors
•
A log message description
Cisco VISM Installation and Configuration Guide
Release 3.0, Part Number OL-2521-01 Rev. D0, June 2004
6-3
Chapter 6
Troubleshooting Tips
VISM and PXM Display, Log, and Diagnostic Loopback Path CLI Commands
The following example shows the results of a typical dsplog command:
09/09/2001-02:09:01 03 cam VISM-6-9157
VISM got time from PXM
PXM Diagnostic Loopback Path CLI Commands
The VISM-8T1 and VISM-8E1 cards provide the capability for creating loopback paths for diagnostic
purposes. Use the VISM and PXM diagnostic loopback CLI commands to troubleshoot your VISM
cards. The following loopback configurations are possible:
•
Local line loopback. Use the PXM addlnloop command to enable local line loopback on a
line-by-line basis. Use the PXM dellnloop command to disable local line loopback.
•
Remote line loopback. The PXM cnfbert command is a T1/E1 diagnostic test package which
includes some loopback tests.
Use the BERT and loopback functions to test the integrity of T1 and E1 lines. You can use the PXM
cnfbert command on the PXM to perform the following actions:
– Run BERT on a per-line basis on the VISM card.
– Put a VISM line on a TDM side loopback.
– Put a VISM line on a network side loopback.
– Cause the VISM to put test equipment residing on the far side into loopback.
•
OAM loopback through the CPU toward the network (per VC). This loopback is enabled
automatically; no PXM or VISM CLI commands are required.
•
DS0 loopback, at the compression DSP toward the TDM side. Use the PXM addendptloop
command to enable DS0 loopback on a DS0-by-DS0 basis. Use the PXM delendptloop command
to disable DS0 loopbacks.
•
VC remote loopback. Use the PXM addconloop command to enable VC remote loopbacks. Use the
PXM delconloop command to disable remote loopbacks.
PXM1E and PXM 45 Display CLI Commands
Refer to the Cisco MGX 8850 Installation and Configuration Guide and the Cisco MGX 8000 Series
Switch Command Reference for information on the following PXM1, PXM1E, and PXM45 card display
commands.
Cisco VISM Installation and Configuration Guide
6-4
Release 3.0, Part Number OL-2521-01 Rev. D0, June 2004
Chapter 6
Troubleshooting Tips
VISM Alarms
VISM Alarms
Table 6-1 describes VISM T1 and E1 card alarms.
Table 6-1
VISM T1 and E1 Card Alarms
Error
Alarm Type
1
Link Failure—receive
LOS1
LOS
Receive RAI3
Yellow
Receive LOF
4
Receive AIS2
Down stream Up Stream
(ATM side)
(TDM side)
AIS
2
RAI
3
Comments
RAI3 returned on the transmit
line.
RAI3
None
2
3
RAI3 returned on the transmit
line.
RAI3
RAI3 returned on the transmit
line.
—
AIS
AIS2
AIS2
RAI
—
1. LOS = Loss of service.
2. AIS = Alarm indication signal.
3. RAI = Remote alarm indicator.
4. LOF = Loss of frame.
Refer to T1.403 for DS1 and G.704 for E1 definitions of alarm states. Alarms are propagated to the
remote end over the ATM network in accordance with ATM specifications.
UNIX Snoop Trace Tool
Use the UNIX snoop trace tool to assist in diagnosing a problem. The snoop command can determine if
there is any activity between the VISM and the call agent. The following example shows the command
and a typical resulting terminal display:
snoop -x 42 -ta <ip address of CA> port <udp port of CA>
E.g snoop -x 42 -ta vismvsc1 port 2427
Symptoms and Solutions
This section includes possible solutions to the following possible symptoms:
•
“VISM Card Did Not Become Active” section on page 6-6
•
“T1/E1 Configuration Mismatch” section on page 6-6
•
“DSP Download Failure” section on page 6-7
•
“VISM Front Card/Back Card Mismatch” section on page 6-8
•
“Cannot Use the cc Command to Access a VISM Card” section on page 6-9
•
“VISM Card Resets Intermittently” section on page 6-9
•
“VISM Card Does Not Accept a Firmware Download” section on page 6-9
•
“Echo Is Heard on a Voice Call” section on page 6-9
•
“VISM Card LEDs Are Not Lighted” section on page 6-9
Cisco VISM Installation and Configuration Guide
Release 3.0, Part Number OL-2521-01 Rev. D0, June 2004
6-5
Chapter 6
Troubleshooting Tips
Symptoms and Solutions
VISM Card Did Not Become Active
Investigate the following possible causes for a VISM card that does not become active:
•
An E1 card is inserted in a slot where a T1 card was present, or a T1 card is inserted in a slot where
an E1 card was present, resulting in configuration mismatch.
•
The minimum number (five) of DSPs failed to download.
•
A front card type does not match the back card type—if the front card is T1 and the back card is E1,
or the front card is E1 and the back card is T1.
•
The VISM card MIB image version does not match the PXM disk MIB image version.
T1/E1 Configuration Mismatch
Use the PXM dspcds command to identify a T1/E1 configuration mismatch, as follows:
NODENAME.1.7.PXM.a
Slot CardState
---- ----------1.1
Empty
1.2
Empty
1.3
Empty
1.4
Empty
1.5
Mismatch
1.6
Empty
1.7
Active
1.8
Empty
1.9
Empty
1.10 Empty
1.11 Empty
1.12 Empty
1.13 Empty
1.14 Empty
1.15 Empty
1.16 Empty
1.17 Empty
1.18 Empty
1.19 Empty
> dspcds
CardType
--------
VISM-8E1
PXM1-OC3
CardAlarm
--------Clear
Clear
Clear
Clear
Clear
Clear
Clear
Clear
Clear
Clear
Clear
Clear
Clear
Clear
Clear
Clear
Clear
Clear
Clear
Redundancy
-----------
Use the PXM dspsmcnf command to identify a T1/E1 configuration mismatch, as follows:
NODENAME.1.7.PXM.a > dspsmcnf
slot
Card
Rate
Channel
MIB
Feature
No.
Type
Control
ized
IMA
MULTRKS
Version
Bits
--------------------------------------------------1
------> No configuration file exist for this slot <-----2
------> No configuration file exist for this slot <-----3
VISM-8T1
Off
Off
Off
Off
20
0x0
4
------> No configuration file exist for this slot <-----5
VISM-8T1
Off
Off
Off
Off
20
0x0
6
------> No configuration file exist for this slot <-----9
------> No configuration file exist for this slot <-----10
------> No configuration file exist for this slot <-----11
------> No configuration file exist for this slot <-----12
------> No configuration file exist for this slot <-----13
------> No configuration file exist for this slot <-----14
------> No configuration file exist for this slot <-----17
------> No configuration file exist for this slot <-----18
------> No configuration file exist for this slot <-----19
------> No configuration file exist for this slot <------
Cisco VISM Installation and Configuration Guide
6-6
Release 3.0, Part Number OL-2521-01 Rev. D0, June 2004
Chapter 6
Troubleshooting Tips
Symptoms and Solutions
20
21
22
25
26
27
28
29
30
------>
------>
------>
------>
------>
------>
------>
------>
------>
No
No
No
No
No
No
No
No
No
configuration
configuration
configuration
configuration
configuration
configuration
configuration
configuration
configuration
file
file
file
file
file
file
file
file
file
exist
exist
exist
exist
exist
exist
exist
exist
exist
for
for
for
for
for
for
for
for
for
this
this
this
this
this
this
this
this
this
slot
slot
slot
slot
slot
slot
slot
slot
slot
<-----<-----<-----<-----<-----<-----<-----<-----<------
Use the PXM dsplog command to show a card mismatch log entry, logged by VISM card on slot 5, as
follows:
09/09/2001-00:01:47 05 dsplog VISM-6-9025
VISM going to standby : Config. Mismatch between PXM and VISM
Use the VISM dspcd command to display the following information:
NODENAME.1.5.VISM8.s > dspcd
ModuleSlotNumber:
5
FunctionModuleState:
Mismatch
FunctionModuleType:
VISM-8E1
FunctionModuleSerialNum:
CAB12345678
FunctionModuleHWRev:
0.13
FunctionModuleFWRev:
2.2.10g.pm
FunctionModuleResetReason: WatchDog timeout reset
LineModuleType:
Missing
LineModuleState:
Not Present
mibVersionNumber:
20
configChangeTypeBitMap:
CardCnfChng, LineCnfChng
cardIntegratedAlarm:
Clear
pcb part no - (800 level): 800-03530-01
pcb part no - (73 level): 73-03021-01
Fab Part no - (28 level): 28-02492-01
PCB Revision:
01
Daughter Card Information:
Daughter Card Serial Number: CAB12345678
pcb part no - (73 level):
73-03022-01
Fab Part no - (28 level):
28-02493-01
PCB Revision:
01 value = 34 = 0x22 = ’"’
DSP Download Failure
Use the PXM dsplog command to determine if the minimum number (five) of the DSPs failed to
download. The terminal displays results similar to the following:
NODENAME.1.7.PXM.a > dsplog
01/01/2001-00:02:10 05 tDspmDl
VISM-6-9193
DSPM task errors
: 6 DSPs failed to download
If the number of DSPs (six in the above case) is greater than five, the card will fail to be in the active
state. If this condition happens repeatedly, replace the card.
Use the following PXM dspcds command, and the results, to determine the current state of VISM DSPs:
NODENAME.1.7.PXM.a > dspcds
Slot CardState
CardType
---- ----------- -------1.1
Empty
1.2
Empty
1.3
Empty
CardAlarm
--------Clear
Clear
Clear
Redundancy
-----------
Cisco VISM Installation and Configuration Guide
Release 3.0, Part Number OL-2521-01 Rev. D0, June 2004
6-7
Chapter 6
Troubleshooting Tips
Symptoms and Solutions
1.4
1.5
1.6
1.7
1.8
1.9
1.10
1.11
1.12
1.13
1.14
1.15
1.16
1.17
1.18
1.19
Empty
Failed
Empty
Active
Empty
Empty
Empty
Empty
Empty
Empty
Empty
Empty
Empty
Empty
Empty
Empty
VISM-8E1
PXM1-OC3
Clear
Clear
Clear
Clear
Clear
Clear
Clear
Clear
Clear
Clear
Clear
Clear
Clear
Clear
Clear
Clear
VISM Front Card/Back Card Mismatch
Use the following PXM dsplog command to investigate a possible VISM front card/back card mismatch:
NODENAME.1.7.PXM.a > dsplog
01/01/2001-00:02:24 05 cmm
VISM-6-9025
VISM going to standby : Config. Mismatch between ASC and VISMV
01/01/2001-00:02:24 05 cmm
VISM-6-9023
Mismatch Backcard
01/01/2001-00:02:24 05 cmm
VISM-6-9023
Mismatch Backcard
In a mismatch condition, use the PXM dspcds command to display the following type of information:
NODENAME.1.7.PXM.a
Slot CardState
---- ----------1.1
Empty
1.2
Empty
1.3
Empty
1.4
Empty
1.5
Mismatch
1.6
Empty
1.7
Active
1.8
Empty
1.9
Empty
1.10 Empty
1.11 Empty
1.12 Empty
1.13 Empty
1.14 Empty
1.15 Empty
1.16 Empty
1.17 Empty
1.18 Empty
1.19 Empty
> dspcds
CardType
--------
VISM-8E1
PXM1-OC3
CardAlarm
--------Clear
Clear
Clear
Clear
Clear
Clear
Clear
Clear
Clear
Clear
Clear
Clear
Clear
Clear
Clear
Clear
Clear
Clear
Clear
Redundancy
-----------
Use the VISM dspcd command to display the following types of information:
NODENAME.1.5.VISM8.s > dspcd
ModuleSlotNumber:
5
FunctionModuleState:
Mismatch
FunctionModuleType:
VISM-8E1
FunctionModuleSerialNum:
CAB0246014P
FunctionModuleHWRev:
0.0
Cisco VISM Installation and Configuration Guide
6-8
Release 3.0, Part Number OL-2521-01 Rev. D0, June 2004
Chapter 6
Troubleshooting Tips
Symptoms and Solutions
FunctionModuleFWRev:
2.2.10g.pm
FunctionModuleResetReason: Reset by ASC from Cell Bus
LineModuleType:
LM-RJ48-8T1
LineModuleState:
Invalid
mibVersionNumber:
20
configChangeTypeBitMap:
CardCnfChng, LineCnfChng
cardIntegratedAlarm:
Clear
pcb part no - (800 level): 800-04399-01
pcb part no - (73 level): 73-03618-01
Fab Part no - (28 level): 28-02791-01
PCB Revision:
05
Daughter Card Information:
Daughter Card Serial Number: CAB024601FF
pcb part no - (73 level):
73-03722-01
Fab Part no - (28 level):
28-02905-01
PCB Revision:
02 value = 34 = 0x22 = ’"’
Cannot Use the cc Command to Access a VISM Card
Use the PXM dspcds command to verify if the VISM card is in the active or standby state. If the VISM
card is not in the active or standby state, you cannot use the cc command to access the card.
VISM Card Resets Intermittently
Investigate the following possibilities to determine why the VISM card is resetting intermittently:
•
Bad hardware device on the card. Replace any corrupt hardware.
•
Daughter card is not attached correctly to the VISM card. As a result, the VISM card is not able to
maintain its abilities. Ensure that the daughter card is making electrical contact to the motherboard,
and is mechanically secure.
VISM Card Does Not Accept a Firmware Download
There must be a VISM card in the slot to which firmware is being downloaded. Ensure that the VISM
card is seated in the slot, and that it is making electrical contacts to the backplane.
The card must be in either the active or boot state. Confirm this is the case and try again.
Echo Is Heard on a Voice Call
Ensure that the call has the ECAN feature enabled. If the echo delay is longer than the provision tail
length, ECAN does not work. Use the VISM cnfecantail command to configure a larger value for the
tail length.
VISM Card LEDs Are Not Lighted
The VISM card may not be inserted completely in the slot. Ensure that the VISM card is seated in the
slot correctly, with top and bottom half portions of the VISM card making electrical contact with the
backplane.
Cisco VISM Installation and Configuration Guide
Release 3.0, Part Number OL-2521-01 Rev. D0, June 2004
6-9
Chapter 6
Troubleshooting Tips
Symptoms and Solutions
Firmware Does Not See the Card Insert Bit Status As Set
This symptom can also indicate a bad VISM card or bad MGX slot.
Cisco VISM Installation and Configuration Guide
6-10
Release 3.0, Part Number OL-2521-01 Rev. D0, June 2004
A P P E N D I X
A
VISM and VISM-PR Card Clocking Options
An MGX 8000 Series platform, consisting of PXM and VISM cards, should have one primary clocking
source. To avoid conflicts and to ensure proper operation, it is important that the settings for clocking
options in both card types are considered together. You must use one of the following primary clocking
source options, which are supported by the VISM/PXM interface:
•
PXM1, PXM1E, and PXM45 cards—Provides clocking for all VISM cards in the chassis.
•
A VISM card—Provides clocking for the PXM1, which then provides clocking to the entire chassis.
•
A VISM-PR card—Provides clocking for the PXM1E or PXM45 card, which then provides clocking
to the entire chassis.
PXM1 Card as Primary Clocking Source
Figure A-1 shows the PXM card primary clocking source option in which the clock source originates at
the PXM side of the VISM/PXM interface.
Figure A-1
VISM Configured for Local Clocking
Clocking on
T1/E1 lines to
PBX or CO
Bus
MGX 8850
External BITS (T1/E1)
VISM
VISM lines configured
for local clocking
Internal crystal
62874
Network (OC3)
Cisco VISM Installation and Configuration Guide
Release 3.0, Part Number OL-2521-01 Rev. D0, June 2004
A-1
Appendix A
VISM and VISM-PR Card Clocking Options
PXM1 Card as Primary Clocking Source
The PXM card option allows you to configure the clocking source origination from one of the following
sources:
•
An external BITS clock on the PXM card’s T1 or E1 back card port.
•
An external OC3 signal on a PXM SONET back card port.
•
The PXM card’s internal crystal (default).
The internal crystal is the default and is set as the primary clock source automatically when power is
applied to the chassis.
To use one of the other two clocking sources, complete the following steps:
Step 1
Use the cnfclksrc command to configure the clocking source—external BITS clock or external OC3
signal.
Step 2
Use the cnfln command to configure all VISM lines for local clocking.
The PXM card option makes the PXM the clock source for the all cards in the chassis. The VISM cards
then use this clocking to provide clocking for their associated T1 or E1 lines. Refer to Chapter 5, “CLI
Commands,” for more information on VISM commands.
Refer to the Cisco MGX 8850 Installation and Configuration Guide and the Cisco MGX 8000 Series
Switch Command Reference for information on the following PXM card clocking commands:
•
cnfcbclk
•
cnfextclk
•
cnfsrmclksrc
•
dspcbclk
•
dspclkinfo
•
dspclksrc
•
dspcurclk
Cisco VISM Installation and Configuration Guide
A-2
Release 3.0, Part Number OL-2521-01 Rev. D0, June 2004
Appendix A
VISM and VISM-PR Card Clocking Options
VISM Card as Primary Clocking Source
VISM Card as Primary Clocking Source
Figure A-2 shows the VISM card primary clocking source option in which the clock source originates
at the VISM side of the VISM/PXM interface.
Figure A-2
VISM Configured for Loop Clocking
Clocking on T1/E1
line 1 to
PBX or CO
Bus
MGX 8850
External BITS (T1/E1)
VISM
Network (OC3)
Internal crystal
MGX clock source configured for:
Service Module
51225
VISM line #1 configured
for loop clocking, all other
VISM lines (including all
lines on other VISM cards)
configured for local clocking
The VISM card option originates clocking from one of the T1 or E1 lines on one of the VISM cards.
To configure the VISM card as the primary clocking source, complete the following steps:
Step 1
Use the cnfln command to configure line number 1—the line that is receiving the clocking source—for
loop clocking.
Step 2
Use the cnfln command to configure all remaining T1 or E1 lines on all VISM cards in the chassis for
local clocking.
Step 3
Use the cnfclksrc command to configure the PXM card as a service module clocking source and specify
VISM and its clocking line (line number 1) as the clocking source.
Note
The VISM card allows you to configure the clock source on line 1 only. The VISM-PR card does not
have this requirement.
VISM-PR Card as Primary Clocking Source
The VISM-PR card allows you to configure primary clocking from the following sources:
•
Network clock—the local clock for the PXM1, PXM1E, or PXM45 module
•
Any VISM-PR T1 or E1 line
•
On-board oscillator
Cisco VISM Installation and Configuration Guide
Release 3.0, Part Number OL-2521-01 Rev. D0, June 2004
A-3
Appendix A
VISM and VISM-PR Card Clocking Options
PXM1E or PXM45 Card as Primary Clocking Source
To configure the VISM-PR card as the primary clocking source, complete the following steps:
Step 1
Use the cnfln command to configure a line number—the line that is receiving the clocking source—for
loop clocking.
Step 2
Use the cnfln command to configure all remaining T1 or E1 lines on all VISM cards in the chassis for
local clocking.
Step 3
Use the cnfclksrc command to configure the PXM card as a service module clocking source and specify
VISM and its clocking line as the clocking source.
You cannot delete a line that is configured as the clock source. You must first configure the line to not
be the clock source and then you can delete the line.
Refer to Chapter 5, “CLI Commands,” for more information on VISM commands.
PXM1E or PXM45 Card as Primary Clocking Source
Use the cnfncdpclksrc command to configure the PXM1E or PXM45 card as the primary clock source.
Refer to the Cisco MGX 8850 Installation and Configuration Guide and the Cisco MGX 8000 Series
Switch Command Reference for configuration instructions. Use the following commands to display and
verify your configuration:
•
dspncdpclkinfo
•
dspncdpclksrc
Revertive and Nonrevertive Clocking
Clocking can be either revertive or nonrevertive. If your MGX switch is configured for a clock source
from a BITS source or PXM line source and the source line goes into the alarm state, a revertive or
nonrevertive recovery occurs.
•
Revertive clocking—If a node is configured and the clock source fails (due to a physical failure such
as a loss of signal, the clock frequency drifts out of specification, or a bad frequency), the node
abandons the clock source and finds an alternate clock source. When the original clock source
repairs, the node automatically reverts to using the original clock source.
•
Nonrevertive clocking—Similar to revertive clocking, except that when the original clock source
repairs, the node does not automatically revert to the original clock source.
Cisco VISM Installation and Configuration Guide
A-4
Release 3.0, Part Number OL-2521-01 Rev. D0, June 2004
Appendix A
VISM and VISM-PR Card Clocking Options
Revertive and Nonrevertive Clocking
Revertive and nonrevertive clocking depends upon the processor module back card used and the clocking
source specified. See Table A-1 to determine if your clocking is revertive or nonrevertive in your
network configuration.
Table A-1
Revertive/Nonrevertive Clocking and PXM Back Card Support
Processor Module
Back Card
Using External Clock
Using Inband/Service Module Clock
PXM-UI
For loss of service: revertive
For loss of service: revertive
For bad frequency/drift: nonrevertive
For bad frequency/drift: nonrevertive
For loss of service: revertive
For loss of service: revertive
For bad frequency/drift: nonrevertive
For bad frequency/drift: nonrevertive
PXM-UI-S3
To make a nonrevertive clock source usable after it has failed, you must use the cnfclksrc command to
change that particular clock source, and then use the cnfclksrc command again to configure it back.
Refer to Chapter 5, “CLI Commands,” for more information on CLI commands.
Cisco VISM Installation and Configuration Guide
Release 3.0, Part Number OL-2521-01 Rev. D0, June 2004
A-5
Appendix A
VISM and VISM-PR Card Clocking Options
Revertive and Nonrevertive Clocking
Cisco VISM Installation and Configuration Guide
A-6
Release 3.0, Part Number OL-2521-01 Rev. D0, June 2004
A P P E N D I X
B
VISM and VISM-PR—3.0 Specifications
VISM Card Specifications
•
ATM layer: Per ITU standards I.361 and ATM UNI v3.1
•
AAL layer: AAL5 as per standard I.363.
VISM Card Physical Interface Specifications and Applicable
Standards
Physical Layer Interface T1:
•
Line Rate: 1.544 Mbps +/– 50 bps.
•
Line Interface Connector: Balanced 100-ohm RJ-48C.
•
Synchronization: The transmit clock can be selected from either the looped clock or the node’s
clock.
•
Line Code: Bipolar 8 zero substitution (B8ZS) per ANSI T1.408 and AMI.
•
Line Framing: Extended Superframe Format (ESF 24-frame multiframe) per ANSI T1.408.
•
Input Jitter Tolerance: Per ATT TR 62411.
•
Output Jitter Generation: Per ATT TR 62411 using normal mode synchronization.
•
Physical Layer Alarms: LOS, LOF, AIS, RAI.
Physical Layer Interface E1:
•
Line Rate: 2.048 Mbps +/- 50 bps.
•
Line Interface Connector: Balanced 120-ohm RJ-48C, Unbalanced 75-ohm SMB.
•
Synchronization: The transmit clock can be selected from either the looped clock or the node’s
clock.
•
Line Code: HDB3 (E1) and AMI.
•
Line Framing: 16-frame multiframe per G.704.
•
Input Jitter Tolerance: As specified in ITU G.823 for 2.048 Mbps.
•
Output Jitter Generation: As specified in ITU G.823 for 2.048 Mbps.
•
Physical Layer Alarms: LOS, LOF, AIS, RAI.
Cisco VISM Installation and Configuration Guide
Release 3.0, Part Number OL-2521-01 Rev. D0, June 2004
B-1
Appendix B
VISM and VISM-PR—3.0 Specifications
VISM Card Physical Interface Specifications and Applicable Standards
General VISM Card Standards
Card Status Indicator LEDs:
•
Active (Green)
•
Standby (Orange)
•
Fail (Red)
Line status indicator LEDs:
•
Active and Okay (Green)
•
Active and Local Alarm (Red)
•
Active and Remote Alarm (Orange)
Maintenance/Serviceability Features: Internal loopbacks, hot-pluggable.
VISM Front Card:
•
AX-VISM-8T1/8E1—7.25 x 16.25 inches
VISM Line Modules:
•
AX-RJ48-8T1-LM—7.0 X 4.5 inches
•
AX-R-RJ48-8T1-LM—7.0 X 4.5 inches
•
AX-RJ48-8E1-LM—7.0 X 4.5 inches
•
AX-R-RJ48-8E1-LM—7.0 X 4.5 inches
•
AX-SMB-8E1-LM—7.0 X 4.5 inches
•
AX-R-SMB-8E1-LM—7.0 X 4.5 inches
Total VISM Power:
•
48 VDC (100W estimated)
•
5 VDC (25W estimated)
•
3.3 VDC (43W estimated)
•
2.5 VDC (12W estimated)
VISM Card Counters Specifications
T1/E1 Framers:
•
OOF Count
•
LCV Count
•
FER Count
•
CRC Error Count
Cisco VISM Installation and Configuration Guide
B-2
Release 3.0, Part Number OL-2521-01 Rev. D0, June 2004
Appendix B
VISM and VISM-PR—3.0 Specifications
VISM-PR Card Specifications
RTP/RTCP:
•
Number of packets received
•
Number of packets transmitted
•
Number of error packets received
ATM Cells:
•
Number of cells transmitted to cellbus
•
Number of cells discarded due to intershelf alarm
•
Number of cells transmitted with CLP bit set
•
Number of AIS cells transmitted
•
Number of FERF cells transmitted
•
Number of end-to-end loop-back cells transmitted
•
Number of segment loop-back cells transmitted
•
Number of cells received from cellbus
•
Number of cells received with CLP bit set
•
Number of AIS cells received
•
Number of FERF cells received
•
Number of end-to-end loop-back cells received
•
Number of segment loop-back cells received
•
Number of OAM cells discarded due to CRC-10 error
Diagnostics:
•
Header of last cell with unknown LCN
VISM-PR Card Specifications
This section describes the card specifications that are unique to the VISM-PR card.
VISM-PR Card Features
The following features are contained in the VISM-PR card:
•
Voice processing for all channels, using the following:
– Echo cancellation (ECAN)
– Digital Signal, level 0 (DS0) channels
– G.711u
– G.711a
– G.726-32k
– G.729a
– G.729ab
– Clear channel
Cisco VISM Installation and Configuration Guide
Release 3.0, Part Number OL-2521-01 Rev. D0, June 2004
B-3
Appendix B
VISM and VISM-PR—3.0 Specifications
VISM-PR Card Specifications
– G.726-16k
– G.726-24k
– G.726-40k
– G.723-H
– G.723a-H
– G.723.1-L
– G.723.1a-L
– Tone detection and generation
•
High functionality negotiated on demand for channels using the following:
– Adaptive Differential Pulse Code Modulation (ADPCM)
– Code Excited Linear Prediction (CELP)
•
Multiple packetization format in the following modes:
– Voice over IP (VoIP) switching/trunking
– VoIP with Real time Transport Protocol (RTP) in AAL5
– Switched AAL1 switched virtual circuits (SVC)
– Switched AAL2 SVC
– Switched AAL2 PVC—this operating mode is not supported in VISM Release 3.0
– AAL2 trunking
– VoIP and Switched ATM AAL1 SVC
•
High-density aggregation, providing the following:
– 8 T1/E1s of PCM voice
– 192 T1 or 248 E1 DS0s per VISM-PR card
– 4608 T1 or 5952 E1 DS0s per chassis shelf
– 13824 T1 or 17856 E1 DS0s per rack (3 MGX 8000 series switch chassis per rack)
See Chapter 1, “Overview of the VISM and VISM-PR Cards” for information about installing and using
VISM and VISM-PR cards in your MGX 8000 series switch chassis.
Cisco VISM Installation and Configuration Guide
B-4
Release 3.0, Part Number OL-2521-01 Rev. D0, June 2004
I N D E X
Symbols
? command
5-2
addsesgrp command
4-50, 5-43
addsesset command
4-50, 5-44
addtoneplan command
5-45
addxgcppersistevt command
alarms
A
AAL2 profiles
6-5
application
AAL2 trunking
4-39
AAL2 trunking application
addcasvar command
4-8, 4-21, 5-7
addcid command
4-8, 4-36, 5-8
addcon command
4-7, 4-8, 4-32, 5-12
4-31
addendpts command
addlapd command
command log file
4-2
4-19, 5-21, 6-4
3-18, 4-18, 5-22
4-21, 5-25
addlapdtrunk command
B
back cards
3-18, 4-1, 4-7, 4-8, 4-18, 5-19
addendptloop command
E1
1-3
T1
1-3
bulk distribution
bye command
1-8
4-5
5-26
4-7, 4-8, 4-12, 5-28
addlnloop command
addmgc command
4-14, 5-29, 6-4
4-7
3-18, 4-7, 4-46, 5-30
addmgcgrpprotocol command
addport command
C
cabling
addmgcgrpentry command
addred command
attributes
4-7, 4-46, 5-18
addendpt command
1-5
4-34, 5-15, 6-4
addendpoint command
addln command
VISM card
4-7, 4-45, 5-16
adddnip command
2-1
architecture
addccs command
adddn command
2-3
tandem switch offload
5-3
4-7, 5-5
addconloop command
2-3
multiservice access
2-3
addannpermanent command
4-7, 4-46, 5-31
4-7, 4-8, 4-9, 5-34
1-18
E1
1-17
CAC
3-19
cc command
4-5, 5-50
chkflash command
5-51
addrscprtn command
4-7, 4-8, 4-9, 5-35
clralmcnt command
addrtpcon command
5-36
clralmcnts command
addrudptrunk command
addses command
4-48, 5-48
5-40
4-50, 5-42
clralm command
clralms command
5-53
5-54
4-1, 5-52
5-55
Cisco VISM Installation and Configuration Guide
Release 3.0, Part Number OL-2521-01 Rev. D0, June 2004
IN-1
Index
clrcacfailcntrs command
cnfco4timer command
5-56
clrmngcidcnt command
4-49, 5-117
cnfcodecjtrdelay command
5-57
clrrtpcnt command
5-58
cnfcodecneg command
clrsarcnt command
5-60
cnfcodecparams command
clrsarcnts command
clrsarmsgcnt command
clrscrn command
4-9, 5-123
cnfcompvad command
cnfconcac command
5-64
clrtaskinfo command
5-121
cnfcodedecparams command
5-62
5-63
clrslipcnt command
5-120
cnfcodectmpl command
5-61
5-118
4-38
5-125
5-128
cnfconcacparams command
5-65
cnfaal2subcellmuxing command
4-38, 5-66
cnfconcacpol command
4-10, 5-129
5-130
cnfaal2timerparams command
4-43, 5-67
cnfcon command
cnfaal2transparams command
4-43, 5-68
cnfconprotect command
4-34, 5-131
cnfconvbdpol command
4-30, 5-132
cnfadapgain command
cnfalmcnt command
cnfalm command
5-69
cnfconvcci command
5-72
cnfdeftos command
4-13, 5-70
cnfannagetime command
cnfanndn command
4-33, 5-126
4-7, 4-39, 5-133
4-35, 5-134
cnfdisctimers command
5-75
cnfdn command
5-77
5-135
5-136
cnfannpathprefix command
5-79
cnfdnssrvr command
cnfannprefcodec command
5-82
cnfdpvcoamparams command
cnfannreqtimeout command
5-84
4-7, 5-138
cnfds0gain command
5-140
cnfbert command
4-14, 6-4
cnfds0localcas command
cnfcac command
4-7, 4-8, 4-10, 5-86
cnfds0loop command
cnfcacparams command
cnfcalea command
4-10, 5-87
cnfcascode command
4-13, 5-89
cnfcasdialdelay command
cnfcasendpt command
5-91
4-7, 5-93
cnfcasflashtime command
5-94
cnfcasglareattrib command
5-96
cnfcasglaretime command
5-98
cnfcasguardtime command
4-20, 5-143
cnfds0musicthreshold command
5-100
cnfecantail command
4-29, 5-147, 6-9
cnfendptcadence command
cnferl command
cnfgain command
5-150
cnfgwis command
3-17 to 3-18, 4-11, 5-151
cnfgwoos command
3-17 to 3-18, 4-11, 5-152
cnfcasonhooktime command
5-103
cnfjtrmode command
cnfcasvar command
cnfclksrc command
4-31, 5-153
4-30, 5-155
cnflapdretrans command
5-156
cnflapdtimer command
5-157
cnflapdtrunkpvc command
5-111
cnfcaswinktime command
cnfcasxgcp command
5-109
5-112
5-114
4-15 to 4-16, 5-115, A-2 to A-4
5-148
4-30, 5-149
cnfjtrinitdelay command
cnfcasparamsource command
4-29, 5-145
4-29, 5-146
5-102
5-105
5-144
cnfecanrec command
cnfcasoffhooktime command
cnfcaspackage command
5-141
cnfecanenable command
5-88
5-139
cnflapdtype command
5-161
cnflapdwinsize command
cnfln command
5-159
5-163
4-12, 4-16, 5-164, A-2 to A-4
Cisco VISM Installation and Configuration Guide
IN-2
Release 3.0, Part Number OL-2521-01 Rev. D0, June 2004
Index
cnflndigitorder command
cnflngain command
cnflnis command
5-167
3-17 to 3-18, 4-14, 5-168
cnflnmusicthreshold command
cnflnoos command
5-169
3-17 to 3-18, 4-14, 5-170
cnflnringback command
cnflnsig command
4-7, 4-8, 4-13, 5-173
5-174
cnflntonetimeout command
5-176
cnflntrunkcond command
5-178
cnfmgcgrpentry command
5-180
cnfmgcgrpparam command
4-46, 5-181
cnfmgcgrpprotocol command
5-183
cnfmidcalltimers command
5-185
cnfmusicthreshold command
cnfnwcot command
5-186
cnft38fxlco command
5-218
cnft38nsetimeout command
cnft38params command
cnfprofelemvbd command
4-42
cnfprofelemvoice command
cnfrsvp command
4-38, 4-42, 5-191
4-43, 5-193
cnfprofparams command
4-41, 5-194
cnfrsvprefreshmiss command
cnfrtpcon command
5-196
cnftrunkcond command
4-13, 5-225
cnfvbdcodec command
5-226
cnfvbdpol command
4-11, 5-227
cnfvismdn command
4-45, 5-228
cnfvismip command
4-7, 4-45, 5-229
cnfvismmode command
5-231
cnfvoiptransparams command
4-35, 5-232
cnfxesmaxwindow command
5-202
4-50, 5-205
4-51, 5-206
cnfsesmaxwindow command
4-51
cnfsesnullsegtmout command
cnfsesoutofseq command
cnfsesport command
4-51, 5-208
4-51, 5-209
4-51, 5-210
cnfsesretrans command
4-51, 5-211
cnfsesstatetmout command
4-51, 5-212
4-47, 5-236
cnfxgcppeer command
4-47, 5-237
cnfxgcpretry command
3-18, 4-47, 5-238
cnprofelemvbd command
commands
5-189
cnfsessyncatmps command
4-2
4-31
1-19
4-41
ATM network side
4-31
4-27
call agent interface
4-44
CAS signaling
4-23
CCS signaling
4-20
clocking
codecs
A-1
4-28
domain names and IP addresses
DS0 channels
4-52, 5-213
echo cancellation
4-48, 5-214
PVCs
4-45
4-17
4-29
PRI backhaul sessions
5-212
cnfsrcppeer command
4-47, 5-234
bearer processing
4-50, 5-204
cnfsesmaxseg command
5-235
cnfxgcpmwd command
AAL2 profiles
5-201
cnfsesmaxreset command
5-207
configuring
5-198
cnfrudptrunkrmtip command
cnfsesack command
4-7, 4-8, 4-9, 5-230
cnfvoiptimerparam command
commit command
5-197
cnfrtprxtimer command
5-221
command log file attributes
5-195
cnfrtcprepint command
5-220
4-7, 4-45, 5-224
cnfxgcpbt command
5-188
cnfsessyncatmps
4-49, 5-217
cnfxgcinteropsdpost command
5-187
cnfprofneg command
4-49, 5-215
cnfsrcpretry command
cnftftpdn command
5-171
cnflntoneplan command
cnfpncon
cnfsrcppeergrpparam command
5-166
4-49
4-32
T1 and E1 lines
4-11
Cisco VISM Installation and Configuration Guide
Release 3.0, Part Number OL-2521-01 Rev. D0, June 2004
IN-3
Index
VISM clocking
4-14
delxgcpcon command
connecting cables
1-16
delxgcppersistevt command
connection admission control
dncon command
5-277
5-278
5-279
See CAC
dspaal2params command
5-280
connectors
dspaal2profile command
5-281
RJ-48
1-16
counters specification
B-2
dspalmcnf command
5-283
dspalmcnt command
5-285
dspalm command
5-282
dspalms command
D
dspannagetime
delannalldynamic command
delanndynamic command
5-239
5-241
delannpermanent command
delcasvar command
5-243
5-287
5-288
dspanncache command
5-290
dspanncontrols command
dspanndn command
5-292
5-294
dspannpathprefix command
5-245
5-296
delccs command
5-246
dspannpermanents command
delcid command
5-247
dspannprefcodec command
delcon command
5-248
dspannreqtimeout command
delconloop command
deldn command
4-34, 5-249, 6-4
dspcalea command
5-250
deldnip command
delendptloop command
delendpts command
dellapd command
5-253, 6-4
delln command
dspcasvar command
4-14, 5-260, 6-4
dellntoneplan command
delmgc command
5-308
5-310
delmgcgrpentry command
5-263
delmgcgrpprotocol command
5-264
5-316
5-317
dspcasxgcps command
5-318
dspccschans command
5-320
dspccs command
5-266
5-313
dspcasvarendpts command
dspccscnt command
5-312
1-19, 5-315
dspcasvars command
5-261
5-262
delport command
dspcasglareattrib command
dspcastimers command
5-257
5-259
dellnloop command
5-307
dspcasparamsource command
5-256
dellapdtrunk command
5-304
dspcaspackage command
3-18, 5-254
5-302
5-306
dspcasendpts command
3-18, 5-252
5-300
5-305
dspcarddsp command
5-251
delendpt command
dspcacfailcntrs command
5-298
5-321
5-319
delrscprtn command
5-267
dspcd command
delrtpcon command
5-268
dspcds command
4-4, 5-323, 6-6 to 6-9
dspcid command
5-324
delrudptrunk command
delses command
5-270
dspcids command
5-272
5-322, 6-2 to 6-3, 6-7, 6-8
5-325
delsesgrp command
5-273
dspco4timer command
delsesset command
5-274
dspcodecjtrdelays command
deltoneplan command
5-275
5-326
dspcodecparams command
5-327
5-328
Cisco VISM Installation and Configuration Guide
IN-4
Release 3.0, Part Number OL-2521-01 Rev. D0, June 2004
Index
dspcodectmpls command
dsplog command
5-329
6-2 to 6-4, 6-7 to 6-8
dspconcac command
5-332
dsploops command
dspconcnt command
5-333
dspmaxmgcs command
dspcon command
dspmgcgrps command
dspdnallips command
dspmgcs command
5-337
dspdpvcoamparams command
dspds0gain command
5-341
5-343
dspds0musicthreshold command
dspgain
5-345
dspmonecanendpt command
dspnwcot command
dspport command
dsplapd command
5-350
5-351
dsplapds command
dsplapdstat command
5-397
5-398
dsprsvpreqs command
5-400
dsprsvpresv command
5-401
dsprsvpresvs command
5-353
5-403
dsprsvpsender command
5-354
dsplapdtrunkpvc command
5-394
5-396
dsprsvpreq command
5-349
5-356
5-404
dsprsvpsenders command
5-406
dsplapdtrunks command
5-358
dsprtpcnt command
5-407
dsplinecasbits command
5-360
dsprtpcon command
5-409
dsplncids command
dspln command
dsprtpconnstat command
5-363
dsprtpcons command
5-362
dsplndigitorder command
dsplndsp command
dspsarcnt command
5-366
dsplnendptstatus command
dsplngain command
5-368
dsplnmusicthreshold command
dsplns command
5-370
5-371
dspsesgrp command
dspsess command
5-374
dsplntoneplan command
5-375
dsplntonetimeout command
5-420
5-377
5-421
5-422
5-423
dspsesgrps command
5-373
dsplnstate command
dspsarcnts command
dspses command
5-417
5-419
dspsarmsgcnt command
5-369
dsplnringback command
5-415
dsprudptrunks command
5-365
dsplndsx0s command
5-411
5-413
dsprudptrunk command
5-364
5-391
5-393
dsprsvpif command
dspgwstate command
5-390
5-392
dsprscprtn command
1-19, 5-348
5-348
dspgain command
5-388
dspprofparams command
5-346
dspendpts command
5-387
dspmusicthreshold command
5-342
dspds0localcasstatus command
dspendpt command
5-386
dspmngcidcnt command
5-340
4-47, 5-383
5-385
dspmidcalltimers command
5-338
dspdnssrvr command
5-382
5-384
dspmgprotocols command
5-339
dspdnips command
5-381
dspmgcgrpprotocols command
5-335
5-336
dspdn command
5-380
dspmgcgrpparams command
5-334
dspconvbdpol command
dspdisctimers
dspmgc command
5-330
dspcons command
5-379
dspsesset command
dspsesstat command
5-424
5-425
5-426
5-427
Cisco VISM Installation and Configuration Guide
Release 3.0, Part Number OL-2521-01 Rev. D0, June 2004
IN-5
Index
dspslipcnt command
5-428
dspxgcpendptcons command
dspsmcnf command
6-6
dspxgcpendpts command
dspsrcpcnt command
5-477
dspxgcperrcnt command
5-429
5-478
dspsrcpcnts command
5-430
dspxgcpinterops command
dspsrcppeer command
5-431
dspxgcplncons command
dspsrcppeergrpparams command
dspsrcppeers command
5-432
dspxgcpport command
5-434
dspsrcpretry command
dspxgcpretry command
5-435
dspss0loop command
5-480
5-481
5-482
5-483
5-484
5-344
dspt38fxlco command
5-436
dspt38fxlcos command
F
5-437
dspt38nsetimeout command
5-438
dspt38nsetimeouts command
dspt38params command
dsptaskinfo command
fax tone detection
3-4
5-439
5-440
H
5-441
dsptonebuildplans command
dsptoneplan command
5-442
Help command
5-448
I
5-485
5-444
dsptoneplans command
5-446
dsptoneprovplans command
dsptoneregionplans command
dspvbdcodec command
5-450
5-452
in-service state
3-17
install a front card
dspvbdpol command
5-453
dspvismdn command
5-454
VISM card
dspvismip command
5-455
install command
4-8, 5-456
dspvoipparams command
5-458
dspxgcpcalls command
5-460
dspxgcpcids command
5-461
dspxgcpcnf command
5-463
dspxgcpcnt command
5-464
dspxgcpcnts command
5-465
dspxgcpcon command
5-466
dspxgcpdetailcnts command
dspxgcpendpt command
VISM back card
1-16
VISM front card
1-15
IS state
1-18
3-17
L
LED indicators
line modules
5-470
dspxgcpdetailcnt command
1-19
VISM software upgrades
5-469
dspxgcpdefpkg command
1-14
installing
5-459
dspxgcpcons command
1-15
installation
dspvismparam command
dspxgcpbt command
5-479
dspxgcppersistevts command
5-433
dspsrcpport command
dspxgcppeers command
5-475
5-471
5-472
logging in
logging out
6-1
B-2
4-3
4-5
logout command
4-5
5-473
Cisco VISM Installation and Configuration Guide
IN-6
Release 3.0, Part Number OL-2521-01 Rev. D0, June 2004
Index
loopback configurations
loopback paths
VISM front card
6-4
revertive clocking
6-4
RUDP links
1-17
A-4
3-10
M
mandatory commands
4-6
modem tone detection
3-4
multiservice access application
S
savesmcnf command
2-3
service states
endpoints
session
N
3-17
3-10
snoop command
newrev command
1-18
6-5
1-19
nonrevertive clocking
A-4
T
tandem switch offloading application
O
2-1
tone detection
OOS state
fax
3-17
out-of-service state
3-17
3-4
modem
3-4
transmit direction
tstcon command
P
tstdelay command
1-16
5-487
5-488
parameters
DS0
4-27
U
T1and E1 lines
4-14
upcon command
physical layer
E1
B-1
T1
B-1
5-489
upgrading
VISM software
pinglndsp command
5-486
power
applying
1-18, 1-20
V
1-18
PXM1E
1-5, 1-8, 1-13, 1-14, 4-17, 4-60, A-4
version command
PXM45
1-5, 1-13, 1-14, 4-17, 4-60, A-4
VISM alarms
5-490
6-5
VISM card architecture
R
redundancy
1-5
VISM log
6-3
VISM-PR
1-1, 1-3, 4-10, 4-17, A-3, B-3
1-8
removing
VISM back card
1-17
Cisco VISM Installation and Configuration Guide
Release 3.0, Part Number OL-2521-01 Rev. D0, June 2004
IN-7
Index
Cisco VISM Installation and Configuration Guide
IN-8
Release 3.0, Part Number OL-2521-01 Rev. D0, June 2004