1
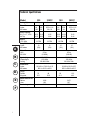
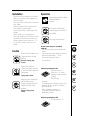
®
Powershred
®
Console Shredders
220/220CC
280/280CC
320/320CC
380/380CC
Operating Instructions
A
Mode d’emploi
B
Instrucciones de funcionamiento
C
Bedienungsanleitung
D
Bedieningsinstructies
E
Istruzioni sul funzionamento
F
English
Important Safety Instructions . . . . . . . . . . . . . . . . . . . . . . . . . . . . . . . . . . . .3
Parts Identification . . . . . . . . . . . . . . . . . . . . . . . . . . . . . . . . . . . . . . . . . . .4
Technical Specifications . . . . . . . . . . . . . . . . . . . . . . . . . . . . . . . . . . . . . . .5-6
Installation, Operation . . . . . . . . . . . . . . . . . . . . . . . . . . . . . . . . . . . . . . . .7
Checklist for Inoperative Machine . . . . . . . . . . . . . . . . . . . . . . . . . . . . . . . . . .8
Maintenance, Supplies, Warranty . . . . . . . . . . . . . . . . . . . . . . . . . . . . . . . . . .9
Declaration of Conformity . . . . . . . . . . . . . . . . . . . . . . . . . . . . . . . . . . . . . .10
Contact For Service . . . . . . . . . . . . . . . . . . . . . . . . . . . . . . . . . . . . . . . . . .51
Français
Consignes de sécurité importantes . . . . . . . . . . . . . . . . . . . . . . . . . . . . . . . .11
Identification des pièces . . . . . . . . . . . . . . . . . . . . . . . . . . . . . . . . . . . . . . .12
Caractéristiques techniques . . . . . . . . . . . . . . . . . . . . . . . . . . . . . . . . . . .13-14
Installation, Mode d’emploi . . . . . . . . . . . . . . . . . . . . . . . . . . . . . . . . . . . .15
Liste de contrôle lorsque l’équipement ne fonctionne pas . . . . . . . . . . . . . . . . .16
Entretien, Fournitures, Garantie . . . . . . . . . . . . . . . . . . . . . . . . . . . . . . . . . .17
Déclaration de Conformité . . . . . . . . . . . . . . . . . . . . . . . . . . . . . . . . . . . . .18
Contact For Service . . . . . . . . . . . . . . . . . . . . . . . . . . . . . . . . . . . . . . . . . .51
A
B
C
D
E
F
Español
Medidas de seguridad importantes . . . . . . . . . . . . . . . . . . . . . . . . . . . . . . . .19
Identificación de las piezas . . . . . . . . . . . . . . . . . . . . . . . . . . . . . . . . . . . . .20
Especificaciones . . . . . . . . . . . . . . . . . . . . . . . . . . . . . . . . . . . . . . . . . .21-22
Instalación, Modo de empleo . . . . . . . . . . . . . . . . . . . . . . . . . . . . . . . . . . .23
Procedimiento en caso de funcionamiento incorrecto . . . . . . . . . . . . . . . . . . . .24
Mantenimiento, Artículos consumibles, Garantía . . . . . . . . . . . . . . . . . . . . . . .25
Declaración de conformidad . . . . . . . . . . . . . . . . . . . . . . . . . . . . . . . . . . . .26
Contact For Service . . . . . . . . . . . . . . . . . . . . . . . . . . . . . . . . . . . . . . . . . .51
Deutsch
Wichtige Sicherheitshinweise . . . . . . . . . . . . . . . . . . . . . . . . . . . . . . . . . . . .27
Identifizierung der Teile . . . . . . . . . . . . . . . . . . . . . . . . . . . . . . . . . . . . . . .28
Technische Daten . . . . . . . . . . . . . . . . . . . . . . . . . . . . . . . . . . . . . . . . .29-30
Montage und Aufstellung, Betrieb . . . . . . . . . . . . . . . . . . . . . . . . . . . . . . . .31
Checkliste für betriebsunfähige Geräte . . . . . . . . . . . . . . . . . . . . . . . . . . . . . .32
Wartung, Materialien, Garantie . . . . . . . . . . . . . . . . . . . . . . . . . . . . . . . . . .33
Konformitätserklärung . . . . . . . . . . . . . . . . . . . . . . . . . . . . . . . . . . . . . . . .34
Contact for Service (Service Adressen) . . . . . . . . . . . . . . . . . . . . . . . . . . . . .51
Nederlands
Belangrijke veiligheidsinstructies . . . . . . . . . . . . . . . . . . . . . . . . . . . . . . . . .35
Onderdelen . . . . . . . . . . . . . . . . . . . . . . . . . . . . . . . . . . . . . . . . . . . . . . .36
Specificaties . . . . . . . . . . . . . . . . . . . . . . . . . . . . . . . . . . . . . . . . . . . .37-38
Installatie en bediening van de machine . . . . . . . . . . . . . . . . . . . . . . . . . . . .39
Checklist voor een niet-functionerende papiervernietiger . . . . . . . . . . . . . . . . . .40
Onderhoud, Toebehoren, Garantie . . . . . . . . . . . . . . . . . . . . . . . . . . . . . . . .41
Verklaring van Conformiteit . . . . . . . . . . . . . . . . . . . . . . . . . . . . . . . . . . . . .42
Contact For Service . . . . . . . . . . . . . . . . . . . . . . . . . . . . . . . . . . . . . . . . . .51
Italiano
2
Importanti istruzioni sulla sicurezza . . . . . . . . . . . . . . . . . . . . . . . . . . . . . . .43
Identificazione dei pezzi . . . . . . . . . . . . . . . . . . . . . . . . . . . . . . . . . . . . . . .44
Specifiche tecniche . . . . . . . . . . . . . . . . . . . . . . . . . . . . . . . . . . . . . . . .45-46
Installazione, Funzionamento . . . . . . . . . . . . . . . . . . . . . . . . . . . . . . . . . . .47
Lista di controllo per apparecchi non funzionanti . . . . . . . . . . . . . . . . . . . . . . .48
Manutenzione, Accessori, Garanzia . . . . . . . . . . . . . . . . . . . . . . . . . . . . . . . .49
Dichiarazione sulla conformità . . . . . . . . . . . . . . . . . . . . . . . . . . . . . . . . . . .50
Contact For Service . . . . . . . . . . . . . . . . . . . . . . . . . . . . . . . . . . . . . . . . . .51
Important Safety
Instructions
1. Read all instructions before use.
2. Save these instructions for later use.
3. Follow all warnings and instructions marked on the
product.
4. Unplug this product from the wall outlet before
cleaning. Clean with a damp cloth using a mild soap
and water solution. (Do not use abrasives or
petroleum based cleaners.)
5. Place this product as close as possible to power
source for quick and easy unplugging. Do not block
the power supply receptacle; it must be possible to
conveniently unplug the power cord.
6. Do not use this product near water.
7. This product should never be placed near or over a
radiator or heat source.
8. Operate from the type of power source indicated on
the marking label. If you are not sure of the type of
power available, consult your dealer or local
electricity board.
9. Do not allow anything to rest on the power cord. Do
not place this product where people may walk on the
cord.
10. If an extension cord is used with this product, make
sure that the total of the ampere ratings on the
products plugged into the extension cord do not
exceed the extension cord ampere rating. Also, make
sure that the total of all products plugged into the
wall outlet does not exceed 15 amps.
11. Do not attempt to service this product yourself, as
opening or removing covers may expose you to
dangerous live parts or other risks.
12. Unplug this product and refer servicing to qualified
personnel under the following conditions:
A) When the power cord or plug is damaged or
frayed.
B) If liquid has been spilled on the product.
C) If the product has been exposed to rain.
D) If the product does not operate normally when
the operating instructions are followed.
E) If the product has been dropped or
the casing has been damaged.
13. Keep out of the reach of children.
14. This shredder should be operated only with an
operator in attendance.
Caution
1. This shredder utilizes a safety interlock switch which
lights the red indicator light and stops power to the
motor when the door is opened. Do not attempt to
override this safety feature.
2. The electronic circuitry in this shredder performs
several functions:
• Senses the presence of paper in the shredder inlet
and automatically starts shredding and then stops
the shredder approximately 3 seconds after the
paper has passed through.
• Controls the safety functions of the shredder.
• Operates the indicator lights.
• (In 320 and 380 series only) Monitors the
amount of electrical current being used and stops
the motor if too much paper has been put into the
shredder or a jam has ocurred.
3. The automatic start function of this shredder uses an
infrared sensor in the inlet to detect the presence of
paper. If a strong light or sunlight is allowed to shine
directly into the inlet, the sensor may give a false
indication and start the shredder. If this occurs, it
does not present a safety hazard. The cover over the
inlet will ordinarily prevent this false indication from
occurring. If the shredder is in a position where
sunlight or a strong lamp shines on the front of the
shredder from such a low position that the light
reaches down into the inlet:
• Move the shredder or the light to a different
position, OR
• Turn the rocker switch to the off position when not
in use.
CAUTION: Do not insert aerosol cleaners or
lubricants into or around the machine. Some
agents may combust, causing serious injury.
A
B
C
D
E
F
3
Parts Identification
1)
2)
3)
4)
A
B
C
D
E
F
4
Indicator Lights
Rocker Switch
Cover
Cabinet
5)
6)
7)
8)
Cabinet Access Door
Paper Feed Opening
Power Supply Receptacle
Circuit breaker (models 320-380 only)
Technical Specifications
Model
220
220CC
280
280CC
Cutting Style
Strip
Cross Cut
Strip
Cross Cut
Shred Size
Inches
Millimeters
1/4
5.99
Sheet Capacity
8-1/2” x 11” 20 lb.
A4/70gr
Speed
115V, 60Hz
Entry Width
Inches
Millimeters
5/32
3.9
5/32 x 1-1/4
3.9 x 32
1/4
5.99
5/32
3.9
5/32 x 1-1/4
3.9 x 32
14-16 12-14
16-18 14-16
8-10
9-11
14-16
16-18
12-14
14-16
8-10
9-11
22 FPM
22 FPM
22 FPM
22 FPM
10
(254)
10
(254)
15
(381)
15
(381)
Motor Power
120V
220-240V
1/4 hp
(0.15 kW)
1/4 hp
(0.15 kW)
Input voltage
(Depending on
country)
100V 50/60Hz
120V 60Hz
220-240V 50Hz
100V 50/60Hz
120V 60Hz
220-240V 50Hz
Dimensions
Inches
Millimeters
32-3/8 H x 17-3/4 W x 16 D
822 H x 451 W x 406 D
32-3/8 H x 23 W x 16 D
822 H x 584 W x 406 D
Weight
Pounds
Kilograms
73
33
83
37.6
90
40.9
100
45.5
Waste Container Vol.
Gallons
Liters
18.24
69.0
24.75
93.7
Reorder bag number
36054
36056
A
B
C
D
E
F
5
Technical Specifications
Model
320
320CC
380
380CC
Cutting Style
Strip
Cross Cut
Strip
Cross Cut
Shred Size
Inches
Millimeters
1/4
5.99
Sheet Capacity
8-1/2” x 11”, 20 lb.
A4/70gr
Speed
115V, 60Hz
A
5/32 x 1-1/4
3.9 x 32
1/4
5.99
5/32
3.9
5/32 x 1-1/4
3.9 x 32
18-20 16-18
20-22 18-20
10-12
12-14
18-20
20-22
16-18
18-20
10-12
12-14
22 FPM
22 FPM
22 FPM
22 FPM
10
(254)
10
(254)
15
(381)
15
(381)
Motor Power
120V
220-240V
2/5 hp
(0.28 kW)
2/5 hp
(0.28 kW)
Input voltage
(Depending on
country)
100V 50/60Hz
120V 60Hz
220-240V 50Hz
100V 50/60Hz
120V 60Hz
220-240V 50Hz
C
Dimensions
Inches
Millimeters
32-3/8 H x 17-3/4 W x 16 D
822 H x 451 W x 406 D
32-3/8 H x 23 W x 16 D
822 H x 584 W x 406 D
D
Weight
Pounds
Kilograms
78
35.3
B
E
F
6
Entry Width
Inches
Millimeters
5/32
3.9
88
39.8
92
41.8
102
46.3
Waste Container Vol.
Gallons
Liters
18.24
69.0
24.75
93.7
Reorder bag number
36054
36056
Installation
• Plug one end of the enclosed power cord (inside the
waste box) into the power supply receptacle in the
back of the shredder.
• Screw casters into the nuts provided on the underside
of the shredder.
• Operate this product only from the type of power
source indicated on the marking label.
• Install the paper shredder so that the plug is easily
accessible.
• Operate shredder only in the upright position.
• Set up paper shredder so that the ventilation slots are
unobstructed. To ensure sufficient ventilation of the
shredder, maintain a minimum distance of 4” (10
cm) from walls or furniture on each side of the
shredder.
Operation
Read operating instructions before
putting shredder into
operation.
Insert power cord into power
supply receptacle on the back of
the shredder.
Insert plug into power outlet.
Install waste bag for shredded
material
Caution
Never insert hand, fingers or any
foreign objects into the feed
opening.
Serious injury may
result.
Keep all loose articles of
clothing, ties, jewelry, long hair
or other loose objects away from
feed opening.
Injury may result.
Always turn off and unplug the
machine before moving,
servicing, cleaning or any other
conduct other than normal
operation.
Serious injury may
result.
• Open door and completely remove wastebox from
cabinet.
• Fold new bag around frame. Allow bag to overhang
waste box by approximately 7” (20 cm).
• Slide box with bag back into cabinet.
• Close cabinet door.
A
B
C
Switching equipment On
• Press rocker switch to (I)
• Switch locks in “on” position
• Equipment is ready for operation
(stand by)
• Green LED lights
• Feed paper
• The shredding process is started by photo-cells in the
paper feed opening. Insert paper and shredding
begins automatically.
• When the shredding is complete, the
cutting system automatically stops after
approximately 3 seconds.
D
E
F
Switching equipment Off
• Press rocker switch to (O)
7
Checklist for Inoperative Machines
All Machines
If no indicator lights are lit:
• Make sure the plug is securely inserted in the
receptacle on the back of the machine and into the
wall outlet.
• Make sure the shredder is on (switch in “I” position).
If both the red and green
lights are on:
B
Waste Box Full:
• Press rocker switch to “O” to stop the cutting system.
• Remove wastebox from inside cabinet and empty.
• Return wastebox, close door and
resume operation.
Door Ajar:
• Make sure door is completely closed.
• If the door is opened while the motor
is running, after closing the door, set the rocker
switch to the “O” position and then to the “I”
position to resume operation.
C
220, 220CC, 280, 280CC
If only the green light is on:
A
D
E
F
8
Paper Jam:
• Press rocker switch to “O” to stop
the cutting system.
• Press and hold down rocker switch
in “R” to reverse the cutting
system and back out jammed
material (paper is pushed out)
• If the jam persists, slowly move
the power switch back and forth
between forward (I) and reverse
(R), always stopping for a
moment in the off position (O).
Do not switch the shredder rapidly
between forward and reverse to
force material through the
shredder. Rapid rocking develops
tremendous forces that can
damage your shredder.
• Continue shredding in smaller
quantities so as not to jam the
machine further.
Overheated:
• If the motor is overheated, switch the machine off
and allow motor to cool down for approximately 1520 minutes.
320,320CC, 380, 380CC
If no lights are on:
• Make sure the circuit breaker is not open. (press to
reset).
If only the red light is on:
Paper Jam:
• Press rocker switch to “O” to stop
the cutting system.
• Press and hold down rocker switch
in “R” to reverse the cutting
system and back out jammed
material (paper is pushed out).
Rocker switch must be held in
reverse for a few seconds to cause
the red light to turn off.
• If the jam persists, slowly move
the power switch back and forth
between forward (I) and reverse
(R), always stopping for a
moment in the off position (O).
Do not switch the shredder rapidly
between forward and reverse to
force material through the
shredder. Rapid rocking develops
tremendous forces that can
damage your shredder.
• Continue shredding in smaller
quantities so as not to jam the
machine further.
Overheated:
• If the motor is overheated, switch the machine off
and allow motor to cool down for approximately 1520 minutes.
Maintenance
(Cross Cut Units Only)
Shredder Oiling Instructions
When shredding capacity drops, noise increases,
or if the cutting cylinders stop with a squeak
or a rubbing sound, the cutters should be
oiled.
• When lubricating the cutters, utilize
POWERSHRED lubricant #35250 or a suitable
substitute, i.e., a light weight machine oil or a
sewing machine oil. Do not spray an aerosol
cleaner or lubricant into the machine. Some
agents may combust, causing serious injury.
Make certain an extension nozzle is provided
so the lubricant can reach well into the throat
of the machine.
• Squeeze the lubricant across the full width of
the cutters and then turn the machine on and
run the cutting system forward for a few
seconds (the photo eye must be blocked with
a piece of paper in order to run the cutting
system forward).
• Then depress the rocker switch in the reverse
direction and run the cutting system in reverse
for a few seconds.
Repeat the procedure.
Supplies
• Bags for cut material (Packed in dispenser carton, 50
bags to a roll. Contact Fellowes or your local
Fellowes dealer for the stock number of the bag that
fits your machine.)
• Cutting block oil for cross-cut units: Stock #35250
• Replacement wasteboxes and handles are available
from Fellowes. Please call Fellowes customer service
for ordering information.
Warranty
Fellowes Powershred Limited
Warranty
1 year on all parts and labor
5 years parts and labor on cutting cylinders
Fellowes warrants this product to be free from
defects in material and workmanship for a period
of one year from the date of purchase by the
original consumer. At it’s option, Fellowes will
repair or replace without charge for material or
labor, any component found to be defective during
the warranty period. Additionally, the cutting
cylinders are warranted for 5 years from the
original purchase date and will be replaced
without charge for material or labor if found by
Fellowes to be defective.
Warranty Exclusions
The parties agree that the buyer’s sole and
exclusive remedy against Fellowes shall be for the
repair or replacement of defective parts as
provided herein. The buyer agrees that no other
remedy (including, but not limited to, incidental or
consequential damages for lost profits, lost sales,
injury to property or any other incidental or
consequential loss) shall be available to him. This
warranty shall NOT apply and is void under the
following circumstances:
1. When this product or any part thereof has been
subjected to accident, alteration, abuse, or misuse.
2. When the shredder's recommended sheet capacity
(per specifications on page 5-6) has been exceeded
(resulting in a paper jam).
3. When the original Model and Serial Number Plate has
been altered, effaced or removed.
4. When repair or service covered under this warranty
(other than routine maintenance as described in the
Owner's Manual) has been performed by personnel
without the express written consent of Fellowes.
5. When the product has been used pursuant to any
verbal or written rental, lease or loan agreement.
This warranty described herein
shall be in lieu of any other
warranty, expressed or implied,
including, but not limited to, any
implied warranty of
merchantability or fitness for a
particular purpose. Any
representations or promises
inconsistent with or in addition to
this warranty are unauthorized
and shall not be binding upon
Fellowes.
A
B
C
D
E
F
9
Declaration of Conformity
Fellowes Manufacturing Company
Doncaster Road, Kirk Sandall
Doncaster, South Yorkshire, DN31H England
declares that the product
Models Powershred 220, 220CC, 280, 280CC, 320, 320CC, 380 and 380CC,
conform with the requirements of the Low Voltage Directive (73/23 EEC) and the Electromagnetic Compatibility
Directive (89/336 EEC) and the following harmonized European Normes (EN Standards) and IEC Standards.
Safety: EN60950 ‘Information Technology Equipment’
EMC:
A
B
C
D
E
F
10
Standard
EN 55014:1995
EN 55014-2:1997
EN 61000-4-2:1995
+ A1:1998
EN 61000-4-4:1995
ENV 50142:1994
EN 61000-4-5:1995
ENV 50141:1993
EN 61000-4-6:1996
EN 61000-4-11
EN 55014-1:1993
+A1:1997
+A2:1998
EN 61000-3-2:1995
+A1:1998
+A2:1998
EN 61000-3-3:1995
Itasca, Illinois, USA
May 15, 1999
Severity Level
See Details Below
Performance Criteria
See Details Below
4kV Contact, 8kV Air
B
1kV 5/50ns, 5kHz, AC Mains
1kV Differential Mode (Line-Line)
2kV Common Mode (Line-Gnd)
3V, 150kHz to 230MHz
80% 1kHz Modulation
10ms dropout, 200ms 60%
variation, 1 sec 30% variation.
Household Limits, Table 1&2
B
B
A
C
N/A
Class A, Section 7.1 Table 1
N/A
Section 5
N/A
_____________________
Anthony Storrie
A
B
C
Contact For Service:
United States
Australia
Canada
United Kingdom
Japan
Benelux
Italy
Germany
France
1-800-955-0959
(In Melbourne) (03) 9330-3211
(Outside Melbourne) 1-800-331-177
1-800-665-4339
01302-885 331
+81-3-5496-2401
+31-(0)347-377988
+39-071730041
+49-5131-49770
+33-(0)4-72-08-25-45
Benelux
Vianen,
The Netherlands
Canada
Markham,
Ontario
E
F
1789 Norwood Avenue • Itasca, Illinois 60143-1095
630-893-1600 • Customer Service 1-800-955-0959
http://www.fellowes.com
®
Australia
Tullamarine,
Victoria
D
Deutschland
Hanover,
Garbsen
France
Montanay,
Lyon
Italy
Via Dante Alighieri,
Camerano (An)
Japan
Tokyo
United Kingdom
Doncaster,
South Yorkshire
© 1999 Fellowes Printed in U.S.A. Part No. 34288