1
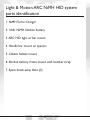
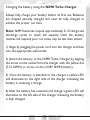
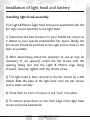
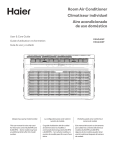
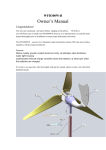
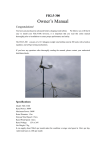
2005 Bike Light Owner’s Manual
Congratulations on your decision to purchase a Light
& Motion Bicycle Lighting System. Prepare yourself
to leave your car at home, rediscover your old
stomping grounds and ride your bike year round.
Please join us in viewing the world in a different light.
To get the maximum satisfaction from your Light &
Motion system, please take a moment to familiarize
yourself with your new light by reading the
instructions.
CAUTION Bicycling in the dark is an inherently dangerous
activity and no lighting system will guard you against
inattentive motorists or other night time hazards.
When not in use, ALWAYS unplug the light head
from the battery. When unplugging the light head
cable from the battery, always pull the connector, not
the cable. Ride with an approved helmet and use
extreme caution. You should carry an auxiliary light
with you and wear reflective clothing. Make sure your
bicycle is equipped with the legally required
reflectors. Only use Light & Motion chargers to
charge your Light & Motion batteries. Failure to do
so will void the warranty and damage the system.
Warranty
Light & Motion offers a 30 day warranty on all lamps
and a 90 day warranty on all batteries.All other facets
of Light & Motion systems carry a one year warranty
against manufacturer defects.
Returning Products for Warranty Evaluation,
or Repair:
Should your system malfunction for any reason,
contact the Light & Motion service department at
(831) 645-1538 to schedule service and receive an
RMA number to return your light to us. Please make
sure to unplug the battery from the light before
shipping. All warranty and repair product should be
returned with proof of purchase to:
Light & Motion
300 Cannery Row
Monterey, CA 93940
In the UK contact your local bicycle dealer for
warranty instructions.
Table of Contents
Warranty and repair information . . . . . . . . . . . . . . . . . . . . . . . . . . . . . . . . . . .4
ARC Li-ion parts identification . . . . . . . . . . . . . . . . . . . . . . . . . . . . . . . . . . . . .6
ARC NiMH parts identification . . . . . . . . . . . . . . . . . . . . . . . . . . . . . . . . . . . .8
Solo Logic Li-ion and NiMH parts identification . . . . . . . . . . . . . . . . . . . . . .10
Commuter parts identification . . . . . . . . . . . . . . . . . . . . . . . . . . . . . . . . . . . .12
Vega parts identification . . . . . . . . . . . . . . . . . . . . . . . . . . . . . . . . . . . . . . . . .14
Charging your battery using the Turbo Charger . . . . . . . . . . . . . . . . . . . . . .15
Charging the 7.2v NiMH battery using the trickle charger . . . . . . . . . . . . . .19
Installation of light head and battery . . . . . . . . . . . . . . . . . . . . . . . . . . . . . . .20
Bar mounted light break-away disk replacement . . . . . . . . . . . . . . . . . . . . . .22
Installing the strap on the 7.2v NiMH and Li-ion battery . . . . . . . . . . . . . . .23
Installing the strap on the 10.8v NiMH and 11.1v Ultra battery mount . . . .23
Installing battery on frame . . . . . . . . . . . . . . . . . . . . . . . . . . . . . . . . . . . . . . .25
Attaching the light head to the battery . . . . . . . . . . . . . . . . . . . . . . . . . . . . .26
Mounting the light head to the Cabeza mount . . . . . . . . . . . . . . . . . . . . . . .27
Mounting the Cabeza light head . . . . . . . . . . . . . . . . . . . . . . . . . . . . . . . . . . .28
ARC and ARC Li-ion HID light operation . . . . . . . . . . . . . . . . . . . . . . . . . . .29
ARC NiMH low battery warning and discharge protection . . . . . . . . . . . . .30
ARC HID run times . . . . . . . . . . . . . . . . . . . . . . . . . . . . . . . . . . . . . . . . . . . .31
Solo Logic Mv light operation . . . . . . . . . . . . . . . . . . . . . . . . . . . . . . . . . . . . .32
Solo Logic run times . . . . . . . . . . . . . . . . . . . . . . . . . . . . . . . . . . . . . . . . . . . .33
Commuter light operation . . . . . . . . . . . . . . . . . . . . . . . . . . . . . . . . . . . . . . .34
Commuter light run times . . . . . . . . . . . . . . . . . . . . . . . . . . . . . . . . . . . . . . .34
Vega LED light operation . . . . . . . . . . . . . . . . . . . . . . . . . . . . . . . . . . . . . . . .35
Vega run times . . . . . . . . . . . . . . . . . . . . . . . . . . . . . . . . . . . . . . . . . . . . . . . . .35
Charging the Vega . . . . . . . . . . . . . . . . . . . . . . . . . . . . . . . . . . . . . . . . . . . . . .36
Lamp replacement . . . . . . . . . . . . . . . . . . . . . . . . . . . . . . . . . . . . . . . . . . . . . .37
5
Light & Motion ARC Li-ion and
Li-ion Ultra HID system parts identification
Please verify the contents of your Light & Motion lighting
system.
1. Lithium ion Turbo Charger
2. 11.1v Li-ion battery
3. 11.1v Ultra Li-ion battery
4. ARC Li-ion HID light w/ bar mount
5. Handle bar mount w/ spacers
6. Cabeza helmet mount
7. Slimline battery mount (6 amp/hr. Ultra battery ONLY)
8. Hook and loop bomber strap
9. Spare break-away disks (2)
6
1
2
3
4
5
6
7
8
9
7
Light & Motion ARC NiMH HID system
parts identification
1. NiMH Turbo Charger
2. 10.8v NiMH Slimline battery
3. ARC HID light w/ bar mount
4. Handle bar mount w/ spacers
5. Cabeza helmet mount
6. Slimline battery frame mount with bomber strap
7. Spare break-away disks (2)
8
1
2
3
4
5
6
7
9
Light & Motion Solo Logic Li-ion and
NiMH Mv system parts identification
A) Solo Logic Li-ion
1. Solo Logic Mv light w/“Lefty” wing mount
2. Handle bar mount w/ spacers
3. Cabeza helmet mount
4. Hook and loop bomber strap
5. Li-ion Turbo Charger
6. 11.1v Lithium ion (4Amp/hr) Battery
B) Solo Logic Mv NiMH
1. Solo Logic Mv light w/“Lefty” wing mount
2. Handle bar mount w/ spacers
3. Cabeza helmet mount
4. Hook and loop bomber strap
7.Trickle Charger
8. NiMH Turbo Charger (Optional w/ Logic Mv)
9. 7.2v NiMH battery
10
1
2
3
4
5
6
7
8
9
11
Light & Motion Commuter
parts identification
1.Trickle Charger
2. 7.2v NiMH battery
3. Commuter light w/ bar mount
4. Handle bar mount w/ spacers
5. Hook and loop bomber strap
6. Spare break-away disks (2)
12
1
2
3
4
5
6
13
Light & Motion Vega LED
system parts identification
1.Vega wall charger
2.Vega light w/ bar mount
3. Handle bar mount w/ spacers
4. Spare break-away disks (2)
1
2
3
4
14
Charging your battery using
the Turbo Charger TM
The Light & Motion Turbo Charger is a universal input system
that will work on any wall voltage from 90-260 volts.
Depending on the outlet style you may require an adapter to
plug the charger into the wall outlet.
Charging the battery using the Li-ion Turbo Charger.
Always fully charge your battery before its first use. Batteries
are shipped partially charged and must be fully charged to
achieve the proper run time.
1) Begin by plugging the power cord into the charger and then
into the appropriate wall socket.
2) Attach the battery to the Li-ion Turbo Charger by aligning
the arrow on the socket from the charger with the red dot or
arrow on the Ultra Li-ion battery.
3) Once the battery is attached to the Li-ion Turbo Charger, a
yellow LED will illuminate on the left side of the charger
indicating the battery is receiving a charge.
15
4) After approximately 2 hrs and 45 min. both the yellow and
the green LED lights will be illuminated, this indicates the
battery is 80% charged.
5) After an additional 2 hrs the battery will be fully charged
and only the green LED on the left side will be liluminated.
Two flashing LED lights indicate an error. If this happens
remove the battery and unplug the Turbo Charger from the
wall and wait about 5 minutes. Then try to charge the system
again.
The Li-ion Turbo Charger will charge a fully depleted battery
in approximately 4.5 hours.
The Li-ion Turbo Charger will automatically shut off so the
battery may be left on the charger indefinitely, without
harming the battery.
Note: The Li-ion Turbo Charger is ONLY compatible with the
Li-ion and Ultra Li-ion batteries.
16
Charging the battery using the NiMH Turbo Charger.
Always fully charge your battery before its first use. Batteries
are shipped partially charged and must be fully charged to
achieve the proper run time.
Note: NiMH batteries require approximately 5-10 charge and
discharge cycles to reach full capacity. Until the battery
reaches full capacity your run times may be less than stated.
1) Begin by plugging the power cord into the charger and then
into the appropriate wall socket.
2) Attach the battery to the NiMH Turbo Charger by aligning
the arrow on the socket from the charger with the yellow dot
(7.2v NiMH) or arrow on the (10.8V NiMH) battery.
3) Once the battery is attached to the charger, a yellow LED
will illuminate on the right side of the charger indicating the
battery is receiving a charge.
4) After the battery has received a full charge, a green LED will
illuminate on the left side of the charger indicating the battery
is fully charged.
17
Two flashing LED lights indicate an error. If this happens, please
remove the battery and unplug the Turbo Charger from the
wall and wait about 5 minutes. Then try to charge the system
again.
The NiMH Turbo Charger will charge a fully depleted battery
in approximately 3.5 hours. Leaving the battery on for
approximately 1 additional hour will “top off” the battery for
highest capacity.
The NiMH Turbo Charger is designed to fully maintain the
battery’s capacity throughout it’s life cycle.The battery can be
left connected to the charger indefinitely to keep the battery
fully charged and ready for use.
NOTE: The NiMH Turbo Charger uses a DT/dt charging
algorithm and is most efficient if the ambient temperature is
between 65-80 degrees Fahrenheit. Extreme heat will cause
the temperature sensor to give a false “charge complete”
reading and will lead to decreased capacity in the battery.
Hint: Always store your battery in a cool dry place and fully
recharge it before every ride. Never leave your battery in a
discharged state and always fully recharge it after 60-90 days
of storage.
18
Charging the 7.2v NiMH battery
using the trickle charger
Always fully charge your battery before its first use. Batteries
are shipped partially charged and must be fully charged to
achieve the proper run time.
Note: NiMH batteries require approximately 5-10 charge and
discharge cycles to reach full capacity. Until the battery reaches
full capacity your run times may be less than stated. The 7.2v
trickle charger operates only on the specified wall voltage and
should be used to charge the 7.2v battery pack only.
1) After plugging the charger into a wall socket, insert the
keyed charger plug into the socket on the top of the battery
by aligning the raised arrows with the yellow dot on the
battery.
Charge time for a fully discharged battery is approximately 14
hours.The battery will become warm to the touch when fully
charged. For partially discharged batteries the charge time is
approximately proportional to the run time ( i.e. 1 hour run
time would require a 7 hour charge). To prolong battery life,
do not charge over 24 hours.
Hint: A timer attached to the wall socket will help prevent
over charging the battery if left on the trickle charger.
19
Installation of light head and battery
Installing light head assembly
Your Light & Motion Light head comes pre-assembled with the
bar style mount attached to the light head.
1) Determine the best location for your handle bar mount as
it relates to your specific brake/shifter bar layout. Ideally, the
bar mount should be attached to the right and as close to the
stem as possible.
2) After determining which bar spacer(s) to use (it may be
necessary to cut spacers), orient the bar mount with the
opening facing rear and the Light & Motion logo facing
forward. Securely tighten with the thumb screw.
3) The light head is then secured to the bar mount by a ball
detent. Slide the base of the light head onto the bar mount
until it seats securely.
4) Once flush to front of mount, it will “lock” into place.
5) To remove press down on the front edge of the light head
mount and press backwards.
20
21
Bar mounted light
break-away disk replacement
The multiple adjustability of the bar mount and light head
allow it to resist varying degrees of impact. If the light head
receives a hard enough impact, it is designed to break away
from the mount, thus protecting the main components.
If broken, remove the Phillips head screw from the underside
of the bar mount and replace the break away disc (2 additional
disks are included).Align the track on the disc with the cut out
on the light head and secure using the supplied Phillips head
screw.
Contact Light & Motion for additional replacement parts.
831-645-1538 or www.bikelights.com
22
Installing the strap on the 7.2v NiMH and
11.1v Li-ion battery
Before mounting the battery to the frame you will need to
first attach the supplied hook and loop strap to the battery.
1) Feed the strap through the slot on the side of the battery
with the hook side facing outward.
2) Pull the strap until the sewn end with the buckle is above
and about even with slot on the battery.
3) Now feed the loose end through the second slot.
23
Installing strap on the 10.8v NiMH and
11.1v Ultra battery mount
Before mounting the 10.8v NiMH, or 11.1v Ultra Li-ion
battery to the frame you will need to first attach the supplied
hook and loop strap to the battery mount. Feed the strap
through the slot on the side of the battery mount with the
hook side facing outward. Pull the strap until the sewn end of
the buckle is about even with slot on the mount. Wrap the
strap around the bottom of the battery and through the
second slot. The battery assembly is now ready to be
mounted to your frame, or seat post.
24
Installing battery on frame
1) Press the side of the battery with the groove against the
frame tube, or seat post.
2) Hold the battery between your thumb and fingers with the
buckle oriented flush against the side of the battery near the
top.Wrap the strap around the frame tube.
3) Once the strap is around the frame tube, pull the strap tight
and affix to the back side. (Note: It is very important to
squeeze the buckle against the battery with your thumb to
keep it from sliding.
4) If you are mounting the battery on a tube with cables,
always run the strap on the inside against the frame).When in
the correct position, the strap should reach all the way around
the bottom of the battery.
25
Attaching the light head to the battery
Plug the light head cable into the socket on top of the battery
by aligning the arrow on the cable with the arrow, or colored
(red, or yellow) dot on the top of the battery.You may choose
to loosely coil the excess cable around the frame. Make sure
the cable has enough slack to move freely when your
handlebar is turned in the furthest position(running the cable
first over the handlebar, then back to the battery), this will
keep the cable from being pulled out of the light head in a
crash.
26
Mounting the light head
to the Cabeza mount
1) Remove the Phillips head screw from the bottom of the
handlebar mount
2) Remove both the small and large break-away disc.
3) The optional Cabeza mount comes fully assembled. Remove
the Phillips head screw from the Cabeza mount.
4) Align the track on the disk with the cut out on the light
head.
5) Insert the Phillips head screw back through the hole in the
bottom of the base plate and tighten with screw driver.
27
Mounting Cabeza Light Head
The Cabeza mount is designed to be mounted on any
standard, vented bicycle helmet. Position the base of the light
head on top of the helmet, in the middle and slightly forward
of center. Slide the hook and loop strap down through the
proper vent, back up through the opposing vent and through
the slot in the base of the light head. Pull the strap tight and
slide it back down the vent and affix it to the “loop” side of
the strap (inside the helmet). Plug the light head cable into the
top of the battery by aligning the arrow on the cable with the
dot or arrow on the battery. The battery pack is designed to
be carried without the bomber strap in a jersey pocket or
hydration pack. Hint: Running the power cord through one of
the back vents of your helmet before connecting it to your
battery will keep the cord from sliding from side to side.
CAUTION! - NEVER attach a Cabeza (helmet) mounted
light to a frame mounted battery.
28
ARC and ARC Li-ion HID light operation
The Light & Motion ARC HID lights all have one switch on the
back of the head that controls power. Pushing it quickly twice
turns the light on; the light starts in the 13w high mode. The
light takes approximately 20 seconds to come to full strength;
the green LED will be on. Pushing the button again causes the
light output to be reduced to 10w.The green LED on the back
of the light head will then go into a slow flash mode. To turn
the light off you must press and hold the button for 3 seconds.
ARC Li-ion Battery Discharge Protection:
The ARC Li-ion HID incorporates a battery discharge
protection circuit. If the battery becomes discharged, the light
head will automatically go into an ultra-low mode and the light
will dim significantly. The green LED will also begin to flash
very rapidly for one minute.After exactly one minute the light
head will then automatically shut down. If the light head shuts
down, it can not be restarted until the battery is recharged.
29
ARC NiMH low battery warning
and discharge protection
The ARC NiMH HID also incorporates a low battery warning
mode. If the battery capacity drops below a certain
threshold, or becomes discharged, the light head will
automatically go into the lowest power setting and the LED
will begin to flash quickly. This signifies you have approximately
15 minutes of battery power left. If the battery is continued
to be discharged , the light head will automatically go into an
ultra-low mode and the light will dim significantly. The green
LED will also begin to flash very rapidly for one minute. The
light will then automatically shut down to preserve the
battery. If the light head shuts down it can’t be restarted until
the battery is recharged.
Note: The HID lamp used in the ARC emits a weak
electromagnetic field and will interfere with some wireless
cycle computers and heart rate monitors.
Hint: If the ARC HID fails to light on the first try, either
unplug the light from the battery, or press and hold the start
button for 3 seconds. Then wait 10 seconds to clear the
memory before following the starting procedure again.
30
ARC HID Run Times
Power Level
High
Low
Watts
13.5
10
Burn Time
10.8v NiMH
3:00
3:30
Burn Time
11.1v Li-ion
3:00
4:00
Burn Time
11.1v Li-ion Ultra
4:50
6:05
31
Solo Logic Mv light operation
The Light & Motion Solo Logic Mv light has one switch on the
top of the head that controls power. Pushing it quickly twice
turns the light on. The light turns on in the 13w mode; pushing
the button again causes the light output to be reduced in 1/3
increments (10w and 7w respectively). The green LED on the
top of the light head displays output levels.To turn the light off
you must press and hold the button for 3 seconds. The Solo
Logic MV incorporates a “soft” start feature which allows the
user to plug a freshly charged battery into the light head
without reducing the bulbs life.
The Solo Logic Mv incorporates a Low Battery
Warning Mode.
If the battery capacity drops below a certain threshold, or
becomes discharged, the light head will automatically go into
the lowest power setting and the LED will begin to blink. This
signifies you have approximately 15 minutes of battery power
left. While in this mode the light output can be adjusted as
normal, but will significantly reduce run time. If the battery
continues to be discharged, the light head will automatically go
into the lowest power setting and the light will begin to pulse.
The green LED will flash very rapidly for one minute.The light
head will automatically shut down to preserve the battery. If
the light head shuts down it can’t be restarted until the
battery is recharged.
32
Solo Logic Mv Run Times
Power Level
High
Med
Low
13
10
7
Burn Time
7.2v NiMH
2:00
2:50
4:00
Burn Time
10.8v NiMH
2:55
4:05
5:45
Burn Time
11.1v Li-ion
3:05
4:20
6:15
Burn Time
11.1v Li-ion Ultra
5:10
6:30
10:20
Watts
Note: When using the Lithium-Ion battery the Low Battery
Warning time will be extended to bwtween 15-40 minutes
and the period before auto shut off will decrease to 30
seconds.
33
Commuter Light Operation
The Light & Motion Commuter light has one switch on the
top of the head that controls power. Pushing it once turns the
light on; pushing it again turns it off
Hint: The light head pans horizontally on the bar mount.
With use the attachement point may loosen up. Occasionally
check attachment point for tightness using a Phillips head
screw driver.
Note: ALWAYS shut off a light at the first sign of dimming or
yellowing. Failure to do so may significantly reduce the life of
the battery.
NEVER plug a warm, freshly charged battery into a
Commuter light head. ALWAYS wait at least 10 minutes for
the battery to cool before starting the light; this will prolong
both the battery and the lamp life.
Commuter Run Times
Power Level
Watts
Burn Time
10
2:00
34
VegaTM LED Light Operation
The Light & Motion Vega LED light has one switch located at
the rear of the light. To turn the light on, push it quickly twice.
The light turns on in the 4w mode; pushing the button again
causes the light output to be reduced in 1/3 increments (2w
and 1w respectively.) Pushing the button again in the low
mode causes the Vega to go into the flash mode. Pushing the
button again will bring the light back up to the 4w mode. To
turn the light off you must push and hold the button for 3
seconds.
Vega Run Times
Power Level
Watts
Burn Time
High
Med
Low
Flash
4
2
1
2
2:00
4:00
8:00
24:00+
35
Charging the Vega
The Vega comes with its own proprietary Light & Motion
universal input charger which will work with any wall current
from 90-260v. WARNING: Using any other charger will
void the warranty and could be extremely dangerous. To
charge the Vega, plug the charger pack into the appropriate
wall socket, then remove the charger port plug from the
bottom of the light. Insert the male jack into the charger port
until it stops. The green LED will blink when the battery is
receiving a charge. After approx. 2 hours the green LED will
glow steadily indicating the battery is fully charged. The Vega
can be left on the charger indefinitely without harming the
battery.
36
Lamp replacement
ARC HID Lamp
All lamp replacements for ARC systems must be performed by
the Light & Motion service department.The front bezel is not
designed to be rotated or removed. Tampering or removing
the front bezel will void the warranty. If for any reason the
front bezel is removed or the glass port breaks, DO NOT
TOUCH the exposed lamp. Immediately unplug the light head
from the battery to minimize the risk of electric shock. Return
the light head to Light & Motion for repair. If the lamp should
fail, contact the Light & Motion service department to
schedule lamp replacement.
All Light & Motion ARC HID bicycle lighting systems use
SolarcTM Technology.
Solo Logic 13w Halogen Lamp
To obtain replacement lamps contact your local Light &
Motion Authorized Dealer. Disconnect the light head from the
battery and allow lamps to cool before removing. Orient the
light head facing upward and remove the bezel by rotating it
counterclockwise.To remove the lamp from the socket, grasp
firmly with your thumb and index finger and pull straight out.
Replace lamp by aligning pins and pressing the new lamp gently
into the socket until it reaches the base. Re-install the bezel
37
by turning clockwise until tight. You can then turn the bezel
counter-clockwise until the desired beam pattern is achieved.
Commuter Halogen Lamp
Disconnect the light head from the battery and allow lamps to
cool before removing. Orient the light head facing upward and
remove the bezel by rotating it counterclockwise. To remove
the lamp from the socket, grasp firmly with your thumb and
index finger and pull straight out. Replace lamp by aligning pins
and pressing the new lamp gently into the socket until it
reaches the base. Re-install the bezel by turning clockwise
until tight. Do not over tighten.
Note: It is extremely important to ONLY use Light & Motion
approved replacement bulbs. Failure to do so will damage the
light and void the warranty.
Vega LED
The LED used in the Vega is extremely durable and should last
for the lifetime of the light. The LED and batteries are not
designed to be removed or replaced. All service work on the
Vega system must be performed by the Light & Motion service
department. See the warranty section of these instructions for
information on contacting us with service questions.The front
bezel is not designed to be rotated or removed. Tampering or
removing the front bezel will void the warranty.
38
Light & Motion
300 Cannery Row • Monterey, CA 93940, USA
831-645-1538 • www.bikelights.com
905-0246-A