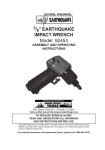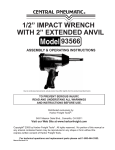
1
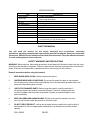
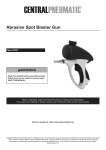
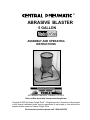
®
ABRASIVE BLASTER
5 GALLON
ASSEMBLY AND OPERATING
INSTRUCTIONS
3491 Mission Oaks Blvd., Camarillo, CA 93011
Visit our Web site at http://www.harborfreight.com
Copyright © 2003 by Harbor Freight Tools®. All rights reserved. No portion of this manual
or any artwork contained herein may be reproduced in any shape or form without the
express written consent of Harbor Freight Tools.
For technical questions please call 1-800-444-3353
SPECIFICATIONS
ITEM
Tank Capacity
Media Type
Air Inlet
Air Consumption
Nozzle Size
Maximum Tank Pressure
Minimum Tank Pressure
Working Pressure
Suction Hose Dimensions
Materials
Overall Dimensions
Net Weight
DESCRIPTION
5 Gallon (Blast Media)
Glass Bead, Silicon Carbide, Aluminum Oxide
Walnut Shell, Brass Bead
1/4”-18 NPT
6 SCFM@125 PSI
3/16” ID (Ceramic Nozzle)
125 PSI
65 PSI
90 PSI
8 Ft., 1/2” I.D. Black Rubber
Polyethylene Red Plastic Tank, Cast Aluminum Blast Gun
14” Leg Spread (3x), 11” Diameter,
21” Deep (Tank), 27” High at Filter Screen
10.80 Lbs.
SAVE THIS MANUAL
You will need the manual for the safety warnings and precautions, assembly
instructions, operating and maintenance procedures, parts list and diagram. Keep your invoice with
this manual. Write the invoice number on the inside of the front cover. Keep the manual and invoice
in a safe and dry place for future reference.
SAFETY WARNINGS AND PRECAUTIONS
WARNING: When using tool, basic safety precautions should always be followed to reduce the risk of personal injury and damage to equipment. Failure to observe these warnings and precautions could result in
failure of the tank, its components or attachments and in serious injury to self or others.
Read all instructions before using this product!
1.
KEEP WORK AREA CLEAN. Cluttered areas invite injuries.
2.
OBSERVE WORK AREA CONDITIONS. Do not use this product in damp or wet locations.
Don’t expose to rain. Keep work area well lighted. Do not use electrically powered tools in the
presence of flammable gases or liquids.
3.
CHECK FOR DAMAGED PARTS. Before using this product, carefully check that it
will operate properly and perform its intended function. Check for damaged parts and
any other conditions that may affect its operation. Replace or repair damaged or worn
parts immediately.
4.
KEEP CHILDREN AND ANIMALS AWAY. Children must never be allowed in the work
area. Do not let them handle this product or extension cords.
5.
DO NOT FORCE PRODUCT. It will do the job better and more safely at the rate for which it
was intended. Do not use inappropriate attachments in an attempt to exceed the product
capacity.
SKU 09588
PAGE 2
6.
USE THE RIGHT TOOL FOR THE JOB. Do not attempt to force a small product or attachment to do the work of a larger industrial product. Do not modify this product and do not use
this product for a purpose for which it was not intended.
7.
DRESS PROPERLY. Do not wear loose clothing or jewelry as they can be caught in moving
parts. Protective, electrically nonconductive clothes and nonskid footwear are recommended when working. Wear restrictive hair covering to contain long hair.
8.
USE EYE AND EAR PROTECTION. Always wear ANSI approved impact safety goggles.
Abrasive Blasting can produce eye irritation. Media will be forcefully ejected from the product’s nozzle
and air passages. Wear an ANSI approved dust mask or respirator when working with this
product. These are available at Harbor Freight Tools.
9.
DO NOT OVERREACH. Keep proper footing and balance at all times.
10.
MAINTAIN TOOLS WITH CARE. Follow instructions for changing accessories. inspect power
cords periodically and, if damaged, have them repaired by an authorized technician.
11.
DISCONNECT POWER. Unplug product when not in use.
12.
AVOID UNINTENTIONAL STARTING. Keep your finger off the trigger of the Abrasive Blast
Gun (#13) when not in use.
13.
STAY ALERT. Watch what you are doing. Use common sense. Do not operate any tool when
you are tired.
14.
CHECK FOR DAMAGED PARTS. Before using any tool, any part that appears damaged
should be carefully checked to determine that it will operate properly and perform its
intended function. Check for alignment and binding of moving parts; any broken parts or
mounting fixtures; and any other condition that may affect proper operation. Any part that is
damaged should be properly repaired or replaced.
15.
GUARD AGAINST ELECTRIC SHOCK. Prevent body contact with grounded surfaces such
as pipes, radiators, ranges and refrigerator enclosures.
16.
REPLACEMENT PARTS AND ACCESSORIES. When servicing, use only identical
replacement parts. Use of any other parts will void the warranty. Only use accessories
intended for use with this product. Approved accessories are available from Harbor
Freight Tools.
17.
DO NOT OPERATE TOOL IF UNDER THE INFLUENCE OF ALCOHOL OR DRUGS. Read
warning labels on prescriptions to determine if your judgement or reflexes are impaired while
taking drugs. If there is any doubt, do not operate this product.
18.
USE PROPER SIZE AND TYPE EXTENSION CORD. If an extension cord is required for an
Air Compressor being used, it must be of the proper size and type to supply the correct current
to the tool without heating up. Otherwise, the extension cord could melt and catch fire, or cause
electrical damage to the tool.
SKU 09588
PAGE 3
19.
MAINTENANCE. For your safety, service and maintenance should be performed regularly
by a qualified technician.
WARNING: This product, when used for abrasive blasting and similar applications, produces chemicals
known to the State of California to cause cancer and birth defects (or other reproductive harm). (California Health & Safety Code 25249.5, et seq.)
Warning: The warnings, cautions, and instructions discussed in this instruction manual cannot cover
all possible conditions and situations that may occur. It must be understood by the operator that
common sense and caution are factors which cannot be built into this product, but must be supplied
by the operator.
SPECIAL WARNINGS FOR THIS PRODUCT
1.
When using this product for cleaning, polishing or finishing purposes, only use those Blast
Media types listed in the Specifications Chart on Page 2.
2.
Finishes may vary from coarse to fine depending on the size of the Blast Media.
3.
Begin with a low amount of air pressure when working with delicate parts.
4.
Never use or mix liquids of any kind with your Blast Media.
5.
Do not point the Abrasive Blast Gun or Hose at another person or animal. Severe injury to skin,
eyes and/or other body parts may result.
6.
Wear proper gloves to protect hands while using this product.
7.
Only use on a flat, level surface to prevent product from tipping while in use.
8.
Do not pull on the Hose or Cord when moving this product.
9.
Use only clean Blast Media.
10.
Never splice, cut or in any way alter the Hose.
UNPACKING
When unpacking, check to make sure that all the parts are included. If any parts are missing or
broken, please call Harbor Freight Tools at the number on the cover of this manual. If any part of
the tool is missing or broken, please call Harbor Freight Tools at the number on the front cover, as
soon as possible.
SKU 09588
PAGE 4
IMPORTANT WARNING FOR SAFE, PRODUCTIVE BLAST CLEANING
1.
2.
3.
4.
5.
6.
7.
8.
9.
10.
11.
12.
Use protective equipment: abrasive-resistant clothing, safety shoes, leather gloves, ear
protection, helmet, safety goggles and dust mask or respirator.
Check for possible toxic hazards.
Do not blast with damaged or worn equipment.
Unless otherwise specified, maximum working pressure of Blast Machine and related components
must not exceed 125 psi.
Point Nozzle only at area being cleaned.
Use only abrasives specifically intended for blasting.
Keep unprotected workers out of the blast area.
Before operating machine:
Check fittings and hose for wear.
Test the Abrasive Blaster nozzle.
Check all fittings for tightness.
Do not modify this equipment in any way and only use identical replacement parts.
Do not attempt to move the Abrasive Blaster Machine when machine contains abrasive media.
This machine and accessories should only be operated by qualified, experienced users.
When loading Abrasive Blaster with media, be sure to unplug the Abrasive Blaster from power
source. Fill Tank (#2) so that it is filled 2/3 full. Replace Screen (#1) securely.
Warning: Abrasive blasting with sand containing crystalline silica can cause serious or fatal respiratory disease. Exposure to crystalline silica may cause silicosis (a serious lung disease), cancer and
death. Exposure to aluminum oxide (a dust generated from material removing processes) can result in
eye, skin and breathing irritation. Always use a NIOSH (National Institute for Occupational Safety and
Health) approved respirator and safety goggles. Avoid skin exposure. Proper ventilation in the work
area is required. Read and understand the 10 recommended measures below to reduce crystalline
silica exposures in the workplace and prevent silicosis and silicosis related deaths.
NIOSH recommends the following measures to reduce crystalline silica exposures in the
workplace and prevent silicosis and silicosis-related deaths:
1.
Prohibit silica sand (or other substances containing more than 1% crystalline silisa) as an
abrasive blasting material and substitute less hazardous materials.
2.
Conduct air monitoring to measure worker exposures.
3.
Use containment methods such as blast-cleaning machines and cabinets to control the hazard
and protect adjacent workers from exposure.
4.
Practice good personal hygiene to avoid unnecessary exposure to silica dust.
5.
Wear washable or disposable protective clothes at the worksite. Shower and change into
clean clothes before leaving the worksite to prevent contamination of cars, homes and other
work areas.
6.
Use respiratory protection when source controls cannot keep silica exposures below the
NIOSH REL.
7.
Provide periodic medical examinations for all workers who may be exposed to crystalline silica.
8.
Post signs to warn workers about the hazard and to inform them about required protective
equipment.
9.
Provide workers with training that includes information about health effects, work practices and
protective equipment for crystalline silica.
10.
Report all cases of silicosis to State health departments and to OSHA or the Mine Safety and
Health Administration (MSHA).
SKU 09588
PAGE 5
ASSEMBLY
NOTE: Part numbers refer to those listed on Page 8. You will need a philips head
screwdriver, an open ended wrench and a hexagonal wrench to assemble this product.
1.
2.
Assemble your Blaster on a clean, level work surface.
Attach the three Leg Pieces (#3) to the Tank (#2) with the
Screws (#5) See Figure 1.
3.
Assemble the three Leg Connecting Boards (#6) to the Leg
Pieces (#3) with the Screws (#4), Washer (#7) and Nut (#8).
See Figure 2.
#2
4.
Connect the Plastic Movable Castors (#9) to the three
Legs (#3) using Movable Caster Nut (#10). See Figure 3.
5.
Attach the Connector (#11) to the bottom of the Tank (#2) by
threading it through the hole with your hand, Hand tighten to
secure. See Figure 1.
6.
Connect the Abrasive Blaster Gun (#13), Suction Hose (#12) as
is illustrated in Figure 4. Then insert the other end of the
Suction Hose (#12) onto the Connector (#11). See Figure 5.
After attaching Hose Clamp (#15), tighten with philips head
screwdriver.
7.
Attach a 1/4” NPT male quick coupler (not included) to bottom
Blaster Gun (#13).
#11
Figure 1
Figure 2
#10
Figure 4
#9
Figure 3
#11
#15 Hose Clamp
Figure 5
SKU 09588
PAGE 6
REV 07/03
OPERATION
1.
Follow instructions supplied with Air Compressor (set working pressure at 90 PSI).
2.
Test the Abrasive Blasting Gun: To avoid mistakes, use a piece of the product you will be
blasting and experiment with the distance you want to place the Gun for the blast. This will
establish the correct distance to be used before working on the actual product.
3.
Pull on the trigger to begin the flow of the blast media. Unplug Air Compressor when blasting
is completed.
CLEANING AND MAINTENANCE
1.
Caution: Always disconnect the Abrasive Blaster from its air supply before performing any
cleaning, servicing, or maintenance.
2.
To clean the Abrasive Blaster, wipe with a clean, damp cloth and dry. If necessary, use a mild
detergent.
3.
The parts of the Abrasive Blaster that require frequent wear inspection and occasional replacement are those that carry the air/abrasive mixture (i.e., Suction Hose (#12), all metal fittings,
and Ceramic Nozzle (#14).
4.
Air leaks in any of the above mentioned parts indicate an obvious need for repair.
5.
When new, the Suction Hose (#12) has a 1/2” I.D. Depending on use, the inside wall of the
Suction Hose becomes thinner. To inspect the Suction Hose, turn on the air pressure. Leave
Abrasive Blaster Gun (#13) in the off position. Then, run your fingers along the length of the
Suction Hose. An enlarged spot (or bubble) indicates a weakened section of the Suction Hose
and should be replaced.
6.
To protect the compressor and its engine or motor from damage by abrasive or dust from
blasting, keep the compressor up wind of the Abrasive Blaster or in a separate room.
SKU 09588
PAGE 7
PARTS LIST
PART #
1
2
3
4
5
6
7
8
9
10
11
12
13
14
15
DESCRIPTION
Screen
Tank
Leg
1/4” X 5/8” Connecting Plate Lock Screw
1/4” X 3/4” Leg Lock Screw
Leg Connecting Board
Washer
1/4” Nut
Movable Castor
Movable Castor Nut
1/2” Connector
Suction Hose
Abrasive Blaster Gun
Ceramic Nozzle
Hose Clamp (not shown)
QTY
1
1
3
6
3
3
3
3
3
3
1
1
1
1
1
PLEASE READ THE FOLLOWING CAREFULLY
THE MANUFACTURER AND/OR DISTRIBUTOR HAS PROVIDED THE PARTS DIAGRAM IN THIS MANUAL AS A REFERENCE
TOOL ONLY. NEITHER THE MANUFACTURER NOR DISTRIBUTOR MAKES ANY REPRESENTATION OR WARRANTY OF
ANY KIND TO THE BUYER THAT HE OR SHE IS QUALIFIED TO MAKE ANY REPAIRS TO THE PRODUCT OR THAT HE OR SHE
IS QUALIFIED TO REPLACE ANY PARTS OF THE PRODUCT. IN FACT, THE MANUFACTURER AND/OR DISTRIBUTOR EXPRESSLY STATES THAT ALL REPAIRS AND PARTS REPLACEMENTS SHOULD BE UNDERTAKEN BY CERTIFIED AND LICENSED TECHNICIANS AND NOT BY THE BUYER. THE BUYER ASSUMES ALL RISK AND LIABILITY ARISING OUT OF HIS
OR HER REPAIRS TO THE ORIGINAL PRODUCT OR REPLACEMENT PARTS THERETO, OR ARISING OUT OF HIS OR HER
INSTALLATION OF REPLACEMENT PARTS THERETO.
SKU 09588
Page 8