1
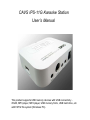
CAVS IPS-11G Karaoke Station
User’s Manual
This product supports USB memory devices with USB connectivity iPod®, MP3 player, MP4 player, USB memory Stick, USB hard drive, etc.
with FAT32 file system (Windows PC).
---- Table of Contents ---1
2
3
4
5
6
7
Introduction ..................................................................................................... 3
Safety and warning instruction ........................................................................ 4
Specification ................................................................................................... 7
CAVS IPS-11G and accessories ..................................................................... 8
4.1 Package contents ................................................................................ 8
4.2 Name of each part and function description .......................................10
Installation and connection .............................................................................13
5.1 Connecting your USB memory device ................................................13
5.2 Removing your USB memory device ..................................................13
5.3 Remote control battery installation .....................................................13
5.4 Power connection ...............................................................................14
5.5 Video connection ................................................................................14
5.6 Audio connection ................................................................................16
5.7 Microphone connection .......................................................................18
Operation ........................................................................................................19
6.1 Photos mode .......................................................................................21
6.2 Music mode ........................................................................................23
6.3 Videos mode .......................................................................................25
6.4 Files mode ...........................................................................................27
6.5 Storing files .........................................................................................29
Karaoke ...........................................................................................................31
7.1 MCG-MP3 Karaoke files .....................................................................31
7.2 Transfering Karaoke files ....................................................................32
7.3 Playing Karaoke files ..........................................................................33
7.4 Song Search and Program .................................................................35
7.5 Using Microphones .............................................................................38
1
8
9
10
2
Firmware update .......................................................................................... 39
Setup system configuration ......................................................................... 40
9.1 PHOTO SETUP ............................................................................... 41
9.2 MUSIC SETUP ................................................................................ 41
9.3 MOVIE SETUP ................................................................................ 42
9.4 SLIDE SHOW SETUP...................................................................... 42
9.5 PREFERENCES .............................................................................. 43
9.6 KARAOKE SETUP ........................................................................... 46
9.7 SPEAKER SETUP ........................................................................... 46
9.8 EXIT SETUP .................................................................................... 46
FAQ (Trouble shooting) ............................................................................... 47
* LIMITED WARRANTY
1 Introduction
CAVS IPS-11G Karaoke Station is an innovative multimedia player that plays photo,
music, video, and karaoke files from your USB memory device, such as iPod®, MP3
player, MP4 player, USB memory stick, USB hard disk, or USB card reader. CAVS
IPS-11G bridges your USB memory device to your home audio video (theater) system.
CAVS IPS-11G will let you view, search, and play the multimedia files directly on TV
screen using a remote controller. Simply connect your USB memory device to CAVS
IPS-11G, sit back, and enjoy the entertainment.
CAVS IPS-11G can play multimedia files of MPEG, AVI, DAT, VOB, MP3, JPEG, BMP,
GIF, and also the MCG-MP3 karaoke files. The karaoke files can be downloaded online
or extracted from CD+G karaoke discs using IPS Manager program included in
CAVS IPS-11G package.
CAVS IPS-11G will turn your USB memory device into a complete home entertainment
unit. Store the multimedia files you wish to play into your USB memory device and let
CAVS IPS-11G play them. Your USB memory device, such as iPod® or MP3 player,
does not have to be video capable or even audio capable. Simply store the files into
your USB memory device, connect the device to CAVS IPS-11G, and let CAVS IPS-11G
play the files into your home audio video (theater) system.
· Play photo, music, video, and karaoke files from USB memory device such as iPod®,
MP3 player, MP4 player, USB memory stick, USB hard disk, or USB card reader.
· View, search, and play the multimedia files directly on TV screen with a remote control.
· Enjoy karaoke play with full features of key control, tempo control, voice cancel, and
built-in dual microphone mixer.
· Connect and recharge your USB memory device.
* iPod® and iTunes® are registered trademarks of Apple Inc.
3
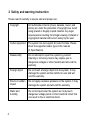
2 Safety and warning instruction
Please read it carefully to ensure safe and proper use:
4
Copyright
All multimedia contents (movie, karaoke, music, and
photo) are under the protection of copyright law. Avoid
using pirated or illegally copied material. Any legal
repercussions resulting from illegal viewing of pirated or
copyrighted material will be born solely by the user.
Codec supported
The system can not support all codec formats. Please
check the supported codec type in this manual.
(3. Specification)
Disassembly
Do not attempt to repair the system by yourself.
Opening or removing covers may expose you to
dangerous voltages or other hazards and will void the
warranty.
Foreign object
Do not insert a foreign object into the system. It may
damage the system and be harmful to user and will
void the warranty.
Shock or sudden
impact
Do not apply excessive pressure on the system. It may
damage the system and will void the warranty.
Water and
humidity
Do not let liquid enter the system as it may touch
dangerous voltage points or short electrical circuit that
can result in fire or electrical shock.
Chemical objects
Do not spill benzene, gas, paint thinner, or other
corrosive materials in or on the system. Serious and
permanent harm can occur.
Firmware update
Do not turn off the power during firmware update. If the
power turns off, it may cause irreparable damage to the
system.
FCC NOTE
This equipment has been tested and found to comply with the limits for a Class B
digital device, pursuant to Part 15 of the FCC rules. These limits are designed to
provide reasonable protection against harmful interference in a residential
installation. This equipment generates, uses and can radiate radio frequency
energy and, if not installed and used in accordance with the instructions, may
cause harmful interference to radio or television reception, which can be
determined by turning the equipment off and on. The user is encouraged to try to
correct the interference by one or more of the following measures:
· Reorient or relocate the receiving antenna.
· Increase the separation between the equipment and receiver.
· Connect the equipment into an outlet on a circuit different from that to which the
receiver is connected.
· Consult the dealer or an experienced radio/TV technician for help.
Modifications not expressly approved by the manufacturer could void the user's
authority to operated the equipment under FCC rules
5
Disposal of Old Electrical & Electronic Equipment (Applicable in
the European Union and other European countries with separate
collection systems)
This symbol on the product or on its packaging indicates that this
product shall not be treated as household waste. Instead it shall be
handed over to the applicable collection point for the recycling of
electrical and electronic equipment. By ensure this product is disposed of correctly,
you will help prevent potential negative consequences for the environment and
human health, which could otherwise be caused by inappropriate waste handling
of this product. The recycling materials will help to conserve natural resource. For
more detailed information about recycling of this product, please contact your local
city office, your household waste disposal service or the shop where you purchased
the product.
6
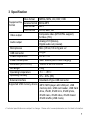
3 Specification
Video format
Supported file Karaoke format
format
Audio format
Photo format
Video output
Audio output
MPEG, MPG, AVI, DAT, VOB
MCG-MP3
MP3
JPEG, BMP, GIF
Composite video (NTSC/PAL support)
S-Video (Y/C)
Analog 2CH (Stereo),
Digital audio out (coaxial)
Microphones
Mini (3.5mm,1/8 inch) jack x 2
USB connector
Power requirement
Power consumption
Dimension (W X H X D)
Net weight
Operating temperature
Operating humidity
A-type
DC 9V / 1A
Max. 900mA (with iPod® charging)
100mm X 28 mm X 80mm
193g
-5G~ +50
0% ~ 90% (RH)
External interface
Standard A Type USB connector
Supported USB memory device
MP3 / MP4 player with USB port, USB
memory stick, USB card reader, USB Hard
drive, iPod®, iPod® mini, iPod® photo,
iPod® nano, iPod® video, iPod® classic
iPod® shuffle (USB mode)
QG{GGGGGUGGwGGGUUGGGU
7
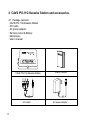
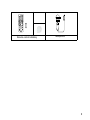
4 CAVS IPS-11G Karaoke Station and accessories.
4.1 Package contents
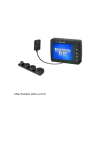
· CAVS IPS-11G Karaoke Station
· A/V cable
· AC power adapter
· Remote control & Battery
· Microphone
· User’s manual
CAVS IPS-11G Karaoke Station
A/V cable
8
User’s manual
AC power adapter
Remote control & Battery
Microphone
9
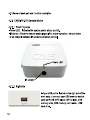
4.2.1.3 Back side
SPDIF connector for digital audio output,
S-Video connector for high-resolution
video output, A/V out connector for 2
Channel audio and composite video output,
9V DC power input terminal, and POWER
ON/OFF Switch are located on the back
side.
4.2.1.4 Left side
Two mini (3.5mm, 1/8 inch) jack connectors for
microphone inputs, microphone volume control
knob and echo volume control knob are located
in left side.
11
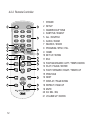
4.2.2 Remote Controller
1
2
3
4
5
6
10
9
8
7
11
13
12
14
15
16
17
18
19
20
21
12
1
2
3
4
5
6
7
8
9
10
11
12
13
14
15
16
17
18
19
20
21
POWER
SETUP
NUMERIC BUTTONS
SUBTITLE / DIGEST
ALL / SHUFFLE
AUDIO / ZOOM
SEARCH / SHOW
PROGRAM / NTSC / PAL
HOME
KEY UP / DOWN
ESC
FAST BACKWARD / LEFT / TEMPO DOWN
PLAY / PAUSE / ENTER
FAST FORWARD / RIGHT / TEMPO UP
PREVIOUS
NEXT
DISPLAY / PAGE DOWN
REPEAT / PAGE UP
MUTE
A/V SEL / EQ
VOLUME UP / DOWN
5 Installation and connection
5.1 Connecting your USB memory device
Connect your USB memory device, such as iPod®, MP3 player, MP4 player,
USB memory stick, USB card reader, or USB hard drive, to CAVS IPS-11G Karaoke
Station. Use the USB cable that came with your USB memory device to connect.
You can connect your USB memory device anytime regardless of CAVS IPS-11G
being powered on or off. “MEDIA DETECTED” message will appears on TV screen.
5.2 Removing your USB memory device
You can remove your USB memory device from CAVS IPS-11G anytime.
“NO MEDIA DETECTED” message will appears on TV screen.
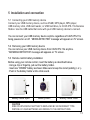
5.3 Remote control battery installation
Before using your remote control, insert the battery as described below.
· Using a clip or fingertip, pull out the battery holder.
· Insert one “CR2032” battery as shown. Make sure to keep the correct polarity (+ or -).
· Push in the battery holder until a click sound.
͑
G
Battery holder open
Battery insert
Battery holder close
CAUTION
RISK OF EXPLOSION IF BATTERY IS REPLACED BY AN INCORRECT TYPE.
DISPOSE OF USED BATTERIES ACCORDING TO THE INSTRUCTIONS.
13
Do not store the remote control in high temperatures or direct sunlight.
The remote control may not function properly in direct sunlight.
5.4 Power connection
AC power adapter supports 100V~240V AC input voltage with DC9V 1000mA
output. To prevent any damage to the system, it is recommended only to use
the included AC power adapter.
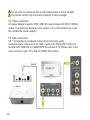
5.5 Video connection
5.5.1 Connecting to composite output (most commonly used)
Using the yellow connector of AV cable, connect the CAVS IPS-11G AV out
terminal with VIDEO IN or COMPOSITE IN terminal of TV. Please refer to the
user’s manual of your TV to find the VIDEO IN terminal.
AV OUT
14
5.5.2 Connecting to S-VIDEO output
If your TV has S-Video input terminal, you can enjoy high quality video using
S-Video cable (not included) from the S-Video out terminal of CAVS IPS-11G to
the S-Video input terminal of your TV.
S-VIDEO
S-VIDEO cable
(sold separately)
15
5.6 Audio connection
5.6.1 Connecting to analog audio output (most commonly used)
Using the white and red connector of AV cable, connect the CAVS IPS-11G AV
out terminal to the AUDIO IN terminal of TV or amplifier. Please refer to the
user’s manual of your TV or amplifier to find the AUDIO IN terminal.
AV OUT
16
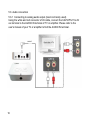
5.6.2 Connecting to digital audio output (5.1CH)
If your AV receiver has a digital audio input terminal (coaxial), you can enjoy
5.1ch audio when playing back 5.1ch audio files. Using the digital audio cable
(not included), connect SPDIF digital audio out terminal of CAVS IPS-11G with
digital audio input terminal (coaxial terminal) of you’re AV receiver. Please refer
to the user’s manual of you’re AV receiver to find the digital audio input terminal.
Digital audio out
Digital audio cable
(sold separately)
HOME AV RECEIVER
17
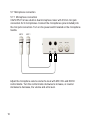
5.7 Microphone connection
5.7.1 Microphone connection
CAVS IPS-11G has a built-in dual microphone mixer with 3.5mm mini jack
connectors for 2 microphones. Connect the microphones (one included) into
the mini jack connectors. Turn on the power switch located on the microphone
handle.
MIC 2
MIC 1
Adjust the microphone volume and echo level with MIC VOL and ECHO
control knobs. Turn the control knobs clockwise to increase, or counter
clockwise to decrease, the volume and echo level.
18
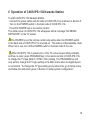
6 Operation of CAVS IPS-11G Karaoke Station
To start CAVS IPS-11G Karaoke Station,
· Connect the power cable and AV cable of CAVS IPS-11G as shown in Section 5.
· Turn on the POWER switch in the back side of CAVS IPS-11G.
· Press the POWER key in the remote control.
The initial screen of CAVS IPS-11G will appear with a message “NO MEDIA
DETECTED” on the TV screen.
The POWER key in the remote control only works when the POWER switch
in the back side of CAVS IPS-11G is turned on. This state is called standby mode.
When not in use, turn off the POWER switch in the back side of the unit.
After CAVS IPS-11G is powered on, if the TV screen keeps rolling vertically
and has no color, press PROGRAM key in the remote control of CAVS IPS-11G
to change the TV type (MULTI / NTSC / PAL) setting. The PROGRAM key will
only work to change the TV type setting in the Main menu when no digital device
is connected. To change the TV type setting at any other time, go to Setup menu
and follow the instruction given in Section 9. Setup system configuration.
19
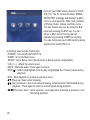
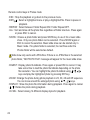
Connect your USB memory device to CAVS
IPS-11G. The TV screen will show “MEDIA
DETECTED” message and display the Main
menu in a few seconds. Main menu consists
of Photos, Music, Videos, and Files icons.
You can choose any icon by using the ඔGඖ
/
keys and pressing the ENT key. You can
return to Main menu from any part of
operation by pressing HOME key anytime.
You can disconnect your USB memory device
anytime from CAVS IPS-11G.
Commonly used remote control keys
· POWER : Turn on/off CAVS IPS-11G.
· HOME : Go to the Main menu
· SETUP : Go to Setup menu (See Section 9. Setup system configuration).
· VOL( +/- ) : Adjust the volume level.
· MUTE : Mute the audio. Press again to cancel.
· ENT( )G : Select a highlighted menu or play a highlighted file. Press to pause during
playback.
· ESC : Stop playback or go back to previous menu.
· / : Move up / down when browsing.
· / : Go to previous / next menu when browsing, or fast reverse / fast forward during
playback. Press again to return to normal speed during playback.
· / (Previous / Next) : Go to previous / next page when browsing or previous / next
file during playback.
20
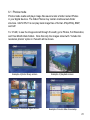
6.1 Photos mode
Photos mode reads and plays image files saved under a folder named Photos
in your digital devices. The folder Photos may contain multilevel sub-folder
structure. CAVS IPS-11G can play back image files of format JPG(JPEG), BMP,
and GIF.
For iPod®, to see the images stored through iTunes®, go to Photos, Full Resolution,
and Year-Month-Date folders. Note that only the images stored with “Include fullresolution photos” option in iTunes® will be shown.
Example of photo library screen
Example of playback screen
Example of thumbnail digest screen
Example of music slide show setup
21
Remote control keys in Photos mode
· ESC : Stop the playback or go back to the previous menu.
· ENT( G) : Select a highlighted menu or play a highlighted file. Press to pause in
playback.
· REPEAT : Select between Folder Repeat ON / Folder Repeat OFF.
· ALL : Sort and show all the photo files regardless of folder structure. Press again
or press ESC to cancel.
· SHOW : Choose a photo folder and press SHOW key to use it for a music slide
show. Only one photo folder can be selected. Press SHOW again or
ESC to cancel the selection. Music slide show can be started only in
Music mode. If no photo folder is selected, the root files under the
Photos folder will be selected as default.
Slide show only works with JPEG files. If there is no JPEG files in the selected
photo folder, “NO PHOTO FILE” message will appear for the music slide show.
· DIGEST : Display photo thumbnails. Press again or press ESC to cancel. It may
take some time to load the photo thumbnails depending on the photo
file resolution. You can highlight the photo thumbnail using / , /
keys and play the highlighted photo by pressing ENT key.
· ZOOM : Enlarge the photo during photo playback in 2X, 3X, 4X and Off sequence.
You can move around the enlarged photo using / , / keys.
· DISPLAY : Show the photo file information during playback. Press again to cancel.
· / : Rotate the photo during playback.
· AV SEL : Select among 14 different display styles for playback.
22
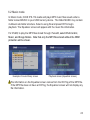
6.2 Music mode
In Music mode, CAVS IPS-11G reads and plays MP3 music files saved under a
folder named MUSIC in your USB memory device. The folder MUSIC may contain
multilevel sub-folder structure. Select a song file and press ENT to begin
playback. The Equalizer screen will appear with the music file information.
For iPod®, to play the MP3 files stored through iTunes®, select iPod-Control,
Music, and Songs folders. Note that only the MP3 files stored without the DRM
protection will be shown.
Example of music library screen
Playback screen (Equalizer screen)
File information on the Equalizer screen comes from the ID3 Tag of the MP3 file.
If the MP3 file does not have a ID3 Tag, the Equalizer screen will not display any
file information.
23
Remote control keys in Music mode
· ESC : Stop the playback or go back to the previous menu.
· ENT( ) : Select a highlighted menu or play a highlighted file. Press to pause in
playback.
· REPEAT : Select between REPEAT: ONE / ALL / OFF.
· ALL(SHUFFLE) : Sort and show all MP3 music files regardless of folder structure.
Press it again or press ESC to cancel.
· DISPLAY : Show the music file information during playback. Press again to cancel.
· SHOW : Start music slide show using the previously selected photo folder in Photos
mode. If no photo folder is selected ahead, the root files under the Photos
folder will be displayed as default. SHOW key works only when a music
file is highlighted in the library screen or is playing back in equalizer screen.
Press SHOW again or ESC to cancel.
· EQ: Change the equalizer setting in the Equalizer screen.
· / : Fast Reverse / Fast Forward during playback.
· / (Previous / Next) : Go to previous / next page when browsing or previous /
next file during playback.
24
6.3 Videos mode
Videos mode reads and plays video files saved under a folder named VIDEOS in
your USB memory device. The folder VIDEOS may contain multilevel sub-folder
structure. CAVS IPS-11G can play back video files of format MPEG, MPG, AVI,
DAT, VOB. Select a video file and press ENT to begin playback.
For iPod®, the video files stored through iTunes® is encrypted in a proprietary format
and can not be viewed by CAVS IPS-11G. To play by CAVS IPS-11G, the video files
must be stored into iPod® as USB memory device, shown in Section 6.5.
Example of video library screen
Example of playback screen
25
Remote control keys in Videos mode
· ESC : Stop the playback or go back to the previous menu.
· ENT( ) : Select a highlighted menu or play a highlighted file. Press to pause in
playback.
· REPEAT : Select between REPEAT: ONE / ALL / OFF.
· ALL : Sort and show all the video files regardless of folder structure. Press it again
or press ESC to cancel.
· DISPLAY : Show the video file information during playback. Press again to cancel.
· / : Fast Reverse / Fast Forward during playback.
· SUB-T : Select the preferred subtitle language. This function is useful only with
video files on which multiple subtitle language are recorded.
· AUDIO : Select the preferred audio language. This function is useful only with
video files on which multiple audio soundtrack language are recorded.
If a video file does not include an audio file or an audio file of a supported format
by CAVS IPS-11G, you will not hear the audio portion of the video file. Please
check the file format for proper operation.
26
6.4 Files mode
Files mode shows all files (supported by CAVS IPS-11G) and folders in your
USB memory device. You can browse and play any of the files shown in Files mode,
as long as the files are of supported formats.
*For information on karaoke features and files, see Section 7.
Example of file library screen
Example of karaoke file library screen
27
Remote control keys in Files mode
· ESC : Stop the playback or go back to the previous menu.
· ENT : Select a highlighted menu or play a highlighted file. Press to pause during
playback.
· REPEAT : Select between REPEAT: ONE / ALL / OFF.
· ALL : Sort and show all the files regardless of folder structure. Press again or
press ESC to cancel.
· DISPLAY : Show the file information during playback. Press again to cancel.
· / : Fast Reverse / Fast Forward during playback.
· / (Previous / Next) : Go to previous / next page when browsing or previous /
next file during playback.
· SUB-T : Select the preferred subtitle language. This function is useful only with
video files on which multiple subtitle language are recorded.
· AUDIO : Select the preferred audio language. This function is useful only with
video files on which multiple audio soundtrack language are recorded.
28
6.5 Storing Files
For MP3 music files, store the files under a folder named MUSIC in your USB
memory device to maximize the features of CAVS IPS-11G.
For JPEG, BMP, and GIF photo files, store the files under a folder named Photos
in your USB memory device to maximize the features of CAVS IPS-11G.
For MPEG, MPG, AVI, DAT, VOB video files, store the files under a folder named
Videos in your USB memory device to maximize the features of CAVS IPS-11G.
If the folders do not exist, follow the user’s manual of your device to create the folders.
The folders may have multilevel sub-folder structure for your convenience of organizing
the files.
To create a folder in USB memory device, a standard method is to:
- Connect your USB memory device to PC using a USB cable.
- Go to Start and My Computuer. You will see your USB moemory device as a
removable drive. Double click on the removable drive to open.
- Go to Files and New folder. Type in a name for the new folder and press Enter.
To create a folder in iPod®,
- Connect your iPod® to PC and wait for the iTunes® program to begin.
- In iTunes@ program, click on your iPod® under DEVICE.
- Click on the Summary tab and check the “Enable disc use” in Options.
- In Windows, go to Start - My Computer in your PC. You will see your iPod as a
Removable drive in the list.
- Double click on the Removable drive to open. Go to Files and New folder, and type
in a name for the new folder and press Enter.
Next, copy all files of your choice from PC to the new folder.
29
CAVS IPS-11G utilizes your USB memory device, such as iPod or MP3 player, as
data storage. It has its own multimedia processor and it accesses your device to play
the files of photos, music, videos, and karaoke. That is why your device may not be
video capable or even audio capable, but when connected to CAVS IPS-11G, it
becomes a home theater and karaoke entertainment center. It plays DVD movies and
Karaoke sing along with lyric display. The number of movies or karaoke songs that
can be stored in your USB memory device will depend on the data capacity of your
device.
For iPod®, the MP3 and Photo files may also be stored using iTunes® program.
Please refer to Sections 6.1 and 6.2 for the instruction on how to play the MP3 and
Photo files stored through iTunes® program.
30
7 Karaoke
CAVS IPS-11G is specially designed to play karaoke songs of MCG-MP3 format
stored in your USB memory device. There are thousands of karaoke songs of
MCG-MP3 file format available for download at www.ipskaraoke.com. You can
also use the IPS Manager program to extract karaoke songs of MCG-MP3 file
format from CD+G karaoke discs commonly found at any local or online karaoke
stores. IPS Manager program is included in CAVS IPS-11G package.
7.1 MCG-MP3 karaoke files
The MCG-MP3 files can be downloaded from www.ipskaraoke.com or extracted
from CD+G karaoke discs.
To download the MCG-MP3 files,
· Go to www.ipskaraoke.com and purchase the karaoke song of your choice.
· Download the song file and save them into your PC.
· In your PC, double click on the song file to unzip the file into MCG-MP3 file.
The MCG-MP3 file “xxxxxxxx-mcg.mp3” will appear, where “xxxxxxxx” indicates
a unique identification number for the song and “mcg” indicates the compatibility
to CAVS IPS-11G.
If you are using Windows XP, the Winzip program for unzipping files is included
in your PC. If you are not using Windows XP, use Tugzip or Winzip program
available for download in the Internet.
To extract the MCG-MP3 files from CD+G discs,
· Go to www.ipskaraoke.com and download the IPS Manager program to your PC.
· Install the IPS Manager program and start.
· Click on Help button in IPS Manager program and follow the instruction to extract
the MCG-MP3 files from CD+G karaoke discs in your PC.
31
7.2 Transfering Karaoke files
The MCG-MP3 files can be transferred from PC to your USB memory device through
USB cable.
· Connect your USB memory device, such as iPod® or MP3 player, to PC using USB
cable.
· Go to Start and My Computer, and you will see your USB memory device as a
Removable drive. Double click on the Removable drive to open. You can create
a new folder in your USB memory device to store the karaoke song files.
· Copy the MCG-MP3 files in PC to the Removable drive of your USB memory device.
· Close the Removable drive of your USB memory device.
· Go to Start and My Computer, and right click on the Removable drive of your USB
memory device. Click on Eject. Your USB memory device can now be removed from
PC.
For iPod®, you can use the iTunes® program to transfer the MCG-MP3 files from PC.
Simply treat the MCG-MP3 files as standard MP3 files and use the iTunes® program
to load the files into your iPod®. The MCG-MP3 files will be loaded into folders
designated by iPod® (not into a folder of your choice). To play the MCG-MP3 files
loaded by iTunes® program, see Section 7.3.
32
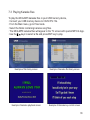
7.3 Playing Karaoke files
To play the MCG-MP3 karaoke files in your USB memory device,
· Connect your USB memory device to CAVS IPS-11G.
· From the Main menu, go to Files mode.
· Select the folder containing karaoke song files.
· The MCG-MP3 karaoke files will appear in the TV screen with special MP3+G logo.
· Use the / keys to select a file and press ENT key to play.
Example of file library screen
Example of karaoke file library screen
Example of karaoke playback screen
Example of Karaoke key control screen
33
For iPod®, if you have stored the MCG-MP3 files using iTunes® program,
· Connect your iPod to CAVS IPS-11G.
· From the Main menu, go to Files mode.
· Go to iPod-Control, Music, and Songs folders. “MUSIC” message will appear and
regular MP3 song files will be listed on TV screen.
· Press SEARCH button on the remote control. “Karaoke” message will appear and
the MCG-MP3 song files will be listed on TV screen.
· Select a karaoke song file and play.
Remote control keys in Karaoke play
· ESC : Stop the playback or go back to the previous menu.
· ENT : Select a highlighted menu or play a highlighted file. Press to pause during
playback.
· KEY UP / KEY DN: Raise or lower the key (pitch) level of music.
· TEMPO UP / TEMPO DN: Increase or decrease the tempo (speed) level of music.
· AUDIO: Select from LEFT / RIGHT / STEREO music channels. When playing a
multiplex karaoke song file, AUDIO key will turn on / off the voice cancel
feature.
· DISPLAY : Show the file information during playback. Press again to cancel.
· VOL( +/- ) : Adjust the volume level.
34
7.4 Song Search and Program
Storing of MCG-MP3 files in a folder allows you to browse and select the songs
under the FILE LIBRARY menu. You can use the / or /
keys to browse
the song files up / down by line or page. Up to 500 songs can be viewed in the
FILE LIBRARY per folder.
Enabling INX menu in a karaoke folder provides the convenience of:
· Display up to 10,000 songs per folder.
· Search by song number, title, or singer.
· Program up to 10 songs.
To enable INX menu, simply make a list file, named ENGLISH.inx, and insert it in
the karaoke folder. The instruction and program for making the ENGLISH.inx list
file is given at www.ipskaraoke.com. Also when making the ENGLISH.inx list file,
a printable song list JUKE.txt in text format will be generated. You can edit
and print the JUKE.txt song list in your PC for your convenience.
If the ENGLISH.inx file is inserted in the karaoke folder and the folder is
selected, Karaoke Search menu will automatically appear in the TV screen.
Example of Karaoke Search menu
Example of Karaoke Help menu
35
Example of Search by Title menu
Example of Search by Singer menu
At Karaoke Search menu, input a song number using NUMERIC keys, or press
the / keys to browse through the songs. For each song number, the song title
will appear on the display. Press ENT key to start playing.
At Karaoke Search menu, press SEARCH key to further select from HELP /
SEARCH BY TITLE / SEARCH BY SINGER menus. HELP menu will display the
instruction on how to search.
In SEARCH BY TITLE menu, use the ඔGඖ
/ keys to select the first character of your
search. Next use the
/
keys to change the cursor position, and use the
ඔGඖ
/ keys to select the second character of your search. Songs with matching
characters will be displayed. You can continue to specify more characters to
narrow the list of matching songs. Or use the ̵G̷
/ or PAGE DN / PAGE UP keys
to select a song in the displayed list and press ENT key to begin playing.
36
At SEARCH BY SINGER menu, use the ඔGඖ
/ keys to select the first character of
your search. Next use the
/
keys to change the cursor position, and use the
ඔGඖ
G
/ keys
to select the second character of your search. Singers with matching
names will be displayed. You can continue to specify more characters to narrow
the list of matching singers. Or use the ̵G̷
/ or PG DN / PG UP keys to select a
singer in the displayed list, and press ENT key. Next, you will see the songs of
the selected singer in the display. Use the ̵G̷
/ or PG DN / PG UP keys to select
a song, and press ENT key to begin playing.
During playback, you can select and program up to next 10 songs. Simply input
a song number using NUMERIC keys and press PROGRAM key. The programmed
song number will appear at the bottom of the screen. The display of programmed
songs will automatically disappear in 5 seconds. To display the list of programmed
songs again, press PROGRAM key.
To exit a folder with INX (Karaoke Search) menu, press HOME key.
You can have a multiple folders, each with INX menu and karaoke files.
Remote control keys in INX menu
· ESC : Stop the playback or go back to the previous menu.
· ENT : Select a highlighted menu or play a highlighted file. Press to pause during
playback.
· HOME : Exit from INX menu and return to the Main menu.
· SEARCH : Select from HELP / SEARCH BY TITLE / SEARCH BY SINGER menus.
· / :GSelect an alphanumeric character.
·
/ : Change the cursor position to input a character during search.
· 1, 2, …0 : Input a song number.
· PROGRAM : Reserve up to 10 songs. Only work during playback.
37
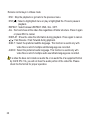
7.5 Using microphones
G
CAVS IPS-11G Karaoke Station has a built-in dual microphone mixer with volume
and echo level controls. To use a microphone in conjunction with CAVS IPS-11G:
· Connect AV (analog audio) out terminal of CAVS IPS-11G to AUDIO IN terminal
of your TV or amplifier. Do not use the digital audio output.
· Connect a microphone (included as accessory) to MIC 1 or MIC 2 input connector.
· Adjust the MIC VOL and ECHO control knobs for the microphone volume and
echo levels.
· Turn on the power switch located on the microphone handle.
Optional second microphone can be purchased from www.ipskaraoke.com.
38
8 Firmware update
8.1 Saving firmware
Download the latest firmware for CAVS IPS-11G from www.ipskaraoke.com
and save it into your PC. Double click on the downloaded file to unzip it into
“klinki2.rom” file. Connect your USB memory device to PC and copy the
“klinki2.rom”.
8.2 Connecting your USB memory device
Connect your USB memory device to CAVS IPS-11G.
Power off CAVS IPS-11G and power it on again.
8.3 Selecting firmware upgrade menu
Press SETUP key on the remote control to go to the Setup menu.
Go to PREFERENCES, UPGRADE MODE and select YES. Exit setup by
pressing SETUP key. Firmware updating will start automatically.
Do not turn off the power during firmware update. If the power is turned
off during update, it will causes critcal damage to the system.
8.4 Completing firmware update
When update is completed, CAVS IPS-11G will power off automatically.
Turn off the POWER switch on the backside of CAVS IPS-11G (POWER key
in the remote control will not work).
8.5 Removing your USB memory device
Remove your USB memory device from CAVS IPS-11G. Connect your memory
device to PC and delete the “klinki2.rom” firmware that is inside.
If you don’t delete the firmware that is inside your USB memory device,
unexpected firmware update may occur in your next connection to CAVS IPS-11G.
39
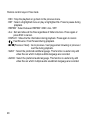
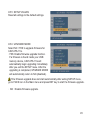
8.6 Checking Firmware update
Press SETUP key to go to the Setup
menu. Go to PREFERENCES,
VERSION MODE and ON to check the
firmware version. Press SETUP key to
return to Setup menu. Press again to
exit Setup menu.
Example of firmware version screen
8.7 Starting CAVS IPS-11G after firmware update
After the firmware update, re-connect your digital device and power on the
CAVS IPS-11G.
9 Setup system configuration.
Press SETUP key to go to the Setup
menu. Highlight the menu item you wish
G
using / / / keys
and press ENT to
select.
40
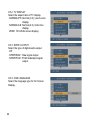
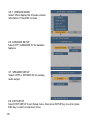
9.1 PHOTO SETUP
9.1.1 TRANSITION MODE
Select a transition speed in photo playback.
9.1.2 DIGEST STYLE.
Select the thumbnail matrix style.
9.2 MUSIC SETUP
9.2.1 REPEAT MODE
Select the repeat mode in music
playback. You can also use the REPEAT
key in the remote control.
41
9.3 MOVIE SETUP
9.3.1 REPEAT MODE
Select the repeat mode in movie playback.
You can also use the REPEAT key in the
remote control.
9.4 SLIDE SHOW SETUP
9.4.1 SLIDE SHOW MODE
Select from manual / auto transition.
For manual transition, use ඔGඖ
/ or
/
keys to move backward /
forward. For auto transition, select the
time in INTERVAL TIME below.
9.4.2 FOLDER REPEAT
Select the repeat mode in photo
playback. You can also use REPEAT key
in the remote control.
42
9.4.3 INTERVAL TIME
Select the interval time per picture in photo
playback. Interval Time becomes effective
only when SLIDE SHOW MODE is set at
AUTO.
9.4.4 TRANSITION
Select the style of photo transition in photo
playback. You can also use the AV SEL key.
9.5 PREFERENCES
9.5.1 TV TYPE
Select the TV type.
· MULTI. SYSTEM
· NTSC
· PAL
43
9.5.2 TV DISPLAY
Select the aspect ratio of TV display.
· NORMAL/PS: Normal (4:3) / pan & scan
display.
· NORMAL/LB: Normal (4:3) / letter box
display.
· WIDE: 16:9 Wide screen display.
9.5.3 SPDIF OUTPUT
Select the type of digital audio output.
· Off
· SPDIF/RAW : Raw signal output
· SPDIF/PCM : PCM modulated signal
output.
9.5.4 OSD LANGUAGE
Select the language type for On Screen
Display.
44
9.5.5 SETUP VALUES
Reset all settings to the default settings.
9.5.6 UPGRADE MODE
Select NO / YES to upgrade firmware for
CAVS IPS-11G.
· YES: Enable firmware upgrade function.
If a firmware is found inside your USB
memory device, CAVS IPS-11G will
automatically begin upgrading immediately
after you exit the SETUP menu. After the
upgrading is completed, UPGRADE MODE
will automatically return to NO (disabled).
If the firmware upgrade does not start automatically after exiting SETUP menu,
go to FILES icon in the Main menu and press ENT key to start the firmware upgrade.
· NO : Disable firmware upgrade.
45
9.5.7 VERSION MODE
Select ON to display the firmware version
information. Press ESC to close.
9.6 KARAOKE SETUP
Select OFF / KARAOKE for the karaoke
features.
9.7 SPEAKER SETUP
Select LT/RT or STEREO for the analog
audio output.
9.8 EXIT SETUP
Select EXIT SETUP to exit Setup menu. Also press SETUP key to exit or press
ESC key to return to previous menu.
46
10 FAQ (Trouble shooting)
Problem
Possible solution
CODEC NOT SUPPORTED Check if a selected file is supported by the system.
message appears on screen. Check your firmware version, and update if new
firmware is available.
DIVX DECRIPTION ERROR Check if the movie file format is supported by the
system.
NO MEDIA DETECTED
message appears
Check if your digital device is securely connected
to the CAVS IPS-11G USB connector.
Nothing appears on screen
Check if the AV OUT cable is properly connected
to TV or receiver’s AV input terminal.
Make sure they are securely connected.
Snowy picture
Check if the correct TV type (NTSC/PAL)
(image is unclear and snowy) is chosen.
The picture is cut off
Check if that the correct TV type (NTSC/PAL)
is chosen.
No sound
Check the audio volume.
Check if mute is enabled.
Check the AV OUT cable connection to TV or
A/V Receiver.
Power is turned off while
updating firmware
The system is critically damaged. Contact
customer service for repair.
47
Problem
Remote control does not
function properly
Possible solution
Keep remote control out of direct sunlight.
Check the battery.
*Product specs are subject to change without notice.
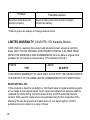
LIMITED WARRANTY CAVS IPS-11G Karaoke Station
CAVS USA Inc. warrants this product and all parts thereof, except as set forth
below ONLY TO THE ORIGINAL PURCHASER AT RETAIL to be FREE FROM
DEFECTIVE MATERIALS AND WORKMANSHIP from the data of original retail
purchase for the period as shown below. ("The Warranty Period")
LABOR
PARTS
1YR
90 DAYS
THIS LIMITED WARRANTY IS VALID ONLY IN THE FIFTY (50) UNITED STATES,
THE DISTRICT OF COLUMBIA AND IN COMMONWEALTH OF PUERTO RICO.
WHAT WE WILL DO :
If this products is found to be defective, CAVS will repair or replace defective parts
at no charge to the original owner. Such repair and replacement services shall be
rendered by CAVS during normal business hours at CAVS authorized service
centers. Parts used for replacement are warranted only for the remainder of the
Warranty Period. All products and parts there of may be brought to a CAVS
authorized service center on a carry-in basis.
48
WHAT YOU MUST DO FOR WARRANTY SERVICE :
Return your product to a CAVS authorized service center with a copy of your bill
of sale. For your nearest CAVS authorized service center,
please call : (562) 777-1846.
If service is not available locally, box the product carefully, preferably in the original
carton, and ship, insured, with a copy of your bill of sale plus a letter of explanation
of the problem to the nearest CAVS Factory Service Center, the name and location
of which will be given to you by the phone.
If you have any questions concerning your CAVS Product, please contact our
Technical Support Department.
WHAT IS NOT COVERED :
This limited warranty provided by CAVS does not cover :
1. Products which have been subject to abuse, accident, alteration, modification,
tampering, negligence, misuse, faulty installation, lack of reasonable care, or if
repaired or serviced by anyone other than a service facility authorized by CAVS
to render such service, or if affixed any attachment not provided with the products,
or if the model number or serial number has been altered, tampered with, defaced
or removed ;
2. Initial installation and removal for repair ;
3. Operational adjustments covered in the Owner's Manual, normal maintenance,
video and audio head cleaning ;
4. Damage that occurs in shipment, due to act of God, and cosmetic damage ;
5. Signal reception problems and failures due to line power surge ;
6. Video Pick-up, Tubes/CCD Image Sensor, Cartridge, Stylus (Needle) are covered
for 90 days from the data of purchase ;
7. Accessories ;
8. Batteries (except that Rechargeable Batteries are covered for 90 days from the
date of purchase) ;
** There are no express warranties except as listed above.
49
THE DURATION OF ANY IMPLIED WARRANTIES, INCLUDING THE IMPLIED
WARRANTY OF MERCHANTABILITY, IS LIMITED TO THE DURATION OF THE
EXPRESS WARRANTY HEREIN.
CAVS SHALL NOT BE LIABLE FOR THE LOSS OF USE OF THE PRODUCT,
INCONVENIENCE, LOSS OR ANY OTHER DAMAGES, WHETHER DIRECT,
INCIDENTAL OR CONSEQUENTIAL (INCLUDING, WITHOUT LIMITATION,
DAMAGE TO TAPES, RECORDS OR DISCS) RESULTING FROM THE USE OF
THIS PRODUCT, OR ARISING OUT OF ANY BREACH OF THIS WARRANTY.
ALL EXPRESS AND IMPLIED WARRANTIES, INCLUDING THE WARRANTIES
OD MERCHANT-ABILITY AND FITNESS FOR PARTICULAR PURPOSE, ARE
LIMITED TO THE WARRANTY PERIOD SET FORTH ABOVE.
Some states do not allow the exclusion of incidental or consequential damages
or limitations on how long an implied warranty lasts, so these limitations or
exclusions may not apply to you. This warranty gives you specific legal rights and
you may also have other rights which vary from state to state.
CAVS USA Inc.
10707 Fulton Wells Ave Santa Fe Springs, CA 90670
REFURBISHED PRODUCTS CARRY A SEPARATE WARRANTY, THIS
WARRANTY DOES NOT APPLY. FOR DETAILS OF REFURBISHED PRODUCT
WARRANTY, PLEASE REFER TO THE REFURBISHED PRODUCT WARRANTY
INFORMATION PACKAGED WITH EACH REFURBISHED PRODUCT.
For customer use :
Enter below the Model No. which is located either on the rear, bottom or side
of the cabinet. Retain this information for future reference.
50
Model.:
Serial No.:
Purchase data :
Name of dealer :