1
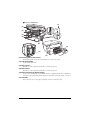
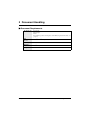
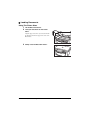
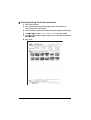
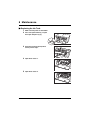
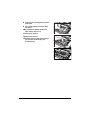
Quick Start Guide
Canon U.S.A., Inc.
One Canon Plaza, Lake Success, NY 11042, U.S.A.
Canon Inc.
30-2, Shimomaruko 3-chome, Ohta-ku, Tokyo 146-8501, Japan
Canon Australia Pty. Ltd.
1 Thomas Holt Drive, North Ryde, Sydney, N.S.W. 2113, Australia
Quick Start Guide
Canon Singapore Pte. Ltd.
1 Harbour Front Avenue #04-01 Keppel Bay Tower, Singapore 098632
Table of Contents
Introduction
14
Document Handling
20
Paper Handling
22
Copying
25
Photo Printing From Film
27
Printing From a Memory Card
30
Photo Printing Directly From A Digital Camera
34
Maintenance
35
The following ink tanks are compatible with this printer.
For details on ink tank replacement, refer to “Maintenance” in this guide.
HT7-0222-000-V.1.0
©CANON INC.2004
PRINTED IN CHINA
ENG
HT7-0222-000-V.1.0
Canon MP760 Quick Start Guide
Copyright
This manual is copyrighted by Canon U.S.A., Inc. with all rights reserved.
Under the copyright laws, this manual may not be reproduced in any form, in whole or in
part, without the prior written consent of Canon U.S.A., Inc.
© 2004 Canon U.S.A., Inc.
Disclaimer
Canon U.S.A., Inc. has reviewed this manual thoroughly in order that it will be an
easy-to-use guide to your Canon MP760 Series. All statements, technical information and
recommendations in this manual and in any guides or related documents are believed
reliable, but the accuracy and completeness thereof are not guaranteed or warranted, and
they are not intended to be, nor should they be understood to be, representation or
warranties concerning the products described.
Specifications are subject to change without notice.
As an ENERGY STAR partner, Canon U.S.A., Inc., has
determined that this product meets the ENERGY STAR
guidelines for energy efficiency.
All information regarding non-Canon products was compiled from publicly available
information. No representation is made regarding the accuracy thereof.
This machine supports Exif 2.2 (also called “Exif Print”).
Exif Print is a standard for enhancing the communication
between digital cameras and printers.
By connecting to an Exif Print-compliant digital camera, the
camera’s image data at the time of shooting is used and
optimized, yielding extremely high quality prints.
X Maintaining The Print Head
Cleaning The Print Head
1 Press [Menu].
2 Use [W] or [X] to select <Maintenance/Settings>, then press [OK].
3 Use [W] or [X] to select <Maintenance>, then press [OK].
4 Use [S] or [T] to select <Print Head Cleaning> or <Head Deep
Cleaning> as necessary, then select <Yes>.
5
Press [OK].
Aligning The Print Head Automatically
1 Press [Menu].
2 Use [W] or [X] to select <Maintenance/Settings>, then press [OK].
3 Use [W] or [X] to select <Maintenance>, then press [OK].
4 Press [Feed Switch] to select the Auto Sheet Feeder.
5 Load a few sheets of A4- or letter-size blank paper in the Auto Sheet
Feeder.
6
Use [S] or [T] to select <Auto Head Align>, select <Yes>, then press
[OK].
7
The pattern is printed.
Trademarks
• Canon, BCI and ScanGear are registered trademarks and PIXMA is a trademark of
Canon Inc. in the United States and may also be registered trademarks or trademarks in
other countries.
• Microsoft® and Windows® are registered trademarks of Microsoft Corporation in the
U.S. and other countries.
• Macintosh, Mac and the Mac logo are registered trademarks of Apple Computer, Inc.,
registered in the U.S. and other countries.
• CompactFlash™ is a trademark of SanDisk Corporation.
• MEMORY STICK® is a registered trademark of Sony Corporation.
• SmartMedia™ is a trademark of Toshiba Corporation.
• Microdrive™ is a trademark of International Business Machines Corporation.
• MultiMediaCard™ is a trademark of the MultiMediaCard Association.
• xD-Picture Card™ is a trademark of Fuji Photo Film Corporation.
• SD Secure Digital™ is a trademark of Toshiba Corporation.
• All other product and brand names are registered trademarks or trademarks of their
respective owners.
1
Chapter 8
Maintenance
38
X How To Use The Documentation Provided
Easy Setup Instructions (Printed documentation):
Be sure to read this sheet first.
This sheet includes instructions for setting up your machine and getting it ready for use.
User’s Guide (Electronic documentation):
Read this guide when starting to use the machine.
After following instructions in the Easy Setup Instructions, read this guide for instructions
on printing from your computer, direct photo printing from selected digital cameras,
copying, and scanning. This guide is included as an HTML file on the Setup CD-ROM.
To read this manual, click the icon appeared on your computer after installing the drivers.
This guide contains the following information:
• Becoming Familiar With The Software
• Document Handling
• Printing From Your Computer
• Paper Handling
• Maintenance
• Copying
• Troubleshooting
• Photo Printing From Film
• Printing From a Memory Card
• Photo Printing Directly
From A Digital Camera
Software Guide (Electronic documentation):
This guide is available on the Setup CD-ROM.
Refer to this guide for full instructions on printing and scanning from your computer. This
guide, also included as an HTML file on the Setup CD-ROM, describes each function in
detail, as well as the methods of using the MP Drivers, MP Navigator. To read this manual,
see the User’s Guide.
This guide contains the following information:
• Printing
• Scanning
• MP Navigator
• Advanced scanning
Photo Application Guide (Electronic documentation):
This guide is available on the Setup CD-ROM.
This guide describes the utility software on the Setup CD-ROM, such as Easy-PhotoPrint
and Easy-WebPrint, including instructions on how to scan data, various printing methods,
and function details. Like the User’s Guide, this guide is included on the Setup CD-ROM.
To read this manual, see the User’s Guide.
2
X How To Read The HTML Manuals
Various Web browsers are available for seeing HTML view and therefore the same text
or image may appear different depending on the browser you use. The HTML manuals
have been prepared on the assumption that it would be displayed and read under the
following conditions:
For Windows:
• Web browser: Microsoft® Internet Explorer 5.0 or later
• Web browser screen: Full screen
• Resolution of display (Desktop): 800 × 600 pixels or above
• Color amount of display: 16 bit or more
For Macintosh:
• Web browser: Microsoft® Internet Explorer 5.0 or later, Safari 1.0 or later
• Web browser screen: Full screen
• Resolution of display (Desktop): 800 × 600 pixels or above
• Color amount of display: 32,000 or more
• We recommend you use Safari as your browser to view the HTML manuals on
Macintosh. If you don’t have Safari, download it on Apple Computer Inc.’s homepage
and install it.
X Reading The Document
Symbols Used In This Guide
WARNING
Indicates a warning concerning operations that may lead to death or
injury to persons if not performed correctly. In order to use the machine
safely, always pay attention to these warnings.
CAUTION
Indicates a caution concerning operations that may lead to injury to
persons or damage to property if not performed correctly. In order to use
the machine safely, always pay attention to these cautions.
Indicates notes for operation or additional explanations. Reading these is
highly recommended.
(See page nn)
Indicates a page number where additional information can be found.
z (Operation branch title)
Used for an operation that can be performed in branch procedures.
1. (Operation branch-step) Used to explain each operation of a branch procedure.
3
Buttons Used In This Guide
[button name]
Text enclosed in these brackets indicates a button on the Operation Panel of the
machine or an item on the computer to be manipulated.
Example: [Color]
<message>
Text enclosed in these brackets indicates a message or selectable menu item
which appears on the LCD (Liquid Crystal Display).
Example: <PHOTO PAPER PRO>, <OFF>
Terms Used In This Guide
machine
General term used to represent MP760.
default
A setting that remains in effect unless you change it.
documents
The original sheets of paper, pages of a book, or photographs you copy, or scan
with the machine.
paper
Paper on which you can print with the machine.
menu
A list of settings from which you select an item to set up or change. A menu has
a title which appears on the LCD.
X Selecting The Language For The LCD
1 Press [Menu].
2 Use [W] or [X] to select <Maintenance/Settings>, then press [OK].
3 Use [W] or [X] to select <Machine Settings>, then press [OK].
4 Use [S] or [T] to select <Languages Selection>, then press [OK].
5 Use [S] or [T] to select the language, then press [OK].
4
X Safety Information
Please read the safety warnings and cautions provided in this guide to ensure that you use
your machine safely. Do not attempt to use the machine in any way not described in this
guide. For detailed safety information, see the User’s Guide.
WARNING
You may cause an electric shock/fire or damage the machine if you ignore any of
these safety precautions.
z Location
• Do not place the machine close to flammable solvents such as alcohol or thinners.
z Power supply
• Never attempt to plug or unplug the machine from the power supply when your hands
are wet.
• Always push the plug all the way into the power outlet.
• Never damage, modify, stretch or excessively bend or twist the power cord. Do not
place heavy objects on the power cord.
• Never plug the machine into a power socket that is shared with other equipment
(extension lead/cord, 2- or 3-way adapter, etc.).
• Never use the machine if the power cord is bundled or knotted.
• If you detect smoke, unusual smells or strange noises around the machine, immediately
unplug the machine at the power supply and contact the Canon Customer Care Center
at 800-828-4040.
Using the machine in such conditions may result in fire or electrical shock.
• Periodically, unplug the machine and use a dry cloth to wipe off any dust or dirt
collected on the plug and the power outlet.
If the machine is placed at a location exposed to a lot of dust, smoke, or high humidity,
the dust collected on the plug absorbs moisture and may cause insulation failure and
fire.
5
z Maintenance
• Use a damp cloth to clean the machine. Never use flammable solvents such as alcohol,
benzene or thinners. If flammable solvents come in contact with electrical components
inside the machine, it could cause a fire or electrical shock.
• Always turn OFF the power and unplug the machine from the power outlet before
cleaning the machine. If you leave on or accidentally switch the machine ON while
cleaning it, it may result in injury or damage the machine.
z Handling
• Do not attempt to disassemble or modify the machine. There are no user serviceable
parts inside the machine.
The machine contains high-voltage components. Never attempt any maintenance
procedure not described in this guide. Incorrect maintenance procedures may damage
the machine, or cause a fire or electrical shock.
• Do not use flammable sprays near the machine.
This could cause a fire or electrical shock if the spray comes into contact with electrical
components inside the machine.
z Others
• This product emits low level magnetic flux. If you use a cardiac pacemaker and feel
abnormalities, please move away from this product and consult your doctor.
• When setting the machine near electric products with fluorescent lighting, separate the
machine at least 5 7/8 inches (15 cm) from electric products equipped with fluorescent
lighting. If you place it near to them, the machine may malfunction as a result of the
noise emitted by the fluorescent lighting.
• When turning OFF the power, be sure to press [ON/OFF] and confirm that the Alarm
Lamp has shut off. If you pull the power plug out of the wall outlet while the Alarm
Lamp is lit or flashing, the print head is not protected, and you may not be able to print
later.
6
CAUTION
You may cause injury or damage the machine if you ignore any of these safety
precautions.
z Location
• Place the machine on a flat, stable, vibration-free surface that is strong enough to
support its weight.
• Do not install the machine in a location that is very humid or dusty, in direct sunlight,
outdoors, or close to a heating source. Installing in such a location may result in fire or
electrical shock. To avoid the risk of fire or electrical shocks, install the machine in a
location with an ambient temperature range of 41°F to 90.5°F (5°C to 32.5°C) and
humidity of 10% to 90% (condensation free).
• Do not place the machine on a thick rug or carpet. If fibers or dust come inside the
machine, it could cause a fire.
z Power supply
• Never remove the plug by pulling on the cord.
Pulling on the power cord may damage the cord and cause a fire or electrical shock.
• Do not use an extension cord as this may result in fire or electrical shock.
• Ensure that the area around the power outlet is kept clear at all times so you can easily
unplug the power cord if necessary. Otherwise you will be unable to disconnect the
power plug in case of an emergency.
• Never use a power supply source other than the one rated for the machine in the country
where you purchased the machine as it may result in fire or electrical shock.
The operating requirement of this machine is as follows:
110-127V AC, 50/60 Hz or 200-240V AC, 50/60 Hz (depending on local electrical
requirements)
• The socket-outlet shall be installed near the equipment and shall be easily accessible.
7
z Handling
• Close the Document Cover gently to avoid catching your hand. Failing to do so may
result in personal injury.
• Do not press down hard on the Document Cover when using the Platen Glass to scan
thick books. This may damage the Platen Glass and Document Cover, and/or result in
personal injury.
• When moving the machine, carry the machine at both ends.
• Do not insert your hands into the machine while it is printing. Parts inside the machine
are moving and this may result in injury.
• Do not turn the machine upside down. Ink may leak out and stain clothing or the
surrounding area.
z Print head/Ink tanks
• For safety reasons, store print heads and ink tanks out of the reach of small children. If
a child ingests any ink, consult a doctor immediately.
• Do not shake print heads or ink tanks. Ink may leak out and stain clothing or the
surrounding area.
• Never touch the print head.
X Legal Limitations On Use Of Your Product And Use Of
Images
It may be unlawful to make copies of, scan, print or use reproductions of the following
documents. The list provided is non-exhaustive. When in doubt, check with a legal
representative in your jurisdiction.
.
• Paper money
• Money orders
• Certificates of deposit
• Postage stamps (canceled or uncanceled)
• Identifying badges or insignias
• Selective service or draft papers
• Checks or drafts issued by governmental
agencies
• Motor vehicle licenses and certificates of
title
• Traveler’s checks
• Food stamps
• Passports
• Immigration papers
• Internal revenue stamps (canceled or
uncanceled)
• Bonds or other certificates of
indebtedness
• Stock certificates
• Copyrighted works/works of art without
permission of copyright owner
8
X Users In The U.S.A.
FCC Notice
PIXMA MP760: H12460
This device complies with Part 15 of the FCC Rules. Operation is subject to the following
two conditions:
(1)This device may not cause harmful interference, and
(2)this device must accept any interference received, including interference that may
cause undesired operation.
This equipment has been tested and found to comply with the limits for a class B digital
device, pursuant to Part 15 of the FCC Rules. These limits are designed to provide
reasonable protection against harmful interference in a residential installation. This
equipment generates, uses and can radiate radio frequency energy and, if not installed and
used in accordance with the instructions, may cause harmful interference to radio
communications. However, there is no guarantee that interference will not occur in a
particular installation. If this equipment does cause harmful interference to radio or
television reception, which can be determined by turning the equipment off and on, the
user is encouraged to try to correct the interference by one or more of the following
measures:
– Reorient or relocate the receiving antenna.
– Increase the separation between the equipment and receiver.
– Connect the equipment into an outlet on a circuit different from that to which the
receiver is connected.
– Consult the dealer or an experienced radio/TV technician for help.
Use of shielded cable is required to comply with class B limits in Subpart B of Part 15 of
the FCC Rules.
WARNING
• Do not make any changes or modifications to the equipment unless otherwise specified in this
guide. If such changes or modifications should be made, you could be required to stop
operation of the equipment.
Mercury Legislation
Hg LAMP(S) INSIDE THIS PRODUCT CONTAIN MERCURY AND MUST BE
RECYCLED OR DISPOSED OF ACCORDING TO LOCAL, STATE OR FEDERAL
LAWS
Canon U.S.A. Inc.
One Canon Plaza, Lake Success, NY 11042, U.S.A.
TEL No. (516) 328-5600
9
Canon U.S.A., INC. LIMITED WARRANTY
The limited warranty set forth below is given by Canon U.S.A., Inc. (“Canon USA”) with
respect to the new or refurbished Canon-brand product (“Product”) packaged with this
limited warranty, when purchased and used in the United States only.
The Product is warranted against defects in materials and workmanship under normal use
and service (a) for a period of one (1) year from the date of original purchase when
delivered to you in new condition in its original container or (b) for 90 days from the date
of original purchase for refurbished Products. Defective parts or a defective Product
returned to a Canon USA repair facility or a Canon USA Authorized Service Facility
(“ASF”), and proven to be defective upon inspection, will be repaired, exchanged for new
or comparable rebuilt parts, or exchanged for a refurbished Product, as determined by the
Canon USA repair facility or the ASF. Warranty repair or replacement shall not extend
the original warranty period of the Product. A dated proof of purchase is required at the
time of warranty service. A copy of your dated bill of sale will satisfy this requirement.
This warranty does not cover any accessories, or any consumables, such as paper or ink
cartridges, as to which there shall be no warranty or replacement.
This limited warranty shall only apply if the Product is used in conjunction with
compatible computers, peripheral equipment and software. Canon USA shall have no
responsibility for such items except for compatible Canon brand peripheral equipment
covered by a separate warranty (“Separate Warranty”). Repairs of such Canon brand
peripheral equipment shall be governed by the terms of the Separate Warranty.
Non-Canon brand equipment and software that may be distributed with the Product are
sold “as is” and without warranty of any kind by Canon USA, including any implied
warranty regarding merchantability or fitness for a particular purpose, and all such
warranties are disclaimed. The sole warranty, if any, with respect to such non-Canon
brand items is given by the manufacturer or producer thereof.
This limited warranty covers all defects encountered in normal use of the Product and
does not apply in the following cases:
(a) Loss of or damage to the Product due to abuse, neglect, mishandling, improper
packaging by you, alteration, accident, electrical current fluctuations, improper use,
failure to follow operating or maintenance instructions in, or environmental
conditions prescribed in, Canon USA’s User’s manual or other documentation, or
services performed by someone other than a Canon USA repair facility or ASF.
Without limiting the foregoing, dropping the Product, scratches, and abrasions will
be presumed to have resulted from misuse, abuse or failure to operate the Product as
set forth in the User’s manual or other documentation for the Product.
(b) Use of parts or supplies (other than those sold by Canon USA) that cause damage to
the Product or cause abnormally frequent service calls or service problems.
(c) If the Product has had its serial number or dating defaced, altered or removed.
10
ANY SYSTEM SOFTWARE (WHETHER FACTORY LOADED ON THE PRODUCT
OR CONTAINED ON THE SOFTWARE DISKETTES OR CD-ROMS ENCLOSED
WITH, OR ACCOMPANYING, THE PRODUCT), AND ANY UTILITY SOFTWARE,
DISTRIBUTED WITH OR FOR THE PRODUCT, IS SOLD "AS IS" AND WITHOUT
WARRANTY BY CANON USA. THE SOLE WARRANTY WITH RESPECT TO
SUCH SOFTWARE IS CONTAINED IN THE SOFTWARE MANUFACTURER'S
LICENSE AGREEMENT DISTRIBUTED THEREWITH, INCLUDING ANY
LIMITATIONS AND DISCLAIMERS THEREON. PLEASE CONTACT CANON
USA IMMEDIATELY IF YOU HAVE NOT RECEIVED A COPY OF THE
SOFTWARE MANUFACTURER'S LICENSE AGREEMENT.
NO IMPLIED WARRANTY, INCLUDING ANY IMPLIED WARRANTY OF
MERCHANTABILITY OR FITNESS FOR A PARTICULAR PURPOSE, APPLIES TO
THE PRODUCT AFTER THE APPLICABLE PERIOD OF THE EXPRESS LIMITED
WARRANTY STATED ABOVE, AND NO OTHER EXPRESS WARRANTY OR
GUARANTY, EXCEPT AS MENTIONED ABOVE, GIVEN BY ANY PERSON OR
ENTITY WITH RESPECT TO THE PRODUCT SHALL BIND CANON USA, OR ITS
ASF. (SOME STATES DO NOT ALLOW LIMITATIONS ON HOW LONG AN
IMPLIED WARRANTY LASTS, SO THE ABOVE LIMITATION MAY NOT APPLY
TO YOU.) CANON USA SHALL NOT BE LIABLE FOR LOSS OF REVENUES OR
PROFITS, INCONVENIENCE, EXPENSE FOR SUBSTITUTE EQUIPMENT OR
SERVICE, STORAGE CHARGES, LOSS OR CORRUPTION OF DATA, OR ANY
OTHER SPECIAL, INCIDENTAL OR CONSEQUENTIAL DAMAGES CAUSED BY
THE USE, MISUSE, OR INABILITY TO USE THE PRODUCT REGARDLESS OF
THE LEGAL THEORY ON WHICH THE CLAIM IS BASED, AND EVEN IF CANON
USA OR ITS ASF HAS BEEN ADVISED OF THE POSSIBILITY OF SUCH
DAMAGES. NOR SHALL RECOVERY OF ANY KIND AGAINST CANON USA OR
ITS ASF BE GREATER IN AMOUNT THAN THE PURCHASE PRICE OF THE
PRODUCT CAUSING THE ALLEGED DAMAGE. WITHOUT LIMITING THE
FOREGOING, YOU ASSUME ALL RISK AND LIABILITY FOR LOSS, DAMAGE
OR INJURY TO YOU AND YOUR PROPERTY AND TO OTHERS AND THEIR
PROPERTY ARISING OUT OF THE POSSESSION, USE, MISUSE, OR INABILITY
TO USE THE PRODUCT SOLD BY CANON USA NOT CAUSED SOLELY AND
DIRECTLY BY THE NEGLIGENCE OF CANON USA, OR ITS ASF. (SOME
STATES DO NOT ALLOW THE EXCLUSION OR LIMITATION OF INCIDENTAL
OR CONSEQUENTIAL DAMAGES, SO THE ABOVE EXCLUSION OR
LIMITATION MAY NOT APPLY TO YOU.) THIS LIMITED WARRANTY SHALL
NOT EXTEND TO ANYONE OTHER THAN THE ORIGINAL PURCHASER OF
THE PRODUCT OR THE PERSON FOR WHOM IT WAS PURCHASED AS A GIFT,
AND STATES YOUR EXCLUSIVE REMEDY.
11
Canon USA offers a range of customer technical support* options:
• Interactive troubleshooting, e-mail technical support, the latest driver downloads and
answers to frequently asked questions (www.canontechsupport.com)
• Toll-free live technical support Monday-Saturday (excluding holidays) at
1-800-828-4040
• Telephone Device for the Deaf (TDD-1-866-251-3752)
• Repair or Exchange Service Options:
In the event service is required for the Product during the limited warranty period,
Canon USA offers two hardware support options:
Authorized Service Facility Carry-In / Mail-In Service
Canon USA’s Carry-In/Mail-In Service provides repair or exchange, at Canon USA’s
option, through Canon USA’s Authorized Service Facility (ASF) network. The name
and telephone number of the ASF(s) near you may be obtained from Canon USA’s
Web site at: www.canontechsupport.com or by calling the Canon USA Customer Care
Center at 1-800-828-4040, or any time while speaking to a technical support person. A
Product covered by this limited warranty will be repaired or exchanged, as determined
by Canon USA, and returned without charge by the ASF.
InstantExchange Service **
Under Canon USA’s InstantExchange Service you may exchange an eligible defective
Product during the limited warranty period for a new or refurbished Product, at Canon
USA’s option. This Service is available in the continental Unites States, Alaska and
Hawaii and is utilized by calling Canon USA’s Customer Care Center at
1-800-828-4040 8 a.m. to midnight Monday through Friday and 10 a.m. to 8 p.m.
Saturday (except holidays). The foregoing times are subject to change in Canon USA’s
sole discretion. If your call is completed by 3pm Eastern Time, Canon USA’s repair
facility will, at its expense, ship out the replacement product the same day, via
overnight courier, for delivery the following business day (second business day in
Alaska and Hawaii).
A further explanation of the service/support options is available at the time of your call
to the live technical support number(s) above or via the website at
www.canontechsupport.com. Please note that under the InstantExchange program, a
replacement product will be provided to you prior to your return of the defective product.
Since the defective product becomes the property of Canon USA at the time of the
exchange, the defective product must be returned in the shipping materials provided. If
the defective product is not returned, as directed, you will be responsible for the value of
the replacement product, for which Canon USA may invoice you.
12
This limited warranty gives you specific legal rights, and you may also have other rights,
which vary from state to state.
* Support program specifics are subject to change without notice.
**InstantExchange warranty service is subject to the availability of refurbished or new replacement
units.
Canon U.S.A., Inc.
One Canon Plaza
Lake Success, NY 11042
USA
Canon is a registered trademark of Canon Inc. in the United States and may also be a
registered trademark or trademarks in other countries.
13
1 Introduction
X Main Components And Their Functions
Machine
z Front
(1)
(2)
(3)
(8)
(7)
(6)
(9)
(4)
(5)
(11)
(10)
(1) Document Cover
Covers the Platen Glass. Open this cover when loading a document on the Platen Glass.
(2) Paper Support
Supports paper loaded on the tray. Extend it before loading paper by putting your finger in the
rounded indent and pulling out the extension until it stops.
(3) Auto Sheet Feeder
Load paper here with the side to print onto facing up. Automatically feeds one sheet at a time.
Chapter 1
Introduction
14
(4) Card Slot Cover
Open to insert a memory card or card adapter.
(5) Paper Output Tray
Printouts are output to this tray.
(6) Scanning Unit Lever
Pull forward to open the Scanning Unit (Printer Cover).
(7) Operation Panel
Displays the operating status of the machine. It is also used to change or check the settings of each
function. For details, see page 18.
(8) FAU (Film Adapter Unit) Protective Sheet
Protects the FAU (Film Adapter Unit) and the Platen Glass. The film guides used for scanning in
film are stored at the rear. Remove when performing Film Direct Print. Always attach this cover
when copying or scanning.
(9) Platen Glass
Used to load a document to be processed.
(10) Cassette
Load paper here with the side to print onto facing down.
(11) Open Button
Press this button to open the Paper Output Tray.
15
Introduction
Chapter 1
z Rear View and Interior
(17)
(12)
(18)
(13)
(14)
(15)
(16)
(19)
(22)
(20)
(21)
(12) Scanning Unit (Printer Cover)
Lift this unit until it locks into place when Inner Cover 2 needs to be opened.
(13) Print Head Holder
Used to install a print head.
(14) Inner Cover 2
Open this cover when replacing the ink tanks, or clearing a paper jam.
(15) Inner Cover 1
Open this cover when replacing the ink tanks, or clearing a paper jam.
(16) Direct Print Port (for digital camera)
Used to connect a PictBridge- or Canon Bubble Jet Direct-compatible digital camera or digital video
camcorder to the machine when printing images directly from the camera. For details, see page 34.
(17) Card Slot
Insert a memory card or a card adapter containing a memory card into these slots.
Chapter 1
Introduction
16
(18) Access Lamp
Lights when a memory card is inserted into the Card Slot. This lamp flashes while the machine is
reading or writing data from/to the memory card.
(19) Power Connector
Used to connect the power cord to the machine.
(20) Rear Cover
Open when clearing jammed paper.
(21) USB Connector (for computer)
Used to connect the machine to a computer for scanning, printing, and other operations.
(22) Duplexing Transport Unit
Open when clearing jammed paper.
17
Introduction
Chapter 1
Operation Panel
This section describes the buttons on the Operation Panel, and their functions and locations.
(11)(12)(13)(14)
(1) (2) (3) (4) (5)
(6) (7) (8) (9)
(10)
(15)
(16) (17)(18)
(19) (20)
(1) Alarm Lamp
Flashes when the machine is turned ON or OFF, when an error occurs, or when paper or ink has run
out.
(2) [COPY]
Switches the machine to Copy mode.
(3) [SCAN]
Switches the machine to Scan mode. This button is used when the machine is connected to a
computer.
(4) [FILM]
Switches the machine to Film Direct Print mode.
(5) [PHOTO]
Switches the machine to Photo mode.
(6) [Feed Switch]
Selects the paper source. The lamp of the currently selected paper source lights. The upper lamp
lights when the Auto Sheet Feeder is selected. The lower lamp lights when the Cassette is selected.
(7) [Two-Sided]
Selects two-sided copying.
(8) [Photo Index Sheet]
Switches to Photo Index Sheet mode.
Chapter 1
Introduction
18
(9) [Slide Show]
Select to automatically display the images on a memory card in sequence.
(10) LCD (Liquid Crystal Display)
Displays messages, menu selections, and the operation status.
(11) [Menu]
Accesses the settings to customize operation of your machine.
(12) [OK]
Selects items in menus, and confirms selections. Restores the machine to normal operation if there
is an error while printing or if paper jams.
(13) [S] [T] [W] [X]
Scroll through menu selections, and increase or decrease the number of copies. You can use these
buttons when [S], [T], [W], and [X] are displayed on the LCD.
(14) [Settings]
Use to configure the paper size, media type, and image correction settings.
(15) [Trimming]
Use to crop the photo that is displayed.
(16) [Search]
Use to search for photos on a memory card by date.
(17) [Stop/Reset]
Cancels operations and returns the machine to the previous screen.
(18) [Black]
Starts black & white copying, or photo printing.
(19) [Color]
Starts color copying, or photo printing.
(20) [ON/OFF]
Turns the machine ON and OFF. Before turning ON the machine, make sure the Document Cover is
closed.
19
Introduction
Chapter 1
2 Document Handling
X Document Requirements
Document type • Documents
• Photographs
• Book
* For details on positive and negative 35 mm film strip and 35 mm slides, see
page 27.
Size
(W × L)
Max. 8 1/2 × 11 3/4 in. (216 × 297 mm)
Quantity
1 sheet
Thickness
Max. 3/4 in. (20 mm)
Weight
—
Chapter 2
Document Handling
20
X Loading Documents
Using The Platen Glass
1 Lift the Document Cover.
2 Load your document on the Platen
Glass.
Align the upper left corner of your document with
the alignment mark on the upper left corner of the
Platen Glass.
3
21
Gently close the Document Cover.
Document Handling
Chapter 2
3 Paper Handling
X Recommended Paper And Requirements
Media Type
Load Limit
Auto Sheet Feeder
Cassette
Plain paper
Approx. 150 sheets
(17 lbs or 64 g/m2)
Approx. 150 sheets
(17 lbs or 64 g/m2)
Envelopes
Approx. 10 envelopes
Approx. 5 envelopes
Super White Paper
Less than 1/2 in. (13 mm) thick
Less than 1/2 in. (13 mm) thick
High Resolution Paper
Approx. 80 sheets
Approx. 80 sheets
Glossy Photo Paper
10 sheets (A4/Letter),
20 sheets (4" × 6"/Credit Card)
10 sheets (A4/Letter),
20 sheets (4" × 6")
Matte Photo Paper
10 sheets
10 sheets
Photo Paper Plus Glossy
10 sheets (A4/Letter/5" × 7"),
20 sheets (4" × 6")
10 sheets (A4/Letter/5" × 7"),
20 sheets (4" × 6")
Photo Paper Plus Double Sided
10 sheets (A4/Letter/5" × 7")
10 sheets (A4/Letter/5" × 7")
Photo Paper Plus Semi-Gloss
10 sheets (A4/Letter),
20 sheets (4" × 6")
10 sheets (A4/Letter),
20 sheets (4" × 6")
Photo Paper Pro
10 sheets (A4/Letter),
20 sheets (4" × 6")
10 sheets (A4/Letter),
20 sheets (4" × 6")
Transparencies
30 sheets
30 sheets
T-Shirt Transfers
1 sheet
1 sheet
Photo Stickers
1 sheet
Not available
Chapter 3
Paper Handling
22
X Auto Sheet Feeder And Cassette
Paper can be loaded into the machine at two locations: the Auto Sheet Feeder at the rear,
and the Cassette at the front. To switch the paper source, press [Feed Switch]. The
selected feeder is indicated on the Operation Panel.
Loading Paper In The Auto Sheet Feeder
1 Open the Paper Support (1), then pull
(1)
out the extension (2).
2
Place a stack of paper (print side up)
in the Auto Sheet Feeder (1), and
pinch the bottom of the paper guide
(A) and adjust it to the left side of the
stack (2).
(2)
(1)
(2)
(A)
23
Paper Handling
Chapter 3
Loading Paper In The Cassette
1 Pull out the Cassette towards you.
2
Load the stack of paper into the
Cassette with the print side facing
DOWN (1). Grasp the paper guide (A)
and align it to the left edge of the
paper stack (2). Align the front edge of
the paper stack in the same way (3).
(2)
(1)
(3)
(A)
3
Chapter 3
Load the Cassette into the machine.
Paper Handling
24
4 Copying
X Making Copies
When making color or black & white copies, you can adjust the print resolution and
density. You can also change reduction or enlargement settings. For more information,
see the User’s Guide.
1
2
3
4
Load the document on the Platen Glass.
Press [COPY].
Press [Feed Switch] to select the paper source, then load paper in that
location.
Adjust the settings for your document as necessary.
(4)
(5)
(1)
(2)
(3)
(6)
(1) Paper Size
The paper size selected on the Settings (Copy) screen is displayed.*
(2) Media Type
The media type selected on the Settings (Copy) screen is displayed.*
(3) Quality
The quality (image quality) selected on the Settings (Copy) screen is displayed.*
(4) Copies
Use [S] or [T] to select the number of copies (max. 99 copies).
(5) Density
Pressing [W] decreases the density, and pressing [X] increases the density.
(6) Ink level
The amount of remaining ink is displayed. Information is displayed from left to right
in the order 6BK/3eBK/6Y/6M/6C.*
5
Press [Color] for color copying, or [Black] for black & white copying.
* For more information, see the User’s Guide.
25
Copying
Chapter 4
X Advanced Copy Features
Two-sided copying Copies two document pages to a single sheet of paper. Press [Two-Sided].
2 on 1 copy
Reduces two document pages to fit onto one page.*
Borderless copying Copies color images so that they fill the entire page without borders.*
Repeating an
image on a page
Copies an image multiple times onto a single page.*
Creating Stickers
(Sticker Copy)
Easily makes stickers from 4" x 6" (101.6 mm x 152.4 mm) photos or
graphics.*
Fading Correction Helps to correct the color and scans documents that have faded due to the
Copy
passage of time or other causes.*
* For more information, see the User’s Guide.
Chapter 4
Copying
26
5 Photo Printing From Film
You can scan 35 mm film into the machine. Both film strips (six connected frames per
strip after regular developing) and slides (one frame per mounted slide) are supported. For
more information, see the User’s Guide.
35mm film strip
35mm slide
X Loading The Film
1 Remove the FAU Protective Sheet
from the Document Cover.
(2)
(1)
2
Remove both the film guides for
film strip and slides from the rear of
the FAU Protective Sheet.
3
Mount film in the appropriate film
guide as described below.
(2)
(1)
(2)
(1)
z Mounting a 35 mm Film Strip:
1. On the film guide, open the film holder.
2. Mount the film in the film guide with the
front side (the side showing the correct
image) face down so that the frame order
runs from right to left.
3. Turn the film guide upside down.
27
Photo Printing From Film
Chapter 5
4. With the front side of the film (the side
showing the correct image) face down,
set the film guide on the Platen Glass
and align it with the indentation on the
left.
z Mounting 35 mm Slides:
1. Align the film guide with the indentation
on the left side of the Platen Glass.
2. Mount the slides in the film guide with the
front side (the side showing the correct
image) face down, the frame order
running from left to right, and with the
image upside down. Load the slides in
the landscape orientation, making sure
they are not loose in the film guide.
• Film is scanned in the order illustrated.
35mm film strip
Chapter 5
35mm slide
Photo Printing From Film
28
X Easy Printing (Printing from Film)
Scan images from film into the machine and print them.
1
2
3
4
5
6
7
8
Press [FILM].
Use [W] or [X] to select the type of film you want to scan.
Place the film on the Platen Glass. See page 27.
Press [OK].
Press [Feed Switch] to select the paper source, then load paper in that
location.*
Use [W] or [X] to select a photo, then press [OK].
Use [S] or [T] to select the number of prints.
Press [Color] for color printing, or [Black] for black & white printing.
* To change the paper size and media type, see the User’s Guide.
X Advanced Film Printing Features
Single-photo Print Displays scanned images one at a time and easily prints them out.
Multi-photo Print
Specifies the number of prints to be made for each image.**
Printing All Photo Prints all scanned photos.**
Creating Stickers
(Sticker Print)
Easily makes stickers from scanned film.**
Printing With
Helps to correct the color and scans films that have faded due to the passage
Fading Correction of time or other causes and photos or films with indistinct colors.**
Cropping Images
(Trimming)
Edits images displayed on the LCD by cropping them.**
** For more information, see the User’s Guide.
29
Photo Printing From Film
Chapter 5
6 Printing From a Memory Card
There are several ways you can print photos directly from a memory card.
If ink runs out or a paper jam occurs during printing, the data that was being printed is
cleared after the problem is resolved. Print the photographs again as necessary. For more
information, see the User’s Guide.
X Inserting and Removing Memory Cards
Inserting Memory Cards
1 Make sure the machine is turned on.
2 Insert the memory card or card adapter into the Card Slot.
3 Press [PHOTO].
xD-Picture Card™
(when mounted on a CF card adapter)
CompactFlash™
Microdrive ™
memory card
MultiMediaCard™
Mini SD Card
(When mounted in
special adapter)
SD memory
card
MEMORY STICK®
MEMORY STICK
Duo™
(When mounted in
special adapter)
Chapter 6
SmartMedia™ Card
Printing From a Memory Card
30
Removing Memory Cards
1 Press [ON/OFF] to turn OFF the machine.
2 Remove the memory card from the Card Slot.
X Easy Printing (Printing Photos Displayed on the LCD)
1 Insert a memory card into the Card Slot, then press [PHOTO].
2 Press [Feed Switch] to select the paper source, then load paper in that
location.*
3
4
5
Use [W] or [X] to select a photo, then press [OK].
Use [S] or [T] to specify the number of prints.
Press [Color].
* To change the paper size and media type, see the User’s Guide.
X Advanced Memory Card Printing Features
Single-image Print
Views memory card images one at a time and easily prints.
Multi-image Print
Specifies the number of prints to be made for each photo.**
Creating Stickers (Sticker
Print)
Easily makes stickers from images saved on a memory card.**
Printing All Images
Prints all images saved on the memory card.**
Printing an Index
Prints a list of all the images saved on a memory card.**
DPOF (Digital Print Order
Format) Printing
Prints by automatically applying DPOF settings.**
Viewing Images (Slide Show) Automatically cycles through the images contained on a memory
card in sequence.**
Searching for Photos By
Date (Search)
Displays the photos within the specified date range.**
** For more information, see the User’s Guide.
31
Printing From a Memory Card
Chapter 6
X Printing By Using The Photo Index Sheet
1 Turn on the machine.
2 Press [Feed Switch] to select the paper source, then load A4- or
Letter-size paper in that location.
3
4
5
Insert a memory card into the Card Slot, then press [Photo Index Sheet].
6
Press [OK].
Chapter 6
Use [W] or [X] to select <Print Index Sheet> then press [OK].
Use [W] or [X] to select a range of images you want to generate a Photo
Index Sheet for.
Printing From a Memory Card
32
7
Fill in the appropriate boxes (
) with a dark pencil or a black ink pen
to select the photographs to print and print settings.
8
Load the paper you selected for the Photo Index Sheet in the Auto Sheet
Feeder or Cassette.
9 Place the Photo Index Sheet face-down on the Platen Glass.
10 Press [Photo Index Sheet].
11 Use [W] or [X] to select <Scan/Print photo>.
12 Press [OK].
33
Printing From a Memory Card
Chapter 6
7 Photo Printing Directly From A Digital
Camera
Connecting a PictBridge- or Canon Bubble Jet Direct-compatible digital camera or digital
video camcorder to the MP760 enables you to print captured images directly without
using a computer.
X Connecting To A Digital Camera
1 Turn on the machine.
2 Press [Feed Switch] to select the paper source, then load paper in that
location.
3
4
Make sure the camera is turned off.
Connect the camera to the machine using the USB cable (for connection
to a computer) supplied with the camera.
The digital camera turns itself on automatically when the connection is established. If your
model of camera does not turn itself on automatically, turn it on manually.
5
Chapter 7
You are now ready to print images from the camera.
Photo Printing Directly From A Digital Camera
34
8 Maintenance
X Replacing An Ink Tank
1 Make sure the power is turned ON.
2 Press the Open Button (1) to open
the Paper Output Tray (2).
(1)
35
3
Raise the Scanning Unit (Printer
Cover) until it stops.
4
Open Inner Cover 1.
5
Open Inner Cover 2.
Maintenance
(2)
Chapter 8
6
Press the empty ink tank’s tab (1),
then remove it from the slot (2).
(2)
(1)
7
Chapter 8
Remove the new ink tank from its
packaging, then pull the orange tape
toward the arrow so that the
protective film does not remain on the
air hole (A). Then hold the ink tank as
shown and remove the orange
protective cap (B).
(B)
(A)
Maintenance
36
8
Insert the ink tank diagonally into the
print head.
9
Press down until the ink tank clicks
into place.
10 If you need to replace another ink
tank, repeat steps 6 to 9.
11 Close Inner Cover 2.
12 Close Inner Cover 1.
13 Pull the Scanning Unit Lever towards
you to close the Scanning Unit
(Printer Cover).
37
Maintenance
Chapter 8
Canon MP760 Quick Start Guide
Copyright
This manual is copyrighted by Canon U.S.A., Inc. with all rights reserved.
Under the copyright laws, this manual may not be reproduced in any form, in whole or in
part, without the prior written consent of Canon U.S.A., Inc.
© 2004 Canon U.S.A., Inc.
Disclaimer
Canon U.S.A., Inc. has reviewed this manual thoroughly in order that it will be an
easy-to-use guide to your Canon MP760 Series. All statements, technical information and
recommendations in this manual and in any guides or related documents are believed
reliable, but the accuracy and completeness thereof are not guaranteed or warranted, and
they are not intended to be, nor should they be understood to be, representation or
warranties concerning the products described.
Specifications are subject to change without notice.
As an ENERGY STAR partner, Canon U.S.A., Inc., has
determined that this product meets the ENERGY STAR
guidelines for energy efficiency.
All information regarding non-Canon products was compiled from publicly available
information. No representation is made regarding the accuracy thereof.
This machine supports Exif 2.2 (also called “Exif Print”).
Exif Print is a standard for enhancing the communication
between digital cameras and printers.
By connecting to an Exif Print-compliant digital camera, the
camera’s image data at the time of shooting is used and
optimized, yielding extremely high quality prints.
X Maintaining The Print Head
Cleaning The Print Head
1 Press [Menu].
2 Use [W] or [X] to select <Maintenance/Settings>, then press [OK].
3 Use [W] or [X] to select <Maintenance>, then press [OK].
4 Use [S] or [T] to select <Print Head Cleaning> or <Head Deep
Cleaning> as necessary, then select <Yes>.
5
Press [OK].
Aligning The Print Head Automatically
1 Press [Menu].
2 Use [W] or [X] to select <Maintenance/Settings>, then press [OK].
3 Use [W] or [X] to select <Maintenance>, then press [OK].
4 Press [Feed Switch] to select the Auto Sheet Feeder.
5 Load a few sheets of A4- or letter-size blank paper in the Auto Sheet
Feeder.
6
Use [S] or [T] to select <Auto Head Align>, select <Yes>, then press
[OK].
7
The pattern is printed.
Trademarks
• Canon, BCI and ScanGear are registered trademarks and PIXMA is a trademark of
Canon Inc. in the United States and may also be registered trademarks or trademarks in
other countries.
• Microsoft® and Windows® are registered trademarks of Microsoft Corporation in the
U.S. and other countries.
• Macintosh, Mac and the Mac logo are registered trademarks of Apple Computer, Inc.,
registered in the U.S. and other countries.
• CompactFlash™ is a trademark of SanDisk Corporation.
• MEMORY STICK® is a registered trademark of Sony Corporation.
• SmartMedia™ is a trademark of Toshiba Corporation.
• Microdrive™ is a trademark of International Business Machines Corporation.
• MultiMediaCard™ is a trademark of the MultiMediaCard Association.
• xD-Picture Card™ is a trademark of Fuji Photo Film Corporation.
• SD Secure Digital™ is a trademark of Toshiba Corporation.
• All other product and brand names are registered trademarks or trademarks of their
respective owners.
1
Chapter 8
Maintenance
38
Quick Start Guide
Canon U.S.A., Inc.
One Canon Plaza, Lake Success, NY 11042, U.S.A.
Canon Inc.
30-2, Shimomaruko 3-chome, Ohta-ku, Tokyo 146-8501, Japan
Canon Australia Pty. Ltd.
1 Thomas Holt Drive, North Ryde, Sydney, N.S.W. 2113, Australia
Quick Start Guide
Canon Singapore Pte. Ltd.
1 Harbour Front Avenue #04-01 Keppel Bay Tower, Singapore 098632
Table of Contents
Introduction
14
Document Handling
20
Paper Handling
22
Copying
25
Photo Printing From Film
27
Printing From a Memory Card
30
Photo Printing Directly From A Digital Camera
34
Maintenance
35
The following ink tanks are compatible with this printer.
For details on ink tank replacement, refer to “Maintenance” in this guide.
HT7-0222-000-V.1.0
©CANON INC.2004
PRINTED IN CHINA
ENG
HT7-0222-000-V.1.0