1
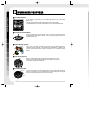
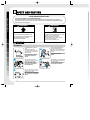
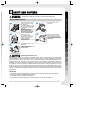
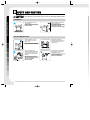
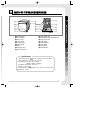
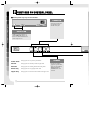
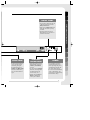
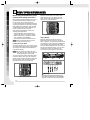
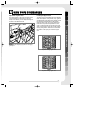
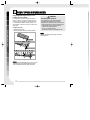
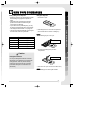
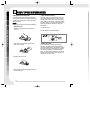
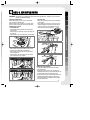
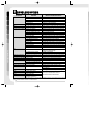
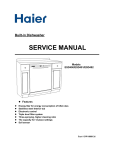
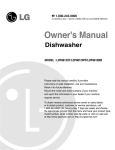
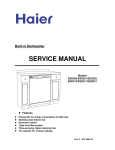
☎ 1-800-243-0000
24 HOURS A DAY, 7 DAYS A WEEK FOR LG CUSTOMER SERVICE
Dishwasher
MODEL: LDF6810ST
DISHWASHER FEATURES
D
ISHWASHER FEATURES
■ Ultra Big Capacity
If you raise the Upper Rack, you can load large dishes in the Lower Rack.
(Max. 14 in.)
The tall tub provides large dishes loading as well as large capacity.
LG dishwashers let you load oversized items in the Lower and Upper Rack.
■ Slim Direct Inverter Motor
Newly introduced Slim Direct Inverter motor is inverter-controlled. Speed is
controlled based on program selection. It also offers high energy efficiency to
minimize energy loss.
■ Hybrid Drying System
Dry
Air
Moist
Air
This is one of the best performance solutions for drying dishes because it
minimizes venting humid air to the outside of the dishwasher. In addition, this
system ensures better drying results compared to the condensing drying
system.
Mixed
Air
■ Vario Spray System
to
Upper
Arm
Because of alternating water spray between the Upper and Lower
Rack, the water pressure allows superior performance and reduced
consumption of water and electricity.
to
Lower
Arm
■ Self Cleaning Filter
Soil Sensor
to Drain
Fine Mesh
2
For best wash results, the self-cleaning filter system continuously cleans the
water as it circulates. Your LG dishwasher has a self-cleaning filter that grinds
food into small particles before it goes down the drain.
C
ONTENTS
PART 2. PARTS OF YOUR DISHWASHER ............................................................................. 7
OPERATING INSTRUCTIONS
PART 3. FUNCTIONS OF CONTROL PANEL ..................................................................... 8~9
PART 4. USING YOUR DISHWASHER .............................................................................10~14
PART 5. CARE & MAINTENANCE ......................................................................................... 15
PART 6. OPERATING SEQUENCE ........................................................................................ 16
PART 7. PROGRAM ................................................................................................................ 17
PART 8. TROUBLESHOOTING ............................................................................................. 18
S
AFETY AND CAUTION
IMPORTANT SAFETY INSTRUCTIONS
Serious injury or death may occur when not observing the following rules.
WARNING - To reduce any risk of electric shock, fire or other personal or property injury when using your
dishwasher, please follow basic precautions, Including the following :
�This manual contains very important notes regarding the installation, use and maintenance of your dishwasher.
�The manufacturer can not be responsible for problems caused by ignoring these safety and caution instructions.
�Read all instructions (manuals) carefully before using the dishwasher.
�Use the dishwasher only for its intended function, or household use.
�Use only detergents or wetting agents recommended for use in a dishwasher and keep them out of the reach of
children.
�The appliance is not intended for use by young children or unqualified persons without supervision.
�When loading items to be washed :
1) locate sharp items so that they are not likely to damage the door seal ; and
2) load sharp knives with the handles up to reduce the risk of cut-type injuries.
�Do not wash plastic items unless they are marked dishwasher safe or the equivalent.
For plastic items not so marked, check the manufacturer’s recommendations.
�Do not touch the heating element during or immediately after use.
�Do not operate your dishwasher unless all enclosure panels are properly in place.
�Do not tamper with controls.
�Do not abuse, sit on, or stand on the door or dish rack of the dishwasher.
�To reduce the risk of injury, do not allow children to play in or on a dishwasher.
�Under certain conditions, hydrogen gas may be produced in a hot-water system that has not been used for two
weeks or more. HYDROGEN GAS IS EXPLOSIVE. If the hot-water system has not been used for such a period,
turn on all hot-water faucets and let the water flow for several minutes. This will release any accumulated hydrogen
gas. As the gas is flammable, do not smoke or use an open flame during this time.
�Remove the door to the washing compartment when disposing of an old dishwasher.
3
SAFETY AND CAUTION
PART 1. SAFETY AND CAUTION ....................................................................................... 3~6
S
AFETY AND CAUTION
SAFETY AND CAUTION
SAVE THESE INSTRUCTIONS
For a permanently connected dishwasher:
This appliance must be connected to a grounded metal, permanent wiring system or an equipmentgrounding conductor must be run with the circuit conductors and connected to the equipment-grounding
terminal or lead on the appliance.
WARNING
Tip Over Hazard
Do not put excessive downward force on the
open door as this could cause damage to the
unit. The dishwasher can be used on
completion of the installation.
WARNING
WARNING
Electrical Shock Hazard
Not following these instructions can result
in death, fire or electrical shock.
Electrically ground dishwasher.
Connect ground wire to green ground
connector in terminal box.
Do not use an extension cord.
Serious injury or death may occur when not observing the following Instructions.
Installation
Your Dishwasher is only for
120V.
Before electrical power
connection, make sure cord is
grounded and connected to a
circuit breaker.
No grounding may cause
breakdowns or electric
shocks.
It may cause electric
shock.
Do not install or store the
dishwasher where it will be
exposed to the weather.
Disassembly or revision should
be conducted by experienced
service persons.
It may cause an electric
shock, fire, malfunctions
and deformation.
It may cause breakdowns,
fire and electric shock.
Do not damage electrical
cable itself or place heavy
objects on the cable.
Electrical cable damage
may cause fire and electric
shock.
4
Do not grasp the electrical
cable or switch with wet
hands. Do not use a damaged
electrical cable, power plug or
socket.
S
AFETY AND CAUTION
WARNING
Serious injury or death may occur when not observing the following rules.
SAFETY AND CAUTION
Use and Maintenance
Do not allow children or pets
to play on the door or inside
the dishwasher.
Do not allow children to hang
on the door because the door
may fling open and they may
be injured.
Don't leave racks out of
dishwasher.
Children may fall off.
Pets or children may be
wounded by rotating parts
or suffocated inside tub.
Do not store or use
combustible materials,
gasoline or other flammable
vapors and liquids in or
around dishwasher.
Keep the dishwasher away
from electric stove, candle
and any inflammable objects.
It may cause melting of some
parts or fire.
It may cause fire.
Do not splash water on to the
dishwasher.
It may cause fire and
electric shock.
CAUTION
concerning the Power Cord
Most appliances should be connected to a dedicated circuit; that is, a single outlet circuit which powers
only that appliance and has no additional outlets or branch circuits. Check the specification page of this
owner's manual to be certain (See page 7). Do not overload wall outlets. Overloaded wall outlets, loose or
damaged wall outlets, extension cords, frayed power cords, or damaged or cracked wire insulation are
dangerous. Any of these conditions could result in electric shock or fire. Periodically examine the cord of
your appliance, and if its appearance indicates damage or deterioration, unplug it, discontinue use of the
appliance, and have the cord replaced with an exact replacement part by an authorized service person.
Protect the power cord from physical or mechanical abuse, such as being twisted, kinked, pinched, closed
in a door, or walked upon. Pay particular attention to plugs, wall outlets, and the point where the cord exits
the appliance.
Child Safety
�Controls may be locked using Child Lock mode to prevent settings from being changed by children.
�Keep children away from detergents and rinse-aids.
�Do not allow children to operate the dishwasher.
�Young children should be supervised to ensure that they do not play with the appliance.
5
S
AFETY AND CAUTION
CAUTION
Injury, malfunction or poor performance may occur when not observing the following instruction.
SAFETY AND CAUTION
Installation
Place dishwasher on even
and solid floor.
After installation, make sure
of hose connection.
Uneven surface may cause
abnormal noise.
Loosened connection may
cause water leakage
leading to property damage.
Use and Maintenance
When dishwasher is not in
use for a long time, close
water valve.
It may cause water leakage.
Use only detergents or
wetting agents recommended
for use in a dishwasher and
keep them out of the reach of
children.
Improper detergents may
cause malfunctions, electric
shock or fire due to
excessive suds.
6
Dishwasher should be
unpacked and moved by 2 or
more persons due to it’s of
heavy weight.
Do not press the button with
sharp edged devices like a
screwdriver or a pin.
It may cause electric
shock or malfunctions.
P
ARTS OF YOUR DISHWASHER
� Lower Spray Arm
� Detergent & Rinse Aid Dispenser
� Vapor Vent Cover
� Upper Rack
� Cutlery Basket
� Lower Rack
� Top Display
� Power Button
Specifications
�Power supply: 120V, 60
AC only, minimum 15A circuit breaker.
�Water Pressure: 20 - 120 psi (140 - 830 kPa)
″X 25″
″X 33 7/8″
″
�Size (WXDXH): 23 7/8″
(606mm X 635mm X 860mm)
�Inlet Water Temperature: 120°F (49℃)
�Weight: 115 Ibs. (52 )
The appearance and specifications are subject to change without
manufacturer’s notice.
7
PARTS OF YOUR DISHWASHER
� Control Panel
� Door Handle
� Front Cover
� Lower Cover
� Leveling Foot
� Side Cabinet
� Base
� Top Spray Arm
� Upper Spray Arm
F
UNCTIONS OF CONTROL PANEL
■ Control panel may vary on some models.
F UNCTIONS OF CONTROL PANEL
PROGRAM
• Press the program that
corresponds to your
desired wash cycle.
INDICATOR
• Child lock: Lamp will turn on
when Child Lock setting is on.
• Rinse Aid: Refill with Rinse aid
when Lamp turns on.
Power Scrub
This program is for very heavily soiled loads
Normal
This program is for normally soiled everyday loads.
Delicate
This program is for washing delicate items like glasses.
Rinse Only
This program is for very lightly soiled loads.
Upper Only
This program is to wash some items loaded on the upper rack.
8
CANCEL
• To cancel a running
program, open the door,
then press and hold the
Power Scrub and
Normal buttons for 3
seconds.
DELAY START
CHILD LOCK
• Lock the control buttons
to prevent the settings
from being changed.
• To lock/unlock, press
Delicate and Rinse Only
buttons simultaneously
for 3 seconds with door
open.
SANITARY/
EXTRA RINSE
• Repeated pressing of the
Rinse button will select
Sanitary, Extra Rinse
or both.
• If you select the Sanitary
function, the temperature
of Heating Rinse can
F (72℃).
reach 161。
• When you select Extra
Rinse, an additional
rinse cycle is added.
FUNCTIONS OF CONTROL PANEL
• If you want to delay the start of
a selected program, press the
Delay Start button.
• Each press of Delay Start will
delay the start of the cycle by
one hour.
• The delay start time can be
adjusted from 1 to 12 hours in
one-hour increment.
POWER
• For operating, press this
button first for power on.
• After operating, the power
automatically switches off
for safety and economy.
• In case of an unusual Power
surge or disturbance, the
power may be automatically
turned off for safety.
9
U
SING YOUR DISHWASHER
Before using the dishwasher, please
read Important Safety Instructions.
USING YOUR DISHWASHER
Water supply temperature should be 120℉ (49℃)
for better washing and reasonable cycle time.
For this reason, use hot water faucet only.
It is also important that the dishwasher is loaded
according to instructions for the effective cleaning.
When loading your dishwasher, make sure that
insoluble items such as bones, toothpicks and
pieces of paper have been removed.
When loading the dishwasher, observe the
following general guidelines;
1. Deep based items should be placed at an
angle to help water run off and dry properly.
2. Remove solid, burnt-on scraps from dishes
prior to loading in the dishwasher.
3. Load only items which are dishwasher safe.
NOTE Please avoid utensils that are non-heat
resistant, metal decorated, etc.
Loading the Lower Rack
This lower rack allows max. 14 in. plates, pans or
any utensils which mean the size of rack is bigger
and is higher than industry standard thanks to
super big tub capacity.
NOTE
Basically the lower rack is not meant to load
small items like cups, wine glasses or small
plates. These items should be loaded on the
upper rack for proper distribution.
12 place setting, lower rack
Cutlery Basket
Racks are designed to hold even the most
delicate items securely in place as well as tall
items. In addition, our extra cutlery and knife rack
has separators to avoid scratching and tarnishing
of your delicate cutlery. Basket can be divided
into three separate baskets which can be used on
both the upper and lower levels. If you only have
a small load of cutlery, the baskets can be
removed leaving extra space for other plates.
Do not obstruct the rotation of the spray
arms. Make sure large items do not prevent
the detergent dispenser from opening.
The lower rack is best loaded with dinner plates,
soup bowls, dishes, pots, pans, lids and even a
grill tray. Plates should be positioned upright and
facing the center of the rack. Pots, pans and
large dishes must be turned upside down.
�
10 place setting, lower rack
10
� �
� �
WARNING
Be careful when loading and unloading sharpedged items. Load sharp knives with the handles
up in order to reduce the risk of cut-type injuries.
U
SING YOUR DISHWASHER
Loading the Upper Rack
The plate supports in the lower and upper racks
can be folded down. Based on the size and
shape of the dishes, you can adjust the angle of
the tines to five different levels.
The upper rack is best loaded with more delicate
items, small plates, cutlery basket, cups, glasses
and dishwasher safe plastic items. Plates should
be positioned upwards with the plate bottom
facing the front of the rack. Cups, glasses and
bowls must be positioned upside down. Extra
cups or cooking utensils can be laid on the fold
down cup racks which may also provide support
for long stem glasses. Take care not to obstruct
the rotation of the spray arm under the upper
rack.
NOTE
Be careful when adjusting angular tines and apply
gentle force.
10 place setting, upper rack
12 place setting, upper rack
11
USING YOUR DISHWASHER
Adjustable angular tines
U
SING YOUR DISHWASHER
Height Adjustable Upper Rack for 14 in.
loading (on some models)
USING YOUR DISHWASHER
LG dishwasher proudly introduces the ability to
load 14 in. dishes. An upper rack that moves up
and down lets you put tall and oversized items on
it. LG dishwashers adjust enough to allow 14 in.
dinner plates on the lower and 12 in. plates on the
upper rack.
To adjust the rack
1. Pull the upper rack out.
2. Reinsert the upper rack in the chosen position.
Caution
Non Dishwasher Safe Items
The combination of high water temperature
and dishwasher detergents may damage
particular items, therefore we do not recommend
using the dishwasher to wash the following items:
�Hand painted silver or gold leaf crockery
�Wood or bone handled utensils
�Iron or non-rustproof utensils
�Plastic items which are not dishwasher safe.
NOTE
Always remove dishes from the upper rack before
removing the rack.
NOTE
After adjusting, check that the spray arm is free to rotate
without being stopped by dishes loaded on the upper
rack. Do not adjust racks when dishes are loaded.
12
U
SING YOUR DISHWASHER
Filling the dispenser
�Detergent must be put into the detergent chamber
before starting every program except the PreWash.
�Please follow the manufacturer's instructions
printed in the manual when determining the
correct amount of detergent.
�If your dishes are only moderately dirty, you may
be able to use less detergent than recommended.
�The detergent chamber holds 1.4 oz (40g) max.
�The amount of detergent depends on the program
and dish loads. Refer to the guide table.
1. Push latch to open.
2. Add detergent to the main wash compartment.
(See the table for the amount of detergent.)
NOTE
Do not add detergent for a rinse cycle.
PROGRAM
AMOUNT OF DETERGENT
Power Scrub
0.9oz (25g)
Normal
0.7oz (20g)
Delicate
0.7oz (20g)
Rinse Only
No detergent
Upper Only
0.7oz (20g)
For main wash
3. If needed, add detergent to pre-wash
compartment.
Caution
Detergent Information
Use only the detergent intended for household
dishwashers or the dishwasher may fill with suds
during operation. Suds may reduce washing
performance and could cause the unit to leak.
(Hand-Wash detergent is not allowed for this
dishwasher.)
For pre-wash
4. Close the cover. (You can hear cover latch click.)
NOTE
Too much detergent can leave a film on dishes.
13
USING YOUR DISHWASHER
Adding detergent to dispenser
U
SING YOUR DISHWASHER
USING YOUR DISHWASHER
Adding Rinse Aid to dispenser
The purpose of rinse aids is to prevent possible
spots on dishes formed from droplets during drying
operation. By removing them, drying performance
will be increased.
NOTE
Only liquid rinse aids can be used for this dishwasher.
�Rinse Aid Amount Setting
The factory setting is at level 3 which is where you
can expect the best performance under a normal
condition. After a cycle is done, if you notice some
spots, streaks or water marks on the dishes, adjust
to a higher setting. If you notice foam present on the
bottom of the glasses or tub bottom, change to a
lower setting.
�Filling Rinse Aid
1. Rotate the round cap counterclockwise and
remove it.
1. Remove the cap.
2. Add a liquid rinse aid to the maximum level.
(Max. 4.8 oz (145ml))
3. Replace and lock the cap.
4. Rinse aid will be automatically dispensed during
the final rinse cycle.
14
2. Rotate adjuster to the desired setting.
�Refilling Rinse Aid
4.8 oz (145ml) is the capacity of the rinse aid
dispenser. The refilling period totally depends on
your washing habits such as the number of washes
per month and which rinse aid setting you adjust to
your washing conditions. The indicator light will
inform you when there is insufficient rinse aid in the
dispenser. The indicator light will stay on when you
close the door to start a cycle.
C
ARE & MAINTENANCE
For best results, it is important to periodically check and care for the filters and spray arms.
WARNING : To prevent any possible injury during care and maintenance / cleaning, be sure to wear
gloves or protective clothing.
Cleaning metallic parts
With a cloth or sponge, you can clean some parts
such as exterior or interior parts.
Stainless steel tub has a tendency to build up cloudy
film on its surface especially when using hard water.
Cleaning Spray Arms
- Lower Spray Arm
�Check that the water jet holes are not blocked by
food particles.
�When cleaning is necessary, remove the Spray arm
by pulling up.
�Clean the spray arm and replace it by pushing down.
- Top Spray Arm
�Make sure the water jet holes are not blocked by
food particles.
�When cleaning is necessary, remove the arm by
disassembling the hook from the bracket which
holds the Top Spray Arm assembly to the tub.
�Clean the spray arm and replace it.
CARE & MAINTENANCE
- Upper Spray Arm
�Pull the upper rack forward. Make sure the water
jet holes are not blocked by food particles.
�When cleaning is necessary, remove the arm by
unscrewing the nut.
�Clean the spray arm and replace it in the reverse
order. Make sure the nut is tight!
Maintenance by seasons
- To prevent possible problems, be sure to follow
procedures below.
- During the summer season If you are absent for
extended periods of time, it is recommended that you
close the water valve and unplug power cord.
- During the winter season, if room temperature where
dishwasher is located is exposed to freezing, it is
recommended that you winterize the water supply
lines and product itself.
15
O
PERATING SEQUENCE
1. Open the door and press the
power button.
Open the door. Press the power button to see
the default setting.
2. Check rinse-aid.
The indicator lights will illuminate if refilling is
necessary.
3. Load the dishes after first
removing any scraps of food.
OPERATING SEQUENCE
Remove any scraps of food in advance. Pull
the lower rack out and load the dishes and
cutlery in and push it all the way back. Pull
the upper rack out and load the cups,
glasses, etc.
4. Ensure that the spray arms can
rotate freely.
5. Measure the detergent.
Add the required amount of detergent into the
dispenser. Close the detergent dispenser lid.
6. Setting the program.
Select desired program and options.
Before starting, the display window will show
the estimated running time of the selected
program.
Remember to load all dishes into the
selected rack.
The estimated remaining time will be
displayed.
If the door is opened during operation, the
dishwasher stops.
Once the door is closed, the program will
restart from the point where it stopped.
16
7. Close the door. The dishwasher
will start automatically.
8. At the end of the Program.
End is displayed on the digital display for a
few seconds and a tone will sound signaling
the program completion. The dishwasher
automatically switches off for safety and
energy savings.
Caution
Empty the lower rack first and then the upper
one, this will avoid water dripping from the
upper rack onto the dishes in the lower one.
Warning
In general, it is not advisable to open the door
while the dishwasher is running. If the door is
opened, a safety device stops the machine.
Care should be taken when opening the door
immediately following the cycle, as steam may
escape.
Auto-Off
When the power is turned on, if you don’t
select program or if you don’t close the door
after selecting a program, your dishwasher will
automatically turn off in 10 minutes.
P
ROGRAM
Program
WASH
Main
Pre-Wash Wash
RINSE
Rinse 1
134~145
Power
Scrub
Rinse 2
Rinse 3
Heating
Rinse
Time
DRY Water
(gal/L)
(min)
154
℃
57~63℃
℃
68℃
113~140
149
Normal
℃
45~60℃
℃
65℃
115~120
154
Delicate
℃
46~49℃
120~140
℃
49~60℃
123~171
4.76~7.9/
18~30
101~135
5.5~7.9/
21~30
103~120
1.3 / 5
14
5.5~7.9/
21~30
103~120
℃
68℃
Rinse
Only
Upper
Only
5.5~9.2/
21~35
149
℃
65℃
Delicate
This program is for very heavily soiled
loads.
This program is for washing delicate
items.
Normal
Rinse Only
This program is for normally soiled
everyday loads.
This program is for very lightly soiled
loads.
Upper Only
This program is to wash items loaded on
the upper rack.
17
PROGRAM
Power Scrub
T
ROUBLESHOOTING
Problem
Causes
Recommended Actions
Dishwasher does not operate
Check the door is completely closed and latched.
Select the desired cycle.
Connect power supply properly.
Check water faucet.
Replace fuse or reset circuit breaker.
Check hot water faucet is connected (Heating water takes it longer).
Operate Quick Wash cycle with detergents without loading dishes.
Straight hose.
Select right cycle based on dish types and soil toughness.
Use hot water faucet.
Use recommended detergents.
Water pressure should range between 20 ~ 120psi.
Clean the arm.
Dishes shouldn’ t interrupt arm rotation and detergent dispensing.
Supplied water temperature should be 120℉ for the best washing performance.
Use the recommended amount of detergent.
Load the proper amount of dishes.
Rearrange dish loading referring to photo at page 10 & 11.
Adjust water pressure between 20 and 120 psi.
Add the recommeded amount of detergent referring to detergent instructions.
Refill the Rinse aid dispenser.
Install home water softener.
Detergent cover opening.
Drainage Sound at the early stage.
Reposition your dishwasher.
Your Dishwasher isn’t horizontal.
Nozzle arm knocks against the dishes.
Reposition your dishes.
Cloudiness on glassware
Combination of excessive detergent and soft water Underload the dishwasher and use a rinse aid to minimize this process.
Black or gray marks on dishes Aluminum items rub dishes during cycle. Remove aluminum markings with a mild cleaner.
Yellow or brown film on inside surfaces Coffee or tea soils
Eliminate the soil by using a stain removal product.
Dishes don’t dry
Rinse agent dispenser empty.
Check and refill the rinse agent if empty.
The lamps don’t illuminate Power is not connected.
Connect power supply.
Fuse is blown out or circuit breaker is tripped.
Replace fuse and repair circuit breaker.
Spray arms don’t rotate smoothly The holes of spray arms is blocked by food particles.
Clean the holes of the spray arms.
Upper rack crooked after loading Rack is poorly adjusted.
Adjust the upper rack properly referring to page 12.
IE Error
Water inlet trouble
Check clogging of water inlet hose (or hose twist or freezing).
Check water supply.
OE Error
Drainage trouble
Check clogging of water drain hose (or twist or freezing).
FE Error
Excessive water supplied
E1 Error
Water leakage trouble
Please call your Authorized Service Center or
HE Error
Heater Circuit Failure
LGE Customer Service at 1-800-243-0000.
TE Error
Thermistor trouble or very high inlet water
temperature. (over 194℉)
TROUBLESHOOTING
Door is not completely closed.
Cycle is not selected.
Power supply is not connected.
Water is not supplied.
Fuse is blown out.
Too long operation
Cold water is supplied.
Odor
Remaining water inside from the last cycle
Water remains after a cycle finishes Drain hose is bent or clogged.
Food Soil remains on dishes Improper cycle selection
Water temperature is low.
Dishwashing detergent was not used.
Low inlet water pressure
Water jet holes of spray arms blocked.
Improper dish loading
Spots and filming on dishes
Low water temperature
Proper detergent amount used
Overloading
Improper loading
Insufficient water pressure
Insufficient detergent
Rinse aid dispenser empty.
Extremly hard water
Noise
This is normal.
If you can’t fix problems with the above actions or you have different problems which are not mentioned in the manual,
please call LGE Customer Service at 1-800-243-0000.
18
W ARRANTY
LG ELECTRONICS, INC.
LG Dishwasher Limited Warranty - USA
Your LG Dishwasher will be repaired or replaced, at LG’s option, if it proves to be defective in material or
workmanship under normal use, during the warranty period (“Warranty Period”) set forth below, effective from the
date (“Date of Purchase”) of original consumer purchase of the product. This warranty is good only to the original
purchaser of the product and effective only when used in the United States, including Alaska, Hawaii and U.S.
Territories.
WARRANTY PERIOD:
HOW SERVICE IS HANDLED:
LABOR: One Year from the Date of Purchase.
In-Home Service: Please retain dealer’s dated bill
of sale or delivery ticket as evidence of the Date of
Purchase for proof of warranty, and submit a copy
of the bill of sale to the service person at the time
warranty service is provided.
PARTS (except as listed below): 2 Years from the Date of
Purchase.
Electronic Control Board: 5 Years from the Date of
Purchase.
Dishwasher Rack: 5 Years from the Date of Purchase.
Stainless Steel Door Liner and Tub: Lifetime (as long
as owned by the original purchaser)
Please call 1-800-243-0000 and choose the
appropriate option to locate your nearest LG
Authorized Service Center.
Replacement Units and Repair Parts may be new or
factory remanufactured.
Or visit our website at : http://www.lgservice.com.
Replacement Units and Repair Parts are warranted for the
remaining portion of the original unit’s warranty period.
THIS WARRANTY IS IN LIEU OF ANY OTHER WARRANTY, EXPRESS OR IMPLIED, INCLUDING WITHOUT
LIMITATION, ANY WARRANTY OF MERCHANTABILITY OR FITNESS FOR A PARTICULAR PURPOSE. TO
THE EXTENT ANY IMPLIED WARRANTY IS REQUIRED BY LAW, IT IS LIMITED IN DURATION TO THE
EXPRESS WARRANTY PERIOD ABOVE. NEITHER THE MANUFACTURER NOR ITS U.S. DISTRIBUTOR
SHALL BE LIABLE FOR ANY INCIDENTAL, CONSEQUENTIAL, INDIRECT, SPECIAL, OR PUNITIVE
DAMAGES OF ANY NATURE, INCLUDING WITHOUT LIMITATION, LOST REVENUES OR PROFITS, OR
ANY OTHER DAMAGE WHETHER BASED IN CONTRACT, TORT, OR OTHERWISE. Some states do not allow
the exclusion or limitation of incidental or consequential damages or limitations on how long an implied warranty
lasts, so the above exclusion or limitation may not apply to you. This warranty gives you specific legal rights and
you may also have other rights that vary from state to state.
�Service trips to your home to deliver, pick up, and/or install the product, instruct, or replace house fuses or
correct wiring, or correction of unauthorized repairs.
�Damages or operating problems that result from misuse, abuse, operation outside environmental specifications
or contrary to the requirements of precautions in the Operating Guide, accident, vermin, fire, flood, improper
installation, acts of God, unauthorized modification or alteration, incorrect electrical current or voltage, or
commercial use, or use for other than intended purpose.
The cost of repair or replacement under these excluded circumstances shall be borne by the consumer.
CUSTOMER INTERACTIVE CENTER NUMBERS
To obtain Customer Assistance, Product
Information. Or Dealer or Authorized Service
Center location.
Call 1-800-243-0000 (24 hours a day, 365 days per
year) and select the appropriate option from the menu.
Or visit our website at : http://www.lgservice.com
TO CONTACT LG ELECTRONICS BY MAIL:
�LG Customer Interactive Center
�P.O. Box 240007
�201 james Record Road
�Huntsville, Alabama 35824
�ATTN: CIC
19
WARRANTY
THIS LIMITED WARRANTY DOES NOT APPLY TO:
P/No.: 3828DD3008Z