1
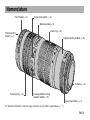
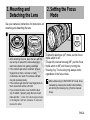
EF70-200mm f/4L USM
C
Y
P
O
ENG
Instruction
Thank you for purchasing a Canon product.
The Canon EF70-200mm f/4L USM lens is a
compact, high-performance telephoto zoom lens
for Canon EOS cameras.
• "USM" stands for Ultrasonic Motor.
C
Features
1. With fluorite and UD lens elements,
outstanding image delineation is obtained.
2. Ultrasonic motor (USM) for quick and quiet
autofocusing.
3. Manual focusing is available after the subject
comes into focus in autofocus mode (ONE
SHOT AF).
4. The lens is compatible with Extender EF1.4X ll
and EF2X ll.
Y
P
O
Conventions used in this instruction
Warning to prevent lens or camera malfunction
or damage.
Supplementary notes on using the lens and
taking pictures.
ENG-1
a Safety Precautions
a Safety Precautions
• Do not look at the sun or a bright light source
through the lens or camera. Doing so could result
in loss of vision. Looking at the sun directly through
the lens is especially hazardous.
• Do not point the lens or camera at the sun or
photograph it. This is because the lens
concentrates the sun’s rays even when the sun is
outside the image area or when shooting with
backlight, which could cause malfunction or fire.
• Whether it is attached to the camera or not, do not
leave the lens under the sun without the lens cap
attached. This is to prevent the lens from
concentrating the sun’s rays, which could cause a fire.
Handling Cautions
C
This device complies with Part 15 of the FCC Rules. Operation is
subject to the following two conditions: (1) This device may not
cause harmful interference, and (2) this device must accept any
interference received, including interference that may cause
undesired operation.
Do not make any changes or modifications to the equipment
unless otherwise specified in the instructions. If such changes or
modifications should be made, you could be required to stop
operation of the equipment.
This equipment has been tested and found to comply with the
limits for a class B digital device, pursuant to part 15 of the FCC
Rules. These limits are designed to provide reasonable protection
against harmful interference in a residential installation. This
equipment generates, uses and can radiate radio frequency
energy and, if not installed and used in accordance with the
instructions, may cause harmful interference to radio
communications.
However, there is no guarantee that interference will not occur in
a particular installation. If this equipment does cause harmful
interference to radio or television reception, which can be
determined by turning the equipment off and on, the user is
encouraged to try to correct the interference by one or more of
the following measures:
• Reorient or relocate the receiving antenna.
• Increase the separation between the equipment and receiver.
• Consult the dealer or an experienced radio/TV technician for
help.
Y
P
O
• If the lens is taken from a cold environment into
a warm one, condensation may develop on the
lens surface and internal parts. To prevent
condensation in this case, first put the lens into an
airtight plastic bag before taking it from a cold to
warm environment. Then take out the lens after it
has warmed gradually. Do the same when taking
the lens from a warm environment into a cold one.
• Do not leave the lens in excessive heat such as in
a car in direct sunlight. High temperatures can
cause the lens to malfunction.
This Class B digital apparatus complies with Canadian ICES-003.
ENG-2
Nomenclature
Hood mount (→ 7)
Focus mode switch (→ 4)
Distance scale (→ 6)
Zoom ring (→ 5)
Filter mounting
thread (→ 7)
Tripod mounting location (→ 8)
C
Y
P
O
Contacts (→ 4)
Focusing ring (→ 4)
Focusing distance range
selection switch (→ 5)
Lens mount index (→ 4)
For detailed information, reference page numbers are provided in parentheses (→ **).
ENG-3
1. Mounting and
Detaching the Lens
2. Setting the Focus
Mode
AF
MF
m
1.2
3m
See your camera’s instructions for instructions on
mounting and detaching the lens.
Y
P
O
• After detaching the lens, place the lens with the
rear end up to prevent the lens surface and
electrical contacts from getting scratched.
• If the contacts get soiled, scratched, or have
fingerprints on them, corrosion or faulty
connections can result. The camera and lens
may not operate properly.
• If the contacts get soiled or have fingerprints on
them, clean them with a soft cloth.
• If you remove the lens, cover it with the dust
cap. To attach it properly, align the lens mount
index and the K index of the dust cap as shown
in the diagram, and turn clockwise. To remove it,
reverse the order.
C
To shoot in autofocus (AF) mode, set the focus
mode switch to AF.
To use only manual focusing (MF), set the focus
mode switch to MF, and focus by turning the
focusing ring. The focusing ring always works,
regardless of the focus mode.
After autofocusing in ONE SHOT AF mode, focus
manually by pressing the shutter button halfway
and turning the focusing ring. (Full-time manual
focus)
ENG-4
4. Zooming
m
1.2
3m
1.2m
3m
3. Switching the Focusing
Distance Range
Y
P
O
You can set the focusing distance range to
1.2 m/3.9 ft. to infinity or 3 m/9.8 ft. to infinity. By
setting the suitable focusing distance range, the
actual autofocusing time can be shorter.
C
To zoom, turn the zoom ring.
Be sure to finish zooming before focusing.
Changing the zoom ring after focusing can affect
the focus.
If the current focusing distance is not within the
focusing distance range you switch to, the lens
focusing may first stop at the start or end of the
focusing range. This is normal and not a
malfunction. Just press the shutter button halfway
again to resume normal autofocusing.
ENG-5
5. Infinity Compensation Mark
6. Infrared Index
Infinity compensation mark
5 10
ft
m
15 30
ft
m
15 30
5 10
100 70
100 70
Distance index
Y
P
O
To compensate for shifting of the infinity focus
point that results from changes in temperature.
The infinity position at normal temperature is the
point at which the vertical line of the L mark is
aligned with the distance indicator on the
distance scale.
C
For accurate manual focusing on subjects at
infinity distance, look through the viewfinder while
rotating the focusing ring.
The infrared index corrects the focus setting
when using monochrome infrared film. Focus on
the subject manually, then adjust the distance
setting by moving the focusing ring to the
corresponding infrared index mark.
Some EOS cameras cannot use infrared film. See
the instructions for your EOS camera.
• The infrared index position is based on a
wavelength of 800 nm.
• The compensation amount differs depending on
the focal length. Use the indicated focal length
as a guide when setting the compensation
amount.
• Be sure to observe the manufacturer’s
instructions when using infrared film.
• Use a red filter when you take the picture.
ENG-6
7. Hood
8. Filters
(Sold Separately)
1.2m
3m
You can attach filters to the filter mounting thread
on the front of the lens.
• If you need a polarizing filter, use the Canon
Circular Polarizing Filter (67mm).
• To adjust the polarizing filter, first remove the
lens hood.
Y
P
O
The ET-74 hood can keep unwanted light out of
the lens, and also protects the front of the lens
from rain, snow, and dust.
Attach and align the hood to the hood mount on
the front of the lens, and turn the hood as shown
by the arrow to secure it.
The hood can be reverse-mounted on the lens
for storage.
C
• Part of the picture may be blocked if the hood is
not attached properly.
• When attaching or detaching the hood, grasp
the base of the hood to turn it. To prevent
deformation, do not grasp the rim of the hood to
turn it.
ENG-7
9. Using the Tripod Mount
(Sold separately)
Adjusting the Revolving Mount
This lens can be used with the A II (W) tripod mount ring, sold separately.
You can loosen the orientation lock-knob on the tripod mount to allow it to rotate as needed to fit a
particular camera model for switching between vertical and horizontal positions.
Detaching
Use the following procedures to remove and attach the tripod mount.
Turn the locking knob
counterclockwise until it
becomes loose (about 3
turns), and pull the knob in
the direction of the arrow to
release the collar.
C
Y
P
O
With the collar open,
remove the tripod mount.
To install, while pulling the
locking knob, bring the collar
to the original position, and
tighten the locking knob
securely.
The tripod collar can be attached to or detached from the lens while the lens is attached to the camera.
ENG-8
10. Extenders
(Sold Separately)
With Extender EF1.4X ll or EF2X ll attached, the lens specifications will change as follows:
Item
With EF1.4X ll Extender
With EF2X ll Extender
Focal length (mm)
98 – 280
140 – 400
Aperture
f/5.6 – 45
f/8 – 64
25°20’ – 8°50’
16°20’ – 6°10’
Diagonal
Angle of view
Vertical
13°50’ – 4°55’
9°10’ – 3°30’
Horizontal
20°50’ – 7°20’
13°40’ – 5°10’
0.31
0.45
Maximum magnification (×)
Y
P
O
• First attach the Extender to the lens, then attach the lens to the camera. Detach it from the
camera in the reverse order. If you attach the lens to the camera first, misoperation may
occur.
• With Extender EF2X II attached to the lens, only manual focus is possible. However, with the EOS1Ds Mark III, EOS-1Ds Mark ll, EOS-1Ds, EOS-1D Mark lll, EOS-1D Mark ll N, EOS-1D Mark ll,
EOS-1D, EOS-1V/HS, EOS-3 camera, autofocusing with the center focusing point is possible.
• Only one Extender can be attached to the lens and camera.
• If you use an Extender on the lens mounted on a EOS A2/A2E/5, set the exposure
compensation to -1/2 stop for the EF1.4X II or -1 stop for the EF2X II.
C
• Autofocusing is still enabled with Extender EF1.4X II attached.
• When an Extender is attached, the AF speed will become slower by design to retain proper
AF control.
ENG-9
11. Extension Tubes (Sold Separately)
You can attach Extension Tube EF12 II or EF25
II for magnified shots. The shooting distance and
magnification are shown below.
EF12 II
EF25 II
70mm
200mm
70mm
200mm
Camera-to-Subject
Distance (mm)
Near
Far
554
639
1015
3572
423
428
901
1942
Magnification
Near
0.23×
0.29×
0.39×
0.36×
Far
0.17×
0.06×
0.35×
0.13×
Manual focusing is recommended for accurate
focusing.
C
Y
P
O
ENG-10
Specifications
Focal Length & Max. Aperture 70 – 200 mm, f/4
Lens Construction
13 groups, 16 elements
Min. Aperture
f/32
Angle of View
Diagonal: 34° – 12°
Min. Focusing Distance
1.2 m / 3.9 ft.
Vertical: 19°30’ – 7°
Horizontal: 29° –10°
Max. Magnification & Field of view 0.21× (at 200 mm), 300 × 450 mm – 114 × 171 mm/11.7 × 17.6 inch – 4.46 × 6.7 inch (at 1.2 m)
Filter Diameter
67 mm
Max. Diameter & Length
76 × 172mm / 3.0 × 6.8 inch
Weight
705 g / 24 oz
Lens Hood
ET-74
Lens Cap
E-67U/E-67 II
Case
LP1224
C
Y
P
O
Tripod Collar (Sold separately) Ring-type tripod mounting socket A II (W)
• The lens length is measured from the mount surface to the front end of the lens. Add 21.5 mm to include the
E-67U lens cap and dust cap, and 24.2 mm for the E-67 II.
• The size and weight listed are for the lens only, except as indicated.
• There is no size available among 250D/500D close-up lenses.
• Aperture settings are specified on the camera.
• All data listed is measured according to Canon standards.
• Product specifications and appearance are subject to change without notice.
ENG-11
C
CT1-8507-004
0812Ni
Y
P
O
© CANON INC. 2002