1
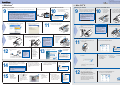
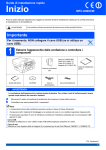
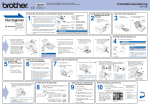
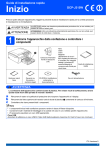
Quick Setup Guide
Before you can use the machine, read this Quick Setup Guide
for the correct setup and installation.
DCP-385C
LS6233040
ARL/ASA/NZ
Printed in China
Load plain A4 paper
Unpack the machine and check the components
1
Start Here
Important
DO NOT
connect the
USB cable yet.
Inbox Ink
Cartridges [x4]1
Black
Yellow
Cyan
Magenta
2
Power Cord
User’s Guide
Hong Kong,
Malaysia &
Singapore
The supplied mains plug is a
grounded three pin plug.
Australia & New
Zealand
Philippines &
Thailand
a. Pull out the paper tray.
b. Lift the paper tray cover a.
1
The supplied mains plug is
a side grounded two pin plug.
WARNING
Plastic bags are used in the packaging of your machine.
To avoid danger of suffocation, please keep these bags
away from babies and children.
Quick Setup
Guide
c. Remove the plastic bag b containing the ink
1
cartridges from on top of the paper tray.
Warnings tell you what to do to
prevent possible personal injury.
CD-ROM
USB
Interface
Cable
1
a. Remove the protective tape and film.
WARNING
by lifting the front of the machine and then
pulling down on the packing part.
• The components of your box may differ depending on your
country.
• Save all packing materials and the box in case for any
reason you must ship your machine.
• Your machine has a USB interface that is compatible with
the USB 2.0 specification.
• To ensure safe operation the supplied plug must be inserted
only into a standard power outlet that is properly grounded
through the standard electrical wiring. Non grounded
equipment may cause an electrical shock hazard, and may
cause excessive electrical noise radiation.
2
d. Make sure you have all components.
b. Remove the green protective packing a
Note
Approx. 65% yield of the replacement cartridge. For details, see
Consumable items in the User’s Guide.
Connect the power cord
c. Press and slide the
d. Fan the stack of paper well.
1
paper side guides a and
paper length guide b to
fit the paper size.
g. Close the paper tray cover
and slowly push the paper
tray back into the machine.
e. Gently put the paper into the
it clicks, and then unfold the paper
support flap b.
paper tray. Check that the paper
is flat in the tray.
3
Make sure that the
triangular marks c on
the paper side guides a
and paper length guide
b line up with the mark
for the paper size you
are using.
3
h. Pull out the paper support a until
f.
2
Important
a. Connect the power cord.
WARNING
The machine must be fitted with an earthed plug.
Important
Gently adjust the paper side
guides to the paper with both
hands.
Make sure the paper side
guides touch the edges of the
paper.
DO NOT connect the USB cable
yet.
2
Note
1
The control panel warning
LED will stay on until you have
installed the ink cartridges.
Do not push the paper
in too far.
3
Set the language (not available for Hong Kong users)
4
a. After connecting the power
5
b. Choose Yes or No and press
cord, the LCD shows:
Select Language
English
Français
Deutsch
Nederlands
Italiano
Select Language
Install the ink cartridges
OK.
English
Yes
No
Select & Press
OK
Select Language
Select & Press
a. The LCD shows:
c. Remove the green protective part a.
d. Unpack the ink cartridge.
No Cartridge
Install Ink
Black
e. Install each ink cartridge in the direction
Turn the green knob on the protective yellow cap
clockwise until it clicks to release the vacuum seal,
then remove the cap a.
Press a or b to choose your
language and press OK.
2
Important
Note
• The languages available may differ depending on your country.
• If you set the wrong language, you can change it again after setting the
date and time. (For details see Changing LCD language in Chapter 3 of the
User’s Guide.)
a. When the preparation process
has finished, the LCD shows this
message.
Set Paper and Press
Start
Set the LCD contrast (If needed)
7
b. Check the quality of the four colour
blocks a on the sheet.
(black/yellow/cyan/magenta)
1
OK
Press Colour Start.
Setup.
press OK.
c. Press a or b to choose LCD
Settings.
press OK.
d. Press a or b to choose LCD Contrast.
e. Press d or c to choose Light, Med or Dark.
press OK.
o If all lines are clear and visible, press
(Yes) to finish the quality check.
o If you can see missing short lines, press
(No) and follow the steps on the LCD.
a. Press Menu.
b. Press a or b to choose General
f.
Poor
After initial installation of the ink cartridges, the machine will start cleaning the
ink tube system. This cleaning process will last approximately four minutes.
DO NOT unplug the machine from the power outlet or attempt to stop the
cleaning process. Interruption of cleaning process may cause undesired print
quality problems.
1
1
1
Check the print quality
6
Gently push the ink cartridge until it clicks. After all the ink
cartridges are installed close the ink cartridge cover.
1
b. Open the ink cartridge cover a.
OK
f.
of the arrow on the label.
Take care to match the colour of the
lever a with the cartridge colour b.
Press Stop/Exit.
Note
You can also adjust the angle of the display by
lifting it.
Set the date and time
8
a. Press Menu.
d. Press a or b repeatedly to enter the last two digits of
the year, and then press OK.
b. Press a or b to choose
Initial Setup, and then press OK.
c. Press a or b to choose
Date&Time, and then press OK.
Note
If you make a mistake and want to start again,
press Stop/Exit to go back to step a.
Date&Time
Year:20
08
MENU
Input & Press
OK
(e.g. Enter 08 for 2008.)
e. Repeat for Month and Day, and Hours and Minutes
in 24-hour format.
f. Press Stop/Exit.
Turn the sheet over.
What is Innobella™?
Innobella™ is a range of genuine consumables offered by Brother.
The name “Innobella™” derives from the words “Innovation” and “Bella”
(meaning “Beautiful” in Italian) and is a representation of the “innovative”
technology providing you with beautiful and long lasting print results.
For
Windows®
For
Before you install
9
Install MFL-Pro Suite
a. Make sure that your computer is ON and you are logged on with Administrator rights.
10
b. Disconnect the machine.
Important
• DO NOT connect the USB cable yet.
• Close any applications.
• Make sure there are no memory cards or a USB Flash memory drive inserted.
• The screen may differ depending on the operating system.
• The supplied CD-ROM includes ScanSoft™ PaperPort™ 11SE*.
• This software supports Windows® 2000 (SP4 or greater), XP (SP2 or greater), XP
Professional x64 Edition and Windows Vista®. Update to the latest Windows®
Service Pack before installing MFL-Pro Suite.
• For Windows Vista®, when the User Account Control screen appears, click Allow.
Mac OS® X
Before you install
9
a. Insert the supplied CD-ROM into
your CD-ROM drive.
Choose your language.
Note
10
Make sure your machine is connected to the
power and your Macintosh® is ON. You must
be logged on with Administrator rights.
Important
• Make sure there are no memory cards
or a USB Flash memory drive inserted.
• For Mac OS® X 10.2.0 to 10.2.3 users,
upgrade to Mac OS® X 10.2.4 or greater.
(For the latest information for
Mac OS® X, visit
http://solutions.brother.com/)
If the Brother screen does not
appear automatically, go to My
Computer (Computer), doubleclick the CD-ROM icon, and then
double-click start.exe.
*For Hong Kong users, CD-ROM includes Presto!® PageManager® instead of ScanSoft™ PaperPort™11SE.
Connect the USB cable
a. Lift the scanner
b. Connect the USB cable to the USB
cover until it locks
securely into the
open position.
socket marked with a
symbol.
The USB socket is inside the
machine as shown below.
Connect the USB cable
b. Click Install MFL-Pro Suite, and click Yes
if you accept the license agreements.
until this screen appears:
b. Connect the USB cable to the USB
c. Carefully guide the USB cable into the cable
socket marked with a
symbol. The USB socket
is inside the machine
as shown.
channel and out the back of the machine.
Connect the cable to your computer.
Connect the power cord
12
a. Connect the power
cord.
11
c. Follow the on-screen instructions
a. Lift the scanner cover until it locks
securely into the open position.
c. Carefully guide the USB cable into the
cable channel and out the back of the
machine.
d. Connect the cable to your Macintosh®.
e. Lift the scanner cover to release the lock a.
Important
• DO NOT connect the machine
to a USB port on a keyboard
or a non-powered USB hub.
Connect the machine directly
to your Macintosh®.
• Make sure that the cable does
not restrict the cover from
closing, or an error may occur.
Gently push the scanner cover support
down b and close the scanner cover c.
1
2
d. Lift the scanner cover to release
Important
• DO NOT connect the
machine to a USB port on a
keyboard or a non-powered
USB hub. Connect the
machine directly to your
computer.
• Make sure that the cable
does not restrict the cover
from closing, or an error
may occur.
the lock a. Gently
push the scanner
cover support
down b and
close the
scanner
cover c.
1
Install MFL-Pro Suite
2
3
11
a. Insert the supplied CD-ROM into your
b. Double-click the Start Here OSX icon.
CD-ROM drive.
Note
Finish and restart
b. When the
Important
DO NOT cancel any
of the screens.
It may take a
few minutes for
installation to
complete.
The installation will continue automatically.
The installation screens appear one after another.
On-Line
Registration
screen appears,
make your
selection and
follow the
on-screen
instructions.
13
3
a. Click Finish to restart your
It may take a few minutes
for installation to complete.
After the installation, click
Restart.
The installation is
now complete.
computer.
Note
If an error message appears
during the software installation,
run the Installation Diagnostics
located in Start/All Programs/
Brother/DCP-XXXX (where
DCP-XXXX is your model name).
c. Click OK.
d. For Mac OS® X 10.2.4
to 10.2.8 users,
click Add and then
choose USB.
e. Choose your
f. Quit Print Center.
model name, and
then click Add.
Install Optional Applications supported by Reallusion, Inc
14
FaceFilter Studio lets you edit your photo data
and add photo effects such as red eye reduction
or skin tone enhancement.
a. Open the main menu again by
Important
• The computer must be connected to the
internet.
• The machine must be ON and connected to
the computer.
ejecting and then reinserting the
CD-ROM or by double-clicking the
start.exe program from the root
folder.
b. The CD-ROM main menu will appear.
Choose your language and then click
Additional Applications.
c. Click the FaceFilter Studio
button to install.
Note
You can also install
BookScan&Whiteboard
Suite from the main menu.
Install FaceFilter Studio Help (For Hong Kong users, CD-ROM includes FaceFilter Studio Help)
15
a. Go to Start/
All Programs/
Reallusion/
FaceFilter Studio
on your computer.
b. Click the
button on
the upper right corner
of the screen, and
then click Check for
updates to go to the
Reallusion update web
page.
c. Click the
Download button
and choose a
folder to save the
file in.
For Mac OS® X 10.3.x or greater users,
go to step 12.
Note
d. Close FaceFilter
Studio, double-click the
downloaded file from the
folder you specified, and
then follow the on-screen
instructions to install.
To view FaceFilter
Studio Help,
go to Start/
All Programs/
Reallusion/
FaceFilter Studio/
FaceFilter Studio
Help on your
computer.
®
®
Install Presto! PageManager
12
When Presto!® PageManager® is
installed, OCR capability is added to
Brother ControlCenter2. With Presto!®
PageManager®, you can easily scan, share
and organize photos and documents.
For Mac OS® X 10.2.4 to 10.3.8 users,
follow the on-screen instructions, and
download the software from the Brother
Solutions Center website.
a. Double-click the Presto! PageManager icon
and follow the on-screen instructions.
The installation is
now complete.