1
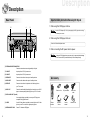
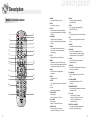
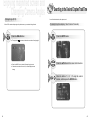
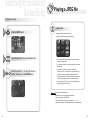
MMDVT
DVD PLAYER
Owner's Manual
RECORD YOUR MODEL NUMBER (Now, while you can see it)
The model and serial number of your new DVD player are located on the back of the DVD player cabinet.
1286970
For your future convenience, we suggest that you record these numbers here:
1286972
MODEL NO.
MADE IN KOREA
SERIAL NO.
Important Information
TO REDUCE THE RISK OF ELECTRIC SHOCK, DO
NOT REMOVE THE COVER(OR BACK).THERE ARE
NO USER-SERVICEABLE PARTS ARE INSIDE.
REFER SERVICING TO QUALIFIED SERVICE
PERSONNEL.
This symbol indicates “dangerous voltage”
inside the product that presents a risk of
electric shock or personal injury.
This symbol indicates important
instructions accompanying the
product.
CAUTION: DVD PLAYERS USE AN INVISIBLE LASER BEAM WHICH CAN CAUSE HAZARDOUS RADIATION EXPOSURE.
CAUTIONS
This product satisfies FCC regulations when shielded cables and connectors are used to connect
the unit to other equipment. To prevent electromagnetic interference with electric appliances,
such as radios and televisions, use shielded cables and connectors for connections.
FCC NOTE (for U.S.A):
This equipment has been tested and found to comply with the limits for a Class B digital device,
pursuant to Part 15 of the FCC rules. These limits are designed to provide reasonable protection against
harmful interference in a residential installation. This equipment generates, uses and can radiate radio
frequency energy and, if not installed and used in accordance with the instructions, may cause harmful
interference to radio or television reception, which can be determined by turning the equipment off and on, the
user is encouraged to try to correct the interference by one or more of the following measures.
• Reorient or relocate the receiving antenna.
• Increase the separation between the equipment and receiver.
• Connect this equipment into an outlet on a circuit different from that to which the receiver is connected.
• Consult the dealer or an experienced radio/TV technician for help.
This class B digital apparatus meets all requirements of the Canadian Interference -- Causing Equipment
Regulations.
Important Safety Instructions
CAUTION: PLEASE READ AND OBSERVE ALL WARNINGS AND INSTRUCTIONS IN THIS OWNER’S
MANUAL AND THOSE MARKED ON THE UNIT. RETAIN THIS BOOKLET FOR FUTURE
REFERENCE.
This set has been designed and manufactured to assure personal safety. Improper use can result in
electric shock or fire hazard. The safeguards incorporated in this unit will protect you if you observe
the following procedures for installation, use and servicing.
This unit is fully transistorized and does not contain any parts that can be repaired by the user.
DO NOT REMOVE THE COVER, OR YOU MAY BE EXPOSED TO DANGEROUS VOLTAGE. REFER
SERVICING TO QUALIFIED SERVICE PERSONNEL ONLY.
1. Read owner’s manual
After unpacking this product, read the owner’s manual carefully, and follow all of the operating instructions.
2. Power Sources
This product should be operated only from the type of power source indicated on the marking label.
If you are not sure of the type of power supply in your home, consult your product dealer or local power
company. For products intended to operate from battery power, or other sources, refer to the operating
instructions. Connect the unit to a switched (ACC) line in your vehicle. There should be 12vdc with the
key in the ACC or Run position.
3. Ventilation
Slots and openings in the cabinet are provided for ventilation and to ensure reliable operation of the
product and to protect it from overheating. These openings must not be blocked or covered. The
openings should never be blocked by placing the product on a bed, sofa, rug or other similar surface.
This product should not be placed in a built-in installation such as a bookcase or rack unless proper
ventilation is provided or the manufacturer’s instructions have been adhered to.
In summer, ventilate for 10 minutes before playing Disc.
In winter, play Disc after igniting the car.
4. Heat
The product should be situated away from heat sources such as radiators, heat registers, stoves, or
other products (including amplifiers) that produce heat.
5. Water and Moisture
Do not use this product near water-for example, near a bath tub, wash bowl, kitchen sink. or laundry
tub; in a wet basement; or near a swimming pool and the like.
6. Cleaning
Unplug this product from the wall outlet before cleaning. Do not use liquid cleaners or aerosol cleaners.
Use a damp cloth for cleaning.
CLASS 1
LASER PRODUCT
7. Power-Cord Protection
Power-supply cords should be routed so that they are not likely to be walked on or pinched by items
placed upon or against them.
LUOKAN 1 LASER LAITE
KLASS 1
2
LASER APPARAT
3
Important Safety Instructions
8. Object and Liquid Entry
Never push objects of any kind into this product through openings as they may touch dangerous
voltage points or short-out parts that could result in a fire or electric shock. Never spill liquid of any
kind on the product.
9. Attachments
Do not use attachments not recommended by the product manufacturer as they may cause hazards.
10. Accessories, Carts, and Stands
Do not place this product on an unstable cart, stand, tripod, bracket, or table.
The product may fall, causing serious injury to a child or adult, and serious
damage to the product. Use only with a cart, stand, tripod, bracket,
or table recommended by the manufacturer, or sold with the product.
Any mounting of the product should follow the manufacturer’s instructions,
and should use a mounting accessory recommended by the manufacturer.
A product and
cart combination should be moved with care. Quick stops, excessive force, and uneven surfaces may
cause the product and cart combination to overturn.
11. Burden
Do not place a heavy object on or step on the product. The object may fall, causing serious personal
injury and serious damage to the product.
12. Connecting
When you connect the product to other equipment, turn off the power and unplug all of the equipment.
Failure to do so may cause an electric shock and serious personal injury. Read the owner’s manual of
the other equipment carefully and follow the instructions when making any connections.
13. Sound Volume
Reduce the volume to the minimum level before you turn on the product. Otherwise, sudden high
volume sound may cause hearing or speaker damage.
Important Safety
Instructions
17. Damage Requiring Service
Diseconnect all cables and refer servicing to qualified service personnel under the following conditions:
a) When the power-supply cord or plug is damaged.
b) If liquid has been spilled, or objects have fallen into the product.
c) If the product has been exposed to rain or water.
d) If the product does not operate normally by following the operating instructions.
Adjust only those controls that are covered by the operating instructions as an improper
adjustment of other controls may result in damage and will often require extensive
work by a qualified technician to restore the product to its normal operation.
e) If the product has been dropped or damaged in any way.
f) When the product exhibits a distinct change in performance-this indicates a need for service.
18. Servicing
Do not attempt to service this product yourself as opening or removing covers may expose you to
dangerous voltage or other hazards. Refer all servicing to qualified service personnel.
19. Replacement parts
When replacement parts are required, be sure the service technician has used replacement parts
specified by the manufacturer or have the same characteristics as the original part. Unauthorized
substitutions may result in fire, electric shock, or other hazards.
20. Safety Check
Upon completion of any service or repairs to this
product, ask the service technician to perform safety checks to determine that the product is in proper
operating condition.
21. Installation
Do not stand the player in the left and right direction on above of the angle +10 ~ -10 when
playing in a car or at home.
(It may not operate.)
14. Sound Distortion
Do not allow the product to output distorted sound for a longtime. It may cause speaker overheating
and fire.
15. Laser Beam
Do not look into the opening of the disc tray or ventilation opening of the product to see the source of
the laser beam. It may cause sight damage.
16. Disc
Do not use a cracked, deformed, or repaired diss. These discs are easily broken and may cause
serious personal injury and product malfunction.
4
5
Information about Disc
DVD(Digital Versatile Disc) can record 135 minutes of video, 8 language
tracks and maximum 32 languages sub-titles. You can enjoy cinema-like
picture and crystal clear sound with MPEG-2 compression technology and
dolby digital surround.
O2@@@@@@@@@@@@@@@@@@@@@@@@@@@@@@@@@@@@@@@@@@@@@@@@@@@@@@@@6K
?O2@@@@@@@@@@@@@@@@@@@@@@@@@@@@@@@@@@@@@@@@@@@@@@@@@@@@@@@6Kh
?O2@@@@@@@@@@@@@@@@@@@@@@@@@@@@@@@@@@@@@@@@@@@@@@@@@@@@@@@@@@@@@@6X?
O2@@@@@@@@@@@@@@@@@@@@@@@@@@@@@@@@@@@@@@@@@@@@@@@@@@@@@@@@@@@@@6K?f
?W2@@@@@@@@@@@@@@@@@@@@@@@@@@@@@@@@@@@@@@@@@@@@@@@@@@@@@@@@@@@@@@@@@)K
W2@@@@@@@@@@@@@@@@@@@@@@@@@@@@@@@@@@@@@@@@@@@@@@@@@@@@@@@@@@@@@@@@@6X?e
W&@@@@@@@@@@@@@@@@@@@@@@@@@@@@@@@@@@@@@@@@@@@@@@@@@@@@@@@@@@@@@@@@@@@@6X
?W&@@@@@@@@@@@@@@@@@@@@@@@@@@@@@@@@@@@@@@@@@@@@@@@@@@@@@@@@@@@@@@@@@@@)Xe
?W&@@@@@@@@@@@@@@@@@@@@@@@@@@@@@@@@@@@@@@@@@@@@@@@@@@@@@@@@@@@@@@@@@@@@@@1
W&@@@@@@@@@@@@@@@@@@@@@@@@@@@@@@@@@@@@@@@@@@@@@@@@@@@@@@@@@@@@@@@@@@@@@)X?
?7@@@@@@@@@@@@@@@@@@@@@@@@@@@@@@@@@@@@@@@@@@@@@@@@@@@@@@@@@@@@@@@@@@@@@@@@L?
7@@@@@@@@@@@@@@@@@@@@@@@@@@@@@@@@@@@@@@@@@@@@@@@@@@@@@@@@@@@@@@@@@@@@@@@)X
J@@@@@@@0M
I'@@@@@@1?
?J@@@@@@@0M?
I4@@@@@@@@
7@@@@@@?
?V'@@@@@@L
?7@@@@@(M?
I'@@@@@@
@@@@@@5?
V'@@@@@1
?@@@@@@H
?N@@@@@@
@@@@@@H?
O2@@@@@@@@@@@6K?
?N@@@@@@
?@@@@@5?
?O2@@@@@@@@@@@6K
3@@@@@
@@@@@5
?O2@@@@@@@@@@@@@@@@@@6K?
@@@@@@
J@@@@@H?
O2@@@@@@@@@@@@@@@@@6K?
N@@@@@
@@@@@H
?O2@@@@@@@@@(M?I'@@@@@@@@6K?
@@@@@@
7@@@@@
?O2@@@@@@@@@(M?I'@@@@@@@@@6K
?@@@@@
@@@@@?
W2@@@@@@@@X@@(Y?eV'@W@@@@@@@6K?
@@@@@@
3@@@@@
?O2@@@@@@@@X@(Y?eV'@@W@@@@@@@6K
?@@@@@
@@@@@?
?O&@@@X@@(MB@@(Yf?N@@UI'@@W@@@6X?
@@@@@@
N@@@@@
?W2@@@X?@@0MS@@Hf?V'@@<I'@@W@@@6X
?@@@@@
@@@@@?hf?W2@@0MS@@0Y?J@(Y?g3@1?V4@@UI4@)K
@@@@@@
?@@@@@
W&@(MS@@(Me7@5?gV'@L?V'@@UI'@)X?hf?@@@@@
@@@@@?hfW&@(M?W&(Me?7@HhV'@LeI')X?I'@6Xhf@@@@@@
?@@@@@hf?O&@0YW&@(Y??J@(Y?g?N@1eV'@)XV4@)Khf?@@@@@
@@@@@?he?W&@0Y?W&(Y?eJ@5?h?N@1e?N@)X?V'@)X?he@@@@@@
?@@@@@he?W2@(M?W&@(Ye?7@Hhe3@L??V'@)X?I'@6Xhe?@@@@@
@@@@@?heW&(MeW&(Yf7@H?he@@f3@)X?V'@)Xhe@@@@@@
?@@@@@heW&@(Y??7@(Y?eJ@5?heN@1?eV'@1eV'@)X?h?@@@@@
@@@@@?h?W&(Y??W&@H?e?J@5hf3@L?eV'@1eV'@)X?h@@@@@@
?@@@@@he7@(YeJ@(Yf7@H?he?3@?e?V'@L??V'@1?h?@@@@@
@@@@@?hW&(Ye?7@5f?7@HhfN@1?e?V'@L??V'@1?h@@@@@@
?@@@@@h?J@(Y??W&@H?f@@hf?N@LfN@)XeV'@Lh?@@@@@
@@@@@?g?W&@H?eJ@(Yf?@@?hf?3@?fN@1?eV'@Lh@@@@@@
?@@@@@hW&(Ye?7@5f?J@5
@1f?3@1e?V')X?g?@@@@@
@@@@@?g?&@@f@0Y?f?@@?hf?V'?f?@@?e?V4@h@@@@@@
?@@@@@h&0Y?e?@0Yf?@0Y
@@f?V4@fV4)?g?@@@@@
@@@@@?gW2@?e?W2@g@@
@@g@@f?@@?g@@@@@@
?@@@@@g?@@@f@@g?@@?
?)X?f@@@?e?@@@g?@@@@@
@@@@@?g7@Y?eO&@Yg@@L?
@@g@@f?@@Lg@@@@@@
?@@@@@gJ@@Yf@@g?@@?
?@)KfV@@?e?V@@L?f?@@@@@
@@@@@?f?J@@@@@@@@@@@@@@@@@@)K
@@@@@@@@@@@@@@@@@1g@@@@@@
?@@@@@g7@@@@@@@@@@@@@@@@@@?
?@@@@@@@@@@@@@@@@@1?f?@@@@@
@@@@@?f?7@?f@@h@V4@@@@@@@@@@@@@@@@@gI'@?e?I'@L?f@@@@@@
?@@@@@f?J@(M?e?@@?g@@@@@@@@@@@@@@@@@@@@@?g@@fI'@Lf?@@@@@
@@@@@?fJ@5?f@@g?J@?h@@@@@?e?@L?f?N@LfN@1?f@@@@@@
?@@@@@f?7@HfJ@5?g@@e?W@@@@@@@@@@X?I'@?g3@f?N@1f?@@@@@
@@@@@?f7@H?e?J@5g?7@?g?J@@@@@?e?@1?g@1f?3@Lf@@@@@@
?@@@@@f?@5?f7@H?g@@eW&@@@@@@@@@@)X?N@?gN@L?f@@f?@@@@@
@@@@@?f@5f?7@Hg?@@?gO&@@@@@?e?@@?g3@f?N@1f@@@@@@
?@@@@@fJ@H?f@@h@5?W&@@@@@@@@@@@@1e@Lg?@1?f3@L?e?@@@@@
@@@@@?e?J@Hf?@@?g?@5?e?O2@@@@@@@@?e?@@?gN@L?f@@f@@@@@@
?@@@@@f7@g@5h@H?7@@@@@@@@@@@@@@e@1g?@@?fN@1?e?@@@@@
@@@@@?e?7@?f?@@?g?@H?e@@@@@@@@@@@?e?@@?g?@1?f3@L?e@@@@@@
?@@@@@f@5g@Hg?J@??@@@@@@(?4@@@@@@L?@@g?3@?f?@@?e?@@@@@
@@@@@?e?@5?f?@5?g?@f@@@@@@@@@@@?e?@@?g?@@?fN@1?e@@@@@@
?@@@@@e?J@Hg@?g?7@?J@@@@@(Ye?@@@@@1?@@g?N@Lf?3@?e?@@@@@
@@@@@?e?@H?f?@H?gJ@f@@@@@@@@@@@?e?3@?g?@@?f?@@?e@@@@@@
?@@@@@e?7@?f?J@?g?@@?7@@@@@H?e?@@@@@@?@@h@1f?N@Le?@@@@@
@@@@@?eJ@g?@h7@f@@@@@@@@@@@?e?N@?g?3@?f?@@?e@@@@@@
?@@@@@e?@@?f?7@?g?@@?@@@@@@hf@@h@@g@1e?@@@@@
@@@@@?e7@g?@h@@he@@@@@?f@?g?N@?f?3@?e@@@@@@
?O2@6K
?@@@@@e?@@?f?@@?g?@@?@@@@@@@@@@@@6Kf@@h@@g@@e?@@@@@
@@@@@?e@@g?@h@@he@@@@@?f@?h@?f?N@?e@@@@@@hf?W2@@@@@@@6Kh?@@@@?he?@@@@@e?@5?f?@@?g?@@?@@@@@@@@@@@@@@6Xe@@h@@g@@e?@@@@@
@@@@@?e@@g?@h@@he@@@@@?f@?h@?g@?e@@@@@@hfW&@@@@@@@@@@6Kg?@@@@?he?@@@@@e?@H?f?@@?g?@5?@@@@@@@@@@@@@@@1e@@h3@g3@e?@@@@@
@@@@@?e@@g?@h@@he@@@@@?f@?h@?g@?e@@@@@@hf7@@@@@@@@@@@@@6KfJ@@@@?he?@@@@@e?@g?@@?g?@Y?@@@@@@@@@@@@@@@@e@@hV@gV@e?@@@@@
@@@@@?e@@@@@@@@@@@@@@@@@@@@@@@@@@@@@@@@@@@@@@@@@@@@@@@@@@@@@@@@@@@?e@@@@@@hf@@@@@@@@@@@@@@@@@6KO&@@@@?he?@@@@@e?@@@@@@@@@@@@@@@@@@@@@@@@@@@@@@@@@@@@@@@@@@@@@@@@@@@@@@@@@@@e?@@@@@
@@@@@?e@@g?@h@@he@@@@@?f@?h@?g@?e@@@@@@he?J@@@@e?I4@@@@@@@@@@@@@@@5?he?@@@@@e?@g?@@?g?@X?@@@@@@(M?I'@@@@@@?@@h@@g@@e?@@@@@
@@@@@?e@@g?@h@@he@@@@@?f@?g?J@?g@?e@@@@@@he?7@@@@f?I4@@@@@@@@@@@@(Y?he?@@@@@e?@L?f?@@?g?@1?@@@@@@H?eN@@@@@@?@@h@@g@@e?@@@@@
@@@@@?e@@g?@L?g@@he@@@@@?f@?g?7@?f?J@?e@@@@@@he?@@@@5hI4@@@@@@@@(Yhf?@@@@@e?@1?f?3@?g?@@?@@@@@5f?@@@@@@?@@h@@g@@e?@@@@@
@@@@@?e3@g?@1?g3@he@@@@@?f@?g?@@?f?7@?e@@@@@@he?@@@0YheI4@@@@@0Y?hf?@@@@@e?@@?f?N@?g?@@?@@@@@?f?@@@@@@?@@h@5g@@e?@@@@@
@@@@@?eN@L?f?@@?gN@he@@@@@?e?J@?g?@@?f?@@?e@@@@@@
?@@@@@e?@@?g@Lg?@@?@@@@@1f?@@@@@@?@@h@Hg@5e?@@@@@
@@@@@?e?@1?f?@@?g?@he@@@@@?e?7@?g?@5?f?@5?e@@@@@@
?@@@@@e?3@Lg@1g?@@?3@@@@@L?eJ@@@@@@?@@g?J@?f?J@He?@@@@@
@@@@@?e?@@?f?3@?g?@he@@@@@?e?@@?gJ@H?fJ@H?e@@@@@@
?@@@@@e?N@1g@@g?3@?N@@@@@)K?O&@@@@@5?@@g?7@?f?7@?e?@@@@@
@@@@@?e?3@Lf?N@Lg?@L?h@@@@@?e?@@?g7@g7@f@@@@@@
?@@@@@f@@g@@g?N@??@@@@@@@@@@@@@@@H?@5g?@@?f?@@?e?@@@@@
@@@@@?e?N@1g@1g?@1?h@@@@@?e?@@?g@@g@@f@@@@@@
?@@@@@f3@L?f3@L?g@??3@@@@@@@@@@@@@5e@Hg?@5?fJ@5?e?@@@@@
@@@@@?f@@g@@g?@@?h@@@@@?e?@@?g@5f?J@5f@@@@@@
?@@@@@fN@1?fN@1?g@L?V'@@@@@@@@@@@(Ye@?gJ@H?f7@H?e?@@@@@
@@@@@?f3@L?f3@L?f?@@?h@@@@@?e?@5?f?J@Hf?7@Hf@@@@@@
?@@@@@f?3@Lf?@@?g@1eV4@@@@@@@@@0Y??J@?g7@g@@f?@@@@@
@@@@@?fN@)KfV@)Kf?@@?
?@Y?fO&@?f?@5?f@@@@@@
?@@@@@f?N@)K?e?@@?g@@f?@@@@@@@fO&@?g@@g@5f?@@@@@
@@@@@?f?3@@@@@@@@@@@@@@@@@@@@@@@@@@@@@@@@@@@@@@@@@@@@@@@@@@@@H?f@@@@@@
?@@@@@g@@@@@@@@@@@@@@@@@@@@@@@@@@@@@@@@@@@@@@@@@@@@@@@@@@@@@Hf?@@@@@
@@@@@?f?N@@X?eI'@Xg@@
@@g@@f?W@5g@@@@@@
?@@@@@g3@@?f@@X?f?@X?
?@@?f?@@?fW@5?f?@@@@@
@@@@@?g3@1?e?N@1g@@
@@f?J@@f?7@Hg@@@@@@
?@@@@@gV'@Lf3@1?f?@1?
?@5?fJ@5?e?W&(Y?f?@@@@@
@@@@@?gV'@Lf3@L?f3@L?
@5f?7@5fJ@5?g@@@@@@
?@@@@@g?N@)X?eN@@Lf?@@?
J@H?f7@H?eW&@Hg?@@@@@
@@@@@?g?N@)X?eN@1?fN@1?hf?J@HfJ@@He?W&(Y?g@@@@@@
?@@@@@h3@)Xe?3@1f?3@L
7@f?J@5f7@5?g?@@@@@
@@@@@?h3@)Xe?3@Lf?@@?hf?7@?f7@5?eW&@Hh@@@@@@
?@@@@@hV'@1e?V'@L?e?N@1
@5fW&@He?J@(Y?g?@@@@@
@@@@@?hV'@)X??V')X?e?3@LhfJ@5?e?J@(Y??W&@5?h@@@@@@
?@@@@@h?V'@fN@)Xf@@hf?J@Hf7@5?eW&(Yh?@@@@@
@@@@@?h?V'@)XeN@)Xe?N@1hf7@H?eW&@HeW&@(Y?h@@@@@@
?@@@@@heV'@6X??3@1f3@L?he?7@?e?J@(Y??W&(Y?h?@@@@@
@@@@@?heV'@)X??3@)X?e3@L?he@@e?W&@5??W&@(Yhe@@@@@@
?@@@@@he?V'@)X?V'@L?eN@1?heJ@5?eW&@HeO&(Yhe?@@@@@
@@@@@?he?V'@)K?V'@)XeN@1?h?J@5eW&@(Y?O&@0Y?he@@@@@@
?@@@@@hfV'@)X?V')Xe?3@Lhe7@H??W&@5?W2@(Y?he?@@@@@
@@@@@?hfV4@@6XV'@)X??3@LhW&@H?W&@@UO2@(M?hf@@@@@@
?@@@@@hf?V4@)K?V')K??N@)X?g?J@5eW&@@UO&@(Yhf?@@@@@
@@@@@?
I'@)KV@@)K?N@)X?f?W&@5?W&@@V@@@0Y
@@@@@@
J@@@@@
?I'@6KS@@6X?3@)XgW&@H?W&@@V@@@0Y?hf?@@@@@
@@@@@?
?V4@@@@@@@6T@@)Xf?7@@UO&@@@@@0M
@@@@@@
7@@@@@
V4@@@Y@@)KS@@)X?e?W&@@=O&@@@@@0M?
?@@@@@
@@@@@?
?I4@@@@@@@Y@@)X?e?@@V@@@@@@0M
@@@@@@
@@@@@@
I4@@@@@@@Y@@)XeW&@@V@@@@@@0M?
?@@@@@
@@@@@?
I4@@@@@@@@)KO2@@@@@@@@0M
@@@@@@
@@@@@@
I4@@@@@@@@@)KO&@@@@@@@@0M?
?@@@@@
@@@@@L
?I4@@@@@@@@@@@@@@0M?
@@@@@@
3@@@@@L?
I4@@@@@@@@@@@@@@0M
J@@@@@
@@@@@1
I4@@@@0M
?J@@@@@5
N@@@@@1?
?I4@@@@0M?
7@@@@@
@@@@@@
W&@@@@@H
?@@@@@@L
?J@@@@@@
3@@@@@@6X?
?W&@@@@@@?
?3@@@@@)K?
O&@@@@@5
N@@@@@@@)K
O&@@@@@@5?
?N@@@@@@@6K?
O2@@@@@@@H
?3@@@@@@@@@@@@@@@@@@@@@@@@@@@@@@@@@@@@@@@@@@@@@@@@@@@@@@@@@@@@@@@@@@@@@@@@H?
3@@@@@@@@@@@@@@@@@@@@@@@@@@@@@@@@@@@@@@@@@@@@@@@@@@@@@@@@@@@@@@@@@@@@@@@5?
?V'@@@@@@@@@@@@@@@@@@@@@@@@@@@@@@@@@@@@@@@@@@@@@@@@@@@@@@@@@@@@@@@@@@@@@@5
V'@@@@@@@@@@@@@@@@@@@@@@@@@@@@@@@@@@@@@@@@@@@@@@@@@@@@@@@@@@@@@@@@@@@@@(Y?
V'@@@@@@@@@@@@@@@@@@@@@@@@@@@@@@@@@@@@@@@@@@@@@@@@@@@@@@@@@@@@@@@@@@@@(Y
?V'@@@@@@@@@@@@@@@@@@@@@@@@@@@@@@@@@@@@@@@@@@@@@@@@@@@@@@@@@@@@@@@@@@@(Ye
?V4@@@@@@@@@@@@@@@@@@@@@@@@@@@@@@@@@@@@@@@@@@@@@@@@@@@@@@@@@@@@@@@@@@0Y?
V4@@@@@@@@@@@@@@@@@@@@@@@@@@@@@@@@@@@@@@@@@@@@@@@@@@@@@@@@@@@@@@@@@(Y?e
?I4@@@@@@@@@@@@@@@@@@@@@@@@@@@@@@@@@@@@@@@@@@@@@@@@@@@@@@@@@@@@@@0M?
I4@@@@@@@@@@@@@@@@@@@@@@@@@@@@@@@@@@@@@@@@@@@@@@@@@@@@@@@@@@@@@@0Yf
I4@@@@@@@@@@@@@@@@@@@@@@@@@@@@@@@@@@@@@@@@@@@@@@@@@@@@@@@@0M
?I4@@@@@@@@@@@@@@@@@@@@@@@@@@@@@@@@@@@@@@@@@@@@@@@@@@@@@@@@0M?g
How to care and store disc
● Be careful in handling the disc, because a slight flaw in the disc might affect piayback.
How to handle disc
● You can pick up disc without difficulty if you press the center of
supporting part when extracting disc from the case.
● Please refer to the left illustration, and do not touch the surface of
the disc.
● Do not paste paper or adhesive tape on the disc.
● Be careful not to leave a fingerprint or stain on the disc.
Both the DVD player and the discs are coded by region. These regional codes must
be matched in order for the disc to be played. If the codes are not matched, the disc
will not be played.
Discs you can play
Caution
Dolby Digital
Digital
Audio Disc
Stereo Disc
Broadcasting Method
MP3 Disc
�Be careful not to leave dirt or other substances on the disc.
�Do not play a cracked disc.
Disc Storage
Discs that cannot be played
● DVD PLAYER can not play LD, CD-G, CD-I, CD-ROM, DVD-ROM.
( When
appears on screen, it indicates an invalid button press.)
Copy Protection
● Most DVD discs are encoded with macro vision to prevent disc copying.
● This product incorporates copyright protection technology that is protected by the methods of
claims of certain U.S. patents and other intellectual property rights owned by Macrovision
Corporation, and is intended for home and other limited viewing uses only unless authorized
by Macrovision Corporation. Reverse engineering or disassembly is prohibited.
Do not keep under direct
sunlight.
Keep in a cool ventilated area.
Store disc in
its case.
R e f e r e n c e ● Sudden shift of the product from cold place to warm place might cause condensation on the
optical lens causing malfunction. In this case, use after waiting 1~2 hours while power is applied
to the unit.
How to clean the disc
● This product is manufactured by technical co-operation with Dolby Laboratories
this symbol and trademark are reserved for Dolby Laboratories.
Dolby Laboratories Inc. All rights Reserved.
● Clean the disc from inside to outside.
R e f e r e n c e ● Do not use thinner, benzen, commercial detergernt, alcohol, elctrostatic-preventing spray
which might cause damage the disc.
6
7
Contents
Contents
Important Information .......................................................................................... 2
Disc Menu .................................................................................................................. 23
Important Safety Instructions ......................................................................... 3
Setting DVD ............................................................................................................... 24
Information about Disc ....................................................................................... 6
Setting up Language ................................................................................................ 25
Setting up Video item ............................................................................................... 27
Setting up Audio item ............................................................................................... 29
Setting up the Parental Control................................................................................ 31
How to care and store disc ............................................................................... 7
Description ............................................................................................................... 10
Front Panel ............................................................................................................... 10
VFD Display .............................................................................................................. 11
Rear Panel ................................................................................................................ 12
Important Safety Instruction When using DC IN jacks ........................................... 13
Accessory ................................................................................................................. 13
Remote controller button.......................................................................................... 14
Installing Batteries in the Remote controller............................................................ 16
Using the Remote controller..................................................................................... 16
Battery Handling Precaution .................................................................................... 16
Remote controller handling precaution ................................................................... 16
Connection ............................................................................................................... 17
Connecting to a TV/MONITOR................................................................................ 17
Connecting to a Dolby Digital Amp.......................................................................... 18
Connecting TV antenna/TV cable ........................................................................... 19
Selecting Audio languages with the unit in play mode ..................... 33
To select Audio Language ....................................................................................... 33
To select Subtitles Language................................................................................... 34
Confirming Screen Display ............................................................................... 35
Scanning Screen or Song ................................................................................. 37
Slow/Divided motion ........................................................................................... 38
Repeating Playback .............................................................................................. 39
Enjoying magnified screen and Changing Camera Angles ............ 41
Searching to the Desired Screen/Song ..................................................... 43
Playing a JPEG file ................................................................................................ 45
Setting TV ................................................................................................................... 46
Before playing Your DVD Disc ....................................................................... 20
Specification ............................................................................................................. 48
Playing a DVD disc(DVD/CD) ........................................................................... 21
Is there something wrong with DVD player ? ......................................... 49
Playing a MP3 file .................................................................................................. 22
8
9
Description
Description
VFD Display
Front Panel
4
1 5
2
3
1
7
8
3
4
8
5
6
1
7
① POWER
Turns the power on/off.
① DVD/SVCD/VCD/CD/PBC/MP3
Indicates the type of the disc loaded in the disc tray.
② Disc slot
A Disc is inserted here.
② Rotation
Rotates when the disc is spinning.
③ EJECT
A Disc is ejected by this button.
③ Play/Pause
Indicates the current operation mode.
④ STOP
Stop disc play
④ Repeat/All
Indicates the current repeat play mode.
⑤ PLAY
Begin disc play
⑤ Chapter/Track
⑥ SKIP
Use to skip a chapter or track
Illuminates the chapter or track information of the
disc playing.
⑦ Remote Sensor
Receives signals from the remote control.
⑥ Angle
⑧ Display Window
Displays information about the current state of the
Indicates that the current disc being played can be viewed from
multiple angles.
⑦ Time
Indicates time information and displays information about
operation.
⑧ Dolby Digital
Indicates that the audio type of the disc under play is Dolby
Digital.
player and the disc.
10
2
6
1
11
Description
Description
Rear Panel
Important Safety Instruction When using DC IN jacks
10
4
1. When using this DVD player at home
5
W a r n i n g:
Use the AC/DC Adapter (DC 12V, 2A) when playing the DVD player at home using
an external power source.
2. When using this DVD player in the car
Connect to a 12vdc switched power source.
3. When connecting the DC power cable to power.
W a r n i n g:
3
2
1
9
6
7
1. Unplug the DVD player when you are not using it to prevent electric discharge.
2. Do not connect the DC power cable directly to the car battery directly.
8
① EXTERNAL REMOTE CONNECTOR
Connect an external remote receiver(provided) to this jack.
② DC IN/OUT
Input/output from DC 12V power sovrce.
③ DC IN/OUT
Input/output from DC 12V power source.
④ VIDEO INPUT
Connect a video cable to video output of auxiliary devices.
⑤ AUDIO INPUT
Connect a audio cable to audio output of auxiliary devices.
⑥ VIDEO OUT
Connect a video cable to this jack and to the Video Input jack on
your TV or monitor.
⑦ AUDIO OUT
Connect the audio cables(left and right) from these jacks on your DVD
player to the corresponding Audio Input jacks on your TV or monitor.
Accessory
Batteries x 2ea
⑧ DIGITAL AUDIO OUT (Coaxial)
Use a coaxial cable(not provided) to connect your DVD player to a
compatible Dolby Digital decoder.
12
⑨ S-VIDEO
Use the S-Video cable not provided to connect this jack to the S-Video
jack on your an TV or monitor for a higher quality picture.
⑩ ANTENNA INPUT JACK
Connect TV Antenna to DVDplayer.
DC power cable
Video /Audio
cable
O
n
maw
nuaelr's
Remote
controller
Remote IR
Sensor
Owner's
manual
L.bracket ✕ 2ea
13
Description
Description
1. POWER
Use to turn the DVD player on or off.
Remote controller button
2. EJECT
Use to insert or eject a disc.
1
3
2
4
5
7
6
8
9
11
10
12
13
14
15
17
19
16
18
20
21
22
23
24
5. ANGLE
Use to access various camera angles on a
disc (only when the disc supports multiple
camera angles).
6. TITLE
Displays the titles on the disc under play.
7. MENU
Shows the root menu of the DVD under play.
Show the menus of the disc under play and choose
air channel or cable channel under TV mode.
8. MODE
Use this button to choose playmode or
repeat mode.
9. ZOOM
Enlarges the picture.
10. GOTO
Use to directly access the track or chapter of the
DVD.
25
26
3. S-TITLE
Use this button to choose subtitle languages.
(only when the disc supports various language
subtitles).
4. LANGUAGE
Use this button to choose language
(only when the disc supports various language
options).
27
16. NEXT
Use to move to the next chapter(DVD) or
track(VCD,CDDA, MP3).
17. FR
Reverses through the disc form 2X to 20X faster.
18. FF
Forward scan through the disc from 2X to 20X
faster.
19. ENTER
Use this button to confirm a selection.
20. ARROWS
Use to move to the desired menu item.
Change channel under TV mode. (Up/Down)
Control adjust under TV mode. (Left/Right)
21. SETUP
Use to set various functions according to
individual preference.
22. DISPLAY
Shows the time information about title, chapter,or
track of the disc under play.
23. SLOW BACK
Reverses through the disc from 1/2X to 1/7X
faster.
24. SLOW FORWARD
Forwards through the disc from 1/2X to
1/7X faster.
11. A - B
Repeats the selected segment.
25. NUMERIC BUTTONS
Use when selecting a password or direct access
of chapters or tracks
12. STOP, ERASE
Stops disc play.
Erase TV channel under TV mode.
13. PLAY, SAVE
Begin disc play.
Memory TV channel under TV mode.
26. TV / AUX
① Access the AV1 or AV2 inputs.
② Change from DVD mode to TV mode.
(DVD➔ TV➔ AUX1(Rear input)➔
AUX2(Front input) )
14. PAUSE, SCAN
Use this button to pause on a scene.
Auto Channel Scanning under TV mode
14
15. BACK
Move to the previous chapter(DVD) or
track(CDDA, MP3).
27.NTSC/PAL, AIR/CABLE
Use to choose broadcasting methods (only
when DVD player is not operating).
15
Description
Connection
Installing Batteries in the Remote Control
1. Press the tab and lift up the battery
cover
2. Insert new batteries and ensure
that the polarity is correct when
installing.
Connecting to a TV/Monitor
3. Slide and Close the battery cover.
Reference :
Using the Remote Controller
S-Video
Cable
Video
Cable
You can connect auxiliary
devices in this port, such
as VCR.
Audio Cable
The effective operating range of the remote control is
16 feet, and 30° left or right of the from the DVDIR
receiver.
Battery Handling Precaution
● Incorrect use of the battery cause leakage or corrosion.
● Ensure that polarities are correct when inserting batteries.
● Do not expose to impose heat or fire. Do not disassemble or short-circuit the batteries.
● Ensure that exhausted batteries are not inserted into the remote control.
● Do not use different types of batteries together. Do not use old batteries together with new ones.
● If you don't use the remote controller for a long time, remove the batteries to avoid possible damage
from battery corrosion.
● Replace the batteries with new ones if the remote controller does not operate or the operating distance
comes to be short.
1. Connect the audio cables between the AUDIO OUT (L/R) jacks on the back of your DVD player and the
corresponding Audio Input jacks on your TV/Monitor.
2. Connect the video cable between the VIDEO OUT jack on the back of your DVD player and the
corresponding Video Input jack on your TV/Monitor. (If you have S-video jack on you TV/Monitor, connect
this jack.)
Caution
�Connet the DVD player to your TV/Monitor directly.
�If you connect the DVD player to a VCR, the playback picture will be distorted because DVD
video discs are copy protected.
Remote control handling precautions
Warning
● Do not leave a remote control in a hot or damp place.
● Do not drop place a heavy object on the remote control.
● Do not disassemble remote control.
● Do not get wet.
16
�When you connect the DVD player to your TV/Monitor, be sure to turn off the power and unplug
both units before making any connection.
�Do not set the Digital Audio Output of this DVD player to "PCM" unless you are connecting the
Digital Audio jack of this DVD player to an AV decoder that has Dolby Digital decoding function.
17
Description
Connecting to a Dolby Digital Amp
Connection
Connecting TV antenna / TV cable
Rear Panel
75 ohm Coaxial Cable
Video Cable
or
Audio
Cable
To digital audio output
Receiver equipped with a
Dolby digital decoder
Front
Speaker
(left)
Center Speaker
Front
Speaker
(right)
Sub
Speaker
Rear Speaker
(left surround)
Rear Speaker
(right surround)
1. Prepare TV antenna or TV cable to see TV.
2. Connect TV antenna or TV cable to antenna jack on the back of your DVD Player.
●
●
●
●
DVD disc must be recorded in Dolby Digtal.
You must have Dolby Digital decoder and 6 channel Amp, 5 speakers and 1 bass woofer.
You must set Digital Out of AC3 at "Raw" in Audio Setting
This product is manufactured by technical co-operation with Dolby Laboratories
this symbol and trademark are reserved for Dolby Laboratories.
Dolby Laboratories Inc. All rights Reserved.
Caution
18
�When connecting an amplifier equipped with Dolby Digital, connect it in the same way as
shown above
�When connecting it, refer to the Audio system's manual.
�Be sure to adjust the receiver's volume to a moderate listening level. Otherwise, the speakers
may be damaged by high volume levels.
�Turn off the receiver before you connect or disconnect the DVD player's power cord.
If you leave the receiver power on, the speakers may be damaged.
Caution
�When you connect TV antenna to DVD Player, be sure to turn off the power and unplug all of
the equipment from the power souce before making any connections.
Warning
�Choose Air channel or Cable channel by pressing menu key.
�Air channel range : 2ch~69ch
�Cable channel range : 1ch~125ch
�There is Volume control when watching the tuner
19
Before playing Your DVD Disc
Playing a DVD disc(DVD/CD)
When connecting to output componets, refer to "Connection" Chapter and output components’ manual,.
Turn on the power of the Amplifier, if it is connected.
First, turn on the power of TV, and press TV/Video button.
Insert the DVD disc
● Make sure that the disc's label is facing up.
● Sliding into the slot, the disc is automatically played
Press the Power button of DVD player
To stop Press the button
no disc
"(STOP)"
To stop temporarily Press the button
To resume again Press the button
● "No disc" is displayed on the screen, following "Loading..."
R e f e r e n c e ● The player is automatically turned off, if "No disc" is on the screen for 8 minutes.
● If
is on the screen when you pressed certain button, it means that this button is not used in
this disc which is being played.
Caution
20
�Do not move DVD player when it is playing. This may cause damages to the disc.
�Be sure to press
button to eject disc.
If you eject disc by force, disc may be damaged.
�Do not insert any other object than disc in the slot.
�Certain function may not operate or operate differently depending on the disc.
In this situation, refer to the contents of the disc case.
"(Pause)"
"(PLAY)"
R e f e r e n c e ● The player memorizes the position you pressed the button
and if you press the
button
the player resumes from the position you pressed the button
If you want
to replay from the beginning, press the button
twice.
● Press the button
to stop disc temporarily.
It you press the button
once again, it replays the disc one scene by one scene.
● Refer to the page 34-35 to change language or subtitles while it is playing.
● It may take several time in reading disc while it is playing, it is not a breakdown.
So wait for a while.
Caution
● Eject the disc when it stopped completely.
● "No disc" is displayed on the screen, when you inserted disc upside down, damaged disc,
and other unplayable disc.
● "REGION ERROR” is displayed on the screen, when regionally unmatched disc
is inserted.
21
Playing a MP3 file
Disc Menu
You can select the following menu when the menu is recorded in discs.
To display recorded menu in disc DVD
Insert the MP3 disc.
● Make sure that the disc's label is facing up.
● Sliding into the slot, the disc is automatically played
1
Press the MENU button
● The menus recorded in discs appears.
Menus appears differently depending on discs.
● ON/OFF of PBC function are selected repeatedly each time you press the
button (Menu)
● CD does not have disc menu function.
To stop Press the button
"(STOP)"
To stop temporarily Press the button
To resume again Press the button
"(Pause)"
2
Press the … † œ √ buttons to move to item you
want, and press the ENTER button.
"(PLAY)"
To replay a song you want
1. Press the button (
) after choosing a song (track) you want by using Arrow button.
( … † œ √ ) Then the selected song you selected will start automatically.
2. You can replay the song directly by entering the number of the song.
● 14 tracks are displayed on the screen. If you want see more tracks, use the button œ √.
● Press the button
to enjoy next or previous song.
● You can enjoy song in another folder by using the button Menu.
3. The Button(FR/FF) moves to the Directory folder when it is pressed.
※ About MP3
● MP3 file must be formatted by ISO 9660 or JOLIET
● The file name of MP3 can not use particular letters.( \,/,:,*,!,",<,>,|...)
● You can not record copy-protected MP3 file
● You may not play certain MP3 disc depending on the recording condition.
22
23
Setting DVD
Setting DVD
The picture which you can set up various menu in advance appears after pressing the button(SETUP)
with the unit in Stop mode. The information about the picture is as follows.
Setting up Language
You can display OSD, subtitles or listen audio by language you want.
1
Press the SETUP button with the unit in Stop mode.
1
Press the SETUP button with the unit in Stop mode.
2
Press the œ √ buttons to move to Language
Setting Menu and press the ENTER button.
● following picture appears
● Setting up language
You can set up text language, subtitles, Audio language, disc menu
language, menu index, factory mode.
● Setting up Screen
You can set up the size of screen, broadcasting method.
● Setting up Audio
You can set up the digital/analogue out method and the volume of
analogue audio out.
● Setting up Parental Control
You can set up the parental control level
Press the button œ √ to move each menu.
Press the button (
) to choose menu you want.
2
24
Press the œ √ buttons to move to menu you want
and press the ENTER button.
● OSD Menu
● Subtitle
● Audio
● DVD Menu
● Default
when selecting menu language of DVD player
when selecting subtitles.
when select "Auto", it is set up as the first
recorded language.
when selecting language you listen from speakers.
when selecting language of each menu recorded
in disc.
when resetting at the factory send-out condition.
25
Setting DVD
Setting DVD
Setting up Video item
You can set up about screen as following.
3
Press the … † buttons to move to Language
Item and press the ENTER button.
1
Press the SETUP button with the unit in Stop mode.
2
Press the œ √ buttons to choose Screen menu
and press the ENTER button.
● Languages you want to select appear.
4
Press the … † buttons to select Language
and press the ENTER button.
Press the button
to exit from the SETUP screen.
R e f e r e n c e ● The selected language does not appear in menu even if you followed above instruction,
if selected language is not recorded in disc.
26
27
Setting DVD
Setting DVD
Setting up Audio item
You can set up as following depending on the connected Audio speaker.
3
Press the … † buttons to set up item and press
the ENTER button.
1
Press the SETUP button with the unit in Stop mode.
TV Shape
2
Press the œ √ buttons to choose Audio Setting
and press the ENTER button.
4 : 3 PS
4 : 3 LB
16 : 9
: You can watch 4:3 screen, but up and
down side of screen is blackened.
: You can watch only the middle part of 4:3 movie.
: You can watch the screen at 16:9 ratio.
TV System
NTSC
PAL
Auto
4
: When connecting to TV with NTSC method.
: When connecting to TV with PAL method.
: Automatically selected depending on disc.
Press the … † buttons to item you want and
press the ENTER button.
Press the button
28
to exit from the SETUP screen.
29
Setting DVD
Setting DVD
Setting up the Parental Control
This setting prohibits children from viewing inappropriate discs.
You can grade by 8 rating levels.
It works with DVD discs that have been assigned a rating.
3
Press the … † œ √ buttons to set up item and press
the ENTER button.
Dolby Digital
Press the SETUP button with the unit in Stop mode.
2
Press the œ √ buttons to choose Parental
Control and press the ENTER button.
3
Press the … † buttons to move to Password item.
Set up PCM of Digital out at "Raw" in the case of being connected
to Dolby Digital Amplifier.
Press the button
30
1
to exit from the SETUP screen.
31
Setting DVD
Selecting Audio languages with the unit in play mode.
To select Audio Language
4
1
Press the LANGUAGE button to change
Audio Language(DVD).
Enter pass word with Numeric buttons.
Memorize the password. In case you forget the password, this function is
not working. Key icon on the screen does not open if not matched with
password.
5
6
Press the … † buttons to move Parental Control
Menu.
Press the ENTER button to select grade you want.
● You can select various language Kor, Eng by pressing the LANGUAGE
button (DVD), if disc has audio information.
R e f e r e n c e ● Audio Language index may differ depending on disc.
● One disc can record maximum 8 languages.
● Set up audio language in "SETTING DVD" chapter if you want a same
language each time you replay DVD
Parental Control rating changes each time you press Enter button
If you select Rating Level 6, Rating Level 7,8 does not replay.
The bigger the number is, the closer to adult the disc is.
32
33
Selecting Audio languages
with the unit in play mode.
On Screen Display
Screen display may differ depending discs.
To select Subtitles Language
1
Press the S-TITLE button to change subtitles.
CD
1
Press the DISPLAY button.
The first screen shows the elapsed time and total time of the present
track.
● You can select various subtitles Kor, Eng, Jap- by pressing the S-TITLE
button (DVD), if disc has subtitle information.
● Turn off subtitles by pressing the S-TITLE button, if you do not want
subtitles.
2
Press the DISPLAY button once more (CD).
This screen shows the elasped time and total time of disc
R e f e r e n c e ● Subtitles indication may differ depending on disc.
● One disc can record maximum 32 languages.
● Set up subtitles in "SETTING DVD" chapter if you want a same subtitle
language whenever you replay DVD
R e f e r e n c e ● Audio Languages/Subtitles may not operate depending on disc
● This function does not operate with the unit in pause mode.
● This function operates with the unit in play mode.
34
35
Confirming Screen
Display
Scanning Screen or Song
DVD
1
To Skip Chapters tracks or Songs (DVD/MP3)
Press the DISPLAY button once more.
1
The screen shows all information about disc.
Press the button (BACK, NEXT).
When you press the BACK button
● Moves to beginning of the present chapter/track.
- If you press once more, it moves to the previous chapter/track.
●DVD
When you press the NEXT button
This screen appears right after loading when
playing CD title. The total running time is
displayed on screen when pressing the "Display"
button. The present lapsing time is displayed
when pressing the "Display" button.
● Moves to the next chapter/track.
The elapsed time and total time of title is displayed.
The present track number, present track lapsing time, present track total
running time are presented.
To Scan video or CD tracks (DVD/CD)
2
The current title,chapter number angle
status,audio track and subtitle selection.
1
Press the button (FR/FF).
Play speed changes in the sequence of 2X, 4X, 8X, 20X.
3
36
Press the DISPLAY button once more,
Display indicator disappears.
● Press the PLAY
button to play at normal speed.
● You can not listen sound at fast Playingback.
● Fast playback does not operate with MP3’s.
37
Slow/Divided motion
Repeating Playback
To playback Slow motion.
To repeat a chapter, title, or track (DVD/CD)
Use this button to repeat a chapter, title, or track
1
Press the SLOW button.
When you press the SLOW button
1
Press the MODE button.
Play mode Menu appears on the screen.
Play speed changes in the sequence of 1/2X, 1/4X, 1/6X, 1/7X each time
pressing the SLOW button.
When you press the SLOW button
Reverse Play speed changes in the sequence of 1/2X, 1/4X, 1/6X, 1/7X
each time pressing the SLOW button.
● Press the PLAY
button to play at normal speed.
● You can not listen sound to audio at slow Playback speeds.
● Slow Playback does not operate while playing CD/MP3.
2
Press the … † buttons to highlight the Repeat
option, and press the ENTER button.
To Scan Each scene.
1
Press the PAUSE button with the unit in the Pause mode.
You can step frame by frame each time the PAUSE button is pressed.
● Press the PLAY
button to play at normal speed.
● DVD
Off : When you do not want to repeat playback
Title : when you want to repeat the present title
Chapter : when you want to repeat the present chapter.
● CD
Off : When you do not want to repeat playback
Track : when you want to repeat the present track.
Disc : when you want to repeat the present disc.
38
39
Repeating Playback
Zoom + Angle Functions
To repeat a particular section
Enlarging the picture
You can enlarge the picture up to 3X the normal size.
1
Press the A-B button at the position from
which you want to repeat.
Play mode Menu appears on the screen.
1
Press the ZOOM button in Play or Pause mode.
●(
) is displayed on screen and the screen ratio is displayed on screen.
● Each press of the ZOOM button enlarges screen in the following sequence
4/3X - 3/2X - 2X - Off
● Press the A-B button to set the starting point A and then press the A-B
button once more to set the end point B.
The selected segment (A-B) will be played repeatedly.
● To cancel the repeat operation. Press the A-B button again.
2
40
You can move the enlarged picture the
… † œ √ buttons.
41
Enjoying magnified screen and
Changing Camera Angles
Searching to the Desired Chapten/Track/Time
You can find the desired time, title, chapter, track.
Change Angle (DVD)
To scan by time (for example by 1 hour 5 minutes 15 seconds)
When a DVD contains multiple angles of a particular scene, you can select the Angle fuction.
1
Press the ANGLE button.
● The Angle icon(
Press the GOTO button.
2
Press the … † buttons to the move to the time item.
3
Press the buttons '1, 0, 5, 1, 5' using the numeric
buttons, and then press the ENTER button.
) is present, and the maximum number of viewing angle’s.
● Press the ANGLE button to, select the Camera Angle you want
● If the maximum number of screen is 1, the Camera Angle does not
change.
42
1
43
Searching to the Desired
Screen/Song
Playing a JPEG file
To scan by title, chapter
Insert the Disc.
1
Press the GOTO button.
2
Press the … † buttons to move to title/chapter item.
3
Press the buttons '1, 3' using the numeric
buttons, and then press the ENTER button.
● Make sure that the disc's label is facing up.
● Slide show begins from first picture automatically
1. You can enjoy a slide show by displaying 9 pictures at a time, by
pressing the "Menu" button.
2. Choose the picture button. you want by pressing the cursor buttons
(√, œ, †, …)
3. You can move to the next/previous picture by using the
NEXT/PREV button. You can also move to the picture directly by
pressing the "Enter" button after pressing the numeric button.
4. The picture rotates 90, 180, 270 original when pressing the button
Slide show begins again as before if you press the play button
5. You can enjoy the 4/3X, 3/2X, 2X, 1/4X, 1/2X magnified/reduced
picture by pressing the button "Zoom".
Reference
Slide show can play 999 pictures.
Slide show play at 10 seconds interval automatically.
● Slide show plays only JPG/JPEG files.
● The JPEG file name can not use some characters(\,/,:,*,!,",<,>,|...)
● Slide show may not play JPEG Disc’s depending on the recording format.
●
●
44
45
Setting TV
Setting TV
TV Channel : Air channel range 2~69ch
Cable channel range 01~125ch
Watching TV
1
4
Press the Play button to enter the channel into memory.
Press the stop button to erase the channel from memory.
5
Press the Pause button or hold the Play button on the
front of set to enter channel into memory automatically.
TV/AUX
Press the TV/ Aux button.
2
Press the Up/Down button or skip button on front of
set to change channel.
3
Press the Left/Right button to adjust channel.
● Channel adjustment
The function for adjusting channel, when chamnnel reception is not good.
Reference
Press the Aux button : DVD mode------TV mode_----Aux mode
No control the button of set under Auto memory
● Changing to DVD mode Automatically, when insert Disc under TV mode
● Press the NTSC/PAL button to change from Air channel to cable channel.
●
●
46
47
Specification
Is there someting wrong with the DVD Player?
Contact the service center if same phenomenon appears, after taking following measures.
General
Power Requirements
Power Consumption
Weight
Dimension
Operating Temperature Range
Operating Humidity Range
Disc
48
DC 12V 2A
15W
1.33Kg, 2.93lbs
178(D) X 175(W) X 50(H)
7.00(D) X 6.88(W) X 1.9(H) inch
0°C ~ +50°C, 32F ~ 122F
30% ~ 80%
Video Output
Composite Video :1.0 V p-p
S-Video Luminance Signal :
1.0Vp-p(75 ohm)
Audio Output
2channel Left(1/L) Right (2/R)
Output level : Analog Audio : 2.0 Vrms
Digital Audio : 0.5V p-p
S/N Ratio
Dynamic Range
Total Harmonic Distortion.(THD)
100dB
90dB
0.05%
The picture is not seen on the screen while
the disc is running, or the picture has poor
quality and wavers.
The sound quality is poor.
� Ensure that TV is turned on.
� Ensure that the power cord is plugged in
completely.
� Check if the disc is dirty or damaged.
� Poorly manufactured discs may not operate.
� Check all connections.
Remote control does not work.
� Check if remote control is not pointed at the
remote sensor of the DVD player or too far from the
DVD player.There is an obstacle between the
remote and the DVD player
�Check if the batteries in the remote control are
exhausted.
Video or Audio does not operate, or disc is
ejected after 2 ~ 5 seconds.
� If the DVD player is moved from cold place to
warm place moisture may condense in side causing
poor operation. Do not use DVD player for about
1 ~ 2 hours.
(After moisture evaporates, you can use the DVD
player.)
The DVD player does not work.
� Check if a disc is inserted.
� Check if the voltage is present.
� Check if the disc is inserted label facing up.
� Check if disc has matching regional code with DVD
player.
49
Is there someting wrong with the DVD
player?
No sound
� Playing the unit in slow or scan mode there is no
sound.
� Check if it is connected and it is set up properly.
� Check if disc is inserted upside down?
(Insert disc label facingup.)
� Is disc damaged or dirty (Clean the disc.)
DVD player does not work as it is set up
initially.
� Initial settings up may operate differently depending
on DVD disc.
The Dolby Digital 5.1 channel sound does
not operate.
50
� You can enjoy Dolby Digital 5.1 channel
sound by connecting to a Dolby Digital decoder and
playing a DVD disc recorded in Dolby Digital 5.1
CH.
Audio language and Subtitles which are
chosen does not operate.
� Audio language and Subtitles only operate in discs
recorded with the desired language.
Camera Angles does not operate in disc play
� You can change Angles on screen with discs
recorded by with multiple camera angles "
mark is present on the screen.
"
51
MEMO