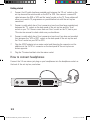
1
Talking set-top box instruction manual Model number: GDB20TTS IMPORTANT: Please read all instructions carefully before use and keep for future reference. Goodmans GDB20TTS_Instruction Manual.indb 1 6/15/2010 4:26:25 PM Introduction Thank you for buying this product. Not only can it receive over 50 digital TV channels, but you can also listen to up to 24 digital radio stations, all at the touch of a button. This product has talking features, audio description, and an option to change the colour settings and font size. You may already be familiar with using similar equipment, but we recommend you take time to read these instructions. We have designed them so you can become familiar with the many features of the system and to make sure you get the very best from your set-top box. Keep these instructions in a safe place in case you need them in the future. Coverage Check the coverage in your area. Text your postcode, followed by your house number or name to 83331. Or visit www.freeview.co.uk For example, NW9 6NY (Costs no more than a normal text.) The Freeview service depends on coverage in your area. We cannot give a guarantee about broadcast signal quality. A wideband rooftop aerial will give the best results. You may need an upgrade to your aerial. The FREEVIEW, FREEVIEW+, FREEVIEW+ HD words and logos are trademarks of DTV Services LTD. DTV Services Ltd 2002, 2008. Safety You must be careful whenever you use any electrical equipment. Please read the product safety section on page 75 before using your digital box. This appliance is for household use only. 2 Goodmans GDB20TTS_Instruction Manual.indb 2 6/15/2010 4:26:25 PM Introduction Contents Introduction . . . . . . . . . . . . . . . . . . . . . . . . . . . . . . . . . . . . . . . . . . . . . . . . . . . . . . . . . 2 Coverage . . . . . . . . . . . . . . . . . . . . . . . . . . . . . . . . . . . . . . . . . . . . . . . . . . . . . . . . . . . 2 Safety . . . . . . . . . . . . . . . . . . . . . . . . . . . . . . . . . . . . . . . . . . . . . . . . . . . . . . . . . . . . . . 2 What’s in the box . . . . . . . . . . . . . . . . . . . . . . . . . . . . . . . . . . . . . . . . . . . . . . . . . . . . . 4 Main unit . . . . . . . . . . . . . . . . . . . . . . . . . . . . . . . . . . . . . . . . . . . . . . . . . . . . . . . . . . . 5 Remote control . . . . . . . . . . . . . . . . . . . . . . . . . . . . . . . . . . . . . . . . . . . . . . . . . . . . . . 6 Getting connected . . . . . . . . . . . . . . . . . . . . . . . . . . . . . . . . . . . . . . . . . . . . . . . . . . . . 8 How to connect the set-top box to a TV set . . . . . . . . . . . . . . . . . . . . . . . . . . . . . . . 10 How to connect to a TV set and DVD recorder or VCR? . . . . . . . . . . . . . . . . . . . . . . . 10 How to connect headphones . . . . . . . . . . . . . . . . . . . . . . . . . . . . . . . . . . . . . . . . . . . 12 How to turn the set-top box on for the first time . . . . . . . . . . . . . . . . . . . . . . . . . . . . 13 Problems installing the channels . . . . . . . . . . . . . . . . . . . . . . . . . . . . . . . . . . . . . . . . 15 How to turn the set-top box off . . . . . . . . . . . . . . . . . . . . . . . . . . . . . . . . . . . . . . . . . 15 How to turn the set-top box on from standby . . . . . . . . . . . . . . . . . . . . . . . . . . . . . . . 15 Commonly used features . . . . . . . . . . . . . . . . . . . . . . . . . . . . . . . . . . . . . . . . . . . . . . 16 Changing the volume . . . . . . . . . . . . . . . . . . . . . . . . . . . . . . . . . . . . . . . . . . . . . . . . . 16 Mute . . . . . . . . . . . . . . . . . . . . . . . . . . . . . . . . . . . . . . . . . . . . . . . . . . . . . . . . . . . . . 16 Changing channel . . . . . . . . . . . . . . . . . . . . . . . . . . . . . . . . . . . . . . . . . . . . . . . . . . . . 17 Programme information . . . . . . . . . . . . . . . . . . . . . . . . . . . . . . . . . . . . . . . . . . . . . . . 19 Programme guide . . . . . . . . . . . . . . . . . . . . . . . . . . . . . . . . . . . . . . . . . . . . . . . . . . . . 20 Mini guide . . . . . . . . . . . . . . . . . . . . . . . . . . . . . . . . . . . . . . . . . . . . . . . . . . . . . . . . . 22 Favourites list . . . . . . . . . . . . . . . . . . . . . . . . . . . . . . . . . . . . . . . . . . . . . . . . . . . . . . . 23 Reminders list . . . . . . . . . . . . . . . . . . . . . . . . . . . . . . . . . . . . . . . . . . . . . . . . . . . . . . 24 On-screen help pages . . . . . . . . . . . . . . . . . . . . . . . . . . . . . . . . . . . . . . . . . . . . . . . . 25 Single-button functions . . . . . . . . . . . . . . . . . . . . . . . . . . . . . . . . . . . . . . . . . . . . . . . 26 Talking features . . . . . . . . . . . . . . . . . . . . . . . . . . . . . . . . . . . . . . . . . . . . . . . . . . . . . 27 Retuning . . . . . . . . . . . . . . . . . . . . . . . . . . . . . . . . . . . . . . . . . . . . . . . . . . . . . . . . . . . 30 Parental control . . . . . . . . . . . . . . . . . . . . . . . . . . . . . . . . . . . . . . . . . . . . . . . . . . . . . 34 Setting up your system . . . . . . . . . . . . . . . . . . . . . . . . . . . . . . . . . . . . . . . . . . . . . . . 38 Preferences . . . . . . . . . . . . . . . . . . . . . . . . . . . . . . . . . . . . . . . . . . . . . . . . . . . . . . . . 38 Reminders list . . . . . . . . . . . . . . . . . . . . . . . . . . . . . . . . . . . . . . . . . . . . . . . . . . . . . . 61 Technical settings . . . . . . . . . . . . . . . . . . . . . . . . . . . . . . . . . . . . . . . . . . . . . . . . . . . . 62 Help . . . . . . . . . . . . . . . . . . . . . . . . . . . . . . . . . . . . . . . . . . . . . . . . . . . . . . . . . . . . . . 71 System information . . . . . . . . . . . . . . . . . . . . . . . . . . . . . . . . . . . . . . . . . . . . . . . . . . 72 Help and advice . . . . . . . . . . . . . . . . . . . . . . . . . . . . . . . . . . . . . . . . . . . . . . . . . . . . . 73 Safety information . . . . . . . . . . . . . . . . . . . . . . . . . . . . . . . . . . . . . . . . . . . . . . . . . . . 75 Cleaning . . . . . . . . . . . . . . . . . . . . . . . . . . . . . . . . . . . . . . . . . . . . . . . . . . . . . . . . . . . 75 Ventilation . . . . . . . . . . . . . . . . . . . . . . . . . . . . . . . . . . . . . . . . . . . . . . . . . . . . . . . . . 75 Servicing . . . . . . . . . . . . . . . . . . . . . . . . . . . . . . . . . . . . . . . . . . . . . . . . . . . . . . . . . . 75 3 Goodmans GDB20TTS_Instruction Manual.indb 3 6/15/2010 4:26:25 PM Getting started What’s in the box Carefully remove your equipment from the box it arrived in. It is recommended that you retain this packaging should the item need to be returned under warranty. Equipment and accessories supplied In the box you should have the items listed below. • Main unit • AC/DC power adapter • Remote control • Two AA batteries • RF cable • Scart-to-Scart cable • User guide and quick start guide These items are illustrated in the diagram below. If any items are missing, please contact our customer services department. TV STB AV 3 1 2 4 5 7 8 9 0 Help 6 + + Vol Ch - - Guide Info OK Menu Exit Back AD Main unit ? TV/ radio Fav Sub Txt TF Remote control Scart-to-Scart cable Set Top Box Set Top Box QS Guide User Guide Quick Start Guide User Guide AC/DC power adapter Batteries type AA RF cable 4 Goodmans GDB20TTS_Instruction Manual.indb 4 6/15/2010 4:26:26 PM Getting started Main unit There are no control buttons on the main unit. The remote control sensor is located on the left side of the front panel. When operating the remote control, point it at this sensor. Do not block the sensor or the remote control won’t work. Smart Talk POWER AD Infrared sensor and power indicator Aerial input connector, connects to TV aerial RF out connector, connects to VCR/ DVD recorder or TV Scart connector, for connects to VCR/DVD scart Scart connector, connects to TV scart connector 5V DC IN + AERIAL RF OUT VCR/DVD TV Headphone output socket 2.0A Power supply input, from AC/DC adapter 5 Goodmans GDB20TTS_Instruction Manual.indb 5 6/15/2010 4:26:26 PM Getting started Remote control The remote control buttons give access to all the functions required for operation of the set-top box. Infrared transmitter Switches the set-top box on and off (standby). Reduces the set-top box volume. Enters and exits the TV electronic programme guide EPG. 1 2 3 4 5 6 7 8 9 0 Help + + Vol Ch - - Guide Selects menu options and displays Mini guide if pressed while watching TV. Enters and exits the menu screen. TV power on/off and input channel selection AV Mutes the set-top box volume. Increases the set-top box volume. TV STB Info Returns to menu previously displayed. Enters and exits the help screen. Moves up the channel list. Moves down the channel list. Displays information about the channel you are currently watching. Up, Down, Left and Right arrow buttons for moving around the on-screen menus. OK Menu 0 - 9. Choose channel numbers and numbers on menus that go to different options. Exit Exits the menu system and returns to the last programme you were Back Switches between TV and Radio. Swaps between the channel you are watching and the previous channel you were watching. Switches the audio description on and off. Displays the info bar which contains information about the programme you are currently watching. AD ? TV/ radio Fav Sub Txt TF Displays list of your favourite channels. Changes or goes to different options when you are on digital text pages. Gives digital text. Switches subtitles on and off. Switches talking features on and off. Stop talking features. 6 Goodmans GDB20TTS_Instruction Manual.indb 6 6/15/2010 4:26:27 PM Getting started Putting batteries in the remote control The remote control needs two type AA batteries to power it. We have supplied these. To replace the batteries 1 Turn the remote control on to its front face to reveal the battery compartment cover (shown tinted in diagram below). 2 Push and pull the cover in the direction of the arrows on the cover and slide it off to reveal the battery compartment. 3 Remove the two batteries from the compartment and put them to one side. (You do not need to do this when you put batteries in for the first time.). 4 Insert the two AA size batteries following the diagram printed around the compartments. 5 Put the cover on the guides of the compartment and slide it closed. You will hear it snap closed. Getting rid of the batteries Make sure you get rid of the batteries safely. Never get rid of them in a fire or with household waste. Check with your local authority for regulations on this. 7 Goodmans GDB20TTS_Instruction Manual.indb 7 6/15/2010 4:26:27 PM Getting started About the remote control 1 The remote control communicates with the main unit using an infrared link between the sensor on the remote control and the sensor on the front of the main unit. 2 The remote control can be used up to seven metres away at an angle of 30 degrees to the front panel of the main unit. 3 The remote control will not work if there is something in between the remote control and the main unit. Sunlight or very bright light may mean the remote control does not work as well as usual. How to use the remote control 1 Point the sensor end of the remote control towards the sensor on the front of the main unit. 2 Press the number buttons for the channel that you want. 3 The sensor on the front panel will flash as it receives commands from the remote control. 4 You can select a setting from the menu to sound a beep when the set-top box has received an instruction from the remote control. Getting connected Connecting an aerial Before you can tune in any TV or radio stations, you must connect an aerial to your unit. You will get better results using a rooftop aerial. If you are in a strong signal area, a portable aerial may be suitable. We recommend that for the initial tuning process you use a fixed aerial to get the strongest signal. Connect the aerial to the unit as shown on page 9. Connecting to a power supply The main unit should only be powered using the AC/DC adapter supplied as shown opposite. The AC/DC adapter is powered from the 230V AC mains supply. 8 Goodmans GDB20TTS_Instruction Manual.indb 8 6/15/2010 4:26:27 PM Getting started EXTERNAL AERIAL SET TOP BOX 5V DC IN + AERIAL RF OUT VCR/DVD TV 2.0A RF CABLE SCART-SCART CABLE TO AERIAL INPUT SOCKET ON TV TO SCART INPUT CONNECTOR ON TV TV 9 Goodmans GDB20TTS_Instruction Manual.indb 9 6/15/2010 4:26:27 PM Getting started How to connect the set-top box to a TV set If your TV has a SCART socket 1 Put your set-top box on a firm, level surface with at least a 10-centimetre gap around all the sides and close to the TV you are going to connect it to. 2 Turn off the mains socket your TV is plugged into or pull the plug out of the socket. 3 Take the aerial lead out of the TV and connect it to the ‘aerial’ connector on the back panel of the set-top box. 4 Connect the RF cable (we have provided one) between the ‘RF out’ socket on the set-top box and the aerial socket on the TV. This cable will allow you to watch TV programmes as you did before but with the set-top box connected. 5 Connect a cable which has a ‘Scart’ connector at each end (we have provided one) between the ‘TV’ socket on the back panel of the set-top box and the ‘Scart’ socket on your TV. If there is more than one ‘Scart’ socket on the TV, look in your TV instruction manual to check which one you should use. 6 The set-top box will not work if you do not have the scart-to-scart cable connected. 7 Plug the AC/DC adapter into a mains socket and then plug the connector on the adapter into the ‘5V DC in’ connector on the back panel of the set-top box as shown on page 11. 8 Plug the TV mains lead back into the mains socket. When your TV does not have a SCART socket Connect as described above but ignore the Scart-to-Scart connection. How to connect to a TV set and DVD recorder or VCR? 1 Put your set-top box on a firm, level surface with at least a 10-centimetre gap around all the sides and close to the TV and DVD recorder or VCR you are going to connect it to. 2 Turn off the mains socket your TV and DVD or VCR is plugged into or pull the plugs out of the sockets. 3 Take the aerial lead out of the TV and connect it to the ‘aerial’ connector on the back panel of the set-top box. 10 Goodmans GDB20TTS_Instruction Manual.indb 10 6/15/2010 4:26:28 PM Getting started EXTERNAL AERIAL SET TOP BOX 5V DC IN + AERIAL RF OUT VCR/DVD SCART-SCART CABLE RF CABLE TV 2.0A SCART-SCART CABLE RF CABLE TO AERIAL CONNECTOR DVD PLAYER/ RECORDER OR VCR TO SCART INPUT CONNECTOR TV 11 Goodmans GDB20TTS_Instruction Manual.indb 11 6/15/2010 4:26:28 PM Getting started 4 Connect the RF cable (we have provided one) between the ‘RF out’ socket on the set-top box and the aerial socket on the DVD or VCR. Also connect a second RF cable between the DVD or VCR and the ‘aerial’ socket on the TV. These cables will allow you to watch TV programmes as you did before but with the set-top box connected. 5 Connect a cable which has a Scart connector at each end (we have provided one) between the ‘TV’ socket on the back panel of the set-top box and the ‘Scart’ socket on your TV. If there is more than one ‘Scart’ socket on the TV, look in your TV instruction manual to check which one you should use. 6 Connect a cable which has a Scart connector at each end (we have not provided this) between the ‘VCR or DVD’ socket on the back panel of the set-top box and the ‘Scart’ socket on your DVD or VCR. 7 Plug the AC/DC adapter into a mains socket and then plug the connector on the adapter into the ‘5V DC in’ connector on the back panel of the set-top box as shown opposite. 8 Plug the TV mains lead back into the mains socket. How to connect headphones Connect the 3.5 mm stereo jack plug on your headphones into the headphone socket on the back of the set-top box, see below. 5V DC IN + AERIAL RF OUT VCR/DVD TV 2.0A 12 Goodmans GDB20TTS_Instruction Manual.indb 12 6/15/2010 4:26:29 PM First time installation How to turn the set-top box on for the first time When you have connected your set-top box to the TV (as described in the previous section), you are ready to use it. 1 Switch on the TV. 2 Set it to the input channel you have connected the set-top box to (AV1, for example). 3 Switch the set-top box on at the mains supply. 4 The power indicator on the front panel of the set-top box will light up red and will change to green as a picture is displayed. The set-top box will automatically use talking features to speak the setup instructions. You can switch this off by pressing the TF button on your remote control. You need to set up your receiver. Please make sure the aerial is connected then press OK to continue. 5 This will be the ‘first-time installation’ title screen (shown above). 6 Check your aerial is connected correctly and then press the OK button. F u l l s c a n r e p l a c e e x i s t i n g s e rv ic e s CN Name No services stored Provider Type 0% 100% P l e a s e w a i t w h i l e s c a n n i n g . . . 9 m i n u t e s re ma i ni ng 13 Goodmans GDB20TTS_Instruction Manual.indb 13 6/15/2010 4:26:29 PM First time installation 7 The ‘Scanning’ window will open (shown below) and the box will search for the TV and radio channels (services). If you have left talking features on you will hear a progress update every 15 seconds. Ful l scan r epl ace exi sti ng ser vi ces CN Name 0 8 1 B B C Pa r l i a m e n t 071 CBeebies 0 8 0 B B C N EW S 001 BBC ONE Pr o v i d e r BBC BBC BBC BBC Ty pe TV TV TV TV 0% 100% P l e a s e wa i t whi l e s c a nni ng . . . 2 mi nute s r e mai n i n g 8 The progress will be shown in the bar along the bottom of the window as the services the box finds are listed above this bar. See above for an example. Tuning complete Total number of channels found: Total TV channels found: Total Radio Channels found: Data channels found: O K Return to TV I n f o Channel Summary 9 120 80 40 6 E x i t Return to TV When scanning finishes, the box will show the number of services (TV and radio stations). An example is shown above. 10 After a short time, the first TV channel in the list of channels the box has found will 14 Goodmans GDB20TTS_Instruction Manual.indb 14 6/15/2010 4:26:30 PM First time installation be shown. This is usually BBC1. An information banner will appear along the top of the picture for a short time which gives basic details of the TV programme you are watching. Problems installing the channels If you could not receive any channels as described previously, do the following. • Check all the connections to your set-top box and TV making sure the connections are secure and connected to the correct sockets. • Try the installation again by following the ‘Retuning procedure’ given on page 30. How to turn the set-top box off If you watch TV regularly, you should leave the set-top box in standby mode when you are not watching TV. You should only switch it off at the mains if you are away or do not want to use the TV for a long time, one month for example. Your set-top box will automatically update the stored channels while it is standby mode as they become available. It can also receive updates to the operating software during this time. It cannot receive new channels and software updates when the set-top box is disconnected from the mains supply or the aerial is disconnected. If you plan to disconnect the set-top box from the mains, you should put it into standby first. You can put the set-top box on standby as follows. 1 Press the button labelled stb. 2 The front panel power indicator will change colour from green to red. 3 The set-top box is now in standby mode. 4 The set-top box ‘Scart’ output will now be turned off. 5 The TV picture will be turned off. How to turn the set-top box on from standby 1 Press the button labelled stb. 2 The front panel power indicator will change colour from red to green. 3 This will turn on the set-top box Scart output. 4 The TV picture will turn on and show the station that you were watching when the set-top box was put on standby. 15 Goodmans GDB20TTS_Instruction Manual.indb 15 6/15/2010 4:26:30 PM Basic operation Commonly used features As with most electrical goods there will be features that you use everyday and others that you need only occasionally. The everyday features are included in this section to help you get your set-top box up and running as quickly as possible. Many functions will need you to use the ‘navigation’ buttons. These are on the centre of the remote control and are shown right. In this user guide these buttons will be called Up, Down, Left and Right as shown in the diagram. Talking features Up Left OK Right Down All information on screen is spoken by your set-top box using talking features. You can switch talking features on and off using the TF button on your remote control. Changing the volume When you want to change the volume, press the Vol + or Vol– buttons. The volume indicator bar will be displayed on the screen as shown below. Volume Press the Vol + button to increase the volume or press the Vol– button to reduce the volume. As you press the buttons the volume level is shown on the indicator. As the volume increases the white bar gets longer; as the volume reduces this bar gets shorter. After 5 seconds of not pressing the volume buttons, the volume indicator will disappear from the screen. Mute To turn the sound off quickly, press the mute button. This button has the following symbol printed on it . This symbol will also be displayed on the screen while mute is on. To put the sound back on, press the mute button again. Sound will come back at its previous level and the mute symbol will disappear from the screen. You can also put the sound back on again if you press the Vol+ or Vol– buttons. 16 Goodmans GDB20TTS_Instruction Manual.indb 16 6/15/2010 4:26:31 PM Basic operation Changing channel When you want to change to another channel you can do this in the following ways. • Using the Ch+ and Ch– buttons. • Entering the channel number on the numerical keypad (0-9). • Choosing from your favourites list (Fav button). You need to programme this list first. See page 59 for how to do this. • Choosing from a list of channels (TV/Radio button). Ch+ and Ch– buttons To change to the channel next to the one you are watching in the channel list, press the Ch+ button. Repeat until you reach the channel you want to watch. To change to the channel before the one you are watching in the channel list, press the Ch– button. Repeat until you reach the channel you want to watch. When changing channel, a banner is shown across the top of the screen that shows the channel and programme information. An example is shown below. 001 BBC ONE BBC News 15:00 - 15 -05 S Using the number buttons Enter the number of the channel you want to change to using the number buttons (0 - 9) on the remote control. The numbers you press will be shown in the top left corner. You can enter one, two or three digits as you need. After a short time, the channel you have entered will be shown. Using your favourites list You must first program this list. See page 59 for how to do this. 1 Press the Fav button. 2 Your favourites list will be displayed. An example is shown below. 17 Goodmans GDB20TTS_Instruction Manual.indb 17 6/15/2010 4:26:31 PM Basic operation F a v o u rite s CN 001 002 003 005 OK N a me BBC ONE BBC TWO IT V 1 F IV E Type . . TV TV TV TV N e x t/P re v io u s B a c k Pr evi ous m enu E x it Ret ur n t o TV A d d /re mo v e 3 Press the Up or Down buttons to move to the channel you would like to watch. The highlight panel will identify your choice. 4 Press the OK button. The channel you have chosen will be shown. Using the channel list 5 Press the TV/Radio button. A list of all channels will be shown. See the example on the next page. 6 Press the TV/Radio button again to display only TV channels and again to display only Radio channels. 7 Repeat until the list you want is shown. 8 Press the Up or Down buttons to move to the channel you would like to watch. The highlight panel will identify your choice. 9 Press the OK button. The channel you have chosen will be shown. Locked channel When you try to switch to a locked channel, and parental control is turned on, the ‘Locked channel’ PIN code entry box will be shown. Enter the PIN code to watch the channel you want to see. The default PIN for the set-top box is 0000. Locked channel Please enter PIN _ _ _ _ Use 0 - 9 18 Goodmans GDB20TTS_Instruction Manual.indb 18 6/15/2010 4:26:32 PM Basic operation C h a n n e l lis t CN 001 002 003 004 005 006 007 009 A ll C h a n n e l s N a me BBC ONE BBC TWO IT V 1 Channel 4 F IV E IT V 2 BBC THREE BBC FOUR Type TV TV TV TV TV TV TV TV N e x t/P re v io u s B a c k P revi ous m enu O K A d d /re mo v e E x it R e t ur n t o TV Programme information To display information about the programme you are watching now, press the Info button. P rogr amme infor mation 006 Now 14:32 ITV2 Th e J e r e my K y l e S h o w 13 : 3 0 - 1 4 : 3 5 Je r e my K y l e p r e s e n t s a c o n f r o n t a t ional talk show i n w h i c h g u e s t t h r a s h o u t t h e i r c o nflicts, dilemas and r e l a t i o n s h i p i s s u e s i n f r o n t o f a studio au d i e n c e . [ S ] Su b t i t l e s E xi t R e t u r n t o T V N e x t P + / P - OK Go to channel Press the Right button to display the same information for the next programme to be broadcast on this channel. To see similar information (if available) on other channels, press the Up and Down buttons until you reach the channel you want. To watch the programme whose details are shown, press the OK button or press Exit to return to the channel you were previously watching. 19 Goodmans GDB20TTS_Instruction Manual.indb 19 6/15/2010 4:26:32 PM Advanced features Programme guide The programme guide lets you see details of radio and TV programmes for the next week and set reminders for programmes you want to watch. When a programme is set with a reminder, just before the programme reaches the broadcast time, a message will be shown on the screen that the programme is about to start. To see the programme guide press the Guide button. Two example are shown below. The first display layout shown here is called the ‘list’ layout. Programme Guide 02:56 15/02/2010 006 I TV2 The Jere my K yl e Sh o w S Jeremy K y l e presents a confronta ti onal tal k sh o w i n wh i ch g u ests Time 22:00 22:35 23:35 01:15 02:05 03:00 05:30 06:00 - Progra mme N a me I TV N e ws at Te n & Weath er BR I Ts H i ts 30 Crossroads Loose Wome n The Jere my K y l e Show I TV N i ghts cre en I TV M orni ng N e ws GM TV 22:35 23:35 01:15 02:05 03:00 05:30 06:00 08:35 B rows e -D a y 15/ 02/ 2010 Ch Pa ge u p / d o wn I nfo Progr amme i n fo r mati o n + Day Exit R e turn to TV OK Vi ew ch an n el The second is called ‘grid’ layout. Press the guide button to move between the two layouts. Programme Guide 14:56 15/02/2010 14:30 -1 5:35 The Jere my K y l e Show S Jeremy K y l e presents a confronta ti onal tal k sh o w i n wh i ch g u ests CN 001 002 003 004 005 006 007 008 N a me B BC ONE B BC TW O I TV1 C hannel 4 FI VE I TV2 B BC TH REE B BC FOU R Browse -D a y + Day Exit R e turn to TV 1 4:30 F r i 16/ 04 16:30 M urde r, S Gr G i g g B ear B e Sh T h e Sto Ani ma l Pa D i a gno si s Mu r d Po i n tl ess 6 0 M i nut Dai l y C o o ks C h al l en g e D i cken so The Sea Wol v es C o u n td o wn D eal o Home I Ow R e tu r n i n g L i l y The Jere my K y l e Sh o w L o o se Wo men Thi s i s B BC TH REE Thi s i s B BC Four Ch Pa g e u p / d o wn I nfo Pro g r amme i n fo r mati o n OK Vi ew ch an n el 20 Goodmans GDB20TTS_Instruction Manual.indb 20 6/15/2010 4:26:33 PM Advanced features You can set which layout displays when you press the Guide button. You set this up using the menu function as described on page 39. How to move around the guide To browse the guide press the Up, Down, Left and Right buttons to move in these directions. The highlighted panel shows which programme has been chosen. To show the programmes for the next day, press the blue button. You can look ahead for up to seven days. To show the programmes for the previous day, press the yellow button. To display the programme guide for another channel, press the Ch+or Ch- buttons to step forward or backward through the channels. To watch a programme that is on now, press the Up, Down, Left and Right buttons to highlight the programme and then press the OK button. To see information about a programme, choose the programme as described above and then press the Info button. The ‘Programme information’ window will open. An example of this is shown below. P r ogr amme infor mation 006 Now 14:32 ITV2 The J e r e my K y l e S h o w 13: 3 0 - 1 4 : 3 5 Jer e my K y l e p r e s e n t s a c o n f r o n t a t i onal talk show i n wh i c h g u e s t t h r a s h o u t t h e i r c o n flicts, dilemas and r e l a t i o n s h i p i s s u e s i n f r o n t o f a studio aud i e n c e . [ S ] Sub t i t l e s E xi t R e t u r n t o T V N e x t P + / P - OK Go to channel How to set a reminder 1 Open the programme guide as described above. 2 Use the Up, Down, Left and Right buttons to choose the programme you want to set the reminder for. 21 Goodmans GDB20TTS_Instruction Manual.indb 21 6/15/2010 4:26:34 PM Advanced features 3 Press the OK button. The programme will be highlighted to show that the reminder has been set. 4 The reminder will appear in the reminders list which you can see using the menu function. See page 24 for details. Mini guide When you are watching a programme you can display the mini guide. An example of this is shown below. Mi ni Guide 14:50 16/04/2010 14:0 0 3 I TV1 60 M i nute M a keo ver S 15:0 0 3 I TV1 D a i l y C ook s C hal l en g e S B rows e OK Watch/ remi nd I nfo I nfo Exi t -D ay + D ay R e turn to T V This lets you see details about the programme you are watching and the next programme to be broadcast on the same channel. The programme you have chosen is enclosed in a coloured rectangle. 5 To see information for other programmes on the channel, press the Up or Down button to highlight the required programme you need. 6 To see information for programmes on another channel, press the Left or Right button until the channel or programme is highlighted. 7 To view programmes for the next day, press the blue button. To see programmes for the previous day, press the yellow button. 8 To show information about the channel you have chosen, press the Info button. This will display full programme information as shown on page 20. 9 When you want to watch a programme you have chosen, press the OK button. If the programme is already on, it will be displayed. If the programme is on later, a reminder will be set. 10 To close the mini guide, press the Exit button. 22 Goodmans GDB20TTS_Instruction Manual.indb 22 6/15/2010 4:26:34 PM Advanced features Favourites list The favourites function lets you create a list of your favourite programmes, in other words, the ones you watch most often. The list can include TV and radio programmes. Using this list will make it easier to change to these channels. You create the list using the menu function as follows. 1 Press the Menu button. 2 Press the Down button until ‘Favourites’ is highlighted. 3 Press the OK button. 4 The ‘Set up favourites’ window will be shown. It contains all the channels stored in your system. An example is shown below. S e t u p fa v o u rite s CN 001 002 003 004 005 006 007 009 N a me BBC ONE BBC TWO IT V 1 Channel 4 F IV E IT V 2 BBC THREE BBC FOUR N e x t/P re v io u s B a c k Save f avour i t es O K A d d /re mo v e E x it Ret ur n t o TV 5 Press the Up and Down buttons to highlight a channel you want to add to the favourites list. 6 Press the OK button to add it to the list. A tick symbol will be shown alongside your choice to show that it is in the list. 7 To remove a channel from the list, highlight the channel and then press the OK button. The tick symbol will be deleted and the channel will no longer be in the favourites list. 8 Press the Back button to save the edited list. 23 Goodmans GDB20TTS_Instruction Manual.indb 23 6/15/2010 4:26:34 PM Advanced features 9 You will be prompted by the ‘Save changes’ window which is shown below. 10 Press the Up or Down button to choose ‘Yes’ and then press OK to save the list and return to the programme you were last watching. Or, press the Back button to choose to the previous menu without saving changes. Or, press the Up or Down button to select ‘No’ and not save the changes Or, press the Exit button to return to the programme you were last watching without saving changes. Reminders list The reminders list shows you the reminders you have set. The list is arranged in date and time order. You can see the list using the menu function as follows. 1 Press the Menu button. 2 Press the Down button until ‘Reminders list’ is highlighted. Ma i n m e n u 1. 2. 3. 4. 5. 6. 0. Preferences Favourites Parental control Reminders list Te c h n i c a l s e t t i n g s Help System information Next/Previous Back Previous menu OK Select menu Exit Return to TV 3 Press the OK button. 4 The reminders list will be shown. An example is shown on the next page. To move up and down the list, press the Up and Down buttons. To delete a reminder, move to the programme in the list and then press the OK button. The ‘Delete reminders’ window will open. An example is shown on the next page. 24 Goodmans GDB20TTS_Instruction Manual.indb 24 6/15/2010 4:26:35 PM Advanced features Remin d e r s lis t Ti t l e Daily Cooks Challenge Ch a n n e l Time D ate IT V1 1 5:00-16:00 Today G i g g l e b iz BBC ONE 1 5:15-15:30 Today Ne xt/ previ ous OK Back Ex i t De l ete Page up/ down R e turn t TV 1 Use the Up and Down buttons to choose ‘Yes’ and then press OK. 2 The reminders list will be updated and saved. D el ete remi n d er D o yo u w a n t t o d el et e t h e rem i nder for “ t h e p r o g r a m m e n am e” 1 . Yes 2. No N e x t / Pr e v i o u s B ack P revi ous m enu O K Save an d r e t u r n E xi t R eturn to TV 3 The TV will now display the previous programme you were watching without the deleted reminder. 4 Or choose No and then OK Or, press the Back button to choose to the previous menu Or, press the Exit button to return to the programme you were last watching without saving changes. On-screen help pages There are nine help pages available that will display information on the screen for various topics for you to call up at any time as follows. 1 Press the Help button. 2 The ‘Help contents’ list will be shown. 3 Use the Up and Down buttons to highlight the topic you are interested in. 4 Press the OK button to display the page of information for the topic. Goodmans GDB20TTS_Instruction Manual.indb 25 25 6/15/2010 4:26:35 PM Advanced features H el p C o n ten ts 0. 1. 2. 3. 4. 5. 6. 7. 8. 9. H el p c o n t e n t s Wat ch i n g T. V. P r o g r am m e/ m i n i g u i d e Menus P r e f e r en c e s R em i n d er s F a v o u r i t es P ar e n t al co n t r o l Channel tuning R em o t e c o n t r o l N e x t / Pr e v i o u s B ack P r e vi ous m enu O K Sel ect m en u E xi t R eturn to TV 5 Use the Left and Right buttons to step forward and backwards through the help pages and display the information as you do so. 6 To return to the previous menu, press the Back button. H elp: Rem inders Page 5 o f 9 The reminders list shows you a list of all the reminders that you have scheduled. To open the reminders list select option 4 from the main menu. Reminders are shown in date and time order. To move up and down the reminders list use the up and down arrow buttons on the remote control. To delete a reminder, select it from the list and press the OK button. Select Yes in the delete reminder window and press the OK button to save the changes and exit. Previous/next page Back Exit 7 Previous menu Return to TV To close the help pages and return to watching TV, press the Exit button. Single-button functions You can carry out many operations by pressing a single button such as changing the volume with the vol+ and vol- buttons and switching to another channel using the Ch+ and Ch- buttons for example. This section will describe these single-button functions. It 26 Goodmans GDB20TTS_Instruction Manual.indb 26 6/15/2010 4:26:36 PM Advanced features will not include those buttons mentioned above which are described fully in the ‘Basic operation’ chapter. TV and radio (channel lists) This function allows you to list all the channels stored in your system. It can also list TV channels only or just radio channels. 1 Press the TV/Radio button once. A list of all the channels will be shown. 2 Press the TV/Radio button again. Only radio channels will be listed. 3 Use the Up and Down buttons to choose a channel you wish to watch or hear. 4 Press the OK button. 5 The channel you have chosen will be shown. Fav This function will display your list of favourite channels. See page 23 for how to create the list. This function will be easier for you to choose from compared with using the TV/ Radio button described above. 1 Press the Fav button to display your list of favourite channels. 2 Use the Up and Down buttons to choose the channel you want to change to. 3 Press the OK button to watch the channel you have chosen. TF (talking features) The talking features function allows you to hear spoken actions on your system, such as ‘Volume control turned up, Change to channel ...’ for example as you carry out the actions using the remote control or receive information from the help screens or programme information. You can turn off the talking features using the TF button. Talking features is on as default. 1 Press the TF button. 2 ‘Talking features off’ will be heard and shown briefly. 3 Talking features will now be turned off. 4 To turn talking features on again, press the TF button. 5 ‘Talking features on’ will be heard and shown briefly on the screen. Goodmans GDB20TTS_Instruction Manual.indb 27 27 6/15/2010 4:26:36 PM Advanced features AD (audio description) Audio description is a spoken narration that describes important information about a TV programme, such as body language, facial expressions, scenery, action costumes or anything that helps to explain the plot of the story, event or image. Audio description is not always available. Audio description is available if you see AD in the ‘Programme information’ window. You can turn off the audio description feature using the AD button. Audio description is off as default. 1 Press the AD button. 2 ‘Audio description off’ will be shown briefly. 3 The audio description feature will now be turned off. 4 To turn the audio description feature on again, press the AD button. 5 ‘Audio description on’ will be shown briefly on the screen. Swap The swap function has a toggle action and allows you to switch directly to the previous channel you were watching. 1 Press the Swap button. 2 The previous channel you were watching will be shown. 3 Press the Swap button again to return to the programme you were just watching. 28 Goodmans GDB20TTS_Instruction Manual.indb 28 6/15/2010 4:26:36 PM Advanced features Sub (subtitles) Subtitles give you an on-screen text version of the conversation or narrative on the TV channel you’re watching. When you choose subtitles, your TV will show the subtitles for the channel you are watching at the bottom of the screen over the picture. If you change channel, subtitles will appear on the new channel until you turn the subtitles off. You cannot use subtitles at the same time as digital teletext. Not all programmes have subtitles. If they are available you will see [S] in the programme information window. Subtitles is off as default. The Sub button lets you instantly turn subtitles on or off if they are provided for the programme you are watching. 1 Press the Sub button while watching a programme. 2 ‘Subtitles on’ will be displayed briefly on the screen. 3 If subtitles are provided for this programme you will see them appear on the screen. 4 To turn subtitles off, press the Sub button again. 5 ‘Subtitles off’ will be shown briefly on the screen. 6 Subtitles will no longer appear on the screen. Silence talking features button The Silence talking features button lets you turn off all narration (audio description) and talking from talking features. The sound in the programme you are watching will not be affected. 1 Press the Silence talking features button. 2 You will now only hear sound from the TV programme you are watching. ? Where am I button. The where am I button provides spoken output of your current location and the navigation buttons available. In most cases this button will not have any visual effect. However, if watching TV pressing ? will display information about the programme you are watching. 29 Goodmans GDB20TTS_Instruction Manual.indb 29 6/15/2010 4:26:36 PM Advanced features 1 Press the ? button. 2 The ‘Programme information’ window will be shown. See program information on page 20 for what is shown in this window. Txt (text) The Text button calls for the teletext provided by the TV channel to be loaded and displayed on the screen. Not all TV channel providers supply teletext. To move around the various pages of teletext, use the Up, Down, Left and Right buttons and the OK button to make your choices. Coloured buttons These interactive service buttons (red, green, yellow, blue) are associated with teletext displays provided by some TV channels providers. See the information provided by the TV channel provider for how to use these buttons. Talking features is not available for interactive services, such as Teletext. To close interactive services press the Txt or Exit buttons. Retuning Retuning your set-top box is similar to installing it for the first time (where the set-top box scans for TV and radio channels and stores them). When retuning is started, all existing channel details are deleted, as are parental-control settings and your favourites list. Ma in me n u 1. 2. 3. 4. 5. 6. 0. Preferences F a v o u rit e s Parental control R e min d e rs lis t Te c h n ic a l s e t t in g s H e lp S y s t e m in f o rma t io n N e x t /P re v io u s B a c k P r evio u s m en u O K S e le c t me n u E x it Retu r n to T V If you need to retune the channels, do the following. 30 Goodmans GDB20TTS_Instruction Manual.indb 30 6/15/2010 4:26:37 PM Advanced features 1 Press the Menu button to display the main menu. The menu will display with the first option highlighted as shown above. 2 Use the Up and Down buttons to choose ‘Technical settings’. Te c h n ic a l s e t t in g s 1. 2. 3. 4. 5. 6. 7. T V c o n n e c t io n s e t t ing s C h a n n e l Tu n in g S h o w c h a n n e l d e t a ils L o w p o w e r mo d e A u t o s t a n d b y mo d e N e t w o rk c h a n g e n o t ificatio n s R e s t o re d e f a u lt s N e x t /P re v io u s B a c k Pr evio u s m en u OK S e le c t me n u E x it Retu r n to T V 3 Press the OK button. 4 The Technical settings menu will be shown. 5 Use the Up and Down buttons to choose ‘Channel tuning’. C h a n n e l t u n in g 1 . R e t u n e c h a n n e ls 2 . Tu rn a u t o ma t ic t u n ing o n /o ff N e x t /P re v io u s B a c k Pr evio u s m en u OK S e le c t me n u E x it Retu r n to T V 6 Press the OK button. 7 The ‘Channel tuning’ menu will open. See below. 31 Goodmans GDB20TTS_Instruction Manual.indb 31 6/15/2010 4:26:37 PM Advanced features Retune channel s Warni ng: Your favouri tes an d p a re n t a l control setti ngs may be affe c t e d if y o u retune your set top box. Press OK to conti nue wi th t h e re t u n e or B ack to return to the pre v io u s me n u . OK Conti nue Back Pre v io u s me n u Exi t R e t u rn t o T V 8 Use the Up and Down buttons to choose ‘Retune channels’. 9 The ‘Retune channels’ warning window will be shown. 10 Press the OK button to start retuning. F u l l s c a n r e p l a c e e x i s t i ng s e r v i c e s CN Na me No s e rv ic e s s t o re d Provider Type 0% 100% Please wai t wh i l e scan n i n g . . . 9 mi n u te s re m a ining Fu l l s c a n r e p l a c e e x i s t i ng s e r v i c e s CN Name 081 BBC Parliament 071 CBeebies 080 BBC NEWS 001 BBC ONE Pro v id e r BBC BBC BBC BBC Ty p e TV TV TV TV 0% 100% Pl ease wai t wh i l e scan n i n g . . . 2 mi n u te s re m a ining 32 Goodmans GDB20TTS_Instruction Manual.indb 32 6/15/2010 4:26:38 PM Advanced features 11 The ‘scanning’ window will open (shown below) and the set-top box will search for TV and radio channels (services). Tuning complete Total number of channels found: Total TV channels found: Total Radio Channels found: Data channels found: O K Return to TV Info Channel Summary 120 80 40 6 E x it Return to TV 12 The progress will be shown in the bar along the bottom of the window as the services it finds are listed above this bar. See the example below. 13 When scanning finishes the number of services (TV and radio stations) found are displayed. An example is shown below. 14 After a short time, the first TV channel in the list of channels found will be shown. This is usually BBC1. An information banner will appear along the top of the picture for a short time which gives basic details of the TV programme you are watching. 33 Goodmans GDB20TTS_Instruction Manual.indb 33 6/15/2010 4:26:39 PM Advanced features Parental control Parental control lets you prevent certain channels from being watched without a PIN code being entered first. This will help to prevent children from watching programmes you think are not suitable for them. To set up parental control, do the following. 1 Press the Menu button to display the main menu. The menu will display with the first option highlighted as shown below. M a in me n u 1. 2. 3. 4. 5. 6. 0. Preferences F a v o u rit e s Parental control R e min d e rs lis t Te c h n ic a l s e t t in g s H e lp S y s t e m in f o rma t io n N e x t /P r e v io u s B a c k P r evio u s m en u O K S e le c t me n u E x it Retu r n to T V 2 Use the Up and Down buttons to choose ‘Parental control’. M a in me n u 1. 2. 3. 4. 5. 6. 0. Preferences F a v o u rit e s Parental control R e min d e rs lis t Te c h n ic a l s e t t in g s H e lp S y s t e m in f o rma t io n N e x t /P r e v io u s B a c k P r evio u s m en u O K S e le c t me n u E x it Retu r n to T V 3 Press the OK button. 4 The parental control ‘Enter PIN’ window will open. 34 Goodmans GDB20TTS_Instruction Manual.indb 34 6/15/2010 4:26:39 PM Advanced features Enter PIN Please enter PIN to access menu _ Use 0 - 9 _ _ _ Back Previous menu 5 Enter the four-digit PIN code in the box using the 0 to 9 numbers on the remote control, or press the Back button to refuse. The default PIN code is 0000. 6 If the PIN code is correct the Parental control window will be shown with the first of three options highlighted as shown below. If the PIN code is not correct, you will be told on the screen and given the chance to enter the correct code. 7 Whether parental control is switched on or off is shown at the top of the message area: The example below shows parental control is off and no channels are locked. Parental control P a r e n t a l c o n t r o l is o f f T h e r e a r e 0 c h a n n e ls lo cked . 1 . Tu rn p a r e n t a l c o n t r o l o n /o ff 2 . L o c k /u n lo c k c h a n n e ls 3 . C h a n g e P IN N e x t /P re v io u s B a c k P r evio u s m en u O K S e le c t me n u E x it Retu r n to T V The settings of the channels (locked or unlocked) is not affected when you change option 1. 35 Goodmans GDB20TTS_Instruction Manual.indb 35 6/15/2010 4:26:40 PM Advanced features Turning parental control on and off When parental control is off, channels which are locked do not need you to enter a PIN code. When parental control is on, channels which are locked require a PIN code to be entered. In the Parental control window, do the following. 1 Use the Up and Down buttons to choose option 1. 2 Press the OK button. 3 The ‘Turn parental control on or off’ window will be displayed. In the ‘Turn parental control on or off’ window, do the following. 1 Use the Up and Down buttons to choose whether to turn parental control on or off. 2 Press the OK button. 3 A tick symbol will appear on the line you have chosen to show that this option is the current setting, and you will then return to the previous menu. 4 Press the Back button to save your changes. 5 When needed, choose the other option in the same way as described above. Lock and unlock channels This function lets you set channels to be locked and to unlock channels that are already locked. In the Parental control window, do the following. 1 Use the Up and Down buttons to choose option 2. 2 Press the OK button. 3 The ‘Lock or unlock channels’ window will be shown. In the ‘Lock or unlock channels’ window, do the following. 1 Use the Up and Down buttons to choose the channel you want to lock. 2 Press the OK button. 36 Goodmans GDB20TTS_Instruction Manual.indb 36 6/15/2010 4:26:40 PM Advanced features 3 A padlock symbol will appear on the line of the channel to show that this channel is locked. 4 Repeat for other channels as you need. To unlock a locked channel. 1 Use the Up and Down buttons to choose the channel you want to unlock. 2 Press the OK button. 3 The padlock symbol will be removed. This shows that the channel is not locked. Change the PIN code It is a good idea to change the PIN code from the default setting if you plan to use parental control. The default setting is 0 0 0 0. Choose a number you can easily remember as restoring defaults will not reset the new PIN code back to the default setting. In the ‘Parental control’ window, do the following. 1 Use the Up and Down buttons to choose option 3. 2 Press the OK button. 3 The ‘Change PIN’ window will be shown. An example is shown below. 4 Enter your chosen PIN code. 5 Enter it again. If there is a mistake it will let you know and you will have another chance to change the PIN. Change PIN Enter New PIN _ _ _ _ Confirm New PIN _ _ _ _ Use 0 - 9 37 Goodmans GDB20TTS_Instruction Manual.indb 37 6/15/2010 4:26:40 PM Setting up your system Setting up your system You carry out all settings using the menu system. We have already described some of the settings. We describe the rest in this section. General The menus allow you to change the settings on your set-top box. The highlight panel shows the item currently selected. 1 To move to a different item in the menu, use the Up and Down buttons. 2 To save the selected item you have chosen, press the OK button. This will open a new menu or return to the previous menu saving any changes you have made. 3 To close the menu without saving any changes, press the Back button to go to the previous menu. 4 Or, you can press the Exit button to return to watching TV without saving any changes. The main menu gives access to the following main menus. • Preferences • Favourites • Parental control • Reminders list • Technical settings • Help • System information Preferences Preferences lets you change audio (sound) and visual (picture) settings according to what you want and the requirements of your TV. To change any preferences, do the following. 1 Press the Menu button. 2 The main menu will be shown with the first option highlighted as shown in the example below. 38 Goodmans GDB20TTS_Instruction Manual.indb 38 6/15/2010 4:26:40 PM Setting up your system Ma in me n u 1. 2. 3. 4. 5. 6. 0. Preferences F a v o u rit e s Parental control R e min d e rs lis t Te c h n ic a l s e t t in g s H e lp S y s t e m in f o rma t io n N e x t /P r e v io u s B a c k P r evio u s m en u OK S e le c t me n u E x it Retu r n to T V 3 Press the OK button. 4 The ‘preferences menu’ will be shown. See below. Prefe renc e s 1. 2. 3. 4. 5. 6. P r ogr am m e guide la y o u t S et v olum e s A udio de sc r ipt ion Vis ual Talk ing f ea t ur e s Langua ge N ex t /pr e vious B ac k P re v i o u s m e n u OK S e lec t m e nu E x it Re t u rn t o T V Layout of the programme guide 1 Use the Up and Down buttons to highlight ‘Programme guide layout’. 2 Press the OK button. 3 The ‘Programme guide layout menu will be shown. 39 Goodmans GDB20TTS_Instruction Manual.indb 39 6/15/2010 4:26:41 PM Setting up your system P rogramme g uid e la y out 1. Gr id vie w 2. Lis t vie w ✓ B ac k P r e v i o u s m e n u N ex t /P r e vious OK S a ve and R et ur n E x it Re t u r n t o T V 4 Use the Up and Down buttons to choose the option you want. 5 Press the OK button to save the setting and return to the previous menu. Or you can press the Back button to return to the previous menu without saving changes, Or, press the Exit button to ignore any changes and return to watching TV. Set volumes This function sets the individual volume levels that will be used by each of the features in the ‘Set volumes menu’ until you next change them in this menu. They are shown below. • AD (audio description) • Set-top box • Talking features • Remote button beep volume • Power on/off beep In the ‘Preferences’ menu, do the following. 1 Use the Up and Down buttons to highlight ‘Set volumes’. 2 Press the OK button. 3 The ‘Set volumes’ menu will be shown. See below. 40 Goodmans GDB20TTS_Instruction Manual.indb 40 6/15/2010 4:26:41 PM Setting up your system Se t volu mes 1. 2. 3. 4. 5. A D volum e S et t op box volum e Talk ing f ea t ur e s v ol u m e R e m ot e but t on bee p v o l u m e P ower on/of f bee p N ex t /pr e vious B ac k P re v i o u s m e n u OK S e lec t m e nu E x it Re t u rn t o T V AD volume 1 Use the Up and Down buttons to highlight ‘AD volume’. 2 Press the OK button. 3 The ‘AD volume’ window will be shown. See below. AD volume Set volume for the audio description sound track. + Volume Decrease/Increase B ack Previous menu E xi t Return to TV O K Save and return In the ‘AD volume’ window, do the following. 1 Use the Left and Right buttons to turn the volume up or down to suit your needs. 41 Goodmans GDB20TTS_Instruction Manual.indb 41 6/15/2010 4:26:42 PM Setting up your system 2 Press the OK button to save the volume setting and return to the previous menu, Or, press the Back button to return to the previous menu without change, Or, press the Exit button to ignore any change and return to watching TV. Set-top box volume 1 Use the Up and Down buttons to highlight ‘Set-top box volume’. 2 Press the OK button. 3 The ‘Set-top box volume’ window will be shown. See below. Set top box volume Set volume for the set top box. - + Volume Decrease/Increase B ack Previous menu E xi t Return to TV O K Save and return In the ‘Set-top box volume’ window, do the following. 1 Use the Left and Right buttons to turn the volume up or down to suit your needs. 2 Press the OK button to save the volume setting and return to the previous menu, Or, press the Back button to return to the previous menu without change, Or, press the Exit button to ignore any change and return to watching TV. 42 Goodmans GDB20TTS_Instruction Manual.indb 42 6/15/2010 4:26:43 PM Setting up your system Talking features volume 1 Use the Up and Down buttons to highlight ‘Talking features volume’. 2 Press the OK button. 3 The ‘Talking features volume’ window will be shown. See below. Talking features volume Set volume for talking features - + Volume Decrease/Increase B ack Previous menu E xi t Return to TV O K Save and return In the ‘Talking features volume’ window, do the following. 1 Use the Left and Right buttons to turn the volume up or down to suit your needs. 2 Press the OK button to save the volume setting and return to the previous menu, Or, press the Back button to return to the previous menu without change, Or, press the Exit button to ignore any change and return to watching TV. 43 Goodmans GDB20TTS_Instruction Manual.indb 43 6/15/2010 4:26:43 PM Setting up your system Remote button beep This function lets you set whether or not to sound a beep when you press a button on the remote control. If you want to sound a beep, you can choose the volume from three settings. 1 Use the Up and Down buttons to highlight ‘Remote button beep volume’. 2 Press the OK button to save the volume setting and return to the previous menu. 3 The ‘Button beep volume’ menu will open. See below. But t on be e p v olum e 1. 2. 3. 4. Off Q uie t Me dium Loud Next/Previous O K Save and return Ba c k Previous menu E x it Return to TV In the ‘Button beep volume’ menu, do the following. 1 Use the Up and Down buttons to highlight the option you want. 2 Press the OK button to save the volume setting and return to watching TV, Or, press the Back button to return to the previous menu without change, Or, press the Exit button to ignore any change and return to watching TV. 44 Goodmans GDB20TTS_Instruction Manual.indb 44 6/15/2010 4:26:43 PM Setting up your system Power on/off beep This function lets you set whether or not to sound a beep when the set-top box is switching on or off. If you choose to sound a beep, you can choose the volume from three settings 1 Use the Up and Down buttons to highlight ‘Power on/off button beep’. 2 Press the OK button. 3 The ‘Power on/off beep’ menu will open. See below. P ow e r on/of f be e p 1 . No a udio be e p 2 . P la y a udio be e p Next/Previous O K Save and return Ba c k Previous menu E x it Return to TV 4 Use the Up and Down buttons to highlight the option you want. 5 Press the OK button to save the volume setting and return to the previous menu, Or, press the Back button to return to the previous menu without change, Or, press the Exit button to ignore any change and return to watching TV. 45 Goodmans GDB20TTS_Instruction Manual.indb 45 6/15/2010 4:26:44 PM Setting up your system Visual The visual preferences let you choose the colour scheme, set a larger font to be used when displaying the full programme guide or mini guide. In the ‘Preferences’ menu, do the following. 1 Use the Up and Down buttons to highlight ‘Visual’. 2 Press the OK button. 3 The ‘Visual preferences’ menu will be shown. See below. Vis ua l pre f e re nc e s 1 . Colour s c he m e 2 . Font s ize 3 . Turn s ubt it le s on/of f Next/Previous O K Select menu Ba c k Previous menu E x it Return to TV 46 Goodmans GDB20TTS_Instruction Manual.indb 46 6/15/2010 4:26:44 PM Setting up your system Colour scheme This function lets you choose the colour scheme you prefer to use when displaying the menus, programme guide and mini guide. There are three schemes to choose from, white on blue, high contrast (white on black) and invert (black on white). In the ‘Visual preferences’ menu, do the following. 1 Use the Up and Down buttons to highlight ‘Colour scheme’. 2 Press the OK button. 3 The ‘Colour scheme’ menu will open. See below. C o lo u r s c h e m e 1 . Whit e on blue 2 . High c ont ra s t ( w hit e o n b lack) 3 . Inv e rt ( bla c k on w hite) Next/Previous O K Save and return Ba c k Previous menu E x it Return to TV 4 Use the Up and Down buttons to highlight the colour scheme you want. 5 Press the OK button to save the colour scheme setting and return to the previous menu, Or, press the Back button to return to the previous menu without change, Or, press the Exit button to ignore any change and return to watching TV. 47 Goodmans GDB20TTS_Instruction Manual.indb 47 6/15/2010 4:26:44 PM Setting up your system Font size This function lets you choose the size of the text used when displaying the full programme or mini guides. There are two sizes to choose from - medium (the default size) and large. In the ‘Visual preferences’ menu, do the following. 1 Use the Up and Down buttons to highlight ‘Font size’. 2 Press the OK button. 3 The ‘Font size’ menu will open. See below. F o n t s iz e 1 . Me dium 2 . La rge Next/Previous O K Save and return Ba c k Previous menu E x it Return to TV 4 Use the Up and Down buttons to highlight the font size you want. 5 Press the OK button to save the setting and return to the previous menu, Or, press the Back button to return to the previous menu without change, Or, press the Exit button to ignore any change and return to watching TV. 48 Goodmans GDB20TTS_Instruction Manual.indb 48 6/15/2010 4:26:45 PM Setting up your system Turn subtitles on and off This function lets you select whether to have subtitles on or off as default. In the ‘Visual preferences’ menu, 1 Use the Up and Down buttons to highlight ‘Turn subtitles on/off’. 2 Press the OK button. 3 The ‘Turn subtitles on/off’ menu will open. See below. Tu r n s u b title s o n /o ff 1 . Turn s ubt it le s on 2 . Turn s ubt it le s of f Next/Previous O K Save and return Ba c k Previous menu E x it Return to TV 4 Use the Up and Down buttons to highlight the setting you want. 5 Press the OK button to save the setting and return to the previous menu, Or, press the Back button to return to the previous menu without change, Or, press the Exit button to ignore any change and return to watching TV. 49 Goodmans GDB20TTS_Instruction Manual.indb 49 6/15/2010 4:26:45 PM Setting up your system Talking features This function lets you choose whether talking features are turned on or off, the volume level, talking speed and beginner or expert mode. In the ‘Preferences’ menu, do the following. 1 Use the Up and Down buttons to highlight ‘Talking features’. 2 Press the OK button. 3 The ‘Talking features preferences’ menu will be displayed. See below. Ta lk in g f e a t u r e s p r e f e r e n ces 1. 2. 3. 4. Tu r n T F o n /o f f Vo lu me c o n t r o l Speed control S e t mo d e N e x t /P r e v io u s B a c k P r evio u s m en u OK S e le c t me n u E x it Retu r n to T V 50 Goodmans GDB20TTS_Instruction Manual.indb 50 6/15/2010 4:26:45 PM Setting up your system Turn talking features (TF) on or off This function lets you select whether talking features are on or off as default. In the ‘Talking features preferences’ menu, do the following. 1 Use the Up and Down buttons to highlight ‘Turn TF on/off’. 2 Press the OK button. 3 The ‘Turn talking features (TF) on/off’ menu will open. Tu r n ta lk in g fe a tu r e s (T F) on/off 1 . Turn TF on 2 . Turn TF of f Next/Previous O K Save and return Ba c k Previous menu E x it Return to TV 4 Use the Up and Down buttons to highlight the setting you want. 5 Press the OK button to save the setting and return to the previous menu, Or, press the Back button to return to the previous menu without change, Or, press the Exit button to ignore any change and return to watching TV. 51 Goodmans GDB20TTS_Instruction Manual.indb 51 6/15/2010 4:26:45 PM Setting up your system Volume This function lets you set the default volume level of Talking features. In the ‘Talking features preferences’ menu, do the following. 1 Use the Up and Down buttons to highlight ‘Volume control’. 2 Press the OK button. 3 The ‘Talking features volume’ window will be shown. See below. Talking features volume Set volume for talking features - + Volume Decrease/Increase B ack Previous menu E xi t Return to TV O K Save and return 1 Use the Left and Right buttons to decrease/increase the volume to suit your needs. 2 Press the OK button to save the volume setting and return to the previous menu, Or, press the Back button to return to the previous menu without change, Or, press the Exit button to ignore any change and return to watching TV. 52 Goodmans GDB20TTS_Instruction Manual.indb 52 6/15/2010 4:26:46 PM Setting up your system Speed control This function lets you set the talking speed of talking features. In the ‘Talking features preferences’ menu, do the following. 1 Use the Up and Down buttons to highlight ‘Speed control’. 2 Press the OK button. 3 The ‘Talking features speed’ window will be shown. See below. Talking features speed 1. Slow 2. Normal 3. Fast Next/previous O K Save and return B ack E xi t Previous menu Return to TV 1 Use the Up and Down buttons to choose the option to suit your needs. 2 Press the OK button to save the speed setting and return to the previous menu, Or, press the Back button to return to the previous menu without change, Or, press the Exit button to ignore any change and return to watching TV. 53 Goodmans GDB20TTS_Instruction Manual.indb 53 6/15/2010 4:26:46 PM Setting up your system Set mode This function lets you set the skill level you need to understand the speech of talking features. In the ‘Talking features preferences’ menu, do the following. 1 Use the Up and Down buttons to highlight ‘Set mode’. 2 Press the OK button. 3 The ‘Talking features mode’ menu will be displayed, see below. Talking features mode 1. Beginner 2. Expert Next/previous O K Save and return B ack E xi t Previous menu Return to TV 1 Use the Up and Down buttons to choose the option to suit your needs. 2 Press the OK button to save the setting and return to the previous menu, Or, press the Back button to return to the previous menu without change, Or, press the Exit button to ignore any change and return to watching TV. 54 Goodmans GDB20TTS_Instruction Manual.indb 54 6/15/2010 4:26:47 PM Setting up your system Languages This function lets you choose the audio language and the language to use for subtitles. The audio refers to the TV soundtrack and the audio description language. It does not include the talking features language which is only available in English. The language choices are: English, Welsh and Scottish. In the ‘Preferences’ menu, do the following. 1 Use the Up and Down buttons to highlight ‘Language’. 2 Press the OK button. 3 The ‘Language preferences’ menu will be shown. See below. La n g u a g e p re f e r e n c e s 1 . A u d io la n g u a g e 2 . S u b t it le la n g u a g e N e x t /P r e v io u s B a c k P r evio u s m en u OK S e le c t me n u E x it Retu r n to T V 55 Goodmans GDB20TTS_Instruction Manual.indb 55 6/15/2010 4:26:47 PM Setting up your system Audio language This function lets you set the language for the TV soundtrack and the audio description (AD). In the ‘Language preferences’ menu, do the following. 1 Use the Up and Down buttons to highlight ‘Audio language’. 2 Press the OK button. 3 The ‘Audio language’ menu will be displayed, see below. Au d io la n g u a g e Au d io re f e r s t o T V s o u n dtr ack an d au d io d e s c r ip t io n s o n ly. Talkin g featu r es i s o n ly a v a ila b le in E n g lish . 1 . E n g lis h 2 . C y mr a e g 3 . G a id h lig N e x t /P re v io u s B a c k P r evio u s m en u O K S a v e a n d r e t u r n E x it Retu r n to T V 4 Use the Up and Down buttons to highlight the language to suit your needs. 5 Press the OK button to save the audio language setting and return to the previous menu, Or, press the Back button to return to the previous menu without change, Or, press the Exit button to ignore any change and return to watching TV. 56 Goodmans GDB20TTS_Instruction Manual.indb 56 6/15/2010 4:26:47 PM Setting up your system Subtitle language This function lets you set the language to use for subtitles. In the ‘Language preferences’ menu 1 Use the Up and Down buttons to highlight ‘Subtitle language’. 2 Press the OK button. 3 The ‘Subtitle language’ menu will be displayed, see below. S u b t it le la n g u a g e 1. E n g lis h 2. C y mr a e g 3. G a id h lig N e x t /P r e v io u s B a c k P r evio u s m en u O K S a v e a n d re t u r n E x it Retu r n to T V 4 Use the Up and Down buttons to highlight the language to suit your requirements. 5 Press the OK button to save the subtitle language setting and return to the previous menu, Or, press the Back button to return to the previous menu without change, Or, press the Exit button to ignore any change and return to watching TV. 57 Goodmans GDB20TTS_Instruction Manual.indb 57 6/15/2010 4:26:48 PM Setting up your system Favourites Favourites lets you put the channels you watch most into a list, making it easier to change to those channels. Favourites is option 2 on the main menu. An example is shown below. Ma in me n u 1. 2. 3. 4. 5. 6. 0. Preferences F a v o u rit e s Parental control R e min d e rs lis t Te c h n ic a l s e t t in g s H e lp S y s t e m in f o rma t io n N e x t /P r e v io u s B a c k P r evio u s m en u OK S e le c t me n u E x it Retu r n to T V To create a favourites list, do the following. 1 Press the Menu button. 2 Use the Up and Down buttons to highlight ‘Favourites’. 3 Press the OK button. 4 The ‘Set up favourites’ window will open. An example of a favourites list being created is shown below. Only the channels marked with the tick symbol will appear in the favourites list when using the Fav button on the remote control. 58 Goodmans GDB20TTS_Instruction Manual.indb 58 6/15/2010 4:26:48 PM Setting up your system S e t u p fa v o u rite s CN 001 002 003 004 005 006 007 009 N a me BBC ONE BBC TWO IT V 1 Channel 4 F IV E IT V 2 BBC THREE BBC FOUR N e x t/P re v io u s B a c k S a ve f avour i t es O K A d d /re mo v e E x it R e t ur n t o TV 5 Use the Up and Down buttons to highlight a channel you want to include in the favourites list. 6 Press the OK button to add it to the list. 7 A tick symbol will be shown in line with your choice. To remove a channel from the favourites list. 1 Use the Up and Down buttons to highlight the channel (ticked) you want to remove. 2 Press the OK button. 3 The tick symbol alongside this channel will disappear. 4 Press the Back button to save the new list of favourites. 5 The Save changes window will be shown. See below. S ave ch an g es D o yo u w a n t t o s a v e c h an g es? 1. Yes 2. N o N e x t / Pr e v i o u s B a c k P revi ous m enu O K Save an d r e t u r n Exi t R eturn to TV 59 Goodmans GDB20TTS_Instruction Manual.indb 59 6/15/2010 4:26:48 PM Setting up your system 6 Use the Up and Down buttons to highlight ‘Yes’. 7 Press the OK button. If at step 6 you decided not to update the favourites list, press Exit to discard the changes and return to watching TV. Parental control Parental control lets you prevent certain channels from being watched without a PIN code being entered first. This will help to prevent children from watching programmes which you think are not suitable for them. We have described this topic in the Advanced features chapter, see page 34. Reminders list The reminders list shows the reminders you have set. As well as listing the reminders you can also delete any programmes you no longer want to be reminded of. We have described this topic in the Advanced features chapter, see page 24. 60 Goodmans GDB20TTS_Instruction Manual.indb 60 6/15/2010 4:26:48 PM Setting up your system Technical settings The ‘Technical settings’ menu allows you to set up the following items: • TV connections • Channel tuning • Power mode • Auto standby mode • Restore defaults It also allows you to see: 1 channel details; and 2 notice of a change to the network To display the Technical settings menu, do the following. 1 In the main menu, use the Up and Down buttons to highlight the ‘Technical settings’. 2 Press the OK button. 3 The TV settings menu will be shown. See below. Te c h n ic a l s e t t in g s 1. 2. 3. 4. 5. 6. 7. T V c o n n e c t io n s e t t in g s C h a n n e l Tu n in g S h o w c h a n n e l d e t a ils L o w p o w e r mo d e A u t o s t a n d b y mo d e N e t w o r k c h a n g e n o t ificatio n s R e s t o r e d e f a u lt s N e x t /P r e v io u s B a c k P r evio u s m en u OK S e le c t me n u E x it Retu r n to T V 61 Goodmans GDB20TTS_Instruction Manual.indb 61 6/15/2010 4:26:49 PM Setting up your system TV connections In this menu you can set the aspect ratio (screen shape) of the TV your set-top box connects to. Also you can set the aspect conversion – how you want the set-top box to deal with programmes created for a TV with a different screen shape (wide (16:9) or square (4:3) for example). You can also give details of the video connection format you want to use from the set-top box to the TV using the Scart connection. To display the TV connection settings menu, do the following. 1 Use the Up and Down buttons to highlight ‘TV connection settings’. 2 Press the OK button. 3 The ‘TV connection settings’ menu will be shown. See below. TV c o n n e c t io n s e t t in g s 1 . A s p e c t r a t io 2 . A s p e c t c o n v e r s io n 3. Scart type N e x t /P r e v io u s B a c k P r evio u s m en u OK S e le c t me n u E x it Retu r n to T V Aspect ratio 1 Use the Up and Down buttons to highlight ‘Aspect ratio’. 2 Press the OK button. 3 The ‘Aspect ratio’ options will be shown. 62 Goodmans GDB20TTS_Instruction Manual.indb 62 6/15/2010 4:26:49 PM Setting up your system A s p e c t r a t io 1. 4:3 (square TV) 2 . 1 6 : 9 ( w id e s c r e e n T V ) N e x t /P re v io u s B a c k P r evio u s m en u OK S a v e a n d r e t u r n E x it Retu r n to T V 4 Use the Up and Down buttons to highlight the option to suit your needs. 5 Press the OK button to save the aspect ratio setting and return to the previous menu, Or, press the Back button to return to the previous menu without change, Or, press the Exit button to ignore any change and return to watching TV. Aspect conversion 1 Use the Up and Down buttons to highlight ‘Aspect conversion’. 2 Press the OK button. 3 The ‘Aspect conversion’ options will be shown. See below. A s p e c t c o n v e r s io n 1. Letterbox 2. Zoom N e x t /P re v io u s B a c k P r evio u s m en u OK S a v e a n d r e t u r n E x it Retu r n to T V 63 Goodmans GDB20TTS_Instruction Manual.indb 63 6/15/2010 4:26:50 PM Setting up your system 4 Use the Up / Down buttons to highlight the option to suit your needs. 5 Press the OK button to save the aspect conversion setting and return to the previous menu, Or, press the Back button to return to the previous menu without change, Or, press the Exit button to ignore any change and return to watching TV. Scart type 1 Use the Up and Down buttons to highlight ‘Scart type’. 2 Press the OK button. 3 The ‘Scart type’ options will be shown. See below. Sc a r t t y p e 1. RGB 2 . C o mp o s it e N e x t /P re v io u s B a c k P r evio u s m en u OK S a v e a n d r e t u r n E x it Retu r n to T V 4 Use the Up and Down buttons to highlight the option to suit your needs. 5 Press the OK button to save the scart setting and return to the previous menu, Or, press the Back button to return to the previous menu without change, Or, press the Exit button to ignore any change and return to watching TV. Tuning the channels We have described this topic in the Advanced features chapter, see Retuning on page 30. 64 Goodmans GDB20TTS_Instruction Manual.indb 64 6/15/2010 4:26:50 PM Setting up your system Channel details The channel details function will give you a list of all the stored channels in your system in the format channel number (CN), channel name and channel type (TV or radio). You can choose any channel from the list and show detailed information about it. To display the ‘Channel details’ menu, do the following. 1 Use the Up and Down buttons to highlight ‘Channel details’. 2 Press the OK button. 3 The ‘Channel details’ menu will be shown. An example is shown below. C h a n n e l d e t a ils CN 001 002 003 004 005 006 007 009 Nam e BBC O NE BBC TW O I TV1 Channel 4 FI VE I TV2 BBC THREE BBC FO UR Ty p e TV TV TV TV TV TV TV TV N e x t /P r e v io u s B a c k P r evio u s m en u OK S h o w d e t a ils E x it Retu r n to T V 4 Use the Up and Down buttons to highlight the channel you would like details about. 5 Press the OK button. 6 The ‘Channel information’ window will be shown. An example is shown below. 65 Goodmans GDB20TTS_Instruction Manual.indb 65 6/15/2010 4:26:50 PM Setting up your system C ha n n e l in f o r ma t io n S e r v ic e : 4 C h a n n e l 4 P r o v id e r : C h a n n e l 4 T V Ne two r k : C a m b s & B e d s . F r e q u e n c y (k H z ) C .I.D . 0x20C 0 T.I.S . 0x2002 N .I.T. 0x3002 666000 S t r e n g th 70% Q ua lity 10 B a c k P re v io u s me n u E x it Retu r n to T V 7 Press the Back button to return to the previous menu, Or, press the Exit button to return to watching TV. Low-power mode In low-power mode some of the features are automatically turned off after a certain time when they have not been used for this period. If you do not want this to happen, you can turn low-power mode off. To display the ‘Turn low-power mode on/off ’ window, do the following. 1 Use the Up and Down buttons to highlight ‘Low-power mode’. 2 Press the OK button. 3 The ‘Turn low power mode on/off’ window will be shown. An example is shown below. 66 Goodmans GDB20TTS_Instruction Manual.indb 66 6/15/2010 4:26:50 PM Setting up your system Tu rn lo w p o w e r mo d e o n /off 1 . Tu rn lo w p o w e r mo d e on 2 . Tu rn lo w p o w e r mo d e off N e x t /p r e v io u s B a c k P r evio u s m en u OK S a v e a n d r e t u r n E x it Retu r n to T V 4 Use the Up and Down buttons to highlight the option to suit your needs. 5 Press the OK button to save the low power mode setting and return to the previous menu, Or, press the Back button to return to the previous menu without change, 67 Goodmans GDB20TTS_Instruction Manual.indb 67 6/15/2010 4:26:51 PM Setting up your system Or, press the Exit button to ignore any change and return to watching TV. Auto standby mode Auto standby mode will automatically switch off your set-top box after 3 hours of inactivity from the remote control. A menu will display on screen asking if you want to continue watching TV. If there is no response to this menu the set-top box will go into standby mode. You can decide if you want this to happen or not by changing the setting. To display the ‘Turn auto standby mode on/off ’ window, do the following. 1 Use the Up and Down buttons to highlight ‘Auto standby mode’. 2 Press the OK button. 3 The ‘Turn auto standby mode on/off’ window will be shown. See below. Tu rn a u t o s t a n d b y mo d e on /o ff 1 . Tu rn a u t o s t a n d b y mo de o n 2 . Tu rn a u t o s t a n d b y mo de o ff N e x t /p r e v io u s B a c k P r evio u s m en u OK S a v e a n d r e t u r n E x it Retu r n to T V 4 Use the Up and Down buttons to highlight the option to suit your needs. 5 Press the OK button to save the setting and return to the previous menu, Or, press the Back button to return to the previous menu without change, Or, press the Exit button to ignore any change and return to watching TV. 68 Goodmans GDB20TTS_Instruction Manual.indb 68 6/15/2010 4:26:51 PM Setting up your system Notice of change to the network When services are updated a record of this will be stored in the ‘Network change notifications’ window. This may happen in the early days of a network being switched on for the first time. To display a record of the changes received by your set-top box, do the following in the ‘Technical settings window. 1 Use the Up and Down buttons to highlight ‘Network change notifications’. 2 Press the OK button. 3 The ‘Network change notifications’ window will open. The headings in the display area show the range of information that can be received. In the example shown below, no information has so far been received. N e tw or k ch a n g e n o t if ic a t io n s 14:29 16/04/2010 The r e a r e n o n e t w o r k c h a n g e s ID NID State Te x t S t a rt Du r atio n Typ e N o i nfor m a t io n t o d is p la y Se l e c t E x it R e t u rn to T V 69 Goodmans GDB20TTS_Instruction Manual.indb 69 6/15/2010 4:26:51 PM Setting up your system Restore defaults When you restore defaults, all settings go back to the factory settings, except for the PIN number if you have changed it. So, it is a good idea to choose a new PIN number you can easily remember, such as your birthday or an anniversary date. To run the restore defaults function from the ‘Technical settings’ menu, do the following. 1 Use the Up and Down buttons to highlight ‘Restore defaults’. 2 Press the OK button. 3 The ‘Restore defaults’ warning message box will open. R e s t o r e d e f a lt s Wa r n in g : A re y o u s u r e y o u wan t to p u t all s e t t in g s b a c k t o f a c t o ry d efau lts? P r e s s O K t o re u r n t o f a c to r y d efau lts o r p r e s s B a c k t o re t u r n t o th e p r evio u s me n u w it h o u t c h a n g in g settin g s. OK C o n t in u e 4 B a c k P r evio u s m en u E x it Retu r n to T V Follow the on-screen instructions. Help There are nine help pages available that will display information on the screen for various topics for you to refer to at any time. To get help, press the Help button at any time. The contents for the help pages are shown below and can be accessed by pressing 0 whilst in a help screen. 70 Goodmans GDB20TTS_Instruction Manual.indb 70 6/15/2010 4:26:52 PM Setting up your system H el p C o n ten ts 0. 1. 2. 3. 4. 5. 6. 7. 8. 9. H e l p co n t en t s Wa t c h i n g T. V. Pr o g r am m e/ m i n i g u i d e M en u s Pr e f e r en c e s Reminders F avo u r i t e s Par e n t al co n t r o l C h an n el t u n i n g R e m o t e co n t r o l N e x t / Pr e v i o u s B a c k P r e vi ous m enu O K Sel ect m en u Exi t R eturn to TV To read a particular help page, use the Up and Down buttons to highlight the page and then press the OK button to display the page. This topic has been described in the Advanced features chapter. Please see page 25. System information You can display various information about your system including manufacturer’s details and the software version installed. Also, for the channel you are watching, you can see technical details including service name, provider, network and frequency of channel, signal strength and quality. The see the system information details, do the following. 1 While watching, press the Menu button. 2 Use the Up and Down buttons to highlight ‘System information’. 3 Press the OK button. 4 The system information page will be shown. An example of this page is shown on the next page. 71 Goodmans GDB20TTS_Instruction Manual.indb 71 6/15/2010 4:26:52 PM Setting up your system S yst em in fo r m a tio n M a n u f a c t u re r: S o f t w a r e v e rs io n : S o f t w a r e la s t u p d a t e d : Go o d ma n s 5 .0 N/A S e r v i c e : 1 BBC ONE P r o v i d e r : BBC N e t w o r k : Ea s t An g lia F r e q u e n cy ( k Hz) Back 698000 Model number: B oot code: C .I.D . 0x1047 T.I.S . 0x1007 N .I.T. 0x3001 St re n g t h 70% Qu a lit y 10 Pre vi ous menu Ex i t S mart Talk v1.7 R e turn to TV 5 Use the Up and Down buttons to highlight the option to suit your needs. 6 Press the OK button to save the setting and return to the previous menu, Or, press the Back button to return to the previous menu without change, Or, press the Exit button to ignore any change and return to watching TV. 72 Goodmans GDB20TTS_Instruction Manual.indb 72 6/15/2010 4:26:53 PM Troubleshooting Help and advice If you have difficulties using your set-top box and none of the suggestions below work, try switching your set-top box off at the mains, and then back on again. If this does not work, contact the shop you bought your set-top box from or a qualified repair technician. Never try to repair your set-top box yourself. Please make sure you know the model number of your set-top box before contacting us. The model number is printed on the label on the underneath of the set-top box main unit. Problem What might be causing the problem The ‘Standby’ light is not lit. The mains lead either unplugged or the fuse in the mains plug has blown. You cannot get a signal on your set-top box. You cannot get a picture or any sound. The aerial is not connected. The aerial is damaged or pointing in the wrong direction. You are not in an area which can receive a digital signal for the set-top box. Your TV is set to the wrong AV channel. Check the channel you are using. Your set-top box may be set to digital teletext mode. You may get an encrypted channel message. You have to pay to watch this channel. The signal is encoded (encrypted) so that only authorised equipment can receive it. Your set-top box is The set-top box is switched off or you are not pointing the not responding to the remote control at the set-top box properly. There might be remote control. something in front of the front panel on the set-top box. You may have put the batteries in the remote control the wrong way round or you may need new batteries. The picture is made The aerial may not be the right type for the set-top box. It may up of square blocks or be damaged or pointing in the wrong direction. it freezes still. You can only find You have your favourites selected. Check your ‘Channel list’. some of the channels on your set-top box. 73 Goodmans GDB20TTS_Instruction Manual.indb 73 6/15/2010 4:26:53 PM Troubleshooting Frequently asked questions • Why do I get square blocks in the picture on the TV screen when I am watching Freeview channels? The Freeview signal may be poor. You can check that you live in an area where you can receive Freeview channels by entering your postcode on the website www.freeview.co.uk or by sending your postcode in a text message to 83331. (This service is available on all major UK mobile phone networks. Standard network charges apply.) • Can I watch the Freeview channels with only the RF cable connected between the TV and the set-top box? No. To watch Freeview channels you must use the TV Scart connection. The RF cable connection lets you watch your existing (non-digital) TV channels when the set-top box is turned off for example. 74 Goodmans GDB20TTS_Instruction Manual.indb 74 6/15/2010 4:26:53 PM Product safety Safety information • Place cables where you won’t walk on them and don’t put anything on or against them. • Do not use the set-top box in humid or damp conditions. • Do not allow the set-top box to get wet. • Do not drip or splash anything on the set-top box. • Do not put anything with water in it (such as a vase) on top of the set-top box. • Do not put naked flames (such as candles) on top of the set-top box. Cleaning • Always unplug the set-top box before you clean it. • Do not use liquid or aerosol cleaners. • You should clean the set-top box with a soft, cloth that is barely damp. Ventilation • The slots and openings on the set-top box are for ventilation (allowing air into the box to keep it cool). Do not cover or block them as this could cause the set-top box to overheat. • Never let children push anything into the slots or openings in the case. Servicing • There are no parts in the set-top box which you can repair yourself • If your set-top box doesn’t work or has a fault, always take it to a qualified engineer. • Always talk to staff in the shop where you bought the set-top box if you have any questions about installing it or how it works, or for safety instructions. Getting rid of batteries • Always make sure you get rid of batteries safely. Check with your local authority for how you should get rid of batteries. • Never put batteries on a fire, or in the bin with household waste. 75 Goodmans GDB20TTS_Instruction Manual.indb 75 6/15/2010 4:26:53 PM Goodmans GDB20TTS_Instruction Manual.indb 76 6/15/2010 4:26:53 PM