1
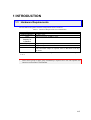
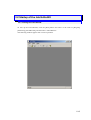
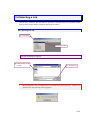
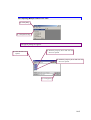
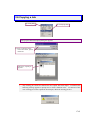
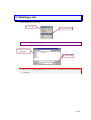
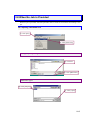
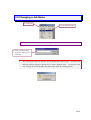
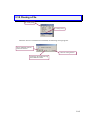
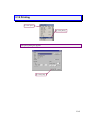
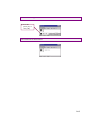
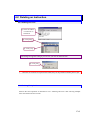
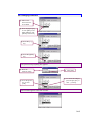
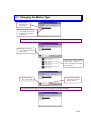
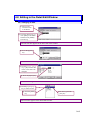
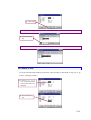
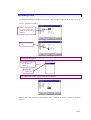
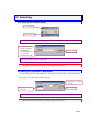
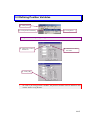
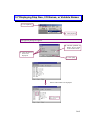
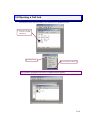
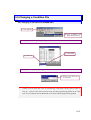
For NX100 for Industrial Robot MOTOMAN
Job Editing Software for Personal Computer
Job EditorNX OPRRATION MANUAL
Upon receipt of the product and prior to initial operation, read this instruction thoroughly, and retain for
future reference.
0/63
General Precautions
・ Diag rams and p hoto s in th is manu al are used as examples only and may differ from
th e actu al deliv ered produ ct.
・ This manual may be modified when necessary because of improv ement of the
p rod uct, mod ificatio n, o r ch anges in sp ecification s.
Such mo d ification is made as a revision b y ren ewing the man u al No.
・ To order a copy of this manual, if your co py has been damaged or lo st, contact your
YASKAWA rep resentative listed on the la st p age stating the man u al No . on the
fron t page.
・ YASKAWA is no t respon sible for an y mo d ification o f th e p rodu ct mad e b y the u ser
sin ce that will void gu arantee.
・ So ftware supp lied with th is manu al is intend ed fo r u se b y licensed operato rs on ly
and may only be u sed o r cop ied acco rd in g to the p rovision s o f th e licen se.
・ Rep rodu ction o f an y p art o f this manu al without the con sent of YASKAWA is
fo rb idden .
(c)2004 YASKAWA ELECTRIC CORPORATION
Trade Mark
・ MS Windows 95/98/ME/NT4.0/2000/XP are registered trademarks of Microsoft Corporation, U.S.A.
・ Job EditorNX is a trademark of YASKAWA.
2/63
CONTENTS
1 INTRODUCTION...............................................6
1.1
1.2
1.3
Hardware Requirements .............................................................................6
Hardware Lock Key .....................................................................................7
Job EditorNX ...............................................................................................8
1.3.1 What is the Job EditorNX?........................................................................................... 8
1.3.2 Features ...................................................................................................................... 8
2 SETUP ..............................................................9
2.1 The Setup Program ..........................................................................................9
3 BASIC OPERATION .......................................10
3.1 Basic Concept and Operation Flow ................................................................10
3.1.1 Difference from MRC-World....................................................................................... 10
3.1.2 Operation Flow .......................................................................................................... 10
3.1.2.1 Saving a Parameter File (ALL.PRM)............................................................................10
3.1.2.2 Creating a Folder ............................................................................................................10
3.1.2.3 Editing ...............................................................................................................................10
3.1.2.4 Loading to the Programming Pendant .........................................................................10
3.2 Startup of the Job EditorNX............................................................................11
3.2.1 Clicking the Job EditorNX .......................................................................................... 11
3.3 Basic Windows ...............................................................................................12
3.4 Selecting a Job...............................................................................................13
3.4.1 Opening One Job ........................................................................................................ 13
3.4.2 Opening Multiple Jobs at One Time........................................................................... 14
3.5 Creating a Job ................................................................................................15
3.5.1 Creating a Job ........................................................................................................... 15
Selecting Options when Creating a Job.............................................................................. 16
3.5.1.1 Job Type ...........................................................................................................................16
3.5.1.2 Control Group ..................................................................................................................16
3.6 Copying a Job ................................................................................................17
3.7 Deleting a Job ................................................................................................18
3.8 When No Job is Provided...............................................................................19
3.8.1 Opening a Parameter File.......................................................................................... 19
3/63
3.9 Changing a Job Name....................................................................................20
3.10 Closing a File ...............................................................................................21
3.11 Saving a File.................................................................................................22
3.12 Printing .........................................................................................................23
3.13 Exit ...............................................................................................................24
4 EDITING..........................................................25
4.1
4.2
Adding an Instruction.................................................................................25
Deleting an Instruction...............................................................................27
4.2.1 Deleting One Line ...................................................................................................... 27
4.2.2 Deleting Multiple Lines............................................................................................... 27
4.3
Selecting Multiple Lines.............................................................................28
4.3.1 Using the Keyboard ................................................................................................... 28
4.3.2 Using the Mouse........................................................................................................ 28
4.4
Copying an Instruction...............................................................................29
4.4.1 Copying One Line ...................................................................................................... 29
4.4.2 Copying Multiple Lines............................................................................................... 29
4.5
Pasting an Instruction................................................................................30
4.5.1 Paste ......................................................................................................................... 30
4.5.2 Reverse ..................................................................................................................... 30
4.6
Modifying an Instruction ............................................................................32
4.6.1 Changing Numeral Values (1).................................................................................... 32
4.6.2 Changing Numeral Values (2).................................................................................... 33
4.6.3 Changing Characters................................................................................................. 34
4.7
4.8
Changing the Motion Type ........................................................................35
Editing in the Detail Edit Window...............................................................36
4.8.1 Changing an Item ...................................................................................................... 36
4.8.2 Adding an Item........................................................................................................... 37
4.8.3 Deleting an Item ........................................................................................................ 39
4.9
Searching ..................................................................................................40
4.9.1 Searching for Character Strings................................................................................. 40
4.9.2 Moving the Line Number or Step Number.................................................................. 40
5 EDITING OTHER ITEMS ................................41
5.1
Changing the Speed..................................................................................41
5.1.1 Changing according to Speed Type ........................................................................... 41
4/63
5.1.2 Changing Speed Relatively (Changing Speed in Ratio for Current Speed) ............... 42
5.2
Defining Control Groups ............................................................................43
5.2.1 Adding a Combination................................................................................................ 43
5.2.2 Changing a Combination ........................................................................................... 44
5.2.3 Deleting a Combination ............................................................................................. 44
5.3
5.4
5.5
5.6
Defining Position Variables........................................................................46
Adding Comments.....................................................................................47
Entering the Number of Local Variables Used...........................................48
Increasing the Instruction Types to be Used .............................................49
5.6.1 Changing the Language Level................................................................................... 49
5.6.2 Parameter Option ...................................................................................................... 49
5.7
5.8
5.9
Displaying Step Nos., I/O Names, or Variable Names...............................50
Opening a Call Job....................................................................................51
Changing a Condition File .........................................................................52
5.9.1 Changing an I/O Name File (IONAME.DAT).............................................................. 52
5.9.2 Changing a Variable Name File (VARNAME.DAT).................................................... 53
5.10 Editing an Expression...................................................................................54
5.11 Using a Macro Command..........................................................................58
5.12 Changing the Font.....................................................................................59
5.13 Changing the Background Color ...............................................................60
5.14 Changing the Comment Color ...................................................................61
5.15 Changing the Language ............................................................................62
5/63
1 INTRODUCTION
1.1 Hardware Requirements
The Job EditorNX operates with the configurations shown in Table 1.
Table 1
OS
Required Memory
CPU
Hardware Disk
Capacity for
Installation
Display
Mouse
Hardware Lock Key
Hardware Requirements for Job EditorNX
Microsoft Windows 95/98/ME/NT4.0/2000/XP *)
16 MB or more
Pentium processor 90 MHz or more
30 MB or more
Supported by MS-Windows (with 256 color or more)
Supported by MS-Windows
Single user registration.
If an conversion adapter is required, refer to “Hardware Lock Key”
for details.
*) MS Windows 95/98/ ME/NT4.0/2000/XP are registered trademarks of Microsoft Corporation,
U.S.A.
!
Power Users group or upper group membership is required for a user who operates Job
EditorNX with Windows NT/2000/XP.
6/63
1.2 Hardware Lock Key
The software is protected by an hardware lock key. There are two different versions available
(USB and SUB-D type). The installation of the hardware lock key driver is included in the
program installation. In case of WindowsNT/2000/XP please log in with local administrative
rights.
SUB-D type
Attach the provided key to parallel port (printer port) of your pc. Make sure that it is not a
25pin serial port. The key can also be attached to an existing key. If this makes problems
change the order of the keys.
USB type
Please do not install the usb key before completing the program installation. Otherwise you
may be prompted for a driver disk. In this case cancel the operation and unplug the key again.
Attach the USB key to a free usb port of your pc. USB ports are only supported by
Windows98SE and higher.
If there are problems starting the application check the proper installation of the key driver.
Check the Add/Remove Software section of the control panel for an entry named "Sentinel
System Driver...".
7/63
1.3 Job EditorNX
1.3.1
What is the Job EditorNX?
The Job EditorNX is editing software for INFORM3, the control language of the robot
controller, the YASKAWA NX.
1.3.2
Features
On a personal computer, Job EditorNX can be used in the same manner as a programming
pendant to edit jobs.
The displays where editing can be done are the same as those for the
programming pendant. Anyone who can edit with the programming pendant can easily use
this software.
The Job EditorNX uses JBI files whereas the conventional MRC-World uses CMOS files for
basic operation.
Files can be easily handled with the tools such as Windows Explorer, etc.
8/63
2 SETUP
2.1 The Setup Program
To install the Job EditorNX in Windows, follow the procedures below.
However, be sure to login
on administrator mode in installing the Job EditorNX in Windows NT4.0/2000/XP, or else the
system related DLL files in Windows might not be updated.
(1) Insert the installation CD-ROM into the CD-ROM drive.
(2) Click the [Start] button and point to [Settings]. Click [Control Panel], and select the
[Add/Remove Programs].
(3) Click the [Install] button. Follow the on-screen instructions to run “Setup.exe” from the
CD-ROM drive.
(4) Clicking the [Finish] button and the [Execute Application] button calls up the [Setup] dialog
box.
(5) Follow the on-screen instructions.
(6) When the setup is completed, [Job EditorNX] is registered under the [Job EditorNX] folder
that appears by clicking the [Start] button in the task bar and selecting [Program] and then
[Motoman].
Note: To re-install the Job EditorNX for some reason, click the [Start] button and point to
[Settings].
Click [Control Panel], and double-click the [Add/Remove Programs] icon.
Then select [Job EditorNX], and delete all the Job EditorNX application files before starting
re-installation.
9/63
3 BASIC OPERATION
3.1 Basic Concept and Operation Flow
3.1.1 Difference from MRC-World
The MRC-World is the previous software version of the Job EditorNX.
For basic operations, the MRC-World uses CMOS.HEX as a file unit, but the Job EditorNX
uses *.JBI file units.
Therefore, the Job EditorNX cannot read in CMOS.HEX directly.
For managing each robot, the MRC-World required registration of the robots at the beginning,
however, such robot registration is no longer required for the Job EditorNX.
To manage each
robot with the Job EditorNX, simply create a folder and input the parameter file and the job file
to be edited into the folder.
3.1.2 Operation Flow
This software requires only parameter files.
To edit the same instructions as the programming
pendant, save the parameter file from the programming pendant in advance.
3.1.2.1 Saving a Parameter File (ALL.PRM)
Use the YASKAWA FC2 or FC1-Emulator to save ALL.PRM and the job file to be edited from
the programming pendant.
3.1.2.2 Creating a Folder
Create a folder anywhere on the personal computer, and copy the parameter file and job file that
have been saved from the programming pendant to the folder.
3.1.2.3 Editing
Use the Job EditorNX to open the job file and save it after editing.
3.1.2.4 Loading to the Programming Pendant
Load the edited file to the programming pendant using the same procedure as described in
paragraph 3.1.2.1.
10/63
3.2 Startup of the Job EditorNX
3.2.1 Clicking the Job EditorNX
To start up the Job EditorNX, click the [Start] button and select in the order of [Program],
[Motoman], [Job EditorNX], and then select “Job EditorNX”.
The following window appears with a correct operation:
11/63
3.3 Basic Windows
The basic windows are the “Main Window,” “Line-edit Box,” and the “Detail Edit Window.”
◆ Main Window
◆ Menu
◆ Current Line Information
◆ Address
◆ Instruction
◆ Job Size
◆ Line-edit Box
◆ Detail Edit Window
12/63
3.4 Selecting a Job
Various basic parameter files and jobs are provided in Sample under the installation folder.
Refer to those samples before reading the following procedures.
3.4.1 Opening One Job
① Click [File].
②Click [Select Job].
The [Open] dialog box appears.
③ Click the file to be
opened.
!
④ Click [Open].
The NX parameter file (ALL.PRM) must be in the directory having the job.
If there is no
parameter file, the following warning appears.
13/63
3.4.2 Opening Multiple Jobs at One Time
① Click [File].
② Click [Select Job].
The [Open] dialog box appears.
③ Click the file to be
opened.
④ Hold the [Ctrl] key down and click the
file to be opened.
⑤ Hold the [Ctrl] key down and click the
file to be opened.
⑥ Click [Open].
14/63
3.5 Creating a Job
3.5.1 Creating a Job
① Click [File].
② Click [Create Job].
The [Create Job] dialog box appears.
③ Enter a job name
using lower-case
letters, maximum
8 characters.
④ Click [OK].
The new job appears.
!
A file is created in the folder.
message appears.
If any existing job has the same name, the following
Select [Yes] only when the existing job is to be overwritten.
15/63
Selecting Options when Creating a Job
3.5.1.1 Job Type
Select whether a job including position data is to be created.
A robot job contains position data, and the concurrent job does not.
3.5.1.2 Control Group
Select the job control group.
If the control group is not found in this list, register the control
group in the “Group Combination Registry,” and re-open this window.
16/63
3.6 Copying a Job
① Click [File].
② Click [Copy Job].
The [Copied Job Name Input] dialog box appears.
③ Enter a job name using
lower-case letters, up to 8
characters.
The newly copied job
appears.
!
Any existing job cannot be selected for the Copied Job Name Input.
following message appears to prompt user to enter a different name.
If selected, the
To select the name
of an existing job for the Copied Job Name Input, delete the existing job first.
17/63
3.7 Deleting a Job
Use the Explorer to delete a file.
① Click [File].
② Click [Delete Job].
The [Delete Job] dialog box appears.
③ Click the file to
be opened.
④ Click [Open].
!
Refer to 3.4.2 “Opening Multiple Files at One Time” for details on deleting multiple files
at one time.
18/63
3.8 When No Job is Provided
When no job is provided, select the parameter file to create an environment for making a new
job.
3.8.1 Opening a Parameter File
① Click [File].
② Click [Select Job].
The [Open] dialog box appears.
③ Click here.
④ Click [PRM Files].
PRM Files appear.
⑤ Click [All.prm].
⑥ Click [Open].
19/63
3.9 Changing a Job Name
① Click [File].
② Click [Modify Name].
The [Modified Job Name Input] dialog box appears.
③ Enter a job name using
upper-case letters, up to 8
characters.
!
Any existing job cannot be specified for the Modified Job Name Input.
following message appears to prompt user to enter a different name.
If selected, the
To select the name
of an existing job for the Modified Job Name Input, delete the existing job first.
20/63
3.10 Closing a File
① Click [File].
② Click [Close].
When the file to be closed has been modified, the following message appears.
Saves modified contents,
and closes the file.
Cancels closing the file.
Closes the file without saving
the modified contents.
21/63
3.11 Saving a File
① Click [File].
② Click [Save].
!
The following error message may appear when saving a file.
This message appears when
the position variable is not defined, although there is an instruction using a position
variable in the job which was going to be saved. Select [View] and then [Position
Variable] to define the position variable.
22/63
3.12 Printing
① Click [File].
② Click [Print].
The [Print] dialog box appears.
③ Click [OK].
23/63
3.13 Exit
① Click [File].
② Click [Exit].
!
If there is any job that has not been saved when attempting to close the Job EditorNX, the
dialog will appear to ask if the edited job is to be saved.
24/63
4 EDITING
4.1 Adding an Instruction
Press the cursor keys to highlight the address of the line where an instruction is to be added.
This can be also done by clicking the mouse directly.
① Move to the address of the line
where an instruction is to be
inserted.
② Press the [Space] key, or click
[Edit] on the Menu and then click
[Insert Instruction].
(Menu: [Edit] - [Insert Instruction])
The [Select Inst] dialog box for each group of instructions appears.
③ Select a line by pressing
the cursor keys or by
clicking the mouse.
④ Press the [Enter] key or
double-click the mouse.
*) Press the [Esc] key to exit
the Add mode.
The [Select Inst] dialog box appears.
⑤ Select a line by pressing
the cursor keys or by
clicking the mouse.
⑥ Press the [Enter] key or
double-click the mouse.
*) Press the [Esc] key to
return to the [Select Inst]
dialog box for each group
of instructions.
25/63
The line-edit box appears in the lower-left of the window.
⑦ Press the
[Enter] key or
click [OK].
The instruction has been inserted.
26/63
4.2 Deleting an Instruction
4.2.1 Deleting One Line
① Select the address
or instruction to
be deleted.
② Click [Edit].
③ Click [Cut].
The dialog box appears asking if you are sure you want to delete the line.
④ Click [Yes].
!
Since the cut contents are copied to the buffer, they can be pasted on another place or job.
4.2.2 Deleting Multiple Lines
Perform the same operation as described in 4.2.1 “Deleting One Line" after selecting multiple
lines described in the next section.
27/63
4.3 Selecting Multiple Lines
4.3.1 Using the Keyboard
① Move to the first
line to be selected.
② Press the [SHIFT]
key.
③ Move the cursor
holding the
[SHIFT] key
down to select
additional lines.
4.3.2 Using the Mouse
① Click the first line to be selected.
② Drag over adjacent lines to
select multiple lines.
28/63
4.4 Copying an Instruction
4.4.1 Copying One Line
① Move to the line
to be copied.
② Click [Edit].
③ Click [Copy].
Perform the same operation as described in 4.5 “Pasting an Instruction.”
!
There is no limitation to the number of instructions that can be copied.
Move instructions
can also be copied, however, pay attention in operating those copied instructions.
4.4.2 Copying Multiple Lines
Perform the procedure described in 4.3 “Selecting Multiple Lines,” and then perform the
procedures as described in steps ② and ③ in 4.4.1 “Copying One Line.”
29/63
4.5 Pasting an Instruction
4.5.1 Paste
① Move to the line where
data is to be pasted.
② Click [Edit].
③ Click [Paste].
A dialog box appears asking if you are sure you want to paste the data.
④ Click [Yes].
4.5.2 Reverse
“Reverse” pastes several copied lines in the opposite order of how they were copied.
A group of move instructions for returning can be simply created by copying the group of move
instructions for going, and reverse-pasting them.
① Select multiple lines
30/63
② Move to the position
where the data is to
be inserted. The
data will be inserted
on the next line.
③ Click [Edit].
④ Click [Reverse].
A dialog box appears asking if you are sure you want to reverse-paste the data.
⑤ Click [Yes].
The data has been reverse-pasted.
31/63
4.6 Modifying an Instruction
4.6.1 Changing Numeral Values (1)
① Move to the
instruction line
to be edited.
② Press the [Space] key, or
click [Edit] on the Menu
and then click [Modify
Instruction].
The line-edit box appears in the lower-left of the window.
③ Press the [→ ] key.
④ Press the [↑ ] key.
⑥ Press the [Enter]
key or click [OK].
⑤ Press the [↑ ] or [↓ ]
key until obtaining
the desired value.
⑥ To cancel the changes,
press the [Esc] key or
click [Cancel].
The new data appears in the main window.
32/63
4.6.2 Changing Numeral Values (2)
Select the numeral value for line editing with the same procedures as described in 4.6.1
“Changing Numeral Values (1).”
① Press the [Space]
key.
The [Value Input] dialog box appears.
② Change the value by
one of the following
three methods.
1)Enter the value directly.
3) Click here.
2) Press the [↑ ] or [↓ ] key.
③ Click [OK].
④ Press the
[Enter] key
or click
[OK].
④ To cancel the changes,
press the [Esc] key or
click [Cancel].
The new data appears in the main window.
!
Lines cannot be moved in the main window during line editing.
33/63
4.6.3 Changing Characters
① Move to the
instruction line
to be edited.
② Press the [Space] key,
or click [Edit] on the
Menu and then click
[Modify Instruction].
③ Press the [→ ]
key.
④ Press the [Space]
key.
The [Character Input] dialog box appears.
⑤ Enter the
character string.
⑦ Press the [Enter]
key or click
[OK].
⑥ Click [OK].
⑦ To cancel the changes,
press the [Esc] key or
click [Cancel].
The new data appears in the main window.
34/63
4.7 Changing the Motion Type
① Move to the
instruction line
to be edited.
② Press the [Space] key, or
click [Edit] on the Menu
and then click [Modify
Instruction].
The line-edit box appears in the lower-left of the window.
③ Press the [↑ ] or [↓ ]
key to select the desired
motion type.
Motion types can be changed
in this order. Speed is
relative speed and converted
automatically.
④ Press the [Enter]
key or click [OK].
*) To cancel the changes,
press the [Esc] key or
click [Cancel].
The instruction line with the new motion type appears in the main window.
35/63
4.8 Editing in the Detail Edit Window
4.8.1 Changing an Item
① Move to the
instruction line
to be edited.
② Press the [Space] key, or
click [Edit] on the Menu
and then click [Modify
Instruction].
The line-edit box appears in the lower-left of the window.
③ Press the [Space]
key.
The Detail Edit window appears.
④ Use the [↓ ], [↑ ], [→ ]
or [← ] key to move the
cursor to the item to be
changed.
⑤ Press the [Space] key.
A selection list appears.
⑥ Use the [↑ ] or [↓ ]
key to select an item.
⑦ Press the [Enter]
key.
*) To cancel, press the
[Esc] key.
The new item appears in the Detail Edit window.
36/63
⑧ Click [OK].
The line-edit box appears in the lower-left of the window.
⑨ Press the [Enter]
key.
The new instruction appears in the main window.
4.8.2 Adding an Item
To call up the Detail Edit window, perform the same procedure as described in steps ① to ③
of 4.8.1 “Changing an Item.”
① Use the [↓ ], [↑ ], [→ ]
or [← ] key to move the
cursor to the item to be
changed.
② Press the [Space]
key.
37/63
A selection list appears.
③ Use the [↓ ] or [↑ ]
key to make a
selection.
④ Press the
[Enter] key.
The added item appears in the Detail Edit window.
⑤ Move the cursor to the
numerical data when
the numerical value of
the item is to be
changed.
⑥ Press the [Space]
key.
The [Value Input] dialog box appears.
(3) Click here.
⑦ Change the value by one
of the following three
methods (1) through (3)
on the right.
(2) Press the [↑ ] key.
⑧ Click [OK].
(1) Enter the value directly.
The Detail Edit window appears with the new value.
Perform the same procedure as described in 4.8.1 “Changing an Item” to return to the main
window.
38/63
4.8.3 Deleting an Item
To call up the Detail Edit window, perform the same procedure as described in steps ① to ③
of 4.8.1 “Changing an Item.”
① Use [↓ ], [↑ ], [→ ] or
[← ] key to move the
cursor to the item to be
deleted.
② Press the [Space]
key.
A selection list appears.
③ Use the [↓ ] or [↑ ]
key to make a
selection.
④ Press the
[Enter] key.
The Detail Edit window appears with the item deleted.
Perform the same procedure as described in 4.8.1 “Changing an Item” to return to the main
window.
39/63
4.9 Searching
4.9.1 Searching for Character Strings
① Click [Edit].
② Click [Find].
The [Find and Jump] dialog box appears.
③ Enter the character
string to be found
(disregarding
whether upper-case
or lower-case
characters are used).
④ Click [Next].
The search for the character string starts.
!
The search starts from the cursor’s position and goes down the list.
4.9.2 Moving the Line Number or Step Number
To call up the [Find and Jump] dialog box, perform the same procedure as described in steps
① to ④ of 4.9.1 “Searching Character String.”
② Click here to select
the No.
① Select a line No. or
Step No.
③ Click [Jump].
The search for the line No. or Step No. starts.
!
The search starts from the cursor’s position and goes down the list.
40/63
5 EDITING OTHER ITEMS
5.1 Changing the Speed
5.1.1 Changing according to Speed Type
① Select the range to be
changed.
② Click [Edit].
③ Click [Modify Speed].
The [Modify speed] dialog box appears.
④ Select VJ.
⑥ Click [OK].
⑤ Enter speed 100.00 as
the speed.
41/63
The main window appears with only VJ changed to 100.00.
5.1.2 Changing Speed Relatively (Changing Speed in Ratio for Current Speed)
To call up the "Modify speed" dialog box, perform the same procedure as described in 5.1.1
“Changing according to Speed Type.”
① Select
RELATIVE
② Enter 50.
③ Click [OK].
The main window appears with all the speeds changed to 50%.
42/63
5.2 Defining Control Groups
When there is more than one control group, the combination can be defined.
The control
group to be selected for new job creation, etc. does not appear on the window when creating a
job unless it is defined here.
5.2.1 Adding a Combination
① Click [Mode].
② Click [Match Control Group].
The [Regist Match of Group] dialog box appears.
③ Click [Add].
The [Select Group] dialog box appears.
④ Click [R1].
⑥ Click [OK].
⑤ Click [S1].
“R1 + S1” has been added to the Regist Match of Group list.
43/63
5.2.2 Changing a Combination
To call up the "Regist Match of Group" dialog box, perform the same procedure as described in
steps ① and ② of 5.2.1 “Adding a Combination.”
① Select the combination to
be changed.
② Click [Modify].
The [Select Group] dialog box appears.
To define the group combination, perform the same procedure as described in steps ① and ②
of 5.2.1 “Adding a Combination.”
“S1” in the [Regist Match of Group] dialog box has been changed to “R1 + S1”.
5.2.3 Deleting a Combination
To call up the "Regist Match of Group" dialog box, perform the same procedure as described in
steps ① and ② of 5.2.1 “Adding a Combination.”
① Select the combination
to be deleted.
② Click [Del].
“S1” has been deleted from the [Regist Match of Group] dialog box.
44/63
45/63
5.3 Defining Position Variables
① Click [View].
② Click [Position Variable].
③ Click [Robot…].
The [Position Variable] dialog box appears.
④ Click here to select
the file No.
⑤ Click here to select
the frame.
⑥ Click [OK].
!
To create a job using position variables, the position variables must be defined in this
window before saving the data.
46/63
5.4 Adding Comments
① Click [View].
② Click [Header].
The [Header of Job] dialog box appears.
③ Enter comment
character string.
④ Click [OK].
!
Enter maximum of 32 characters for the comment character string.
47/63
5.5 Entering the Number of Local Variables Used
① Click [View]
② Click [Header].
The [Header of Job] dialog box appears.
③ Click [More].
The Local variable Num text boxes appear.
④ Enter the number.
!
⑤ Click [OK].
The [More] button occasionally be invalided and become unable to select..
48/63
5.6 Increasing the Instruction Types to be Used
5.6.1 Changing the Language Level
Since the “language level” is set to “Reduction” by default, the instruction types displayed are
less than the total number available.
Setting the language level to “Extension” increases the
number of instruction types displayed.
① Click [Mode].
② Click [Extension].
The number of instructions increases.
5.6.2 Parameter Option
For example, the SRCH tag is one of several instructions that can be added to MOVL.
Because the instruction is a parameter option, it requires the parameter file, where the flag
permitting the use of the SRCH tag is valid, from the programming pendant.
49/63
5.7 Displaying Step Nos., I/O Names, or Variable Names
① Click [Mode].
② Click [Option].
The [Option] dialog box appears.
④ Set the position to
display the I/O name
or the variable name.
③ Click the desired
items to be
displayed.
⑤ Click [OK].
Names and numbers are displayed.
50/63
5.8 Opening a Call Job
This function can be used only with a CALL instruction or a JUMP instruction.
① Move the cursor to
a CALL or JUMP
instruction.
② Click [View].
③ Click [Open Call Job].
The job that is designated in the CALL or JUMP instruction appears.
51/63
5.9 Changing a Condition File
5.9.1 Changing an I/O Name File (IONAME.DAT)
① Click [Mode].
② Click [Condition File
Edit] and [I/O name].
The [Condition file edit] dialog box appears.
④ Click [Edit].
③ Select I/O.
The [Character edit] dialog box appears.
⑤ Enter an I/O name up to
16 characters.
!
If there is no I/O name file, a file is automatically created after entering the I/O name in
step ⑤.
This I/O name file can also be used with the programming pendant in the same
way as a job edited by the Job EditorNX can be used with the programming pendant.
52/63
5.9.2 Changing a Variable Name File (VARNAME.DAT)
① Click [Mode].
②Click
[Condition File Edit] and
[Variable name].
The [Condition file edit] dialog box appears.
④ Click [Edit].
③ Select variable.
The [Character edit] dialog box appears.
⑤ Enter an I/O name up to
16 characters.
!
If there is no variable name file, a file is automatically created after entering the variable
name in step ⑤.
This variable name file can also be used with the programming pendant
in the same way as a job edited by the Job EditorNX can be used with the programming
pendant.
53/63
5.10 Editing an Expression
To edit an expression, use a "SET" instruction.
!
To edit an expression, set the language level to "Standard" or "Extension."
① Move to the
address area of the line
to be inserted
② Press the [Space] key,
or click [Edit] on the
Menu and then click
[Insert Instruction].
The [Select Inst] dialog box for each group of instructions appears.
③ Select a line by
pressing the cursor
keys or clicking the
mouse.
④ Press the [Enter]
key or
double-click the
mouse.
*) Press the [Esc] key to
exit the Add mode.
The [Select Inst] dialog box appears.
⑤ Select a line by
pressing the cursor
keys or clicking the
mouse.
⑥ Press the [Enter]
key or
double-click the
mouse.
*) Click here or press the
[Esc] key to return to the
[Select Inst] dialog box for
each group of instructions.
54/63
The line-edit box appears in the lower-left of the window.
⑦ Press the [Space]
key.
The [Detail Edit] dialog box for the SET instruction appears.
⑧ Press the [Space] key.
A selection list appears.
⑨ Press the [Enter] key.
*) Press the [Esc] key to cancel.
The [Detail Edit] dialog box for EXPRESS appears.
⑩ Set an expression.
⑫ Click [OK].
*) Displays the set
expression.
⑪-a) Click here to
add the data.
⑪-b) Click here to
delete the data.
55/63
Double-click the position or click [Edit] to select the following items.
(a) Left parenthesis
By performing double-click or clicking [Edit], the display changes in the following order.
( → (( → ((( → - ( → - (( → - (((
(b) Data
The [Value Input] box appears.
(1) Enter the value.
(2) Click [OK].
(c) Changing the data type
A selection list appears.
(1) Use the [↓] or [↑] key
to select the data
(2) Press the [Enter] key.
(3) Enter the value.
(4) Click [OK].
(d) Right parenthesis
By performing double-click or clicking [Edit], the display changes in the following order.
) → )) → )))
(e) Operator
A selection list appears.
(1) Use the [↓] or [↑] key
to select the operator.
(2) Press the [Enter] key.
The [Detail Edit] dialog box for the SET instruction appears again.
56/63
⑬ Click [OK].
The line-edit box appears in the lower-left of the window.
⑭ Press the [Enter] key.
The changed main window appears.
57/63
5.11 Using a Macro Command
By storing the macro definition file (MACRO.DAT) in the same folder as the parameter file
(All.prm), the defined macro command can be used.
① Move the cursor to
the address area of the
line to be added.
② Press the [Space] key,
or click [Edit] on the
Menu and then click
[Insert Instruction].
The [Select Inst] dialog box for each group of instructions appears.
③ Move the cursor to
"MACRO" and select
it by clicking it.
The [Select Inst] dialog box appears.
Instructions that have been defined in the macro definition file appear.
These instructions are
used to add or edit the macro command.
!
The Job EditorNX can use a macro command but cannot create the command.
!
To use this function, use the parameter file of which option for "INFORM creation
function" is available.
58/63
5.12 Changing the Font
The font can be changed in the “Main Window,” “Line-edit Box,” or “Detail Edit Window.”
① Click [View].
② Click [Font].
③ Click the window to be
changed.
The [Font] dialog box appears.
④ Click [OK].
59/63
5.13 Changing the Background Color
The background color can be changed in the “Main Window,” “Line-edit Box,” or “Detail Edit
Window.”
① Click [View].
② Click [BackColor].
③ Click the window to
be changed.
The [Color] dialog box appears.
④ Select the color.
⑤ Click [OK].
60/63
5.14 Changing the Comment Color
① Click [View].
② Click [Comment Color].
The [Color] dialog box appears.
③ Select the color.
④ Click [OK].
61/63
5.15 Changing the Language
① Click [View].
② Click [Change Language].
The [Select Language] dialog box appears.
③ Select the language.
④ Click [OK].
62/63