1
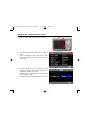
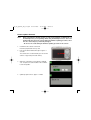
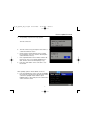
X1_FW_upd110_GB_r4.qxd
29.09.2005
16:26 Uhr
Seite 1
www.konicaminolta.com
www.konicaminoltasupport.com
DiMAGE X1 Camera Firmware Ver.1.10
This section explains how to install DiMAGE X1 firmware version 1.10. (Firmware is software used internally to control the camera.) Be sure to read through the following explanation before you install the firmware. Do not turn the camera OFF during installation; doing
so could damage the CPU inside the camera.
Contents of update
1. Shortened shutter-release time lag.
(Time period from when the shutter-release button is pressed down fully to when exposure
begins.)
2. Shortened operation time lag.
(Time period from zooming lever is operated to when operation of any other function button
is accepted.)
Target products
This firmware is for use only with the DiMAGE X1 and cannot be used with other products.
If the firmware version is already Ver.1.10, it is not necessary to update the firmware.
(Check the firmware version as shown below.)
1
X1_FW_upd110_GB_r4.qxd
29.09.2005
16:26 Uhr
Seite 2
Checking the camera firmware version
1. Press the main switch (a) to turn on the camera.
2. Press the menu button (b) to open the recording
menu.
3. Press the left/right keys of the controller (c) to highlight the setup menu icon, and press the center button to enter.
4. Press the left/right keys of the controller (c) to highlight the set up tab 4, and press the up/down keys
to highlight “Firmware ver,” option.
Highlight “Enter” option and press the center button
of the controller to enter.
A window will open to indicate the firmware version.
2
X1_FW_upd110_GB_r4.qxd
29.09.2005
16:26 Uhr
Seite 3
Checking the camera firmware version
5. Check the displayed version number. If it is Ver.
1.10, the camera need not be updated.
Press the center button of the controller to close
the window.
Preparing the SD memory card for updating
A downloaded file must be copied to a Secure Digital (SD) memory card by either methods as
shown below.
Prepare an 8MB or larger SD memory card and insert it in the camera.
• Make sure that the SD memory card has been formatted by the camera.
Copying via SD memory card reader
•
Please refer to the instruction manual for
the card reader for details.
Copying via DiMAGE X1 (loaded on the Cradle CA1) connected to PC
•
Confirm data storage is selected in the transfermode option in section 4 of the setup menu.
•
Refer to the data-transfer section of the
DiMAGE X1 instruction manual to connect the
camera to a computer.
3
X1_FW_upd110_GB_r4.qxd
29.09.2005
16:26 Uhr
Seite 4
Preparing the SD memory card for updating
1. Download the firmware file suitable for your PC after carefully reading the end-user license
agreement, and save the file in your PC.
The downloaded file is compressed.
-Windowsx1v110.exe--636KB
Double-click the downloaded file.
The file is a self-extracting archive, and decompresses automatically.
-Macintoshx1v110.sit.hqx--832KB
Use Stuffit Expander or another such software utility to extract the downloaded file.
[Decompressing the downloaded file with Mac OS X v10.4]
The StuffIt Expander does not come with Mac OS X v10.4. For details, please visit:
http://docs.info.apple.com/article.html?artnum=301016
If no decompressing application is included in the computer, please install separately.
After creating a folder in your PC and extracting the contents of the archive, the “FIRMWARE” folder
containing the following file is created.
FIRMWARE.BIN: Windows 2.37MB / Macintosh 2.3MB
Copy the "FIRMWARE" folder onto root directory of the SD memory card.
For Windows
For Macintosh
4
X1_FW_upd110_GB_r4.qxd
29.09.2005
16:26 Uhr
Seite 5
Preparing the SD memory card for updating
2. Open the FIRMWARE folder of the SD memory card to confirm that the FIRMWARE.BIN file has
been successfully copied.
3. Disconnect the camera from the computer or remove the SD memory card from the card reader.
- If you are using Windows Me, 2000 or XP, click the unplug-or-eject-hardware icon in the lower right-hand corner of the screen, wait until the safe-to
remove-hardware window appears, then remove the SD memory card from
the card reader, or disconnect the camera from PC.
- When the camera is connected to PC via the cradle, turn the camera off in advance of removing it from the cradle.
5
X1_FW_upd110_GB_r4.qxd
29.09.2005
16:26 Uhr
Seite 6
How to update firmware
Note:
When performing the firmware update, use fully charged Lithium-ion Battery NP-1 or
the AC Adapter Set (sold separately). When using the AC Adapter Set, be sure not to
inadvertently disconnect the camera during the firmware updating procedure, otherwise the camera may be permanently damaged.
- Do not use the cradle during the firmware updating procedure in the camera.
1. Confirm that the camera is turned off.
Insert the prepared SD memory card.
2. Press and hold the Mode button (d) for approx. 2
seconds.
The camera turns on automatically. (Do not turn the
camera on by pressing the main switch.)
3. When the confirmation screen appears, highlight
“Yes” and press the center button of the controller
to start the update.
4. Update program runs for approx. 1 minute.
6
X1_FW_upd110_GB_r4.qxd
29.09.2005
16:26 Uhr
Seite 7
How to update firmware
5. The updating-completed message appears.
Turn the camera off.
6. Turn the camera on by pressing the main switch, to
confirm the firmware version.
7. Check that the camera firmware version number
has changed to “Ver.1.10”. (See the “Checking the
camera firmware version”)
•
If the original firmware version number remains displayed or an error occurs during updating procedure, turn the camera off and repeat (1) to (7).
8. Press the center button of the controller to close
the window.
After updating, perform ‘Reset default’ as follows:
9. Press the left/right keys of the controller to highlight
the set up tab 3, and press the up/down keys of the
controller to highlight “Reset default” option.
Highlight “Enter” option and press the center button
of the controller to enter.
7
X1_FW_upd110_GB_r4.qxd
29.09.2005
16:26 Uhr
Seite 8
How to update firmware
10. When the confirmation screen appears, highlight
“Yes” and press the center button of the controller.
•
In advance of using the prepared SD memory card
for recording image, format it via the camera or
delete the file/folder prepared for firmware update.
*
Windows and Windows Me, 2000 and XP are registered trademarks of Microsoft Corporation in
the U.S.A and other countries.
*
Macintosh is a registered trademark of Apple Computer Inc. in the U.S.A. and other countries.
For questions or comments about this matter, contact your nearest Konicaminolta service facility.
8