1
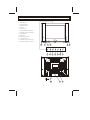
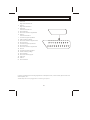
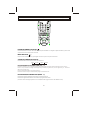
www.denver-electronics.com
21" COLOUR TELEVISION
ON SCREEN DISPLAY
REMOTE CONTROL
HYPERBAND TUNER
PERITELEVISION(SCART JACK)
NTSC PLAYBACK
TELETEXT
DTX-2110
MANUAL
Description:
MANUAL
Job No.
3B099M
Brand Name:
Model:
21NI
P/No.
Revised:1
DENVER
Scale:
Engineering Dept:
Artwork By:
Date:
Checked By:
Date:
Approved By:
Date:
12-02-03
3Y
SPECIFICATIONS
Receiving System
Colour System
Picture Tube
Ext. Antenna
Ext. In/Out
Speaker
:
:
:
:
:
:
BG
PAL / NTSC Playback
54cm (21") diagonal
75 Ohm Coaxial Cable
Peritelevision(Scart Jack)
16 Ohm x 2
Audio Output
Power Consumption
Dimension
Net Weight
: > 3W
: AC 180-240V 50/60Hz, 80W
: 602(W) x 488(D) x 457(H)mm
: 22 kg
REMOTE CONTROL
Transmitting System
Power Supply
Dimension
Net Weight
:
:
:
:
Infrared
DC 3V (1.5 x 2)
55(W) x 184(L) x 34(D)mm
130 g
Design and specifications are subject to change without prior notice.
-1-
SPECIFICATIONS
Thank you very much for your purchase of this product-the most natural Colour Television Receiver.
To enjoy your set to the full from the very beginning, read this manual carefully and keep it handy for ready
reference.
INSTALLATION
Locate the receiver in the room where direct light does not strike the screen.
Total darkness or a reflection on the picture screen can cause eyestrain. Soft and indirect lighting is
recommended for comfortable viewing.
Allow enough space between the receiver and the wall to permit ventilation.
Avoid excessively warm locations to prevent possible damage to the cabinet or premature component
failure.
This TV receiver can be connected to AC 180-240 Volts. 50/60 Hz. Never connect to DC supply or any
other power supply.
Do not install the receiver in a location near heat sources such as radiator, air ducts, direct sunlight, or in
a place somewhere like close compartment and close area.
Do not cover the ventilation openings when using the set.
CAUTION
Never tamper with any components inside your set, or any other adjustment controls not mentioned in
this manual. All television receivers are high voltage instruments. Your PICTURE TUBE is highly evacuation.
If broken, glass fragments will be violently expelled. Scratching, chipping or undue pressure is dangerous
and should be avoided. When you clean up dust or stick of a water drop on the PICTURE TUBE FACE or
CABINET, the power cord should be pulled out from the plug receptacle, then wipe the receiver with dried
soft cloth. During thunder and lighting, unplug the power cord and antenna cord to prevent your TV set
from damage. All "inside work" on your receiver should be performed only by the TV service personnel.
-1-
CONTROL LOCATION
1.
2.
3.
4.
5.
6.
7.
8.
9.
10.
11.
12.
13.
Main Switch
Power Indicator
Remote Sensor
AV/TV
Mute Button
Volume Down & Up Button
Program Down & Up Button
Menu Button
Speakers
Side AV in(Option)
AC Power Cord
Peritelevision (Scart Jack)
Terminal Antenna (75 Ohm)
9
1
2
7
3
7
11
-2-
9 10
6
6
8
5
4
12
13
INPUT AND OUTPUT TERMINALS
1. Audio Out
Right channel Audio out
2. Audio In
Right channel Audio in
3. Audio Out
Left channel Audio out
4. Ground "Audio"
5. Ground of luminance signal "Blue"
6. Audio In
Left channel Audio in
7. Luminance signal input "Blue"
8. Video switching voltage
9. Ground of luminance signal "Green"
10. No Connection
11. Luminance signal input "Green"
12. No Connection
13. Ground of luminance signal "Red"
14. Ground
15. Luminance signal input "Red
16. R.G.B. switching voltage
17. Ground "Video"
18. Ground of switching input
19. Video Out
20. Video In
21. Ground chassis
20 18 16 14 12 10
21 19 17 15 13 11
8
9
6
7
4
5
2
3
1
It can be connected to the following appliances: video-tape recorder, video camera, tape recorder and
audio amplifier, etc.....
*Please keep AC cord unplugged when connecting TV system.
-3-
OPERATION INSTRUCTIONS
Turn the TV set on, then power indicator will light up. Press the program up or down button on the TV
set,or press the on/off button on the remote control.The picture will appear after a few seconds . (If tuned
on) The program number is displayed on the top right-hand corner of the screen.
MENU BUTTON
1.Press this button to select menu. PRESET, PICTURE, SYSTEM ,and TIME menu can be selected
cyclically.
Preset Menu
Picture Menu
System Menu
Time Menu
Exit Menu
2.After enters each menu, you can select the item which you will adjust by PROG.+/- buttons, and adjust
this item by VOL. +/- buttons.
*The item which you select will change blue.
Preset menu
PRESET
CHANNEL
SKIP
BAND
ASM.SIF
FINE
SEARCH
ASM
1. CHANNEL
In this item, you can store the channel number which are watching, and change
the channel number by VOL.+/- Buttons (or number keys).
2. SKIP
You can set "ON" by VOL.+/- Buttons if you want to cancel the channel number
which you are watching.
3. BAND
You can select V-L, V-H or UHF.
4. ASM.SIF
You can select 6.0M, 4.5M, 6.5M or 5.5M.
5. FINE
To tune in weak station this item must be used.
6. SEARCH
Press VOL.+/- Buttons to start searching. The VOL- button searches for lowernumbered channels; the VOL+ button for higher-numbered channels. When a
TV station signal is received ,the searching will stop.
7. ASM
Press VOL.+/- Buttons, then the TV set will automatically search from V-L band
to U band.
00
OFF
V-L
6.5M
Picture menu
You can select BRIGHTNESS, CONTRAST, COLOR, SHARPNESS, and TINT
item by PROG.+/- Buttons , and adjust the item which you select by
VOL.+/- Buttons.
PICTURE
BRIGHTNESS
CONTRAST
COLOR
SHARPNESS
TINT
*TINT is displayed only for NTSC and is not available for PAL or SECAM.
35
-4-
OPERATION INSTRUCTIONS
System menu
SYSTEM
COL.SYS
AUTO
SIF.SYS
6.0M
BLUE BACK
ON
LOGO
ON
1. COL.SYS
You can change present color system in this item.
2. SIF.SYS
You can change present sound system in this item.
3.BLUE BACK
Blue back function can be opened by setting this item ON.
4.LOGO
You can see the brand logo as you turn the Tv set on ,by setting this item£¢
ON..
Time menu
TIME
CLOCK
TIMING
TVON
TVOFF
AWOKE
AWTIME
_ _:_ _:_ _
OFF
_ _:_ _
_ _:_ _
OFF
_ _:_ _
1. CLOCK
You can adjust the currently time by this item. Press the VOL+button set
hour , and the VOL-button set minute .
2. TIMING
If you set the item is TIMING ON , you can set the time of TV ON and TV
OFF .
3.TV ON
Set the time when the TV set turn on .
4.TV OFF
Set the time when the TV set turn off .
5.AWOKE
Selecting AWOKE ON , you can set the AWTIME item.
6.AWTIME
Set the awake time that you want . If you set the AWTIME is 12:00, The
CATCH TIME11:58:00¡±
will display on the screen for awaking you .It will
disappear from the screen until¡°
CATCH TIME 12:00:00¡±
.
SELECTING PROGRAM
Use 0-9 digit buttons to call directly on the program number that you want. If you want to select a double digits
program number , firstly press "- / - -" button, then input the two digits.
Program number can also be changed by "PROGRAM DOWN" and "PROGRAM UP" buttons. Press
"PROGRAM UP" button, program number will increase. Press "PROGRAM DOWN" button, program number
will decrease.
CHILD LOCKED
The TV set can provide the locked key for control or prevent your children from watching the program.
SET CHILD LOCKED:
Press the "LOCK" button on remote unit.The key locked (
) is displayed on the screen. Then the
symbol will disappear after five seconds and enter child locked mode. You can't use any key on the TV set.
RELEASE CHILD LOCKED:
You can cancel this mode by pressing the 'LOCK" button again.
-5-
LOCATION OF CONTROL (REMOTE HANDSET UNIT)
1
2
3
P.P.
4
5
6
7
8
9
- -/- - -
0
Q.
VIEW
REVEAL
SIZE
STOP
CLOCK
INDEL
OFF
ON/MIX
SUB.PAGE
SYS
LOCK
A.V.
PROG.+
VOL.-
MENU
VOL.+
PROG.-
POWER (STAND BY) BUTTON (
)
Press this button to turn the TV on/off. Press any Number Button or Program Up/Down Button, picture and
sound will come on within a few seconds.
MUTE BUTTON (
)
Press once to mute the sound, press again to return to previously set sound level.
SOUND SYSTEM BUTTON (SYS)
Press this button to select the correct sound system.
5.5M
6.0M
4.5M
6.5M
PROGRAM SELECTION BUTTONS (0-9, -/--)
Push the number for your desired program and the program indicator will be displayed on the screen.
Press -/-- key to select one digit or two digit entry, to select program 0-9, use one digit entry, to select 1099 use two digits entry.
Press number key 0-99 for program selection.
Press the number keys to select teletext pages in teletext mode.
PROGRAM UP/DOWN BUTTON (PROG +/-)
Press the Program Up Button to select the program forwards.
Press the Program Down Button to select the program backwards.
(Use this button for Page Up/Down to increase/decrease page number in TELETEXT mode.)
-6-
LOCATION OF CONTROL (REMOTE HANDSET UNIT)
VOLUME UP/DOWN BUTTONS (VOL+/-)
Press Volume Up/Down Buttons to adjust sound level.
PERSONAL PRESETS BUTTON (P.P.)
You can select DYNAMIC, MILD, COLORFUL, STANDARD and CUSTOM by pressing this button.
RECALL BUTTON (
)
Press this button sequentially to recall for the program number, color system and sound system on the
screen.
SLEEP BUTTON (
)
This key is used to set the sleep timer in 15 minutes step up to two hours. When the preset time runs to 0.
TV set will go into stand by mode. To switch off this function, press this key step by step until " --" is
displayed on the screen.
LOCK BUTTON
The key is to prevent a child watching the TV, please refer to page 5 for the details.
QUICK VIEW BUTTON (Q.VIEW)
Press this button to return to the previously viewed program.
A.V. BUTTON
Press this button to display external video signal such as VCR or CD video player. AV will be displayed on
the screen. Press this button again to switch back to TV signal from AV.
MENU BUTTON (MENU)
Use "MENU" button for tuning procedure, please refer to page 4-5 for the details.
-7-
LOCATION OF CONTROL (REMOTE HANDSET UNIT)(TELETEXT OPTION)
REVEAL (OPTION)
Display hidden characters. Press this button repeatedly to switch between "CONCEAL MODE" and
"REVEAL MODE"
REVEAL MODE
CONCEAL MODE
Conceal mode will always be resumed when any of the teletext key is pressed except "REVEAL" key.
SIZE (OPTION)
The top or bottom half of any page can be enlarged teletext character size to double height by pressing
this button.
STOP (OPTION)
Stop page acquisition on current page to prevent text to be updated.
CLOCK(OPTION)
Display the time on the top right corner of the screen.
INDEX (OPTION)
INDEX page or P100 will be requested.
OFF and ON/MIX BUTTON (OPTION)
You can select the following modes by pressing these buttons.
TELETEXT ON
MIX MODE
TELETEXT OFF
SUBPAGE BUTTON (SUBPAGE) (OPTION)
Page number may contain several subpages which are automatically paged in a certain cycle by the TV
station. Press this button once. "0001" will by displayed on screen, enter number key (0-9) to look for other
subpages if available. If these is no subpage, "****" will be displayed. To cancel this, press this button
again.
COLOR BUTTONS (RED, GREEN, YELLOW, BLUE)(OPTION)
In teletext mode, the same color page number which is on the bottom of screen will respond to pressing
these color keys.
*The above buttons are applicable only to Teletext models.
-8-
BATTERY INSTALLATION (REMOTE CONTROL UNIT)
1. Remove the battery cover.
2. Insert two batteries of the 2 UM3-AA 1.5Vtype and make sure that polarity (+/-)_match the marks
inside the unit.
3. Replace the battery cover.
Replace with new batteries when the TV set begins to show the following symptoms:
Operation becomes unsteady or erratic. Sometimes the TV set does not function with Remote
Control Unit.
Remark:
1) Alkaline Batterie Recommended
2) Remove batteries when they are exhausted or if the remote control is not to be used for a long time.
THE CAUSES OF INTERFERENCE
Those incorporated in your TV receiver are the
most up-to-date devices to eliminate interference.
Local radiation however, can create disturbances
which visibly affect picture. Proper installation
and , a good aerial are the best safe-guards
against these disturbances.
SNOW
Weak TV signals from distant stations result in
unsteady picture and have the effect of falling
snow. An antenna adjustment or antenna
amplifier may be needed.
GHOST
RF INTERFERENCE
Multiple image caused by TV signals which are
reflected back from surrounding buildings, hills,
aircraft, etc. is minimized by correct aerial
positioning.
Moving ripples across the screen are caused by
nearby transmitting or receiving-short-wave radio
equipment.
DIATHERMY
CAR IGNITION
Herringbone pattern and partial picture loss can
result from the operation of diathermy equipment
from a nearby doctor's surgery or hospital.
Nearby cars and electrical motors can cause small
streaks across the picture or make the picture roll.
-9-
SERVICE TIPS
BEFORE CALLING FOR SERVICE, HAVE YOU
CHECKED (
) THE FOLLOWING CHART
Try diffe
rent ch
annel,
Check
if OK, p
aerial c
robably
onnecti
station
Check
ons on
aerial fo
trouble
back o
r broke
f set
Re-orie
n wires
nt aeria
l
(if indo
Probab
or type
ly local
)
interfere
Adjust
nce, su
fine tun
c h as a
in
g
control
Adjust
n applia
brightn
nce
ess co
Adjust
n
trol
contras
t
c
o
ntrol
Check
if statio
n is bro
Adjust
adcasti
colour
ng colo
control
ur
Check
if syste
m
switch
Check
is corre
if on/off
ct
switch
Check
is "on"
Batterie
s in Re
mote c
ontrol
Symptoms
Solutio
n
ON SYMPTOMS AND SOLUTIONS?
No picture, no sound
Poor sound, picture OK
Poor picture, sound OK
Weak picture
Blurred picture
Double image
Lines in picture
Distorted picture
Weak reception on some channels
Horizontal bars
Picture rolls vertically
Poor colour
No colour
Misoperation of Remote control
No Remote control
On Screen Display Control outside the screen
-10-
www.denver-electronics.com