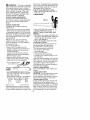
1
Operator's
Manual
JCRRFTSMRN°I
2.6 cu. in./42cc 2-Cycle
GASOLINE CHAIN SAW
Model No.
358.341950
•
- 18 in. Bar
Safety
• Assembly
• Operation
• Maintenance
•
Parts List
•
Espa_ol,
TECHNOLOGY
p. 28
CRRFTSMAN
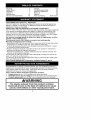
WARNING:
Read and follow all Safety Rules and Operating
Instructions
before first use of this product.
For answers
Call 7 am-7
to your questions about this product:
pm, Mon-Sat;
Sun, 10 am-7 pm
1-800-235-5878
Sears Brands Management
115488427
Rev. 2
7/26/12
BRW
Corporation,
(Hours
listed are Central Time)
Hoffman Estates,
IL 60179 U.S.A.
Warranty
Safety Rules
Assembly
Operation
Maintenance
Service and Adjustments
2
3
7
7
14
18
Storage
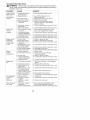
Troubleshooting
Table
Emissions Statement
Parts List
Spanish
Parts & Ordering
21
22
24
26
28
Back Cover
CRAFTSMAN TWO YEAR FU LL WARRANTY
FOR TWO YEARS from the date of purchase, this product is warranted against any
defects in material or workmanship. A defective product will receive free repair or
replacement if repair is unavailable.
ADDITIONAL
LIMITED WARRANTY
ON ENGINE CRANKSHAFT
FOR THE THIRD THROUGH TENTH YEAR from date of purchase, the engine crankshaft
in this product is warranted against any defects in material or workmanship. With
proof of purchase, a defective engine crankshaft will be replaced. This additional
warranty covers only the engine crankshaft, and does not apply to any other engine
component. You must pay the labor cost of crankshaft installation.
For warranty coverage details to obtain free repair or replacement,
visit the
website:
www.craftsman.com
This warranty covers ONLY defects in material and workmanship.
Warranty coverage does NOT include:
• Expendable items that can wear out from normal use within the warranty period,
including but not limited to chain bar, chain, filters or spark plug.
• Product damage resulting from user attempts at product modification or repair
or caused by product accessories.
• Repairs necessary because of accident or failure to operate or maintain the
product according to all supplied instructions.
• Preventive maintenance, or repairs necessary due to improper fuel type, fuel
mixture, contaminated or stale fuel.
This warranty is void if this product is ever used while providing commercial services or if rented to another person.
This warranty gives you specific legal rights, and you may also have other rights
which vary from state to state.
Sears Brands Management
Corporation,
Hoffman Estates, IL 60179
Congratulations
on making a smart purchase. Your new Craftsman product is
designed and manufactured for years of dependable operation. But like all products,
it may require repair from time to time. That's when having a Repair Protection
Agreement can save you money and aggravation.
Here's what the Repair Protection
Agreement* includes:
_" Expert service by our 10,000 professional repair specialists
_" Unlimited service and no charge for parts and labor on all covered repairs
_" Product replacement
up to $1500 if your covered product can't be fixed
AWARNING
The engine exhaust from this product contains
chemicals known to the State of California to cause
cancer, birth defects or other reproductive
harm.
_"
Discount of 10% from regular price of service and related installed parts
not covered by the agreement; also, 10% off regular price of preventive
maintenance check
_" Fast help by phone - we call it Rapid Resolution - phone support from a
Sears representative.
Think of us as a "talking operator's manual".
Once you purchase the Repair Protection Agreement, a simple phone call is all
that it takes for you to schedule service. You can call anytime day or night, or
schedule a service appointment online.
The Repair Protection Agreement is a risk-free purchase. If you cancel for any
reason during the product warranty period, we will provide a full refund. Or, a prorated refund anytime after the product warranty period expires. Purchase your
Repair Protection Agreement today!
Some limitations
and exclusions
apply, For prices and additional
information in the U,S,A, call 1-800-827-6655,
*Coverage
in Canada varies
Canada at 1-800-361-6665,
Sears Installation Service
on some items.
For full details
call Sears
For Sears professional installation of home appliances, garage door openers,
water heaters, and other major home items, in the U.S.A. or Canada call
1-800-4-MY-HOME®.
,_ WARNING:
Always disconnect
spark plug wire when making repairs except for carburetor adjustments. Because a chain saw is a high-speed
wood-cutting tool, special precautions
must be observed to reduce the risk of
accidents. Careless or improper use of
this tool can cause serious injury.
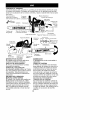
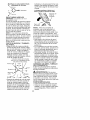
PLAN AHEAD
• Restrict the use of your saw to adult
users who understand and can follow
safety rules, precautions, and operating instructions found in this manual.
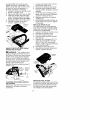
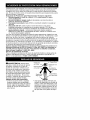
Hearing
Protection
Snug
Fitting
Clothing
A,/
,_.
"_! u'e_"
Safety
Shoes
Safety Hat
Eye
Protection
Heavy Duty
Gloves
Safety Chaps
• Wear protective gear. Always use
steel-toed safety footwear with nonslip soles; snug-fitting clothing; safety
chaps; heavy-duty, non-slip gloves;
eye protection such as non-fogging,
vented goggles or face screen; an
approved safety hard hat; and sound
barriers (ear plugs or mufflers) to protect your hearing. Regular users
should have hearing checked regularly as chain saw noise can damage
hearing.
• Secure hair above shoulder length. Do
not wear loose clothing or jewelry; they
can get caught in moving parts.
• Keep all parts of your body away from
the chain when the engine is running.
• Keep children, bystanders, and animals a minimum of 30 feet (10 meters) away from the work area when
starting and using the saw.
• Do not handle or operate a chain saw
when you are fatigued, ill, or upset, or
if you have taken alcohol, drugs, or
medication. You must be in good
physical condition and mentally alert. If
you have any condition that might be
aggravated by strenuous work, check
with doctor before operating.
• Do not start cutting until you have a
clear work area, secure footing, and,
if you are felling trees, a planned retreat path.
OPERATE YOUR SAW SAFELY
• Do not operate a chain saw with one
hand. Serious injury to the operator,
helpers, bystanders or any combination of these persons may result from
one-handed operation. A chain saw
is intended for two-handed use.
• Operate the chain saw only in a wellventilated outdoor area.
• Do not operate saw from a ladder or
in a tree.
• Make
surethechain
willnotmake
operation. A guard or other part that is
contact
withanyobject
whilestarting damaged should be properly repaired
theengine.
Never
trytostartthesaw or replaced by a Sears Service Center
unless otherwise indicated elsewhere
when
theguide
barisinacut.
• Donotputpressure
onthesawat
in the operator's manual.
theendofthecut.Applying
pressure • When not in use, chain saws should
cancause
youtolosecontrol
when
be stored in a dry, high or locked-up
thecutiscompleted.
place out of the reach of children.
• Stopengine
before
setting
sawdown. • When storing saw, use a scabbard or
• Hand
carrysawonlywhen
engine
is
carrying case.
stopped.
Carry
withmuffler
away
HANDLE FUEL WITH CAUTION
frombody;
guide
bar&chainproject- • Do not smoke while handling fuel or
ingbehind
you;guide
barpreferably while operating the saw.
covered
withascabbard.
• Eliminate all sources of sparks or
• Donotoperate
achain
sawthatis
flame in the areas where fuel is
damaged,
improperly
adjusted,
or
mixed or poured.
notcompletely
andsecurely
• Always have fire extinguishing tools
assembled.
Always
replace
bar,
available if you should need them.
chain,
hand
guard,
orchainbrake • Mix and pour fuel in an outdoor area
immediately
ifitbecomes
damaged, and use an approved, marked conbroken
orisotherwise
removed.
tainer for all fuel purposes. Wipe up
MAINTAIN YOUR SAW IN GOOD
WORKING ORDER
,_WARNING:
Disconnect
the
spark plug before performing maintenance except carburetor adjustments.
• Have all chain saw service performed
by a qualified service dealer with the
exception of the items listed in the
MAINTENANCE section of this manual.
• Make certain the saw chain stops
moving when the throttle trigger is
released. For correction, refer to
CARBURETOR ADJUSTMENT.
• Keep the handles dry, clean, and
free from oil or fuel mixture.
• Keep caps and fasteners securely
tightened.
• Nonconforming replacement components or the removal of safety devices
may cause damage to the unit and
possible injury to the operator or bystanders. Use only Craftsman accessories and replacement parts as recommended. Never modify your saw.
• Maintain chain saw with care.
• Keep unit sharp and clean for better
and safer performance.
• Follow instructions for lubricating and
changing accessories.
• Check for damaged parts. Before further use of the chain saw, a guard or
other part that is damaged should be
carefully checked to determine that it
will operate properly and perform its
intended function. Check for alignment
of moving parts, binding of moving
parts, breakage of parts, mounting and
any other conditions that may affect its
all fuel spills before starting saw.
• Move at least 10 feet (3 meters) from
fueling site before starting engine.
• Turn the engine off and let saw cool
in a non-combustible
area, not on
dry leaves, straw, paper, etc. Slowly
remove fuel cap and refuel unit.
• Empty the fuel tank before storing or
transporting the unit. Use up fuel left in
the carburetor by starting the engine
and letting it run until it stops.
• Store the unit and fuel in an area
where fuel vapors cannot reach
sparks or open flames from water
heaters, electric motors or switches,
furnaces, etc.
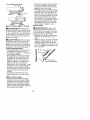
GUARD AGAINST KICKBACK
Follow all safety rules to help avoid
kickback and other forces which can
result in serious injury.
.
X_\
_/LWARNING:
Kickback Path
Avoid kickback
which can result in serious injury.
Kickback
is the backward, upward or
sudden forward motion of the guide
bar occurring when the saw chain near
the upper tip of the guide bar contacts
anyobject
suchasalogorbranch,
or • Begin
andcontinue
cutting
atfull
when
thewoodcloses
inandpinches speed.
Ifthechainismoving
ata
slower
speed,
there
isgreater
thesawchaininthecut.Contacting
a
ofkickback
occurring.
foreign
object
inthewood
canalsore- • chance
Useextreme
caution
whenre-entersultinlossofchain
sawcontrol.
• Rotational
Kickback
canoccur
ingaprevious
cut.
cutsstarting
withthe
when
themoving
chaincontacts
an • Donotattempt
tipofthebar(plunge
cuts).
object
attheupper
tipoftheguide
bar.Thiscontact
cancause
the
• Watch
forshifting
logsorother
forces
chain
todigintotheobject,
which
thatcouldclose
acutandpinchor
fallintochain.
stops
thechain
foraninstant.
The
• UsetheReduced-Kickback
Guide
result
isalightning
fast,reverse
BarandLow-Kickback
Chain
specireaction
which
kicks
theguide
bar
fiedforyoursaw.
upandbacktoward
theoperator. Avoid
Pinch-Kickback:
• Pinch-Kickback
canoccur
when
the
Be extremely aware of situations or
thewood
closes
inandpinches
the • obstructions
that can cause material
moving
sawchaininthecutalong
the top of or otherwise stop
thetopoftheguidebarandthesaw tothepinch
chain.
chainissuddenly
stopped.
ThissudDo not cut more than one log at a
denstopping
ofthechainresults
ina • time.
reversal
ofthechain
forceused
to
• Do not twist the saw as the bar is
cutwoodandcauses
thesawto
withdrawn from an undercut when
move
intheopposite
direction
ofthe
bucking.
chainrotation.
Thesawisdriven
straight
back
toward
theoperator. Avoid Pull-In:
• Pull-In
canoccur
when
themoving • Always begin cutting with the engine
at full speed and the saw housing
chain
contacts
aforeign
object
inthe
against wood.
wood
inthecutalong
thebottom
of
• Use wedges made of plastic or wood.
theguide
barandthesawchain
is
Never use metal to hold the cut open.
suddenly
stopped.
Thissudden
MAINTAIN CONTROL
stopping
pulls
thesawforward
and
away
fromtheoperator
andcould
Stand to the left of the saw
easily
cause
theoperator
tolose
control
ofthesaw.
underside
t
Thumb on
\!
REDUCE
THECHANCE
OF
KICKBACK
• Recognize
thatkickback
canhappen.Withabasic
understanding
of
kickback,
youcanreduce
theelementofsurprise
which
contributes
to
Elbow
accidents.
locked
• Never
letthemoving
chain
contact
Never reverse hand positions
anyobject
atthetipoftheguide
bar.
• Keep
theworking
area
freefromob- • A good, firm grip on the saw with both
structions
suchasother
trees,
hands will help you maintain control.
branches,
rocks,
fences,
stumps,
Don't let go. Grip the rear handle with
etc.Eliminate
oravoid
any
your right hand whether you are right
obstruction
thatyoursawchain
could or left handed. Wrap the fingers of
hitwhile
youarecutting.
your left hand over and around the
• When
cutting
abranch,
donotletthe front handlebar, and your left thumb
guide
barcontact
branch
orother
ob- under the front handlebar. Keep your
jectsaround
it.
left arm straight with the elbow locked.
• Keep
sawchain
sharp
andproperly • Position your left hand on the front
tensioned.
Aloose
ordullchain
can
handlebar so it is in a straight line
increase
thechance
ofkickback.
Folwith your right hand on the rear
lowmanufacturer's
chain
sharpening handle when making bucking cuts.
andmaintenance
instructions.
Check Never reverse right and left hand
tension
atregular
intervals,
butnever positions for any type of cutting.
withtheengine
running.
Make
sure
• Stand with your weight evenly balthebarnutsaresecurely
tightened. anced on both feet.
\\\
\\
• Donotoverreach.
Youcouldbe
WE DO NOT REPdrawn
orthrown
offbalance
andlose m_WARNINu:
RESENT AND YOU SHOULD NOT AScontrol
ofthesaw.
• Donotcutabove
shoulder
height.
It SUME THAT THE CHAIN BRAKE WILL
isdifficult
tomaintain
control
ofsaw PROTECT YOU IN THE EVENT OF A KICKBACK. Kickback is a lightning fast action
above
shoulder
height.
KICKBACK
SAFETY
FEATURES which throws the bar and rotating chain
back and up toward the operator. Kick_IWARNING:Thefollowing
feaback can be caused by allowing contact
bar tip in the danger zone with
tures
areincluded
onyoursawtohelp ofanythehard
object. Kickback can also be
reduce
thehazard
ofkickback;
however,
such
features
willnottotally
eliminate caused by pinching the saw chain along
top of the guide bar. This action may
thisdanger.
Donotrelyonlyonsafety the
push the guide bar rapidly back toward
devices.
Follow
allsafety
rules
tohelp the
operator. Either of these events may
avoid
kickback
andother
forces
which
cause you to lose control of the saw
canresult
inserious
injury.
could result in serious injury or
• Front
Hand
Guard,
designed
toreduce which death.
DO NOT RELY UPON ANY OF
thechance
ofyourlefthand
contact- even
DEVICES BUILT INTO YOUR SAW.
ingthechain
ifyourhand
slipsoffthe THE
YOU SHOULD USE THE SAW PROPERLY
front
handlebar.
CAREFULLY TO AVOID KICKBACK.
• Position
offront
andrearhandlebars,AND
guide bars and lowdesigned
withdistance
between
han- Reduced-kickback
saw chains reduce the chance
dlesand"in-line"
witheach
other.
The kickback
and magnitude of kickback and are recspread
and"in-line"
position
ofthe
Your saw has a low kickhands
provided
bythisdesign
work ommended.
chain and bar as original equiptogether
togivebalance
andresis- back
ment. Repairs on a chain brake should
tance
incontrolling
thepivot
ofthe
be made by an authorized Sears Sersawback
toward
theoperator
ifkick- vice
Center. Take your unit to the place
back
occurs.
if purchased from a servic• Reduced-Kickback
Guide
Bar,de- ofingpurchase
dealer, or to your nearest Sears
signed
withasmallradius
tipwhich Service
Center.
reduces
thesizeofthekickback
•
Tip
contact
in some cases may cause
danger
zoneonthebartip.Thistype a lightning fast
REACTION,
ofbarhasbeendemonstrated
tosig- kicking guide barreverse
up and back toward
nificantly
reduce
thenumber
andse- operator.
riousness
ofkickbacks
when
tested
inaccordance
withANSI
B175.1. • Pinching the saw chain along the top
TipGuide
Bar
_&
LareRadius
/
mall
Radiu__
L
• Low-Kickback
Chain, has met kickback performance requirements
when tested on a representative
sample of chain saws below 3.8
cubic inch displacement
specified
in ANSI B175.1.
Low-Kickback Chain
../ Contoured Depth Gauge
.,--_,_
....... Elongated Guard Link
_'_1_
_
deflects kickback
"L-_.
_
force And allows
",...,
_
wood to gradually
"---_/-"
ride into Cutter
CHAIN BRAKE
• Chain Brake, designed to stop the
chain in the event of kickback.
of the guide bar may push the guide
bar rapidly back toward the operator.
• Either of these reactions may cause
you to lose control of the saw which
could result in serious injury. Do not
rely exclusively upon devices built into
your saw.
This unit is not equipped with an antivibration system and is intended for
occasional use only.
SAFETY NOTICE: Exposure to vibrations through prolonged use of gasoline
powered hand tools could cause blood
vessel or nerve damage in the fingers,
hands, and joints of people prone to
circulation disorders or abnormal swellings. Prolonged use in cold weather has
been linked to blood vessel damage in
otherwise healthy people. If symptoms
occur such as numbness, pain, loss of
strength, change in skin color or texture,
or loss of feeling in the fingers, hands, or
joints, discontinue the use of this tool
andseekmedical
attention.
Ananti-vi- NewJersey,
Oregon,
andWashington
bration
system
does
notguarantee
the require
bylawthatmany
internal
comavoidance
ofthese
problems.
Users
bustion
engines
tobeequipped
witha
whooperate
power
toolsonacontinual spark
arresting
screen.
Ifyouoperate
sawinastate
orlocale
where
andregular
basis
must
monitor
closely achain
theirphysical
condition
andtheconditionsuchregulations
exist,
youarelegally
ofthistool.
responsible
formaintaining
theoperatCHAIN
BRAKE:
Tocomply
with
ingcondition
ofthese
parts.
Failure
to
ofthelaw.Refer
to
Federal
OSHA
Regulations
forCom- dosoisaviolation
mercial
Logging,
achainbrake
is
theCustomer
Responsibilities
chartin
section.
required
andshallnotberemoved theMAINTENANCE
orotherwise
disabled.
STANDARDS:
This
chain
sawislisted
SPARK
ARRESTING
SCREEN:
Your byUnderwriters
Laboratories,
Inc.in
sawisequipped
withatemperature accordance
withAmerican
National
limiting
muffler
andspark
arresting Standards
forGasoline-Powered
Chain
screen
which
meets
therequirementsSaws
Safety
Requirements
(ANSI
ofCalifornia
Codes
4442and4443. B175.1-2000).
AllU.S.forest
landandthestates
of
California,
Idaho,
Maine,
Minnesota,
If you need assistance or find that parts
are missing or damaged, please call
1-800-235-5878.
NOTE: It is normal to hear the fuel filter
rattle in an empty fuel tank.
Your unit has been factory tested and
the carburetor precisely adjusted. As a
result you may smell gasoline or find a
drop of oil/fuel residue on the muffler
when you unpack the unit.
_WARNING:Before
using
chain
saw,ensure
allfasteners
aresecure.
CARTON
CONTENTS
Check
carton
contents
against
thefollowing
list.
Model 358,341950
•
•
•
•
•
•
Chain saw (fully assembled)
Chain adjustment tool (bar tool)
2-cycle engine oil
Carrying case
Extra 14 in. bar
Extra 14 in. chain
ASSEMBLY
Your saw is fully assembled;
assembly is necessary.
no
Examine parts for damage. Do not use
damaged parts.
KNOW YOUR CHAIN SAW
READ THIS OPERATOR'S MANUAL AND SAFETY RULES BEFORE OPERATING YOUR
CHAIN SAW. Compare the illustrations with your unit to familiarize yourself with the
location of the various controls and adjustments. Save this manual for future reference.
Chain
Adjustment Tool
(Bar Tool)
Front Hand Guard
J
Front Handle
Starter Rope
ON/STOP
Switch
________
!
Bar
Sprocket
Hole
Chain
Fast Idle
Choke/
Lever
Muffler
Bar Oil Fill Cap _
I
/
Starter Housing
7
\
Fuel Mix Fill Cap Primer Bulb
Cylinder Cover
/
Chain
Throttle
Lock-out
Rear \
Handle
Chain
Direction
of Travel
Brake
CRRFTSMA
!
Guide Bar
Throttle
Trigger
/
Clutch Cover
/
"_
/
Bar Nuts
Chain
Catcher
ON/STOP SWITCH
The ON/STOP SWITCH is used to stop
the engine.
THROTTLE TRIGGER
The THRO-FILE TRIGGER controls engine speed.
THROTTLE LOCK-OUT
The THRO-FILE LOCK-OUT must be
pressed before you can squeeze the
throttle trigger. This feature prevents you
from accidentally squeezing the trigger.
CHOKE/FAST IDLE LEVER
The choke and fast idle are set by pulling the CHOKE/FAST IDLE LEVER out to
the full extent for cold starting or after
refueling. The choke provides additional
fuel to the engine during cold starting.
PRIMER BULB
The PRIMER BULB circulates fuel to the
carburetor to provide quicker starting.
CHAIN BRAKE
The CHAIN BRAKE is a device designed
to stop the chain if kickback occurs. The
chain brake activates automatically in
the event of kickback. The chain brake
activates manually if the front hand
guard is pushed forward. The chain
brake is disengaged by pulling the front
hand guard back toward the front handle
as far as possible.
CHAIN TENSION
It is normal for a new chain to stretch
during the first 15 minutes of operation.
You should check your chain tension
each time before you start the chain
saw. See CHAIN TENSION under the
MAINTENANCE section.
_...__....._
_WARNINGi:
Ifthe saw is operated with a loose chain, the chain
could jump off the guide bar and result
in serious injury to the operator and/or
damage the chain making it unusable.
BEFORE STARTING ENGINE
GUIDE BAR AND CHAIN OIL
The bar and chain require lubrication.
The chain oiler provides continuous
lubrication to the chain and guide bar.
Be sure to fill the bar oil tank when you
fill the fuel tank (Capacity = 6.8 fl. oz.).
Lack of oil will quickly ruin the bar and
chain. Too little oil will cause overheating shown by smoke coming from the
chain and/or discoloration of the bar.
For maximum guide bar and chain life,
we recommend you use Craftsman
chain saw bar oil. If Craftsman bar oil
is not available, you may use a good
grade SAE 30 oil until you are able to
obtain Craftsman brand. The oil output
is automatically metered during operation. Your saw will use approximately
one tank of bar oil for every tank of fuel
mix. Always fill the bar oil tank when
you fill the fuel tank.
_IkWARNING:
Muffler is very hot
during and after use. Do not touch the
muffler or allow combustible material
such as dry grass or fuel to do so.
_WARNING:
Be sure to read the
fuel handling information in the safety
rules section of this manual before you
begin. If you do not understand the
fuel handling information do not attempt to fuel your unit. Seek help from
someone that does understand the information or call the customer assistance help line at 1-800-235-5878.
FUELING
ENGINE
Starter Rope Handle
_LWARNING:
Remove
fuelcap
Left Hand
slowly
whenrefueling.
on Front
IMPORTANT:
Thisequipment
isdeHandle
signed
tooperate
onunleaded
gasoline
withaminimum
87octane
(R+M/2
method),
withethanol
blended
upto
10%
maximum
byvolume
(E-10).
Before
operation,
gasoline
must
be
mixed
withagood
quality
synthetic
2-cycle
air-cooled
engine
oildesigned
to
bemixed
ataratioof40:1.Craftsman Right Foot Through Rear Handle
brand
synthetic
oilisrecommended. &WARNING;
Do not attemptto
Mixgasoline
andoilataratio
of40:1. throw or drop-start the chain saw.
A40:1ratioisobtained
bymixing
Doing so will put the operator at risk of
3.2fluidounces
ofoilwith1gallon
of
injury due to loss of control of
unleaded
gasoline.
DONOT
USE
auto- serious
chain saw.
motive
oilormarine
oil.These
oilswill the
IMPORTANT POINTS TO REMEMBER
cause
engine
damage.
When
mixing When
the starter rope, do not
fuel,follow
instructions
printed
oncon- use thepulling
extent of the rope as this can
tainer.
Once
oilisadded
togasoline, cause thefullrope
to break. Do not let startshake
container
momentarily
toassure er rope snap back.
Hold the handle and
thatthefuelisthoroughly
mixed.
Always let the rope rewind slowly.
For cold
readandfollow
thesafety
rules
relating weather starting, start the unit
at FULL
tofuelbefore
fueling
yourunit.PurchaseCHOKE; allow the engine to warm
fuelinquantities
thatcanbeused
within before squeezing the throttle trigger.up
30days
toassure
fuelfreshness.
CAUTION:
Never
usestraight
gasoline NOTE: Do not attempt to cut material
inyourunit.
Thiswillcause
permanent with the choke/fast idle lever in the FULL
CHOKE position.
engine
damage
andvoidthelimited
warranty.
Do not use alternate fuels
STARTING A COLD ENGINE (or warm
such as ethanol blends above 10% by
volume (E-15, E-85) or any methanol
blended fuel. Use of these fuels can
cause major engine performance and
durability problems.
CHAIN BRAKE
Ensure chain brake is disengaged by
pulling the front hand guard back toward
the front handle as far as possible. The
chain brake must be disengaged before
cutting with the saw.
_LWARNING:
engine after running out of fuel)
NOTE: In the following steps, when the
choke/fast idle lever is pulled out to the
full extent, the correct throttle setting for
starting is set automatically.
IGNITION
SWITCH
ON
STOP
The chain must not
move when the engine runs at idle
speed. If the chain moves at idle
speed refer to CARBURETOR ADJUSTMENT within this manual. Avoid contact
with the muffler. A hot muffler can
cause serious burns.
STOPPING YOUR ENGINE
• Release the throttle trigger.
• Move ON/STOP switch to the STOP
position.
STARTING POSITION
• To start the engine, hold the saw
firmly on the ground as illustrated.
Make sure the chain is free to turn
without contacting any object.
Lever
1.
2.
3.
4.
Move ON/STOP switch to the ON
position.
Pull choke/fast idle lever out to the
full extent (to the FULL CHOKE position).
Slowly press primer bulb 6 times.
This unit has the Sim--pulTM starting
system. You do not have to pull the
starter rope handle sharply or briskly.
Using your right hand, pull starter
rope handle 5 times with a controlled
andsteady
motion.
Then,
proceed
tothenextstep.
NOTE:
Iftheengine
sounds
asifitistryingtostartbefore
the5thpull,stoppullingandimmediately
proceed
tothenext
step.
5. Push
thechoke/fast
idlelever
into
theHALF
CHOKE
position.
CHOKE
IDLE LEVER
OFF
J
HALF
FULL
/
6.
Pull the starter rope sharply with
your right hand until the engine
starts.
7. Allow the engine to run for approximately 30 seconds. Then, squeeze
and release the throttle trigger to
allow engine to return to idle
speed.
STARTING A WARM ENGINE
1. Move ON/STOP switch to the ON
position.
2. Pull the choke/fast idle lever out to
the FULL CHOKE position to set the
fast idle, then push the lever in to
the HALF CHOKE position.
3. Slowly press primer bulb 6 times.
4. Using your right hand, pull starter
rope handle with a controlled and
steady motion until engine starts.
5. Squeeze and release throttle trigger
to allow engine to return to idle
speed.
DIFFICULT STARTING (or starting a
flooded engine)
The engine may be flooded with too
much fuel if it has not started after 10
pulls. Flooded engines can be cleared
of excess fuel by pushing the choke/
fast idle lever in completely (to the OFF
CHOKE position) and then following the
warm engine starting procedure listed
above. Ensure the ON/STOP switch is
in the ON position. Starting could require pulling the starter rope handle
many times depending on how badly
the unit is flooded. If engine fails to
start, refer to the TROUBLESHOOTING
TABLE or call 1-800-235-5878.
CHAIN BRAKE
_ILWARNING:
Ifthe
brake band is
worn too thin it may break when the
chain brake is triggered. With a broken
brake band, the chain brake will not
stop the chain. The chain brake must
be replaced if any part is worn to less
than 0.020" (0.5 mm) thick. Repairs on
a chain brake should be made by your
Sears Service Center. Take your unit
to the place of purchase or to the nearest Sears Service Center.
• This saw is equipped with a chain
brake. The brake is designed to stop
the chain if kickback occurs.
• The inertia-activated
chain brake is
activated if the front hand guard is
pushed forward, either manually (by
hand) or automatically (by sudden
movement).
• If the brake is already activated, it is
disengaged by pulling the front hand
guard back toward the front handle
as far as possible.
• When cutting with the saw, the chain
brake must be disengaged.
Disengaged
Engaged
Braking function control
CAUTION:
The chain brake must be
checked several times daily. The engine
must be running when performing this
procedure. This is the only instance
when the saw should be placed on the
ground with the engine running.
Place the saw on firm ground. Grip the
rear handle with your right hand and
the front handle with your left hand.
Apply full throttle by fully depressing
the throttle trigger. Activate the chain
brake by turning your left wrist against
the hand guard without releasing your
grip around the front handle. The chain
should stop immediately.
Inertia activating
function
,_WARNING:
When performing
control
the following procedure, the engine
must be turned off.
Grip the rear handle with your right hand
and the front handle with your left hand.
Hold the chain saw approximately 14
10
inches
(35cm)above
astump
orother • Stop the engine before setting the
wooden
surface.
Release
yourgripon
saw down after cutting.
TREE FELLING TECHNIQUES
thefronthandle
andusetheweight
of
thesawtoletthetipoftheguide
barfall
Check for broken or
forward
andcontact
thestump.
When _IkWARNING:
dead branches which can fall while cutthetipofthebarhitsthestump,
the
ting causing serious injury. Do not cut
brake
should
activate.
near buildings or electrical wires if you
OPERATING
TIPS
• Check
chain
tension
before
firstuse, do not know the direction of tree fall, nor
at night since you will not be ale to
after1minute
ofoperation,
andeach cut
well, nor during bad weather such
timebefore
youstartthechain
saw. see
SeeCHAIN
TENSION
intheMAINTE- as rain, snow, or strong winds, etc.
If the tree makes contact with any utility
NANCE
section.
• Cutwood
only.
Donotcutmetal,
plas- line, the utility company should be notitics,masonry,
non-wood
building
ma- fied immediately.
• Carefully plan your sawing operation
terials,
etc.
in advance.
• Stopthesawifthechainstrikes
a
foreign
object.
Inspect
thesawand • Clear the work area. You need a clear
repair
orreplace
parts
asnecessary. area all around the tree so you can
have secure footing.
Ifthechainjumps
offtheguide
bar,
inspect
thechain
fordamaged
drive • The chain saw operator should keep
on the uphill side of the terrain as the
linksbefore
reinstalling.
Burrs
on
is likely to roll or slide downhill
drive
links,
which
prevent
themfrom tree
entering
thegroove
oftheguide
bar, after it is felled.
canberemoved
withaflatfile.
• Study the natural conditions that can
cause the tree to fall in a particular di• Keep
thechain
outofdirtandsand.
rection.
Even
asmall
amount
ofdirtwilldulla
chain,
increase
thepossibility
ofkick- Natural conditions that can cause a tree
back,
andrequire
chain
sharpening
or to fall in a particular direction include:
• The wind direction and speed.
replacement.
• Practice
cutting
afewsmalllogsus- • The lean ofthe tree. The lean of a
tree might not be apparent due to uningthefollowing
techniques
toget
even or sloping terrain. Use a plumb
the"feel"
ofusing
yoursawbefore
youbegin
a major
sawing
operation. or level to determine the direction of
tree lean.
• Squeeze
thethrottle
trigger
andallowtheengine
toreach
fullspeed • Weight and branches on one side.
• Surrounding trees and obstacles.
before
cutting.
• Begin
cutting
withthesawframe Look for decay and rot. If the trunk is
against
thelog.
rotted, it can snap and fall toward the
• Keep
theengine
atfullspeed
the operator. Make sure there is enough
entire
timeyouarecutting.
room for the tree to fall. Maintain a dis• Allow
thechain
tocutforyou.Ex- tance of 2-1/2tree lengths from the nearertonlylightdownward
pressure. est person or other objects. Engine
Ifyouforcethecut,damage
tothe
can drown out a warning call.
bar,chain,
orengine
canresult. noise
Remove dirt, stones, loose bark, nails,
• Release
thethrottle
trigger
as
and wire from the tree where
soonasthecutiscompleted,
al- staples,
cuts are to be made.
lowing
theengine
toidle.Ifyou
runthesawatfullthrottle
without Plan a clear retreat path to the rear
acutting
load,
unnecessary
wear and diagonal to the line of fall.
canoccur
tothechain,
bar,and
engine.
To maximize operating
•
pi Plan a clear retreat path
efficiency, do not run the engine
for longer than 30 seconds at a
time at full throttle,
To avoid losing control when cut is
complete, do not put pressure on
saw at end of cut.
I'
__ ,_--_-
45" /_
_K"ee't"
11
Direction of Fail
FELLING LARGE TREES
(6 inches (15 cm) in diameter or larger)
The notch method is used to fell large
trees. A notch is cut on the side of the
tree in the desired direction of fall. After
a felling cut is made on the opposite
side of tree, the tree will tend to fall into
the notch.
NOTE: If the tree has large buttress
roots, remove them before making the
notch. If using saw to remove buttress
roots, keep saw chain from contacting
ground to prevent dulling of the chain.
NOTCH CUT AND FELLING THE
TREE
• Make notch cut by cutting the top of
the notch first. Cut through 1/3 of the
diameter of the tree. Next complete
the notch by cutting the bottom of the
notch. See illustration. Once the
notch is cut remove the notch of
wood from the tree.
Final (felling) cut here, 2 inches
(5 cm) above center of notch.
NOTE: Before felling cut is complete,
use wedges to open the cut if necessary
to control the direction of fall. To avoid
kickback and chain damage, use wood
or plastic wedges, but never steel or iron
wedges.
• Be alert to signs that the tree is
ready to fall: cracking sounds, widening of the felling cut, or movement in
the upper branches.
• As tree starts to fall, stop saw, put it
down, and get away quickly on your
planned retreat path.
• DO NOT cut down a partially fallen tree
with your saw. Be extremely cautious
with partially fallen trees that may be
poorly supported. When a tree doesn't
fall completely, set the saw aside and
pull down the tree with a cable winch,
block and tackle, or tractor.
CUTTING A FALLEN TREE
(BUCKING)
Bucking is the term used for cutting a
fallen tree to the desired log size.
,_WARNING:
First out
}
,2"I
"-,,d-,! i÷
N°tch___
log being cut. Any portion can roll
causing loss of footing and control. Do
not stand downhill of the log being cut.
IMPORTANT POINTS
/ ]__inge_-2"
• Cut only one log at a time.
• Cut shattered wood very carefully;
sharp pieces of wood could be flung
toward operator.
• Use a sawhorse to cut small logs.
Never allow another person to hold
the log while cutting and never hold
the log with your leg or foot.
• Do not cut in an area where logs,
limbs, and roots are tangled such as
in a blown down area. Drag the logs
into a clear area before cutting by
pulling out exposed and cleared logs
first.
Second.
• After removing the wood from the
notch, make the felling cut on the opposite side of the notch. This is done
by making a cut about two inches (5
cm) higher than the center of the
notch. This will leave enough uncut
wood between the felling cut and the
notch to form a hinge. This hinge will
help prevent the tree from falling in the
wrong direction.
Hinge holds tree on stump and helps
control fall
Opening
of felling
Closing
notch
of
Do not stand on the
/
TYPES OF CUTTING
BUCKING
_/L WARNING:
USED FOR
If saw becomes
pinched or hung in a log, don't try to
force it out. You can lose control of the
saw resulting in injury and/or damage
to the saw. Stop the saw, drive a
wedge of plastic or wood into the cut
until the saw can be removed easily.
Restart the saw and carefully reenter
the cut. To avoid kickback and chain
damage, do not use a metal wedge.
Do not attempt to restart your saw
when it is pinched or hung in a log.
12
Use a wedge
to remove
pinched
saw
Turn saw OFF and use a plastic or
wooden wedge to force cut open,
Overcutting begins on the top side of
the log with the bottom of the saw
against the log. When overcutting use
light downward pressure.
_0vercu_
ing
._
• Your first cut should extend 1/3 of the
diameter of the log.
• Finish with your second cut.
Using a log for support
''_-"_.__
*
Undercutting involves cutting on the
underside of the log with top of saw
against the log. When undercutting
use light upward pressure.
Hold saw
firmly and maintain control. The saw
will tend to push back toward you.
_ILWARNING:
Neverturn saw upside down to undercut. The saw cannot be controlled in this position.
Always make your first cut on the compression side of the log. The compression side of the log is where the pressure of the log's weight is
concentrated.
First cut on compression side of log
Using a support
stand
2 nd Cut
_,
l_
Cut
L
Second cut
Second cut
LIMBING
AND PRUNING
_IkWARNING:
JJ
First cut on compression side of log
BUCKING WITHOUT A SUPPORT
• Overcut through 1/3 of the diameter
of the log.
• Roll the log over and finish with a
second overcut.
• Watch for logs with a compression
side to prevent the saw from pinching. See illustrations for cutting logs
with a compression side.
BUCKING USING A LOG OR
SUPPORT STAND
• Remember your first cut is always on
the compression side of the log.
(Refer to the illustrations below for
your first and second cut)
Be alert for and
guard against kickback. Do not allow the
moving chain to contact any other
branches or objects at the nose of the
guide bar when limbing or pruning. Allowing such contact can result in serious
injury.
_WARNING:
Never climb into a
tree to limb or prune.
ladders, platforms, a
tion which can cause
balance or control of
Do not stand on
log, or in any posiyou to lose your
the saw.
IMPORTANT POINTS
• Work slowly, keeping both hands firmly
gripped on the saw. Maintain secure
footing and balance.
• Watch out for springpoles. Springpoles
are small size limbs which can catch
the saw chain and whip toward you or
13
pullyouoffbalance.
Useextreme
cautionwhen
cutting
small
sizelimbs
or
slender
material.
• Bealertforspringback.
Watch
outfor
branches
thatarebentorunder
pressure.
Avoid
being
struck
bythe
branch
orthesawwhenthetension
inthewood
fibersisreleased.
• Keep
aclear
workarea.
Frequently
clear
branches
outofthewaytoavoid
tripping
over
them.
LIMBING
• Always limb a tree after it is cut
down. Only then can limbing be done
safely and properly.
• Leave the larger limbs underneath the
felled tree to support the tree as you
work.
• Start at the base of the felled tree and
• Always use an overcut to cut small
and freely hanging limbs. Undercutting
could cause limbs to fall and pinch the
saw.
PRUNING
_kwARNING:
Limit pruning to limbs
shoulder height or below. Do not cut if
branches are higher than your shoulder.
Get a )rofessional to do the job.
• Make your first cut 1/3 of the way
through the bottom of the limb.
• Next make a 2nd cut all the way
through the limb. Then cut a third
overcut leaving a 1 to 2 inch (2.5 to 5
cm) collar from the truck of the tree.
iTcS.co
:'i //,c
work toward the top, cutting branches
and limbs. Remove small limbs with
one cut.
• Keep the tree between you and the
chain. Cut from the side of the tree
opposite the branch you are cutting.
• Remove larger, supporting branches
with the cutting techniques described
in BUCKING WITHOUT A SUPPORT.
CUSTOMER
Collar tit_
"_l!
j _
Pruning technique
RESPONSIBILITIES
,_kWARNING:
Disconnect the spark plug before performing
except for carburetor adjustments.
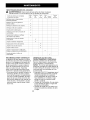
Fill in dates as you complete
regular service
Check for damaged/worn
parts
_,_"
Check chain tension
_"
Check chain sharpness
_"
Check guide bar
_"
Check fuel mixture level
_"
Check guide bar and chain oil
_
i
_"
Inspect and clean unit & decals
j
i
Clean cooling system
i
Check chain brake
Clean guide bar groove
Clean air filter
Clean/inspect
muffler and spark
arresting screen
spark plug and fuel filter
14
maintenance
Everyi Every
i Service
5 hrs.i 25 hrs.;;Yearlyi
Dates
Before ::After
Use
Use
Check for loose fasteners/parts
Replace
First cut
i
GENERAL RECOMMENDATIONS
The warranty on this unit does not cover items that have been subjected to
operator abuse or negligence. To receive full value from the warranty, the
operator must maintain unit as
instructed in this manual. Various adjustments will need to be made periodically to properly maintain your unit.
• Once a year, replace the spark plug,
air filter, and check guide bar and
chain for wear. A new spark plug and
air filter assures proper air-fuel mixture
and helps your engine run better and
last longer.
CHECK FOR DAMAGED
OR
WORN PARTS
Contact your Sears Service Center for
replacement of damaged or worn parts.
NOTE: It is normal for a small amount of
oil to appear under the saw after engine
stops. Do not confuse this with a leaking
oil tank.
• ON/STOP Switch - Ensure ON/STOP
switch functions properly by moving
the switch to the STOP position. Make
sure engine stops; then restart engine
and continue.
• Fuel Tank - Do not use saw if fuel
tank shows signs of damage or leaks.
• Oil Tank - Do not use saw if oil tank
shows signs of damage or leaks.
CHECK FOR LOOSE
FASTENERS AND PARTS
• Bar Knob
• Chain
• Muffler
• Cylinder Shield
• Air Filter
• Handle Screws
• Vibration Mounts
• Starter Housing
• Front Hand Guard
CHECK CHAIN TENSION
,_
WARNING:
Guide
Bar
Chain Adjustment
Bar Nuts Adjus'ting
Tool
Screw
(Bar Tool)
2.
3.
Screw
4.
5.
around guide bar to ensure kinks
do not exist. The chain should rotate freely.
,/.
/
Using bar tool, roll chain around
guide bar to ensure all links are in
bar groove.
Lift up tip of guide bar to check for
sag. Release
tip of guide bar, then
turn adjusting screw 1/4 turn clockwise. Repeat until sag does not
exist.
Adjusting Screw - 1/4 Turn
6.
While lifting tip of guide bar, tighten
bar nuts securely with the bar tool.
Bar Nuts
Wear protective
gloves when handling chain. The chain
is sharp and can cut you even when it is
not moving.
Chain tension is very important. Chains
stretch during use. This is especially true
during the first few times you use your
saw. Always check chain tension each
time before you start the chain saw.
1. Use a screwdriver to move chain
Loosen bar nuts until they are
finger tight against the clutch cover.
Turn adjusting screw clockwise until
chain solidly contacts bottom of
guide bar rail.
8.
9.
Use the screwdriver end of the bar
tool to move chain around guide
bar.
If chain does not rotate, it is too
tight. Slightly loosen bar nuts and
loosen chain by turning the adjusting screw
1/4 turn counterclockwise. Retighten bar nuts.
If chain is too loose, it will sag below the guide bar. DO NOT operate
the saw if the chain is loose.
NOTE: The chain is tensioned correctly
when the weight of the chain does not
cause it to sag below the guide bar
(with the chain saw sitting in an upright
position), but the chain still moves freely
around the guide bar.
15
rails occurs. If replacement
is necessary,
_WARNIN_I:Ifthesawisoperateduse only the guide bar specified for your
witha loose
chain,
thechain
could
jump saw in the repair parts list or on the deofftheguide
barandresult
inserious cal located on the chain saw.
injury
totheoperator
and/or
damage
the CHECK FUEL MIXTURE LEVEL
chain
making
itunusable.
Ifthechain • See FUELING ENGINE under the OPjumps
offtheguide
bar,inspect
each
ERATION section.
drive
linkfordamage.
Damaged
chain LUBRICATION
must
berepaired
orreplaced.
CHECK
CHAIN
SHARPNESS
Asharp
chainmakes
wood
chips.
Bar Oil
Adullchainmakes
asawdust
powder
Fill Cap
andcutsslowly.
SeeCHAIN
SHARPENING.
CHECK
GUIDE
BAR
Conditions
which
require
guide
bar
maintenance:
• Sawcutstoonesideoratanangle. • See GUIDE BAR AND CHAIN OIL un• Sawhastobeforced
through
thecut. der the OPERATION section.
• Inadequate
supply
ofoiltobar/chain.INSPECT AND CLEAN UNIT AND
Check
thecondition
ofguide
bareach DECALS
timechainissharpened.
Aworn
guide • After each use, inspect complete unit
barwilldamage
thechain
andmake
for loose or damaged parts. Clean the
unit and decals using a damp cloth
cutting
difficult.
with a mild detergent.
Aftereachuse,ensure
ON/STOP
• Wipe off unit with a clean dry cloth.
switch
isintheSTOP
position,
then
clean
allsawdust
fromtheguide
bar COOLING SYSTEM
To keep the working temperature as
andsprocket
hole.
low as possible the machine is
Tomaintain
guide
bar:
equipped with a cooling system.
• Move
ON/STOP
switch
toSTOR
• Loosen
andremove
barknob
com- The cooling system consists of:
• Air intake on the starter
pletely
bylifting
lever
andturning
counterclockwise.
• Air guide plate
• Fins on the flywheel
• Loosen
chain
tension
byturning
fins on the cylinder
adjusting
wheel
(upward
direction). •• Cooling
Cylinder cover (directs cold air over
Remove
clutch
cover.
• Remove
barandchain
fromsaw.
the cylinder)
• Clean
theoilholes
andbargroove Clean the cooling system with a brush
after each use, more often in demandaftereach
5hours
ofoperation.
ing conditions. A dirty or blocked coolRemove
Sawdust
From._ j_
ing system results in the machine
Guide Bar tr_ov__,._
Oil Holes
o
• Burring of guide bar rails is a normal
process of rail wear. Remove these
burrs with a flat file.
• When rail top is uneven, use a flat file
to restore square edges and sides.
!_('7 -_ File Rail Edges_
N N
and Sides
]U I
Square
I
I
I"1
Worn Groove
Correct Groove
Replace guide bar when the groove is
worn, the guide bar is bent or cracked,
or when excess heating or burring of the
overheating which causes damage to
the piston and cylinder.
CHECK CHAIN BRAKE
See CHAIN BRAKE in the OPERATION
section.
CLEAN AIR FILTER
CAUTION:
Do not clean filter in gasoline or other flammable solvent to
avoid creating a fire hazard or producing harmful evaporative emissions.
Cleaning the air filter:
A dirty air filter decreases the life and
performance of the engine and increases fuel consumption and harmful
emissions. Always clean your air filter
after 10 tanks of fuel or 5 hours of operation, whichever comes first. Clean
more frequently in dusty conditions.
16
Aused
airfiltercannever
becom1. Loosen and remove the nut from
the exhaust outlet cover.
pletely
cleaned.
Itisadvisable
toreplace
yourairfilterwithanewoneaf- 2. Remove the exhaust oulet cover.
terevery
50hours
ofoperation,
or
3. Remove spark arresting screen.
annually,
whichever
comes
first.
Handle screen carefully to prevent
1. Loosen
3screws
oncylinder
cover. damage.
2. Remove
cylinder
cover.
4. Clean the spark arresting screen
3. Remove
airfiltercover
andairfilter.
gently with a wire brush. Replace
4. Clean
theairfilterusing
hotsoapy
screen if breaks are found.
water.
Rinse
withclean
coolwater. 5. Replace any broken or cracked
Airdrycompletely
before
reinstalling. muffler parts.
5. Reinstall
airfilter
andairfiltercover. 6. Reinstall spark arresting screen, ex6. Reinstall
cylinder
cover
and3
haust outlet cover, and nut. Tighten
screws.
Tighten
securely.
nut securely.
Cylinder REPLACE SPARK PLUG
Air Filter
Cover
The spark plug should be replaced
Cover
INSPECT MUFFLER AND SPARK
ARRESTING
SCREEN
_IkWARNING:
each year to ensure the engine starts
easier and runs better. Ignition timing
is fixed and nonadjustable.
1. Loosen 3 screws on cylinder cover.
2. Remove the cylinder cover.
3. Pull off the spark plug boot.
4. Remove spark plug from cylinder
and discard.
5. Replace with Champion RCJ-7Y
spark plug and tighten securely
with a 3/4 inch (19 mm) socket
wrench. Spark plug gap should be
0.025 inch (0,6 mm).
6. Reinstall the spark plug boot.
7. Reinstall the cylinder cover and 3
screws. Tighten securely.
The muffler on this
product contains chemicals known to
the State of California to cause cancer.
As the unit is used, carbon deposits
build up on the muffler and spark arresting screen, and must be removed
to avoid creating a fire hazard or affecting engine performance.
Replace the spark arresting screen if
breaks occur.
Spark
Arresting
Screen
Cylinder
Cover
Spark
Plug Boot
Exhaust
Outlet
Cover
J
Spark
Plug
Nut
Muffler
CLEANING THE SPARK ARRESTING SCREEN
Cleaning is required every 25 hours of
operation or annually, whichever
comes first.
REPLACE FUEL FILTER
To replace fuel filter, drain your unit by
running it dry of fuel. Remove fuel cap
and its connected retainer from tank.
Pull filter from tank and remove from
line. Replace and reassemble.
17
,_LWARNING:
Disconnect
spark plug before performing maintenance, service, or adjustments except
for carburetor adjustments.
CHAIN SHARPENING
,_WARNING:
'X_
the
30° /,,
v, ,
File Holder Line
Sharpen cutters on one side of
the chain first. File from the inside
of each cutter to the outside.
Then, turn the chain saw around
and repeat the process for the
other side of the chain.
• File on the forward stroke only.
Use 2 or 3 strokes per cutting
edge.
• Keep all cutters the same length
when filing.
• File enough to remove any damage to cutting edges (side plate
and top plate of cutter).
All Cutters
Remove Damage
Same Length
/
\.
WAR NI N G: Wear protective
gloves when handling chain. The chain
is sharp and can cut you even when it is
not moving.
Conditions which indicate the need for
chain sharpening:
• Reduction in size of wood chips.
The size of the wood chip will decrease as the chain gets duller until it
becomes more like a powder than a
chip. Note that dead or rotted wood
will not produce a good chip.
• Saw cuts to one side or at an angle.
• Saw has to be forced through the cut.
-,4
•
Tools required:
Cutte_e_pth
",4 r
_..
• Align the 30 ° file holder marks
parallel with the bar and to the
center of the chain.
//"-,...60°
\\\
30° ,
/
_
Hook Angle
",,\,
_
\
0.025 inch
O__O"_
: (0.65 mm)
_ounded
Right
Corner
Too Much Hook Angle
_
Gauge r
Side Plate
,__ 80°
j
Sharpen cutters.
• To sharpen the cutters, position
the file holder level (90 °) so that
it rests on the top edges of the
cutter and depth gauge.
NOTE: The chain has both left
and right hand cutters.
File Holder
"-J
File chain to meet the specifications as shown.
round file
TO SHARPEN CHAIN:
1. Move ON/STOP switch to the STOP
position.
2. Check chain for proper tension.
Adjust chain tension if necessary.
See CHAIN TENSION section.
3.
Cutter
•
Improper chain
sharpening techniques and/or depth
gauge maintenance will increase the
chance of kickback which can result in
serious injury.
• 5/32 inch (4 mm) diameter
and file holder
• Flat file
• Depth gauge tool
Cutter
Squared Off
Corner
Wrong
_WARNING:
Maintain the proper
hook angle according to the manufacturer's specifications for the chain you
are using. Improper hook angle will
increase the chance of kickback which
can result in serious injury.
18
4.
Check and lower depth gauges.
Depth Gauge Tool
__/__J
Q "_,,,J
File
Depth Gauge
Place gauge tool on cutter.
If the depth gauge is higher than
the depth gauge tool, file it level
to the top of the depth gauge tool.
• Maintain rounded front corner of
depth gauge with a flat file.
NOTE: The very top of the depth
gauge should be flat with the front
half rounded off with a flat file.
If you require further assistance
or are
unsure about performing this procedure,
contact your Sears Service Center or
call our customer assistance
help line at
] -800-235-5878.
Clutch cover
•
•
Bar nuts
Chain adjustment tool
(Bar Tool)
_t
4.
CHAIN REPLACEMENT
_/L WARNING:
Wear protective
gloves when handling chain. The
chain is sharp and can cut you even
when it is not moving.
It is normal for a new chain to stretch
during the first 15 minutes of operation.
You should recheck your chain tension
each time before you start the chain
saw and adjust the chain tension as
required. See CHAIN TENSION section.
Replace the old chain when it becomes worn or damaged. Use only the
Low-Kickback replacement chain specified in the repair parts list.
The correct replacement bar and chain
is also specified on a decal located on
the chain saw.
An adjusting pin and screw is used
to adjust the tension of the chain. It
is very important when assembling
the bar, that the pin located on the
adjusting screw aligns into a hole in
the bar. Turning the screw will move
the adjustment pin up and down the
screw. Locate this adjustment before
you begin mounting the bar onto the
saw. See following illustration.
_
4\
I_J%_)
/_
Inside
view of
,_\ clutch
............
\\cover
Adjustment located on clutch cover
5.
6.
See your Sears Service Center to replace and sharpen individual cutters
on your chain.
TO REPLACE CHAIN:
1. Move ON/STOP switch to the STOP
position.
2. Loosen and remove the bar nuts
and the clutch cover from the saw.
3. Remove the old chain.
Turn the adjusting screw by hand
counterclockwise
until the adjusting pin just touches the stop. This
should allow the pin to be near the
correct position.
Slide guide bar on bar bolts until
guide bar stops against clutch
drum sprocket.
Guide bar
Bar bolts
7,
19
\
Carefully remove the chain from the
package. Hold chain with the drive
links as shown.
Tip of
Bar
CHAIN ADJUSTMENT
See CHAIN TENSION in MAINTENANCE
section.
CARBURETOR
_IkWARNING:
N,
CUTTERS MUST FACE IN
DIIRECTION OF ROTATION
,,*..... Cutters
Depth Gauge
Drive Links
Place chain over and behind clutch
retainer, fitting the drive links in the
clutch drum sprocket.
9. Fit bottom of drive links between
the teeth in the sprocket in the
nose of the guide bar.
10. Fit chain drive links into bar groove.
11. Pull guide bar forward until chain is
snug in guide bar groove. Ensure
all drive links are in the bar groove.
12. Now, install clutch cover making
sure the adjusting pin is positioned
in the lower hole in the guide bar.
Remember this pin moves the bar
forward and backward as the
screw is turned.
8.
ADJUSTMENT
The chain will be
moving during most of this procedure.
Wear your protective equipment and
observe all safety precautions. The
chain must not move at idle speed.
The carburetor has been carefully set
at the factory. Adjustments may be
necessary if you notice any of the following conditions:
• Chain moves at idle. See IDLE
SPEED-T adjusting procedure.
• Saw will not idle. See IDLE SPEED-T
adjusting procedure.
Idle Speed-T
Allow engine to idle. If the chain moves,
idle is too fast. If the engine stalls, idle is
too slow. Adjust speed until engine runs
without chain movement (idle too fast) or
stalling (idle too slow). The idle speed
screw is located in the area above the
primer bulb and is labeled T
• Turn idle screw (T) clockwise to increase engine speed.
• Turn idle screw (T) counterclockwise
to decrease engine speed.
If you require further assistance or are
unsure about performing this procedure,
contact your Sears Service Center or
call our customer assistance help line at
1-800-235-5878.
Clut,
Cover
Adjusting Pin
Hole
//
Guide Bar
13. Install bar nuts and finger tighten
only. Do not tighten any further
at this point. Proceed to CHAIN
ADJUSTMENT.
2O
_WARNIN_I:
Perform the following steps after each use:
• Allow the engine to cool, and secure
the unit before storing or transporting.
• Store chain saw and fuel in a well
ventilated area where fuel vapors
cannot reach sparks or open flames
from water heaters, electric motors or
switches, furnaces, etc.
• Store chain saw with all guards in
place and position chain saw so that
any sharp object cannot accidentally
cause injury.
• Store chain saw well out of the reach
of children.
SEASONAL STORAGE
Prepare your unit for storage at the
end of the season or if it will not be
used for 30 days or more.
If your chain saw is to be stored for a
period of time:
• Clean saw thoroughly before storage.
• Store in a clean dry area.
• Lightly oil external metal surfaces
and guide bar.
• Oil the chain and wrap it in heavy paper or cloth.
FUEL SYSTEM
Empty the fuel system before storage
for 30 days or longer. Drain the gas
tank, start the engine and let it run until
the fuel lines and carburetor are empty.
Use fresh fuel next season.
Under FUELING ENGINE in the OPERATION section of this manual, see message labeled IMPORTANT regarding
the use of gasohol in your chain saw.
Fuel stabilizer is an acceptable alternative in minimizing the formation of
fuel gum deposits during storage. Add
stabilizer to the gasoline in the fuel
tank or fuel storage container.
Follow the mix instructions found on
stabilizer containers. Run engine at
least 3 minutes after adding stabilizer.
Craftsman 40:1,2-cycle
engine oil (air
cooled) is blended with fuel stabilizer. If
you do not use this oil, you can add a
fuel stabilizer to your fuel tank.
ENGINE
• Remove spark plug and pour 1 teaspoon of 40:1,2-cycle
engine oil (air
cooled) through the spark plug opening. Slowly pull the starter rope 8 to
10 times to distribute oil.
• Replace spark plug with new one of
recommended type and heat range.
• Clean air filter.
• Check entire unit for loose screws,
nuts, and bolts. Replace any damaged, broken, or worn parts.
• At the beginning of the next season,
use only fresh fuel having the proper
gasoline to oil ratio.
OTHER
• Do not store gasoline from one season to another.
• Replace your gasoline can if it starts
to rust.
21
TROUBLESHOOTING
TABLE
WARNING:
Always stop unit and disconnect spark plug before performing all of the recommended
remedies below except remedies that require
operation of the unit.
TROUBLE
CAUSE
Engine will not
start or will run
only a few
seconds after
starting.
REMEDY
1. ON/STOP switch in
STOP position.
2. Engine flooded.
3. Fuel tank empty.
4. Spark plug not firing.
5. Fuel not reaching
carburetor.
6. Carburetor requires
adjustment.
7. None of the above.
Engine will
not idle
properly.
Engine will not
accelerate,
lacks power,
or dies under
a load.
Engine
smokes
excessively.
Chain moves
idle speed,
(see back cover).
1. Clean or replace air filter.
2. Clean or replace plug and regap.
3. Contact Sears Service (see back cover).
1. Choke partially on.
2. Fuel mixture incorrect.
1. Adjust choke.
2. Empty fuel tank and refill with
correct fuel mixture.
3. Clean or replace air filter.
4. Contact Sears Service (see back cover).
incorrect.
1. Oil tank empty.
2. Oil pump or oil filter
clogged.
3. Guide bar oil hole
blocked.
at
Sears Service
1. Air filter dirty.
2. Spark plug fouled.
3. Carburetor requires
adjustment.
4. Exhaust ports or muffler outlets plugged.
5. Compression low.
6. Chain brake engaged.
7. None of the above.
2. Spark plug incorrect.
3. High Speed Mixture
set too lean.
4. Exhaust ports or muffler outlets plugged.
5. Carbon build-up on
spark arresting screen.
6. Starter housing dirty
7. None of the above.
Oil inadequate
for bar and
chain
lubrication.
7. Contact
1. See "Carburetor Adjustment"
in the
Service and Adjustments Section.
2. Contact Sears Service (see back cover).
1. Fuel mixture
runs
2. See "Difficult Starting" in the
Operation Section.
3. Fill tank with correct fuel mixture.
4. Install new spark plug.
5. Check for dirty fuel filter; replace.
Check for kinked or split fuel line;
repair or replace.
6. Contact Sears Service (see back cover).
1. Idle speed set too high
or too low.
2. Low Speed Mixture
requires adjustment.
3. Crankshaft seals worn.
4. Compression
low.
5. None of the above.
3. Air filter dirty.
4. High Speed Mixture
requires adjustment.
5. Crankcase leak.
Engine
hot.
1. Move ON/STOP switch to ON.
1. Idle speed requires
adjustment.
2. Clutch requires repair.
3. Contact
4. Contact
5. Contact
4. Contact
Sears Service
Sears Service
Sears Service
(see back cover).
(see back cover).
(see back cover).
Sears Service
(see back cover).
5. Contact Sears Service (see back cover).
6. Disengage chain brake.
7. Contact Sears Service (see back cover).
5. Contact
Sears Service
(see back cover).
1. See "Fueling Engine" in the Operation
section.
2. Replace with correct plug.
3. Contact Sears Service (see back cover).
4. Contact
Sears Service
5. Clean spark arresting
(see back cover).
screen.
6. Clean starter housing area.
7. Contact Sears Service (see back cover).
1. Fill oil tank.
2. Contact Sears Service
3. Remove
(see back cover).
bar and clean.
1. See "Carburetor Adjustment"
in the
Service and Adjustments
Section.
2. Contact Sears Service (see back cover).
22
TROUBLESHOOTING
TROUBLE
Chain does not
move when engine is accelerated.
Chain clatters
or cuts roughly.
TABLE - Continued
CAUSE
REMEDY
1. Chain tension too
tight.
2. Carburetor requires
adjustment.
3. Guide bar rails
pinched.
4. Clutch slipping.
5. Chain brake engaged.
1. See "Check Chain Tension" in the
Maintenance
Section.
2. Contact Sears Service (see back cover).
1. Chain tension
1. See "Check Chain Tension" in the
Maintenance Section.
2. Contact Sears Service (see back cover).
3. Resharpen or replace chain.
4. See "Chain Sharpening" in the
Service and Adjustments Section.
incorrect.
2. Cutters damaged.
3. Chain worn.
4. Cutters dull, improperly
sharpened, or depth
gauges too high.
5. Sprocket worn.
6. Chain installed
backwards.
Chain stops
within the cut.
1. Chain cutter tops not
filed flat.
2. Guide bar burred or
bent; rails uneven.
3. Clutch slipping.
Chain cuts at
an angle.
1. Cutters damaged on
one side.
2. Chain dull on one side.
3. Guide bar bent or worn.
3. Repair or replace.
4. Contact Sears Service (see back cover).
5. Disengage chain brake.
5. Contact Sears Service (see back cover).
6. Install chain in right direction.
See "Chain Sharpening" in the
Service and Adjustments Section.
2. Repair or replace guide bar.
1.
3. Contact Sears Service (see back cover).
1. See "Chain Sharpening"
in the
Service and Adjustments Section.
2. See "Chain Sharpening" in the
Service and Adjustments Section.
3. Replace guide bar.
If situations occur which are not covered in this manual, use care and good
judgement. If you need assistance, contact Sears Service or the CUSTOMER
ASSISTANCE HELPLINE at 1-800-235-5878.
23
IMPORTANT:
This product is compliant with U.S. EPA Phase 3 regulations for
exhaust and evaporative emissions. To ensure EPA Phase 3 compliance, we recommend using only genuine Craftsman brand replacement parts. Use of non-compliant
replacement parts is a violation of federal law.
YOUR WARRANTY RIGHTS AND
OBLIGATIONS:
The U.S. Environmental Protection Agency/California
Air Resources Board and Sears
Brands Management Corporation,
U.S.A., are pleased to explain the
emissions control system warranty on
your year 2012 and later small offroad engine. In California, all small offroad engines must be designed, built,
and equipped to meet the State's stringent anti-smog standards. Sears must
warrant the emission control system
on your small off-road engine for the
periods of time listed below provided
there has been no abuse, neglect, or
improper maintenance
of your small
off-road engine. Your emission control
system includes parts such as the carburetor, the ignition system and the
fuel tank. Where a warrantable condition exists, Sears will repair your small
off-road engine at no cost to you.
Expenses covered under warranty
include diagnosis, parts and labor.
MANUFACTURER'S
WARRANTY
COVERAGE: If any emissions related
part on your engine (as listed under
Emissions Control Warranty Parts List)
is defective or a defect in the materials
or workmanship of the engine causes
the failure of such an emission related
part, the part will be repaired or replaced by Sears. OWNER'S WARRANTY RESPONSIBILITIES:
As the
small off-road engine owner, you are
responsible for the performance of the
required maintenance listed in your operator's manual. Sears recommends
that you retain all receipts covering
maintenance on your small off-road
engine, but Sears cannot deny warranty solely for the lack of receipts or for
your failure to ensure the performance
of all scheduled maintenance. As the
small off-road engine owner, you
should be aware that Sears may deny
you warranty coverage if your small
off-road engine or a part of it has
failed due to abuse, neglect, improper
maintenance, unapproved modifica-
tions, or the use of parts not made or
approved by the original equipment
manufacturer. You are responsible for
presenting your small off-road engine
to a Sears authorized repair center as
soon as a problem exists. Warranty
repairs should be completed in a reasonable amount of time, not to exceed
30 days. If you have any questions
regarding your warranty rights and responsibilities, you should contact your
nearest authorized service center, call
Sears at 1-800-469-4663,
or send
e-mail correspondence
to emission.
warranty@ HCOP- emission.com.
WARRANTY COMMENCEMENT
DATE: The warranty period begins on
the date the small off-road engine is
purchased. LENGTH OF COVERAGE: This warranty shall be for a period of two years from the initial date of
purchase, or until the end of the product warranty (whichever is longer).
WHAT IS COVERED: REPAIR OR
REPLACEMENT
OF PARTS, Repair
or replacement of any warranted part
will be performed at no charge to the
owner at an approved Sears Service
Center. If you have any questions regarding your warranty rights and responsibilities, you should contact your
nearest authorized service center, call
Sears at 1-800-469-4663,
or send
e-mail correspondence
to emission.
warranty@ HCOP- emission.com.
WARRANTY PERIOD: Any warranted
part which is not scheduled for replacement as required maintenance,
or which is scheduled only for regular
inspection to the effect of "repair or replace as necessary" shall be warranted for 2 years. Any warranted part
which is scheduled for replacement as
required maintenance shall be warranted for the period of time up to the
first scheduled replacement point for
that part. DIAGNOSIS: The owner
shall not be charged for diagnostic labor which leads to the determination
that a warranted part is defective if the
24
diagnostic work is performed at an approved Sears Service Center.
CONSEQUENTIAL
DAMAGES:
Sears
may be liable for damages to other engine components caused by the failure
of a warranted part still under warranty.
WHAT IS NOT COVERED: All failures
caused by abuse, neglect, or improper
maintenance are not covered.
ADD-ON OR MODIFIED PARTS:
The use of add-on or modified parts
can be grounds for disallowing a warranty claim. Sears is not liable to cover
failures of warranted parts caused by
the use of add-on or modified parts.
HOW TO FILE A CLAIM: If you have
any questions regarding your warranty
rights and responsibilities,
you should
contact your nearest authorized service center, call Sears at
1-800-469-4663,
or send e-mail correspondence to emission.warranty@
HCOP-emission.com.
WHERE TO
GET WARRANTY SERVICE: Warranty services or repairs shall be provided
at all Sears Service Centers. Call
1-800-469-4663
or send e-mail correspondence to emission.warranty@
HCOP-emission.com.
MAINTENANCE,
REPLACEMENT
AND REPAIR OF EMISSION RELATED PARTS: Any Sears approved
replacement part used in the performance of any warranty maintenance
or repair on emission related parts will
be provided without charge to the owner if the part is under warranty.
EMISSION CONTROL WARRANTY
PARTS LIST: Carburetor, air filter (covered up to maintenance schedule),
ignition system: spark plug (covered
up to maintenance schedule), ignition
module, muffler including catalyst (if
equipped), fuel tank, line and cap.
MAINTENANCE
STATEMENT: The
owner is responsible for the performance of all required maintenance
as defined in the operator's manual.
The information on the product label indicates which standard your engine is certified.
Example: (Year) EPA and/or CALIFORNIA.
EMISSION
CONTROL
INFORMATION
THIS
ENGINE
MEETS
EXHANDEVPEMISSIONS
REGULATIONS
FOR2012
USEPAIGALIFORNIA
SI/ALL
OFFROAD
ENGINES
SEARSBRANDS&IGMT
CORP
FA_ILY/DISP
MODEL#
ENISSION
COMPLIANCE
PERIOD HOURS
[
BAR C0DE
]
THEAIRINDEX
OFTHISENGINE
IS
10 I 2J I 41 I 61 I 81 1101
THELOWER
THEAIRINDEX,
THELESSPOLLUTION
REFEN
TOOWNER'S
N£_NUAL
FOR
MAINTENANCE
SPECIFICATIONS
ANDADJUSTMENTS
This engine is certified to be emissions
[]
Moderate
[]
Intermediate
[]
Extended
compliant
(50 hours)
(125 hours)
(300 hours)
25
for the following
use:
Declaraci6n de Garantia
Reglas de Seguridid
Montaje
Uso
Mantenimiento
Servicio y Ajustes
28
29
34
35
43
47
Almacenamiento
Tabla Diagn6stica
Declaraci6n de Emision
Lista de Piezas
Repuestos y Encargos
51
52
54
26
Contratapa
GARANTIA COMPLETA DE DOS ANOS DE CRAFTSMAN
POR DOS ANOS a partir de la fecha de la compra, este producto est,. garantizado
contra cualquier defecto de material o mano de obra. El producto defectuoso se
reparar& o sustituir& de forma gratuita si la reparaci6n no es posible.
GARANTIA LIMITADA ADIClONAL
EN EL ClGOENAL DEL MOTOR
A PARTIR DEL TERCER ANO HASTA EL DECIMO desde la fecha de compra, el cig0e_al
del motor de este producto est& garantizado contra cualquier defecto de material o
mano de obra. Tras presentar el comprobante de la compra, un cigQeSal del motor
defectuoso se sustituir&. Esta garantia adicional cubre s61o el cig0eSal del motor, y
no se aplica a cualquier otro componente del motor. Usted debe pagar el costo de la
mano de obra de instalaci6n del cigQeSal.
Para mas information
sobre la cobertura de la garantia para obtener una
reparacion o sustitucion gratuita, visite la pagina web: www.craftsman.com
Esta garantia SOLO cubre defectos de material y mano de obra. La cobertura
de la garantia NO incluye:
• Piezas desechables
que pueden sufrir desgaste debido al uso normal dentro
del periodo de garantia, incluidas, entre otras, la barra guia, la cadena, los
filtros o la bujia.
• DaSos provocados por los intentos del usuario de modificar o reparar el producto o
debido a los accesorios del producto.
• Reparaciones debidas a un accidente o a no utilizar o mantener el producto de
acuerdo a todas las instrucciones
proporcionadas.
• Mantenimiento preventivo o reparaciones debidas al uso de un tipo incorrecto
de combustible, una mezcla incorrecta de combustible o combustible contaminado o con impurezas.
Esta garantia se anular& si el producto se utiliza para ofrecer servicios comerciales o si se alquila a otra persona.
Esta garantia otorga derechos legales especificos y puede que algunos varien
de un estado a otro.
Sears Brands Management Corporation,
Hoffman Estates, IL 60179
AADVERTENCIA
Los gases de escape del motor de este producto
contienen sustancias
quimicas conocidas
en el
Estado de California como causantes
de cancer,
defectos congenitos
y otros daSos reproductivos.
28
iFelicitaciones!
ilia realizado una compra inteligente! Su nuevo producto Craftsman est,. disefiado y fabricado para brindar muchos afios de funcionamiento
confiable. Pero como todos los productos, puede requerir reparaciones peri6dicas. En ese momento, tener un Acuerdo de protecci6n para reparaciones
puede
ahorrarle dinero y trastornos.
El Acuerdo de Proteccion para Reparaciones*
incluye Io siguiente:
_" Servicio experto por parte de nuestros 10 000 especialistas en reparaclones profesionales
_" Servicio ilimitado y ningun costo por las piezas y la mano de obra en
todas las reparaciones cubiertas
_" Reemplazo del producto hasta $1500 si el producto cubierto no puede ser
reparado
_" Descuento de110% sobre el precio normal del servicio y las piezas
instaladas asociadas no cubiertas por el acuerdo; adem&s, 10% de des
cuento sobre el precio normal de la verificaci6n de mantenimiento preventivo
_" Ayuda telefonica rapida - la Ilamamos Resoluci6n r&pida; asistencia
telef6nica por parte de un representante de Sears. Piense en nosotros como
un "manual del propietario parlante".
Una vez que compre el Acuerdo de protecci6n para reparaciones, bastard, con que
realice una simple Ilamada telef6nica para programar servicios. Puede Ilamar a cualquier hora, de dia o de noche, o programar una visita de servicios en Internet.
El Acuerdo de Protecci6n para Reparaciones
es una compra libre de riesgos. Si
cancela por cualquier motivo durante el periodo de garantia del producto, le proporoionaremos un reembolso completo. O un reembolso prorrateado en cualquier
momento posterior al vencimiento
del periodo de garantia del producto.iCompre
su Acuerdo de protecci6n para reparaciones ya mismo!
Aplican algunas limitaciones
y exclusiones.
Para conocer los precios e informacion
adicional en EE.UU, Ilame al 1-800-827-6655.*La
cobertura en
Canada varia en algunos articulos.
Para obtener los detalles completos,
Ilame a Sears Canada al 1-800-361-6665.
Servicio de instalacion de Sears
Para la instalaci6n profesional de Sears de electrodomesticos,
abrepuertas de
garajes, calentadores de agua y otros articulos domesticos importantes, en
EE.UU. o Canada. Ilame a 1-800-4-MY-HOME®.
_k ADVERTENClA:
Desconecte
siempre el cable de la bujia al reparar
el aparato, excepto en el caso de
ajustes al carburador. Debido a que
las sierras de cadena son instrumentos para cortar madera a alta velocidad, deben observarse precauciones
de seguridad especiales para reducir
el riesgo de accidentes.
El uso descuidado o indebido de esta herramienta puede causar graves heridas.
PIENSE ANTES DE PROCEDER
• Limite el uso de la sierra a aquellos
usuarios adultos que comprendad y
puedan implementar todas las precauclones, reglas de seguridad e instrucoiones de uso que se enouentran en
este manual.
Protecci6n
de Oidos
_
.j
Casco Duro
_.
m._/_Protecci6n
de
-m,,| I,,B IPr _.
Ropa Ajustada
ujos
al Cuer
Guantes de
Uso Industrial
Zapatos de
Seguridad
Pantorrilleras
Seguridad
• Use equipo protector. Siempre use
calzado de seguridad con puntas de
acero y suelas anti-deslizantes; ropa
ajustada al cuerpo; pantorrilleras de
seguridad; guantes gruesos de uso
industrial anti-deslizantes; protecci6n
de ojos tales como gafas de seguri29
dadguenoselacars;
casco
duro
• Pare
elmotor
antes
deapoyar
la
aprobado;
ybarters
desonido
(tasierraenningQn
lado.
pones
deoidouorejeras
anti-sonido)• Cuando
traslade
lasierra
enlamano,
parsproteger
laaudici6n.
Losque
h&galo
t3nicamente
conelmotor
parsusan
sierras
defuerza
habitualmentedo.Llevela
conelsilenciador
apartado
deber&n
hacerse
revisar
laaudici6n delcuerpo
ylabarra
ycadena
hacia
frecuentemente
yaqueelruido
delas atr&s,
conlabarra
depreferencia
cusierras
decadena
puede
dafiar
los
bierta
porunafunds.
oidos.
• Noponga
enfuncionamiento
lasierra
decadena
siest&
dafiada,
incorrecta• Mantenga
elcabello
porencima
del
niveldeloshombros.
Nodesgaste
la
mente
ajustada,
osinoest,.armada
ropasuelta
ojoyeria;
pueden
enre- completa
yseguramente.
Siempre
darse
enlaspiezas
m6viles.
cambie
elbarre,
cadena,
protector
de
• Mantenga
todas
laspartes
decuerpo mano,
freno
decadena,
o elotras
piealejadas
delacadena
siempre
queel
zasimmediatamente
sidafiado,
roto,
motor
esteenfuncionamiento.
osesaleporcualquier
motivo.
• Mantenga
a losnifios,
espectadoresMANTENGA
LASIERRA
ENBUEyanimales
aunadistancia
minima NASCONDIClONES
DEFUNCTIONde10metros
(30pies)
del&rea
de
AMIENTO
trabajo
ocuando
est&
haciendo
ar- ,_ADVERTENClA:
Desconecte
la
rancar
elmotor.
• Nolevante
niopere
lassierras
deca- bujia antes de hacer cualquier mantendens
cuando
est&
fatigado,
enfermo, imiento menos los ajustes al carburador.
ansioso
osihatomado
alcohol,
dro- • Lleve la sierra de cadena aun progasoremedios.
Esinprescindible
que veedor de servicio autorizado pars
ud.est&
enbuenas
condiciones
risk
que hags todo servicio menos aquelcasyalerts
mentalmente.
Siud.sufre los procedimientos listados en la secdecualquier
condici6n
quepueda
em- ci6n de MANTENIMIENTO de este
peorar
coneltrabajo
arduo,
ases6rese manual.
consumedico.
• Asegt3rese de que la cadena se de• Noponga
enmarcha
lasierra
sinten- tenga por completo cuando se suelta
erun_.rea
detrabajo
despejada,
una
el gatillo. Pars hacer correcciones,
vea los AJUSTE AL CARBURADOR.
superficie
estable
parsparase
y,si
est&
derrubando
&rboles,
uncamino • Mantenga las manijas secas, limpias
predeterminado
deretroceso.
y libres de aceite o de mezcla de
USELASIERRA
OBSERVANDO
TO- combustible.
DOS
LOSPROCEDIMIENTOS
DE
• Mantenga las tapas y los fijadores
SEGURIDAD
bien fijos.
• Mantenga
lasdosmanos
enlasman- • Componentes de repuesto que no
ijassiempre
queelaparato
esteen
concuerden con las piezas originales
marcha.
Elusodelaparato
conuna
o la remoci6n de dispositivos de segusolamano
puede
causar
graves
heri- ridad podria causar dafios al aparato y
dasalusuario,
alosasistentes
oa los accidentes al usuario o a espectaespecadores.
Lassierras
decadena dotes. Use exclusivamente los acceest&n
disefiadas
parsqueselasuse
sorios y repuestos Craftsman recomconlasdosmanos
entodomomento. endados. Nunca modifique la sierra.
• Hags
usodelasierra
decadena
t3ni- • Mantenga su sierra de cadena con
cuidado.
camente
enlugares
exteriores
bien
ventilados.
• Mantenga la herramienta afilada y
• Nohagsusodelasierra
desde
las
limpia pars mejor funcionamiento
y
escaleras
port&tiles
nilos&rboles. mayor seguridad.
• Asegt3rese
dequelacadena
novaya • Siga todas las instrucciones pars luahacer
contacto
conningt3n
objeto
bricaci6n y cambio de accesorios.
antes
deponer
enmarcha
elmotor. • Inspeccione todas las piezas por si
Nunca
intente
hacer
arrancar
lasierra hubiera dafios. Antes de continuar con
conlabarra
guiadentro
deuncorte. el uso del aparato; el protector u otra
• Noaplique
presi6n
alasierra
alfinal pieza que se encuentre dafiada debdeloscortes.
Aplicar
presi6n
puede er& ser inspeccionada cuidadosahacer
uuepierda
elcontrol
alcommente pars determinar si pueden
pletarse
elcorte.
usarse de forms apropiada y pars
30
vierificar si puede efectuar el funcionamiento para el cueal fue disefiada. Inspeccione el alineamiento de las piezas movibles, piezas movibles que se
encuentren atascadas, la ruptura de
piezas, montura y cualquier otra condici6n que pueda afectar el uso del
aparato. El protector o cualquier otra
pieza que se encuentre dafiada deber& ser reparada apropiadamente o
deber& ser reemplazada por un Centro de Servicio Sears, a no ser que se
indique de otra forma en este manual
del usuario.
• AI no encontrarse en uso, las sierras
de cadena deber&n almacenarse
en
un lugar seco, en un lugar alto o bajo
Ilave, fuera del alcance de los nifios.
• AI almacenar la sierra, use una funda o un estuche de carga.
MANEJE EL COMBUSTIBLE
CON
EXTREMO CUIDADO
• No fume mientras trabaja con el
combustible ni cuando est& haciendo uso de la sierra.
• Elimine todas las posibles fuentes de
chispas o llamas en las &reas donde
se mezcla o vierte el combustible.
• Tenga siempre a mano herramientas
para extinguir incendios, por si fueran
necesarias.
• Mezcle y vierta el combustible afuera
y use siempre recipiente aprobado
para combustibles y marcado como
tal. Limpie todos los derrames de
combustible antes de poner el aparato en marcha.
• Alejese a por Io menos 3 metros (10
pies) del lugar de abastecimiento
antes de poner el mtor en march&
• Apaque el motor y deje que la sierra
se enfrie en un lugar libre de substancias combustibes y no sobre hojas secas, paja, palel, etc. Retire la tapa lentamente y reabastezca el aparato.
• Antes de guarder el aparato, vacie el
dep6sito de combustible. Arranque
el motor y dejelo en marcha hasta
que se detenga con el fin de agotar
el combustible que pueda quedar en
el carburador.
• Guarde el aparato y el combustible
en un espacio fresco, seco y bien
ventilado donde los vapores del
combustible no puedan entrar en
contacto con dchispas ni llamas
abiertas provenientes de termotangues, motores o interruptores electricos, calefactores centrales, etc.
PROTEJASE
CONTRA LAS
RECULADAS
Ud. debe seguir todas las precauclones e instrucciones de seguridad
para ayudar e evitar las reculadas y
las dem&s fuerzas que pueden causar
graves heridas.
Trayectoria de la
,.,C_..>,: _ .j".: Reculada
Evite las obstrucciones
Despeje el
Area de
Trabajo
,_/LADVERTENClA:
Evite reculada
le pueden causar graves heridas. Reculada es el movimiento hacia el
frente, hacia atr&s o r&pidamente hacia adelante, esto puede ocurrir cuando la punta de la barra guia de la sierra de cadena entra en contacto con
cualquier objeto como puede ser otra
rama o tronco, o cuando la madera se
cierra y atasca mientras se hace el
corte. El entrar en contacto con algQn
objeto extrafio a la madera le puede
causar al usuario la perdida del control
de la sierra de cadena.
• La Reeulada Rotacional puede
acontecer cuando la cadena en movimiento entra en contacto con algQn
objeto en la parte superior de la punta de la barra guia puede causar que
la cadena entre al material y se detenga por un instante. El resultado
es una reacci6n inversa, a velocidad
de rel_.mpago, que hace recular la
barra guia hacia arriba y hacia atr_.s
hacia el usuario.
• La Reculada por Atasco acontecen
cuando la madera se cierra y atasca
la cadena en movimiento en el corte a
Io largo de la parte superior de la barra guia y la cadena se detiene repentinamente. Esta detenci6n repentina de
la cadena tiene como resultado una
inversi6n de la fuerza de la cadena
usada para cortar madera y causa
que la sierra se mueva en sentido opuesto al de la rotaci6n de la cadena.
La sierra directamente hacia atr_.s en
direcci6n al usuario.
• La Reculada por Impulsion
puede
acontecer cuando la cadena en movimiento entra en contacto con algOn
31
objeto extrafio a la madera en el
corte a Io largo de la parte inferior de
la barra guia y la cadena se detiene
repentinamente.
Esta detenci6n repentina de la cadena tira de la sierra
adelante y lejos del usuario y podria
hacer f&cilmente al usuario perder el
control de la sierra.
REDUZCA LAS PROBABILIDADES
DE RECULADA
• Este consciente de la posibilidad de
reculada. Teniendo una buena comprensi6n b&sica de la reculada, ud.
podr& reducir el elemento de sorpresa
que contribuye a los accidentes.
• Nunca permita que la cadena en movimiento toque ningOn objeto en la
punta de la barra guia.
• Mantenga el _.rea de trabajo libre de
obstrucciones como por ejemplo otros
_.rboles, ramas, piedras, cercas, tocones, etc. Elimine o evite toda obstrucci6nes comp por ejemplo otros
_.rboles, ramas, piedras, cercas, tocones, etc. Elimine o evite toda obstrucci6n que la cadena pueda tocar
mientras est,. cortando.
• AI cortar una rama, no deje la barra
guia entrar en contacto con otra
rama o otros objetos alrededor.
• Mantenga la sierra afilada y con la
tensi6n correcta. Las cadenas con
poco file o flojasincrementan
la probabilidad de reculada. Siga las instrucciones del fabricante para afilar
y efectuar mantenimiento
de la cadena. Verifique la tensi6n a intervalos
regulares con el motor parado, nunca en marcha. AsegQrese de que las
tuercas de la freno de cadena estenparado, nunca en marcha.
Asegt3rese de que las tuercas de la
freno de cadena esten ejustadas firmemente.
• Empiece y efectt3e la totalidad de
cada corte con el acelerador a fondo. Si la cadena se est,. moviendo a
una velocidad menor que la m&xima,
hay m&s probabilidad de que la sierra recule.
• Use cuidado extremo al entrar de
nuevo en un corte ya empezado.
• No intente hacer cortes empezando
con la punta de la barra (cortes de taladro).
• Tenga cuidado con troncos que se
desplazan y con las dem_.s fuerzas
que podrian cerrar un corte y apretar
la cadena o bien caer sobre ella.
• Use la barra Guia Reducidora de
Reculadas y la Cadena Minimizadora de Reculadas recomendadas
para su sierra.
Para Evitar la Reculada por Ataseo:
• Mantengase completamente conciente
de toda situaci6n u obstrucci6n que
pueda hacer que el material presione
la cadena en la parte superior o que
pueda parar la cadena de cualquier
otro modo.
• No corte m&s de un tronco a la vez.
• No retuerza la sierra al retirar la barra
de un corte ascendiente cuando est,.
seccionando troncos.
Para Evitar la Reculada por Impulsion:
• Empiece todo corte con el motor acelerado a fondo y con la caja de la sierra apoyada contra la madera.
• Use cutlas de pl_.stico o de madera
(nunca de metal) para mantener ablerto el corte.
MANTENGA EL CONTROL
P_.resehacia la izquierda de la sierra.
Nunca invierta
la posici6n de
las manos
\
Codo rigido
El pulgar por debajo de la manija
• Sostener firmemente con las dos
manso le ayudar& a mantener el control de la sierra. No afloje. Mantenga la
mano derecha envolviendo totalmente
la manija trsera, sea ud. derecho o
zurdo. Sostenga la manija delantera
con la mano izquierda, colocando el
pulgar debajo de la manija y rodeando
la manija con los dedos. Mantenga el
brazo izquierdo totalmente extendido
con el codo fijo.
• Coloque le mano izquierda el la manija delantera, de modo que quede en
linea recta con la mano derecha en la
manija trasera, cuando este haciendo
cortes de seccionamiento. P_.rese levemente hacia la izquierda de la sierra
para evitar que el cuerpo este el linea
directa con la cadena.
• P_.rese con el peso distribuido igualmente entre los dos pies.
• No se extienda excesivamente. La
sierra puede impulsario o empujarlo y
32
ud. puede perder el equilibrio y el control de la sierra.
• No corte arriba del nival de los hornbros. Es dificil mantener el control de
la sierra si est& por encima del nivel
de los hombros.
DISPOSITIVOS
DE SEGURIDAD
CONTRA LAS REGULADAS
,_ADVERTENClA:
Los siguientes
dispositivos han sido incluidos en la
sierra para ayudar a reducir el riesgo de
reculadas; sin embargo, tales implementos no pueden eliminar totalmente esta
reacci6n peligrosa. Como usuario de
sierra de cadena, ud. no debe confiarse
solamente en los dispositivos de seguridad. Ud. debe seguir todas las precauciones de seguridad, instrucciones y
mantenimiento que se encuentran en
este manual para ayudar a evitar las reculadas y otras fuerzas que pueden
causar graves heridas.
• Protector de Mano Delantera, diseSado para reducir la probabilidad que su
mano izquierda entre en contacto con
la cadena, si la mano se desprende
de la manija delantera.
• La posici6n de las manijas delantera y
trasera, diseSadas con distancia entre
las manijas y "en lined' la una con la
otra. La separaci6n y la colacaci6n en
linea que este diseSo provee se combinan para dar equilibrio y resistencia
para controlar la propulsi6n de la sierra hacia el usuario si acontece una
reculada.
• Barra Guia Reducidora de Reculadas,
diseSada con punta de radio pequeSo
que reduce el tamaSo de la zona de
peligro en la punta de la barra. Las
barras guias reducidoras de reculadas
son aquellas que han demostrado que
reducen significativamente la cantidad
y la seriedad de las reculadas cuando
han sido examinadas de acuerdo con
los requisitos de seguridad para las
sierras de cadena a gasolina establecidos por el Patr6n ANSI (American
National Standards Institute, Inc.)
B175.1.
Punta de Radio
Zona de Peligro
Pequet_o
Barra
Guia
/
Zona de Peligro [_"_
Puntade Radio I
Grande Barra
Guia
• Las Cadenas Minimizadoras
de Reculadas han satisfecho los requisitos
[
de rendimiento del ANSI B175.1 (Requisitos de Seguridad para las Sierras de Cadena a Gasolina) en pruebas con una muestra representativa
de Sierras de cadena con desplazamiento de menos de 3,8 pulgadas,
como se especifica en ANSI B175.1.
Cadena Minimizadora
de Reculadas
Marcador de Profundidad Perfilado
........... Eslab6n Protector
fuerza de reacci6n
yAlargado
permite desvia
que la la
madera entre gradualmente a la Cuchilla
FRENO DE CADENA
• Freno de Cadena, diseSado para detener la cadena en el caso de reculada.
,_/LADVERTENClA:
NUESTRA COMPANIA NO REPRESENTA Y USTED NO
DEBERA ASUMIR QUE EL FRENO DE CADENA LO PROTEGERA EN CASO DE RECULADAS. Una reculada es una acci6n
r&pida la cual lanza la barra y la cadena
rotativa hacia atr&s y hacia arriba en direcci6n al usuario. Una reculada podria
ser causada cuando se permite que la
punta de la barra en la zona de peligro
entre en contacto con cualquier objeto
en la zona superior de la barra guia.
Esta acci6n puede empujar la barra
guia r&pidamente hacia atr&s en direcci6n donde se encuentra el usuario. Cualquiera de estos dos acontecimientos
puede causar que el usuario pierda el
control de la sierra Io que podria resultar
en lesiones de alta gravedad o hasta la
muerte. NO DEPENDA CIEGAMENTE EN
CUALQUIERA DE LOS DISPOSlTIVOS INCLUIDOS EN SU CUIDADOSAMENTE
PARA EViTAR I_ASRECULADAS. Las barras guia reducidoras de reculadas y las
cadenas de sierra de baja acci6n de reculadas reducen la ocasi6n y magnitud
de las reculadas y son recomendadas.
Con su sierra vienen incluidas una cadena de baja acci6n de reculadas y una
barra de equipo original. Reparaciones
al freno de cadena deben ser hechos
por un Centro de Servicio Sears que
este autorizado. Ueve la unidad al sitio
de compra a el Centro de Servicio
Sears mas cercano.
• El contacto con la punta de la sierra
puede causar una REACCION contraria
que a una velocidad vertiginosa expulsa la espada hacia arriba y hacia
atr_.s, en direcci6n al operador.
33
fiscalizar
atentamente
suestado
• Silacadena
queda
atrapada
porla deben
parte
superior
delaespada,
esta
fisico
yelestado
delaparato.
DECADENA:
Para
con-forpuede
rebotar
bruscamente
hacia
el FRENO
operador.
marse
conlasRegulaciones
Feder• Cualquiera
deestas
dosreacciones alesdelOSHA
paraeltumbado
comde_.rboles,
unfreno
decadena
puede
provocar
lap@dida
delcon- ercial
troldelamotosierra
ycausar
una
serequiere
ynoser&
quitado
niser&
deotramanera.
grave
lesi6n.
Noconfie
exclusiva- lisiado
ANTICHISPA:
Susierra
mente
enlosdispositivos
deseguri- REJILLA
dadqueincorpora
susierra.
viene
equipada
consilenciador
limitador
Este
aparato
noestaequipado
conun detemperatura
yconrejilla
antichispa
sistema
deanti-vibraci6n
ysedisefia quecumple
losrequisitos
delos
siesusado
ocasionalmente.
C6digos
deCalifornia
4442
y 4443.
AVlSO
SEGURIDAD:
Elestar
expuestoTodas
lastierras
forestadas
federales,
alasvibraciones
traves
delusoprolon- m&slosestados
deCalifornia,
Idaho,
gadodeherramientas
defuerza
agaso- Maine,
Minnesota,
Nueva
Jersey,
linapuede
causar
dafios
alosvasos Washington
yOreg6n,
requieren
porley
sanguineos
oalosnervios
delosdequemuchos
motores
decombusti6n
dos,lasmanos
ylascoyunturas
en
interna
esten
equipados
conrejilla
aquellas
personas
quetienen
propensi- antichispa.
Siusted
usaunasierra
de
dadalostrastornos
delacirculaci6n
o
enunestado
yotraIocalidad
alashinchazonees
anormales.
Eluso cadena
donde
existen
tales
reglamentos,
usted
prolongado
entiempo
friohasidoaso- tiene
l
aresponsabilidad
juridica
de
ciado
condafios
a losvasos
sanestas piezas en correcto
guineos
depersonas
queporotraparte mantener
estado de funcionameinto. De Io
seencuentran
enperfecto
estado
de
estar& en infracci6n de la ley.
salud.
Siocurren
sintomas
tales
como contrario,
Refiera a la carta de RESPONSABILIelentumecimiento,
eldolor,
lafaltade
DEL USUARIO en la secci6n del
fuerza,
lascambios
enelcolor
olatex- DADES
MANTENIMIENTO.
turadelapielofaltadesentido
enlos
Este sierra de cadena
dedos,
lasmanos
olascoyunturas, PADRONES:
en la lista de Underwriters Labpare
desuarestam&quina
immediata-consta
Inc. de acuerdo a los Requimente
yprocure
atensi6n
medica.
Los oratories,
Nacionales de Seguridad Estasisternas
deanti-vibraci6n
nogaranti- sitos
zanqueseeviten
tales
problemas.
Los dounidenses para Sierras de Cadena
usuarios
quehacen
usocontinuo
ypro- a Gasolina (ANSI B175.1-2000).
Iongando
delasherramientas
defuerza
_ADVERTENCIA:
Antes de usar
la sierra de cadena, asegure todos los
fijadores se encuentren bien ajustados.
CONTENIDO DE LA CAJA
Use la siguiente lista para verificar el
contenido:
Modelo 358,341950
• Sierra de cadena (completamente armada)
• Herramienta de Ajuste de la Cadena
(Herramienta de la Barra)
• Aceite de motor de 2-ciclos
• Estuche transportador
• Barra adicional de 14 pulgadas
• Cadena adicional de 14 pulgadas
Verifique las piezas en caso de averia.
No use piezas que se encuentren
dafiadas.
Si necesita ayuda, faltan piezas o encuentra piezas dafiadas, favor Ilamar
al 1-800-235-5878.
AVlSO: Es normal oir el golpeteo del
filtro de combustible en el tanque
vacion.
Su aparato ha sido puesto a prueba en
la f&brica y se le ha ajustado con precisi6n el carburador. Como resultado, es
posible que se sienta un olor a gasolina
o gue se encuentre una gota de residuo
de aceite o combustible en el silenciador
al desempacar el aparato.
MONTAJE
El aparato viene completamente
armado y no hay necesidad de montaje.
34
CONOZCA EL APARATO
LEA ESTE MANUAL DEL USUARIO Y I_AS REGLAS DE SEGURIDAD ANTES DE USAR
LA SIERRA DE CADENA. Compare las ilustraciones con su aparato para familiarizarse con la ubicaci6n de los varios controles y ajutes. Guarde este manual para
uso futuro.
Herramienta de
Ajuste de la Cadena
(Herramienta de la Barra)
Protector
de Mano
Delantera _
j
Manija Delantera
Cuerda de Arranque
Interruptor
O N/STO P
_
Cadena
Palanca del
cebador/
marcha
lenta
r&pida
Silenciador
CRAFTSMAN°
/'
Orificio del
Engranaje
Tapa del Tanque de_
Lubricante de Barra
I
J
Caja del Arranque
Tapa del Cilindro
"
Bombeador
Tapa del Tanque de Combustible
Freno de
/
Cadena
Traba del
Acelerador
Manija
Trasera
Ouchillas
Marcador
!;
t_'_
/
Direcci6n de
%1Rotaci6n de
.
Tornillo de
Ajuste
Es abones
de profundidad
de
Funcionamiento
'X
CRIIFTSMA I °
Gatillo
Acelerador
Cubierta del
Embrague
Captador
de Cadena
Tuercas de
la Barra
INTERRUPTOR ON/STOP
El INTERRUPTOR ON/STOP esta. acostumbrado a detener la m&quina.
GATILLO DE ACELERADOR
El GATILLO DE ACELERADOR controla
velocidad de m&quina.
TRABA DEL ACELERADOR
Es necesario apretar primero la TRABA
DEL ACELERADOR para poder accionar
el acelerador. Este dispositivo previene el acionamiento accidental del
acelerador.
PALANCA DEL CEBADOR/
MARCHA LENTA RAPIDA
El cebador y la marcha lenta rapida son
fijadas tirando la PALANCA DEL CEBADOR/MARCHA LENTA RAPIDA completamente para arrancar el aparato en frio o
despues reaprovisionado de combustible. La palanca del cebador provee
combustible adicional al motor al arrancar fifo.
Barra Guia
BOMBEADOR
El BOMBEADOR circula combustible al
carburador.
FRENO DE CADENA
El FRENO DE CADENA est& diseSado
para detener la cadena en caso de reculada. El freno de cadena se activa
autom&ticamente
en caso de reculadas. El freno de cadena se activa
manualmente
si empujan al protector
de mano delantero adelante. Para desactivar el freno de cadena, tire Io m&s
posible del protector de mano delantero hacia la manija delantera.
TENSION DE LA CADENA
Es normal que las cadenas nuevas se
estiren durante los primeros 15 minutos
de uso. Deber& verificarse la tensi6n de
la cadena cada vez que haga arrancar
la sierra de cadena. Vea TENSION DE LA
CADENA en la secci6n de MANTENIMIENTO.
35
_ADVERTENCIA:
Silasierra
se
usaconlacadena
floja,estapodria
saltar
delabarra
guiayproducir
lesiones
graves
aloperador
y/odafios
a
lacadena,
inutiliz&ndola.
ANTES
DEPONER
ELMOTOR
EN
MARCHA
,_ADVERTENClA:
El silenciador
es extremadamente caliente durante el
uso y despues de usar el aparato. No
toque el silenciador ni permita que el
material combustible tal como gasolina o
hierba seca hagan contacto.
_,ADVERTENClA"
Lea toda la in-
formaci6n sobre el manejo del combustible en la secci6n de reglas de seguridad de este manual antes de
empezar. Si no comprende la informaci6n sobre el manejo del combustible,
no intente abastecer su aparato. Procure ayuda de alguien que comprenda
la informaci6n o Ilame al telefono de
ayuda al consumidor al
1-800-235-5878.
ACEITE PARA BARRA Y LA CADENA
La barra y la cadena requieren lubricaci6n. El libricador de la cadena provee
lubricaci6n continua a la cadena y a la
barra guia No se olvide de Ilenar el tanque de aceite para barra siempre que
Ilene el tanque de combustible (Capacidad = 6,8 fl. oz.). La falta de aceite arruinar& la barra y la cadena r&pidamente.
El uso de demasiado poco aceite causar& exceso de calentamiento que ser&
detectable por el humo proveniente de
la cadena y/o por la descoloraci6n de la
barra. Para obtener la maxima prolongaci6n de la vida de la bara y la cadena,
recomendamos que use el aceite para
barras de sierra de cadena Craftsman.
Si el aceite Craftsman no est& dispondible, puede usarse un aceite SAE 30 de
buena calidad hasta obtener el aceite
marcha Craftsman. La cantidad de lubricaci6n es medida autom&ticamente
durante el funcionamiento de la sierra.
La sierra usar& m&s o menos un tanque
de aceite para la barra por cada tanque
de combustible. Siempre Ilene el tanque
de aceite de la barra cuando Ilene el
tanque de combustible.
ABASTEClMIENTO
DEL MOTOR
,_ADVERTENClA:
Remueva
la
tapa del tanque de combustible
lentamente al reabastecer
combustible.
IMPORTANTE:
Este equipo est,.
disefiado para operar con gasolina sin
plomo con un minimo de octano 87
(metodo R+M/2), con etanol mezclado
hasta un 10% mAximo por volumen
(E-10). Antes de la operaci6n, la
gasolina se debe mezclar con un
aceite para motor enfriado por aire de
2 ciclos sinteticos de buena calidad
disefiado para mezclarse a una
proporci6n de 40:1. Se recomienda el
aceite sintetico de la marca Craftsman.
Mezcle la gasolina y el aceite a una
proporci6n de 40:1. Se obtiene una
proporci6n de 40:1 al mezclar 3.2
onzas liquidas (95 ml) de aceite con
1 gal6n (4 litros) de gasolina sin
plomo. NO USE aceite automotriz ni
aceite maritimo. Estos aceites
causar&n dafios al motor. AI mezclar
combustible, siga las instrucciones
impresas en el recipiente. Una vez
que el aceite se agregue a la gasolina,
agite el recipiente moment&neamente
para asegurar que el combustible se
mezcle bien. Siempre lea y siga las
reglas de seguridad relacionadas con
el combustible antes de Ilenar su
unidad con combustible. Compre
combustible en cantidades que se
puedan usar en 30 dias para asegurar
la frescura del combustible.
PRECAUClON:
Nunca use gasolina
sola en su unidad. Esto causar& un
dafio permanente en el motor y
anular& la garantia limitada. No use
combustibles
alternativos
como
mezclas de etanol por arriba del 10%
por volumen (E-15, E-85)o cualquier
combustible mezclado con metanol.
El uso de estos combustibles puede
causar un mayor desempefio del
motor y problemas de durabilidad.
FRENO DE CADENA
AsegOrese el freno de cadena se disactiva tirando el protector de mano delantero hacia atr&s, acerc&ndolo a la
manija delantera todo Io que sea posible. Es necesario desactivar el freno
de cadena para cortar con la sierra.
_,ADVERTENClA:
La cadena no
debe moverse cuando el motor se encuentre en marcha inactiva. Si la cadena se mueve en marcha inactiva, vea la
secci6n de AJUSTE AL CARBURADOR en
este manual. Evite contacto con el silenciador. Un silenciador caliente podria
causar quemaduras muy graves.
36
PARA PARAR EL MOTOR
• Suelte el gatillo acelerador.
• Mueva el interruptor ON/OFF a la posici6n OFF.
INTERRUPTOR
ON
STOP
POSlClON DE ARRANQUE
• Para poner en marcha el motor, sujete
la sierra firmamente en el suelo como
se ilustra. AsegQrese de que la cadena pueda moverse libremente sin tocar ningQn objeto.
Mango de la cuerda de arranque
La mane
izquierda en
la mango
delantera
El pie derecho en el interior de la
mango trasera.
,_ADVERTENOIA:
No intente
hacer arrancar la sierra de cadena
arroj&ndola o dej&ndola caer. Esto
pondr& al operador en riesgo de sufrir
lesiones graves debidas a la p@dida
de control de la sierra de cadena.
PUNTOS IMPORTANTES
PARA
RECORDAR
AI tirar de la cuerda de arranque, no use
la extensi6n completa de la cuerda ya
que esto puede causar que la cuerda
se parta. No permita que la cuerda de
arranque regrese a su lugar bruscamente. Sujete el mango y permita que la
cuerda rebobine lentamente.
Para arranques bajo condiciones de clima frio, ponga en marcha el motor con
el cebador en la posici6n FULL CHOKE;
permita que el motor caliente antes de
apretar el gatillo acelerador.
AVISO: No intente a cortar ningQn tipo
de material si la palanca del cebador/
marcha lenta rapida se encuentran en
la posici6n FULL CHOKE.
PARA ARRANCAR EL MOTOR FRIO
(o motor caliente despues
de quedar sin combustible)
AVISO: En los pasos siguientes, cuando la palanca del cebador/marcha
lenta
rapida se activa en su m&xima extensi6n, autom&ticamente fijar& la aceleraci6n para la puesta en marcha.
1.
Mueva el interruptor ON/STOP a la
posici6n ON.
2. Tire de la palanca del cebador/
marcha lenta rapida su m&xima extensi6n (a la posici6n FULL
CHOKE).
3. Lentamente, oprima el bombeador 6
veces.
4. Este aparato cuenta con un sistema de arranque Sim-puF M. No
tiene que tirar brusca ni en@gicamente del mango de la cuerda de
arranque. Usando su mano derecha, tire del mango de la cuerda de
arranque 5 veces con un movimiento controlado y constante; luggo, proceda al siguiente paso.
AVlSO: Si el motor parece que este
intentando arrancar antes del quinto
tir6n, pare de tirar y proceda inmediatamente al siguiente paso.
5. Empuje la palanca del cebador/
marcha lenta rapida a la posici6n
HALF CHOKE.
PALANCA DEL CEBADORi
MARCHA LENTA RAPIDA
OFF
/
HALF
/
FULL
/
6.
Tire del mango de la cuerda de arranque con su mano derecha hasta
que el motor se ponga en marcha.
7. Permita que el motor contint3e en
marcha por approximadamente 30
segundos. Luego, apriete y suelte el
gatillo acelerador para permitir que
el motor regrese a marcha lent&
PARA ARRANCAR
CON EL
MOTOR CALIENTE
1. Mueva el interruptor ON/STOP a la
posici6n ON.
37
• El freno de cadena inercia-activado
2. Tiredelapalanca
delcebador/
marcha
lenta
r&pida
sumaxima
se activa si el protector delantero de
extension
(alaposici6n
FULL
mano es empujado hacia adelante ya
CHOKE)
para
fijarlamarcha
lenta
sea manualmente (a mano) o aur&pida;
luego,
regrese
lapalanca
del tom&ticamente (por el movimiento recebador/marcha
lenta
r&pida
ala
pentino).
posici6n
HALF
CHOKE).
• Si el freno ya est,. activado, se Io de3. Lentamente,
oprima
elbombeador sactiva tirando el protector de mano
6veces.
delantero hacia &no&, acerc&ndolo a
4. Usando
sumano
derecha,
tiredel
la manija delantera todo Io que sea
mango
delacuerda
dearranque posible.
• Para cortar con la sierra, es necesario
conunmovimiento
controlado
y
desactivar el freno de cadena.
constante
hasta
queelmotor
se
Desactivado
ponga
enmarcha.
Activado
5. Apriete
ysuelte
elgatillo
aceleradorparaparapermitir
queelmotor
regrese
amarcha
lenta.
ARRANQUE
DIFICIL (o arranque de
motor ahogado)
El motor puede encontrarse ahogado
con demasiado combustible si no se ha
puesto en marcha despues de110 tir6n.
Un motor que se encuentre ahogado
puede ser aclarado del exceso de combustible empujando la palanca del cebador/marcha lenta rapida en totalmente (a
la posici6n OFF CHOKE) y luego siguiendo el procedimiento de puesta en marcha para motores calientes que se has
indicado anteriormente. Asegt3rese de
que el interruptor ON/STOP se encuentre
en la posici6n ON. Que el motor se
ponga en marcha puede requerir que
se tire de la cuerda de arranque muchas veces, dependiendo
cu&n ahogado se encuentre el motor.
Si el motor no arranca, refierase a la
TABLA DIAGNOSTICA o Ilame al
1-800-235-5878.
FRENO DE CADENA
Control del freno
PRECAUCION:
El freno de cadena
debe ser inspeccionado varias veces al
dia. AI hacer esta inspecci6n, el motor
siempre debe estar prendido. Esta es la
Onica ocasi6n cuando la sierra se debe
colocar en la suelo con el motor aun
prendido.
Coloque la sierra en suelo firme. Sostenga la manija trasera con la mano
derecha y la manija delantera con la
mano izquierda. Aplique a la velocidad maxima presionando el gatillo del
acelerador. Active el freno de cadena
dando vuelta a su muSeca izquierda
contra el protector de mano delantera
sin soltar la manija delantera. La cadena debe parar inmediatamente.
Control del funcionamiento
activado pot inercia
_ILADVERTENCIA:
_L, ADVERTENClA:
La banda del
freno podr_, romperse al activar el freno
si esta se encuentra demasiado usada
y flna. Si la banda del freno se encuentra rota, el freno de cadena no detendr&
la cadena. El freno de cadena debe ser
substituido si cualquier parte se desgasta menos de 0,5 mm (0,020 de pulgada) densamente. Reparaciones al freno
de cadena deben ser hechos por un
Centro de Servicio Sears que este autorizado. Ueve la unidad al sitio de compra a el Centro de Servicio Sears mas
cercano.
• Esta sierra viene equipada con un freno de cadena diseSada para detener
la cadena en el caso de reculada.
Cuando
Ileve a
cabo el procedimiento
siguiente, el
motor deber& estar apagado.
Sostenga la manija trasera con la mano
derecha y la manija delantera con la
mano izquierda. Sujete la sierra unos
35 cm (14 pulgadas) por encima de un
toc6n u otro superfice de madera. Libere
la empuSadura del mango delantero y
que la punta de la barra guia caiga hacia adelanta y pueda entrar en contacto
con el tocon. Cuando la punta de la barra golpee el tocon, el freno debe activarse.
SUGERENCIAS
PARA EL USO
CORRECTO DEL APARATO
• Verifique la tensi6n de la cadena
antes del primer uso, despues de un
38
minuto de funcionamiento y cada vez
que haga arrancar la sierra de cadena. Vea TENStON DE LA CADENA en la
secci6n de MANTENIMIENTO.
• Corte madera Qnicamente. No corte
metal, pl&stico, ladrillos, cemento,
otros materiales de construcci6n que
no sean de madera, etc.
• Pare la sierra si la cadena toca cualquier objeto ajeno. Inspeccione la sierra y repare o instale repuestos segQn
la necesidad. Si la cadena salta y se
sale de la barra guia, inspeccione la
cadena en busca de eslabones de
funcionamiento daSados antes de
instalarla nuevamente. Las rebabas
en los eslabones de funcionamiento,
que puedan impedirles entrar en la
muesca de la barra guia, se pueden
eliminar con una lima plana.
• Mantenga la cadena fuera de la arena y la tierra. La menor cantidad de
tierra desafila r&pidamente las cadenas, asi incrementa la posibilidad de
reculadas y har& necesario volver a
afilar o sustituir la cadena.
• Corte varios troncos pequehos como
pr&ctica, usando la siguiente tecnica,
para acostumbrarse
al manejo de la
sierra, antes de empezar un proyecto de grandes dimensiones.
• Acelere el motor a fondo antes de
empezar a cortar apretando el gatillo acelerador.
• Empiece el corte con el bastidor de
la sierra apoyada contra el tronco.
• Mantenga el motor con acelerador
a fondo constantemente
mientras
corta.
• Deje que la sierra haga todo el trabajo de cortar; no use m&s que una
muy ligera presi6n hacia abajo.
• Suelte el gatillo acelerador inmediatamente al terminar de cortar, dejando que el motor funcione a marcha lenta. Si mantiene la sierra en
marcha con acelerador a fondo sin
estar cortando, puede causar desgaste innecesario. Para maximizar
la eficacia operativa, no haga
funcionar el motor durante mas
de 30 segundos
en el momento
a la veloeidad m_xima,
• Para no perder el control cuando
se haya completado el corte, no le
ponga presi6n a la sierra al final
del corte.
• Pare el motor antes de apoyer la sierra al finalizar un corte.
TECNICAS
PARA TUMBAR ARBOLES
,_ILADVERTENCIA:
Yea que no
haya ramas rotas o muertas que
podrian caerle encima mientras corta,
causando heridas graves. No corte
cerca de edificios ni cables electricos
si no sabe la direcci6n de tumbado del
&rbol, ni de noche ya que no podr& ver
bien, ni durante mal tiempo como Iluvia, nieve, o vientos fuertes, etc. Si el
&rbol hace contacto con algt3n cable
de linea de servicio pt3blico, la compaSa de servicio pt3blico deber& ser
notificada de inmediato.
• Planifique la operaci6n de corte cuidadosamente por adelantado.
• Despeje al &rea de trabajo. Ud. precisa un &rea despejada en todo el contorno de &rbol donde pueda pisar con
firmeza entodo momento.
• El usuario de la sierra de cadena deber& permanecer del lado cuesta arriba
del terreno ya que es probable que el
&rbol rodillo o se deslice cuesta abajo
despues de caer.
• Estudie las condiciones naturales que
puedan causar que el &rbol caiga en
una direcci6n determinada.
Entre las condiciones naturales que
pueden causar que el _.rbol caiga en
una direcci6n determinada, se encuentran:
• La direcci6n y la velocidad del viento.
• El &ngulo de inclinaci6n del &rbol. El
&ngulo de los _.rboles a veces no se
nota debido al declive del terreno o a
terreno desparejo. Use plana o cordel
de sonda para determinar I direcci6n
de la inclinaci6n del &rbol.
• El &rbol es m&s pesado o tieno mucho
m&s ramas de un lado.
• Arboles y obst&culos en derredor.
Verifique si hay porciones descompuestas o podridas. Si el tronco est&
podrido, puede partirse repentinamente
sin aviso y caer sobre el usuario.
Asegt3rese de que haya suficiente espacio para la caida del &rbol. Mantenga una distancia equivalente a dos
veces y medio del larbo del &rbol que
est& cortando entre el &rbol y la persona m&s cercana u otros objetos. El ruido del motor puede impedir que se escuchen las advertencias gritadas.
Retire la tierra, las piedras, la corteza
suelta, los clavos, las grampas y el
alambre que pueda haber en el &rbol
en el lugar del corte.
39
Planifique una ruta predeterminada
tumbado y la muesca para formar una
bisagra. Esta bisagra ayudar_, a evitar
que el &rbol ciaga en la direcci6n equivocada.
y despejada
de retroceso
troceso
t....
(}-'_-
La bisagra sostiene el arbol en el
tocon y ayuda a controlar la calda
Retroceso
Abertura del
corte de
tumbada
etroceso
PARA TUMBAR ARBOLES
GRANDES (condi&metro de 35 cm
(6 pulgadas) o mas)
Se usa el metodo de corte de muesca
para los &rboles grandes. La muesca
es un corte en el lado del &rbol hacia
el cual se desea que caiga. Despues
de hacer el corte de tumbado del lado
opuesto, el &rbol tendr& la tendencia
de caer hacia el lado en que se ha hecho el corte de muesca.
AVlSO: Si el &rbol tiene raices de
apoyo grandes, retirelas antes de hacer el corte de muesca. Si us6 la sierra
para quitar raices grandes de apoyo,
prevenir la cadena de entrar en contacto con la tierra esto le previene de
perder del filo.
CORTE DE MUESCA Y TUMBADO
DEL ARBOL
• Haga el corte de muesca cortando
primero la base de la muesca. Haga
que el corte atraviese un tercio del ancho del tronco. Luego complete el
corte de muesca cortando en _.ngulo
como se muestra en la ilustraci6n
"Metodo muesca", abajo. Una vez
completo el corte de muesca, retire la
cuSa de madera del &rbol.
Corte final (corte de tumbada)
aqui, a 5 cm (2 pulgadas) arriba
del centro de la muesca.
I/
",,,, -.! .÷ i /
u sca--• Despues de retirada la cutSa de madera del muesca, del lado opuesto al
corte de muesca haga el corte de
tumbado. El corte de tumbado debe
quedar a 5 cm (2 pulgadas) m&s arriba que la base del corte de muesca.
Este procedimiento dejar& suficiente
madera sin cortar entre el corte de
Cierre de
la muesoa
AVISO: Antes de completar el
tumbado, use cuSas para abrir el
corte, cuando sea necesario, para
controlar la direcci6n de la caida. Use
cuSas de madera o de pl&stico, pero
nunca de acero o de hierro, para evitar
que la sierra recule y para evitar daSos
a la cadena.
• Este alerta a los indicios de que el
&rbol est& por caer: los crujidos, el
ensanchamiento
del corte de rumbado y los movimientos de las ramas
superiores.
• En el instante en que el &rbol comienza a caer, pare la sierra, ap6yela en el
suelo y retroceda r&pidamente, por la
trayectoria de retroceso prevista.
• Para evitar heridas, NO corte un &rbol
parcialmente caido con la sierra. Tome
extremo cuidado con los &rboles parcialmente tumbados que tienen apoyo
precario. Cuando el arbol no cae totalmente, ponga la sierra de lado y use
un montacargas a cable, un aparejo
de poleas o un tractor para bajarlo.
CORTANDO UN ARBOL TUMBADO
(SECClONAMIENTO)
El termino seccionamiento
significa
cortar un &rbol tumbado en secciones
del largo deseado.
_ADVERTENClA:
No se pare
sobre el tronco que est& siendo cortado. Cualquier parte del tronco puede
rodar haciendo que el usuario pierda
el equilibrio y el control. No se posiclone cuesta abajo del tronco que est&
siendo cortado.
PUNTOS IMPORTANTES
• Corte t3nicamente un tronco a la vez.
• Corte con sumo cuidado la madera
astillada. La sierra puede arrojar pedazos punteagudos y filosos hacia el
usuario.
40
• Useuncaballete
para
cortar
troncos Haga siempre el primer corte del lado
pequeSos.
Nunca
permita
aotraper- del tronco que est& bajo compresi6n.
sona
quesostenga
eltronco
mientras El lado de compresi6n del tronco es
ud.corta
nisostenga
eltronco
conla donde la presi6n del peso del tronco
pierna
oelpie.
se concentra.
• Nocorte
enlugares
donde
haya
tron- Primer corte del lado del tronco
cos,ramas
yraices
entrelazadas bajo compresi6n ,%,
como
puede
acontecer
despues
de
unvendaval.
Arrastre
lostroncos
hastaunlugar
despejado
antes
decortarlos,empezando
porlostroncos
expuenstos
yyaretirados.
Segundo corte
TIPOS
DECORTE
QUE
SEUSAN
PARA
ELSEOOIONAMIENTO
Segundo corte
_/LADVERTENClA:
Si la sierra queda apretada o atascada dentro del tronco, no intente sacarla a la fuerza.
Puede perder el control de la sierra,
causando heridas o daSos al aparato.
Pare la sierra, martille una cuSa de
pl&stico o de madera en el corte hasta
que la sierra salga f&cilmente. Ponga la
sierra de nuevo en marcha y col6quela
cuidadosamente de nuevo en el corte.
No intente poner en marcha la sierra de
nuevo cuando est& apretada o atascada
en un tronco.
Use una cuba para sacar la sierra
atasca
Apague la sierra y use una cuba de
madera o de pl&stico para abrir el tajo.
Corte Deseendiente:
empieza desde
el lado superior del tronco con la parte
de abajo de la sierra contra el tronco;
haga una leve presi6n hacia abajo.
Corte descendiente
Primer corte de lado del tronco
bajo compresi6n
SECClONAMIENTO
SIN APOYO
• Haga el corte descendiente de un tercio del di&metro.
• Haga rodar el tronco y termine con
otro corte descendiente.
• Tenga cuidado con los troncos presionados de un lado. Vea la ilustraciones
anterior para seccionar un tronco
presionado.
SECClONAMIENTO
USANDO TRONCO O CABALLETE
DE APOYO
• Recuerde que el primer corte siempre
es de lado del tronco bajo compresi6n. (Vea en la ilustraciones que sigue
el primer corte y el segundo corte.)
• El primer corte deber& extenderse por
1/3 del di&metro del tronco.
• Termine por el segundo corte.
Use de tronco come
apoyo
2do corte
Corte Ascendiente:
empieza desde
el lado inferior del tronco con la parte
de arriba de la sierra contra el tronco;
haga una leve fuerza hacia arriba. Sujete la sierra firmemente para mantener el control. La sierra tendr& la tendencia de empujar al usuario hacia
atr&s.
,_ADVERTENClA:
Nunca
_
invierta
la sierra para hacer cortes ascendientes. No se puede controlar la sierra de esa forma.
41
_,
......._
_
_.
-_..
Con caballete como apoyo
/
2do corte
_
corte
_(, 1er corte
PARA CORTAR
RAMAS Y PODAR
_ILADVERTENCIA:
Este alerta y
tenga cuidado con los reculada. Cuando cortar ramas y podar, nunca permita que la cadena en movimiento toque
ningQn objeto en la punta de la barra
guia. Permitir tal contacto puede causar graves heridas.
_L, ADVERTENCIA:
Nunce trepe a
los &rboles para cortar ramas o para
podar. No se pare sobre escaleras,
plataformas, troncos ni en ninguna posici6n que podria causarle que pierda
el equilibrio o el control de la sierra.
PUNTOS IMPORTANTES
• Trabaje lentamente, con las dos manos sujetando firmemente la sierra.
Mantenga el equilibrio, con los pies en
una superficie estable.
• Tome cuidado con las ramas chicas.
El material de poco di&metro puede
entredarse en la cadena, dando un
latigazo al usuario o haciendo que
pierda el equilibrio. Use extremo cuidado al cortar ramas pequeffas.
• Este alerta contra los rebotes. Tenga
cuidado al cortar ramas dobladas o
bajo presi6n para evitar ser golpeado por la rama o la sierra cuando se
suelte la tensi6n en las fibras de
madera.
• Despeje frecuentemente las rams
acumuladas para no le hagan tropezar.
PARA CORTAR RAMAS
• Siempre corte las ramas del &rbol
despues de que se Io haya tumbado.
Unicamente asi se puede cortar las
ramas de forma adecuada y segura.
• Deje las ramas m&s gruesas debajo
del &rbol tumbado para que apoyen el
&rbol mientras ud. trabaja.
• Empiece por la base del &rbol tumbado y vaya trabajando hacia el tope,
cortando las ramas. Corte las ramas
pequeffas de un solo corte.
• Mantenga el tronco del &rbol entre ud.
y la cadena tanto como fuere posible.
• Retire las ramas m&s grandes y las
ramas de apoyo con la tecnica de un
tercio y dos tercios descirta en la secci6n SECCIONAMIENTO SIN APOYO.
• Use siempre un corte descendiente
para cortar ramas pequeffas y ramas
que cuelgan libremente. Los cortes
ascendientes podrian hacer que las
ramas caigan y apreten la sierra.
PARA PODAR
,_ADVERTENCIA:
Pode tSnicamente last la altura del hombro. No
eorte las ramas que queden m&s altas
que los hombros. Consiga a un profesional para efectuar ese trabajo.
• Haga el primer corte en forma ascendiente de 1/3 del di&mentro de la
rama.
• Despues haga un segundo corte atravesando completamente la rama. Finalmente haga un tercer corte, descendiente, dejando un toco de 2,5 a 5
cm (1 a 2 pulgada) sobresaliendo del
tronco del &rbol.
mercer
Toco I
\t
42
LI-.v
RESPONSABILIDADES
ADVERTENClA:
mantenimiento,
DEL USUARIO
Desconecte la bujia antes de hacer cualquier
con la excepci6n de los ajustes al carburador.
Anote las fechas al completar
el servicio de rutina
Antes
;; de
Usar
/,I,
Verifique que no hay fijadorre
piezas sueltas
v"
la tensi6n
Verifique
el filo de la cadena
Inspeccione
5
i horas
c+_+i
i
25
horas
i
i
i Anuati mente
Fechas
de
Servicio
la barra guia
Inspeccione la barra y verifique
del aceite de la cadena
v"
/,I,
y limpie el aparato
Limpie el sistema
Inspeccione
i
de la cadena
Verifique el nivel de la mezcla del
combustible
Inspeccione
y las placas
i Cada
i
Verifiique que no haya piezas
daSadas/gastadas
Verifique
i Despu6s
;;
de
Usar
refrigerante
v"
v"
el freno de cadena
Limpie el ranura de la barra
Limpie el filtro de aire
Limpie e inspeccione
la rejilla antichispas e inspeccione
el silenciador.
Cambie la bujia y la filtro de
combustible
RECOMENDAClONES
GENERALES
La garantia de este aparato no cubre
los articulos que han sido sometidos al
abuso o a la negligencia de parte del
usuario. Para poder recibir el valor total de la garantia, el usuario deber&
hacer el mantenimiento
tal como se
indica en este manual. Har& falta
hacer varios ajustes peri6dicos para
mantener el aparato adecuadamente.
• Una vez por aSo, cambie la bujia y el
elemento del filtro de aire e inspeccione la barra guia y la cadena para
ver que no esten gastadas. El reemplazo de la bujia y del elemento del
filtro de aire asegura una mezcla correcta de aire y combustible y ayuda
a que el motor marche mejor y que
dure m&s.
VERIFIQUE QUE NO HAYA
PIEZAS DANADAS O GASTADAS
Entre en contacto con el Centro de
Servicio Sears para el reemplazo de
piezas daSadas o desgastadas.
AVISO: Es normal que aparezca una
pequeSa cantidad de aceite debajo de
la sierra despues de parar el motor. No
confunda esto con perdidas del tanque de aceite.
• Interruptor ON/STOP-AsegOrese que el
interruptor este funcionando correctamente coloc&ndolo en la posici6n
STOP.AsegOrese de que el motor se
haya detenido por completo, luego
ponga el motor en marcha nuevamente y contint3e.
• Tanque de Combustible-No
use sierra
si hay seSales de daSos o fugas del
tanque de combustible.
• Tanque de Aceite-No use sierra si el
tanque de aceite da seSales de daSo
o fugas.
43
VERIFIQUE
QUE NO
HAYA FIJADORES O PIEZAS SUELTAS
• Tuercas de la barra
• Cadena
• Silenciador
• Protector del Cilindro
• Filtro de Aire
• Tornillos de las Manijas
• Fijadores Anti-Vibraci6n
• Caja del Arranque
• Protector de Mano Delantera
VERIFIQUE LA TENSION DE LA
CADENA
_I, ADVERTENCIA:
Use guantes
protectores al manejar la cadena. La
cadena tiene filo y podria causarle
graves cortaduras, aun cuando esta
no se encuentre en movimiento.
La tensi6n de la cadena es muy importante. Estiramientos de la cadena durante uso. Esto es especialmente
verdad durante los tiempos primeros que
usted utiliza la sierra. Controle siempre
la tensi6n de la cadena antes de cada
arranque de la sierra de cadena.
1. Use un destornillador
para mover
la cadena alrededor de la barra
guia para asegurarse de que la cadena no se haya enroscado. La
cadena deber& moverse libremente.
Tuercas de Tornillo de de Ajuste de
la barra
Ajuste
la Cadena
(Herramienta
de la Barra)
2,
3,
Afloje las tuercas de la barra hasta
que esten tan ajustadas contra la
cubierta del embrague con los dedos t3nicamente.
Gire el tornillo de ajuste a la derecha (en el sentido del reloj) hasta
entra en contacto con s61idamente
el fondo del riel de la barra guia.
5,
barra guia para asegurarse de que
todos los eslabones se encuentren
dentro de las ranura de la barra.
Levante la punta de la barra guia
para asegurarse que ninguna parte
de la cadena se encuentre floja o
cuelgue. Suelte la punta de la barra, entonces gire el tornillo de
ajuste 1/4de vuelta a la derecha (en
el sentido del reloj) hasta que la
cadena quede tirante.
Tornillo de ajuste - ¼ de vuelta
6,
Manteniendo
la punta de la barra
levantada, ajuste firmemente las
tuercas de la barra con la herramienta de ajuste de la barra.
Tuercas de
la barra
7.
Use la punta en forma de destornillador de la herramienta de la barra
para hacer rotar la cadena por la
barra.
8. Si no puede hacer rotar la cadena,
est& demasiado ajustada. Afloje
levemente las tuercas de la barra y
afloje cadena dar vuelta el tornillo
de ajuste hacia la izquierda (en
contra del sentido del reloj). Vuelva
a ajustar las tuercas de la barra.
g. Si la cadena se encuentra demasiado floja, colgar& por debajo de
la barra guia. NO USE la sierra si la
cadena se encuentra floja.
AVlSO: La tensi6n de la cadena es
correcta cuando el peso de la cadena
no causa una comba por debajo de la
barra guia (con la sierra de cadena
apoyada en posici6n vertical), pero la
cadena se mueve igualmente con libertad alrededor de la barra guia.
_L, ADVERTENCIA:
Tornillo de
4.
Usando la herramienta de la barra,
haga girar la cadena alrededor de la
Si la sierra se
funciona con un cadena flojo, la cadena podria saltar de la barra y resultado
en accidentes muy graves y/o dafios a
la cadena, inutiliz&ndola. Si la cadena
salta fuera de la barra guia, inspeccione cada eslab6n de funcionamiento
en busca de dafios. La cadena debe
repararse o sustituirse si est& dafiada.
44
VERIFIQUE
SlLACADENA
ESTA Cambie la barra si la ranura est,. gastaAFILADA
da, si la barra est,. torcida o resquebraLascadenas
afiladas
producen
trocitos jada o si hay calentamiento excesivo o
demadera.
Lascadenas
desafiladas formaci6n de protuberancias en los
producen
polvo
deaserrin
ycortan
len- rieles. Si es necesario cambiar la barra,
tamente.
VeaAFILACION
DELACADENA.
use exclusivamente la barra guia especificada para su sierra en la lista de reINSPECClONE
LABARRA
puestos, especificada tambien en la calCondiciones
querequieren
quese
comania de repuesto de barra y
haga
mantenimiento
alabarra:
cadena que se encuentra en la sierra.
• Lasierra
corta
paraunladooen
VERIFIQUE EL NIVEL DE LA MEZ&ngulo.
DEL COMBUSTIBLE
• Hayqueforzarla
para
queatraviese
el CLA
• Vea ABASTECIMIENTO DEL MOTOR en
corte.
la secci6n USO.
• Cantidad
inadecuada
delubricante
en
LUBRICAClON
labarra
ylacadena.
Verifique
lacondici6n
delabarra
cada
vezquehaga
afilar
lacadena.
LasbarTapa del Tanque de
rasgastadas
daSan
lacadena
yroman
Aceite de la Barra
dificil
eltrabajo
decortar.
Despues
deusar,
asegQrese
elinterruptorON/STOP
est,.enposici6n
STOP,
luegolimpie
todoelaserrin
ycualquier
otto
escombro
delaranura
delabarra
ydel
orificio
delengranaje.
• Vea ACEITE PARA BARRA Y LA CADEPara
mantener
labarra
guia:
• Coloque
elinterruptor
ON/STOP
enpo- NA en la secci6n USO.
sici6n
STOR
INSPEOClONE
Y LIMPIE EL APARA• Afloje
yremueva
porcompleto
laperil- TO Y LAS PLACAS
• Despues de que cada uso, inspecladelabarra;
paraellolevante
la
palanca
ygirela
hacia
laizquierda. clone la aparato completa para saber
si hay piezas flojas o daSadas. Limpie
• Afloje
latensi6n
delacadena;
para
ellogirelarueda
deajuste
(hacia
el aparato y las placas usando un trapo ht3medo con detergente suave.
arriba).
Remueva
lacubierta
del
• Seque el aparato con un trapo limpio
embrague.
• Remueva
labarra
y lacadena
del
y seco.
SISTEMA REFRIGERANTE
aparato.
• Limpie
losorificios
delaceite
yelranu- Para Iograr una temperatura de funcioradelabarra
despues
decada
5ho- namiento Io m&s baja posible, la m&quirasdelaoperaci6n.
na incorpora un sistema refrigerante.
El sistema refrigerante est& compuesto
Retire
elAserrin
dela _t
por:
Ranura
dela_a_
.-
• Los rieles de la barra desarrollan protuberancias al gastarse. S&quelas con
una lima plan&
• Si la superficie superior del riel est&
desnivelada, use una lima plana para
restaurar la forma cuadrada.
_]-_'_
Ranura
Bordes del Riels
....... con
Encuadre
los _
una Lima
correcta
_]_
Ranura gastada
• Toma de aire en el mecanismo de arranque
• Deflector de aire
• Palas de ventilador en el volante
• Aletas de enfriamiento en el cilindro
• Cubierta del cilindro (dirige el aire refrigerante hacia el cilindro)
Limpie el sistema refrigerante con un
cepillo despues de cada uso (en condiciones dificiles, con mayor frecuencia). Un sistema refrigerante sucio u
obturado produce sobrecalentemiento
de la m&quina, con las consiguientes
averias del cilindro y el pist6n.
INSPEOOIONE
EL FRENO DE CADENA
• Vea FRENO DE CADENA en la secci6n
USO.
45
LIMPIE EL FILTRO DE AIRE
PRECAUClON:
No use gasolina ni
ningQn otro liquido inflamable para limpiar el filtro, para evitar incendios y emisiones nocivas.
Limpieza del filtro de aire:
El filtro de aire sucio disminuir_, la vida
Qtily el rendimiento del motor e incrementar& el consumo de combustible y la
producci6n de contaminantes. Limpie
siempre el filtro de aire despues de 10
tanques de combustible o 5 horas de
uso, el que acontezca primero. Limpielo
con m&s frecuencia en condiciones muy
polvorientas. Los filtros usados nunca
quedan totalmente limpios. Se aconseja
reemplazar al filtro de aire por uno nuevo despues du cada 50 horas de uso o
anualmente, Io que acontezca primero.
Para limpiar el filtro:
1. Afloje los 3 tornillos en la tapa del
cilindro.
2. Remueva la tapa del cilindro.
3. Remueva la cubierta del filtro de
aire y el filtro de aire.
4. Limpie el filtro de aire con agua
caliente y jab6n. Enjuague bien
con agua clara y fria. Sequelo al
aire totalmente antes de reinstalarIo.
5. Reinstale la cubierta del filtro de
6.
aire y el filtro de aire.
Reinstale la tapa del cilindro y los 3
tomillos. Apriete firmemente.
Cubierta
del Filtro
de Aire
Tapa del
Cilindro
INSPECClONE
EL SILENClADOR
LA REJILLA ANTICHISPAS
,_ADVERTENClA:
Y
El silenciador
en este producto contiene las substancias quimicas que el estado de California reconoce como causantes de
c&ncer.
A medida que se use el aparato, el silenciador y la rejilla antichispas se van
carbonizando.
Es necesario sacar la
carbonizaci6n
para evitar el riesgo de
incendio o afectar el rendimiento del
motor.
Cambie la rejilla antichispas si ocurren
las roturas.
Rejilla
Antichispas
i
Difusor del
silenciador
i
Tuerca
Silenciador
PARA LIMPIAR LA REJILLA
ANTICHISPAS
Se requiere la limpieza cada 25 horas
de uso o anualmente, el que accontezca primero.
1. Afloje y remueva la tuerca de la cubierta del difusor del silenciador.
2. Remueva la cubierta del difusor del
silenciador.
3. Remueva la rejilla antichispas. Remueva la rejilla cuidadosamente
para prevenir dafio.
4. Limpie la rejilla antichispas con un
cepillo de alambre. Cambie la rejilla si encuentra roturas.
5. Cambie todas las piezas del silenciador que esten rotas o resquebrajadas.
6. Reinstale la rejilla antichispas, la
cubierta del difusor del silenciador,
y tuerca. Apriete firmemente.
BUJIA
Deber& cambiarse la bujia anualmente
para asegurar que el motor arranque
m&s f&cilmente y marche mejor. La
cronometrizaci6n
del encendido es fija
e inalterable.
1. Afloje los tres tornillos en la tapa del
cilindro.
2. Retire la tapa del cilindro.
3. Saque la cubierta de la bujia.
4. Retire la bujia del cilindro y desechela.
5. Reempl&cela con una bujia Champion RCJ-7Y ajt_stela con una Ilave
de 19 mm (3/4 de pulgada). Apriete
firmemente. Separaci6n de electrodos: 0,6 mm (0,025 de pulgada).
6. Reinstale la cubierta de la bujia.
7. Reinstale la tapa del cilindro y tos
tres tornillos. Apriete firmemente.
46
REEMPLAZO
EL FILTRO DE COMBUSTIBLE
Para reemplazar el filtro de combustible, vacie el aparato haciendo que el
motor marche hasta quedar sin combustible, luego retire el juego de tapa
del filtor de combustible y retentor del
tanque. Saque el filtor del tanque y
sep&relo de la linea. Reemplazo.
Tapa del
cilindro
Cubie
de la
buji_
.J
Bujia
,_ADVERTENClA:
Desconecte
la
bujia antes de realizar mantenimiento,
servicio, o ajustes, excepto de ajustes
del carburador.
AFILAClON
DE LA CADENA
,_ADVERTENCIA:
2,
3,
Las tecnicas
de afilado de la cadena y/o el mantenimiento del marcador de profundidad
incorrectos aumentan las probabilidades de reculadas, que pueden producir lesiones graves.
,_ADVERTENClA:
Use guantes
protectores al manejar la cadena. La
cadena tiene filo y podria causarle
graves cortaduras, aun cuando esta
no se encuentre en movimiento.
Condiciones que indican la necesidad
de afilar la cadena:
• Reducci6n del tamaSo de las astillas
de madera. El tamaSo de las astillas
de madera se reduce a medida que la
cadena se desafila, hasta volverse
m&s un polvo que una astilla. Observe
que la madera muerta o podrida no
produce una buena astilla.
• La sierra corta de lado o en &ngulo.
• La sierra debe ser forzada a traves del
corte.
Verifique la tensi6n correcta de la
cadena. Ajt3stela si es necesario.
Vea la secci6n TENSION DE LA CADENA.
Afile las cuchillas.
• Para afilar las cuchillas, ubique
el nivel del soporte de la lima
(90 ° ) de modo que se apoye
sobre los bordes superiores de
la cuchilla y el marcador de profundidad.
AVlSO: La cadena tiene cuchillas del lado izquierdo y del lado
derecho.
Soporte para Lima
Lima,
Cuchilla
•
Marcador de Profundidad
Alinee las marcas de 30 ° del
soporte para lima, paralelas a la
barra y al centro de la cadena.
_
Herramientas
necesarias:
• Lima redonda de 5/32 de pulgada (4
mm) de di&metro y soporte para lima
• Lima plana
• Herramienta marcadora de profundidad
PARA AFILAR LA CADENA:
1. Mueva el interruptor ON/STOP a la
posici6n STOP.
Cuchilla .
Marca del Soporte
para Lima
Afile primero las cuchillas de un
lado de la cadena. Lime desde
el interior de cada cuchilla hacia
el exterior. Despues, gire la sierra de cadena y repita el proceso
en el otro lado de la cadena.
47
•
Lime s61o el golpe de avance;
use 2 o 3 golpes por borde de
corte.
Mantenga todas las cuchillas de
la misma Iongitud cuando las
lima.
•
•
Lime Io suficiente como para eliminar cualquier da_o en los
bordes de corte (placa lateral y
placa superior de la cuchilla).
Cuchillas
Remueva daho
igual Iongitud
,./
_,
_
•
_"
_
Placa
I Superior
Pla?ClaI
Lime la cadena segt3n las especificaciones, tal como se ilustra.
,_
80°
30 ° ,
/
"_ 60°
=
,i_ngulo de gancho
0.025 inch
_-_'--""]_-_
i,t(0.65 mm)
Correcto
,6,ngulo del Gancho
Incorrecto
Fuera Elevada el
Cuadrado Esquina
__
Incorrecto
,_/LADVERTENCIA:
Mantenga el
_.ngulo de gancho correcto de acuerdo
con las especificaciones
del fabricante
de la cadena que usa. Si el _.ngulo del
gancho es incorrecto, aumentan las
probabilidades de reculadas, que pueden producir lesiones graves.
4. Verifique y baje los marcadores de
profundidad.
Herramienta marcadora
•
Coloque la herramienta marcadora sobre la cuchilla.
• Si el marcador de profundidad es
m_.s alto que la herramienta marcadora de profundidad, limelo
para nivelarlo con la parte superior de la herramienta marcadora.
• Mantenga redondeada la esquina
delantera del marcador de profundidad con una lima plan&
AVlSO: El extremo superior del
marcador de profundidad debe
ser parejo con la mitad delantera,
redondeada con una lima plan&
Si necesita m_.s asistencia o no est,.
seguro sobre c6mo Ilevar a cabo este
procedimiento, comuniquese
con el
Centro de Servicio Sears o Ilame a
nuestra linea de asistencia al cliente al
1-800-235-5878.
REEMPLAZAR
LA CADENA
,_/LADVERTENClA:
Use guantes
protectores al manejar la cadena. La
cadena tiene filo y podria causarle
graves cortaduras, aun cuando esta
no se enouentre en movimiento.
Es normal que una cadena nueva se
estire durante los primeros 15 minutos
de uso. Usted deber& verificar la tensi6n
de la cadena cada vez que haga arrancar la sierra de cadena y ajustarla cuando sea necesario. Yea la secci6n de
TENSION DE LA CADENA.
Cambie la cadena usada cuando este
gastada o daSada.Use exclusivamente
la cadena de repuesto Minimizadora de
Reculadas que se especifica en la lista
de repuestos para reparaciones. La cadena y barra de repuesto correctas tambien se especifican en una etiqueta
ubicada en la sierra de cadena. Entre
en contacto con el Centro de Servicio
de Sears para cambiar y afilar las cuchillas individuales de la cadena.
PARA REEMPLAZAR
LA CADENA:
1. Mueva el interruptor ON/STOP a la
posici6n STOP.
2. Afloje y remueva las tuercas de la
barra y la cubierta del embrague
de la sierra.
3. Remueva la cadena usada.
48
cadena con los eslabones de impulsi6n orientados como se ve en
la ilustraci6n.
Cubierta del
Embrague
Punta de
la Barra
Tueroas de (
la barra
LAS CUCHILLAS
DEBERAN APUNTAR EN
DIRECC!ON A LA ROTACION
Herramienta de
Ajuste de la Cadena
(Herramienta de la Barra)
4.
Cuchillas Marcador de Profundidad
El aparato tiene clavija y tornillo de
ajuste para ajustar la tensi6n de la
cadena. Es muy importante que al
instalar la barra, la clavija que se
encuentra en el tornillo de ajuste
este alineada con un orificio en la
barra. Girar el tornillo hace que la
clavija de ajuste se deslice hacia
arriba y hacia abajo por el tornillo.
Ubique este ajuste antes de empezar a instalar la barra en la sierra.
Vea la ilustraci6n siguiente.
Vista interior
de la cubierta
I embrague
Ajuste situado
en la cubierta
5.
Gire el tornillo de ajuste a mano
hacia la izquierda (en contra del
sentido del reloj) hasta que la clavija de ajuste toque el retentor. Esto
debe colocar el clavija cerca de la
posici6n correcta.
6. Haga deslizar la barra en los pernos de la barra hasta que la barra
se detenga al tocar el engranaje
del cilindro del embrague.
Eslabones de Funcionamiento
8.
Coloque la cadena por encima y
detr_.s del seguidor del embrague,
ponga las eslabones de funcionamiento en el cilindro del embrague.
9. Coloque los eslabones de propulsi6n entre los dientes del engranaje en la punta de la barra.
10. Coloque los eslabones de propulsi6n en la ranura de la barra.
11. Tire la barra hacia adelante hasta
que la cadena quede tirante en la
ranura de la barra. Asegure que
todas los eslabones de propulsi6n
se encuentren en el ranura de la
barra.
12. Ahora instale la cubierta del embrague asegur_.ndose que la clavija de ajuste este posicionada en el
orificio inferior en la barra guia.
Cubierta
del
embrague
Clavija
Orificio
inferior
"
/
Barra guia
Barra guia
Pernos de la barr_
7. Retire muy cuidadosamente
la
cadena del paquete. Sostenga la
13. Instale las tuercas de la barra y
ajt3stelas a mano t3nicamente.
Ajuste las tuercas de la barra
despues de que la cadena este
tensionada.
49
AJUSTE
DELACADENA
VeaTENSION
DELACADENA
en la secci6n de MONTAJE
AJUSTE AL CARBURADOR
_ILADVERTENClA:
La cadena
es-
tar& en movimiento durante la mayor
parte de este prodecimiento
Use el
equipo protector y observe todad las
precauciones de seguridad
La cadena no debe moverse con el motor en
marcha lenta
El carburador ha sido ajustado cuidadosamente en la f&brica Posiblemente se
hagan necesarios ajustes si se nota cualquiera de las siguientes condiciones:
• La cadena se mueve con el motor en
marcha lent& Vea procedimiento de
MARCHA LENTA "T"
• La sierra no anda a marcha lent& Vea
procedimiento de MARCHA LENTA "T"
Marcha Lenta "T"
Deje que el motor trabaje en marcha
lenta. Si la cadena se mueve, la marcha lenta es demasiado.
Si el motor
se para, la marcha lenta es demasiado
lenta.
Ajuste las revoluciones
hasta que el
motor se mantenga en marcha sin que
la cadena se mueva (la marcha lenta
es demasiado) o que el motor se ahogue (la marcha lenta es demasiado
lenta). El tomillo de la marcha est& situado arriba del bombeador y marcado
con la "T".
• Gire el tornillo de la marcha lenta "T' a
la derecha (en el sentido del reloj)
para aumentar las revoluciones del
motor.
• Gire el tornillo de la marcha lenta "T' a
la izquierda (en contra del sentido del
reloj) para bajar las revoluciones.
Si requiriera ayuda adicional o no se
sintiera seguro al desempeSar este
procedimiento,
entre en contacto con
el Centro de Servicio Sears, o Ilame a
nuestro telefono de ayuda al consumidor al 1-800-235-5878.
5O
_ADVERTENCIA:
Realice los siguientes pasos despues de cada uso:
• Deje que el motor se enfrie y fije bien
el aparato antes de guardarlo o de
transportarlo.
• Guarde la sierra y el combustible en
unlocal bien ventilado donde los vapores de combustible no puedan entrar en contacto con shispas ni llamas
abiertas provenientes de los termotanques, los motores o interruptores electricos, calefactores centrales, etc.
• Guarde el aparato con todos los protectores en su lugar y coloque el aparato de modo que las piezas filosas no
puedan causar heridas por accidente.
• Guarde el aparato bien fuera del alcance de los nifios.
ESTACIONAL
ALMACENAJ E
Prepare el aparato para guardarlo al
final de la temporada o si no se Io va a
usar por m&s de 30 dias o m&s.
Siva a guardar el aparato durante un
periodo largo:
• Limpie la sierra a conciencia antes del
almacenaje.
• Almacene en un lugar limpio y seco.
• Aplique una pequefia cantidad de
aceite a las superficies externas
met&licas y a la barra guia.
• Lubrique la cadena y envuelvala en
papel grueso o en tel&
SISTEMA DE COMBUSTIBLE
Vacie el sistema de combustible antes
de almacenar el aparato por 30 dias o
m&s. Vacie el tanque de combustible,
ponga el motor en marcha y dejelo en
marcha hasta que las lineas de combustible y el carburador esten vacios.
Use combustible fresco para la pr6xima temporada. Yea el mensaje marcado IMPORTANTE, que se refiere al uso
de combustibles con mezcla de alcohol en su aparato, en la secci6n de
USO, bajo ABASTECIMIENTO DEL MOTOR.
Los estabilizadores de combustible
son una alternativa aceptable para
minimizar la formaci6n de dep6sitos
de goma durante el almacenamiento.
Afiada estabilizador a la gasolina en el
tanque de combustible o en el reck
piente de almacenado de combustible.
Siga las instrucciones de mezcla que
se encuentran en los envases de estabilizador. Ponga el motor en marcha y
dejelo en marcha unos 3 minutos despues de ponerle estabilizador.
El aceite Craftsman 40:1 para motores
de 2 tiempos (enfriados a aire) viene
mezclado con estabilizador de combustible. Si no usa este aceite, entonces puede afiadir un estabilizador
al tanque de conmbustible.
INTERIOR DEL MOTOR
• Retire la bujia y vierta una cucharada
de las de te de adceite 40:1 para motores de 2 tiempos (enfriados a aire)
por la abertura para la bujia. Tironee
lentamente de la soga de arranque 8
a 10 veces para distribuir el aceite.
• Reemplace la bujia con otra del tipo y
de la gama de calor recomendados.
• Limpie el filtro de aire.
• Examine todo el aparato para verificar
que no haya tornillos, tuercas ni pernos sueltos. Cambie dotas las piezas
dafiadas, quebradas o gastadas.
• AI principio de la pr6xima temporada,
use exclusivamente combustible nuevo con la proporci6n correcta de gasolina a adeite.
OTRO
• No guarde gasolina de una temporada
a la pr6xima.
• Cambie el recipiente de gasolina si se
empieza a oxidar.
51
TABLA
DIAGNOSTICA
ADVERTENCIA:
Siempre apague el aparato y desconecte la bujia antes
de hacer cualquiera de las reparaciones
recomendadas
a continuaci6n
excepto reparaciones
que requieran que el aparato este en operaci6n.
PROBLEMA
El motor no
arranca o se
mantiene en
marcha s61o
unos segundos
despues de arrancar.
CAUSA
SOLUClON
1. El interruptor est& en
posici6n STOP.
2. El motor esterahogado.
1. Coloque el interruptoren ON.
2. Vea "Arranque Dificil" en la
secci6n Uso.
3. Llene el tanque con la mezcla
correcta de combustible.
4. Instale una bujia nueva.
5. Verifique si el filtro de
combustible est& sucio;
limpielo. Verifique si hay
dobleces en la linea de
combustible o si ester partida:
rep_trla o c&mbiela.
6. Entre en contacto con el Servicio
Sears (vea parte trasera del manual).
7. Entre en contacto con el Servicio
Sears (vea parte trasera del manual).
3. El tanque de
combustible est& vacio.
4. La bujia no hace chispa.
5. El combustible no est&
Ilegando al carburador.
6. El caburador requiere
ajuste.
7. Ninguno de los
anteriores.
El motor no
anda en
marcha lenta
como debe.
El motor no
acelera, le falta
potencia o se
para bajo carga.
El motor
humea
excesivamente.
1. Las revoluciones
de la
marcha lenta est&n muy
altos o muy bajas.
2. La Mezcla para Bajas
Revoluciones
requier
ajuste.
3. Las juntas del cigQe6al
est_tn gastadas.
4. La compresi6n est&
baja.
5. Ninguno de los
anteriores.
Yea "Ajuste al Carburador"
secci6n Servicio y Ajustes.
en la
2. Entre en contacto con el Servicio
Sears (vea parte trasera del manual).
3. Entre
Sears
4. Entre
Sears
5. Entre
Sears
1. El filtro de aire est&
sucio.
2. La bujia ester
carbonizada
3. El carburador requiere
ajuste.
4. Los puertos de escape
o las aberturas de
salida del silenciador
est&n tapados.
5. La compresi6n ester
baja.
6. La freno de cadena es
activado.
7. Ninguno de los
anteriores.
en contacto con el
(vea parte trasera
en contacto con el
(vea parte trasera
en contacto con el
(vea parte trasera
Servicio
del manual).
Servicio
del manual).
Servicio
del manual).
1. Limpie o cambie el filtro de aire.
2. Limpie o cambie la bujia y
calibre la separaci6n.
3. Entre en contacto con el Servicio
Sears (vea parte trasera del manual).
4. Entre en contacto con el Servicio
Sears (vea parte trasera del manual).
5. Entre en contacto con el Servicio
Sears (vea parte trasera del manual).
6. Desactive el freno de cadena.
7.
1. El cebador ester
parcialmente accionado.
2. La mezcla de combustible se ha hecho
Entre en contacto con el Servicio
Sears (vea parte trasera del manual).
1. Ajuste el cebador.
2. Vacie el tanque de combustible
y II_nelo de combustible con la
mezcla correcta.
3.
Limpie o cambie el filtro aire.
3. El filtro de aire est&
sucio.
4. La mezcla para Altas
Revoluciones
requiere
ajuste.
5. El c_trter est& perdiendo.
4. Entre en contacto con el Servicio
Sears (vea parte trasera del manual).
Entre en contacto con el Servicio
Sears (vea parte trasera del manual).
52
TABLA
DIAGNOSTICA
(continuado)
PROBLEMA
CAUSA
SOLUCION
El motor
marcha con
1. La mezcla de combustible se ha hecho
2. Se ha instalado la bujia
3. La Mezcla para Altas
Revoluciones ester
demasiado pobre.
4. Los puertos de escape
o las aberturas de
salida silenciador est&n
tapados.
5. Acumulaci6n
del carb6n.
en el rejilla antichispas.
1. Vea"Abastecimiento
del
Aparato" en la secci6n Uso.
2. C_.mbiela por la bujia correcta.
3. Entre en contacto con el Servicio
Sears (vea parte trasera del manual).
temperatura
vada.
el-
4. Entre en contacto con el Servicio
Sears (vea parte trasera del manual).
5. Vea "Para Limpiar la Rejilla
Antichispas"
en la secci6n
Mantenimiento.
6. Limpie el &rea.
7. Entre en contacto con el Servicio
Sears (vea parte trasera del manual).
6. Caja del arranque sucio.
7. Ninguno del antedicho.
Insuficiencia
de aceite
para lubricar
la barra y cadena.
La cadena se
mueve en
marcha lenta.
La cadena no
se mueve
cuando se
acelera el
motor.
El tanque de aceite
est&
2. El bombeador de aceite
o el filtor de aceite est&
tapado.
3. El orificio para aceite en
la barra est& tapado.
2. Entre en contacto con el Servicio
Sears (vea parte trasera del manual).
3. Saque la barra y limpiela.
1. La marcha lenta
requiere ajuste.
2. El embrague reauiere
reparaciones.
1. La cadena est,.
demasiado tensionada.
1. Vea "Ajuste al Carburador" en
la secci6n Servicio y Ajustes.
2. Entre en contacto con el Servicio
Sears (vea parte trasera del manual).
1. Vea "Verifique la Tensi6n de la
Cadena" en la secci6n Mantenimiento.
2.
Entre en contacto con el Servicio
Sears (vea parte trasera del manual).
3. Repara o reemplace.
El carburador requiere
ajuste.
3. Los rieles de la barra
guia est&n apretados.
4. El deslizarse de embrague.
2.
5. La freno de cadena
activado.
La cadena
golpetea o
corta desparejo.
1. Llene el tanque de aceite.
1.
4. Entre en contacto con el Servicio
Sears (vea parte trasera del manual).
5.
Desactive el freno de cadena.
es
1. La Cadena est&
incorrectamente
tensionada.
2.
Las cuchillas est&n
da_adas,
3. La cadena ester gastada,
4. Las cuchillas est&n
desafiladas o mal
afiladas o los medidores
de profundidad est&n muy
altos.
5.
Engranaje desgastada.
6. La cadena
atr_ts.
1. Vea "Verifique la Tensi6n de la
Cadena" en la secci6n Mantenimiento.
2. Entre en contacto con el Servicio
Sears (vea parte trasera del manual).
3. Afile o cambie la cadena.
4. Vea "Afilaci6n de la Cadena" en
la secci6n Servicio y Ajustes.
5. Entre en contacto con el Servicio
Sears (vea parte trasera del manual).
6. Instale el cadena en la direcci6n
derecha.
instalado hacia
53
TABLA
DIAGNOSTICA
(continuado)
PROMBLEMA
CAUSA
SOLUCION
Parada del
cadena dentro
del corte,
1. La parte de arriba de
las cuchillas no est_tn
planas.
2. La barra tiene
protuberancias
o est&
torcida o los rieles
est_m desparejos.
3. El embrague est&
patinando.
1. Vea "Afilaci6n de la Cadena" en
la secci6n Servicio y Ajustes.
1. Las cuchillas est&n
da6adas por un lado.
2. Cadena no esta
afilada.
3. Barra guia esta doblada
o desgastada.
1. Vea "Afilaci6n de la Cadena" en
la secci6n Servicio y Ajustes.
2. Vea "Afilaci6n de la Cadena" en
la secci6n Servicio y Ajustes.
3. Reemplace la barra guia.
La cadena
corta en
_tngulo.
2. Repara o reemplace
barra guia.
la
3. Entre en contacto con el Servicio
Sears (vea parte trasera del manual).
Si acontencen situaciones no previstas en este manual, actue con cautela y use
buen criterio. Si necesita ayuda, entre en contacto con el Centro de Servicio
Sears o Ilame al TELEFONO DE AYUDA AL CONSUMIDOR al 1-800-235-5878.
IMPORTANTE: Este producto es conforme con la normativa Fase 3 de la Agencia de Protecci6n Ambiental de los Estados Unidos (EPA) referente a emisiones
de escape y evaporaci6n.
Para asegurar la conformidad con EPA Fase 3, se
recomienda utilizar s61o repuestos originales de la marca Craftsman. El uso de
otro tipo de repuestos incumple las leyes federales.
SUS DERECHOS Y OBLIGACIONES
DE GARANTIA:
La Agencia de Protecci6n Ambiental de los Estados Unidos,
la Junta de Recursos Ambientales de
California y Sears Brands Management
Corporation, U.S.A., se complacen en
explicar la garantia con la que cuenta el
sistema de control de emisi6n en su
motor peque_o, modelo 2012 y m&s
adelante, para uso fuera de carretera.
En California, todos los motores peque_os para uso fuera de carretera deben ser dise_ados, construidos y equipados para satisfacer las rigurosas
normas antihumo que posee el estado.
Sears deber_, garantizar el sistema de
control de emisi6n en su m&quina de
motor peque_o para uso fuera de carretera por los periodos de tiempo que
explicamos a continuaci6n y con la condici6n de que su m&quina de motor peque_o para uso fuera de carretera no
haya sufrido ningt3n tipo de abuso, negligencia o mantenimiento inapropiado.
Su sistema de control de emisi6n incluye piezas tales como el carburador,
el sistema de ignici6n y el tanque de
combustible. Donde exista una condici6n que requiera reparaci6n bajo garantia, Sears reparar_, gratis su motor
pequeSo para uso fuera de carretera.
Los gatos cubiertos bajo la garantia incluyen el diagn6stico, las piezas y labor.
CUBIERTA DE GARANTIA DEL FABRICANTE: Si cualquier pieza relacionada con el sistema de emisi6n de su motor (como hemos enumerado en la lista
de piezas de control de emisi6n bajo
garantia) se encontrara defectuosa o
defectos en el material o en la labor del
motor causaran que tal pieza comenzara a fallar, la pieza ser& reparada o reemplazada por Sears. GARANTIA DE
RESPONSABILIDAD
DE DEL DUEllO:
Como dueSo de una m&quina de motor
peque_o para uso fuera de carretera,
usted ser& responsable por el mantenimiento adecuado en los periodos previamente programados y enumerados
en su manual del usuario. Sears recomienda que guarde todos los recibos que
indiquen que se ha desempeSado mantenimiento en su m&quina de motor pequeSo para uso fuera de carretera, pero
Sears no podr_, negar el servicio bajo
garantia Qnicamente a causa de la falta
de recibos o por el incumplimiento de su
parte en asegurarse que el mantenimiento programado haya sido desempeSado. Como dueSo de una
54
m&quina
demotor
pequefio
para
uso
da que este programada para ser reemfuera
decarretera,
usted
deber_,
contar plazada como parte del mantenimiento
conelconocimiento
dequeSears
requerido deber& estar garantizada por
puede
negar
lacubierta
bajogarantia
si el periodo de tiempo que comienza en
sum&quina
demotor
pequefio
para
uso la fecha de compra inicial hasta la fecha
fuera
decarretera
oalguna
pieza
dela del primer reemplazo programado para
misma
hadejado
defuncionar
debido
al dicha pieza. DIAGNOSTICO: No se
abuso,
negligencia,
mantenimiento
indeber& cobrar al duefio ningt3n tipo de
apropiado,
modificaciones
noaprobadascargos por la labor de diagn6stico la
oelusodepiezas
quenohayan
sido cual determine que una pieza garantizafabricadas
oaprobadas
porelfabricanteda se encuentra defectuosa si el trabajo
original
delequipo.
Esresponsabilidad
de diagn6stico ha sido desempefiado
suyaelIlevar
sum&quina
demotor
pe- por un Centro de Servicio Sears.
quefio
parausofuera
decarretera
aun DANOS POR CONSECUEOIA: Sears
centro
dereparaci6n
autorizado
Sears podr& ser responsable de dafios ocurritanpronto
como
sepresente
elproble- dos a otras piezas del motor causados
ma.Lasreparaciones
bajogarantia por la falla de una pieza garantizada
deber_.n
sercompletadas
enunperiodo que se encuentre bajo el periodo de gadetiempo
razonable,
quenoexceda
los rantia. QUE NO CUBRE LA GARAN30dias.
Sicuenta
usted
conalguna TIA: Todas las fallas causadas por el
pregunta
enrelaci6n
asusderechos
y
abuso, negligencia o mantenimiento inresponsabilidades
degarantia,
usted apropiado no est&n cubiertas. PIEZAS
deber&
comunicarse
consucentro
de ANADIDAS O MODIFICADAS: El uso
servicio
autorizado
m&s
cercano,
Ilamar de piezas afiadidas o la modificaci6n de
aSears
al1-800-469-4663,
oenvie
la piezas podr&n servir como base para
correspondencia
porcorreo
electronicoque se anule la reclamaci6n de gaa emission.warranty@HOOP-emission.
com. FEOHA DEL COMIENZA DE LA
GARANTIA: El periodo de garantia
comienza en la fecha de compra de la
m&quina de motor pequefio para uso
fuera de carretera. DURAClON DE LA
GARANTIA: Esta garantia cuenta con
un periodo de duraci6n de dos afios
comenzando en la fecha inicial de compra, o hasta el final del garantia de
producto (cualquiera que sea m&s
largo). ClUE CUBRE LA GARANTIA:
REPARAClON O REEMPLAZO DE
PIEZAS. La reparaci6n o el reemplazo
de cualquier pieza garantizada ser_.n
desempefiados y ofrecidos al duefio sin
costo alguno en un Centro de Servicio
Sears. Si cuenta usted con alguna pregunta en relaci6n a sus derechos y responsabilidades de garantia, usted deber_. comunicarse con su centro de
servicio autorizado m&s cercano, Ilamar
a Sears al 1-800-469-4663,
o envie la
correspondencia por correo electronico
a emission.warranty@HOOP-emission.
com. PERIODO DE GARANTIA:
Oualquier pieza garantizada que no este programada para ser reemplazada como
parte del mantenimiento requerido, o
que este programada t3nicamente para
inspecci6n regular para efectos de "reparaci6n o reemplazo si fuera necesario" deber_, garantizarse por un periodo
de dos afios. Oualquier pieza garantiza-
rantia. La garantia de Sears no se responsabiliza por el mal funcionamiento
debido al uso de piezas afiadidas o de
piezas modificadas. COMO ENTABLAR
UNA RECLAMACION:
Si cuenta usted
con alguna pregunta relacionada con
sus derechos y responsabilidades de
garantia, usted deber& entrar en contacto con su centro de servicio autorizado
m&s cercano, Ilamar a Sears al
1-800-469-4663,
o envie la correspondencia por correo electronico a
emission.warranty@HOOP-emission.
corn. DONDE OBTENER SERVlClO
DE GARANTIA: Servicio o reparaciones
bajo garantia deber&n ser provistas en
todos los Centros de Servicio Sears.
Por favor comuniquese al
1-800-469-4663
o envie la correspondencia por correo electronico a
emission.warranty@HOOP-emission.
com. MANTENIMIENTO,
REEMPLAZO
Y REPARAClON DE PIEZAS RELAClONADAS CON LA EMISlON: Cualquier pieza de repuesto Sears aprobada
y utilizada en el desempefio de cualquier servicio de mantenimiento o servicio
de reparaci6n bajo garantia de piezas
relacionadas con la emisi6n ser& provisto sin costo alguno al duefio si la pieza
se encuentra bajo garantia.
55
LISTA SE PIEZAS DE CONTROL DE
EMISION GARANTIZADAS:
Carburador, filtro de aire (cubierta hasta la fecha
de mantenimiento programada), sistema
de ignici6n: bujia (cubierta hasta la fecha de mantenimiento programada),
m6dulo de ignici6n, silenciador incluido
al catalizador (si est& equipado), tanque
de combustible, linea de combustible y
tapa.
La informaci6n en la etiqueta del producto
Ejemplo: (Aho) EPA y/o CALIFORNIA•
DECLARAClON
DE MANTENIMIENTO: El dueho es responsable de adquirir todo el mantenimiento requerido
como Io define en el manual del usuario.
indica las normas de certificaci6n
de su motor•
Informacion Importante en relaci6n
al motor. Este motor satisface las ....
regulaciones de emision para mo'"--,_(
EMISSION
CONTROL
INFORMATION
"
tores nenuehos onerados fuera de
ITHISENGINE
MEETS
EXHANDEVPEMISSI_SREGULATIONS
la car_etera
_
I FOR2012US EPAICALIFOFINIA
SI/ALL
OFFROADENGINES
•
Familia
-_
I SEARSBRANDSMGMTCORP
# De Serie -
-_ F_ILY/DIGP
MODEL#
....
_ ENISSIONCOMPLIANCE PERIOD
Horas de la durabilidaddel motor ......
BAR
HOURS
CODE
I
Vea el manual de instrucciones
para especificaciones
de
mantenimiento
y ajustes.
Se certifica este motor para satisfacer
siguientes:
[]
Moderado
los requisitos
(50 horas)
_i_ Intermedio
(125 horas)
[]
(300 horas)
Extendido
THEAIR INDEXOF THISENGINEIS
10 I 2I
I 41
I 61
I 81
1101
I THELOWERTHE AIR INDEX,THE LESSPOLLUTION
-_
REFER
TO OWNER'S
MANUAL
FOR
L MAINTENANCE
SPECIFICATIONS
AND ADJUSTMENTS
56
de emisi6n para los uso
57
58
59